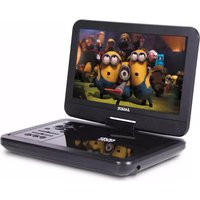
DVD-PT-10D - Portable DVD Player Laser - Free user manual and instructions
Find the device manual for free DVD-PT-10D Laser in PDF.


| Product Type | Portable DVD Player |
| Brand | Laser |
| Model | DVD-PT-10D |
| Screen Size | 10.2 inches TFT LCD |
| Screen Resolution | 800 x 480 pixels |
| Dimensions (W x D x H) | 260 x 180 x 40 mm |
| Weight | 1.2 kg (including battery) |
| Power Supply | AC 100-240V, 50/60Hz; DC 9V, 2A |
| Battery | Rechargeable lithium-ion, 2600 mAh |
| Battery Playback Time | Up to 3.5 hours |
| Disc Compatibility | DVD, DVD±R/RW, CD, CD-R/RW, MP3, JPEG |
| Video Output | Composite AV out (1x) |
| Audio Output | Headphone jack (3.5mm), stereo speakers |
| USB Port | USB 2.0 for media playback |
| Card Slot | SD/MMC card slot |
| Region Code | Multi-region or region 2 (depending on market) |
| Languages | Multi OSD, subtitle, and audio languages |
| Parental Control | Yes, adjustable level |
| Maintenance | Clean with soft dry cloth; avoid liquids |
| Safety | Do not expose to moisture; use only supplied adapter |
| Spare Parts | Remote control, AC adapter, car adapter, AV cable available |
| Repairability | Service only by authorized technicians |
| Included Accessories | Remote control, AC adapter, car charger, AV cable, user manual |
| Warranty | 1 year limited warranty |
Frequently Asked Questions - DVD-PT-10D Laser
User questions about DVD-PT-10D Laser
0 question about this device. Answer the ones you know or ask your own.
Ask a new question about this device
Download the instructions for your Portable DVD Player in PDF format for free! Find your manual DVD-PT-10D - Laser and take your electronic device back in hand. On this page are published all the documents necessary for the use of your device. DVD-PT-10D by Laser.
USER MANUAL DVD-PT-10D Laser
DVD-PT-10D USER MANUAL
Laser 10" Screen Portable DVD Player

natural_image
Black portable TV with a group of people on screen, open lid open (no visible text or symbols)
AUDIO / VIDEO



CARD SLOT

UNIVERSAL SERIAL BUS

REMOTE CONTROL

BUILT-IN SPEAKERS
Please read carefully before use
IMPORTANT SAFETY INSTRUCTIONS AND PRECAUTIONS 4
CARE OF DISCS 5
WHAT'S IN THE BOX 6
THE PLAYER INSTALLATION 6
Indoor Use 7
In-car use 7
PLAYBACK 7
The Remote Control 8
Key Functions 8
Loading and Playing a Disc 9
Display 9
Angle 10
Subtitle 11
Audio 11
Zoom 11
A-B Repeat 12
ALL Repeat 12
Playback MP3/MPEG-4 Disc 12
Playback of DIVX content 13
Play USB and SD/MMC Card 13
SYSTEM SETUP 14
General Setup Page 14
TV Display 14
Angle Mark 14
OSD Language 14
Captions 15
Screen Saver 15
Last Memory 15
Audio 15
Speaker Setup 15
Dolby Dual Mono 15
Dynamic 15
Video 16
Preferences 16
TV Type 16
Audio 16
Subtitle 16
Disc Menu 17
Parental 17
Password 17
Default 17
TROUBLESHOOTING 18
Charging the DVD Player 19
SPECIFICATIONS 19
Warranty Against Defects 20
IMPORTANT SAFETY INSTRUCTIONS AND PRECAUTIONS
- Read all instructions carefully before use.
- Retain manuals for future reference.
- Use this product only in the manner described.
- Only use a water-dampened soft-cloth to clean the surface of this product.
- Use electronic devices in well ventilated areas & not exposed to excess vibration.
- The following will damage this product: any liquids such as water or moisture extreme heat, cold, humidity, dusty or sandy environments.
- Only place this device on stable surfaces and ensure that any attached cables are secure and will not cause the device to fall.
- There are no user serviceable parts in this product.
- Un-authorized attempts to dismantle or repair this product will void product warranty and may result in dangerous electric shock.
- Do not use this product if you are in control of dangerous machinery such as a motor vehicle.
- Remove any power or data cords by pulling them from the plug and not the cord.
- Using this device near other electronic devices may cause interference.
- Do not open the drive door while disc is spinning.
- Ensure that the Portable DVD Player is installed in accordance with the instructions and illustrations provided in this manual.
- It is the responsibility of the driver of the vehicle to ensure that this product is installed and used in compliance with all Federal and State laws governing products of this type.
- Mount this product with thought for other motorists to reduce the amount of distraction that they may provide to other road users.
- We reserve the right to make changes to this document and for the product without notification.
CAUTION: Only use the supplied charger with this product. There is a risk of explosion if the battery is replaced with the incorrect type. Please dispose of batteries in-line with local council regulations.
CLASS 1 LASER PRODUCT

CAUTION
RISK OF ELECTRIC SHOCK DO NOT OPEN

Laser product symbol located on the rear panel of the unit indicates that this player is a class 1 laser product: It uses only weak laser and no hazardous radiation outside of the unit.

The lightning flash with arrowhead symbol, within an equilateral triangle, is intended to alert the user to the presence of uninsulated “dangerous voltage within the product’s enclosure that may be of sufficient magnitude to constitute a risk of electric shock to persons.

The exclamation point within an equilateral triangle is intended to alert the user to the presence of important operation and maintenance (servicing) instruction in the literature accompanying the appliance.
CARE OF DISCS
- Do not place discs near any heat source such as direct sunlight or areas or high humidity.
- Do not touch the readable area or the disc (underside). Always hold discs by the edges.
- Do not use adhesive tape on the disc.
- Do not use commercial cleaner liquids on the discs as they may cause damage.
- Do not leave discs in a vehicle that may be subject to strong direct sunlight as the heat build up in the vehicle may damage the discs even if stored in shaded areas.
• To clean the disc, always use a very soft damp cloth and wipe from the inside to the outside of the disc.
• Always return the disc to its enclosure when finished with.
DO DONT

natural_image
Black and white abstract circular shape with a white arrow pointing to its center (no text or symbols)
natural_image
Black and white abstract circular graphic with a curved arrow, no text or symbols present.Wipe discs with a soft damp cloth and allow to dry before placing disc in the players tray.
Never use alcohol, paint thinner or benzene to clean discs.
WHAT'S IN THE BOX
1x Main DVD player with 10" 16:9 LCD display
1x Remote Control
1x 12V DC car power supply
1x 110-240V AC main power adaptor
1x AV Cable
1x Earphones
2x AAA batteries
1x User Manual
1x Dual Purpose Carry Case and Headrest Pouch
Please check the contents of the packaging carefully.
THE PLAYER

15 16
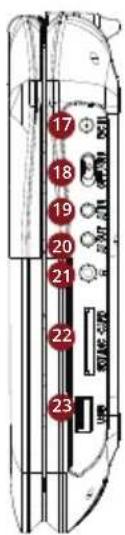
| BUTTONACTION | |
| 1Mode | |
| 2DVD/USB/SD | |
| 3Menu | |
| 4Setup | |
| 5Up/Skip Back | |
| 6Left/Rewind | |
| 7Right/Fast Forward | |
| 8Down/Skip Forwards | |
| 9OK | |
| 10Volume Down | |
| 11Volume Up | |
| BUTTONACTION | |
| 12Stop | |
| 13Play/Pause | |
| 14Open Disc Tray | |
| 15IR Sensor | |
| 16Power LED | |
| 17DC Power Input | |
| 18Main Power ON/OFF Switch | |
| 19AV Input | |
| 20 | 3.5mm AV Output |
| 213.5mm Stereo Headphone Output | |
| 22 | SD/MMC Card Slot |
| 23 | USB Port |
INSTALLATION
Indoor Use
1 Locate a spare mains outlet and turn it OFF.
2. Plug the supplied AC adaptor in to the outlet.
3. Connect the other end to the 12V DC input socket.
4. Turn the main outlet ON.
5. Turn the main Power Switch on the player to the ON position.

IN-CAR USE
- With the vehicle ignition off, connect the supplied DC adaptor to the vehicle power outlet.
- Connect the other end to the DC power input on the side of the DVD player.
- Turn the vehicle ignition to ON to power the outlet and slide the DVD player power switch to the ON position.
Note: Care should be take with all cable and connections with the DVD player. Please ensure that there is no tension on any connection as this may damage the units. Tidy any excess cabling to trip hazards that may damage the player.
PLAYBACK
The Remote Control

| ITEM BUTTON | |
| 1 | Power |
| 2 | Display |
| 3 | TFT |
| 4 | Mute |
| 5 | Repeat |
| 6 | Search |
| 7 | Zoom |
| 8 | Prog |
| 9 | Setup |
| 10 | Mode1 |
| 11 | Play/Pause |
| 12 | Stop |
| 13 | Up |
| 14 | Left |
| 15 | Right |
| 16 | Down |
| 17 | OK |
| 18 | Audio |
| 19 | Mode2 |
| 20 | A-B |
| 21 | Number Pad |
| 22 | Sub/Copy |
| 23 | Rewind |
| 24 | Fast Forward |
| 25 | Previous |
| 26 | Next |
| 27 | Angle |
| 28 | DVD Title |
| 29 | Volume Down |
| 30 | Volume Up |
KEY FUNCTIONS
| BUTTON ACTION | |
| Power | Switches the player ON or OFF |
| Display | Shows information about the current content |
| TFT | Switches the screen ON or OFF |
| Mute | Mutes the audio output of the player |
| Repeat | Toggle repeat title, chapter, or track |
| Search | Select a title, chapter, track, title time, or tracking time |
| Zoom | Enlarge the image |
| Prog | This button is used to program favourite tracks or chapters when using discs |
| Setup | Enter or exit the setup menu |
| Mode1 | Toggle between AV IN and DVD modes |
| Play/Pause | Press to start or pause playback |
| Stop | Press to stop playback |
| Up | Navigate up during menus |
| Left | Navigate left during menus |
| Right | Navigate right during menus |
| Down | Navigate down during menus |
| BUTTON ACTION | |
| OK | Press to select an option or validate a setting |
| Audio | Select available audio language for the DVD |
| Mode2 | Toggle between DVD, USB and SD Card |
| A-B | Used to select a portion of the audio/video to repeat |
| Number Pad | Use to enter an item in a menu or to enter a password |
| Sub/Copy | During playback, press to change subtitle language or to turn subtitles on/off |
| Rewind | Use to rewind at speeds of 2x, 4x, 8x, 16x, and 32x normal playback speeds |
| Fast Forward | Use to fast forward at speeds of 2x, 4x, 8x, 16x, and 32x normal playback speeds |
| Previous | Press to skip to the previous chapter or track |
| Next | Press to skip to the next chapter or track |
| Angle | Display the available angles for discs containing multiple camera angles |
| DVD Title | Return to disc main menu |
| Volume Down | Decrease the volume |
| Volume Up | Increase the volume |
LOADING AND PLAYING A DISC
- After connecting power to the DVD Player, slide the Power On/Off switch to the "on" position.
-
Place a disc gently into the tray.
-
You should hear and feel the disc snap firmly into place.
- Place a disc into the tray with the disc's label facing up.
- Close the DVD cover until it clicks shut. The unit will now load disc and commence playback.
- Stopping Play. Press the STOP (▪) Button during play.
5. Play/Pause.
Press the Play/Pause (button on the remote during play to pause playback.
To resume, Press the Play/Pause button once again.
6. Fast Forward/ Rewind
Press Fast Forward or Rewind buttons to toggle between 2x, 4x, 8x, 16x, and 32x speeds.
7. Menu
A DVD is divided into sections called titles and chapters. When you play a DVD, a root menu of the disc will appear on the screen of your DVD player. The contents of the menu vary from disc to disc. Press MENU during playback to display the menu.
DISPLAY
A. Playing Time and Remaining Time
During playback, press the "DISPLAY button to display the current Title Number, the total Number of Title,
The current Chapter Number. The total Number of Chapters, and the Playing elapsed Time for the title.
The heading will disappear automatically after 3 seconds if DISPLAY button is not pressed.
TITLE ELAPSED TT 01/01 CH 02/17 2:00:00
B. Press "DISPLAY" constantly to choose the options below in sequence.
Title Elapsed: The elapsed time of the title.
Title Remain: The remaining time of the title.
Chapter Elapsed: The elapsed time of the chapter.
Chapter Remain: The remaining time of the chapter.
Display off: The DVD's time information will not be displayed.

flowchart
graph LR
    A["Title Elapsed"] --> B["Title Remain"]
    B --> C["Chapter Elapsed"]
    C --> D["Display Off"]
    D --> E["Chapter Remain"]
ANGLE
During playback of a disc, press the “ANGLE” button to display the available angles for discs containing multi-angles, with the current angle number and the total number of angles displaying. Press “ANGLE” to select another angle, then press again to exit and return to the normal viewing angle. The angle display will disappear automatically if the “ANGLE” button is not pressed again within 3 seconds.
Note: Not all discs contain this feature.
SUBTITLE
During disc playback press “SUB/COPY to select the Subtitle language you desire, with the current Subtitle Language Number and the total Number of Subtitle Languages displayed. If there are multiple languages press “SUB/COPY” again to select another Subtitle language. To turn Subtitles OFF, press the “SUB/COPY” button until “Subtitle Off is displayed. The Subtitle display will disappear automatically if the “SUB/COPY” button is not press again within 3 seconds.
Note: Some DVDs only allow access to this function through DVD Menu.
AUDIO
During playback press “AUDIO” to select the audio language you desire, with the current Audio Channel Number and the total number of Audio Channels displayed. Press “AUDIO again to select another audio language. The audio display will disappear automatically if the “AUDIO button is not pressed within 3 seconds.

1/3
Subtitle 01/02
Audio 1/2:AC35.1CH
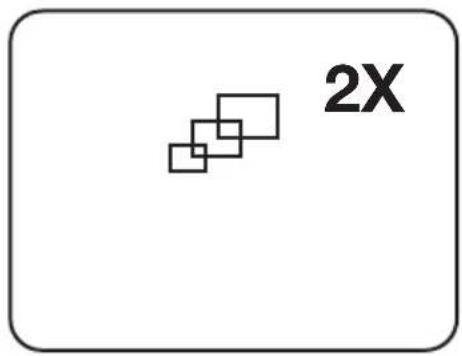
ZOOM
During playback press "ZOOM" to enlarge the picture. The zoomed in value will be displayed onscreen.
A-B REPEAT
A. During playback press a first time "A-B" to set the Starting Point A.
B. Press "A-B" a second time to set the Ending Point B and player will repeatedly play the part between Point A and Point B.
C. Press "A-B" a third time to cancel "AB" repeat and resume normal playback.

ALL REPEAT
During playback press "REPEAT" constantly to see the repeat mode as below.

Chapter: Repeat the current chapter.
Title: Repeat the current title.
All: Repeat all chapters and titles.
Off: Resume normal playback.

PLAYBACK
MP3/MPEG-4 Disc When a MP3/MPEG-4 disc is inserted into the unit, the menu screen appears automatically. You can use the menu screen to select your desired folders and songs or the system plays the songs in the order they were burned onto the disc.
- Press the directional buttons to choose a folder from the folder list.
- Press "OK" to select the highlighted folder. The songs available under the folder will be listed.
- Use the directional buttons to choose a song from the list. Press "OK" to select and begin playback of the highlighted song.
- Use the skip forwards button to move to the next song. Press the skip back button to move to the beginning of the song or skip back one song.
PLAYBACK OF DIVX CONTENT
The DIVX format is capable of holding high quality video and sound in a highly compressed file format. File types such as AVI are typically able to hold more data in a smaller file. For example (as below) a 1.5 hour DVD file coded in MPEG-2 takes up space between 1.5 and 2.0GB. Where as, If it was coded in DIVX, the file would only be between 600 and 800MB.
| 1.5 hours file | MPEG-12 Format | DIVX Format |
| DVD(MPEG-2) | About 1.5-2GB | About600-800MB |
| VCD(MPEG-1) | About 800MB-1 G | About 200-300 MB |
Comparing MPEG-1, MPEG-2 and MPEG-4
| MPEG-1 | MPEG-2 | MPEG-4 | |
| Speed(kb/s) | 1380kb/s(352x288) | 6500kb/s(720x576) | 880kb/s(720x576) |
| Video quality | Good | Excellent | Perfect |
| Hardware requirement | Low | Middle | High |
However depending on how the file was encoded, compatibility may still be and issue with certain types of DivX or AVI type files. We highly recommend that files be tested and “Trial & Error” be used to find the best compromise between quality and file size for encoded files.
Play USB and SD/MMC Card
- Plug in the USB device noting correct orientation. Press [Mode2], then choose USB to select the content. 2. Insert a memory card to the SD/MMC slot. Press [Mode2] and select SD to play memory card.
SYSTEM SETUP
- Press "SETUP on the remote to bring up the SYSTEM SETUP MENU.
- Press the directional buttons to go to or return to the required settings page.
- When the required page is shown press the "OK" button to enter the page.
- Use the directional buttons to navigate to the feature to be changed and then press the right direction button to enter the submenu.
- Use the directional buttons to select the submenu item and then press the "OK" button to confirm.
- Press the left direction button to return to the previous menu or press the "SETUP" button to close the Setup Screen.
Note: Not all discs contain these features. Some features are disc dependent.
GENERAL SETUP PAGE
TV Display
4:3: When the player outputs signal to a normal monitor or TV. Wide-screen images are shown on the screen. But with some parts cropped automatically.
Normal/LB: Normal/LB: When the player outputs signal to a normal monitor or TV, a normal picture is shown on the screen with a black strip at both the top and bottom of the screen.
16:9: Wide: When the player outputs signal to a wide screen monitor or TV, a wide picture is shown on the full screen.
Angle Mark
- ON: The screen will show the angle mark icon. (If an angle option is available).
• OFF: The screen will not display the Angle Mark.
OSD LANGUAGE
You can choose one out of several different languages as the OSD setup language
Captions
- ON: Captions are displayed. (If any captions available).
• OFF: The screen will not display captions.
SCREEN SAVER
• ON: Enables screen saver.
• OFF: Disables screen saver (off).
Note: The DVD player will enter the Screen Saver mode after approximately five minutes of the same image remaining on the screen.
Last Memory
- ON: The unit will return to the last position on the disc.
- OFF: The unit will not return to the last position on the disc.
AUDIO
Speaker Setup
Downmix
- LT/RT - RIGHT/LEFT Channel: Mixes a 5.1 ch audio signal to 2 audio channels and then outputs to the left and right speakers.
- Stereo - Outputs a stereo signal to the left and right speakers.
DOLBY
Dual Mono
- Stereo: Left/Right channel audio will be played back by the Left/Right speakers.
• L-Mono Playback of Left channel audio only.
• R-Mono: Playback of Right channel audio only.
- Mb Mono: Both Left/Right channels are mixed to one mono channel.
DYNAMIC
Use this mode to level all sound channels to ensure even sound levels.
- Press The OK Button to enter.
- Use the ▲ or ▼ buttons to adjust the dynamic range as required.
- Press the OK Button again to confirm the adjustment.
VIDEO
Adjust the image quality.
- Use the ▲ or ▼ buttons to select the option to change and the press the "OK" button.
- Press the ▲ or ▼ buttons to adjust the setting and then press the "OK" button to confirm the changes.
Options are:
- Sharpness
- Brightness
- Contrast
PREFERENCES
The Preferences page cannot be accessed if a disc is in the player. Please remove any discs before accessing this page.
TV Type
Used for settings the Video format output if the player is connected to an external display.
• PAL: Video output is PAL only.
- Mult: Video output is as per source material,
• NTSC: Video output is NTSC only.
Audio
Sets the default Audio language of DVDs played on this player.
Subtitle
Sets the default Language of the Subtitles of DVDs played on this player.
Disc Menu
Sets the default Language of the DVD Menu of DVDs played on this player.
NOTE: Audio, Subtitle and Disc Menu settings are subject the availability of your selection on the DVD.
Parental
Select the parental level you desire for disc with lock-out function or multiple rating levels. They are listed from level (1 Kid Safe) to the highest level (8 Adult). The setting allows PLAYBACK to be restricted via password.
Note: This function will only work if the disc contains a parental control lockout.
Password
This function allows you to re-set a new password.
Note: You have to input the correct password to change the password setting. The default password is 136900
Default
Used to reset the player to Original Factory Defaults.
TROUBLESHOOTING
| Problem Possible | Solution |
| No sound or distorted sound? | 1. Make sure your DVD is connected properly. Make sure all cables are securely inserted into the appropriate jacks. 2. Make sure the Audio is not muted. |
| No Power | Ensure that power connection is firmly seated in plug and there is power to the power supply. |
| Can't advance through a movie? | You can't advance through the opening credits and warning information that appears at the beginning of movies because the disc is programmed to prohibit that action. |
| The icon (∅) appears on the screen? | The feature or action cannot be completed at this time because: 1. The disc's software restricts it. 2. The disc's software doesn't support the feature (eg, angles) 3. The feature is not available at the moment. 4. You've requested a title or chapter number that is out of range. |
| Picture is distorted? | 1. The disc might be damaged. Try another disc 2. It is normal for some distortion to appear during forward or reverse scan. |
| No forward or reverse scan? | 1. Some discs have sections that prohibit rapid scanning or title and chapter skip. 2. If you try to skip through the warning information and credits at the beginning of a movie, you won't be able to. This part of the movie is often programmed to prohibit skipping through it. |
| IR sensor inoperative? | 1. Ensure that the batteries in the remote are fresh. 2. Ensure that the remote sensor eye is not obstructed. 3. Ensure that the infrared transmitter is affixed over the sensor eye of the component to be controlled. |
| Disc won't play? | 1. Insert a disc with the label side fading up. 2. Check the type of disc you put into disc tray. This DVD only plays digital video discs, audio CDs and MPs. |
| Play starts, but then stops immediately? | 1. The disc is dirty. Clean it. 2. Condensation has formed. Allow player to dry out. |
CHARGING THE DVD PLAYER
In the first instance the player should be left on charge for 12 hours.
Regular charging can be completed in 5 hours.
Connect the player to the AC charger or DC charger. The player will charge when connected.
Although the player will charge during playback, the player can be turned off to decrease charging times.
SPECIFICATIONS
| Compatible Disc: | DVD/VCD/CD/MP3/JPG/MPEG-4 |
| Signal System: | PAL/NTSC |
| Screen Size: | 10 Inch (254MM) |
| Frequency Response: Video | 20 Hz to 20 KHz |
| Output: | 1 Vp-p/75 Ohm, Unbalanced |
| Audio S/N: | Better than 60 dB |
| Dynamic range: | Better than 85 dB |
| Laser: | Semiconductor Laser, Wave Length: 650 nm/795 nm |
| Power source: | DC 9-12V 1.5 amps |
| Power Consumption: | 15W |
| Battery Type: | 7.4V Li Ion 1600mAh |
| Charge Time | Up to 5hrs |
| Playback Time: | Approx 2 hours |
| Working temperature: | 5-40°C |
| Weight: | 872 grams (without remote, discs or cables) |
| Dimensions (LxWxH): | 262 x 193.2 x 41.55mm |
WARRANTY AGAINST DEFECTS
Laser warrants your new product to be free from defects in materials and workmanship for 12 months, from the date of purchase, provided that the product is used in accordance with accompanying recommendations or instructions where provided. The benefit of this warranty is in addition to your rights under the Australian Consumer Law and to other rights and remedies of the consumer under a law in relation to the goods or services to which the warranty relates.
Through a network of retailers and resellers, Laser will provide you with your choice of a refund, repair, or exchange (where possible) for this product if it becomes defective within the warranty period. This warranty will no longer apply where the defect is a result of alteration, accident, misuse, abuse, normal wear and tear, neglect, or improper storage. Please retain your receipt as proof of purchase
How to make a product warranty claim:
-
Find your receipt with date of purchase. If this is not available, Laser will make an assessment based on the date of manufacture, condition of the product and type of defect.
-
Please contact your original place of purchase. They will assess the nature of the fault and refund or replace the product as per their store refund or warranty policy.
-
If your original place of purchase cannot be contacted, please contact Laser with a description of the fault. To assist our team in providing you with a quick resolution, please include any photos and/or a short video demonstrating the fault with your product.
• Phone: (02) 9870 3355
- Email: support@laserco.com.au
• Online: www.laserco.net/support/warranty and follow the website instructions
• Business Address: U1 6-8 Byfield Street, Macquarie Park, 2113, NSW, Australia
- Laser will review your claim and in the first instance, attempt to troubleshoot and resolve the issue for you without the need to return the product.
- If it is determined via troubleshooting that your product may be faulty, our team will provide instructions to have the product returned for assessment. If the product does need to be returned within the warranty period, Laser will arrange return shipping at no cost to you.
- Once we receive the product, our experienced technicians will assess it and determine how best to resolve the issue.
Our goods come with guarantees that cannot be excluded under the Australian Consumer Law. You are entitled to a replacement or refund for a major failure and compensation for any other reasonably foreseeable loss or damage. You are also entitled to have the goods repaired or replaced if the goods fail to be of acceptable quality and the failure does not amount to a major failure.
The Avengers, all related marks and characters are trademarks and copyrights of Disney©

- DVD-PT-10D USER MANUAL
- IMPORTANT SAFETY INSTRUCTIONS AND PRECAUTIONS 4
- IMPORTANT SAFETY INSTRUCTIONS AND PRECAUTIONS
- CARE OF DISCS
- WHAT'S IN THE BOX
- INSTALLATION
- Indoor Use
- IN-CAR USE
- PLAYBACK
- The Remote Control
- LOADING AND PLAYING A DISC
- Play/Pause.
- Fast Forward/ Rewind
- Menu
- DISPLAY
- Playing Time and Remaining Time
- Press "DISPLAY" constantly to choose the options below in sequence.
- ANGLE
- SUBTITLE
- AUDIO
- ZOOM
- A-B REPEAT
- ALL REPEAT
- PLAYBACK OF DIVX CONTENT
- Play USB and SD/MMC Card
- SYSTEM SETUP
- GENERAL SETUP PAGE
- TV Display
- Angle Mark
- OSD LANGUAGE
- Captions
- SCREEN SAVER
- Last Memory
- Speaker Setup
- Downmix
- DOLBY
- Dual Mono
- DYNAMIC
- VIDEO
- PREFERENCES
- TV Type
- Disc Menu
- Parental
- Password
- Default
- CHARGING THE DVD PLAYER
- WARRANTY AGAINST DEFECTS
- How to make a product warranty claim:
Brand : Laser
Model : DVD-PT-10D
Category : Portable DVD Player