
WSF6608XA - Dishwasher WESTINGHOUSE - Free user manual and instructions
Find the device manual for free WSF6608XA WESTINGHOUSE in PDF.


| Product Type | Built-in Dishwasher |
| Model | WSF6608XA |
| Brand | Westinghouse |
| Color | Stainless Steel |
| Width | 60 cm |
| Height | 85 cm |
| Depth | 60 cm |
| Capacity | 14 Place Settings |
| Energy Efficiency Class | A++ |
| Annual Energy Consumption | 262 kWh |
| Water Consumption per Cycle | 9.5 L |
| Noise Level | 44 dB(A) re 1 pW |
| Number of Programs | 6 |
| Programs | Eco, Auto, Intensive, Normal, Quick, Rinse |
| Drying System | Heat exchanger with condensation drying |
| Delay Start | Up to 24 hours |
| Control Type | Electronic push buttons with LED display |
| Safety Features | Child lock, overflow protection, anti-flood system |
| Maintenance | Clean filters regularly; descale every 3 months |
| Spare Parts Availability | 7 years after discontinuation |
| Weight | 45 kg |
Frequently Asked Questions - WSF6608XA WESTINGHOUSE
User questions about WSF6608XA WESTINGHOUSE
0 question about this device. Answer the ones you know or ask your own.
Ask a new question about this device
Download the instructions for your Dishwasher in PDF format for free! Find your manual WSF6608XA - WESTINGHOUSE and take your electronic device back in hand. On this page are published all the documents necessary for the use of your device. WSF6608XA by WESTINGHOUSE.
USER MANUAL WSF6608XA WESTINGHOUSE
natural_image
Black-and-white photo of a set of kitchen utensils including a spoon, fork, spoon, fork, knife, and spoon (no text or symbols)CONGRATULATIONS
Congratulations and thank you for choosing our product. We are sure you will find your new appliance a pleasure to use and a great asset to your cooking. Before you use the appliance, we recommend you read through the whole user manual which provides a description of the product and its functions.
To make the best use of your new appliance, it is important that the appliance is installed correctly and that you read the safety instructions carefully to avoid misuse and hazards. We recommend that you keep this instruction booklet for future reference and pass it on to any future owners. This appliance complies with the requirements of Australian Standard AS/NZ 60335.2.5.
Conditions of use
This appliance is intended to be used in household and similar applications such as:
- Staff kitchen areas in shops, offices and other working environments
- Farm houses
- By clients in hotels, motels and other residential type environments
• Bed and breakfast type environments.
Record model and serial number here:
Model:
Serial number: ....

ENVIRONMENTAL TIPS
Important – check for any damage or marks
If you find the dishwasher is damaged or marked, you must report it within 7 days if you wish to claim for damage/ marks under the manufacturers warranty. This does not affect your statutory rights.
CONTENTS
Important safety instructions 3
Recycling 3
Safety information 3
Recommendations 4
Items not suitable for dishwashing 4
Technical specifications 5
Conformity with the standards and Test data ..... 5
Description of your appliance 6
Quick Start Guide 8
Installing the machine 9
Positioning the machine 9
Water connections 9
Water inlet hose 9
Water outlet hose 9
Electrical connection 10
Fitting the machine undercounter ..... 11
Preparing the machine for use . . . . . . . . . . . 12
Prior to using the machine ..... 12
Detergent usage 12
Filling the detergent compartment . . . . . . . 12
Combined detergent 13
Filling with rinse aid and making the setting . . . . . 13
Loading your dishwasher 14
Alternative basket loads 17
Standard loading and Test data 18
Program descriptions ..... 19
Program items 19
Switching on the machine and selecting a program . 20
Switching on the machine 20
Program follow-up 20
Changing a program ..... 20
Changing a program with resetting ..... 21
Switching the machine off 21
Maintenance and Cleaning 22
Filters 22
Spray arms 23
Hose filter 23
Failure codes and what to do in case of failure . . . 24
Practical and useful information 24
Troubleshooting 25
Notes 26
Warranty 27

ENVIRONMENTAL TIPS
Information on disposal for users
- Most of the packaging materials are recyclable. Please dispose of those materials through your local recycling depot or by placing them in appropriate collection containers.
- If you wish to discard this product, please contact your local authorities and ask for the correct method of disposal.
IMPORTANT SAFETY INSTRUCTIONS
These warnings have been provided in the interest of safety. You MUST read them carefully before installing or using the appliance.
The symbols you will see in this booklet have these meanings:

WARNING
This symbol indicates information concerning your personal safety

TIPS AND INFORMATION
This symbol indicates tips and information about use of the appliance

ENVIRONMENTAL TIPS
This symbol indicates tips and information about economical and ecological use of the appliance
Recycling
- Certain components and the packaging of your machine have been produced from recyclable materials.
- Plastic parts are marked with international abbreviations: (>PE<, >PS<, >POM<, >PP<, ....)
- Cardboard parts have been produced from recycled paper and they should be disposed of into waste paper collection containers for recycling.
- These materials should not be disposed of into garbage bins. They should be delivered to recycling centres instead.
- Contact relevant centres in order to obtain information on methods and points of disposal.
Safety Information
When you take delivery of your machine
- Check for any damage to your machine or to its packaging. Never start a damaged machine, make sure to contact an authorised technician.
- Unwrap the packaging materials as indicated and dispose of them in accordance with the rules.
The points to pay attention during machine installation
- Choose a suitable, safe and level location to install your machine.
- Carry out the installation and connection of your machine by following the instructions.
- This machine should be installed and repaired by an authorised technician only.
-
Only original spare parts should be used with the machine.
-
Before commencing the dishwasher installation, be sure that the machine is unplugged.
- Check whether the indoor electrical fuse system is connected according to the regulations.
- Pay special attention and make sure that the machine does not crush the power cord.
- Never use an extension cord or a multiple socket to make a connection. The plug should be easily accessible after the machine has been installed.
- After installing the machine, run it unloaded for the first time.
In daily use
- Do not stand, sit or place a load on the open door of the dishwasher, it may fall over.
- Only use detergents and rinse aids which are produced specifically for dishwashers. Otherwise Electrolux does not take any responsibility for any damage that might occur to your machine.

WARNING
The water in the machine's washing section is not drinking water, do not drink it.
- Due to danger of explosion, do not put into the machine's washing section any chemical agents such as solvents.
- Check whether plastic items are heat-resistant before washing them in the machine.
- Do not put into your machine those items which are not suitable for dishwashing. Also, do not overload basket.
- The machine door should not be opened while the machine is in operation, to avoid the risk of hot water spraying out. A safety device ensures that the machine stops if the door is opened.

WARNING
Do not leave your dishwasher's door open, this may lead to accidents and injury.

WARNING
Place knives and other sharp ended objects in the cutlery basket in the point down position.
- This appliance is not intended for use by persons (including children) with reduced physical, sensory or mental capabilities, or lack of experience and knowledge, unless they have been given supervision or instruction concerning use of the appliance by a person responsible for their safety.
SAFETY INFORMATION AND RECOMMENDATIONS
For your children's safety
- After removing the machine's packaging, make sure that the packaging material is out of reach of children.
- Do not allow children to play with or start the machine.
- Keep your children away from detergents and rinse aids.
- Keep children away from the machine while it is open because there may still be residues of cleaning substances inside the machine.
- Be sure that your old machine does not pose any threat to children. Remove the dishwasher door lock and power supply cord.
In case of malfunctioning
- Any malfunction in the machine should be repaired by qualified persons. Any repair work performed by anyone other than the authorised service personnel will cause your machine to be left outside the scope of warranty.
- Prior to any repair work on the machine, be sure to unplug the dishwasher from the power supply. Do not pull by the cable when unplugging. Make sure to turn off the water tap.
Recommendations
- For energy and water saving, remove coarse residues on your dishes before placing the dishes into the machine. Start your machine after having fully loaded it.
- Use the pre-wash program only whenever necessary.
- Place items such as bowls, glasses and pots into the machine face down.
Items not suitable for dishwashing:
- Cigarette ashes, candle leftovers, polish, paint, chemical substances, iron-alloy materials;
- Forks, spoons and knives with wooden or bone, ivory or nacre-coated handles; glued items, items soiled with abrasive, acidic or base chemicals;
- Plastic items that are not heat-resistant, copper or tin coated containers;
- Aluminium and silver objects (they may discolour, become dull);
- Certain delicate glass types, porcelains with ornamental printed patterns (may fade even after the first wash); certain crystal items (may lose their transparency over time), laminated cutlery that is not heat-resistant, lead crystal glasses, cutting boards, items manufactured with synthetic fibre;
- Absorbent items such as sponges or kitchen rags are not suitable for dishwashing.

WARNING
Some dishwasher detergents are strongly alkaline. They can be extremely dangerous if swallowed. Avoid contact with the skin and eyes and keep children away from the dishwasher when the door is open. Check that the detergent compartment is empty after completion of wash cycle.
DESCRIPTION OF YOUR APPLIANCE
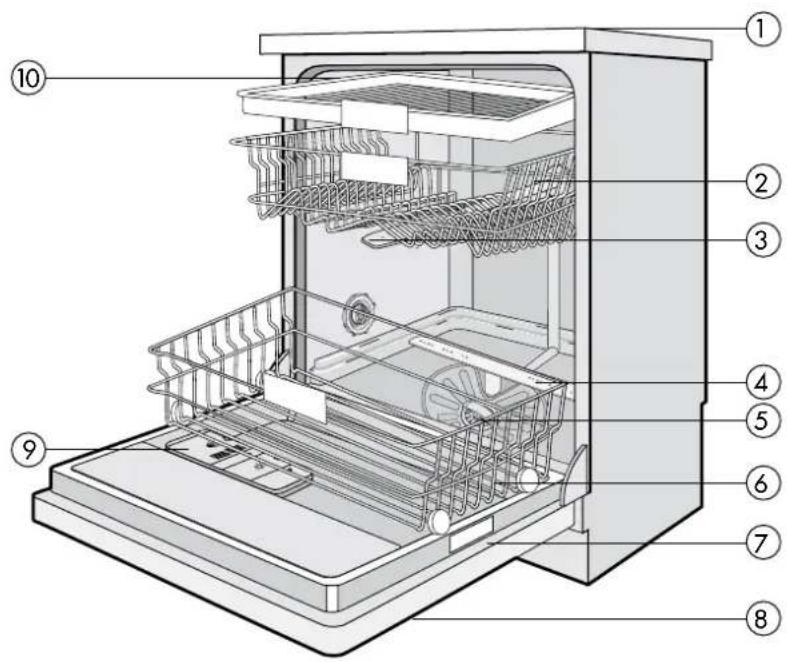
text_image
Technical diagram of a refrigerator with numbered parts for identification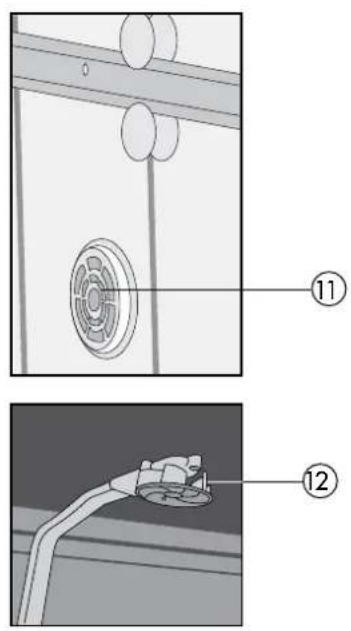
text_image
Technical diagram showing two views of a device with labeled parts, including a circular component and a plug inserted into a housing.- Worktop
- Upper basket with racks
- Upper spray arm
- Lower spray arm
- Filters
- Lower basket
- Rating plate
-
Control panel
-
Detergent and rinse-aid dispenser
- Upper cutlery basket
- Turbo drying unit
- Ceiling spray impeller
TECHNICAL SPECIFICATIONS
Capacity 15 place settings
Height 845 mm
Height (without worktop) 820* mm
Width 596 mm
Depth 598 mm
Net Weight....56 kg
Electricity input 220-240 V, 50 Hz
Total Power 1900 W
Heating Power....1800 W
Pump Power 100W
Drain Pump Power 30 W
Water supply pressure...0.03 MPa (0,3 bar) - 1 MPa (10 bar)
Water supply temperature....5 - 60°C
Current 10 A
- Electrolux reserves the right to amend design and technical specifications.
* with counterweight and insulation removed
DESCRIPTION OF YOUR APPLIANCE
text_image
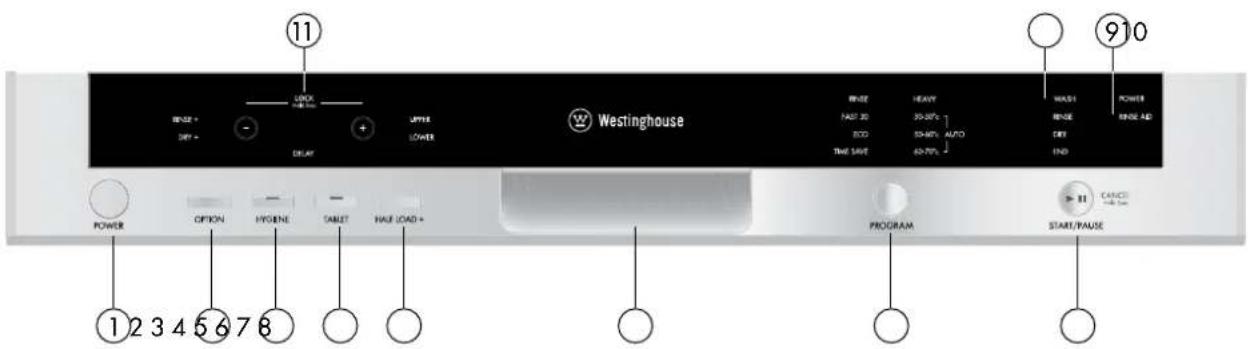
11 12 3 4 5 6 7 8 POWER OPTION HYDENE TABLET HALE LOAD + UPPER LOWER WESTINGHOUSE RINSE FAST 30 BOD TIME SAVE HEAVY 30-30% 1 50-40% AUTO 40-70% ↓ WASH RINSE DRY END 910 CANCE START/PAUSE1. Power button
When pressed on, the machine is energised and the power light illuminates.
2. Option button rinse+ / dry+
You can add extra rinsing or drying functions for the selected program by using this option.
Once you select rinse+ function, the light for extra rinsing illuminates, washing-rinsing time will be added into the selected program to ensure that your dishes will be cleaner.
Once you select dry+ function, the light for extra drying illuminates, extra heating and drying time will be added into the selected program to be sure that your dishes will be drier.
3. Hygiene button
By using this option, washing temperature and periods during respective programs may be changed, which ensures more hygienic washing.
4. Tablet button
Use this option when using combined detergent that contains rinse aid and extra functions.
5. Half load + button
Using the half load+ function, three sections for washing can be selected; lower basket, upper basket and both baskets.
If you have a small number of dishes in your machine to wash in both baskets, press the half load+ button and select the position in which both lights are illuminated.
If you have dishes only in the upper basket, press the half load+ button and select the position in which the upper light is illuminated. Washing occurs only on the upper basket of your machine.
No dishes should be placed in the lower basket while using this option.
If you have dishes only in the lower basket, press half load+ button and select the position in which the lower light is illuminated.
Washing occurs only on the lower basket of your machine. In using this option, make sure that there are no dishes in the upper basket.
NOTE: If you have used this option on the last washing program, this option will remain active also on the next washing program. If you do not want to use this option on the newly selected washing program, press the selected feature button again, and check that the light on the button goes off.
6. Door handle
The door handle is used to open/close the door of your machine.
7. Program button
With the program button, you can select a suitable program for your dishes.
8. Start/Pause button
The Start/Pause button will start the selected program. In the Pause condition while wash indicator light is on, Start/Pause LED will blink.
9. Rinse aid/power indicators
When the rinse aid light illuminates, fill in rinse aid chamber.
The power light indicates power is available to the appliance.
NOTE: If you have used an extra option on the last washing program, this feature will remain active also on the next washing program. To deselect an option on the newly selected washing program, press the selected option button again, and check that the indicator light on the button goes off.
10. Progress indicator Lights
Program status can be monitored via the progress indicator lights on control panel:
- Wash
- Rinse
• Dry - End
11. Time indicator and delay display
The time indicator displays the program time and time remaining for the program. In addition you can delay the start of the program by pressing the "+" and "-" buttons before the program is commenced. The delay function is indicated by the letter "H" followed by the number of hours selected.

If you want to change the delay time, you can reset it by pressing START/PAUSE and then using the "+" and "-" buttons to select the new delay time, then press START/PAUSE to activate.
Child Lock Operation
In order to activate child lock, press "+" and "-" buttons simultaneously for 3 seconds. At this time, "CL" appears for 2 seconds on remaining time indicator. To deactivate child lock, press "+" and "-" buttons again simultaneously for 3 seconds. "CL" will blink once.
QUICK START GUIDE
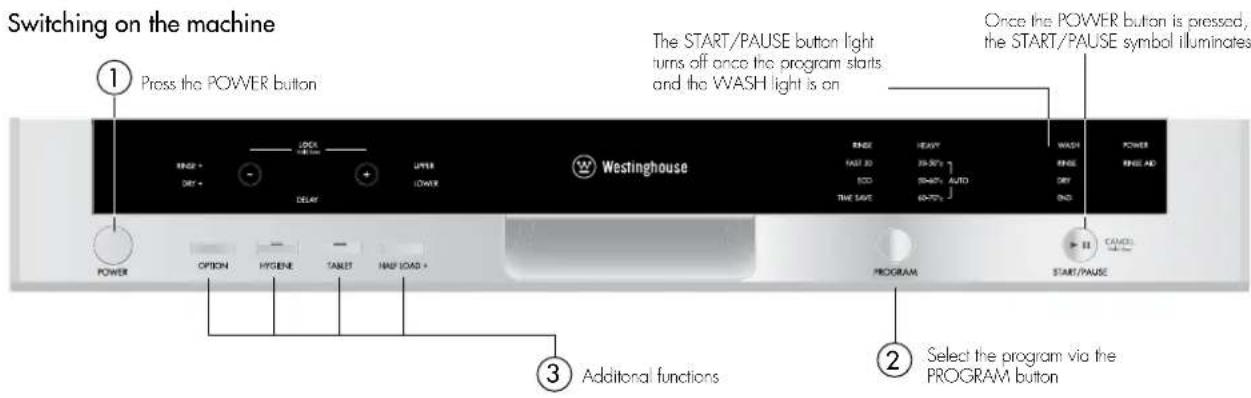
text_image
Switching on the machine ① Press the POWER button The START/PAUSE button light turns off once the program starts and the WASH light is on Once the POWER button is pressed, the START/PAUSE symbol illuminates Westinghouse RANGE FAST 30 SOD THE SAVE HEAVY 25-SET'S SHORT AUTO 60-70'S WASH RANGE FAST 30 SOD THE SAVE HOLD HOLD POWER OPTION HYGENE TAILET MAD I/OAD + PROGRAM START/PAUSE ② Select the program via the PROGRAM button Additional functionsProgress indicator
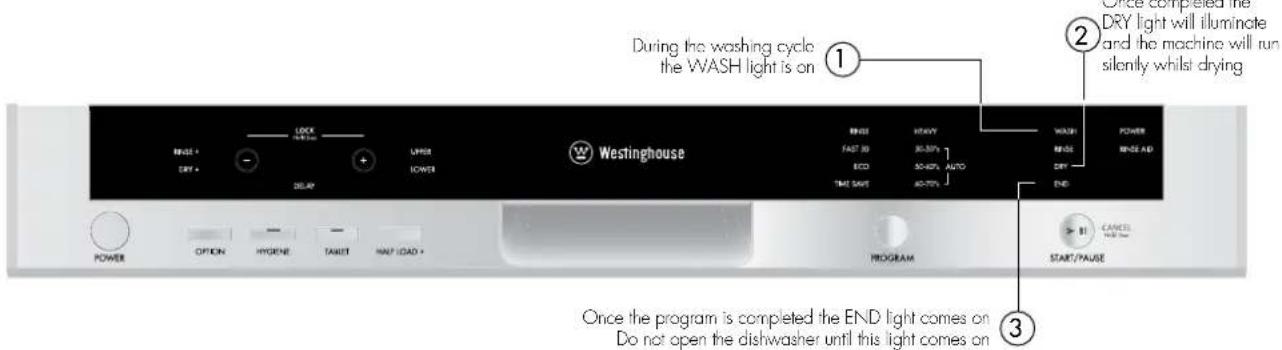
You can follow the program flow using the progress indicator lights located on the control panel.
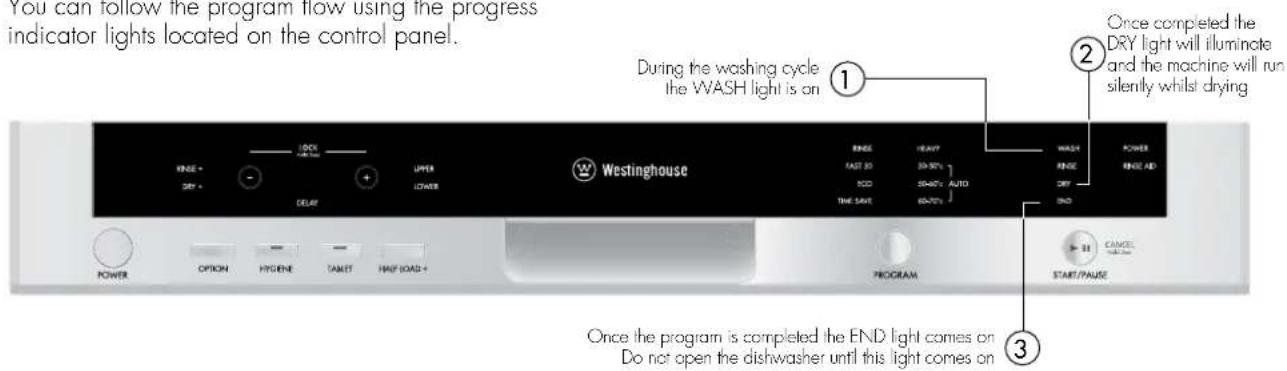
text_image
You can follow the program flow using the progress indicator lights located on the control panel. During the washing cycle the WASH light is on Once completed the DRY light will illuminate and the machine will run silently whilst drying Once the program is completed the END light comes on Do not open the dishwasher until this light comes on Once the program is completed the END light comes on Do not open the dishwasher until this light comes onChanging a program
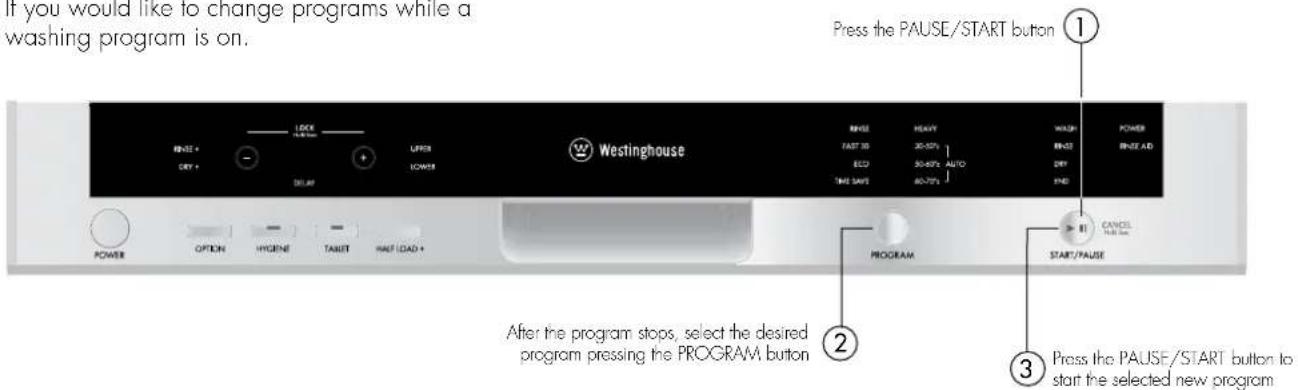
If you would like to change programs while a washing program is on.
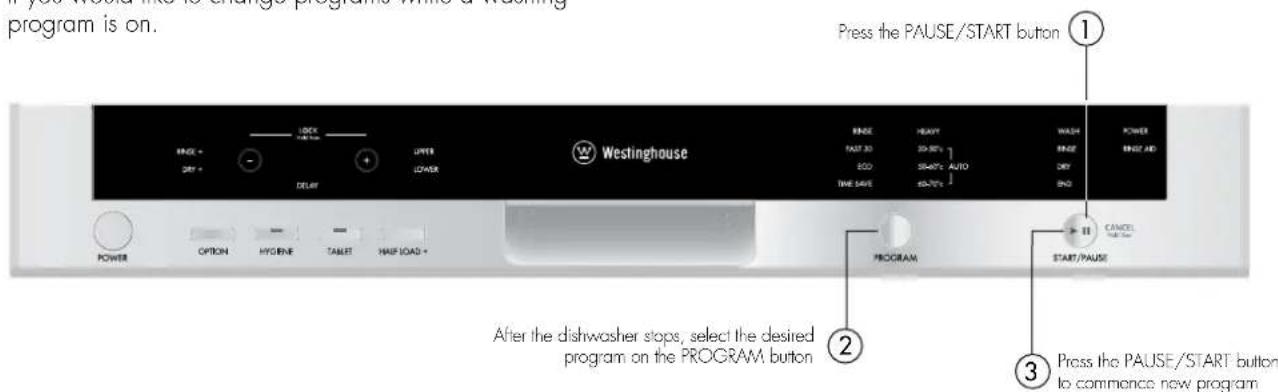
text_image
Press the PAUSE/START button 1 WASH POWER BASE FAST 3D SO-SET AUTO END BASE ORDER AND EXP EXP/EXP EXP/EXP EXP/EXP EXP/EXP EXP/EXP EXP/EXP EXP/EXP EXP/EXP EXP/EXP EXP/EXP EXP/EXP EXP/EXP EXP/EXP EXP/EXP EXP/EXP EXP/EXP EXP/EXP EXP/EXP EXP/EXP EXP/EXP EXP/EXP EXP/EXP EXP/EXP EXP/EXP EXP/EXP EXP /PAUSE CANCE EXP /PAUSE After the dishwasher stops, select the desired program on the PROGRAM button 2 3 Press the PAUSE/START button to commence new programCancelling a program
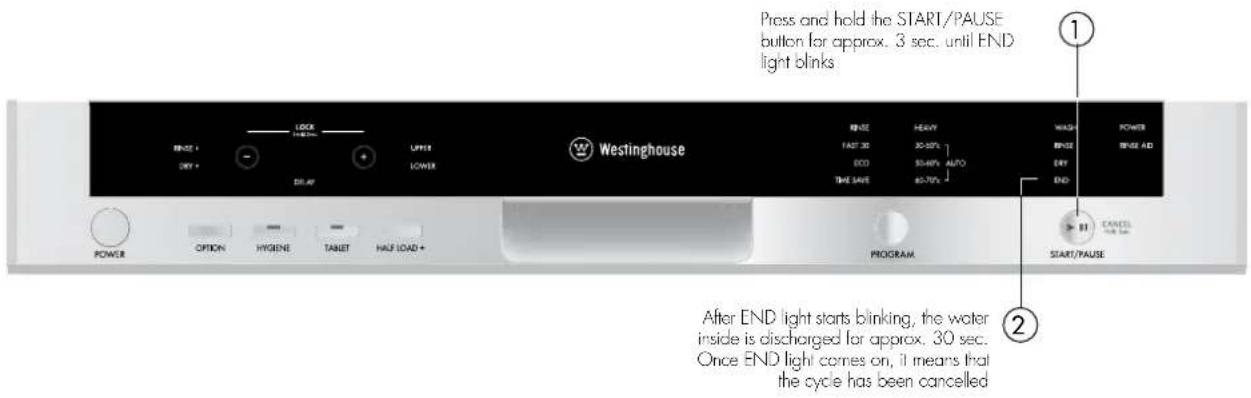
If you want to cancel current program for any reason.
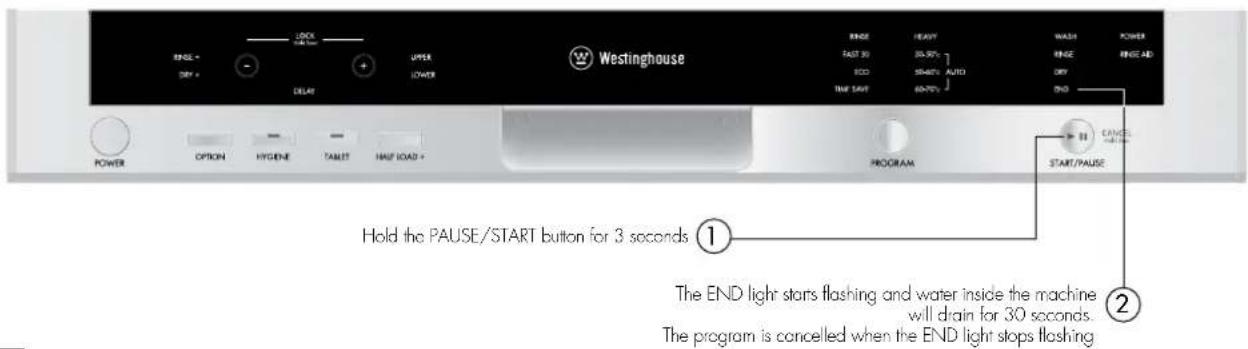
text_image
WESTINGHOUSE EASE - EASY + DELAY UPPER LOWER POWER OPTION HYDENE TAILET HAUF LOAD + EASE FAST 30 ECD TIME 54T HEAVY 30.50V~ SHAKEN AUTO 60/70V WASH RINCE DRY END START/PAUSE CANCE HOLD THE PAUSE/START button for 3 seconds ① The END light starts flashing and water inside the machine will drain for 30 seconds. The program is cancelled when the END light stops flashingINSTALLING THE MACHINE
Positioning the machine
When considering the location for the dishwasher, ensure that there is adequate space to enable loading and unloading of the dishes.
- Do not put your machine in any location where the ambient temperature can fall below 5°C.
- Before positioning, take the machine out of its packaging by following the warnings located on the package.
- Position the machine close to a water tap and drain. You need to position your machine, taking into consideration that its connections will not be altered once they are made.
- Do not grip the machine by its door or panel in order to move it.
- Take care to leave a certain clearance from all sides of the machine so that you can comfortably move it back and forth during cleaning.
- Make sure that the water inlet and outlet hoses do not get squeezed while positioning the machine. Also, make sure that the machine does not stand on the electrical cable. Adjust the machine's feet so that it is level and stable. Proper positioning of the machine ensures problem-free opening and closing of its door.
- If the door of your machine does not close properly, check if the machine is stable on the floor; if not, adjust the feet and ensure it is level and stable.
Water connection
Ensure that the indoor plumbing is suitable for installing a dishwasher. Also, we recommend that you fit a filter at the entrance of your place or apartment so as to avoid any damage to your machine because of any contamination (sand, clay, rust etc) that might be occasionally carried in through the main's water supply or the indoor plumbing, and to avoid problems of staining and formation of deposits after washing.
Water inlet hose
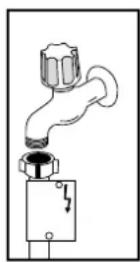
Do not use the water inlet hose of your old machine, you must use the new water inlet hose supplied with your machine. Before connecting the water inlet hose to the water tap, ensure clean water is flowing from the tap before making the connection. Connect the water inlet hose directly to the water inlet tap. The pressure supplied by the tap should be at a minimum of 0.03 MPa and at a maximum of 1 MPa. If the water pressure is above 1 MPa, a pressure-relief valve should be installed.
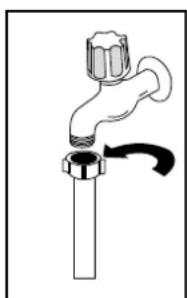
natural_image
Simple line drawing of a faucet with a valve and handle (no text or symbols)
WARNING: only turn the locking nut to secure hose - do not turn the hose.
After the connections are made, the tap should be turned on fully and checked for water tightness. For the safety of your machine, make sure to always turn off the water inlet tap after each wash program is finished.

WARNING
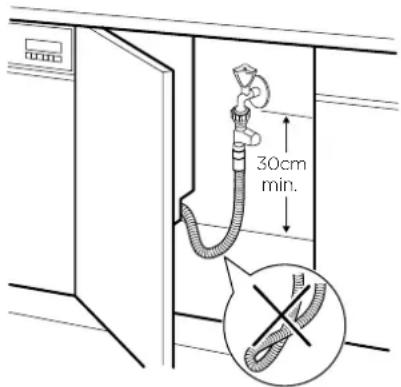
NOTE: Aquastop inlet hose has components using 240V. Do not cut Aquastop inlet hose. Do not let it get folded, twisted, kinked or crushed.

WARNING
NOTE: A water tempering valve is required if the water temperature is over 60^ C.

CAUTION
Always use new hoses when you connect the appliance to the water mains. Old hoses must not be used. The water inlet hose must be examined at an interval of twelve months for deterioration and replaced if necessary.
In order to pass the safety valve through the kitchen cabinets, an opening of at least 45mm x 90mm is needed.
text_image
30cm min.Water drain hose
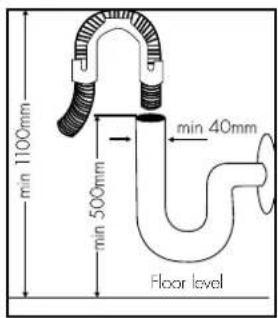
If you connect the water drain hose to a trap spigot under the sink, remove the plastic membrane. If you do not remove the entire membrane, remaining food can cause blockage in the drain hose spigot. Ensure a hose clamp is used to secure the hose to the spigot.
INSTALLING THE MACHINE
Water drain hose
text_image
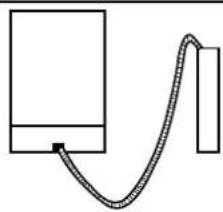
min 1100mm min 500mm min 40mm Floor levelThe water drain hose can be connected either directly to the water drain hole or to the sink outlet spigot. Using a hose hook (if available), the water can be drained directly into the sink by positioning the hose hook over the edge of the sink.
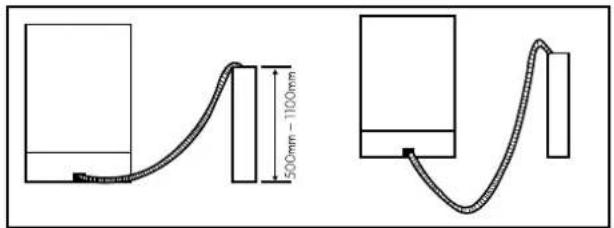
This connection should be at a minimum of 50 cm and at a maximum of 110 cm above the base of the dishwasher.

WARNING: Maximum drain hose length
is 4m. Longer hose length will prevent correct draining, and result in poor wash performance.
text_image
500mm - 1100mm√
(correct)
natural_image
Simple line drawing of a device with a curved cable or tube connecting two rectangular blocks (no text or symbols)×
(incorrect)
①
text_image
Timber wedging piece Bench top Filler piece cut to suit installation 3mm gap②
text_image
596 598 850 820 27 105 570 83 ③
WARNING
Electrical Connection
The plug of your machine should be connected to an earthed outlet that supplies suitable voltage and current. If there is no earthing installation, have a competent electrician carry out an earthing installation. In case of usage without earthing installed, our company will not be responsible for any loss of usage that might occur.
The indoor fuse current value should be 10-16 A.
Your machine is designed for 220-240 V. The machine should not be plugged in during installation.
• Always use the molded plug supplied with your machine.
- Running in low voltage will cause a decline in washing quality.
- The machine's electrical cable should be replaced by an authorised service or an authorised electrician only. Failure to do so may lead to accidents.
- For safety purposes, always make sure to disconnect the plug when a wash program is finished.
- In order not to cause an electric shock, do not unplug when your hands are wet.
- When disconnecting your machine from the mains supply, always pull from the plug. Never pull the cord itself.
Fitting the machine undercounter
If you wish to fit your machine undercounter, check whether you have sufficient space under your countertop and whether the wiring-plumbing is suitable to do so.
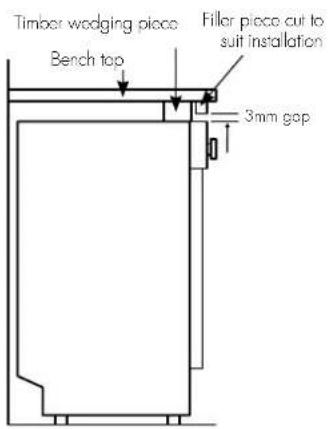
- To ensure the stability of the dishwasher for an underbench installation, if the underbench dimension is greater than 820mm, any gap between the dishwasher and the underside of the benchtop should be bridged with a packing piece. This may be achieved by wedging a piece of timber between the dishwasher and the benchtop as shown
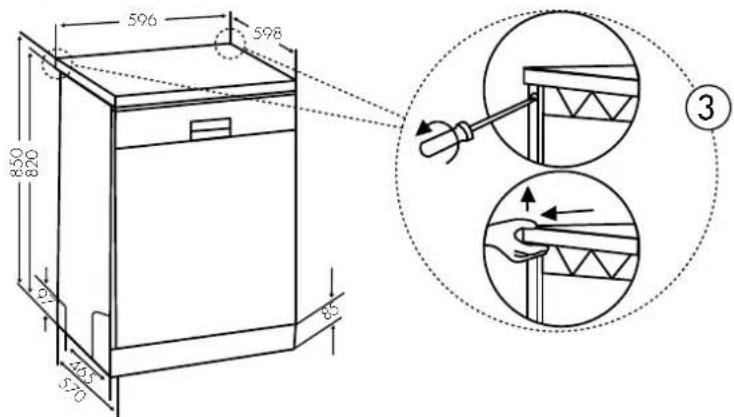
- If required, remove the worktop as shown in the illustration.
- To remove the worktop, remove the screws that hold the worktop which are located at the rear of the machine; then push the front panel 1 cm from the front towards the rear and lift it.
INSTALLING THE MACHINE
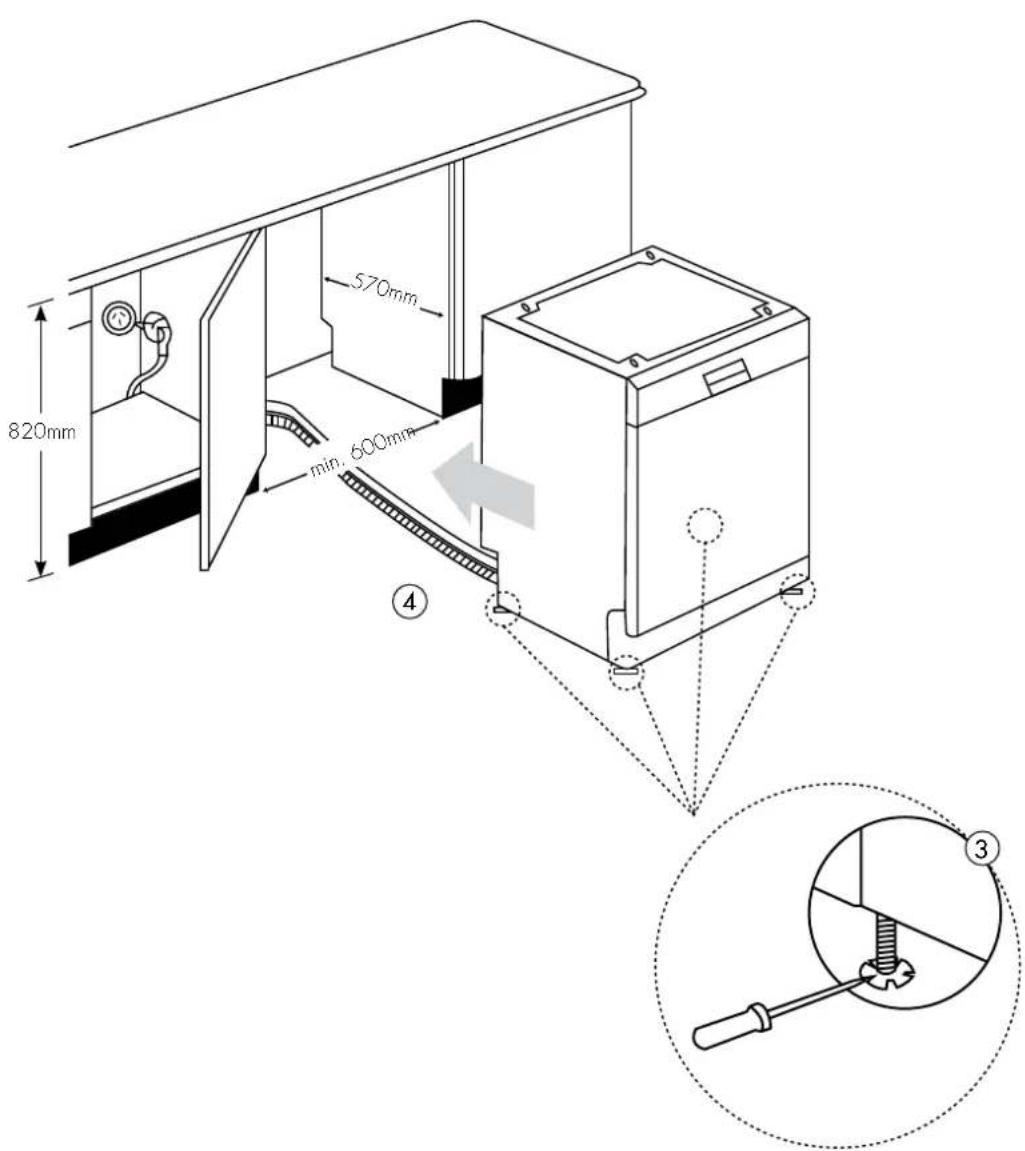
- Adjust the machine feet according to the slope of the floor.
- Fit your machine by pushing it undercounter without letting the hoses get crushed or bent.

WARNING
After removal of worktop, ensure the opening for the dishwasher is according to the following dimensions.
text_image
820mm 570mm min. 600mm ④ ③PREPARING THE MACHINE FOR USE
Prior to using the machine for the first time
- Check whether the electricity and water supply specifications match the values indicated by the installation instructions for the machine.
- Remove all packaging materials inside the machine.
• Fill the rinse aid compartment.
Detergent usage
Use a detergent specifically designed for use in domestic dishwashers. You can find powder, gel, and tablet detergents in the market that have been designed for household dishwashers. Detergent should be put into the compartment prior to starting the machine. Keep your detergents in coal, dry places out of reach of your children. Do not fill detergent into the detergent compartment more than required; otherwise it may etch your glasses as well as leaving undissolved detergent in the dishwasher. Should you need more information concerning the detergent you use, contact detergent manufacturers directly.
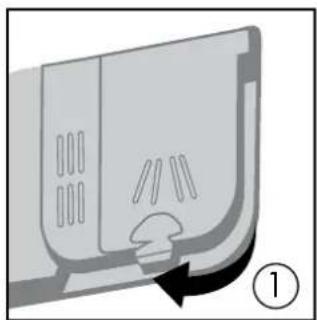
natural_image
Diagram of a device with ventilation slots and a curved arrow indicating rotation (no text or symbols)Filling the detergent compartment
- Push the latch to open the detergent container as shown in image 1.
- Detergent compartment has level lines inside. It is possible to measure the right detergent amount using these lines.
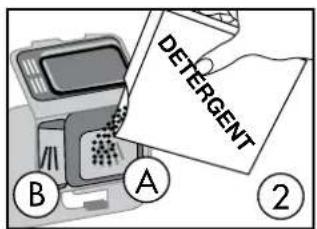
Detergent compartment (A) can take 40 gm of detergent. Open the dishwasher detergent and pour into the larger compartment 25 gm if your dishes are heavily soiled or 15 gm if they are less soiled.
If your dishes have
text_image
DETERGENT A B ②been kept dirty for a very long time, if there are dried food wastes on them, and if you have fully loaded the dishwasher, pour 5 gm detergent into the pre-wash compartment (B) and start your machine.
You may have to add more detergent into your machine, depending on the degree of soil and on the water hardness level in your area.
Combined detergent
Detergent manufacturers also produce combined detergents called "2 in 1", "3 in 1" or "5 in 1" etc.
"2 in 1" detergents contain detergent or rinse aid. When using "2 in 1" detergent make sure to check the specifications of the tablet.
Other tablet detergents contain detergent + rinse aid + various extra functions/additives.
Generally, combined detergents produce acceptable results under certain usage conditions only. These detergents contain rinse aid in preset amounts.
Points to consider when using these type of products:
- Always make sure to check the specifications of the detergent you will use or whether or not it is a combined detergent.
- Check if the detergent used is appropriate for the hardness of mains water.
- Observe the instructions on packaging when using such products.
- If detergents are in the form of tablets, never put them into the interior section or the cutlery basket of the dishwasher. Always put the tablets into the detergent compartment in the detergent dispenser.
- Tablets produce good results for certain types of usage only. If you are using this type of detergent, you need to contact the manufacturer and find out about the suitable conditions of use.
- When the conditions of use of such products and the machine settings are appropriate, they ensure savings in rinse aid consumption.
- Contact the detergent manufacturers if you are not obtaining good wash results (if your dishes have limescale and stay wet) after having used 2 in 1 or 3 in 1 detergents. The scope of warranty for your machine does not cover any complaints caused by the use of these types of detergents.
Recommended usage: If you want to obtain better results while using combined detergents, add rinse aid into your machine and the rinse aid setting to the lowest position.
Solubility of the tablet detergents produced by different companies can vary depending on the temperature and time. Therefore, it is not recommended to use these detergents in short programs. It is more suitable to use powder detergents and rinse aid in short programs.
WARNING
Should any problem, which you have not encountered before, occur with the use of these types of detergents, contact the detergent manufacturers directly.
PREPARING THE MACHINE FOR USE
When you stop using combined detergents
• Fill the rinse aid compartments.
- Select a suitable rinse aid setting.
Filling with rinse aid and making the setting
Rinse aid is used to improve the drying of the wash load and reduce the deposit of cloudy drops and streaks on glasses and dishware. For this reason, care should be taken that there is adequate amount of rinse aid in the rinse aid compartment and only rinse aid produced for use in dishwashers should be used.
If the rinse aid lamp on the control panel illuminates, fill the rinse aid compartment with rinse aid.
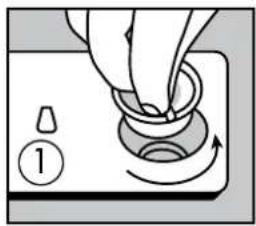
natural_image
Hand turning a button with a knob, showing rotational motion (no text or symbols)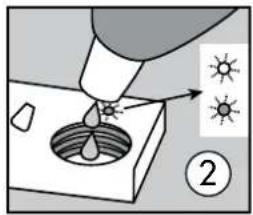
text_image
Diagram illustrating a droplet being injected into a container with sunlight, labeled with number 2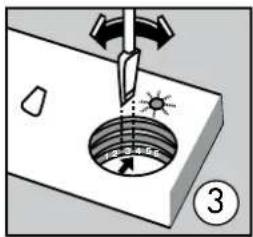
text_image
15°-30.5° ③- To put in rinse aid, remove the rinse aid compartment cap by turning it.
-
Fill the rinse aid compartment with rinse aid until the rinse aid level indicator becomes dark; refit the cap by locating the locking pins and close it by turning in the opposite direction. By checking the rinse aid level indicator on the detergent dispenser, you can understand whether or not your machine needs rinse aid. A dark indicator means that there is rinse aid in the compartment, while a light indicator shows that you need to fill the compartment with rinse aid.
-
The rinse aid level adjuster can be set to a position between 1 and 6. Factory setting for rinse aid is position 3. You need to increase the setting of the adjuster if water stains form on your dishes after a wash, whereas you need to decrease the setting if a blue stain is left when wiped by hand.
i TIPS AND INFORMATION
Only use rinse aid suitable for automatic dishwashers. As rinse aid residues left as a result of overflowing will create extremely high amounts of foam and reduce the washing performance, remove the excess amount of rinse aid by wiping it with a cloth. Remove all excess rinse aid if spilt while filling,
LOADING YOUR DISHWASHER
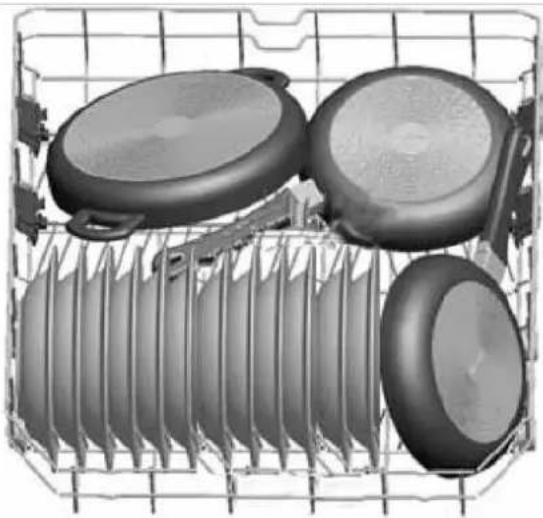
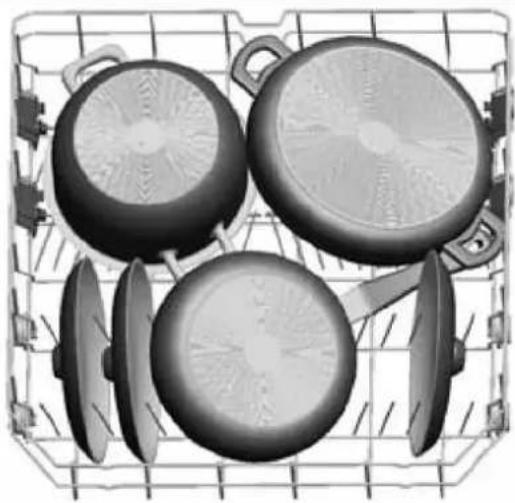
Correctly loaded dishes will result in the best energy consumption, washing and drying performance. There are two separate baskets for you to load your dishes into your machine. You can load into the lower basket round and deep items as pots with long handles, pot lids, plates, salad plates and cutlery sets.
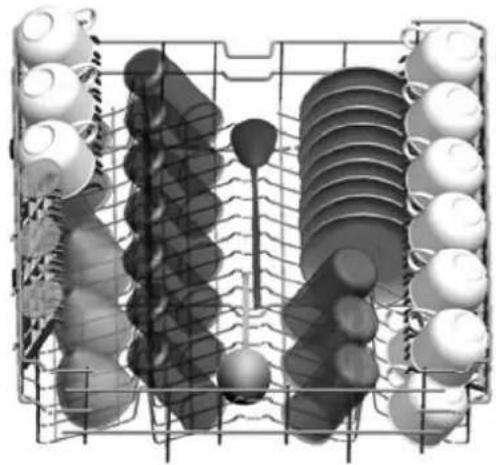
The upper basket has been designed for tea plates, dessert plates, salad bowls, cups and glasses. When placing long-stem glasses and goblets, lean them against the basket edge, rack or glass support wire and not against other items. Do not lean long glasses against one another if they are unsupported, they may break. It is more appropriate to locate the thin narrow parts into the middle sections of baskets. You can place spoons among the other cutlery sets in order to prevent them from sticking to one another. You are recommended to use the cutlery grid in order to obtain the best result. To avoid any possible injuries, always place such long-handle and sharp-pointed items such as serving forks, bread knives etc. with their sharp points facing down or horizontally on the baskets.

TIPS AND INFORMATION
Ensure the position of the dishware does not prevent the upper or lower spray arm from turning.
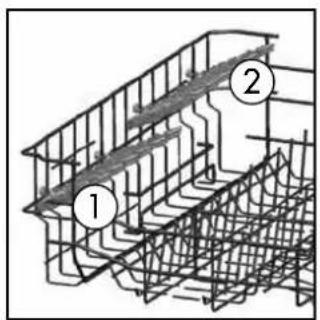
Top basket cup rack
These racks are designed to increase the capacity of the top basket. You can place your glasses and cups on the racks. You can adjust the height of these racks. Thanks to this feature, you can place different sizes of glasses under these racks. The cup racks can be adjusted to 3 height positions. In addition, you can place long forks, knives and spoons horizontally, so that they do not block the rotation of the spray arm.
text_image
Technical diagram of a structural steel frame with labeled components 1 and 2Top basket folding supports
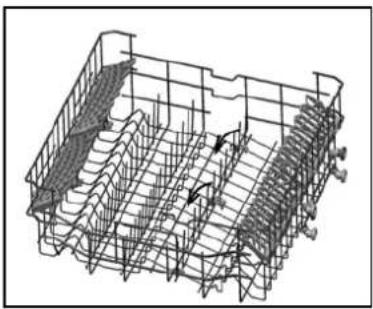
Foldable tines (or prongs) on the upper basket are designed to let you place big items easier such as pots, pans, etc. If required, each set of tines can be folded separately, or all of them can be folded and larger spaces can be obtained. You can use foldable tines in the upright position, or by folding down.
natural_image
3D wireframe model of a mechanical or structural assembly with no visible text or symbolsTop basket height adjustment while it is full
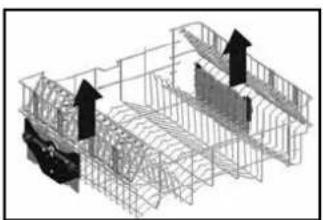
Basket height adjustment mechanism on the top basket of your machine is designed to let you adjust the height of your top basket (refer to diagram ①) upwards or (refer to diagram ②) downwards, without removing it from your machine when it is full, to create more space at the top or bottom area of your machine as needed. Basket of your machine is set to upper position in factory settings. In order to raise your basket, hold it from both sides and pull it upwards. In order to lower it, hold it from both sides again, pull upwards then lower carefully.
Make sure that both sides are in the same position (up or down).
natural_image
3D wireframe diagram of a structural framework with arrows indicating upward movement (no text or symbols)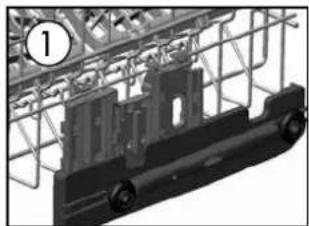
natural_image
Mechanical assembly with metal frame and mounting bracket (no visible text or symbols)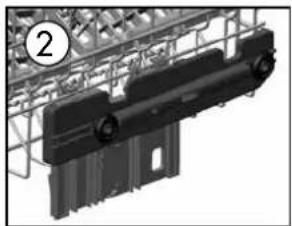
natural_image
Close-up of a mechanical component with a metal frame and internal components (no visible text or symbols)LOADING YOUR DISHWASHER
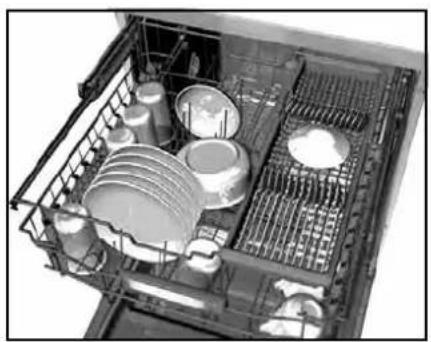
Upper Cutlery Basket
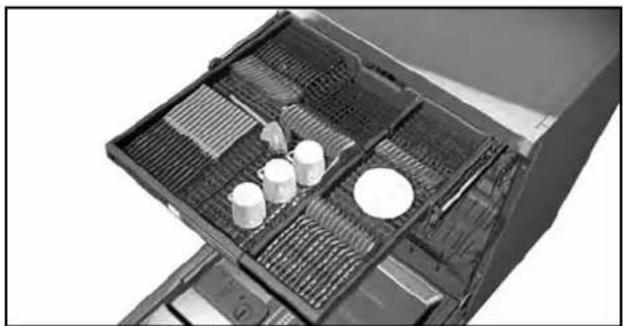
The upper cutlery basket is designed for you to place forks, spoons and knives, ladles and small crockery.
natural_image
Stacked plastic storage tray with white cylindrical components (no visible text or symbols)Because it can easily be taken out of the machine, it allows your dishes to be taken out of the machine along with the basket after washing.
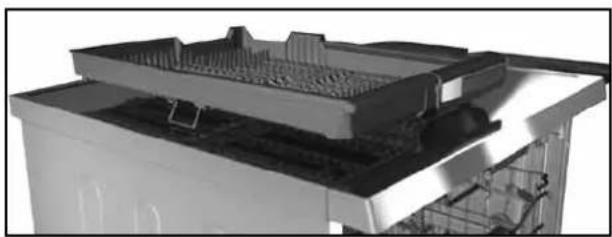
Cutlery and dishes to be carried together to another location
natural_image
3D rendering of a mechanical assembly with layered components and mounting brackets (no visible text or symbols)The upper cutlery basket is composed of two pieces. If you need to make space for the dishes in the upper basket, you can take out the left or right part of the upper cutlery basket in order to obtain more space.

WARNING
The upper cutlery basket must then be moved together with the upper basket
natural_image
Interior view of a kitchen appliance with multiple dish units and grilles (no visible text or labels)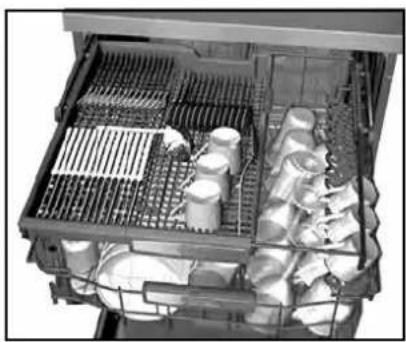
natural_image
Interior view of a multi-level kitchen appliance with grilles and plastic cups (no visible text or labels)
WARNING
Knives and other sharp objects must be placed horizontally in the cutlery basket.
LOADING YOUR DISHWASHER
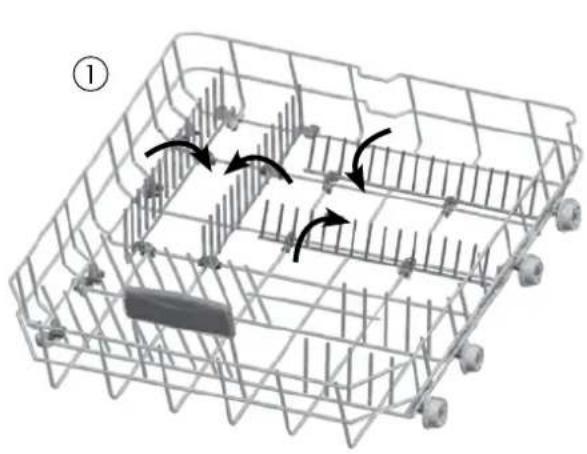
Lower basket folding racks
Folding tines (prongs) consisting of four parts that are located on the lower basket of your machine are designed to let you place big items easier such as pots, pans, etc. If required, each part can be folded separately, or all of them can be folded and larger spaces can be obtained. You can use folding tines (prongs) in the upright position, or by folding down.
natural_image
3D wireframe model of a mechanical assembly with no visible text or symbols
natural_image
3D wireframe model of a mechanical assembly with no visible text or symbolsAlternate cutlery basket
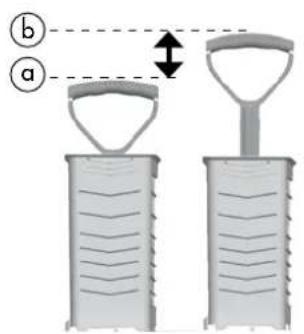
An alternate cutlery basket has been provided for convenience. The cutlery basket handle is adjustable - position (a) or (b). The basket can be used in the upper or lower dishwasher basket as required.
text_image
a b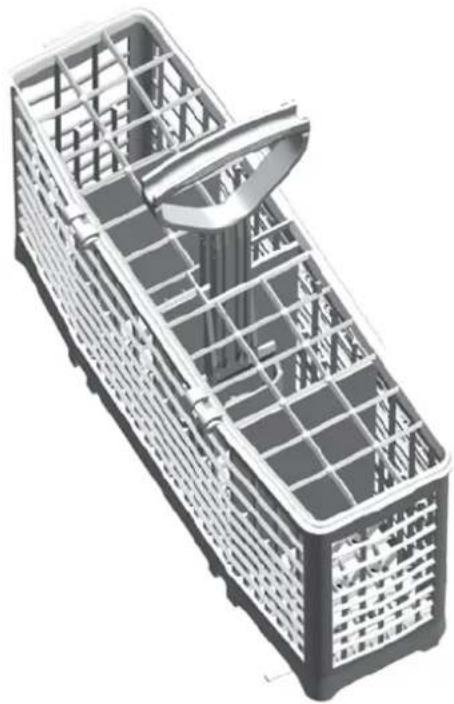
natural_image
3D rendering of a rectangular plastic crate with internal grid structure and a handle, no text or symbols visibleLOADING YOUR DISHWASHER
Alternative basket loads Lower Basket
natural_image
3D rendered image of a grid box containing multiple circular components, no text or symbols visible* Illustration only
natural_image
Black-and-white illustration of four cooking pots arranged in a wire basket (no text or symbols visible)Top Basket
natural_image
3D rendered diagram of a grid with mechanical components and spherical elements (no text or symbols)
TIPS AND INFORMATION
Examples of incorrect loading
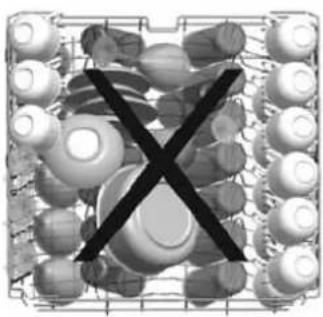
natural_image
Diagram of a cross symbol crossed over a grid of circular objects (no text or labels)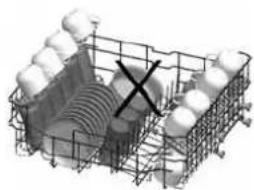
natural_image
3D wireframe model of a mechanical assembly with internal components and a central X mark (no text or symbols)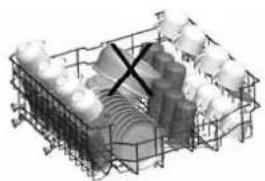
natural_image
3D wireframe model of a mechanical assembly with spherical components and a central cross mark (no text or symbols)AS/NZS STANDARD LOADING AND TEST DATA
Information for test laboratories
For all the necessary information for performance testing, send an email to dishwasher@standardtest.info
In your mail please provide the model number and PNC number (9 digits) that is on the rating plate on the appliance door.
PROGRAM DESCRIPTIONS
Program items
| NAME OF PROGRAM | RINSE** FAST 30 ECO* TIME SAVE HEAVY | AUTO 30 - 50 | AUTO 50 - 60 | AUTO 60 - 70 | ||||
| WASHING TEMPERATURE | -40°C 50°C 65°C 60°C 30 - 50°C 50 - 60°C 60 - 70°C | |||||||
| TYPE OF FOOD SOILS | Fresh, less dirty, coffee, milk, tea | Fresh coffee, milk, tea, cold meat, vegetables | Fresh coffee, milk, tea, cold meat, vegetables | Baked on soup, sauce, pastry, egg, rice, potato and meats cooked in oven, fried food | Fresh coffee, milk, tea, cold meat, vegetables | Detects contamination level of dishes and sets temperature and amount of washing water and washing period automatically | ||
| LEVEL OF FOOD SOILS | Small | Small | Medium | Medium | Medium | Small | High | High |
| AMOUNT OF DETERGENT A: 25GM/15GM B: 5GM | - | A: 15 | A: 25 B: 5 | A: 25 B: 5 | A: 25 B: 5 | A: 25 | A: 40 B: 5 | A: 40 B: 5 |
| Pre-wash | 40°C Wash | 30°C Wash | 65°C Wash | Pre-wash | Detects contamination level of dishes and sets temperature and amount of washing water and washing period automatically | |||
| Finish | Cold Rinse | 50°C Wash | Intermediate Rinse | 60°C Wash | ||||
| Hot Rinse | Cold Rinse | Hot Rinse | Cold Rinse | |||||
| End | Hot Rinse | End | Hot Rinse | |||||
| Dry | Dry | |||||||
| End | End | |||||||
| PROGRAM TIME (MINS) | 15 | 30 | 159 | 50 | 94 | 64 - 92 | 100 - 121 | 111 - 178 |
| POWER CONSUMPTION (KW HOUR) | 0.02 | 0.78 | 0.95 | 1.21 | 1.34 | 0.76 - 0.95 | 1.09 - 1.40 | 1.22 - 1.85 |
| WATER CONSUMPTION (LITRES) | 4.2 | 10.9 | 13.5 | 10.7 | 14.4 | 10.6 - 17.7 | 10.9 - 18.5 | 12.3 - 24.6 |
* Recommended program for normally soiled load.
** Only powder detergent should be used in the Rinse program.
At the end of the program, for improved drying results, it is recommended the door be opened approximately 50mm for some minutes before removing the dishes.

WARNING
Short programs do not include a drying step. The values declared above are the values obtained under laboratory conditions according to relevant standards. These values can change depending on conditions of product's use and environment (network tension, water pressure, water input temperature and environment temperature).
SWITCHING ON THE MACHINE AND SELECTING A PROGRAM
Switching on the machine
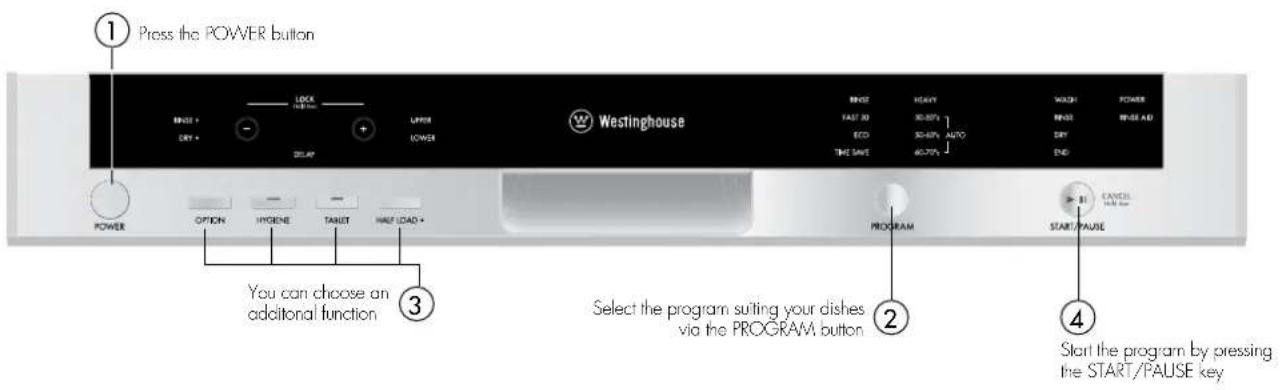
text_image
1 Press the POWER button RANGE + DRY + LOCK + - DELAY UPPER LOWER WESTINGHOUSE BNGE FAST 3D ECO THE SAVE HEAVY 30-50% 30-40% AUTO 60-70% WASH MAKE DRY END POWER OPTION HYGENE TAILET HAFT LOAD + You can choose an additional function 3 Select the program suiting your dishes via the PROGRAM button 2 PROGRAM START/PAUSE 4 Start the program by pressing the START/PAUSE keyProgress indicator
You can follow the program flow using the progress indicator lights located on the control panel.
text_image
During the washing cycle the WASH light is on Once completed the DRY light will illuminate and the machine will run silently whilst drying Westinghouse RHOZ FAST 3D ECO TIME SAVE SHORT AUTO 40-70% WASH RHOZ FAST 3D ECO TIME SAVE SHORT POWER RHOZ FAST 3D ECO TIME SAVE SHORT END POWER OPTION HYDENE TAKET HAPP LOAD + PROGRAM START/PAGE CANCE 100 gm Once the program is completed the END light comes on Do not open the dishwasher until this light comes onChanging a program
If you would like to change programs while a washing program is on.
text_image
If you would like to change programs while a washing program is on. Press the PAUSE/START button 1 BINEE + CRY + LOCK HOLD + - LIFRS POWER WESTINGHOUSE BINEE FAST 10 ECO THIS SANS HEAVY 20-50% 50-80% 60-70% AUTO AUTO POWER BINEE AD TRY AFTER THE PROGRAM STOPS, SELECT THE DESired program pressing the PROGRAM button PROGRAM START/PAUSE 2 3 Press the PAUSE/START button to start the selected new programCancelling a program
If you would like to cancel a program while a washing program is in progress.
text_image
Press and hold the START/PAUSE button for approx. 3 sec. until END light blinks 1 Washing POWER FAST 30 20-50% 1 ECD 55-40% AUTO THE SAVE 60-70% 1 END POWER OPTION HYGENE TABLET HALF LOAD + PROGRAM START/PAUSE After END light starts blinking, the water inside is discharged for approx. 30 sec. Once END light comes on, it means that the cycle has been cancelledSwitching the machine off

text_image
When the END light comes on, switch your machine off by using the POWER button Pull the plug out of the outlet. Turn off the water tap WESTINGHOUSE POWER OPTION HYCENE TABLET HALF LOAD + PROGRAM START/PAUSEi TIPS AND INFORMATION
NOTE: If the machine door is opened during washing or the power is cut off, the machine resumes the program when the door is shut or the power comes back.
NOTE: For better drying results, when the program has finished keep the door ajar for some minutes before you remove the dishes.
MAINTENANCE AND CLEANING
Switch off the power supply or disconnect the product before any maintenance or cleaning operation.
Cleaning the machine at regular intervals prolongs the machine's service life.
Oil and lime may accumulate in the machine's washing section. To clean the machine:
Fill the detergent compartment with detergent, do not load any dishes into the machine, select a program that runs at high temperature, and start the machine. Alternatively, use descaling material available in the market. (Dishwasher cleaners produced by detergent manufacturers.)
Cleaning the seals in the machine door
To clean any accumulated residues in the door seals, wipe the seals regularly by using a dampened cloth.
Cleaning the machine
Clean the filters and spray arms at least once a week. Unplug your machine and turn off its tap before starting the cleaning. Do not use abrasive materials when cleaning your machine. Wipe with a fine cleaning material and a dampened cloth.
Filters
Check if any food wastes have remained on the coarse and fine filters. If any food wastes is found, remove the filters and clean them thoroughly with water under the tap.
a. Micro Filter
b. Coarse Filter
c. Metal
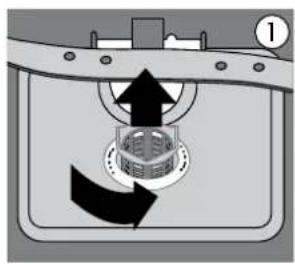
1 To remove and clean the filter combination (a+b), turn it counter clockwise and remove it by lifting upwards.
2 Pull and remove the metal filter (c).
3 Then pull the coarse filter (b) out of the micro filter. Rinse it with water under the tap and reassemble.
4 Relocate the Coarse/Micro filter (a) combination into the metal filter and turn it in the direction of the arrow. It is locked when the arrows on the micro filter can be seen on either side.
5 Reposition the metal filter in the machine.
6 Never use your dishwasher without any filter.
7 Incorrect fitting of the filter will reduce the washing effectiveness.
8 Clean filters are very important in terms of the proper running of the machine.
natural_image
Diagram of a mechanical device with a rotating button and directional arrows, no text or symbols present.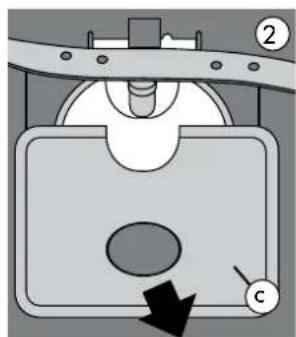
natural_image
Mechanical assembly diagram showing a component with labeled parts (no readable text or symbols)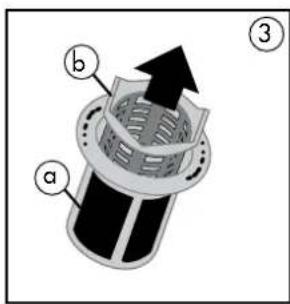
text_image
a b ③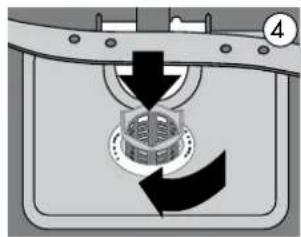
natural_image
Diagram of a mechanical device with a rotating component and directional arrows indicating motion (no text or symbols)MAINTENANCE AND CLEANING
Spray arms
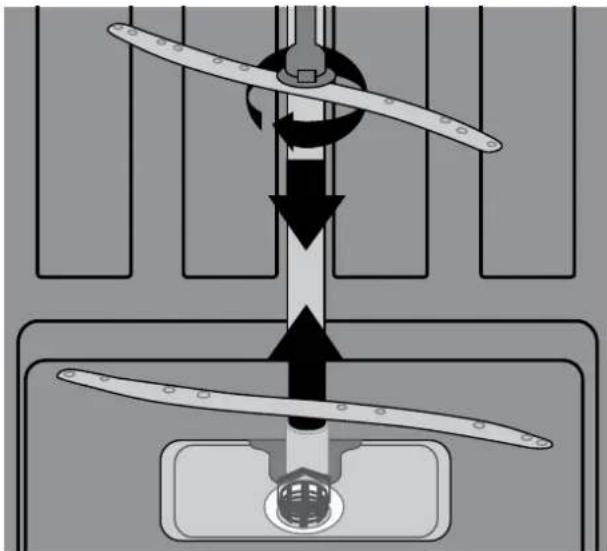
Check whether the holes for the upper and lower spray arms are clogged. If there is any clogging, remove the spray arms and clean them under water.
You can remove the lower spray arm by pulling it upwards, while the upper spray arm can be removed by turning the lock nut to the left. Be sure that the nut is tightened when refitting the upper spray arm.
natural_image
Diagram of a mechanical device with rotating blades and a central hub, showing directional flow (no text or symbols)Hose filter
The inlet hose filter reduces contamination (sand, clay, rust etc.) that might be occasionally carried in through the main's water supply or the indoor plumbing, and avoids damage to dishwasher components. Check the filter and the hose from time to time and clean them if necessary. To clean the filter, first turn off your tap and then remove the hose. After removing the filter from the hose, clean it under the tap. Insert the cleaned filter back into its place inside the hose. Refit the hose and check that there are no leaks.
FAILURE CODES AND WHAT TO DO IN CASE OF FAILURE
| ERROR CODE ERROR DESCRIPTION CONTROL | |
| F1 Leak detection | Switch off the dishwasher and close the tapContact the service centre. |
| F2 Draining fault | Cancel program and power off machine, then check the followingSpigot on sink trap is cloggedCheck if the drain spigot membrane has been removedDrain hose is cloggedFilters of the dishwasher may be cloggedIf error continues contact the service centre. |
| F3 Water overfill | Close the tapContact the service centre. |
| F5 Water supply fault | Make sur e the water tap is open and the main water supply is onClose he tap, disconnect the hose and clean the filter at the tap connection endCheck the inlet hose is not kinkedIf error continues contact the service centre. |
| F6 Faulty heater sensor | Contact the service centre. |
| F7 Overheating (water temperature too high) | Contact the service centre. |
| F8 Not heating | Contact the service centre. |
| F9 Flow control position error | Contact the service centre. |
| FE Power supply fault | Restart the dishwasher. |
| H01 – H24 Delay has been selected | Cancel the delay setting. |
PRACTICAL AND USEFUL INFORMATION
1 Whenever you will not be operating your machine:
- Unplug the machine and then turn the water off.
- Leave the door slightly ajar in order to prevent the formation of unpleasant odours.
- Keep the machine interior clean.
2 Eliminating water droplets:
- Wash the dishes with the intensive program.
- Increase the rinse aid setting.
- If plastic items are washed, water drops on these items will be unavoidable. Programs with higher temperatures and increased rinse aid settings may reduce the water drops. Check that the plastic items are suitable for dishwasher use.
3 Correctly loaded dishes will give the best energy consumption, washing and drying performance.
4 Scrape off food soils before you place dirty dishes in the machine.
5 Operate the machine after it is completely full.
6 Use pre-washing program only when necessary.
7 Observe program information and average consumption values table when selecting a program.
8 Since the machine will reach high temperatures, it should not be installed near a refrigerator.
9 If the appliance is located where the risk of freezing exists, you must completely drain the water that has remained in the machine. Turn off the water tap, disconnect the water inlet hose from the tap and allow the interior water to drain.
TROUBLESHOOTING
| PROBLEM SOLUTION | |
| If one of program monitor lights is on and start/pause light is flashing | ·Your machine's door is open, shut the door. |
| If the program won't start ·Check if the plug is connected. | ·Check your indoor fuses.·Be sure that the water inlet tap is turned on.·Be sure that you have closed the machine door.·Be sure that you switched off the machine by pressing the Power On/Off button.·Be sure that the water inlet filter and the machine filters are not clogged.·First time use: Check if the drain spigot's membrane has been removed or spigot blocked.·Check if the delay start has been selected - reset. |
| If detergent residues are left in the detergent compartment | ·Detergent has been added when the detergent compartment was wet.·A large dish in the lower basket has blocked the dispenser door. |
| If water is left inside the machine at the end of the program | ·The water drain hose is clogged or twisted.·The filters are clogged.·The program is not finished yet. |
| If the machine stops during a wash operation | ·Power failure.·Water inlet failure.·Program can be on standby mode. |
| If shaking and hitting noises are heard during a wash operation | ·Dishes placed incorrectly.·Spray arm hitting the dishes. |
| If there are partial food wastes left on the dishes | ·Dishes placed incorrectly into the machine, sprayed water did not reach related places.·Basket over loaded.·Dishes leaning against one another.·Very small amount of detergent added.·An unsuitable, rather weak wash program selected.·Spray arm clogged with food wastes.·Filters clogged.·Filters incorrectly fitted.·Water drain pump clogged. |
| If there are whitish stains on the dishes ·A very small amount of detergent is being used.·Rinse aid dosage setting at a very low level. | |
| If the dishes won't dry up ·A program without a dry operation selected.·Rinse aid dosage set too low.·Dishes unloaded too fast. | |
| If there are rust stains on the dishes ·Stainless-steel quality of the dishes washed is insufficient.·Unhealthy mains grounding. | |
Call an authorised service centre if the problem still persists after the controls or in case of any malfunction not described above.
NOTES
This document sets out the terms and conditions of the product warranties for Electrolux Appliances. It is an important document. Please keep it with your proof of purchase documents in a safe place for future reference should you require service for your Appliance.
1. In this warranty:
(a) ‘acceptable quality’ as referred to in clause 10 of this warranty has the same meaning referred to in the ACL;
(b) 'ACL' means Schedule 2 of the Competition and Consumer Act 2010;
(c) 'Appliance' means any Electrolux product purchased by you and accompanied by this document;
(d) 'ASC' means Electrolux authorised service centres;
(e) 'Electrolux' means Electrolux Home Products Pty Ltd of 163 O'Riordan Street, Mascot NSW 2020, ABN 51 004 762 341 in respect of Appliances purchased in Australia and Electrolux (NZ) Limited (collectively 'Electrolux') of 3-5 Niall Burgess Road, Mount Wellington, in respect of Appliances purchased in New Zealand;
(f) ‘major failure’ as referred to in clause 10 of this warranty has the same meaning referred to in the ACL and includes a situation when an Appliance cannot be repaired or it is uneconomic for Electrolux, at its discretion, to repair an Appliance during the Warranty Period;
(g) 'Warranty Period' means the Appliance is warranted against manufacturing defects in Australia for 24 months and in New Zealand for 24 months, following the date of original purchase of the Appliance;
(h) 'you' means the purchaser of the Appliance not having purchased the Appliance for re-sale, and 'your' has a corresponding meaning.
-
This warranty only applies to Appliances purchased and used in Australia or New Zealand and used in normal domestic applications and is in addition to (and does not exclude, restrict, or modify in any way) any non-excludable statutory warranties in Australia or New Zealand.
-
During the Warranty Period Electrolux or its ASC will, at no extra charge if your Appliance is readily accessible for service, without special equipment and subject to these terms and conditions, repair or replace any parts which it considers to be defective. Electrolux or its ASC may use remanufactured parts to repair your Appliance. You agree that any replaced Appliances or parts become the property of Electrolux. This warranty does not apply to light globes, batteries, filters or similar perishable parts.
-
Parts and Appliances not supplied by Electrolux are not covered by this warranty.
-
To the extent permitted by law, you will bear the cost of transportation, travel and delivery of the Appliance to and from Electrolux or its ASC. If you reside outside of the service area, you will bear the cost of:
(a) travel of an authorised representative;
(b) transportation and delivery of the Appliance to and from Electrolux or its ASC.
In all instances, unless the Appliance is transported by Electrolux or an Electrolux authorised representative, the Appliance is transported at the owner's cost and risk while in transit to and from Electrolux or its ASC.
-
Proof of purchase is required before you can make a claim under this warranty.
-
You may not make a claim under this warranty unless the defect claimed is due to faulty or defective parts or workmanship. Electrolux is not liable in the following situations (which are not exhaustive):
(a) the Appliance is damaged by:
(i) accident
(ii) misuse or abuse, including failure to properly maintain or service
(iii) normal wear and tear
(iv) power surges, electrical storm damage or incorrect power supply
(v) incomplete or improper installation
(vi) incorrect, improper or inappropriate operation
(vii) insect or vermin infestation
(viii) failure to comply with any additional instructions supplied with the Appliance;
(b) the Appliance is modified without authority from Electrolux in writing;
(c) the Appliance's serial number or warranty seal has been removed or defaced;
(d) the Appliance was serviced or repaired by anyone other than Electrolux, an authorised repairer or ASC.
-
This warranty, the contract to which it relates and the relationship between you and Electrolux are governed by the law applicable where the Appliance was purchased. Where the Appliance was purchased in New Zealand for commercial purposes the Consumer Guarantee Act does not apply.
-
To the extent permitted by law and subject to your non-excludable statutory rights and warranties, Electrolux excludes all warranties and liabilities (other than as contained in this document) including liability for any loss or damage whether direct or indirect arising from your purchase, use or non use of the Appliance.
-
For Appliances and services provided by Electrolux in Australia, the Appliances come with a guarantee by Electrolux that cannot be excluded under the ACL. You are entitled to a replacement or refund for a major failure and for compensation for any other reasonably foreseeable loss or damage. You are also entitled to have the Appliance repaired or replaced if the Appliance fails to be of acceptable quality and the failure does not amount to a major failure. The benefits to you given by this warranty are in addition to your other rights and remedies under a law in relation to the Appliances or services to which the warranty relates.
-
At all times during the Warranty Period, Electrolux shall, at its discretion, determine whether repair, replacement or refund will apply if an Appliance has a valid warranty claim applicable to it.
-
For Appliances and services provided by Electrolux in New Zealand, the Appliances come with a guarantee by Electrolux pursuant to the provisions of the Consumer Guarantees Act, the Sale of Goods Act and the Fair Trading Act.
-
To enquire about claiming under this warranty, please follow these steps: (a) carefully check the operating instructions, user manual and the terms of this warranty;
(b) have the model and serial number of the Appliance available;
(c) have the proof of purchase (e.g. an invoice) available;
(d) telephone the numbers shown below. -
You accept that if you make a warranty claim, Electrolux and its ASC may exchange information in relation to you to enable Electrolux to meet its obligations under this warranty.
Important Notice
Before calling for service, please ensure that the steps listed in clause 13 above have been followed.
| FOR SERVICEor to find the address of your nearest state service centre in AustraliaPLEASE CALL 13 13 49For the cost of a local call (Australia only) | SERVICE AUSTRALIAELECTROLUX HOME PRODUCTSelectrolux.com.au | FOR SPARE PARTSor to find the address of your nearest state spare parts centre in AustraliaPLEASE CALL 13 13 50For the cost of a local call (Australia only) |
| FOR SERVICEor to find the address of your nearest authorised service centre in New ZealandFREE CALL 0800 10 66 10(New Zealand only) | SERVICE NEW ZEALANDELECTROLUX (NZ) Limitedelectrolux.co.nz | FOR SPARE PARTSor to find the address of your nearest state spare parts centre in New ZealandFREE CALL 0800 10 66 20(New Zealand only) |
For more information on all Westinghouse appliances, or for dimension and installation information, call into your retailer, phone or email our customer care team or visit our website:
AUSTRALIA
phone: 1300 363 640
fax: 1800 350 067
email: customercare@electrolux.com.au
web: westinghouse.com.au
NEW ZEALAND
phone: 0800 436 245
fax: 0800 225 088
email: customercare@electrolux.co.nz
web: westinghouse.co.nz
TOP SERVICE
Top Service encompasses the after sales service provided by The Electrolux Group to consumers including delivery, home service and spare parts.
P/No: 5208 2734 Issue: E
W and WESTINGHOUSE are trademarks of Westinghouse Electric Corporation. Used under license by Electrolux Home Products Pty Ltd. All Rights Reserved.
© 2016 Electrolux Home Products Pty Ltd. WMAN_WSF6608_Oct16