
GV 1510LWC2/1-S - Washing machine CANDY - Free user manual and instructions
Find the device manual for free GV 1510LWC2/1-S CANDY in PDF.


| Product Type | Washing machine |
| Brand | Candy |
| Model | GV 1510LWC2/1-S |
| Power Supply | 220-240 V, 50 Hz, 10 A fuse |
| Water Pressure | 0.05 MPa (min) - 0.8 MPa (max) |
| Maximum Spin Speed | 1000 rpm |
| Maximum Load Capacity | 10 kg (dry clothes) |
| Programmes | Perfect 20°C Mix & Wash, Intensive 40°, Hygiene 60°, Perfect Rapid 59 min, Rapid 30 min, Rapid 14 min, Baby, Rinse, Drain + Spin, Hand/Silk, Wool, Delicates, Mixed, Cottons (40°C and 60°C), Whites |
| Special Features | Mix Power System+, Stain Level (3 levels), Prewash, Hygiene Plus, Extra Rinse, Easy Iron, Memory (2 custom programmes), Night & Day, Key Lock, Delay Start (up to 24h), Kg Check system |
| Display | Digital display with indicators for door lock, spin speed, temperature, cycle duration, stain level, extra rinses, options, Wi-Fi (on some models), delay start, kg check, memory, key lock, tap closed, filter blocked, standard cotton programmes |
| Water Connection | Cold water only or Hot&Cold (grey tube for cold, red for hot). AQUASTOP and AQUAPROTECT supply tube options available |
| Detergent Drawer | 3 compartments: prewash (1), main wash (2), additives (☐). Liquid detergent cup included in some models |
| Maintenance | Clean drawer and filter regularly; drain hose and filter cleaning instructions provided |
| Safety | Door lock, child safety (key lock), anti-flood devices, CE compliant |
| Installation | Requires removal of transport screws and shims, leveling feet, drain hose connection at min 50 cm height |
| Spare Parts | Original spare parts available through Candy Customer Service Centre |
| Warranty | Standard warranty with registration at www.registercandy.com |
| Energy Efficiency | Standard cotton programmes (40°C and 60°C) are most efficient; ErP directive compliant |
| Noise and Vibration | Electronic device prevents spin cycle if load unbalanced; night mode reduces spin speed to 400 rpm |
Frequently Asked Questions - GV 1510LWC2/1-S CANDY
User questions about GV 1510LWC2/1-S CANDY
0 question about this device. Answer the ones you know or ask your own.
Ask a new question about this device
Download the instructions for your Washing machine in PDF format for free! Find your manual GV 1510LWC2/1-S - CANDY and take your electronic device back in hand. On this page are published all the documents necessary for the use of your device. GV 1510LWC2/1-S by CANDY.
USER MANUAL GV 1510LWC2/1-S CANDY
Thank-you for choosing a Candy washing machine. We are confident it will loyall assist you in safely washing your clothes even delicates, day after day.
You can register your product at www.registercandy.com to gain faster access to supplementary services solely reserved to our most loyal customers.
Carefully read this manual for correct and safe appliance use and for helpful tips of efficient maintenance.

Only use the washing machine arefully reading these instructions. We recommend you always keep this manual on hand and in good conditions for any future owners.
Please check that the appliance is delivered with this instruction manual, warranty certificate, service centre address and energy efficiency label. Also check that plugs, curve for drain hose and liquid detergent or bleach tray (only on some models) are included. We recommend you keep all these components.
Each product is identified by a unique 16-character code, also called the "serial number", printed on the sticker affixed to the appliance (porthole area) or in the document envelope found inside the product. This code is a sort of specific product ID card that you will need to register it and should you need to contain the Candy Customer Service Centre.
Environmental conditions

This appliance is marked according to the European directive 2002/96/EC on Waste Electrical and Electronic Equipment (WEEE).
By ensuring this product is disposed of correctly, you will help prevent potential negative consequences for the environment and human health, which could otherwise be caused by inappropriate waste handling of this product.
The symbol on the product indicates that this product may not be treated as household waste. Instead it shall be handed over to the applicable collection point for the recycling of electrical and electronic equipment.
Disposal must be carried out in accordance with local environmental regulations for waste disposal.
For more detailed information about treatment, recovery and recycling of this product, please contact your local city office your household waste disposal service or the shop where you purchased the product.
Contents
- GENERAL SAFETY RULES
- INSTALLATION
- PRACTICAL TIPS
- MAINTENANCE AND CLEANING
- QUICK USER GUIDE
- CONTROLS AND PROGRAMS
- CUSTOMER SERVICE CENTRE AND WARRANTY
1. GENERAL SAFETY RULES
● This appliances is intended to be used in household and similar applications such as:
- Staff kitchen areas in shops, offices and other working environments; - Farm houses;
- By clients in hotels, motels and other residential type environments;
- Bed and breakfast type environments. A different use of this appliance from household environment or from typical housekeeping functions, as commercial use by expert or trained users, is excluded even in the above applications. If the appliance is used in a manner inconsistent with this it may reduce the life of the appliance and may void the manufacturer's warranty. Any damage to the appliance or other damage or loss arising through use that is not consistent with domestic or household use (even if located in a domestic or household environment) shall not be accepted by the manufacturer to the fullest extent permitted by law.
- This appliance can be used by children aged from 8 years and above and persons with reduced physical, sensory or mental capabilities or lack of experience and knowledge if they have been given supervision or instruction concerning use of the appliance in a safe way and understand the hazards involved.
Children shall not play with the appliance. Cleaning and user maintenance shall not be made by children without supervision.
● Children should be supervised to ensure that they do not play with the appliance.
● Children of less than 3 years should be kept away unless continuously supervised.
- If the supply cord is damaged, it must be replaced by the manufacturer, its service agent or similarly qualified persons in order to avoid a hazard.
- Only use the hose-sets supplied with the appliance for the water supply connection (do not reuse old hose-sets).
● Water pressure must be between 0,05 MPa and 0,8 MPa.
● Make sure that a carpet do not obstruct the base of the machine and ventilation openings.
- The OFF condition is reached by placing the reference mark on the programmes control/knob in the vertical position. Any other different position of such control sets the machine in ON condition.
● After installation, the appliance must be positioned so that the plug is accessible.
● The maximum load capacity of dry clothes depends on the model used (see control panel).
● To consult the product fiche please refer to the manufacturer website.
Safety instructions
- Before cleaning or maintaining the washing machine, unplug the appliance and turn off the water faucet.
● Make sure the electrical system is grounded. Otherwise, seek qualified professional assistance. - Please do not use converters, multiple sockets or extension cords.

WARNING:
water may reach very high temperatures during the wash cycle.
● Make sure there is no water in the drum before opening the porthole.
- Do not pull on the power cord or appliance to unplug the machine.
- Do not expose the washing machine to rain, direct sunlight or other weather elements.
- When moving, do not lift the washing machine by the knobs or detergent drawer; during transport, never rest the porthole on the trolley. We recommend two people lift the washing machine.
- In the event of fault and/or malfunction, turn off the washing machine, close the water faucet and do not tamper with the appliance.
Immediately contact the Customer Service Centre and only use original spare parts. Failure to observe these instruction may jeopardise appliance safety.
CE Appliance complies with European Directives: ● 2006/95/EC (LVD); ● 2004/108/EC (EMC); ● 2009/125/EC (ErP); ● 2011/65/EU (RoHS) and subsequent amendments.
2. INSTALLATION
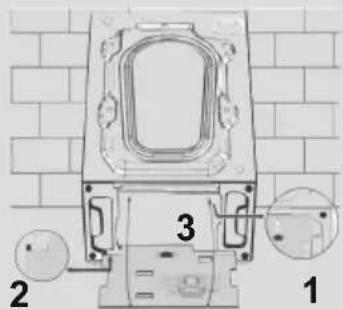
- Cut the tube straps, being careful not to damage the tube and power cord.
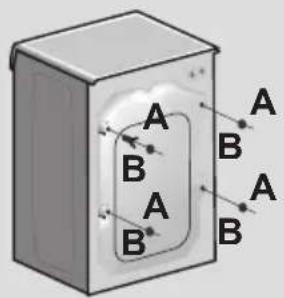
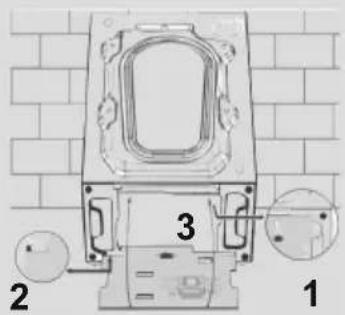
● Unscrew the 2 or 4 screws (A) on the back and remove the 2 or 4 shims (B) as illustrated in figure 1. - Close the 2 or 4 holes using the plugs included in the instruction envelope.
- If the washing machine is built-in, after cutting the hose straps, unscrew the 3 or 4 screws (A) and remove the 3 or 4 shims (B).
- In some models, 1 or more shims will fall inside the machine: tilt the washing machine forward to remove them. Close the hole using the plugs found in the envelope.

WARNING:
keep packaging materials away from children.
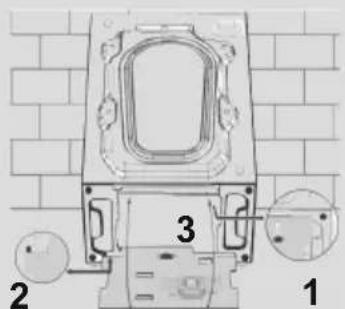
- Place the polionda sheet on the bottom as shown in figure 2 (according to the model, consider version A, B or C).
1
natural_image
Diagram of a device with internal components and an inset view showing a close-up of a component (no text or symbols present)C
text_image
1 2 3Hydraulic connections
- Connect the water tube to the faucet, only using the drain tube supplied with the washing machine (fig. 3).
DO NOT OPEN THE FAUCET.
● Some models may include one or more of the following features:
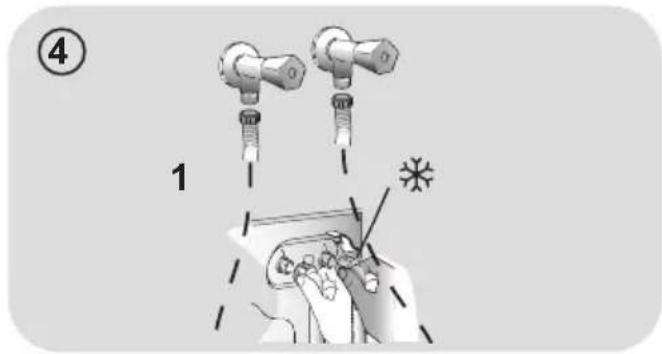
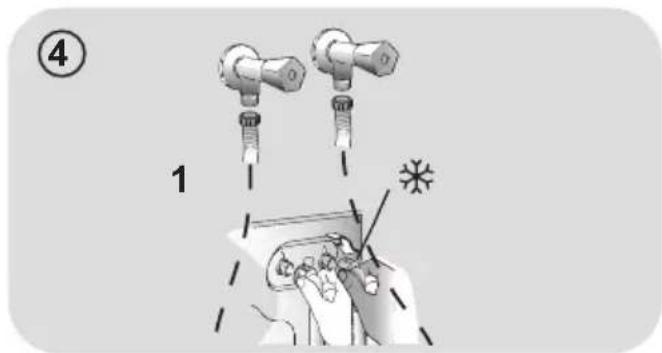
● HOT&COLD (fig. 4):
water mains connection settings with hot and cold water for higher energy savings. Connect the grey tube to the cold water faucet ✦ and the red one to the hot water faucet. The machine can be connected to the cold water faucet only: in this case some programs may start a few minutes later.
● AQUASTOP (fig. 5):
a device located on the supply tube th stops water flow if the tube deteriorate in this case, a red mark will appear in the window "A" and the tube must be replaced. To unscrew the nut, press th one-way lock device "B".
● AQUAPROTECT – SUPPLY TUBE WITH GUARD (fig. 6):
Should water leak from the primary internal tube "A", the transparent containment sheath "B" will contain water to permit the washing cycle to complete. At the end of the cycle, contact the Customer Service Centre to replace the supply tube.
Setting
● Near the washing machine to the wall, being careful that the tube is not bent or crushed, and place the drain tube in the tub or, preferably, connect it to a wall drain at least 50 cm high with diameter greater than the washing machine tube (fig. 7).

text_image
Diagram showing a hand holding a doorbell with a valve, illustrating the step of cleaning or repair.z
text_image
④ 1 *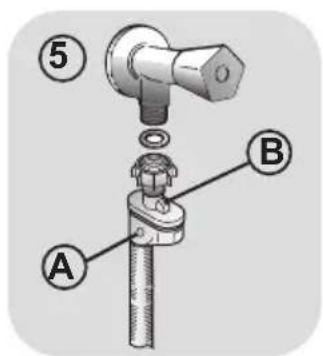
text_image
Technical diagram of a mechanical valve assembly with labeled parts A, B, and numbered components ⑤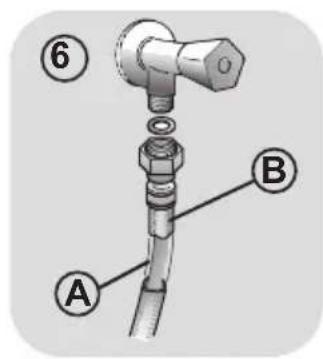
text_image
⑥ A B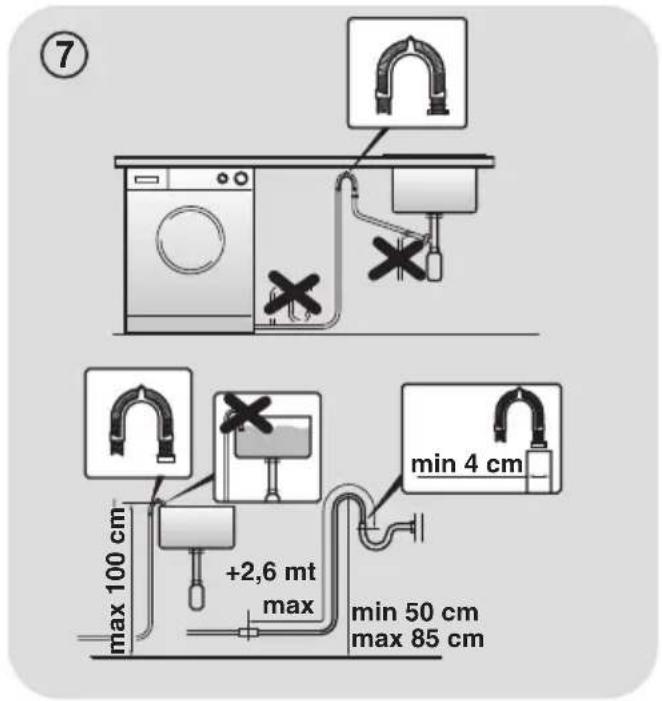
text_image
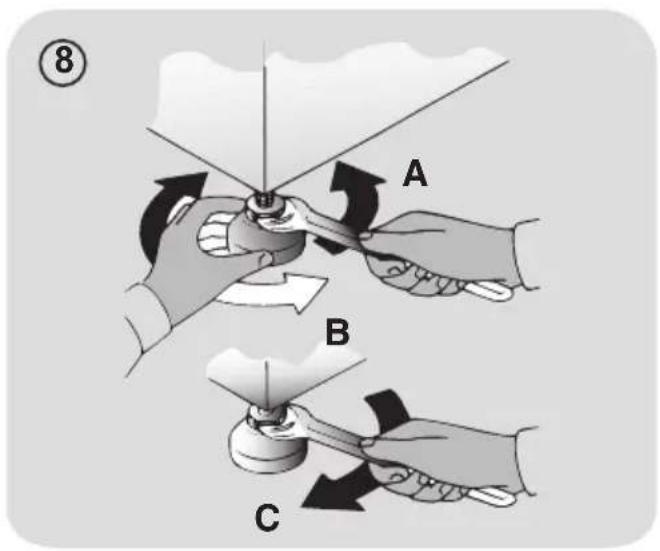
⑦ max 100 cm +2,6 mt max min 4 cm min 50 cm max 85 cm● Level the appliance using the feet as illustrated in figure 8:
a. turn the nut clockwise to release the screw;
b. rotate the foot to raise or lower it until it adheres to the floor;
c. lock the foot, screwing in the nut, until it adheres to the bottom of the washing machine.
- Plug in the appliance.

WARNING:
contact the Customer Service Centre should the power cord need replacement.
Detergent drawer
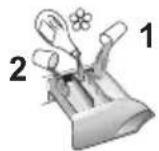
The detergent draw is split into 3 compartments as illustrated in figure 9:
● compartment "1": for prewash detergent;
- compartment “☐”: for special additives, softeners, starch fragrances, etc.;

WARNING:
only use liquid products; the washing machine is set to automatically dos additives at each cycle during the last rinse.
● compartment "2": for washing detergent.
A liquid detergent cup is also included in some models (fig. 10). To use it, place it in compartment "2". This way, liquid detergent will only enter the drum at the right time. The cup can also be used for bleach when the "Rinse" program is selected.

WARNING:
some detergents are hard to remove In this case we recommend using the specific container to be placed in the drum (example in figure 11).
text_image
⑧ A B C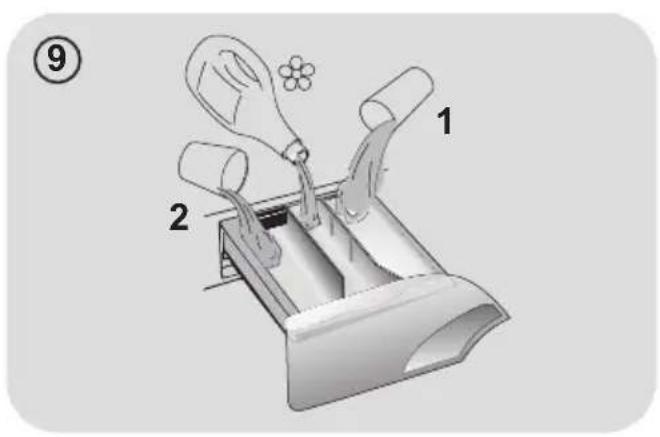
text_image
Diagram showing a mechanical device with labeled parts, including a tool and two washers, marked with numbers 1 and 2.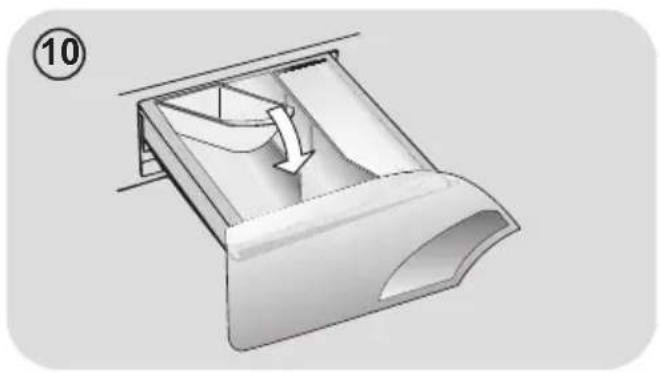
natural_image
3D mechanical component diagram showing a curved internal structure with an arrow indicating direction (no text or symbols)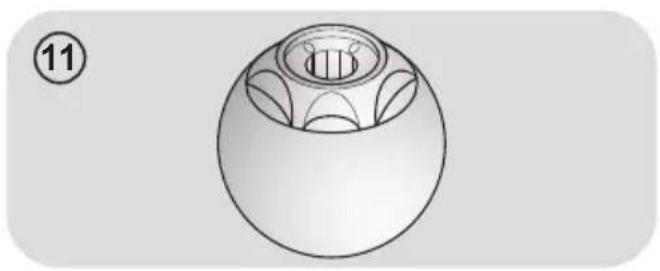
natural_image
Technical line drawing of a mechanical component with a circular top and flanged base (no text or symbols)3. PRACTICAL TIPS
Load tips
WARNING: when sorting laundry, make sure:
- have eliminated metallic objects such as barrettes, pins, coins, from laundry;
- to have buttoned pillow cases, closed zips, tied loose belts and long robe ribbons;
- to have removed rollers from curtains;
- to have carefully read clothing washing labels;
-
to have removed any persistent stains using specific detergents.
-
When washing rugs, bedcovers or other heavy clothing, we recommend you avoid centrifuging.
- To wash wool, make sure the item can be machine washed and marked by the "Pure virgin wool" symbol with the "Does not mat" or "Machine washable" label.
Helpful suggestions for the user
A guide environmentally friendly and economic use of your appliance.
Maximise The Load Size
- Achieve the best use of energy, water, detergent and time by using the recommended maximum load size.
Save up to 50% energy by washing a full load instead of 2 half loads.
Do you need to pre-wash?
- For heavily soiled laundry only! SAVE detergent, time, water and between 5 to 15% energy consumption by NOT selecting Prewash for slight to normally soiled laundry.
Is a hot wash required?
- Pretreat stains with stain remover or soak dried in stains in water before washing to reduce the necessity of a hot wash programme.
Save up to 50% energy by using a 60°C wash programme.
Following is a quick guide with tips and recommendations on detergent use at the various temperatures. In any case, always read the instructions on the detergent for correct use and doses.
When washing heavily soiled whites, we recommend using cotton programs of 60^ C or above and a normal washing powder (heavy duty) that contains bleaching agents that at medium/high temperatures provide excellent results.
For washes between 40°C and 60°C the type of detergent used needs to be appropriate for the type of fabric and level of soiling.
Normal powders are suitable for “white” or colour fast fabrics with high soiling, while liquid detergents or “colour protecting” powders are suitable for coloured fabrics with light levels of soiling.
For washing at temperatures below 40^ C we recommend the use of liquid detergents or detergents specifically labeled as suitable for low temperature washing.
For washing wool or silk, only use detergents specifically formulated for these fabrics.
4. MAINTENANCE AND CLEANING
To clean the washing machine exterior, use a damp cloth, avoiding abrasives, alcohol and/or solvents. The washing machine does not require any special care for ordinary cleaning: clean drawer compartments and the filter; some tips on how to move the machine or on long periods of disuse are provided below.
Drawer cleaning
- We recommend you clean the drawer to avoid accumulating detergent and additive residue.
● To do this, extract the drawer using slight force, clean it with running water and reinsert it in its housing.
Filter cleaning
● The washing machine comes with a special filter able to trap large residue, such as buttons or coins, which could clog the drain.
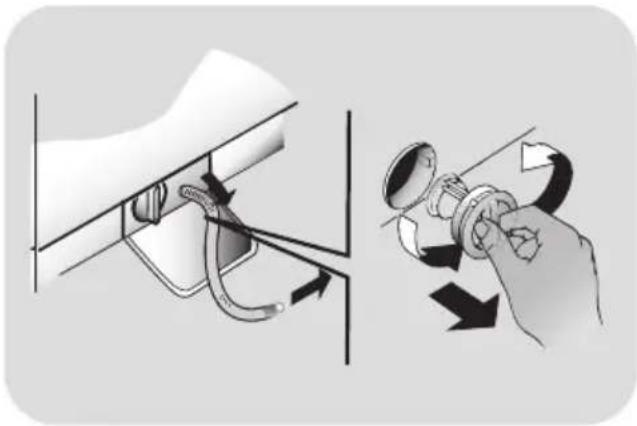
- Only available on certain models: pull out the corrugated hose, remove the stopper and drain the water into a container.
● Before unscrewing the filter, we recommend you place an absorbent cloth under it to keep the floor dry.
● Turn the filter counter-clockwise to the limit stop in the vertical position.
- Remove and clean the filter; when finished, replace it turning it clockwise.
- Repeat the previous steps in reverse order to reassemble all parts.
natural_image
Illustration showing a hand adjusting a pipe fitting with directional arrows (no text or symbols)Suggestions for moves or prolonged disuse
● Should the washing machine be stored in an unheated room for a long period of time, drain all water from tubes.
● Unplug the washing machine.
- Detach the tube from the strap and lower it, fully draining water into a bowl.
- Secure the drain tube with the strap when finished.
5. QUICK USER GUIDE
This washing machine automatically adapts the level of the water to the type and quantity of washing. This system gives a decrease in energy consumption and a sensible reduction in washing times.
Program selection
- Turn on the washing machine and select the required program.
- Adjust the washing temperature if necessary and press the required "option" buttons.
- Press the START/PAUSE button to start washing.
Should power go out when the washing machine is running, a special memory saves the settings and, when power returns, the machine resumes the cycle from where it left off.
● The message "end" will appear on the display or the corresponding led will turn on at the end of the program.
Wait until the porthole locked light turns off: about 2 minutes after the program ends.
● Turn off the washing machine.
For any type of wash, see the program table and follow the operating sequence as indicated.
Technical data
Water pressure:
min 0,05 Mpa
max 0,8 Mpa
Spin r.p.m.:
See rating plate.
Power input / Power current fuse amp / Supply voltage:
See rating plate.
6. CONTROLS AND PROGRAMS
text_image
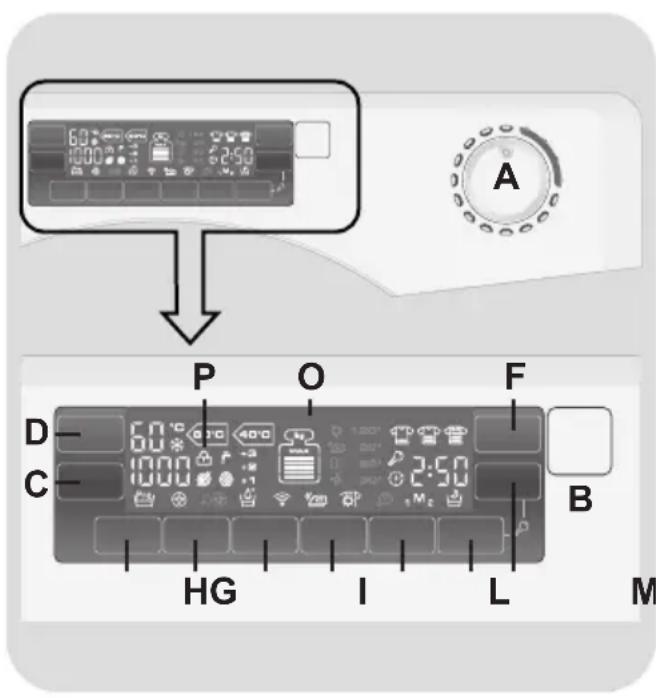
60 1000 2:50 A P O F D- 1000 3:50 C- B HG I L MA Programme selector with OFF position
B START/PAUSE button
C SPIN SELECTION button
D TEMPERATURE SELECTION button
E DELAY START button
F STAIN LEVEL button
G PREWASH button
H HYGIENE PLUS button
I EXTRA RINSE button
L EASY IRON button
M MEMORY button
N NIGHT & DAY button
O Digital display
P DOOR LOCKED indicator light
E+N KEY LOCK

WARNING:
Don't touch the display while inserting the plug because the machines calibrates the systems during the first seconds: touching the display, the machine couldn't work property. In this case, remove the plug and repeat the operation.
The programme selector must be returned to the OFF position at the end of each cycle or when starting a subsequent wash cycle prior to the next programme being selected and started.
START/PAUSE button
Opening the door
A special safety device prevents the door from being opened immediately after the end of the cycle.
Wait for 2 minutes after the wash cycle has finished and the "Door Security" light has gone out before opening the door.
Close the door BEFORE selecting the button START/PAUSE.
- Press to start the selected cycle.
When the START/PAUSE button has been pressed, the appliance can take few seconds before it starts working.
Programme selector with OFF position
When the programme selector is turned the display lights up to show the settings for the programme selected.
For energy saving, at the end of the cycle or with an inactivity period, the display level contrast will decrease.
N.B.: To switch the machine off, turn the programme selector to the OFF position.
- Press the START/PAUSE button to start the selected cycle.
- Once a programme is selected the programme selector remains stationary on the selected programme till cycle ends.
- Switch off the washing machine by turning the selector to OFF.
ADD OR REMOVE ITEMS AFTER THE PROGRAMMES HAS STARTED (PAUSE)
- Press and hold the START/PAUSE button for about 2 seconds (some indicator light and the time remaining indicator will flash, showing that the machine has been paused).
● Wait 2 minutes until the safety device unlocks the door.
● After you have added or removed items, close the door and press the START/PAUSE button (the programme will start from where it left off).
CANCELLING THE PROGRAMME
- To cancel the programme, set the selector to the OFF position.
The option buttons should be selected before pressing the START/PAUSE button.
If an option is selected that is not compatible with the selected programme then the option indicator first flashes and then goes off.
SPIN SELECTION button
- By pressing this button, it is possible to reduce the maximum speed, and if you wish, the spin cycle can be cancelled.

spin speed cancelled.
- To reactivate the spin cycle press the button until you reach the spin speed you would like to set.
To prevent damage to the fabrics, it is not possible to increase the speed over that which is automatically suitable during the selection of the program.
- It is possible to modify the spin speed without pausing the machine.
The machine is fitted with a special electronic device, which prevents the spin cycle should the load be unbalanced.
This reduces the noise and vibration in the machine and so prolongs the life of your machine.
TEMPERATURE SELECTION button
● This button allows you to change the temperature of the wash cycles.

cold wash.
- It is not possible to raise the temperature over the maximum allowed for every programme, in order to save the fabrics.
DELAY START button
● This button allows you to pre-programme the wash cycle to delay the start of the cycle for up to 24 hours.
● To delay the start use the following procedure:
- Set the required programme.
- Press the button once to activate it (h00 appears on the display) and then press it again to set a 1 hour delay (h01 appears on the display). The pre-set delay increases by 1 hour each time the button is pressed, until h24 appears on the display, at which point pressing the button again will reset the delay start to zero.
- Confirm by pressing the START/PAUSE button (the light on the display starts to flash). The countdown will begin and when it has finished the programme will start automatically.
- It is possible to cancel the delay start by turning the programme selector to OFF.
If there is any break in the power supply while the machine is operating, a special memory stores the selected programme and, when the power is restored, it continues where it left OFF
STAIN LEVEL button
- By selecting this button there is a choice of 3 levels of wash intensity, depending on how much the fabrics are soiled (can be used only on some programmes as shown in the table of programmes).
- Once the programme has been selected the indicator light will automatically show the stain level set for that programme.
- Selecting a different stain level the relevant indicator will light up.
PREWASH button
- This option allows you to make a prewash and it is particularly useful for heavily soiled loads (can be used only of some programmes as shown in the table of programmes).
- We recommend you use only 20% of the recommended quantities shown on the detergent pack.
HYGIENE PLUS button
With this option it is possible to hygienize the clothes, the washing programme reach a temperature of 60^ C.
EXTRA RINSE button
- This button allows you to add rinses at the end of the washing cycle. The maximum number of extra rinses is related to the programme selected.
● This function has been studied for the people with delicate and sensitive skin, for which also a least residue of detergent can cause irritations or allergies. - It advises to also use this function for the children items and in case of washings of very dirty items, for which it is due to use a lot of detergent, or in the washing of toweling items whose fibres mostly have the tendency to hold the detergent.
EASY IRON button
This function allows you to minimize creases as much as possible, eliminating the intermediate spins or reducing the intensity of the last one.
MEMORY button
onThis function allows you to save the settings of your two favourite personalised programmes, including the temperature, spin speed and soil level, so you can recall them quickly.
How to memorize a programme for the first time:
1) Select the programme and the options you want.
2) Press the MEMORY button, choosing either M1 or M2. You should choose M1 if this is the first programme you have saved.
3) Keep your finger on the MEMORY button for about 3 seconds to save the combination in the chosen position.
Memorize a new programme when M1 & M2 already have programmes saved:
1) Set the programme and the options you want.
2) Press the MEMORY button for about 3 seconds to save the combination in the position M1. The pre-existing saved programme in M1 will move in the position M2.
Start a program that is already memorized
- Press briefly the MEMORY button (once for M1, twice for M2) and press the START/PAUSE button.
- Once you recall a memorized program, you can still change its options and settings, pressing the corresponding keys. In this case, the added options won't be memorized.
If you accidentally select a memorized program, simply turn the program knob to select another one.
NIGHT & DAY button
- This option reduces the intermediate spin speed to 400 rpm, where applicable, increase the water level during rinsing and keep the laundry immersed in water after the final rinse, in order to spread the fiber perfectly.
● During the phase in which the water is held in the tub, the relevant indicator light blink to show that the machine is at a standstill. - Deselect the option to end the cycle with a spin dry (which may be reduced or cancelled using the appropriate button) and emptying phase.
- Thanks to electronic control, the water in the intermediate phases is emptied silently, making this option very useful for washing at night.
KEY LOCK
- Pressing simultaneously the buttons NIGHT & DAY and DELAY START for about 3 seconds, the machine allows you to lock the keys. In this way, you can avoid making accidental or unwanted changes if a button on the display is pressed accidentally during a cycle.
- The key lock can be simply cancelled by pressing the two buttons simultaneously again or by turning the program knob to OFF.
N
Digital Display
The display's indicator system allows you to be constantly informed about the status of the machine.
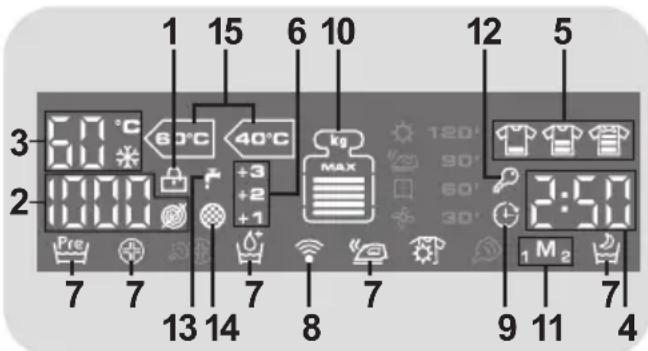
text_image
1 15 6 10 12 5 3 80°C 40°C kg MAX 120' 90' 60' 30' 2 7 7 7 7 7 7 13 14 8 9 11 4 1 M21) DOOR LOCKED INDICATOR LIGHT
● The indicator light is illuminated when the door is fully closed.
Close the door BEFORE selecting the START/PAUSE button.
- When START/PAUSE is pressed on the machine with the door closed, the indicator will flash momentarily and then illuminate.
If the door is not properly closed, the light will continue to flash for about 7 seconds, after which the start command will be automatically delete. In this case, close the door in the proper way and press the START/PAUSE button.
- A special safety device prevents the door from being opened immediately after the end of the cycle. Wait for 2 minutes after the wash cycle has finished and the DOOR LOCKED light has gone out before opening the door. At the end of the cycle turn the programme selector to OFF.
2) SPIN SPEED
This show the spin speed of the selected programme that can be changed or omitted by the relevant button.

spin speed cancelled.
3) WASH TEMPERATURE
This show the washing temperature of the selected programme that can be changed (where allowed) by the relevant button.

cold wash.
4) CYCLE DURATION
- When a programme is selected the display automatically shows the cycle duration, which can vary, depending on the options selected.
- Once the programme has started you will be kept informed constantly of the time remaining to the end of the wash.
- The appliance calculates the time to the end of the selected programme based upon a standard loading, during the cycle, the appliance corrects the time to that applicable to the size and composition of the load.
5) STAIN LEVEL
- Once the programme has been selected, the indicator light will automatically show the stain level set for that programme.
- Selecting a different stain level the relevant indicator will light up.
6) EXTRA RINSES
The indicator lights show the extra rinses selected by the relevant button.
7) OPTIONS
The indicator lights show the options that can be selected by the relevant buttons.
8) Wi-Fi (some models only)
- In the models with the Wi-Fi option, the icon indicates that the Wi-Fi system is working.
- For all other information in the Wi-Fi system, there is a specific manual inside the machine.
9) DELAY START
This flashes when delay start has been set.
10) Kg Check (function active only on Cotton and Synthetics programmes)
- For the programmes where the "Kg Check" function is active, the appliance in the first minutes it calculates the real laundry loaded, updating the levels on the display in real time. Every levels shown on the display is the 20% of the maximum loading capacity. When a programme is selected the maximum capacity suggested is shown on the display.
-
Through every wash phase "Kg Check" allows to monitor information on the wash load in the drum and in the first minutes of the wash it:
-
adjusts the amount of water required;
- determines the length of the wash cycle;
- controls rinsing according to the type of fabric selected to be washed it;
- adjusts the rhythm of drum rotation for the type of fabric being washed;
- recognizes the presence of lather, increasing, if necessary, the amount of water during rinsing;
- adjusts the spin speed according to the load, thus avoiding any imbalance.
11) MEMORY
The indicator light show that the memory function is working.
12) KEY LOCK
The indicator light show that the keys are locked.
13) TAP CLOSED
Indicates that the machine is unable to load the water: it is suggested to turn off the machine, check that the tap is open and the water pressure is not particularly low.
14) FILTER BLOCKED
Indicates that the machine is not able to drain the water: it is suggested to turn of the machine, check that the filter is not clogged or that the drain hose is not kinked or crushed.

15) STANDARD COTTON PROGRAMMES LIGHTS (see table of programmes)
The lights will light up when you select the most efficient program in terms of water and energy consumption, to wash cotton garments with a normal grade of soil.
Table of programmes
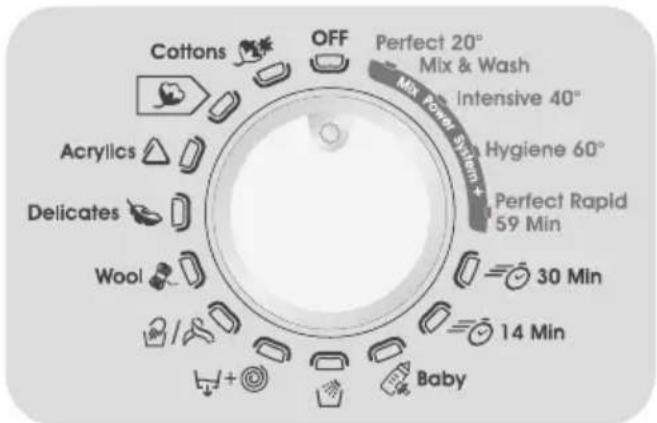
| PROGRAM | kg*(MAX.) | TEMP.°C | DETERGENT | |||||||
| Recommended | Max. | 2 | ☀ | 1 | ||||||
| Perfect 20°Mix & Wash | Perfect 20°Mix & Wash 1) | 5,5 | 6 | 6,5 | 7 | 20° | 20° | ● | ● | |
| Intensive 40° | Intensive 40° 1) | 5,5 | 6 | 6,5 | 7 | 40° | 40° | ● | ● | |
| Hygiene 60° | Hygiene 60° | 5,5 | 6 | 6,5 | 7 | 60° | 60° | ● | ● | |
| Perfect Rapid59 Min | Perfect Rapid59 Min | 3 | 3 | 3,5 | 3,5 | 40° | 40° | ● | ● | |
| 30 Min | Rapid 30 Min | 2,5 | 2,5 | 2,5 | 2,5 | 30° | 30° | ● | ● | |
| 14 Min | Rapid 14 Min | 1,5 | 1,5 | 1,5 | 1,5 | 30° | 30° | ● | ● | |
| Baby | Baby 1) | 5,5 | 6 | 6,5 | 7 | 60° | 60° | ● | ● | |
 | Rinse | - | - | - | - | - | - | △ | ● | |
| Drain + Spin | - | - | - | - | - | - | ||||
 | Hand/Silk | 2 | 2 | 2 | 2 | 30° | 30° | ● | ● | |
W  | Wool | 2 | 2 | 2 | 2 | 40° | 40° | ● | ● | |
| Delicates [BCYX] | Delicates | 2,5 | 2,5 | 2,5 | 2,5 | 40° | 40° | ● | ● | |
| Acrylics △ | Mixed 1) | 4 | 4,5 | 5 | 5,5 | 40° | 60° | ● | ● | (●) |
 | Cottons **1) | 8 | 9 | 10 | 11 | 40° | 60° | ● | ● | (●) |
Cottons  | Whites 1) | 8 | 9 | 10 | 11 | 60° | 90° | ● | ● | (●) |
text_image
Cottons OFF Perfect 20° Mix & Wash Mix Power System + Intensive 40° Hygiene 60° Perfect Rapid 59 Min Acrylics Delicates Wool 30 Min 14 Min BabyPlease read these notes:
* Maximum load capacity of dry clothes, according to the model used (see control panel).
** STANDARD COTTON PROGRAMMES ACCORDING TO (EU) No 1015/2010 and No 1061/2010.
COTTON PROGRAMME WITH A TEMPERATURE OF 60°C.
COTTON PROGRAMME WITH A TEMPERATURE OF 40°C.
These programmes are suitable to clean normally soiled cotton laundry and they are the most efficient programmes in terms of combined energy and water consumptions for washing cotton laundry.
These programmes have been developed to be compliant with the temperature on the wash label on the garments and the actual water temperature may slightly differ from the declared temperature of the cycle.
The spin speed may also be reduced, to match any guidelines suggested on the fabric label, or for very delicate fabrics cancel the spin completely this option is available with a spin speed button. This function can be activated with the button SPIN SELECTION.
If the label does not indicate specific information, it is possible to use the maximum spin expected in the program.
An over dosing of detergent can cause excessive foaming.
If the appliance detects the presence of excessive foam, it may exclude the spinning phase or extend the duration of the program and increase water consumption.
(●) Only with PREWASH option selected (programmes with PREWASH option available).
△ (Only for models with liquid detergent compartment)
When only a limited number of articles have stains which require treatment with liquid bleaching agents, preliminary removal of stain can be carried out in the washing machine.
Pour the bleach into the liquid bleach container, inserted into the compartment marked "2" in the detergent drawer, and set the special programme RINSE.
When this phase has terminated turn the programme selector on the OFF position, add the rest of the fabrics and proceed with a normal wash on the most suitable programme.
1) For the programmes shown you can adjust the duration and intensity of the wash using the STAIN LEVEL button.
Programmes selection
To clean different types of fabrics and various levels of dirt, the washing machine has specific programs to meet every need of washing (see table of programmes).
Mix Power System +
The washing machine is equipped with an innovative pre-mix of detergent and water. A jet of water under high pressure spray the mixture directly in the load.
In the initial phase of the wash cycle, the high pressure spray facilitate the penetration of the wash solution through the fibres, thoroughly removing dirt ensuring the best wash performance.
The system also delivers the "Mix Power System +", during the rinse, the complet removal of the residues of detergent due to its high pressure water jet, which invests the laundry.
Perfect 20°C – Mix & Wash
This innovative "Mix Power System +" technology, allows you to wash fabrics such as cottons, synthetics and mixed fabrics at 20°C with a performance which is comparable to a 40°C wash.
The consumption of this programme is about 50% of a conventional 40°C. Cottons wash.
We suggest a wash load equal to 2/3 of the maximum capacity of the machine.
This programme applies to the washing system "Mix & Wash" which allows you wash different fabrics and colours together.

WARNING:
New coloured garments should be washed separately for at least 5 or 6 washes.
Certain large dark items such as jeans and towels should always be washed separately.
Never mix NON COLOURFAST fabrics.
Intensive 40°
This programme is suitable for cotton garments and achieves excellent cleaning results at 40°C ensuring the application of fabrics and colors.
Hygiene 60°
This programme is suitable for cotton garments and has been specially developed to remove stubborn stains already at 60° thanks to the "Mix Power System +" technology.
Perfect Rapid 59 Min
This specially designed programme maintains the high quality wash performance whilst greatly reducing the wash time.
The programme is designed for a reduce load (see table of programmes).
Rapid 30 Min
A complete washing cycle (wash, rinse and spin). This programme is particularly suited to slightly dirty cottons and mixed fabrics. With this programme it is recommended to use only 20% of the detergent normally used to avoid waste.
Rapid 14 Min
A complete washing cycle (wash, rinse and spin). This programme is suited to slight dirty cottons and mixed fabrics. With this programme it is recommended to use only 20% of the detergent normally used to avoid waste.
Baby
This program allows you to wash all bal clothes getting a perfect clean and sanitizing effect, setting the temperature at 60^ C minimum.
To optimize the result of the sanitizing effect we recommend the use of powder detergent.
Rinse
This program performs 3 rinses with an intermediate spin (which can be reduced or excluded by using the appropriate button). It is used for rinsing any type of fabric, for example after a wash carried out by hand.
Drain + Spin
The program completes the drain and a maximum spin. It is possible to delete or reduce the spin with the SPIN SELECTION button.
Hand/Silk
This programme allows a delicate washing cycle for garments specified as "Hand Wash only" and laundry items made from Silk or specified as "Wash as Silk" on the fabric label.
Wool
This program performs a wash cycle dedicated to the wool fabrics that can be washed in a washing machine, or the articles to be washed by hand.
Delicates
This program alternates among moments of work during breaks and is particularly suitable for washing delicate fabrics. The wash cycle and rinses are carried out with a high level water to ensure the best performance.
Mixed
The washing and rinsing are optimized in the rhythms of rotation of the drum and to the water levels. The gentle spin, ensures a reduced formation of creases in the fabric.
Cottons 40°C - 60°C
This program is suitable to clean normally soiled cotton laundry and it is the most efficient program in terms of combined energy and water consumptions for washing cotton laundry.
Whites
Made to have a perfect washing. The final spin at maximum speed gives more efficient removal.
7. CUSTOMER SERVICE CENTRE AND WARRANTY
If you believe the washing machine is not working correctly, consult the quick guide provided below with some practical tips on how to fix the most common problems.
| Problem | Possible causes and practical solutions |
| The washing machine does not work/start | Make sure it is correctly plugged in. |
| Make sure power is on. | |
| Check whether the required program was correctly selected and to have correctly started the machine. | |
| Make sure the fuse has not blown and that the wall socket is working, testing it with another appliance such as a lamp. | |
| The porthole may not be correctly closed: open and close it again. | |
| The washing machine does not fill with water | Make sure the water faucet is open. |
| Make sure the timer is correct set. | |
| The washing machine does not drain water | Make sure the filter is not clogged. |
| Make sure the drain hose is not bent. | |
| Make sure there are no foreign objects in the filter. | |
| Water leaked on the floor near the washing machine | This may be due to a leak in the gasket between the faucet and supply tube; in this case, replace it and tighten the tube and faucet. |
| The washing machine does not centrifuge | This could be due to the fact that water has not been completely drained: wait a few minutes. Some models include a "no centrifuge" function: make sure it is not on. An excessive amount of detergent could prevent centrifuge: reduce the amount at the next wash. |
| Strong vibrations are heard during centrifuge | The washing machine may not be fully levelled: if necessary, adjust the feet as indicated in the specific section. |
| Make sure transport brackets were removed. | |
| Make sure the load is evenly distributed. | |
| If a specific ERROR appears of blinks | If error no. 0, 1, 5, 7 or 8 appears or blinks, contact the Customer Service Centre directly. |
| If error no. 2 appears or blinks, the machine does not load water. Make sure the water faucet is open. | |
| If error no. 3 appears or blinks, the machine does not correctly drain. Make sure the drain is free and that the drain hose is not bent. | |
| If error no. 4 appears or blinks, the machine is too full. Close the water faucet and contact the Customer Service Centre. | |
| If error no. 9 appears or blinks, turn off the washing machine, wait 10 – 15 seconds and restart the program. |
The use of ecological detergents without phosphates may cause the following effects:
- cloudier rinse drain water: This effect is tied to the suspended zeolites which do not have negative effects on rinse efficiency.
- white powder (zeolites) on laundry a the end of the wash: this is normal, the powder is not absorbed by fabric and does not change its colour.
- foam in the water at last rinse: this does not necessary indicate poor rinsing.
- abundant foam: This is often due to the anionic surfactants found in the detergents which are hard to eliminate from laundry. In this case, do not re-rinse to eliminate these effects: it will not help at all.
If the problem persists or if you suspect a malfunction, immediately contact the Candy Customer Service Centre.
You can also register for the Candy service plan to receive free home service after the warranty expires.
Attention: the call is not toll-free. The cost will be communicated in a voice message by your telephone operator's customer service.
Candy recommends you always use original spare parts available at our Customer Service Centre.
Warranty
The product is guaranteed under the terms and conditions stated on the certificate included with the product. The warranty certificate must be duly filled in and stored, so as to be shown to the Authorised Candy Service Centre in case of need.
Register your product!
Don't waste time. Register your washing machine at once, and discover the benefits to which you are entitled. Discover how at www.registercandy.com or by calling the number stated on the related material.
The manufacturer declines all responsibility for any printing errors in the booklet included with this product. Moreover, it also reserves the right to make any changes deemed useful to i products without changing their essential characteristics.
natural_image
Diagram of a computer monitor with an inset showing internal components (no text or symbols)C
text_image
1 2 3text_image
Diagram showing a hand holding a door panel with a valve, illustrating the step of cleaning or repair.S
text_image
④ 1 2 *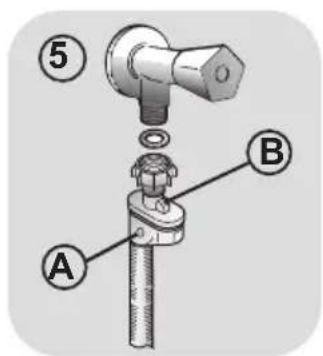
text_image
Technical diagram of a mechanical valve assembly with labeled parts A, B, and numbered annotations ⑤ and ⑥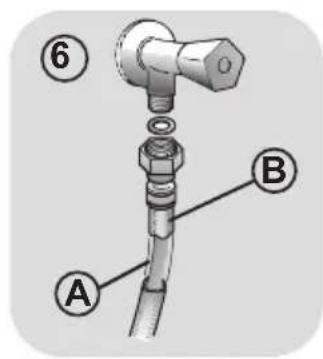
text_image
⑥ A B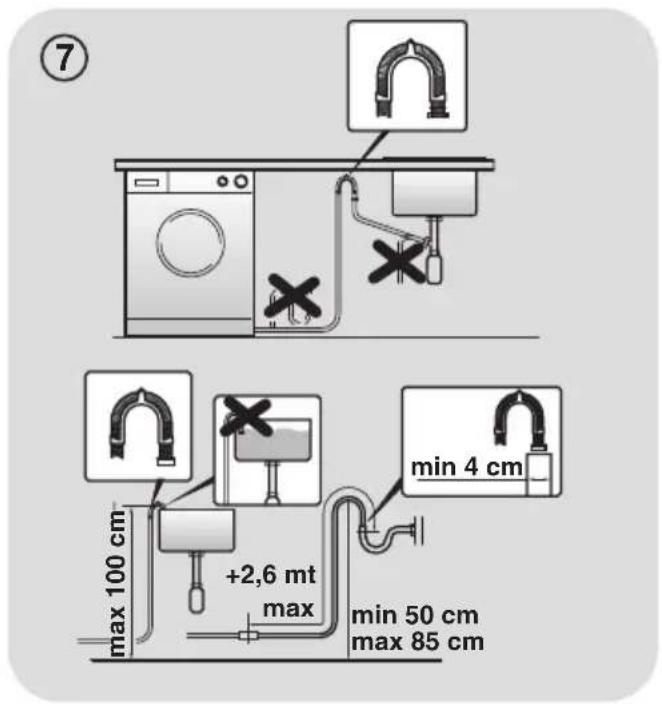
text_image
⑦ max 100 cm +2,6 mt max min 4 cm min 50 cm max 85 cmtext_image
Diagram showing a mechanical device with labeled parts, including tool and component 1, and numbered callouts (9) and 2.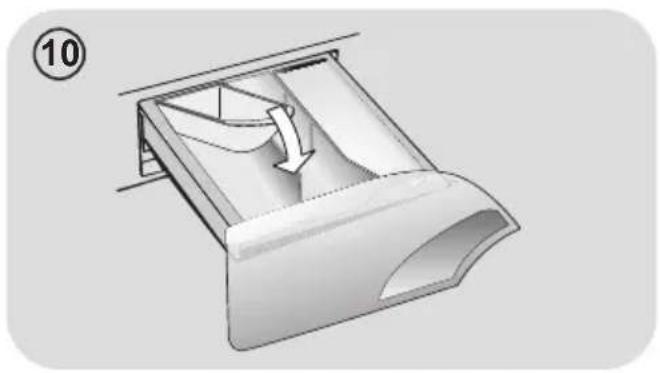
natural_image
Mechanical component diagram showing a curved structure with a directional arrow, no text or symbols present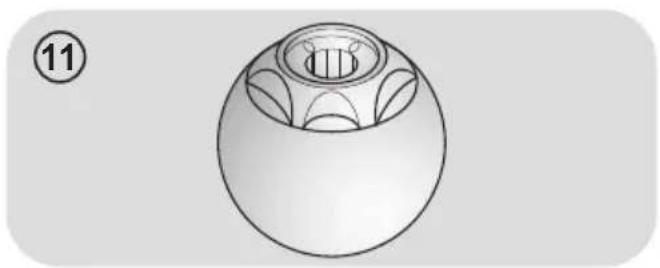
natural_image
Technical line drawing of a mechanical component with a spherical body and internal features (no text or symbols)3. CONSEJOS PRÁCTICOS
natural_image
Illustration showing a hand holding a mechanical component with directional arrows indicating motion (no text or symbols)natural_image
Diagram of a device with internal components and an inset magnified view (no text or symbols)C
text_image
1 2 3Wasseranschluss
text_image
Diagram showing a hand holding a door panel with a tool, illustrating the step of cleaning or repair.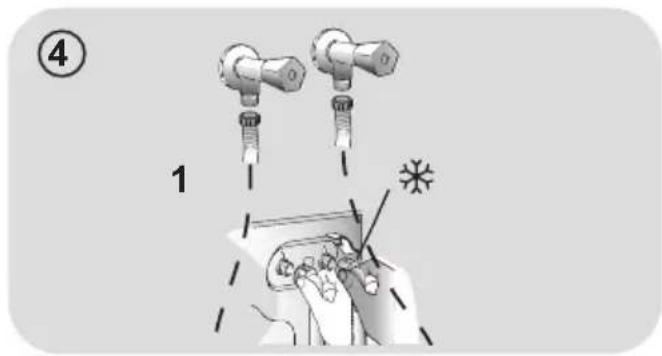
text_image
④ 1 2 *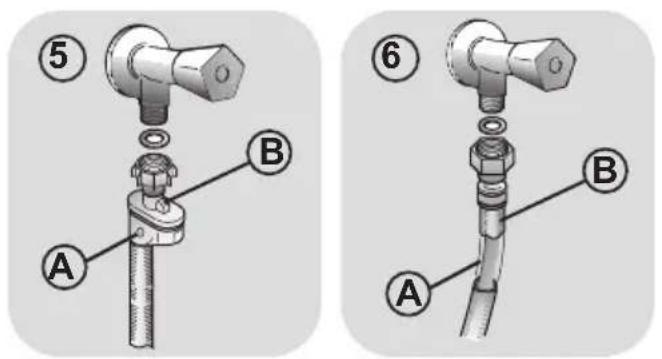
text_image
Technical diagram showing two mechanical assembly steps labeled A and B, with numbered annotations indicating component identification.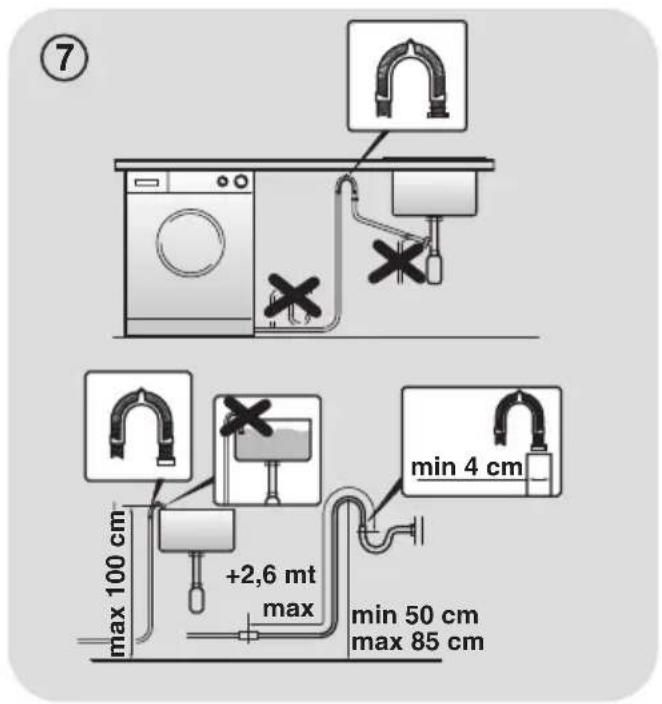
text_image
⑦ max 100 cm +2,6 mt max min 4 cm min 50 cm max 85 cmtext_image
Diagram of a cleaning or cleaning device with labeled parts 1 and 2, showing tool placement and cleaning mechanism.natural_image
3D diagram of a mechanical component with a curved arrow indicating direction (no text or symbols)