
DV-RW2U - DVD Recorder SHARP - Free user manual and instructions
Find the device manual for free DV-RW2U SHARP in PDF.


| Product Type | DVD Recorder |
| Brand | Sharp |
| Model | DV-RW2U |
| Dimensions (W x H x D) | Approx. 430 mm x 82 mm x 361 mm (16¹⁵/₁₆" x 3¹/₄" x 14¹/₄") |
| Weight | Approx. 5.1 kg (11.3 lbs) |
| Power Supply | AC 120 V, 60 Hz |
| Power Consumption (Normal) | 40 W |
| Power Consumption (Standby) | 0.9 W (with front panel display off) |
| Playable Discs | DVD Video, DVD-R/RW, Audio CD, Video CD, CD-R/RW (CD-DA, MP3) |
| Recording Formats | VR Mode (DVD-RW) and Video Mode (DVD-R/RW) |
| Recording Times (4.7 GB disc) | FINE: Approx. 60 min; SP: Approx. 120 min; LP: Approx. 240 min; EP: Approx. 360 min |
| Tuner Channel Coverage | VHF 2-13, UHF 14-69, CATV 1-125 |
| Timer Programming | 1 year / up to 8 programs |
| Video Outputs | Composite, S-Video, Component (Y, Pb, Pr) |
| Audio Outputs | Analog stereo (RCA), Digital Optical (TOSLINK) |
| DV Input/Output | 4-pin i.LINK (IEEE 1394) |
| Special Features | EZ Set Up, VCR Plus+, Simple Recording Timer, Exact Rec, AV AUTO REC, DiscNavi, Playlist Editing, Chapter Markers, Progressive Scan, Universal Remote Control |
| Audio Decoding | Dolby Digital 5.1 (passthrough), DTS (passthrough) |
| Region Code | 1 |
| Accessories Included | Remote control (RRMCGA056WJSA), two AA batteries, video/audio cable, coaxial cable (75 Ohm, 1 m) |
Frequently Asked Questions - DV-RW2U SHARP
User questions about DV-RW2U SHARP
0 question about this device. Answer the ones you know or ask your own.
Ask a new question about this device
Download the instructions for your DVD Recorder in PDF format for free! Find your manual DV-RW2U - SHARP and take your electronic device back in hand. On this page are published all the documents necessary for the use of your device. DV-RW2U by SHARP.
USER MANUAL DV-RW2U SHARP

VIDEO/R/RW


DOLBY DIGITAL

SPATIALIZER ^⑩ N-2-2 ^™

DIGITAL OUT


• The region number for this recorder is 1

! IMPORTANT / IMPORTANTE
EZ SET UP (AUTO CHANNEL /CLOCK SET UP)
4 EZ SET UP complete. EZ SET UP completo.
Detail: Please see page 23
For future reference, record the model and serial number (located on the rear of the product) in the space provided.
Model No.: DV-RW2U
Serial No.:
WARNING: TO REDUCE THE RISK OF FIRE OR ELECTRIC SHOCK, DO NOT EXPOSE THIS APPLIANCE TO RAIN OR MOISTURE.

CAUTION
RISK OF ELECTRIC SHOCK DO NOT OPEN

CAUTION:
TO REDUCE THE RISK OF ELECTRIC SHOCK, DO NOT REMOVE COVER. NO USER-SERVICEABLE PARTS INSIDE. REFER SERVICING TO QUALIFIED SERVICE PERSONNEL.

This symbol warns the user of uninsulated voltage within the unit that can cause dangerous electric shocks.

This symbol alerts the user that there are important operating and maintenance instructions in the literature accompanying this unit.
"WARNING—FCC Regulations state that any unauthorized changes or modifications to this equipment not expressly approved by the manufacturer could void the user's authority to operate this equipment."
INFORMATION
This equipment has been tested and found to comply with the limits for a Class B digital device, pursuant to Part 15 of the FCC Rules. These limits are designed to provide reasonable protection against harmful interference in a residential installation. This equipment generates, uses and can radiate radio frequency energy and, if not installed and used in accordance with the instructions, may cause harmful interference to radio communications. However, there is no guarantee that interference will not occur in a particular installation. If this equipment does cause harmful interference to radio or television reception, which can be determined by turning the equipment off and on, the user is encouraged to try to correct the interference by one or more of the following measures:
—Reorient or relocate the receiving antenna.
—Increase the separation between the equipment and receiver.
—Connect the equipment into an outlet on a circuit different from that to which the receiver is connected.
—Consult the dealer or an experienced radio/TV technician for help.
CAUTION:
THIS UNIT IS A CLASS 1 LASER PRODUCT.
USE OF CONTROLS OR ADJUSTMENTS OR PERFORMANCE OF PROCEDURES OTHER THAN THOSE SPECIFIED HEREIN MAY RESULT IN HAZARDOUS RADIATION EXPOSURE.
AS THE LASER BEAM USED IN THIS UNIT IS HARMFUL TO THE EYES, DO NOT ATTEMPT TO DISASSEMBLE THE CABINET.
REFER SERVICING TO QUALIFIED PERSONNEL ONLY.
Note to CATV system installer:
This reminder is provided to call the CATV system installer's attention to Article 820-40 of the National Electrical Code that provides guidelines for proper grounding and, in particular, specifies that the cable ground shall be connected to the grounding system of the building, as close to the point of cable entry as practical.
As an ENERGY STAR® Partner, SHARP has determined that this product meets the ENERGY STAR® guidelines for energy efficiency. ENERGY STAR is a U.S. registered mark.
IMPORTANT SAFEGUARDS
CAUTION: Please read all of these instructions before you operate this product and save these instructions for later use.
Electrical energy can perform many useful functions. This product has been engineered and manufactured to assure your personal safety. BUT IMPROPER USE CAN RESULT IN POTENTIAL ELECTRICAL SHOCK OR FIRE HAZARDS. In order not to defeat the safeguards incorporated in this product, observe the following basic rules for its installation, use and servicing.
- Read Instructions – All the safety and operating instructions should be read before the product is operated.
- Retain Instructions – The safety and operating instructions should be retained for future reference.
- Heed Warnings – All warnings on the product and in the operating instructions should be adhered to.
- Follow Instructions – All operating and use instructions should be followed.
- Cleaning – Unplug this product from the wall outlet before cleaning. Do not use liquid cleaners or aerosol cleaners. Use a damp cloth for cleaning.
- Attachments – Do not use attachments not recommended by the product manufacturer as they may cause hazards.
- Water and Moisture – Do not use this product near water-for example, near a bath tub, wash bowl, kitchen sink, or laundry tub; in a wet basement; or near a swimming pool; and the like.
-
Accessories – Do not place this product on an unstable cart, stand, tripod, bracket, or table. The product may fall, causing serious injury to a child or adult, and serious damage to the product. Use only with a cart, stand, tripod, bracket, or table recommended by the manufacturer, or sold with the product. Any mounting of the product should follow the manufacturer's instructions, and should use a mounting accessory recommended by the manufacturer.
-
Transportation – A product and cart combination should be moved with care. Quick stops, excessive force, and uneven surfaces may cause the product and cart combination to overturn.
-
Ventilation-Slots and openings in the cabinet are provided for ventilation to ensure reliable operation of the product and to protect it from overheating, and these openings must not be blocked or covered. The openings should never be blocked by placing the product on a bed, sofa, rug, or other similar surface. This product should not be placed in a built-in installation such as a bookcase or rack unless proper ventilation is provided or the manufacturer's instructions have been adhered to.
-
Power Sources - This product should be operated only from the type of power source indicated on the marking label. If you are not sure of the type of power supply to your home, consult your product dealer or local power company. For products intended to operate from battery power, or other sources, refer to the operating instructions.
-
Grounding or Polarization – This product is equipped with either a two-wire polarized plug (one plug blade bigger than the other) or a three-wire grounded plug (a third pin for grounding). The two-wire polarized plug will fit only one way into the power outlet. The three-wire grounded plug will fit only into a grounding-type power outlet. If the plug does not fit, ask your electrician to replace your obsolete outlet. Do not modify the plug. To do so will void the safety feature.
-
Power-Cord Protection – Power-supply cords should be routed so that they are not likely to be walked on or pinched by items placed upon or against them, paying particular attention to cords at plugs, convenience receptacles, and the point where they exit from the product.
-
Outdoor Antenna Grounding - If an outside antenna or cable system is connected to the product, be sure the antenna or cable system is grounded so as to provide some protection against voltage surges and built-up static charges. Article 810 of the National Electrical Code, ANSI/NFPA 70, provides information with regard to proper grounding of the mast and supporting structure, grounding of the lead-in wire to an antenna discharge unit, size of grounding conductors, location of antenna-discharge unit, connection to grounding electrodes, and requirements for the grounding electrode. See diagram below.

NEC-NATIONAL ELECTRICAL CODE
(NEO PART 250, PART II)
-
Lightning - For added protection for this product during a lightning storm, or when it is left unattended and unused for long periods of time, unplug it from the wall outlet and disconnect the antenna or cable system. This will prevent damage to the product due to lightning and power-line surges.
-
Power Lines - An outside antenna system should not be located in the vicinity of overhead power lines or other electric light or power circuits, or where it can fall into such power lines or circuits. When installing an outside antenna system, extreme care should be taken to keep from touching such power lines or circuits as contact with them might be fatal.
-
Overloading – Do not overload wall outlets, extension cords, or integral convenience receptacles as this can result in a risk of fire or electric shock.
-
Object and Liquid Entry – Never push objects of any kind into this product through openings as they may touch dangerous voltage points or short-out parts that could result in a fire or electric shock. Never spill liquid of any kind on the product.
-
Servicing – Do not attempt to service this product yourself as opening or removing covers may expose you to dangerous voltage or other hazards. Refer all servicing to qualified service personnel.
-
Damage Requiring Service – Unplug this product from the wall outlet and refer servicing to qualified service personnel under the following conditions:
a. When the power-supply cord or plug is damaged.
b. If liquid has been spilled, or objects have fallen into the product.
c. If the product has been exposed to rain or water.
d. If the product does not operate normally by following the operating instructions. Adjust only those controls that are covered by the operating instructions, as an improper adjustment of other controls may result in damage and will often require extensive work by a qualified technician to restore the product to normal operation.
e. If the product has been dropped or damaged in any way. f. When the product exhibits a distinct change in performance, this indicates a need for service.
-
Replacement Parts-When replacement parts are required, be sure the service technician has used replacement parts specified by the manufacturer or have the same characteristics as the original part. Unauthorized substitutions may result in fire, electric shock, or other hazards.
-
Safety Check-Upon completion of any service or repairs to this product, ask the service technician to perform safety checks to determine that the product is in proper operating condition.
-
Heat-This product should be situated away from heat sources such as radiators, heat registers, sloves, or other products (including amplifiers) that produce heat.
Contents
IMPORTANT SAFEGUARDS .... 3
Features 6
Accessories 6
About Discs 7
Types of Discs that Can Be Played on This Recorder ... 7
Discs that Cannot be Played 7
About Recording 9
Recording Format 9
VR (Video Recording) Mode 9
Video Mode 9
Discs and Recording Formats 9
DVD-RW Discs 9
DVD-R Discs 9
Recording Time 10
Disc Remaining Time 10
Cautions Regarding Recording 10
Using the Proper Disc 11
Unrecordable Material 11
Initialization and Finalization 12
Initialization (Format) 12
Allowing Discs to be Played Back with Other DVD Players (Finalization) 12
About the Contents of the Disc 12
Title, Chapter and Tracks 12
Icons Used on DVD Video Disc Case 13
The icons used in this Operation Manual.... 13
Precautions During Use 14
Disc Precautions 14
Proper Disc Storage 14
Handling Precautions 14
Cleaning the Pick Up Lens 14
Warning of Dew Formation 14
Copyright 14
Major Components.... 15
Operating a TV Using the Remote Control (Universal Remote Control) 18
Setting the Remote Control Code 18
Basic Conneciton 19
Easy Connection 19
Using Other Types of Video Output 20
Connecting Using an S-Video Output 20
Connecting Using the Component Video Output ..... 20
CATV or Satellite Receiver Connections ..... 21
Connecting to a Cable Box or Satellite Receiver (1)..... 21
Connecting to a Cable Box or Satellite Receiver (2)..... 22
EZ Set Up 23
Channel Setting 24
Channel Setting 24
Adding Channel Memory/Erasing Channel Memory ..... 24
Clock Setting 25
Auto Clock Setting 25
Manual Clock Setting 26
Automatic Daylight Saving-Time (D.S.T.) Adjustment .... 26
OSD Language Setting 27
Display Information.... 28
Change the Display on the TV Screen 28
Change the Display on the Front Panel Display 28
Playback.... 29
DVD Playback 29 Playback the playback-only discs 29
Selected Title Playback 30
Recorded DVD Disc Playback 30
Playback After Confirming Contents with DiscNavi .. 30
Playback by Selecting a Title 31
Video CD/Audio CD/CD-R/CD-RW Playback 31
Selected Track Playback 31
Fast Forward/Fast Reverse .... 32 Fast Forward/Fast Reverse (Search) Function on the Recorder .... 32
SKIP (Forward/Reverse) 32
Slow-Motion 32
Still/Pause, Frame Advance 33
Skip Search 33
MP3 Discs Playback 34
To Play Another File (music title) during Playback ...... 34
To Skip the File during Playback 34
Changing Image/Audio During Playback .. 35
Zoom Function 35
Angle Function 35
Audio Setting 36
Monitor Output when Receiving a Stereo or SAP Broadcast 36
DNR (Digital Noise Reduction) 36
Programmed Playback 37
Title/Track Programmed Playback 37
Chapter Programmed Playback 38
Repeat Playback.... 39
Repeat Playback 39
A-B Repeat Playback 39
Function Control 40
Direct Skip (title/chapter/track) 41
Direct Time Skip 41
Subtitle/Angle/Audio Setting 42
Clearer Picture and Dynamic Sound Setting 43
Direct Selection of Scenes
Selecting Scenes by Title Number 45
Disc Menu Screen 45
Recording for DVD Discs
Before Recording 46
Recordable Discs 46
About the Recording Format 46
Before Starting Recording 46
Initialization 46
Recording Formats and Recording Modes 47
Disc Information 47
Confirmation of Available Disc Space 47
TV Program Recording 48
Basic Recording 48
Pause Recording 49
Stop Recording 50
Useful Recording Functions 50
Contents
Simple Recording Timer 51
Changing the Settings of the Simple Recording Timer .. 51
Cancelling the Simple Recording Timer 51
Timer Recording with VCR Plus+® System 53
Timer Recording 54
Disc Timer Recording 56
Canceling the Disc Timer Recording 57
Using the Recorder During Timer Standby Mode .... 58
When Finished Using the Recorder 58
Confirming/Cancelling Timer Program ..... 59
Automatic Recording of Satellite Broadcast (AV AUTO REC) 60
Connecting to a Satellite receiver, etc. 60
Recording with AV AUTO REC 60
To Cancel the AV AUTO REC Function 61
Problems of Timer Recording 62
Blinking the TIMER Indicator.... 62
When Timer Recording Times Overlap 62
Editing the Disc 63
Before Editing the Disc 63
About Editing 63
Editing Procedure 63
Switching between Playlist and Original Playback ... 64
Editing an Original Title 65
Erasing a Part from the Original 65
Inputting/Renaming the Title 66
Adding Chapter Markers 66
Erasing Chapter Markers 67
Navimark 68
Protecting the Title 69
Cancelling the Protection 70
Erasing a Title from the Original or Playlist 71
Erasing All Titles 71
Erasing One Title 71
Making a New Playlist (PL) 72
Making a Playlist from Original Title 72
Adding a Part to the Playlist 73
Searching for Start Point and End Point Parts 74
Editing a Playlist Title 75
Erasing a Part from the Playlist 75
Moving the Title 75
Adding a Part from the Original to the Playlist 76
Adding Chapter Marker in a Playlist 77
Erasing Chapter Marker in a Playlist 78
Renaming the Title 78
Navimark 78
Tamper Proof 79
Tamper Proof Setting 79
Disengaging Tamper Proof 79
Operating during Tamper Proof 79
Playback Setup Screen.... 80
TV MODE 80
PROGRESSIVE 80
PARENTAL 81
DISC LANG. 81
DD LEVEL(Dolby Digital Output Level) 81
Digital OUT 81
Basic Settings of the Playback Setup Screen 82
PARENTAL Level Setting 82
DISC LANGUAGE Setting 84
Language Code List for Disc Language ... 85
Record Setup Screen 86
CHP INT. 86
EXACT REC....86
R REC START 86
EX. AUDIO 86
D-MONO REC 86
RW INIT. 86
SAP 87
Basic Settings of the Record Setup Screen 87
Disc Setup Screen.... 88
VR MODE INITIALIZE 88
VIDEO MODE INITIALIZE 88
FINALIZE 88
PROTECT 88
Basic Settings of the Disc Setup Screen 89
Option Setup Screen.... 90
CLOCK DISP 90
POWER OFF 90
DUBBING 90
DV LINK 90
DV AUDIO IN 91
BLUE SCREEN 91
3D Y/C....91
Basic Settings of the Option Setup Screen 92
Connecting to Audio Equipment 93
Playing 2 channel audio with an Analog Connector ..... 93
Playing Dolby Digital (5.1 channel)
and DTS audio with a Digital Connection 93
Playing 2 channel audio with a Digital Connection ..... 94
Recording by Connecting
with a Digital Camcorder Using i.LINK 95
DV IN/OUT Terminal 95
Connecting Using the DV IN/OUT Terminal
(i.LINK) 95
Recording with this recorder (DV Uptake) 96
Recording with a Digital Camcorder 97
Recording Using an Analog Connection
with a Digital Camcorder 98
Recording with this Recorder 98
Recording Material from External Equipment 99
Troubleshooting 100
Service Informatino (For the U.S.) ...... 101
Glossary 102
Specifications 104
- Powerful sound comparable to a movie theater Connecting this recorder to an AV amplifier compatible with Dolby Digital or DTS lets you enjoy powerful Surround sound filled with a sense of presence.
- Find what you want to watch quickly and easily Unlike video tape, you can jump right to the part of a DVD disc that you want to watch without having to fast forward and rewind. You can also search for the scene you want to watch both quickly and easily.
- DiscNavi The DiscNavi function lets you find the title you want to play back at a glance for easy playback. Lists of titles are displayed for finalized DVD-RW discs (discs recorded in the Video mode) and DVD-R discs.
Recording Function
- Up to 8 programs of Timer recording
• VCR Plus+ ^1
*1 VCR Plus+ and PlusCode are registered trademarks of Gemstar Development Corporation. The VCR Plus+ system is manufactured under licence from Gemstar Development Corporation.
- Simple Recording Timer
• Disc Timer Recording
The disc timer recording function lets you program timer recordings onto a disc for added convenience when recording regular weekly programs.
- Exact Rec
This function automatically changes the recording mode to prevent recordings from running out before they are finished due to a lack of available disc space by comparing the available disc space and the time required for the timer recording.
• AV AUTO REC
Record the timer program automatically when connected to a satellite receiver, etc. with timer recording functions.
Audio Input/Output
• Digital connection with a digital camcorder
You can uptake, edit and store material from a digital camcorder equipped with a DV jack. In addition, you can also output material recorded with this recorder to a digital camcorder.
Edit Function
- Editing a recorded material without changing an Original
You can edit original recordings by creating a collection of titles (Playlist) without actually altering the recorded titles (originals). - Chapter Marker
You can put a chapter marker anywhere in your desired point. This function is useful when you search the scene you want to watch with chapter skip function. - Erase/Move/Add Scenes
You can make your desired Playlists to erase the scene, add the scene and move the scene.
Compatibility
• Video mode recording that will be played back with other DVD players
Discs recorded in the Video mode can be played back with other DVD players by finalizing them after recording. (However, this does not guarantee that these discs can be played back on all DVD players.)
* Recordings onto DVD-R/RW discs using the Video mode (video format) employ a new standard approved by the DVD Forum in 2000, and compatibility with this standard is left to the discretion of the respective DVD player manufacturer. Consequently, there are some models of DVD players and DVD-ROM drives that are unable to play back DVD-R/RW discs.
Disc Features and this Operation Manual
- The types of functions and operations that can be used for a particular disc vary depending on the features of that disc. In some cases, these functions and operations may differ from the descriptions given in this Operation Manual. In this event, follow the instructions given on the screen. This Operation Manual only covers basic disc operations.
- For some operations, the 📄 or 📄 indicator may appear on the TV screen. This indicates that the operation described in this Operation Manual is not permitted for the current disc.
Accessories

Remote control unit (RRMCGA056WJSA)

Two "AA" size batteries (R-6, UM/SUM-3) for the remote control unit

Video/Audio cable (QCNW-8388AJZZ)

Round coaxial cable (75 Ohm, 1 m [3-1/4 ft.]) (QCNW-8387AJZZ)
About Discs
Types of Discs that Can Be Played on This Recorder
- The following discs can be played back and recorded with this recorder. Do not use an 8 cm (3") adapter (for CDs).
- Since this recorder is compatible with the NTSC format, use discs that contain the letters "NTSC" on the disc or package.
- Use discs that are compatible with standards as indicated by the presence of the following logo marks on the disc label. Playback of discs not complying with these standards is not guaranteed. In addition, image quality or sound quality is not guaranteed even if such discs are able to be played back.
■ Discs For Recording and Playback
| Types of Discs | Recording Format | Contents of Discs | Size of Discs | |
| DVD-RWDVDRW | •Ver. 1.1•Ver. 1.1(CPRM compatible)1 | VR ModeVideo Mode | Audio + Video(Movie) | 12cm (5"), single-sided/double-sidod, single layer disc8cm (3"), single-sided, single layer disc2 |
| DVD-RDVR47 | Ver.2.0 | Video Mode | ||
*1 "Copy-once" satellite broadcasts and other programs that can be recorded only once can be recorded.
*2 DVD-R/RW 8 cm (3") single-sided, single-layer discs can only be used for recording in the Video mode. Some discs of this type may not be able to be recorded.
■ Discs for Playback (Playback Only)
| Types of Discs | Recording Format | Contents of Discs | Size of Discs | |
| DVD Video | Region number | Video format | Audio + Video (Movie) | 12cm (5")8cm (3") |
| Video CD | Video CD format | Audio + Video (Movie) | ||
| Audio CD "2" | Audio CD (CD-DA) format | Audio | ||
| CD-R/CD-RW | Audio CD (CD-DA) format | Audio | ||
| MP3 file format | ||||
| Video CD format | Audio + Video (Movie) | |||
*3 This recorder has been designed on the premise of playing back Audio CDs that comply with CD (Compact Disc) standards. CDs containing a signal for the purpose of protecting copyrights (copy control signal) may not be able to be played back with this recorder.
- DVD video players and discs have region numbers, which dictate the regions in which a disc can be played. The region number for this product is 1. (Discs marked ALL will play in any player.)
- The specific playback functionality for some DVD discs is determined by the disc manufacturer. Because this recorder plays disc data in accordance with the disc manufacturer's guidelines, some functions may not be available on some discs. Be sure to read the instructions provided with the disc.
- The "Prohibited" indicator 📋 displayed on the TV screen during this product operation indicates that such manufacturer-imposed restrictions apply.
- If a menu screen or operating instructions are displayed during playback of a disc, follow the displayed operating procedure.
Discs that Cannot be Played
■The following discs are unable to be played back or are not played back properly on this recorder. If such a disc is mistakenly played back, the speakers may be damaged due to the large volume. Never attempt to play back such discs.
CDG, Photo CD, CD-ROM, CD-TEXT, CD-EXTRA, SVCD, SACD, PD, CDV, DVD-ROM, DVD-RAM, +RW, DVD-Audio
■The following DVD video discs cannot be played.
- Discs not containing "1" or "ALL" for the region number (Discs sold outside the authorized marketing area). ^1
• Discs recorded on PAL or SECAM format. ^2
• Discs produced illegally.
• Discs recorded for commercial use
*1The region number for this product is 1.
*2This recorder is compatible with the NTSC format. Make sure to check the format of the disc before purchasing.
■The following CD-R/CD-RW discs cannot be played.
- Discs on which data has not been recorded cannot be played back.
- Discs recorded in a format other than a Video CD/Audio CD and MP3 file format cannot be played back. ^3
• Discs may not be able to be played back depending on their recording status or the status of the disc itself. - Discs may not be able to be played back depending on their compatibility with this recorder.
- Discs may not be able to be played back depending on the recorder used for recording.
• Non-finalized discs cannot be played back.
About Discs
■Discs with unusual shapes cannot be played.
- Discs with unusual shapes (heart-shaped or hexagonal discs, etc.) cannot be used. The use of such discs will cause a fault.
\*3 About MP3 file format
MP3 files are audio data compressed in MPEG1 Audio layer 3 file format. "MP3 files" have ".mp3" as extensions. (Some files that have ".mp3" extensinos or files that have not been recorded in MP3 format will produce noise or cannot be played.)
● Playing MP3 discs
- Some MP3 files are not played in the order they were recorded.
- The number of layers which can be recognized, including files and folders, is maximum of 8.
- Some multi-session discs cannot be played.
- It is recommended to record data at a lower speed as data recorded at fast speed can produce noise and may not be able to be played.
- The more folders there are, the longer the reading time.
- Depending on the folder tree, reading MP3 files can take time.
- Folder or track (file) names are limited to 8 characters. Folder or track (file) names that go over 8 characters will be abbreviated. (Certain letters or symbols in folder names or title name may not be displayed.)
- The playing time may not be correctly displayed during MP3 file playback.
●The following files cannot be played on this recorder
• Discs that have more than 1000 folders and files in total.
- When both Audio CD format and MP3 files format are recorded on a disc. (The disc is recognized to be an Audio CD and only tracks in the Audio CD format are played back.).
About Recording
Recording Format
- There are two recording formats available with this recorder consisting of the VR mode and Video mode.
- The recording format that can be selected may differ depending on the disc. Refer to the section on Discs and Recording Formats.
VR (Video Recording) Mode
The VR mode is the basic DVD-RW recording format, and lets you enjoy the various editing functions available with this recorder.
- When a disc has been recorded in the VR mode, it can be recorded and erased repeatedly. Erasure also allows the recording time to be increased.
- Recorded discs can only be played back with DVD-RW-compatible DVD players ^1 .
- "Copy-once" programs can also be recorded ^2 .
*1: • Although there are some cases in which the disc must be finalized, the disc can be recorded and erased after it has been finalized.
- The following mark is indicated on DVD-RW-compatible DVD players.

This mark indicates that the player on which it is indicated has the function of being able to play back DVD-RW discs recorded in the VR mode with a DVD recorder.
*2: When using a disc compatible with DVD-RW Ver. 1.1 (CPRM). Recorded programs cannot be played back with other DVD players (including DVD-RW players) or DVD recorders not compatible with CPRM.
Video Mode
This recording format is compatible with commercially available DVD players and DVD-ROM drives.
- Discs recorded in the Video mode can be played back with other DVD players by finalizing them after recording. (However, this does not guarantee that these discs can be played back on all DVD players.)
- When recording in the Video mode, discs can be played back, additionally recorded and edited only with this recorder until they are finalized. Editing-functions are limited.
- Recordings onto DVD-R/RW discs using the Video mode (video format) employ a new standard approved by the DVD Forum in 2000, and compatibility with this standard is left to the discretion of the respective DVD player manufacturer. Consequently, there are some models of DVD players and DVD-ROM drives that are unable to play back DVD-R/RW discs.
- "Copy-once" programs cannot be recorded.
Discs and Recording Formats
- DVD-RW and DVD-R discs can be recorded with this recorder. The recording format that can be selected may vary according to the disc version and types of disc.
| Types of Discs | Recording Formats | |
| VR Mode | Video Mode | |
| DVD-RW Ver. 1.1 | × | × |
| DVD-RW Ver. 1.1 (CPRM compatible) | × | × |
| DVD-R | — | × |
Make sure to use a disc that has the words "For Video" or "For recording" on the disc or disc jacket for recording and playback with this recorder.
DVD-RW Discs
- DVD-RW discs are available in Ver. 1.1 or Ver. 1.1 (CPRM).
- Ver. 1.1 discs can be recorded in either the VR mode or Video mode ^*1 .
- In the case a disc has been recorded in the VR mode, it can be recorded and erased repeatedly. Erasure also allows the recording time to be increased.
- In the case a disc has been recorded in the Video mode, although additional recordings can be made until the disc is full, recording time cannot be increased by erasure ^2 .
- When a disc is initialized, all of its recorded contents can be erased allowing it to be recorded even if it has been recorded in the Video mode. (Refer to pages 12 and 88 regarding initialization.)
*1: Recordings in the VR mode and Video mode cannot be mixed on one disc.
*2: Recording time can only be increased when the last title is erased (titles cannot be erased after a disc has been finalized).
DVD-R Discs
- DVD-R discs can only be recorded in the Video mode.
- Although additional recordings can be made until the disc is full, disc space does not increase even if titles are erased (because erasure here refers only to making the titles not visible).
- Although these discs can be played back with other DVD players once they have been finalized, the discs can no longer be recorded or erased after they have been finalized.
- Discs can be additionally recorded and edited with this recorder only until they are finalized.
! Important!
This recorder cannot be used to record CD-R or CD-RW discs.
About Recording
Recording Time
- The recording mode that can be set varies according to the recording format. Refer to the table below for the applicable recording mode.
| Recording Mode | Recordable Time | Recording format | Description | |
| VR Mode | Video Mode | |||
| FINE | About 60 minutes (About 90 minutes) | × | × | When you want to record high-quality images |
| SP | About 120 minutes (About 180 minutes) | × | × | This is the standard recording mode |
| LP | About 240 minutes (About 300 minutes) | × | × | When you want to record for a long period of time with slightly lower image quality |
| EP | About 360 minutes | × | When you want to place priority on recording time | |
- Recordable time is based on the recording time when using a 4.7 GB disc. Since recording capacity varies according to the recorded material, there may be times where there is much more disc space remaining on the disc when recording is completed.
- Values for recording time shown in parentheses ( ) indicate the time of Exact Rec. function. (A recordable time of about 300 minutes in the LP mode is the recordable time in the VR mode.)
* Since recording by DVD is performed using VBR (variable bit rate, refer to the section on VBR Control on page 103) with the exception of some recording modes, recording time varies according to the recorded material.
- Recordable time may be shorter than that indicated above in the case of recording material of poor image quality such as broadcasts from televisions with poor reception.
- The total of recording time and remaining time may not always agree with the recordable time of the recording mode.
- Block-like images may become conspicuous during scenes containing rapid movement due to the characteristics of digital image compression technology.
Disc Remaining Time
●VR Mode
- Additional recordings can be made as long as there is available space on the disc. (Additional recordings can also be made after the disc is finalized.)
- Erasing unnecessary original recordings (page 71) lets you increase the remaining time on the disc. (The disc can also be erased after it has been finalized.)
Video Mode
- Additional recordings can be made with this recorder provided there is available space on the disc until the disc is finalized. (Additional recordings and erasure cannot be performed once the disc has been finalized.)
- The remaining time cannot be returned to the status prior to recording, and recordings cannot be overwritten.
- The "Erase Title" editing function is for not displaying unnecessary titles. The available disc space does not increase. (In the case of DVD-RW discs, available disc space can be increased only by erasing the last title provided the disc has not yet been finalized.)
Cautions Regarding Recording
●When Recording in the Video Mode
- Since images are recorded in 30 second units (1 minute units in the LP mode), images may be recorded briefly after recording has been stopped.
- When recording onto a DVD-R disc, press ●REC twice. If ●REC is only pressed once, recording will be paused. Recording starts when ●REC is pressed again. (The procedure for starting a recording can be changed (page 86)).
●Always Make Sure to Test Record First
- Make a test recording with a DVD-RW disc (VR mode) first before making any important recordings to confirm whether or not the recorded material is recorded properly.
●Compensation for Recordings
- In the event a recording is unable to be made due to a problem with this recorder or a disc, or due to an external factor such as a power failure or condensation of moisture and so forth, the manufacturer is not responsible for compensation for unrecorded contents or incidental damages.
●Be Careful of Scratches and Dust
- DVD-R and DVD-RW discs are sensitive to dust, fingerprints and especially scratches. A scratched disc may not be able to be recorded, or important data recorded may not be able to be played back. Handle discs with care and store them in a safe place.
Using the Proper Disc
Select the disc used and recording format according to the objective of the recording.
Select the disc and recording format by referring to the table below.
| Objective | Disc Used | Recording Format |
| When you want to play back a recorded disc with a DVD player or DVD video-compatible PCWhen not re-recording a recorded disc (when making a permanent recording or when you do not want the recording to be erased) | Recordable DVD-R disc  | Video mode recording +finalization processing |
| When you want to play back a recorded disc with a DVD player or DVD Video-compatible PCWhen you want to repeatedly record and erase a recorded disc | Recordable DVD-RW disc Ver. 1.1 or Ver. 1.1 (CPRM-compatible) | Video mode recording +finalization processing |
| When you want to edit a disc recorded with this recorderWhen playing back with a DVD-RW-compatible player (a player containing the mark indicated below)RW COMPATIBLEWhen you want to repeatedly record and erase a recorded disc | Recordable DVD-RW disc Ver. 1.1 or Ver. 1.1 (CPRM-compatible) | VR mode recording +(finalization processing) |
| When you want to record a “copy-once” satellite broadcast, etc. | Recordable DVD-RW disc Ver. 1.1 (CPRM-compatible) | VR mode recording |
Unrecordable Material
● Video recordings protected by a copy guard (a signal that controls copying to prevent recording) cannot be recorded.
Example:
- DVD videos
- PPV (pay-per-view) broadcasts
●The proper image may not be able to be obtained in the case a copy guard is contained in the images of equipment connected to the external input jacks (IN 1, IN 2, IN 3 or DV) of this recorder.
Example:
- Images not output at proper brightness
- Incorrect output of picture size (page 80) and other data. Connect such equipment directly to your TV without going through this recorder.
● In the case a copy guard signal is contained in a source video that occurs partway through recording, recording is paused at that point. Recording resumes when the copy guard signal is no longer present, while no recordings will be made for the part where the copy prevention signal is present.
●This recorder is equipped with a copy guard function that prevents recording of video software or broadcast programs that contain a signal that restricts copying in accordance with copyrights and so forth.
Initialization and Finalization
Initialization (Format)
Initialization is required when using DVD-RW discs in the Video mode. (See page 88 for details about Initialization)
When an unused DVD-RW disc is placed in the recorder immediately after it has been purchased, the recorder is set to automatically begin initializing in the VR mode. The settings can also be changed so that discs are initialized in the Video mode (page 86).
When using a DVD-RW disc in the Video mode without changing this setting, initialize the disc in the Video mode after first completing initialization in the VR mode (page 88).
- Initialization causes the entire previously recorded contents of the disc to be erased.
- It takes about 1 minute to 1 minute and 30 seconds for initialization to be completed.
Allowing Discs to be Played Back with Other DVD Players (Finalization)
Discs must always be finalized in order to play them back with another DVD player after having been recorded in the Video mode. (See page 88 for details about Finalization)
Finalize discs on which all recordings have been completed so that they can be viewed with another DVD player or a DVD video-compatible PC. Discs that are not finalized may not be able to be played back with other DVD players or DVD video-compatible PCs. (However, this does not guarantee that finalized discs can be played back on all DVD players or DVD video-compatible PCs.)
- Finalizing a DVD-R disc prevents all recordig and editing of that disc.
- Although DVD-RW discs can be re-recorded by initializing even after they have been recorded in the Video mode and finalized, all previously recorded contents are erased.
- Finalizing is required if a disc recorded in the VR mode cannot be played back with a DVD-RW-compatible player. (Discs can be recorded and edited even after finalizing in the case of the VR mode.)
- Finalizing takes from several minutes to about an hour. (Processing takes longer time if there is considerable available space on the disc.)
About the Contents of the Disc
Title, Chapter and Tracks
- DVDs are divided into "Titles" and "Chapters". If the disc has more than one movie on it, each movie would be a separate "Title". "Chapters", on the other hand, are subdivisions of titles.
Example: DVD

flowchart
graph TD
    A["Title 1"] --> B["Chapter 1 Chapter 2 Chapter 3"]
    C["Chapter 1 Chapter 2"] --> B
    D["Chapter 1 Chapter 2"] --> B
- Video CDs and Audio CDs are divided into "Tracks". You can think of a "Track" as one tune on an Audio CD.
Example: Video CDs or Audio CD

- Recording on a DVD-RW Disc in the VR Mode An once recording is treated as a single title (or one chapter). However, a chapter marker (division) is inserted automatically if the recording is paused or a scene is erased during editing. In addition, you can also insert a chapter marker (division) at your favorite scene (page 66).
- Recording on a DVD-R or DVD-RW Disc in the Video Mode An once recording is treated as a single title, and recordings are automatically divided into chapters every 3 minutes. Although the interval at which recordings are divided into chapters can be changed to either 3 minutes, 5 minutes, 10 minutes, 15 minutes, 30 minutes or off (page 86), you cannot insert a chapter at a desired scene.
NOTE
- Numbers identify each title, chapter, and track on a disc. Most discs have these numbers recorded on them, but some do not.
About the Contents of the Disc
Icons Used on DVD Video Disc Case
When you buy a DVD Video disc, the back of the disc case usually contains various information about the contents of the disc.
1

1 Audio tracks and audio formats
DVD discs can contain up to 8 separate tracks with a different language on each. The first in the list is the original track.
This section also details the audio format of each soundtrack—Dolby Digital, DTS, etc.
Dolby Digital
A sound system developed by Dolby Laboratories Inc. that gives movie theater ambience to audio output when the recorder is connected to a Dolby Digital 5.1 channel processor or amplifier.
DTS
DTS is a digital sound system developed by Digital Theater Systems for use in cinemas. This system uses 6 audio channels and provides accurate sound field positioning and realistic acoustics. (By Connecting a DTS Digital Surround decoder, you can also listen to DTS Digital Surround sound.)
Linear PCM
Linear PCM is a signal recording format used for Audio CDs.
The sound on Audio CDs is recorded at 44.1 kHz with 16 bits. (On DVD discs, sound is recorded at between 48 kHz with 16 bits and 96 kHz with 24 bits.)
2 Subtitle languages
This indicates the kind of subtitles.
3 Screen aspect ratio
Movies are shot in a variety of screen modes.
4 Camera Angle
Recorded onto some DVD discs are scenes, which have been simultaneously shot from a number of different angles (the same scene is shot from the front, from the left side, from the right side, etc.).
5 Region code
This indicates the region code (playable region number).
The icons used in this Operation Manual
DVD VIDEO
Indicates the functions that can be performed for DVD Video discs.
DVD RW
DVD RW
...
Indi
cate
s th
e fu
nctio
ons t
hat
can
be
VR MODE
y
D MOLI
。
perf
orm
ed f
or F
VD-
BW
disc
C
[Non-Text]
- Indicates the functions that can be recording in VR mode or playback a disc recorded in VR mode. VIDEO MODE:
- Indicates the functions that can be recording in Video mode or playback a disc recorded in Video mode.
DVD R
......
......
Indi
cate
s th
e fu
nctio
ons
that
can
be
VIDEO CD
......
......
ndio
cate
s the
e fur
nctic
ns t
hat
can
AUDIO CD
......
......
ndio
cate
s the
e fur
nctic
ns t
hat
can
CD-R
......
......
ndio
cate
s the
e fun
nctic
ns t
hat
CD-RW
......
......
ndio
cate
s the
e fun
nctic
ns t
hat
Precautions During Use
Disc Precautions
Proper Disc Storage
| Place the disc in the center of the disc case and store the case and disc upright. | 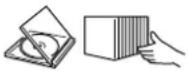 |
| Avoid storing discs in locations subject to direct sunlight, next to heating appliances or in locations of high humidity. |  |
| Do not drop discs or subject them to strong vibrations or impacts. |  |
| Avoid storing discs in locations where there are large amounts of dust or locations where mold tends to grow easily. |  |
Handling Precautions

- If the surface is soiled, wipe gently with a soft, damp (water only) cloth. When wiping discs, always move the cloth from the center hole toward the outer edge.
- Do not use record cleaning sprays, benzene, thinner, static electricit prevention liquids or any other solvent.
- Do not touch the surface.
- Do not stick paper or adhesive labels to the disc.
- If the playing surface of a disc is soiled or scratched, the recorder may decide that the disc is incompatible and eject the disc tray, or it may fail to play the disc correctly. Wipe any soiling off the playing surface with a soft cloth.
Cleaning the Pick Up Lens
- Never use commercially available cleaning discs. The use of these discs can damage the lens.
- Request cleaning of the lens to the nearest Sharp Authorized Service Center.
Warning of Dew Formation
- Dew may form on pick up lens or disc in the following conditions:
- Immediately after a heater has been turned on.
• In a steamy or very humid room. - When the recorder is suddenly moved from a cold environment to a warm one.
When dew forms: It becomes difficult for the recorder to read the signals on the disc and prevents the recorder from operating properly.
To remove dew: Take out the disc and leave the power on for about 1 hour. The recorder will again operate properly when the dew has evaporated.
Copyright
- It is the intent of Sharp that this product be used in full compliance with the copyright laws of the United States and that prior permission be obtained from copyright owners whenever necessary.
- This product incorporates copyright protection technology that is protected by method claims of certain U.S. patents and other intellectual properly right owned by Macrovision Corporation and other rights owners. Use of this copyright protection technology must be authorized by Macrovision Corporation, and is intended for home and other limited viewing uses only unless otherwise authorized by Macrovision Corporation. Reverse engineering or disassembly is prohibited.
Apparatus Claims of U.S. Patent Nos. 4,631,603, 4,577,216, 4,819,098 and 4,907,093 licensed for limited viewing uses only.
- Manufactured under license from Dolby Laboratories. "Dolby", "Pro Logic" and the double-D symbol are trademarks of Dolby Laboratories.
- "DTS" and "DTS Digital Surround" are trademarks of Digital Theater Systems, Inc.
- Certain audio features of this product manufactured under a license from Desper Products, Inc. Spatializer® N-2-2™ and the circle-in-square device are trademarks owned by Desper Products, Inc.
• DVD logo are registered trademark. - i.Link refers to the IEEE 1394-1995 industry specification and extensions thereof. The logo is used for products compliant with the i.Link standard.
• are trademark. VIDEO/R/RW
“Licensed under one or more of U.S. Pat. 4,972,484,5,214,678, 5,323,396, 5,530,655, 5,539,829, 5,544,247,5,606,618, 5,610,985, 5,740,317, 5,777,992, 5,878,080 or 5,960,037.”
Major Components
Main Unit (Front)
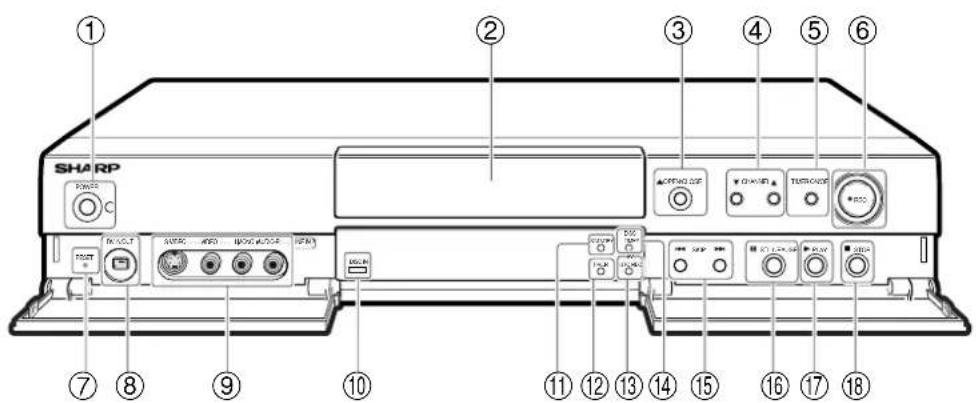
①POWER (P.29)
②Disc tray (P.29)
③ OPEN/CLOSE (P.29)
④CHANNEL ▼▲(P.24)
⑤TIMER ON/OFF (P.52)
⑥RBC (P.48)
⑦RESET (P.101)
⑧DV IN/OUT terminal (P.95)
⑨LINE IN 2
AUDIO input jacks
- VIDEO input jack
· S-VIDEO input jack
⑩DISC IN indicator (P.29)
⑪STANDBY indicator (P.28)
⑫TIMER indicator (P.53)
⑬AV AUTO REC indicator (P.61)
⑭DISC TIMER indicator (P.56)
⑮SKIP (P.32)
⑯ STILL/PAUSE (P.33)
⑰PLAY (P.29)
⑱STDP (P.29)
Front Panel Display

①Recording Mode indicator (P.48)
②Tamper Proof indicator (P.79)
③Disc Type indicator
④ Simple Timer Recording indicator (P.51)
⑤Angle indicator (P.35)
⑥Progressive indicator (P.80)
⑦Recording mark (P.48)
⑧Video mode disc-in indicator
⑨Disc remain time indicator (P.28)
Major Components
Main Unit (Rear)

① LINE IN 1 (AUTO REC)
- AUDIO input jacks
- VIDEO input jack
· S-VIDEO input jack
② COMPONENT VIDEO output jacks (P.20)
③ ANTENNA IN (antenna or cable iput) (P.19)
④ DIGITAL OUT OPTICAL terminal (P.93)
⑤ LINE IN 3
· AUDIO input jacks
- VIDEO input jack
· S-VIDEO input jack
⑥ Output jacks
· AUDIO output jacks
· VIDEO output jack
· S-VIDEO output jack
⑦ ANTENNA OUT (P.19)
Major Components
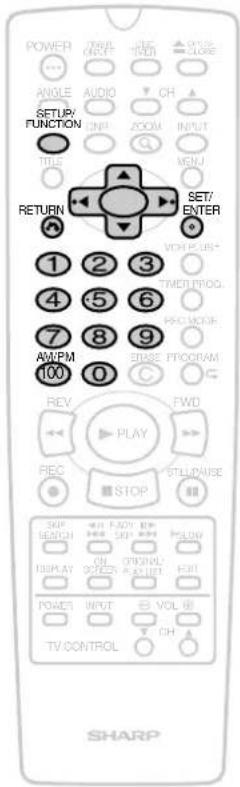
Remote Control Unit

Operating Renge of Remote Control
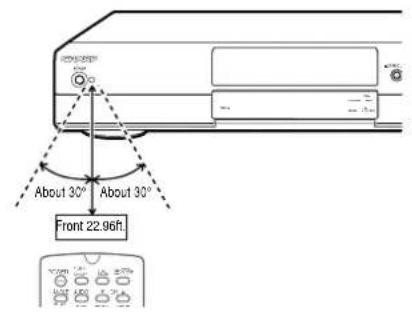
① TIMER ON/OFF (P.52)
② POWER (P.29)
③ AUDIO (P.36)
④ ANGLE (P.35)
⑤ SETUP/FUNCTION (P.24)
⑥ DNR (P.36)
⑦ TITLE (P.30)
⑧ CURSOR (▲/▼/◄/►) (P.24)
⑨ RETURN (P.27)
⑩ Number buttons (P.24)
⑪ 100, AM/PM (P.26)
⑫ ▶ PLAY (P.29)
⑬ REV (P.32)
⑭ ● REC (P.48)
⑮ SKIP SEARCH (P.33)
⑯ DISPLAY (P.28)
⑰ ON SCREEN (P.28)
⑱ TV Function Control (P.18) (Power/INPUT/VOL/CH)
⑲ DISC TIMER (P.56)
⑳ OPEN/CLOSE (P.29)
② CH ▼/▲(P.24)
② INPUT (P.96)
② ZOOM (P.35)
⑳ MENU (P.30)
② SET/ENTER (P.24)
② VCR PLUS+ (P.52)
②7 TIMER PROG. (P.54)
⑳ REC MODE (P.48)
⑲ PROGRAM (P.37)/ [REPEAT] (P.39)
③0 ERASE (P.37)
③1 ▶▶ FWD (P.32)
③2 ■ STOP (P.29)
③ STILL/PAUSE (P.33)
③4 ◀F.ADV▶ (P.33), ◀SKIP▶▶ (P.32)
③5 ▶ SLOW (P.32)
③6 EDIT (P.64)
③7 ORIGINAL/PLAY LIST (P.30)
Loading the Batteries
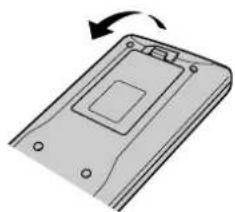
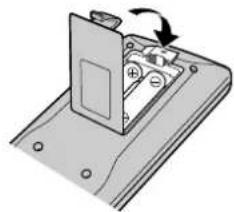
1 Open the battery cover by pulling the lid in the direction of the arrow.
natural_image
Diagram of a device with a scroll wheel and arrow indicating rotation (no text or symbols)2 Load the batteries. Load the two "AA" size batteries (R6, UM/SUM-3) supplied with the remote control unit so that the battery poles and are positioned as indicated.

natural_image
Illustration of a battery pack with two terminals and a central socket (no text or symbols)3 Close the battery cover by lowering the lid in the direction of the arrow.
natural_image
Diagram of a battery pack with an open lid and a rotating arrow indicating rotation (no text or symbols)NOTE
- Do not subject the remote control unit to shock, water or excessive humidity.
- The remote control unit may not function if the recorder's sensor is in direct sunlight or any other strong light.
- Incorrect use of batteries may cause them to leak or burst. Read the battery warnings and use the batteries properly.
- Do not mix old and new batteries, or mix brands in use.
- Remove the batteries if you do not use the remote control unit for an extended period of time.
Major Components

Operating a TV Using the Remote Control (Universal Remote Control)
The Universal Remote Control may operate the basic functions of 21 different types of TVs. To enter the Manufacturer's Code for your TV, follow the instructions below.
There is no guarantee that the universal remote control will function with your TV.
Setting the Manufacturer's Code
1 Press POWER and CH ▲ of TV CONTROL simultaneously.
2 Enter the 2-digit Manufacturer's Code with the number buttons (Ex. 02-“0”, “2”) within 10 seconds after releasing POWER and CH ▲ of TV CONTROL.
3 Point the remote control unit towards the TV and then press POWER of TV CONTROL.
- If the TV turns on/off, setup was successful. If not, repeat the procedure using another code.
Refer to the list below for the Manufacturer's Code and the buttons which work with each brand.
| Buttons on the Remote | POWERCH ▲▼VOL ⊕ ⊖ | INPUT | |
| Brand | Code | ||
| EMERSON | 19 | × | × |
| FISHER | 17 | × | × |
| FUNAI | 06 | × | × |
| GE | 07, 09 | × | — |
| GOLDSTAR | 18 | × | — |
| HITACHI | 15 | × | × |
| JVC | 16 | × | × |
| MAGNAVOX | 09 | × | — |
| 11 | × | × | |
| MITSUBISHI | 14 | × | × |
| PANASONIC | 13, 21 | × | × |
| PIONEER | 03 | × | × |
| RCA | 07, 09 | × | — |
| SAMSUNG | 20 | × | × |
| SANYO | 17 | × | × |
| SHARP | 01 | × | × |
| 02 | × | × | |
| SONY | 10 | × | × |
| TECHNOL ACE | 04 | × | × |
| TOSHIBA | 12 | × | × |
| ZENITH | 05 | × | × |
| 08 | × | — | |
NOTE
- If the batteries in the remote control unit are changed, the code settings must be re-entered.
- Some brands have more than one code listed above, due to changes in the codes. In such cases, try another code to find the code that operates your TV.
Setting the Remote Control Code
- There are two types of codes (remote control codes) for operating this recorder with the remote control (RC1 and RC2). If you operate this recorder with the remote control while using with another SHARP DVD recorder or DVD player placed next to it and both units end up being operated simultaneously, switching the remote control code (for both the recorder and the remote control) to one of the two signals (RC1 or RC2) will let you operate only the recorder.
- Make sure to set the recorder and remote control to the same remote control code. You will not be able to operate the recorder with the remote control if different remote control codes are used.
! Important!
If the remote control codes of the recorder and remote control are different, the remote control code will flash on the display of the recorder. Reset the remote control number to the code flashing on the display.
Note
- The remote control code of the remote become "RC 1" when you change the batteries.
Setting the Remote Control Code of the Recorder
1 Press POWER to turn off the recorder.
2 Press and hold CHANNEL▼ and ▲ on the recorder together for more than 5 seconds.
- Each time the button is pressed, the code of the recorder toggles between "RC-1" and "RC-2".
- At this point, the recorder can no longer be operated with the remote control. Next, set the remote control code for the remote control.
Setting the Remote Control Code of the Remote
Example: Setting the "RC2".
1 Press and hold POWER and 2 together for more than 5 seconds.
- When you set the code to "RC1", press and hold POWER and 1 together.
2 The recorder is turned on.
Basic Conneciton
Easy Connection
The following connection is the basic connection to watch or record TV programs. To use cable box or satellite receiver, see "CATV or Satellite Receiver Connections" on page 21.
! Important!
- This recorder is equipped with copy protection technology. The playback picture from this recorder will not appear correctly on your TV when you connect this recorder to your TV via a VCR (or your VCR via this recorder) using Video/Audio cables.
- Be sure to turn off and unplug from the wall outlet this recorder and all equipments before connecting the cables.

flowchart
graph TD
    A["TV"] --> B["Video/Audio cable (Supplied)"]
    A --> C["VCR"]
    A --> D["The Recorder"]
    A --> E["Antenna cable"]
    B --> F["To antenna input jack"]
    C --> G["Coaxial cable (Commercially available)"]
    C --> H["To antenna output jack"]
    C --> I["To OUT TO TV"]
    C --> J["Coaxial cable (Supplied)"]
    C --> K["To IN FROM ANTENNA"]
    D --> L["To VIDEO/AUDIO output jacks"]
    E --> M["To VIDEO/AUDIO in 1 jacks"]
    E --> N["To VIDEO/AUDIO in 2 jacks"]
    E --> O["Video/Audio cable (Commercially available)"]
    E --> P["To antenna cable"]
    E --> Q["To Antenna cable TV wall outlet"]
1 Connect the TV antenna cable to the IN FROM ANTENNA jack on the rear of this recorder.
2 Connect the OUT TO TV jack on the rear of this recorder to the antenna input jack on your VCR using a coaxial cable.
NOTE
- If you connect this recorder directly to your TV, skip the next step.
- The input signal to IN FROM ANTENNA jack is passed through to the OUT TO TV jack.
3 Connect the antenna output jack on your VCR to antenna input jack on your TV using a coaxial cable.
4 Connect the VIDEO/AUDIO output jacks on this recorder to the VIDEO/AUDIO input jacks on your TV using a Video/Audio cable.
Be sure that the colors of the jacks and plugs match up when connecting the cable.
NOTE
- To connect using S-Video or component cables, see "Using other types of video output" on the next page.
5 Connect the VIDEO/AUDIO output jacks on your VCR to the VIDEO/AUDIO input jacks on your TV using a Video/Audio cable.
! Important!
- When using this connection, set "PROGRESSIVE" in "PLAYBACK SETUP" to "OFF". (When the setting is "ON", the disc playback picture cannot be viewed.)
After the Connection
Plug in the power cords of the TV and VCR. Then go to "EZ Set Up" (see page 23).
Basic Conneciton
Using Other Types of Video Output
In order to view clearer DVD images, it is recommended that you use a commercially available S-Video or component video cable when connecting your TV to the video output.


Connecting Using an S-Video Output
Connect the S-VIDEO output jack on this recorder to the S-VIDEO input jack on your TV using a S-VIDEO cable (Commercially available).
! Important!
- When using this connection, set "PROGRESSIVE" in "PLAYBACK SETUP" to "OFF". (When the setting is "ON", the disc playback picture cannot be viewed.)
After the Connection
Plug in the power cords of the TV. Then go to "EZ Set Up" (see page 23).
Connecting Using the Component Video Output
Connect the COMPONENT OUT jacks on this recorder to the COMPONENT input jacks on your TV using a Component Video cable (Commercially available).
! Important!
- If your TV is compatible with progressive-scan component video, set "PROGRESSIVE" in "PLAYBACK SETUP" to "ON". If your TV is not compatible with progressive-scan video, set to "OFF".
After the Connection
Plug in the power cords of the TV. Then go to "EZ Set Up" (see page 23).
CATV or Satellite Receiver Connections
Connecting to a Cable Box or Satellite Receiver (1)
The following connection is the connection to a cable box or satellite receiver when receiving only a few scrambled channels. When many or all the channels are scrambled, see the connection on the next page.
Using this connection, you can:
- Record unscrambled CATV signals by selecting them on this recorder.
- Record scrambled CATV signals by selecting them on the cable box or satellite receiver and using AV AUTO REC function (See page 60).
- Record another channel while you watch one channel.

flowchart
graph TD
    A["TV"] -->|To antenna input jack| B["Cable box/Satellite receiver"]
    A -->|Coaxial cable (Commercially available)| B
    B -->|To antenna output jack| C["The Recorder"]
    B -->|Video/Audio output jacks| C
    B -->|Video/Audio cable (Commercially available)| C
    B -->|IN 1 (AUTO REC) VIDEO/AUDIO jacks| C
    B -->|To antenna input jack| C
    B -->|Coaxial cable (Supplied)| C
    C -->|To OUT TO TV| D["Antenna cable"]
    C -->|To IN FROM ANTENNA| E["Antenna output jacks"]
    C -->|To video/Audio output jacks| F["Antenna cable (Supplied)"]
    style A fill:#f9f,stroke:#333
    style B fill:#ccf,stroke:#333
    style C fill:#cfc,stroke:#333
    style D fill:#fcc,stroke:#333
    style E fill:#cff,stroke:#333
1 Connect the TV antenna and coaxial cables as shown on the left.
You can watch and record the TV channels.
NOTE
- The input signal to IN FROM ANTENNA jack is passed through to the OUT TO TV jack.
2 Connect the VIDEO/AUDIO output jacks on this recorder to the VIDEO/AUDIO input jacks on your TV using a Video/Audio cable.
You can watch discs.
3 Connect the VIDEO/AUDIO IN 1 jacks on this recorder to the VIDEO/AUDIO output jacks on your cable box or satellite receiver using a Video/Audio cable.
You can record scrambled CATV channels when using a cable box or satellite receiver for decoding.
NOTE
- This is a standard video connections. You can use S-Video or component connections if they are available.
! Important!
- Connect this recorder directly to your TV and not via the VCR, cable box or satellite receiver.
- When using this connection, set "PROGRESSIVE" in "PLAYBACK SETUP" to "OFF". (When the setting is "ON", the disc playback picture cannot be viewed.)
After the Conneciton
Plug in the power cords of the TV and cable box/satellite receiver. Then go to "EZ Set Up" (see page 23).
CATV or Satellite Receiver Connections
Connecting to a Cable Box or Satellite Receiver (2)
The following connection is the connection to a cable box or satellite receiver when receiving many or all the channels are scrambled.
Using this connection, you can:
- Record any CATV signals by selecting them the cable box or satellite receiver.
- Record using AV AUTO REC function.
NOTE
- In this connection, you cannot record another channel while you watch one channel.

flowchart
graph TD
    A["TV"] --> B["Video/Audio audio jack"]
    B --> C["Video/Audio cable (Supplied)"]
    C --> D["Coaxial cable (Commercially available)"]
    D --> E["To antenna input jack"]
    E --> F["To OUT TO TV"]
    F --> G["The Recorder"]
    G --> H["Video/Audio output jacks"]
    G --> I["Video/Audio cable (Commercially available)"]
    I --> J["Cable box/Satellite receiver"]
    J --> K["To IN FROM ANTENNA"]
    K --> L["Antenna cable"]
    L --> M["To Antenna/CATV wall outlet"]
    M --> N["Video/AUDIO output jacks"]
    style A fill:#f9f,stroke:#333
    style B fill:#ccf,stroke:#333
    style C fill:#cfc,stroke:#333
    style D fill:#fcc,stroke:#333
    style E fill:#cff,stroke:#333
    style F fill:#ffc,stroke:#333
    style G fill:#cfc,stroke:#333
    style H fill:#fcc,stroke:#333
    style I fill:#cff,stroke:#333
    style J fill:#cfc,stroke:#333
    style K fill:#fcc,stroke:#333
    style L fill:#ffc,stroke:#333
    style M fill:#cfc,stroke:#333
1 Connect the TV antenna and coaxial cables as shown on the left.
You can watch and record the TV channels.
NOTE
- The input signal to IN FROM ANTENNA jack is passed through to the OUT TO TV jack.
2 Connect the VIDEO/AUDIO output jacks on this recorder to the VIDEO/AUDIO input jacks on your TV using a Video/Audio cable.
You can watch discs.
3 Connect the VIDEO/AUDIO IN 1 jacks on this recorder to the VIDEO/AUDIO output jacks on your cable box or satellite receiver using a Video/Audio cable.
You can record scrambled CATV channels.
NOTE
- This is a standard video connections. You can use S-Video or component connections if they are available.
! Important!
- Connect this recorder directly to your TV and not via the VCR, cable box or satellite receiver.
- When using this connection, set "PROGRESSIVE" in "PLAYBACK SETUP" to "OFF". (When the setting is "ON", the disc playback picture cannot be viewed.)
After the Connection
Plug in the power cords of the TV and cable box/satellite receiver. Then go to "EZ Set Up" (see page 23).
EZ Set Up
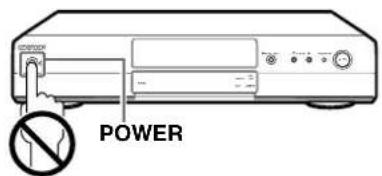
Important! (Caution during EZ Set Up):
- Do not press POWER on the recorder or remote control.
The EZ Set Up function automatically sets the tuner channels and clock when the antenna cable is connected to the rear of the recorder and the power plug is then connected to an AC outlet.
! Important!
When using a cable box:
• See "CATV or Satellite Receiver Connections" on page 21.
- Leave POWER on the cable box turned on and select a channel that carries EDS signals.
1 Make sure that the antenna cable is connected. For connection configuration, refer to "Basic Connection" on page 19.
2 Connect the power plug of the recorder to an AC outlet.
3 The tuner channels and clock will automatically be set.
- This recorder can monitor and use time-signals (EDS signals), which are provided by some TV stations, to automatically adjust the clock. This recorder automatically searches EDS signals, but if you are in a hurry to use timer recording or know the channel of the EDS signal carrier in you area, follow the procedure in "Auto Clock Setting" or "Manual Clock Setting".
During Auto Channel Setting During Auto Clock Setting EZ Set Up complete

• Channel number is increasing.


- Front Panel Display is turned off when setting "CLOCK DISP" in "OPTION SETUP" to "OFF".
NOTE
- If power is supplied to the recorder before the cable is connected, EZ Set Up will not be able to preset the channels into memory. If this occurs, press RESET in the front of the recorder (See page 101). EZ Set Up function will work again.
- If the power is turned on during EZ Set Up, the Auto Channel setting will be interrupted and the turner channels will not be able to be preset.
• Auto Clock Setting may take several minutes. - If the Auto Clock Setting is not completed within 30 minutes, there may be no channels with EDS signals. In this case, set the clock manually. (See "Manual Clock Setting" on page 26.)
- If the antenna signal is weak, the Auto Clock Setting function may not operate.
- During initial channel setting, the channels are set into the AIR channel setting. To watch CATV channel, select "CATV" on the CHANNEL PRESET screen. (See "Channel Setting" on page 24.)
Channel Setting

Channel Setting
This recorder can receive a maximum of 181 channels as shown below by presetting the channels into memory. (VHF: 2 to 13, UHF: 14 to 69, CATV: 1 to 125)
Important!
When you use the recorder for the first time, press SETUP/FUNCTION. "OSD LANGUAGE SETUP" screen appears. You should set the language to be used in the OSD. See "OSD Language Setting" on page 27 for details.
1 Press SETUP/FUNCTION. Select "CHANNEL" with ▲/▼ and then press SET/ENTER.

2 Press ◀/▶ to select "AIR" or "CATV" and then press ▼. Example: AIR
- To watch CATV after EZ Set Up, select "CATV", and then press SET/ENTER.
3 Press ◀/▶ to set "CH SET" to "AUTO" then press SET/ENTER.

4 The automatic tuning will start.
- The channel display will count up, and when finished, the screen returns to normal.
NOTE
- Automatic tuning will not start unless the arrow is at "CH SET-AUTO" position.
- If a button is not pressed within 3 minutes during the setting procedure, the screen will return to normal.
- If the power is interrupted for more than 1 hour, AIR / CATV selection must be set again.
• Automatic tuning will be interrupted if SETUP/FUNCTION is pressed before the screen returns to normal.
Adding Channel Memory/Erasing Channel Memory
Use this function to manually add or erase channels to/from the memory.
1 Select the channel to be added with the number buttons and the channel to be erased with the CH ▲/▼ or number buttons.
2 Press SETUP/FUNCTION. The MENU screen appears. Press ▲/▼ to select "CHANNEL" and then press SET/ENTER.
3 Press ▲/▼ to select "CH SET" and then press ◀/▶ to select "MANUAL". Then press SET/ENTER.
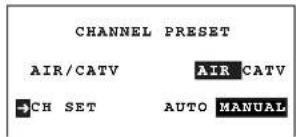
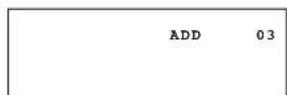
4 Press ◀/▶ to select "ADD" if you want to add the channel memory or "ERASE" if you want to erase the channel memory.
[ADD]


5 Press RETURN to return to the CHANNEL PRESET screen.
Clock Setting

Auto Clock Setting
(If you know a channel that carries EDS signals)
! Important!
When using a cable box:
- See "CATV or Satellite Receiver Connections" on page 21.
- Leave POWER on the cable box turned on and select a channel that carries EDS signals.
1 Press SETUP/FUNCTION. Press ▲/▼ to select "CLOCK" and then press SET/ENTER.
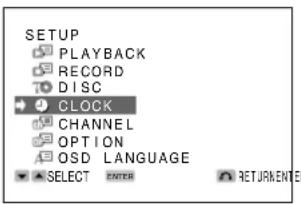
2 Press ▲/▼ to select "AUTO" and then press SET/ENTER.

3 Press ◀/▶ to set EDS CH SET mode to "MANUAL" and then press ▼.
4 Press ◀/▶ to select a channel that carries EDS signals and then press ▼.
Example: 07
- The number of channels that can be selected depends on the mode setting on the CHANNEL PRESET screen.
See NOTE.
When using a cable box: Input the output channel (02, 03, or 04) of the cable box.
5 Press ◀/▶ to select "TIME ZONE".
- If you want the Recorder to use the time zone from which your broadcasts with EDS signals, choose AUTO. If your broadcasts with EDS signals from a different time zone than the one in which you live, be sure to select your time zone.
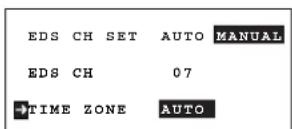
6 Press SET/ENTER to enter. The screen returns to normal.
7 Press POWER to turn off the recorder.
- The Auto Clock Setting function will automatically set the clock.
NOTE
- If the EDS CH SET mode is set to MANUAL mode in Step 3 and a channel that does not carry EDS signal is selected in Step 4, the Auto Clock Setting function will not operate.
- In Step 4, the number of channels that can be selected depends on the mode setting on the CHANNEL PRESET screen. See the table below.
| AIR/CATV | Channels to be selected |
| AIR | 02 ↔03 ↔04 ...... 68 ↔ 69 ↔02 |
| CATV | 01 ↔02 ↔03 ......124 ↔125 ↔01 |
- In Step 1, if you press SETUP/FUNCTION when operating the screen setting for the first time, the OSD LANGUAGE SETUP screen will appear.
- If you entered incorrect data during the setting procedure, re-enter the correct data in the following manner:
① Use ◀/▶ to select the data to be corrected.
②Set the correct data with ▲/▲▼.▼
③ After correcting the data in Step ②, press SET/ENTER to enter.
- If you press RETURN or SETUP/FUNCTION in Step 6, the data will not be stored.
- If a button is not pressed within 3 minutes during the setting procedure, the screen will return to the normal screen.
- "TIME ZONE" is changed as follows.
ATLANTICA AUTO EASTERN CENTRAL ALASKA PACIFIC MOUNTAINHAWA
Clock Setting
Manual Clock Setting
1 Press SETUP/FUNCTION. The MENU screen appears. Press ▲/▼ to select "CLOCK" and then press SET/ENTER.

2 Press ▲ / ▼ to select "MANUAL" and then press SET/ENTER.
3 Press ◀/▶ to select "TIME" and press ▲/▼ to set time. Example: 10:28 AM
- Number buttons can be used instead of ▲▼▼ to set time and date. Press AM/PM to select AM or PM during time setting.
4 Select and set "DATE", "YEAR" and "DST" in turn, in the same manner as in Step 3.
- See "Automatic Daylight Saving-Time (D.S.T.) Adjustment".
Example: Jul. 4, 2003, DST: ON
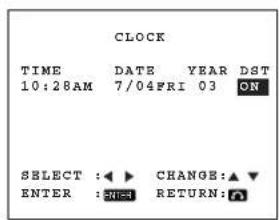
5 If the data is correct, press SET/ENTER to enter.
• The screen returns to normal.
NOTE
-
If you entered incorrect data during the setting procedure, re-enter the correct data in the following manner:
① Use ◀/▶ to select the data to be corrected.
②Set the correct data with ▲/▲▼▼
③After correcting the data in Step ②, press RETURN or SET/ENTER to enter. -
If you press RETURN or SETUP/FUNCTION to exit the clock setting screen in Step 4, the data will not be stored.
- If a button is not pressed within 3 minutes during the setting procedure, the screen will return to the normal screen.
automatic Daylight saving-Time (D.S.T.) adjustment
This recorder is equipped with an internal Automatic Daylight Saving-Time Adjustment function. In spring (first Sunday in April) and autumn (last Sunday in October), the time is adjusted as shown below. This function has been preset to ON at the factory. Set the D.S.T. mode in the clock setting screen.
Spring
Programmed timer recording set within this time frame (2:00 AM to 3:00 AM) will not be carried out.
First Sunday in April (D.S.T. is ON)

Autumn
Because there will be two time frames from 1:00 AM to 2:00 AM, timer programming set between these times will be influenced by the time change.
Last Sunday in October (D.S.T. is ON)

NOTE
- If the timer recording program is affected by the D.S.T. time change, check your TV listing and find out when it reflects the time change. Some TV listings will indicate the time change in the same manner as is programmed in this recorder, but others do not show the time change until the next morning. In that case, when programming a timer, use the clock setting screen to set the D.S.T. mode to OFF so the time change will not be carried out.
OSD Language Setting

1 Press SETUP/FUNCTION to display the MENU screen.

! Important!
When you use the recorder for the first time, press SETUP/FUNCTION. "OSD
LANGUAGE SETUP" screen in the step 3 appears. You should set the language to be used in the OSD.
2 Press ▲/▼ to select "OSD LANGUAGE" and then press SET/ENTER.
3 Press ▲/▼ to select the language you want to use. Example: ENGLISH
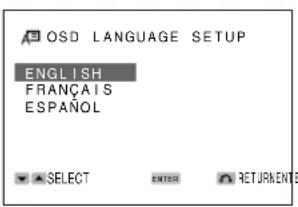
4 Press SET/ENTER to enter and then press RETURN to return to the SETUP screen.
NOTE
- If you press RETURN or SETUP/FUNCTION to exit the OSD LANGUAGE SETUP screen in Step 3, the data will not be stored.
Display Information

Change the Display on the TV Screen
Each time ON SCREEN on the remote control unit is pressed, the display on the TV screen changes the mode in the following sequence:

(When the disc is set)

AUTO: Displays indicators for 3 seconds when operation begins.
ON: Displays indicators continuously until the operation mode is changed.
OFF: Does not display indicators.
Disc information:
Displays the information on the disc when the disc is set. During playback, the information is displayed for about 10 seconds and automatically disappear.
■ Operation mode screen
Example:

■ Disc information screen
Example:

Change the Display on the Front Panel Display
Each time DISPLAY on the remote control unit is pressed, the Front Panel Display changes the mode in the following sequence:
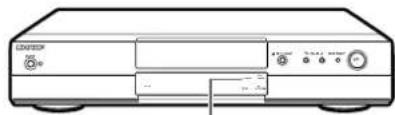
natural_image
Front view of a vintage desktop computer with ports and indicator lights (no visible text or labels)STANDBY
- When the recorder is turned off (STANDBY indicator lights on), clock is displayed. The display goes off automatically after one minute (when setting "CLOCK DISP" in "OPTION SETUP" to "OFF").

Example: During stop mode

flowchart
graph TD
    A["输入"] --> B["处理1"]
    B --> C["输出1"]
    C --> D["处理2"]
    D --> E["输出2"]
Example: When playing back the DVD-RW disc

flowchart
graph TD
    A["12345"] --> B["PLAY"]
    B --> C["03001"]
The time is not displayed when a disc is played back on which the time has not been recorded.
Example: When recording onto the DVD-RW disc
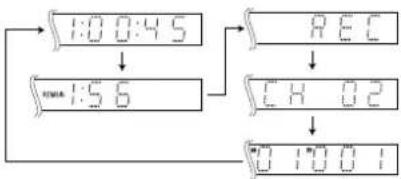
flowchart
graph TD
    A["1:00:45"] --> B["1:56"]
    C["REC"] --> D["CH 02"]
    D --> E["0:10:01"]
    B --> E
NOTE
- This recorder turns off the clock indicator on the Front Panel Display to save electricity when the product is turned off. To display the clock indicator during power off, set "CLOCK DISP" in "OPTION SETUP" to "ON" (See page 90).
Playback

DVD Playback
Playback the playback-only discs
DVD VIDEO
1 Turn on the TV and switch the TV channel to the external "VIDEO" or "AV" channel connected to the VIDEO/AUDIO output jacks.
2 Press POWER. The recorder is turned on.
3 Press OPEN/CLOSE to open the disc tray.
4 Load a disc onto the tray.
- Position it with the printed title side facing up, align it with the guides.
- When you load a double-sided disc, load it with the side you want to play face down.
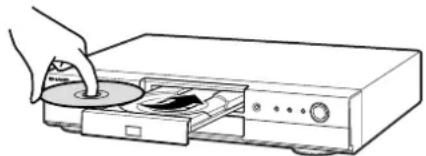
natural_image
Line drawing of a hand inserting a CD into a CD-ROM drive (no text or symbols)5 Press OPEN/CLOSE to close the disc tray.
- When the disc is being identified ("LOAD" is displayed on the Front Panel Display), the DISC IN indicator on the front panel is blinking. The indicator lights when the disc is finished being identified ("LOAD" disappears).
- Some discs start playback automatically.
6 Press ▶PLAY to start playback.
- If you're playing some DVD-Video discs, a disc menu screen may appear. See page 45 for how to operate the menu.
7 Press ■STOP to stop playback.
- When starting playback from the place last stopped, go to step 8.
- When starting playback from the beginning, go to step 9.
Resume Function
This recorder stores the location where you stopped the disc. This function enables you to resume the playback from the place last stopped.
8 Press ▶PLAY after pressing ■STOP in the step 7.
- Play resumes from a point slightly before the point where it was stopped.
- Resume information will not be canceled if the power is turned off.
- Resume function may not work on some discs.
RES. ■ DVD
NOTE
The resume function is canceled in the following cases.
- When you press ■STOP during auto-playback.
- When you open the disc tray.
- When you display the DiscNavi screen.
- When a DVD-R/RW disc has been edited or finalized after playback has been stopped.
- When you switch between ORIGINAL and PLAYLIST.
Playback From the Beginning
9 Press ■STOP again.
10 Press ▶PLAY.
NOTE
- When taking out a disc, first press ■STOP before taking out the disc. When the OPEN/CLOSE is pressed during playback, it may take a short time for the tray to open.
- In cases when a disc cannot be played back as a result of inserting a non-standard disc or the presence of scratches and so forth on the disc "INCORRECT TYPE. REMOVE DISC." will appear and all other functions of the recorder will be disabled except for opening and closing of the tray. Take out the disc when this happens.
Playback
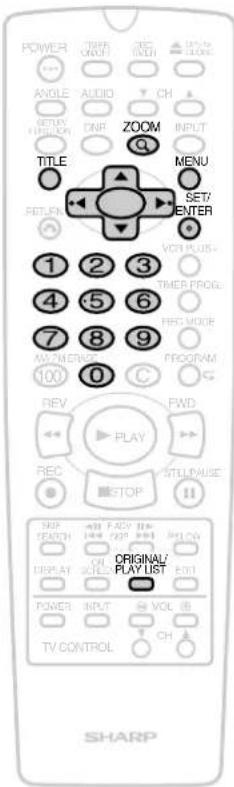
Selected Title Playback
DVD VIDEO
1 Press ZOOM during stop mode.
2 Press number buttons to enter the title number.
3 Press SET/ENTER.
- Selected title is played back.
NOTE
- This function does not work or work correctly on some discs.
Recorded DVD Disc Playback
DVD RW DVD RW DVD R VR MODE VIDEO MODE
- When playing back DVD-R or DVD-RW discs recorded with this recorder, first select the title where you want to start playback.
- Select a title by displaying a list of first scenes for each title (DiscNavi).
Playback After Confirming Contents with DiscNavi
DiscNavi displays a list of the first scene of each title.
NOTE
- When the DV input is selected, discs cannot be played back if "DV LINK" is set to "ON". You can enjoy other channels by switching to the other channel.
1 Load a disc recorded in VR mode.
2 Press TITLE or MENU.
• DiscNavi Title List screen appears.

- If a DVD-RW disc (VR mode) has the PLAYLIST, you can switch the screens between PLAYLIST and ORIGINAL by pressing ORIGINAL/PLAYLIST.
3 Press ▲/▼/◄/► to select the title screen you want to watch.

4 Press SET/ENTER.
- Selected title is played back.
NOTE
- Parts that have been erased (page 65), moved (page 75) or added (page 76) during editing appear as a momentarily paused during playback.
- In the case of titles added with another DVD recorder that contain characters which cannot be displayed with this recorder, the titles are displayed as “*****” (up to a maximum of 24 characters).
- Titles for which recording has been interrupted due to a scratched disc, soiled disc or other reason are displayed with an exclamation point “!” in front of the title displayed on the DiscNavi menu and so forth.
- When playing back the playlist of a disc that has been edited with another DVD recorder, and a single title lasts for 12 hours or more, that title cannot be played back beyond 12 hours.
• Discs edited with another DVD recorder that contain more than 201 chapter markers cannot be played back.
Playback

Playback by Selecting a Title
When playing back a disc recorded in the Video mode after it has been finalized, play back the disc by selecting a title after displaying the list of titles by pressing MENU.
NOTE
- This function can be used for DVD-R or DVD-RW Video mode disc that have been finalized.
1 Load a disc recorded in Video mode.
2 Press TITLE or MENU.
• Title screen appears.
After Finalize
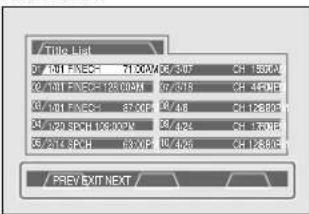
NOTE
- When a disc that has been recorded in the Video mode is finalized (pages 12 and 88), a menu is automatically created that can be played back even with other DVD players. Consequently, the menu before finalizing is different from that of after finalizing.
- In the case of titles added with another DVD recorder that contain characters which cannot be displayed with this recorder, the titles are displayed as “****...” (up to a maximum of 24 characters).
3 Press ▲/▼/◄/► to select the title name.
4 Press SET/ENTER.
- Selected title is played back.
Video CD/Audio CD/CD-R/CD-RW Playback
VIDEO CD AUDIO CD CD-R CD-RW
1 Load a CD and press ▶PLAY.
2 Press ■STOP to stop the playback.
Selected Track Playback
VIDEO CD AUDIO CD CD-R CD-RW
1 Press number buttons to select the track number during playback. Example: For track 12, press 1,2.
2 Press SET/ENTER or ▶PLAY.
- Selected track (music) is played back.
Playing VIDEO CDs with Playback Control (PBC)
- Pressing ▶PLAY begins PBC playback. Time display is not shown for some discs.
- If you specify the track number to be played (with playback stopped) and press ▶ PLAY, normal playback (not PBC playback) begins.
- Digital Connection to an MD to Record a CD
When you are using a digital connection to record the contents of a CD to an MD, the track numbers of the CD may not match the track numbers recorded to the MD.
NOTE
- When the DV input is selected, discs cannot be played back if "DV LINK" is set to "ON". You can enjoy other channels by switching to the other channel.
Playback
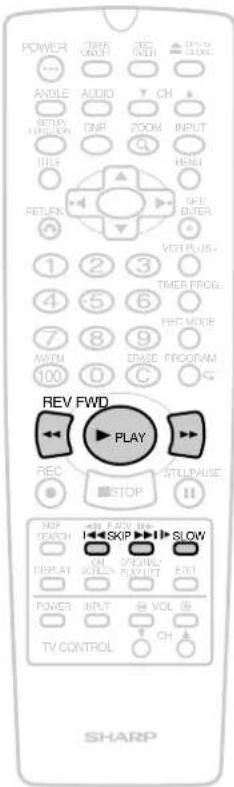
Fast Forward/Fast Reverse

Press FWD▶▶ or ◀◀REV during playback.
- The disc begins fast scan at x2 speed (1). Scanning speed selection
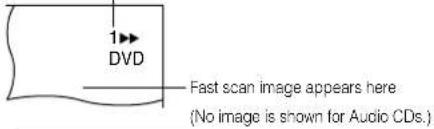

Fast Forward/Fast Reverse (Search) Function on the Recorder
Press and hold SKIP 1★◄for►1 more than 2 seconds on the front of the recorder.
• The search speed is 2 (about ×8).

natural_image
Front view of a portable electronic device with indicator lights and ports (no visible text or symbols)NOTE
- On some discs, the fast scan function is disabled.
- On DVD discs and Video CDs, audio and subtitles are not played back during the fast scan playback.
- With a DVD disc, you cannot search past a title. Playback starts from the beginning of the title.
- During the fast scan playback, the sound may not come out.
- When the fast forward search function is used during playback of a DVD video disc, the speed may differ from that described in this manual depending on the disc and the scene being played back.
SKIP (Forward/Reverse)

While you are playing a disc, this function jumps to the beginning of the next chapter/track (Forward) or the current chapter/track (Reverse) and automatically starts playing that chapter/track.
Press SKIP▶▶I or I◀◀SKIP during playback.
- Playback skips forward one chapter/track for each time SKIP▶▶I pressed.
- If you press SKIP and playback begins, and you then press ISKIP again within 5 seconds, playback returns to the beginning of the previous chapter/track.
NOTE
- On some discs, the skip functions are disabled.
Slow-Motion

1 Press ISLOW during playback.
- Three speeds are available. Each time I-SLOW is pressed, the speed of slow-motion playback changes in the following sequence:
$$ \rightarrow 1 (\text { about } \times 1 / 2) \longrightarrow 2 (\text { about } \times 1 / 8) \longrightarrow 3 (\text { about } \times 1 / 1 6) $$
2 Press ▶PLAY to return to the normal playback.
NOTE
- On some discs, the slow-motion playback functions are disabled.
Playback
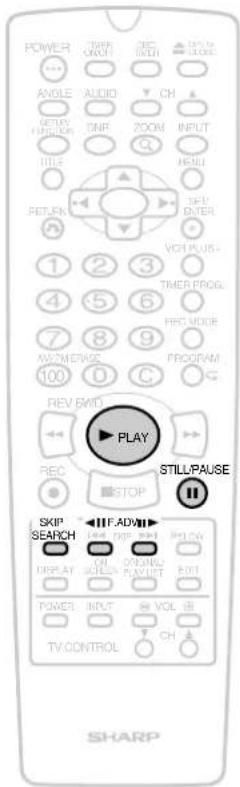
Still/Pause
Frame Advance
| DVD VIDEO | DVD RW | DVD RW | DVD R | VIDEO CD |
| VR MODE | VIDEO MODE |
1 Press || STILL/PAUSE during playback.
• The playback is stilled.
- The playback is paused when Audio CD is played back.
2 Press F.ADVIII or ◀F.ADV.
- The disc goes forward by one frame each time F.ADVII is pressed.
- The disc goes rewind by one frame each time RIVADV is pressed.
- If you press and hold SKIP▶let more than 2 seconds on the front of the recorder, seach will be started.
3 Press ▶PLAY to return to the normal playback.
NOTE
- On some discs, still/pause and frame advance functions are disabled.
- The frame advance playback functions are disabled for Audio CDs.
- The frame reverse playback function is disabled for Video CDs.
• Picture quality may diminish during frame advance and frame reverse with a disc other than a DVD-RW disc in VR mode (such as a DVD video disc).
Skip Search
| DVD VIDEO | DVD RW | DVD RW | DVD R |
| VR MODE | VIDEO MODE |
With this feature, you can set a forward search time to approx. 30, 60, 90 or 120 seconds of recorded material. After searching, normal playback will resume automatically.
- Press SKIP SEARCH during playback. (Example: during commercials)
| Number of Times Pressed | Search Time |
| 1 Time | Approx. 30 sec. |
| 2 Times | Approx. 60 sec. |
| 3 Times | Approx. 90 sec. |
| 4 Times | Approx. 120 sec. |
NOTE
- This function can only be used within the same title.
MP3 Discs Playback

CD-R CD-RW
NOTE
- When the DV input is selected, discs cannot be played back if "DV LINK" is set to "ON". You can enjoy other channels by switching to the other channel.
• See page 8 for details about the MP3 file format.
1 Press POWER. The recorder is turned on.
2 Load the MP3 recorded CD-R or the CD-RW and then press TITLE or MENU.

3 Press ▲/▼/◄/► to select the folder you want to play and then press SET/ENTER.
- The file (music title) in the folder is displayed on the file selection screen.

- Press RETURN to return to the folder selection screen.
- When pressing ▶PLAY after selecting the folder, the playback screen is displayed, and the files in that folder can be played from the beginning.
4 Press ▲/▼/◄/► to select the file (music title) you want to play and then press SET/ENTER.
- The chosen file (music title) will be played in sequence.

5 Press ■STOP to stop play.
To Play Another File (music title) during Playback
Press ▲/▼/◄/► to select the file (music title) you want to play and then press SET/ENTER.
- The chosen file (music title) will be played.
NOTE
- The file where the cursor is on will be played when the cursor is moved to a different from the file being played and no operation is taken within 10 seconds.
To Skip the File during Playback
Press SKIP▶or SKIP
- SKIP ▶ skip forward, and ◀SKIP will rewind.
While the MP3 disc is playing
• Time Search is disabled.
- Programmed playback is disabled.
- It is possible to repeat one track or the entire folder.
• Dolby Virtual Surraund does not operate.
Changing Image/Audio During Playback
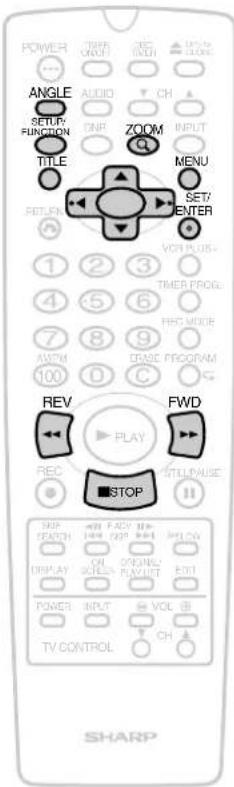
Zoom Function
You can zoom the desired part of an image during DVD playback.

1 Press ZOOM during playback.

• Each press of ZOOM cycles through the zoom settings in the following sequence:

2 While an image is zoomed, press ▲/▼/◄/► to shift the view and display the part you want.
The ZOOM indicator changes from white to red to let you know when you are trying to perform an illegal shift of view.
3 Press ZOOM to return to the normal screen
NOTE
- An image may become distorted when zoomed.
- You can cancel the zoom operation by pressing FWD▶▶, ◀◀REV, TITLE, MENU, SETUP/FUNCTION or ■STOP.
- The zoom operation is cleared automatically whenever you display a DVD screen that enables you to change the scene by pressing ▲/▼/▼/▶.
- Subtitle cannot be zoomed.
Angle Function
DVD VIDEO
You can change the angle of view when playing a DVD video disc that contains scenes recorded from multiple angles.
1 Press ANGLE during playback.
- mark lights when different angles are recorded for the title currently playing.
• Show the number of the current angle.

- If no angles are recorded on the disc, xx is displayed.
2 Press ▲ / ▼ (or ANGLE) to change the scene to the next angle in those recorded.
- About 10 seconds later, the indicator on the TV will disappear automatically. (Or press SET/ENTER to turn off the indicator.)
NOTE
- The operation differs depending on the discs. Refer to the operation manuals for your disc.
Changing Image/Audio During Playback
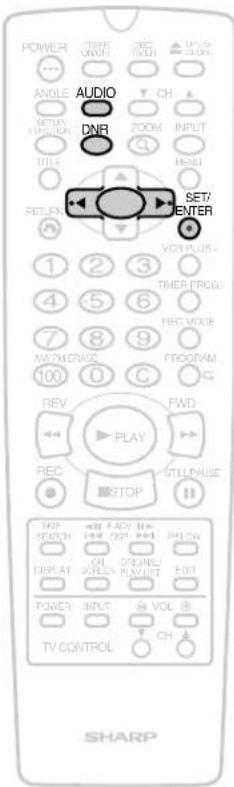
Audio Setting
DVD RW VIDEO CD AUDIO CD VR MODE
You can change the audio output channel between stereo, left channel and right channel when you play Video CDs and Audio CDs. You can change the audio output channel when you play a DVD-RW disc recorded multiple sounds in VR mode (See also page 87).
Each time AUDIO is pressed, the audio channels changes as follows:

DVD RW VR MODE
It may differs depending on the recorded sound on the disc. See the table of SAP on page 87 for details.
NOTE
- When you play a VR mode disc recorded on a Dual Mono, and if you are listening to the Dolby Digital sound via the digital output jack, you cannot select the audio channel. Set "Digital OUT" in "PLAYBACK SETUP" to "PCM" (See page 81), or if you want to change the audio channel, listen via the analog output jacks.
Monitor Output when Receiving a Stereo or SAP Broadcast
When receiving a stereo or SAP broadcast, press AUDIO to change the audio output mode to select Monitor Output. See the table of SAP on page 87 for details.
NOTE
- When the signal is weak (it is hard to listen) in a stereo broadcast, press AUDIO to turn off "L R" display on the TV screen and change the audio output mode to MONO.
DNR (Digital Noise Reduction)
DVD VIDEO DVD RW DVD RW DVD R VIDEO CD VR MODE VIDEO MODE
When the noise contained in recorded material being played back becomes a problem, you can reduce the noise to make the picture clearer. DNR can be set to one of three levels according to the recorded material being played back. It is recommended to turn DNR "ON" when playing back discs that have been recorded in the LP mode or EP mode, and turn DNR "OFF" when playing back discs having low noise levels such as DVD video discs.
1 Press DNR during playback.
• Each time DNR is pressed, the mode changes between "ON" and "OFF".

2 When the mode is "ON", press ◀/▶ to adjust the level.
- Effects are diminished when ◀ is pressed.
- Effects are enhanced when ▶ is pressed.
NOTE
- About 10 seconds later, the indicator on the TV will disappear automatically. (Or press SET/ENTER to turn off the indicator.)
- The DNR function does not work when setting "PROGRESSIVE" in "PLAYBACK SETUP" to "ON".
Programmed Playback

Title/Track Programmed Playback
DVD VIDEO DVD RW DVD R VIDEO CD AUDIO CD VIDEO MODE
1 Press PROGRAM while the disc is stopped.
- The "TITLE PROGRAM" screen appears.

• Each time PROGRAM is pressed, the mode changes between "Title (Track) Program" and "Chapter Program".
- Press RETURN to return to normal screen.
- Chapter Program does not work on Video CDs and Audio CDs.
- Track Program screen is displayed when a Video CD or Audio CD is set.

NOTE
- Up to 20 titles can be programmed.
- When you input the title number which has not been recorded on the disc, the number is not set. Input correct title number.
- Press ERASE to cancel the program.
- Press and hold ERASE for about 2 seconds, all programmed title is canceled.
3
Press ▶ PLAY.
- The title will be played in the order they were entered.
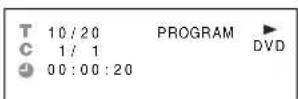
4
Press ■STOP to stop the programmed playback.
- To start programmed playback again, repeat step 1 to 3.

NOTE
• The program cannot be set during playback.
- This function can only be used for discs on which the title has been recorded.
- On some discs in which programmed playback is prohibited, this function is disabled.
- Programmed playback does not work on DVD-RW discs in VR mode.
2 Press number buttons to enter the desired title number and then press SET/ENTER.
Example:
- For title 10, press 1, 0 and then press SET/ENTER.
- For title 2, press 2 and then press SET/ENTER.
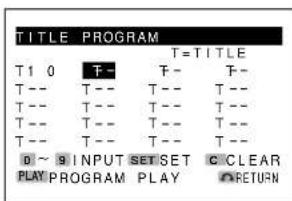
- Repeat step 2 to program other titles.
Programmed Playback

Chapter Programmed Playback
DVD VIDEO DVD RW DVD R VIDEO MODE
1 Press PROGRAM twice while the disc is stopped.
- The "CHAPTER PROGRAM" screen appears.

- Press RETURN to return to normal screen.
2 Press number buttons to enter the desired title number and then press SET/ENTER.
Example:
- For title 10, press 1, 0 and then press SET/ENTER.
- For title 2, press 2 and then press SET/ENTER.
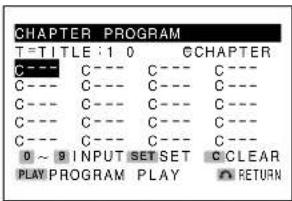
NOTE
- Up to 20 chapters can be programmed.
- When you input the chapter number which has not been recorded on the disc, the number is not set. Input correct chapter number.
- Press ERASE to cancel the program.
- Press and hold ERASE for about 2 seconds, all programmed chapter is canceled.
- Press RETURN to cancel the setting
4 Press ▶PLAY.
• The chapter will be played in the order they were entered.
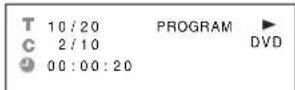
5 Press ■STOP to stop the programmed playback.
• To start programmed playback again, repeat step 1 to 3.
NOTE
• The program cannot be set during playback.
- This function can only be used for discs on which the chapter has been recorded.
- This function does not work on Video CDs or Audio CDs.
- On some discs in which programmed playback is prohibited, this function is disabled.
3 Press number buttons to enter the desired chapter number and then press SET/ENTER.
Example:
- For chapter 10, press 1, 0 and then press SET/ENTER.
- For chapter 2, press 2 and then press SET/ENTER.

- Repeat step 3 to program other chapters.
Repeat Playback
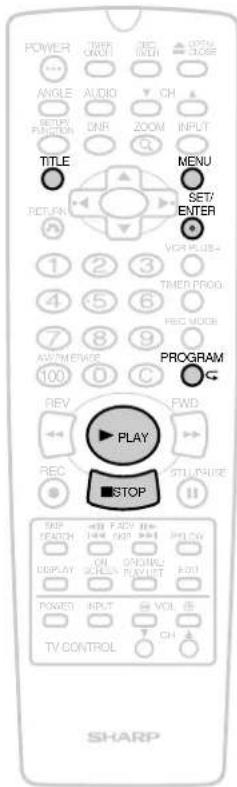
Repeat Playback
1 Press (REPEAT) while a disc is playing.
• Each time ⬇ (REPEAT) is pressed, the repeat function changes as follows.
- Depending on the disc type, the repeat function will vary.
DVD VIDEO DVD RW DVD RW DVD R
VR MODE VIDEO MODE
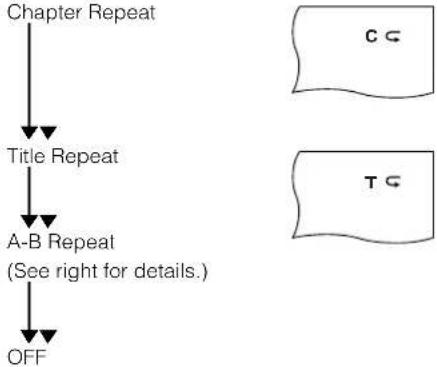
flowchart
graph TD
    A["Chapter Repeat"] --> B["Title Repeat"]
    B --> C["A-B Repeat\n(See right for details.)"]
    C --> D["OFF"]
VIDEO CD AUDIO CD CD-R CD-RW

flowchart
graph TD
    A["Track Repeat"] --> B["Repeat all files in the disc"]
    B --> C["A-B Repeat\n(See right for details.)"]
    C --> D["OFF"]
2 Press SET/ENTER or ▶PLAY to start repeat playback.
- Press ⬇ (REPEAT) and select OFF to return to the normal playback.
NOTE
- Repeat playback is disabled on some discs.
- Repeat playback cannot be used during programmed playback.
- Repeat playback cannot be used on Video CDs with PBC mode playback.
A-B Repeat Playback

A-B repeat allows you to repeat specified section on the disc.
1 Press (REPEAT) three times while a disc is playing.
2 While you are playing a disc, press SET/ENTER or ▶PLAY when you reach the start of the section to be repeated.
3 While the disc is playing the same chapter/track, press SET/ENTER or ▶PLAY again when you reach the end of the section to be repeated.

• The A-B repeat begins from the point where you specified in step 2.
4 Press (REPEAT) to return to the normal playback.
NOTE
- To cancel A-B repeat, press ■STOP, TITLE, MENU or other buttons.
- A-B repeat can only be used within the same title/track.
(On some DVD discs, A-B repeat is restricted to the same chapter.) If the title/track finishes before specifying the ending location (B), the location where the title/track finishes will be set as the ending location (B). - The A-B repeat function cannot be used during programmed playback.
- The A-B repeat function does not operate in scenes where different camera angles are recorded.
- The A-B repeat cannot be used on Video CDs with PBC mode playback.
Function Control
While the disc is playing, press SETUP/FUNCTION to display the screen shown below. Using Function control, you can check at a glance and change the current settings of the each items.
Example: DVD video disc
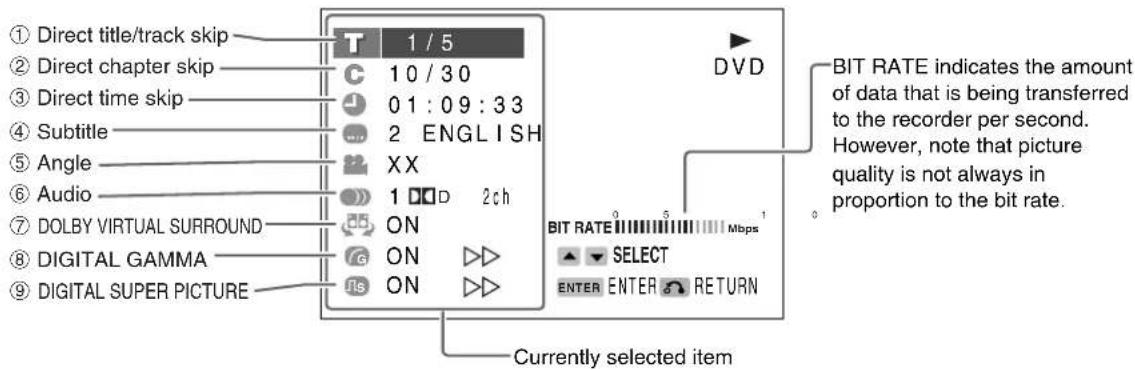
① Direct title/track skip (P.41)
- The number of the title/track (max. 99) currently played back is displayed.
- You can skip directly to the desired title/track.
- When a disc with no title is played back, XX is displayed.
② Direct chapter skip (P.41)
- The number of the chapter (max.999) currently played back is displayed.
- You can skip directly to the desired chapter.
- When a disc with no chapter is played back, XX is displayed.
③ Direct time skip (P.41)
- Elapsed time from the beginning of the disc is displayed.
- DVD discs .... Displays the elapsed time of the title. CD ...... Displays the elapsed time of the track.
④ Subtitle setting (P.42)
- You can select the desired subtitle language if the disc has a number of different subtitle languages.
- The subtitle number and language currently selected are displayed. (When a disc with no subtitle is played back, xx is displayed.)
⑤ Angle setting (P.42)
- You can select the desired angle if the disc has a number of different angles.
- The current angle is displayed. (When a disc with only one angle is played back, XX is displayed.)
⑥ Audio setting (P.42)
- The type of audio currently selected is displayed.
- You can select the desired type of audio.
⑦ DOLBY VIRTUAL SURROUND setting (P.43)
- This function provides rich surround sound by stereo (2-channel audio) or TV.
- You can toggle the setting between "ON" and "OFF".
⑧ DIGITAL GAMMA setting (P.43)
- You can make the entire image easier to see by brightening the darker and obscure portions.
- You can toggle the setting between "AUTO", "ON" and "OFF", and change the level.
- This function does not work when "PROGRESSIVE" in "PLAYBACK SETUP" to "ON".
⑨ DIGITAL SUPER PICTURE setting (P.43)
- This function enhances the fine detail of the image and outlines of the objects it contains by reducing the amount of picture noise.
- You can toggle the setting between "ON" and "OFF" and change the level.
- This function does not work when "PROGRESSIVE" in "PLAYBACK SETUP" to "ON".
NOTE
- If the function control screen is displayed during playback of a DVD video disc, it may not be possible to perform the operations instructed by the DVD video disc. If this happens, perform the instructed operations after canceling the function control screen.
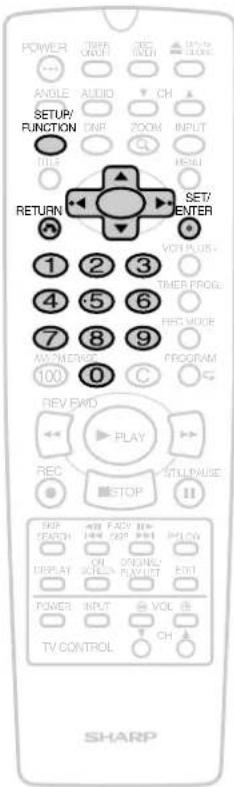
Direct Skip (title/chapter/track)

Use the following procedure to perform the Direct title [track] skip or Direct chapter skip.
1 Press SETUP/FUNCTION during playback.
• The Function control screen appears.
2 Press ▲/▼ to select 📋 and then press SET/ENTER.
Example: Direct title skip
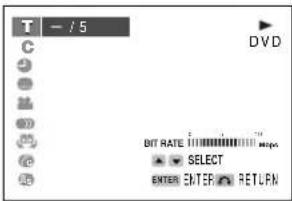
3 Press ▲ / ▼ to input the title number to which you want to skip.
- You can also number buttons to input the title number.
- Press RETURN to return to the previous screen.
Example: Entering title 5

4 Press SET/ENTER to confirm the setting.
- The played back image changes to the beginning of the specified title.
- You can go on to specify other settings.
5 Press SETUP/FUNCTION or RETURN to return to normal playback screen.
NOTE
- On some discs, this function is disabled.
• This function does not work during programmed playback.
Direct Time Skip

You can play back from an intermediate location of a title or chapter by specifying the time.
1 Press SETUP/FUNCTION during playback.
• The Function control screen appears.
2 Press ▲ / ▼ to select 🔍 and then press SET/ENTER.
3 Press ▲ / ▼ to set "hour" and then press ▶.
- Set "minutes" and "seconds" in the same way.
- If you enter the wrong number, press ◀ to return to the previous digit.
- Number buttons can be used instead of ▲/▲▼▼ to set.
- Press RETURN to return to the previous screen.
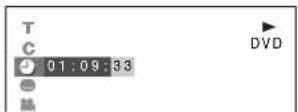
4 Press SET/ENTER.
• The played back starts from the specified time.
- You can intend to go on and specify other settings.
5 Press SETUP/FUNCTION or RETURN to return to the normal playback screen.
NOTE
- On Video CDs or Audio CDs, direct time skip can be set within the same track.
- On some discs, direct time skip is prohibited.
- This function does not work during programmed playback.
Function Control
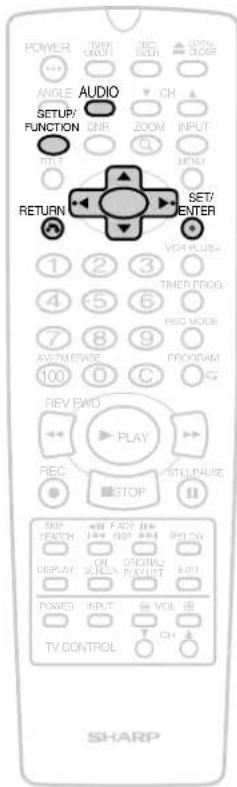
Subtitle/Angle/Audio Setting
DVD VIDEO
Use the following procedure to perform the Subtitle language, Angle or Audio setting.
1 Press SETUP/FUNCTION during playback.
• The Function control screen appears.
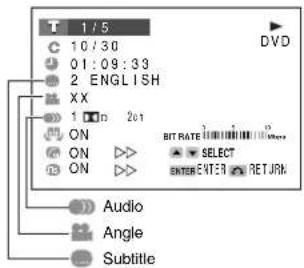
2 Press ▲/▼ to select ⚙ and then press SET/ENTER.
Example: Subtitle language setting

3 Press ▲/▼ to select the subtitle language you want to choose.
- Press RETURN to return to the previous screen.
4 Press SET/ENTER to confirm the setting.
- You can go on to specify other settings.
5 Press SETUP/FUNCTION or RETURN to return to the normal playback screen.
NOTE
About the subtitle setting
- When setting the subtitle language, you can also toggle the setting between "ON" and "OFF" by pressing ◀/▶.
About the Audio setting
- With certain types of discs, you can change the audio using the disc menu.
- About the audio settings, see page 36 for details.
- On Video CDs and Audio CDs, audio is changed as follow:

- A DTS digital surround decoder is required to listen to DTS audio. (When use a DTS digital surround decoder, press AUDIO to select "DTS".)
Function Control
Clearer Picture and Dynamic Sound Setting
DVD VIDEO
DVD RW
DVD RW
DVD R
VIDEO CD
VR MODE
VIDEO MODE
- This function allows you to enjoy a "surround sound" effect when you are using an analog connection to 2-channel audio equipment (TV, etc.).
- The Dolby Virtual Surround feature is activated in the following cases even if digital equipment is connected.
- When playing back the linear PCM audio of a DVD video disc.
- When Dolby digital audio is played back when "Digital OUT" has been set to "PCM" (See page 81).
- The Dolby Virtual Surround feature of this recorder employs the Spatializer system*.
* Certain audio features of this product manufactured under a license from Desper Products, Inc. Spatializer® N-2-2™ and the circle-in-square device are trademarks owned by Desper Products, Inc.
NOTE
- When a monaural audio recording is played back with the Dolby Virtual Surround feature "ON", the sound level may be low and it may be difficult to hear. When this happens, turn the Dolby Virtual Surround feature "OFF".
- The Dolby Virtual Surround feature does not function in the following cases:
- When the Dolby Digital output level is set to "OFF".
• During TV broadcasts and external input - When playing back a Video CD or Audio CD
- When playing back discs or audio recordings for which the Dolby Virtual Surround features does not function, the Dolby Virtual Surround feature is automatically switched to "OFF".
- There is no "Auto" setting.
• There is no level setting.
DIGITAL GAMMA
DIGITAL GAMMA is a digital image quality enhancement function that gives a richer image by brightening the darker and more obscure portions of the image without altering the brightness of the brighter portions, thereby making the entire image easier to see.
NOTE
- Three digital GAMMA level settings are available.
- When setting is "AUTO", GAMMA level is set automatically depending on the brightness of the image.
• This function does not work during progressive playback.
DIGITAL SUPER PICTURE
DIGITAL SUPER PICTURE is a digital image quality enhancement function that gives a clearer image by sharpening the details and outlines in the image and reducing the amount of picture noise.
NOTE
- Three DIGITAL SUPER PICTURE level settings are available.
- There is no "Auto" setting.
- This function does not work during progressive playback.
Function Control

DOLBY VIRTUAL SURROUND/DIGITAL GAMMA/DIGITAL SUPER PICTURE setting
DVD VIDEO DVD RW DVD RW DVD R VIDEO CD VR MODE VIDEO MODE
Use the following procedure to perform the DOLBY VIRTUAL SURROUND, DIGITAL GAMMA or DIGITAL SUPER PICTURE setting
Example: Setting "DIGITAL GAMMA"
1 Press SETUP/FUNCTION during playback.
• The Function control screen appears.

2 Press ▲/▼ to select 📄 and then press SET/ENTER.
3 Press ▲ / ▼ to select "ON".
• Each time the button is pressed, the mode changes in the following sequence:

4 While the "ON" is displayed, press ◀/▶ to select the level.
• The level selection indicator that shows the current level appears.
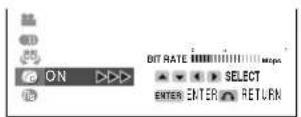
- Press RETURN to return to the previous screen.
5 Press SET/ENTER to confirm the setting.
- You can go on to specify other settings.
6 Press SETUP/FUNCTION or RETURN to return to the normal playback screen.
Direct Selection of Scenes
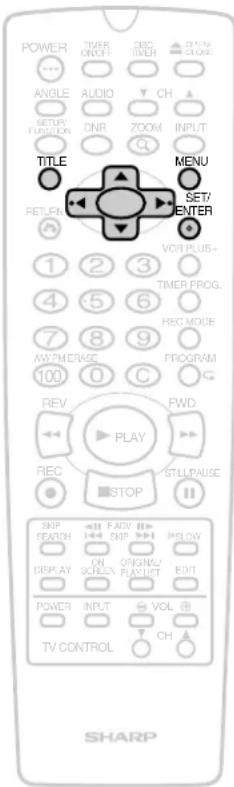
Selecting Scenes by Title Number
DVD VIDEO
DVD RW
DVD R
VIDEO MODE
NOTE
- This function only work on the finalized DVD-R or DVD-RW (Video mode).
1 Press TITLE to show the title screen.
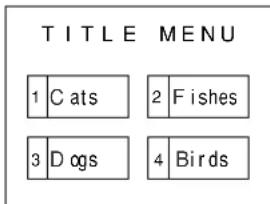
2 Press ◀/▶ to select the desired title.
3 When you press SET/ENTER, the title specified in step 2 starts playing.
NOTE
- The above procedure indicates the standard operating procedure. Since the procedure may be different depending on the DVD video disc, follow the procedure indicated in the user's manual provided with the DVD video disc or displayed on the screen.
About the Title Menu
- There are some DVD video discs that use the word "Top Menu" when explaining the title menu. In these explanations, the button referred to as the "Top Menu" is equivalent to the TITLE on this recorder.
- The Title screen will not be displayed when pressing TITLE if no titles are recorded on the disc.
Disc Menu Screen
DVD VIDEO
Example: Selecting "LANGUAGE"
1 Press MENU to display disc menu screen.
2 Press ▲ / ▼ to select "LANGUAGE".

3 Press SET/ENTER to display language screen.
4 Press ▲ / ▼ to select language.

5 Press SET/ENTER to confirm the setting.
NOTE
- The above procedure indicates the standard operating procedure. Since the procedure may be different depending on the DVD video disc, follow the procedure indicated in the user's manual provided with the DVD video disc or displayed on the screen.
Recording for DVD Discs
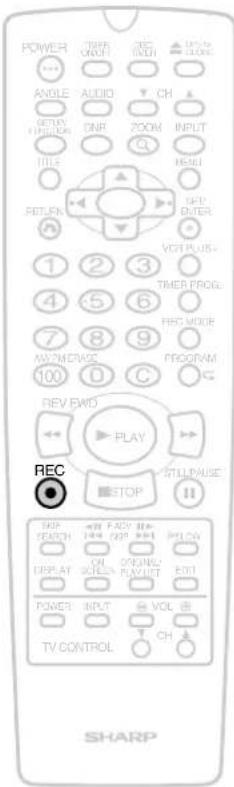
Before Recording
Recordable Discs
DVD-RW Discs DVD
• DVD-RW discs make it possible to repeatedly make about 1,000 recordings of high-quality sound and pictures attainable.
- There are two types of DVD-RW discs consisting of Ver. 1.1 and Ver. 1.1 (CPRM). These discs can be recorded while selecting the preferred mode from two different recording formats (VR mode or Video mode).
DVD-R Discs DVD 第47
- DVD-R discs are able to record the high quality pictures only once.
- DVD-R discs can only be recorded in the Video mode.
NOTE
- When using DVD-RW discs in the Video mode, record these discs after first initializing the disc in the Video mode. For further details, read the section on "VIDEO MODE INITIALIZE" (page 88) of Disc Setup.
- When recording onto DVD-RW or DVD-R discs, it takes a while until recording begins (about 2 seconds for DVD-RW discs and about 10 seconds for DVD-R discs). Make sure to press ●REC earlier when recording onto DVD-RW or DVD-R discs.
About the Recording Format
VR mode: When you want to edit recorded material
Video mode: When you want to enjoy recorded material with another DVD player (playback with all DVD players is not guaranteed)
- DVD-RW discs that have been recorded in the VR mode can be played back with DVD recorders indicated as being "RW COMPATIBLE".
NOTE
- Recorded materials must be finalized (page 88) in order to be viewed with another DVD player.
- Materials recorded in the VR mode and the Video mode cannot be contained on the same disc.
Before Starting Recording
- Refer to "About Recording" on page 9 for information on recording.
NOTE
DVD recorders perform high-precision recording. Pay attention to the following matters so that data is recorded accurately on the disc.
- Do not subject the recorder to impacts.
- Do not use the recorder in unstable locations or locations subject to vibrations.
- Do not unplug the recorder during recording, writing of data, editing, initialization, finalizing or any other occasions when the recorder is operating. Unplug the recorder only after turning the power "OFF". Furthermore, the manufacturer is not responsible for compensation for the contents of data in the case data has been lost or was not recorded.
- Titles for which recording has been interrupted due to a scratched disc, soiled disc or other reason are displayed with an exclamation point “!” in front of the title displayed on the DiscNavi menu and so forth.
* CD-R and CD-RW discs cannot be recorded with this recorder.
Initialization
DVD-RW discs must be initialized (formatted) before using for recording. (Since DVD-R discs are not required to be initialized, they can immediately be recorded in the Video mode.)
Initializing in the VR Mode
When an unused disc is loaded onto the recorder, it is automatically initialized in the VR mode.
Recording for DVD Discs

Initializing in the Video Mode
When a disc that has been initialized in the VR mode is used in the Video mode, select initializing in the Video mode in Disc Setup of the Initial Setup menu.
- The setting can be changed so that unused discs are automatically initialized in the Video mode when loaded onto the recorder (page 86).
Recording Formats and Recording Modes
The recording modes that can be set differ depending on the recording format (VR mode or Video mode).
| Recording format | Recording mode | |||
| FINE | SP | LP | CP | |
| VR modeRecording time | About60 min.(About90 min.) | About120 min.(About180 min.) | About240 min.(About300 min.) | About360 min. |
| Video modeRecording time | About60 min.(About90 min.) | About120 min.(About180 min.) | About240 min. | |
- Recording time is based on the recording time when using a 4.7 GB disc.
- Values for recording time shown in parentheses ( ) provide a general indication of recording time when timer recording has been made with "EXACT REC" set to "ON".
Disc Information
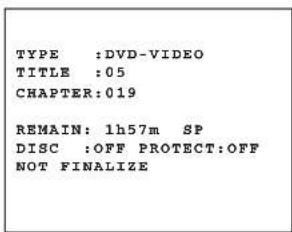
Disc information provides you with the remaining time on the disc, titles that have been recorded and other information. It is recommended to check disc information before recording.
- Disc information can be displayed while the disc is stopped by pressing ON SCREEN (page 28).
-
Up to 99 original titles and Playlist titles each can be created on VR mode discs. Up to 99 titles can be created on Video mode discs.
-
Although the number of chapters that can be created on a single disc varies according to available memory space, it is generally around 200 chapters. However, only up to 50 unerasable chapter marks (chapter marks that are automatically created when a part has been added or erased) can be created on a single disc.
- When an unrecordable disc has been loaded onto the recorder, the remaining recording time is displayed as "0h00m" and blinking. In addition, the remaining recording time is displayed as "0:00" and blinking when the on-screen display is set to "ON".
Confirmation of Available Disc Space
- Confirm remaining recording time by setting the on-screen display to "ON".
- When the remaining recording time is "0:00" (when blinking), no further material can be recorded on that disc. Replace the disc with a different recording disc.
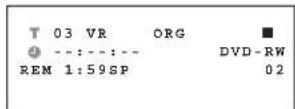
- Remaining recording time can also be confirmed by pressing DISPLAY on the remote control during recording. The display changes in the order shown below each time it is pressed.
T--C--- Counter Remain Time Operation StatusChann
- The disc remaining recording time display serves as a general indicator of the amount of available space on the disc. Available space may still be remaining on the disc when recording is completed. (The display of remaining recording time during recording and that of when recording is completed may not always be identical.)
TV Program Recording

When recording TV programs, an once recording (from the start of recording until recording stops) is recorded as a single "title".
Basic Recording
DVD RW DVD RW DVD R VR MODE VIDEO MODE
1 Turn on the TV and switch the TV channel to the external "VIDEO" or "AV" channel connected to the VIDEO/AUDIO output jacks.
2 Press POWER. The recorder is turned on.
3 Press OPEN/CLOSE to open the disc tray.
4 Load the disc onto the tray.
- Hold the disc without touching either of its surfaces, position it with the printed title side facing up.

natural_image
Illustration of a hand inserting into a CD into a washing machine (no text or symbols visible)5 Press OPEN/CLOSE to close the disc tray.
- When the disc is being identified ("LOAD" is displayed on the Front Panel Display), the DISC IN indicator on the Front Panel is blinking. The indicator lights when the disc is finished being identified ("LOAD" disappears).
- If you load a completely blank disc, the recorder takes a short while to initialize the disc. (It takes around 60 to 90 seconds.)
6 Press CH ▲ / ▼ to select the TV channel to record.
- Check whether the channel is set to the channel you want to record on the TV screen.
7 Press REC MODE to select the recording mode.
- Current mode is displayed on the TV screen and Front Panel Display.
• Each time REC MODE is pressed, the mode changes as follows:
VR mode:

Video mode:

8 Press ●REC.
DVD-RW:
Recording starts immediately.
- The recording indicator on the Front Panel Display lights up.
DVD-R:
The recorder prepares to start recording when setting "R REC START" in "RECORD SETUP" to "2 PRESS". Press
●REC again to start recording.
- Recording continues until you press ■STOP or the disc is full.
- If you prefer DVD-R recording to work in the same way as recording to DVD-RW, set "R REC START" in "RECORD SETUP" to "1 PRESS".
! Important!
- When you record SAP broadcast, setting "SAP" in "RECORD SETUP" to "ON" (See page 87).

NOTE
- Recorded images may not appear correctly on the screen when viewing broadcasts with poor reception. This may be improved by resetting "3D Y/C" to "OFF" (page 91).
• Discs edited with another recorder that contain more than 201 chapter marks cannot be edited (or recorded) with this recorder. - Discs on which parts have been added or erased more than 51 times for a single title with another DVD recorder, and discs that are protected cannot be edited (or recorded).
- Titles for which recording has been interrupted due to a scratched disc, soiled disc or other reason are displayed with an exclamation point “!” in front of the title displayed on the DiscNavi menu and so forth.
When Recording Discs are Scratched or Soiled
- Recording may be temporarily interrupted at those portions of a disc that cannot be recorded as a result of being scratched or soiled. When recording is resumed, the portion where recording starts is recorded as a different title. When a disc is unable to be recorded, "INCORRECT TYPE. REMOVE DISC." will appear and all other functions of the recorder will be disabled except for opening and closing of the tray. Take out the disc when this happens.
- When recording in the Video mode, a maximum of about 60 seconds of recorded material prior to the point where recording is interrupted may be lost.
Pause Recording
DVD RW DVD RW DVD R VR MODE VIDEO MODE
1 Press NTILL/PAUSE during recording.
- This function does not work during timer recording and Simple Recording Timer.
- Although the channel can be changed while recording is paused, the recorded title does not change. (The name of the title is the same as that of the previous channel.)
2 Press R TILL/PAUSE or ●REC to start recording again.
NOTE
- In the case of a VR mode disc, a chapter mark is automatically inserted at the location where recording is paused.
- When recording onto a DVD-RW disc, the channel cannot be changed if recording is paused by pressing INTILL/PAUSE immediately after having pressed ●REC.
TV Program Recording

Stop Recording
DVD RW DVD RW DVD R VR MODE VIDEO MODE
Press ■STOP during recording.
- Stop recording before you remove the disc from the recorder.
NOTE
- Since images are recorded in 30 second units in the Video mode (1 minute units in the LP mode), images may be briefly recorded after recording has been stopped. In this case, if recording is stopped after first pausing the recording, a black screen will be recorded for up to 30 seconds (or up to 1 minute in the LP mode).
- A black screen may be recorded at the end of a recording when a recording in the VR mode is stopped after pausing.
- Erase recorded titles when they are no longer required (page 71). In the case of a disc recorded in the VR mode, remaining recording time increases by the amount of original titles erased. In the case of discs recorded in the Video mode, although titles are no longer displayed, remaining recording time does not increase. (In the case of DVD-RW discs, remaining recording time only increases when the last title has been erased.)
- ■STOP does not function for the first 5 seconds of a recording. (Press ■STOP 5 or more seconds after recording begins.)
Useful Recording Functions
■Watching Other TV Programs while Recording
- The TV channel can be changed by pressing the channel button on the TV. The TV can also be turned off.
■Accurately Starting Recording from a Desired Part
When recording onto a DVD-RW or DVD-R disc, a brief amount of time is required until recording begins (about 2 seconds for DVD-RW discs and about 10 seconds for DVD-R discs). Start recording using the following procedure when you want to start recording at a precise time.
●When recording onto a DVD-RW disc:
- Press ■TILL/PAUSE Immediately after earlier pressing ●REC to pause recording, and then once the recording reaches the scene you want to record, press ●REC to start recording from that scene.
- ■STOP does not function while recording is paused. If you want to stop recording, press ■STOP after waiting at least 5 seconds after recording has started.
●When recording onto a DVD-R disc:
- Set the "R REC START" setting of the "RECORD SETUP" to "2 PRESS". Recording is paused for about 10 seconds later after ●REC is pressed once. When ●REC is pressed for a second time while recording is paused, you can accurately start recording from the scene you want to record.
- If "R REC START" of the "RECORD SETUP" is set to "1 PRESS", recording starts automatically about 10 seconds later after ●REC is pressed (the Pause function does not function).
Simple Recording Timer

DVD RW DVD RW DVD R VR MODE VIDEO MODE
The Simple Recording Timer (SRT) enables you to set the recording stop time. The SRT can be set on the TV screen by using the remote control.
! Important!
The SRT cannot be set if the clock has not been set. Make sure the clock is set before setting the SRT.
1 Perform the steps 1 to 8 of "Basic Recording" on page 48.
2 Press ●REC during recording.
• Each press of ●REC increases the stop time by 10 minutes.
Example: Stop the recording at 9:40 AM.

- When the stop time comes, recording is finished, and the power turns off.
Changing the Settings of the Simple Recording Timer
1 Press ●REC. The stop time is blinking on the TV screen.
2 Press ●REC to change the stop time as desired.
Cancelling the Simple Recording Timer
Press ■ STOP.
NOTE
- The Simple Recording Timer has priority over other recordings.
- Ordinary timer programs will not be recorded when portions of the time setting of the simple recording timer and of the time setting of the ordinary timer recording overlap.
Example:

Timer Recording with VCR Plus+® System

DVD RW DVD RW DVD R VR MODE VIDEO MODE
The VCR Plus+ Programming System allows you to program your recorder for timer recording simply by inputting the PlusCode Programming number.
The PlusCode numbers are listed in most newspaper, television guides, and local CATV listings. Simply by inputting this PlusCode number, you can program your recorder for timer recording, eliminating the need to input program start time, stop time, channel, date and other information necessary for timer recording.
Up to 8 timer programs can be stored in the recorder.
1 Press POWER and load a recordable disc.
- Timer recording does not work during loading a disc. Start the timer setting after the disc is finished being identified.
! Important!
- Check that the clock is displaying the correct time.
- When you record SAP broadcast, setting "SAP" in "RECORD SETUP" to "ON" (See page 87).
- When you press ■STOP to stop timer recording, the timer standby mode will be canceled. Press TIMER ON/OFF to enter the timer standby mode if you set other timer recordings. The TIMER indicator lights up.
2 Press VCR PLUS+ to display the VCR PLUS+ setting screen.
- If you press VCR PLUS+ when the clock has not been set, the clock setting screen will appear.
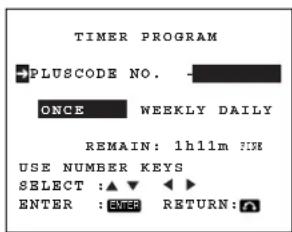
3 Press number buttons to enter "PLUSCODE NO." and then press ▼.
- If you make a mistake in entering the numbers, press ERASE to erase the numbers one by one or press ◀/ ▶ to move the cursor, then re-enter the correct number.

4 Press ◀/▶ to select "ONCE", "WEEKLY" or "DAILY" and then press SET/ENTER.
- ONCE: To record only once.
- WEEKLY: To record every week at the same time.
• DAILY: To record everyday at the same time.
5 The timer program information is shown on the TV screen. Check the contents.
- If you want to change any settings, press ◀/▶ to select items and press ▲/▼▼▼ to correct.
- When recording a program on a channel for the first time, you must enter the correct channel number on the screen, other wise the PlusCode number will not be successfully decoded.

6 Press SET/ENTER. The VCR PLUS+ setting screen will appears. To program additional timer settings, repeat steps 3 to 6.
Timer Recording with VCR Plus+® System
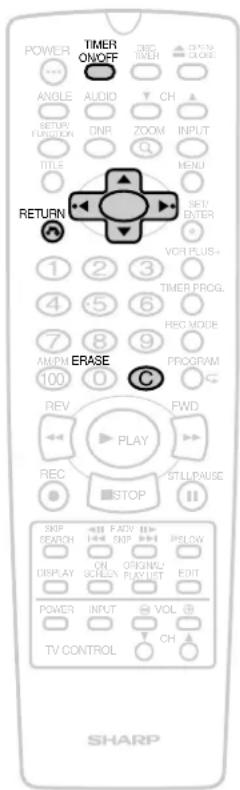
7 Press RETURN to return to the normal screen.
• The display appears shown below.
- TIMER indicator on the front of the recorder will light up.
- Timer recording will not work if the recorder is left on.
NOTE
- If you select "DAILY" in step 4, the recorder will record the program Monday-Sunday at the same time. If you want to record Monday-Friday or Monday-Saturday, select "DATE" with ◀/▶ and change it to "MO-FR" or "MO-SA" with ▲▲▼▼1 step 5.
- In step 5, input the channel number you want to record. Once the preset channel has been input, you will not need to set the preset channel for that station again. - In step 4, if the recorder cannot decode the PlusCode number, or if the combination of PlusCode number and Program mode does not exist, then "ERROR" will appear. To correct, press ERASE and re-enter the PlusCode number.
- The following causes are possible when the TIMER indicator is blinking or "ERROR" is displayed when TIMER ON/OFF has been pressed.
• A recording has been programmed having a recording time of 1 minute
- Inadequate available disc space
• The disc is protected
- No disc is loaded in the recorder
- Disc identification is not finished
Repeat the procedure after checking the recording time and disc.
Checking/Cancelling the VCR Plus+ Programming System
Use the procedure described in "Confirming/Cancelling Timer Program" to confirm or cancel program data (See page 59).
Timer Recording

DVD RW DVD RW DVD R VR MODE VIDEO MODE
! Important!
- Check that the clock is displaying the correct time.
- When you record SAP broadcast, setting "SAP" in "RECORD SETUP" to "ON" (See page 87).
- When you press ■STOP to stop timer recording, the timer standby mode will be canceled. Press TIMER ON/OFF to enter the timer standby mode if you set other timer recordings. The TIMER indicator lights up.
NOTE
- Up to 8 timer programs can be stored in the recorder.
- "DV" cannot be set for the channel reserved for timer recording.
- When "0h00m" is blinking as the remaining recording time in the disc information after disc identification, the disc loaded cannot be used for recording. Replace it with a different disc.
- Set the duration of recording time to at least 2 minutes. Recordings of 1 minute cannot be programmed.
Example: Recording a TV program in the FINE mode: the TV program is on channel 7 starting at 9:05 PM and stopping at 10:35 PM on August 10^th .
1 Turn on the recorder and load a recordable disc.
- Timer recording does not work during loading a disc. Start the timer setting after the disc is finished being identified.
2 Press TIMER PROG. to display the TIMER PROGRAM screen.
- If you press TIMER PROG. when the clock has not been set, the clock setting screen will appear.
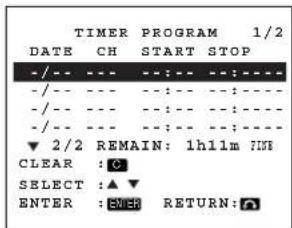
3 Press SET/ENTER to set the timer program.
4 Press ▲ / ▼ to select the desired month/day (DATE) and then press
▶. The cursor will move to the next column.
Example: August 10th
- If you want to record every day or week at the same time, hold when you select the date.
When pressing: The recording date changes in this sequence:


5 Press ▲ / ▼ to select the desired channel and then press ▶.
6 Press ▲ / ▼ to set the recording start time (hour digits and minute digits) and then press ▶.
Press AM/PM to select "AM" or "PM".
7 Press ▲ / ▼ to set the recording stop time and then press ▶.
It is not necessary to select AM or PM.
8 Press ▲ / ▼ to select the recording mode.
Example: SP

- To program additional timer settings, press SET/ENTER and repeat steps 3–9.
10 Press RETURN to finish settings.
11 Press TIMER ON/OFF to enter the timer standby mode.
- The power turns off, and the recorder enters the timer standby mode (the TIMER indicator on the recorder lights up). - During playback, the power does not turn off, but the timer recording will be set.
NOTE
- If the power is interrupted for more than 1 hour (power failure, etc.) during timer recording, the Auto Clock Setting will reset the time after the power is returned (the timer indicator on the Front Panel Display will blink.) but the timer settings will be canceled.
- Number buttons can be used instead of ▲/▲▼▼ to set the data.
- To stop timer recording, press ■STOP.
- If a button is not pressed within 3 minutes during the setting procedure, the screen will return to the normal screen.
• There are two timer setting screens (1/2, 2/2). - The following causes are possible when the TIMER indicator is blinking or "ERROR" is displayed when TIMER ON/OFF has been pressed.
• A recording has been programmed having a recording time of 1 minute
- Inadequate available disc space
• The disc is protected
- No disc is loaded in the recorder
- Disc identification is not finished
Repeat the procedure after checking the recording time and disc.
Disc Timer Recording

DVD RW
VR MODE
- Disc timer recording is a function that lets you record programming information directly onto a disc. Since programming information is recorded onto the disc itself, recording is programmed simply by placing the disc in the recorder. It is useful when recording a particular program either every week or every day.
- A single disc can be programmed with up to 8 timer recordings, including daily and weekly programming.
- When programming recording information directly on a disc, use a DVD-RW disc that has been initialized in the VR mode.
1 Press POWER and then load a DVD-RW disc.
- Timer recording does not work during loading a disc. Start the timer setting after the disc is finished being identified.
2 Press and hold DISC TIMER for more than 2 seconds.
- The DISC TIMER indicator on the recorder lights up and the recorder enters the Disc Timer Recording mode.
- If a disc that has already been programmed disc timer recording is loaded, the recorder enters the Disc Timer Recording mode automatically.
3 Set the timer recording. (See "Timer Recording" on page 54 or "Timer Recording with VCR Plus+® System" on page 52.)
- If a disc that has already been programmed disc timer recording is loaded, go to step 4.
4 Press TIMER ON/OFF.
- The recorder is turned off and the TIMER indicator on the recorder lights up (Timer standby mode).
- Make sure to check both the TIMER indicator and the DISC TIMER indicator light up.

natural_image
Line drawing of a CD-ROM front panel with buttons and drive dials (no text or symbols)TIMER
DISC
TIMER
NOTE
- DVD-R discs and DVD-RW discs initialized in the Video mode cannot be used for disc timer recording.
- Disc timer recording and standard timer recording cannot be performed simultaneously.
- If disc timer recording is set for a disc that has not been programmed for disc timer recording, the recorder will not enter the disc timer recording mode until the disc has finished being identified.
- In the case of loading a disc in this recorder for which the disc timer recording has been programmed with another recorder, check the contents of the recording have been programmed since this recorder has four types of recording modes.
- When "Oh00m" is blinking as the remaining recording time in the disc information after disc identification, the disc loaded cannot be used for recording. Replace it with a different disc.
Disc Timer Recording

Canceling the Disc Timer Recording
Follow the procedure shown below when you want to cancel disc timer recording and use standard timer recording. (Disc timer recording is not canceled even after the recording program has ended.)
■When a disc containing a disc timer recording program is set in the recorder and is ready for recording (the DISC TIMER indicator and TIMER indicator are lit)
1 Press TIMER ON/OFF.
The TIMER indicator turns off.
2 Turn on the power.
3 Cancel the disc timer recording. Refer to page 59 for how to cancel the disc timer recording.
4 Press and hold DISC TIMER for at least 2 seconds.
- When you want to use standard timer recording with a disc containing a disc timer recording program, cancel disc timer recording by performing steps 3 and 4.
- Disc timer recording can also be canceled by removing the disc containing the disc timer recording program.
■When a disc containing a disc timer recording program is set in the recorder and the recorder is in the disc timer recording mode (only the DISC TIMER indicator is lit)
Press and hold DISC TIMER for at least 2 seconds.
NOTE
- The following causes are possible when the TIMER indicator is blinking or "ERROR" is displayed when TIMER ON/OFF has been pressed.
• A recording has been programmed having a recording time of 1 minute
- Inadequate available disc space
• The disc is protected
- No disc is loaded in the recorder
- Disc identification is not finished
Repeat the procedure after checking the recording time and disc.
- Disc timer recording and standard timer recording cannot be performed simultaneously.
- Disc timer recording is canceled when the disc is removed.
! Important!
- Recordings cannot be programmed when the power is turned off or when a VR mode DVD-RW disc is not set in the recorder.
Using the Recorder During Timer Standby Mode

This recorder cannot be used during timer standby. When you want to play back a disc that is different from the disc to be used for timer recording, first cancel timer standby.
DVD RW DVD RW DVD R VR MODE VIDEO MODE
1 Press TIMER ON/OFF.
- The TIMER indicator turns off and timer standby is canceled.
2 Press POWER.
• The recorder can now be operated.
When Finished Using the Recorder
1 Load a disc to be used for timer recording.
- Once disc identification (loading) is completed, press TIMER ON/OFF. The recorder will not enter recording standby unless disc identification has been completed.
2 Press TIMER ON/OFF.
- The power is turned off and the TIMER indicator lights up to indicate timer standby.
natural_image
Line drawing of a CD-ROM front panel with buttons and drive dials (no text or symbols)TIMER
Confirming/Cancelling Timer Program

DVD RW DVD RW DVD R VR MODE VIDEO MODE
You can see on the timer setting screen a list of timer programs that are already set.
1 When the mode is timer standby mode, press TIMER ON/OFF to cancel the timer standby mode and then press POWER.
2 Press TIMER PROG. to display the TIMER PROGRAM screen.
- All timer programs that are already set are displayed on the TIMER PROGRAM screen.
3 If you want to cancel the data, select the data to be canceled with ▲/▼ and then press ERASE.
See 2/2 screen also.

4 Press RETURN to return to the normal screen.
- During playback or recording (Timer recording), you cannot confirm or cancel the programs.
• After checking or cancelling the program contents, press
TIMER ON/OFF to enter the Timer Standby mode if you have other timer recordings.
Automatic Recording of Satellite Broadcast (AV AUTO REC)

DVD RW DVD RW DVD R VR MODE VIDEO MODE
When connected to a Satellite receiver, etc. with timer recording functions, this recorder can be used to automatically record the timer program. (Refer to the operation manual of the Satellite receiver, etc. for instructions on how to set the timer program.)
Example: Use of AV AUTO REC Function

flowchart
graph TD
    A["Satellite receiver, etc."] --> B["Set timer program"]
    B --> C["Program Timer"]
    C --> D["Program Timer"]
    E["DVD Recorder"] --> F["Set AV AUTO REC function"]
    F --> G["Records timer program"]
    G --> H["Records timer program"]
    I["Recording begins"] --> J["Recording ends"]
    J --> K["Recording begins"]
    K --> L["Recording ends"]
    M["Power ON"] --> N["Power OFF"]
    N --> O["Power ON"]
    P["Power OFF"] --> Q["Power OFF"]
NOTE
- The AV AUTO REC function only operates when used with a Satellite receiver, etc. with timer recording functions.
- The AV AUTO REC function will not operate when the Satellite receiver, etc. is connected to the IN 3 jacks on the rear of the recorder or the IN 2 jacks on the front of the recorder.
Recording with AV AUTO REC
1 Set up the Satellite receiver, etc..
- Set the recording timer on the Satellite receiver, etc. for the program you wish to record. (Refer to the operation manual of the Satellite receiver, etc. for instructions on how to set the timer program.)
2 Turn off the Satellite receiver, etc..
3 Load a recordable disc into the recorder.
4 Press POWER to turn off the recorder.
5 Press and hold REC MODE for more than two seconds. The AV AUTO REC indicator on the recorder will lights up.
- The recorder will automatically turn on and begin recording and then stop recording and turn off, according to the timer program setting on the Satellite receiver, etc..
Connecting to a Satellite receiver, etc.
To use the AV AUTO REC function, connect the Satellite receiver, etc. to the VIDEO/AUDIO IN 1 jacks on the rear of the recorder.
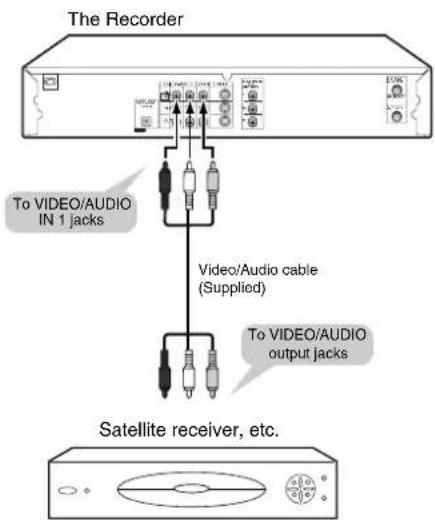
Automatic Recording of Satellite Broadcast (AV AUTO REC)

To Cancel the AV AUTO REC Function
Before Recording
Press POWER.
- The recorder is turned on and the AV AUTO REC indicator will be turned off.
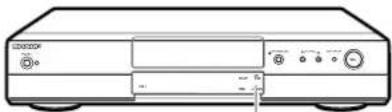
natural_image
Front view of a CD-ROM front panel with buttons and drive dials (no visible text or labels)AV AUTO REC
During Recording
Press and hold REC MODE for more than 2 seconds.
- The AV AUTO REC indicator will be turned off and become normal recording mode. Press ■STOP to stop recording.
- Timer recording is given priority when timer recording and AV AUTO REC times overlap.
NOTE
- When recording PPV (pay-per-view) programs of satellite broadcasts, always make sure to set the satellite receiver, etc. to "Record". Certain programs may not be able to be recorded or require additional charges.
- Only DVD-RW Ver. 1.1 (CPRM-compatible) discs in the VR mode can be used to record "Copy-once" satellite broadcasts, etc.
- Use AV AUTO REC in combination with a satellite broadcast receiver, etc. equipped with a programming function.
- Since the power of this recorder is switched on after the video signal from a satellite receiver, etc. has been received, the start of a program may not be recorded.
- When a timer recording is started during AV AUTO REC, since disc information is written at the point recording switches to timer recording, the start of timer recording is delayed by a maximum of about 1 minute.
- AV AUTO REC cannot be set while the simple recording timer is being set.
- In the case AV AUTO REC starts after the start of timer recording, the recording mode will be the one set with timer recording.
Problems of Timer Recording
Blinking the TIMER Indicator
Timer recording cannot be performed in the situations shown below. Check the contents of the error and reprogram timer recording correctly. When an error occurs, the TIMER indicator on the recorder blinks for about 5 seconds.
| Front Panel Display Causes | Solution | Setting correctly | ||
| TIMER indicator is blinking. |  | There is no disc loaded | Load a disc for recording, and after the disc has finished being identified, press TIMER ON/OFF to enter standby.When a disc for recording has already been loaded in the recorder, turn on the power and after the disc has finished being identified, press TIMER ON/OFF to enter standby. | TIMER indicator lights up. |
| —— | A non recordable disc is loaded | |||
 | There is enough blank space on the disc | |||
| —— | The disc is unplayable | |||
| —— | The disc that's loaded is protected | Enter standby after either canceling the disc protect function or loading a different disc for recording in the recorder. | ||
| Timer recording does not work. |  | Timer Recording is full | Repeat timer recording after deleting some of the timer program. | |
 | The clock has not been set.The channel is incorrectThe Recording time is set at 1 minute | Repeat timer recording after setting the clock.Check the channel that has been programmed for timer recording.Reset the recording time to 2 minutes or more. | ||
| The clock on the recorder is not setTimer Recording or Simple Recording Timer has been setTimer Recording is full | Repeat timer recording after setting the clock.Program timer recording after the timer recording menu or simple recording menu has finished.Repeat timer recording after deleting the timer program. | |||

NOTE
- Press ■STOP when you want to discontinue recording while timer recording is in progress. Timer recording is canceled when ■STOP is pressed. When there are other timer programs, enter standby by pressing TIMER ON/OFF.
- When timer programs are programmed that have the same recording starting date and time, the first timer program is overwritten.
When Timer Recording Times Overlap
| Problem | Helpful Hint |
| Timer recording times overlap | ■If two timer recording times overlap, the second timer program starts after the first timer program is finished.Example:  |

NOTE
- When multiple timer programs have been set and the timer recording times overlap or the ending time of the first timer program overlaps the starting time of the second timer program, disc information is written and the second timer program starts after the first timer program is finished. Consequently, the start of the second timer program is delayed by a maximum of about 1 minute.
Editing the Disc
Before Editing the Disc
About Editing
Recorded contents that can be edited and the editing procedure differ depending on the mode in which the contents were recorded.
●When Recorded in VR Mode
Editing can be performed with this recorder alone such as gathering your favorite parts from recorded titles to create your own collection of personal favorites, relocating parts within a specified range, or erasing unnecessary parts. You can also create a “Playlist” from original recordings, or edit original recordings directly. (Those materials that can be edited differ between original recordings and playlists.)
Original
Recordings generated in the same manner in which they were recorded are referred to as originals. An once recording (from starting to stopping of the recording) is treated as a single title.
Playlist
Titles created based on an original are referred to as a Playlist. Playlists can be recreated as many times as you desire.
* A Playlist consists of a list that describes the order in which originals are to be played back, and is not an actually copy of the original. This lets you edit using less disc space.

flowchart
graph TD
    A["OriginalOriginalOriginal"] --> B["1"]
    B --> C["2"]
    C --> D["3"]
    D --> E["4"]
    E --> F["5"]
    F --> G["6"]
    G --> H["7"]
    H --> I["8"]
    I --> J["9"]
    J --> K["10"]
    K --> L["11"]
    L --> M["12"]
    M --> N["13"]
    N --> O["14"]
    O --> P["15"]
    P --> Q["16"]
    Q --> R["17"]
    R --> S["18"]
    S --> T["19"]
    T --> U["20"]
●When Recorded in Video Mode
Playlists cannot be created from recordings recorded in the Video mode. Recorded contents that can be edited are indicated below.
- Input the title names (page 66)
- Erasure of titles (page 71)
* "Title erasure" in the case of recordings that have been recorded in the Video mode is provided so that the title is no longer displayed during playback, and does not mean that the recording is actually erased. (Remaining recording time does not increase. However, in the case of DVD-RW discs that have been recorded in the Video mode, remaining recording time can be increased only by erasing the last recorded title.)
* Discs cannot be edited after they have been finalized (page 88).
* Recordings can be added and edited with this recorder only until a disc has been finalized.
Editing Procedure
This is the basic procedure when editing titles of originals that have been recorded in the VR mode.
Load a disc.
Select the desired title and then edit the title.
- Erasing a part from Original (See page 65).
- Inputting/Renaming the Title (See page 66).
- Adding Chapter Markers (See page 66).
• Navimark (See page 68). - Protecting the Title (See page 69).
- Erasing the Titles (See page 71).
This is the basic procedure when editing titles that have been recorded in the VR mode after creating a playlist.
Load a disc.
Making a New Playlist
- Making a Playlist from Original Title (See page 72).
- Adding a part to the Playlist (See page 73).
Select the Playlist and then edit.
- Erasing the Titles (See page 71).
- Erasing a Part from the Playlist (See page 75).
- Moving the Title (See page 75).
- Adding a Part from the Original to the Playlist (See page 76).
- Adding Chapter Marker in a Playlist (See page 77).
- Renaming the Title (See page 78).
• Navimark (See page 79).
Editing the Disc

Switching between Playlist and Original Playback
■ Switching Between Original and Playlist when Power is turned ON

• Example of Original screen
The screen for editing originals is displayed when operation is switched to DiscNavi or editing.

Press this button to switch between Original and Playlist
• Example of Playlist screen
The screen for editing the playlist is displayed when operation is switched to DiscNavi or editing.
NOTE
- The display does not switch to the Playlist screen when a playlist has not been created.
- Operation automatically returns to Original if contents are recorded when editing is switched to Playlist.
■ Switching Between Original and Playlist with DiscNavi

• Example of Original screen
Switches when an Original is played back.

Press this button to switch between Original and Playlist
• Example of Playlist screen
Switches when a Playlist is played back.
NOTE
- The display does not switch to the Playlist screen when a playlist has not been created.
■Switching to Original Editing Screen during Playback
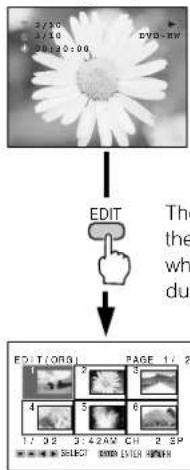
The display switches to the editing screen when EDIT is pressed during playback.
NOTE
• Discs that have been edited with another DVD recorder and contain more than 201 chapter markers cannot be edited (recorded) with this recorder.
• Discs on which parts have been added or erased more than 51 times for a single title with another DVD recorder, and discs that are protected cannot be edited (or recorded).
This recorder cannot be used to edit exact frames.
- When editing a recording by adding chapter markers or erasing parts and so forth, there may be a slight discrepancy between the frames to be edited and the frames that are actually edited.
- When playing back a disc that has been edited in frame units with another DVD recorder, the start and end points may be altered slightly, or the DiscNavi screen may be slightly different.
Editing an Original Title

Erasing a Part from the Original
DVD RW VR MODE
You can erase a part of a title currently in the Original content.
- You cannot edit a finalized disc recorded in Video mode.
1 Press EDIT while the disc is stopped.
• The Original Edit Title List screen appears.
2 Press ▲/▼/◄/► to select the title and then press SET/ENTER.

3 Press ▲/▼ to select "ERASE PART." and then press SET/ENTER.
• The selected title is played back.

- Press ▶ PLAY, FWD ▶, ◀◀REV, ■ STILL/PAUSE, I SKIP, SKIP ▶▶I or ISLOW to find the part to erase.
4 Press SET/ENTER to set the start point of the part to erase.

5 Press SET/ENTER to set the end point of the part.
• The title will become still mode.

6 When you confirm the part to erase, press ◀ to select "YES" and then press SET/ENTER.
- The title is played back without the erased part.
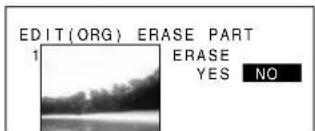
7 Press ◀ to select "YES" and then press SET/ENTER.
• The selected part is erased.
8 Press EDIT to exit the edit mode.
Resetting Start and End Points
- The start point and end point can be reset until a part is erased. After returning to setting of start point and end point with RETURN, reselect the part using the procedures of steps 4 and 5.
- The start point is canceled when ◀◀REV and ISKP are pressed to go back to before the start point after the start point has been set.
- Some playback buttons can be used when searching for a part (page 74).
Important! Selecting Start Point and End Point when Erasing a Part
- The first and last 5 seconds of a title to be edited cannot be selected as part erasure (start or end) points. If a start point is selected during the first 5 seconds from the start of a title, the start of the title becomes the start point. When the last 5 seconds from the end of a title is selected as a start point or end point, the point 5 seconds before the end of the title is selected as the start point or end point. When the end of a title has been selected, the end of a title is selected as the end point. In addition, when erasing 5 seconds before or after a chapter marker that has been automatically added during addition or erasure of a part as well, those parts cannot be selected as part erasure (start or end) points in the same manner as above:
- Once a specified range has been erased, it is completely erased. Since it cannot be restored to its prior state, use caution when erasing by checking the contents in advance.
Editing an Original Title

NOTE
- Start and end points may change slightly.
- When erasing a part, select a part that continues for at least 5 seconds. Parts of less than 5 seconds duration cannot be erased.
- In the case of increasing remaining recording time by erasing a part selected from an original title, erase a part that continues for at least 1 minute. In addition, a chapter marker is automatically inserted at the location of the erased part.
- Parts can be added or erased no more than 50 times for a single title.
• Discs on which parts have been added or erased more than 51 times for a single title with another DVD recorder can only be played back or initialized.
Inputting/Renaming the Title
DVD RW DVD RW DVD R VR MODE VIDEO MODE
When material is recorded, a title name that includes the date, time, channel number and other information is created automatically. You can change the title name to any name you desire. (The title name can no longer be changed once a disc recorded in the Video mode has been finalized.)
1 Press EDIT while the disc is stopped.
• The Original Edit Title List screen appears.
2 Press ▲/▼/◄/► to select the title and then press SET/ENTER.

3 Press ▲ /▼ to select "RENAME" and then press SET/ENTER.
4 Rename the title.
① Move the cursor to a character you want to change.
- Press ▲/▼/◄/► to select "FWD" or "BACK" and then press SET/ENTER to move the cursor.
② Press ▲/▼/◄/► to select "DEL" and then press SET/ENTER.
- Delete the character at the cursor position.
③ Press ▲/▼/◄/► to select a character you want to enter and then press SET/ENTER.
- Enter the character at the cursor position.
④ Repeat the above step to change other characters.
![EDIT(ORG) RENAME ABCDE abcde + - / * = END FGHIJ fghij & \$%# SPACE KLMNO klmno [ ]{} < DEL PQRST pqrst >l_^@ FWD UVWXY uvwxy 12345 BACK Z.. !? z* : : 67890 1/02 3:42AM CH 2 SP SELECT ENTER ENTER RETURN](/content/2026/05/815172/images/df8e06667849fcd9d30ddbf4ae491193bf98178e92bd32029a732e9af28be13b.jpg)
5 Press ▲/▼/◄/► to select "END" and then press SET/ENTER. to fix the name.
6 Press EDIT to exit the edit mode.
NOTE
- Up to 24 characters can be entered.
Adding Chapter Markers
You can put a chapter marker anywhere in a title. (This function does not operate if the disc is recorded in Video mode.)
1 Press EDIT while the disc is stopped.
• The Original Edit Title List screen appears.
2 Press ▲/▼/◄/► to select the title and then press SET/ENTER.
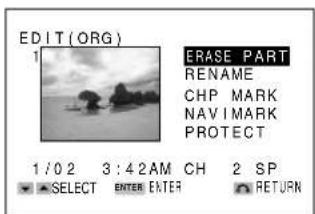
Editing an Original Title
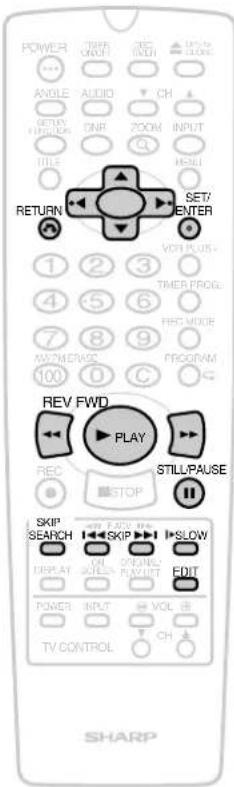
3 Press ▲ / ▼ to select "CHP MARK" and then press SET/ENTER.
• The selected title is played back.

- Press ▶PLAY, FWD▶▶, ◀◀REV, ■■STILL/PAUSE, SKIP▶▶I ◀◀SKIP, I&LOW or SKIP SEARCH to find the point to put a chapter marker.
4 Press SET/ENTER to put a chapter marker.
- The material being played back pauses, and the added chapter marker is displayed in orange.

NOTE
Intervals at which Chapter Markers are Added
- Leave an interval of at least 5 seconds between an existing chapter marker and the chapter marker that you want to add. A chapter marker cannot be added if this interval is too short.
5 Press ◀ to select "YES".
- When you want to re-select the point, select "NO". The screen in the step 3 appears.
6 Press SET/ENTER.
• The added chapter marker is displayed in blue.
- If you want to add another chapter marker, repeat steps 3 through 6.
- Pressing RETURN returns the operation to the screen described in step 2.
7 Press EDIT to exit the edit mode.
Erasing Chapter Markers
You can erase chapter markers that you no longer want. Chapter markers that have been added in the editing procedure (page 66) can be erased. Chapter markers that have been added automatically during the following procedures cannot be erased (chapter markers are displayed in red in step 4).
• Chapter markers that have been set automatically during recording
- Chapter markers that have been added automatically when parts have been added or erased (pages 66 and 73)
(Chapter markers cannot be erased from discs recorded in the Video mode.)
1 Press EDIT while the disc is stopped.
• The Original Edit Title List screen appears.
2 Press ▲/▼/◄/► to select the title and then press SET/ENTER.

3 Press ▲ / ▼ to select "CHP MARK" and then press SET/ENTER.
• The selected title is played back.

Editing an Original Title

4 Playback the chapter (The marker is blue) that you want to erase.
- Press ▶PLAY, FWD▶▶, ◀REV, ■STILL/PAUSE, SKIP▶▶I or I◀◀SKIP to find the point to erase a chapter marker.
- Red chapter markers cannot be selected.

5 Press ERASE during playback the chapter.
- The material being played back returns to the start of the chapter, and the chapter marker turns orange.
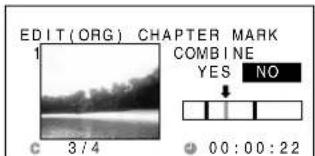
6 Press ◀ to select "YES".
- When you want to re-select the chapter marker, select "NO". The screen in the step 4 appears.
7 Press SET/ENTER.
- The chapter marker is erased and the part is connected to the previous chapter.
- If you want to add erase chapter mark, repeat steps 4 through 7.
- Pressing RETURN returns the operation to the screen described in step 2.
8 Press EDIT to exit the edit mode.
Navimark
DVD RW VR MODE
In the DiscNavi, each title is shown with a still frame picture. You can select a different still picture from within a title.
1 Press EDIT while the disc is stopped.
• The Original Edit Title List screen appears.
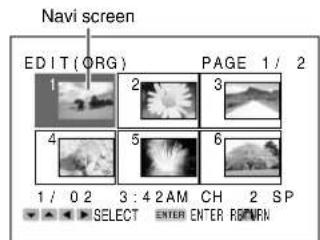
2 Press ▲/▼/◄/► to select the desired title and then press SET/ENTER.

3 Press ▲ / ▼ to select "NAVIMARK" and then press SET/ENTER.
• The selected title is played back.

Editing an Original Title

4 Select the desired part displayed in the DiscNavi.
- Press ▶PLAY, FWD▶▶, ◀◀REV, ■■STILL/PAUSE, SKIP▶▶I I◀◀SKIP, I6LOW or SKIP SEARCH to find the desired part.

5 Press SET/ENTER at the point you want to set as Navimark.
- The material being played back pauses.

6 Press ◀ to select "YES".
- When you want to re-select the part, select "NO". The screen in the step 2 appears.
7 Press SET/ENTER.
• The screen in the step 2 appears.
8 Press EDIT to exit the edit mode.
Protecting the Title
DVD RW VR MODE
This prevents disc contents from being edited or erased so that they cannot be altered by mistake. This is convenient for keeping discs safe during editing. (This function cannot be used with discs recorded in the Video mode.)
NOTE
- The protect function cannot be used in the case of playlists or discs recorded in the Video mode.
1 Press EDIT while the disc is stopped.
• The Original Edit Title List screen appears.
2 Press ▲/▼/◄/► to select the desired title and then press SET/ENTER.

3 Press ▲ / ▼ to select "PROTECT" and then press SET/ENTER.

4 Press ◀ to select "YES" and then press SET/ENTER and press RETURN.
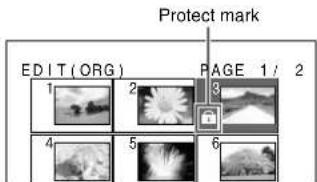
- A protect mark is inserted in protected titles. (Protect marks can be confirmed on either the DiscNavi Title List screen or Edit Title List screen.)
5 Press EDIT to exit the edit mode.
Editing an Original Title

Cancelling the Protection
NOTE
- A protect mark is attached to all titles when disc protect is set to "ON" in the "PROTECT" (page 88) of the "DISC SETUP" menu. In this case, none of the titles can be unprotected. (Cancel disc protection in the "Disc Setup Screen" to unprotect discs.)
1 Press EDIT while the disc is stopped.
- The Original Edit Title List screen appears.
2 Press ▲/▼/◄/► to select the protected title and then press SET/ENTER.
3 Press SET/ENTER.

4 Press ◀ to select "YES" and then press SET/ENTER.
- Title protect is canceled and the protect mark is no longer displayed.
5 Press EDIT to exit the edit mode.
Erasing a Title from the Original or Playlist

This allows all Original or Playlist titles to be erased. (If a Playlist (page 72) has been created, all of the Playlist titles are erased if the Original title is erased.)
NOTE
Erasing all titles differs initialization in the ways indicated below.
- Titles which is protected are not erased.
- Disc timer recording programs are not erased.
1 Press ERASE while the disc is stopped.
• The Erase Title screen appears.
2 Press ORIGINAL/PLAY LIST to select Original or Playlist.
• Operation cannot be switched between Original and Playlist for a disc on which a Playlist has not been created.
• Discs recorded in the Video mode cannot contain Playlists.
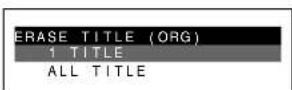
3 Press ▲ / ▼ to select "ALL TITLE" and then press SET/ENTER.
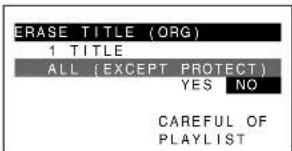
4 Press ◀ to select "YES" and then press SET/ENTER.
- All titles will be erased and then return to the normal screen.
NOTE
- About 2 minutes may be required for processing depending on the recording status of the disc, such as in the case the disc contains a lot of titles.
Erasing One Title
DVD RW DVD RW DVD R VR MODE VIDEO MODE
This is used to erase a specific title by selecting that title. Since remaining recording time can be increased by erasing unnecessary titles, this function is convenient since it enables you to record repeatedly on the same disc.
- In the case of DVD-RW discs (Video mode), remaining recording time can only be increased by erasing the last title on the disc.
- Remaining recording time does not increase in the case of DVD-R discs. In the case a Playlist has been created, the erased portions are no longer present when the Playlist is played back.
1 Perform the steps 1 and 2 of "Erasing All Titles" on this page.
- Pressing ERASE during playback changes the display to the screen of step 3, allowing you to erase the title currently being played back.
2 Press ▲/▼ to select
"1 TITLE" and then press SET/ENTER.

3 Press ▲/▼/◄/► to select the title you want to erase and then press SET/ENTER.

4 Press ◀ to select "YES" and then press SET/ENTER.
- The selected titles will be erased and then return to the screen in the step 2.
5 Press RETURN to exit the Erase Title screen.
- Press RETURN again to return to the normal screen.
NOTE
- Protected titles are not erased.
- The protect function is not available for Playlists and discs recorded in the Video mode.
Making a New Playlist (PL)

You can create a new Playlist by specifying the range of the material to be made into a Playlist from an Original. When specifying the range of a Playlist, the titles used for the Playlist have to be consecutive titles. DVD-RW discs recorded in the VR mode can be used to create Playlists. (Playlists cannot be created with DVD-R discs or DVD-RW discs recorded in the Video mode.)
You can add up to 99 titles to the Playlist.
Making a Playlist from Original Title
DVD RW
VR MODE
One title of an Original can be used as the title of the Playlist. (The entire contents of the selected Original become the title of the Playlist.)
1 Press EDIT while the disc is stopped.
• The Original Edit Title List screen appears.
2 Press ORIGINAL/PLAY LIST to select Playlist mode.
• The Playlist Edit Title List screen appears.

- Since a title does not exist at this point, a title frame that does not contain a picture is displayed.
- Select a title frame that does not contain a picture when creating a new Playlist.
3 Press SET/ENTER.
• The Playlist Make screen appears.

4 Press ▲ / ▼ to select "TITLE" and then press SET/ENTER.
• The Original Navi screen appears.

5 Press ▲/▼/◄/► to select the title you want to copy and then press SET/ENTER.
- A new Playlist is created.

NOTE
- The operation of copying a title does not actually copy the title of the Original, but rather writes information indicating that the Original title is to be used as the title of the Playlist. Consequently, editing can be performed without reducing available space on the disc.
- Only chapter markers automatically created at the start of recording and erasure of a part are copied.
- When creating a Playlist from an Original title, Navimark information has been changed or the title name of the Original title is not copied.
- Chapter markers that have been copied to a Playlist cannot be erased.
Making a New Playlist (PL)
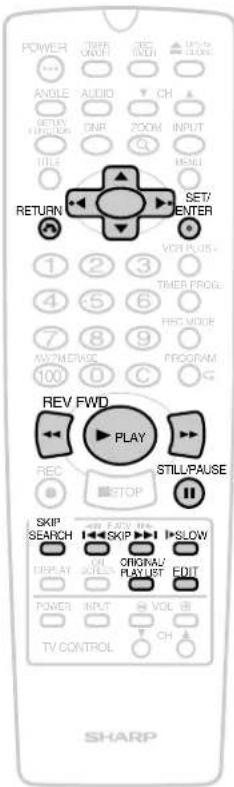
Adding a Part to the Playlist
DVD RW VR MODE
You can select part of an Original title as a new title to add to the Playlist.
1 Press EDIT while the disc is stopped.
• The Original Edit Title List screen appears.
2 Press ORIGINAL/PLAY LIST to select Playlist mode.
• The Playlist Edit Title List screen appears.
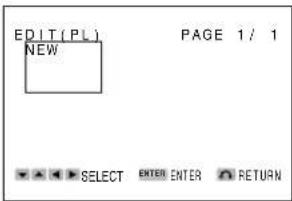
- Since a title does not exist at this point, a title frame that does not contain a picture is displayed. - Select a title frame that does not contain a picture when creating a new Playlist.
3 Press SET/ENTER.
• The Playlist Make screen appears.

4 Press ▲/▼ to select "PART" and then press SET/ENTER.
• The Original title is played back.

5 Press SET/ENTER to set the start point of the part.
- Press▶PLAY, FWD▶, ◀REV, ■■STILL/PAUSE, SKIP▶▶I I◀◀SKIP, ISLOW or SKIP SEARCH to find the start point.

6 Press SET/ENTER to set the end point of the part.

NOTE
- When copying a part, make sure to select a part that continues for at least 5 seconds. Parts of less than 5 seconds duration cannot be copied.
Resetting Start Point and End Point
- Until you have actually set the range, the start point and end point can be reset. After going back to setting the start point and end point by pressing RETURN, perform step 5 or step 6 to reselect the part.
7 Press ◀ to select "YES" to confirm the part.
Making a New Playlist (PL)
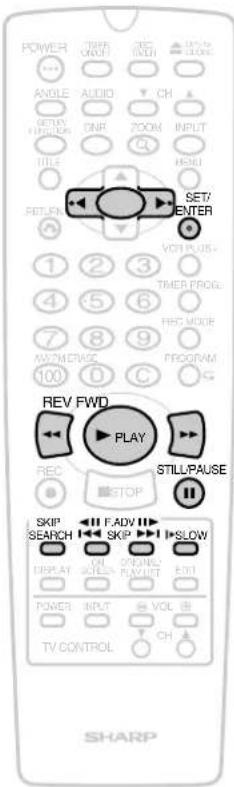
8 Press SET/ENTER.
- The part is played back from the start point to the end point.
- If you select "NO" in the step 7, go to step 9.

9 Press ◀ to select "YES" and then press SET/ENTER.
- The new title appears in the updated Playlist.

●Pause
When you have found a part that is close to the start point or end point, press ⚫TILL/
PAUSE. Pausing playback makes it easier to search for parts. Parts cannot be edited in exact frames. The start point and end point may shift slightly.
●Frame advance/Frame reverse
Recorded material is played back by reversing individual frames when
F. ADVI▶pressed after pausing the part. When RADV is pressed, recorded material is played back while reversing individual frames. (There is an error of 2-3 frames during frame advance playback.)
●Final selection of part
Press ▶ SLOW after the part has been paused and select the start point and end point by slow playback.
Searching for Start Point and End Point Parts
You can use the procedures described below during playback to search for the start point and end point parts.
●Playback
Press ▶PLAY to playback the current title that is paused.
●Searching for parts within a chapter
FWD▶▶ REV▶ are convenient when searching for parts within a chapter.
●Rapidly skipping parts
When the editing screen is displayed, pressing SKIP SEARCH lets you skip by recorded material at 5 minute intervals, which is convenient for rapidly moving through parts. This can be pressed consecutively up to 4 times, enabling you to skip 20 minutes of recorded material all at once.
Only use the skip function within the same title.
● Moving to the start of titles and chapters
When currently viewing or a title or chapter that is far away from the part to be selected, first search for the title or chapter with the I◀◀SKIP or SKIP▶▶I.
Editing a Playlist Title

Erasing a Part from the Playlist
DVD RW
VR MODE
You can erase a part from the Playlist. If you erase a part, nothing is actually erased from the Original title.
1 Press EDIT while the disc is stopped.
• The Original Edit Title List screen appears.
2 Press ORIGINAL/PLAY LIST to select Playlist mode.
• The Playlist Edit Title List screen appears.
3 Perform the steps 2 to 8 of "Erasing a Part from the Original" on page 65.
NOTE
- A chapter marker is inserted automatically when a part has been erased.
- Since editing cannot be performed in exact frames, the start point and end point may shift.
- When erasing a part, select a part that continues for at least 5 seconds. Parts of less than 5 seconds duration cannot be erased.
- Parts can be added or erased up to 50 times per title.
! Important!
- The first and last 5 seconds of a title to be edited cannot be selected as part erasure (start or end) points. If a start point is selected during the first 5 seconds from the start of a title, the start of the title becomes the start point. When the last 5 seconds from the end of a title is selected as a start point or end point, the point 5 seconds before the end of the title is selected as the start point or end point. When the end of a title has been selected, the end of a title is selected as the end point. In addition, when erasing 5 seconds before or after a chapter mark that has been automatically added during addition or erasure of a part as well, those parts cannot be selected as part erasure (start or end) points in the same manner as above.
Moving the Title
DVD RW
VR MODE
You can change the playing order of Playlist titles.
1 Press EDIT while the disc is stopped.
• The Original Edit Title List screen appears
2 Press ORIGINAL/PLAY LIST to select Playlist mode.
• The Playlist Edit Title List screen appears.

3 Press ▲/▼/◄/► to select the title and then press SET/ENTER.
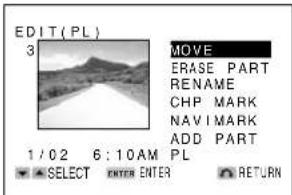
4 Press ▲ / ▼ to select "MOVE" and then press SET/ENTER.
5 Press ▲/▼/◄/► to select the place you want to move the title.

Editing a Playlist Title

6 Press SET/ENTER.
- When having selected a destination that is before a selected file, the file moves to the destination immediately before the selected title.

Example: When Title 3 has been selected and the destination cursor is placed at Title 1, Title 3 moves before Title 1.
- When having selected a destination that is after a selected file, the file moves to the destination immediately after the selected title.

Example: When Title 3 has been selected and the destination cursor is placed at Title 4, Title 3 moves after Title 4.
7 Press EDIT to exit the edit mode.
Adding a Part from the Original to the Playlist
DVD RW VR MODE
A part selected from an Original is added to the end of the Playlist title.
1 Press EDIT while the disc is stopped.
• The Original Edit Title List screen appears.
2 Press ORIGINAL/PLAY LIST to select Playlist mode.
• The Playlist Edit Title List screen appears.

3 Press ▲/▼/◄/► to select the title and then press SET/ENTER.
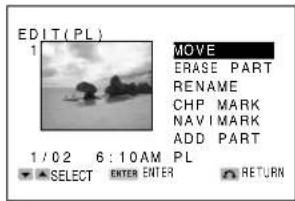
4 Press ▲ / ▼ to select "ADD PART" and then press SET/ENTER.

5 Press SET/ENTER to set the start point of the part.
- Press ▶ PLAY, FWD ▶, ◀REV,
■ STILL/PAUSE, SKIP▶▶
SKIP, ISLOW or SKIP SEARCH
to find the start point.
• The Original title is played back.

Editing a Playlist Title

6 Press SET/ENTER to set the end point of the part.
NOTE
- When erasing a part, select a part that continues for at least 5 seconds. Parts of less than 5 seconds duration cannot be erased.
- Parts can be added or erased up to 50 times per title.
- The start point is canceled when ◀REV or I◀SKIP is pressed to go back to before the start point after the start point has been set.
- Some playback buttons can be used when searching for a part (page 74).
- Until you have actually set the range, the start point and end point can be reset. After going back to setting the start point and end point by pressing RETURN, perform step 5 or step 6 to reselect the part.
7 Press ◀ to select "YES".

8 Press SET/ENTER.
- The part is played back from the start point to the end point.

- You can test playback the range from the added start point to the added end point.
- It may take up to about 1 minute until the confirmation screen is displayed.
9 Press ◀ to select "YES" and then press SET/ENTER.
- The part is added to the end of Playlist 1.
• The screen in the step 4 appears.
10 Press EDIT to exit the edit mode.
NOTE
- A chapter marker is automatically inserted at the start point where the part was added.
- Discs on which parts have been added or erased more than 51 times for a single title with another DVD recorder can only be played back or initialized.
Adding Chapter Marker in a Playlist
DVD RW VR MODE
You can put a chapter marker anywhere in a title.
1 Press EDIT while the disc is stopped.
- The Original Edit Title List screen appears.
2 Press ORIGINAL/PLAY LIST to select Playlist mode.
- The Playlist Edit Title List screen appears.
3 Perform the steps 2 to 7 of "Adding Chapter Markers" on page 66.
- The procedure is the same for addition of chapter markers of Original recordings.
NOTE
When adding chapter markers during editing:
- Allow an interval of at least 5 seconds between a chapter marker and the chapter marker you want to add. A chapter marker cannot be added if this interval is too short.
Editing a Playlist Title

Erasing Chapter Marker in a Playlist
1 Press EDIT while the disc is stopped.
- The Original Edit Title List screen appears
2 Press ORIGINAL/PLAY LIST to select Playlist mode.
- The Playlist Edit Title List screen appears.
3 Perform the steps 2 to 8 of "Erasing Chapter Marker" on page 67.
NOTE
The following chapter markers cannot be erased. These chapter markers are displayed in red on the Chapter Erase screen (page 68, step 4).
- Chapter markers that have been inserted automatically when recording is started.
- Chapter markers that have been added automatically after adding a part.
- Chapter markers that have been added automatically after erasing a part.
Renaming the Title
DVD RW VR MODE
1 Press EDIT while the disc is stopped.
• The Original Edit Title List screen appears
2 Press ORIGINAL/PLAY LIST to select Playlist mode.
• The Playlist Edit Title List screen appears.
3 Perform the steps 2 to 6 of "Inputting/Renaming the Title" on page 66.
Navimark
DVD RW VR MODE
1 Press EDIT while the disc is stopped.
- The Original Edit Title List screen appears.
2 Press ORIGINAL/PLAY LIST to select Playlist mode.
• The Playlist Edit Title List screen appears.
3 Perform the steps 2 to 8 of "Navimark" on page 68.
Tamper Proof

With this feature, you can lock all recorder modes to prevent accidental change. This function works even when the recorder power is off, thus preventing children from operating the recorder or viewing selected programs while you are away from home.
Tamper Proof Setting

Press and hold SET/ENTER and RETURN together for more than 2 seconds.
- "C" on the Front Panel Display starts blinking and then lights up.

Disengaging Tamper Proof
Press and hold SET/ENTER and RETURN together for more than 2 seconds when the Tamper Proof function is set.
- “” starts blinking and then disappears. Now, Tamper Proof is disengaged.
Operating during Tamper Proof
" 🔊 " on the Front Panel Display is blinking.

NOTE
- This function does not work when the disc tray is opened.
- If an unplayable disc is loaded, the disc tray slides out automatically and then Tamper Proof function is disengaged.
Playback Setup Screen
This section explains each item of playback setup. See "Basic Settings of the Playback Setup Screen" on page 82 to set each item.
TV MODE
This lets you set whether you want to view played back material at an aspect ratio of 16:9 for wide screen TVs or at an aspect ratio of 4:3 for conventional TVs. (This setting is made to match the TV connected to this recorder.)

- 4:3 PS — (Pan & Scan mode): When wide-screen video material is played, this mode clips the right and left sides of the image so that it can be viewed on a conventional TV screen.
- Some wide-screen DVDs that do not permit Pan & Scan mode playback are automatically played in letterbox mode (black bands top and bottom).
• 4:3 LB — (Letterbox mode): When wide-screen video material is played in this mode on a conventional TV screen, black bands appear at the top and bottom of the screen. - 16:9 — (Wide-screen TV): This is the correct mode for playing wide-screen videos on a wide-screen TV.
- You must also set the screen mode on your wide-screen TV to "FULL".
NOTE
When recording wide screen material (16:9) from a satellite broadcast in the Video mode:
- The screen becomes longer in the vertical direction when playing back with this recorder or another DVD player and viewing on a normal (4:3) TV.
- The screen also becomes longer in the vertical direction when playing back with a PC capable of playing back DVD video. (The output is set at 16:9 regardless of the TV screen setting during playback.)
When recording wide screen material (16:9) from a satellite broadcast in the VR mode:
- When playing back with this recorder and viewing with a normal (4:3) TV, the screen size during playback can be changed according to the setting for "TV MODE" of "PLAYBACK SETUP". However, if the recording mode of the disc is set to LP or EP, the material will be played back in "4:3 LB" even if "TV MODE" of "PLAYBACK SETUP" is set to "4:3 PS".
PROGRESSIVE
Clearer images containing minimal flickering can be enjoyed when playing back discs by connecting a progressive-compatible TV with a component.
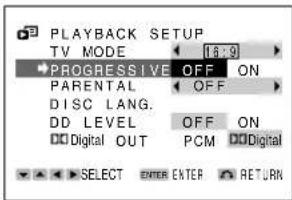
●ON
Set when the recorder is connected to a progressive-compatible TV.
- The screen may not switch to a 4:3 screen during progressive material depending on the TV you are using. If you want to view material on a 4:3 screen with such TVs, set "PROGRESSIVE" to "OFF".
Compatibility of this recorder with Progressive-compatible TVs:
- Since some progressive-compatible TVs are currently not completely compatible with this recorder, there may be times when images may not appear clearly. If a problem occurs during progressive playback, set "PROGRESSIVE" to "OFF".
OFF
Set when the recorder is connected to a TV that is not progressive-compatible.
- When the recorder is connected to a TV that is not progressive-compatible and "PROGRESSIVE" is set to "ON", there is no video output.
NOTE
- The DV output cannot be used during progressive playback.
PARENTAL
Certain discs come preset with country codes and parental level settings defined for particular countries.

See "PARENTAL Level Setting" on page 82 for details.
DISC LANG.
Use this setting for selecting "SUBTITLE", "AUDIO" and "MENU".

SUBTITLE
The language that has been set is your preferred subtitle language.
AUDIO
The language that has been set is your preferred audio language.
●MENU
- The language that has been set is your preferred menu language.
- Disc language changes as follows: "ENGLISH" → "FRENCH" → "GERMAN" → "ITALIAN" → "SPANISH" → "CHINESE" → "SWEDISH" → "DUTCH" → "OTHER:AA...ZU"
- If you select "OTHER", see "Language Code List for Disc Language" on page 85 when selecting the code.
See "DISC LANGUAGE Setting" on page 84 for details.
DD LEVEL
(Dolby Digital Output Level)
When Dolby Digital is used to record the audio on a DVD disc, the average overall volume level of the audio is relatively lower than that produced by an Audio CD. This is to provide the widest possible dynamic range. To counteract this, this recorder automatically raises the overall average volume level of a disc recorded using Dolby Digital to a level that is similar to that of an Audio CD.

ON: Dolby Digital average audio level is increased so it sounds similar to that of an Audio CD.
OFF: Audio level recorded on disc is played back without modification.
Digital OUT
Use this setting to enjoy Dolby Digital Surround audio by making a digital connection with equipment provided with a digital input jack.

●PCM
PCM audio can be enjoyed by making a digital connection with 2 channel audio equipment and MD players. Dolby Digital audio is output in the form of PCM (non-compressed) audio that can be played back with 2 channel audio equipment.
● DIGITAL
You can enjoy Dolby Surround audio by making a digital connection with audio equipment compatible with Dolby Digital (5.1 ch). DTS audio can be enjoyed by connecting with an amplifier or other equipment compatible with DTS Digital Surround.
Playback Setup Screen

Basic Settings of the Playback Setup Screen

NOTE
- During playback, you cannot set each item in the SETUP screen. Press ■STOP to stop playback.
Example: Set "PROGRESSIVE" to "ON"
1 Press SETUP/FUNCTION to display the SETUP screen.
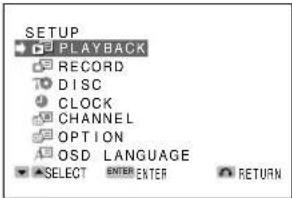
2 Press ▲ / ▼ to select "PLAYBACK" and then press SET/ENTER.
- The PLAYBACK SETUP screen appears.
3 Press ▲/▼ to select "PROGRESSIVE".

4 Press ◀/▶ to select "ON".
5 Press SET/ENTER to confirm the setting.
- You can exit the SETUP screen by pressing SETUP/FUNCTION.
PARENTAL Level Setting
DVD VIDEO
Certain discs come preset with country codes and parental level settings defined for particular countries. Discs equipped with the parental lock function are rated according to their content. The rated content allowed by a parental lock level and the way a DVD can be controlled vary from disc to disc. Some discs, for example, may let you edit out parts and replace them with parts suitable for children. You can also use the parental lock to completely disable playback of the DVD.
1 Press SETUP/FUNCTION to display the SETUP screen.
2 Press ▲ / ▼ to select the "PLAYBACK" and then press SET/ENTER.
• The PLAYBACK SETUP screen appears.
3 Press ▲ / ▼ to select "PARENTAL".
4 Press ◀/▶.
- The password specification and verification screen appears.

- If you have already set your password, □□(password verification display) appears.
- Press RETURN to return to the previous screen.
5 Use the number buttons to enter a 4-digit password.
- When you set the password for the first time, enter the same password again. The password will be automatically stored.
NOTE
- Enter the numbers slowly as each number is stored separately.
If you forget your password, you can erase your current password by pressing ■STOP four times.

6 The cursor is moved to "LEVEL" and then press ◀/▶ to select "LEVEL".

- Level 1: for most restricted viewing → Level 8: for adult viewing (The smaller the number, the greater the level of restriction.)
- When "PARENTAL" is set to "OFF", DVD discs can be played back regardless of the parental level.
The parental level for U.S.A. is as follows.
Level 7: NC-17 Level 6: R Level 4: PG13 Level 3: PG Level 1: G
The parental level set up for Canada is prepared for future use. As for the set up of an appropriate level, please check the level when you purchase your DVD disc equipped with the parental feature.
7 Press ▲/▼ to select "CODE".
8 Press ◀/▶ to select the desired country code.

9 Press SET/ENTER to confirm the setting.
- Press SETUP/FUNCTION to exit the SETUP screen.
! Important!
- Be sure to try playing back the disc to confirm that the parental level setting is working correctly. If it is not working correctly, try changing the country code.
NOTE
- You can use the parental lock function only with DVD discs that are equipped with the parental lock feature.
- On some DVD discs, the PARENTAL level setting is fixed and cannot be modified.
- The parental level depends on countries. If you do not set the country code correctly, it fails to work correctly.
- Some DVD discs allow the viewer to temporarily change the parental level setting to view the original scenes. When this prompt appears, input the password to view the original scenes.
Country Code List
| USA | FINLAND |
| CANADA | BELGIUM |
| JAPAN | HONG KONG |
| GERMANY | SINGAPORE |
| FRANCE | THAILAND |
| UK | MALAYSIA |
| ITALY | INDONESIA |
| SPAIN | TAIWAN |
| SWISS | PHILIPPINE |
| SWEDEN | AUSTRALIA |
| HOLLAND | RUSSIA |
| NORWAY | CHINA |
| DENMARK | - |
Playback Setup Screen
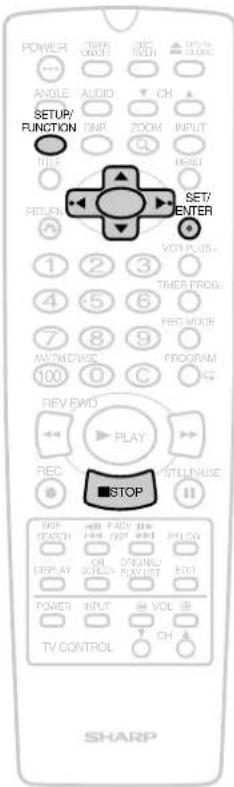
DISC LANGUAGE Setting
DVD VIDEO
NOTE
- During playback, you cannot set each item in the SETUP screen. Press ■STOP to stop playback.
Example: Setting "SUBTITLE"
1 Press SETUP/FUNCTION to display the SETUP screen.
2 Press ▲ / ▼ to select "PLAYBACK" and then press SET/ENTER.
- The PLAYBACK SETUP screen appears.
3 Press ▲ / ▼ to select "DISC LANG." and then press ▶.
Example: Selecting "SUBTITLE"

4 Press ▲ / ▼ to select "SUB TITLE".
5 Press ◀/▶ to select the language you want to use.
NOTE
- Disc language changes as follows: "ENGLISH" → "FRENCH" → "GERMAN" → "ITALIAN" → "SPANISH" → "CHINESE" → "SWEDISH" → "DUTCH" → "OTHER:AA...ZU"
- If you select "OTHER", see "Language Code List for Disc Language" on page 85 when selecting the code.
6 Press SET/ENTER to confirm the setting.
- You can set "AUDIO" and "MENU" the same way.
- Press SETUP/FUNCTION to exit the SETUP screen.
Language Code List for Disc Language
| Code | Language Name | Code | Language Name | Code | Language Name | Code | Language Name |
| AA Afar | FY Frisian | MG Malagasy | SL Slovenian | ||||
| AB Abkhazian | GA Irish | MI Maori | SM | Samoan | |||
| AF Afrikaans | GD Scots Gaelic | MK Macedonian | SN Shona | ||||
| AM Ameharic | GL Galician | ML Malayalam | SO Somali | ||||
| AR Arabic | GN Guarani | MN Mongolian | SQ Albanian | ||||
| AS Assamese | GU Gujarati | MO Moldavian | SR Serbian | ||||
| AY Aymara | HA Hausa | MR Marathi | SS Siswat | ||||
| AZ Azerbaijani | HI Hindi | MS Malay | ST Sesotho | ||||
| BA Bashkir | HR Croatian | MT Maltese | SU Sundanese | ||||
| BE Byelorussian | HU Hungarian | MY Burmese | SV Swedish | ||||
| BG Bulgarian | HY Armenian | NA Nauru | SW Swahili | ||||
| BH Bihari | IA Interlingua | NE Nepali | TA Tamil | ||||
| BI Bislama | IE Interlingue | NL Dutch | TE Telugu | ||||
| BN Bengali; | IK Inupiak | NO Norwegian | TG Tajik | ||||
| Bangla | IN Indonesian | OC Occitan | TH Thai | ||||
| BO Tibetan | IS Icelandic | OM (Afàn) Oromo | TI Tigrinya | ||||
| BR Breton | IT Italian | OR Oriya | TK Turkmen | ||||
| CA Catalan | IW Hebrew | PA Panjabi | TL Tagalog | ||||
| CO Corsican | JA Japanese | PL Polish | TN Setswana | ||||
| CS Czech | JI Yiddish | PS Pashto, Pushto | TO Tonga | ||||
| CY Welsh | JW Javanese | PT Portuguese | TR Turkish | ||||
| DA Danish | KA Georgian | QU Quechua | TS Tsonga | ||||
| DE German | KK Kazakh | RM Rhaeto- | TT Tatar | ||||
| DZ Bhutani | KL Greenlandic | Romance | TW Twi | ||||
| EL Greek | KM Cambodian | RN Kirundi | UK Ukrainian | ||||
| EN English | KN Kannada | RO Romanian | UR Urdu | ||||
| EO Esperanto | KO Korean | RU Russian | UZ Uzbek | ||||
| ES Spanish | KS Kashmiri | RW Kinyarwanda | VI Vietnamese | ||||
| ET Estonian | KU Kurdish | SA Sanskrit | VO Volapük | ||||
| EU Basque | KY Kirghiz | SD Sindhi | WO Wolof | ||||
| FA Persian | LA Latin | SG Sangho | XH Xhosa | ||||
| FI Finnish | LN Lingala | SH Serbo- | YO Yoruba | ||||
| FJ Fiji | LO Laothian | Croatian | ZH Chinese | ||||
| FO Faroese | LT Lithuanian | SI Singhalese | ZU Zulu | ||||
| FR French | LV Latvian, Lettish | SK Slovak |
Record Setup Screen
This section explains each item of record setup. See "Basic Settings of the Record Setup Screen" on page 87 to set each item.
CHP INT.
This is used to set the interval at which chapters are automatically inserted when recording in the Video mode.
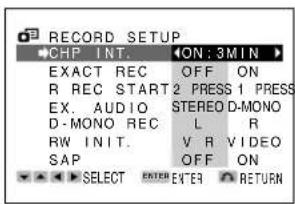
| ON: ON: ON: ON:3 MIN 5 MIN 10 MIN 15 MIN | 30 MIN | OFF | ||
| Every Every 3 minutes 5 minutes | Every 10 minutes 15 | Every minutes 30 minutes | OFF | |
* When "EXACT REC" has been set to "ON", the auto chapter interval becomes a little shorter (by a maximum of 1 minute).
EXACT REC
This function prevents a recording from ending out before it is completed by automatically changing the recording mode when timer recording (including VCR Plus+, timer recording and disc timer recording) is unable to be completed in the set recording mode due to insufficient time or available disc space. (There may be times when considerable amount of disc space remains available compared to recording time.)
- The EXACT REC function is activated when, during the course of recording in the programmed order, the next program is unable to be completely recorded due to insufficient available disc space in the set recording mode.
- When the available disc space is extremely small low, the recording may not be able to be completed even if the EXACT REC function has been set.
- The EXACT REC function is not available during Simple Recording Timer (page 51).
- The EXACT REC function is not activated during timer recording in the VR mode when the recording mode has been set to EP, or during timer recording in the Video mode when the recording mode has been set to LP.

●OFF: Recording continues in the recording mode set during timer recording programming.
●ON: The recording mode is changed automatically during timer recording to prevent the recording from ending before it is completed.
R REC START
When recording using a DVD-R disc, you need to press
●REC twice.
You can change this if you prefer DVD-R recording to work in the same way as recording to DVD-RW. This function is factory preset to "2 PRESS".

EX. AUDIO
Select the sound input from the external source.
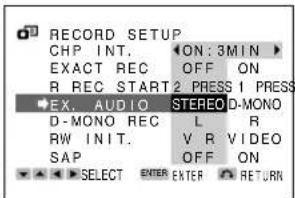
●STEREO: Recording standard stereo sound.
● D-MONO: Recording the sound that each channel carries as a separate sound.
D-MONO REC
When recording a external source in Video mode, you can select the sound to record either "L" (left) or "R" (right) audio channel.

* This does not apply if recording from the DV input.
RW INIT.
When you load a new DVD-RW disc, the recorder starts initializing automatically. You can select to initialize for VR mode or Video mode.
* This function works only on DVD-RW discs.

●VR: Initialize a disc for VR mode automatically
● VIDEO: Initialize a disc for Video mode automatically
Record Setup Screen

SAP
This recorder can record stereo or SAP (Separate Audio Program) broadcasts, where available. If the broadcast is in stereo, the recorder automatically records the stereo sound. If the broadcast is in SAP, you can record both the MAIN and the SAP mode to ON. If the broadcast is in stereo/SAP, you can record either the SAP sound by using the menu screen to set the SAP mode to ON, or stereo sound by setting the SAP mode to OFF.

SAP Broadcast
The monitor output listed in the table shows the audio output mode. The contents of audio recording are different VR mode and Video mode. See the table below for details.
| Broadcast Received/SAP ON or OFF | AUDIO Mode | Recording | AUDIO OUTPUT | ||
| L | R | L | R | ||
| STEREO +SAP SAP OFF | MONO | L+R | L+R | L+R | L+R |
| LR | L | R | L | R | |
| STEREO +SAP SAP ON | MONO | L+R | L+R | L+R | L+R |
| LR | L+R | SAP | SAP | SAP | |
| STEREO SAP OFF | MONO | L+R | L+R | L+R | L+R |
| LR | L | R | L | R | |
| STEREO SAP ON | MONO | L+R | L+R | L+R | L+R |
| LR | L | R | L | R | |
| MONO +SAP SAP OFF | MONO | MONO | MONO | MONO | MONO |
| LR | MONO | MONO | MONO | MONO | |
| MONO +SAP SAP ON | MONO | MONO | MONO | MONO | MONO |
| LR | MONO | SAP | SAP | SAP | |
| MONO SAP OFF | MONO | MONO | MONO | MONO | MONO |
| LR | MONO | MONO | MONO | MONO | |
| MONO SAP ON | MONO | MONO | MONO | MONO | MONO |
| LR | MONO | MONO | MONO | MONO | |
☐: When recording in Video mode, the SAP channel is recorded on this channel.
Basic Settings of the Record Setup Screen


NOTE
- During playback, you cannot set each item in the SETUP screen. Press ■STOP to stop playback.
Example: Set "EXACT REC" to "ON"
1 Press SETUP/FUNCTION to display the SETUP screen.
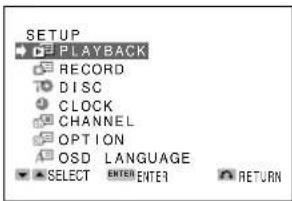
2 Press ▲/▼ to select "RECORD" and then press SET/ENTER.
- The RECORD SETUP screen appears.
- Press RETURN to return to the previous screen.
3 Press ▲ / ▼ to select "EXACT REC".

4 Press ◀/▶ to select "ON" and then press SET/ENTER.
- Press SETUP/FUNCTION to exit the SETUP screen.
Disc Setup Screen
This section explains each item of disc setup. See "Basic Settings of the Disc Setup Screen" on page 89 to set each item.
VR MODE INITIALIZE
When you record on a DVD-RW disc in VR mode, you need to initialize the disc in VR mode.
(This is used when you want to erase the entire contents of a recorded disc. Check the recorded contents before erasing so that disc contents are not erased by mistake.)
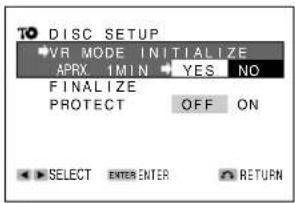
* This function does not work when the disc is protected.
* You cannot initialize DVD-R discs for VR mode.
When a DVD-RW disc is used to record in the Video mode, the disc must be initialized in the Video mode before you start recording. Initializing is also used to erase the entire contents of a recorded disc (contents cannot be erased from DVD-R discs).

* DVD-R discs cannot be initialized.
FINALIZE
- When a disc recorded in the Video mode is played back with another DVD player or when a disc recorded in the VR mode is not played back with another DVD-RW-compatible player, finalize the disc so that it can be played back.
- Several minutes to about 1 hour may be required for finalizing processing. (Processing takes longer time when there is a large amount of available disc space on DVD-RW discs (VR mode).)

- Once a disc has been finalized with this recorder, it does not have to be finalized again.
• Discs in the VR mode that have been finalized with this recorder can be recorded and edited even after they have been finalized. - A disc menu is generated for discs in the Video mode that have been finalized with this recorder. Discs that have been finalized cannot be used for recording or editing.
- Finalizing cannot be selected when a finalized disc has been loaded in the recorder. When a DVD-RW disc (VR mode) that has been finalized with a different recorder is loaded in this recorder, "UNDO FINALIZE" may be displayed. The disc can be used for recording and editing with this recorder if Undo Finalize is performed at this time.
- Finalizing of VR mode discs can be interrupted even when finalizing is in progress. However, starting about 4 minutes before completion of finalizing, the interrupt display is no longer displayed, indicating that finalizing can no longer be interrupted. In addition, finalizing can also not be interrupted if the interrupt display is not displayed from the start of finalizing.
PROTECT
This lets you protect a recorded disc. Disc protect prevents the contents of that disc from being altered by recording or editing. In addition, this procedure is used to cancel disc protect. Once disc protect is canceled, it can again be used for recording and editing.
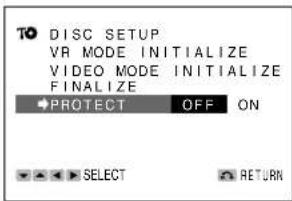
●OFF: Disc protect is canceled and the disc can be used for editing and recording.
●ON: Disc protect is activated and the disc cannot be edited or recorded.
* Discs for which disc protect has been set cannot be initialized.
* Disc protect is only available for DVD-RW discs (VR mode).
* Protect processing may take up to about 2 minutes depending on the recording status of the disc such as if the disc contains a large number of titles.
Disc Setup Screen

Basic Settings of the Disc Setup Screen
DVD RW DVD RW DVD R VR MODE VIDEO MODE
NOTE
- During playback, you cannot set each item in the SETUP screen. Press ■STOP to stop playback.
Example: Select "VR MODE INITIALIZE"
1 Press SETUP/FUNCTION to display the SETUP screen.

2 Press ▲ / ▼ to select "DISC" and then press SET/ENTER.
- The DISC SETUP screen appears. - Press RETURN to return to the previous screen.

3 Press ▲/▼ to select "VR MODE INITIALIZE" and then press ▶.
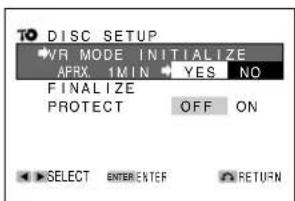
4 Press ◀ to select "YES" and then press SET/ENTER.
• The initializing is starts.
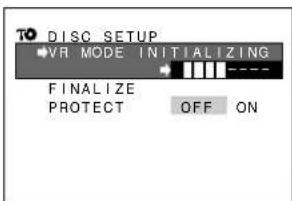
- The screen in step 2 appears after initializing. - Press SETUP/FUNCTION to exit the SETUP screen.
Option Setup Screen
This section explains each item of option setup. See "Basic Settings of the Option Setup Screen" on page 92 to set each item.
CLOCK DISP
This function turns on or off the clock indicator on the Front Panel Display to save electricity when the recorder is turned off.

●OFF: Turns off the clock indicator on the Front Panel Display to save electricity when the recorder is turned off. The STANDBY indicator lights up when the recorder is turned off.
●ON: Turns on the clock indicator on the Front Panel Display when the recorder is turned off.
POWER OFF
When you forget to turn off power or do not operate the recorder, the power is turned off automatically about 3 hours later to save electricity.
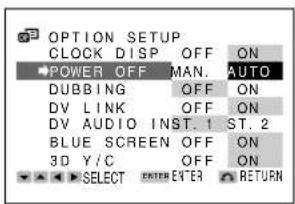
● MAN.: The recorder does not turn off until the POWER is pressed.
●AUTO: Turns off the power automatically when you do not operate the recorder for about 3 hours.
DUBBING
When recording material played back with this recorder using other equipment, the contents displayed on the TV screen may also be recorded. This function is for preventing this from happening.

●OFF: On screen display displayed when playing back a disc is displayed to match switching of the on-screen display (page 28).
●ON: On screen display displayed when playing back a disc is canceled so that only the played back material is output.
* Some error messages are displayed.
DV LINK
When recording with this recorder by connecting a digital camcorder using the DV IN/OUT terminal, the digital camcorder can be controlled with the remote control of this recorder.

* Refer to page 95 for information on the procedure when connecting this recorder with a digital camcorder.
●OFF: Set to OFF when the digital camcorder does not operate properly when the recorder is connected to a digital camcorder and controlled with the remote control of this recorder.
●ON: A digital camcorder connected to this recorder can be controlled with the remote control of this recorder.
* Discs cannot be played back when it is set to "ON" and DV input has been selected.
Option Setup Screen
DV AUDIO IN
You can select the audio to be recorded when recording material from a digital camcorder using the DV IN/OUT terminal.
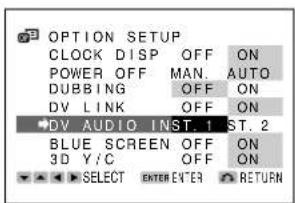
●ST. 1: Original audio
●ST. 2: Overdubbed audio
●Monaural audio cannot be input through the DV IN/OUT terminal.
* The DV input audio settings are disabled when the audio output of the digital camcorder that is connected is set to 16 bits.
BLUE SCREEN
This function automatically switches material containing unwanted noise to a blue screen when a channel for which there is no broadcast or a channel for which broadcasting has ended has been selected.

●OFF: The Blue Screen function does not work.
●ON: The Blue Screen function works.
* The display may switch to the blue screen when material has been input from external input that involves a special playback format. Set this function to "OFF" if this happens.
3D Y/C
The 3D Y/C separation circuit is a function that lets you enjoy clear viewing and recording of TV broadcasts or recorded material from equipment connected to the external input.

- OFF: Set this function to "OFF" when images appear incorrectly during reception of a weak broadcast signal, or when the picture is distorted when a video deck or video game machine is connected to the external input jack of this recorder.
●ON: Enables recording with higher picture quality (Normally, this function is set to "ON").
* This function is not activated for DV input or S-Video.
Option Setup Screen
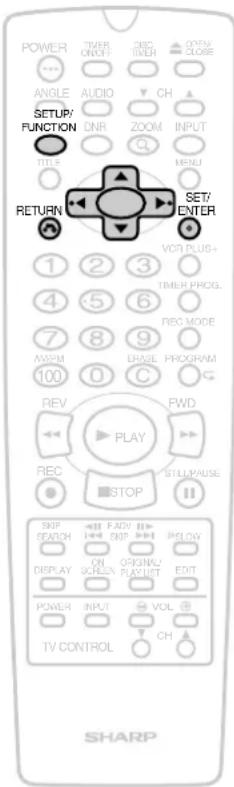
Basic Settings of the Option Setup Screen
DVD VIDEO
DVD RW
DVD RW
DVD R
VIDEO CD
AUDIO CD
NOTE
- During playback, you cannot set each item in the SETUP screen. Press ■STOP to stop playback.
Example: Set "CLOCK DISP" to "ON"
1 Press SETUP/FUNCTION to display the SETUP screen.

2 Press ▲ / ▼ to select "OPTION" and then press SET/ENTER.
- The OPTION SETUP screen appears.
- Press RETURN to return to the previous screen.
3 Press ▲ / ▼ to select "CLOCK DISP".
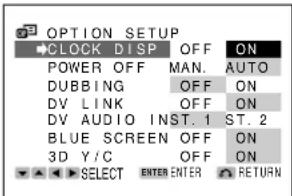
4 Press ◀/▶ to select "ON" and then press SET/ENTER.
- Each time ◀/▶ is pressed, the mode toggles between "ON" and "OFF".
- Press SETUP/FUNCTION to exit the SETUP screen.
Connecting to Audio Equipment
Playing 2 channel audio with an Analog Connector


NOTE
- When connecting the audio equipment to the analog connection, we recommend that you set the "DD LEVEL" in "PLAYBACK SETUP" to "OFF" (See page 81).
Playing Dolby Digital (5.1 channel) and DTS audio with a Digital Connection
- Connecting an amplifier with a Dolby Digital/DTS digital surround processor or a Dolby Digital/DTS digital surround decoder to the recorder's optical digital jack provides richer, more powerful audio play.
- To use DTS digital surround, press AUDIO to select DTS audio.
■Connection to a processor or amplifier with a optical digital input jack

Dolby Digital (5.1ch)/ DTS processor or amplifier

Important|
- When using this connection, set the "Digital OUT" in "PLAYBACK SETUP" to "DIGITAL" (See page 81).

NOTE
- To play a disc recorded with DTS, you need to use DTS processor or amplifier.
- This connection is not possible if the processor or amplifier to which you want to connect does not have a optical digital input jack.
- Refer to the operation manual for the processor or amplifier for information about connecting to it.
Connecting to Audio Equipment
Playing 2 channel audio with a Digital Connection

Audio equipment with optical digital input terminal
■Digital Connection to Audio Equipment or MD Player without a Dolby Digital Decoder
• Audio CD or Video CD
You can enjoy these discs by playing them back the ordinary playback procedure. (The normal audio output is not played back for discs recorded with DTS.)
• DVD Video Disc
There is no audio signal generated for DVD video discs recorded with DTS. A processor or amplifier equipped with a DTS Surround decoder function is required to enjoy DTS audio.

Important!
- When connecting the audio equipment to the digital connection, set the "Digital OUT" in "PLAYBACK SETUP" to "PCM" (See page 81).

NOTE
- No sound will come out from the DIGITAL OUT OPTICAL terminal.
Digital Connection to an MD to Record a CD
When you are using a digital connection to record the contents of a CD to an MD, the track numbers of the CD may not match the track numbers recorded to the MD.
Connecting to Audio Equipment
Recording by Connecting with a Digital Camcorder Using i.LINK
DVD RW DVD RW DVD R VR MODE VIDEO MODE
This function lets you make high picture quality and high sound quality recordings by connecting with a digital camcorder using the DV IN/OUT terminal (i.LINK). You can record material from this recorder with a digital camcorder, or record material from a digital camcorder with this recorder.
In addition, you can also record while controlling the digital camcorder with the remote control of this recorder (DV uptake).
* i.LINK is a function that lets you control other equipment by input and output of video, audio, data and control signals between equipment having an i.LINK jack.
* i.Link refers to the IEEE1394-1995 industry specification and extensions thereof. The logo is used for products compliant with the i.Link standard.
DV IN/OUT Terminal
■ About the Connected Equipment
When this recorder is connected with a DV-format camcorder using a DV cable, you can record and edit with minimal deterioration of picture and sound quality using a digital signal.
NOTE
- The DV IN/OUT terminal of this recorder only enables input and output of DV-format camcorders (DVC-SD signals). It is not compatible with satellite receivers or Digital VHS video recorders since they employ a different format.
- When this recorder is connected with a camcorder equipped with a DV terminal, the signal may not be input to this recorder depending on the camcorder. When this happens, use an analog connection (page 98).
- The DV IN/OUT terminal is not compatible with connection to a PC.
- This recorder cannot be controlled from other equipment by using the DV IN/OUT terminal.
- Only one camcorder can be connected to this recorder using the DV IN/OUT terminal.
- Connect this recorder and the camcorder directly. The DV signal will not be input if the camcorder is connected to this recorder through other equipment equipped with a DV IN/OUT terminal.
- When two of these recorders are connected using the DV IN/OUT jack, one cannot be used to control the other.
- Signals may not be able to be output or control may not be possible from this recorder in the case of some digital camcorders (page 96).
■ Input/Output of Video, Audio and Data Signals
●Date and time data as well as the contents of cassette memory cannot be recorded with this recorder.
●Video and audio signals from TV programs, external inputs, CDs or Video CDs cannot be output.
●Video and audio signals of protected material or "copy-once" material cannot be output.
●Video and audio signals of protected material or "copy-once" material cannot be recorded.
●Monaural audio cannot be input through the DV IN/OUT terminal.
■ Audio Mode
Digital camcorders typically have the following two audio modes.
●16-bit (48 kHz)
Although this yields high sound quality, only one stereo audio signal can be processed.
●12-bit (32 kHz)
Two stereo signals can be processed. In general, overdubbed audio is recorded in Stereo 2.
●This recorder allows listening or recording of either Stereo 1 or Stereo 2 audio if the input audio is in the 12-bit audio mode.
●Only the 16-bit audio mode is output from this recorder.
●This recorder is unable to process 44.1 kHz input audio signals.
Connecting Using the DV IN/OUT Terminal (i.LINK)
Refer to the user's manual provided with the camcorder for information on the procedure for connecting the camcorder with this recorder.
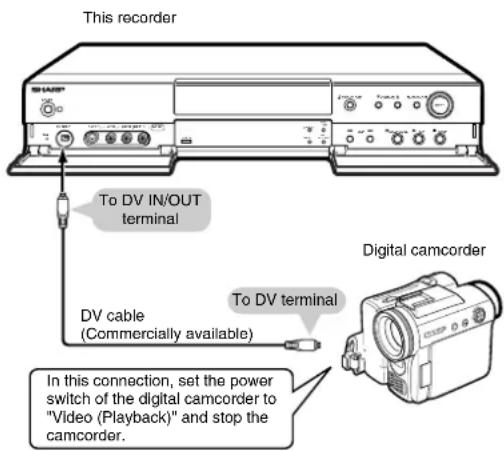
Connecting to Audio Equipment
Recording with this recorder (DV Uptake)
You can record images from a digital camcorder connected to the DV IN/OUT terminal of this recorder. You can also control the operation of the camcorder with the remote control provided with this recorder, making it easy to record material from a camcorder onto a disc.
Record material from a camcorder after first setting the "DV AUDIO IN" (page 91) of "OPTION SETUP".
NOTE
- Material protected with a copy guard cannot be recorded.
- Date and time data as well as the contents of cassette memory cannot be recorded.
- Discs cannot be played back when "DV LINK" is set to "ON" during DV input. Set the "DV LINK" to "OFF" when you want to play back recorded material.
- The video and audio signals of Audio CDs or Video CDs are not output.
- The video and audio signals of protected material or copy-once material are not output.
1 Setup
① Connect the digital camcorder to the DV IN/OUT terminal.
- Set the power switch of the camcorder to "Video (Playback)" and connect while it is stopped.
This recorder
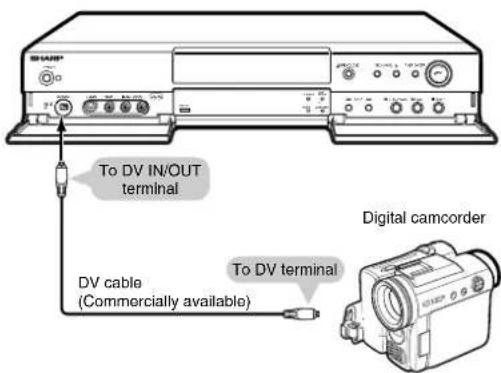
②Place a disc for recording in the recorder.
2 Select the external input audio.
- Before starting recording, check the setting of "DV AUDIO IN" (page 91).
- Monaural audio cannot be input through the DV IN/OUT terminal.
3 Press INPUT.
- The setting changes in the order of DV (DV Input), L 1 (External Input 1), L 2 (External Input 2), L 3 (External Input 3), Channel and then back to DV (DV Input) each time this is pressed.
- When "DV LINK" is set to "ON", the digital camcorder can be controlled with the remote control of this recorder.
- The following buttons can be used: ▶ PLAY, FWD▶, ◀REV, ■ STOP, SLOW and ■ STILL/PAUSE.
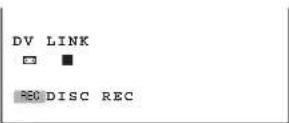
4 Begin playback of the digital camcorder.
5 Press ●REC where you want to start recording.
• This recorder begins to record.
- Recording by this recorder pauses if there is a portion of the digital camcorder playback where nothing has been recorded or playback is stopped during recording. When a recorded portion of the playback is again played back, pause is canceled and recording resumes.
6 Pause recording (as necessary).
When "DV LINK" is "ON": Press ●REC. When "DV LINK" is "OFF": Press ■STILL/PAUSE.

7 Stop (end) recording.
When "DV LINK" is "ON": Press SET/ENTER. When "DV LINK" is "OFF": Press ■STOP.
Refer to the section on "Troubleshooting" (page 100) when DV uptake does not function properly.
! Important!
Abnormal images may be recorded when any of the following occur during DV uptake.
- When connected equipment plays back a portion where nothing is recorded
- When the DV cable is disconnected or the camcorder power is turned off during DV uptake
- When playback from the camcorder is stopped
Connecting to Audio Equipment
NOTE
- Only DVC-SD signals can be input from the DV IN/OUT terminal of this recorder.
- There are some digital camcorders that cannot be operated with the remote control of this recorder even if "DV LINK" is set to "ON". Set "DV LINK" to "OFF" when this happens (page 90).
- When connecting a digital camcorder to this recorder, set the power switch of the digital camcorder to "Playback (Video)" and press ■STOP. If the camcorder is connected with the power switch set to "RECORD (Camera)" or while it is playing back, DV Link will not function properly.
- This recorder cannot be controlled from the outside using the DV IN/OUT terminal.
- When two of these recorders are connected using the DV IN/OUT jack, one cannot be used to control the other.
- Date and time data as well as the contents of cassette memory cannot be recorded.
- Discs cannot be played back while "DV LINK" is set to "ON" during DV input. If you want to play back a disc, set "DV LINK" to "OFF" after recording is finished.
Recording with a Digital Camcorder
When playback is started with this recorder after the channel has been set to a channel other than DV, the DV IN/OUT terminal functions as an external input jack. (When DV input has been selected, there is no signal output from the DV IN/OUT terminal.)
1 Connect the digital camcorder to the DV IN/OUT terminal on this recorder.
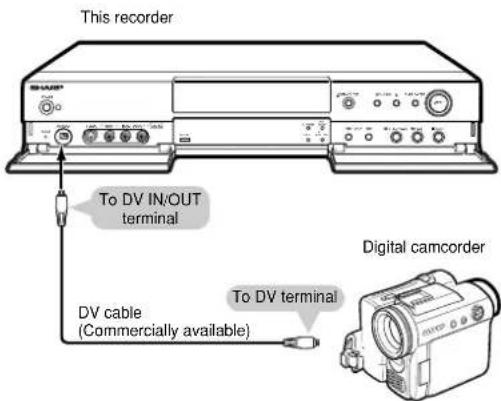
2 Play back the recorded material with this recorder.
- The material played back with this recorder is output to the digital camcorder.
NOTE
- Images protected with a copy guard are not output to the DV IN/OUT terminal.
- Video and audio signals of protected material or "copy-once" material cannot be output.
- When disc information (page 28) is displayed, that information is also displayed on images output from the digital camcorder. Turn off the display of disc information when recording images output from the DV IN/OUT terminal with a digital camcorder.
- The DV IN/OUT terminal of this recorder functions as a connection terminal for digital camcorders. Images may not be able to be taken up or output properly if other equipment (such as PC) is connected to this terminal.
- Since recording is performed in 30 seconds units (1 minute units in the LP mode) when recording in the Video mode, recording may continue briefly after it is finished.
- The DV output cannot be used during progressive playback (page 80).
• This recorder is only able to output 16-bit audio.
! Important!
Proper images may not be recorded when any of the following occur during DV uptake.
- When the digital camcorder plays back a portion where nothing is recorded
- When the DV cable is disconnected or the camcorder power is turned off during recording
- When playback from the camcorder is stopped
Connecting to Audio Equipment
Recording Using an Analog Connection with a Digital Camcorder
DVD RW DVD RW DVD R VR MODE VIDEO MODE
Material from a digital camcorder can be recorded with this recorder using an analog connection between this recorder and the digital camcorder.
NOTE
- It is recommended to use the DV IN/OUT terminal when connecting a digital camcorder equipped with a DV terminal. (Refer to the section on "Recording by Connecting with a Digital Camcorder Using i.LINK" (page 95).)
- More vivid images can be viewed by connecting the S-VIDEO IN jack on this recorder with the S-VIDEO OUT jack on the camcorder using an S-VIDEO cable.
- Some camcorders may be required to be connected using a special cable.
- Refer to the operation manual provided with the camcorder for further information on the procedure for connecting the camcorder.
2 Select the external input audio.
- Refer to the section on "EX. AUDIO" (page 86) or the section on "D-MONO REC" (page 86).
3 Press INPUT to set to the channel of the external input.
- The setting changes in the order of DV/(DV/Input), L 1 (External Input 1), L 2 (External Input 2), L 3 (External Input 3), Channel and then back to DV (DV Input) each time this is pressed.
4 Perform the procedure for recording with this recorder.
Recording with this Recorder
1 Setup
①Connect the equipment to IN 2 of this recorder.

② Lload and dissof for recording in the recorder.
Connecting to Audio Equipment
Recording Material from External Equipment
DVD RW DVD RW DVD R VR MODE VIDEO MODE
You can record material from equipment connected to one of the external input jacks of this recorder (IN 1, IN 2 or IN 3).
1 Setup
①Connect the equipment to an external input jack of this recorder.
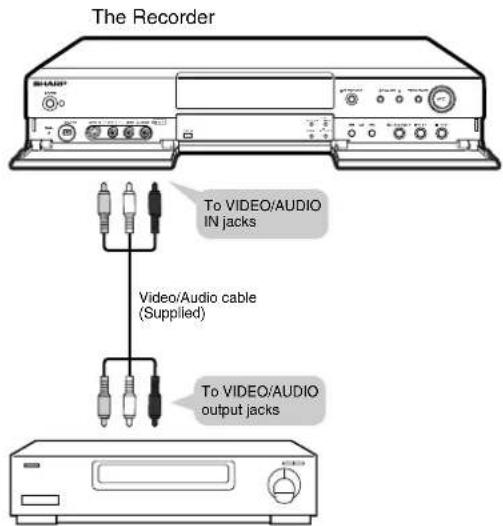
External equipment
②Place a disc for recording in this recorder.
2 Select the external input audio.
- Refer to the section on "EX. AUDIO" (page 86) or the section on "D-MONO REC" (page 86).
3 Press INPUT.
- The setting changes in the order of DV (DV Input), L 1 (External Input 1), L 2 (External Input 2), L 3 (External Input 3), Channel and then back to DV (DV Input) each time this is pressed.
4 Perform the procedure for recording with this recorder.
NOTE
- Material protected with a copy guard cannot be recorded. In addition, proper images may not be able to be viewed even when only viewing such material without recording.
Troubleshooting
The following problems do not always denote a broken this recorder. Perform the checks listed below before calling service.
Problem Suggested Solution
| The recorder does not switch on | • Is the power cord firmly plugged into the power outlet? |
| The disc is automatically ejected after closing the disc tray | • Make sure that the disc is loaded properly (aligned in disc tray and label-side up)• Take out the disc and clean it• Make sure that region number on the disc match the region number in this recorder• Make sure that the disc is playable |
| No picture | • Make sure that the cables are connected correctly• Make sure that the connected TV and the AV receiver is set to the correct input• Take out the disc and clean it• Make sure that region number on the disc match the region number in this recorder |
| The recorder does not play a disc | • Take out the disc and clean it• Make sure that the disc is loaded properly (aligned in disc tray and label-side up)• Make sure that region number on the disc match the region number in this recorder• Remove the dew in the recorder• Check that the disc is NTSC• Make sure that "DV LINK" in "OPTION SETUP" to "OFF" when selecting DV input |
| Settings have disappeared | • If the recorder is unplugged (or there is a power failure) for more than about 1 hour while the recorder is on, all the settings will be lost. Make sure that you turn off the recorder before unplugging the power cord |
| Screen goes blank and operation buttons do not work | • Press ■STOP and restart playback• Turn off the power and turn on the power again |
| No sound and/or picture from a camcorder connected to the DV IN/OUT terminal | • Since played back material is not output when DV input has been selected, select another channel when you want to playback recorded material.• Make sure that "PROGRESSIVE" in "PLAYBACK SETUP" to "OFF" |
| The remote control does not work | • Check that the Tamper Proof function is active• Set the remote control to the same ID number as the recorder• Use the remote control within its operating range• Replace the batteries |
| No sound or sound is distorted | • Make sure that the volume of the amplifier/receiver or TV is not set to minimum• There is no sound during still mode, slow motion playback, fast forward and fast rewind• DVD audio recorded in DTS is only output from the DIGITAL OUT OPTICAL terminal. Connect a DTS-compatible digital amplifier or decoder to this recorder.• Check that the audio cable is connected correctly• Check that the cable plugs are clean• Take out the disc and clean it• Audio may not be able to be output depending on the audio recording status, such as when audio other than an audio signal or non-standard audio is recorded for the audio content recorded on a disc. |
| The picture from the external input is distorted | • If the signal is copy-protected, you cannot connect via this recorder. Connect the component directly to your TV |
| The screen is stretched vertically or horizontally | • This recorder's input switches into wide mode automatically according to the input signal. When the unit connected is not compatible with ID-1, the screen does not wide mode• Check that the aspect ratio settings of your TV |
| A disc recorded using this recorder cannot be played back on another player | • Check that the disc is finalized• Some player will not play even a finalized disc• If the disc was recorded in VR mode, the other player must be RW compatible in order to play the disc |
| The recorder does not record | • Check that the blank space on the disc remains• Check that the disc is protected• Check that the number of titles on the disc has already reached 99• Check that the source you are trying to record is not copy protected• Check that there wasn't a power failure during the timer recording• Check that the 2 timer programs may have overlapped |
Troubleshooting
Problem Suggested Solution
| Can not control your TV using this remote control | Check that you entered the correct code for your TV |
| Unable to Record, Timer Record or Automatically Record from an External Input | Place a disc for recording (DVD-R or DVD-RW) in the recorder and after confirming that disc identification (loading) has been completed, perform the respective procedures for recording, timer recording or automatically recording from an external input. |
| Nothing is Recorded Following Recording | There is nothing recorded when a channel has been recorded that is not broadcasting (or for which broadcasting has ended). There may also be nothing recorded when a channel with poor reception has been recorded. |
| Unable to Record onto a DVD-RW Disc in the Video Mode | Use a Ver 1.1 disc or later. (The version is usually indicated on the back of the disc jacket). |
| Images from a Camcorder Connected to the DV IN/OUT terminal are not Displayed, are Displayed without Sound or the Camera does not Operate Properly | Recorded material protected with a copy guard cannot be viewed.Check the connections.Turn the power OFF and then turn it back ON again.Reconnect the DV cable.Try setting "DV LINK" to "OFF".Switch "DV AUDIO IN". |
| A Camcorder Connected to the DV IN/OUT terminal cannot be Controlled with this Product | Set "DV LINK" to "ON".Some types of camcorders may not be able to be controlled. |
| Images are Distorted (Appear Improperly) during External Input or Broadcasts with Poor Reception | Switch "3D Y/C" to "OFF". |
| There is no On-screen Display during Playback | Check whether or not "DUBBING" is set to "ON". When this is set to ON, the on-screen display is forcibly set to OFF during playback. |

NOTE
- This recorder is equipped with a microprocessor. Its performance could be adversely affected by external electrical noise or interference. If this should happen, unplug the product and plug it in again after a few minutes.
- Press RESET with a toothpick or other narrow rod-like object (nonmetal) when the recorder does not operate properly even after the power has been turned off and then back on again.
- Since the clock, channel, timer recording programs and other data in memory are also reset when RESET has been pressed, they must be set again.
- EZ Set Up function starts automatically when RESET is pressed.

natural_image
Line drawing of a portable electronic device with control knobs and buttons (no text or symbols)Service Informatino (For the U.S.)
For the location of the nearest Sharp Authorized Service Center, or to obtain product literature, accessories, supplies or customer assistance, please call 1-800-BE-SHARP (1-800-237-4277) or visit SHARP's website (http://www.sharp-usa.com).
- Do not attempt to service this product yourself. Instead, unplug it and contact a qualified service technician. (See CONSUMER LIMITED WARRANTY at the end of this manual.)
- Be sure the service technician uses authorized replacement parts or their equivalents. Unauthorized parts may cause fire, electrical shock, or other hazards.
- Following any service or repair, be sure the service technician performs safety checks to certify that this product is in safe operating order.
Glossary
| Angle | Recorded onto some DVD discs are scenes which have been simultaneously shot from a number of different angles (the same scene is shot from the front, from the left side, from the right side, etc.). With such discs, you can select the angle on Function Control Screen to view the scene from different angles. |
| Chapter Number | These numbers are recorded on DVD discs. A title is subdivided into many sections, each of which is numbered, and specific parts of video presentations can be searched quickly using these numbers. |
| Digital Gamma | Corrects for gradations in dark areas of images to make images clearer. |
| Digital Super Picture | Enhances the fine detail of the image and outlines of the objects it contains. |
| DiscNavi | DiscNavi displays a list of the first scene of each titles when playing a DVD-R/DVD-RW disc recorded in this recorder. |
| Dolby Digital (5.1 channel) | A sound system developed by Dolby Laboratories Inc. that gives movie theater ambience to audio output when the product is connected to a Dolby Digital 5.1 channel processor or amplifier. |
| Dolby Digital output level | Setting that increases the average volume of Dolby Digital audio when playing a DVD. |
| DTS | This is a digital sound system developed by Digital Theater Systems for use in cinemas. This system uses 6 audio channels and provides accurate sound field positioning and realistic acoustics. (By connecting a DTS Digital Surround decoder, you can also listen to DTS Digital Surround sound.) |
| Exact Rec | This function automatically changes the recording mode to prevent recordings from running out before they are finished due to a lack of available disc space by comparing the available disc space and the time required for the timer recording. |
| EZ Set Up | Tuner channels and clock are automatically set for both Air and Cable channels. |
| Finalization | Finalization is required to play DVD discs with another DVD player or DVD video-compatible PC. |
| Initialization | Initialization is required when using DVD-RW discs in the Video mode. |
| Letter Box | Screen size that cuts off the top and bottom of the image to allow playing of Wide (16:9) software on a connected 4:3 TV. |
| Linear PCM Sound | Linear PCM is a signal recording format used for Audio CDs. The sound on Audio CDs is recorded at 44.1 kHz with 16 bits. (On DVD discs, sound is recorded at between 48 kHz with 16 bits and 96 kHz with 24 bits.) |
| MP3 | One type of audio compression that uses MPEG1. This format compresses sound to about 1/10, without impairing the original sound quality. |
| Original (ORG) | An image of title created when they are recorded the disc is called “Original”. |
Glossary
| Pan Scan431PS | Screen size that cuts off the sides of the image to allow playing of Wide (16:9) software on a connected 4:3 TV. |
| Playlist (PL) | Titles for editing created based on an original are called “Playlist”. |
| Playback Control (PBC) | This is recorded on a video CD (version 2.0). The scenes or information to be viewed (or listened to) can be selected into actively with the TV monitor by looking at the menu shown on the TV monitor. |
| Region Number | Number identifying a geographic region of compatibility for a DVD. |
| Subtitles | These are the printed lines appearing at the bottom of the screen which translate or transcribe the dialog. They are recorded on DVD discs. |
| Time Number | This indicates the play time which has elapsed from the start of a disc or a title. It can be used to find a specific scene quickly. (It may not work with some discs.) |
| Title Menu | This is a menu displayed by some DVDs for selection of chapters and subtitle set. The title menu is also called a “top menu”. |
| Title Number | These numbers are recorded on DVD discs. When a disc contains two or more movies, these movies are numbered as title 1, title 2, etc. |
| Track Number | These numbers are assigned to the tracks which are recorded on video CDs and Audio CDs. They enable specific tracks to be located quickly. |
| VBR | VBR is the abbreviation for Variable Bit Rate control. This feature performs control by varying the bit rate (the amount of code transferred in a fixed period of time) by assigning a larger amount of code to complex video images such as sections containing rapid movement or sections containing sudden changes in color, and assigning a smaller amount of code in the opposite cases. |
| Video Mode | This recording format is compatible with commercially available DVD players and DVD-ROM drive. |
| VR Mode | This recording format is the basic DVD-RW recording format, and lets you enjoy the various editing functions available with this recorder. |
Specifications
General
Power supply: AC 120 V, 60 Hz
Power consumption
(Normal): 40 W
Power consumption
(Standby): 0.9 W (During the Front Panel
Display is off.)
Dimensions: .... Approx. 430 mm × 82 mm × 361 mm
(W × H × D)
Approx. 16^15 / 16'' × 3^1 / 4'' × 14^1 / 4''
Weight: Approx. 5.1 kg (11.3 lbs)
Operating temperature 5°C to 35°C (41°F to 95°F)
Storage temperature: -20°C to 55°C (-4°F to 131°F)
Operating humidity: 5% to 80%(no condensation)
Discs Played: DVD Video, DVD-R/RW, Audio
CD (CD-DA), Video CD
CD-R/RW (CD-DA, MP-3 file
format)
TV systems: NTSC system, 525 lines, 60
fields
Recording
Recording format: DVD-Video Recording
(VR mode)
DVD-VIDEO (Video mode)
Recording discs: DVD-RW
DVD-R
Video recording format:
Sampling frequency: 13.5 MHz
Compression format: ...... MPEG
Audio recording format:
Sampling frequency: 48 kHz
Compression format: ...... Dolby Digital
Recording time (Using the 4.7 GB disc):
DVD-RW (VR mode): ...... FINE: Approx. 60 minutes
SP: Approx. 120 minutes
LP: Approx. 240 minutes
EP: Approx. 360 minutes
DVD-R/RW (Video mode): ...... FINE: Approx. 60 minutes
SP: Approx. 120 minutes
LP: Approx. 240 minutes
Tuner
Channel coverage: VHF 2-13
UHF 14-69
CATV 1-125
Timer
Programs: 1 year/8 programs
Clock: Quartz lock
(12-hour digital display)
Memory backup: .... Approx. 1 hour
Input/Output
VHF/UHF antenna input/
output terminal: 75Ω (F-shape Connector)
Video input:.... Input 1,3(rear),2(front)
Input level: 1 Vp-p (75Ω)
Jacks: RCA jack
Video output:
Output level: 1 Vp-p (75Ω)
Jacks: RCA jack
S-Video input: Input 1, 3(rear), 2 (front)
Y-Input level: 1 Vp-p (75Ω)
C-Input level: 0.286 Vp-p (75Ω)
Input level: 2 V rms (Input impedance: more
than 22 kΩ)
Jacks: RCA jack
Audio output: L/R
Input level: 2 V rms (Output impedance:
less than 1.5 kΩ)
Jack: RCA jack
Digital audio optical output:
Terminal: Square Optical terminal
DV input/output:
Terminal: 4 pin (i.LINK/IEEE 1394
standard)
LASER Specification
Wave length: DVD: 650 nm
CD: 780 nm
Laser power: DVD: 70 mW
CD: 108 mW
Specifications are subject to change without notice.
natural_image
Line drawing of a hand inserting a CD into a rectangular electronic device (no text or symbols)natural_image
Line drawing of a hand inserting a CD into a rectangular device (no text or symbols)(Valid for warranty service in the U.S. only)
CONSUMER LIMITED WARRANTY
SHARP ELECTRONICS CORPORATION warrants to the first consumer purchaser that this Sharp brand product (the "Product"), when shipped in its original container, will be free from defective workmanship and materials, and agrees that it will, at its option, either repair the defect or replace the defective Product or part thereof with a new or remanufactured equivalent at no charge to the purchaser for parts or labor for the period(s) set forth below.
This warranty does not apply to any appearance items of the Product nor to the additional excluded item(s) set forth below nor to any Product the exterior of which has been damaged or defaced, which has been subjected to improper voltage or other misuse, abnormal service or handling, or which has been altered or modified in design or construction.
In order to enforce the rights under this limited warranty, the purchaser should follow the steps set forth below and provide proof of purchase to the servicer.
The limited warranty described herein is in addition to whatever implied warranties may be granted to purchasers by law. ALL IMPLIED WARRANTIES INCLUDING THE WARRANTIES OF MERCHANTABILITY AND FITNESS FOR USE ARE LIMITED TO THE PERIOD(S) FROM THE DATE OF PURCHASE SET FORTH BELOW. Some states do not allow limitations on how long an implied warranty lasts, so the above limitation may not apply to you.
Neither the sales personnel of the seller nor any other person is authorized to make any warranties other than those described herein, or to extend the duration of any warranties beyond the time period described herein on behalf of Sharp.
The warranties described herein shall be the sole and exclusive warranties granted by Sharp and shall be the sole and exclusive remedy available to the purchaser. Correction of defects, in the manner and for the period of time described herein, shall constitute complete fulfillment of all liabilities and responsibilities of Sharp to the purchaser with respect to the Product, and shall constitute full satisfaction of all claims, whether based on contract, negligence, strict liability or otherwise. In no event shall Sharp be liable, or in any way responsible, for any damages or defects in the Product which were caused by repairs or attempted repairs performed by anyone other than an authorized servicer. Nor shall Sharp be liable or in any way responsible for any incidental or consequential economic or property damage. Some states do not allow the exclusion of incidental or consequential damages, so the above exclusion may not apply to you.
THIS WARRANTY GIVES YOU SPECIFIC LEGAL RIGHTS. YOU MAY ALSO HAVE OTHER RIGHTS WHICH VARY FROM STATE TO STATE.
| Model Specific Section | |
| Your Product Model Number & Description: | DV-RW2U DVD RECORDER(Be sure to have this information available when you need service for your Product.) |
| Warranty Period for this Product: | One (1) year parts and ninety (90) days labor from date of purchase. |
| Additional Item(s) Excluded from Warranty Coverage (if any): | Non-rechargeable batteries. |
| Where to Obtain Service: | From a Sharp Authorized Servicer located in the United States. To find the location of the nearest Sharp Authorized Servicer, call Sharp toll free at 1-800-BE-SHARP. |
| What to do to Obtain Service: | Ship prepaid or carry in your Product to a Sharp Authorized Servicer. Be sure to have Proof of Purchase available. If you ship the Prod-uct, be sure it is insured and packaged securely. |
TO OBTAIN SUPPLY, ACCESSORY OR PRODUCT INFORMATION, GO TO OUR WEBSITE AT www.sharp-usa.com OR CALL 1-800-BE-SHARP.
SHARP®
SHARP ELECTRONICS CORPORATION
Sharp Plaza, Mahwah, New Jersey 07430-2135
SHARP CORPORATION
Osaka, Japan
Printed in Malaysia Impreso en Malaysia TINS-A555WJZZ 03P01-MSM
- ! IMPORTANT / IMPORTANTE
- EZ SET UP (AUTO CHANNEL /CLOCK SET UP)
- WARNING: TO REDUCE THE RISK OF FIRE OR ELECTRIC SHOCK, DO NOT EXPOSE THIS APPLIANCE TO RAIN OR MOISTURE.
- CAUTION
- "WARNING—FCC Regulations state that any unauthorized changes or modifications to this equipment not expressly approved by the manufacturer could void the user's authority to operate this equipment."
- INFORMATION
- CAUTION:
- Note to CATV system installer:
- IMPORTANT SAFEGUARDS
- CAUTION: Please read all of these instructions before you operate this product and save these instructions for later use.
- Contents
- IMPORTANT SAFEGUARDS .... 3
- Features 6
- Accessories 6
- About Discs 7
- About Recording 9
- Initialization and Finalization 12
- About the Contents of the Disc 12
- Precautions During Use 14
- Major Components.... 15
- Basic Conneciton 19
- CATV or Satellite Receiver Connections ..... 21
- EZ Set Up 23
- Channel Setting 24
- Clock Setting 25
- OSD Language Setting 27
- Display Information.... 28
- Playback.... 29
- MP3 Discs Playback 34
- Changing Image/Audio During Playback .. 35
- Programmed Playback 37
- Repeat Playback.... 39
- Function Control 40
- Direct Selection of Scenes
- Recording for DVD Discs
- TV Program Recording 48
- Recording Function
- Audio Input/Output
- Edit Function
- Compatibility
- Disc Features and this Operation Manual
- Accessories
- About Discs
- Types of Discs that Can Be Played on This Recorder
- Discs that Cannot be Played
- ■Discs with unusual shapes cannot be played.
- \*3 About MP3 file format
- ● Playing MP3 discs
- ●The following files cannot be played on this recorder
- About Recording
- Recording Format
- VR (Video Recording) Mode
- Video Mode
- Discs and Recording Formats
- DVD-RW Discs
- DVD-R Discs
- ! Important!
- Recording Time
- Disc Remaining Time
- ●VR Mode
- Cautions Regarding Recording
- ●When Recording in the Video Mode
- ●Always Make Sure to Test Record First
- ●Compensation for Recordings
- ●Be Careful of Scratches and Dust
- Using the Proper Disc
- Unrecordable Material
- Initialization and Finalization
- Initialization (Format)
- Initialization is required when using DVD-RW discs in the Video mode. (See page 88 for details about Initialization)
- Allowing Discs to be Played Back with Other DVD Players (Finalization)
- Discs must always be finalized in order to play them back with another DVD player after having been recorded in the Video mode. (See page 88 for details about Finalization)
- About the Contents of the Disc
- Title, Chapter and Tracks
- NOTE
- Icons Used on DVD Video Disc Case
- Audio tracks and audio formats
- Dolby Digital
- DTS
- Linear PCM
- Subtitle languages
- Screen aspect ratio
- Camera Angle
- Region code
- The icons used in this Operation Manual
- Precautions During Use
- Disc Precautions
- Handling Precautions
- Cleaning the Pick Up Lens
- Warning of Dew Formation
- Copyright
- Major Components
- Loading the Batteries
- Operating a TV Using the Remote Control (Universal Remote Control)
- Setting the Manufacturer's Code
- Setting the Remote Control Code
- Setting the Remote Control Code of the Recorder
- Setting the Remote Control Code of the Remote
- Basic Conneciton
- Easy Connection
- After the Connection
- Using Other Types of Video Output
- Connecting Using an S-Video Output
- Connecting Using the Component Video Output
- CATV or Satellite Receiver Connections
- Connecting to a Cable Box or Satellite Receiver (1)
- Connect the TV antenna and coaxial cables as shown on the left.
- Connect the VIDEO/AUDIO output jacks on this recorder to the VIDEO/AUDIO input jacks on your TV using a Video/Audio cable.
- Connect the VIDEO/AUDIO IN 1 jacks on this recorder to the VIDEO/AUDIO output jacks on your cable box or satellite receiver using a Video/Audio cable.
- After the Conneciton
- Connecting to a Cable Box or Satellite Receiver (2)
- EZ Set Up
- Important! (Caution during EZ Set Up):
- Channel Setting
- Important!
- Press SETUP/FUNCTION. Select "CHANNEL" with ▲/▼ and then press SET/ENTER.
- Press ◀/▶ to select "AIR" or "CATV" and then press ▼. Example: AIR
- Press ◀/▶ to set "CH SET" to "AUTO" then press SET/ENTER.
- The automatic tuning will start.
- Adding Channel Memory/Erasing Channel Memory
- Clock Setting
- Auto Clock Setting
- Example: 07
- See NOTE.
- Manual Clock Setting
- automatic Daylight saving-Time (D.S.T.) adjustment
- Spring
- Autumn
- OSD Language Setting
- Press SETUP/FUNCTION to display the MENU screen.
- Press ▲/▼ to select "OSD LANGUAGE" and then press SET/ENTER.
- Press ▲/▼ to select the language you want to use. Example: ENGLISH
- Press SET/ENTER to enter and then press RETURN to return to the SETUP screen.
- Display Information
- Change the Display on the TV Screen
- Disc information:
- ■ Operation mode screen
- ■ Disc information screen
- Change the Display on the Front Panel Display
- Playback
- DVD Playback
- Playback the playback-only discs
- Resume Function
- Playback From the Beginning
- Selected Title Playback
- Recorded DVD Disc Playback
- Playback After Confirming Contents with DiscNavi
- Playback by Selecting a Title
- Load a disc recorded in Video mode.
- Press TITLE or MENU.
- Press ▲/▼/◄/► to select the title name.
- Press SET/ENTER.
- Video CD/Audio CD/CD-R/CD-RW Playback
- Selected Track Playback
- Press SET/ENTER or ▶PLAY.
- Playing VIDEO CDs with Playback Control (PBC)
- - Digital Connection to an MD to Record a CD
- Fast Forward/Fast Reverse
- Press FWD▶▶ or ◀◀REV during playback.
- Fast Forward/Fast Reverse (Search) Function on the Recorder
- SKIP (Forward/Reverse)
- Press SKIP▶▶I or I◀◀SKIP during playback.
- Slow-Motion
- Press ISLOW during playback.
- Press ▶PLAY to return to the normal playback.
- Still/Pause
- Frame Advance
- Press || STILL/PAUSE during playback.
- Press F.ADVIII or ◀F.ADV.
- Press ▶PLAY to return to the normal playback.
- Skip Search
- MP3 Discs Playback
- CD-R CD-RW
- Press POWER. The recorder is turned on.
- Load the MP3 recorded CD-R or the CD-RW and then press TITLE or MENU.
- Press ▲/▼/◄/► to select the folder you want to play and then press SET/ENTER.
- Press ▲/▼/◄/► to select the file (music title) you want to play and then press SET/ENTER.
- Press ■STOP to stop play.
- To Play Another File (music title) during Playback
- Press ▲/▼/◄/► to select the file (music title) you want to play and then press SET/ENTER.
- To Skip the File during Playback
- Press SKIP▶or SKIP
- While the MP3 disc is playing
- Changing Image/Audio During Playback
- Zoom Function
- Press ZOOM during playback.
- While an image is zoomed, press ▲/▼/◄/► to shift the view and display the part you want.
- Press ZOOM to return to the normal screen
- Angle Function
- DVD VIDEO
- Press ANGLE during playback.
- Press ▲ / ▼ (or ANGLE) to change the scene to the next angle in those recorded.
- Audio Setting
- Each time AUDIO is pressed, the audio channels changes as follows:
- Monitor Output when Receiving a Stereo or SAP Broadcast
- DNR (Digital Noise Reduction)
- Press DNR during playback.
- When the mode is "ON", press ◀/▶ to adjust the level.
- Programmed Playback
- Title/Track Programmed Playback
- Press PROGRAM while the disc is stopped.
- 3
- Press ▶ PLAY.
- 4
- Press ■STOP to stop the programmed playback.
- Press number buttons to enter the desired title number and then press SET/ENTER.
- Example:
- Chapter Programmed Playback
- Press PROGRAM twice while the disc is stopped.
- Press ▶PLAY.
- Press ■STOP to stop the programmed playback.
- Press number buttons to enter the desired chapter number and then press SET/ENTER.
- Repeat Playback
- Press (REPEAT) while a disc is playing.
- Press SET/ENTER or ▶PLAY to start repeat playback.
- A-B Repeat Playback
- Press (REPEAT) three times while a disc is playing.
- While you are playing a disc, press SET/ENTER or ▶PLAY when you reach the start of the section to be repeated.
- While the disc is playing the same chapter/track, press SET/ENTER or ▶PLAY again when you reach the end of the section to be repeated.
- Press (REPEAT) to return to the normal playback.
- Function Control
- Example: DVD video disc
- ① Direct title/track skip (P.41)
- ② Direct chapter skip (P.41)
- ③ Direct time skip (P.41)
- ④ Subtitle setting (P.42)
- ⑤ Angle setting (P.42)
- ⑥ Audio setting (P.42)
- ⑦ DOLBY VIRTUAL SURROUND setting (P.43)
- ⑧ DIGITAL GAMMA setting (P.43)
- ⑨ DIGITAL SUPER PICTURE setting (P.43)
- Direct Skip (title/chapter/track)
- Press SETUP/FUNCTION during playback.
- Press ▲/▼ to select 📋 and then press SET/ENTER.
- Press ▲ / ▼ to input the title number to which you want to skip.
- Press SET/ENTER to confirm the setting.
- Press SETUP/FUNCTION or RETURN to return to normal playback screen.
- Direct Time Skip
- Press ▲ / ▼ to select 🔍 and then press SET/ENTER.
- Press ▲ / ▼ to set "hour" and then press ▶.
- Press SETUP/FUNCTION or RETURN to return to the normal playback screen.
- Subtitle/Angle/Audio Setting
- Press ▲/▼ to select ⚙ and then press SET/ENTER.
- Press ▲/▼ to select the subtitle language you want to choose.
- About the subtitle setting
- About the Audio setting
- Clearer Picture and Dynamic Sound Setting
- DIGITAL GAMMA
- DIGITAL SUPER PICTURE
- DOLBY VIRTUAL SURROUND/DIGITAL GAMMA/DIGITAL SUPER PICTURE setting
- Press ▲/▼ to select 📄 and then press SET/ENTER.
- Press ▲ / ▼ to select "ON".
- While the "ON" is displayed, press ◀/▶ to select the level.
- Press SET/ENTER to confirm the setting.
- Selecting Scenes by Title Number
- Press TITLE to show the title screen.
- Press ◀/▶ to select the desired title.
- When you press SET/ENTER, the title specified in step 2 starts playing.
- About the Title Menu
- Disc Menu Screen
- Press MENU to display disc menu screen.
- Press ▲ / ▼ to select "LANGUAGE".
- Press SET/ENTER to display language screen.
- Press ▲ / ▼ to select language.
- Before Recording
- Recordable Discs
- DVD-RW Discs DVD
- DVD-R Discs DVD 第47
- About the Recording Format
- Before Starting Recording
- Initialization
- Initializing in the VR Mode
- Initializing in the Video Mode
- Recording Formats and Recording Modes
- Disc Information
- Confirmation of Available Disc Space
- T--C--- Counter Remain Time Operation StatusChann
- TV Program Recording
- Basic Recording
- When Recording Discs are Scratched or Soiled
- Pause Recording
- Press NTILL/PAUSE during recording.
- Press R TILL/PAUSE or ●REC to start recording again.
- Stop Recording
- Press ■STOP during recording.
- Useful Recording Functions
- ■Watching Other TV Programs while Recording
- ■Accurately Starting Recording from a Desired Part
- ●When recording onto a DVD-RW disc:
- ●When recording onto a DVD-R disc:
- Simple Recording Timer
- DVD RW DVD RW DVD R VR MODE VIDEO MODE
- Perform the steps 1 to 8 of "Basic Recording" on page 48.
- Press ●REC during recording.
- Changing the Settings of the Simple Recording Timer
- Cancelling the Simple Recording Timer
- Timer Recording with VCR Plus+® System
- Press POWER and load a recordable disc.
- Press VCR PLUS+ to display the VCR PLUS+ setting screen.
- Press number buttons to enter "PLUSCODE NO." and then press ▼.
- Press ◀/▶ to select "ONCE", "WEEKLY" or "DAILY" and then press SET/ENTER.
- The timer program information is shown on the TV screen. Check the contents.
- Press SET/ENTER. The VCR PLUS+ setting screen will appears. To program additional timer settings, repeat steps 3 to 6.
- Press RETURN to return to the normal screen.
- Checking/Cancelling the VCR Plus+ Programming System
- Timer Recording
- Turn on the recorder and load a recordable disc.
- Press TIMER PROG. to display the TIMER PROGRAM screen.
- Press SET/ENTER to set the timer program.
- Press ▲ / ▼ to select the desired month/day (DATE) and then press
- ▶. The cursor will move to the next column.
- Press ▲ / ▼ to select the desired channel and then press ▶.
- Press ▲ / ▼ to set the recording start time (hour digits and minute digits) and then press ▶.
- Press ▲ / ▼ to set the recording stop time and then press ▶.
- Press ▲ / ▼ to select the recording mode.
- Press RETURN to finish settings.
- Press TIMER ON/OFF to enter the timer standby mode.
- Disc Timer Recording
- DVD RW
- VR MODE
- Press POWER and then load a DVD-RW disc.
- Press and hold DISC TIMER for more than 2 seconds.
- Set the timer recording. (See "Timer Recording" on page 54 or "Timer Recording with VCR Plus+® System" on page 52.)
- Press TIMER ON/OFF.
- Canceling the Disc Timer Recording
- Using the Recorder During Timer Standby Mode
- Press TIMER ON/OFF.
- Press POWER.
- When Finished Using the Recorder
- Load a disc to be used for timer recording.
- Press TIMER ON/OFF.
- Confirming/Cancelling Timer Program
- Automatic Recording of Satellite Broadcast (AV AUTO REC)
- Example: Use of AV AUTO REC Function
- Recording with AV AUTO REC
- Set up the Satellite receiver, etc..
- Turn off the Satellite receiver, etc..
- Load a recordable disc into the recorder.
- Press POWER to turn off the recorder.
- Press and hold REC MODE for more than two seconds. The AV AUTO REC indicator on the recorder will lights up.
- Connecting to a Satellite receiver, etc.
- To Cancel the AV AUTO REC Function
- Press POWER.
- During Recording
- Press and hold REC MODE for more than 2 seconds.
- Problems of Timer Recording
- Blinking the TIMER Indicator
- Editing the Disc
- Before Editing the Disc
- About Editing
- ●When Recorded in VR Mode
- Original
- Playlist
- ●When Recorded in Video Mode
- Editing Procedure
- Load a disc.
- Select the desired title and then edit the title.
- Making a New Playlist
- Select the Playlist and then edit.
- Switching between Playlist and Original Playback
- Editing an Original Title
- Erasing a Part from the Original
- Press EDIT while the disc is stopped.
- Press ▲/▼/◄/► to select the title and then press SET/ENTER.
- Press ▲/▼ to select "ERASE PART." and then press SET/ENTER.
- Press SET/ENTER to set the start point of the part to erase.
- Press SET/ENTER to set the end point of the part.
- When you confirm the part to erase, press ◀ to select "YES" and then press SET/ENTER.
- Press ◀ to select "YES" and then press SET/ENTER.
- Press EDIT to exit the edit mode.
- Resetting Start and End Points
- Important! Selecting Start Point and End Point when Erasing a Part
- Inputting/Renaming the Title
- Press ▲ /▼ to select "RENAME" and then press SET/ENTER.
- Rename the title.
- Press ▲/▼/◄/► to select "END" and then press SET/ENTER. to fix the name.
- Press EDIT to exit the edit mode.
- Adding Chapter Markers
- Press ▲ / ▼ to select "CHP MARK" and then press SET/ENTER.
- Press SET/ENTER to put a chapter marker.
- Intervals at which Chapter Markers are Added
- Press ◀ to select "YES".
- Press SET/ENTER.
- Press EDIT to exit the edit mode.
- Erasing Chapter Markers
- Playback the chapter (The marker is blue) that you want to erase.
- Press ERASE during playback the chapter.
- Press ◀ to select "YES".
- Press SET/ENTER.
- Navimark
- Press ▲/▼/◄/► to select the desired title and then press SET/ENTER.
- Press ▲ / ▼ to select "NAVIMARK" and then press SET/ENTER.
- Select the desired part displayed in the DiscNavi.
- Press SET/ENTER at the point you want to set as Navimark.
- Protecting the Title
- Press ▲ / ▼ to select "PROTECT" and then press SET/ENTER.
- Press ◀ to select "YES" and then press SET/ENTER and press RETURN.
- Press EDIT to exit the edit mode.
- Cancelling the Protection
- Press ▲/▼/◄/► to select the protected title and then press SET/ENTER.
- Press SET/ENTER.
- Press ◀ to select "YES" and then press SET/ENTER.
- Erasing a Title from the Original or Playlist
- Press ERASE while the disc is stopped.
- Press ORIGINAL/PLAY LIST to select Original or Playlist.
- Press ▲ / ▼ to select "ALL TITLE" and then press SET/ENTER.
- Erasing One Title
- Perform the steps 1 and 2 of "Erasing All Titles" on this page.
- Press ▲/▼ to select
- Press ▲/▼/◄/► to select the title you want to erase and then press SET/ENTER.
- Press RETURN to exit the Erase Title screen.
- Making a New Playlist (PL)
- Making a Playlist from Original Title
- Press ORIGINAL/PLAY LIST to select Playlist mode.
- Press ▲ / ▼ to select "TITLE" and then press SET/ENTER.
- Press ▲/▼/◄/► to select the title you want to copy and then press SET/ENTER.
- Adding a Part to the Playlist
- Press ▲/▼ to select "PART" and then press SET/ENTER.
- Press SET/ENTER to set the start point of the part.
- Press SET/ENTER to set the end point of the part.
- Resetting Start Point and End Point
- Press ◀ to select "YES" to confirm the part.
- Press SET/ENTER.
- Press ◀ to select "YES" and then press SET/ENTER.
- ●Pause
- ●Frame advance/Frame reverse
- ●Final selection of part
- Searching for Start Point and End Point Parts
- ●Playback
- ●Searching for parts within a chapter
- ●Rapidly skipping parts
- ● Moving to the start of titles and chapters
- Editing a Playlist Title
- Erasing a Part from the Playlist
- Perform the steps 2 to 8 of "Erasing a Part from the Original" on page 65.
- Moving the Title
- Press ▲/▼/◄/► to select the title and then press SET/ENTER.
- Press ▲ / ▼ to select "MOVE" and then press SET/ENTER.
- Press ▲/▼/◄/► to select the place you want to move the title.
- Adding a Part from the Original to the Playlist
- Press ▲ / ▼ to select "ADD PART" and then press SET/ENTER.
- Press ◀ to select "YES".
- Press EDIT to exit the edit mode.
- Adding Chapter Marker in a Playlist
- Perform the steps 2 to 7 of "Adding Chapter Markers" on page 66.
- When adding chapter markers during editing:
- Erasing Chapter Marker in a Playlist
- Renaming the Title
- Tamper Proof
- Tamper Proof Setting
- Disengaging Tamper Proof
- Operating during Tamper Proof
- Playback Setup Screen
- TV MODE
- When recording wide screen material (16:9) from a satellite broadcast in the Video mode:
- When recording wide screen material (16:9) from a satellite broadcast in the VR mode:
- PROGRESSIVE
- ●ON
- Set when the recorder is connected to a progressive-compatible TV.
- Compatibility of this recorder with Progressive-compatible TVs:
- OFF
- Set when the recorder is connected to a TV that is not progressive-compatible.
- PARENTAL
- DISC LANG.
- SUBTITLE
- AUDIO
- ●MENU
- DD LEVEL
- (Dolby Digital Output Level)
- Digital OUT
- ●PCM
- ● DIGITAL
- Basic Settings of the Playback Setup Screen
- Press SETUP/FUNCTION to display the SETUP screen.
- Press ▲ / ▼ to select "PLAYBACK" and then press SET/ENTER.
- Press ▲/▼ to select "PROGRESSIVE".
- Press ◀/▶ to select "ON".
- PARENTAL Level Setting
- Press ▲ / ▼ to select the "PLAYBACK" and then press SET/ENTER.
- Press ▲ / ▼ to select "PARENTAL".
- Press ◀/▶.
- Use the number buttons to enter a 4-digit password.
- The cursor is moved to "LEVEL" and then press ◀/▶ to select "LEVEL".
- Press ▲/▼ to select "CODE".
- Press ◀/▶ to select the desired country code.
- Press SET/ENTER to confirm the setting.
- DISC LANGUAGE Setting
- Language Code List for Disc Language
- Record Setup Screen
- CHP INT.
- EXACT REC
- R REC START
- AUDIO
- D-MONO REC
- RW INIT.
- SAP
- SAP Broadcast
- Basic Settings of the Record Setup Screen
- Press ▲/▼ to select "RECORD" and then press SET/ENTER.
- Press ▲ / ▼ to select "EXACT REC".
- Press ◀/▶ to select "ON" and then press SET/ENTER.
- Disc Setup Screen
- VR MODE INITIALIZE
- FINALIZE
- PROTECT
- Basic Settings of the Disc Setup Screen
- Press ▲ / ▼ to select "DISC" and then press SET/ENTER.
- Press ▲/▼ to select "VR MODE INITIALIZE" and then press ▶.
- Option Setup Screen
- CLOCK DISP
- POWER OFF
- DUBBING
- DV LINK
- DV AUDIO IN
- BLUE SCREEN
- 3D Y/C
- Basic Settings of the Option Setup Screen
- Press ▲ / ▼ to select "OPTION" and then press SET/ENTER.
- Press ▲ / ▼ to select "CLOCK DISP".
- Connecting to Audio Equipment
- Playing Dolby Digital (5.1 channel) and DTS audio with a Digital Connection
- Important|
- ■Digital Connection to Audio Equipment or MD Player without a Dolby Digital Decoder
- Digital Connection to an MD to Record a CD
- Recording by Connecting with a Digital Camcorder Using i.LINK
- DV IN/OUT Terminal
- ■ About the Connected Equipment
- ■ Audio Mode
- ●16-bit (48 kHz)
- ●12-bit (32 kHz)
- Connecting Using the DV IN/OUT Terminal (i.LINK)
- Recording with this recorder (DV Uptake)
- Setup
- Select the external input audio.
- Press INPUT.
- Begin playback of the digital camcorder.
- Press ●REC where you want to start recording.
- Pause recording (as necessary).
- Stop (end) recording.
- Abnormal images may be recorded when any of the following occur during DV uptake.
- Recording with a Digital Camcorder
- Connect the digital camcorder to the DV IN/OUT terminal on this recorder.
- Play back the recorded material with this recorder.
- Proper images may not be recorded when any of the following occur during DV uptake.
- Recording Using an Analog Connection with a Digital Camcorder
- Press INPUT to set to the channel of the external input.
- Perform the procedure for recording with this recorder.
- Recording with this Recorder
- Recording Material from External Equipment
- Troubleshooting
- Service Informatino (For the U.S.)
- Glossary
- Specifications
- General
- Recording
- Tuner
- Timer
- Input/Output
- LASER Specification
- CONSUMER LIMITED WARRANTY
- SHARP®
- SHARP ELECTRONICS CORPORATION
- SHARP CORPORATION
Brand : SHARP
Model : DV-RW2U
Category : DVD Recorder