AINVR-VAL-12TB-EU - Video recorder Avigilon - Free user manual and instructions
Find the device manual for free AINVR-VAL-12TB-EU Avigilon in PDF.


User questions about AINVR-VAL-12TB-EU Avigilon
0 question about this device. Answer the ones you know or ask your own.
Ask a new question about this device
Download the instructions for your Video recorder in PDF format for free! Find your manual AINVR-VAL-12TB-EU - Avigilon and take your electronic device back in hand. On this page are published all the documents necessary for the use of your device. AINVR-VAL-12TB-EU by Avigilon.
USER MANUAL AINVR-VAL-12TB-EU Avigilon
natural_image
Front view of two server rack units with hexagonal grid patterns and control buttons (no visible text or symbols)Avigilon AI NVR
AINVR-STD-24TB, AINVR-STD-32TB, AINVR-STD-48TB
AINVR-VAL-6TB, AINVR-VAL-12TB
© 2020, Avigilon Corporation. All rights reserved. AVIGILON, the AVIGILON logo, AVIGILON CONTROL CENTER and AVIGILON APPEARANCE SEARCH are trademarks of Avigilon Corporation. MacOS, FINDER and MACINTOSH are registered trademarks of Apple Inc. FIREFOX is a registered trademark of Mozi Foundation. Other names or logos mentioned herein may be the trademarks of their respective owner absence of the symbols ^™ and ^® in proximity to each trademark in this document or at all is no ownership of the related trademark. Avigilon Corporation protects its innovations with patents issued in United States of America and other jurisdictions worldwide (see avigilon.com/patents). Unless stated
explicitly and in writing, no license is granted with respect to any copyright, industrial design, trader patent or other intellectual property rights of Avigilon Corporation or its licensors.
This document has been compiled and published using product descriptions and specifications available at the time of publication. The contents of this document and the specifications of the products discuss herein are subject to change without notice. Avigilon Corporation reserves the right to make any such changes without notice. Neither Avigilon Corporation nor any of its affiliated companies: (1) guarantees completeness or accuracy of the information contained in this document; or (2) is responsible for year of, or reliance on, the information. Avigilon Corporation shall not be responsible for any losses or (including consequential damages) caused by reliance on the information presented herein.
Avigilon Corporation
avigilon.com
PDF-AINVR-A
Revision: 1 - EN
20201207
Table of Contents
Introduction .5.
System Recommendations 6
Uninterruptible Power Supply 6
Camera Frame Rate...6.
Web Browser 6
Networking .7....
Passwords .7
Certificate Management 7.
Package Contents 8
Overview of the AI NVR Standard Models..9....
Overview of the AI NVR Value Models 11
Setting Up the AI NVR.... 13
Install the Sliding Rack Rails and Cable Management Arm 13
Install the Bezel 13....
Connect the Cables and Power On 13
Download and Install the Latest ACC Client...Software.... 14
Connect to the AI NVR (using DHCP) 14
Connect to the AI NVR (using Static...IP) 15
Activate the ACC Software and Connect to Avigilon Cloud Services 16
Activate ACC Software and Feature Licenses 16
Connect to Avigilon Cloud Services 16
Activating a License 16
Online Activation.... 17
Offline Activation.... 17
Reactivating a License 18
Using the AI NVR 19
Using the Server Management Dialogue.... 19
Open the Server Management Dialogue 19
Server Management Dialogue Dashboard 20
Access the Server Management Dialogue Features 21
Managing Device Settings 22
Change the AI NVR Administrator Password 22
Manage Time Settings 23
Manage Certificates 23.
Replace the Web Certificate 24
Upload a Trusted CA Certificate 25
Upgrade the Firmware..26....
Reboot the AI NVR 27
Manage ACC Services..28....
Enable ACC Client Users to Archive Video 28
Manage Storage 29
Replace Hard Disk Drives 31
Connect the Device to Cameras and ACC Client..Users..32....
Provide Service and Device Logs for Support 32
Troubleshooting 33
Cannot Discover the Device 33
Network Configuration.... 34
Monitoring System Health 34
LED Indicators 35
Diagnostic Indicators 35
Power Status Indicators 35
Restore the AI NVR to Factory Default Settings 36
For More Information.... 38
Introduction
The Avigilon AI NVR is a network security appliance that provides all of the functionality of an AvigNetwork Video Recorder with:
- Avigilon Hardened OS, Avigilon's secure, managed, embedded OS.
• Avigilon Control Center server software. -
Integration of existing multi-megapixel IP cameras in your network that are not already analytic-enabled with most of the features available on Avigilon analytic cameras:
-
Object Detection — Detects and classifies people or vehicles to help operators verify and respond faster. Next-generation analytics provide improved object classification.
- Avigilon Appearance Search ^™ — Quickly locates a specific person or vehicle of interest across an entire site using a sophisticated deep-learning AI search engine.
- Face Recognition — Detects matches from managed watchlists to alert operators of people of interest. Requires Appearance Search and an additional license.
- No-Face-Mask Detection — Detects when a person is not wearing a face mask, with the ability to set-up alarms in ACC's Focus of Attention interface, Radio Alert and ACC Mobile 3
System Recommendations
Uninterruptible Power Supply
Use an uninterruptible power supply (UPS) system to protect your video surveillance system hardware. UPS system is used to protect critical equipment from mains supply problems, including spikes, voltages, and dips, fluctuations and complete power failures using a dedicated battery. It can also be used to provide equipment during the time it takes for a standby generator to be started and synchronized.
Camera Frame Rate
The AI NVR can provide analytics for non-analytics cameras. For optimal analytics performance, the soil camera should stream a minimum of 10 frames per second (fps).
Web Browser
Basic administration settings for the AI NVR are managed through its Server Management Dialogue, wI can be accessed from the ACC Client application or a web browser on a network workstation con the AI NVR.
Supported web browsers for Windows ^® , Mac or mobile devices include:
- Mozilla Firefox®
- Google Chrome™
- Microsoft Edge™
- Safari®
- Chrome on Android ^TM
- Safari on Apple® iOS
Note: Your web browser must be configured to accept cookies or the Server Manager Dialogue will not function correctly.
It is recommended to use the latest version of any supported web browser.
Networking
When locating where to install the AI NVR in a multi-server deployment, consider the following items:
- Before connecting the AI NVR, install the latest ACC Client software on the ACC Client PC.
- At initial setup time, the ACC Client PC must have network access to the AI NVR. After a multi-server site is created, the ACC Client PCs require network access to at least one site member. For information, see Download and Install the Latest ACC Client Software on page 14
- The AI NVR only requires a single network connection to achieve its maximum recording throughput, but up to four network connections are available to accommodate advanced site networking deployments.
• The AI NVR must be installed with network connectivity to all ACC Site member servers.
Passwords
The first time you start the AI NVR you must create new administrator passwords for both:
• The ACC Site running on the AI NVR.
• The Avigilon Hardened OS running on the AI NVR.
Without these passwords the AI NVR can only be brought back into service by resetting it to its as it was when first delivered — all recorded data, updates made to the ACC Server software, and configuration settings are lost and cannot be restored.
Certificate Management
By default, the AI NVR is configured with a self-signed certificate, which generates a connection warrant the web browser. Organizations that deploy their own PKI can use the Certificates pane of the Serial Management Dialogue to manage certificates on the device. For more information, see Manage Certificates on page 23.
Package Contents
Ensure the package contains the following:
- Avigilon AI NVR
- Rack sliding rail assembly kit
- Cable management arm assembly kit
- Bezel and key
- Power cables (may be provided in a separate box)
Overview of the AI NVR Standard Models
text_image
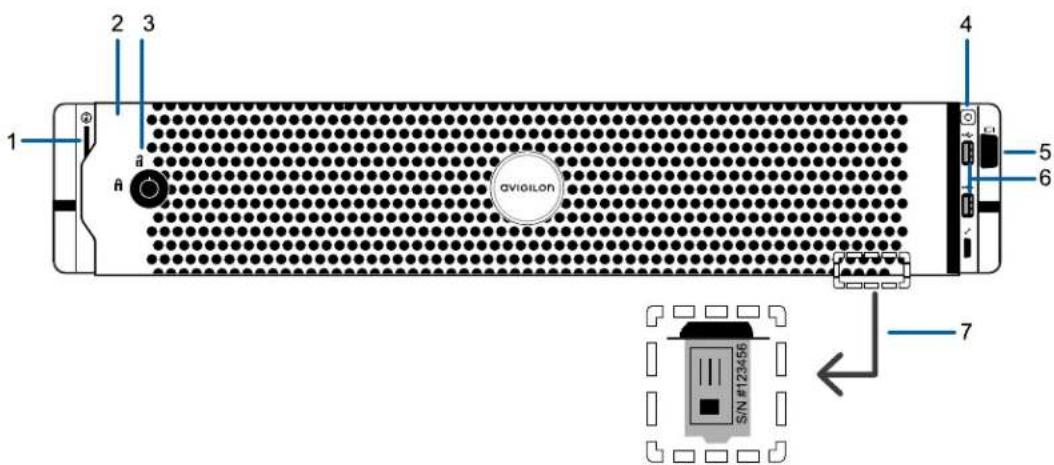
1 2 3 4 5 6 a AVIOILON 7 S/N pin 123456Figure 1: Front view of AI NVR Standard showing information tag (accessible after removing front bezel)
text_image
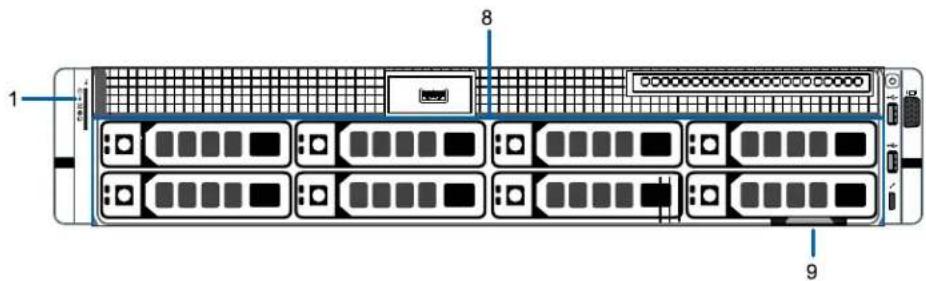
1 8 9Figure 2: Front view of AI NVR Standard with bezel removed.
1. Diagnostic indicators
Provides information about system operations.
For more information, see LED Indicators on page 35.
2. Bezel
Protects against unauthorized physical access to the hard drives. The bezel must be removed access the front of the recorder.
3. Bezel Lock
Protects against unauthorized physical access.
4. Power button
Controls the power supply to the appliance.
5. Video connector
Accepts a VGA monitor connection.
6. USB connectors
Disabled at run time.
7. Information tag
Details of the pull-out tag that provides the serial number, product service details and support information.
8. Hard drive caddies
Provides access to hot-swappable hard drives. The LED indicators on each hard drive caddy in the status of the hard drive.
The AINVR-STD-24TB and AINVR-STD-48TB models are equipped with eight hard drives. The AIN\ STD-32TB, model is equipped with six hard drives.
9. Pull-out tab for the information tag
Location of pull-out tab.
text_image
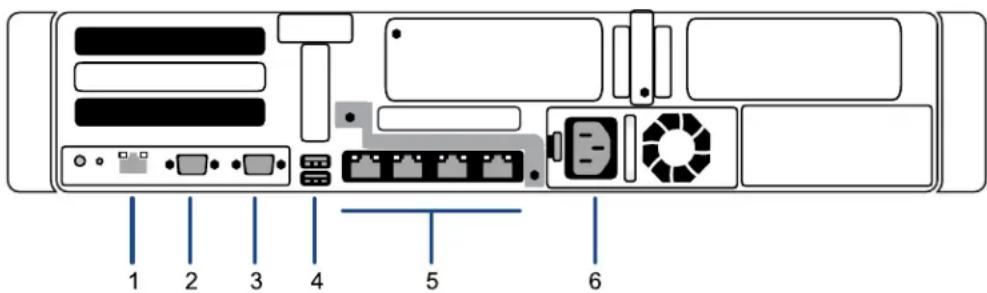
1 2 3 4 5 6Figure 3: Back view of the AI NVR Standard
1. Out-of-Band Management (OOBM) connector
Accepts an OOBM RJ-45 Ethernet connection to the management network.
2. Serial connector
Accepts connections to serial devices.
3. Video connector
Accepts a VGA monitor connection.
4. USB connectors
Disabled at run time.
5. Four (4) RJ-45 1 Gbps Ethernet ports
Use these ports to connect to the network of security cameras and ACC Client workstations.
6. Power supply
Power supply.
Overview of the AI NVR Value Models
text_image
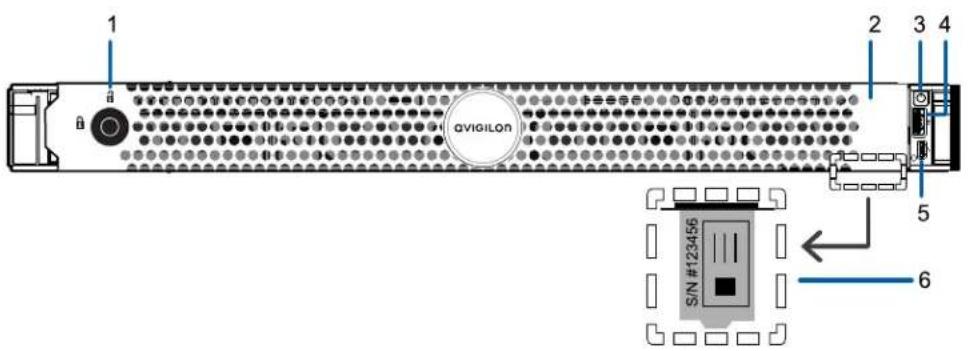
1 2 3 4 aVIGILON 5 6 S/N #123456Figure 4: Front view of AI NVR Value showing information tag (accessible after removing front bezel).
text_image
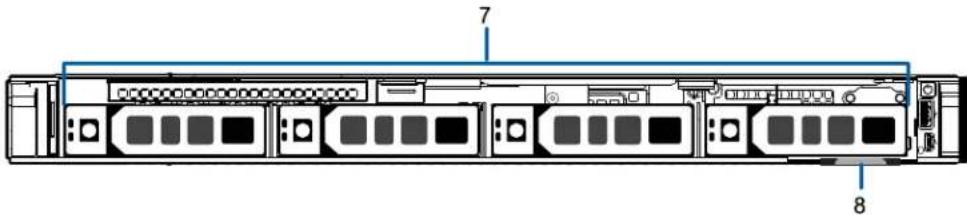
Technical diagram of a server rack with labeled ports and connectorsFigure 5: Front view of AI NVR Value with bezel removed.
- Bezel Lock
Protects against unauthorized physical access.
- Bezel
Protects against unauthorized physical access to the hard drives. The bezel must be removed access the front of the recorder.
- Power button
Controls the power supply to the appliance.
- USB connectors
Disabled at run time.
- Micro USB port
Provides access to the Out-of-band (OOB) Management Network interface.
- Information tag
Details of the pull-out tag that provides the serial number, product service details and support information.
7. Hard drive caddies
Provides access to hot-swappable hard drives. The LED indicators on each hard drive caddy in the status of the hard drive.
The AINVR-VAL-6TB and AINVR-VAL-12TB models are equipped with four hard drives.
8. Pull-out tab for information tag
Location of pull-out tab.
text_image
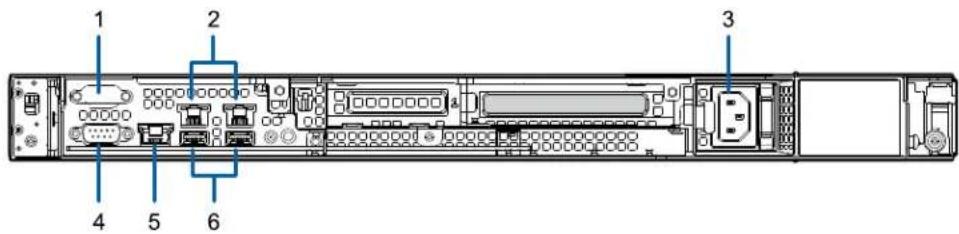
1 2 3 4 5 6Figure 6: Back view of the AI NVR Value
1. Serial connector
Accepts connections to serial devices.
2. Two (2) RJ-45 1 Gbps Ethernet ports
Use these ports to connect to the network of security cameras and ACC Client workstations.
3. Power supply
Primary power supply. An optional secondary power supply is available.
4. Video connector
Accepts a VGA monitor connection.
5. Out-of-band management (OOBM) connector
Accepts an OOBM RJ-45 Ethernet connection to the management network.
6. USB connectors
Disabled at run time.
Setting Up the AI NVR
Install the Sliding Rack Rails and Cable Management
If the AI NVR will be mounted in a server rack, install the Sliding Rack Rails and the Cable Man (CMA) provided in the appliance package. Follow the procedures outlined in the Rack Installation Instructions and the CMA Installation Instructions provided in the assembly kits.
Install the Bezel
The bezel can be installed on the front of the recorder to help protect the hard drives against I access.
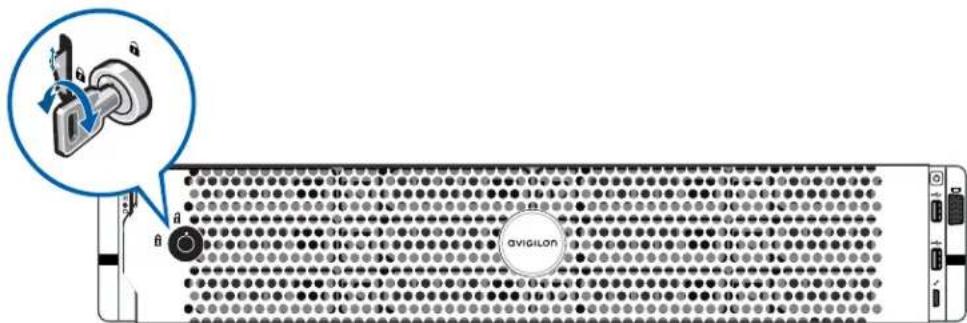
text_image
avidilon- Align and insert the right end of the bezel until it clicks into place.
- Push the left end of the bezel into the front of the unit until it clicks into place.
- Use the provided key to lock the bezel.
Connect the Cables and Power On
Refer to the diagrams in the Overview section for the location of the different connectors. Make the following connections as required:
- Connect the AI NVR to the network by plugging an Ethernet cable into one of the Ethernet
- Connect a power cable to the power supply at the back of the AI NVR.
- Press the power button on the front of the AI NVR and wait for it to start up. Wait for t and System ID diagnostic LED indicator to stop blinking and turns a steady blue. For more on the different LED status indicators, see LED Indicators on page 35.
Download and Install the Latest ACC Client Software
Install the latest version of the ACC Client software (from avigilon.com/support/software) on a workstation connected to the same network on which you are going to connect the new AI NVR.
- Click through to locate the installation software for the latest version of the ACC Client softw
- If necessary, copy the installation software to transferable media and then to a network works with network access to the device, following the security protocols in force for your organization
Note: The first time you access the web site from which you download the be prompted to register. Enter all of the required information and click Comp Registration. Your registration is automatically accepted and you will proceed to site.
Connect to the AI NVR (using DHCP)
If you use DHCP to assign IP addresses in your network, the new AI NVR is immediately detected connected to the security network. The ACC server software then adds it to the list of sites that in the System Explorer when you start the ACC Client.
- Start the ACC Client software.
- Locate the new site in the System Explorer. You are looking for a site labeled "AINVR-STD-x
" or "AINVR-VAL-xxTB- ". -
Click on the site to log in.
You are prompted to enter a new password for the administrator username. This is the | for the system administrator of the ACC Server software running on the AI NVR. -
Enter the new password.
-
In the System Explorer right-click on the AI NVR and select Site Setup
-
Click Server Management
-
Click Trust.
The login dialogue for the Server Management Dialogue is displayed.
- Enter administrator as the username and a new password. This is the username and password for the system administrator of the Avigilon Hardened OS.
The Dashboard panel of the Server Management Dialogue is displayed. You can now configure basic settings for your new AI NVR in the Server Management Dialogue, including the hostname, time zone language. For more information see Using the AI NVR on page 19
Connect to the AI NVR (using Static IP)
After powering on the AI NVR:
- Discover the appliance.
Use File Explorer on a Windows computer or Finder® on an Apple® computer. You are lookir device labeled “AINVR-STD-xxTB-
- Click to connect to the device.
Click past any connection messages displayed by the web browser. You will see two warning messages that differ slightly depending on the browser. For example, if the browser is:
- Chrome—Click Advanced on the first screen and Proceed to
(unsafe) on the second screen. -
Firefox—Click Advanced on the first screen and Add Exception on the second screen, check Permanently store this exception, and click Confirm Security Exception.
-
You are prompted to log in to the Server Management Dialogue. Enter administrator as the username and a new password. This is the username password for the system administrator of Avigilon Hardened OS.
The Dashboard panel of the Server Management Dialogue is displayed.
-
On the navigation sidebar click Network.
-
Toggle Automatic off to manually specify the connections:
-
IP Address
- Subnet Mask
- Default Gateway
You can also configure other basic settings, including the hostname, time zone, and language. For information see Using the AI NVR on page 19.
Activate the ACC Software and Connect to Avigilon C Services
After you have deployed your AI NVR, activate your ACC software and feature licenses and connect Avigilon Cloud Services.
Activate ACC Software and Feature Licenses
You can activate, deactivate, and reactivate product or feature licenses. Licenses are called Product I the ACC system, and Activation IDs in the licensing portal.
Important: When a new server is added to or removed from a multi-server site, licenses become inactive and must be reactivated to confirm system changes. See Reactivating a License on page 18
- Initial ACC™ System Setup and Workflow Guide
- ACC 7 Help Center
Printable versions of these guides are available on the Avigilon website: avigilon.com/support/software/.
Once your license is activated, you can immediately use the new licensed features.
Connect to Avigilon Cloud Services
After activating your ACC software, you can connect your ACC site to the cloud, which may require subscription, and take advantage of the capabilities and features that provide centralized access across distributed systems.
To connect your site to Avigilon Cloud Services, see help.avigilon.com/cloud.
For information about the cloud services, see Avigilon Cloud Services Support.
You can start to back up the system settings for your new site in the ACC Client software after configured. These settings include the ACC password, and the settings for the camera connections. For more information on backing up the site and server configurations, see the Avigilon ACC Client User Guide.
Activating a License
Once your license is activated, you can immediately use the new licensed features.
Tip: Finish organizing your multi-server site before activating a new license to avoid reactivating the site license each time a new server is added.
Online Activation
If you have internet access, use online activation. However, if your site is large and contains hund licenses, the server may time out. See Offline Activation below instead.
-
In the New Task menu, click Site Setup.
-
Select your new site, then click .
- Click Add License....
- Enter your product keys.
If you copy and paste more than one comma-separated product key, the system will format i automatically.
• To remove the last product key, click Remove Last Key.
• To clear all the product keys, click Clear.
-
Click Activate Now.
-
Click OK.
Offline Activation
Offline licensing involves transferring files between a computer running the ACC Client software and computer with internet access.
In the ACC Client:
- In the New Task menu, click Site Setup.
- Select your new site, then click .
- Click Add License....
- Select the Manual tab.
- Enter your product keys.
If you copy and paste more than one comma-separated product key, the system will format i automatically.
• To remove the last product key, click Remove Last Key.
• To clear all the product keys, click Clear.
- Click Save File... and choose where you want to save the . key file. You can rename the file as required.
- Copy the .key file to a computer with internet access.
In a browser:
- Go to activate.avigilon.com.
- Click Choose File and select the .key file.
- Click Upload.A capabilityResponse.bin file should download automatically.
If not, allow the download to occur when you are prompted.
- Complete the product registration page to receive product updates from Avigilon.
- Copy the .bin file to a computer running the ACC Client software.
In the ACC Client:
- In the License Management dialog box, click Apply....
- Select the .bin file and click Open.
- Click OK to confirm your changes.
Reactivating a License
FOR ENTERPRISE EDITION
When servers are added to or removed from a site, the site licenses become inactive and must I reactivated to confirm system changes.
If you do not reactivate the affected licenses, the site will stop normal operations.
- In the New Task menu, click Site Setup.
- Click the site name, then click .
- Click Reactivate Licenses...
If you have Internet access:
- Click Reactivate Licenses.
- Click OK to confirm your changes.
If you do not have Internet access:
- Select the Manual tab.
- Click Save File... and choose where you want to save the . key files.
-
Copy the .key files to a computer with internet access:
-
Go to activate.avigilon.com.
-
Click Choose File and select the . key file.
- Click Upload. A capabilityResponse.bin file should download automatically.
If not, allow the download to occur when you are prompted.
- Complete the product registration page to receive product updates from Avigilon.
-
Copy the .bin file to a computer running the ACC Client software.
-
In the License Management dialog box, click Apply...
- Select the .bin file and click Open.
- Click OK to confirm your changes.
Using the AI NVR
Configure the AI NVR with the Server Management Dialogue, accessed from any ACC Client application compatible browser on a workstation on the same network as the appliance. With the Server Manage Dialogue you can configure the server settings.
Using the Server Management Dialogue
Open the Server Management Dialogue
From any network workstation with network access to the AI NVR, you can open the Server Manage Dialogue:
- Directly from the ACC Client software:
a. Start the ACC Client software.
b. Log in to the site from the System Explorer.
c. In the New Task menu, click Site Setup.
d. Select the device in the System Explorer and click Server Management to open the device sign in page.
- With a bookmark from a web browser
Use one of these methods to create the bookmark:
Discover Open the Network tab in File Explorer (Windows) or Finder (Macintosh) locate the device. You are looking for a device labeled "AINVR-STD-xxTB-
Right click and select View Device Webpage to open the device sign in page in your default web browser.
Bookmark the device sign in page.
IP 1. Open a web browser and enter IP address or hostname of the AI NVR into address web browser to open the device sign in page:
or https://
hostname
- IP address example: https://169.254.100.100/
- Hostname example: https://my_AvigilonDevice/
IP address or hostname are configured on the Device panel.
If you forget the IP address or hostname, it is listed in the ACC Client soft the server Setup tab.
- Bookmark the device sign in page
Server Management Dialogue Dashboard
ACC Check the operating state of the ACC Server software:
Server - Running in green
- Stopped in red
View site information:
- Site Name
- Server Name
- Server Version
System View the AI NVR operating state:
- Ready when it is fully operational
- Rebooting when it is power-cycling
- Initializing when it is restarting
View system information:
- Product Name
- Part Number
- Serial Number
- Firmware Version
Storage View information about the storage capacity of the device.
When storage is on a RAID array of disks, a single virtual disk and the total storage capacity is listed. Otherwise, each storage disk and its storage capacity is listed.
Click to open the Storage panel.
Network View information about the uplink ports on the device: the link speed and whether the link is active (up) or inactive (down). Click 🔒 to open the Network panel.
Access the Server Management Dialogue Features
To... Do... See
| Manage the services Expand of the ACC Server section and... | the ACC ...click on the panel | Server Manage ACC Services on page 28 |
| Reboot the AI NVR. Expand section and... | the System click on the panel | Device Managing Device Settings on the next page |
| Upgrade the AI NVR firmware. | Upgrade the Firmware on page 26 | |
| Manage certificates. Manage Certificates on page 23 | ||
| Monitor and manage the storage on the device. | ... click on the Storage panel | Manage Storage on page 29 |
| Connect to cameras and the ACC Clients. | ... click on the Network panel | Connect the Device to Cameras and ACC Client Users on page 32 |
| Prepare service logs Expand from the ACC Server section and system log files from the AI NVR for Avigilon Technical Support. | the Logs ... click on the Logs panel | Server Provide Service and Device Logs for Support on page 32nn |
| ... click on the Logs panel | System | |
Managing Device Settings
On the navigation bar, click Device.
| To... On the Device panel card... | Setting | |
| Change the language for the General Server Management Dialogue | Choose your language from the drop downLanguage list | |
| Replace the default server hostname name with a user-friendly hostname | Change the Hostname.The default hostname is the same as the server name. The server name is in the form. | |
| Set the time zone Time | Specify the Time Zone and identify the time source in the NTP drop-down and Servers list.See Manage Time Settings on the next page | |
| Change the password for the Password AI NVR administrator. | See Change the AI NVR Administrator Password below. | |
| Install the latest version of Upgrade firmware on your device. Firmware | See Upgrade the Firmware on page 26. | |
| Manage the certificates used by the Server Management Dialogue and the AI NVR. | See Manage Certificates on the next page. |
Change the AI NVR Administrator Password
You can only change the password, not the default administrator username for the Server Management Dialogue.
- On the navigation bar, click Device.
- On the General panel click Password
- Enter your current password in the Old Password field.
- Enter your new password in the New Password and Confirm Password fields.
A complex password is recommended.
Remember to save the password in a secure format and location either physically or digitally so that be retrieved if the password is forgotten, and discard the record of the previous password.
CAUTION — You will lose recorded video and configuration data if you forget your password. To reset the
administrator password, you must reset the device to the factory default settings. This will also form hard drives and delete the configuration data and recorded video. For more information on performir factory restore, see Restore the AI NVR to Factory Default Settings on page 36.
Manage Time Settings
Customize how the AI NVR keeps time:
-
Select your Time Zone from the drop-down list. The time zone that you set here is used by the recording schedules defined in the ACC Client software.
-
Select whether you want to keep synchronized time through a Network Time Protocol (NTP) s (recommended) in the NTP field.
Tip: To synchronize time with ONVIF devices (that is, non-Avigilon cameras), yo to port 123 on the AI NVR to use it as an NTP server.
Select:
• DHCP to automatically use the existing NTP servers in the network.
- Manual to enter the address of NTP servers in the Servers list. Controls to add and delete addresses in the list, and reorder them are activated.
- Off if you do not use an NTP server.
Note: The default set of NTP servers is always present in the Servers list. However, this list is only used if NTP is enabled and not provided by your DHCP server. The d be rearranged or deleted.
• 0.pool.ntp.org
• 1.pool.ntp.org
• 2.pool.ntp.org
• 3.pool.ntp.org
- Click Apply to save the time settings.
Manage Certificates
Trusted certificates are used by the device to authenticate other servers and clients to which it is not connected, and to secure those connections. Avigilon provides a self-signed Web Certificate to secure connection to the Server Management Dialogue and to the WebEndpoint service, and a set of system signed certificates from well-known trusted Certificate Authorities (CAs) to ensure secure connections to needed servers. Optionally, you can provide your own certificates and CAs.
The level of security provided by the certificates included with the device should be sufficient for any organization that does not deploy a Public Key Infrastructure (PKI) on its internal servers.
The certificate management feature on the appliance controls only the appliance web certificate used by the Server Management Dialogue and the ACC WebEndpoint product. Within the ACC server the certificate authorities configured by this feature are only used to validate secure email servers used by the ACC Email and Central Station Monitoring features. ACC Server to ACC Server and ACC Server to ACC Client connections are not controlled or validated using the appliance certificate management feature.
For example, if your organization uses a public email server such as Google Mail, when email notifications are triggered, the ACC software accesses the Google Mail server and receives a certificate identifying the Google Mail server. The ACC software verifies the certificate by confirming the CA that signed the Google Mail certificate is from the system-level list of well-known trusted CAs, and the connection is secured.
Note: The signed certificates shipped with the device are the same as those shipped with Mozilla's browser, and are publicly available from The Debian Project. The certificates allow SSL-based applications to check for the authenticity of SSL connections. Avigilon can neither confirm nor deny whether the certificate authorities whose certificates are included with this appliance have in any way been audited for trustworthiness or RFC 3647 compliance. Full responsibility to assess them belongs to the local system administrator.
Organizations that deploy their own PKI can use the Certificates pane of the Server Management Dialogue to manage certificates on the device.
For example, you can:
- Replace the default self-signed Web Certificate with your own organization's certificate.
- Add CAs, such as internal CAs used within your organization, to the device.
- Disable (and enable) any of the system-level CA certificates.
Replace the Web Certificate
Manage the device's Web Certificate from the Web Certificate tab on the Certificates pane. The Server Management Dialogue and the WebEndpoint service use this certificate to authenticate themselves to devices that connect to them. Only one Web Certificate can be active at any time.
You can replace the default Web Certificate with a custom certificate.
Important: When you reset the device to its factory settings (also known as a factory reset), you need to reload your custom certificate.
Obtaining a new Web Certificate is a three-step process:
- Send the certificate issuer used by your organization a Certificate Signing Request (CSR) and issuer will return you a new certificate file and private key file (typically by email). You can CSR from the Web Certificate tab, or using the certificate issuer's preferred method if they do accept the CSR from the Server Management Dialogue:
a. Open the Server Management Dialogue, click Device in the navigation bar, and scroll do the Certificates pane.
b. On the Web Certificate tab, click the Certificate Signing Request button.
c. Fill in the standard CSR form with the information defined by the PKI you are using an Generate.
The CSR file generated.csr is saved in your Downloads folder.
d. Send the file to your organization's certificate issuer.
Tip: If the certificate issuer does not accept the CSR, use the certificate preferred method to generate the CSR.
-
After you receive the .crt file containing the new certificate from the certificate issuer, save it location accessible to the device.
-
Upload the new certificate to the device:
a. Open the Server Management Dialogue, click Device in the navigation bar, and scroll do the Certificates pane.
b. On the Web Certificate tab, click Upload.
c. In the Upload Web Certificate dialog, enter a name for the certificate, and click and n to the .crt file or drag and drop into the Drop '.crt' certificate (pem) file here or click area.
- If the certificate file was created with the most recently generated CSR file from t Server Management Dialogue, Upload is activated.
- Otherwise, click and navigate to the .key file or drag and drop into the Drop '.key' private key (pem) file here or click to upload area. Upload is activated.
Note: If the certificate file (.crt) was created with a CSR generated certificate issuer's preferred method (or was not generated using the recent CSR file on the device), repeat this step to upload the pr
d. Click Upload.
- On the Web Certificate tab, click on the name of the uploaded certificate to enable it. This disables the previous certificate.
Upload a Trusted CA Certificate
Manage signed certificates from internal CAs deployed in your organization's internal servers from the
Certificate Authorities tab of the Certificates.
For example, an internal email server in an organization that deploys its own PKI may provide a signed by a CA that is not in the set of well-known trusted CAs to the ACC software when it the mail server. The certificate cannot be verified unless a certificate signed by that CA is uploaded User Certificate Authorities tab of the Certificates pane.
If you are required to upload a signed certificate from a CA, complete the following steps:
- Open the Server Management Dialogue, click Device in the navigation bar, and scroll down to Certificates pane.
- Click the User Certificate Authorities tab.
- Click Upload.
- In the Upload User Certificate Authority dialog, enter a name for the certificate, and click or drop to upload the file. You can only upload one file at a time.
Upgrade the Firmware
Upgrade the firmware to ensure the AI NVR is operating with the latest software. When you upgrad firmware, all your current settings and all recorded video are retained.
Upgrade the firmware in any of the following ways:
- You can use Cloud Remote Site Upgrade from Avigilon Cloud Services to update:
• the firmware on the AI NVR,
- the firmware on all other Avigilon servers,
• the firmware on all Avigilon cameras, and
- the ACC Client software on all network workstations
in the same site all at the same time.
A subscription to the Advanced System Health feature package is required. This is the Avigilon recommended way to quickly and efficiently complete site-level upgrades. Refer to the procedure for upgrading servers in a site in the Help files provided with Avigilon Cloud Services.
- You can use Remote Site Upgrade from an ACC Client connected to all of the AI NVRs in a site at the same time. Refer to the procedure for upgrading servers in a site in the Help files provided ACC Client.
- You can use the Server Management Dialogue, using the following procedure.
Before you can upgrade or reinstall the firmware with the Server Management Dialogue, download the latest version of the firmware (.fp) file from the Avigilon website: partners.avigilon.com. From a workstation connected to the Internet:
- Navigate to partners.avigilon.com and download the appropriate AI NVR firmware.
- Save the file to a location accessible to the Server Management Dialogue.
To upgrade the firmware from the Server Management Dialogue:
- Navigate to the Device panel.
If necessary, scroll to show the Upgrade Firmware pane.
-
In the Upgrade Firmware pane, use Drop '.fp' file here or click to upload to upload the file.
-
Click OK to confirm you want to continue. An upload progress indicator appears. Wait while the file is uploaded and verified. After the file is verified, the device will reboot. The Web UI Communic Lost message appears while the device is rebooting. The process takes several minutes. When device has rebooted, the connection to the Server Management Dialogue is restored in your v browser.
You can cancel a firmware upgrade that is in progress only during the upload and verification. Click Cancel upload before the file has uploaded.
Note: If an error occurs during the upload phase or the upgrade process or becomes corrupted, you are prompted to remove the file.
Reboot the AI NVR
You can reboot the AI NVR from the Server Management Dialogue:
-
Open the Device panel
-
On the General pane click Reboot.
Monitor the progress of the device as it reboots from the System pane of the Server Management Dialogue Dashboard. For more information see Using the AI NVR on page 19).
Manage ACC Services
On the Server panel use the:
- General pane:
To... Do this...
Shut down all the services before you sClick dStop. the device.
Start up all the services after they have ClickenStart.shut down.
Format the storage drive.
Click Reinitialize to delete all configuration and recorded video data.
Download and install the ACC Client software Download. After the download is version provided with the AI NVR on the complete, open the installer as you would any computer you are using to access the Application downloaded with a web browser to Management Dialogue. install the software.
Tip: The version of the ACC Client software provided with the AI NVR firm, the most recent. To ensure you are using the latest version of the ACC (the ACC system used by your security team, see Download and Install the Client Software on page 14.
-
Network Storage Management pane to enable ACC Client application users to archive video from the AI NVR. See Enable ACC Client Users to Archive Video below
• Service and RTP Ports panes to change the UDP and TCP ports used to communicate with the AI NVR: -
In the Service Ports pane, enter the Base value to use for the HTTP, HTTPS, and UDP ports and click Apply. The list of ports is updated.
- In the RTP Ports pane, enter the Base value to use for the UDP ports and click Apply. The range of ports available for RTP is updated.
Important: These changes can only take effect after the system restarts. When prompted, allow the system to restart.
Enable ACC Client Users to Archive Video
To allow users of the ACC Client application to archive video from the AI NVR:
- From the navigation bar, open the Server panel.
- In the Network Storage Management pane, click Enabled
-
From the Protocol drop down list, select one of the following:
-
CIFS — Common Internet file system. The network path is typically in this format: //
/ -
NFS — Network file system. The network path is typically in this format:
: -
In the Network Path field, enter the path to the preferred video archiving location.
- If the network location requires authentication, enter the credentials in the Username and Password fields.
- Click Apply.
Manage Storage
On the Storage panel of the AI NVR you can:
- Monitor the storage capacity and the status of the virtual disks configured on the device on the Virtual Disks panel, and the physical disks installed on the device on the Physical Disks pane
- Expand a virtual disk on the Virtual Disks panel to monitor the status of the physical disks that are members of that virtual disk.
- View details about each physical disk, including capacity, model, and serial number on the Physical Disks panel.
- Set the status of a physical disk to Offline before removing it from the appliance for replacement if it ever fails.
Important: The storage physical disk is a hard disk drive (HDD) that must be HDD of the same capacity.
Click Storage on the navigation bar to open the Virtual Disks and Physical Disks panels.
In the... To... You can...
Virtual View the capacity View information about the virtual disk, including its label, the RAID mode Disks and status of a in use, and its capacity.
panel virtual disk
When a virtual disk is:
- Correctly working, Ready is displayed.
- Not correctly working, one of several error states is displayed.
Complete
maintenance
on a
Click

check consistency of the virtual disk.
virtual disk
Monitor the status the physical disk
members of a virt disk
C### to
display information about all the physical disks that are
members of the virtual disk and to hide the information. When the tual member disks are displayed, the status of each disk is listed. When a physical disk is:
- Correctly working, Ready is displayed.
- Not correctly working, one of several error states is displayed.
Virtual Prepare to replace Click ▲. You are prompted to Eject or Cancel. The status changes to
Disks a physical disk
and
Physical
Disks
panel
Offline and
changes to +, indicating all services have stopped. For
more information on replacing a physical disk, see Replace Hard Disk Drives on the next page.
Physical View the capacity View information about each physical disk, including its label, capacity,
Disks and status of each model, serial number and status is listed.
panel physical disk.
When a physical disk is:
- Correctly working, Ready is displayed.
- Not correctly working, one of several error states is displayed.
Rebuild the virtual disk after replacing
Click to rebuild the virtual disk.
a failed member physical disk.
Note: An HDD in a RAID that has been taken offline rebuilt to return it to service.
Replace Hard Disk Drives
The hard disk drives (HDDs) on the AI NVR are set up in a RAID configuration. This allows inform recorded across several HDDs. If one HDD fails on an AI NVR VAL or up to two HDDs fail on there is enough information on the other HDDs for the recorder to continue recording video. This to replace a failed HDD without any downtime. If two disks have failed on an AI NVR STD, they replaced one at a time.
To replace a failed HDD:
-
In the Server Management Dialogue, open the Storage panel.
-
In the Physical Disks panel, click 📄. You are prompted to Eject or Cancel. The status changes to Offline and changes to +, indicating all services have stopped.
Important: An HDD in a RAID that has been taken offline has to be rebuilt service. If you decide not to remove the HDD after ejecting it, click to rebuild with this HDD. The progress of the rebuilding is displayed in the Physical DI may take several hours.
-
You can now remove the HDD from the appliance:
-
Locate the failed hard drive at the front of the recorder.
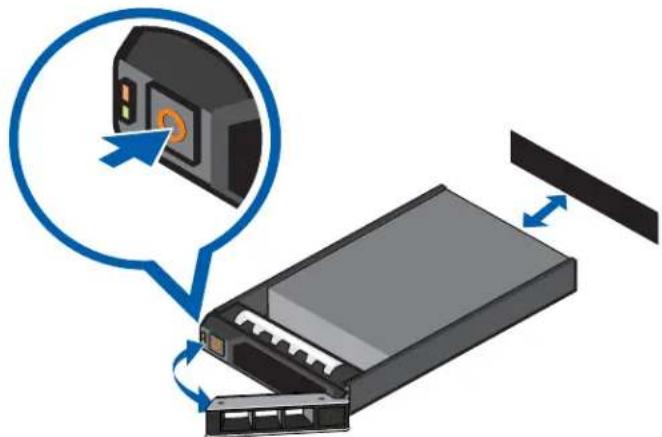
natural_image
Illustration of a computer drive with a speech bubble showing a button, connected to a cable (no text or symbols present)-
Press the release button on the front left of the hard drive.
-
When the handle is released, pull the hard drive out of the recorder.
-
Remove the four screws from the side of the hard drive carrier.
-
Lift the failed hard drive out of the carrier.
-
Insert a new hard drive into the carrier then screw it into place. The hard drive conn should face the back.
-
When the hard drive is secured in the carrier, insert the hard drive back into the rec
- Once the hard drive is inserted all the way in, push the handle against the hard drive into place.
The AI NVR immediately starts rebuilding the hard drive. The progress of the rebuilding is disp in the Physical Disks panel. This may take several hours.
Connect the Device to Cameras and ACC Client Users
When connecting an ONVIF device to the camera network, configure it to use the appliance as its server.
On the Network panel, you can configure the network connections for the appliance. Four network connections are supported on the AI NVR STD models and two network connections on the AI NVR models. Use one connection for the network where the AI NVR can be discovered by other ACCs and ACC Client PCs, so you can join it to an existing ACC site. Users who administrate the AI NACC Client software connect to the appliance through this network. Use another network connection to the camera network monitored by your security team.
You can perform any of the following actions in each of the panes in the Network panel:
To... Do this...
Set how the In each of the panes in the Network panel, toggle Automatic IP on to discover
device obtains arconnected networks automatically (the default setting), or off to manually specify the IP address for connections. Enter the appropriate values in the following fields if you are manually each network. entering the connection settings:
- IP Address
- Subnet Mask
- Default Gateway
Click Apply to save your changes.
Set how the Toggle Automatic DNS on to discover connected DNS servers automatically (the device obtains a default setting), or off to manually specify the DNS servers. Controls to add and named address delete addresses in the list, and reorder them are activated when Automatic DNS is from a DNS toggled off.
server.
Provide Service and Device Logs for Support
Use the Logs panel to view the Server Logs and System Logs panes and prepare log files request Avigilon Technical Support to help resolve an issue.
Typically, Avigilon Technical Support assists you to access and filter the logs on this panel to isolate that they require. You then copy and paste the logs into a text file, save it and send it to Av Support.
By default, a log pane displays 100 warning messages from the logs.
You can filter the logs to display the information that you need:
- In the drop down list, select the type of logs that you need.
• For the Server Logs:
- Analytics Service Exception Logs
- Analytics Service FCP Logs
• Analytics Service Logs - Exception Logs
- FCP Logs
- Server Logs
- WebEndpoint Logs
• For the System Logs:
- System Logs
- Boot Logs
- Web Server Logs
- In the Maximum Logs drop down list, select the number of log messages you want to display each time.
- Enter text in the Filter field to apply a filter to the log listings.
- Click the Sync button to display the updated logs.
Troubleshooting
Cannot Discover the Device
There are several ways you can discover a device that is supposed to connected to your network network workstation. The recommended order to discover a device is:
- Check that the appliance is connected to the local network with an Ethernet cable.
- Check that the appliance LED indicators display the correct status. See LED Indicators on page 35 for more information.
• Using File Explorer (Windows) or Finder (Apple)
You are looking for a device labeled “AINVR-STD-xxTB
• Discover the DHCP-assigned IP address from the ACC Client software:
- Log into the site that uses this naming convention: AINVR-STD -
Note: The username and password for the Web Interface application is the administrator username and password for the ACC Server.
-
Access the appliance from your web browser using the https://AINVR-STD-
or https://AINVR-VAL- .
• Use the Address Resolution Protocol (ARP) to determine the IP address for the device: -
Locate and copy down the MAC Address (MAC) listed on the Serial Number Tag for r
-
Open a Command Prompt window and enter the following command:
arp -a
- Scroll through the response and look for the IP address corresponding to the MAC adc
- Connect a laptop directly to an Ethernet port and try to access the device with its ZeroConf IP address:
Interface (Ethernet Port) ZeroConf IP Address
0 169.254.100.99
1 169.254.100.100
2 169.254.100.101
3 169.254.100.102
Network Configuration
By default, the AI NVR acquires an IP address on the network through DHCP. If you need to set AI NVR to use a static IP address or any specific network configuration, see the Connect to the AI NVR (using Static IP) on page 15 for more information.
Monitoring System Health
You can monitor the health of the system components in the Site Health in the ACC Client softw the Help files provided with the ACC Client for more information.
LED Indicators
Diagnostic Indicators
The diagnostic indicators on the front panel highlight system issues during system startup.
| LED Indicator | Description |
| Hard drive | Blinks orange — the hard drive is experiencing an error. |
| Temperature | Blinks orange — there is a thermal error.Errors include:temperature out of rangefan failureCheck that the fans are functioning correctly and the air vents are not blocked |
| Electrical | Blinks orange — there is an electrical error.Errors include:voltage out of rangefailed power supplyvoltage regulatorCheck the power status indicator to confirm if it is an issue with the power : |
| Memory | Blinks orange — there is a memory error. |
| PCIe | Blinks orange — there is a PCIe card error.Restart then upgrade the device firmware if the error persists. |
| System health and System ID | Blue — powered and in good healthBlinking blue — System ID mode activeOrange — fail-safe modeBlinks orange — there is an error |
Power Status Indicators
The power button on the front lights up when power is on.
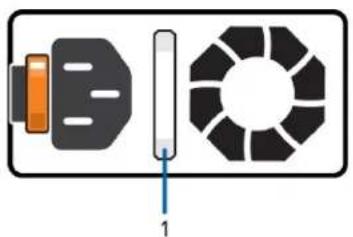
Additional information about the power supply is provided by the power status indicator on the power supplies at the back. The following table describes what the LEDs indicate:
natural_image
Pure diagram of three mechanical components without any text, numbers, or symbolsFigure 7: (1) The power status indicator.
LED Indicator Description
| Off | Power is not connected. |
| Green | Power is supplied. |
| Flashing green | The firmware update is being applied to the power supply unit. |
| Flashing green then turns off | The redundant power supply is mismatched. This only occurs if you have a secondary redundant power supply installed. |
| Flashing orange | There is a problem with the power supply. |
Restore the AI NVR to Factory Default Settings
You may have to restore the AI NVR to the original factory default settings if you forget the admin password and have no backup administrator account with a known password, or if the firmware bec unusable.
Important: All configuration data and recorded data is deleted when you restore the AI NVR to its factory default settings. The firmware installed on the machine at the factory before delivered is restored. After the appliance is restarted, you must reconfigure the app though it was newly installed, and upgrade the firmware to the latest release.
To restore the factory settings:
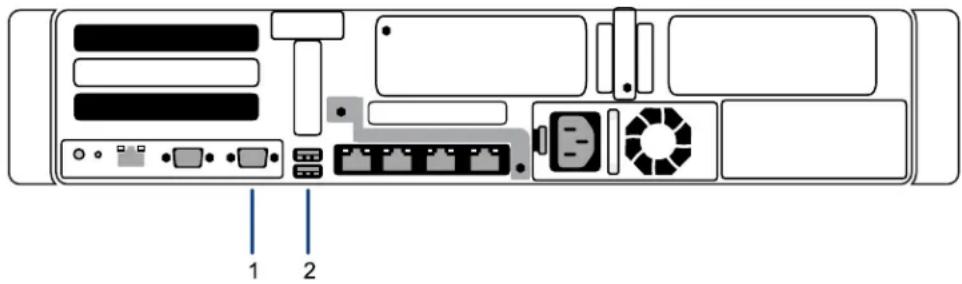
- Connect a monitor and keyboard to the AI NVR to the connections on the rear of the appli
text_image
1 2- VGA connector (for monitor)
-
USB connector (for keyboard)
-
Press the power button on the front of the appliance to powercycle the appliance and start reboot process.
The Avigilon logo and a progress bar appear on the monitor while the BIOS is loading.
- When the progress bar indicates the BIOS loading is nearly complete, press and hold down the f key on the keyboard.
Within a minute the bootloader welcome screen appears. The first progress message indicates the factory reset button has been pressed.
- Release the f key when the progress message "reset latched -- waiting for release" appears.
Within a minute the bootloader welcome screen appears. The first progress message indicates the factory reset button has been pressed.
- After the AI NVR has completed the reboot, it must be completely reconfigured, starting from Download and Install the Latest ACC Client Software on page 14.
Limited Warranty and Technical Support
Avigilon warranty terms for this product are provided at avigilon.com/warranty.
Warranty service and technical support can be obtained by contacting Avigilon Technical Support: avigilon.com/contact.
For More Information
For additional product documentation and software and firmware upgrades, visit avigilon.com/support.
Technical Support
Contact Avigilon Technical Support at avigilon.com/contact.