
GQ-3500 - Printer EPSON - Free user manual and instructions
Find the device manual for free GQ-3500 EPSON in PDF.


User questions about GQ-3500 EPSON
0 question about this device. Answer the ones you know or ask your own.
Ask a new question about this device
Download the instructions for your Printer in PDF format for free! Find your manual GQ-3500 - EPSON and take your electronic device back in hand. On this page are published all the documents necessary for the use of your device. GQ-3500 by EPSON.
USER MANUAL GQ-3500 EPSON
The standard GQ-3500 with a #5691 card installed has a base memory configuration of 512 kBytes of RAM. For most application software this amount of memory is sufficient.
If you are printing large amounts of graphic data, using a number of downloaded fonts, or mixing graphics and text on a page, it is possible you will have pages eject which are not complete. No error message will be generated and the remainder of the page will be printed on the following sheet of paper. Nothing is wrong with your printer. This occurs when the page gets too complex and there is insufficient memory.
There are two ways to handle the situation. The easiest and quickest solution is to switch to a lower graphics resolution. By reducing the resolution to either 150, 100, or 75 DPI, depending upon the complexity of the page, the printer will then be able to print full page graphics. An alternative solution, if you want the 300 DPI quality, is to purchase one of the EPSON Memory upgrade boards for the GQ-3500. Contact your dealer for pricing and availability.
EPSON®
G Q - 3 5 0 0
FCC COMPLIANCE STATEMENT FOR AMERICAN USERS
This equipment generates and uses radio frequency energy and if not installed and used properly, that is, in strict accordance with the manufacturer's instructions, may cause interference to radio and television reception. It has been type tested and found to comply with the limits for a Class B computing device in accordance with the specifications in Subpart J of part 15 of FCC Rules, which are designed to provide reasonable protection against such interference in a residential installation. However, there is no guarantee that interference will not occur in a particular installation. If this equipment does cause interference to radio or television reception, which can be determined by turning the equipment off and on, the user is encouraged to try to correct the interference by one or more of the following measures:
— Reorient the receiving antenna
-Relocate the printer with respect to the receiver
-Plug the printer into a different outlet so that the printer and receiver are on different branch circuits.
If necessary, the user should consult the dealer or an experienced radio/ television technician for additional suggestions. The user may find the following booklet prepared by the Federal Communications Commission helpful
"Television Interference Handbook."
This booklet is available from the U.S. Government Printing Office, Washington, DC 20402. Stock No. 004-000-00450-7.
WARNING
The connection of a non-shielded printer interface cable to this printer will invalidate the FCC Certification of this device and may cause interference levels which exceed the limits established by the FCC for this equipment. If this equipment has more than one interface connector do not leave cables connected to unused interfaces.
All rights reserved. No part of this publication may be reproduced, stored in a retrieval system, or transmitted, in any form or by any means, mechanical, photocopying recording or otherwise, without the prior written permission of Seiko Epson Corporation. No patent liability is assumed with respect to the use of the information contained herein. While every precaution has been taken in the preparation of this book, Seiko Epson Corporation assumes no responsibility for errors or omissions. Neither is any liability assumed for damages resulting from the use of the information contained herein.
Centronics is a registered trademark of Centronics Data Computer Corporation. Epson is a registered trademark of Seiko Epson Corporation.
IBM is a registered trademark of International Business Machines Corporation. MS is a trademark of Microsoft Corporation.
Xerox is a registered trademark of Xerox Corporation.
Copyright © 1986 by Seiko Epson Corporation
Nagano, Japan
SAFETY INFORMATION
Laser Safety
This printer is certified as a Class 1 laser product under the U.S. Department of Health and Human Services (DHHS) Radiation Performance Standard according to the Radiation Control for Health and Safety Act of 1968. This means that the printer does not produce hazardous laser radiation.
Since radiation emitted inside the printer is completely confined within protective housings and external covers, the laser beam cannot escape from the machine during any phase of user operation.
CDRH Regulations
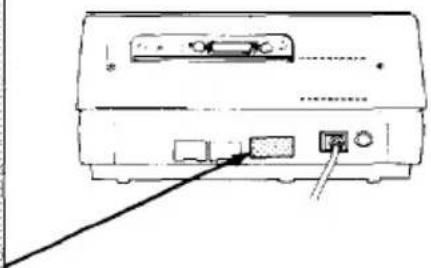
The Center for Devices and Radiological Health (CDRH) of the US. Food and Drug Administration implemented regulations for laser products on August 2, 1976. These regulations apply to laser products manufactured from August 1, 1976. Compliance is mandatory for products marketed in the United States. The label shown below indicates compliance with the CDRH regulations and must be attached to laser products marketed in the United States.
This laser product conforms to the applicable requirement of 21 CFR subchapter J.
SEIKO EPSON CORP.
Hirooka Office
80 Hirooka, Shiojiri-shi, Nagano-ken, JAPAN
MANUFACTURED:
natural_image
Line drawing of a device rear panel with cable and ports, no text or symbols presentCAUTION: Use of controls, adjustments or performance of procedures other than those specified in the manual may result in hazardous radiation exposure.
Contents
Introduction
Chapter 1
Setting Up
1-1 Unpacking the Printer
1-1 Finding a Place for the Printer
1-2 Installing the Drum Cartridge
1-6 Installing the Toner Cartridge
1-9 Installing the Paper Tray
1-9 Loading Paper
1-12 Turning On the Printer
1-12 Operating the Control Panel
1-14 The Indicator Lights
1-15 Running a Self Test
Chapter 2
Starting Printing
2-1 Removing the Interface
2-3 Setting Switches
2-7 Connecting the Printer to a Computer
2-8 Using the GQ-3500 with Application Programs
Chapter 3
SelecType
3-1 Entering SelectType Mode
3-3 SelectType Functions and Options
3-6 SelectType with DIP Switches or Software Commands
3-6 Using Optional IC Cards
Chapter 4
Paper
4-1 Paper Delivery Choices
4-2 Types of Paper
4-3 Considerations in Selecting Paper
4-3 Sizes of Paper
4-4 Choosing a Standard Paper Size
4-4 Loading the Paper Tray
4-4 Hand-Feeding Paper
4-5 Clearing Paper Jams
Chapter 5
Maintenance and Status Messages
5-1 Status Messages
5-3 IC Card Status Messages
5-4 Paper Status Messages
5-7 User Maintenance
5-15 Service Maintenance
5-16 Corrective or Preventive Maintenance
5-16 Transfer Charger Wire
Chapter 6
Software Control of Printer Features
6-1 Using BASIC
6-2 Orientation
6-3 Font Selection
6-5 Character Attributes
6-7 Ruled Lines
6-9 Graphics Primitives
Appendix A
Command Summary
A-2 Commands in Numerical Order
A-5 Page Printer Commands
A-37 LQ Emulation Commands
A-55 Line Printer Commands
Appendix B
Directory of Status Messages
Appendix C
DIP Switches
Appendix D
Character Tables
Appendix E
Specifications
E-1 Printing
E-2 Paper and Paper Delivery
E-2 Mechanical
E-3 Electrical
E-3 Controller Hardware
E-4 Environment
E-4 Transportation
Appendix F
Parallel Interface
F-1 DIP Switch 4
F-2 Parallel Interface Jumpers
F-3 Pin Assignments
GQ-3500 Options
Introduction
The Epson GQ-3500 Laser Printer combines a semiconductor laser with the electrophotographic technology used in office copiers to give you printing that is high quality, quiet, and fast.
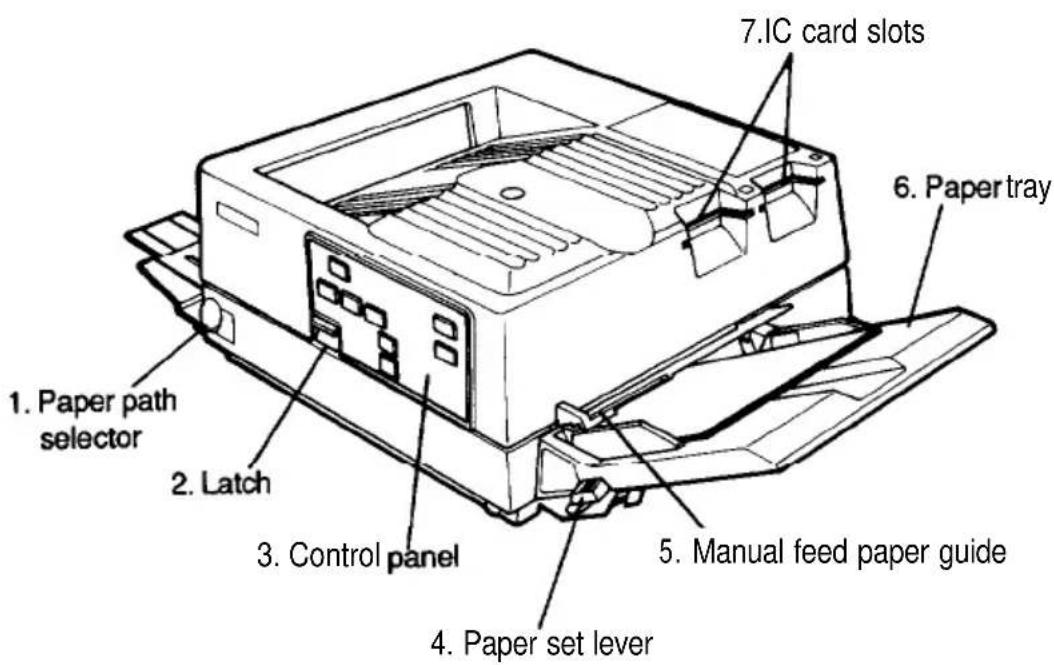
Before you set up your printer, take a few minutes to look at the illustrations in this introduction. The captions name and briefly describe the basic parts of the outside of the printer. This will help you in following the setup steps in Chapter 1.
The first illustration shows the front and the right side of the printer with the major parts identified.
text_image
1. Paper path selector 2. Latch 3. Control panel 4. Paper set lever 5. Manual feed paper guide 6. Paper tray 7.IC card slots- Paper path selector. Selects either faceup or facedown delivery of printed pages
- Latch. Used to open the printer
- Control panel. Has buttons for controlling the printer and indicators for displaying its status
- Paper set lever. Used for loading paper
-
Manual feed paper guide. Guides paper for manual feed
-
Paper tray. Holds paper for automatic feed printing
-
IC card slots. Sockets for optional IC cards, which add additional fonts and operating modes to the GQ-3500
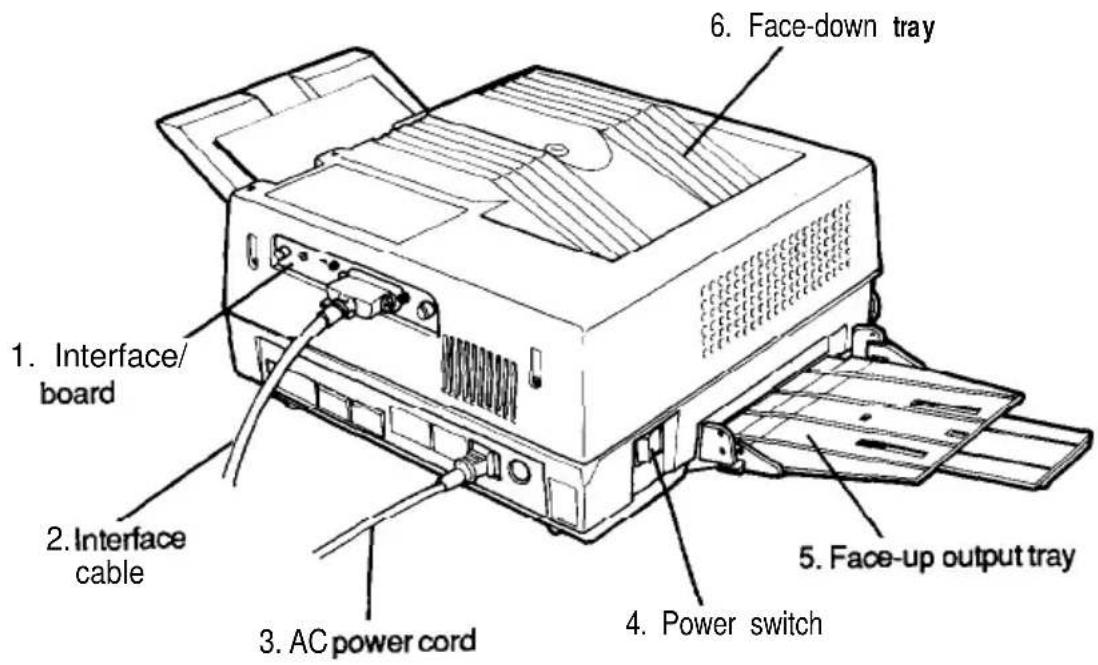
The illustration below shows the back and left side of the GQ-3500.
text_image
1. Interface/ board 2. Interface cable 3. AC power cord 4. Power switch 5. Face-up output tray 6. Face-down tray- Interface board. A parallel interface is supplied with the printer; a serial interface is available as an option
- Interface cable. Used for connecting the printer to a computer
- AC power cord. Supplies power to the printer
- Power switch. The 1 side of this switch turns the printer on; the 0 side turns it off
- Face-up output tray. Receives printed pages when face-up delivery is selected
- Face-down tray. The printer's top cover also serves as its print exit tray for face-down delivery
Laser Printer Precautions
because the GQ-3500 is a laser printer using electrophotographic technology, certain precautions are necessary to ensure safe and efficient operation. The following list of precautions applies whenever you open the printer case. Even if you are familiar with other types of printers, be sure to familiarize yourself with these precautions.
-
Be careful not to touch the fusing unit, which is marked by a CAUTION: HOT SURFACE label.
-
Protect the light-sensitive drum from exposure to light. The drum should not be exposed to any light stronger than room light. Furthermore, the drum should not be exposed to room light for longer than five minutes. If you must expose the drum for more than five minutes, either by taking the drum out of the printer or by leaving the printer case open, cover the drum area with a soft cloth or paper.
-
Avoid pressing on the top of the toner cartridge. Pressing directly on the cartridge may cause toner powder to spill into the printer. If there is a spill, the toner must be removed by a small vacuum cleaner.
-
Be sure to raise the cover completely when you open the printer. If the cover is not fully raised when you are servicing the printer (such as clearing a paper jam), damage could result from printer parts colliding with the cover or the delicate lens shield contained in the cover.
Chapter 1
Setting Up
To set up your GQ3500 printer simply follow the steps in this chapter.
1 Unpacking the Printer
Carefully unpack the carton. At the top of the carton is a box containing several printer components. Beneath that box is the printer itself, which is protected by white foam packing material.
After you take out the inner box where you found this manual, do not open the smaller boxes that are inside of it. Instead, carefully remove the printer from the large carton. See that neither the printer nor any of the smaller boxes have been damaged during transportation.
Remember
Do not open any of the small boxes and do not plug in or turn on the printer yet.
When you are finished unpacking, put the packaging materials including the desiccant bag in the carton and keep them in case you need to transport the printer. Full details on transporting the printer are in Appendix E.
2 Finding a Place for the Printer
Now you must find a place for the printer. It must be close enough to the computer for the cable to reach. Proper operation of the printer also requires a certain amount of space.
If you're going to put your printer near a wall or large piece of furniture, such as a filing cabinet, remember to leave enough space for operation and maintenance.
You need at least 40 inches in front of the printer (the side with the control panel), 15 inches on the right, 4 inches on the left (16 inches if you use the faceup output tray), and 12 inches behind.
Also keep the following tips in mind:
. Place the printer on a flat, stable surface.
. Choose a place that is clean and free from excessive heat (including direct sunlight), moisture, and dust.
Use a grounded outlet — one that has three holes to match the power plug on the printer. Don't use an adapter plug.
- Avoid sockets on the same circuits with large motors or other appliances that might disturb the power supply.
- Keep your entire computer system away from potential sources of interference such as the base units of cordless telephones.
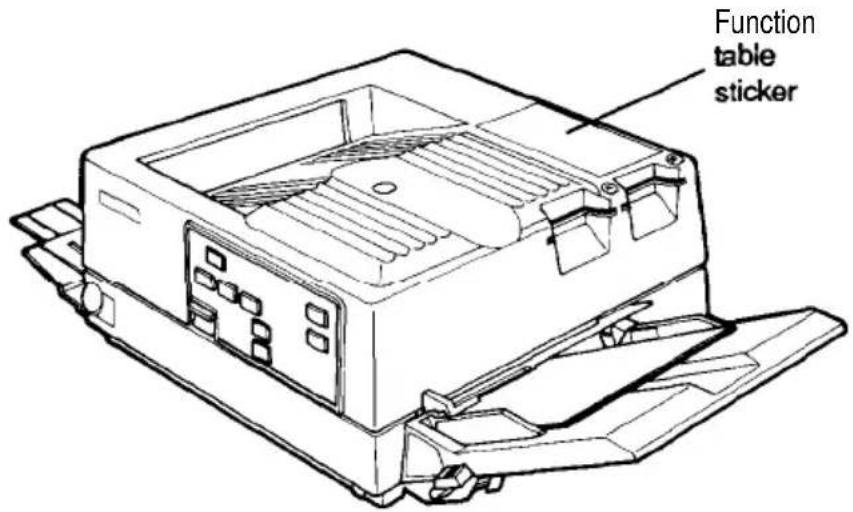
When you have found a place for the printer, place the function table sticker on the top of the printer in the location indicated in Figure I-I.
Figure 1-1. Function table location
text_image
Function table sticker3 Installing the Drum Cartridge
Before you use the printer, you must install a few important parts that are packaged separately for safe transportation. The first is the drum cartridge.
WARNING
Do not expose the drum cartridge to any light brighter than normal room light, and do not expose it to room light for more than five minutes. Leave it boxed until you have read over the next few pages and know how to install it. Also, do not touch the surface of the drum or let it rest on any hard surface that might scratch it.
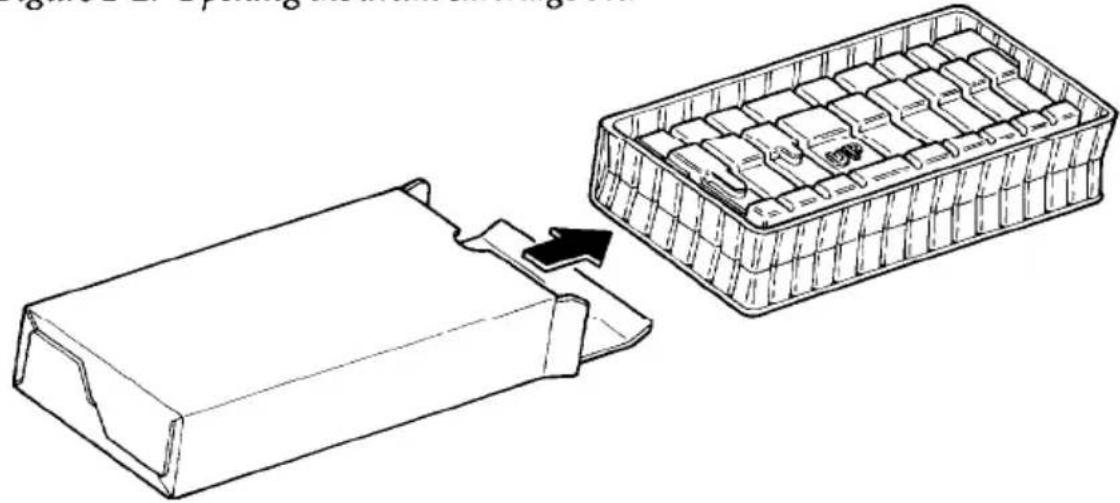
Open the drum cartridge box and pull out the plastic container, as shown in Figure 1-2. (The plastic bag inside the box is for eventual disposal of the cartridge when it has to be replaced.)
Figure 1-2. Opening the drum cartridge box
natural_image
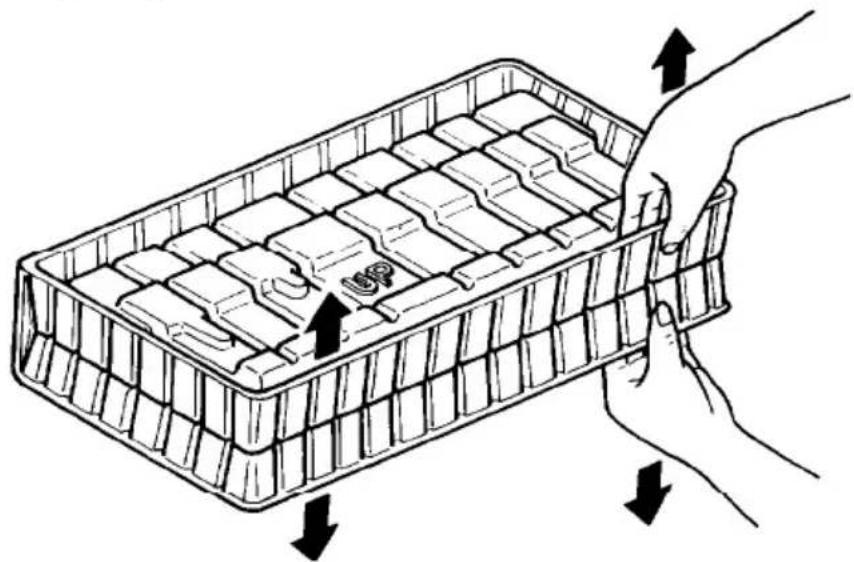
Technical line drawing of a mechanical component being processed into a multi-tiered plastic housing (no text or symbols present)See that the side of the plastic container marked UP is up, and carefully open the plastic container as shown in Figure 1-3.
Figure 1-3. Opening the container
natural_image
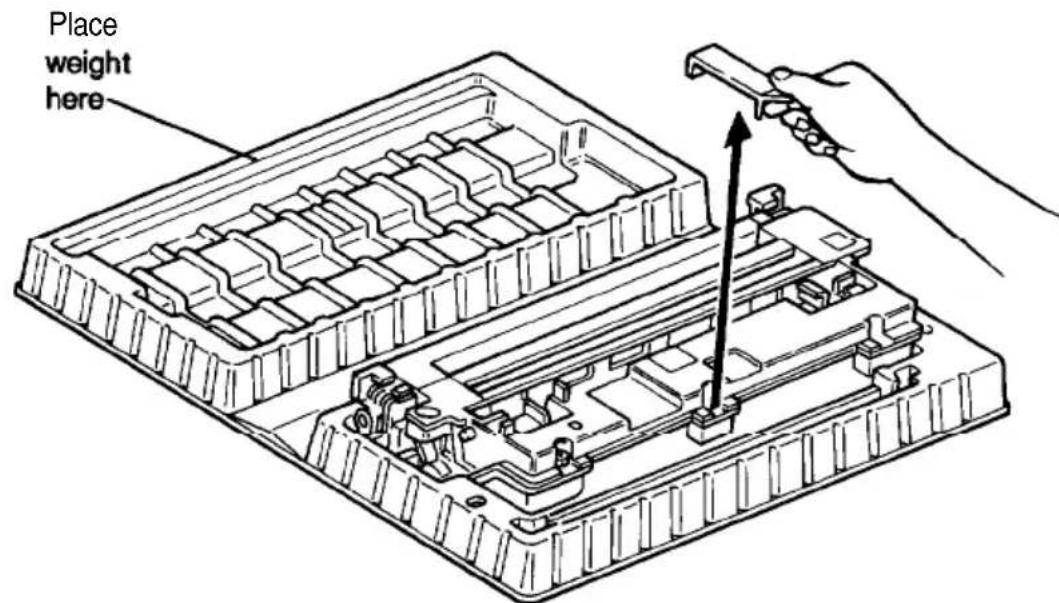
Diagram of a hand placing a component into a grid-like plastic container with arrows indicating direction (no text or symbols)Because the top of the plastic container does not stay open by itself, put a small object on the top to hold it open, as indicated in Figure 1-4. Then remove the orange holder. It is needed only for transportation.
Figure 1-4. The open container
text_image
Place weight hereNow you are ready to install the drum cartridge. Follow these steps:
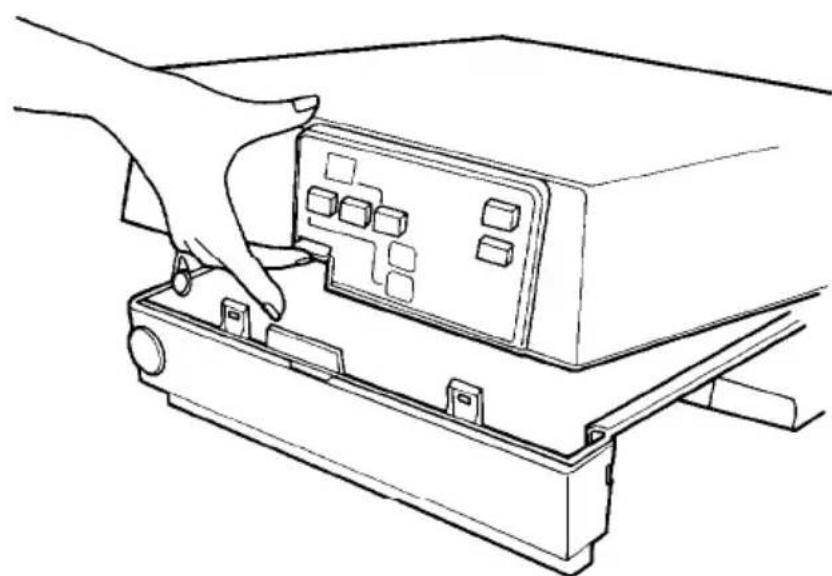
- Lift up on the latch on the front of the printer and open the printer. (See Figure 1-5.)
Figure 1-5. Opening the printer
natural_image
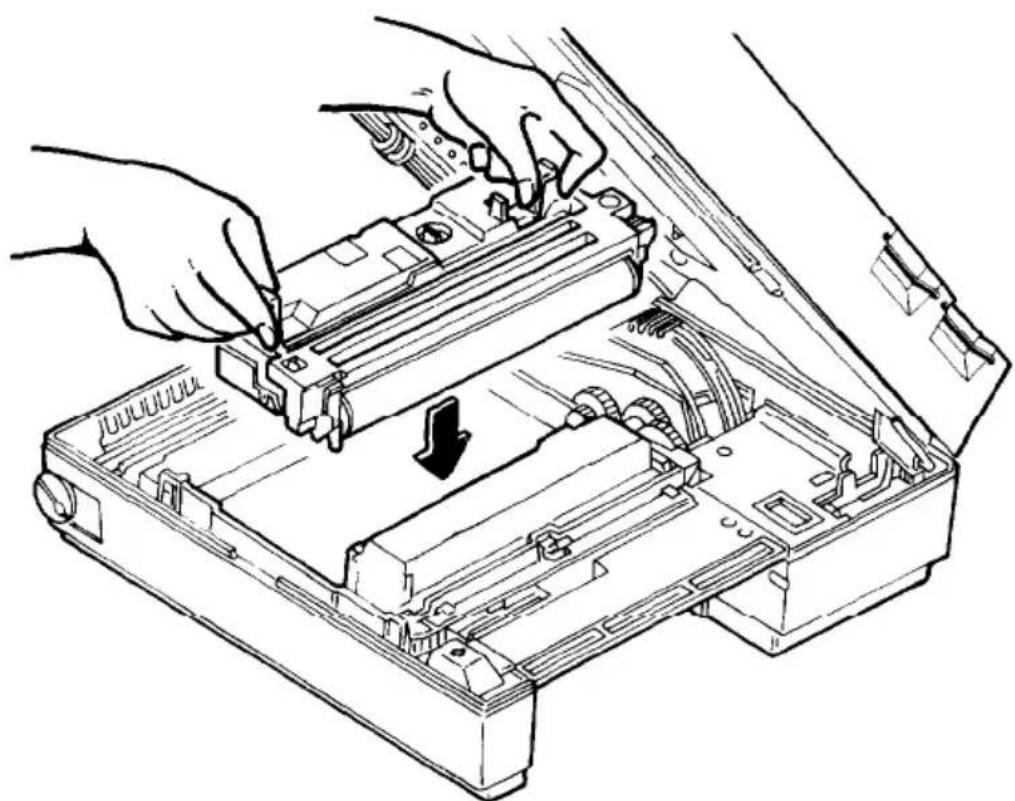
Line drawing of a hand inserting a device into a rack-mounted device (no text or symbols)- Hold the drum cartridge by the two green tabs and lift it out of the plastic container. Then be sure that the drum is toward the right side of the printer, and lower the cartridge into the opening to the left of the block of white foam packing material (as shown in Figure 1-6).
Figure 1-6. Installing the drum cartridge
natural_image
Line drawing of hands installing or adjusting a device into an open case (no text or symbols visible)-
Lower the cartridge into the printer until it fits into place. Then press the green tabs back to the horizontal position.
-
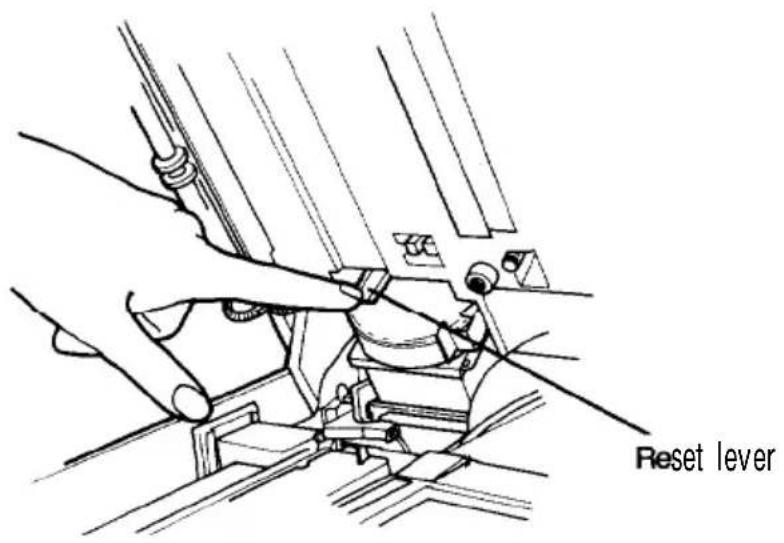
Press the reset lever at the left rear of the inside of the printer, as shown in Figure 1-7. This is important because the reset lever resets the counter that keeps track of the usage of the drum cartridge.
Figure 1-7. Pressing the reset lever
text_image
Reset lever4 Installing the Toner Cartridge
The toner cartridge must be installed in the developing unit (which is already in the printer). Follow these steps:
- Remove the block of white packing material from the developing unit (to the right of the drum cartridge).
- Next take the toner cartridge out of its box. Remove the take-up handle and the tape from the top of the cartridge.
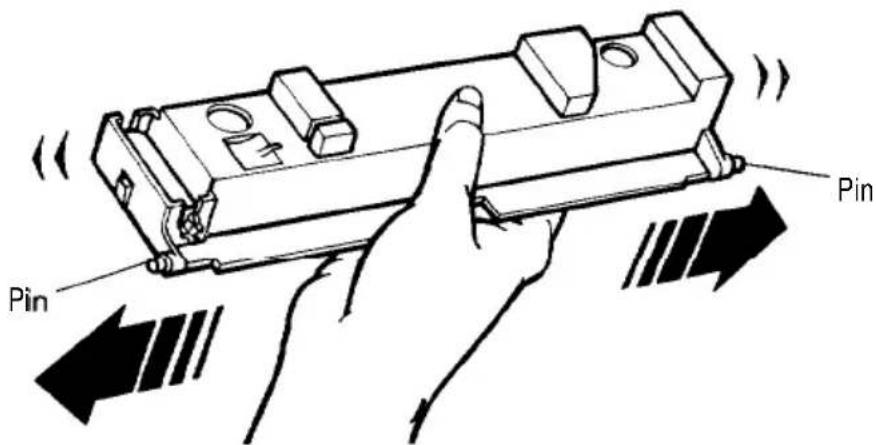
- Shake the toner cartridge back and forth several times horizontally, as shown in Figure 1-8. This distributes the toner evenly in the cartridge.
Figure 1-8. Distributing the toner
text_image
Pin PinCaution
Do not press on the top of the toner cartridge because toner may spill into the printer. Instead press on the edge of the cartridge as shown. If toner spills into the printer, remove it with a small vacuum cleaner.
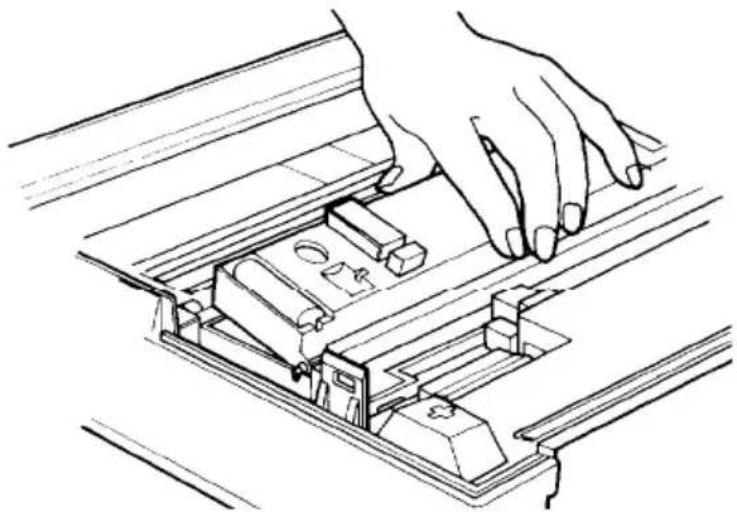
- On the bottom right side of the toner cartridge are two pins, one at each end. (See Figure 1-8.) Hold the toner cartridge vertically with the pins at the bottom and lower the pins into the notches in the developing unit. Then tilt the cartridge into place, as shown in Figure 1-9.
Figure 1-9. Installing the toner cartridge
natural_image
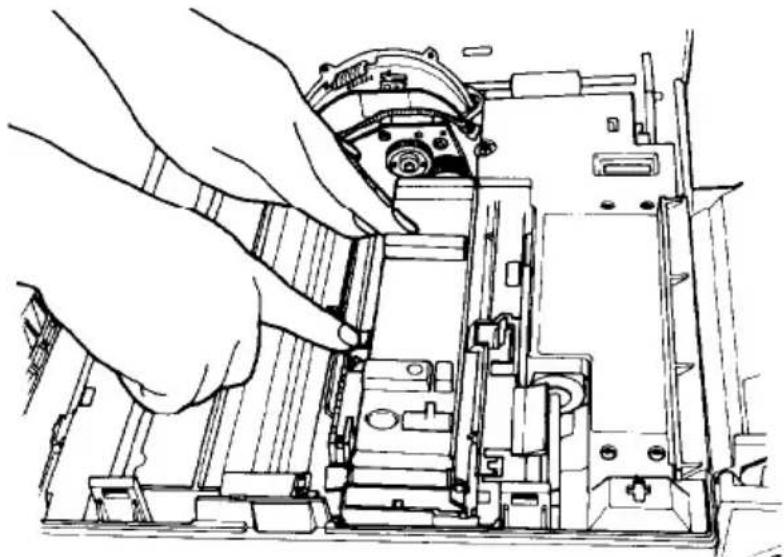
Line drawing of a hand pressing down an open mechanical device (no text or symbols)- Now hold the green toner cartridge lock lever down while you lower the left side of the toner cartridge. Then release the lock lever to lock the cartridge into place as shown in Figure 1-10.
Figure 1-10. Locking the cartridge info place
natural_image
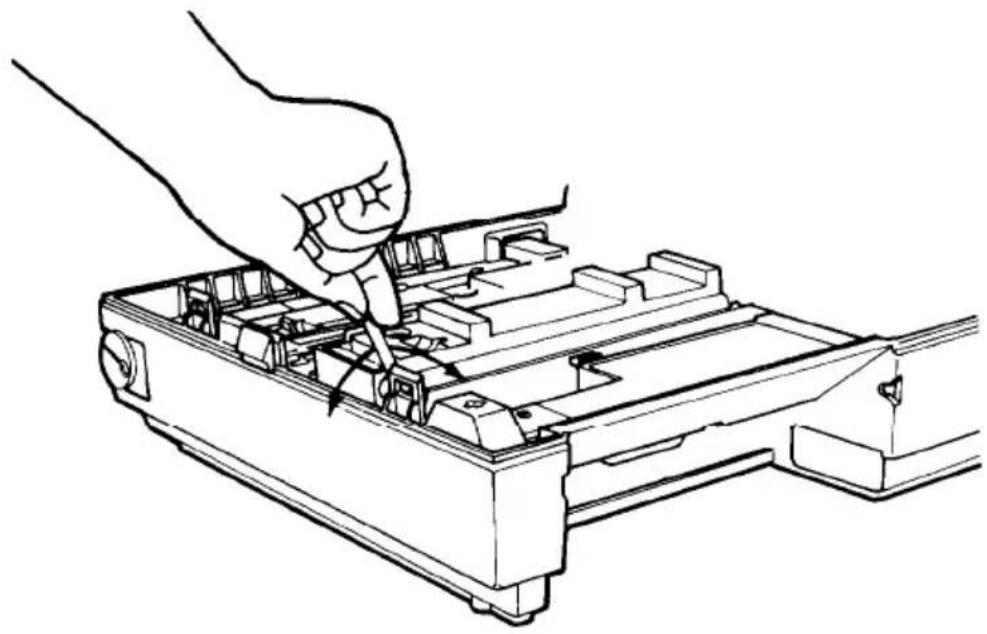
Line drawing of hands operating a mechanical device with no visible text or symbols- Attach the seal take-up handle to the small plastic shaft at the front of the toner cartridge. (See Figure 1-11.) Move the lever back and forth (in the direction of the arrows in Figure 1-11) until it won't move any further with moderate pressure. (You will see red markings on the seal when you reach the end of it.) This step, which may take up to 40 back and forth movements of the handle, peels back the toner seal and releases the toner into the developer.
Figure 1-11. Removing the toner seal
natural_image
Line drawing of a hand using a tool to adjust internal components of an electronic device (no text or symbols present)Caution
Once the toner cartridge has been installed, do not remove it until you are prompted to do so by the TONER OUT light on the control panel. Otherwise toner will spill into the printer.
- Remove and discard the take-up lever.
- Tap each of the corners of the toner cartridge to prevent toner from remaining in the comers of the cartridge.
- Make sure that the developer unit is properly locked into place by pressing on the two places marked by blue dots. They are to the right of the toner cartridge.
Now that you have installed the internal components, close the printer and gently press down on the top of the case until the latch clicks shut.
5 Installing the Paper Tray
before you install the paper tray, remove all of the packing material, including any white foam and pieces of tape. Then follow these steps:
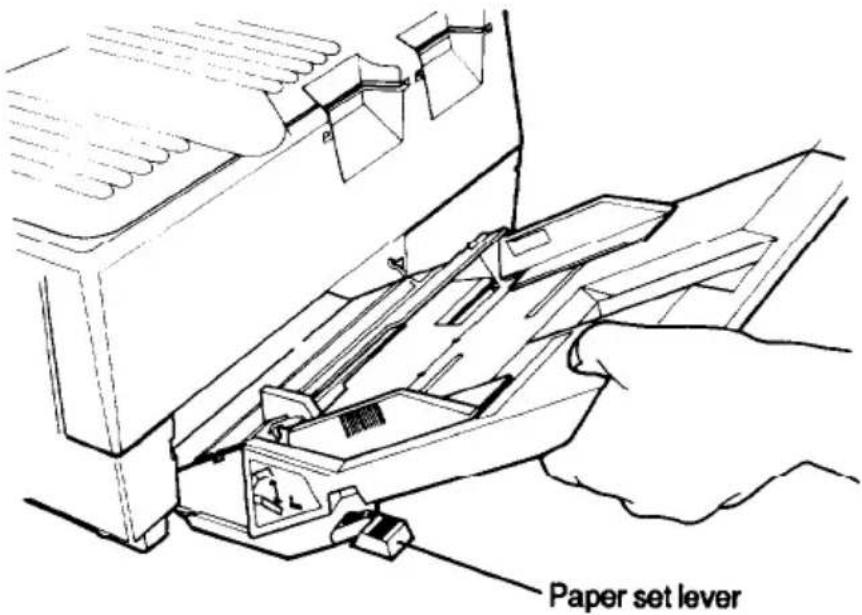
- Push down the paper set lever until it clicks into place. (See Figure 1-12 for the location of the paper set lever.)
- Hold the paper tray as shown in Figure 1-12. Notice that it is at an angle. Slide the plastic runners on either side of the paper tray into the black grooves inside the printer. When properly installed, the tray clicks into place.
Figure 1-22. Installing the paper fray
text_image
Paper set lever6 Loading Paper
Chapter 4 contains complete information about choosing paper types and sizes. For now, simply use up to 150 sheets of ordinary 8-1/2" x 11" white paper. (Xerox® 4024 copier paper is preferred.)
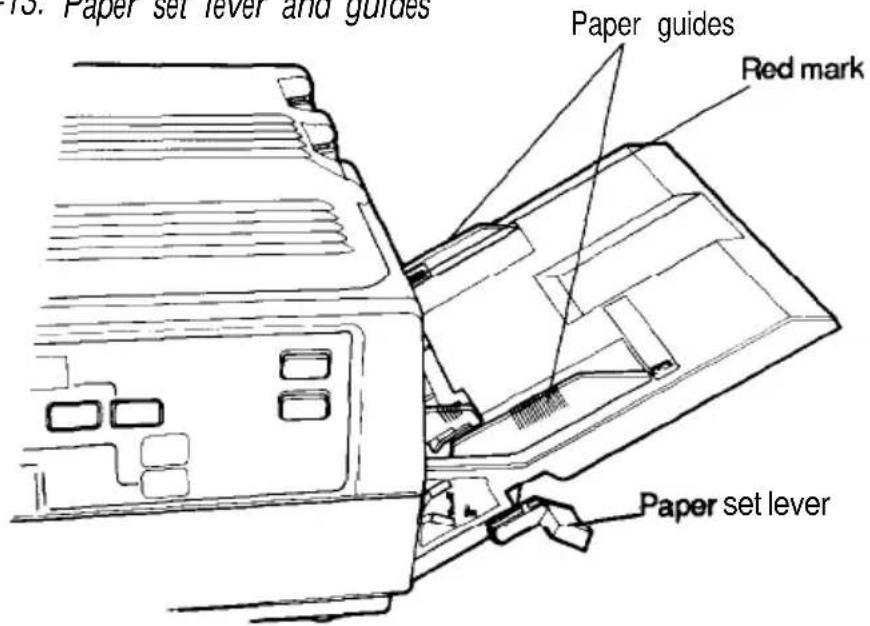
- See that the paper set lever is down, and open the paper guides all the way. (See Figure 1-13.)
Figure 1-13. Paper set lever and guides
text_image
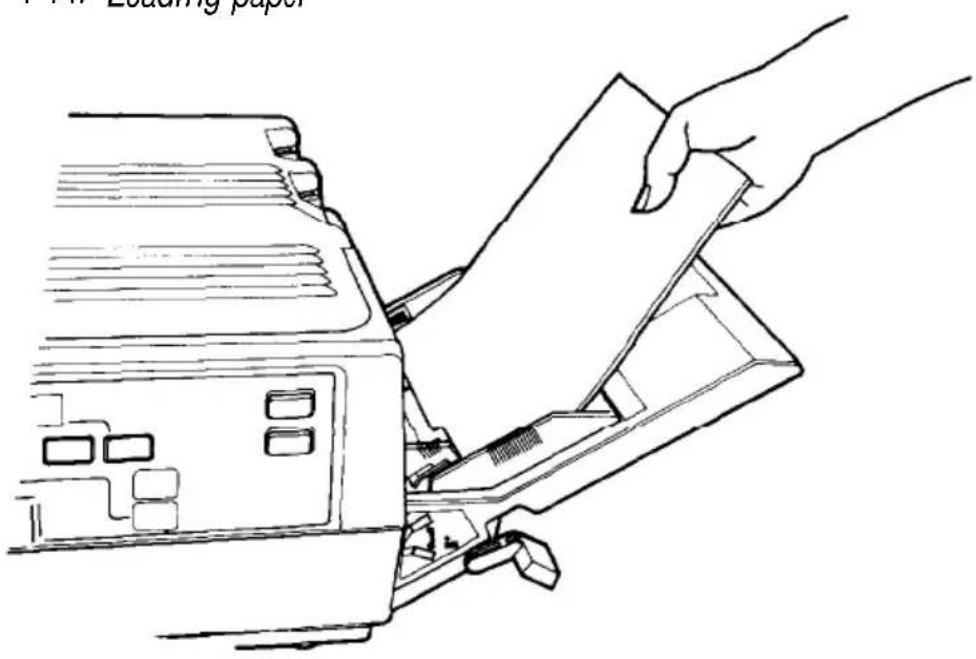
10. Paper set lever and guides Paper guides Red mark Paper set lever- Insert a stack of paper into the tray, making sure that the top of the stack does not cover the red mark on the inside of the paper tray. Push the paper in gently as far as it will go, as shown in Figure 1-14. (The paper will feed more easily if you fan it before you load it.)
Figure 1-14. Loading paper
natural_image
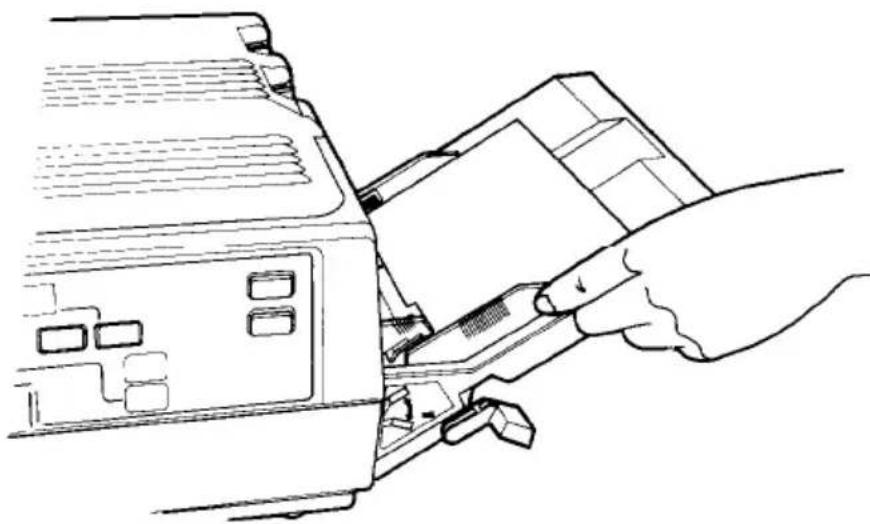
Line drawing of a hand inserting a card into a printer (no text or symbols)- Slide the paper guides together until they are both against the edges of the stack of paper. (See Figure 1-15.) Then raise the paper set lever to the up position.
Figure 1-15. Adjusting the paper guides
natural_image
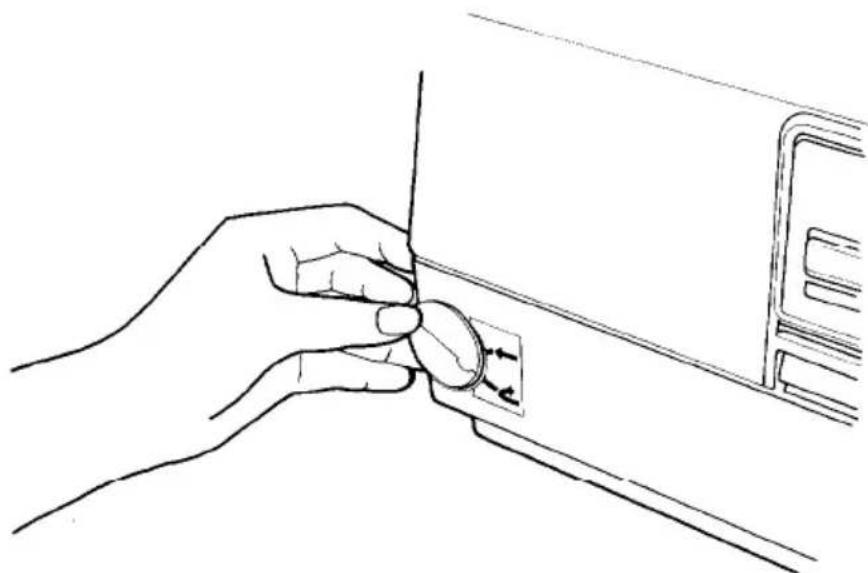
Line drawing of a hand inserting a card into a device (no text or symbols present)- Set the paper exit path with the paper path selector at the bottom left of the front of the printer. Set the path for facedown delivery by turning the dial down as shown in Figure 1-16. With this setting the paper will exit at the top of the printer.
Figure 1-16. Setting paper path
natural_image
Line drawing of a hand holding a small circular object with arrows indicating direction (no text or symbols)When ejected facedown, the pages are stacked in the order in which they are printed. The other setting for paper delivery requires the use of the face-up output tray. because you do not need to use it now, the installation and use of that tray is explained in Chapter 4.
7 Turning On the Printer
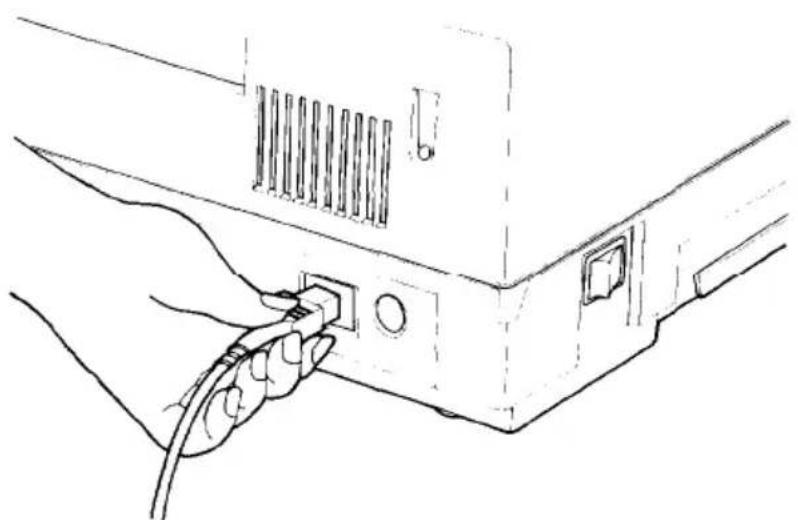
- before attaching the power cord, make sure the power switch on the left side of the printer (see Figure 1-17) is turned off. (It is off when the 0 side of the switch is pushed in.)
- Attach the power cord at the back of the printer as shown in Figure 1-17. Then plug the power cord into a properly grounded outlet.
Figure 1-17. Attaching the power cord
natural_image
Line drawing of a computer cable inserted into a port, showing ports with connectors and a cable (no text or symbols)- Turn the power ON with the power switch. The STATUS indicator on the control panel displays the warm-up symbol, which is two horizontal lines (- -). The warm-up symbol flashes to show that the printer is warming up. After about 45 seconds, the warm-up symbol stops flashing, meaning that the printer is ready to operate. The POWER, READY, and ON LINE indicators on the control panel should also be on.
8 Operating the Control Panel
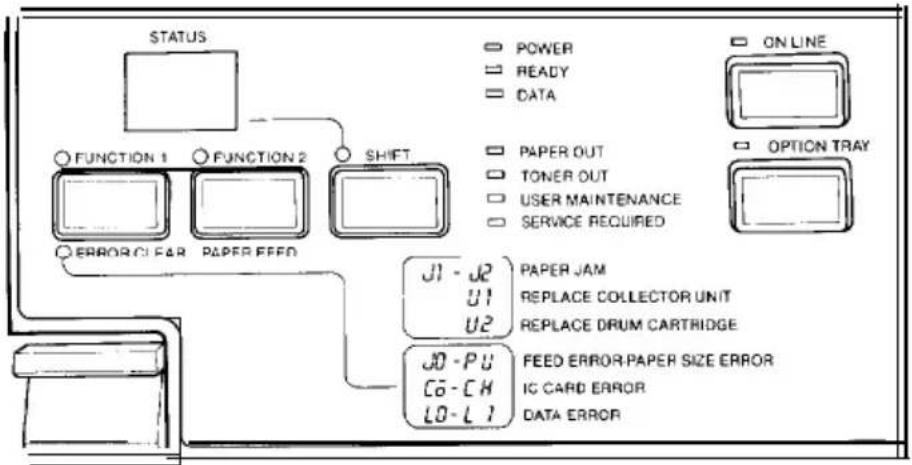
The GQ-3500 control panel (shown on the next page in Figure 1-18) has five buttons, nine indicator lights, and the STATUS indicator, an LED (Light-Emitting Diode) that can display two numbers or letters. The bottom half of the panel lists some of the common status messages and their meanings.
Figure 1-18. The control panel
flowchart
graph TD
    A["STATUS"] --> B["FUNCTION 1"]
    A --> C["FUNCTION 2"]
    A --> D["SHIFT"]
    B --> E["ERROR: clear"]
    C --> F["PAPER FEED"]
    D --> G["SHIFT"]
    H["POWER"] --> I["PAPER OUT"]
    J["READY"] --> K["TONER OUT"]
    L["DATA"] --> M["USER MAINTENANCE"]
    N["OPTION TRAY"] --> O["SERVICE REQUIRED"]
    P["J1 - JP"] --> Q["U1"]
    P --> R["U2"]
    S["PAPER JAM"] --> T["REPLACE COLLECTOR UNIT"]
    S --> U["REPLACE DRUM CARTRIDGE"]
    V["J0 - PU"] --> W["C0 - CH"]
    V --> X["L0 - L1"]
    Y["FEED ERROR-PAPER SIZE ERROR"] --> Z["IC CARD ERROR"]
    AA["DATA ERROR"] --> AB["DATA ERROR"]
From this panel you can control almost all the printer functions.
ON LINE
The ON LINE button switches the printer between the on line and off line states. In the on line state, the ON LINE light is on. This means that the printer can receive and print data (if the POWER and READY lights are also on).
In the off line state, the ON LINE light is not on, nor is the READY light on. In this state, you can enter the SelectType mode, as explained in Chapter 3.
FUNCTION I/ERROR CLEAR
This button has several uses:
• Clearing the printer to correct an error condition
• Continuing printing after clearing a paper jam.
- Entering the test mode and changing test patterns.
- Selecting functions in the SelecType mode.
FUNCTION 2/PAPER FEED
This button also has several uses:
- Printing out any data received and ejecting the paper.
. Feeding the paper during a printer self test. - Selecting details for each function in the SelecType mode.
Note
Because they have so many functions, these two buttons have two names each. This manual uses whichever name is appropriate to the operation being described. For example, the button on the left is called the ERROR CLEAR button when error messages are discussed, but it is called the FUNCTION 1 button when selecting functions in SelecType is described.
SHIFT
When the printer is off line, this button selects or cancels the SelecType mode, described in Chapter 3. This button also stops the printing of multiple copies when the printer is off line.
The Indicator Lights
In addition to the lights above the ON LINE and OPTION TRAY buttons, the printer has seven other indicator lights.
POWER — Indicates that the printer is turned on and receiving power.
READY — Lights when the printer is ready to receive data.
DATA — Flashes rapidly when data is being received from the host computer. When no data is being received, it flashes slowly. When the printer buffer is empty, the light is off.
PAPER OUT — Rashes when the paper tray is out of paper.
TONER OUT — Flashes when the toner drops below a certain level. This is an indication that you need to change the toner cartridge.
USER MAINTENANCE — This light indicates that the drum cartridge or the collector unit needs to be replaced. The STATUS display code tells you which one to replace. (See Chapter 5 for a full explanation.)
SERVICE REQUIRED - Flashes when certain printer malfunctions are detected. The STATUS display shows the code for the specific malfunction. See Chapter 5 for full information on SERVICE REQUIRED messages.
STATUS display
The STATUS display shows many different messages. Some common status message codes are shown on the control panel for easy reference.
| J1 - J2 | PAPER JAM |
| U1 | REPLACE COLLECTOR UNIT |
| U2 | REPLACE DRUM CARTRIDGE |
| JO - PU | FEED ERROR — PAPER SIZE ERROR |
| CO - CH | IC CARD ERROR |
| LO - L1 | DATA ERROR |
Each of these messages and what you need to do about it is discussed in this manual, and all of them are listed in Appendix B.
9 Running a Self Test
The GQ-3500 has two built-in self tests so that you can be sure the printer is working properly.
Before running a self test, see that the paper is loaded correctly and the power is OFF.
-
Hold down the FUNCTION 1 button while you turn the power on. Release the button when the warm-up symbol (--) begins to flash in the STATUS display. The warm-up symbol flashes until the printer is ready and then the message OC appears. Press the FUNCTION 1 button once again.
-
Press the FUNCTION 2 button to start the self test. The 1C message will flash until the page is ejected from the printer. You will see a sample of the printer's characters like this one:
!'"#8&'( )*+,-. /0123456789: ;<=>?@ABCDEFGHIJKLMNOPQRSTUVWXYZ!'"#8&'( )*+,-. /0123456789: ;<=>?@ABCDEFGHIJKLMNOPQRSTUVWXYZ!'"#8&'( )*+,-. /0123456789: ;<=>?@ABCDEFGHIJKLMNOPQRSTUVWXYZ!#8&'( )*+,-. /0123456789: ;<=>?@ABCDEFGHIJKLMNOPQRSTUVWXYZ!#8&'( )*+,-. /0123456789: ;<=>?@ABCDEFGHIJKLMNOPQRSTUVWXYZ!#8&'( )*+,-. /0123456789: ;<=>?@ABCDEFGHIJKLMNOPQRSTUVWXYZ!#8&'( )*+,-. /0123456789: ;<=>?@ABCDEFGHIJKLMNOPQRSTUVWXYZ!#8&'( )*+,-. /0123456789: ;<=>?@ABCDEFGHIJKLMNOPQRSTUVWXYZ!#8&'( )*+,-. /0123456789: ;<=>?@ABCDEFGHIJKLMNOPQRSTUVWXYZ!#8&'( )*+,-. /0123456789: ;<=>?@ABCDEFGHIJKLMNOPQRSTUVWXYZ!#8&'( )*+,-. /0123456788: ;<=>?@ABCDEFGHIJKLMNOPQRSTUVWXYZ!#8&'( )*+,-. /0123456789: ;<=>?@ABCDEFGHIJKLMNOPQRSTUVWXYZ!#8&'( )*+,-. /0123456789: ;<=>?@ABCDEFGHIJKLMNOPQRSTUVWXYZ!#8&'( )*+,-. /0123456789: ;<=>?@ABCDEFGHIJKLMNOPQRSTUVWXYZ!#8&'( )*+,-. /01234456789: ;<=>?@ABCDEFGHIJKLMNOPQRSTUVWXYZ!#8&'( )*+,-. /0123456789: ;<=>?@ABCDEFGHIJKLMNOPQRSTUVWXYZ!#8&'( )*+,-. /0123456789: ;<=>?@ABCDEFGHIJKLMNOPQRSTUVWXYZ!#8&'( )*+,-. /0123456789: ;<=>?@ABCDEFGHIJKLMNOPQRSTUVWXYZ!#$8&'( )*+,-.
- Press the FUNCTION 1 button to change to the other self test, which is indicated by OC on the STATUS display.
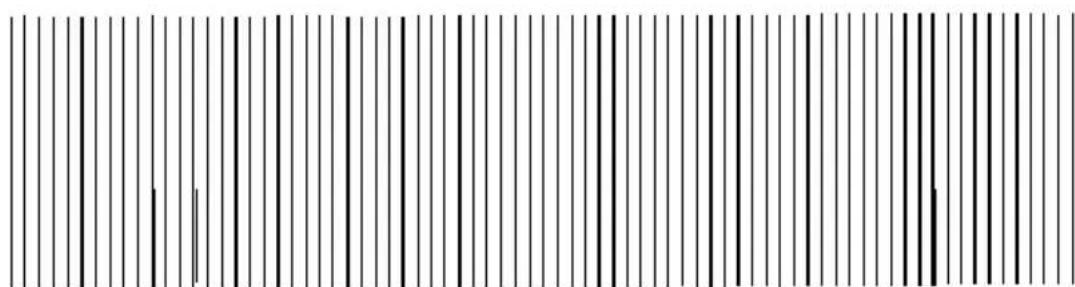
- Press the FUNCTION 2 button to start the second self test. The OC will flash until the page is elected from the printer. The test shows a pattern of lines like this:
text_image
Image displaying a series of vertical black lines on white background, resembling a barcode or data pattern.- Once you have seen that your printer is printing normally, turn the printer off.
The GQ-3500 comes equipped with a Centronics® compatible parallel interface. If your computer can communicate through a parallel interface, all you need is the proper shielded cable. If your computer requires a serial interface, see your dealer for the optional serial interface available for this printer. The serial interface contains its own instructions. If you don't know what kind of interface your computer requires, consult your dealer or your computer manual.
Starting Printing
Now that you have set up your GQ-3500 and tested it to make sure it is working properly, you need to do three things before you start printing:
- Set switches that change some of the printer's settings to suit your individual needs
. Connect the printer to your computer - Set up your application programs for the GQ-3500.
It is best to read this entire chapter before you begin changing switch settings.
Also, whether you are using a parallel or a serial interface, the DIP switches described in this chapter are the same.
Removing the Interface
Before you change any switch settings, you must remove the interface from the printer. This doesn't require any tools. Just follow these steps:
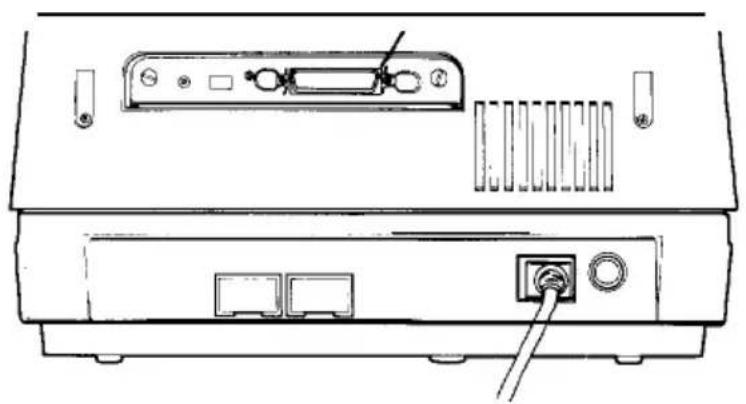
- Locate the interface on the back of the printer. Its position is shown in Figure 2-1.
Figure 2-1. Interface location
Interface board
natural_image
Technical line drawing of a CD-ROM rear panel with ports and connectors (no text or symbols)- Make sure that the power to the printer is turned off and that no cable is connected from the printer to the computer.
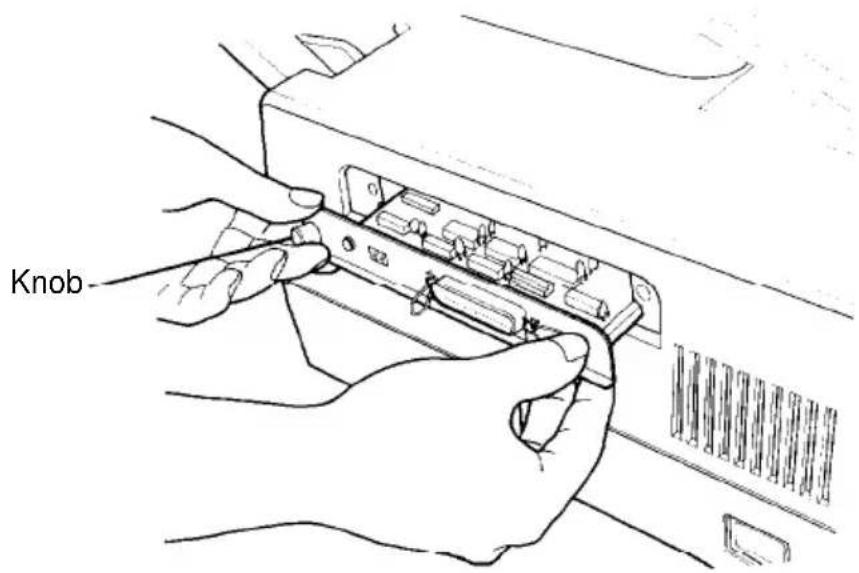
- Loosen the two knobs and pull the interface straight out as shown in Figure 2-2.
Figure 2-2. Removing the interface
text_image
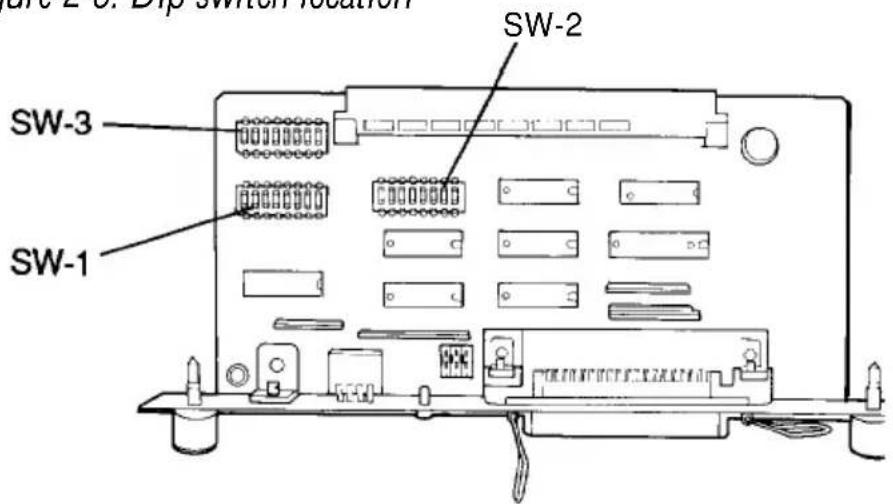
Knob-- Locate the switches on the interface board. The two groups of DIP switches (see Figure 2-3) are labeled SW 1 and SW 2. Each of the individual switches also has a small number, from 1 to 8. The individual switches are referred to by group and number: thus, the switch with the small number 4 in the group labeled SW 1 is called switch 1-4.
Figure 2-3. Dip switch location
text_image
SW-1 SW-2 SW-3Setting the DIP switches
Use the tip of a ballpoint pen or another small pointed object to turn the switches ON or OFF.
Setting Switches
This section first describes the main choices you have and then it tells you how to reset the appropriate switches.
Choosing an operating mode
The GQ-3500 has four operating modes:
Page printer-gives access to all the printer's capabilities, including such features as forms overlays, double-high and triple-high printing, and graphics primitives. (Chapter 6 contains full details.)
Epson LQ emulation - for use with an application program that requires you to use an Epson LQ printer.
Line printer- can be used for printing simple text or spreadsheets. It allows 66 lines with 136 columns on standard letter size paper, using a special character set with 13 characters per inch (cpi). The page printer mode, however, can also print this material. See Chapter 3 for instructions on using SelecType to put more characters on a page. To select an operating mode, set switches 1-1 and 1-2 as shown in Table 2-1.
IC card-allows the use of optional IC cards that provide other operating modes. If you buy an optional IC card, you receive full instructions with it.
If you are not sure which mode to use, use the page printer mode and see whether the GQ-3500 prints properly with your application programs.
To select an operating mode, set switches 1-1 and 1-2 as shown in Table 2-1.
Table 2-1. Settings for operating mode
| 1 - 1 | 1 - 2 | |
| Page Printer | OFF | OFF |
| LQ Emulation | OFF | ON |
| Line Printer | ON | OFF |
| IC Card | ON | ON |
Automatic reprint when paper jams
When a paper jam occurs, the page being printed is sometimes spoiled. If switch 1-3 is ON, the printer automatically reprints pages that jam. If this switch is OFF, the jammed page is not reprinted. Setting this switch ON may slow the printing speed because the printer's memory buffer retains the data describing the page being printed until it has finished printing it.
Non-printable codes
Switch 1-4 controls what the printer does with codes that it receives but does not recognize as a printing character. If this switch is ON, a space character is substituted for the unknown code to leave space in the line for you to put the character in manually. If this switch is OFF, the unrecognized code is just ignored and no space is left.
Automatic line feed
When switch 1-5 is ON, the printer adds a line feed to each carriage return; when it is OFF, it does not. If your printing has an extra space between lines, turn this switch OFF. If your printed lines are on top of each other, turn this switch ON.
Automatic carriage return
When switch 1-6 is ON the printer starts a new line (by inserting a carriage return and line feed) if it receives a line that extends past the right margin. If this switch is OFF, any characters that don't fit on a line are discarded.
Automatic form feed
When switch 1-7 is ON, the printer starts a new page if it receives more lines than will fit on the current page. If this switch is OFF, the printer will not start a new page until it receives a form feed code.
Beeper
When switch 1-8 is ON, the beeper tells you of errors and signals sent by the computer. You can silence the printer's beeper by turning this switch OFF.
Page orientation
Most printing is done in the portrait (vertical) orientation. Set switch 2-1 OFF for portrait, ON for landscape (horizontal) orientation.
Paper size
The GQ-3500 offers several possible paper size settings: letter (8-1/2" x 11"), legal (8-1/2" x 14"), half letter (8-1/2" x 5-1/2"), and three metric sizes: A4, A5, and B5. Set the switches for the size you will use most often and use SelecType (described in Chapter 3) to change to another size if necessary.
To select the paper size, set switches 2-2, 2-3, and 2-4 as shown in the tablebelow. --
Table 2-2. Settings for paper size
| 2 - 2 | 2 - 3 | 2 - 4 | |
| Letter | ON | OFF | ON |
| Legal | ON | ON | ON |
| Half Letter | OFF | ON | ON |
| A4 | ON | OFF | OFF |
| A5 | OFF | ON | OFF |
| B5 | OFF | OFF | ON |
| Other | OFF | OFF | OFF |
Use other for envelopes and other paper sizes not shown.
International character sets
Switches 2-5, 2-6, 2-7, 2-8 allow you to print characters used in many languages. Table 2-3 shows the international characters available, and Table 2-4 shows the DIP switch settings you use to select these characters. You can also select international characters with a software command, ESC R. See the Command Summary for details.
Table 2-3. International characters
| 35 | 36 | 64 | 91 | 92 | 93 | 94 | 96 | 123 | 124 | 125 | 126 | |
| USA | # | @ | [ | \ | ] | ^ | ` | | | ~ | |||
| France | # | à | ` | ç | S | ^ | ` | é | ù | è | .. | |
| Germany | # | S | Ä | Ö | Ü | ^ | ` | ä | ö | ü | β | |
| UK | £ | @ | [ | \ | ] | ^ | ` | { | | | } | ~ | |
| Denmark | # | @ | Æ | ∅ | Å | ^ | ` | æ | ø | å | ~ | |
| Sweden | # | ¤ | É | Ä | Ö | Å | Ü | é | ä | ö | å | ü |
| Italy | # | @ | ` | \ | é | ^ | ù | à | ò | è | ì | |
| Spain | Pt | @ | i | Ñ | ¿ | ^ | ` | .. | ñ | ~ | ||
| Japan | # | @ | [ | ¥ | ] | ^ | ` | { | | | } | ~ |
Note: At the top of each column is the decimal code for that character.
Table 2-4. International character sets
| Country 2-5 | 2-6 | 2-7 | 2-8 | ||
| USA OFFFrance ONGermanyUKDenmark OFFSweden ONItalySpainJapan OFF | OFFONOFFON | OFF OFFOFFONOFFONONOFF | OFF OFFOFFOFFOFFONOFFONONOFF | OFF OFFOFFOFFOFFOFFOFFOFFOFFOFFOFFOFFOFFOFFOFFOFFOFFOFFOFFOFFOFFOFFOFFOFFOFFOFFOFFOFFOFFOFFOFFOFFOFFOFFOFFOFFOFFOFFOFFOFFOFFOFFOFFOFFOFFOFFOFFOFFOFFOFFOFFOFFOFFOFFOFFOFFOFFOFFOFFOFFOFFOFFOFFOFFOFFOFFOFFOFFOFFOFFOFFOFFOFFOFFOFFOFFOFFOFFOFFOFFOFFOFFOFFOFFOFFOFFOFFOFFOFFOFFOFFOFFOFFOFFOFFOFFOFFOFFOFFOFFOFFOFFFFFFFFFFFFFFFFFFFFFFFFFFFFFFFFFFFFFFFFFFFFFFFFFFFFFFFFFFFFFFFFFFFFFFFFFFFFFFFFFFFFFFFFFFFFFFFFFFFFFFFFFFFFFFFFFFFFFFFFFFFFFFFFFFFFFFFFFFFFFFFFFFFFFFFFFFFFFFFFFFFFFFFFFFFFFFFFFFFFFFFFFFFFFFFFFFFFFFFFFFFFFFFFFFFFFFFFFFFFFFFFFFFFFFFFFFFFFFFFFFFFFFFFFFFFFFFFFFFFFFFFFFFFFFFFFFFFFFFFFFFFFFFFFFFFFFFFFFFFFFFFFFFFFFFFFFFFFFFFFFFFFFFFFFFFFFFFFFFFFFFFFFFFFFFFFFFFFFFFFFFFFFFFFFFFFFFFFFFFFFFFFFFFFFFFFFFFFFFFFFFFFFFFF | |
Replacing the interface board
When you've made the desired changes to DIP switch settings, reinstall the interface board.
- Slide the card into the slot in the back of the printer until it is flush with the printer casing.
- Tighten the two knobs that hold the board in place.
Connecting the Printer to a Computer
If you are using the GQ-3500's standard parallel interface, you must use a shielded cable suitable for a Centronics compatible interface.
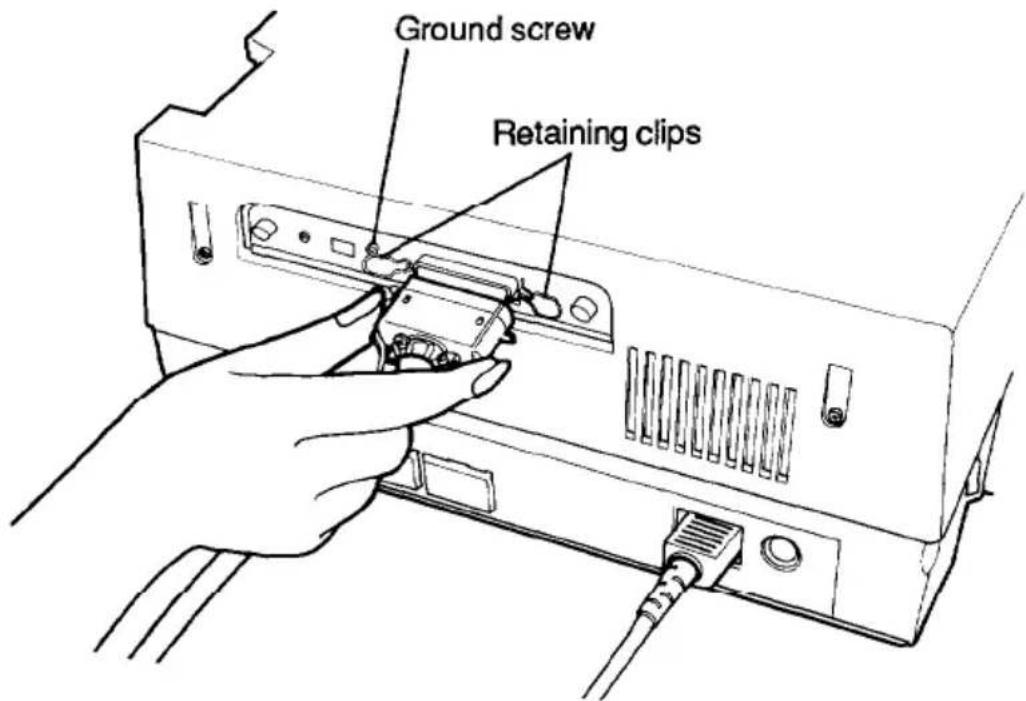
- Be sure that the power to both the computer and printer are turned OFF. Plug the connector into the printer as shown in Figure 2-4.
- Snap the retaining clips into place.
Figure 2-4. Connecting the interface cable
text_image
Ground screw Retaining clipsSome parallel cables have a ground wire. Connect this wire to the ground screw on the printer to protect data from interference. Then plug the other end of the cable into the computer and connect the ground wire on the computer end of the cable if it has one.
If you have purchased an optional serial interface, consult the instructions packaged with it for specific information regarding the type of cable required.
Note
Paper size and operating mode are the two most important settings you can make with DIP switches. Also, additional settings for the parallel interface are described in Appendix F and for the serial interface in the instructions packaged with the serial interface.
Using the GQ-3500 with Application Programs
Now that you've set up and tested the printer, you need to start using it with your application programs. Doing this is basically a five-step process:
- Set the DIP switches as described in the previous section so that the GQ-3500 is in the page printer mode.
- Check the installation or setup procedure for your application program. See if it has a printer selection menu (a list of printers to choose from).
- Choose GQ-3500 from the printer selection menu.
- If GQ-3500 is not listed in the printer selection menu, choose Epson printer instead.
Important
If your application program does not list the GQ-3500, contact the manufacturer and ask for an update with the GQ-3500 on the menu.
- Print a sample document or file that is like the ones you will usually print on the GQ-3500.
Now look at the sample you printed. See if there are any problems.
If your printing is not correct and your application program does not have the GQ-3500 in its menu (especially if it includes graphics), set the DIP switches for the Epson LQ emulation mode and choose an Epson LQ on the printer selection menu. Then your printing should be correct.
Note
The GQ-3500 will not print italics in any operating mode unless an italic or oblique font is available (from a font card or a user-defined font), and because of the high resolution of the GQ-3500, the LQ mode may slightly change the aspect ratio of some graphics.
Putting printer codes in documents
Some programs provide a way of placing complete printer commands in the text. These commands may or may not be visible on your screen. This method has the advantage of allowing you to use any printer command, not just a limited set. To make use of it, however, you need to understand how to use the printer's commands.
Check the manual for your application program to see if you can place printer commands in your text. If this is possible, use the Command Summary (Appendix A) in this manual to find the command, and use the manual for your word processor to find how to assign the command.
SelecType
The GQ-3500 has a feature on the control panel that gives you control over many printer features. With a touch of a button you can change features such as the font, line spacing, page orientation, and the number of copies to print.
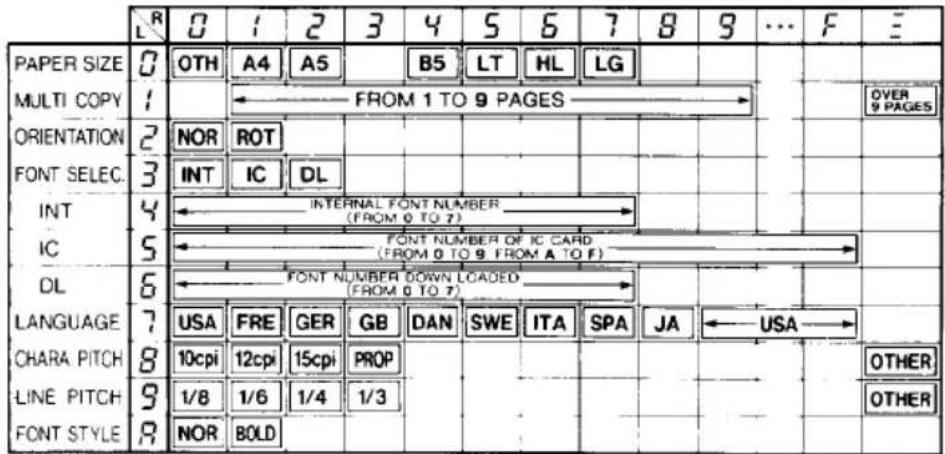
The function sticker (shown below) that you applied to the top of the printer shows the functions and options you can select with SelectType.
FUNCTION TABLE
PAGE PRINTER MODE
text_image
PAPER SIZE MULTI COPY ORIENTATION FONT SELEC. INT IC DL LANGUAGE CHARA PITCH LINE PITCH FONT STYLE 0 7 2 3 4 5 6 7 8 9 ... F 0 OTH OTH A4 A5 B5 LT HL LG FROM 1 TO 9 PAGES NOR ROT INT IC DL INTERNAL FONT NUMBER (FROM 0 TO 7) FONT NUMBER OF IC CARD (FROM 0 TO 9 FROM A TO F) FONT NUMBER DOWN LOADED (FROM 0 TO 7) USA FRE GER GB DAN SWE ITA SPA JA ←→ USA←→ 10cpi 12cpi 15cpi PROP 1/8 1/6 1/4 1/3 NOR BOLDThe SelectType mode lets you choose among the various printing options. Once you have changed an option, the printer remembers it until you turn the power off, and you can make one or more changes at a time.
Entering SelectType Mode
To enter SelectType, follow these steps:
- Make sure that the printer is off line. If the ON LINE light is on, press the ON LINE button to set the printer off line.
-
If the DATA light is flashing, press the PAPER FEED button to print the information that is still in the printer's buffer.
-
Press the SHIFT button once. The status indicator on the control panel displays a blinking dot to show that the printer is in SelecType mode.
In the SelecType mode, the left character in the STATUS indicator indicates the function and the right character indicates an option within that function.
If you have set your DIP switches for letter size paper, the STATUS indicator displays 05 when you first enter SelecType. As you can see on the function table, function 0 is paper size and option 5 is letter (LT). The 05, therefore, indicates that letter size paper has been selected.
Selecting functions
When you are in SelecType, the FUNCTION 1 button selects functions and the FUNCTION 2 button selects the options.
To select functions and options in SelecType, follow these steps:
- Press the FUNCTION 1 button to select the function you want. Each time you press the button, you advance the left character by one digit, from 0 through 9 to A and then back to 0 again. As the function selections change, the option settings change to reflect the different options in effect for the different functions.
Don't worry if you pass the selection you want. Just keep pressing the button until it comes up again. If you hold down the FUNCTION 1 button, the digits keep changing until you let it up.
- After you have selected the function you want, press the FUNCTION 2 button to select an option within that function. Options that are not possible are not displayed in the status indicator.
When an option selected by software is not available in SelecType for the current function, the right position displays three horizontal bars (3) instead of a number or letter. For example, if a software command has set the printer for ten copies and you select function 1 (MULTI COPY), the three bars display on the status indicator because 1 through 9 are the only options for this function in SelecType.
- After selecting the option you want, either exit SelecType or press the FUNCTION 1 button again to move to the next function. Repeat these steps until you have selected all the options you need.
Exiting SelectType mode
To exit SelecType mode, press the SHIFT button. The blinking dot at the bottom of the status indicator goes out. The printer remembers your selections until the power is turned off or until you change them.
Note
These settings override your DIP switch settings and they can be overridden by software commands.
SelectType Functions and Options
The SelecType functions and their options are described below.
Function 0: Paper Size
Selects the size of the paper you are using. Using a paper size different from your selection results in a PU error.
| Option | Description |
| 0 | Other -Use this setting when your paper doesn't match any of the paper size options. |
| 1 | A4 - 210mm x 297mm |
| 2 | A5 - 148mm x 210mm |
| 4 | B5 - 182mm x 257mm |
| 5 | Letter - 8-l /2" x 11" |
| 6 | Half Letter - 5-l /2" x 8-1/2" |
| 7 | Legal - 8-l /2" x 14" |
Function 1: Number of Copies
Selects single or multiple copies (up to 9). If more than 9 copies have been selected by a software command, the option position displays three horizontal bars.
| Option | Description |
| 1-9 | Number of copies of each page to print |
Function 2: Orientation
Prints in either portrait (vertical) or landscape (horizontal) orientation.
option Description
0 NOR (normal), which is also called portrait orientation 1 ROT (rotated), which is also called landscape orientation
Function 3: Font Selection
Selects the source of fonts as internal, IC card, or download. After setting this function, you can select an individual font with functions 4, 5 or 6.
Remember that these can also be selected by software commands.
| Option | Description |
| 0 | Internal (built-in) fonts |
| 1 | IC card fonts |
| 2 | Download fonts |
Function 4: Internal Fonts
Selects one of the internal fonts. (This is valid only if option 0 for function 3 has been selected.)
| Option | Description |
| 0 | Courier 10 (portrait) |
| 1 | Courier 10 (landscape) |
| 2 | EDP 13 (portrait) |
| 3 | EDP 13 (landscape) |
| 4 | Modem PS (portrait) |
| 5 | Extended graphics (portrait) |
| 6 | Extended graphics (landscape) |
Function 5: IC Card Font
Selects one of 16 fonts from IC cards. (Function 3, Option 1 must first be selected.)
| Option | Description |
| 0-9 | Selects an IC Card font numbered from 0-9 |
| A-F | Selects an IC Card font numbered from 10-15 |
Function 6: Download Font
Selects one of up to 8 user-defined fonts that can be downloaded to the GQ-3500 (function 3, option 2 must first be selected).
Option Description
0-7 Selects a user-defined font numbered from 0 - 7
Function 7: Language
Selects between 9 different language character sets. There are 12 characters that change depending on the country you choose. (See Appendix D.)
| Option | Description |
| 0 | USA |
| 1 | France |
| 2 | Germany |
| 3 | United Kingdom |
| 4 | Denmark |
| 5 | Sweden |
| 6 | Italy |
| 7 | Spain |
| 8 | Japan |
| 9-F | USA |
Function 8: Character Pitch
Selects the character spacing. If a character pitch that is not one of the four options has been selected by a software command, the option position displays three horizontal bars.
| Option | Description |
| 0 | 10 characters per inch |
| 1 | 12 characters per inch |
| 2 | 15 characters per inch |
| 3 | proportional character spacing |
Function 9: Line Spacing
Sets the number of printed lines per inch. If a line spacing that is not one of the four options has been selected by a software command, the option position displays three horizontal bars.
| Option | Description |
| 0 | 1 /8" line spacing |
| 1 | 1/6" line spacing |
| 2 | 1/4" line spacing |
| 3 | 1/3" line spacing |
Function A: Font Style
Selects either normal or bold printing.
| Option | Description |
| 0 | Normal characters |
| 1 | Bold characters |
SelectType with DIP Switches or Software Commands
You can select many of the options available with SelecType by software commands (see Appendix A) or DIP switches (see Appendix 0. The settings displayed in the status indicator when you are in SelecType are the ones currently in effect, whether set by SelecType, DIP switch, or software command.
The list below explains the relationship between settings made by DIP switches, SelectType, and software commands.
- DIP switch settings are in effect from the time the printer is turned on until they are changed by a SelecType setting or software command.
- SelecType settings are in effect from the time they are made until the printer is turned off or they are changed by software commands or new SelecType settings.
- Software settings are in effect from the time they are made until they are changed by SelecType or another software command or the printer is turned off.
Using Optional IC Cards
Optional IC cards may be bought separately from your Epson dealer. Instructions for their use are packaged with them.
Paper
With the GQ-3500 you can print on many different sizes and types of paper. The printer feeds most types automatically from the paper tray, while special ones -such as envelopes, labels, and overhead projector transparencies - should be fed individually for greater control. This chapter describes the paper delivery choices and how to select and load paper.
Paper Delivery Choices
The GQ-3500 can deliver paper facedown on top of the printer or face-up on the face-up output tray. The advantage of the printer stacking the pages face-down is that they are stacked in the same order in which they are printed.
The face-up delivery tray is necessary for printing envelopes and overhead transparencies. It also gives you immediate viewing of your output so you can see right away if a mistake in your file is causing incorrect printing.
In Chapter 1 you used only the facedown delivery. Now you can decide whether you want to install the face-up delivery tray. Even if you do install it, you can still use either choice simply by changing the paper path selector.
Installing the face-up tray
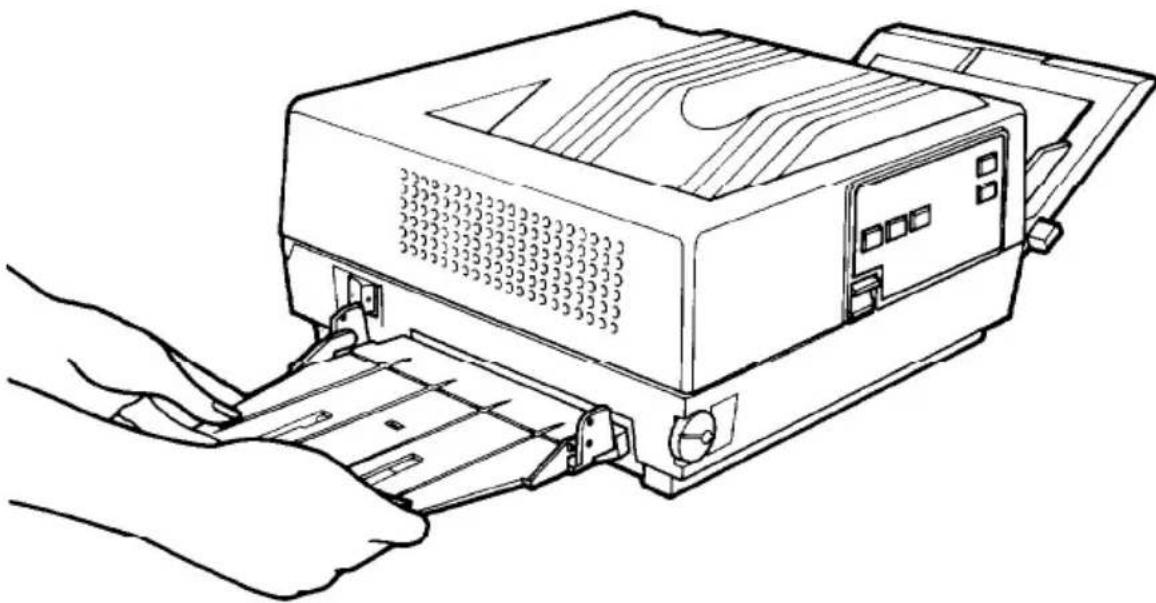
Installing the face-up tray is easy. Simply hold it in the position shown on the next page in Figure 4-1. Then fit the edge of the tray over the tab on the printer. That's it.
When you are not using the tray, you can leave it on the printer but raise it to the vertical position.
Figure 4-1. Installing the face-up tray
natural_image
Line drawing of a printer with hands operating it, showing internal components and paper binding (no text or symbols)Types of Paper
Plain paper-The GQ-3500 automatically feeds 16- to 24-pound paper. This encompasses the normal papers found in an office, such as copier paper, memo sheets, and letterheads.
If you hand-feed the paper or load it one sheet at a tune through the paper tray, you can use 16- to 34-pound paper.
Special paper -You can use colored or three-hole punched paper in the GQ-3500 as long as it meets the weight limits given above.
Labels - Labels designed for plain paper copiers can be used in the GQ-3500. Various sizes and styles of labels are available.
Envelopes - Normal envelopes can be hand-fed or fed one at a time through the paper tray with the GQ-3500. Envelopes should be ejected face-up into the faceup output tray.
Other materials -You can use overhead projector transparencies and adhesive drafting film if they are made for use with plain-paper copiers. These materials should be ejected face-up.
Considerations in Selecting Paper
The paper that you use with your GQ-3500 affects the quality of your printed output. The printed image is made up of many tiny dots of toner that are transferred to the paper.
If the paper is rough, the edges of the letters become ragged because some of the dots fall into indentations on the paper, while others fall on the ridges. Therefore, the print quality will not be as good as that produced on a smooth paper. In fact, the smoother the paper you use, the better your printing will look.
Papers made expressly for plain-paper copiers are a good choice. Xerox 4024 is a good quality, relatively smooth, and readily available paper to use.
You should use especially smooth paper for printing originals when you plan to make reproductions. Because reproduction introduces its own raggedness to the edges of the letters, you will want to start with the best original possible.
If you use letterhead or three-hole punched paper, be sure to load it face-up, with the top of the paper at the bottom of the input tray.
Some letterheads use inks or dyes that may smear or come off when subjected to the high temperature of the fusing unit. Try a few sheets before you print large jobs on letterhead or other special paper.
Sizes of Paper
The GQ-3500 is set up to feed six different sizes of paper automatically. These sizes are marked on the paper tray for your convenience.
Table 4-1. Standard paper sizes
| Size | Dimensions |
| Letter | 8-1/2" x 11" |
| Legal | 8-1/2" x 14 |
| Half Letter | 5-1 /2" x 8-1 /2 |
| A4 (metric) | 21 Omm x 297mm |
| A5 (metric) | 148mm x 21 Omm |
| B5 (metric) | 182mm x 257mm |
Choosing a Standard Paper Size
You will probably use one paper size most of the time. For your convenience, set the DIP switches (described in Chapter 2) so that the GQ-3500 starts out ready for your usual paper size.
When you change the size of paper in the paper tray, use SelecType to select the new paper size, as described in Chapter 3. All of the paper sizes listed in Table 4-1 are on the control panel menu, as well as a size called other. Select other if you are using an unusual paper size, such as that for envelopes.
Loading the Paper Tray
The paper feed tray holds up to 150 sheets of paper. Follow the instructions in Step 6 in Chapter 1 to load paper in the tray.
If you have changed the paper size, select the new paper size from the control panel with SelecType, as described in Chapter 3.
Hand-Feeding Paper
If you want to print envelopes, labels, heavy paper, or other special papers, you must hand-feed them or feed them one at a time through the paper tray. Hand-feeding special papers or envelopes is easy with the GQ-3500. You do not have to remove the paper in the paper tray; just follow these steps:
- If necessary, use SelecType to select the new paper size as described in Chapter 3. If you are not using a standard size, select other from the menu.
- Push the paper set lever down.
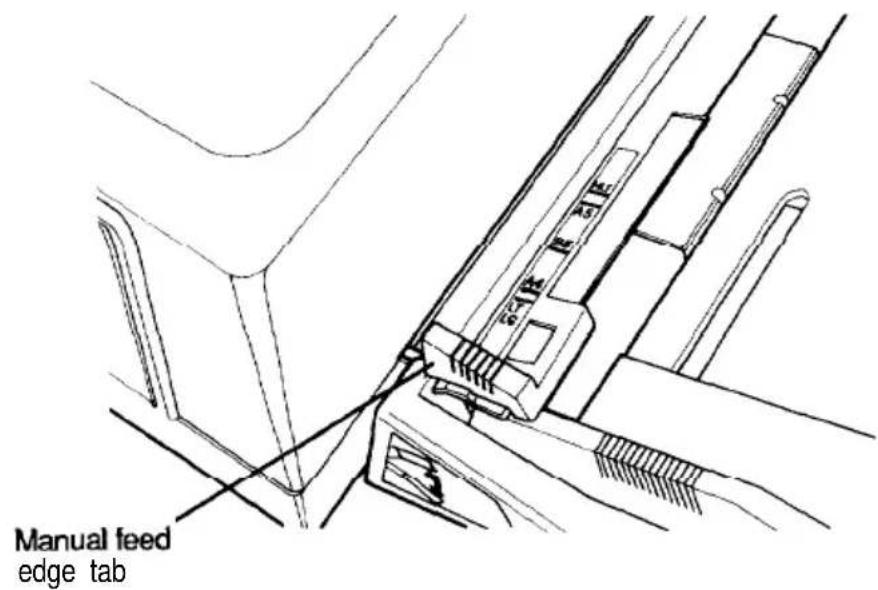
- Set the manual feed edge tab to the size of paper that you are using. (See Figure 4-2.)
Figure 4-2. Manual paper feed guide
text_image
Manual feed edge tab- Insert a sheet of paper into the manual feed slot.
- Raise the paper set lever.
- Print the page.
Clearing Paper Jams
Clearing paper jams is easy. There are three types of paper jams, and the GQ-3500 lets you know which kind is occurring by displaying a special code (J0, J1, or J2) on the status indicator. Pages 5-4 through 5-7 tell you how to clear the jams.
Maintenance and Status Messages
The GQ-3500 STATUS indicator messages tell you if some condition exists that may interfere with your printing. You can correct most of these conditions by maintaining your printer as suggested and by following the simple instructions below.
Status Messages
Status messages are two-digit codes shown on the LED status indicator on the control panel. Some of these messages display in conjunction with indicator lights.
The status messages described in this chapter indicate those conditions that you can easily correct, as well as more serious conditions that require a call to a service technician. The status messages are:
-
- Indicates that the printer is warming up. While the printer is warming up, input data may be received and the printer may be set off line or on line.
. Indicates that the GQ-3500 is in SelecType mode (described in Chapter 3). To exit SelecType mode, press the SHIFT button.
- Indicates that the printer is warming up. While the printer is warming up, input data may be received and the printer may be set off line or on line.
99 When printing is in progress, the STATUS indicator performs a countdown and displays to the user the number of copies left to be printed out. (The number shown here is an example.) To cancel printout of remaining copies, set the printer off line and press the SHIFT button. The indicator stops flashing if a jam occurs.
OC Indicates that the GQ-3500 is in test mode (described in Chapter 1). To exit test mode, press the ON LINE button.
1C Same as UC, except that it prints a character test pattern instead of a vertical line test pattern.
CH IC card problem. The procedure to follow is described in the IC Card Status Messages section of this chapter.
Cō IC card problem. The procedure to follow is described in the IC Card Status Messages section of this chapter.
dō Door open. Indicates that the printer case is open. Close the cover, and the printer will begin warming up again.
E17 In conjunction with a flashing SERVICE REQUIRED light, this indicates an error requiring a service call. The procedure to follow is described in the Service Maintenance section of this chapter.
E1 In conjunction with a flashing SERVICE REQUIRED light, this indicates an error that may require a service call. The procedure to follow is described in the Service Maintenance section of this chapter.
J0 Paper feed jam. See the Paper Status Messages section of this chapter.
J1 Paper transport jam. See the Paper Status Messages section of this chapter.
J2 Paper exit jam. See the Paper Status Messages section of this chapter.
LO Indicates input buffer overflow; the overflow characters will be lost. To clear the condition, press the ERROR CLEAR button.
L1 Page composition error; some characters may be lost. To clear the condition, press the ERROR CLEAR button.
PF When the printer is off line and the DATA light is flashing the printer prints the received data when the PAPER FEED button is pressed. This status message is displayed while the printer is printing in this way.
Pō In conjunction with a flashing PAPER OUT light, indicates paper out. Add paper according to the instructions in Chapter 4. Make sure that the paper tray is fully inserted and that the paper set lever is raised. After you correct the condition, printing resumes; no data is lost.
PU Paper size being used is different from the paper size selected. See the Paper Status Messages section of this chapter.
Γo In conjunction with a flashing TONER OUT light, this indicates toner out. See the User Maintenance section of this chapter.
U1 In conjunction with a USER MAINTENANCE light, this indicates that the collector unit and lens shield should be replaced. See the User Maintenance section of this chapter.
U2 In conjunction with a USER MAINTENANCE light, this indicates that the drum cartridge and lens shield should be replaced. See the User Maintenance section of this chapter.
IC Card Status Messages
CH: IC card problem
Indicates one of the following IC card problems. To correct the problem, first make sure the ON LINE indicator light is off. Then correct as described below and press the ERROR CLEAR button. (For more information, see the instructions packaged with the IC card.)
- IC card installed only in slot B, or identity card installed in slot B. Put the IC card in slot A.
- IC card is unreadable. Clean the gold connectors (contacts) and the IC card socket, or use a different card.
Cō: IC card problem
Indicates that the total IC card capacity exceeds 2M bytes, or that the total number of font card fonts is greater than 16. Change the
combination of IC cards installed, then press the ERROR CLEAR button. (For more information, see the instructions packaged with the IC card.)
Paper Status Messages
All of these messages indicate conditions that are easy to correct. Simply follow the instructions below.
J0: paper feed jam
When the GQ-3500 has trouble feeding paper from the paper tray, the panel displays this code. To clear this jam, follow these steps:
- Check to see that the paper set lever was not accidentally left in the down position.
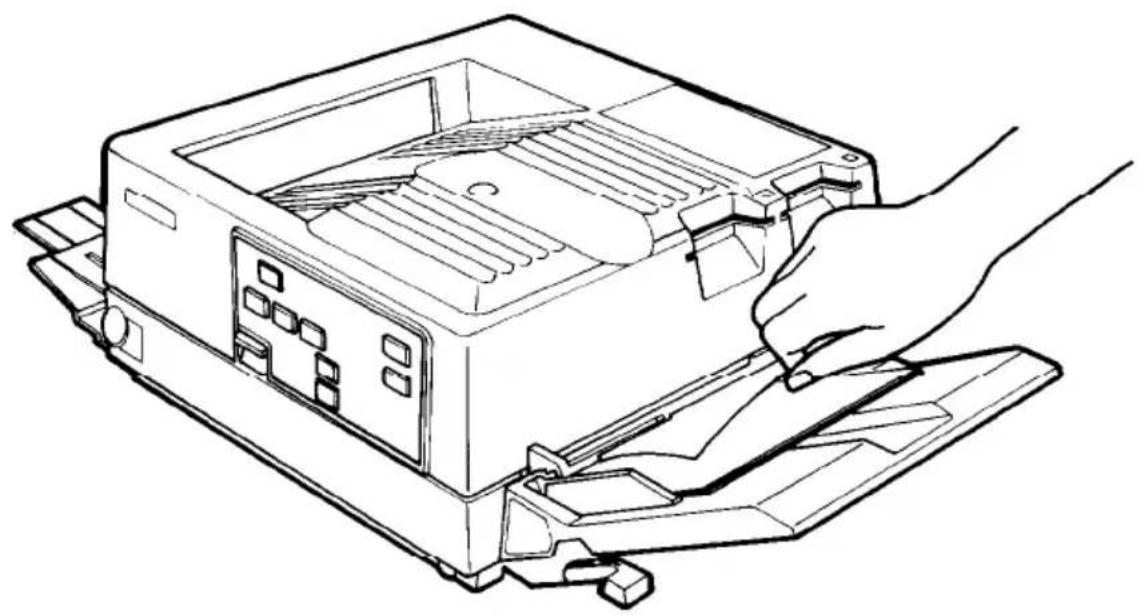
- If the lever is correctly positioned, clear the jam by pressing the paper set lever down and removing all sheets that have fed part of the way into the printer. (See Figure 5-1.)
Figure 5-1. Clearing a paper feed jam
natural_image
Line drawing of a computer tower with a hand inserting a component (no text or symbols)- Raise the paper set lever and continue printing by pressing the ERROR CLEAR button.
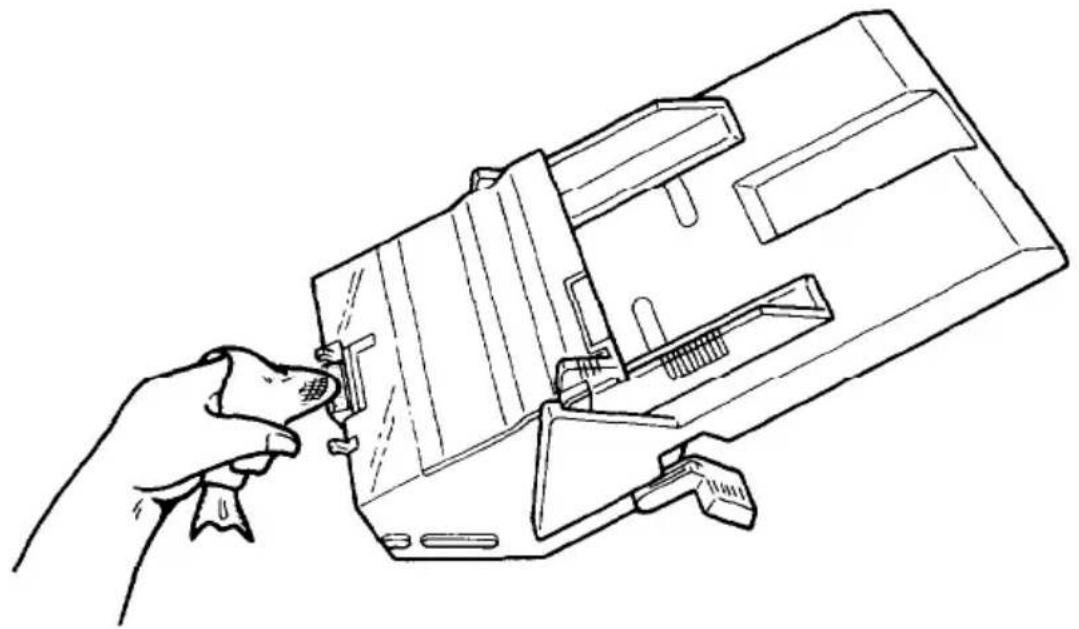
If there are frequent paper feed jams, clean the cork pads located on the side of the paper tray that fits into the printer. Use a damp cloth to wipe dust and paper fiber off the cork pads. Allow the cork pads to dry before using the tray. (See Figure 5-2.)
Figure 5-2. Cleaning paper tray pads
natural_image
Line drawing of a hand inserting a component into a device housing (no text or symbols)J1: paper transport jam
When paper jams in the transport section, the panel displays this code. To clear this jam, follow these steps:
- Open the printer using the latch on the front of the printer.
WARNING
Opening the printer exposes the fusing unit, which is marked by a CAUTION: HOT SURFACE label. Be careful not to touch the fusing unit.
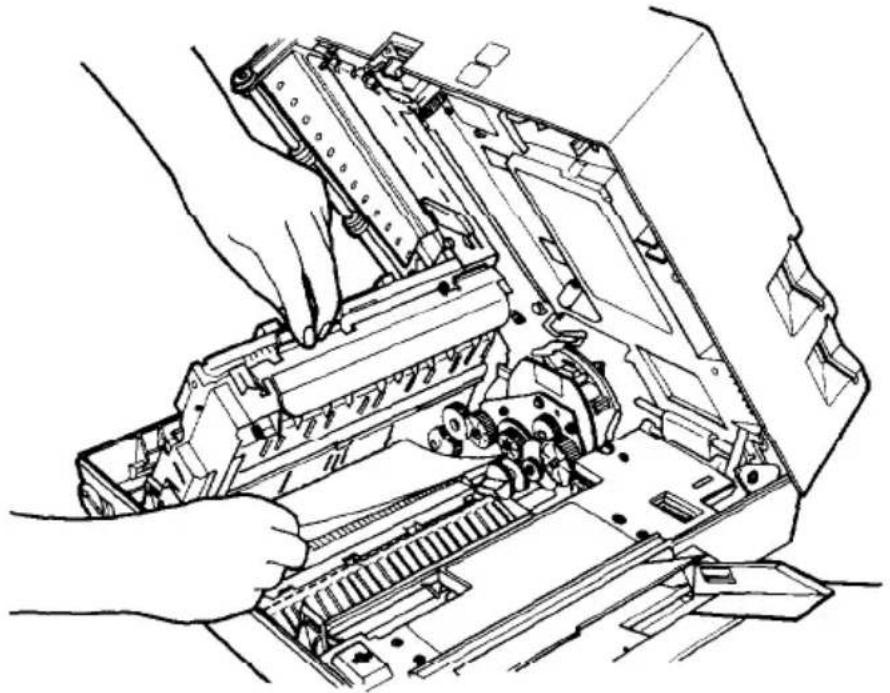
- Use the blue handle on the right side of the processing unit to lift the processing unit. (See Figure 5-3.)
Figure 5-3. Clearing a paper transport jam
natural_image
Technical line drawing of hands assembling or inspecting a mechanical device (no text or symbols visible)- Gently remove the jammed paper.
- Lower the processing unit back to its original position and press the two comers marked by blue stickers to lock the processing unit in place (avoid pressing directly on the toner cartridge).
- Close the case and resume printing when the printer has warmed up.
J2: paper exit jam
When paper jams as it is leaving the printer, the panel displays this code. To clear this jam, follow these steps:
- Open the printer using the latch on the front of the printer.
WARNING
Opening the printer exposes the fusing unit, which is marked by a CAUTION: HOT SURFACE label. Be careful not to touch the fusing unit.
-
Lift the processing unit using the blue handle on the right side. (See Figure 5-3 above.)
-
Gently remove the jammed paper from the area of the exit rollers.
- Lower the processing unit back to its original position and press the two comers marked by blue stickers to lock the processing unit in place (avoid pressing directly on the toner cartridge).
- Close the case.
- Resume printing when the printer has warmed up.
PU: paper mismatch
This status message occurs when you have selected one paper size (from the control panel, by software, or by DIP switch) and are attempting to feed a different size paper through the printer. To correct the problem, set the printer off line, press the ERROR CLEAR button, and set the correct paper size with SelecType. After the paper mismatch error is cleared, the printer may still have data in the buffer (the DATA light will flash in this case). Press the PAPER FEED button to force printing thus clearing the buffer.
User Maintenance
Three messages indicate a need for routine maintenance. These conditions can be corrected by following the instructions below. Consult your Epson dealer for any necessary replacement parts and supplies.
rō: toner out
The toner cartridge supplied with your GQ-3500 should last for about 800 pages. Replacement cartridges contain enough toner for approximately 1500 pages.
When the toner runs out, the TONER OUT light begins flashing and the status display shows rδ. The printer stops after ejecting the page being printed. When this occurs, replace the toner cartridge as follows:
- Open the printer by releasing the latch on the front of the printer.
WARNING
Opening the printer exposes the fusing unit, which is marked by a CAUTION: HOT SURFACE label. Be careful not to touch the fusing unit.
- Tap lightly on the comers and edges of the used cartridge. Toner may have gathered along these edges and should be leveled before the cartridge is removed.
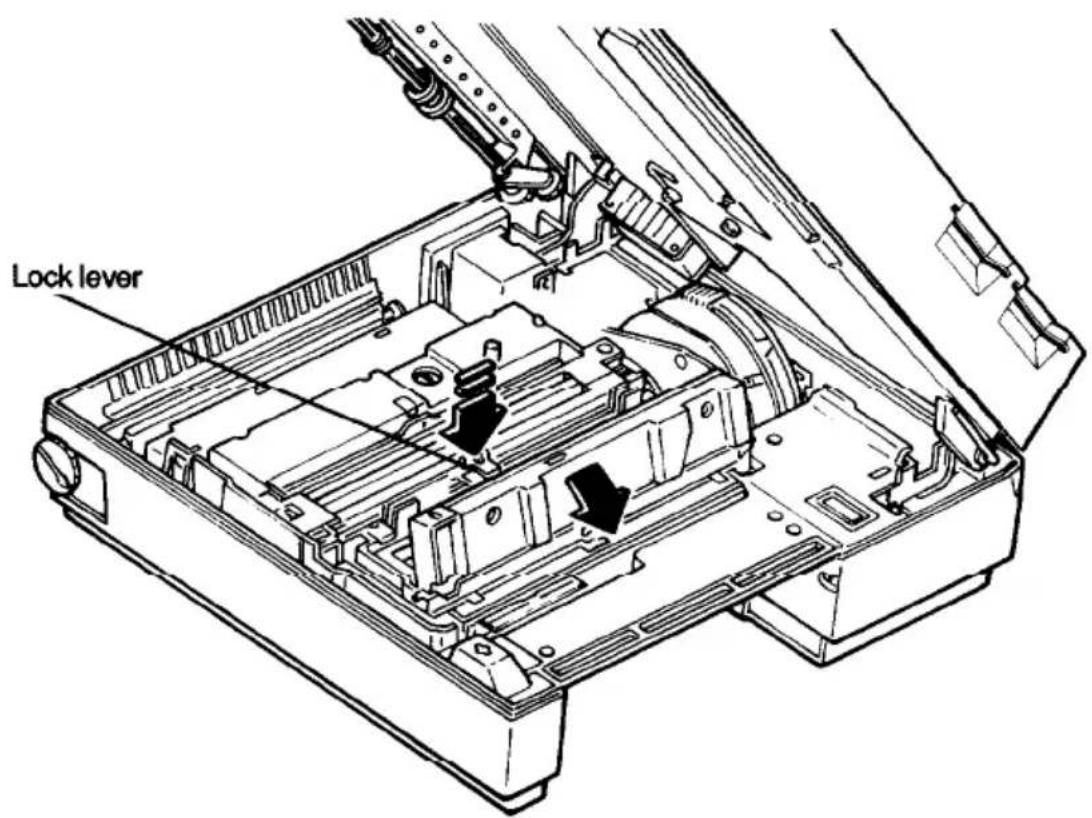
- Press down on the green toner cartridge lock lever and lift up the left side of the toner cartridge, rotating it in the direction of the arrow on the right in Figure 5-4. Remove the cartridge.
Figure 5-4. Removing toner cartridge
text_image
Lock lever- Take the toner cartridge out of its box. Remove the take-up handle from the top of the cartridge. (Note: The end of the cartridge with the take-up handle on it is the front of the cartridge.)
- Shake the toner cartridge back and forth several times horizontally. This distributes the toner evenly in the cartridge.
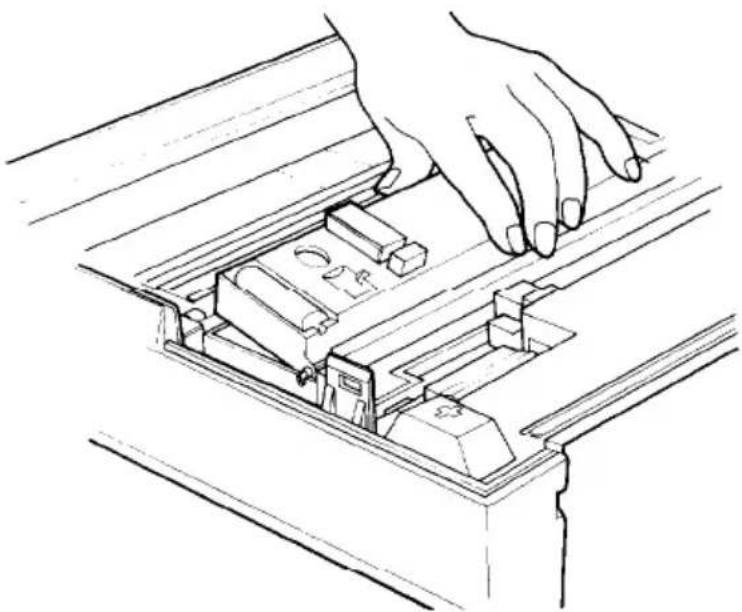
- On the bottom right side of the toner cartridge are two pins, one at each end. Hold the toner cartridge vertically with the pins at the bottom and lower the pins into the notches in the developing unit. Then tilt the cartridge into place. (See Figure 5-5.)
Figure 5-5. Installing the toner cartridge
natural_image
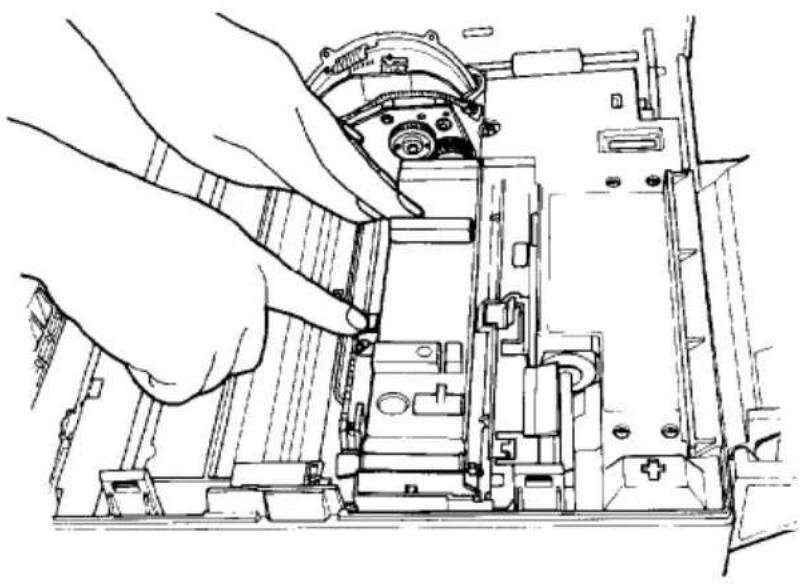
Line drawing of a hand pressing down on a mechanical device component (no text or symbols)- Now hold the green toner cartridge lock lever down while you lower the left side of the toner cartridge. Then release the lock lever to lock the cartridge into place. (See Figure 5-6.)
Caution
Do not press on the top of the toner cartridge because toner may spill into the printer. Instead, press on the edge of the cartridge as shown. If toner does spill into the printer, you must remove it with a small vacuum cleaner.
Figure 5-6. Locking the cartridge info place
natural_image
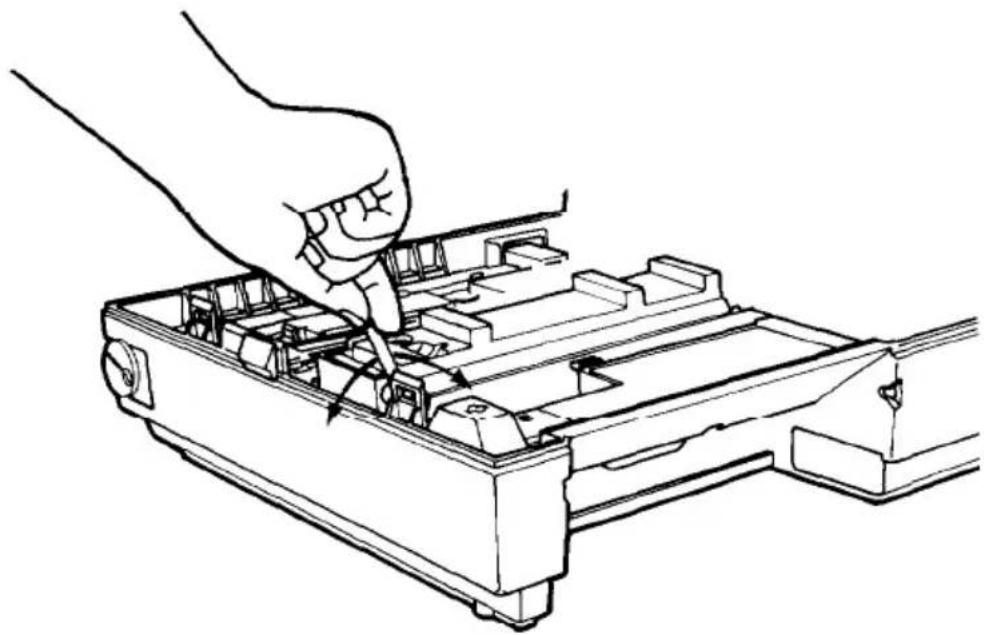
Line drawing of hands operating a mechanical device with no visible text or symbols- Attach the seal take-up lever to the small plastic shaft at the front of the toner cartridge. (See Figure 5-7.) Move the lever back and forth (in the direction of the arrows as shown in Figure 5-7) until it won't move any farther with moderate pressure. (You will see red markings on the seal when you reach the end of it.) This step peels back the toner seal and releases the toner into the developing unit.
Figure 5-7. The take-up lever
natural_image
Line drawing of a hand using a tool to adjust internal components of an electronic device (no text or symbols present)- Tap lightly on the comers of the toner cartridge to prevent the toner from remaining in the comers of the cartridge.
Caution
Once the toner cartridge has been installed, do not remove it until you are prompted to do so by the TONER OUT light on the control panel. Otherwise toner will spill into the printer.
-
Remove the take-up lever.
-
To make sure that the developer unit is properly locked into place, press on the two blue stickers located to the right of the toner cartridge.
-
Now that you have installed the internal components, close the printer and gently press down on the top of the case until the latch clicks shut.
U1: replace collector unit and lens shield
The drum cartridge consists of two separate parts, the collector unit and the drum. The collector unit by itself needs to be replaced about every 10,000 pages. The drum needs to be replaced about every 20,000 pages. Therefore, every other time you replace the collector unit, you also replace the drum. In the latter case, this means you replace the complete drum cartridge.
The collector unit by itself and the drum cartridge unit are both available from your Epson dealer. The drum itself is not sold as a separate part, but only as a part of the drum cartridge unit.
The lens shield also needs to be replaced about every 10,000 pages, which means that whenever you replace either the collector unit or the drum cartridge, you also replace the lens shield.
When the collector unit requires replacement, the status display shows U1 and the USER MAINTENANCE indicator lights. Printer operation stops after the page being printed. To replace the collector unit and lens shield, follow these steps:
WARNING
This procedure will expose the drum. Because the drum is light-sensitive, it should not be exposed to lighting brighter than normal room light. Room light exposure should not exceed five minutes. (Completing this procedure in less than five minutes should be no problem.) Also, be careful not to touch the drum surface.
- Open the printer using the latch on the front of the printer.
WARNING
Opening the printer exposes the fusing unit, which is marked by a CAUTION: HOT SURFACE label. Be careful not to touch the fusing unit.
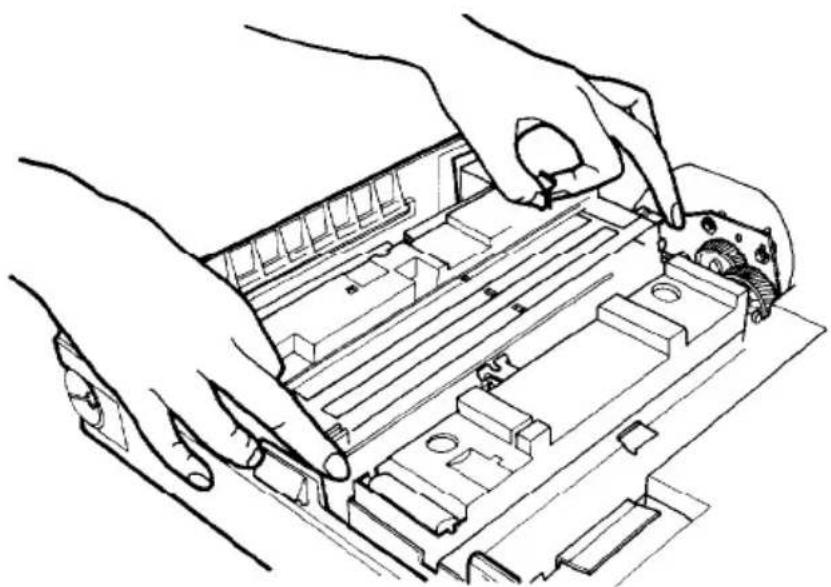
- Pinch open the green lock levers that hold the collector unit in place on top of the drum. While holding these levers open, lift the collector unit by its green handles. In this manner, you can lift the unit off the drum, leaving the drum in place. (See Figure 5-8.)
Note
If you remove and reinsert the collector unit, you must press the reset lever. (See Step 5.)
Figure 5-8. Removing the collector unit
natural_image
Line drawing of hands installing or adjusting a mechanical component on a device (no text or symbols visible)- Remove a new collector unit from its package and remove the orange plastic holder.
- Hold the collector unit by its green handles and set it on the drum inside the printer. Pinch the green lock levers open and fit the collector unit down over the drum.
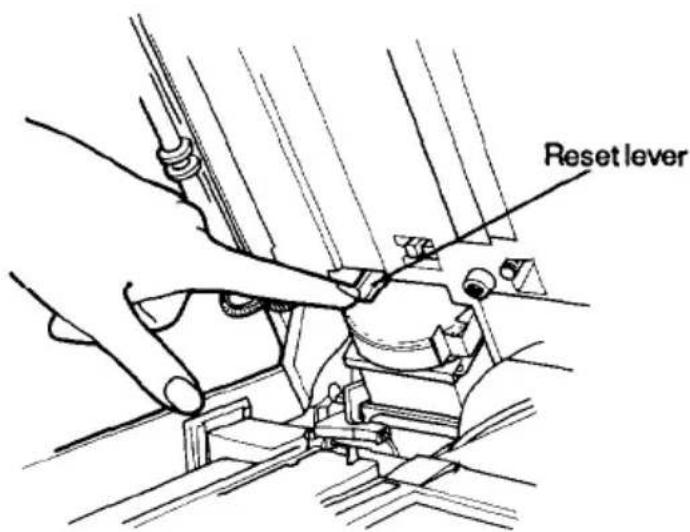
- Firmly press the blue reset lever located toward the back inside of the printer on the left. (See Figure 5-9.) This lever resets the counter that keeps track of the usage of the drum.
Figure 5-9. Resetting the printer
text_image
Reset lever- Now change the lens shield. First, pull the shield out from below the latch on the front of the printer. Next, make sure that both sides of the new lens shield are clean and free of scratches. (Hold onto the green tab so the tab curves down; avoid touching the lens itself.) Slide the end of the lens opposite the green tab into the printer. (See Figure 5-10.)
Figure 5-10. Replacing the lens shield

natural_image
Line drawing of a hand inserting a component into a device (no text or symbols)- Close the printer.
U2: replace drum cartridge and lens shield
When the drum cartridge requires replacement, the status indicator displays u2 and the USER MAINTENANCE indicator lights. Printer operation stops after ejection of the page being printed. To replace the drum cartridge and lens shield, follow these steps:
WARNING
This procedure will expose the drum. Because the drum is light-sensitive, it should not be exposed to lighting brighter than normal room light. Room light exposure should not exceed five minutes. (Completing this procedure in less than five minutes should be no problem.) Also, be careful not to touch the drum surface.
- Open the printer by releasing the latch on the front of the printer.
WARNING
Opening the printer exposes the fusing unit, which is marked by a CAUTION: HOT SURFACE label. Be careful not to touch the fusing unit.
- Raise the green handles and lift out the drum cartridge (the collector unit together with the drum).
Note
If you remove and reinsert the drumcartridge without replacing it with a new one, you must press the reset lever. (See Step 6)
- After the drum cartridge has been removed, clean the transfer charger wire with the cleaning tool in the printer as described in the Preventive Maintenance section of this chapter.
- Remove a new drum cartridge from its package and pull the handle of the blade pressure release lever. Then remove the orange holder.
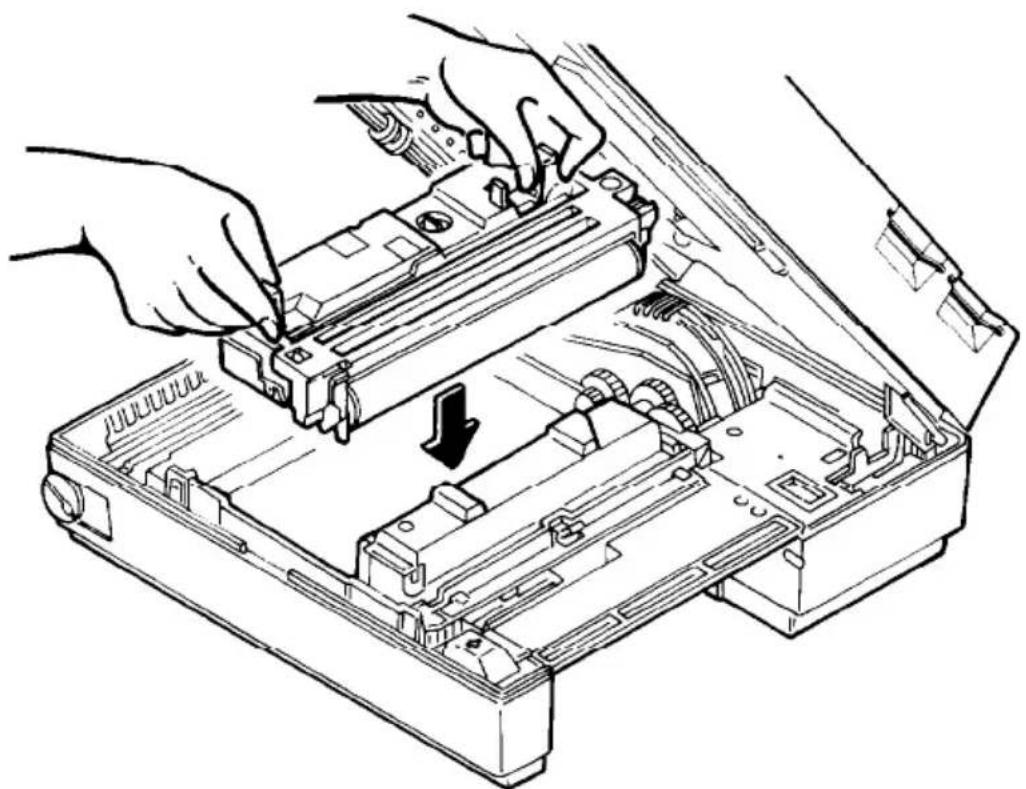
- Grasp the green handles and set the new drum cartridge in the printer. (See Figure 5-11.)
Figure 5-11. Installing the new drum cartridge.
natural_image
Line drawing of hands installing or adjusting a mechanical device into an open case (no text or symbols visible)-
Firmly press the blue reset lever located toward the back inside of the printer on the left. (See Figure 5-9 on page 5-12.)
-
Now change the lens shield. First, pull the shield out from below the latch on the front of the printer. Next, make sure that both sides of the new lens shield are clean and free of scratches. (Hold onto the green tab so the tab curves down; avoid touching the lens itself.) Slide the end of the lens opposite the green tab into the printer. (See Figure 5-10 on page 5-13.)
- Close the printer.
Service Maintenance
It may sometimes be necessary to call for a service technician to repair a problem with the GQ-3500. Because the printer has built-in self-diagnostic capabilities, it will indicate when this is necessary. If there is a serious problem, the SERVICE REQUIRED light flashes and a message is displayed in the status indicator.
EO: mechanical error
In case of an error with the engine driver CPU, the main motor, the optical unit, or the fusing unit, the status indicator displays EO alternating with a two-digit error code number.
If this happens, write down the error code number, turn off the power, and contact a qualified service representative.
E 1: printer controller error
If the GQ-3500 detects an error in its controller unit or its system memory, the status indicator displays E1 alternating with a two-digit error code number.
Unlike an EO error, this type may correct itself if you reset the printer. Turn the printer off for a few seconds, then turn it back on. If the error condition still exists, write down the error code, turn off the power, and contact a qualified service representative.
If error code Cd alternates with E1, this indicates an IC card installation error. Turn off the power and properly install the IC card. If the error recurs, contact a qualified service representative.
Corrective or Preventive Maintenance
Because the GQ-3500's status messages advise you when to replace supplies and consumable parts, little additional preventive maintenance is required. If the printing quality should decline, however, it may help to clean the transfer charger wire. Do this whenever you replace the drum cartridge, and periodically as required to maintain maximum printing quality.
Transfer Charger Wire
To clean the transfer charger wire, follow these steps:
- Open the printer by releasing the latch on the front of the printer.
WARNING
Opening the printer exposes the fusing unit, which is marked by a CAUTION: HOT SURFACE label. Be careful not to touch the fusing unit.
-
Raise the green handles and lift out the drum cartridge (the collector unit together with the drum).
-
Locate the small cleaning blade, a user maintenance tool stored inside of the printer. This cleaning tool is in the boxy receptacle located at the front of the printer to the right of the toner cartridge. (Note that the direction the cleaning blade is stored is the reverse of the direction you use it.) Remove the blade from the receptacle.
-
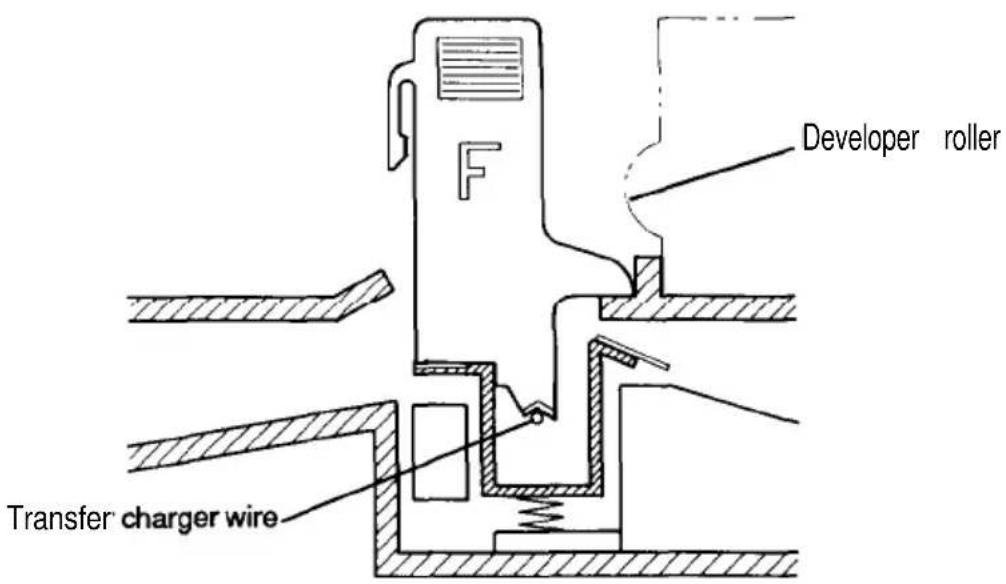
Clean the transfer charger wire with this cleaning blade, as follows. (The wire is thin and may be difficult to spot instantly; look closely.) Place the blade at one end of the charger wire (located on the right side of the drum receptacle) and move the blade along the wire. Use the blade's shape as a guide. (See Figure 5-12.)
Note
As you clean the transfer charger wire, be careful not to touch the developer roller, which is located immediately above and to the right of the wire.
Figure 5-12. Cleaning the transfer charger wire
text_image
Developer roller Transfer charger wire- Return the cleaning blade to its receptacle.
- Replace the drum cartridge, then close the case.
- Test the print quality by turning the printer off, then turning the power on while holding down the ERROR CLEAR button. The status indicator will display seemingly random values as the printer's memory is checked; when the warm up indication (--) appears, release the ERROR CLEAR button.
- When the printer is warmed up, the status indicator displays OC. Pressing the ERROR CLEAR button switches back and forth between OC, which prints a vertical line pattern, and 1 C, which prints the GQ-3500's text characters. To make a test print, press the PAPER FEED button. (If you hold down the PAPER FEED button for more than two seconds, the printer continues to produce test prints until you press the SHIFT button.)
- Examine the test print, checking to see that the image is clear and distinct. If it is, place the GQ-3500 in its normal printing mode by pressing the ON LINE button. If the test print is blurred or defective in other ways, replace the drum cartridge as described in the User Maintenance section of this chapter. If the quality is still poor, contact a qualified service representative.
Software Control of Printer Features
In Chapter 3 you learned how to select many of the GQ-3500's functions from the control panel. Many more functions are available through the use of software commands.
You can send software codes to the printer by writing a program that addresses the printer or by embedding printer commands in files printed by your word processing or other application program.
This chapter describes how to use the commands that access the printer's features. It covers the general format of the commands as well as several specific commands to improve the appearance of your printing. Your word processing or other application manual should tell you how to send control codes to the printer from within the program.
Using BASIC
This chapter includes examples in the BASIC programming language. Although you may not do much of your printing using BASIC, nearly all computers come with some version of this language, and it's easy to use, even for the non-programmer.
To try the examples shown here, you'll need to know how to start BASIC and how to enter and run a program. Your computer's manual should provide this information.
To use these programs, you need to know a few BASIC commands. The most important is LPRINT, which sends characters to a line printer or page printer. LPRINT is used in nearly all versions of BASIC that run on IBM ^® PCs, compatibles, and other MS ^TM -DOS computers. Some other computers use a PRINT# command instead; check your computer's BASIC manual.
LPRINT can be used to send letters and words to the printer. These should be enclosed in double quotes. For example, to print the name of your printer, the command is:
LPRINT "Epson GQ-3500"
Many of the codes that control the GQ-3500's features are not letters, numbers, or punctuation. These codes are control codes, which are most easily accessed with BASIC's CHR\function. CHR!\ followed by a number sends the ASCII character that number represents. For example, to send the FF (form feed) code, which is ASCII 12, the command is:
LPRINT CHR\$(12)
After the LPRINT command sends the information to the printer, it sends two more codes: a CR (carriage return) and LF (line feed). This causes the next LPRINT command to begin printing at the left margin of the next line down the page. In some cases, you will not want the LPRINT command to send these two codes. You can prevent it from doing so by ending the command with a semicolon, like this:
LPRINT "Don't send CR/LF";
Because the GQ-3500 prints one page at a time instead of one line at a time, no printing takes place until a form feed (FF) command or a full page of data is received.
Orientation
Before you start printing, decide which direction you want the printing to go. In portrait orientation, the lines of text are printed perpendicular to the direction of the paper moving through the printer. This is the most common orientation and is the one used for the pages of this manual.
In landscape orientation, the lines of text are printed parallel to the direction of the paper moving through the printer. This gives you a page that is wider than it is high.
You cannot combine portrait- and landscape-oriented text on the same page. As soon as you send the orientation command, the sheet currently being printed is ejected and a new sheet is started with the new orientation.
Not all fonts are available in both orientations. Be sure that the typeface you want is available in the desired orientation by checking the label on the download font software or IC card. Three of the internal fonts (Courier 10, EDP 13, and Extended Graphics) can be printed in either orientation.
The command to change the orientation is ESC o, followed by a number specifying the desired orientation: 0 for portrait or 1 for landscape. To change to landscape orientation, the BASIC command is:
LPRINT CHR\(27); "o"; CHR\(1)
To change back to portrait orientation, you can use the orientation command again (replacing the 1 with a 0), use the control panel (see Chapter 3), or use the printer initialization command. The initialization command, which is ESC @, resets the printer to its normal settings for such items as orientation, font, margins, and line spacing. To use the command in BASIC, enter the following:
The initial settings reset by ESC @ are also affected by the settings of the DIP switches.
Font Selection
If you have any IC font cartridges or user-defined (download) fonts for your GQ-3500, you have a wide variety of typestyles and sizes available to enhance the appearance of your printed documents. Even without these options, however, the GQ-3500 has many print variations.
You use the ESC y command followed by two numbers to select a typeface. The first number specifies the group of fonts you want to usc: 0 for internal fonts, 1 for IC card fonts, or 2 for user-defined fonts. The second number identifies the specific font within the selected group. The following program shows how the ESC y command can be used to choose any of the four internal fonts available in portrait orientation.
100 LPRINT CHR(27); "y"; CHR(0); CHR$(2);
110 LPRINT "EDP 13 cpi font."
120 LPRINT CHR(27); "y"; CHR(0); CHR$(4);
130 LPRINT "Modern PS font"
140 LPRINT CHR(27); "y"; CHR(0); CHR$(5);
150 FOR X=176 TO 193
160 LPRINT CHR$(X);
170 NEXT
180 LPRINT
190 LPRINT CHR(27); "y"; CHR(0); CHR$(0);
200 LPRINT "Courier 10 cpi font"
210 LPRINT CHR$(12);
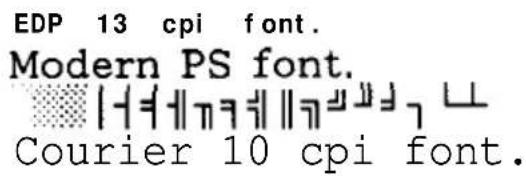
text_image
EDP 13 cpi font. Modern PS font. Courier 10 cpi font.Different sizes of type are possible using the ESC z command, which allows you to double or triple the height and/or width of each character. The first number in the command controls the width; the second number controls the height. For normal width or height, use a 1; for double-wide or double-high type, use a 2; for triple-wide or triple-high, use a 3.
The GQ-3500 can print any combination of standard-, double- and triple-height and width. The program below shows some examples.
100 LPRINT CHR(27); "z"; CHR(1); CHR$(1)
110 LPRINT "normal size"
120 LPRINT CHR(27); "z"; CHR(1); CHR$(2)
130 LPRINT "double-high"
140 LPRINT
150 LPRINT CHR(27); "z"; CHR(2); CHR$(3)
160 LPRINT "triple-high/double-wide"
170 LPRINT
180 LPRINT CHR(27); "z"; CHR(3); CHR$(3)
190 LPRINT "triple-wide"
200 LPRINT CHR$(12);
normal size
double-high
triple-high/double-wide triple-wide
Character Attributes
There are other ways to vary the appearance of your printing besides selecting different fonts and sizes. The attributes in this section can be used with any font.
Bold type
You may want to make some words or headlines stand out by using bold type. This is done with the ESC E command; the ESC F command returns printing to normal. No numeric parameters are needed with these commands; just embed them anywhere in your text files and the characters between them will print in bold face.
Underlining
The GQ-3500 has an automatic underlining feature that underlines all characters (and the spaces that separate them). Underlining is useful for giving greater emphasis to some portions of your text. The command to begin underlining is ESC - 1. To stop underling, use ESC-O.
Background patterns
Another way to change the appearance of your print is to print a background pattern behind part of your text. The GQ-3500 has six predefined background patterns and reverse (white type on a black background). All are shown on the next page. It is also possible to define two of your own background patterns.
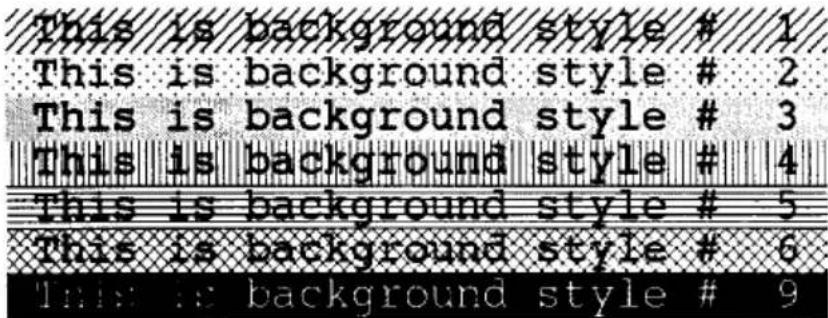
text_image
This is background style # 1 This is background style # 2 This is background style # 3 This is background style # 4 This is background style # 5 This is background style # 6 This is background style # 9To print a background pattern, use the ESC - n 1 command (where n is the pattern number you want). The background pattern will print behind each character until you turn it off with ESC - 0 1.
The background pattern command differs from the other commands in this section, which affect all characters between the mode on and mode off commands. The background pattern command affects a rectangular area. The point where the command is turned on is the upper left corner of the rectangle, and the point where the command is turned off is the lower right corner of the rectangle.
Try this program to see the difference in the way the commands work:
100 LPRINT CHR(27); "~"; CHR(1); CHR$(1);
110 LPRINT "This is a demonstration of background"
120 LPRINT "patterns and the way they affect a"
130 LPRINT "rectangular area. "; CHR$(27); "-1";
140 LPRINT "Notice how underline"
150 LPRINT "works"; CHR$(27); "-0";
155 LPRINT " on character-by-character basis"
160 LPRINT "instead of affecting an area.";
170 LPRINT CHR(27); "~"; CHR(0); CHR$(1);
180 LPRINT CHR$(12);
This is a demonstration of background patterns and the way they affect a rectangular area. Notice how underline works on character-by-character basis instead of affecting an area.
Ruled Lines
With the GQ-3500, you can easily draw ruled lines, which are very useful in making forms. Although line drawing is a very powerful feature, the command format is rather complex. Before you use the command, you'll need to figure out:
- The type of line (five different styles are available, shown on page 6-9)
- The distance from the left edge of the physical print area (the GQ-3500 cannot print within 1/4" of the left edge of the sheet) to the starting point of the line, in 1/300ths of an inch
- The distance from the top edge of the physical print area (the GQ-3500 cannot print within 1/4" of the top edge of the sheet) to the starting point of the line, in 1/300ths of an inch
• The direction of the line (either horizontal or vertical) - The weight, or thickness, of the line, measured in 1/300ths of an inch
• The length of the Line, measured in 1/300ths of an inch.
With the above information, you'll need to make some calculations. because your computer can only represent numbers up to 255 in a single character and many measurements will be more than 255/300 of an inch, you need to break up the numbers into two characters. To do this, divide your total measurement by 256. The remainder becomes the first number to send to the printer; the quotient is the second number.
Here is an example: suppose you want to make a line 4-1/2 inches long, which could be written as 1350/300". Divide 1350 by 256. The quotient is 5; the remainder is 70. You can verify this by multiplying (5 × 256) + 70 = 1350 .
Now you have everything you need to draw a line. The following example shows how to use the ESC command to draw a line.
. Line type: dotted (type 1)
Distance from left edge: 1/2" = 150/300" (remainder = 150; quotient = 0)
. Distance from top edge: 2-1 /2" = 750/300" (remainder = 238; quotient = 2)
Direction: horizontal (type 0)
Line thickness: 5/300" (remainder = 5; quotient = 0)
. Line length: 4-1/4" = 1350/300" (remainder = 70; quotient = 5).
The complete command looks like this:
LPRINT CHR(27);"_";CHR(1);CHR$(150);
CHR(0);CHR(238);CHR(2);CHR(0);
CHR(5);CHR(0);CHR(70);CHR(5)
The following program shows each of the line types and how to vary the line thickness and direction.
100 J=110
110 FOR I=0 TO 4
120 LPRINT CHR(27);"_";CHR(I);
125 LPRINT CHR(255);CHR(0);CHR(J);CHR(0);
130 LPRINT CHR(0);CHR(9);CHR(0);CHR(19);CHR$(2);
140 J=J + 35
150 NEXT
160 J=110
170 FOR I=0 TO 4
180 LPRINT CHR(27);"_";CHR(I);CHR$(J);
185 LPRINT CHR(0);CHR(127);CHR$(1);
190 LPRINT CHR(1);CHR(3);CHR(0);CHR(19);CHR$(2);
200 J=J + 35
210 NEXT
220 LPRINT CHR$(12);
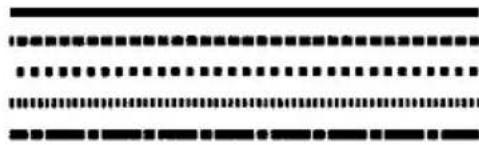
natural_image
Abstract pattern of black rectangular shapes on white background, no text or symbols present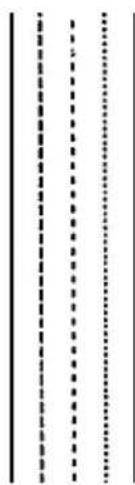
text_image
Scanned text of dense vertical columns of black and white characters, likely from a document or form.Graphics Primitives
The GQ-3500 has a set of commands called graphics primitives. These commands allow you to create an image, store it in the printer's memory, and print it. You can print an image as many times as you like once it has been stored.
Creating images
The ESC 11 n command, which invokes the graphics mode, is similar to the other commands with which you are now familiar. To select the graphic mode, use the ESC 11 n command, replacing n with a number from 1-8 you wish to use to identify the image. You can store eight images in the printer's memory at a time. They remain in memory until you either turn the printer off or delete them from memory with the ESC 10 n command.
The five graphics commands, which are available only in graphics mode, are the following:
ALLOCATE
Reserves the proper amount of printer memory for the image to be stored
CIRCLE
Draws a circle (or a partial circle, called an arc>
LINE
Draws a line or a box
PAINT
Fills an enclosed area with a pattern
EXIT
Leaves the graphics mode and returns the printer to normal operation.
The parameters for these commands are entered as ASCII strings. For example, to send the value 100 to the printer in graphics mode, you use LPRINT "100" instead of LPRINT CHR\$(100). The difference is that three codes (1, 0, and 0) are sent to the printer instead of just one (ASCII 100). To see the difference, study the example programs that follow.
Using the line primitive
100 LPRINT CHR(27);";";CHR(0);CHR$(4);
110 LPRINT "EXIT";CHR$(13);
120 LPRINT CHR(27);";";CHR(1);CHR$(4);
130 LPRINT "ALLOCATE(650,650)";CHR$(13);
140 LPRINT "LINE(100,100)-(100,600)";CHR$(13);
150 LPRINT "LINE(100,600)-(600,600)";CHR$(13);
160 LPRINT "LINE(100,400)-(300,400)";CHR$(13);
170 LPRINT "LINE(300,400)-(300,600)";CHR$(13);
180 LPRINT "LINE(500,200)-(100,600)";CHR$(13);
190 LPRINT "LINE(100,100)-(85,145)";CHR$(13);
200 LPRINT "LINE(500,200)-(445,235)";CHR$(13);
210 LPRINT "LINE(600,600)-(555,585)";CHR$(13);
220 LPRINT "EXIT";CHR$(13);
230 LPRINT CHR(27);";";CHR(2);CHR$(4);
240 LPRINT CHR(236);CHR(0);CHR(100);CHR(2);
250 LPRINT "EXIT";CHR$(13);
260 LPRINT CHR$(12);
text_image
Hand-drawn coordinate system diagram showing a square and diagonal line with directional arrowsUsing the line primitive for boxes
100 LPRINT CHR(27);";|";CHR(0);CHR$(4);
110 LPRINT "EXIT";CHR$(13);
120 LPRINT CHR(27);";|";CHR(1);CHR$(4);
130 LPRINT "ALLOCATE(1800,1800)";CHR$(13);
140 LPRINT "LINE(100,100)-(500,300),0,1,";CHR$(13);
150 LPRINT "LINE(600,100)-(1000,600),0,1,";CHR$(13);
160 LPRINT "PAINT(110,110),1";CHR$(13);
170 LPRINT "EXIT";CHR$(13);
180 LPRINT CHR(27);";|";CHR(2);CHR$(4);
190 LPRINT CHR(236);CHR(0);CHR(100);CHR(2);
200 LPRINT "EXIT";CHR$(13);
210 LPRINT CHR$(12);
natural_image
Rectangular shape filled with diagonal hatching lines, no text or symbols present
natural_image
Empty white square with black border (no text or symbols)Using the circle primitive with fills
100 LPRINT CHR(27); "|"; CHR(0); CHR$(4);
110 LPRINT "EXIT"; CHR$(13);
120 LPRINT CHR(27); "|"; CHR(1); CHR$(4);
130 LPRINT "ALLOCATE(2100,650)"; CHR$(13);
140 LPRINT "CIRCLE(300,300),150"; CHR$(13);
150 LPRINT "CIRCLE(600,300),150"; CHR$(13);
160 LPRINT "CIRCLE(900,300),150"; CHR$(13);
170 LPRINT "PAINT(300,300),2"; CHR$(13);
180 LPRINT "PAINT(600,300),3"; CHR$(13);
190 LPRINT "PAINT(900,300),4"; CHR$(13);
200 LPRINT "EXIT"; CHR$(13);
210 LPRINT CHR(27); "|"; CHR(2); CHR$(4);
215 LPRINT CHR(236); CHR(0); CHR(100); CHR(2);
220 LPRINT "EXIT"; CHR$(13);
230 LPRINT CHR$(12);
natural_image
Three circular diagrams with different fill patterns: dotted, solid, and striped (no text or symbols)The values to use for each of the parameters are covered in Appendix A. Like the ruled line command, all measurements are given in 1/300ths of an inch. The GQ-3500 printer prints using dots that are 1/300ths of an inch wide, thus the measurement value equals the number of dots needed to print an image. Because parameters are entered as ASCII strings in the graphics mode, no mathematical conversions arc necessary.
Printing images
As the previous sample programs demonstrate, the ESC :1 command is used to print images as well as store them. For printing, however, it is followed by a few more parameters.
Before you can print an image, you must determine where you want the image to print on the page. Like the ruled line command, the measurements should be made in 1/300ths of an inch, starting from the edge of the physical printing area, which is 1/4" from the left edge of
the sheet and 1/4" from the top. Just as you did with the ruled line command, you must convert these measurements mathematically to two-byte strings. The example on the next page shows how to calculate a position and put in into the command.
. Image number: 1
- Distance from left edge: 2" = 600/300"(remainder = 88; quotient = 2)
. Distance from top edge: 3.3" = 990/300" (remainder = 222; quotient = 3).
The complete command looks like this:
LPRINT CHR(27);";|";CHR(2);CHR$(1);
CHR(88);CHR(2);CHR(222);CHR(3)
The point specified by this command is the upper left corner of the area allocated for the figure.
Command Summary
This appendix lists and describes all the commands available on the GQ-3500.
The commands are divided into three sections, one for each of the first three operating modes explained in Chapter 2.
Page Printer Mode. This section is divided into two parts: the first lists all commands in numerical order and gives the page number where each is fully described. If you know which command you are looking for, consult the numerical list to find the page where it is described. The second part is divided by topics; it fully describes each command.
The Quick Reference card at the end of the book also contains a list of the page printer commands divided by topic, with page number references that direct you to full explanations of the commands.
Epson LQ Emulation. This section lists and describes all the commands for this mode.
Line Printer. This section lists and describes all the commands for this mode.
In the description sections, the commands are divided into the following topics:
Printer Operation
Data Control
Vertical Motion
Horizontal Motion
Page Position
Overall Printing Style
Print Size and Character Width
Print Enhancement
Word Processing
Character Sets
User-defined Characters
User-defined Forms
Graphics
Each command description has a format section and a comment section. The format section gives the ASCII, decimal, and hexadecimal values for the command; the comment section describes the effect of the command and gives any additional information necessary for using it.
All three formats are equivalent, and it should be easy to pick the one most suited to your purpose.
The simplest type of command consists of a single character to be sent to the printer. For instance, to advance to the next horizontal tab stop the code format is:
ASCII code: HT
Decimal: 9
Hexadecimal: 09
This code can be sent from a program by sending the code 9 directly.
More complex commands consist of two or more character codes. For example, to print in proportional mode the code format is the following:
| ASCII code: | ESC | p | n |
| Decimal: | 27 | 112 | n |
| Hexadecimal: | 1B | 70 | n |
In this case n can be either 1 or 0, to begin or end proportional printing. You can use either of the following commands to turn ON proportional print from BASIC:
LPRINT CHR\(27);CHR\(112);CHR\$(1) LPRINT CHR\(27);"p";CHR\(1)
Note
In the format section letters such as n and d represent variables that must be entered when the command is used. These variables should be entered as ASCII codes, not characters. For example, the format for selecting an international character set is ESC R n. To select the French character set, the variable n should be 1. In BASIC the command to select the French character set is LPRINT CHR\(27);"R";CHR\(1).
Commands in Numerical Order
This section lists all the GQ-3500 page printer commands, with their decimal and hexadecimal values. The numbers in the column on the right are the page numbers in this appendix where a complete description of the command can be found.
| ASCII | Decimal | Hexa- decimal | Description | Page |
| BEL | 7 | 07 | Beeper | A-6 |
| BS | 8 | 08 | Backspace | A-13 |
| HT | 9 | 09 | Tab horizontally | A-14 |
| LF | 10 | OA | Line feed | A-9 |
| VT | 11 | OB | Tab vertically | A-11 |
| FF | 12 | oc | Form feed | A-8 |
| CR | 13 | OD | Carriage return | A-8 |
| s o | 14 | OE | Select double-wide (1 line) | A-22 |
| DC1 | 17 | 11 | Select printer | A-5 |
| DC3 | 19 | 13 | Deselect printer | A-6 |
| DC4 20 | 14 | Cancel double-wide (1 line) | A-22 | |
| ESC SO | 14 | OE | Select double-wide (1 line> | A-22 |
| ESC EM 25 | 19 | Select input paper tray | A-6 | |
| ESC SP 32 | 20 | Set intercharacter space | A-27 | |
| ESC ! | 33 | 21 | Master select | A-19 |
| ESC $ | 36 | 24 | Set print position on line | A-13 |
| ESC % 37 | 25 | Select download font set | A-29 | |
| ESC ( | 40 | 28 | Set page format | A-16 |
| ESC ) | 41 | 29 | Set print position on page | A-16 |
| ESC + 43 | 2B | Move base line | A-26 | |
| ESC, | 44 | 2c | Select pitch | A-21 |
| ESC - 45 | 2D | Turn underlining on/ off | A-25 | |
| ESC. | 46 | 2E | Move logical coordinates | A-17 |
| ESC 0 48 | 30 | Select 1 / B-inch line spacing | A-10 | |
| ESC 2 | 50 | 32 | Select 1 /6-inch line spacing | A-10 |
| ESC 3 | 51 | 33 | Programmable line spacing | A-11 |
| ESC 4 52 | 34 | Select italic mode | A-28 | |
| ESC 5 | 53 | 35 | Cancel italic mode | A-28 |
| ESC @64 40 | Initialize printer | A-5 | ||
| ESC A | 65 | 41 | Select line spacing | A-10 |
| ESC B 66 | 42 | Set vertical tabs | A-12 | |
| ESC C | 67 | 43 | Set page length in lines | A-9 |
| ESC CO | 67 | 43 | Set page length in inches | A-9 |
| ESC D | 68 | 44 | Set horizontal tabs | A-15 |
| ESC E | 69 | 45 | Select emphasized mode | A-24 |
| ESC F | 70 | 46 | Cancel emphasized mode | A-24 |
| ESC G | 71 | 47 | Select emphasized mode | A-24 |
| ESC H | 72 48 | Cancel emphasized mode | A-24 | |
| ESC J | 74 | 4A | Immediate line feed | A-11 |
| ESC Q | 81 51 | Set right margin | A-13 | |
| ESC R | 82 52 | International character set | A-28 | |
| ESC SO | 83 | 53 | Select superscript mode | A-25 |
| ESC S1 | 83 | 53 | Select subscript mode | A-25 |
| ESCT | 84 | 54 | Cancel super/ subscript | A-25 |
| ESC W | 87 | 57 | Turn double-wide on/ off | A-23 |
| ESC [ | 91 | 5B | Character set by point size | A-20 |
| ESC \ | 92 | 5c | Set relative position | A-14 |
| ESC ] | 93 | 5D | Character set by weight | A-20 |
| ESC _ | 95 | 5F | Print ruled line | A-29 |
| ESC a | 97 | 61 | Justification | A-27 |
| ESC c | 99 | 63 | Character set by pitch | A-21 |
| ESC d | 100 | 64 | Font set definition | A-29 |
| ESC k | 107 6B | Select typeface | A-17 | |
| ESC l | 108 | 6C | Set left margin | A-12 |
| ESC m | 109 | 6D | Set number of copies | A-7 |
| ESC n | 110 | 6E | Define background | A-31 |
| ESCo | 111 | 6F | Set page orientation | A-15 |
| ESC p | 112 | 70 | Proportional mode on/ off | A-22 |
| ESC q | 113 | 71 | Specify minimum increment | A-7 |
| ESC t | 116 | 74 | Extended graphics on/ off | A-18 |
| ESC u | 117 | 75 | Character alignment | A-26 |
| ESC v0 | 118 | 76 | Erase graphic image | A-33 |
| ESC vl | 118 76 | Define graphic image | A-32 | |
| ESC v2 | 118 | 76 | Print graphic image | A-33 |
| ESC w | 119 | 77 | Turn double-high on/ off | A-23 |
| ESC y | 121 | 79 | Select character set | A-18 |
| ESC z | 122 | 7A | Set character magnification | A-23 |
| ESC ( | 123 | 7B | Define/ delete form | A-30 |
| ESC ! | 124 | 7c | Select graphic mode | A-33 |
| ESC ) | 125 | 7D | Form print mode on/ off | A-31 |
| ESC - | 126 | 7E | Select background | A-32 |
| ALLOCATE | Reserve graphic area | A-34 | ||
| CIRCLE | Draw circle or arc | A-34 | ||
| PAINT | Paint area | A-35 | ||
| LINE | Draw line or box | A-36 | ||
| EXIT | End graphic mode | A-36 |
Page Printer Commands
The following section, which is arranged by topic, lists and describes all the page printer commands.
Printer Operation
Initialization
ESC@
Initialize Printer
Format:
ASCII code: ESC @
Decimal: 27 64
Hexadecimal: 1 B 40
Comments:
Restores most printer settings to the power-on default values. Contents of the print buffer are deleted; if a partial page has been printed it is ejected. However, the page orientation, font selection and coordinate settings don't change, and download fonts and graphics images are saved.
Selection
DC1
Select Printer
Format:
ASCII code: DC1
Decimal: 17
Hexadecimal: 11
Comments:
Returns the printer to the selected state if it has been deselected by the printer deselect code (DC3). Does not select the printer if it has been switched off line by pressing the ON LINE button. The selected state is the initial printer state.
DC3
Deselect Printer
Format:
ASCII code: DC3
Decimal: 19
Hexadecimal: 13
Comments:
Switches the printer to the deselected state. In this state, the printer ignores input data until it receives code DC1. The printer cannot be reselected with the ON LINE button.
ESC EM Select Input Paper Tray
Format:
| ASCIIcode: | ESC | EM | n |
| Decimal: | 27 | 25 | n |
| Hexadecimal: | 1 B | 19 | n |
Comments:
The following values can be used for n:
1: Selects standard tray.
2: Selects other tray.
All values of n except those listed above are ignored. If the printer is not equipped with an option tray, the command is ignored. This command must be specified at the beginning of a page; otherwise, it is ignored.
Beeper
BEL
Beeper
Format:
ASCII code: BEL
Decimal: 7
Hexadecimal: 07
Comments:
Sounds the printer's beeper for 0.2 second. This code can be enabled or disabled by changing the setting of DIP switch 1-8.
Format:
| ASCII code: | ESC | m | n |
| Decimal: | 27 | 109 | n |
| Hexadecimal: | 1B | 6D | n |
Comments:
Specifies the number of copies to print of each page. The value of n must be from 1 - 99. If n=0, this command is ignored. If n is greater than one, the number of copies to be printed is displayed by the STATUS indicator.
ESC a
Specify Minimum Increment
Format:
| ASCIIcode: | ESC | q | nl | n2 |
| Decimal:27 | 113 | nl | n2 | |
| Hexadecimal: | 1B | 71 | nl | n2 |
Comments:
Specifies the minimum increment which is used when specifying parameters in other commands. The value of nl determines the unit of measure to be used; the value of n2 specifies the number of units that will make up the minimum increment.
The following values can be used for nl :
0: Minimum increment is specified in dots (1/300 of an inch).
1: Minimum increment is specified in 1/720 of an inch.
2: Minimum increment is specified in characters (character pitch horizontally and line spacing vertically).
The following values can be used for n2:
When n1=0 (dots), the smallest possible minimum increment is 1/300 inch (n2=1); n2 must be from 1 - 255.
When n1=1(1/720 of an inch), the smallest minimum increment is 3/720 inch; n2 must be from 3 - 255.
When n1=2 (characters), the minimum increment is based on the current character pitch (if proportional mode is selected, it is based on pica pitch) and line spacing; n2 must be 1.
The power on default minimum increment is 1/300 of an inch.
The following commands are affected by this command:
Returns the print position (the position at which the next character is printed) to the left margin. A line feed will be added if DIP switch I-5 is ON.
Vertical Motion
Form feeding
FF
Form Feed
Format:
ASCII code: FF
Decimal: 12
Hexadecimal: OC
Comments:
Prints the data in the print buffer, then moves the print position to the left margin at the beginning of the next page. In other words, this code starts a new page.
With DIP switch I-7 ON, the form feed operation takes place automatically when the data exceeds the page length even if no FF code is received.
With DIP switch I-7 OFF, the data exceeding the page length is discarded until an FF code is received.
Format:
| ASCII code: | ESC | C | n |
| Decimal: | 27 67 | n | |
| Hexadecimal: | 1B | 43 | n |
Comments:
Sets the page length to n lines in the current line spacing. The value of n must be from 1 - 127. After the printer receives this command, the current print position becomes the top line of the page. This command is ignored if the current line spacing is 0. This command must be at the beginning of a line.
ESC C0
Set Page Length in Inches
Format:
| ASCII code: | ESC | C | NUL | n |
| Decimal: | 27 | 67 | 0 | n |
| Hexadecimal: | 1B | 43 | 00 | n |
colnments:
Sets the page length to n inches. The value of n must be from 1 - 22. After the printer receives this command, the current print position becomes the top line of the page. This command must be at the beginning of a line.
Line feeding
LF
Line Feed
Format:
ASCII code: L F
Decimal: 10
Hexadecimal: OA
Comments:
Moves the current print position down one line and to the left margin. The line spacing can be set with ESC 0, ESC 2, ESC A, or ESC 3. See also ESC q.
Format:
| ASCII code: | ESC | 0 |
| Decimal: | 27 | 48 |
| Hexadecimal: | 1B | 30 |
Comments:
Sets the line spacing to 1/8th of an inch for subsequent line feed commands. The "0" is the character zero (30 hex) and not ASCII code 0. When a line feed is made after setting the line spacing to 1/8th of an inch, the reference point for positioning is the bottom edge of the immediately preceding line space.
ESC 2
Select 1/6-inch Line Spacing
Format:
| ASCII code: | ESC | 2 |
| Decimal: | 27 | 50 |
| Hexadecimal: | 1B | 32 |
Comments:
Sets the line spacing to 1/6 of an inch for subsequent line feed commands. The "2" is the character two (32 hex) and not ASCII code 2. This is the default at power on.
When a line feed is made after setting the line spacing to 1/6th of an inch, the reference point for positioning is the bottom edge of the immediately preceding line space.
ESC A
Select n/60-inch Line Spacing
Format:
| ASCII code: | ESC | A | n |
| Decimal: | 27 | 65 | n |
| Hexadecimal: | 1B | 41 | n |
Comments:
Sets the line spacing to n/60 of an inch for subsequent line feed commands. The value of n must be from 0 - 127. When a line feed is made after setting the line spacing with this command, the reference point for positioning is the bottom edge of the immediately preceding line space. This command changes the character baseline as well as the line spacing. The baseline is set at the point that is 3/4ths of the distance from the top edge of the line space to the bottom edge. If the line spacing is changed in the middle of a line the characters on that line may not align properly.
ESC3 Set Line Spacing Using Minimum Increment
Format:
| ASCII code: | ESC | 3 | n |
| Decimal: | 27 | 51 | n |
| Hexadecimal: | 1B | 33 | n |
Comments:
Sets the line spacing to n tunes the minimum increment (specified by ESC q) for subsequent line feed commands. The “3” is the character three (33 hex) and not ASCII code 3. The value of n must be from 0 - 255.
ESC! Immediate Line Feed
Format:
| ASCII code: | ESC | J | n |
| Decimal: 27 | 74 | n | |
| Hexadecimal: | 1B | 4A | n |
Comments:
Advances the print position vertically (towards the bottom of the page) by n times the minimum increment specified by ESC q. The value of n must be from 0 - 255. This command does not change the horizontal print position and does not affect the line spacing.
Vertical tabbing
VT Vertical Tab
Format:
| ASCII code: | VT |
| Decimal: | 11 |
| Hexadecimal: | OB |
Comments:
Advances the print position vertically to the next vertical tab stop. After executing this command, the next character received by the printer is printed at the left margin. Vertical tab stops are set with ESC B. If no vertical tab stops follow the current print position, this code performs the same function as FF. If no vertical tab stops have been set, the print position advances one line.
Format:
| ASCII code: | ESC | B | nl | n2 | ... | NUL |
| Decimal: | 27 | 66 | nl | n2 | . . . | 0 |
| Hexadecimal: | 1B | 42 | nl | n2 | . . . | 00 |
Comments:
Sets up to 16 vertical tabs in the current line spacing. Tab settings are not affected by subsequent changes in line spacing. The tab settings are entered as nl, n2, etc., all from 1 - 255, in ascending order. The top of the page is counted as line 1. The NUL character indicates the end of the command. Before you set vertical tabs there are default vertical tabs set every 1/6 inch. Send ESC B NUL to clear all vertical tabs. Tabs are cancelled if paper size is changed.
Horizontal Motion
Margins
ESC 1
Set Left Margin
Format:
| ASCII code: | ESC | I | n |
| Decimal: | 27 | 108 | n |
| Hexadecimal: | 1B | 6C | n |
Comments:
Sets the left margin to n columns from the left edge of the physical print area. The width of one column is equal to the current character pitch, and the left edge of the physical print area is counted as the first column. Settings made in the proportional mode are treated as pica. The printer accepts this command only if it is received while the current print position is at the beginning of a line. The left margin setting is canceled when the paper size is changed. The variable n must be between 0 - 255. The first column is number 0.
Format:
| ASCII code: | ESC | Q | n |
| Decimal: | 27 | 81 | n |
| Hexadecimal: | 1 B | 51 | n |
Comments:
Sets the right margin n columns from the left edge of the physical print area. The width of one column is equal to the current character pitch, and the left edge of the physical print area is counted as the first column. Settings made in the proportional mode are treated as pica.
The printer accepts the command only if it is received while the current print position is at the beginning of a line.
Print position movement
BS
Backspace
Format:
| ASCII code: | BS |
| Decimal: | 8 |
| Hexadecimal: | 08 |
Comments:
Moves the print position one character's width to the left. The amount of movement is determined by the pitch of the preceding character. The BS code can only backspace one character. The BS code will be ignored if it appears, at the left margin, at the beginning of a line, or following HT, ESC \$, ESC \, or ESC).
ESC \$
Set Absolute Print Position on Line
Format:
| ASCII code: | ESC | $ | n1 | n2 |
| Decimal: | 27 | 36 | n1 | n2 |
| Hexadecimal: | 1B | 24 | n1 | n2 |
Comments:
This command specifies the horizontal distance from the left margin that subsequent characters are to be printed. The distance is specified in units of the minimum increment specified by ESC q, using the formula: total distance = nl + (n2 × 256).
Format:
| ASCII code: | ESC | \ | n1 | n2 |
| Decimal: | 27 | 92 | nl | n2 |
| Hexadecimal: | 1B | 5C | nl | n2 |
Comments:
Specifies the position (relative to the current position) at which subsequent data will print. To find nl and n2, first calculate the displacement required in units of the minimum increment specified by ESC q. The displacement must be from 0 - 16383. If the displacement is to the left, subtract it from 65536. Send the resulting number using this formula: total units = nl + (n2 x 256). If you specify a position past the right margin, this command will wrap to the next line if DIP switch l-6 is ON. Otherwise, information that would print past the right margin will be ignored.
Horizontal tabbing
HT
HorizontalTab
Format:
ASCII code: H T
Decimal: 9
Hexadecimal: 09
Comments:
Advances the print position horizontally to the next horizontal tab stop. The default settings are at intervals of eight characters in the default pitch. The command is ignored if there is no horizontal tab stop to the right of the current print position. Horizontal tab stops are set with ESC D. When used with automatic underlining, the area skipped is not underlined.
Format:
| ASCII code: | ESC | D | nl | n2 | ... | NUL |
| Decimal: | 27 68 | nl | n2 | ... | 0 | |
| Hexadecimal: | 1B | 44 | nl | n2 | . . . | 00 |
Comments:
Sets up to 32 horizontal tabs, which are entered as nl, n2, etc. (from 1 - 255) with the NUL character or any value less than the previous one terminating the command. Tab stops are set as absolute positions determined by the current character pitch, so they do not change if the character pitch is changed. Settings made in the proportional mode are treated as pica. Upon initialization, horizontal tab stops are set in every eighth column. All tabs can be cleared by sending ESC D NUL. HT code will then be ignored.
Page Position
Orientation
ESC o
Set Page Orientation
Format:
| ASCII code: | ESC | o | n |
| Decimal: | 27 | 111 | n |
| Hexadecimal: | 1 B | 6F | n |
Comments:
Sets the page orientation. The following values can be used for n:
0: Portrait orientation (printed lines of text perpendicular to the direction of paper travel).
1: Landscape orientation (printed lines of text parallel to the direction of paper travel).
If orientation is changed in the middle of a page, all data received to that point is printed and the sheet is ejected. Portrait- and landscape-oriented text cannot be mixed on a page.
Margins
ESC
Set Page Format
Format:
| ASCII code: | ESC | ( | nl | n2 | . | . | . | n9 |
| Decimal: | 27 | 40 | n1 | n2 | . | . | . | n9 |
| Hexadecimal: | 1B | 28 | nl | n2 | . | . | . | n9 |
Comments:
Specifies margins (top, bottom, left, and right) within a specified page. The following values can be used for nl, which specifies the paper size:
0: Same as physical paper size
1: A4 fed lengthwise
2: A5 fed lengthwise
4: B5 fed lengthwise
5: Letter fed lengthwise
6: Half Letter fed lengthwise
7: Legal fed lengthwise
9: A4 fed sideways
10: A5 fed sideways
12: B5 fed sideways
13: Letter fed sideways
14: Half Letter fed sideways
15: Legal fed sideways
The next eight characters are used to set the margins: n2 and n3 specify the top margin; n4 and n5 specify the bottom margin; n6 and n7 specify the left margin; n8 and n9 specify the right margin. In each case, the margin is specified in units of the minimum increment, using the formula: total distance = n1 + (n2 x 256). The minimum increment is specified with ESC q. The margins are cleared if the paper size is changed. Margins must be less than 5461 in dots.
Print position movement
ESC)
Set Absolute Print Position on Page
Format:
| ASCII code: | ESC | ) | nl n2 | n3 | n4 |
| Decimal: | 27 | 41 | nl n2 | n3 | n4 |
| Hexadecimal: | 1B | 29 | nl n2 | n3 | n4 |
Comments:
Specifies the position at which subsequent data is printed. The values of nl and n2 specify the distance of the print position from the origin in the X (horizontal) direction; n3 and n4 specify the distance of the print position from the origin in the Y (vertical) direction. In each case, the distance is specified in units of the minimum increment, using the formula: total distance = n1 + (n2 × 256). The minimum increment is specified with ESC q.
Format:
| ASCII code: | ESC | . | nl n2 | n3 | n4 | |
| Decimal: 27 | 46 | nl n2 | n3 | n4 | ||
| Hexadecimal: | 1 | B | 2E | nl | n2 | n3 |
Comments:
Specifies the horizontal and vertical distance of the logical coordinate system's origin from the physical coordinate system's origin. The physical origin is always in the upper left corner of the page. This command lets you move the logical origin (referred to by all the page layout commands) anywhere on the page. Some of your printing may run off the paper if you move the logical coordinates too far down or to the right.
The values of n1 and n2 specify the distance between the physical and logical origins in the X (horizontal) direction; n3 and n4 specify the distance between the origins in the Y (vertical) direction. In each case, the distance is specified in units of the minimum increment, using the formula: total distance = n1 + (n2 x 256). The minimum increment is specified with ESCq.
Overall Printing Style
Font selection
ESC k
Select Typeface
Format:
| ASCII code: | ESC | k | n |
| Decimal: | 27 | 107 | n |
| Hexadecimal: | 1B | 6B | n |
Comments:
The following values can be used for n:
0: Roman 5: OCR-B
1: Sansserif 6: Modem
2: Courier 7: Gothic
3: Prestige 8: EDP
4: Script
The value of n must be between 0 and 255. The values between 9 and 127 are reserved by Epson.
Format:
| ASCII code: | ESC | y | nl | n2 |
| Decimal: | 27 | 121 | nl | n2 |
| Hexadecimal: | 1B | 79 | nl | n2 |
Comments:
Selects a character set specified by nl and n2 as shown in the following table. If n1 and n2 are outside the given ranges, or character sets that are not available are specified, the command is ignored. It will also be ignored if the specified character set does not match the current page orientation.
Table A-I. Character sets
| nl | n2 | Character set group |
| 0 | 0 to 7 | Internal character set |
| 1 | 0 to 15* | IC card character set |
| 2 | 0 to 7** | Download character set |
* If you are using two font cards, the fonts in the card in the A slot are numbered 0 -X, and the numbering of the fonts in the B slot begins with X+1.
** To select a download character set with this command, subtract 1 from the download font number. For example, to select download font 2, specify font 1.
ESC t
Turn Extended Graphics Mode On/Off
Format:
| ASCII code: | ESC | t | n |
| Decimal: | 27 | 116 | n |
| Hexadecimal: | 1B | 74 | n |
Comments:
The extended graphics font includes a range of character graphics. When you turn on the extended graphics font, the font that is the closest size to the font that you are using is selected. The following values can be used for n:
1: Mode is turned ON.
0: Mode is turned OFF.
Format:
| ASCII code: | ESC | ! | n |
| Decimal: | 27 | 33 | n |
| Hexadecimal: | 1B | 21 | n |
Comments:
Selects any valid combination of print modes in the table below. The variable n is determined by adding together the values of the desired modes from the table. Appropriate fonts must be available for the italic and proportional modes.
Table A-2. Master Select numbers
| Decimal | Hex Mode | |
| 0 | 00 | Pica (10 cpi) |
| 1 | 01 | Elite (12 cpi) |
| 2 | 02 | Proportional |
| 8 | 08 | Emphasized |
| 16 | 10 | Emphasized |
| 32 | 20 | Double-wide |
| 64 | 40 | Italic |
| 128 | 80 | Underline |
Print Size and Character Width
| ESC r | Select Character Set by Point Size | ||
| Format: | |||
| ASCII code: | ESC | [ | n |
| Decimal: | 27 | 91 | n |
| Hexadecimal: | 1B | 5B | n |
Comments:
Changes the character point size to that specified by the value of n as shown in the following table. If the specified font is not available, the font is selected according to the font selection procedure.
Table A-3. Character sizes
| Decimal | Hex | Point Size |
| 55 | 37 | 7 point |
| 56 | 38 | 8 point |
| 65 | 41 | 10 point |
| 67 | 43 | 12 point |
| ESC 1 | Select Character Set by Weight | ||
| Format: | |||
| ASCII code: | ESC | ] | n |
| Decimal: | 27 | 93 | n |
| Hexadecimal: | 1B | 5D | n |
Comments:
Changes the character weight to that specified by the value of n as shown in the following table. If the specified font is not available, the previous font is used.
Tab& A-4. Character sizes
| Decimal | Hex Weight | |
| 72 | 48 | Hair line (extra light) |
| 76 | 4c | Light |
| 77 | 4D Medium | |
| 66 | 42 | Bold |
| 68 | 44 | Demi Bold |
| 69 | 45 | Extra Bold |
Format:
| ASCII code: | ESC | c | n |
| Decimal: | 27 99 | n | |
| Hexadecimal: | 1B | 63 | n |
Comments:
Changes the character pitch to that specified by the value of n as shown in the following table. If the specified font is not available, the font is selected according to the font selection procedure.
Table A-5. Character sizes
| Decimal Hex | Pitch | |
| 48 | 30 | 10 characters per inch |
| 50 | 32 | 12 characters per inch |
| 53 | 35 | 15 characters per inch |
| 51 | 33 | 13 characters per inch |
ESC
Select Pitch
Format:
| ASCII code: | ESC | , | n1 (n2 n3) |
| Decimal: | 27 | 44 | nl (n2 n3) |
| Hexadecimal: | 1B | 2C | nl (n2 n3) |
Comments:
Specifies the print pitch (character spacing), which determines the distance from the left edge of one character cell to the left edge of the next one. If ESC SP (intercharacter spacing) is set with a value more than 0, the distance between the characters will be the value of ESC SP plus the value in the ESC, command. If n1=0, the pitch assigned to each character is used. If n1=1 the pitch specified by n2 and n3 is selected and characters are printed in that pitch. The distance is specified in units of the minimum increment (specified by ESC q), using the formula: total distance = n2 + (n3 × 256). This command does not work if you are using proportional spacing.
ESC p
Turn Proportional Mode On/Off
Format:
| ASCII code: | ESC | p | n |
| Decimal: | 27 | 112 | n |
| Hexadecimal: | 1B | 70 | n |
Comments:
The following values can be used for n:
1: Mode is turned ON.
0: Mode is turned OFF.
If a proportional font is not available, a fixed pitch font will be used with proportional spacing.
s o Select Double-wide Mode (one line)
Format:
| ASCII code: | SO |
| Decimal: | 14 |
| Hexadecimal: | OE |
Comments:
Double-wide mode doubles the width of all characters and spaces.
This mode is canceled when the printer receives the DC4, LF, VT, ESC WO or FF code.
ESC SO Select Double-wide Mode (one line)
Format:
| ASCII code: | ESC | SO |
| Decimal: | 27 | 14 |
| Hexadecimal: | 1 B | OE |
Comments:
Duplicates the SO command.
DC4 Cancel Double wide Mode (one line)
Format:
| ASCII code: | DC4 |
| Decimal: | 20 |
| Hexadecimal: | 14 |
Comments:
Cancels one-line double-wide printing selected by SO or ESC SO, but not double-wide printing selected by ESC W or ESC !.
ESC W
Turn Double-wide Mode On/Off
Format:
| ASCII code: | ESC | W | n |
| Decimal: | 27 | 87 | n |
| Hexadecimal: | 1B | 57 | n |
Comments:
Double-wide mode doubles the width of all characters and spaces. The following values can be used for n:
1: Mode is turned ON.
0: Mode is turned OFF.
ESC w
Turn Double-high Mode On/Off
Format:
| ASCII code: | ESC | w | n |
| Decimal: | 27 | 119 | n |
| Hexadecimal: | 1B | 77 | n |
Comments:
Double-high mode doubles the height of all characters. The following values can be used for n:
1: Mode is turned ON.
0: Mode is turned OFF.
ESCz
Set Character Magnification
Format:
| ASCII code: | ESC | z | nl | n2 |
| Decimal: | 27 | 122 | nl | n2 |
| Hexadecimal: | 1B | 7A | nl | n2 |
Comments:
gets the horizontal and vertical character magnification, which is specified independently for each direction. The value of nl specifies the horizontal character magnification (character width); the value of n2 specifies the vertical character magnification (character height). The following values can be used for nl and n2:
1: Normal width or height
2: Double-wide or double-high
3: Triple-wide or triple-high
Does not change line spacing.
Print Enhancement
ESCE Select Emphasized Mode
Format:
| ASCII code: | ESC | E |
| Decimal: | 27 | 69 |
| Hexadecimal: | 1B | 45 |
Comments:
Makes text bolder by printing each dot twice, with the second offset one dot to the right. This command is canceled by ESC F.
| ESC F | Cancel Emphasized Mode | ||
| Format: | |||
| ASCII code: | ESC | F | |
| Decimal: | 27 | 70 | |
| Hexadecimal: | 1B | 46 | |
Comments:
Cancels emphasized mode selected with ESC E.
| ESC G | Select Emphasized Mode | ||
| Format: | |||
| ASCIIcode: | ESC | G | |
| Decimal: | 27 | 71 | |
| Hexadecimal: | 1B | 47 | |
Comments:
Duplicates the ESC E command, but must be turned off with ESC H.
ESCH Cancel Emphasized Mode
Format:
| ASCII code: | ESC | H |
| Decimal: | 27 | 72 |
| Hexadecimal: | 1B | 48 |
Comments:
Cancels emphasized mode selected with ESC G.
ESC SO
Select Superscript Mode
Format:
| ASCII code: | ESC | S | NUL |
| Decimal: | 27 | 83 | 0 |
| Hexadecimal: | 1B | 53 | 00 |
Comments:
Prints characters high on the text line. It is canceled with ESC T. This command only works if there is a 15 pitch font loaded. Does not work in the proportional mode.
ESC S1
Select Subscript Mode
Format:
| ASCII code: | ESC | S | SOH |
| Decimal: | 27 | 83 | 1 |
| Hexadecimal: | 1B | 53 | 01 |
Comments:
Prints characters low on the text line. It is canceled with ESC T. This command only works if there is a 15 pitch font loaded. Does not work in the proportional mode.
ESCT
Cancel Superscript/Subscript
Format:
| ASCII code: | ESC | T |
| Decimal: | 27 | 84 |
| Hexadecimal: | 1B | 54 |
Comments:
Cancels either superscript or subscript mode.
ESC -
Turn Underlining Mode On/Off
Format:
| ASCII code: | ESC | - | n |
| Decimal:27 | 45 | n | |
| Hexadecimal: | 1B | 2D | n |
Comments:
This mode provides continuous underlining, including spaces. The following values can be used for n:
1: Mode is turned ON.
0: Mode is turned OFF.
Changing the baseline with ESC + will change the underline position.
Format:
| ASCII code: | ESC | + | n |
| Decimal: | 27 | 43 | n |
| Hexadecimal: | 1B | 2B | n |
Comments:
Shifts the character base line from the standard base line position. To find n, calculate the displacement required in units of the minimum increment specified by ESC q. The displacement must be from 0 - 127. If the base line is to be moved up, subtract the displacement from 256. If the amount of base line movement exceeds the current line spacing the command is ignored.
ESC u Character Alignment
| Format: | |||
| ASCII code: | ESC | u | n |
| Decimal: | 27 | 117 | n |
| Hexadecimal: | 1B | 75 | n |
Comments:
The following values can be used for n:
0: Base line alignment
1: Cell top edge alignment
2: Cell bottom edge alignment
3: Character center alignment
4: Cell center alignment
The position of a character is determined according to the position of the preceding character.
Word Processing
ESC a
Justification
Format:
| ASCII code: | ESC | a | n |
| Decimal: | 27 | 97 | n |
| Hexadecimal: | 1B | 61 | n |
Comments:
The following values can be used for n:
0: Selects left justification
1: Selects centering
2: Selects right justification
3: Selects full justification
The default setting is n = 0. Lines of text are positioned whenever a line is ended with CR, LF, VT, or FF. In order to affect a line of text, this command must be received at the beginning of the line. The HT and ESC \$ commands are ignored if received after selecting centered (n = 1) or flush right (n = 2) positioning.
ESC SP
Set Intercharacter Space
Format:
| ASCII code: | ESC | SP | n |
| Decimal: | 27 | 32 | n |
| Hexadecimal: | 1 B | 20 | n |
Comments:
Sets the amount of space between characters. The value of n specifies the number of dots from O-127. The initial setting is 0. The minimum increment is specified with ESC q.
Character Sets
ESC 4
Select Italic Mode -
Format:
| ASCII code: | ESC | 4 |
| Decimal: | 27 | 52 |
| Hexadecimal: | 1B | 34 |
Comments:
Selects an italic font. This command is only effective when the printer contains an italic or oblique font.
ESC 5
Cancel Italic Mode
Format:
| ASCII code: | ESC | 5 |
| Decimal: | 27 | 53 |
| Hexadecimal: | 1B | 35 |
Comments:
This command ends printing with italic or oblique characters.
ESC R
Select an International Character Set
Format:
| ASCII code: | ESC | R | n |
| Decimal: | 27 | 82 | n |
| Hexadecimal: | 1B | 52 | n |
Comments:
See Appendix D for full information on international character sets.
The following values can be used for n:
0: USA 5: Sweden
1: France 6: Italy
2: Germany 7: Spain
3: UK 8: Japan
4: Denmark 9-15: USA
User-defined Characters
ESC %
Select Download Font Set
Format:
| ASCII code: | ESC | % | n |
| Decimal: | 27 | 37 | n |
| Hexadecimal: | 1B | 25 | n |
Comments:
Selects a download font. The value of n specifies the number of the download font that you want to use. The value of n must be between 1 - 8.
ESC d
Font Set Definition
Format:
| ASCII code: | ESC d | n1 n2 n3 n4 n5 n6 dl d2... dm |
| Decimal: | 27 1 0 0 | n1 n2 n3 n4 n5 n6 d1 d2... dm |
| Hexadecimal: | 1B 64 | nl n2 n3 n4 n5 n6 dl d2... dm |
comments:
This command is used for downloading up to eight additional fonts for the GQ-3500. This command can also delete a download font set.
Because of the complexity of this command, Epson is making available a programmer's manual that treats the subject in detail.
User-Defined Forms
ESC
Print Ruled Line
Format:
| ASCII code: | ESC | nl | n2 | ... | n10 | |
| Decimal: | 27 | 95 | nl | n2 | ... | n10 |
| Hexadecimal: | 1 B | 5F | nl | n2 | ... | n10 |
Comments:
Prints a horizontal or vertical ruled line. See pages 6-8 and 6-9 for examples. The following values can be used for nl, which specifies the type of line:
0: Midline
1: Dottedline
2: Dottedline
3: Dotted line
4: Dot-dash line
The value of n2 and n3 specifies the horizontal distance (in units of the minimum increment) from the logical origin (Y-axis) to the line's starting point, using the formula: n2 + (n3 x 256). The value of n4 and n5 specifies the vertical distance (in units of the minimum increment) from the logical origin (X-axis) to the line's starting point, using the formula: n4 + (n5 x 256).
The following values can be used for n6, which specifies the line direction:
0: Horizontal line
1: Vertical line.
The value of n7 and n8 specifies the line thickness (in units of the minimum increment), using the formula: n7 + (n8 × 256) . The value of n9 and n10 specifies the line length (in units of the minimum increment), using the formula: n9 + (n10 × 256) . The minimum increment is specified with ESC q.
| ESC { | Define/ Delete Form | |||||
| Format: | ||||||
| ASCII code: | ESC | { | nl | n2 | dl | ... |
| Decimal: | 27 | 123 | nl | n2 | dl | ... |
| Hexadecimal: | 1B | 7B | nl | n2 | dl | ... |
Comments:
Defines a form that can be printed on each page or deletes a form. The following values can be used for nl:
0: Delete a defined form
1: Start form definition
2: End form definition
The value of n2 must be from 1 to 8; it specifies the number of the form being defined or deleted. If nl = 2 (to end a form definition) then n2 can be eliminated. The full command format for form definition is as follows:
ESC {n1 n2 d1 d2 d3 ... dmESC(2.
Here, d1 to dm are the data (including ESC sequences) making up the form. Form definition will not work if any of the following codes are included in the definition data: FF, ESC @, DC3, ESC., ESC }, or other form definition commands.
When a form is to be printed starting at a specific location on a page, you should specify the print position at the beginning of the form. When using this command to delete a form, the command must not be used on the current page. After printing of a form, the active print position is located immediately after the last print position in the form.
ESC } Turn Forms Overlay PrintingOn/Off
Format:
| ASCII code: | ESC | } | nl | n2 |
| Decimal: | 27 | 125 | nl | n2 |
| Hexadecimal: | 1B | 7D | nl | n2 |
Comments:
Selects printing using a form defined with ESC {. The following values can be used for n1:
1: Mode is turned ON.
0: Mode is turned OFF.
The value of n2 must be from 1 to 8; it specifies the number of the form to be printed. When overlays are on, the selected form is automatically printed at the beginning of each page until printing is stopped by using this command with 0 specified for nl.
Graphics
| ESC n | Define Background | |||||
| Format: | ||||||
| ASCII code: | ESC | n | n | dl | ... | d32 |
| Decimal: | 27 | 110 | n | dl | ... | d32 |
| Hexadecimal: | 1B | 6E | n | dl | ... | d32 |
Comments:
Defines a background which can be used with ESC - or PAINT command. The value of n1 specifies the number of the background being defined; it must be 7 or 8. Following nl are sixteen pairs of characters (32 bytes in all) that specify the background pattern.
The background pattern is defined as a square of 16 dots by 16 dots. Each row of dots is specified by two bytes, starting at the top.
Format:
| ASCII code: | ESC | - | nl | n2 |
| Decimal: | 27 | 126 | nl | n2 |
| Hexadecimal: | 1B | 7E | nl | n2 |
Comments:
Selects background printing. The value of nl specifies the background area and type of background. The background area is a rectangular area determined by specifying its start and end. See page 6-6 for examples.
The following values can be used for nl:
0: End of background area
I-6: Start of background area and type of pm-defined pattern
7-8: Start of background area and userdefined background pattern
9: Start of background area and reverse printing
The value of n2 must always be 1. See Chapter 6 for examples and more information.
ESCv1
Define Graphic Image
Format:
| ASCII code: | ESC | v | SOH | nl . . . n5 | ... |
| Decimal: | 27 | 118 | 1 | nl . . . n5 | ... |
| Hexadecimal: | 1B | 76 | 01 | nl . . . n5 | ... |
Comments:
Defines a graphic image (bit image) pattern. The value of nl (from 0 - 127) specifies the number assigned to the image. The value of n2 and n3 specifies the width of the image being defined in units of the minimum increment specified by ESC q. The value of n4 and n5 specifies the height of the image. In each case, the size is determined using the formula: nl + (n2 × 256). These are followed by the bit image data. If a specified image is already defined, the command is ignored.
The bit image data is defined as horizontal rows of dots, each byte controlling eight dots in a horizontal row. You need to supply (width x height) / 8 bytes of data.
Format:
| ASCII code: | ESC | v | STX | nl | . | . | . | n7 |
| Decimal: | 27 | 118 | 2 | nl | . | . | n7 | |
| Hexadecimal: | 1B | 76 | 02 | nl | . | . | . | n7 |
Comments:
Prints a graphic image (bit image) pattern defined with ESC v 1. The value of nl (from 0 - 127) specifies the number assigned to the image. The values of n2 and n3 specify the width and height resolution, respectively. The following values can be used for n2 and n3:
1: 1/300 of an inch (normal)
2: 1/150 of an inch (2 times size)
3:1/100 of an inch (3 times size)
The value of n4 and n5 specifies the horizontal distance from the logical origin (Y-axis) to the left side of the image in units of the minimum increment. The value of n6 and n7 specifies the vertical distance from the logical origin (X-axis) to the top of the image. This formula determines the distance: n4 + (n5 × 256) or n6 + (n7 × 256) .
ESC v0
Erase Graphic Image
Format:
| ASCII code: | ESC | v | NUL | nl |
| Decimal: | 27 | 118 | 0 | n1 |
| Hexadecimal: | 1B | 76 | 00 | nl |
Comments:
Erases graphic images from the printer's memory. The value of nl (from 0 - 127) specifies the number assigned to the image.
Graphics primitives
ESC!
Select Graphic Mode
Format:
| ASCII code: | ESC | ! | nl | . | . | . | n6 |
| Decimal: | 27 | 124 | nl | . | . | . | n6 |
| Hexadecimal: | 1B | 7C | nl | . | . | . | n6 |
Comments:
Switches to the graphics primitive mode, allowing the use of the ALLOCATE, CIRCLE, PANT, LINE, and EXIT graphic primitive commands. The value of nl determines the type of operation to be performed after switching to the graphic mode. The following values can be used for n1:
0: Delete image from printer memory
1: Define graphic image (data follows this command)
2: Print defined image
3: Define image (same as 1) and print image at current print position
The value of n2 (from 1 - 8) specifies the number assigned to the image. The value of n3 and n4 specifies the horizontal distance from the logical origin (Y-axis) to the left side of the image in units of the minimum increment. The value of n5 and n6 specifies the vertical distance from the logical origin (X-axis) to the top of the image. In each case, the distance is determined using the formula: nl + (n2 x 256). Values should be specified for n3, n4, n5, and n6 only when nl is 2.
Note
The graphic primitive commands that follow should be entered as ASCII strings followed by a carriage return (indicated as
ALLOCATE
Reserve Graphic Area
Format:
ASCII code: ALLOCATE (nl, n2)
Comments:
This command reserves an area for preparing graphic images with the simplified graphics functions. The width, in units of the minimum increment, is defined by nl. The height is defined by n2. Both parameters should be entered as decimal integers, with a comma separating the two.
CIRCLE
Draw Circle or Arc
Format:
ASCII code: CIRCLE (nl, n2), n3, n4, n5, n6, n7, n8, n9
Comments:
Draws a circle or an arc in the graphic area reserved by the ALLOCATE command. The value of n1 and n2 specifies the X- and Y-coordinates, respectively, of the center of the circle. The value of n3 specifies the radius of the circle. These are the only required parameters.
The following values can be used for n4:
0: Circle prints in black (default).
1: Circle does not print (useful only if circle is painted; then the border will not show as a solid black line).
The value of n5 and n6 specifies the starting and ending angle, if you are printing only an arc instead of a complete circle. Angles are specified in degrees. If n5 and n6 are negative then pie-shaped wedges are drawn, with lines connecting the center of the circle to the ends of the arc.
The value of n7 determines the ratio of the horizontal axis to the vertical axis, creating an ellipse. The value of n7 can range from 4 to 4. Values from -1 to 1 create a true circle.
The value of n8 determines the line style. The value of n8 is interpreted as a 64-bit binary number where each bit represents one dot on the line. Bits set to 1 print, and bits set to 0 don't.
The following values can be used for n9, which determines the line thickness:
0: Thin line
1: Medium line (default)
2: Thick line
Any of the optional parameters can be left out, but if you are specifying other parameters after the missing ones, you must include commas to hold the place. All measurements are made in units of the minimum increment, and all parameters are entered as ASCII text strings.
PAINT
Paint Area
Format:
ASCII code: PAINT(n1, n2), n 3
Comments:
Fills a closed area containing a specified location with a specified background pattern. The values of nl and n2 (which use the increment specified by ESC q) specify the X- and Y-coordinates, respectively, of some point within the closed area. The values for n3 are one less than those used with ESC \~. The values nl and n2 must be within the area reserved by the ALLOCATE command.
Format:
ASCII code: LINE (XI, Y1) - (X2, Y2), nl, n2, n3, n4
Comments:
This command draws a line or rectangle between two points, (X1,Y 1) and (X2,Y2) using the minimum increment specified by ESC q. The following values can be used for nl:
0: Line/ box prints in black (default).
1: Line/ box does not print (useful only if box is painted; then the border will not show as a solid black line).
The following values can be used for n2:
0: Draw straight line between points.
1: Draw a box ((XI, Y1) is the upper left comer; (X2, Y2) is the lower right comer).
The value of n3 determines the line style. The value of n3 is interpreted as a 64-bit binary number where each bit represents one dot on the line. Bits set to 1 print, and bits set to 0 don't.
The following values can be used for n4, which determines the line thickness:
0: Thin line
1: Medium line (default)
2: Thickline
EXIT
End Graphic Mode
Format:
ASCII code: EXIT
Comments:
Ends the simplified graphics mode selected by ESC I.
LQ Emulation Commands
The following section lists and describes all the LQ Emulation mode commands. See Chapter 2 for an explanation of the LQ Emulation mode.
Printer Operation
Initialization
ESC @ Initialize Printer
Format:
| ASCII code: | ESC | @ |
| Decimal: | 27 | 64 |
| Hexadecimal: | 1B | 40 |
Comments:
Resets the printer settings to the initial power-on values. Does not affect page orientation or SelectType settings.
Selection
DC1 Select Printer
Format:
| ASCII code: | DC1 |
| Decimal: | 17 |
| Hexadecimal: | 11 |
Comments:
Returns the printer to the selected state if it has been deselected by the printer deselect code (DC3). Does not select the printer if it has been set off line by pressing the ON LINE button.
DC3 Deselect Printer
Format:
| ASCII code: | DC3 |
| Decimal: | 19 |
| Hexadecimal: | 13 |
Comments:
Puts the printer into the deselected state until select printer code (DC1) is received. The printer cannot be reselected with the ON LINE button.
Beeper
BEL
Beeper
Format:
ASCII code: BEL
Decimal: 7
Hexadecimal: 07
Comments:
Sounds the printer's beeper.
Data Control
CR
Carriage Return
Format:
ASCII code: CR
Decimal: 13
Hexadecimal: OD
Comments:
Returns the print position to the left margin. A line feed may be added if the AUTO FEED XT line on the parallel interface is held LOW.
Vertical Motion
Form feeding
FF
Form Feed
Format:
ASCII code: FF
Decimal: 12
Hexadecimal: OC
Comments:
Advances the paper to the top of the next form according to the current page length. If the next top of form is on a different physical page, the contents of the print buffer are printed and the page is ejected.
Format:
| ASCII code: | ESC | C | n |
| Decimal: | 27 | 67 | n |
| Hexadecimal: | 1B | 43 | n |
Comments:
Sets the page length to n lines in the current line spacing. The value of n must be from 1-127 lines. The top of form position is set to the current line.
ESC C0
Set Page Length in Inches
Format:
| ASCII code: | ESC | C | NUL | n |
| Decimal: | 27 | 67 | 0 | n |
| Hexadecimal: | 1B | 43 | 00 | n |
Comments:
Sets the page length to n inches. The value of n must be from 1-22. The top of form position is set to the current line.
Line feeding
LF
Line Feed
Format:
| ASCII code: | LF |
| Decimal: | 10 |
| Hexadecimal: | 0A |
Comments:
Print position advances one line in the current line spacing, and moves to the left margin.
ESC 0
Select 1/8-inch Line Spacing
Format:
| ASCII code: | ESC | 0 |
| Decimal: | 27 | 48 |
| Hexadecimal: | 1B | 30 |
Comments:
Sets the line spacing to 1/8 of an inch for subsequent line feed commands.
ESC 2
Select W-inch Line Spacing
Format:
| ASCII code: | ESC | 2 |
| Decimal: | 27 | 50 |
| Hexadecimal: | 1B | 32 |
Comments:
Sets the line spacing to 1/6 of an inch for subsequent line feed commands.
ESC 3 Select n/180-inch Line Spacing
Format:
| ASCII code: | ESC | 3 | n |
| Decimal: | 27 | 51 | n |
| Hexadecimal: | 1B | 33 | n |
Comments:
Sets the line spacing to n/ 180 of an inch for subsequent line feed commands.
ESC A Select n/ 60-inch Line Spacing
Format:
| ASCII code: | ESC | A | n |
| Decimal: | 27 | 65 | n |
| Hexadecimal: | 1B | 41 | n |
Comments:
Sets the line spacing to n/60 of an inch for subsequent line feed commands. The value of n must be from 0 - 127.
ESC J Perform n/180-inch Line Feed
Format:
| ASCII code: | ESC | J | n |
| Decimal: | 27 | 74 | n |
| Hexadecimal: | 1B | 4A | n |
Comments:
Advances the print position n/ 180 of an inch. The value of n must be from 0 - 255. This command produces an immediate line feed but does not affect subsequent line spacing and does not produce a carriage return.
Vertical tabbing
VT
Vertical Tab
Format:
ASCII code: VT
Decimal: 11
Hexadecimal: OB
Comments:
Advances the print position to the next tab setting in the channel selected by ESC B. If no channel has been selected, channel 0 is used. If no vertical tabs have been selected, the print position advances one line to the left margin.
| ESC B | Set Vertical Tabs | |||||
| Format: | ||||||
| ASCII code: | ESC | B | nl | n2 | ... | NUL |
| Decimal: | 27 | 66 | nl | n2 | ... | 0 |
| Hexadecimal: | 1B | 42 | nl | n2 | ... | 00 |
Comments:
Sets up to 16 vertical tabs in the current line spacing. Tab settings are not affected by subsequent changes in line spacing. The tab settings are entered as nl, n2, etc., all from 1 - 255, in ascending order. The 0 character indicates the end of the command. All settings are stored in channel 0 (see ESC b). ESC B 0 clears the tab settings.
ESC b Set Vertical Tabs in Channels
| Format: | ||||||||
| ASCII code: | ESC | b | c | nl | n2 | . | . | NUL |
| Decimal: | 27 | 98 | c | nl | n2 | . | . | 0 |
| Hexadecimal: | 1B | 62 | c | nl | n2 | . | . | 00 |
Comments:
Functions the same as ESC B, except that the variable c selects a channel for the vertical tabs, which must be between 0 - 7. Therefore, up to eight sets of vertical tabs can be set. The channels are selected by ESC /. To clear the tabs in channel c use ESC b c 0.
Format:
| ASCII code: | ESC | / | C |
| Decimal: | 27 | 47 | C |
| Hexadecimal: | 1 B | 2F | C |
Comments:
This command is used to select the vertical tab channel, with the value of c from 0 - 7. All subsequent VT commands use the channel selected by this command.
Horizontal Motion
Margins
| ESC 1 | Set Left Margin | |||
| Format: | ||||
| ASCII code: | ESC | I | n | |
| Decimal: | 27 | 108 | n | |
| Hexadecimal: | 1B | 6C | n | |
Comments:
Sets the left margin to n columns in the current pitch, with the maximum value of n as follows: 134 in 10 pitch, 229 in condensed, 160 in 12 pitch, and 270 in condensed 12 pitch. Settings made in the proportional mode are treated as 10 pitch. This command clears previous tab settings and all previous characters in the print line. Use lowercase 1 (for left), not the numeral one. The minimum space between the margins is the width of one double-wide 10 pitch character.
ESC Q
Set Right Margin
Format:
| ASCII code: | ESC | Q | n |
| Decimal: | 27 | 81 | n |
| Hexadecimal: | 1 B | 51 | n |
Comments:
Sets the right margin to n columns in the current pitch. Settings made in the proportional mode are treated as 10 pitch. This command clears previous tab settings and all previous characters in the print line. The minimum space between the margins is the width of one double-wide 10 pitch character.
Print head movement
BS
Backspace
Format:
ASCII code: BS
Decimal: 8
Hexadecimal: 08
Comments:
Moves the print position one space to the left. Backspacing can be performed up to, but not beyond, the left margin setting. If the BS code is received immediately after receiving codes which unconditionally change the print position, such as HT, it is ignored.
ESC \$
Set Absolute Print Position
Format:
| ASCII code: | ESC | $ | n1 | n2 |
| Decimal: | 27 | 36 | n1 | n2 |
| Hexadecimal: | 1B | 24 | n1 | n2 |
Comments:
This sequence specifies the distance from the left margin that subsequent characters are to be printed, using this formula: total number of dots = nl + (n2 x 256). Each unit equals 1/60th of an inch. The sequence is ignored and the previous setting remains effective if the position specified is beyond the right margin.
ESC\
Set Relative Position
Format:
| ASCII code: | ESC | \ | n1 | n2 |
| Decimal: | 27 | 92 | n1 | n2 |
| Hexadecimal: | 1B | 5C | n1 | n2 |
Comments:
Determines the position (relative to the current position) at which printing of following data will start. To find nl and n2, first calculate the displacement required in dots. If the displacement is to the left, subtract it from 65536. Send the resulting number using this formula: total number of dots = nl + (256 x n2). The command is ignored if it would move the print position outside the current margins.
Horizontal tabbing
HT
Horizontal Tab
Format:
ASCII code: HT
Decimal: 9
Hexadecimal: 09
Comments:
Advances the print position to the next horizontal tab setting. The default settings are at intervals of eight characters in the default pitch, and tab positions are not affected by subsequent changes in character pitch.
ESC D Set Horizontal Tabs
Format:
| ASCII code: | ESC | D | n1 | n2 | ... | NUL |
| Decimal: | 27 | 68 | n1 | n2 | ... | 0 |
| Hexadecimal: | 1B | 44 | n1 | n2 | ... | 00 |
Comments:
This command allows setting of up to 32 horizontal tabs, which are entered as nl, n2, n3, etc. (from 1 - 255) with the 0 character terminating the command. The tab settings must be entered in ascending order. ESC D 0 clears all tabs. The settings on power up or after an ESC @ command are every eight characters. The tab settings do not change if the character pitch is changed, and for proportional printing the size of 10 pitch characters determines the tab positions.
Overall Printing Style
ESC x Select Letter Quality or Normal
Format:
| ASCII code: | ESC | x | n |
| Decimal: | 27 | 120 | n |
| Hexadecimal: | 1B | 78 | n |
Comments:
The following values can be used for n: 0: Selects the normal mode. 1: Selects the Letter Quality (LQ) mode. The actual appearance of the printing does not change.
Format:
| ASCII code: | ESC | ! | n |
| Decimal: | 27 | 33 | n |
| Hexadecimal: | 1 B | 21 | n |
Comments:
Selects any valid combination of the following modes: 10 pitch, 12 pitch, proportional, emphasized, double-strike, double-wide, italic, and underline. An italic font must be available to use italics.
Print Size and Character Width
ESC P Select 10 Pitch (Pica)
Format:
| ASCII code: | ESC | P |
| Decimal: | 27 | 80 |
| Hexadecimal: | 1B | 50 |
Comments:
Selects 10 pitch (10 characters per inch). Because 10 pitch is the default pitch, this command is normally used to cancel 12 pitch (elite), or 15 pitch.
ESC M Select 12 Pitch (Elite)
Format:
| ASCII code: | ESC | M |
| Decimal: | 27 77 | |
| Hexadecimal: | 1 B | 4D |
Comments:
Selects 12 pitch (12 characters per inch).
Format:
| ASCII code: | ESC | p | n |
| Decimal: | 27 | 112 | n |
| Hexadecimal: | 1 B | 70 | n |
Comments:
The following values can be used for n:
1: Mode is turned ON.
0: Mode is turned OFF.
The width of proportional characters varies from character to character. Therefore, a narrow letter like i receives less space than a wide letter like W. The proportional widths are given in the character tables, which appear in Appendix D. This command overrides condensed.
SO
Select Double-wide Mode (one line)
Format:
| ASCII | code: | SO |
| Decimal: | 14 | |
| Hexadecimal: | OE |
Comments:
Double-wide mode doubles the width of all characters. This mode is cancelled by a carriage return, DC4, LF, VT, or ESC W 0.
ESC SO
Select Double-wide Mode tone line)
Format:
| ASCIIcode: | ESC | SO |
| Decimal: | 27 14 | |
| Hexadecimal: | 1 B | OE |
Comments:
Duplicates the SO command.
DC4
Cancel Double-wide Mode (one line)
Format:
| ASCII code: | DC4 |
| Decimal: | 20 |
| Hexadecimal: | 14 |
Comments:
Cancels one-line double-wide printing selected by SO or ESC SO, but not double-wide printing selected by ESC W or ESC !.
ESC W Turn Double-wide Mode On/Off
Format:
| ASCII code: | ESC | W | n |
| Decimal: | 27 | 87 | n |
| Hexadecimal: | 1B | 57 | n |
Comments:
The following values can be used for n:
1: Mode is turned ON.
0: Mode is turned OFF.
Double-wide mode doubles the width of all characters.
Print Enhancement
ESC E Select Emphasized Mode
Format:
| ASCII code: | ESC | E |
| Decimal: | 27 | 69 |
| Hexadecimal: | 1B | 45 |
Comments:
Makes text bolder.
ESC F Cancel Emphasized Mode
Format:
| ASCII code: | ESC | F |
| Decimal: | 27 | 70 |
| Hexadecimal: | 1B | 46 |
Comments:
Cancels emphasized, the mode selected by ESC E.
ESC G Select Double-strike Mode
Format:
| ASCII code: | ESC | G |
| Decimal: | 27 | 71 |
| Hexadecimal: | 1B | 47 |
Comments:
Makes text bolder.
Format:
| ASCII code: | ESC | H |
| Decimal: | 27 | 72 |
| Hexadecimal: | 1B | 48 |
Comments:
Turns off the double-strike mode selected by ESC G.
ESC S0 Select Superscript Mode
Format:
| ASCII code: | ESC | S | NUL |
| Decimal: | 27 | 83 | 0 |
| Hexadecimal: | 1B | 53 | 00 |
Comments:
Prints characters high on the text line. It is canceled with ESC T.
Superscript characters are printed using a 15 pitch font. If a 15 pitch font is not installed the internal 13 pitch EDP font is used. Superscript characters print in a fixed pitch even when printing in proportionate spacing mode. The character "0" can also be used for "n".
ESC S 1 Select Subscript Mode
Format:
| ASCII code: | ESC | S | SOH |
| Decimal: | 27 83 | 1 | |
| Hexadecimal: | 1B53 | 01 |
Comments:
Prints characters low on the text line. It is canceled with ESC T.
Subscript characters are printed using a 15 pitch font. If a 15 pitch font is not installed the internal 13 pitch EDP font is used. Subscript characters print in a fixed pitch even when printing in proportionate spacing mode. The character "1" can also be used for "n".
ESC T Cancel Superscript/Subscript
Format:
| ASCII code: | ESC | T |
| Decimal: | 27 | 84 |
| Hexadecimal: | 1B | 54 |
Comments:
Cancels either superscript or subscript.
Format:
| ASCIIcode: | ESC | - | n |
| Decimal: | 27 | 45 | n |
| Hexadecimal: | 1 B | 2D | n |
Comments:
The following values can be used for n:
1: Mode is turned ON.
0: Mode is turned OFF.
This mode provides continuous underlining, including spaces.
Word Processing
| ESC a | Select Justification | |||
| Format: | ||||
| ASCII code: | ESC | a | n | |
| Decimal: | 27 | 97 | n | |
| Hexadecimal: | 1B | 61 | n | |
Comments:
The following values can be used for n:
0: Selects left justification.
1: Selects centering.
2: Selects right justification.
3: Selects full justification.
| ESC SP (space) | Set Intercharacter Space | |||
| Format: | ||||
| ASCII code: | ESC | SP | n | |
| Decimal: | 27 | 32 | n | |
| Hexadecimal: | 1 B | 20 | n | |
Comments:
Sets the amount of space added between characters, in addition to the space already allowed in the design of the character. The number of dots is determined by n, which should be from 0 - 127. Each unit of space is 1/180th of an inch.
Character Tables
ESC 4
Select Italic Mode
Format:
| ASCII code: | ESC | 4 |
| Decimal: | 27 | 52 |
| Hexadecimal: | 1B | 34 |
Comments:
Causes italic characters to be printed. This command is ignored if no italic or oblique font is available.
ESC 5
Cancel Italic Mode
Format:
| ASCII code: | ESC | 5 |
| Decimal: | 27 53 | |
| Hexadecimal: | 1B | 35 |
Comments:
Cancels the mode selected by ESC 4.
ESCR
Select an International Character Set
Format:
| ASCII code: | ESC | R | n |
| Decimal: | 27 | 82 | n |
| Hexadecimal: | 1B | 52 | n |
Comments:
Appendix D includes all the international character sets. The following values can be used for n:
| O=USA |
| 1=France |
| 2=Germany |
| 3=UK |
| 4=Denmark |
| 5=Sweden |
| 6=Italy |
| 7=Spain |
| 8=Japan |
| 9-15=USA |
User-defined Characters
Note: Characters are 3/5 the size of those defined for an LQ-1500 printer.
| ESC & | Define User-defined Characters | |||||||
| Format: | ||||||||
| ASCII code: | ESC & | NUL | dl | d2 | . . . | dn | ||
| Decimal: | 27 | 38 | 0 | dl | d2 | . | . . | dn |
| Hexadecimal: | 1B | 26 | 00 | dl | d2 | . | . . | dn |
Comments:
This command allows characters to be redefined in the currently selected mode.
| ESC : | Copy ROM into RAM | ||||
| Format: | |||||
| ASCII code: | ESC | : | NUL | NUL | NUL |
| Decimal: | 27 58 | 0 | 0 | 0 | |
| Hexadecimal: | 1B | 3A | 00 | 00 00 | |
Comments:
This code copies the characters in the ROM into RAM so that specific characters can be redefined.
| ESC % | Select User-defined Set | |||
| Format: | ||||
| ASCII code: | ESC | % | n | |
| Decimal: | 27 | 37 | n | |
| Hexadecimal: | 1B | 25 | n | |
Comments:
ESC & is required to define the character set. The following values can be used for n:
0: Selects the normal set.
1: Selects the user-defined set.
Graphics
ESC K Select Single-density Graphics Mode
Format:
| ASCII code: | ESC | K | nl | n2 |
| Decimal: | 27 | 75 | nl | n2 |
| Hexadecimal: | 1B | 4B | nl | n2 |
Comments:
Turns on eight-pin, single-density graphics mode. The total number of columns = nl + (n2 x 256).
ESCL Select Single-density Graphics Mode
Format:
| ASCII code: | ESC | L | n1 | n2 |
| Decimal: | 27 | 76 | n1 | n2 |
| Hexadecimal: | 1B | 4C | n1 | n2 |
Comments:
Duplicates ESC K.
ESC Y Select Single-density Graphics Mode
Format:
| ASCII code: | ESC | Y | n1 | n2 |
| Decimal: | 27 | 89 | n1 | n2 |
| Hexadecimal: | 1B | 59 | n1 | n2 |
Comments:
Duplicates ESC K.
ESC Z Select Quadruple-density_Graphics_Mode
Format:
| ASCII code: | ESC | Znl | n2 | |
| Decimal: | 27 | 90 | nl | n2 |
| Hexadecimal: | 1B | 5A | n1 | n2 |
Comments:
Turns on eight-pin, quadruple-density graphics mode. The total number of columns = nl + (n2 x 256).
ESC*
Select Graphics Mode
Format:
| ASCII code: | ESC | . | m | nl | n2 |
| Decimal: | 27 | 42 | m | nl | n2 |
| Hexadecimal: | 1B | 2A | m | nl | n2 |
Comments:
Turns on graphics modem.
ESC?
Reassign Graphics Mode
Format:
| ASCII code: | ESC | ? | s | n |
| Decimal: | 27 | 63 | s | n |
| Hexadecimal: | 1 B | 3F | s | n |
Comments:
Changes one graphics mode to another. The variable s is a character (K, L, Y or Z), which is reassigned to a mode n (0 - 6, 32, 33, 38, or 39).
Line Printer Commands
The following section lists and describes all the line printer mode commands. See Chapter 2 for information on how to select this mode.
This mode is designed for list output. It uses a special 13 character per inch font that can print up to 66 lines by 136 columns on letter size paper in the landscape orientation. The only SelectType settings available in this mode are page orientation and paper size.
CR
Carriage Return
Format:
| ASCII code: C | R |
| Decimal: | 13 |
| Hexadecimal: | OD |
Comments:
Returns the print position (the position at which the next character is printed) to the left margin.
FF
Form Feed
Format:
| ASCII code: F | F |
| Decimal: | 12 |
| Hexadecimal: | OC |
Comments:
Prints the data in the print buffer, then moves the print position to the left margin at the beginning of the next page. In other words, this code starts a new page.
LF
Line Feed
Format:
| ASCII code: L | F |
| Decimal: | 10 |
| Hexadecimal: | OA |
Comments:
Moves the current print position down one line and to the left margin.
Format:
ASCII code: H T
Decimal: 9
Hexadecimal: 09
Comments:
Advances the print position horizontally to the next horizontal tab stop. The default settings are at intervals of eight characters and cannot be changed.
Appendix B
Directory of Status Messages
Status messages are shown in the left column. Explanation of the message and the appropriate action are detailed in the right column.
(For more detailed information on these status messages, see Chapter 5.)
Printer is warming up. No action is required. While the printer is warming up, input data can be received and the printer may be set on line or off line.
Printer is in SelecType mode (described in Chapter 3). No action is required. To exit SelecType mode, press the SHIFT button.
01 - 99 Indicates number of copies remaining to be printed. (Indicator stops flashing if a jam occurs.) No action is required. To cancel the printout of remaining copies, set the printer off line and press the SHIFT button.
The printer is in test mode (described in Chapter 1). In this mode, the GQ-3500 prints a vertical line test pattern when the PAPER FEED button is pressed. No action is required. To exit test mode and enter normal print mode, press the ON LINE button.
1C Same as oc, except that it prints a character test pattern instead of a vertical line test pattern. No action is required. To exit test mode and enter normal print mode, press the ON LINE button.
CH This message covers two different situations: 1. IC card installed only in slot B, or identity card installed in slot B. Set IC card in slot A, then press the ERROR CLEAR button.
- IC card unreadable. Clean gold connectors and IC card socket, or use a different IC card. Press the ERROR CLEAR button. (For more information, see the instructions packaged with the IC card.)
Cō Total IC card capacity exceeds 2M bytes, or total number of font card fonts is greater than 16. Change the combination of IC cards installed, then press the ERROR CLEAR button. (For more information, see the instructions packaged with the IC card.)
dō The printer case is open. Close the cover.
EO EO alternating with a two-digit number indicates a problem requiring a service call. Write down the full number displayed (such as E0 02), turn off the power, and contact a qualified service representative.
E1 E1 alternating with a two-digit number indicates a problem that may require a service call. (For error code E1 Cd in particular, see the following status message.) Turn the printer off for a few seconds, then turn it back on. If the same error recurs, then write down the full number displayed (such as E1 80), turn off the power, and contact a qualified service representative.
E1Cd IC card installation error. Turn off the power and properly install the XC card. If the error recurs, contact a qualified service representative.
J0 Paper feed jam. Make sure that the paper set lever was not accidentally left in the down position. If it was not, then press down the paper set lever and remove the jammed paper. Raise the lever and press the ERROR CLEAR button.
| J1 | Paper transport jam. Open the printer and lift the processing unit. Gently remove the jammed paper, then lower and lock the unit into place. Close the case and resume printing when the printer has warmed up. |
| J2 | Paper exit jam. See instructions for paper transport jam. |
| L0 | Buffer overflow; overflow characters will not be printed. Press the ERROR CLEAR button. |
| L1 | Page composition error; some characters may be lost. Press the ERROR CLEAR button. |
| PF | When the printer is off line and the DATA light is flashing, the printer prints the received data when the PAPER FEED button is pressed. This status message is displayed while the printer is printing in this way. |
| Pō | Paper out. See Chapter 4 for details on adding paper. |
| PU | Paper size being used does not match paper size selected. Change the setting or change the paper to make the setting and paper size match. |
| Fō | Toner out. Change the toner cartridge. (See Chapter 5 for more details.) |
| U1 | Collector unit and lens shield should be replaced. Replace the collector unit and lens shield. Press the reset lever before closing the cover. (See Chapter 5 for complete details.) |
| U2 | Drum cartridge and lens shield should be replaced. Remove the drum cartridge, and clean the transfer charger with the cleaning blade. Next, replace the drum cartridge. Then change the lens shield. Press the reset lever before closing the cover. (See Chapter 5 for complete details.) |
DIP Switches
The GQ-3500 has three groups of DIP (Dual In-line Package) switches that control printer functions. These switches are on the interface board and can be accessed by removing the interface board from the back of the printer. (See Chapter 2 for instructions and fuller explanations of DIP switch functions.)
DIP switches 1 and 2 determine the printer's initial (default) settings. Although you can override many of these settings from the control panel or with software commands, the defaults remain the same. Whenever you turn on the printer, the printer is set to the default settings.
DIP switch 3 is used with optional IC Cards. If you use an optional IC card, the functions of switch 3 will be described in the instructions that came with the IC card.
There are also one or two DIP switches on the outside of the interface card. These switches control the functions of the interface itself and are discussed in the sections on the interfaces.
The following tables list the switches and their functions.
Table C-1. DIP switch 1 settings
| Switch | Function | ON | OFF |
| 1-1 | Printer mode | See Table | |
| 1-2 | Setting | C-2 | |
| 1-3 | Automatic reprint when paper jams | ON | OFF |
| 1-4 | Processing of unprintable codes | ON | OFF |
| 1-5 | Automatic line feed | ON | OFF |
| 1-6 | Automatic carriage return | ON | OFF |
| 1-7 | Automatic form feed | ON | OFF |
| 1-8 | Beeper | ON | OFF |
Table C-2. Print mode settings
| Settings | 1-1 | 1-2 |
| Page printer | OFF | OFF |
| Line printer | ON | OFF |
| LQ emulation | OFF | ON |
| IC card | ON | ON |
Table C-3. Dip switch 2 settings
| Switch | Function | ON | OFF |
| 2-1 | Page orientation | Landscape | Portrait |
| 2-2 | Paper size | See Table | |
| 2-3 | C-4 | ||
| 2-4 | |||
| 2-5 | International | See Table | |
| 2-6 | character set | C-5 | |
| 2-7 | selection | ||
| 2-8 | |||
Table C-4. Paper size settings
| Settings | 2-2 | 2-3 | 2-4 |
| Other (Use this size when your paper doesn't match any of the paper size options.)A4 — 210mm x 297mmA5 — 148mm x 210mmB5 — 18mm x 257mmLetter — 8-1/2" x 11"Half Letter — 5-1/2" x 8-1/2"Legal — 8-1/2" x 14" | OFF OFF OFFON OFF OFFOFFOFFOFFONOFFON | ONOFFONON | OFFONONONON |
Table C-5. International Character Sets
| Settings | 2-5 | 2-6 2-7 2-8 | ||
| USA | OFF | OFF | OFF | OFF |
| France | ON | OFF | OFF | OFF |
| Germany | OFF | ON | OFF | OFF |
| UK | ON | ON | OFF | OFF |
| Denmark | OFF | OFF | ON | OFF |
| Sweden | ON | OFF | ON | OFF |
| Italy | OFF | ON | ON | OFF |
| Spain | ON | ON | ON | OFF |
| Japan | OFF | OFF | OFF | ON |
Character Tables
This appendix contains tables of all seven of the GQ-3500 internal fonts.
The fonts and their characteristics are shown in the table below:
| No. | Name Orientation | CPI | PS | |
| 0 | Courier 1 ON | Portrait | 10 10 | |
| 1 | Courier 1 OL | Landscape | 10 | 10 |
| 2 | EDP 13N Portrait | 13 | 7 | |
| 3 | EDP 13L Landscape | 13 | 7 | |
| 4 | Modern PSN10 | Portrait -- | 10 | |
| 5 | Ext. Graphics 1 ON | Portrait | 10 | 12 |
| 6 | Ext. Graphics 1 OL | Landscape | 10 | 12 |
*CPI is characters per inch and PS is point size
Modem PSN10 is a proportionally spaced font.
The pages that follow show all the characters in all the internal fonts along with their decimal and hexadecimal codes. The characters are shown only in the portrait orientation. The last column on the right on each page gives the proportional width (in 300ths of an inch) for the characters in the Modem PSN10 font, and the international characters are shown on page D-10.
| Dec | Hex | Fonts Fonts Fonts Font Width | ||||
| 0&1 | 2&3 | 5&6 | 4 | for F4 | ||
| 0 | 00 | |||||
| 1 | 01 | |||||
| 2 | 02 | |||||
| 3 | 03 | |||||
| 4 | 04 | |||||
| 5 | 05 | |||||
| 6 | 06 | |||||
| 7 | 07 | |||||
| 8 | 08 | |||||
| 9 | 09 | |||||
| 10 | OA | |||||
| 11 | OB | |||||
| 12 | o c | |||||
| 13 | OD | |||||
| 14 | OE | |||||
| 15 | OF | |||||
| 16 | 10 | |||||
| 17 | 11 | |||||
| 18 | 12 | |||||
| 19 | 13 | |||||
| 20 | 14 | |||||
| 21 | 15 | § | § | 25 | ||
| 22 | 16 | |||||
| 23 | 17 | |||||
| 24 | 18 | |||||
| 25 | 19 | |||||
| 26 | 1A | |||||
| 27 | 1B | |||||
| 28 | 1C | |||||
| 29 | 1D | |||||
| 30 | 1E | |||||
| 31 | 1F | |||||
| Dec | Hex | Fonts0&1 | Fonts2&3 | Fonts5&6 | Font4 | Widthfor F4 |
| 32 20 | 24 | |||||
| 33 | 21 | ! | ! | 16 | ||
| 34 | 22 | " | " | 22 | ||
| 35 | 23 | # | # | # | 26 | |
| 36 | 24 | 26 | ||||
| 37 25 | 8 | x | % | 26 | ||
| 38 26 | & | & | & | 26 | ||
| 39 | 27 | ' | 14 | |||
| 40 | 28 | ( | ( | ( | 17 | |
| 41 | 29 | ) | ) | ) | 17 | |
| 42 2A | * | * | * | 24 | ||
| 43 | 2B | + | + | + | 24 | |
| 44 | 2c | , | , | 14 | ||
| 45 | 2D | - | - | - | 24 | |
| 46 2E | . | . | 14 | |||
| 47 | 2F | / | / | 18 | ||
| 48 | 30 | 0 | 0 | 0 | 24 | |
| 49 | 31 | 1 | 1 | 1 | 24 | |
| 50 32 | 2 | 2 | 2 | 24 | ||
| 51 | 33 | 3 | 3 | 3 | 24 | |
| 52 | 34 | 4 | 4 | 4 | 24 | |
| 53 | 35 | 5 | 5 | 5 | 24 | |
| 54 | 36 | 6 | 6 | 6 | 24 | |
| 55 | 37 | 7 | 7 | 7 | 24 | |
| 56 | 38 | 8 | 8 | 8 | 24 | |
| 57 | 39 | 9 | 9 | 9 | 24 | |
| 58 | 3A | : | 16 | |||
| 59 | 3B | ; | ; | 16 | ||
| 60 | 3c | < | < | < | 21 | |
| 61 | 3D | = | = | = | 24 | |
| 62 | 3E | > | > | 21 | ||
| 63 | 3F | ? | ? | ? | 22 | |
| Dec | Hex | Fonts0&1 | Fonts2&3 | Fonts Font Width5&6 4 for F4 | ||
| 64 | 40 | @ | @ | @ | 30 | |
| 65 | 41 | A | A | A | 32 | |
| 66 | 42 | B | B | B | 29 | |
| 67 43 | C | C | C | 32 | ||
| 68 | 44 | D | D | D | 32 | |
| 69 | 45 | E | E | E | 29 | |
| 70 46 | F | F | F | 29 | ||
| 71 | 47 | G | G | G | 32 | |
| 72 48 | H | H | H | 33 | ||
| 73 | 49 | I | I | I | 19 | |
| 74 | 4A | J | J | J | 27 | |
| 75 | 4B | K | K | K | 32 | |
| 76 | 4c | L | L | 30 | ||
| 77 4D | M | M | M | 35 | ||
| 78 | 4E | N | N | N | 31 | |
| 79 | 4F | O | O | O | 34 | |
| 80 | 50 | P | P | P | 29 | |
| 81 51 | Q | Q | Q | 34 | ||
| 82 | 52 | R | R | R | 32 | |
| 83 | 53 | S | S | S | 28 | |
| 84 | 54 | T | T | T | 29 | |
| 85 | 55 | U | U | U | 32 | |
| 86 | 56 | V | V | V | 31 | |
| 87 | 57 | W | W | W | 35 | |
| 88 | 58 | X | X | X | 34 | |
| 89 | 59 | Y | Y | Y | 32 | |
| 90 | 5A | Z | Z | Z | 28 | |
| 91 | 5B | [ | [ | [ | 23 | |
| 92 | 5C | \ | \ | 16 | ||
| 93 | 5D | ] | ! | ] | 23 | |
| 94 | 5E | ^ | ^ | 24 | ||
| 95 | 5F | - | - | 26 | ||
| DecHex | Fonts Fonts | Fonts Font | Width for F4 | |||
| 0&1 | 2&3 | 5&6 | 4 | |||
| 96 | 60 | 1 | 20 | |||
| 97 | 61 | a | a | a | 27 | |
| 98 | 62 | b | b | b | 29 | |
| 99 | 63 | c | c | c | 25 | |
| 100 | 64 | d | d | d | 29 | |
| 101 | 65 | e | e | e | 26 | |
| 102 | 66 | f | f | f | 22 | |
| 103 | 67 | g | g | g | 27 | |
| 104 68 | h | h | h | 30 | ||
| 105 69 | i | i | i | 19 | ||
| 106 | 6A | J | j | j | 18 | |
| 107 | 6B | k | k | k | 30 | |
| 108 | 6C | l | l | l | 19 | |
| 109 | 6D | m | m | m | 35 | |
| 110 | 6E | n | n | n | 29 | |
| 111 | 6F | o | o | o | 28 | |
| 112 | 70 | p | p | p | 29 | |
| 113 | 71 | q | q | q | 29 | |
| 114 72 | r | r | r | 24 | ||
| 115 73 | s | s | s | 25 | ||
| 116 | 74 | t | t | t | 22 | |
| 117 75 | U | u | u | 30 | ||
| 118 | 76 | V | v | V | 29 | |
| 119 | 77 | W | w | W | 35 | |
| 120 | 78 | X | x | X | 29 | |
| 121 | 79 | Y | Y | Y | 27 | |
| 122 7A | z | z | z | 22 | ||
| 123 | 7B | 24 | ||||
| 124 | 7c | ! | ! | 16 | ||
| 125 | 7D | 24 | ||||
| 126 7E | ~ | 24 | ||||
| 127 | 7F | |||||
| Dec | Hex | Fonts0&1 | Fonts Fonts2&3 5&6 | Font4 | Widthfor F4 | |
| 128 | 80 | Ç | Ç | Ç | 32 | |
| 129 | 81 | ü | ü | ü | 30 | |
| 130 | 82 | é | é | é | 26 | |
| 131 | 83 | â | â | â | 27 | |
| 132 | 84 | ä | ä | ä | 27 | |
| 133 | 85 | à | à | à | 27 | |
| 134 | 86 | å | å | å | 27 | |
| 135 | 87 | ç | ç | ç | 25 | |
| 136 | 88 | è | è | è | 26 | |
| 137 | 89 | ë | ë | ë | 26 | |
| 138 | 8A | è | è | è | 26 | |
| 139 | 8B | ï | ï | ï | 21 | |
| 140 | 8C | î | î | î | 21 | |
| 141 | 8D | ì | ì | ì | 19 | |
| 142 | 8E | Ä | Ä | Ä | 32 | |
| 143 | 8F | Å | Å | Å | 32 | |
| 144 | 90 | É | É | É | 29 | |
| 145 | 91 | æ | æ | æ | 34 | |
| 146 | 92 | Æ | Æ | Æ | 35 | |
| 147 | 93 | ô | ô | ô | 28 | |
| 148 | 94 | ö | ö | ö | 28 | |
| 149 | 95 | ò | ò | ò | 28 | |
| 150 | 96 | û | û | û | 30 | |
| 151 | 97 | ù | ù | ù | 30 | |
| 152 | 98 | ÿ | ÿ | ÿ | 27 | |
| 153 | 99 | Ô | Ô | Ô | 34 | |
| 154 | 9A | Ü | Ü | Ü | 32 | |
| 155 | 9B | ¢ | ¢ | ¢ | 25 | |
| 156 | 9C | £ | £ | £ | 27 | |
| 157 | 9D | ¥ | ¥ | ¥ | 29 | |
| 158 | 9E | Pt | Pt | Pt | 35 | |
| 159 | 9F | f | f | f | 23 | |
| Dec | Hex | Fonts0&1 | Fonts2&3 | Fonts5&6 | Font4 | Widthfor F4 |
| 160 | A0 | á | á | á | 27 | |
| 161 | AI | í | í | í | 19 | |
| 162 | A2 | ó | ó | ó | 28 | |
| 163 | A3 | ú | ú | ú | 30 | |
| 164 | A4 | ñ | ñ | ñ | 29 | |
| 165 | A5 | Ñ | Ñ | Ñ | 31 | |
| 166 | A6 | a | a | a | 27 | |
| 167 | A7 | o | o | o | 28 | |
| 168 | A8 | ¿ | ¿ | ¿ | 22 | |
| 169 | A9 | r | r | r | 29 | |
| 170 | AA | ¬ | ¬ | ¬ | 29 | |
| 171 | AB | \frac{1}{2} | \frac{1}{2} | \frac{1}{2} | 24 | |
| 172 | AC | \frac{1}{4} | \frac{1}{4} | \frac{1}{4}$ | 24 | |
| 173 | AD | i | i | 16 | ||
| 174 | AE | « | « | « | 32 | |
| 175 | AF | » | » | » | 32 | |
| 176 | BO | |||||
| 177 | BI | : | ||||
| 178 | B2 | |||||
| 179 | B3 | |||||
| 180 | B4 | |||||
| 181 | B5 | |||||
| 182 B6 | ||||||
| 183 B7 | 11 | |||||
| 184 B8 | ||||||
| 185 | B9 | |||||
| 186 | BA | |||||
| 187 | BB | |||||
| 188 | BC | |||||
| 189 | BD | |||||
| 190 | BE | |||||
| 191 | BF | |||||
| 192 | C0 | L | ||||
| 193 | C1 | ⊥ | ||||
| 194 | c2 | T | ||||
| 195 | c3 | F | ||||
| 196 | c4 | - | ||||
| 197 | c5 | + | ||||
| 198 | C6 | F | ||||
| 199 | c7 | E | ||||
| 200 C8 | L | |||||
| 201 | C9 | I | ||||
| 202 | CA | II | ||||
| 203 CB | TF | |||||
| 204 | c c | = | ||||
| 205 | CD | + | ||||
| 206 CE | I | |||||
| 207 CF | II | |||||
| 208 | D0 | I | ||||
| 209 | D1 | = | ||||
| 210 | D2 | II | ||||
| 211 | D3 | L | ||||
| 212 D4 | F | |||||
| 213 D5 | II | |||||
| 214 | D6 | F | ||||
| 215 | D7 | F | ||||
| 216 | D8 | F | ||||
| 217 | D9 | F | ||||
| 218 DA | F | |||||
| 219 DB | I | |||||
| 220 DC | F | |||||
| 221 | DD | F | ||||
| 222 DE | J | |||||
| 223 | DF | I | ||||
| Dec | Hex | Fonts0&1 | Fonts2&3 | Fonts Font5&6 | 4 | Widthfor F4 |
| 224 | E0 | α | α | α | 28 | |
| 225 | EI | β | β | β | 26 | |
| 226 | E2 | Γ | Γ | Γ | 28 | |
| 227 | E3 | π | π | π | 27 | |
| 228 | E4 | Σ | Σ | Σ | 29 | |
| 229 E5 | σ | σ | σ | 28 | ||
| 230 | E6 | μ | μ | μ | 29 | |
| 231 | E7 | τ | τ | τ | 23 | |
| 232 | E8 | Φ | Φ | Φ | 31 | |
| 233 | E9 | θ | θ | θ | 25 | |
| 234 | EA | Ω | Ω | Ω | 30 | |
| 235 | EB | δ | δ | δ | 26 | |
| 236 | EC | ∞ | ∞ | ∞ | 31 | |
| 237 | ED | ∅ | ∅ | ∅ | 28 | |
| 238 | EE | ∈ | ∈ | ∈ | 27 | |
| 239 | EF | ∩ | ∩ | ∩ | 29 | |
| 240 | F0 | ≡ | ||||
| 241 | F1 | ± | ||||
| 242 | F2 | ≥ | ||||
| 243 | F3 | ≤ | ||||
| 244 | F4 | ∫ | ||||
| 245 | F5 | ÷ | ||||
| 246 | F6 | ≈ | ||||
| 247 | F7 | ° | ||||
| 248 | F8 | |||||
| 249 | F9 | . | ||||
| 250 | FA | |||||
| 251 | FB | √n | ||||
| 252 | FC | 2 | ||||
| 253 | FD | |||||
| 254 | FE | ■ | ||||
| 255 | FF | |||||
Table D-2. International characters
| 35 | 36 | 64 | 91 | 92 | 93 | 94 | 96 | 123 | 124 | 125 | 126 | ||
| 0 | USA | # | @ | [ | \ | ] | ^ | ` | | | ~ | |||
| 1 | France | # | à | . | ç | § | ^ | ` | é | ù | è | .. | |
| 2 | Germany | # | § | Ä | Ö | Ü | ^ | ` | ä | ö | ü | β | |
| 3 | UK | £ | @ | [ | \ | ] | ^ | ` | { | | | } | ~ | |
| 4 | Denmark | # | @ | Æ | ∅ | Å | ^ | ` | æ | ø | å | ~ | |
| 5 | Sweden | # | α | É | Ä | Ö | Å | Ü | é | ä | ö | å | ü |
| 6 | Italy | # | @ | . | \ | é | ^ | ù | à | ò | è | ì | |
| 7 | Spain | Pt | @ | i | Ñ | ¿ | ^ | ` | .. | ñ | ~ | ||
| 8 | Japan | # | @ | [ | ¥ | ] | ^ | ` | { | | | } | ~ | |
At the top of each column is the decimal code for that character.
Appendix E
Specifications
The first section of this appendix gives the basic specifications of the GQ-3500 printer. The second section tells how to prepare the printer if you have to move it more than a short distance.
Printing
Printing method
Electrophotographic using a semiconductor laser
Resolution
Horizontal (laser beam scanning direction), 300 dpi
Vertical (paper travel direction), 300 dpi
Printing speed
(during continuous printing using the multiple copy print command)
6 pages per minute for letter size paper
Warm-up time
At normal temperature: 45 seconds or less
Line spacing
1/6-inch, or programmable
Resident character sets
Courier, 10 cpi (portrait and landscape)
EDP, 13 cpi (portrait and landscape)
Modern PSN, 12 cpi (portrait)
Extended graphics, 10 cpi (portrait and landscape)
External character sets
Optional (provided with IC cards)
Paper and Paper Delivery
Paper specifications
Types: Plain paper
Labels
Colored paper
Paper with punch holes
Overhead projector transparencies
Envelopes
Weight: 16 to 24 lbs for automatic feed
16 to 34 lbs for manual feed or automatic feed one sheet at a time
Paper size
Standard sizes:
Type Horizontal Vertical
A4 210mm (8.3") 297mm (11.7")
A5 148mm (5.8") 210mm (8.3")
B5 182mm (7.2") 257mm (10.2")
Letter 8.5" 11"
Legal 8.5" 14"
Half Letter 5.5" 8.5"
Special sizes: any size within the usable paper size range
Paper feed alignment and direction
Center alignment for all sizes; lengthwise direction for standard sizes
Paper feed
Automatic feed with paper tray or manual feed
Paper tray capacity up to 150 sheets (20 lb paper)
Mechanical
Dimensions and Weight
Height: 8.5" (215mm)
Width: 15.9" (405mm) excluding output and input trays
Depth: 16.5" (418mm)
Weight: 35 lbs (16 kg) including paper tray, drum cartridge, and toner cartridge
MPBF (mean prints between failures)
18,000 sheets (1,500 per month x 12 months)
MTBF (mean time between failures)
3,000 hours
Durability
5 years or 180,000 sheets (3,000 per month x 60 months)
Electrical
Voltage
120V AC
Consumption
Less than 600 W during continuous printing
Insulation resistance
10 Mohms between AC power line and chassis
Dielectric strength
Can withstand 1.25 kV for 1 minute between primary and frame ground or 1.25 kV for 1 minute between primary and secondary of transformer
Controller Hardware
ROM: 192K bytes (for storing programs and character patterns)
RAM: system area 128K bytes; user area control 32K bytes; user area for download, graphic data, and form overlays 470K bytes
IC card slots (for font and identity cards): 2
Interfaces: Centronics parallel (standard); RS-232C or RS-422 serial (optional)
See Appendix F for parallel interface specifications.
Environment
Temperature
Operation: 50" F to 90° F (10° C to 32" C)
Storage: -20" F to 109" F (-29" C to 43" C)
Humidity
Operation: 20% to 80%
Storage: 10% to 90%
Transportation
There are several precautions you should take when packing the printer for transportation. You should try to pack it as closely as possible to the way it was packed when you first received it.
The following points are especially important:
- Remove the drum cartridge from the printer and put it in its original packing materials.
- Remove the toner cartridge. If the cartridge is not yet empty, this will cause toner to spill into the printer. Remove the spilled toner with a small vacuum cleaner.
- Push back the reset lever shown on page 5-12 while you close the top of the printer. If you do this carefully, the reset lever will go behind a connector in the bottom part of the printer and will be protected from vibration during transportation.
- After locating the printer in a new place, go through the setting up procedure as described in Chapter 1. Be sure to install the new drum cartridge and toner cartridge.
Parallel Interface
The GQ-3500 is equipped with a Centronics compatible parallel interface, described in this appendix. You may purchase an optional serial interface from your dealer. Installation and operating instructions for your serial interface come packaged with the interface card and are not included here.
In most cases, the parallel interface will work without any changes. However, you can change several options on the interface. This appendix describes the options and how to change them.
DIP Switch 4
DIP Switch 4 controls several functions of the parallel interface. This DIP switch is located on the back of the interface, so you don't have to remove the interface to access it. Figure F-1 shows the location of DIP switch 4. Table F-1 shows the functions of the switches.
Typically, you will not have to make any changes to these switches. The factory settings work for most applications.
Figure F-1. DIP Switch 4 on the back of the interface
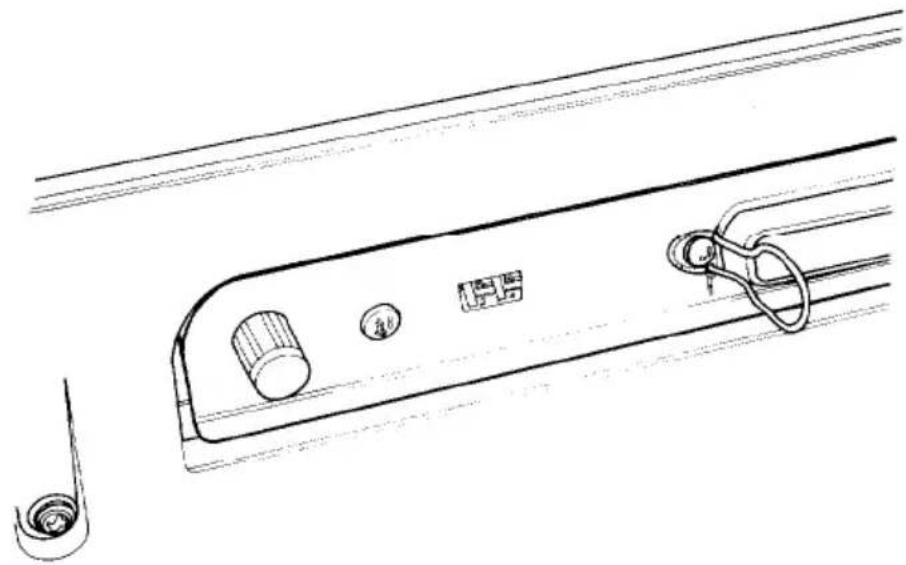
natural_image
Technical line drawing of a mechanical component with no visible text or symbolsTable F-1. DIP Switch 4
| Switch Function | ON OFF | Explanation | ||
| 4-1 | ACKNLG delay | See Table F-2 | Sets the delay period from the ACKNLG to the BUSY signals. | |
| 4-2 | ||||
| 4-3 | Printer select | ON | OFF | When this switch is ON, the printer cannot be deactivated by software codes. For most uses and commercial software programs you should leave this switch ON. |
| 4-4 | Data length | 8 bits | 7 bits | When this switch is ON the printer accepts all 8 data bits. When this switch is OFF the eighth data bit is ignored. |
Table F-2. ACKNLG delay timing
| Delay | 4-1 | 4-2 | Explanation |
| 0 microseconds OFF10 microseconds5 microseconds | ON OFFOFF ON | OFF | Sets the delay period from the ACKNLG to the BUSY signals. |
Parallel Interface Jumpers
There are three jumpers on the parallel interface. These jumpers control some of the functions of the parallel interface.
These jumpers change settings that do not normally require changing. Do not change these jumpers unless you understand what they do and have a specific requirement.
To change the jumpers, you need to remove the interface from the printer. Chapter 2 tells you how to remove and replace it.
The first jumper, labeled AUTO on the left and PS3 on the right, controls the AUTO FEED function. The AUTO FEED signal on pin 14 is ignored unless this jumper is in the AUTO position.
The second and third jumpers change the state of two of the signals on the interface. The STROBE (STB) and BUSY signals can be changed from + to -by changing the corresponding jumper.
Pin Assignments
Table F-3 shows connector pin assignments and describes the respective interface signals.
Table F-3. Pins and signals
| Signal Return Pin | Signal | Direction | Description |
| 1 | 19 | STROBE | The strobe pulse is used to synchronize the timing when the data lines are read. A pulse width of at least 0.5 microseconds is required.Ordinarily, this signal is kept HIGH; data is read when it drops to LOW. However, the phase of this signal can be reversed (move the second jumper under J-I from + to -STB) so that data is read at the leading edge (as the signal goes from LOW to HIGH). |
Table F-3. Continued
| Signal Return | Direc- tion | Descrlption | ||
| Pin | Pin | Signal | ||
| 2 20 DATA1 | IN | DATA1 to DATA8 carry the parallel interface data. These signals use positive logic (HIGH = 1, LOW = 0), and the levels of these signals must be kept constant for 0.5 microsecond before and after the active edge of the STROBE signal. Whetherthe interface ignores unrecognizable codes received or prints them as spaces is determined by the setting of DIP switch I-4.The most significant data bit is DATA8. However, if DIP switch 4-4 is OFF, the interface will ignore DATA8, giving an effective data length of 7 bits. | ||
| 3 | 21 | DATA2 | IN | |
| 4 | 22 | DATA3 | IN | |
| 5 | 23 | DATA4 | IN | |
| 6 | 24 DATA5 | IN | ||
| 7 | 25 | DATA6 | IN | |
| 26 | DATA7 | IN | ||
| 9 | 27 | DATA8 | IN | |
| Signal Pin | Return Pin | Signal | Direction Description | |
| 11 | 29 | BUSY | OUT This signal indicates whether or not the printer is ready to receive the next character. Data input is normally possible when this signal is LOW. However, the phase of this signal can be changed so that a LOW level indicates that the printer is busy by moving the third jumper under J1 from + to -BUSY. | |
| 12 | 30 | PE OUT This signal, which is normally LOW, goes HIGH when the printer runs out of paper. | ||
| 13 | - | SLCT OUT | Pulled up to +5V through a 3.3kohm resistor inside the printer. | |
| 14 | - | AUTO FEED IN | When this signal is LOW (and the first jumper under J1 is set to AUTO) the printer will add a LF (line feed) to each CR (carriage return) it receives.This signal may be ignored and assumed to be HIGH whe the printer is operating in certain Identity card modes. (See Identity card manual.) | |
| 15 | - | NC | Unused. | |
| 16 | - | GND | Signal ground level for twisted pair return. | |
| 17 | - | CHASSIS GND - | Connected to the printer chassis. Chassis GND is connected to Signal GND. | |
| Signal Return Pin | Pin | Signal tion Description | ||
| 18 | - | NC Unused. | ||
| 19-30 | - | GND | Signal ground level for twisted pair return. | |
| 31 | 16 | INIT | IN Dropping this signal to LOW resets the printer to the power-on state. Any data that has been received by the printer but not printed is lost.This signal is normally HIGH; it must go LOW for at least 50 microseconds in order to reset the printer.If INIT is received during printing, the reset will be delayed until the current page is printed. | |
| 32 | - | ERROR OUT | Normally HIGH, this signal goes LOW to indicate any of the following conditions: paper jam, paper size error, IC card error, cover open, error in execution, user service required, service call required, toner low, or paper out.This signal is always HIGH when the printer is off-line. | |
| 33 | - | GND | Signal ground level for twisted pair return. | |
| 34 | - | NC | Unused. | |
| 35 | - | +5V | OUT Pulled up to +5V through a 3.3k ohm resistor inside the printer. | |
Table F-3. Continued
| Signal Pin | Return Pin | Signal tion | Direc- | Description |
| 36 | - | SLCT-IN | IN | If this signal is HIGH when the printer is turned on, and DIP switch 4-3 is OFF, then the device control codes DC1 and DC3 are effective. Otherwise DC1 and DC3 are ignored.This signal is ignored in the Line Printer mode; i.e., DC1 and DC3 are ignored. |
Notes:
The column headed "Direction" refers to the direction of the signal as viewed from the printer.
“Return” denotes the twisted-pair return, to be connected to signal ground. The interface cable should have a twisted-pair for each signal. Be sure to complete the connection on the return side. To prevent noise, the cable must be shielded and the shield should be connected to the chassis of the host computer or the printer.
All the interface signals are TTL level. Both the rise and fall times of each signal must be less than 0.2 microseconds.
Data transfer must be carried out by coordinating with the ACKNLG or BUSY signals. Data transfer can only be carried out after receipt of the ACKNLG signal or when the BUSY signal is LOW.
GQ-3500 Options
The GQ-3500 printer is designed to accept a variety of options. The GQ-3500 accommodates an optional serial interface board, which is available from your Epson dealer. In addition, the two IC (Integrated Circuit) slots in the top cover allow the use of IC cards that can add fonts or identity modes to the operation of the printer. For example, the #5400 Font Card makes available 8 additional fonts.
Consult your Epson dealer to find out what other options are currently available for your GQ-3500 printer.
Each option comes packaged with its own instructions, which fit the binder for this manual. This allows you to insert the instructions directly into this section to keep them handy for future reference.
EPSON®
G Q - 3 5 0 0
Status Messages
Status messages are shown in the left column. An explanation of the message and the appropriate action are detailed in the right column. For more information, see Chapter 5.
Printer is warming up. No action is required.
Printer is in SelectType mode (described in Chapter 3). No action is required
9 9 Numbers between 1 and 99 indicate number of copies remaining to be printed. No action is required.
0C The printer is in test mode (described in Chapter 1). In this mode, the GQ-3500 prints a vertical line test pattern when the PAPER FEED button is pressed. No action is required.
1c Same as UC, except that it prints a character test pattern instead of a vertical line test pattern.
CH This message covers two different situations:
-
IC card installed only in slot B, or identity card installed in slot B. Set IC card in slot A, then press the ERROR CLEAR button.
-
IC card unreadable. Clean gold connectors (contacts) and IC card socket, or use a different IC card. Press the ERROR CLEAR button. (For more information, see the instructions packaged with the IC card.)
Cō Total IC card capacity exceeds 2M bytes, or total number of font card fonts is greater than 16. Change the combination of IC cards installed, then press the ERROR CLEAR button. (For more information, see the instructions packaged with the IC card.)
dō The printer cover is open. Close the cover.
EO EO alternating with a two-digit number indicates a problem requiring a service call. Write down the full number displayed (such as E0 02), turn off the power, and contact a qualified service representative.
E1 E 1 alternating with a two-digit number indicates a problem that may require a service call. (For error code E 1 Cd in particular, see the following status message.) Turn the printer off for a few seconds, then turn it back on. If the same error recurs, then write down the full number displayed (such as E 180), turn off the power, and contact a qualified service representative.
E1 Cd IC card installation error. Turn off the power and properly install the IC card. If the error recurs, contact a qualified service-representative.
J0 Paper feed jam. See that the paper set lever is up. If it is up, press it down and remove the jammed paper. Raise the lever and press the ERROR CLEAR button.
J1 Paper transport jam. Open the printer and lift the processing unit. Gently remove the jammed paper, then lower and lock the unit into place. Close the case and resume printing when the printer has warmed up.
J 2 Paper exit jam. See instructions for paper transport jam.
LO Buffer overflow; overflow characters will not be printed. Press the ERROR CLEAR button.
L1 Page composition error; some characters may be lost. Press the ERROR CLEAR button.
PF When the printer is off line and the DATA light is flashing the printer prints the received data when the PAPER FEED button is pressed. This status message is displayed while the printer is printing in this way.
Pō Paper out. See Chapter 4 for details on adding paper.
PU Paper size being used does not match paper size selected. Change the setting or change the paper to make the setting and paper size match.
rō Change the toner cartridge. (See Chapter 5 for details.)
U1 Replace the collector unit and lens shield. Press the reset lever before closing the cover.
U2 Replace the drum cartridge and lens shield. Press the reset lever before closing the cover.
Commands by Function
The following list of commands is in the order used in the command summary (Appendix A). To find details of the command you want to use, refer to the page number in the right column.
Note that for commands consisting of two or more codes, the decimal and hexadecimal columns show only the second code.
Printer operation Page
| ESC@ | 64 | 40 | Initialize Printer | A-5 |
| DC1 | 17 | 11 | Select Printer | A-5 |
| DC3 | 19 | 13 | Deselect Printer | A-6 |
| ESC EM | 25 | 19 | Select Input Paper Tray | A-6 |
| BEL | 7 | 07 | Beeper | A-6 |
| ESC m | 109 | 6D | Set Number of Copies | A-7 |
| ESC q | 113 | 71 | Specify Minimum Increment | A-7 |
Data control
| CR | 13 0D Carriage Return | A-8 |
Vertical motion
| FF | 1 2 | 0C Form Feed | A-8 |
| ESCC | 67 43 | Set Page Length in Lines | A-9 |
| ESCCO | 67 43 Set | Page Length in Inches | A-9 |
| LF | 10 OA | Line Feed | A-9 |
| ESC 0 | 48 30 | Select 1/8-inch Line Spacing | A-10 |
| ESC2 | 50 32 | Select 1/6-inch Line Spacing | A-10 |
| ESCA | 65 41 | Selectn/ 60-inch Line Spacing | A-10 |
| ESC3 | 51 33 | Set Line Spacing | A-11 |
| ESC J | 7 4 4 A | Immediate Line Feed | A-11 |
| VT | 11 OB | Vertical Tab | A-11 |
| ESCB | 66 42 | Set Vertical Tabs | A-12 |
Horizontal motion
| ESC1 | 108 6C Set Left Margin | A-12 | ||
| ESC Q | 81 51 | Set Right Margin | A-13 | |
| BS | 8 | 08 | Backspace | A-13 |
| ESCS | 36 | 24 | Set Absolute Print Position on Line | A-13 |
| ESC\ | 92 5C Set Relative Position | A-14 | ||
| I-IT | 9 | 09 | Horizontal Tab | A-14 |
| ESCD | 68 44 | Set Horizontal Tabs | A-15 | |
Page position
| ESC o | 111 6F Set Page Orientation | A-15 |
| ESC ( | 40 28 Set Page Format | A-16 |
| ESC ) | 41 29 Set Absolute Print Position on Page | A-16 |
| ESC. | 4 6 2 E Move Logical Coordinates | A-17 |
Overall printing style
| ESC k | 107 | 6B | Select Typeface | A-17 |
| ESC y | 121 | 79 | Select Character Set | A-18 |
| ESC t | 116 | 74 | Extended Graphics Mode | A-18 |
| ESC! | 33 | 21 | Master Select | A-19 |
Print size and character width
| ESC [ | 91 5B | Select Character Set by Point Size | A-20 |
| ESC ] | 93 5D | Select Character Set by Weight | A-20 |
| ESC c | 9 9 6 3 | Select Character Set by Pitch | A-21 |
| ESC , | 44 2c | Select Pitch | A-21 |
| ESC p | 112 70 | Turn Proportional Mode On/ Off | A-22 |
| so 14 OE | Select Double-wide Mode (1 line) | A-22 | |
| ESC SO | 14 OE | Select Double-wide Mode (1 line) | A-22 |
| DC4 | 20 14 | Cancel Double-wide Mode (1 line) | A-22 |
| ESCW | 87 57 | Turn Double-wide Mode On/ Off | A-23 |
| ESC w | 119 77 | Turn Double-high Mode On/Off | A-23 |
| ESC z | 122 7A | Set Character Magnification | A-23 |
Print enhancement
| ESCE | 69 | 45 | Select Emphasized Mode | A-24 |
| ESC F 70 | 46 | Cancel Emphasized Mode | A-24 | |
| ESCG | 71 | 47 | Select Emphasized Mode | A-24 |
| ESCH | 72 | 48 | Cancel Emphasized Mode | A-24 |
| ESCSO | 83 | 53 | Select Superscript Mode | A-25 |
| ESC S 1 | 83 | 53 | Select Subscript Mode | A-25 |
| ESCT | 84 | 54 | Cancel Superscript/ Subscript | A-25 |
| ESC - | 45 | 2D | Turn Underlining Mode On/ Off | A-25 |
| ESC+ | 43 | 2B | Move Base Line | A-26 |
| ESC u | 117 | 75 | Character Alignment | A-26 |
Word processing
| ESC a | 97 | 61 | Justification | A-27 |
| ESC SP | 32 | 20 | Set Intercharacter Space | A-27 |
Character sets
| ESC4 | 52 | 34 | Select Italic Mode | A-28 |
| ESC.5 | 53 | 35 | Cancel Italic Mode | A-28 |
| ESCR | 82 | 52 | Select International Character Set | A-28 |
User-defined characters
| ESC d | 100 | 64 | Font Set Definition | A-29 |
| ESC% | 37 | 25 | Select Download Font Set | A-29 |
User-defined forms
| ESC_ | 95 | 5F | Print Ruled Line | A-29 |
| ESC{ | 123 | 7B | Define/ Delete Form | A-30 |
| ESC} | 125 | 7D | Forms Overlay Printing On/ Off | A-31 |
Graphics
| ESC n | 110 6E | Define Background | A-31 |
| ESC ~ | 126 7E | Select Background | A-32 |
| ESC v 1 | 118 76 | Define Graphic Image | A-32 |
| ESC v 2 | 118 76 | Print Graphic Image | A-33 |
| ESC v 0 | 118 76 | Erase Graphic Image | A-33 |
| ESC : | 124 7C | Select Graphic Mode | A-33 |
| ALLOCATE | Reserve Graphic Area | A-34 | |
| CIRCLE | Draw Circle or Arc | A-34 | |
| PAINT | Paint Area | A-35 | |
| LINE | Draw Line or Box | A-36 | |
| EXIT | End Graphic Mode | A-36 |