
WT 5005 - Grill SEVERIN - Free user manual and instructions
Find the device manual for free WT 5005 SEVERIN in PDF.

| Product Type | Electric Sausage Grill (Wurster) |
| Brand | SEVERIN |
| Model | WT 5005 |
| Dimensions (W x H x D) | 272 mm x 362 mm x 207 mm |
| Weight | Approx. 6 kg |
| Power Supply | 220-240 V~, 50-60 Hz |
| Power Consumption | Approx. 2000 W |
| Pre-set Programmes | Thick sausage (05:00 min) and Thin sausage (04:30 min), with pre-heating |
| Adjustable Grilling Time | 00:30 to 10:00 min (30-second increments) |
| Keep Warm Function | Up to 30 minutes after grilling |
| Sausage Capacity | Maximum 2 sausages simultaneously |
| Sausage Dimensions | Length 160-220 mm, maximum diameter 30 mm |
| Safety Features | Overheat protection (display shows 'CCCC'), automatic power-off, child safety |
| Cleaning | Grill insert, reflectors, springs, fat tray, and sausage holder are dishwasher-safe |
| Accessories Included | Wooden BBQ tongs, instruction manual |
| Warranty | 2 years (statutory rights apply) |
| Stand-by Power Consumption | Less than 0.5 W |
| Repairability | No user-serviceable parts; contact SEVERIN Service |
| Conformity | CE-marked, complies with all relevant directives |
Frequently Asked Questions - WT 5005 SEVERIN
User questions about WT 5005 SEVERIN
0 question about this device. Answer the ones you know or ask your own.
Ask a new question about this device
Download the instructions for your Grill in PDF format for free! Find your manual WT 5005 - SEVERIN and take your electronic device back in hand. On this page are published all the documents necessary for the use of your device. WT 5005 by SEVERIN.
USER MANUAL WT 5005 SEVERIN
natural_image
Hand inserting a card into a printer device (no text or symbols visible)natural_image
3D diagram of a mechanical component with two cylindrical cavities and an upward arrow, no text or symbols presentnatural_image
Mechanical assembly diagram showing a hand rotating a cylindrical component mounted on a base plate (no text or symbols visible)natural_image
Illustration of a hand holding a coiled wire or spring attached to a cylindrical component, with arrows indicating force direction (no text or symbols)natural_image
Illustration of a hand using a spring to lift a cylindrical component (no text or symbols present)natural_image
Illustration of a hand turning a cylindrical component with arrows indicating rotational motion (no text or symbols)natural_image
3D mechanical assembly diagram showing a piston-like component with two circular holes and an arrow indicating downward motion (no text or symbols)natural_image
Illustration showing two hands inserting a coil into a device, with a magnified inset highlighting the coil component (no text or symbols present)1 For your safety....24
2 Technical specifications 29
3 Overview and parts included....29
4 Setting up....31
5 Using the appliance for the first time....31
6 Pre-set grilling programmes ....32
7 Adjusting the grilling time....34
8 Keeping the sausages warm....34
9 Cleaning the unit....35
9.1 After use: cleaning the fat tray....35
9.2 After use: cleaning the grill insert 36
9.3 After use: cleaning the interior....38
9.4 If required: cleaning the housing ....39
10 Trouble-shooting 39
10.1 How to solve problems yourself ....39
10.2 Hints for saving energy....41
10.3 Accessories and spare parts ....41
10.4 Disposal....41
11 Warranty 42
12 Conformity....43
Customer service....44
Dear Customer,
we wish you much pleasure and satisfaction with this SEVERIN quality product, and thank you for your confidence.
For over 130 years, the SEVERIN brand name has been a synonym for consistency, German quality and developmental strength. Each unit has been produced with great care and tested extensively.
With proverbial, Sauerland ^thoroughness , precision and honesty, the family-owned business - based in Sundern, Germany - has drawn customers worldwide with innovative products since the company was established in 1892.
In eight product groups - coffee, breakfast, kitchen, BBQ, household, floor-care, personal care and cooling & freezing - SEVERIN offers more than 250 products, a truly comprehensive range of small electric appliances, with the right product for every occasion!
Get to know the wide SEVERIN product range, and visit us on
www.severin.de or www.severin.com.
Your SEVERIN-team
1 For your safety
Always follow the instructions for use
Please read the instructions carefully before using the appliance, and keep them in a safe place. If the appliance is handed over to a third party, these instructions shall accompany it.
Failure to comply with the instructions could result in serious personal injury or damage to the appliance.
Important safety precautions beyond the contents of Chapter 1 are prominently marked, as below, and should be followed at all times in order to prevent accidents and damage to the appliance:

WARNING!
Indicates information that must be followed in order to avoid serious personal injury or mortal danger.

CAUTION!
Indicates information which must be followed in order to prevent damage to the appliance.

HINT
Presents hints and other useful information.
Danger of burning
Sausages, and specifically the fat they contain, may burn. There is, as a matter of principle, always a risk of fire, while the appliance is switched on:
- Ensure that the appliance is not positioned or operated near or below combustible materials (eg curtains, wall cupboards). The area above the sausage slot must always be unobstructed (minimum clearance, 1 metre).
- Do not place the appliance on any easily inflammable surfaces (eg paper towels).
- Do not cover the sausage slots.
- The appliance must only be used for simultaneous grilling and keeping warm a maximum of two sausages. Do not place any other items such as bread rolls or other bakery products on the appliance for warming or crisping.
- Do not leave the appliance unattended during grilling.
- Should the appliance nevertheless catch fire, extinguish the fire by smothering the flames. Caution: Do not use water under no circumstances.
Danger to particular group of persons
There is an increased risk of injury for particular groups of people:
- This appliance may be used by children (at least 8 years of age) and by persons with reduced physical, sensory or mental capabilities, or lacking experience and knowledge, provided they have been given instruction or are supervised in using the appliance and fully understand all dangers and safety precautions involved.
- Children must not be permitted to play with the appliance.
- Children must only be permitted to carry out any cleaning or maintenance work on the appliance if they are supervised and at least 8 years of age.
- Keep children under 8 years well away from the appliance and its power cord.
- Caution: Keep children well away from any packaging materials. There is a potential danger of suffocation.
- Persons with sensitivity disorders, especially those with reduced sensitivity for differences in temperature, must definitely exercise increased caution when using the appliance.
Improper use
This appliance must only be used for simultaneous grilling and keeping warm a maximum of two sausages, which must not exceed the dimensions specified in Chapter 2, Technical specifications'.
Any other use is considered improper and may lead to personal injuries or material damage.
- The appliance is intended for domestic or similar applications, eg in offices and similar locations. It is not suitable for commercial use, eg in canteen or catering kitchens.
- The appliance is not intended to be operated by means of an external timer or separate remote-control system.
- Do not operate the appliance unless the grill insert, fat tray, sausage holder and cleaning flap are properly fitted.
Electricity
The device is powered by electricity, and so there is always a risk of an electric shock. Therefore the following safety precautions must be taken:
- This appliance must only be connected to an earthed safety socket installed in accordance with the regulations (minimum fuse protection 10 A).
- The appliance must only be connected to the mains if the voltage marked on the rating label corresponds to the supply voltage.
- Do not kink or pinch the power cord. Keep both the cord and the appliance itself well away from heat sources (eg hotplates, hobs or burners).
- When removing the plug from the wall socket, never pull on the power cord; always grip the plug itself. Do not carry the unit by its power cord.
- Do not immerse the appliance in water or any other liquid, do not clean it under running water and do not put it in a dishwasher. The sausage holder and the grill insert and its components, however, are dish-washer-safe once detached.
- Do not touch the plug with wet hands.
-
Do not operate the unit outdoors.
-
Do not try to remove a sausage from the appliance using any metal implement (e.g. knife, fork). Disconnect the unit from the mains and use a blunt wooden tool (eg the wooden BBQ tongs supplied).
- As long as it is connected to the mains, a current is present inside the unit, even if it is switched off.
- Always remove the plug from the wall socket after use.
- In the case of an emergency or malfunction, disconnect the appliance from the mains immediately. Ensure, therefore, that the wall socket the appliance is connected to is accessible and the plug can be removed from the wall socket at any time.
- Always remove the plug from the wall socket before any cleaning or maintenance work is carried out.
- Do not attempt to open or dismantle the unit, and do not attempt to make any technical alteration.
Hot surfaces and hot fat

With the appliance switched on, and also after grilling, the temperature of accessible surfaces can be extremely high. There is also a danger of burns being caused by the hot sausages themselves:
- Do not insert your fingers into the sausage slots, and do not touch the heating coil under no circumstances.
- Do not attempt to remove sausages from the slots while grilling is in progress.
- Do not put your hands over the sausage slots and keep your face well away from them while the appliance is operating.
- Do not carry or move the unit during operation.
- Do not touch any metal surfaces around the sausage slots immediately after grilling.
- Caution: After grilling, wait at least 30 minutes before removing the grill insert, the sausage holder or the fat tray. Fat remains hot for a very long time, and should therefore not be touched or handled until fully cooled down.
Poor hygiene
Lack of hygiene may result in the build-up of germs inside the unit:
- The fat tray, sausage holder and grill insert should be emptied and cleaned at regular intervals.
- Do not leave any sausages in the slots when the appliance is not in use.
The use of wrong cleaning agents poses health risks:
- Only food-grade cleaning agents should be used for those parts that come into contact with sausages.
Dangers to the unit
Incorrect handling of the appliance can cause damage:
- Always place the unit on a dry, stable, level, non-slip and heat-proof surface, which is impervious to contact with the rubber feet.
- Do not position the appliance on a hot surface or near any strong sources of heat.
- Do not let the power cord hang free, or over the edge of a table.
- Do not use any cleaning agents or tools other than those specified in these instructions to clean the unit.
- Before the appliance is stored away, remove the plug from the socket and allow the unit to cool down completely.
In case of a defective appliance
A defective appliance can cause material damage and injury:
- Check the appliance for damage each time before use. If you notice any kind of transport damage, please contact the retail dealer where the unit was purchased.
- Never operate a defective appliance. Do not operate any appliance after is has been dropped.
- If the power cord of the unit shows any sign of damage, it must be replaced by the manufacturer, their customer service or another qualified person in order to avoid any danger.
- The unit does not contain any components that you can service or repair yourself. Repairs must only be carried out by SEVERIN Service (see ,Customer service' on page 44).
2 Technical specifications
| Device category and type „Wurster" WT 5000 | |
| Voltage 220-240 V~, 50-60 Hz | |
| Output/energy consumption approx. 2.000 W | |
| Dimensions (W x H x D) 272 mm x 362 mm x 207 mm | |
| Weight approx. 6 kg | |
| ,Thick sausage' programme 05:00 min + pre-heating if required* | |
| ,Thin sausage' programme 04:30 min + pre-heating if required* | |
| *The pre-heating time depends on the temperature inside the unit | |
| Adjustable grilling time 00:30 to 10:00 min | |
| Minimum/maximum length of sausage | 160-220 mm |
| Maximum thickness of sausage 30 mm | |
| Symbols used | |
 | CAUTION! Hot surface. Allow appliance and its components to cool down. |
 | Do not dispose of in domestic garbage! |
| [6x7A] | This product complies with all binding CE labelling directives. |
3 Overview and parts included
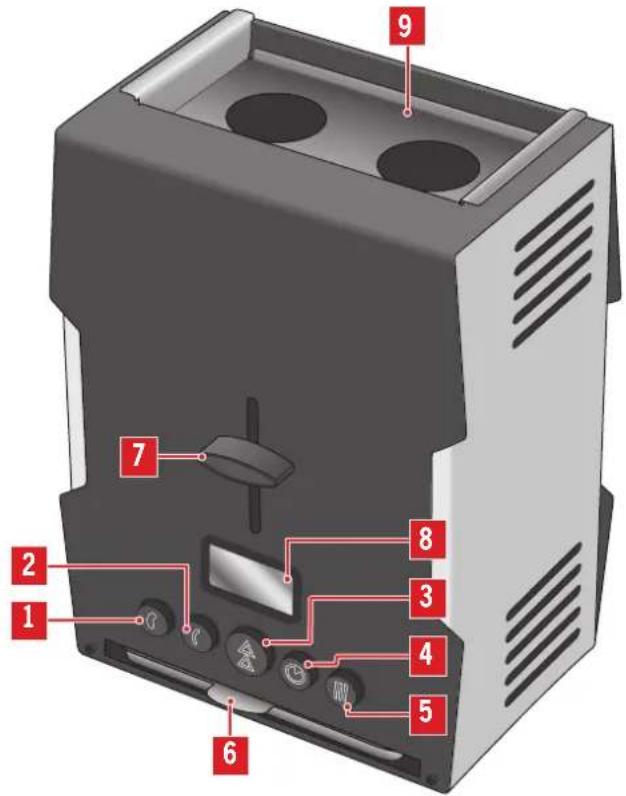
Fig. 1: Front view
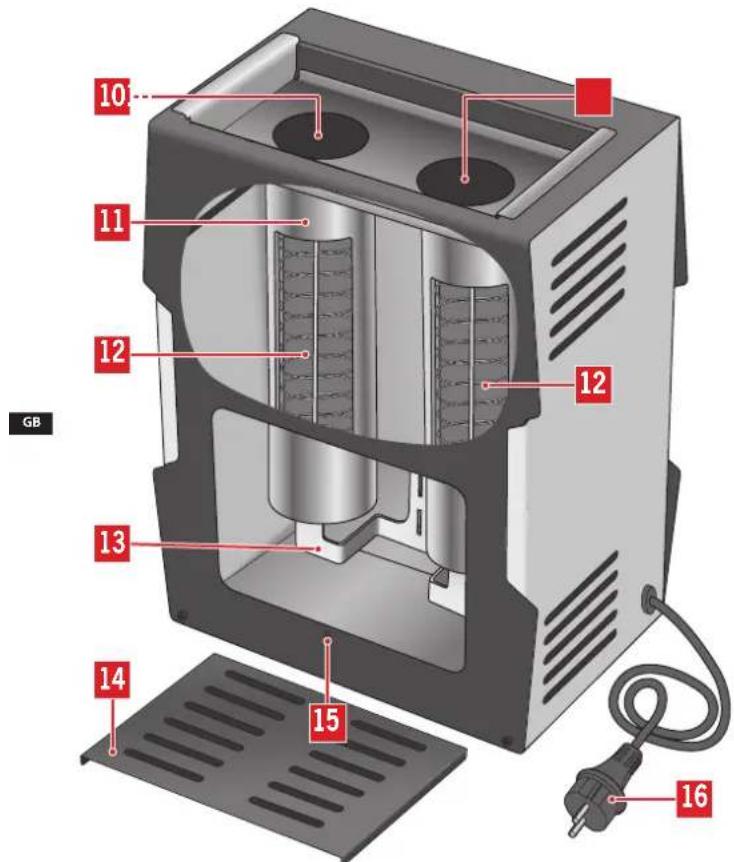
Fig. 2: Rear view and interior components (cross-sectional view)
| Pos. | Description/Function |
| 1 | "button (thick sausage'), pre-set programme for thicker sausages, eg with a diameter of 25 mm or more |
| 2 | "button (thin sausage'), pre-set programme for thinner sausages, eg with a diameter of 25 mm or less |
| 3 | "button, to stop the grilling, roasting or keeping-warm process |
| 4 | "button, to adjust the pre-set programmes (for thick or thin sausages) by 30-second intervals, before the programme starts:pressing briefly increases the grilling time by 30 secondspressing longer reduces the grilling time by 30 seconds |
| 5 | "button (Keeping warm') keeps the sausages warm for up to 30 minutes |
| 6 | Fat tray |
| 7 | Slide control |
| 8 | Display |
| 9 | Grill insert |
| 10 | Sausage slots |
| 11 | Reflectors |
| 12 | Springs |
| 13 | Sausage holder |
| 14 | Cleaning flap |
| 15 | Threaded hole for locking off the cleaning flap |
| 16 | Power cord and plug |
| - Instructions for use; wooden BBQ tongs | |
4 Setting up
The appliance should be set up on a suitable worktop meeting following requirements:
- near an earthed safety socket (minimum fuse protection 10 A),
• level, stable and shock-resistant, - heat-proof and unaffected by the rubber coating of the feet,
- well away from any heated or inflammable surfaces and objects (minimum 1 m or more)
• well away from walls (minimum 1 m or more)

WARNING!
Fire hazard – The heat radiating from the appliance is sufficiently strong to ignite flammable objects nearby.
– A minimum clearance of 1 metre or more from any appliance, overhang, ceiling or other object must be maintained.
5 Using the appliance for the first time
Before you use the appliance for the first time, is must be operated once without any sausages inserted; this will eliminate of any odour typically emitted when switching on appliances of this type for the first time:
-
Set up the unit as described in Chapter 4, Setting up'.
-
Completely remove any packaging materials and stickers from on and inside the appliance. Pull the grill insert together with the reflectors upwards and out of the appliance (see 9.2, After use: cleaning the grill insert' on page 36). Open and take off the cleaning flap (see 9.3, After use: cleaning the interior' on page 38). Remove all cardboard and polyfoam inlays from the interior of the appliance.
- Insert the plug into a suitable safety wall socket.
- Select the 'thick sausage' programme, using the "button."
The selected button lights up.
- Push the slide control all the way down until it locks into place.

HINT:
Press down the slide control and hold for 0.5 seconds until it clicks into place and the countdown or the animated image „pre-heating phase“ starts.
→ Pre-heating starts.
During this phase, the display shows an animated picture.
Once pre-heating is complete, the display shows the remaining grilling time, counting down.

HINT:
During the first few heating cycles, the appliance may emit a slight smell and a little smoke. This is harmless and will disappear after a short while. Ensure adequate ventilation.
- Wait until the grilling cycle has finished, when the slide control comes up again.
- Let the appliance cool for 2 minutes before starting the next grilling cycle.
6 Pre-set grilling programmes
2 pre-set programmes are available:
- ,thick sausage' programme (,, ")05:00 min + pre-heating if required*
• ,thin sausage' programme („”)04:30 min + pre-heating if required*
*Pre-heating time depends on the temperature inside the unit
In addition to the standard time required, the programmes „thick sausage“ and „thin sausage“ differ primarily in terms of heating power. While the „thin sausage“ is grilled at full heating capacity, the temperature at which the „thick sausage“ is grilled is slightly reduced in order to ensure that the sausage is heated correctly all the way through.

HINT:
The ,thick sausage' programme ( w ) is best suited for sausages with a 30 mm diameter, the ,thin sausage' programme ( w ) for those with a diameter of around 20 mm.

HINT:
If you are unsure which programme to use, we recommend that you use the 'thick sausage' programme. However, in this case ensure that the sausages do not turn too dark, and interrupt the grilling cycle with the "button where necessary."

HINT:
The settings for both pre-set programmes are based on sausages at room temperature. If you have taken the sausages from the refrigerator, we recommend they are left to stand for around 30 minutes at room temperature.
- Ensure that the fat tray is empty and that the sausage holder and fat tray are properly fitted.
- Ensure that the plug is inserted into a suitable safety socket.
- Insert 2 sausages of the same kind into the slots, one sausage per slot.
- If you want to keep the sausages warm for 30 minutes after grilling, simply press the „button before, during or within 60 seconds after the grilling cycle.
The „ ^18 ” button lights up. The sausages will be kept warm for up to 30 minutes after grilling; see also 8, Keeping the sausages warm on page 34 - Use the „or, “ button to select a programme suitable for the size of the sausages.
The selected button lights up. - Push the slide control all the way down until it locks into place.

HINT:
Press down the slide control and hold for 0.5 seconds until it clicks into place and the countdown or the animated image „pre-heating phase“ starts.
The appliance starts pre-heating (unless it is still hot from a previous grilling cycle).
he pre-heating phase, the display shows an animated picture.

e-heating is complete, the display shows the remaining grilling time and counts down.
The ,Keeping warm' function may still be activated or de-activated during the grilling cycle (。).
Once the grilling cycle is complete, the slide control automatically comes up again.
However, if you have selected the 'Keeping-warm' function („") before or during grilling, the sausages will remain inside the appliance and be kept warm for up to 30 minutes.
If required, the 'Keeping-warm' function may also be activated within 60 seconds after completion of the grilling cycle: Simply press the „button and push down the slide control.
7. Check the browning level:
If you are not satisfied with the result:
- Press the "button briefly, or keep it pressed, in order to increase the grilling time in 30-second intervals to 01:00 minute (see also 7 'Adjusting the grilling time' on page 34), and lower the slide control afterwards.
If you are happy with the result:
- Carefully remove the sausage using the wooden tongs.

WARNING!
Caution: Danger of burns. The sausages are extremely hot immediately after grilling!
- Carefully remove the sausage using a non-metallic implement, eg the wooden tongs.
-
Point out to your guests that the sausage may be very hot.
-
If no more grilling is planned for the same day:
-
Remove the plug from the socket.
- Wait for around 30 minutes, until the appliance and the content of the fat tray have cooled down to the ambient temperature.
-
Clean all components as described below, see:
-
9.1, After use: cleaning the fat tray' on page 35
- 9.2, After use: cleaning the grill insert' on page 36
- 9.3 ,After use: cleaning the interior' on page 38
- 9.4, If required: cleaning the housing' on page 39
7 Adjusting the grilling time
If you are not happy with the results from the ,thick sausage' and ,thin sausage' pre-set programmes, the ,●button allows you to adjust the grilling time manually:

WARNING!
Health hazard - When sausages burn, hazardous substances are generated!
- Always start with a 5-6 minute cycle, and increase the time only slowly.
- Never start with the maximum time setting!
-
Select the programme that you wish to adjust, using the "or" button.
-
Press the "button briefly to increase the grilling time in 30-second steps. (Once you have reached 10:00, pressing the button again results in the time being reset to 00:00.)
-
Press longer and hold the „button to reduce the grilling time in 30-second steps.
-
If you are still unhappy with the result at the end of the following grilling cycle, grill the sausages again for about one minute. Before the next grilling cycle, increase the grilling time directly by 30 seconds using the „button.

HINT:
The 'thick/thin sausage' pre-set programmes store the grill setting last used until the unit is disconnected from the mains. Once disconnected, both programmes return to their respective factory settings.
8 Keeping the sausages warm
With the „button you can keep the grilled sausages warm for up to 30 minutes. There are two possible approaches:
Selecting the 'Keeping-warm' function, "before or during the grilling cycle:
- Press the "button before or during the grilling cycle."
The "①" button lights up. The sausages are not ejected after grilling is complete (the slide control does not come up again).
,Keeping-warm' function is active, the display shows an animated picture.
Activate the 'Keeping-warm' function, after the grilling cycle is complete (this is only possible within the first 60 seconds after the cycle has finished):
- Press the "button once the grilling cycle is complete."
The "button lights up.
- Push down the slide control.
e, Keeping-warm' function is active, the display shows an animated picture.
The sausages are kept warm for up to 30 minutes.

HINT:
The keeping-warm time is always pre-programmed for 30 minutes, irrespective of when the function has been selected; it cannot be changed. However, you can end this phase at any time by pressing the „button, or by disconnecting the unit from the mains.
9 Cleaning the unit

WARNING!
Danger of burns!
- Prior to any cleaning work: switch the appliance off, remove the plug from the socket and allow the unit and its components to cool down completely (minimum 30 minutes).

WARNING!
Danger of injuries and damage to the appliance!
- Caution: Never submerge the appliance in water!

WARNING!
Health risks due to unsuitable cleaning agents!
- Only food-grade cleaning agents should be used for those parts that come into contact with sausages.

CAUTION!
Do not use abrasives, harsh cleaning solutions or tools that night cause scratches to the surfaces.
9.1 After use: cleaning the fat tray
For reasons of hygiene, the fat tray must be emptied each time after use.

WARNING!
Danger of burns – The fat collected in the fat tray can remain very hot for a considerable time after the appliance has been switched off!
- Wait for at least 30 minutes; do not handle hot fat!
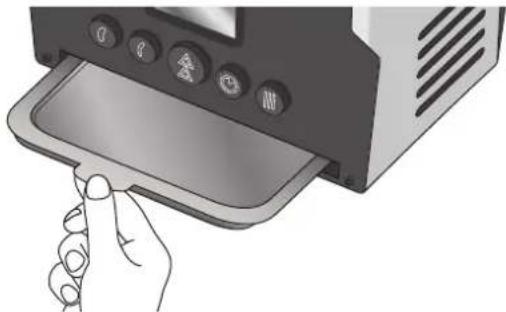
- Pull the fat tray completely out of the unit (fig. 3) and dispose of its contents with your domestic refuse.
natural_image
Hand inserting a card into a computer monitor (no text or symbols visible)Fig. 3: Removing the fat tray
- If you intend to use the tray again right away, it is sufficient to clean it with a kitchen towel.
- However, the tray should be cleaned after every fourth cycle of use by rinsing it thoroughly, or in the dishwasher.
- Ensure that the tray is clean and dry, before you slide it all the way back into the unit.
9.2 After use: cleaning the grill insert
After use, and also if the appliance is not going to be used for some time, we recommend taking out and disassembling the grill insert, and cleaning it thoroughly.

WARNING!
If these interior components are not cleaned regularly, there is a hygienic risk, and the fire danger increases; in addition, it will become more and more difficult to remove old dirt particles.
- The interior components should therefore be cleaned regularly and each time the unit is not going to be used for some time, but at least once a week.
natural_image
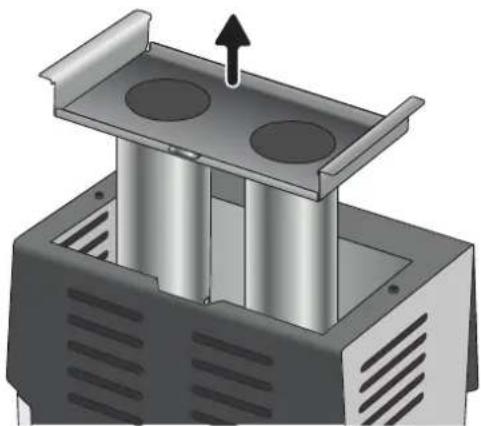
3D diagram of a mechanical component with two circular holes and an upward arrow, no text or symbols presentFig. 4: Removing the grill insert
- Wait for around 30 minutes until the components have cooled down to room temperature.
- Pull the grill insert upwards and out of the appliance as shown (fig. 4).
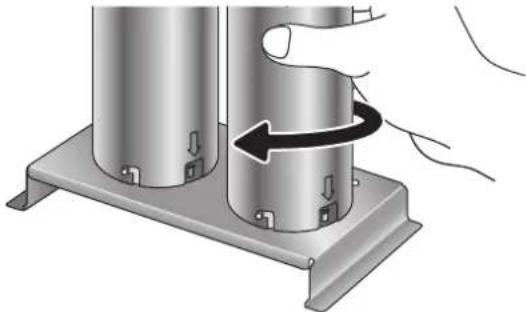
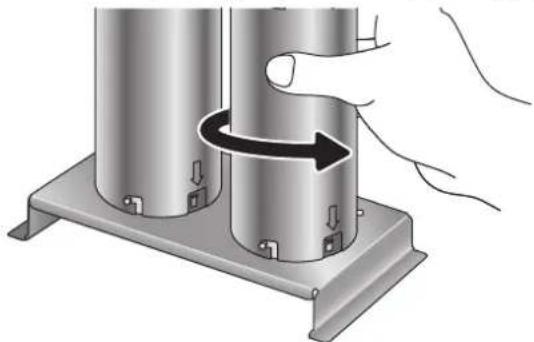
- Separate the reflectors from the grill insert by turning them (fig. 5).
natural_image
Mechanical assembly diagram showing a hand pressing down on two cylindrical components mounted on a base plate (no text or symbols visible)Fig. 5: Unlocking and removing the reflectors
- If necessary, compress the spring which forms the 'sausage cage' and remove it as shown (fig. 6).
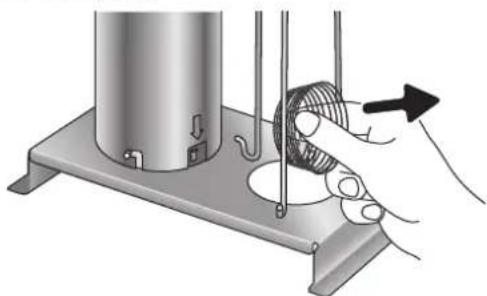
natural_image
Illustration of a hand holding a coiled wire or cable mounted on a base platform, with no visible text or symbols.Fig. 6: Removing the springs
- Remove the second reflector and spring by following the same steps.

HINT:
If there is excessive dirt, we recommend using a special grill cleaning agent.
- Clean all five parts (1 grill insert + 2 reflectors + 2 springs) by rinsing them thoroughly, or in the dishwasher.
- Ensure that all components are properly dried afterwards.
- If you have removed the springs for cleaning, compress them again and thread them inside the 3 retaining rods of the grill insert (fig. 7).
The springs will expand to their full size.

natural_image
Illustration of a hand pressing a spring on a cylindrical component (no text or symbols)Fig. 7: Re-inserting the springs

HINT:
When the spring is put back, ensure that its wider end faces the threaded hole of the grill insert (fig. 7). Otherwise, the spring will not be able to expand fully.
- Re-install the reflectors, following the position markings ,arrow' (fig. 8).
natural_image
Illustration of a hand turning a cylindrical component with arrows indicating rotation (no text or symbols)Fig. 8: Installing the reflectors

HINT:
Fit the reflector in such a way that the arrow mark on the reflector faces the corresponding recess on the grill insert (fig. 8). Otherwise you will not be able to install the grill insert correctly.
-
Re-install the grill insert after cleaning. Ensure that
-
the protrusion on the grill insert engages into the corresponding recess in the housing (fig. 9),
- the insert is pushed down all the way and correctly seated (fig. 9).
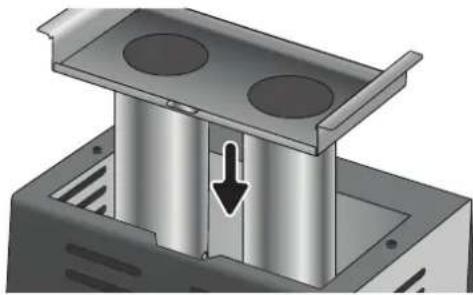
natural_image
3D mechanical assembly diagram showing a piston-like component with two circular holes and an arrow indicating downward motion (no text or symbols)Fig. 9: Fitting the grill insert correctly
9.3 After use: cleaning the interior
After use, and also if the appliance is not going to be used for some time, we recommend opening the cleaning flap and thoroughly cleaning the interior of the appliance.

WARNING!
If the interior components are not cleaned on a sufficiently frequent basis, there is a hygienic risk, and the fire danger increases; in addition, it will become more and more difficult to remove old dirt particles.
- The interior components should therefore be cleaned regularly, and also each time the unit is not going to be used for some time.
- Disconnect the unit from the mains.
- Wait for around 30 minutes until the interior components, including the fat tray, have cooled down to room temperature.
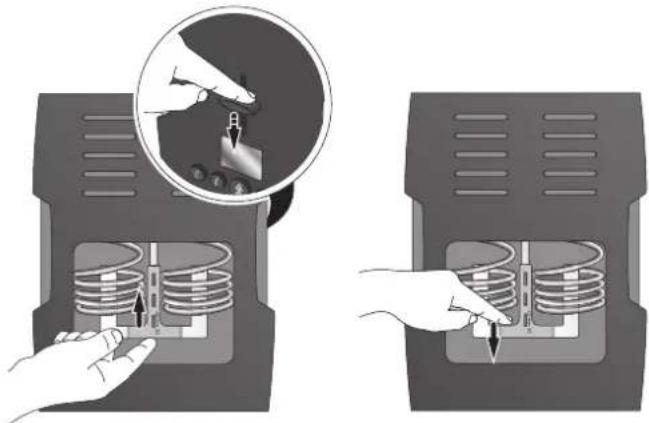
natural_image
Illustration showing two hands inserting a spring into a device, with a magnified inset highlighting the component (no text or symbols present)Fig. 10: (a) Remove the sausage holder (b) Fit the sausage holder
- Loosen the screw on the cleaning flap.
- Open the cleaning flap and take it off.
- Remove the sausage holder (fig.10 a) as follows: hold the slide control in place and lift up the upper corner of the sausage holder. The holder can now be taken out.
- Clean the sausage holder with a sponge and a little detergent, or in the dishwasher.
- Wipe clean with a dry, lint-free cloth afterwards.
-
Close the cleaning flap.
-
Tighten the fixing screw.
- Re-insert the sausage holder (fig.10 b). This is done by inserting the wings of the holder from below into the heating coils. Secure it by fitting the protruding studs on the lifting mechanism into the corresponding recesses on the holder. Pull the holder downwards and check that it is firmly seated.
- Re-insert the cleaning flap.
- Tighten the fixing screw.

WARNING!
Risk of fire and burns!
There is an increased risk of fire and burns if the cleaning flap has not been properly secured.
- Ensure that the cleaning flap is properly closed and securely locked with its fixing screw immediately after cleaning.
9.4 If required: cleaning the housing
- The exterior housing may be wiped with a slightly damp, lint-free cloth.
- If this is not sufficient, a little mild detergent may be added.
- Wipe dry with a clean cloth afterwards.
- If you have removed the grill insert for cleaning, ensure that it is properly fitted again, ie that it has been pushed down all the way and is correctly seated.
10 Trouble-shooting
10.1 How to solve problems yourself

WARNING!
Risk of injury - The unit does not contain any components or parts that can be repaired by the user.
- Caution: Never use a defective appliance!
- Caution: Do not attempt to carry out any repair work yourself. If a defect is found, contact our Customer Service Department (see 'Customer service' on page 44).
Before you contact our Customer Service or send the appliance in, please use the following table to check whether the problem can be solved at home.
| Problem Cause Remedy | ||
| The slide control doesn't lock into place when pushed down. | The unit is not connected to the mains, and no power is supplied. | Insert the plug into the socket. |
| The unit has overheated.The display shows ,CCCC'. | Wait for a few minutes; you should then be able to continue grilling afterwards. | |
| Problem Cause Remedy | ||
| The sausages turn out too dark and/or there is a burning smell during the grill-ing process. | The fat tray should be emptied. | Stop the grilling process. Allow the unit to cool down for at least 30 minutes. Empty the fat tray (see 9.1 ,After use: cleaning the fat tray'). |
| The pro-grammed grilling time is too long. | Dispose of the burnt sausages and select a shorter time for the next cycle. | |
| You have grilled a sausage more than once. | Refrain from grilling sausages repeatedly. Two full grilling cycles are definitely too long, no matter whether the ,thick' or ,thin sausage' programme is selected. | |
| The „#or „#button flashes, the countdown will be stopped. | The internal temperature of the Wurster approaches the maximum. The heating elements are switched off until the device is sufficiently cooled down. | Wait for the pause time of about 90–120 seconds. The Wurster automatically switches the heater on. The „#or „" button then lights up continuously again and the time counts down continues. |
| Problem Cause Remedy | ||
| The sausages are not ejected once the grilling cycle is complete. | The sausages are too thick, or they have changed their shape from the heat. | Disconnect the unit from the mains and allow it to cool down. Remove the sausages carefully with the help of a blunt, non-metallic implement (eg the wooden BBQ tongs supplied). In future, use only sausages with a maximum diameter of 30 mm or those with a less pronounced curvature. |
| The sausage holder has not been fitted. | Disconnect the unit from the mains and allow it to cool down. Fit the sausage holder (see ,9.3 After use: cleaning the interior'). | |
| The grilling process ter-minates pre-maturely. The display shows ,CCCC'. | The unit has overheated. The Display shows ,CCCC'. | Wait for a few minutes; you should then be able to continue grilling afterwards. |

HINT:
- If the suggestions in the table do not lead to a satisfactory result and the problem persists, contact our Customer Service Department (see 'Customer service' on page 44).
- Should you require replacement parts or accessories for your appliance, please visit our online shop under the section ,Service/Spare part shop' on our website www.severin.com.
10.2 Hints for saving energy

HINT:
To save energy, grill two sausages at the same time. Grill the sausages just before they are to be served; this will help to avoid using the keeping-warm function, thus saving energy again.

HINT:
If the appliance has not been used for 60 seconds, it will automatically switch to stand-by mode. While in this mode, the power consumption is less than 0.5 W. However, even this consumption can be avoided by simply disconnecting the appliance from the mains.
10.3 Accessories and spare parts
Article no Accessory / spare part
| 8805048 1 grill insert, complete (fig. 1 / no. 9) |
| 8806048 2 springs (fig. 2 / no. 12) |
| 8807048 2 reflector tubes (fig. 2 / no. 11) |
| 5577048 1 sausage holder (fig. 2 / no. 13) |
| 3423048 1 fat tray (fig. 1 / no. 6) |
| 3426048 1 pair of wooden BBQ tongs |
10.4 Disposal
Devices marked with this symbol must be disposed of separately from your household waste, as they contain valuable materials which can be recycled. Proper disposal protects the environment and human health. Your local authority or retailer can provide information on the matter.
11 Warranty
-
The buyer's statutory rights with regard to defects shall apply if the appliance is defective. The buyer may exercise any of these rights free of charge. You shall assert these rights against your contract partner, i.e. the dealer from whom you purchased the appliance. The contractual arrangements between you and the dealer shall be observed. Your statutory rights with regard to defects are in no way restricted or affected by this warranty. We as the manufacturer have voluntarily and additionally taken on the warranty service.
-
This warranty shall apply as follows:
If the appliance is defective at the time of the transfer of risk (i.e. at the time of receipt of the appliance) within the meaning of the statutory provisions, we as the manufacturer will remedy the defect free of charge within a reasonable time, at our discretion, or provide you with a new defectfree appliance. This warranty is not a durability warranty.
This warranty is valid for the device with the article number stated on the front. This warranty applies to newly bought appliances only. The warranty shall not apply to equipment that has been used, repaired, altered or otherwise modified by a third party (also referred to as "refurbished" equipment).
You may only receive the warranty service if you assert your rights under this warranty within two years of receipt of the appliance (e.g. from the time you pick it up in a shop in case of a purchase in stationary retail and from the delivery date in case of shipment), as described in section 4 below. We will not assume any further voluntary obligations, such as the reimbursement of transport, installation and dismantling expenses. Our statutory obligations will remain unaffected.
The warranty does not cover any defects or faults caused by:
- Incorrect setup or installation, e.g. non-observance of the applicable safety regulations or the written instructions for use, installation and assembly
- Improper use, including improper operation or misuse
- External influences, such as transport damage, damage caused by shock or impact, damage caused by the weather
• Current and voltage fluctuations outside the tolerance limits
Non-observance of maintenance and cleaning work according to the instruc-
tions for use
- Use-conditioned or natural wear-and-tear, such as the decreasing charging capacity of rechargeable batteries, lamps or components that typically require regular replacement during the life cycle of the product
- Guarantor: The warranty provider valid for your country can be found in the appendix to this warranty statement.
- You can assert your rights under this warranty by contacting your contract partner, i.e. the dealer from whom you purchased the appliance, and providing them with the following information:
- Your full name, address details and phone number or email address at which you can be reached,
- Description of the defect of your appliance (a brief description of the defect signs is enough),
- Date of purchase or, if different, date of delivery of the appliance.
Your dealer will then contact us and take care of everything else.
Alternatively, you can submit the above Information to our customer service and contact them directly.
You can find the contact details valid for your country in the appendix to this warranty statement or on our website www.severin.com.
12 Conformity
This product complies with all CE labelling directives necessary for its CE-marking.
GB
Kundendienst / Customer service
Deutschland
SEVERIN Service
Röhre 27
59846 Sundern