SportCam 1080P - Camcorder Talius - Free user manual and instructions
Find the device manual for free SportCam 1080P Talius in PDF.


User questions about SportCam 1080P Talius
0 question about this device. Answer the ones you know or ask your own.
Ask a new question about this device
Download the instructions for your Camcorder in PDF format for free! Find your manual SportCam 1080P - Talius and take your electronic device back in hand. On this page are published all the documents necessary for the use of your device. SportCam 1080P by Talius.
USER MANUAL SportCam 1080P Talius
text_image
TALIUS TECH4-V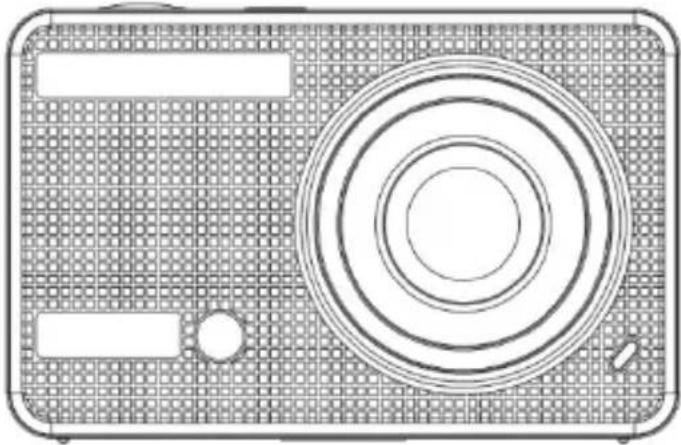
natural_image
Top-down schematic of a camera with concentric circular components and a rectangular panel (no text or symbols)Talius SportCam 1080P User Manual
Function Function
Thank you for choosing this camera. Please carefully read the manual before using, and keep it at a safe place for future reference.
The compilation of the user manual refers to the latest information. The manual quotes captured screen displays and graphics, with the aim to introduce the digital camera through detailed and direct methods. Due to the differences of technical R&D and production batch, those captured screen displays and graphics indicated in the manual may be different from that of actual digital camera.
Precautions Precautions
TF high-speed card (multimedia memory card) at Class4 or above is required for this camera.
Instructions for using the memory card
- In case of a newly purchased memory card for the first time use, or data available in the memory card unrecognized for the camera or image captured by other cameras, please ensure to firstly format the memory card;
- Before plugging in or out the memory card, please firstly disconnect power supply of the camera;
- After using for many times, performance of the memory card will be lowered. In case of lowered performance, a new memory card is needed to purchase;
- The memory card is a precise electronic device. Please don't bend it and keep it away from falling or heavy load;
- Don't keep the memory card in the environment with strong electromagnetic or magnetic field, like the
place near speaker or receiver of TV;
- Don't use or keep the memory card in environment with over high or low temperature;
- Keep the memory card clean and away from contacting liquid. In case of contacting liquid, please dry it with soft cloth;
- In case of keeping the memory card idle, place it into the card sleeve;
- Please note that the memory card will get hot after long-term use, and this is normal;
- Don't use the memory card having used on other digital cameras. If to memory card on this camera, please firstly format it with the camera;
- Don't use the memory card having formatted on other camera or card reader;
- In case of one of the followings with the memory card, the recorded data may be damaged:
- Improper use of the memory card;
- Disconnect power supply or take the memory card out during recording, deleting (formatting) or reading;
- You are recommended to backup important data on other media like soft disk, hard disk, CD.
Camera Maintenance
- Keep it in a dry and dark place for keeping idle;
- Use proper protective cover to avoid lens and display scratched;
- In case of cleaning the surface of camera lens, first blow the dust off the surface, use a cloth or paper available to optical equipment to wipe the lens gently. Use the professional camera cleanser to clean the lens. Do not use any organic solvent;
- Do not touch the lens surface by fingers.
System requirements System requirements
When operating or using the digital camera, please take minimum system requirements for the computer of the camera into consideration. You are strongly recommended to use better computer equipment for operating the camera to achieve the optimized effect. The minimum system requirements are as below:
| System Requirements | ||
| Operating System | PCCAM | Microsoft Window XP(SP3), Vista, 7, 8Mac OS X ver: 10.8.0 or above version |
| MSDC | Microsoft Window 2000, XP, Vista, 7, 8Mac OS X ver: 10.0.0 or above version | |
| CPU | Intel Pentium of more than 1GB Hz or other CPU with equivalent performance | |
| Internal Memory | Larger than 1GB | |
| Sound Card and Display Card | The sound card and video card shall support DirectX8 or higher version. | |
| CD Driver | Speed of 4 times or faster | |
| Hard Disk | Free space of more than 2GB | |
| Others | One standard USB1.1 or USB2.0 port | |
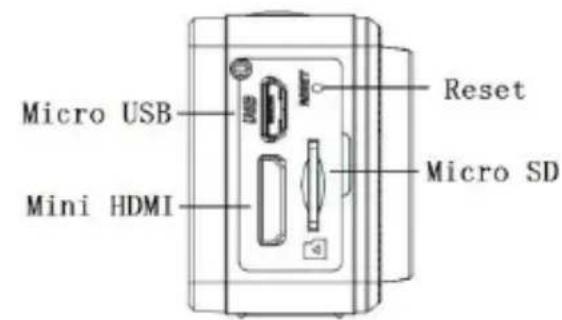
Appearance Appearance
text_image
Micro USB Mini HDMI Reset Micro SD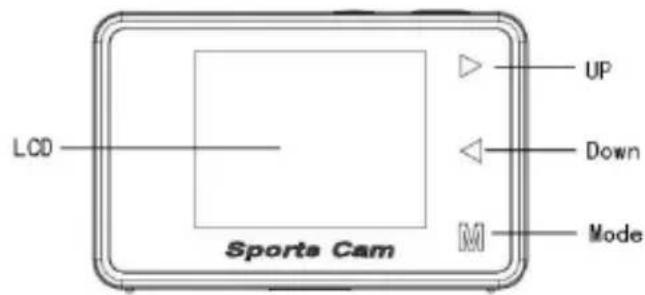
text_image
LCD Sports Cam UP Down M Mode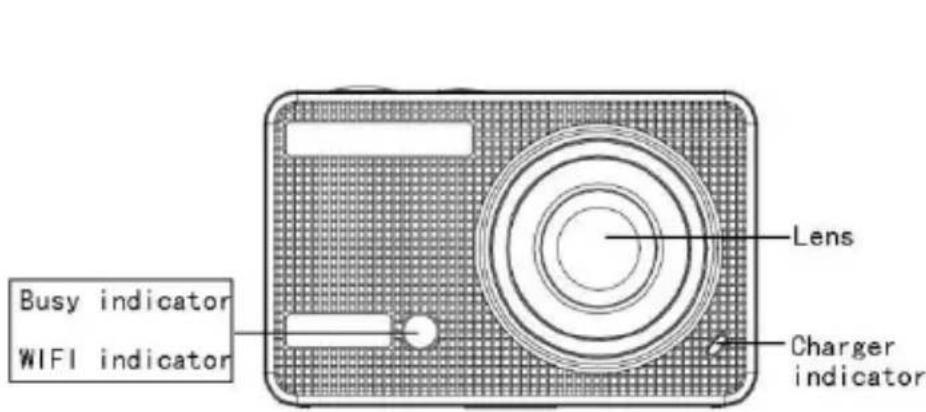
text_image
Busy indicator WIFI indicator Lens Charger indicator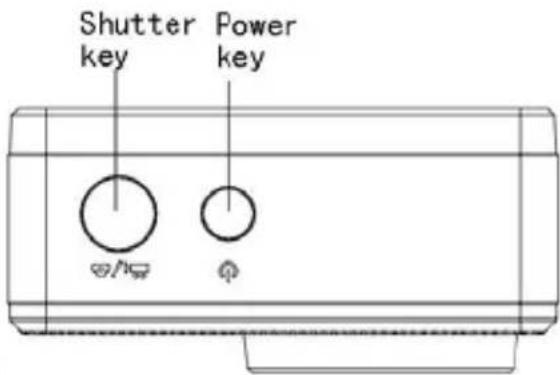
text_image
Shutter key Power keyKey Functions and Indicators
| Key/Indicator Function | |
| Power key(Menu key) | Power On/Off; Open and exit from menu; Stop play video files ( playback mode ) |
| Shutter key | Video recording/capturing; play/pause playing video file (Playback mode); menu confirmation |
| Mode key | switch_over among video recording,vehicle-mounted mode, capturing and playback, |
| Up key | file page-up;Retreat quickly video ( playback mode ) |
| Down key | file page-down;Fast forward video ( playback mode ) |
| Charger indicator(red) | Indicator lights in red during charging, and the indicator turns off after charging full. ( Power off charging ) |
| WIFI indicator( orange ) | When the WIFI is in working ,the indicator will light. |
| Busy indicator(blue) | When the camera is busy (for example: during film recording, capturing, automatic screen-off), the busy indicator will light. |
Start to use
1. Charge the built-in lithium battery
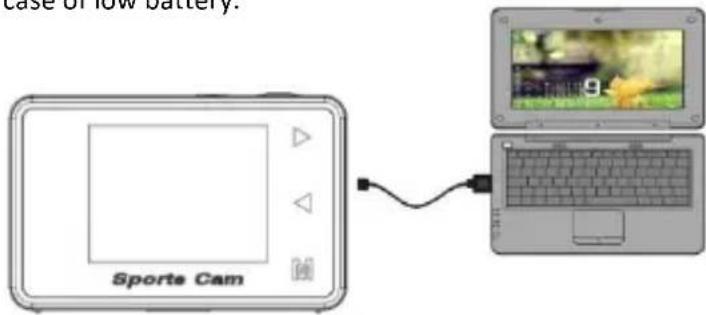
The camera is equipped with built-in 3.7V lithium battery. Please ensure power available for the camera and timely charge it in case of low battery.
text_image
case of low battery. Sports CamConnect the camera to computer for charging under shutdown status. The charging indicator will be on when charging, and will be off when the battery is fully charged. Generally, the battery can be fully charged after about 5 hours.
Note: When the DV is on, It will not charge until the DV turn off.
- How to use the memory card
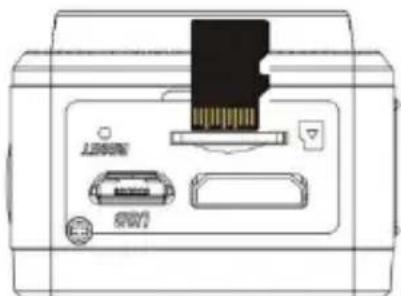
2.1. Properly insert the TF card into the card holder as per the instructions indicated near the card holder.
2.2. To remove the TF card, press the end of memory card gently, the card will be ejected.
natural_image
Diagram of a printer front panel showing internal components and a connector (no text or symbols)Note: The camera is not equipped with built-in memory. Please insert memory card before using. Before using the camera, it is a must to format the memory card on the camera.
- Startup and shutdown
3.1 Startup: press the POWER key for 3 second, the camera will show startup screen and enters into POWER ON state:
3.2 Shutdown: press the POWER key for 3 second when the camera is under idle mode to shut down;
3.3 Auto shutdown: the camera will be shut down automatically when the camera is under idle mode for a certain time to save power. The default time for auto shutdown is 3 min.
3.4 Shutdown under low power: when the battery is under low power, the LCD will indicate "☑ Please charge the battery timely. When the icon turns red and flashes, the camera will be shut down automatically.
4. Function modes switching
The camera has 4 modes: recording mode, vehicle-mounted mode, photo mode and playback mode. Touch the Mode key to switch the modes after starting up.
Recording mode: video can be recorded;
vehicle-mounted mode: videotape can be recorded (one section every 3 minutes);
Photo mode: for taking photos;
Playback mode: for playing back the current video.
5. Indicators
5.1 BUSY indicator: When the camera is working (e.g. recording, photographing, etc.), the indicator will light;
5.2 Charging indicator: In shutdown state, the lightened indicator means the user is charging the camera.
5.3 WIFI indicator: When the WIFI is in working, the indicator will light.
6. Photo/recording/vehicle-mounted /mode
It enters automatically into recording mode.
Press Shutter to start recording, and press Shutter again to stop recording. Touch Mode key to vehicle-mounted mode.
Press Shutter to start recording, and press Shutter again to stop recording. Touch Mode key to photo mode.
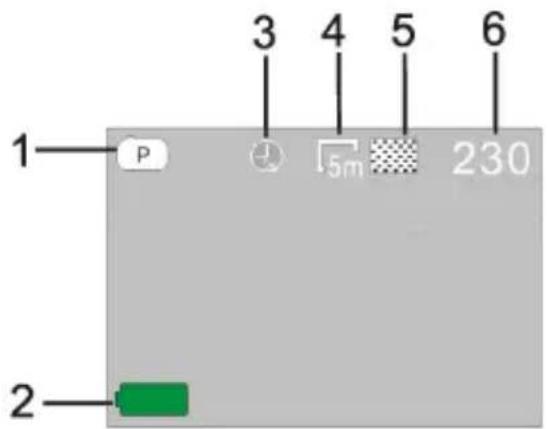
6.1 Screen display in photo mode
text_image
1 P 3 4 5 6 5m 230 2- Photo mode
- Battery state
- Self-timer mode
- Photo resolution
- Photo quality
- Available shooting count
6.2 Screen display in recording mode

text_image
1 2 3 4 5 30fps FHD 00:28:54 6- Recording mode
- Video quality
- Video framerate
- Video resolution
- Available time to record
- Battery state
After the camera records about 1 minute, the LCD screen will turn off.
Note:
- When using the HD size or FHD video, you must use the TF high-speed card at class 4 or above.
- Automatic screen-off will be performed during recording for saving power. User may short press Power key or shutter key to enable the screen for displaying.
6.3 Screen display in vehicle-mounted mode
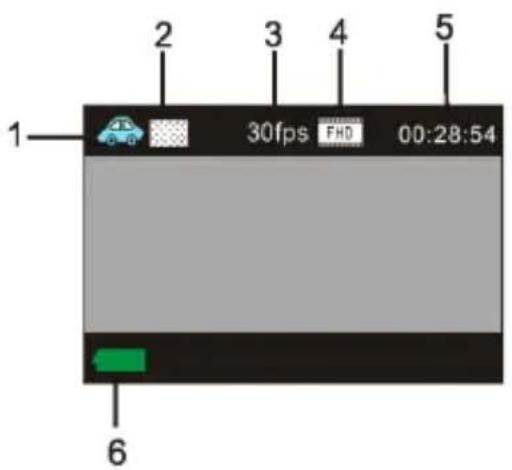
text_image
1 2 3 4 5 30fps FHD 00:28:54 6- In vehicle-mounted mode
- Video quality
- Video framerate
- Video resolution
- Available time to record
- Battery state
Press the shutter button once under the preview state to begin recording, save a segment for recording every 3 minutes, then start to record the next segment of video. When the storage card is full, the earliest segment of video will be deleted to release the corresponding space for continuous recording.
7. Playback mode
Turn on the camera, you can touch the mode key to enter playback mode. and you can touch the Up/Down key to choose CAR/VIDEO/JPG, then press the shutter key to enter preview.
Touch Mode key to enter playback mode to browse photo/video, play the video recorded by this camera. Press Up/Down key to access to previous or next photo/video.
Play movie: Press the shutter key to start/pause play video, touch the Up/Down key to Retreat quickly /fast forward playback, press the power key to stop play video.
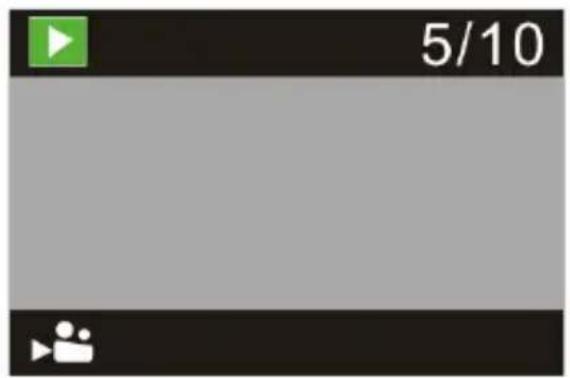
text_image
5/10Video file playback
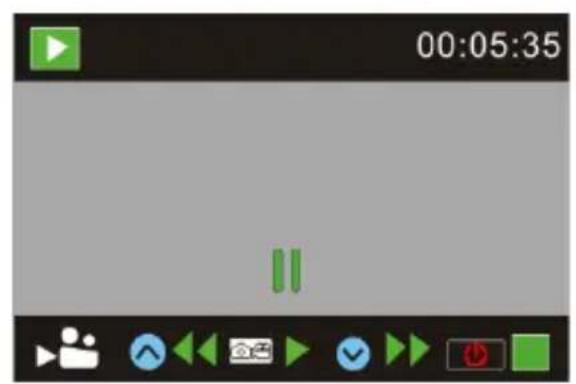
text_image
00:05:35 ==Video pause mode
8. Menu Setting Mode
8.1 Menu display
In photo, recording, vehicle-mounted and playback mode, press Power key to open the menu, and then press Up/Down key to select menu, press the Shutter key to enter submenu. When selecting menu, the selected menu will be displayed with blue background.
Recording/vehicle-mounted menu mode:
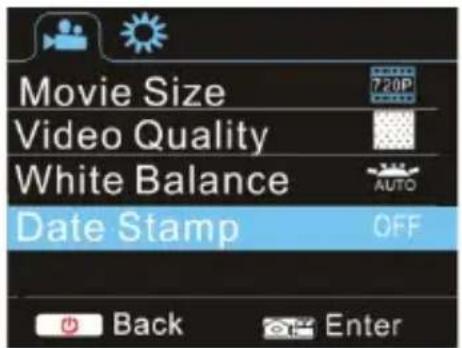
text_image
Movie Size Video Quality White Balance Date Stamp OFF Back EnterPhoto menu mode:
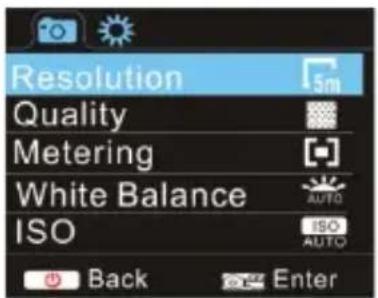
text_image
Resolution Quality Metering White Balance ISO ISO AUTO Back Enter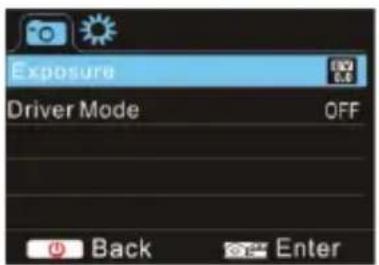
text_image
Exposure Driver Mode OFF Back Enter8.2 System mode menu setting
After opening the menu by pressing Power key, press mode key to switch over to setting main menu, press Up/Down key to select menu, and after that to press Shutter key for confirming to enter the submenu. In the submenu, press Up or Down key to select menu, and press Shutter to confirm. After returning to the main menu, press Power key to exit from the menu.
System menu mode:
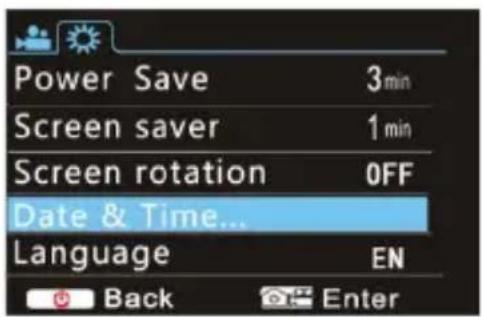
text_image
Power Save 3min Screen saver 1 min Screen rotation OFF Date & Time... Language EN Back Enter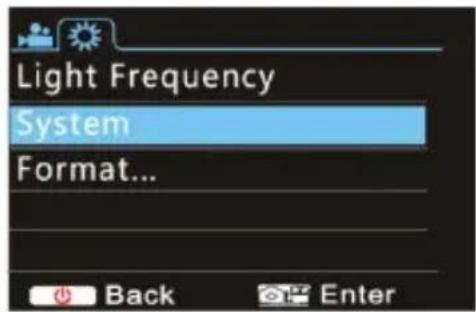
text_image
Light Frequency System Format... Back Enter8.3 Setting date and time
Press Power key to open the menu, press Mode key to switch to setting menu, and then press Shutter key to confirm. Press Down key to select "Date and time" in menu item, and then press Shutter key to enter setting window.
In setting window, press Mode key to select items (date, time) to be adjusted, and then press Up key or
Down key to make adjustment, press Shutter key for conformation at completion of adjustment, or press Power key to cancel setting and exit. Finally, press Power key to exit from setting mode.

text_image
Power Save 3min Screen saver 1 min Screen rotation OFF Date & Time... Language EN Back Enter 2014/01/01 12:29 YY/MM/DD Back Enter8.4 Playback mode menu setting
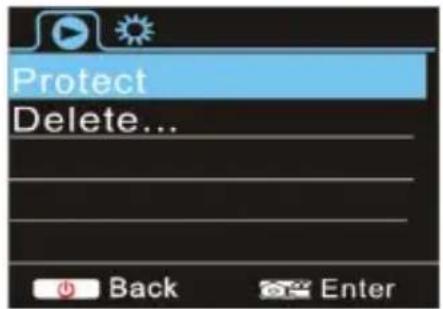
In playback mode press power key to open playback main menu, press Up or Down key to select menu, press Shutter key to enter submenu. In the submenu, press Up or Down key for selection, and press Shutter key to confirm. After returning to the main menu, press Mode key to exit from the menu.
Playback mode menu
text_image
Protect Delete... Back Enter9. Connecting to HDTV
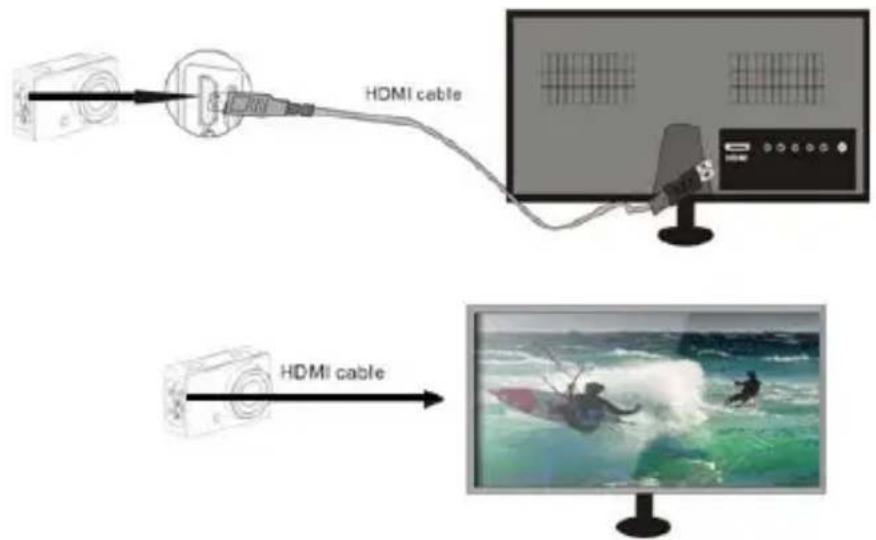
5.1 Connect the DV to HDTV via HDMI cable (optional)
If you need to transfer the image and audio to an HDTV for playback, insert the Com end of the HDMI cable to the DV, and the other end (output) to the HD input of the HDTV, as shown in the following figure:
text_image
HDMI cable HDMI cableWhen the camera is connected with the HDTV successfully, the camera display is synchronize with HDTV display.
Note: Before connecting or removing the HDMI cable, please stop video recording and disconnect Wi-Fi first.
10. Connect to PC
10.1 When the camera is connected with the computer and entering removable disk mode, there will be a removable disk added in the window of "My computer". The photo or video file may be stored in the catalogue of "DCIM\CAR,JPG,VIDEO" in the removable disk. You may enter this catalogue to copy files on to hard disk of your computer.

Note: During file downloading, it is prohibited to disconnect USB connection, and plugging out the memory card when USB connected is also prohibited to avoid loss of data.
10.2 In U-disk mode (MSDC mode), press the Shutter key to switch to web cam mode (PCCAM). the LCD will display: PCCAM
Now you can start the web cam through application. To return to U-disk mode (MSDC mode), press the power key again.
Note: Driver is not required for web cam mode (PCCAM mode) on Windows XP(SP3) version or
above.
11. APP (Support Android and ISO)
1. How to install an APP
1.1 Search for "Ismart DV" in Google Play (for Android OS) to find the APP and install it according to the instruction.
1.2 Search for "Ismart DV" in APP Store (for iOS) to find the APP and install it according to the instruction.
2. Android APP
2.1 Install "Ismart DV" APP (provided by dealer or via internet) on smartphone or tablet. When installation
completes, the LCD will display icon :

2.2 Insert the TF card and turn on the DV, When you want to turn on the wifi, you can press the shutter key about 3 seconds, the LCD Screen display: Waiting for WiFi connection.....and the wifi indicator will flash.
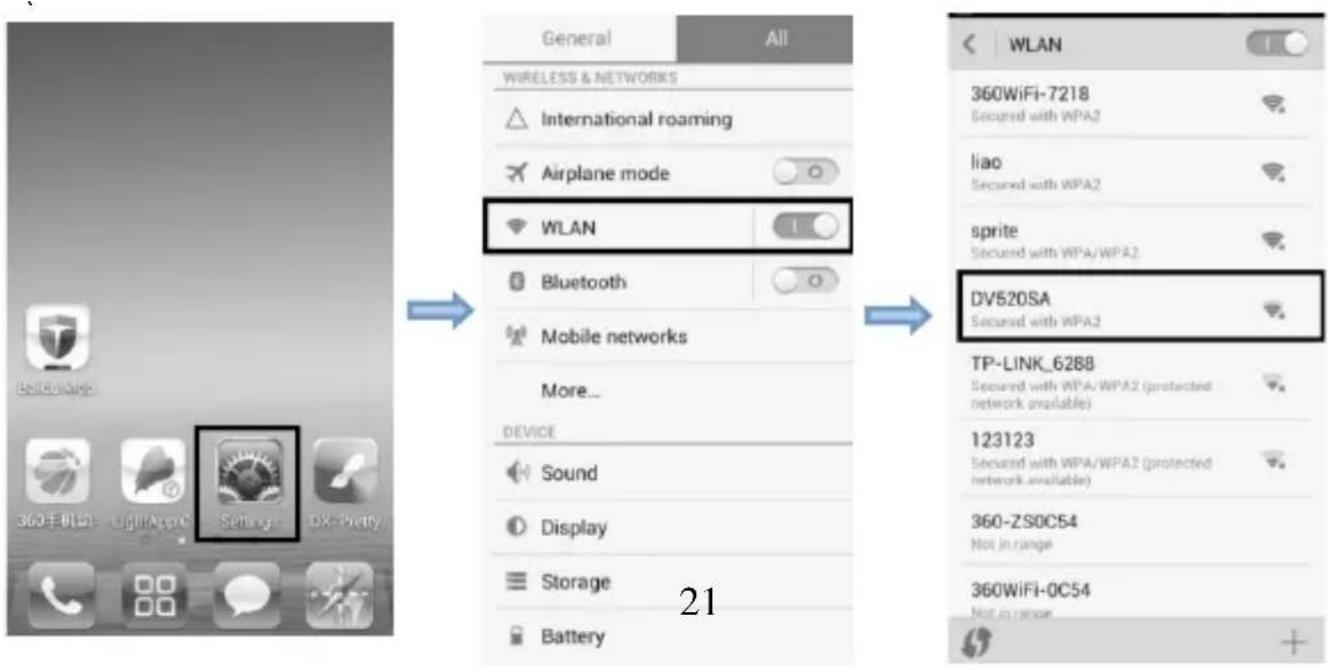
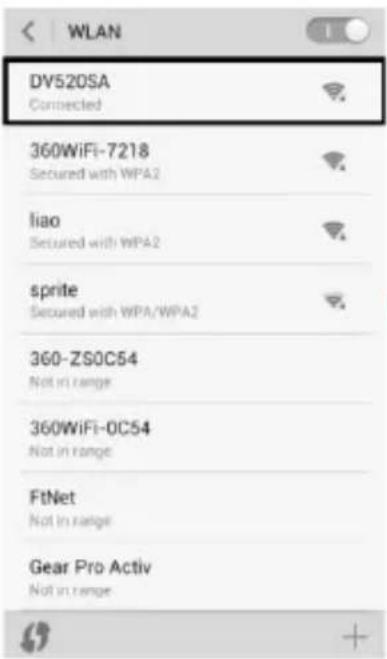
2.3 Enable Wi-Fi on smartphone or tablet and search for wireless AP signal "DV520SA", then connect it to DV, until the system displays "Connected successfully". After it Connects successfully, the LCD Screen will turn off after about 30 seconds, and the wifi indicator will not flash. When you press shutter key to turn on the LCD Screen, the LCD Screen display: WiFi Connection Ready! and turn off the WIFI immediately.
Note: The first time connecting to DV you need to enter password "1234567890".
text_image
General All WIRELESS & NETWORKS International roaming Airplane mode WLAN Bluetooth Mobile networks More... DEVICE Sound Display Storage Battery 21 WLAN 360WiFi-7218 Secured with WPA2 liao Secured with WPA2 sprite Secured with WPA/WPA2 DV520SA Secured with WPA2 TP-LINK_6288 Secured with WPA/WPA2 (protected network available) 123123 Secured with WPA/WPA2 (protected network available) 360-ZS0C54 Not in range 360WiFi-0C54 Not in range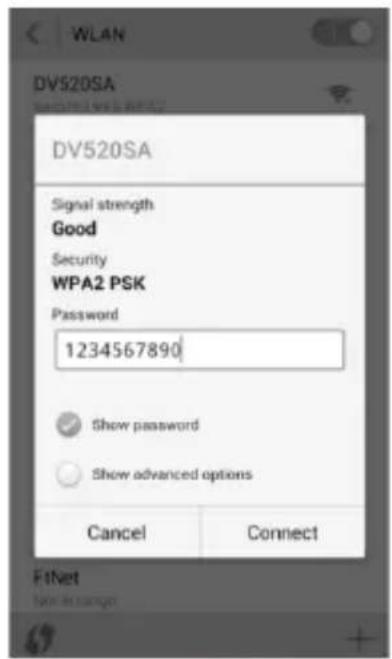
text_image
DV520SA Signal strength Good Security WPA2 PSK Password 1234567890 Show password Show advanced options Cancel Connect FitNet New message
text_image
WLAN DV520SA Connected 360WiFi-7218 Secured with WPA2 liao Secured with WPA2 sprite Secured with WPA/WPA2 360-ZS0C54 Not in range 360WiFi-0C54 Not in range FtNet Not in range Gear Pro Activ Not in range
text_image
Search Gallery File Manager Music Themes Email Browser - Management Tools iSmart DV
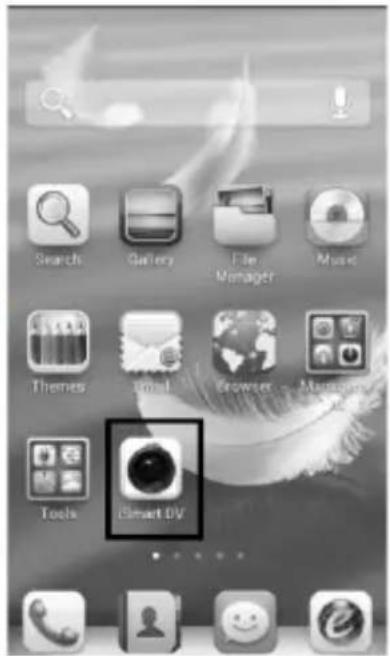
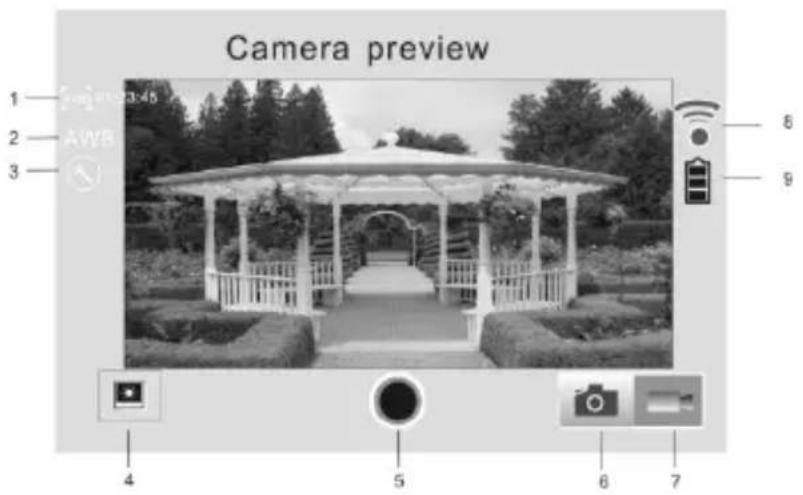
2.4 Click the icon SmartD in the App list of the smartphone or tablet to open it. Now you can preview the image
sent by the DV on the phone or tablet and start some operating. The operation interface on terminal is shown in the following figure.
- Video resolution
- White balance
- Setup (enter setup menu)
- Enter Playback mode
- Shutter button
- Photo mode
- Video mode
- Wi-Fi signal icon
- DV battery icon
text_image
Camera preview 1 2 3 4 5 6 7 8 93. iOS APP
3.1 Install "Ismart DV" APP (provided by dealer or via internet) on iOS phone or tablet. When installation

completes, the LCD will display icon
3.3 Enable Wi-Fi on iOS phone or tablet and search for wireless AP signal "DV520SA", then connect it to DV, until the system displays "Connected successfully".

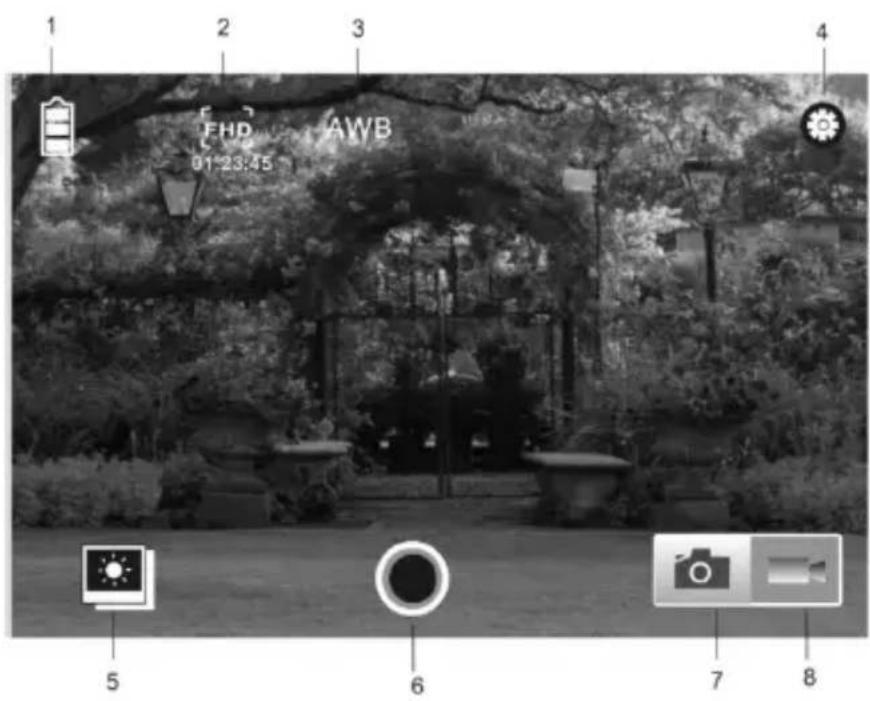
3.4 Click the icon Smart DV in the App list of the iOS phone or tablet to open it. Now you can preview the image sent by the DV on the phone or tablet and start some operating. The operation interface on terminal is shown in the following figure.
text_image
1 2 3 4 FHD AWB 01:23:45 5 6 7 8Note: A TF card must be inserted if you need to take a photo, record a video, or download files on the terminal;
Technical parameters
| Image sensor | 5.0 mega-pixel CMOS image sensor |
| Function mode | Recording, Driving recorder, photo, playback |
| LCD screen | 1.5" HD LCD |
| Picture resolution | 12M (4000 x 3000), 10M (3648×2736), 8M (3264 x 2448), 5M (2592 x 1944), |
| Video resolution | FHD (1920x1080 30fps), HD (1280X720 30fps), HD (1280X720 60fps) |
| Storage medium | TF card (Maximum supporting 32GB) |
| File format JPEG, H.264 | |
| Driver Mode 2 sec./10 sec. | |
| USB port USB 2.0/3.0 | |
| Power supply | Built-in 3.7V rechargeable lithium battery |
| Menu language | English/Simplified Chinese/Traditional Chinese |
| Power Save | 1 min. / 3 min./5 min./OFF |
| Operating system requirements | Windows XP/Vista/7/8, Mac 10.8 |
| Dimensions 60X38X28mm |
Note: The product design specification is made based on updated information when compiling this product manual. The specification is subject to change without further notice. The product is subject to the actual camera.
This device complies with Part 15 of the FCC Rules. Operation is subject to the following two conditions: (1) this device may not cause harmful interference, and (2) this device must accept any interference received, including interference that may cause undesired operation. Changes or modifications not expressly approved by the party responsible for compliance could void the user's authority to operate the equipment.
NOTE: This equipment has been tested and found to comply with the limits for a Class B digital device, pursuant to Part 15 of the FCC Rules. These limits are designed to provide reasonable protection against harmful interference in a residential installation. This equipment generates, uses and can radiate radio frequency energy and, if not installed and used in accordance with the instructions, may cause harmful interference to radio communications. However, there is no guarantee that interference will not occur in a particular installation. If this equipment does cause harmful interference to radio or television reception, which can be determined by turning the equipment off and on, the user is encouraged to try to correct the interference by one or more of the following measures:
-- Reorient or relocate the receiving antenna.
-- Increase the separation between the equipment and receiver.
-- Connect the equipment into an outlet on a circuit different from that to which the receiver is connected.
-- Consult the dealer or an experienced radio/TV technician for help.
RF Exposure Statement
To maintain compliance with FCC's RF Exposure guidelines, This equipment should be installed and operated with minimum distance between 20cm the radiator your body: Use only the supplied antenna.