PowerTel M4000 - Smartphone Amplicomms - Free user manual and instructions
Find the device manual for free PowerTel M4000 Amplicomms in PDF.


| Product Type | Smartphone |
| Brand | Amplicomms |
| Model | PowerTel M4000 |
| Dimensions | 140 x 70 x 12 mm |
| Weight | 150 g |
| Display | 4-inch color touchscreen |
| Operating System | Android-based (simplified interface) |
| Processor | Quad-core 1.3 GHz |
| RAM | 1 GB |
| Internal Storage | 8 GB (expandable via microSD) |
| Rear Camera | 3 MP with LED flash |
| Battery | Li-Ion 2000 mAh (removable) |
| Connectivity | 4G LTE, Wi-Fi 802.11 b/g/n, Bluetooth 4.0 |
| Hearing Aid Compatibility | M4/T4 rating |
| Key Features | Large tactile keys, SOS emergency button, loud speaker, easy mode |
| Charging | Micro USB, 5V/1A |
| Maintenance | Clean with dry cloth; avoid moisture and extreme temperatures |
| Safety | Use only approved chargers; keep away from water; do not disassemble |
| Spare Parts and Repairability | Battery and charging port replaceable by authorized service center |
| General Information | Designed for seniors and hearing aid users; supports Bluetooth hearing aids |
Frequently Asked Questions - PowerTel M4000 Amplicomms
User questions about PowerTel M4000 Amplicomms
0 question about this device. Answer the ones you know or ask your own.
Ask a new question about this device
Download the instructions for your Smartphone in PDF format for free! Find your manual PowerTel M4000 - Amplicomms and take your electronic device back in hand. On this page are published all the documents necessary for the use of your device. PowerTel M4000 by Amplicomms.
USER MANUAL PowerTel M4000 Amplicomms
Operating Instructions
PowerTel M4000
HAC Hearing Aid Compatible to M3 / T3 Rating
The M4000 Phone has a built in Induction Coil and is hearing aid compatible.
To ensure optimum benefit, users with hearing aids may wish to select the T setting on their hearing aids.

Exposure to the receiver at full volume for a long period could cause ear damage.
1 Quick Start Guide 4. . . . . . . . . . . .
2 At a Glance 16. . . . . . . . . . . . . . .
3 How does it work 20. . . . . . . . . . . . .
4 Getting Started 24. . . . . . . . . . . . . . .
5 Phone Book Set Up 29. . . . . . . . . . .
6 Making and Receiving Calls 35. . . . . .
7 Calls List 39.
8 SMS - Text Messages 40
9 Voice Mail 45
10 Other Useful Features 47
11 SIM Tool Kit 67
12 Menu Structure 68
13 Trouble Shooting 77
14 Technical Properties 80
15 Safety Information 84
16 Maintenance / Guarantee ..... 89
17 Index 91
Quick Start Guide
1 Quick Start Guide
Important: Before you start, please read the safety information on page 84.
Quick Glance
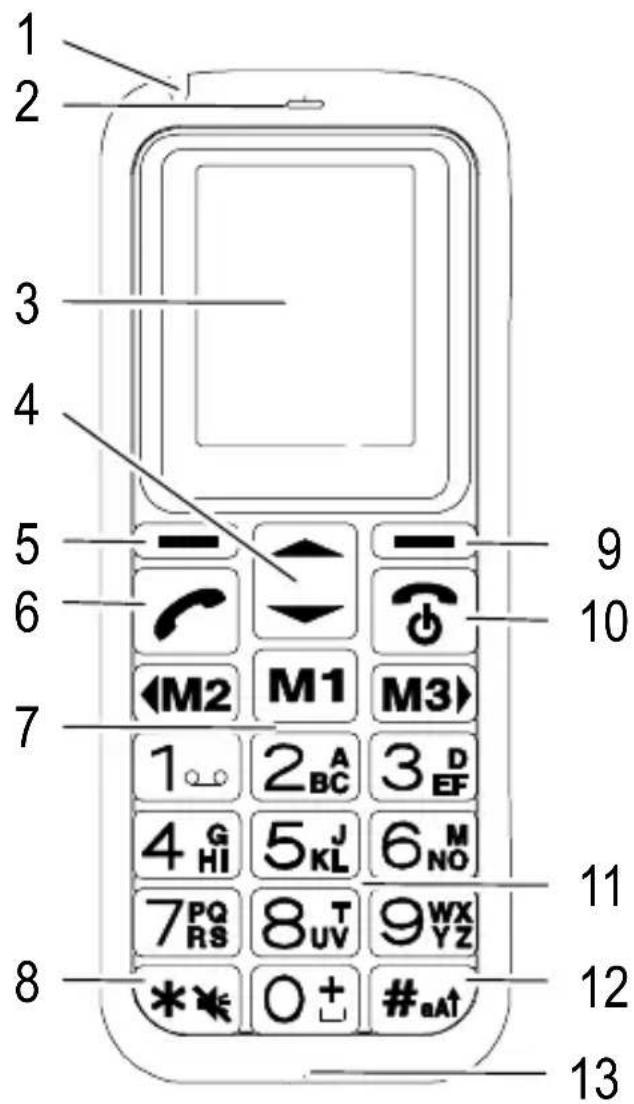
1 LED
2 Earpiece
3 Display
4 Navigation keys (scroll up/down)
5 Softkey, left
6 Call key
7 One-touch dialling keys
8 Star key / Ringer On/Off - Silent Mode
9 Softkey, right
10 On/Off key / End call key
11 Keypad
12 Hash key
13 Microphone
14 Charge contacts
15 Mini USB socket
16 Headset socket (Headset not supplied)
text_image
1 2 3 4 5 6 7 8 9 10 M2 M1 M3 1 2 A BC 3 D EF 4 G HI 5 J KL 6 M NO 7 PQ RS 8 T UV 9 WX YZ * * 0 + #aAt 11 12 13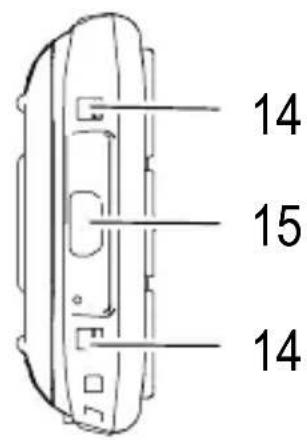
text_image
14 15 14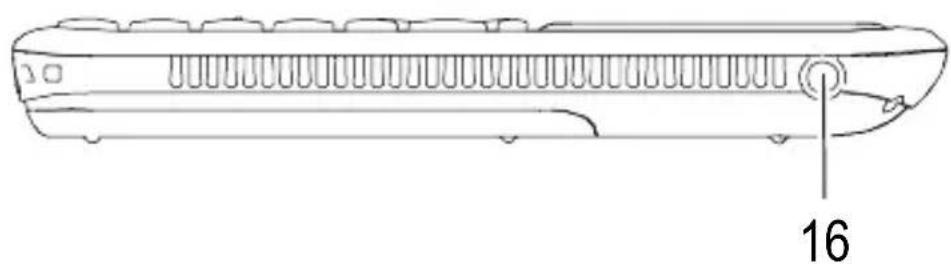
natural_image
Line drawing of a rectangular electronic device with internal components and a labeled pin (16), no text or symbols present.Quick Start Guide
What is in the box
The package contains:
1 mobile phone 1 desktop charging unit
1 li-ion battery 1 operating manual
1 charging cable
Installing the SIM card
Risk of swallowing small objects! The SIM card can be removed. Small children can swallow them.
Switch the phone off.
Pay attention that the SIM card is not bent or scratched. Prevent any contact with water, dirt or electrical charges.
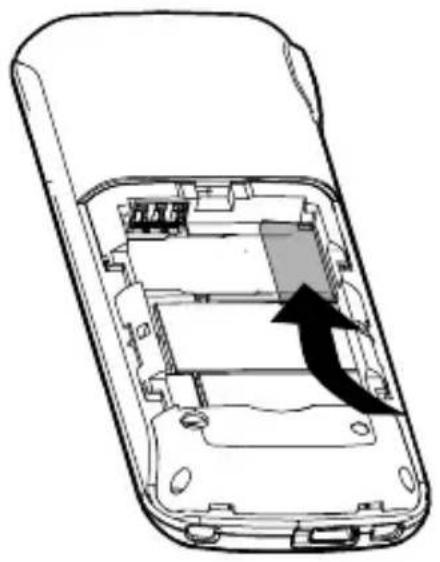
Slide the mobile phone's battery compartment cover towards the bottom using a little force. Lift the battery compartment cover off the phone completely.
If there is already a battery inside, remove it.

natural_image
Simple line drawing of a smartphone casing with two arrows indicating downward motion (no text or symbols)Quick Start Guide
Your telephone number is carried by the SIM card, not the phone. Therefore if you use a SIM card you had in a previous phone, you will keep the same phone number.
Slide the SIM card with the golden contacts facing down in the SIM card holder provided for it at the top right. The SIM card must be located under the metal retaining bar to be in the correct position.
natural_image
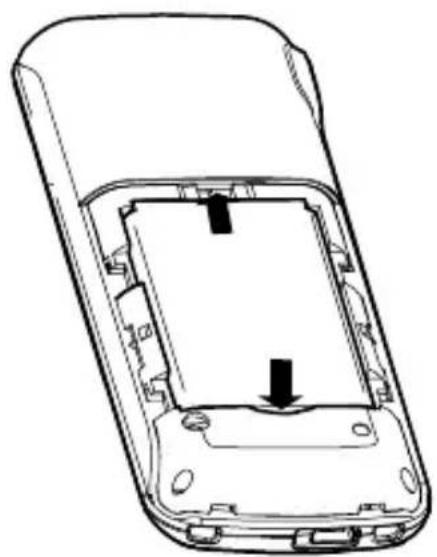
Diagram of a smartphone internal structure showing internal components and an arrow indicating rotation (no text or symbols present)Insert the battery. The golden contacts on the battery must face towards the top left. Press lightly on the bottom end of the battery until it snaps into place.
natural_image
Line drawing of a mobile phone casing showing internal components and a downward arrow indicating a component (no text or symbols present)Quick Start Guide
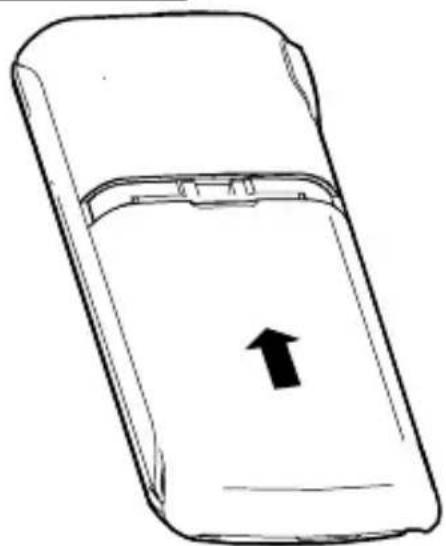
Replace the battery compartment cover back on the phone. Slide the battery compartment cover upwards until it snaps in to place.
natural_image
Line drawing of a mobile phone casing with an upward arrow indicating a component (no text or symbols present)Charging the battery
Before starting to charge the battery, check that it has been installed properly. Do not remove the battery while it is being charged. This could damage the phone.
When charging the battery for the first time, it should be charged for at least 4 hours. Some batteries only reach their full capacity after several complete charge/discharge cycles.
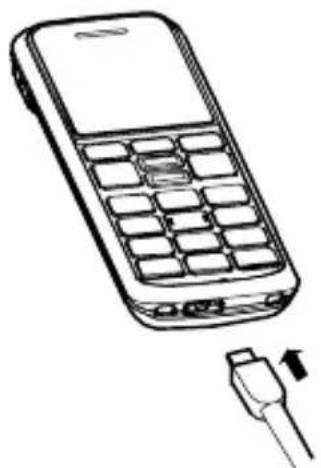
Charging via the mini USB socket Plug the power adapter in the mini USB port.
natural_image
Line drawing of a mobile phone with keypad and USB cable connector (no text or symbols)Quick Start Guide
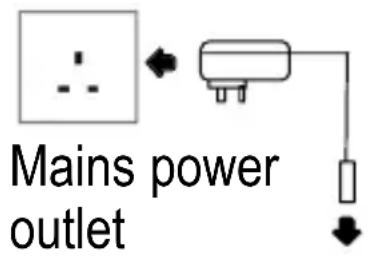
Connect the power adapter plug as illustrated in the diagram. For safety reasons, only use the power adapter plug supplied.
text_image
Mains power outletCharging via the desktop charging unit
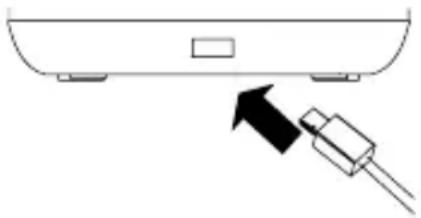
Plug the power adapter in the mini USB socket on the charging unit. Insert the phone in the charging unit to charge it.
natural_image
Simple line drawing of a device rear panel with an arrow pointing to a plug (no text or symbols)The display will go blank but even so the battery is still being charged. This is correct operation.
It may take a few seconds before the phone indicates the charging process. You can use the phone during the charging process.
Battery status warning
The current battery charge status is indicated in the display as follows:




Full Half empty Low Empty
Quick Start Guide
When the battery charge is low, a corresponding warning message appears in the display.
Charge the battery.
In cases where the battery charge is extremely low, it is possible that the back-lighting no longer works and certain functions are no longer available.
When the battery charge drops below the minimum status, the phone switches off automatically.
Switching the mobile phone on and off
3 sec. 📞 Switch the mobile phone on
3 sec. 📞 Switch the mobile phone off

Some SIM cards will require you to enter a PIN code. Follow the prompts on the screen or read more details about PIN & PIN2 on Page 58.
Make sure you are in range of your Network
Some networks offer better coverage than others in different areas. The icon 📂 indicates you have a signal and are connected to the network. The network will also appear in the display.
Setting the display language
If you want to select a different language please refer to Page 50.
The following languages are available: German, English, French and Dutch.
Setting the time and date
Refer to Page 49.
Setting the loudest Ringer
Refer to Page 60.
Now you are ready to make and receive calls.
Taking a call
Take the call
Rejecting a call
Reject the call
Ending a call
Ending a call (on-hook)
Making a call
Enter the phone number

Delete the last number if incorrect

text_image
Dial the phone numberQuick Start Guide
Advanced Settings and Functions
For more details about setting up your Amplicomms M4000 and other functions follow the descriptions in this user guide.
Examples;
- Set your one-touch dialling keys; 📋 Page 47.
- Store numbers in the phone book; 📋 Page 26.
- Use the Index; 📋 Page 91.
If you have any questions please call the Service-Hotline: 0844 800 6503 (Using an UK landline, at the time of going to print: calls cost 6p for connection charge and then 5p a minute. Mobile costs may vary.)
Questions and Answers
In the majority of cases your M6000 phone is supplied without a SIM card. You may find the following “Questions and Answers” (Q & A) helpful.
Q - Why hasn't the mobile phone been supplied with a SIM card?
A - Many people already have a mobile phone and wish to transfer their existing SIM card over to the new phone. This has the advantage of keeping the same telephone number and if the card is subscribed to a Pay-as-you-go service then you also benefit from being able to carry over any credit that has
been paid the card.
Q - Where can I get a SIM card from?
A - Any high street mobile phone shop will be able to provide you with a SIM card. Some of the major supermarket chains also provide mobile phone services and can supply a SIM card. A useful tip when choosing a SIM card / service provider however is to make sure that you have adequate signal coverage at home; this particularly important if you live in a very rural area.
Q - Why doesn't the Amplicomms mobile phone have a telephone number?
A - The telephone number is supplied by the service provider and will be registered onto the SIM card.
Q - Can I use the SIM card from my old mobile phone?
A - Yes as long as the SIM card is less than three years old you can transfer the card over. Some old SIM cards however are not compatible with the Amplicomms mobile phone as they are from an earlier generation of SIM card design.
Q - Can I use a SIM card from any mobile phone company?
Quick Start Guide
A - Yes. The Amplicomms mobile phone is what is termed as an open SIM card phone and so it is not restricted to any particular service provider or mobile phone company.
Q - How do I pay for my calls?
A - There are two main types of registration with a service provider or mobile phone company. One is a contract - this is where you sign up for agreed contract over several months / year and pay an agreed monthly fee. This is more suited to people who are using their mobile phone as part of their job for example. The other is Pay-as-you-go, sometimes abbreviated to PAYG. With this type of service you add credit to the card and top up as and when required. Topping up the card is easy, you can do this over the phone, on-line, at many shops and even some cash points allow you to do this. PAYG is more suited to less frequent users.
Q - How do I find out my credit balance?
A - The service provider of the SIM card should have provided an information pack with the card. This will give details of a short number to dial in order to check your balance. These access codes differ between mobile phone companies so please check the details specific to your service provider. Key in your number, press the talk button and the credit balance will be announced to you.
Notes
At a Glance
2 At a Glance Keys and Parts
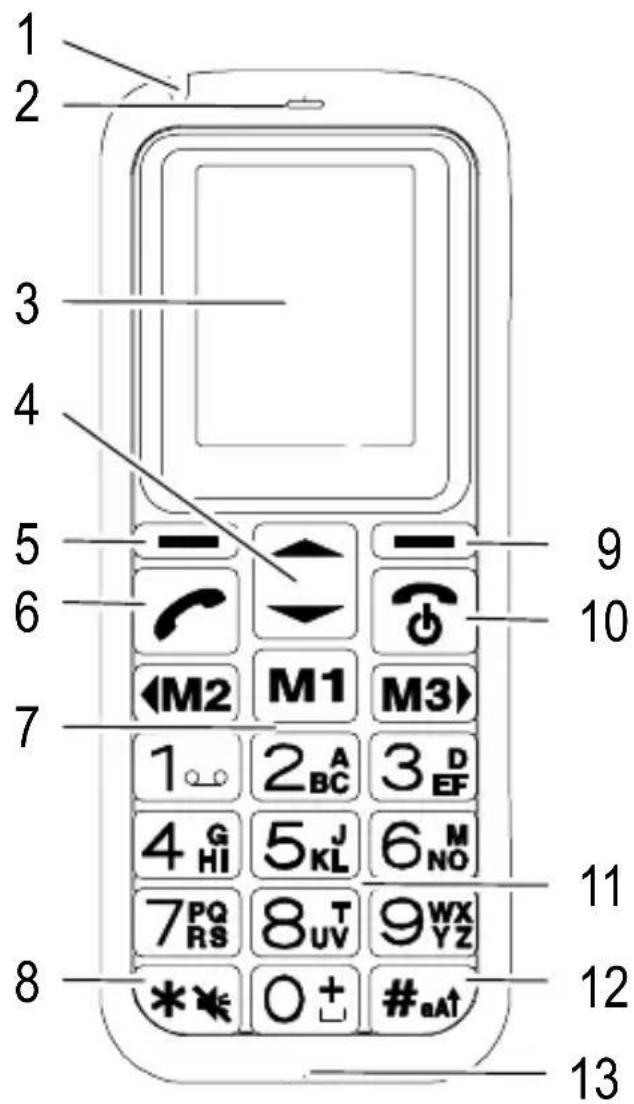
1 LED
2 Earpiece
3 Display
4 Navigation keys (scroll up/down)
5 Softkey, left
6 Call key
7 One-touch dialling keys
8 Star key / Ringer On/Off - Silent Mode
9 Softkey, right
10 On/Off key / End call key
11 Keypad
12 Hash key
13 Microphone
14 Charge contacts
15 Mini USB socket
16 Headset socket (Headset not supplied)
text_image
1 2 3 4 5 6 7 8 9 10 M2 M1 M3 1 2 A BC 3 D EF 4 G HI 5 J KL 6 M NO 7 PQ RS 8 T UV 9 WX YZ * * 0 + #aAt 11 12 13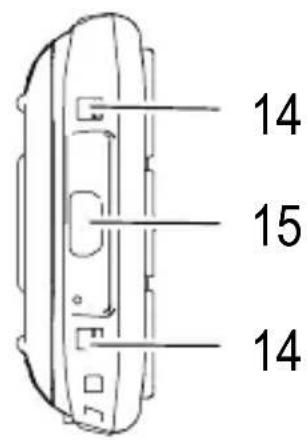
text_image
14 15 14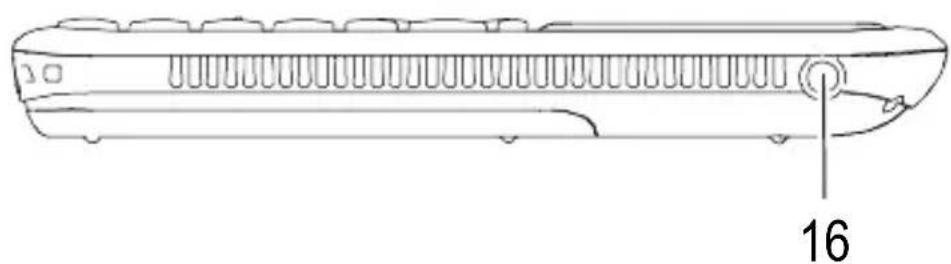
natural_image
Line drawing of a rectangular electronic device with internal components and a labeled pin (16), no text or symbols present.At a Glance
Icons and texts in the handset display
Icon Description

Displays the battery capacity.
Running-through segments : the battery is being charged.

Charge the battery.

Signal strength of the phone connection.

Alarm is activated.

A headset is connected.

The key lock function is activated; Page 37.

A roaming ^1 call is in progress.

Call forwarding is active.

There are new calls in the call list; Page 39.
^1 Cost of roaming calls and SMS will vary considerably from country to country. Check with your Operator.

A new SMS ^1 text message has been received; Page 40.

SMS text memory is full; Page 44.

Ringing tone only is activated

Vibration alert only is activated

Vibration alert and ringing tone are activated

The volume is set high and care should be taken when using the phone.
^1 SMS: Short Message Service = Service for sending text messages.
How does it work
3 How does it work
1 LED Indicates the phone operating status. The LED will stay on while charging and will flash if no signal is detected or no network to be clamp on to alert the user.
2 Earpiece The voice of the caller can be heard here when no headset is being worn and the device not set to Handsfree mode.
3 Display The information which appears in the display guides you through the menu structure and helps operate the mobile phone.
4 Navigation keys Use the Navigation keys to scroll through the menus and select settings.
How does it work
5 — Softkey, left The softkeys are assigned different functions in the various menus. The function currently assigned is always indicated by a word in the display directly above the softkey.
6 Call key Take a call or dial a number. Redial.
7 ◀M2 M1 M3> One-touch dialling keys A phone number can be assigned to each one-touch dialling key and then dialled directly by pressing and holding the respective key. In addition: ◀M2 M3> = Scroll left/right, e.g. to program settings in the Alarm menu.
8 * Star key Enter special characters. Ringer On / Off - Silent Mode
How does it work
9 — Softkey, right The softkeys are assigned different functions in the various menus. The function currently assigned is always indicated by a word in the display directly above the softkey.
10 On/Off key, End call key Switch the mobile phone on and off. Cancel the current process. End or reject a call.
11 1.00-0± Keypad Enter phone numbers and names or write a text.
12 # _aA Hash key Activate the key lock. Switch between upper/lower case and numbers.
13 Microphone Is activated during a call.
14 Charging contacts The phone is charged via these contacts when in the charging unit.
15 Mini USB socket For connecting the power adapter plug.
How does it work
16 ⏻ Headset socket (Headset not supplied)
Connect a headset.
The earpiece, loudspeaker and microphone are deactivated. You can only hear and speak via the headset.
Special Function Keys
Mode Press and hold ✕Press and hold #aA↑
Standby Ringer On / Off - Silent Mode
Activate the key lock
This icon will appear in the display.
Press and hold 1.0 A connection is established to your mailbox and you can listen to your messages; Page 45.
Getting Started
4 Getting Started
This chapter provides basic information on using the operating instruction manual and the telephone.
Description of operating sequences in the manual
| Display Description | |
| 1Press the key depicted briefly | |
| 2 sec. 1Press the key depicted for 2 seconds | |
| Hold 1Press and hold down the key depicted | |
| Enter numbers or letters | |
| Mobile phone rings | |
| Message | Represents text in the display |
| Indicates icons in the display | |
| OK | Press the softkey; Page 25 |
Standby mode
All descriptions in this operating manual assume that the mobile phone is in Standby mode. The system is switched to Standby mode by pressing the 🔒 key, several times if necessary. It may be necessary to deactivate the key lock function.
Energy-save mode
When the phone has been in Standby mode for some time, it automatically switches to energy-save mode. The display no longer lights up. Press any key to reactivate Standby mode.
Softkeys
The — and — softkeys are assigned different functions in the various menus. The softkeys are always referred to in this manual according to the word directly above them in the display.
| Key In Standby mode In a menu | ||
| —left | - Open the main menu | - Various functions |
| —right | - Open the phone book | - Various functions |
Navigating in the menu
All the functions can be accessed via the various menus. Refer to Menu Structure, ☐ Page 68, for information on how to access each respective function.
| Menu | Open the main menu |
| / | Select the submenu required |
| OK | Open the submenu |
Getting Started
/ Select the function required
OK
Open the function

OK
Select the setting required
Use the keypad to enter
numbers or letters
( left ) Confirm the entries
( right ) Move one level back
Cancel the programming and
saving processes and return to Standby mode
Creating phone book entries - example
The way in which to navigate through the menus and define settings is explained by means of the example Creating phone book entries. Proceed as in this example for all the settings.
Menu
Open the main menu

Contacts
OK
Select the phone book (Contacts) and confirm it

New contact
OK
Select the submenu and confirm it

Save to SIM
or
Save to phone
OK
How to enter text and numbers
| Select the memory location and confirm it | |
| OK | Enter the name and confirm it |
| OK | Enter the number and confirm it |
How to enter text and numbers
The keypad is labelled with letters for the entry of text.
The phone provides various methods by which text can be entered. These are used when creating or editing contacts in the phone book, when searching for names in the phone book and when writing SMS text messages.
Not every method is always available for each application.
Methods of entering text
Multitap
In order to enter text in Multitap mode, press the key labelled with the corresponding letter/character. If the first character of the group is required, press the key once. If the second character is required, press it twice, and so on.
How to enter text and numbers
To enter two characters assigned to the same key, press the key the respective number of times to enter the first character. Then wait for approx. 2 sec. and enter the second letter.
| abc | Multitap upper case |
| abc | Multitap lower case |
| abc | The first character of a new sentence will be upper case and the rest is lower case. |
| 123 | Numbers |
To switch between the text and numbers, press the #aA↑ key.
Punctuation and special characters
When in Editing mode, press the Ⓞ key. Punctuation marks and special characters are displayed. Use the 🖱️ / 🏠️ and ◀M2 / ◀M3▶ keys to select the required character and insert it by pressing the OK softkey. A wide range of frequently used special characters are available when editing by repeatedly pressing the 1○○ key.
Other entries and functions
O±Enter a space
Delete
Delete character
/ Move the cursor
5 Phone Book Set Up
The phone book in the phone can store up to 200 entries.
•Always enter the area code and country codes with all the phone numbers.
- When the memory capacity is used up, the corresponding message appears when an attempt is made to store another entry. Before new entries can be stored, old entries must be deleted.
- The phone book entries are arranged alphabetically. To skip directly to a required phone book entry, press the corresponding first letter. To search for the entries manually, use the / keys.
Your provider can state how many entries you can store on your SIM card.
Entering names
The keypad is labelled with letters for the entry of names. Press the corresponding key the respective number of times to enter letters. Information on ways of entering text; 📄 Page 27.
Phone Book Set Up
Creating phone book entries
See Page 26.
Saving in Standby mode
| Enter the phone number | ||
| Options | Open the Options menu | |
| Save number OK Start the saving process | ||
| Save to SIM or Save to phone OK Select the memory location and confirm it | ||
| OK | Enter the name and confirm it | |
| OK | Edit the number and confirm it | |
Modifying, editing, deleting phone book entries
| Menu | Open the main menu | |
|  | Contacts | OK Select "Contacts" and confirm it |
|  | View contacts | OK Select the submenu and confirm it |
Search for the required entry as described at the beginning of this chapter.
Phone Book Set Up
Options
Open the Options menu
The following functions can be used:
View
View/Edit the entry
Send SMS
Send the SMS text
Add to group
Assign the number to a group
Copy to phone
Copy the entry
(SIM → phone)
Copy to SIM
Copy the entry
(phone → SIM)
Call
Dial the entry
Delete
Delete the entry
Execute the functions and then confirm them.
Copying or deleting all entries
Menu
Open the main menu

Contacts
OK
Select "Contacts" (phone book) and confirm it

Advance
OK
Select the submenu and confirm it

Copy all
OK
Copy entries
(SIM or phone)
Phone Book Set Up

Delete all contacts
OK
Delete all the entries (SIM or phone)
Execute the functions and then confirm them.
Groups
You can assign the entries to various groups. These groups can then be allocated different ringing melodies.
Assigning an entry to a group
| Menu | Open the main menu | ||
|  | Contacts | OK Select "Contacts" and confirm it | |
|  | View groups | OK Select the submenu and confirm it | |
|  | Friends | OK Select the group and confirm it | |
|  | Group member | OK Open the list | |
| Options |  | Add member | OK Initiate adding a member |
Phone Book Set Up

Select an entry from the list and add it
All the entries stored in the phone are then displayed. Entries which are stored on the SIM card are not displayed and cannot be selected! Copy the entries from the SIM card to the phone as necessary; Page 30.
Editing group names
| Menu | Open the main menu | |
| / | Contacts | OKSelect the menu and confirm |
| / | View groups | OKSelect the menu and confirm |
| / | Friends | OKSelect the group and confirm it |
| / | Rename | OKInitiate renaming |
| Delete | Delete the existing group name letter-by-letter | |
| Save | Enter the new group name using the keypad and then confirm it | |
Phone Book Set Up
Changing the ringer for groups
| Menu | Open the main menu | ||
| Contacts | OKSelect “Contacts” and confirm it | ||
| View groups | OKSelect the submenu and confirm it | ||
| Friends | OKSelect the group and confirm it | ||
| Alert tone | OKOpen the menu | ||
| OK | Select the ringer and confirm it | ||
Making and Receiving Calls
6 Making and Receiving Calls
Taking a call
Take the call
Rejecting a call
Reject the call
Ending a call

Ending a call (on-hook)
Making a call
Enter the phone number
Clear
Delete the last number if incorrect
Dial the phone number
Call list
Your mobile phone stores the last numbers dialled (redialling) as well as calls received and missed in a call list.
Open the call list
◀M2 / ▶M3▶ Select a calls list
/ Select the entry and dial it
Dialling numbers from the phone book
You must have already stored phone numbers in the phone book; ➕ Pages 26.
Contacts
Open the phone book
Making and Receiving Calls
/ Select the entry and dial it
To skip directly to an entry, use the keypad to enter the first letters of the name stored. If necessary, you must press a key several times in order to enter the respective letters.
One-touch dialling keys
You must have already assigned phone numbers to the one-touch keys; ☐ Page 47.
3 sec. M1, ◀M2 or M3
Press and hold the one-touch dialling key
Setting the receiver volume
The volume can be adjusted during a call.
or Select a volume level

Exposure to the receiver at full volume for a long period could cause ear damage.
Talk time display
The duration of a call is displayed in hours, minutes and seconds during the call.
Handsfree
This function is used to listen to the caller via the loudspeaker.
While a call is in progress
H/free
Activate the handsfree facility
Making and Receiving Calls
Normal
Deactivate the handsfree facility
Muting the microphone in the handset
The microphone in the handset can be activated and deactivated during a telephone conversation.
Options
Open the menu

Mute
OK
Deactivate the microphone (muting function activated)
Unmute
OK
Activate the microphone
Keypad lock
The keypad lock is intended to prevent functions being triggered unintentionally.
3 sec. #_aA Activate the key lock function
Calls can still be taken in the normal way even when the key lock function is activated.
Unlock and then #_aA immediately
Deactivate the key lock function
Turn ringer Off/On
The ringer can be set to silent - vibrate only.
3 sec. ✪Switch the ringer off
3 sec. ✕Switch the ringer on
Making and Receiving Calls
When you have set the ringer "Off" you will notice this icon in the display.
Deactivating the ringer for the current call
Options
Mute
OK
Switch off the ringer
The ringer is automatically activated for the next incoming call.
Options during a call
Options
Open the "Options" menu
This menu provides access to functions which can be executed during a call:
Hold

Hold
OK
Put the current call on hold
When a call is put on hold, the menu option changes to "Unhold".
Take back the call previously put on hold:

Unhold
OK
Resume the call
Contacts (phone book)

View contacts
OK
Open the phone book and view the entries
7 Calls List
The mobile phone is equipped with a calls list.
Your mobile stores the last phone numbers dialled, taken and received but missed.
If one of the phone numbers received matches an entry in the phone book, the associated name appears.
Dialling from the calls list
Open the calls list
◀M2 / ▶M3▶ Select a calls list
/ Select an entry and dial it
Displaying list details
Open the calls list.

Options
Select an entry and open the Options menu
The following functions are available:
Call Dial the entry
Send SMS Send the SMS text
Delete Delete the entry
Save number Save the entry
Delete all Delete the entire call list
Show number Display the telephone number
SMS - Text Messages
8 SMS - Text Messages
It is possible that not all functions described are supported by every provider. Therefore, please contact your local mobile phone provider for details.
SMS settings
The distribution of text messages is performed via a Service Center (SMSC) ^1 . If you want to send and receive text messages, you must program a Service Center number in your phone. Normally, this has already been set up by your service provider.
Menu
Open the main menu

Message
OK
Select the menu and confirm it

Message settings
OK
Select the submenu and confirm it
^1 SMSC: Short Message Service Center = Service center controlling the transfer of text messages.
SMS service center
Navigate to the “Message settings” submenu.

text_image
/↓ SMS center number OKSelect the submenu and confirm it

Enter or edit the SMSC number and save the setting
Validity
You can use the menu option to define how long an attempt should be made to deliver a message which you have sent.
Navigate to the "Message settings" submenu.

text_image
/ Validity period OKSelect the submenu and confirm it
There are 5 different settings available for selection.

Select the duration and confirm it
Delivery report
The corresponding confirmation is received after sending a text.
Navigate to the “Message settings” submenu.

text_image
/Delivery report OKSelect the menu and confirm
SMS - Text Messages

softkey or
OK
Activate/Deactivate the delivery report and confirm it
SMS memory status
Navigate to the "Message" menu.


ory status

Select the submenu and confirm it
The memory locations occupied and free on the mobile phone and SIM card are displayed.
Writing an SMS text
A text message can contain up to 457 characters, including spaces. A standard message contains 160 characters. Additional costs may ensue in the case of messages containing more than 160 characters.
Menu
Open the main menu


sage

Select the menu and confirm it


e message
Select the submenu and confirm it
SMS - Text Messages
Write the text.
Information on ways of entering text; Page 27.
Options
Open the menu
The following functions are available
Send
OK

Search
Enter the number or select one from the phone book
Save
OK
The SMS text is saved in the Drafts folder.
Send to many
OK
The message can be sent to several recipients selected from the phone book.
Templates
OK
Select a template for your SMS text.
Execute the functions and then confirm them.
SMS text messages sent and received
Texts received are indicated by a ringing tone which you have set. A corresponding message appears in the display.
SMS texts received are stored in the “Inbox” folder. SMS texts sent are stored in the “Sent message” folder.
SMS - Text Messages
Editing stored texts
| Menu | Open the main menu | |
| / | Message | OKSelect the menu and confirm it |
| / | Inbox or | |
| Sent message | OKSelect the submenu and confirm it | |
| Select SMS | / | OKSelect SMS text and confirm |
| Options | Open the menu | |
| The following functions are available: | ||
| Reply | Reply to the number from which the text was sent | |
| Forward | Forward the text to a different number | |
| Call | Call the number from which the text was sent | |
| Save number | Store the number from which the text was sent | |
| Delete | Delete the SMS text | |
| Delete all | Delete all the SMS texts | |
| Execute the functions and then confirm them. | ||
9 Voice Mail
It is possible that not all functions described are supported by every provider. Therefore, please contact your local mobile phone provider for details. They may concern services which are subject to charges.
In order to use the “Voice Mail” ^1 feature, the relevant phone number must be programmed in your mobile phone. Normally, this has already been set up by your service provider.
Setting up the Voice Mail feature
| Menu | Open the main menu | |
|  | Contacts | OK Select the menu and confirm it |
|  | Special numbers | OK Select the submenu and confirm it |
|  | Voice mail | OK Select the submenu and confirm it |
^1 Voice Mail, also referred to as mailbox (answering machine in mobile telecommunication network)
Voice Mail

Number
OK
Select the submenu and start editing

Enter or edit the voice mail number and save it
The following functions are also available in the "Voice mail" menu:
Connect to voice mail
OK
The voice mail number is dialled.
Execute the functions and then confirm them.
Playing the Voice Mail messages
Navigate to the “Connect to voice mail” menu option, as previously described, and press the OK softkey or
Hold 1 _∞
A connection is established to your “Voice Mail” and you can play messages recorded.
10 Other Useful Features
One-touch dialling keys
It is possible to assign phone numbers to the one-touch dialling keys M1, ◀M2 or M3 which are then dialled directly by pressing and holding the corresponding key; Page 36.
Assigning a phone number to a one-touch dialling key:
| Menu | Open the main menu | |
| / | Contacts | OKSelect the menu and confirm it |
| / | Advance | OKSelect the submenu and confirm it |
| / | M1 M2 M3 | OKSelect the submenu and confirm it |
| / | OK | Select the one-touch dialling key and confirm it |
| OK | Enter the number and confirm it | |
Other Useful Features
Speed dialling
Phone numbers can be assigned to the keypad 2_BC^A to 9_YZ^WX . Then hold the corresponding key pressed longer than 3 seconds to dial the corresponding number.
| Each number you want to define as a speed dial number must be stored in the phone book. | ||
| Menu | Open the main menu | |
| / | Contacts | OKSelect the menu and confirm |
| / | Advance | OKSelect the submenu and confirm it |
| / | Speed dial | OKSelect the submenu and confirm it |
| / | OK | Select the speed dial key and confirm it |
| / | Set/Change | OKSelect the function and confirm it |
| / | OK | Select the number and confirm it |
Date and time
This menu option can be used to set and change the date and time.
To open the menu:
| Menu | Open the main menu | |
| / | Settings | OKSelect the menu and confirm it |
| / | General | OKSelect the submenu and confirm it |
| / | Time and date | OKSelect the submenu and confirm it |
| / | Date & time settings | OKSelect the submenu and confirm it |
| Enter day/month/year and jump to time | ||
| OK | Enter hours:minutes and confirm it | |
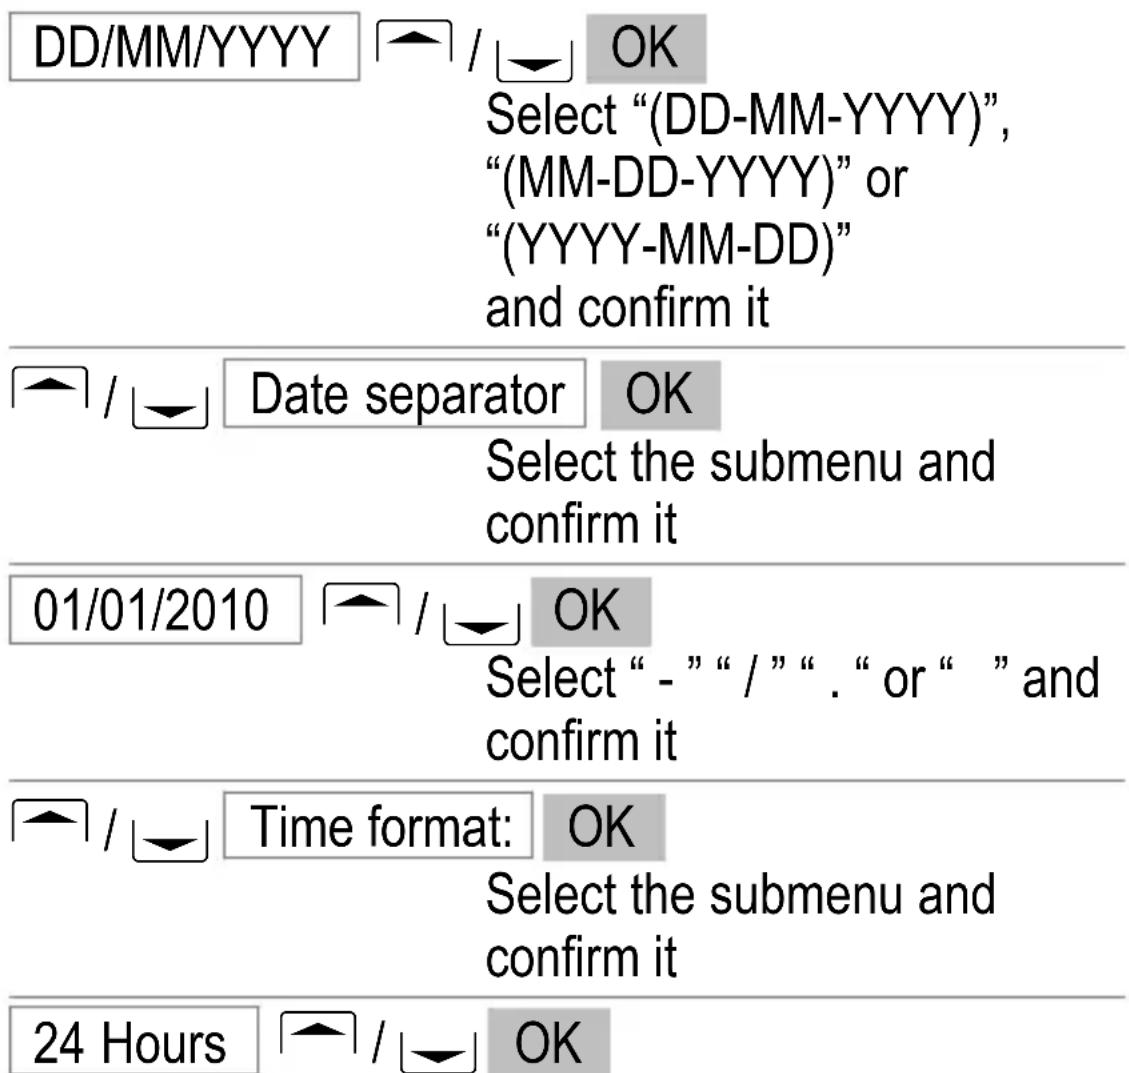
| / | Date format | OKSelect the submenu and confirm it |
Other Useful Features
text_image
DD/MM/YYYY / OK Select “(DD-MM-YYYY)”, “(MM-DD-YYYY)” or “(YYYY-MM-DD)” and confirm it / / Date separator OK Select the submenu and confirm it 01/01/2010 / OK Select “ - ” “ / ” “ . “ or “ ” and confirm it / / Time format: OK Select the submenu and confirm it 24 Hours / OKSelect "12 Hours" or "24 Hours" and confirm it
Language
This menu option can be used to set and change the display language.
| Menu | Open the main menu | |
| / | Settings | OK Select the menu and confirm it |
| / | General | OK Select the menu and confirm it |
Other Useful Features
Language OK
Select the menu and confirm it
/ OK
Select your preferred language and confirm it
Alarm
This menu option can be used to programme 3 different alarms.
| Menu | Open the main menu | ||
| / | Tools | OKSelect the menu and confirm it | |
| / | Alarm | OKSelect the menu and confirm it | |
| / | Alarm 1 | OKSelect an alarm and confirm it | |
| Off | [M2] / [M3], | Select “Once”, “Mon~Fri”, “Everyday” or “Off” and jump down | |
| 00:00 | , | Enter hours:minutes and jump to Tone | |
| Tone 1 | [M2] / [M3], | OKSelect a tone and confirm it | |
Other Useful Features
Calculator
This feature provides a simple calculator feature with which to solve simple, basic calculations.
Use the ▶ and ▶ keys to select the required arithmetic operation (+, -, x, ÷).
Use the Ⓞ key to set the decimal point.
Use the # key to change the sign (±).
Menu
Open the main menu

Tools
OK
Select the menu and confirm it

Calculator
OK
Select the submenu and confirm it
Example
To execute the calculation “-5 x 2.5” you have to type the following keys;
$$ \boxed {5 _ {\mathrm{KL}} ^ {\mathrm{J}}} \boxed {# _ {\mathrm{aA} \uparrow}} = - 5 $$
$$ \boxed {\triangle} \boxed {\triangle} \boxed {\triangle} = x $$
$$ \boxed {2 _ {\mathrm{BC}} ^ {\mathrm{A}}} \boxed {*} \boxed {5 _ {\mathrm{KL}} ^ {\mathrm{J}}} = 2. 5 $$
$$ O K = - 1 2. 5 $$
$$ \text { Clear } = \text { Delete } $$
Other Useful Features
Calendar
This menu option opens the calendar. You can select other days. Use the / and ◀M2 / M3 keys to navigate.
Menu
Open the main menu

Tools OK
Select the menu and confirm it

Calendar
OK
Select the menu and confirm it
Stopwatch
Menu
Open the main menu

Tools OK
Select the menu and confirm it

Stopwatch
OK
Select the submenu and confirm it
Other Useful Features
Network settings
This menu can be used to select mobile telecommunication networks other than your own mobile network provider. However, the corresponding agreements must have been concluded.
It is possible that not all functions described are supported by every provider. Therefore, please contact your local mobile phone provider for details.
Menu
Open the main menu

Settings
OK
Select the menu and confirm it

Network settings
OK
Select the submenu and confirm it

Automatic mode
or Manual mode OK
Select the setting and confirm it
Security settings
This menu is used to define which functions on the phone or SIM card should be protected by a password/PIN. The PIN and password can be changed.
PIN and PIN2 are supplied together with the SIM card. Further information is available from your SIM card provider.
Menu
Open the main menu

Settings
OK
Select the menu and confirm it

General
OK
Select the submenu and confirm it

Security
OK
Select the submenu and confirm it
Other Useful Features
PIN protection
The password is supplied together with the SIM card. If you deactivate the SIM lock, you need not enter the PIN after switching the mobile phone on. It is recommended to leave the SIM lock on to prevent unauthorised persons from using the mobile phone.
Phone lock
The default password programmed at the factory is 0000. If this lock is active, you must first enter the password for the phone lock after switching the mobile phone on and then enter the PIN.
Auto keypad lock
You can set up the mobile phone so that the key lock is automatically activated after a certain time in Standby mode.
Change password
You can change the password to lock the phone against use and altering the default settings.
Refer to Menu Structure; Page 73.
Tips
Locking your phone with your own personal PIN. You can lock your mobile phone to prevent unauthorised use by setting up a personal PIN number.
| Menu | Open the main menu | |
|  | Settings | OK Select the menu and confirm it |
|  | General | OK Select the submenu and confirm it |
|  | Security | OK Select the submenu and confirm it |
|  | PIN protection | OK Select the submenu and confirm it |
|  | Change PIN1 | OK Select the menu and confirm it |
| Input PIN: | OK | |
| Input new PIN: | OK | |
| Input again new PIN: | OK | |
Other Useful Features
PIN& PIN2 codes
The PIN (Personal Identity Number) and PIN2 codes are 4 to 8 digit numbers. The PIN and PIN2 codes are given to you, together with the SIM card, by your network provider.
PUK & PUK2 codes
The PUK (Personal Unblocking Key) and PUK2 codes are 4 to 8-digit numbers. These are only necessary if you enter the PIN code for the SIM card incorrectly three times in succession and the SIM card is blocked. The PUK and PUK2 codes are given to you, together with the SIM card, by your network provider.
Phone settings
Display settings
Use this menu to adapt the phone display to your own personal needs.
| Menu | Open the main menu | |
|  | Settings | OK Select the menu and confirm it |
|  | Display | OK Select the submenu and confirm it |
| Select | ||
| Idle display | To select a wallpaper and display the time and date | |
Other Useful Features
Backlight
To set the length of time the backlight stays on
Background
To select a background colour
Audio settings
Use this menu to adapt the phone's ringing tones to your own personal needs.
Menu
Open the main menu

Settings
OK
Select the menu and confirm it

Sounds
OK
Select the submenu and confirm it
Select
Ringtones
To select specific ringing
tones for various alert ringing signals
Volume
To select specific volumes for the various alert ringing signals.
Call = Earpiece volume level

Exposure to the receiver at full volume for a long period could cause ear damage.
Other Useful Features
Alert type
To select whether you are alerted of incoming calls via a ringing tone or vibration
Example - Setting the loudest Ringer
The loudest ringer is Ring tone 1 + Volume 7 = 100dB.
| Menu | Open the main menu | |
| □/□ | Settings | OKSelect the menu and confirm it |
| □/□ | Sounds | OKSelect the submenu and confirm it |
| □/□ | Ringtones | OKSelect the menu and confirm it |
| □/□ | Incoming call | OKSelect the menu and confirm it |
| □/□ | Ring tone 1 | OKSelect the ringer and confirm it |
| Back | ||
| □/□ | Volume | OKSelect the menu and confirm it |
Other Useful Features

text_image
/ Ring tone OKSelect the menu and confirm it

Select the volume and confirm it
Call settings
It is possible that not all functions described are supported by every provider. Therefore, please contact your local mobile phone provider for details. They may concern services which are subject to charges.
Forwarding calls
The following functions enable incoming calls to be transferred to other phone numbers.
| Menu | Open the main menu | |
|  | Settings | OK Select the menu and confirm it |
|  | Call setup | OK Select the menu and confirm it |
|  | Call divert | OK Select the submenu and confirm it |
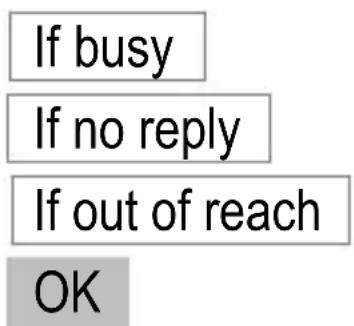
Select the setting to define which calls should be redirected:

Other Useful Features
flowchart
graph TD
    A["If busy"] --> B["If no reply"]
    B --> C["If out of reach"]
    C --> D["OK"]
and then select

Check status
OK
Display the current setting

Activate
Enter the number and activate the call divert function.

Deactivate
OK
Deactivate the corresponding call divert function
Call barring
The following function is used to restrict calls which can be received and made.
Menu
Open the main menu

Settings
OK
Select the menu and confirm it

Call setup
OK
Select the menu and confirm it

Call barring
OK
Select the menu and confirm it
Other Useful Features
Select the setting for which calls should be restricted:
All outgoing calls
All international calls
Only here & home
All incoming calls
Incoming calls if abroad
OK
The default password is 0000.
Call waiting
This function issues an audible signal to inform you that another call has been received while the current call is in progress.
Menu
Open the main menu

Settings
OK
Select the menu and confirm it

Call setup
OK
Select the menu and confirm it

Call waiting
OK
Select the submenu and confirm it
Other Useful Features
Automatic redialling
When this function is activated, redialling is initiated automatically if the number dialled is “engaged”.
| Menu | Open the main menu | |
|  | Settings | OK Select the menu and confirm it |
|  | Call setup | OK Select the menu and confirm it |
|  | Auto redial | OK Select the submenu and confirm it |
|  | Enable | OK Enable the function and confirm it |
|  | Disable | OK Disable the function and confirm it |
Caller ID
This function is used to activate/deactivate transmission of the phone number, with which you are making the call, with the call.
| Menu | Open the main menu | |
|  | Settings | OK Select the menu and confirm it |
|  | Call setup | OK Select the menu and confirm it |
|  | Caller ID | OK Select the submenu and confirm it |
|  | Set by network, Show number OK | Hide number or Select a setting and confirm it |
Broadcast messages
You mobile phone can receive broadcast messages ^1 .
Information on broadcast messages, charge rates, data and offers can be obtained from your SIM card service provider.
^1 Broadcast, also referred to as Cell Broadcast (CB) = Information services from your telephone network provider
Other Useful Features
| Menu | Open the main menu | |
| / | Message | OK Select the menu and confirm it |
| / | Message settings | OK Select the submenu and confirm it |
| / | Broadcast message | OK Select the submenu and confirm it |
Refer to Menu Structure; ☐ Page 69.
Default settings
The mobile phone is reset to its default (factory) settings.
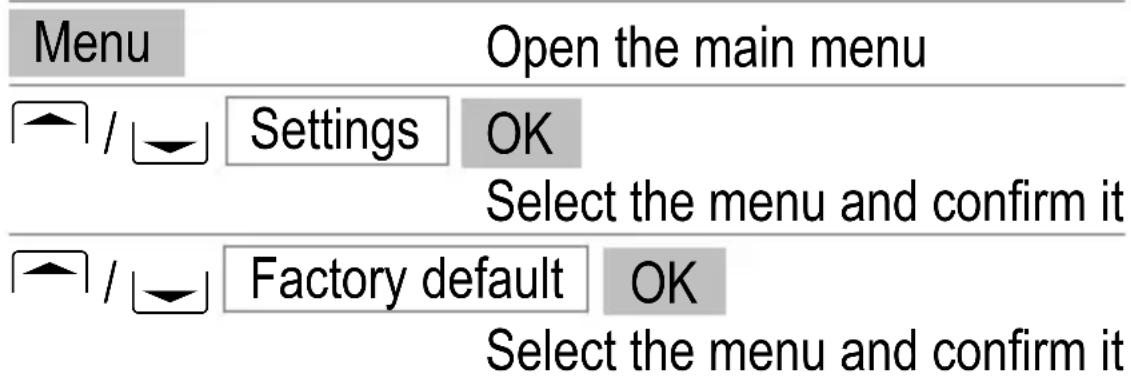
text_image
Menu Open the main menu Settings OK Select the menu and confirm it Factory default OK Select the menu and confirm itDuring the course of the menu, you will be prompted for the phone password. The default password programmed at the factory is 0000.
11 SIM Tool Kit
This menu contains the SIM Application Toolkit (commonly referred to as STK) of your mobile phone provider. The content and functions available vary from provider to provider and are dependent on the SIM card used.
SIM Application Toolkit (STK) is a GSM system standard which enables the SIM to initiate actions which can be used for various value-added services.
Please contact your local mobile phone provider for details. They may concern services which are subject to charges.
12 Menu Structure
Main menu
Open the main menu by pressing the Menu key. Then press the / keys to select a menu option or entry and follow the dialogue in the display using the softkeys which appear.
In this case, the softkeys are assigned different functions, e.g. OK, Go back, Cancel, Options etc.
Softkeys (grey) are only displayed in a few exceptional cases in the following menu structure.
For further information on the menu and operation, Chapter 4.
Message
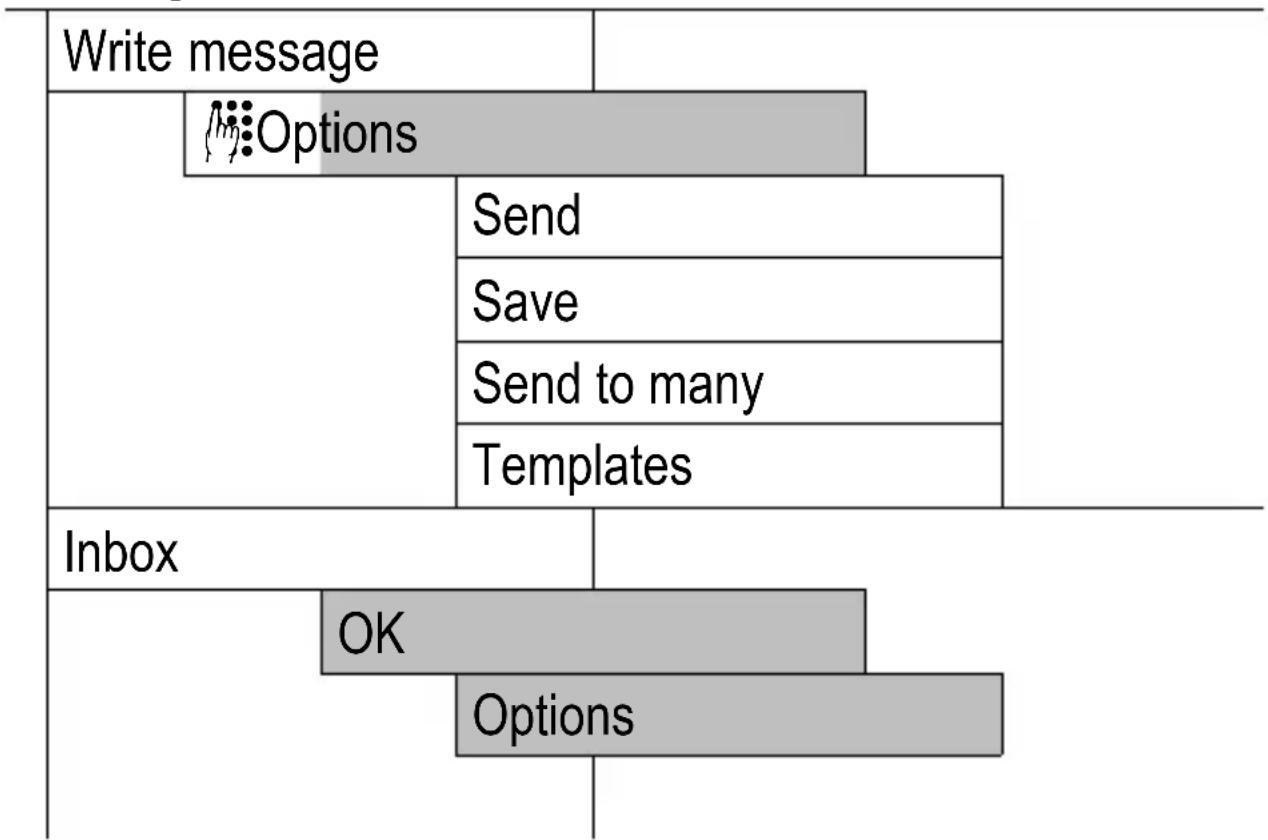
flowchart
graph TD
    A["Write message"] --> B["Options"]
    B --> C["Send"]
    C --> D["Save"]
    D --> E["Send to many"]
    E --> F["Templates"]
    G["Inbox"] --> H["OK"]
    H --> I["Options"]
Menu Structure
| Reply | |||
| Forward | |||
| Call | |||
| Save number | |||
| Delete | |||
| Delete all | |||
| Sent message | |||
| Refer to Inbox | |||
| Drafts | |||
| Templates | |||
| Message settings | |||
| SMS center number | |||
| Validity period | |||
| Auto save SMS | |||
| Delivery report | |||
| Preferred storage | |||
| SIM | |||
| Phone | |||
| Broadcast message | |||
| Topic | |||
Menu Structure
| Languages | ||
| Receive mode | ||
| Storage status | ||
Contacts
| New contact | |||
| Save to SIM | |||
| Name | |||
| Number | |||
| Save to phone | |||
| View contacts | |||
| Options | |||
| View | |||
| Send SMS | |||
| Add to group | |||
| Copy to phone | |||
| Copy to SIM | |||
| Call | |||
| Delete | |||
| View groups | ||
| Family | ||
| Friends | ||
| Office | ||
| Others | ||
| Special numbers | ||
| My numbers | ||
| Voice mail | ||
| Advance | ||
| M1 M2 M3 | ||
| Speed dial | ||
| Choose contacts list | ||
| Copy all | ||
| Delete all contacts | ||
| Storage status | ||
Menu Structure
Calls
| Incoming calls | |||
| Call | |||
| Send SMS | |||
| Delete | |||
| Save number | |||
| Delete all | |||
| Show number | |||
| Outgoing calls | |||
| Refer to Incoming calls | |||
| Missed calls | |||
| Refer to Incoming calls | |||
| Call duration | |||
Tools
| Alarm |
| Calculator |
| Calendar |
| Stopwatch |
Settings
| General | |||
| Language | |||
| Time and date | |||
| Date & time settings | |||
| Date format | |||
| Date separator | |||
| Time format: | |||
| Answer mode | |||
| Normal answer | |||
| Any key answer | |||
| Security | |||
| PIN protection | |||
| SIM lock | |||
| Change PIN1 | |||
| Change PIN2 | |||
| Phone lock | |||
| Auto keypad lock | |||
| Change password | |||
Menu Structure
| Display | ||||
| Idle display | ||||
| Backlight | ||||
| Background | ||||
| Sounds | ||||
| Ringtones | ||||
| Incoming call | ||||
| Message | ||||
| Key tone | ||||
| Volume | ||||
| Call | ||||
| Ring tone | ||||
| Key tone | ||||
| Alert type | ||||
| Ring only | ||||
| Vibrate only | ||||
| Vibrate and ring | ||||
| Call setup | ||||
| Call divert | ||||
| All calls | ||||
Menu Structure
| Check status | |||
| Activate | |||
| Deactivate | |||
| If busy | |||
| If no reply | |||
| If out of reach | |||
| Call barring | |||
| All outgoing calls | |||
| Check status | |||
| Activate | |||
| Deactivate | |||
| All international calls | |||
| Only here & home | |||
| All incoming calls | |||
| Incoming calls if abroad | |||
| Call waiting | |||
| Auto redial | |||
| Caller ID | |||
| Set by network | |||
| Hide number | |||
Menu Structure
| Show number | |||
| Network settings | |||
| Automatic mode | |||
| Manual mode | |||
| Factory default | |||
SIM tool kit
(Provider-dependent menu)
13 Trouble Shooting
Service hotline
Should problems arise with the telephone, please refer to the following information first. In the event of technical problems, please contact out service hotline under tel. 0844 800 6503 (Using an UK landline, at the time of going to print: calls cost 6p for connection charge and then 5p a minute. Mobile costs may vary.) In the case of claims under the terms of guarantee, contact your sales outlet. There is a 2 year period of guarantee.
Problems and solutions
| Problems Solutions | |
| The mobile phone cannot be switched on. | - No battery inserted.- Battery is not loaded. |
| No signal quality is displayed. | - No network connection. The mobile phone is in a location where there is no network service. Move to a different location or contact your service provider. |
Trouble Shooting
| Keypad does not function or only functions very slowly. | - The operating speed of the display is reduced in the case of low temperatures. This is normal. Use the phone in a warmer location. |
| A message appears in the display for some functions, indicating execution/use is not possible. | - Many functions can only be used after the respective service has been applied for. Contact your service provider for more details. |
| Screen frozen or no response when pressing keys. | - Remove the battery for 3 minutes and try again. |
| No connection to the mobile telecommunication network. | - Contact your service provider. |
| The “Insert SIM” message appears in the display. | - Ensure that the SIM card has been installed correctly. Contact your service provider, if necessary. |
Trouble Shooting
The battery cannot be charged or is empty within a short time.
- Battery is defect.
- Place the phone correctly in the charging unit or connect the charging unit properly. Clean the contact surfaces on the mobile phone and charging unit with a soft, dry cloth.
- Charge the mobile for 4 hours.
Tips on the battery
Only use batteries and charging unit approved by the manufacturer, otherwise the battery could be damaged.
Do not short circuit the battery. Always leave the battery in the phone to avoid accidentally short circuiting the battery contacts.
Keep the battery contacts clean and free of dirt.
The battery can be charged/discharged hundreds of times but its service life is limited. Replace the battery when the battery power has decreased noticeably.
Technical Properties
14 Technical Properties
Technical data
| Feature Value | |
| Standard GSM | ^1 900, 1800 MHzDualband |
| Dimensions 52 x 128 x 15 | mm(W x H x D) |
| Weight 92 g incl. battery | |
| Power supply Input: 100-240 V, 50-60Hz, 0.15 AOutput: Mini-USB 5 V,500 mA | |
| Battery 3.7 V, 750 mAh | Charge duration:Approx. 4 h |
| Standby time Up to 150 h | |
| Max. talk time Up to 120 min | |
| Display 1.75” colour, | Resolution 128 x 160 |
| Key lighting White | |
| LED Red/Green | |
^1 GSM = Global System for Mobile Communications. Standard for mobile phones.
Technical Properties
| Languages German, English, French, Dutch | |
| Phone book Max. 200 contacts | |
| SMS Standard SMS | Memory capacity: Max. 100 entries (Phone) |
| Ringing volume Max. 100 dB | |
| Permissible ambient temperature | -10°C to 40°C |
| Permissible relative humidity | 30% to 75% |
| At Rights Reserved! | |
Technical Properties
Default settings
The default settings can be restored via the menu.
Declaration of Conformity
This device fulfils the requirements stipulated in the EU directive:
1999/5/EU directive on radio equipment and telecommunications terminal equipment and the mutual recognition of their conformity.
Conformity with the above mentioned directive is confirmed by the CE mark on the device.
To view the complete Declaration of Conformity, please refer to the free download available on our web site www.amplicomms.eu.
CE
SAR Information
Information on radio frequency emissions and specific absorption rates (SAR = Specific Absorption Rate).
All the applicable safety standards related to radio frequency emissions were implemented during the development of this mobile phone. The limit values are based on scientific directives and contain a safety margin in order to guarantee the safety of all persons regardless of age and state of health.
The values specified in the directive concerning radio frequency emissions are based on a unit called SAR. SAR values are established using standard methods in which the phone is operated in all possible frequency bands with the highest power output.
Although the SAR values of various phone models can differ, all the models were developed to maintain the relevant directives on radio frequency emissions.
The following information applies to residents of countries which, as with the European Union, have adopted the SAR limit value recommended by the ICNIRP (International Commission on Non-Ionizing
Radiation Protection) which lies at 2W/Kg (averaged from 10 gram tissue): The highest SAR value measured, averaged over 10 g tissue, was < 0.583 W/kg for this mobile phone measured at the ear.
Safety Information
15 Safety Information
Please read this section carefully.

of suffocation!
Keep packaging materials and protective foils out of reach of children.
Intended use
This mobile phone is designed for use when connected to a mobile phone network. Any other use is considered unintended use. Unauthorised modification or reconstruction is not permitted. Under no circumstances open the device or complete any repair work yourself.
Areas of use
- Do not use the phone in prohibited areas.
- Switch the phone off in the vicinity of medical equipment (e.g. in hospitals).
- Do not use the phone in petrol stations or near fuels and chemicals.
- Check with the airline whether mobile phones may be used on board.
General information
- Prevent exposure to smoke, dust, vibration, chemicals, moisture, heat and direct sunlight. The phone is not waterproof; therefore, keep it dry.
- Only use the original power supply and batteries. Never attempt to connect other products.
•Repairs to this device may only be completed by qualified service personnel.
- All mobile communication equipment is subject to interference which may impair its performance.
- Keep the phone and accessories out of the reach of children.
•The SIM card can be removed. Caution! Small children can swallow them.
•The ringing tone is issued via the loudspeaker. Take an incoming call first and then hold the phone to your ear. This prevents any possible hearing damage.
- Only use the phone while driving with the correct handsfree equipment. Ensure that no safety-related functions are interfered with when operating the phone. It is essential to observe the applicable national laws and regulations.
Safety Information
•Always maintain a distance of at least 15 cm to implanted heart pacemakers to prevent any possible interference. If you have had a pacemaker implanted, do not carry the phone in a breast pocket when switched on. Always hold the phone to the ear furthest away from the pacemaker during calls. Switch the phone off immediately if you notice or suspect any adverse effects.
- Do not rely on the mobile phone as a safeguard for emergencies. For a variety of technical reasons, it is not possible to guarantee a reliable connection under all circumstances.
Power adapter plug
Attention: Only use the power adapter plug supplied because other power supplies could damage the phone. Ensure access to the power adapter plug is not obstructed by furniture or such.

e power adapter plug supplied fulfils the ecodesign requirements of the European Community (Directive 2005/32/EC). This means that the current consumption is considerably less, both in operation as well as in standby, in comparison to older power adapter plug models.
Rechargeable batteries
Attention: Never throw batteries into a fire. Only use batteries of the same type.
Barcode label in the phone
The barcode label contains information on the phone, such as the serial number, for example. Do not remove it.
Safety Information
Disposal
In order to dispose of your device, take it to a collection point provided by your local public waste authorities (e.g. recycling centre). According to laws on the disposal of electronic and electrical devices, owners are obliged to dispose of old electronic and electrical devices in a separate waste container. The symbol indicates that the device must not be disposed of in normal domestic waste!
Batteries represent a hazard to health and the environment!

Never open, damage or swallow batteries or allow them to pollute the environment. They may contain toxic, ecologically hazardous heavy metals. You are legally obliged to dispose of power packs and batteries at the point of sale or in the corresponding containers at collection points provided by local public waste authorities. Disposal is free of charge. The symbols indicate that the batteries must not be disposed of in normal domestic waste and that they must be brought to collection points provided by local public waste authorities.
Packaging materials must be disposed of according to local regulations.

16 Maintenance / Guarantee
Maintenance
- Clean the housing surfaces with a soft, fluff-free cloth.
- Do not use any cleaning agents or solvents.
Guarantee
AMPLICOMMS equipment is produced and tested according to the latest production methods. The implementation of carefully chosen materials and highly developed technologies ensure trouble-free functioning and a long service life. The terms of guarantee do not apply when a device malfunction was caused by the mobile telecommunications network operator/provider. The terms of guarantee do not apply to the batteries or power packs used in the products. The period of guarantee is 24 months from the date of purchase.
All deficiencies related to material or manufacturing errors within the period of guarantee will be redressed free of charge. Rights to claims under the terms of guarantee are annulled following tampering by the purchaser or third parties. Damage caused as the result of improper handling or operation, normal wear and tear, incorrect positioning or storage, improper connection or installation or Acts of God and other external influences are excluded from the
Maintenance / Guarantee
terms of guarantee. In the case of complaints, we reserve the right to repair defect parts, replace them or replace the entire device. Replaced parts or devices become our property. Rights to compensation in the case of damage are excluded where there is no evidence of intent or gross negligence by the manufacturer.
If your device shows signs of defect during the period of guarantee, please return it to the sales outlet in which you purchased the AMPLICOMMS device together with the purchase receipt. All claims under the terms of guarantee in accordance with this agreement can only be asserted at the sales outlet. No claims under the terms of guarantee can be asserted after a period of two years from the date of purchase and hand-over of the product.
17 Index
A
Alarm, 51
At a Glance, 4, 16
Audio settings, 59
Automatic redialling, 64
B
Battery charge status, 8
Battery status warning, 9
Broadcast messages, 65
C
Calculator, 52
Calendar, 53
Call barring, 62
Call list, 35, 39
Call settings, 61
Call waiting, 63
Caller identification, 65
Calling back, 35
Calling back missed calls, 35
Charging, 8
Creating
phone book entries, 26, 30
D
Date, 11, 49
Declaration of Conformity, 82
Default settings, 66, 82
Delete text, 28
Deleting phone book entries, 30
Dialling, 35
Display, 18
Display icons, 18
Display language, 11
Display settings, 58
Displaying list details, 39
During a call, 38
E
Editing phone book entries, 30
Ending a call, 11, 35
Energy-save mode, 25
Entering names, 29
Entering spaces, 28
Entering text, 29
F
Forwarding calls, 61
G
Getting Started, 24
Groups, 32
Guarantee, 89
Index
H
Handsfree, 36
Hold, 38
How does it work, 20
How to enter text and numbers, 27
|
Icons, 18
K
Keypad lock, 37
L
Language, 50
Loudest Ringer, 11
M
Main menu, 68
Maintenance, 89
Making a call, 11, 35
Making and Receiving Calls, 35
Menu structure, 68
Methods of entering text, 27
Modifying phone book entries, 30
Moving the cursor, 28
Multitap, 27
Muting, 37
N
Network, 10
Network settings, 54
Notation, 24
0
On-hook, 11, 35
One-touch dialling, 36
One-touch dialling buttons, 47
Other Useful Features, 47
P
Package contents, 6
Phone book, 35, 38
Phone Book Set Up, 29
Phone settings, 58
PIN/PIN2 code, 58
Problems, 77
Problems and solutions, 77
PUK/PUK2 code, 58
Punctuation and special characters, 28
Q
Questions and Answers, 12
Quick Start Guide, 4
R
Receiver volume, 36
Redialling, 35
Rejecting a call, 11, 35
Ringtone, 59
S
Safety information, 84
SAR Information, 83
Security settings, 55
Service-Hotline, 77
Setting
the loudest Ringer, 11, 60
SIM card, 6
SIM Tool Kit, 67
SMS, 40
SMS settings, 40
Softkeys, 25
Sounds, 59, 60
Speed dial, 48
Standby mode, 24
Stopwatch, 53
Switching off, 10
Switching on, 10
T
Taking a call, 11, 35
Talk time, 36
Technical data, 80
Time, 11, 49
Tips on the battery, 79
Trouble Shooting, 77
Turn ringer Off/On, 37
V
Voice Mail, 45
Volume, 59
W
Writing an SMS text, 42
Important Notes on the Guarantee
The period of guarantee for the AMPLICOMMS product begins on the date of purchase. Rights to claims under the terms of guarantee relate to deficiencies resulting from material or production faults. Rights to claims under the terms of guarantee are annulled following intervention by the purchaser or third parties. Damage caused as a result of improper handling or operation, normal wear and tear, incorrect positioning or storing, improper connection or installation, Acts of God or other external influence are not covered by the terms of guarantee.
CLAIMS UNDER THE TERMS OF GUARANTEE MAY ONLY BE ASSERTED TO THE RETAILER WHERE THE EQUIPMENT WAS PURCHASED, WHEREBY THE PURCHASE RECEIPT MUST ALSO BE SUBMITTED.
TO PREVENT UNNECESSARY LONG DELAYS, PLEASE DO NOT SEND EQUIPMENT UNDER COMPLAINT TO OUR OFFICE ADDRESS.
IN THE CASE OF QUESTIONS CONCERNING OPERATION OR THE TERMS OF GUARANTEE, PLEASE REFER TO THE OPERATING MANUAL OR CONTACT OUR HOTLINE:
0844 800 6503 (Using an UK landline, at the time of going to print: calls cost 6p for connection charge and then 5p a minute. Mobile costs may vary.)
AUDIOLINE GmbH
Neuss
Internet: www.amplicomms.eu - E-mail: info@audioline.de