
RM65B - Blender ROLLS - Free user manual and instructions
Find the device manual for free RM65B ROLLS in PDF.


| Product Type | Professional Audio Mixer |
| Model | RM65b HexMix |
| Brand | Rolls |
| Channels | 6 |
| Input Connectors | 6x XLR (balanced), 6x 1/4" (unbalanced, configurable as inserts) |
| Output Connectors | Main L/R: 2x 1/4" TRS balanced, Monitor: 1x 1/4" unbalanced, FX Send: 1x 1/4" unbalanced, Headphone: 1x 1/4" TRS stereo |
| Input Impedance | XLR: 20kΩ balanced, 1/4": 10kΩ unbalanced |
| Output Impedance | 50Ω TRS balanced |
| Max Input Level | +10 dBV (XLR and 1/4") |
| Max Output Level | +17 dBV (main, monitor) |
| Phantom Power | 36V DC, individual per channel (DIP switches on rear) |
| Max Gain (Main) | 60 dB balanced/unbalanced |
| Max Gain (Monitor) | 55 dB |
| Tone Controls | Bass (400 Hz) and Treble (1 kHz center), ±12 dB cut/boost |
| Total Harmonic Distortion (THD) | < 0.003% |
| Signal-to-Noise Ratio (S/N) | 106 dB (max) |
| CMRR | 80 dB |
| Frequency Response (Phase Shift) | < 10° phase shift from 20 Hz to 20 kHz |
| Power Supply | 12 VAC, 300 mA (Rolls PS12 adapter) |
| Dimensions (W x H x D) | 19" x 1.75" x 6.5" (48.3 x 4.4 x 16.5 cm) |
| Weight | 7 lbs (3.2 kg) |
| Mounting | Standard 19" rack, 1U |
| Maintenance and Cleaning | Use a dry cloth to clean the exterior; avoid moisture. Keep vents free of dust. |
| Safety | Use only the specified Rolls PS12 power adapter. Do not expose to rain or moisture. |
| Spare Parts and Repairability | Contact Rolls Corporation or an authorized service center for repairs. Internal jumpers allow reconfiguration of inputs as inserts. |
Frequently Asked Questions - RM65B ROLLS
User questions about RM65B ROLLS
0 question about this device. Answer the ones you know or ask your own.
Ask a new question about this device
Download the instructions for your Blender in PDF format for free! Find your manual RM65B - ROLLS and take your electronic device back in hand. On this page are published all the documents necessary for the use of your device. RM65B by ROLLS.
USER MANUAL RM65B ROLLS
This product is warranted to the original consumer purchaser to be free from defects in materials and workmanship under normal installation, use and service for a period of one (1) year from the date of purchase as shown on the purchaser's receipt.
The obligation of Rolls Corporation under this warranty shall be limited to repair or replacement (at our option), during the warranty period of any part which proves defective in material or workmanship under normal installation, use and service, provided the product is returned to Rolls Corporation, TRANSPORTATION CHARGES PRE-PAID. Products returned to us or to an authorized Service Center must be accompanied by a copy of the purchase receipt. In the absence of such purchase receipt, the warranty period shall be one (1) year from the date of manufacture.
This warranty shall be invalid if the product is damaged as a result of defacement, misuse, abuse, neglect, accident, destruction or alteration of the serial number, improper electrical voltages or currents, repair, alteration or maintenance by any person or party other than our own service facility or an authorized Service Center, or any use violative of instructions furnished by us.
This one-year warranty is in lieu of all expressed warranties, obligations or liabilities. ANY IMPLIED WARRANTIES, OBLIGATIONS, OR LIABILITIES, INCLUDING BUT NOT LIMITED TO THE IMPLIED WARRANTIES OF MERCHANTABILITY AND FITNESS FOR A PARTICULAR PURPOSE, SHALL BE LIMITED IN DURATION TO THE ONE YEAR DURATION OF THIS WRITTEN LIMITED WARRANTY. Some states do not allow limitations on how long an implied warranty lasts, so the above limitation may not apply to you.
IN NO EVENT SHALL WE BE LIABLE FOR ANY SPECIAL, INCIDENTAL OR CONSEQUENTIAL DAMAGES FOR BREACH OF THIS OR ANY OTHER WARRANTY, EXPRESSED OR IMPLIED, WHATSOEVER. Some states do not allow the exclusion or limitation of special, incidental or consequential damages so the above limitation or exclusion may not apply to you. This warranty gives you specific legal rights, and you may also have other rights which vary from state to state.

ROLLS CORPORATION
SALT LAKE CITY, UTAH

RM65b HEXMIX
Professional Audio Mixer


FEATURES
- 6 XLR and 1/4" Inputs
- 1/4" Inputs may be configured as Insert jacks
- Individual 36 V Phantom Power
- Clip LEDs on each channel
- Input Trim, Monitor, FX Send and Pan on each channel
- Treble & Bass control on each channel
• Mono send, stereo return effects loop - Stereo Aux Bus Input
- Headphone Output
OWNERS MANUAL
INTRODUCTION
Thank you for your purchase of the Rolls RM65b HexMix Professional Audio Mixer. This unit is a breakthrough in size/performance for an audio mixer. It's a full-function 6 channel mic/line mixer in a single space 19" rack chassis. It is intended for sound reinforcement, studio, choir, and other applications where high channel to size ratio is desired. Each mic input has individual phantom power switches and input gain trims located on the rear panel. Each channel features a Monitor send, stereo Effects loop (mono send / stereo return), Bass, and Treble controls. This manual assumes the user has some familiarity with audio mixers.
INSPECTION
- Unpack and inspect the RM65b box and package.
If obvious physical damage is noticed, contact the carrier immediately to make a damage claim. We suggest saving the shipping carton and packing materials for safely transporting the unit in the future. - Please visit our website at www.rolls.com, and click on the Register Warranty Here text. Complete the warranty page to register your RM65b. If you do not have access to the internet, complete the Warranty Registration Card and return it to the factory.
TABLE OF CONTENTS
- INTRODUCTION
INSPECTION
TABLE OF CONTENTS
DESCRIPTION
FRONT PANEL
- FRONT PANEL (Continued)
REAR PANEL
- OPERATION
- OPERATION (Continued)
- SPECIFICATIONS
- SCHEMATIC
DESCRIPTION
FRONT PANEL

CHANNEL CONTROLS
VOLUME: Adjusts the amount of signal sent through the channel and to the FX send and output.
CLIP LED: Indicates that the channel is being overdriven. This LED lights 3 dB before clipping.
MONITOR: Adjusts the amount of signal sent from that channel to the Monitor Send jack. The signal is pre-fader (pre-Volume control)
BASS: Controls the boost or cut of frequencies below 400 Hz for each channel.
1
SCHEMATIC
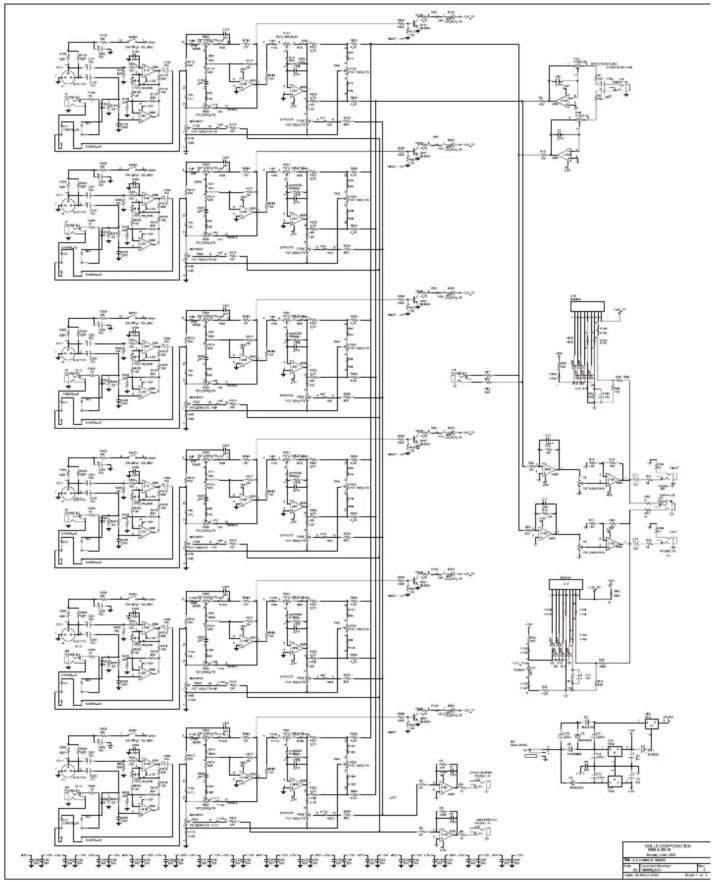
SPECIFICATIONS
| Input Impedance: | 20K Ohms balanced10K Ohms unbalanced (1/4") |
| Output Impedance: | 50 OhmsTRS Balanced |
| Max Input Level: | +10 dBV XLR+10 dBV 1/4" |
| Phase Shift: | < 10 deg. 20 Hz - 20 kHz |
| Input Connectors: | XLR and 1/4" |
| Phantom Power: | 36 Volts DC |
| Outputs: | 1/4" main balanced +17 dB max1/4" monitor +17 dB max1/4" FX send1/4' TRS Stereo Headphone |
| Max Gain: (Mains): | 60 dB bal/ unbal |
| (Monitor): | 55 dB |
| Tone controls: | 12 dB treb, bass cut/ boost, 1K Hz center |
| Max S/N Ratio: | 106 dB |
| THD: | < .003% |
| IMD (SMPTE): | < .003% |
| CMRR: | 80 dB |
| Power: | AC adapter 12 VAC (Rolls PS12) |
| Weight: | 7 lbs (3KG) |
| Size: | 19" x 1.75" x 6.5" (48cm x 4.5cm x 17cm) |
| NOTES: | |
TREBLE: Controls the boost or cut of frequencies above 400 Hz for each channel. PAN: Adjusts the amount of relative signal to the Right, Left or both Main Out jacks.
FX SEND: Controls the amount of signal (post-volume control) that is sent for that channel to the FX Send jack.
MASTER CONTROLS
FX RETURN: Adjusts the amount of signal coming back into the FX Return jack. MASTER VOLUME, RIGHT - LEFT: Controls the amount of signal sent out the main Right and Left Output jacks, and sets the overall signal level except for the Monitor Send and Effects Send jacks.
REAR PANEL
| MODEL NAME | SPRING NUMBER |
| BASE V.5.A | NO. |
| CHANNEL 6 | |
| CHANNEL 5 | |
| CHANNEL 4 | |
| CHANNEL 3 | |
| CHANNEL 2 | |
| CHANNEL 1 | |
| SUPPORT | WARNING: DO NOT EXPOSE, THE CHAMPED TO RANK |
| 12 MAC | CHANNEL 6 |
| CHANNEL 5 | |
| CHANNEL 4 | |
| CHANNEL 3 | |
| CHANNEL 2 | |
| CHANNEL 1 |
POWER: Connects to the Rolls PS12 12VAC, 300mA power adapter.
1 - 6 CHANNEL MIC INPUTS: XLR input connectors for mic or line level signals.
1 - 6 CHANNEL LINE INPUTS: 1/4" input connectors for line level signals.
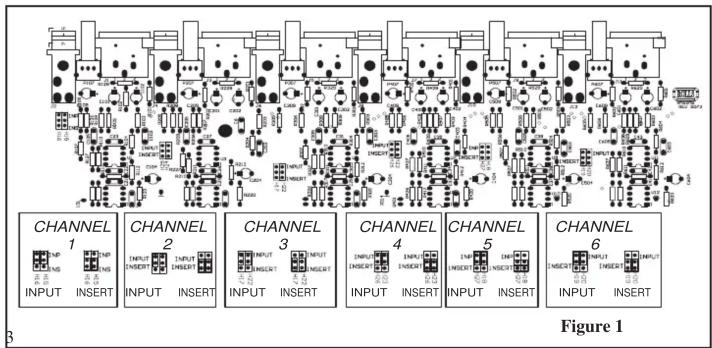
Each of these inputs may be reconfigured as INSERTS by moving jumper connector for each channel located inside the RM65b.
TRIM: Adjusts the amount of input signal from the mic and line input jacks.
PHANTOM POWER: 6 switches for turning on the microphone phantom power for the XLR inputs, and are numbered for the channel they are assigned to. DOWN is on, UP is off.
AUX BUS IN: 1/4" TRS stereo input to the main mix bus, and may be used as an auxiliary stereo input for joining two RM65s together.
FX SEND: 1/4" unbalanced jack for sending the signals assigned by each channel's FX Send control out to external effects.
FX RETURN: STEREO 1/4" Tip-Ring-Sleeve jack for inputting signals from external effects devices. NOTE: THIS JACK IS STEREO ONLY - CONNECTING A MONO 1/4" TIP-SLEEVE JACK WILL RESULT IN THE RETURN SIGNAL BEING PRESENT AT THE RIGHT OUTPUT ONLY.
MONITOR OUT: 1/4" unbalanced jack for sending signals assigned by each channel's monitor output control to an auxiliary amplifier or monitoring system. RIGHT and LEFT OUTPUT: 1/4" TRS balanced jacks to be used as the unit's main outputs.
USING PHANTOM POWER
Phantom power is a means of powering condenser microphones through the microphone cable. The RM65b has individually switchable 36 volts of phantom power for each of its 6 channels through the XLR jacks. The DIP switches on the rear of the unit are for switching the power on and off. When the little switch tab is down, the power is on. The number on the switch corresponds to the channel that is receiving the power. If phantom power is not needed, it should be switched off to avoid possible damage to a microphone, or degraded sound quality.
OPERATION
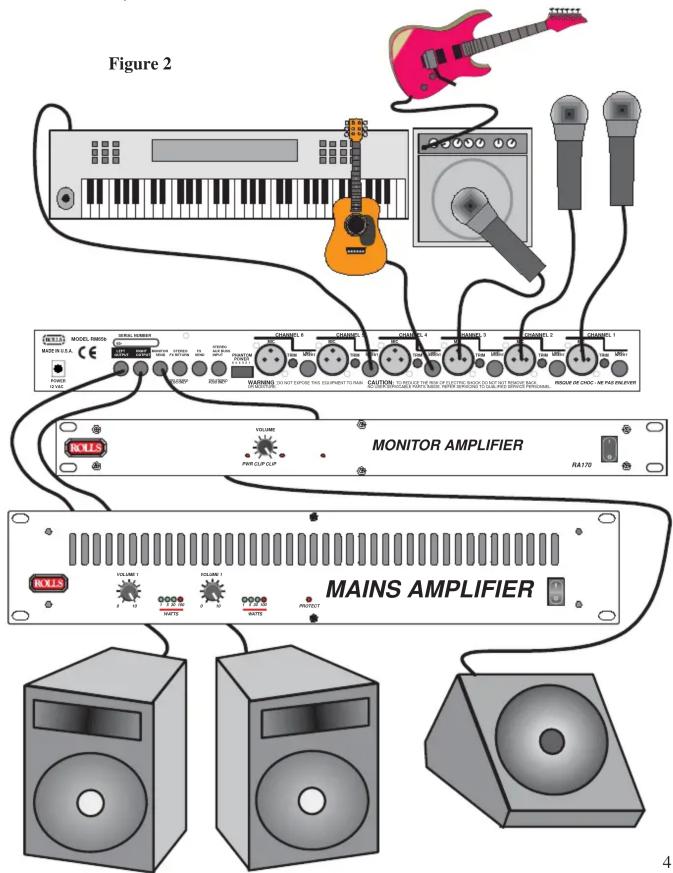
The RM65b is ideal for small combo groups where a small number of instruments and microphones need to be mixed together. Refer to Figure 2 for an example of how to connect the inputs and outputs of your RM65b. Connect microphones to balanced XLR cables and to the XLR inputs. If any of these microphones are condenser microphones, they will require phantom power. To turn on the phantom power for an individual channel, set the phantom power switch for that channel to the ON (down) position. Instruments may be played into a microphone which is connected as indicated above, or if you have active pickups in your instrument, simply connect the output of your instrument to an RM65b Line Input as the acoustic guitar is shown.
Electric guitars and basses normally are connected to an instrument preamplifier. Amplifiers may have microphones placed in front of the speaker, or if the amp has a line level output (check with the amplifier's owners manual) - it may also be connected to the mixer directly. Keyboards and sound modules are connected directly to the RM65b line inputs as shown.
FX LOOP
To use the FX Loop, connect a 1/4" unbalanced cable to the FX Send and to the Input on your signal processor or effects device. Connect the Outputs of the signal processor or effects device to the RM65b FX Return jack. You will need an "Insert" type of cable (shown to the right) to adapt the dual 1/4' end connected to your signal processor, to the 1/4' TRS end of the RM65b. The level of the effect will be controlled by the settings on the channels' FX Sends and by the Output Level of your effects device. The overall level of the effect to the final mix will be controlled by the FX Return level on the front of the RM65b.
MONITOR
To use the Monitor feature of the RM65b, connect the Monitor Out jack to a monitor amplifier via a 1/4" unbalanced cable. Each channel's monitor level is controlled by that channel's Monitor level setting. Be aware that the RM65b has no master monitor level, so you will need to set the overall monitor level with the monitor amplifier and the Monitor Levels of each channel.
Connect the Right and Left Main Outputs to the main amplifier(s) and make sure the amplifier is the correct rating for the speakers. If you are operating in mono, use either the Right or Left Output.
flowchart
graph TD
    subgraph Channel 1
        A["INPUT INSERT"] --> B["INSCR"]
        C["INPUT INSERT"] --> D["INSCR"]
        E["INPUT INSERT"] --> F["INSCR"]
        G["INPUT INSERT"] --> H["INSCR"]
        I["INPUT INSERT"] --> J["INSCR"]
        K["INPUT INSERT"] --> L["INSCR"]
        M["INPUT INSERT"] --> N["INSCR"]
        O["INPUT INSERT"] --> P["INSCR"]
        Q["INPUT INSERT"] --> R["INSCR"]
        S["INPUT INSERT"] --> T["INSCR"]
        U["INPUT INSERT"] --> V["INSCR"]
        W["INPUT INSERT"] --> X["INSCR"]
        Y["INPUT INSERT"] --> Z["INSCR"]
        AA["INPUT INSERT"] --> AB["INSCR"]
        AC["INPUT INSERT"] --> AD["INSCR"]
        AE["INPUT INSERT"] --> AF["INSCR"]
        AG["INPUT INSERT"] --> AH["INSCR"]
        AI["INPUT INSERT"] --> AJ["INSCR"]
        AK["INPUT INSERT"] --> AL["INSCR"]
        AM["INPUT INSERT"] --> AN["INSCR"]
        AO["INPUT INSERT"] --> AP["INSCR"]
        AQ["INPUT INSERT"] --> AR["INSCR"]
        AS["INPUT INSERT"] --> AT["INSCR"]
        AU["INPUT INSERT"] --> AV["INSCR"]
        AW["INPUT INSERT"] --> AX["INSCR"]
        AY["CHANNEL 1"] --> Z
    end
    style Channel 1 fill:#f9f,stroke:#333
    style Channel 2 fill:#f9f,stroke:#333
    style Channel 3 fill:#f9f,stroke:#333
    style Channel 4 fill:#f9f,stroke:#333
    style Channel 5 fill:#f9f,stroke:#333
    style Channel 6 fill:#f9f,stroke:#333
    style Channel 1 fill:#ccf,stroke:#333
    style Channel 2 fill:#ccf,stroke:#333
    style Channel 3 fill:#ccf,stroke:#333
    style Channel 4 fill:#ccf,stroke:#333
    style Channel 5 fill:#ccf,stroke:#333
    style Channel 6 fill:#ccf,stroke:#333
The RM65b may also be used for recording. Connect microphones, instruments, and effects to the inputs as described above - the connect the Right and Left outputs to your recording device and set the levels accordingly.
CONFIGURING THE 1/4" INPUTS AS INSERTS
NOTE: You are responsible for any damage that may occur during this process. Carefully remove the seven screws that hold the lid of the RM65b to the chassis. Refer to Figure 1 for the placement of the input to insert jumpers. To convert the 1/4" Input jack to become an "Insert", move the appropriate channel jumpers from INPUT to INSERT. Note that channel 5 jumpers are moved perpendicular to their original placement for the Insert position rather than parallel.



Brand : ROLLS
Model : RM65B
Category : Blender