SC-431E - Screen Samtron - Free user manual and instructions
Find the device manual for free SC-431E Samtron in PDF.


User questions about SC-431E Samtron
0 question about this device. Answer the ones you know or ask your own.
Ask a new question about this device
Download the instructions for your Screen in PDF format for free! Find your manual SC-431E - Samtron and take your electronic device back in hand. On this page are published all the documents necessary for the use of your device. SC-431E by Samtron.
USER MANUAL SC-431E Samtron
Radio Frequency Interference Statement 4
Connecting Your Monitor 5
Controlling and Adjusting Your Monitor 7
Cautions 9
Specifications 11
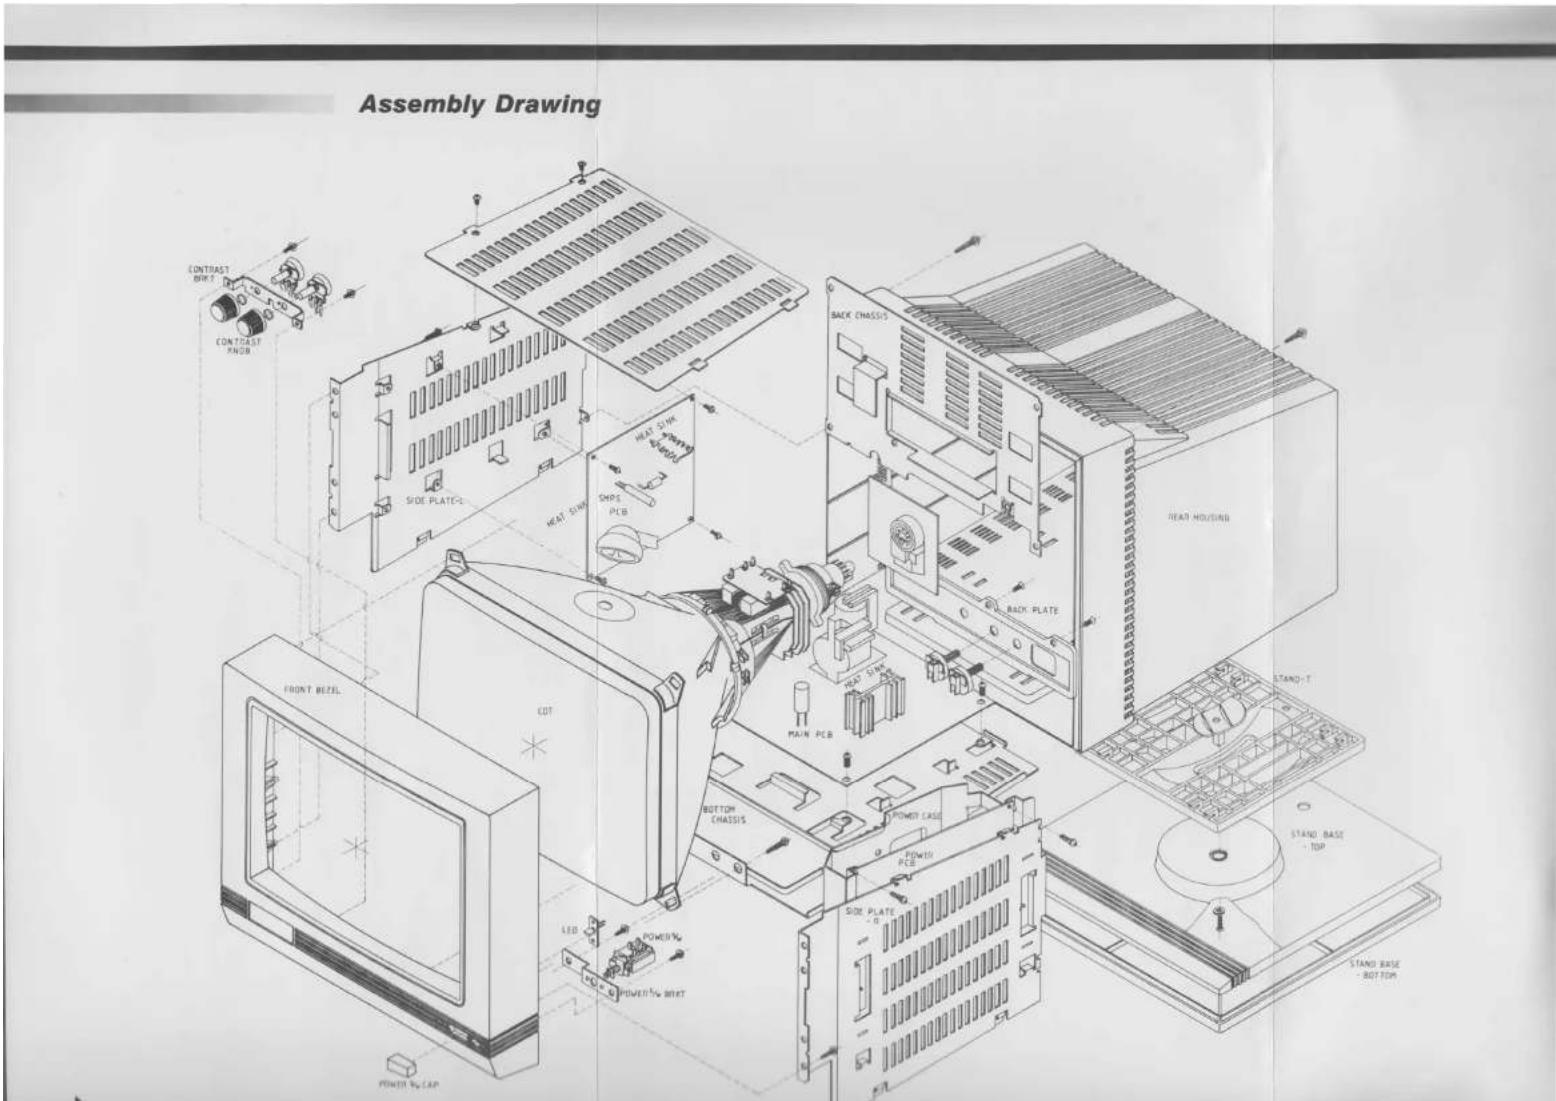
Assembly Drawing 13
Welcome
Congratulations on your purchase of a SAMTRON color Monitor part of the growing line of quality SAMTRON products. Your new Display color Monitor is a solid state 14-inch Display color Monitor designed to display the signal from Personal Micro Computurs or other signal sources. This manual has been prepared to assist you in becoming familiar with your new Display color Monitor to obtain optimum results. Spend a few minutes reading this manual carefully before you start operating this unit. Your Monitor's performance incorporates many convenient features.
Features
■ RGB I/TTL Signal input.
■ A stable display through variations in the power source voltage.
■ Good overall display quality.
■ New circuits adoupted enabling an outstanding sharp and steady display.
■ Instant Action System ..... Immediate display after turn-on.
■ Outstanding performance and reliability.
■ The latest 14",90° deflection CRT.
■ Fully compatible with the IBM PC-AT/XT.
■ 2 MODE(15.75KHz/21.85KHz)horizontal Frequency.
■ 16 color/64 color display.
Radio Frequency Interference Statement
The equipment described in this manual generates and uses radio-frequency energy. If it is not installed and used properly, that is, in strict accordance with our instructions, it may cause interference with radio and television reception.
This equipment has been tested and complies with the limits for a Class B computing device in accordance with the specifications in Subpart J, Part 15, of FCC rules. These rules are designed to provide reasonable protection against such interference in a residential installation. However, there is no guarantee that the interference will not occur in a particular installation, especially if you use a “rabbit ear” television antenna. (A “rabbit ear” antenna is the telescoping-rod type usually contained on TV receivers.)
You can determine whether your computer is causing interference by turning it off. If the interference stops, it was probably caused by the computer or its peripheral devices. To further isolate the problem:
■ Disconnect the peripheral devices and their input/output cables one at a time. If the interference stops, it is caused by either the peripheral device or it's I/O cable. These devices usually require shielded I/O cables.
If this equipment does cause interference to radio or television reception, you can try to correct the interference by using one or more of the following measures:
■ Turn the TV or radio antenna until the interference stops.
■ Move the equipment to one side or the other of the TV or radio.
■ Move the equipment farther away from the TV or radio.
- Plug the equipment into an outlet that is on a different circuit than the TV or radio. (That is, make certain the equipment and the radio or television set are on circuits controlled by different circuit breakers or fuses.)
■ Consider installing a rooftop television antenna with coaxial cable lead-in between the antenna and TV.
If necessary, consult your dealer service representative for additional suggestions.
The manufacturer is not responsible for any radio or TV interference caused by unauthorized modifications to this equipment. It is the responsibility of the users to correct such interference.
Connecting Your Monitor
Warning:
Be sure your Monitor and Computer are turned off before plugging any cables into them, and all electrical connections to your equipment must be grounded.
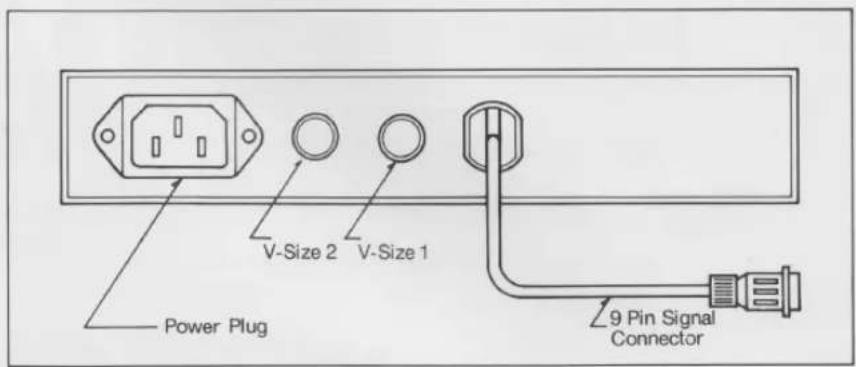
With the back of the Monitor facing you, you'll see the power plug, video cable, two control knobs and one hole.
REAR VIEW OF SYSTEM UNIT
text_image
V-Size 2 V-Size 1 Power Plug 9 Pin Signal ConnectorFollow these simple steps to install your Monitor
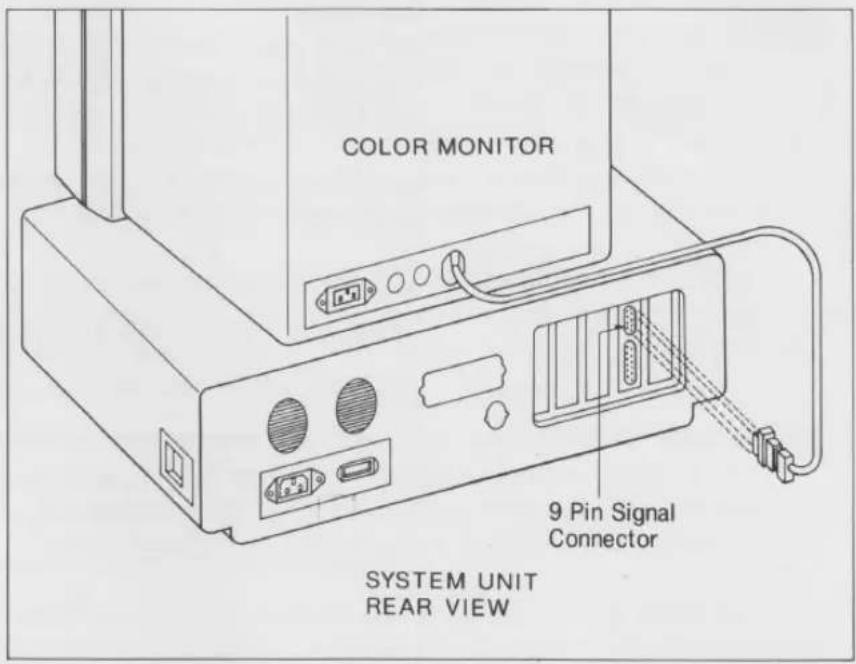
- Connect the signal cable from the Monitor to the computer.
This Monitor is RGB I/TTL signal mode.
■ Plug the end of the video cable firmly into the TTL-input connector on the back of the computer.
text_image
COLOR MONITOR 9 Pin Signal Connector SYSTEM UNIT REAR VIEW■ RGB I/TTL signal cable is included with your Monitor.
Controlling and Adjusting Your Monitor
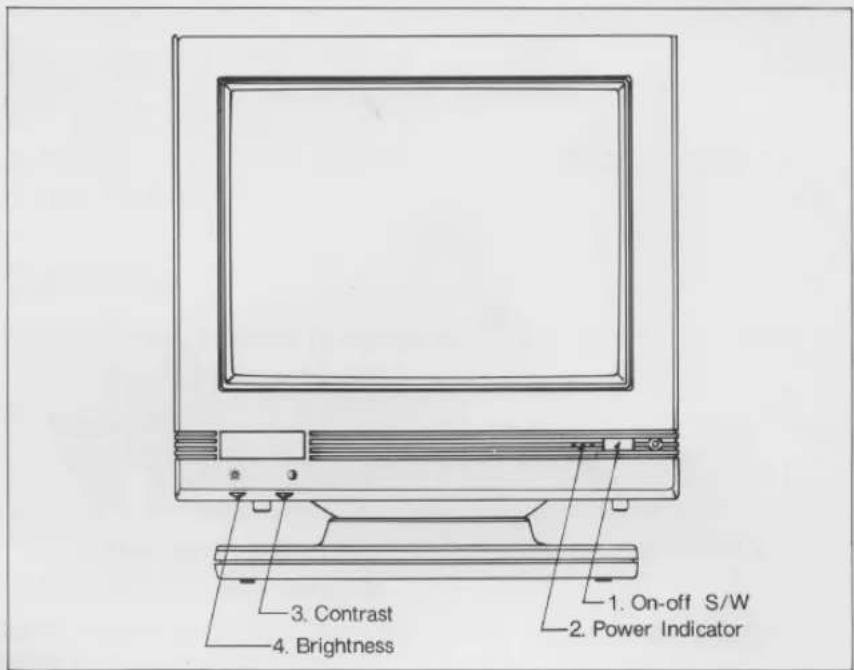
The design of this Monitor makes controlling the display and adjusting the screen easy.
FRONT VIEW
text_image
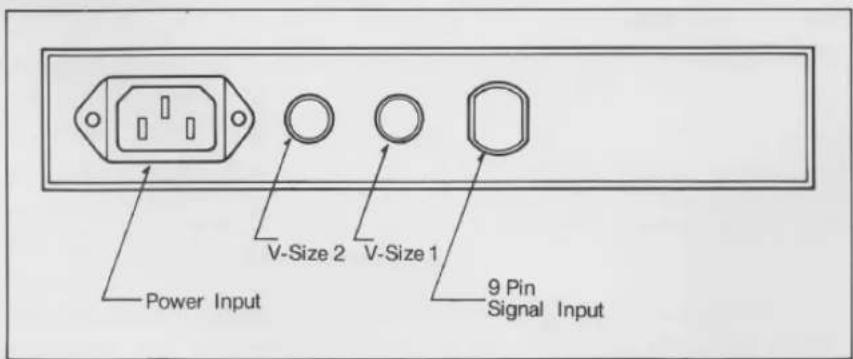
1. On-off S/W 2. Power Indicator 3. Contrast 4. BrightnessREAR VIEW
text_image
Power Input V-Size 2 V-Size 1 9 Pin Signal Input-
The On-Off Switch : The push-button on-off switch for the Monitor is in the lower right-hand corner. To turn the Monitor on push the button in. You will see the light of the power indicator. To turn the Monitor off, press the switch again. The power indicator will go out.
-
The Power Indicator : Green light.
-
The Contrast Control : Rotating it increases or decreases the degree of difference between the lightest and darkest sections on the screen.
-
Brightness Control : Intensifies screen illumination.
-
V-Size 1 Control : Adjusting screen height 1.
-
V-Size 2 Control : Adjusting screen height 2.
-
Connector Defined. A 9pin D-sub miniature connector is used as the SC-431E input signal connector. Pin assignments and numbers are depicted in the table and illustration below.
| PIN NUMBER | CONNECTION |
| 1 | Ground |
| 2 | Secondary Red |
| 3 | Primary Red |
| 4 | Primary Green |
| 5 | Primary Blue |
| 6 | Secondary Green/Intensity |
| 7 | Secondary Blue |
| 8 | Horizontal Sync |
| 9 | Vertical Sync |
Adjusting Contrast and Brightness
Contrast and brightness work together to provide optimum picture quality. Follow these steps to adjust them properly:
■ Load a program, and turn on both the computer and Monitor.
■ Turn the contrast control up as high as it will go.
■ Turn the brightness control clockwise until the background lines on the screen are clearly visible.
■ Turn the brightness control counterclockwise until the background lines just disappear.
■ Adjust the contrast control to give a pleasing level of text illumination.
Cautions
Your new Monitor is tough and can take some heavy knocks, but don't abuse it.
- Please don't place any spillables on the Monitor. Coffee, dust, or chicken soup can ruin the Monitor.
- Your new Monitor's vents are recessed to help prevent moisture from getting inside. But still, a spill could damage internal circuits.
■ Do not block the ventilation slots on the rear cabinet.
■ Do not place in direct sunlight or near heat souses.
■ To prevent shock hazard, do not remove back cover. A high voltage of 24KV is generated inside the unit.
■ Do not use this Monitor in locations subject to hazardous gases.
■ When wiping the cabinet, use a soft polishing cloth.
■ Do not use benzene or paint thinner for cleaning the set, for they may stain the cabinet.
■ Before moving your Monitor, be sure to unplug the video cable from the Monitor and the power cable from
the wall. When lifting and carrying, use the special hand recess at the top of the cabinet.
■ The screen of the Monitor is quite rugged. But still, it's a good idea not to lay the Monitor face down, to avoid scratching it.
■ Like TV screens, Monitor screens attract dust because of static electricity, and built-up dust makes for uncomfortable viewing. An occasional wipe with a dry, lint-free cloth will help to keep your Monitor's screen clean.
■ Avoid smearing or smudging the screen with your fingers. The oil from your fingertips will make dust adhere to the screen.
■ Avoid eye fatigue.
Your Monitor's screen has an etched antiglare surface, which greatly reduces eye fatigue and makes reading easy, even when light reflects from its surface.
Whenever you look for any length of time into a light source such as a TV or computer Monitor, you may feel bleary-eyed. Though we have designed the screen to be comfortable for all users, you may still experience eye fatigue. If you find your eyes tiring, just look away from the screen and focus on objects at varying distances. By exercising your eye muscles in this way, you can avoid or relieve eye strain.
Specifications
■ CRT-TYPE : 13" (33cm) 90Deg. In-Line. Etched for non-glare
■ Power Consumption: 1.2A Max.
75W typical
■ Input Signal : R.G.B.I/TTL LEVEL
■ Band Width(Approx.): 18 MHz
■ Sync. Signal : Horizontal: 15.75 KHz and 21.8 KHz
adjusts automatically
Vertical : 60 Hz
■ Display Size : 250(W) x 170(H) ± 5mm
■ Display Time : 21.8 KHz Mode
Horizontal : 39.9 μsec
Vertical : 16.0 m sec
15.75 KHz Mode
Horizontal : 44.3 μsec
Vertical : 12.6 msec
■ Retrace Time : Horizontal : 6.5 μsec Max.
Vertical : 0.5 msec Max.
■ Resolution : Horizontal : up to 640 Dots
■ (Non-interlaced) : Vertical : up to 200 Lines(15.75 KHz Mode)
: up to 350 Lines(21.8 KHz Mode)
■ Misconvergence : Center : 0.4 mm max.
Corner : 0.6 mm max.
■ Display Colors : 64 Colors (21.8 KHz Mode)
16 Colors (15.75 KHz Mode)
■ Recommended Number : up to 2000 Characters(80CH/Line x 25Lines)
■ Of Characters to Display : 8 x 14at 21.8KHz: 8 x 8at 15.75KHz Character Matrix
■ Dot Pitch : 0.31mm
■ External Demensions (mm)
| Without stand | With stand | |
| Width | 357 | 357 |
| Height | 345 | 393 |
| Length | 400 | 400 |
■ Weight : Net Weight : 14.8kg Gross Weight: 17.1kg
text_image
Assembly Drawing CONTRAST BRITT CONTRAST PANDB SIDE PLATCE BEET SHIP SHIPS PCB BEET CHASSIO BACK CHASSIO BEAT HOUSING BACK PLATE MAIN PCB FRONT BEZEL COT BOTTOM CHASSIS POWER LAGS POWER LAGS LED POWER LAGS POWER LAGS SIDE PLATCE - 0.1 SIDE PLATCE - 0.2 STAND BASE - TOP STAND BASE - BOTTOMSAMTRON
SEOUL HEAD OFFICE
11TH FL, DAE KYUNG BLDG