Video Xpress - Uncategorized DgFlick - Free user manual and instructions
Find the device manual for free Video Xpress DgFlick in PDF.


User questions about Video Xpress DgFlick
0 question about this device. Answer the ones you know or ask your own.
Ask a new question about this device
Download the instructions for your Uncategorized in PDF format for free! Find your manual Video Xpress - DgFlick and take your electronic device back in hand. On this page are published all the documents necessary for the use of your device. Video Xpress by DgFlick.
USER MANUAL Video Xpress DgFlick
text_image
Video xpress
USER MANUAL 4.0
DgFlick Soluons Pvt. Ltd.,
203/204,
Shreeji Arcade,
M. G. Road,
Borivali (E),
Mumbai-400066
Telephone: India +91 22 2968 68 68,
US +1-732-543-7676.
www.dgick.com,
support@dgick.com

text_image
Video xpressAdd Life to Photos
USER MANUAL 4.0
Introducon 3
System Requirements 3
Opening the Tool Box – Geng Started .... 3
Geng Into the Job – Using the Soware 8
Animaons and Eects 18
Adding or Eding Decors.... 22
Building the Framework – Page Composition.... 29
Fine Tuning - Photo Eding.... 32
Job's Done! – Saving and Generating Video Creaon 37
Open Saved Project.... 38
Troubleshoot 38
Support 39
Table of Index.... 39
www.dgick.com
India +91 22 2968 68 68,
support@dgick.com
US +1-732-543-7676.
Hello
Video Xpress is featured soware provides you the facility of making video of Album project designed in Album Xpress. Almost every individual object on the page is automatically animated by the soware. It's loaded with large number of transions, eects; set of decors to edit previously designed Album. Video Xpress can be used for complete new creation of Album and the video too.
Photo book designed in Book Xpress can also be animated using Video Xpress. You have full control over the entry, stay and exit of the objects on the page. It isn't necessary to bring album or photo book, you can also choose only photos and make a stunning video by decorang video with set of decors.
Video Xpress User Manual
Table of Contents
Introducon 3
System Requirements....3
Opening the Tool Box – Geng Started .... 3
Registraon 3
Online Registraon....3
Oine Registraon....4
Know Your Soware....5
General Features 5
Controls and Navigaon 5
Shortcut Tools....6
Preferences....8
Geng Into the Job – Using the Soware 8
Predened Video Types 8
Making the Video 9
Making Video of Photos 9
Making Video of Album Pages....13
Making Video of Photo Book....16
Animaons and Eects.... 18
Animaon tab....18
'Entrance' tab 19
'Exit' tab....20
'Songs' tab 22
Adding or Eding Decors 22
Building the Framework – Page Composition 29
Basic Page and Photos....29
Advanced Page and Photos....31
Fine Tuning - Photo Eding 32
Basic Filters....32
Other Icons on Edit Photo window 36
Job's Done! – Saving and Generang Video Creaon 37
Saving the Video Creaon 37
Generang the Video in Dierent Formats....37
Open Saved Project 38
Troubleshoot....38
Support 39
Table of Index 39
Introducon
Congratulaons on buying Video Xpress! This Manual will guide you on how to use this soware eecvely.
System Requirements
Windows System
➢ Penum 4, 2.8 GHz Processor and above
1 GB RAM
1 GB free disk space
CD/DVD-ROM drive
Microso Windows XP (service pack 2)/ Microso Windows 7 / Microso Windows 8
Opening the Tool Box – Geng Started
This secon deals with online and ofine registraon process and other tools like shortcuts, preferences and help.
Registraon
Once you have installed the Video Xpress soware on your computer, you need to proceed to Registraon. This ensures that all features of the soware are made available to you. Registraon is very easy and the user-friendliness of the soware makes the process quick and simple.
The Process
On installaon of Video Xpress, the Registraon Window appears on your screen. Relevant details such as the Owner's name, Address, City, Country, State, Zip/Pin, Email and Phone or Mobile Number need to be entered; some elds are mandatory (marked by an asterisk *). Fill in the details and proceed as per the instrucons in this secon.
The soware enables you to complete the registraon process while you are connected to the Internet and also while you are oine. It also allows you to register at a later date.
Online Registraon
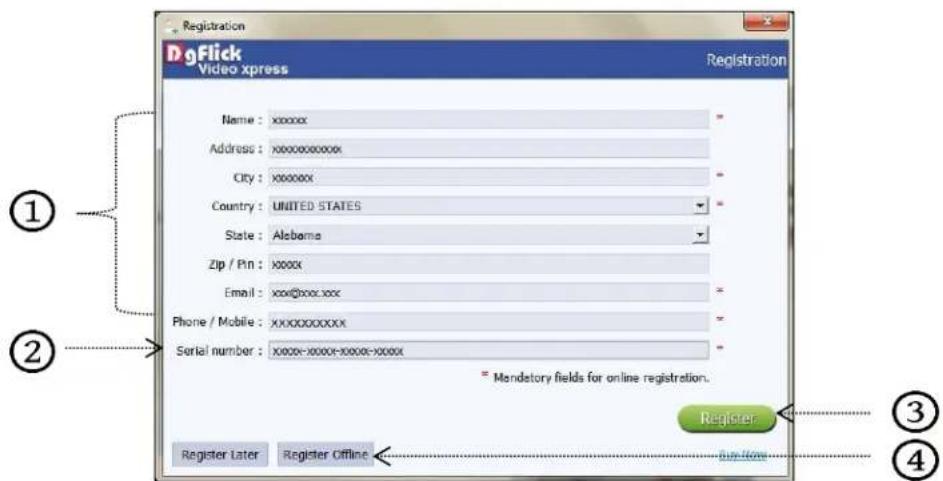
The screen that you rst see on starng the registraon process needs to be completed as a rst step. Here is how:
text_image
Registration DgFlick Video xpress Registration Name: xxxxxx Address: xxxxxxxxxxxxxx City: xxxxxxxxxx Country: UNITED STATES State: Alabama Zip / Pin: xxxxx Email: xxx@box.xxxx Phone / Mobile: xxxxxxxxxxxxxx Serial number: xxxxx-xxxxxxxxxx-xxxxx-xxxxxx = Mandatory fields for online registration. Register Later Register Offline Buy Now ① ② ③ ④'Registraon' Window
Enter your details in the relevant elds. These are Name, Address, City, Country, State, Zip/Pin, Email and Phone or Mobile number.①
Fields marked with an asterisk (*) are mandatory and cannot be le incomplete.
In the last eld- Serial Number (XXXXX-XXXXX-XXXXX-XXXXX) will be automatically generated in the serial number text box. You will also nd the serial number inside the soware box pack.
Aer ensuring that all the elds are lled correctly, click on 'Register' in the lower right-hand corner.
The message conrming compleon of the registraon process appears on the screen.
You are now registered and can use the soware.
Oine Registraon
If you do not have Internet access on your computer, you can proceed as follow
Enter your details in the relevant elds. These are Name, Address, City, Country, State, Zip/Pin, Email and Phone or Mobile number①
Fields marked with an asterisk (*) are mandatory and cannot be le incomplete.
In the last eld- Serial Number (XXXXX-XXXXX-XXXXX-XXXXX) will be automatically generated in the serial number text box. You will also nd the serial number inside the soware box pack.
Aer ensuring that all the elds are lled correctly, click on 'Register Ofine' at the lower le-hand corner of the page, aer which you move on to the next page.
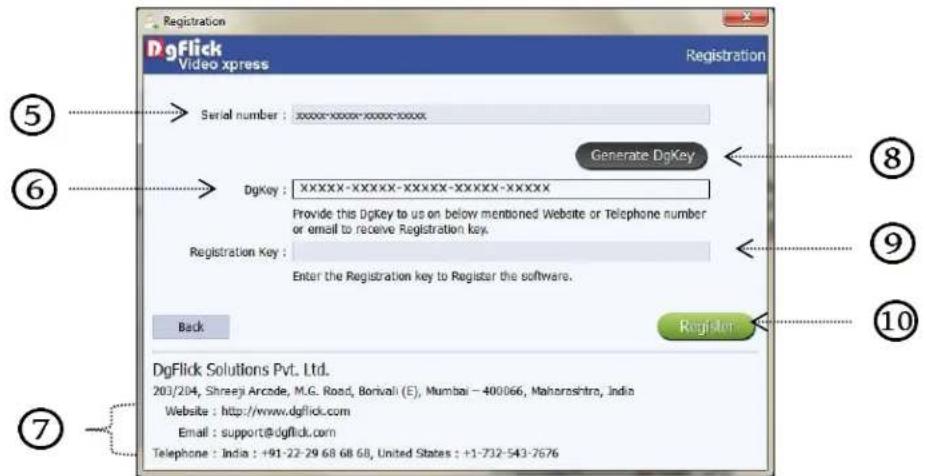
The next page has boxes for 'Serial number', 'DgKey' and 'Registraon Key'.
If the serial number (XXXXX-XXXXX-XXXXX-XXXXX) is not already there in the serial number text box, ⑤ then enter the number provided by the vendor on purchasing the pack or alternatively, found on the soware box pack.
text_image
Registration DgFlick Video xpress Registration Serial number : xxxxx-xxxx-xxxx-xxxx Generate DgKey DgKey : XXXXX-XXXXX-XXXXX-XXXXX-XXXXX Provide this DgKey to us on below mentioned Website or Telephone number or email to receive Registration key. Registration Key : Enter the Registration key to Register the software. Back Register DgFlick Solutions Pvt. Ltd. 203/204, Shreagi Arcade, M.G. Road, Bonivali (E), Mumbai - 400066, Maharashtra, India Website : http://www.dgflick.com Email : support@dgflick.com Telephone : India : +91-22-29 68 68 68, United States : +1-732-543-7676Oine Registraon
Click on the 'Generate DgKey' button ⑧ below the serial number text box.
The DgKey appears on the screen in the appropriate text box. ⑥
➢ Next, a registraon key is required to complete the process. There are three ways of obtaining this key: ⑦
Telephone: Call +91 22 2968 68 68 and the support execuve will provide you with the registraon key corresponding to your DgKey.
○ Email: Email us at support@dgick.com to receive your registraon key via Email.
- Web: Log on to www.dgick.com to receive the key.
Once you have your registraon key, enter it in the corresponding text box ⑨
Click on 'Register' ⑩ to acvate the soware.
Note: To get a feel of Video Xpress, You can download the soware from our website www.dgick.com and use as Trial. OR
Click on the 'Buy Now' buon to buy the complete version of Video Xpress.
Some of the features may not be available in trial version.
Note: If you are an exisng user, ll in details such as your email id and password. The registraon key is generated for your use.
Know Your Soware
This secon gives you a basic understanding of Video Xpress before you actually start working on the soware. Running through this secon will enhance your understanding of the opons available and will help you to make opmal use of the soware.
General Features
Video Xpress comes with several features, which are discussed in this secon:
Online Cropping: The online photo crop feature allows you to trim out any part of the source photo that you don't need. You can crop the photo to give it the desired height and width before incorporating it in your design.
In-built Standard eects: Video Xpress provides you the opon of deciding the eect from several in-built eects.
Mullingual: Video Xpress supports Unicode. DgFlick keeps adding to its list of languages that Video Xpress works on. You could download the latest dictionary, which may include the language you are looking for. Else, you could add the language of your choice to DgFlick's dictionary for your own use.
➢ Interactive User Interface: Navigaon through the soware is simplified by user-friendly controls and virtually no training is required before use. Moreover, all control panels are dock able and expandable and can be moved to the posion of your choice.
Controls and Navigaon

Preferences

Help

Go to the Home page

Select path for browsing

Adjust thumbnail size

Photo is locked

Photo is unlocked and can be
modied

Zoom in

Zoom out

Photo is not of very good quality but can be used

Photo is of bad quality but can sill be used

Photo is unt for use

Lock/unlock objects

Arrange objects

Page-based alignment

Object-based alignment

Equal spacing between objects

Equal size photos

Rotate photo
Edit photo

Undo edit

Redo edit

Fit to screen

Actual size

Save the work

Save a copy of the changes

Load original image

Reset all

Helps you to go back to the
previous page

Helps you to go to the next page
Rotate in 90°, 180° and 270°

Rotate Clockwise 90 ^0

Rotate Clockwise 270°

Flip horizontally

Flip vercally

Color Picker

Swap photo

Panning

Entrance Eect

Exit Eect

Generate Video
Shortcut Tools
| Video Xpress - Shortcut Keys | ||
| Object Type | Acons | Windows |
| All | Move – Le | Le Arrow key |
| Move – Right | Right Arrow key | |
| Move – Top | Top Arrow key | |
| Move – Boom | Boom Arrow key | |
| Move – Le + Snap | CTRL + Le Arrow key | |
| Move – Right + Snap | CTRL + Right Arrow key | |
| Move – Top + Snap | CTRL + Top Arrow key | |
| Move – Boom + Snap | CTRL + Boom Arrow key | |
| Photo | Crop – Zoom In | ALT + '+' |
| Crop – Zoom Out | ALT + '-' | |
| Crop – Le Pan | ALT + Le Arrow key | |
| Crop – Right Pan | ALT + Right Arrow key | |
| Crop – Top Pan | ALT + Top Arrow key | |
| Crop – Boom Pan | ALT + Boom Arrow key | |
| All | Rotate X Increase | ALT + X |
| Rotate X Decrease | ALT + CTRL + X | |
| Rotate Y Increase | ALT + Y | |
| Rotate Y Decrease | ALT + CTRL + Y | |
| Rotate Z Increase | ALT + Z | |
| Rotate Z Decrease | ALT + CTRL + Z | |
| All | Arrange Object – Bring To Front | SHIFT + Top Arrow Key |
| Arrange Object – Bring Forward | SHIFT + Right Arrow key | |
| Arrange Object – Send to Back | SHIFT + Boom Arrow key | |
| Arrange Object – Send Backward | SHIFT + Le Arrow key | |
| All | Align Page based – Top Le | CTRL + 7 |
| Align Page based – Top Center | CTRL + 8 | |
| Align Page based – Top Right | CTRL + 9 | |
| Align Page based – Center Le | CTRL + 4 | |
| Align Page based – Center | CTRL + 5 | |
| Align Page based – Center Right | CTRL + 6 | |
| Align Page based – Boom Le | CTRL + 1 | |
| Align Page based – Boom Center | CTRL + 2 | |
| Align Page based – Boom Right | CTRL + 3 | |
| Align Page based – Top | CTRL + T | |
| Align Page based – Boom | CTRL + B | |
| Align Page based – Le | CTRL + L | |
| Align Page based – Right | CTRL + R | |
| All | Equal Spacing Horizontally | CTRL + SHIFT + H |
| Equal Spacing Vercally | CTRL + SHIFT + V | |
| All | Align Object based – Top Le | CTRL + SHIFT + 7 |
| Align Object based – Top Center | CTRL + SHIFT + 8 | |
| Align Object based – Top Right | CTRL + SHIFT + 9 | |
| Align Object based – Center Le | CTRL + SHIFT + 4 | |
| Align Object based – Center | CTRL + SHIFT + 5 | |
| Align Object based – Center Right | CTRL + SHIFT + 6 | |
| Align Object based – Boom Le | CTRL + SHIFT + 1 | |
| Align Object based – Boom Center | CTRL + SHIFT + 2 | |
| Align Object based – Boom Right | CTRL + SHIFT + 3 | |
| Align Object based – Top | CTRL + SHIFT + T | |
| Align Object based – Boom | CTRL + SHIFT + B | |
| Align Object based – Le | CTRL + SHIFT + L | |
| Align Object based – Right | CTRL + SHIFT + R | |
| Page | Flip Page composition Horizontally | ALT + H |
| Flip Page composition Vercally | ALT + V | |
| All | Move Selecon to Next Object | TAB |
| Move Selecon to Previous Object | SHIFT + TAB | |
| Add Next Object to current Selecon | CTRL + TAB | |
| Add Previous Object to current Selecon | CTRL + SHIFT + TAB | |
| All | Select All Objects on page | CTRL + A |
| Cut Object(s) | CTRL + X | |
| Copy Object(s) | CTRL + C | |
| Paste Object(s) | CTRL + V | |
| Delete Object(s) | DEL | |
| Undo Object(s) | CTRL + Z | |
| Redo Object(s) | CTRL + Y | |
| Show Photo Informaon | CTRL + SHIFT + I | |
| View | Fit to Screen | CTRL + F12 |
| Actual Size (1:1) | CTRL + SHIFT + F12 | |
| Zoom In | + | |
| Zoom Out | - | |
Preferences
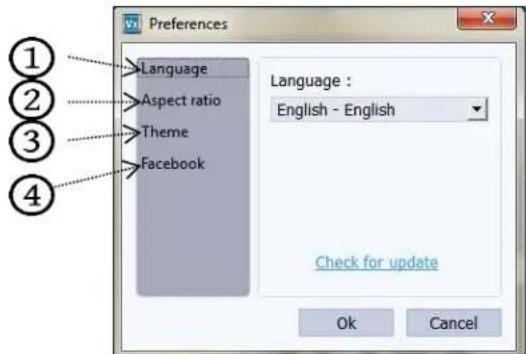
Video Xpress allows you great exibility in usages while working on it. You could
Change to the language of your choice.
Select the aspect rao for the video.
Select the desired Theme for your soware.
Choose your Facebook history storage opons.
Aer installaon, click on the Video Xpress shortcut icon in your specied path to start the soware.
text_image
Preferences Language Aspect ratio Theme Facebook Language : English - English Check for update Ok Cancel'Preferences' Window
Click on 'Preferences' icon on the top right side of the screen to see the available opons in the window.
Choose your preferred language from various available languages from 'Language' tab①, click on 'Check for Updates' to check the updated list of languages.
Decide the aspect rao of the video from 'Aspect Rao' tab ②ou have the opons of 16: 9 and 4: 3 to generate the video.
Select the color in which you want your soware to be displayed from 'Theme' tab ③click on 'Get More' to get more themes from Dgick website.
The history which was generated at the me of imporng photos from Facebook will be deleted by clicking on the 'Clear History Everyme' checkbox from Facebook opon. ④ OR
If you want to work of fine and want to access the photos from Facebook in future which are already accessed then keep the 'Clear History Everyme' checkbox unchecked.
Clicking on 'OK' will accept your choices but you might need to restart your soware for the changes to take eect. Click on 'OK' when the following dialog box appears:
Save your changes by clicking on 'Ok'. You might need to restart your software for the changes to take eect.
Click on 'Help' to get the help menu. This has a complete list of shortcut keys that you will nd useful while using the soware (Refer Secon Shortcut tools).
Geng Into the Job – Using the Soware
In previous secon we learnt about soware funconality. Now in this secon we will learn how to use this soware to take output. We will see various available ways to create videos.
Predened Video Types
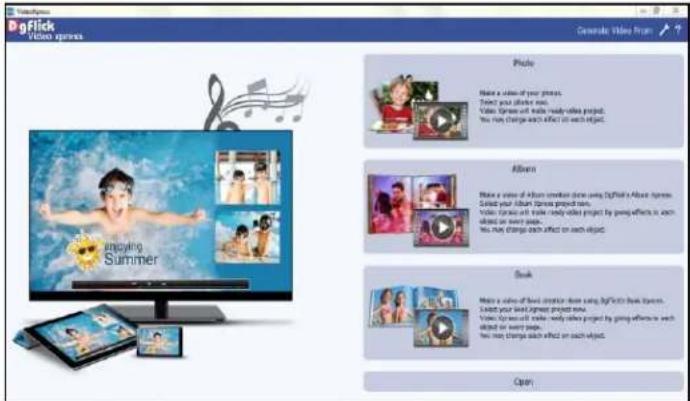
You can generate video of Album, Photo Book and Photos in Video Xpress.
➢ Photo: You can bring in the photos and make a video of those photos very easily. Video Xpress will make a ready project for you. You can change effects individually and can also give new effects in the video.
text_image
DgFlick Video app Imputing Summer Create Video From Photo Make a video of your photos. Select your affinity news. Video frames with make ready video projects. You may change each effect on each project. Album Make a video of Album creation done using DogClick's Album frames. Select your affinity projects news. Video frames with make ready video projects by young officers to reach address on every page. You may change each effect on each project. Book Make a video of book creation done using DogClick's Book frames. Select your affinity project news. Video frames with make ready video projects by young officers to reach address on every page. You may change each effect on each project. Open'Home' window .... Video Xpress
Album: You can bring in the album project designed in Album Xpress and create a video of the album with individual eects to clipart, background and photos.
Book: You can bring in the Book project designed in Book Xpress and create a video of the photo book project with individual eects to each background and photo.
Making the Video
Once you have a basic understanding of the soware, it's me to move on to the actual process of video creation.
Making Video of Photos
You can create a video of the photos. Video Xpress allows you to make a video of photos with eects. You can insert background, photos, cliparts and much more.
The Process
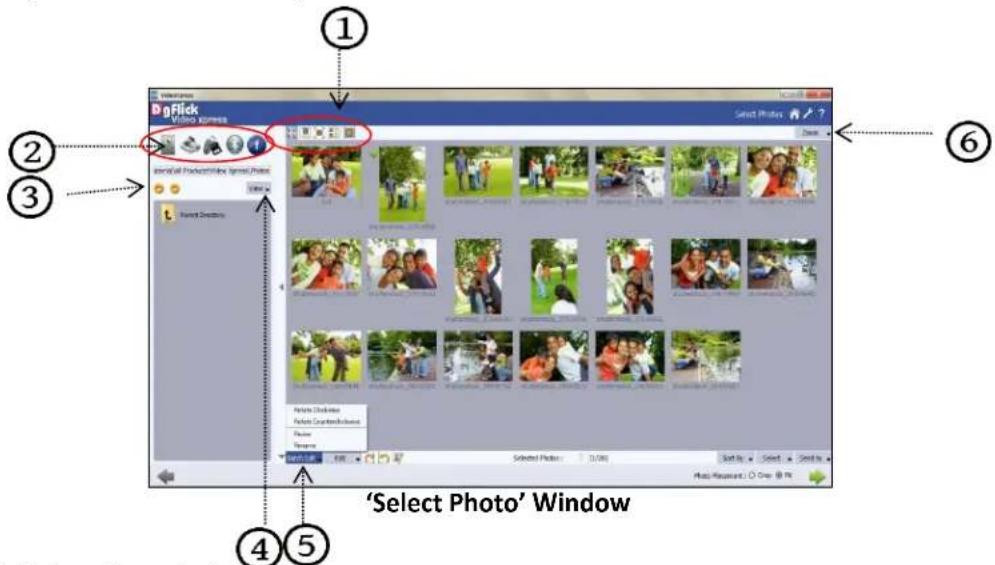
On the 'Home' window of the Video Xpress, you will nd three opons for creang videos i.e. Photo, Album and Book. If you want to make a video of the photos, click on 'Photo' opon. You will be redirected to the 'Select Photo' window where you have to choose the photos for the video.
text_image
1 2 3 4 5 Select Photo' Window Select Photos Select Photo Photo Channels Photo Channels Photo Channels Photo Channels Photo Channels Photo Channels Photo Channels Photo Channels Photo Channels Photo Channels Photo Channels Photo Channels Photo Channels Photo Channels Photo Channels Photo Channels Photo Channels Photo Channels Photo Channels Photo Channels Photo Channels Photo Channels Photo Channels Photo Channels Photo Channels Photo Channels Photo Channels Photo Channels Photo Channels Photo Channels Photo Channels Photo Channels Photo Channels Photo ChannelsNow you are in 'Select Photos' window.
On the 'Select Photos' window, you have the opon of selecng the photos from

Hard disk CD/DVD USB Bluetooth Facebook
Select any of the media where the photos have been saved.
➢ Go forward or backward from here ③
View your folders in list or icon style from here④.
This buon ⑥ on the top right corner of the Window to zoom in/out the photos.
The top opon bar helps you to view the photos in different ways
○ Thumbnail style.
To get a full view of the photo.
○ Filmstrip view.
- Get the photos list wise.
○ Navigate the photos from
○ Starts the slide show
'Batch Edit' buon ⑤ at the lower opon bar helps you to edit mulple photos at a me.
Select the photos to be edited and click on 'Batch Edit'.
Here you can rotate, color correct, resize and rename your mulple photos.
Select "Rotate Clockwise" or "Rotate Counterclockwise" to rotate the photos.
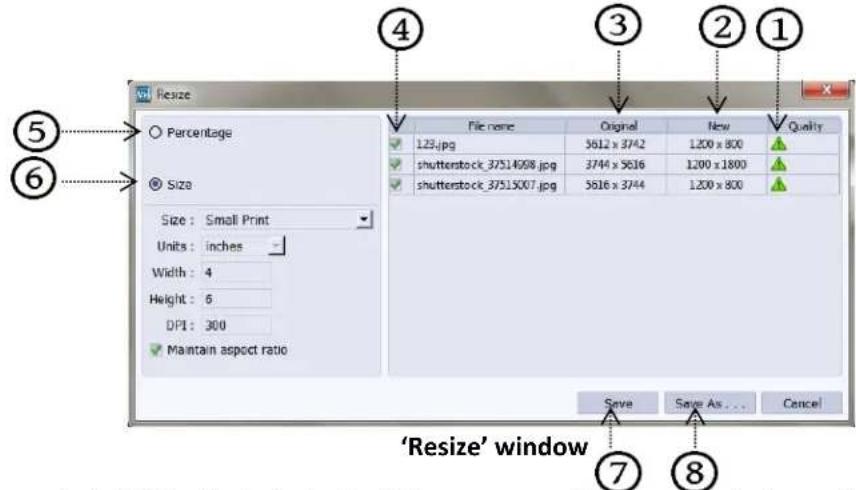
Select 'Resize' opon to change the size of the photos.
Check the green checkbox ④ of the photos to be resized and select the desired percentage from 'Percentage' ⑤ tab if you want to resize the photos percentage wise.
From the 'Original' ③ and 'New' ② tab you can see the changes applied. The 'Quality' tab ① indicates the quality of the photo. The quality of photos used here must be good to ensure clarity in the nal product.
text_image
Resize Percentage Size Size : Small Print Units : inches Width : 4 Height : 6 DP1 : 300 Maintain aspect ratio File name Original New Quality 125.jpg 5612 x 3742 1,200 x 800 shutterstock_37514908.jpg 3744 x 5616 1,200 x 1800 shutterstock_37515007.jpg 5616 x 3744 1,200 x 800 Save Save As... Cancel ④ ③ ② ① ⑤ ⑥ ⑦ ⑧ 'Resize' windowVideo Xpress has an in-built 'Quality Indicator', which warns you whenever the photo quality goes below the required standards.
➢ Go to 'Size'⑥ tab if you want to resize the photos size wise.
Select the custom opon from size tab if you want to give your customized size to the photo.
Aer resizing the photo click on 'Save' ⑦ to overwrite the changes over the exisng photos.
➢ Clicking on 'Save as' ⑧ will save the changes done on the photo with a dierent name.
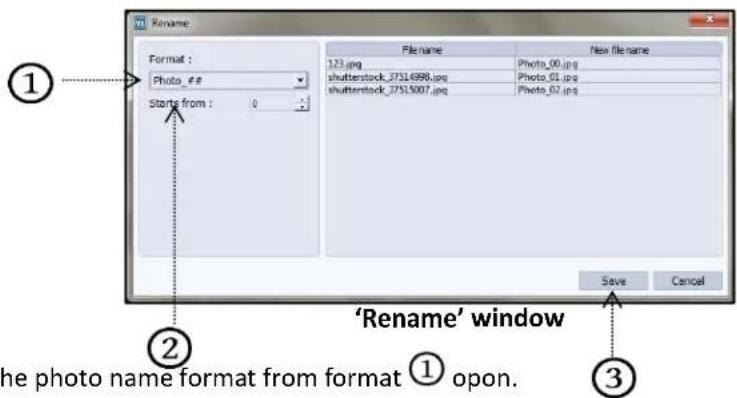
Select the 'Rename' upon to rename the photos.
text_image
Rename Format : Photo_## Starts from : 0 123.jpg shutterstock_37516998.jpg shutterstock_37515007.jpg New filename Photo_00.jpg Photo_01.jpg Photo_02.jpg Save Cancel ① ② ③ 'Rename' window the photo name format from format ① opon.Manually change the photo name format from format ① opon. OR
From 'Starts From' opon ② you can change the count of the photos.
Click on 'Save' ③ to save the changes made.
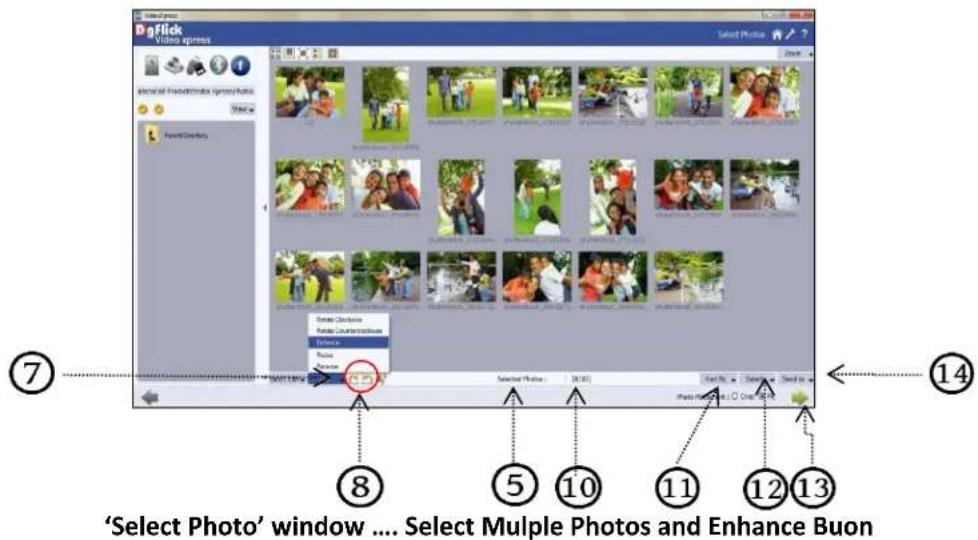
From 'Edit' button ⑦ you can rotate, resize, rename and enhance your individual photos.
text_image
DogClick Video Express Select Photo ⑦ ⑧ ⑤ ⑩ ⑪ ⑫ ⑬ ⑬ ⑭ ⑬ ⑭ ⑮ ⑰ ⑱ ⑲ ⑳ ⑰ ⑱ ⑲ ⑳ ⑯ ⑰ ⑱ ⑲ ⑳ ⑯ ⑱ ⑲ ⑳ ⑯ ⑱ ⑲ ⑳ ⑯ ⑱ ⑲ ⑳ ⑯ ⑱ ⑲ ⑳ ⑯ ⑱ ⑲ ⑳ ⑯ ⑱ ⑲ ⑳ ⑯ ⑱ ⑲ ⑳ ⑯ ⑱ ⑲ ⑳ ⑯ ⑱Select the photo to be edited and click on "Enhance" upon to color correct the photo.
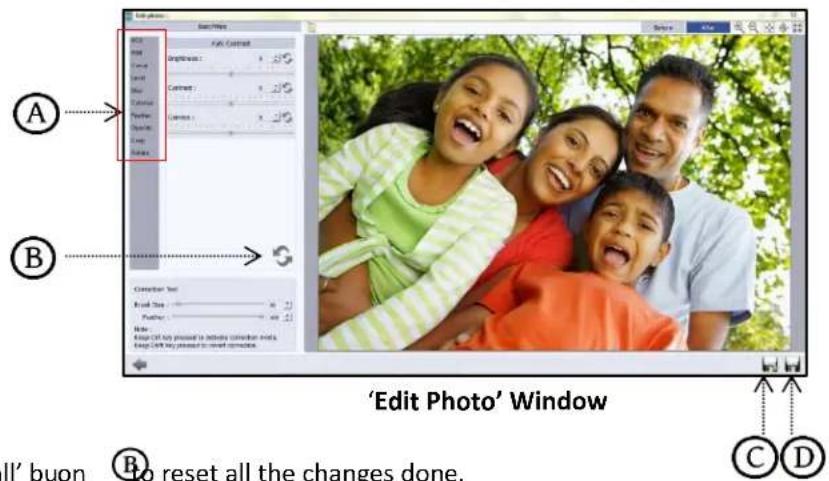
On the 'Edit Photo' Window, you will nd dierent types 'Basic Filters' like 'BCG', 'RGB', 'Curve', 'Level', 'Blur', 'Colorize', 'Feather', 'Opacity', 'Crop' and 'Rotate'.
text_image
Edit photo A B C D 'Edit Photo' Window All' buon B to reset all the changes done. Close: 100%Click on 'Reset all' buon ☑ to reset all the changes done.
Click on 'Save' Ⓓ to save all the changes made.
- Clicking on 'Save Copy' © will create a folder for original image and will save the changes made on the copy of the image, without aecng the original image.
In 'Select Photo' window, you can rotate the photos clockwise or anclockwise in a single click with these 'Rotate' icons.⑧
You can edit photo easily with this 'Edit photo' opon
'Selected Photos' ⑨ shows number of photos selected.
⑩ Here it indicates the posion of highlighted photo.
Sort the photos in various ways from 'Sort By' buon ⑪
Select individual, mulple or all photos or deselect selected photos with this 'Select' button ⑫
Send your edited photos to your Facebook account or any hard disk folder from 'Send to' opon 14
You can either crop or t the selected photos onto the page from 'Crop' and 'Fit' opon available at the boom right corner of the window.
Select the photos for the video and move on to the next process with 'Next' buon ⑬
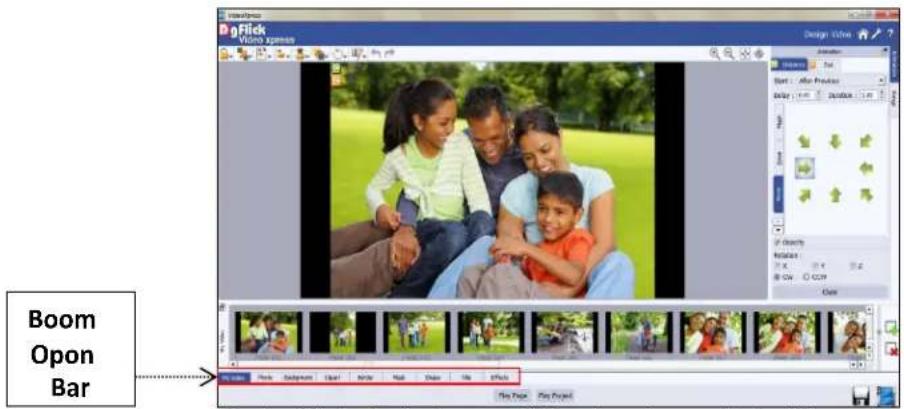
In the 'Design Video' window, you can view the Video ready with the selected photos and Eects. You can also make any changes if required with the help of various tabs available.
You can nd various tabs in Boom Opon Bar. (For details refer secon Adding or Eding Decors)
'Photo' tab allows you to insert more photos on the page and give them various effects.
From 'Background' tab, you can add background on the video slide.
➢ Decorate the video more by adding cliparts on the page from 'Clipart' tab.
text_image
Boom Opon Bar'Design Video' window .... Video is auto created with eects
Highlight photos by applying borders from 'Border' tab.
Masking effects can be given to the objects on the page from the 'Mask' tab.
You can elaborate some thoughts about photos and event by adding tle on the page.
Video Xpress provides you various ready presets of eects like Colorize, Blur, Opacity, Feather, Shadow, Glow, Outline, Rotaon, Presets and Blend in 'Effects' tab. You can apply any of them by double clicking on required preset.
You can also apply various animaons and effects to the objects on the page from 'Animaon' tab located at the right side of the window. (for more details refer secon Animaons and eects)
Add song to the background of the video from the 'Songs' tab located at the right side of the window. (for more details refer secon Animaons and eects)
The 'Play Page' opon helps you to play the page.
The 'Play Project' buon helps you to view the whole project with the given effects.
My Video
As you design one slide aer the other, you can view the video slide wise on My Video tab.
You can alter the number of slides in the Video by clicking on 'Add' and 'Delete' buons available in 'My Video' tab.
When you choose to reduce the number of slides, a textbox for conrmaon of deleon of slides from the end appears.
- Clicking on 'Yes' will let you proceed as desired.
In this way the video is ready to save and generate.
Making Video of Album Pages
Apart from photos, you can create a video of the Album project too. The album designed in Album Xpress soware can be brought into Video Xpress and eects can be given to the various objects on the page like photos, cliparts, background, etc.
If you want to create video of Album project, click on 'Album' opon on the home page on Video Xpress.
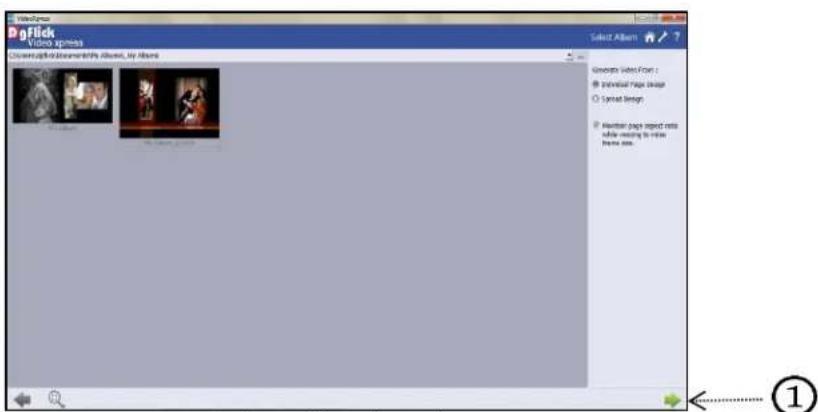
You will be redirected to the 'Select Album' window where you will be asked to select the album of which you want to create video.
From 'Browse' button, you can browse in your computer and give the path of the folder in which you have saved the album. All the albums in the given path will be displayed in 'Select Album' window.
text_image
DgClick Video spaces Downloaded documents by author, my authors Select Author Concepts Video Form : Individual Page Image Symbol Design Molecular Page impact meta while mapping to video theme image. ①'Select Album' window
On the 'Select Album' window you have some additional opons at the right side of the window through which you can set parameters for the video creation. They are as follow:
'Individual Page Design': If you select this opon, all the pages of the panoramic album will split into two and each page will appear as a separate page.
'Spread Design': If you select this opon, the pages will appear as they are designed in Album Xpress.
'Maintain Page Aspect Rao while resizing to Video Frame Size': If you want to maintain aspect rao while creang video, check this check box the album gets resized to the video size. Otherwise keep the checkbox o.
Select the desired album and move on to the next process with 'Next' buon ①
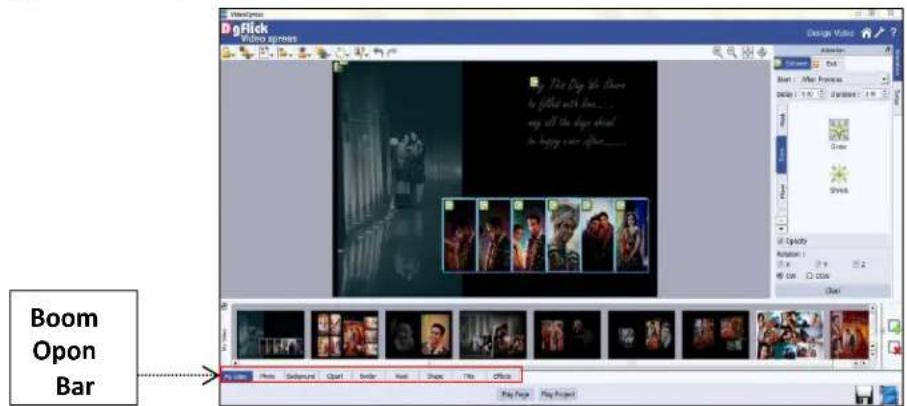
You will be redirected to the 'Design Video' window where you will see that your album is ready with the effects.
You can change these eects if you want. You can insert more photos, add or edit background, add clipart, etc.
The 'Play Page' opon helps you to play the page.
The 'Play Project' button helps you to view the whole video with the given effects.
The 'Animaon' panel is to give effects and adjust their mings.
There are various opons available in the animaon panel which helps you to give eects to the selected object on the page.
If you want to give any entrance eect to any object then rst select the object and then select the 'Entrance' opon and from the available opons select the desired eect.
Add song to the background of the video from the 'Songs' tab located at the right side of the window. (for more details refer secon Animaons and eects)
text_image
Boom Opon Bar'Design Video' window .... Video is auto created with eects
You can nd various tabs in Boom Opon Bar. (For details refer secon Adding or Eding Decors)
'Photo' tab allows you to insert more photos on the page and give them various effects.
From 'Background' tab, you can add background on the video slide.
Decorate the video more by adding cliparts on the page from 'Clipart' tab.
Highlight photos by applying borders from 'Border' tab.
Masking effects can be given to the objects on the page from the 'Mask' tab.
Add shapes on the page from 'Shape' tab. Let's see how to add a shape and give it an entrance and exit eect.
Shape
Click 'Shape' tab on the opon bar to select a shape you would like to add to decorate the page.
Double click on the shape or drag and drop onto the canvas.
You can align and resize the shape or rotate it using icon on the shape.
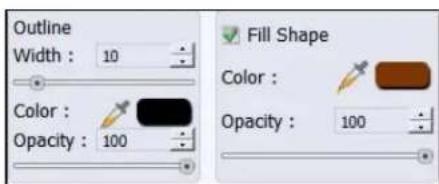
To customize the shape according to your taste, click on 'Customize' opon.
Aer clicking on 'Customize' opon, more opons will get visible. Use the sliders on the new window to modify the shape to suit your requirements.
Use the 'Color Picker' to pick any color from the screen for your shape.
text_image
Outline Width : 10 Color : Opacity : 100 Fill Shape Color : Opacity : 100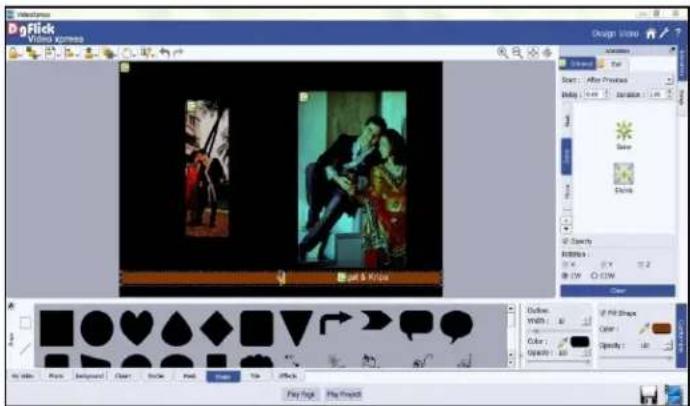
text_image
BigFlick ina Session Design Style Categories Show: After Preview Copy: View Insert Selection Paste Show Opacity Intensity OK COW Clear File Edit View Background Clean Stroke Help Window Help Play Print Play ProjectShape added from the 'Shape' tab and customized with the 'Customize' opon
You can elaborate some thoughts about photos and event by adding tle on the page.
Video Xpress provides you various ready presets of eects like Colorize, Blur, Opacity, Feather, Shadow, Glow, Outline, Rotaon, Presets and Blend in 'Effects' tab. You can apply any of them by double clicking on required preset.
Aer you add the shape into the design and customize it according to the need, you can give entrance and exit effect from 'Animaon' tab.
You can also manage duraon and delay from the 'Animaon' tab.
My Video
As you design one slide aer the other, you can view the video slide wise on My Video tab.
You can alter the number of slides in the Video by clicking on 'Add' and 'Delete' buons available in 'My Video' tab.
When you choose to reduce the number of slides, a textbox for conrmaon of deleon of slide from the end appears.
- Clicking on 'Yes' will let you proceed as desired.
In this way the video is ready to save.
Making Video of Photo Book
Apart from photos and Album, you can create a video of the photo Book project too. The book designed in Book Xpress soware can be brought into Video Xpress and eects can be given to the various objects on the page like photos, cliparts, background, etc.
If you want to create video of Photo Book project, click on 'Book' opon on the home page on Video Xpress.
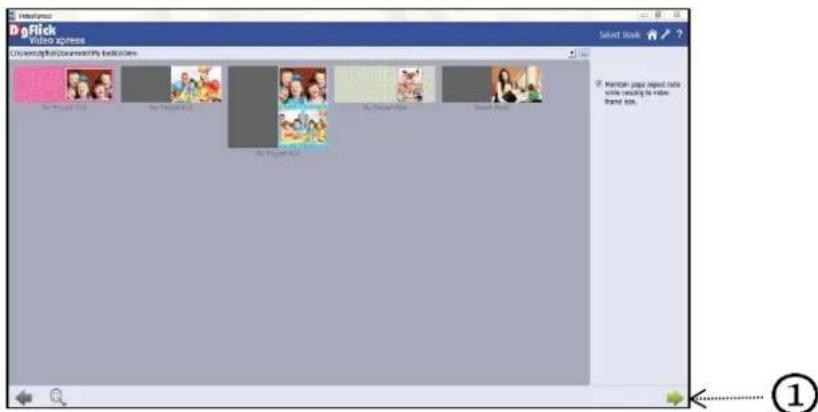
You will be redirected to the 'Select Book' window where you will be asked to select the book of which you want to create video.
From 'Browse' button, you can browse in your computer and give the path of the folder in which you have saved the book. All the books in the given path will be displayed in 'Select Book' window.
text_image
DogClick VIDEO ACTIVITY Chronic/field documentation by booklets Select Book Human popa impact rate while resulting to video frame rate. ①'Select Book' window
'Maintain Page Aspect Rao while resizing to Video Frame Size': If you want to maintain aspect rao while creang video, check this check box, the book gets resized to the video size. Otherwise keep the checkbox o.
Select the desired book and move on to the next process with 'Next' buon ①
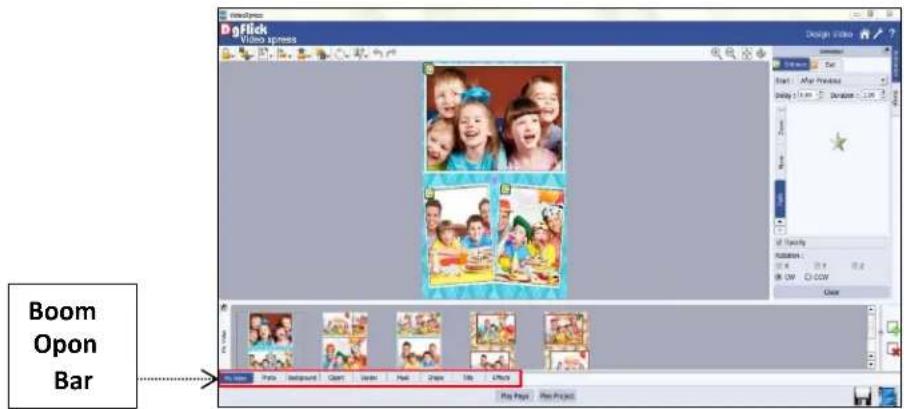
You will be redirected to the 'Design Video' window where you will see that your book is ready with the effects.
You can change these effects if you want. You can insert more photos, add or edit background, add clipart, etc.
The 'Animaon' panel is to give effects and adjust their mings.
There are various opons available in the animaon panel which helps you to give eects to the selected object on the page.
text_image
Boom Opon Bar'Design Video' window .... Video is auto created with eects
If you want to give any entrance eect to any object then rst select the object and then select the 'Entrance' opon and from the available opons select the desired eect.
Add song to the background of the video from the 'Songs' tab located at the right side of the window. (for more details refer secon Animaons and eects)
You can nd various tabs in Boom Opon Bar. (For details refer secon Adding or Eding Decors)
'Photo' tab allows you to insert more photos on the page and give them various eects.
From 'Background' tab, you can add background on the video slide.
Decorate the video more by adding cliparts on the page from 'Clipart' tab.
Highlight photos by applying borders from 'Border' tab.
Masking effects can be given to the objects on the page from the 'Mask' tab.
You can elaborate some thoughts about photos and event by adding tle on the page.
Video Xpress provides you various ready presets of effects like Colorize, Blur, Opacity, Feather, Shadow, Glow, Outline, Rotaon, Presets and Blend in 'Eects' tab. You can apply any of them by double clicking on required preset.
The 'Play Page' opon helps you to play the page.
The 'Play Project' button helps you to view the whole video with the given effects.
My Video
As you design one slide aer the other, you can view the video slide wise on My Video tab.
You can alter the number of slides in the Video by clicking on 'Add' and 'Delete' buttons available in 'My Video' tab.
When you choose to reduce the number of slides, a textbox for conrmaon of deleon of slide from the end appears.
- Clicking on 'Yes' will let you proceed as desired.
In this way the video is ready to save.
Animaons and Eects
All the objects on the page even background of the page can be animated. Add or edit existing eects on the page. This secon guides you about the animaon and eects procedure. In addition to eects, Video Xpress also provides you the facility of adding background music to the video.
Animaon tab
text_image
Animation Start : With Previous Delay : 1.00 Duration : 2.00 Invert Zoom Move Opacity Rotation : X CW CCW Clear'Animaon' tab .... 'Entrance' opons
'Entrance' tab
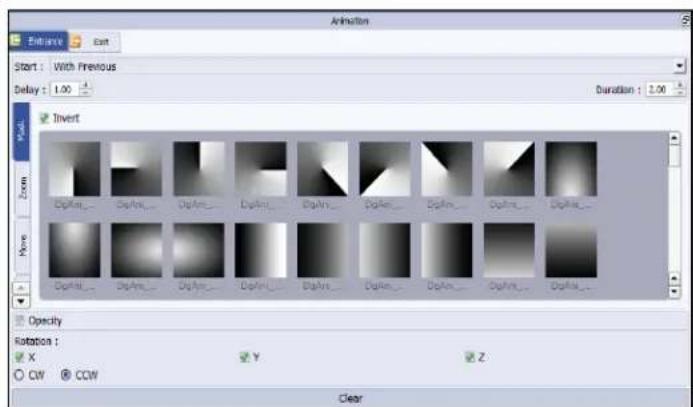
'Animaon' tab provides you various opons to give entrance effects to the various objects on the page.
Through this opon, you can provide not only effects but also you can dene duraon and delay for the video. There are various opons available in this 'Entrance' tab.
Let's see all of them one by one.
First opon is 'Start'. From start opon you can decide the starng point of the effect i.e. whether this eect should come with the previous eect or aer the previous eect. There are two opons given in the 'Start' opon. First is 'Aer Previous' in which the selected effect will take place aer the previous eect is played. Second available opon is 'With Previous' in which the eect is played while the previous eect is being played.
Next opon available is 'Delay'. This opon helps you to denote the delay
Next opon given is 'Duraon'. Through 'Duraon' option, you can dene the duraon of the eect on the object.
There are various ready eects given in the soware. You just need to select the object and click on the eect to see the preview of the eect on the object.
Once you click on any eect, it will be applied on the object.
There are various sub-opons available for various kinds of eects.
First type of eect is 'Mask'. In this opon, you can nd various masking effects for the entry of the selected object. You can click on the eect to apply it to the selected object.
In 'Mask' tab, you nd an additional opon of 'Invert'. If you select this opon, the masking eect you apply will be inverted and applied on the selected object.
Second tab in eects is 'Zoom'. You can give zooming eect to the selected object from this tab.
Two opons are available in this tab. One is 'Grow' in which the selected object grows up on the display.
Second is 'Shrink' in which the objects shrinks and appears on the page.
Next effects opon is 'Move'. In this opon various arrows are given and the selected object comes from the direcon shown in the arrow which you choose. There are various direcve arrows given in this tab like top le, top centre, top right, etc.
Choose the desired one and see the immediate preview.
The last eects tab is 'Fade'. If you give the 'Fade' effect to the object on the page, the object slowly appear on the page.
Apart from several eects, you can also manage the opacity of the objects. To give opacity eect to the selected object, check the opacity checkbox and then give eect.
You can manage the rotaon of the object from the rotaon tab. You can rotate the object in three perspectives i.e. X, Y and Z.
You can rotate objects in clockwise or anclockwise order.
If you do not want to give any effect to any object then select the object and click on 'Clear' buon available on the boom side of 'Animaon' tab.
When you apply any 'Entrance' eect on any object, a green box with an arrow in it appears on that object. It indicates that this object has an entrance eect.
To go to the selected eect, click on the green box and you will be able to see the selected eect in the 'Animaon' tab.
Note: If no object is selected and any eect is applied by you, then that eect will be applied on background of the page.
In this way you can give effect to the objects on the page, manage the duraons and make the video.
Give effects to all the pages of the video and see the preview of individual pages from 'Play Page' on.
To see the preview of the whole video, click on the 'Play Project' buon. You will see the preview of the whole video.
When you play the whole video, you can pause the Video with 'Pause' button.
You can also stop the video with the 'Stop' buon and restart it with the 'Play' buon.
You can remove all entrance effects on current page that too in a single click.
Right click on the page and from 'Entrance Animaon' opon, select the 'Reset all' opon.
All the entrance eects on the page will be removed.
Similarly, you can apply the same eect on all the objects on the page.
For that apply the eect on any of the object, then select the object and right click on the same, you will nd 'Entrance Animaon' opon. In that select 'Apply to all' and with 'Play page' opon see the preview.
'Exit' tab
From 'Exit' tab you can manage the exit effects of the objects. All the eects which are available in the 'Entrance' tab are also available in the 'Exit' tab. The only difference is these eects are applied on exit of the object.
text_image
Animation Enhance Exit Exit : After Previous Hold : 1.00 Duration : 2.00 Invert CpA1 CpA1 CpA1 CpA1 CpA1 CpA1 CpA1 CpA1 CpA1 CpA1 CpA1 CpA1 CpA1 CpA1 CpA1 CpA1 CpA1 CpA1 CpA1 CpA1 CpA Opacity Rotation : X Y Z CW CCW Clear'Animaon' tab .... 'Exit' opons
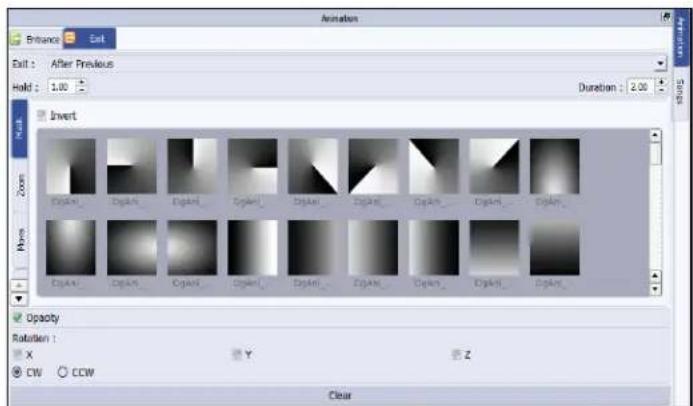
'Animaon' tab provides you various opons to give exit eects to the various objects on the page.
Through this opon, you can provide not only eects but you can also dene duraon, hold and delay for the video. There are various opons available in this 'Exit' tab. Let's see all of them one by one.
First opon is 'Exit'. From exit opon you can decide the exit point of the eect i.e. whether this eect should exit with the previous eect or aer the previous effect. There are two opons given in the 'Exit' opon. First is 'Aer Previous' in which the selected eect will take place aer the previous eect is played. Second available opon is 'With Previous' in which the eect is played while the previous eect is being played.
Next opon available is 'Hold'. This opon helps you to denote the holding period of the object on the page
Next opon given is 'Duraon'. Through 'Duraon' option, you can dene the duraon of the eect on the object.
There are various ready effects given in the soware. You just need to select the object and click on the eect to see the preview of the eect on the object.
Once you click on any eect, it will be applied on the object.
There are various sub- opons available for various kinds of effects.
First type of eect is 'Mask'. In this opon, you can nd various masking effects for the exit of the selected object. You can click on the eect to apply it to the selected object.
In 'Mask' tab, you nd an additional opon of 'Invert'. If you select this opon, the masking eect you apply will be inverted and applied on the selected object.
Second tab in eects is 'Zoom'. You can give zooming eect to the selected object from this tab.
Two opons are available in this tab. One is 'Shrink' in which the objects shrinks and disappears from the page.
Second is 'Grow' in which the selected object grows up and disappears from the page.
Next effects opon is 'Move'. In this opon various arrows are given and the selected object exits towards the direcon shown in the arrow which you choose. There are various direcve arrows given in this tab like top le, top centre, top right, etc.
Choose the desired one and see the immediate preview.
The last eects tab is 'Fade'. If you give the 'Fade' eect to the object on the page, the object slowly faints and disappears from the page.
Apart from several eects, you can also manage the opacity of the objects. To give opacity effect to the selected object, check the opacity checkbox and then give eect.
You can manage the rotaon of the object from the rotaon tab. You can rotate the object in three perspectives i.e. X, Y and Z.
You can rotate objects in clockwise or anclockwise order.
If you do not want to give any eect to any object then select the object and click on 'Clear' buon available on the boom side of 'Animaon' tab.
When you apply any 'Exit' eect on any object, an orange box with an arrow in it appears on that object. It indicates that this object has an exit eect.
To go to the selected eect, click on the orange box and you will be able to see the selected effect in the 'Animaon' tab.
Note: If no object is selected and any eect is applied by you, then that eect will be applied on background of the page.
In this way you can give effect to the objects on the page, manage the duraons and make the video.
Give effects to all the pages of the video and see the preview of individual pages from 'Play Page' onpon.
To see the preview of the whole video, click on the 'Play Project' buon. You will see the preview of the whole video.
When you play the whole video, you can pause the Video with 'Pause' buon.
You can also stop the video with the 'Stop' buon and restart it with the 'Play' button.
You can remove all exit eects on current page that too in a single click.
Right click on the page and from 'Exit Animaon' opon, select the 'Reset all' opon.
All the exit eects on the page will be removed.
Similarly, you can apply the same eect on all the objects on the page.
For that apply the effect on any of the object, then select the object and right click on the same, you will nd 'Exit Animaon' opon. In that select 'Apply to all' and with 'Play page' opon see the preview.
'Songs' tab
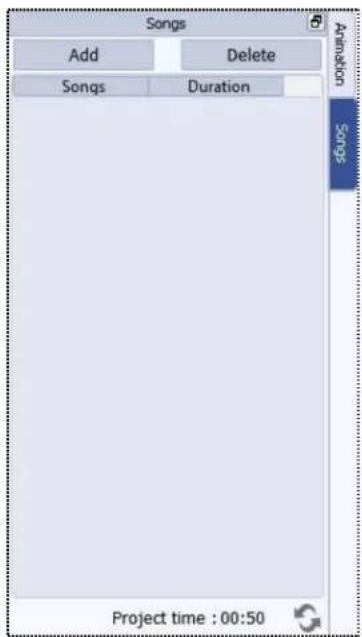
Apart from eects, you can also add the background song from the 'Songs' tab.
In 'Songs' tab, you can see the total project play me.
➢ You can add songs according to the duraon of the project.
'Add' buon is given at the top of the 'Songs' tab from where you can add the song to the video.
You can add more than one song i.e. you can create the play list.
If you don't want any song, you can delete the song as well.
Just select the son you want to delete and press 'Delete' buon.
The song will be deleted.
In this way the video is ready to save and generate.
text_image
Songs Add Delete Songs Duration Animation Songs Project time : 00:50'Songs' tab
Adding or Eding Decors
Video Xpress generates automac videos of photos, album and photo books. You can add and edit the decors of the page with the help of various tabs available at the opon bar.
Background Tab
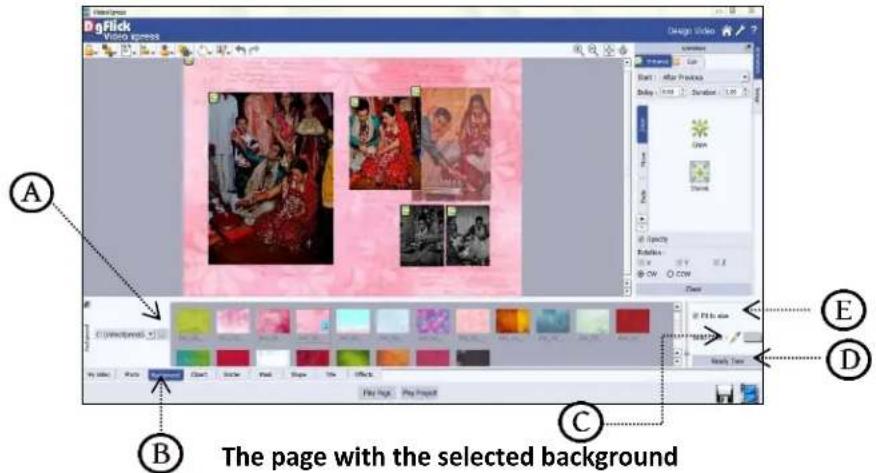
Click on the 'Background' tab® on the opon bar to select the background for the video slide or to ll it with any solid color.
text_image
DgFlick Video progress A B The page with the selected background C D E F G H I J K L M N O P Q R S T U V W X Y Z A B CBesides the in-built backgrounds, you could access and select backgrounds that you have saved elsewhere by clicking on the 'Browse' buon. The last 15 paths used can be viewed.
To use a background, double click on it or drag and drop it on the canvas from the opon bar.
Uncheck the 'Fit to size' check box Ⓔ on the Background tab to expand the background on the page.
To ll the canvas with one single solid color, click on 'Color Picker' © and place it on the color you wish to use as background for the video slide. The whole page now gets a background of that color.
Click on the 'Ready Tone' buon D on the Background tab to select from a range of 18 ready tones available for each background.
To change the tone, double click on the chosen tone.
text_image
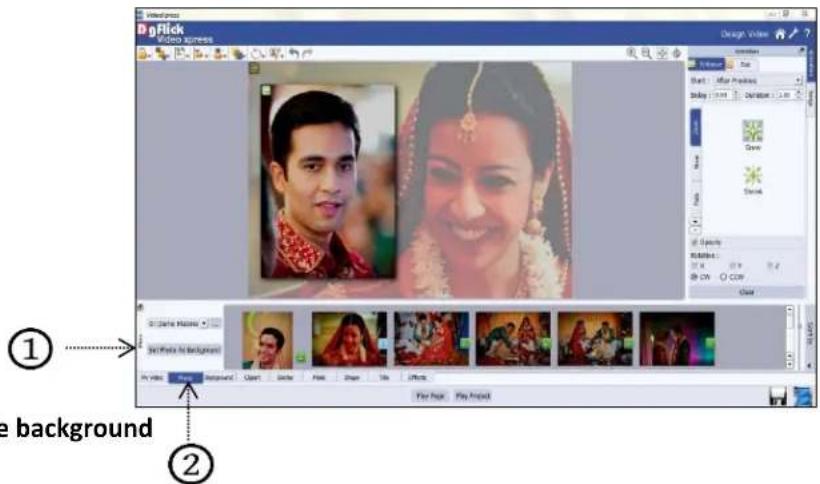
1 2 the backgroundYou could also use photo of your choice as the background for the video slide. To do this, click on the 'Photo' tab to view the photos. Select the photo and click on 'Set Photo as Background' in the 'Photo' tab and then double click on the photo. The photo now serves as a background to the page.
Photo Tab
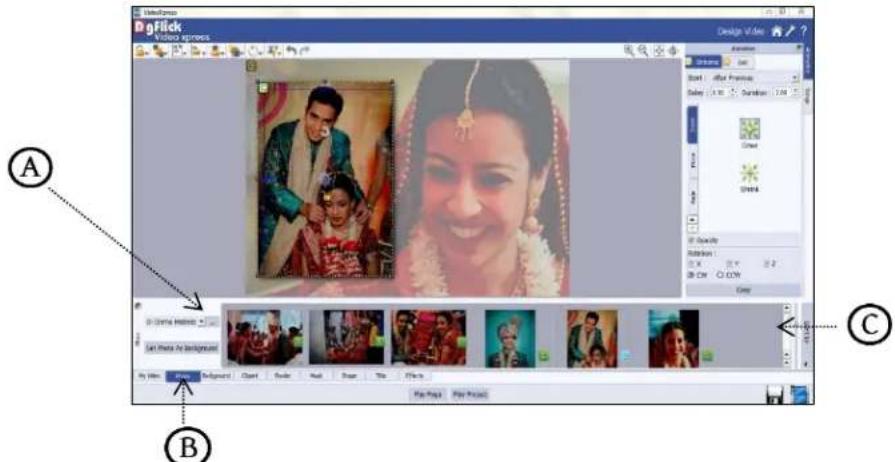
Click on the 'Photo' tab Ⓑ on the 'Design Video' window to access the photos of your choice.
You could browse photos from 'Browse' button Ⓐ and even access the last 15 paths you have used.
Sort the photos by clicking on 'Sort By' button©. You can sort photos Date, Modified me, Name, Size, Type, Orientaon and Used wise in ascending and descending order.
text_image
3d Fiji Video frames Design video A B C'Design Video' window .... 'Photo' tab .... Photo changed
To use a photo, either double click on it or drag and drop it on the canvas.
Rotang Photo
Rotang photo in the Design page keeping the creavity in mind adds to the overall presentaon of the pages. Video Xpress gives you the opon of either rotang the photo within the frame or rotang the whole picture along with the frame.
To rotate the photo within the frame: Keep your cursor on the rotate icon that is seen when you select a photo. Once the 'hand' symbol appears use the mouse to rotate it in the direcon of your choice.
To rotate the photo along with the frame: 'Unlock' the photo by clicking on. Now keep your cursor on and use the mouse to rotate the photo with the frame when the 'hand' appears.
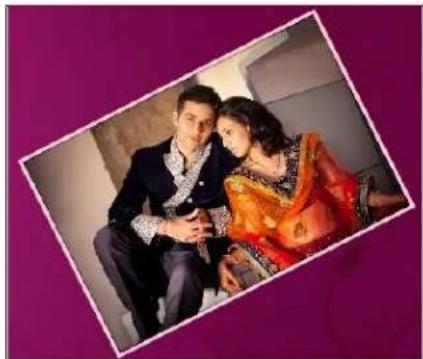
natural_image
Black-and-white photo of a couple posing together indoors, no visible text or symbols(a)
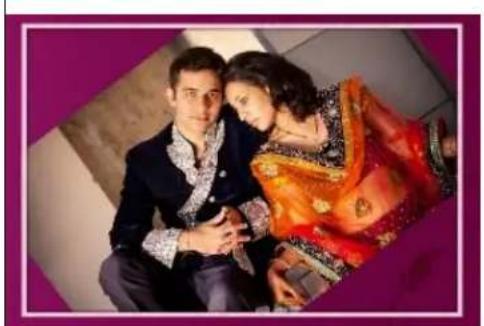
natural_image
A couple posing together indoors, one in formal attire and the other in traditional orange dress (no visible text or symbols)(b)
Rotang: (a) the photo with the frame; (b) the photo in the frame
Swapping Photos
Many a mes you need to swap photos on a page as you go along to. However, the borders if applied to the photos do not get swapped.
Select the photos you wish to swap by keeping the ctrl key pressed. When both the photos are selected the 'Swap' icon appears click on the icon to swap the photos.
Zooming In/Out
While working on your Design you can focus aenon on a specific area of the page by zooming in or take a look at the 'larger picture' by zooming out. You can use a combinaon of these opons to obtain the desired level of accuracy on the page.
Click on the photo you want to work on and then use the scroll wheel of the mouse to zoom in or zoom out as per your requirement.
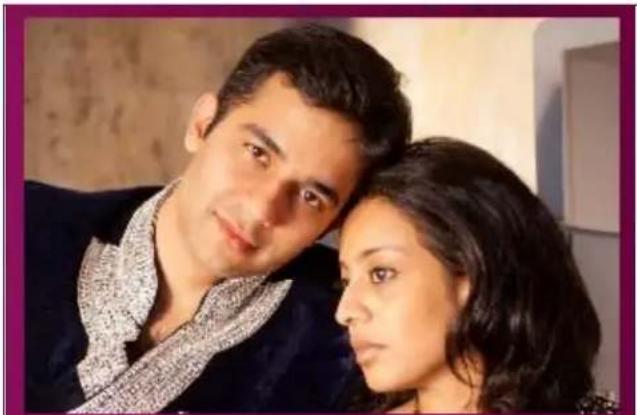
natural_image
Close-up portrait of a man and woman in a close moment, no visible text or symbols(a)
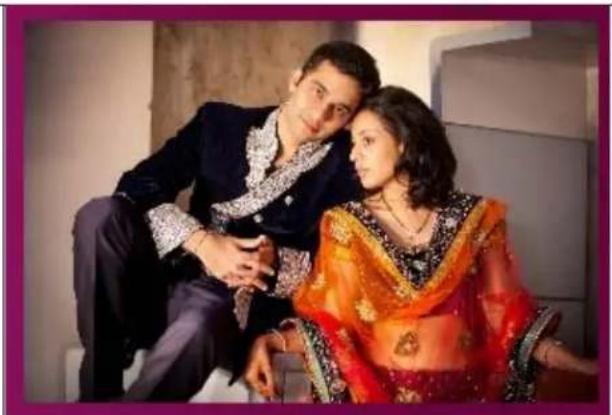
natural_image
A couple in formal attire embracing, posing closely together (no visible text or symbols)(b)
(a) Zooming in; (b) zooming out
Panning
Panning lets you view specific areas of the photo by moving the photo up or down and sideways in the 'Design Video' window. This gives access to the areas that would otherwise remain obscure.
Place the cursor over, which then changes to or the 'hand symbol'. Now use your mouse to take hold of the photo and move it around to get to the area you wish to work on.
Photo Quality Indicator
The quality of photos used in the design must be good to ensure clarity in the nal product. Video Xpress has an in-built 'Quality Indicator', which warns you whenever the photo quality goes below the required standards. Once a photo has been placed into the frame the indicator warns you if the resoluon is inappropriate for the desired output size. The warning symbols and their interpretaons are presented in Table.
| Indicator and color | Interpretaon |
| [D56W]Yellow | The photo quality is not good; however, the nal output will be sasfactory. |
 Orange Orange | The photo quality is poor and will not yield good results on prinng. |
The photo is unsuitable for prinng.
Border
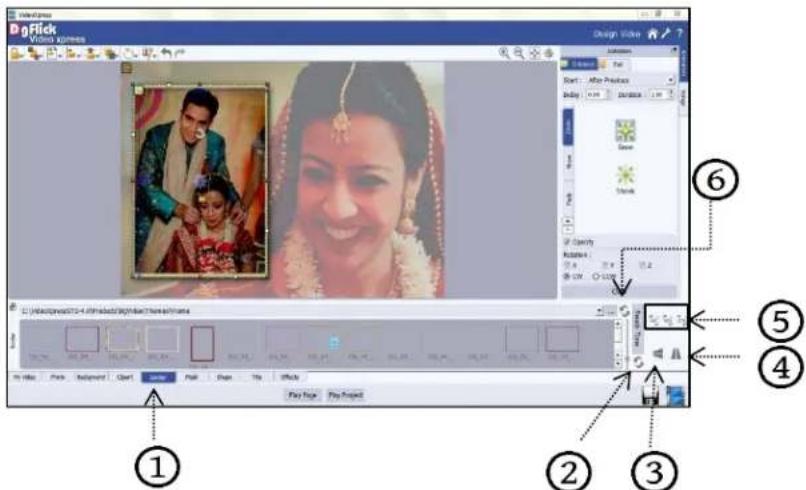
Click on 'Border' tab ① on the 'Design Video' window to select the border that you want for the photo.
You could select a border from the opons, Video Xpress displays for you or you could browse and select a border of your choice from the path in which you have saved it.
Double click on the border or drag and drop the border on the photo to apply.
You could change the color of the border to better suit the photo by clicking on the 'Ready Tone' buon. There are 18 ready tones available for use.
Reset the border with the 'Reset' buon ⑥
text_image
0-Rick Video frames Design Video Start: After Production Entry: 1.0 mm Description: 6 Opacity Reliability: 1.2 1.0 1.0 1.0 1.0 1.0 1.0 1.0 1.0 1.0 1.0 1.0 1.0 1.0 1.0 1.0 1.0 1.0 1.0 1.0 1.0 1.0 1.0 1.0 1.0 1.0 1.5 1.5 1.5 1.5 1.5 1.5 1.5 1.5 1.5 1.5 1.5 1.5 1.5 1.5 1.5 1.5 1.5 1.5 1.5 1.5 1.5 1.5 1.5 1.5 1.5 1.0 1.0 1.0 1.0 1.0 1.0 1.0 1.0 1.0 1.0 1.0 1.0 1.0 1.0 1.0 1.0 1.0 1.0 1.0 1.0 1.0 1.0 1.0 1.0 1.2 1.2 1.2 1.2 1.2 1.2 1.2 1.2 1.2 1.2 1.2 1.2 1.2 1.2 1.2 1.2 1.2 1.2 1.2 1.2 1.2 1.2The border applied to the photo
Choose the ready tone you want and double click on it to apply it to the photo border.
You can transform these borders freely on the page.
! Additional icons on the 'Design Video' – Border tab:
- 'Reset': ② to reset the ready tone.
- 'Flip Vercal' ③ To ip the border vercal.
- 'Flip Horizontal' ^4 : To ip the border horizontally.
- 'Rotate CW90' ^5 : To rotate the border 90 degrees.
○ 'Rotate CW180'⑤: To rotate the border 180 degrees.
○ 'Rotate CW270'⑤: To rotate the border 270 degrees.
Title
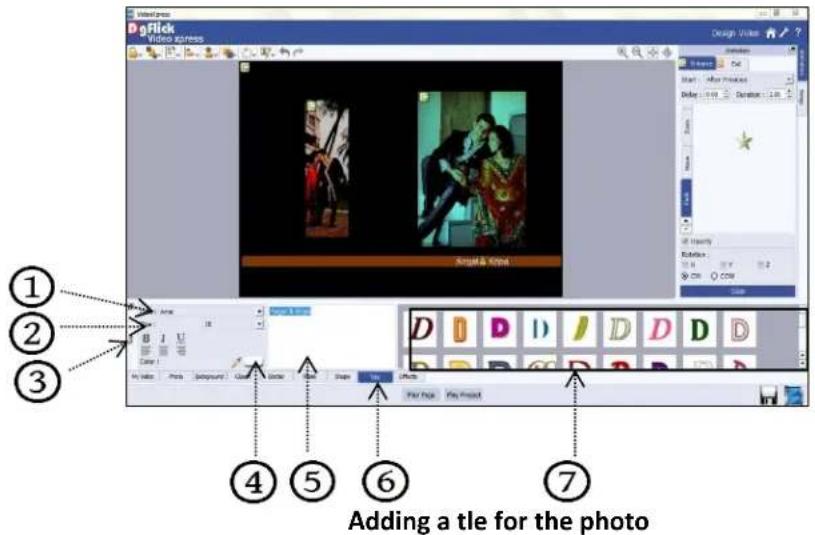
➢ Click on the 'Title' tab ⑥ to add or amend a tle for the photo.
The empty white eld ⑤ can be used to type in the tle you wish to add for the photo.
You can change the following parameters for the tle:
○ Font from font dropdown menu,①
○ Font size from size dropdown menu,②
○ Style from various style opons, ③
- Font Color from color palee or color picker ④
- Ready presets can be used from available opons ⑦
text_image
1 2 3 4 5 6 7 Adding a tie for the photoShape
Click 'Shape' tab on the option bar to select a shape you would like to add to decorate the page.
Double click on the shape or drag and drop onto the canvas.
You can align and resize the shape or rotate it using icon on the shape.
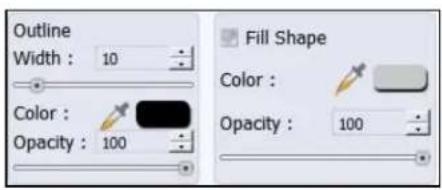
To customize the shape according to your taste, click on 'Customize' opon.
Aer clicking on 'Customize' opon, more opons will get visible. Use the sliders on the new window to modify the shape to suit your requirements.
Use the 'Color Picker' to pick any color from the screen for your shape.
text_image
Outline Width : 10 Color : Opacity : 100 Fill Shape Color : Opacity : 100Add Eects
To apply eects to the photo, click on 'Eects' tab on the opon bar.
There are 10 different opons under this category. They are: Colorize, Blur, Opacity, Feather, Shadow, Glow, Outline, Rotaon, Presets and Blend.
○ Colorize: ① Click on the photo to be modified and then click on the colorize preset to apply the eect to the photo. To manually make changes or customize, click on 'Custom' buon and change the color, opacity and level using given sliders. You can reset all the given eects with a single click from 'Reset all' buon.
Blur②: You could give a blurred appearance to the photo to make the page more visually appealing. Click on the photo you need to blur and then select the preset of your choice under this opon. Click on 'Custom' buon to increase or decrease the level or blurriness using the slider. You can reset all the given eects with a single click from 'Reset all' buon. ©
Opacity③: Add opacity to the photo by selecng the presets available under this opon. You could also manually choose the level of opacity by clicking on 'Custom' buon. ☐u can reset all the given eects with a single click from 'Reset all' buon. ©
Feather④: Apply the feather eect to the photo by clicking on the photo and then selecng the preset of your choice. Click on 'Custom' buon to manually change the values of the feather using the slider. You can reset all the given eects with a single click from 'Reset all' buon.
Shadow⑤: To apply the shadow effect to the photo, click on 'Shadow' and then choose from the available presets. You could customize 'shadow' by clicking on 'Custom' buon and then applying the shadow sengs manually using various sliders. You can reset all the given effects with a single click from 'Reset all' buon C
- Glow⑥: Apply the required preset under the 'Glow' opon by clicking on the photo and then clicking on the preset. Apply your own sengs by clicking on 'Custom' buon and changing your blur, color and opacity values. You can reset all the given eects with a single click from 'Reset all' buon.
- Outline⑦: Select the photo and click on the preset of your choice to apply the outline. To customize the outline, Click on 'Custom' buon then, create the outline of your choice by lling in the values in these elds. You can reset all the given eects with a single click from 'Reset all' buon.
○ Rotaon ⑧ The photo can be rotated using the predened presets under the 'Rotation' opon. Click on 'Custom' buon ⑨ to change the values for the x, y and z axes and give the photo a 3-D effect. You could also ip the photo horizontally and vertically by using and , respectively. You can reset all the given eects with a single click from 'Reset all' buon . C
○ Presets⑨: This opon gives you certain in-built eects that you could use on the photo. Click on the photo and then on the desired preset to apply it. You can reset all the given effects with a single click from 'Reset all' buttonⒶ.
○ Blend ^10 : There are 13 blending modes that help you achieve the desired eect for the photo. Click on the photo and then select the blend opon of your choice to apply.
Clipart
Click on the 'Clipart' tab on the opon bar for a lisng on the available clip-arts.
Double click on the clip-art of your choice or drag and drop it onto the canvas to use it on the page.
You could even use your own clip-arts by accessing them using, where the last 15 paths accessed are available.
Click on 'Ready Tone' buon to access the ready tones for the clip-arts. There are 18 ready tones available for each clipart and you could use the color of your choice depending on your page setup by double clicking on the ready tone.
Mask
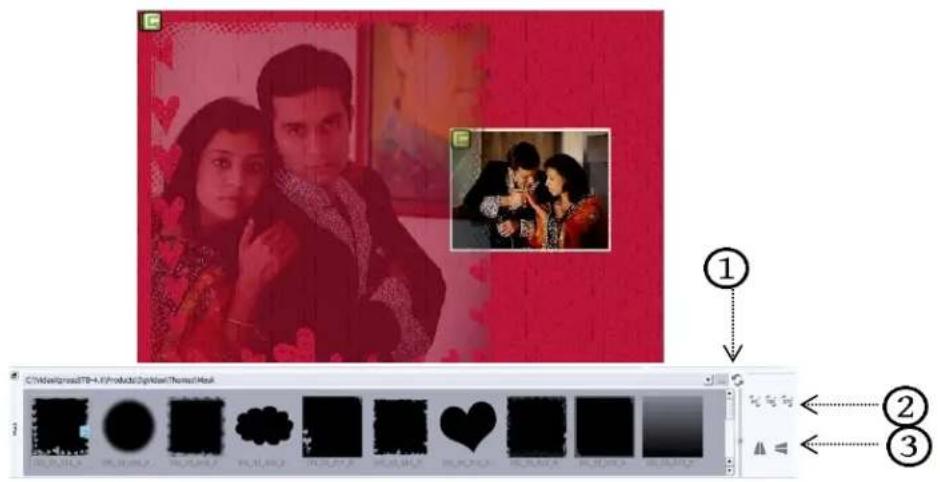
Click the 'Mask' tab on the opon bar to select the mask of your choice.
text_image
Screenshot of a photo editing software interface showing a couple photo and a color palette with heart-shaped swatches.Applying a 'mask' to the photo
➢ Select the photo to which you want to apply the mask and double click on the mask or drag and drop the mask on the photo to apply it. You could even access the previous 15 paths.
You can transform these masks freely on the page.
! Additional Icons on 'Mask' tab
- 'Reset': 1 to reset the changes.
- 'Rotate CW90'②: To rotate the border 90 degrees.
○ 'Rotate CW180'②: To rotate the border 180 degrees.
- 'Rotate CW270'②: To rotate the border 270 degrees.
- ‘Flip Vercal’ ③To ip the border vercal.
- 'Flip Horizontal' ^3 : To ip the border horizontally.
Building the Framework – Page Composition
In previous secon we learnt how to create designs and take output in Video Xpress. In this secon we will learn how to align photos and decorate design.
Basic Page and Photos
While you are designing your Project, you need exibility in operaons to help you manipulate the photos to achieve the desired layout. Video Xpress gives you this exibility and more. This secon deals with the additional features in the soware that helps you in page composition.
Used Photo Indicator
Video Xpress helps you sort the photos and manage them beer by indicang the photos the number of me they have been used in Video.
Blue tab on the photo: This indicates the photos used in design on current page.
Number on the tab: This indicates the number of mes the photo has been used in the design.
Besides these opons, photos can be sorted as 'used' and 'unused' by selecng the 'Sort By' buon on the tab.
Swap Photos
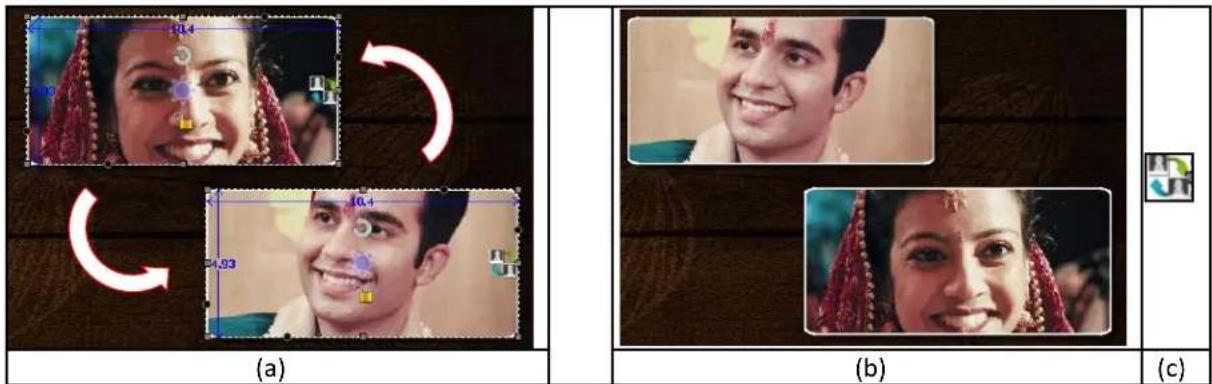
While working on a design, you might want to swap photos to achieve the desired composition on the page or design. Video Xpress lets you do this by just a single click. Just select the photos to be swapped using the Ctrl key. Then click on to swap the photos. This is particularly useful to t a portrait photo into a portrait frame and vice versa.
text_image
(a) (b) (c)Swapping photos (a) Original photos, (b) Swapped Photos, (c) Swap Icon
Copy, Paste and Clear Eects
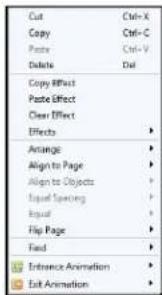
Video Xpress allows you to cut, copy and paste photos and eects on the photos in the Design. Right click on the element you want to copy and select the 'Copy' opon on the drop list. Now paste it on to the locaon of your choice by right clicking on it and choosing the 'Paste' opon.
text_image
Cut Ctrl+X Copy Ctrl+C Paste Ctrl+V Delete Del Copy Effect Paste Effect Clear Effect Effects ▶ Arrange ▶ Align to Page ▶ Align to Objects ▶ Liquid Spaning ▶ Equal ▶ Flip Page ▶ Text ▶ Enhance Animation ▶ Exit Animation ▶Lock and Unlock Photos
Video Xpress generally 'locks' the photo on the Design to ensure precise designing. This ensures that changes do not happen on the photos by mistake while one is working on the Video. Clicking on the 🔊 'lock' icon 'unlocks' 🔑 it and now you can move it or resize it as per your wish.
Resize Photo
Within border: In the 'locked' condion, a photo can be enlarged within its frame, by zooming it and adjusng it in the frame. It can even be panned within the frame.
With border: Once the photo is ' unlocked' by clicking on the icon, the photo can be resized according to your size requirements by moving the nodes.
Ensure that the photo stays within ‘printable’ limits while increasing the size of the photo. Refer the ‘Photo Quality Indicator’.
Rotaon of Photo
Within border: A photo can be rotated within its frame when it is in the 'locked' state. However, if a border or a mask has been applied to it, it stays in its posion while the photo alone rotates within it.
With border: A photo can be rotated along with its border or its mask as a single unit when the photo is in an 'unlocked' state. The photo can now be rotated in all three axis x, y and z to give it a 3D effect.
Flip Décor
Decors like border and mask can be ipped horizontally and vercally, with the help of 'Flip' opon provided at the boom in the respective tabs.
Flip Page
Video Xpress gives you the opon of ipping a page both horizontally and vercally as per your requirements. Horizontal ip: Right click on the page and select the 'Flip page' opon on the drop list. Select 'Horizontal' to ip the page horizontally.
Vercal ip: Right click on the page and select the 'Flip page' opon on the drop list. Select 'Vercal' to ip the page vercally.
Advanced Page and Photos
The following are the opons available with Video Xpress for advanced page composition.
Guideline
Video Xpress gives you the opon of using ruler as guidelines on the page to help you align your design beer and design with ease.
Rulers: On the 'Design Video' window, you can view the rulers at the top and on the le of the page. Double click on the ruler to acvate it and then drag and drop the green line that appears on to the page at the desired locaon to align an element against it. You could work with mulple rulers simultaneously. Select and delete the rulers to remove them from the page.
Arrange objects
Video Xpress allows you the opon of changing the posion of an object on the Video i.e. send it backward or forward or to the back or front. Select the object you
wish to move backward or forward and click on access the opons under this funcon.

| Arrange object(s) | |
| Send to Back | Shift+Down |
| Send Backward | Shift+Left |
| Bring to Front | Shift+Up |
| Bring Forward | Shift+Right |
Alternatively, use the right click buon and on the drop list click on 'Arrange' to access the sub-opons. Select the object and click on 'Send to back' or 'Bring to front' to move the element to the last or the rst posion, respectively. Select 'Send backward' or 'Bring forward' to move the object either one step backward or one step forward. You can
undo the changes by clicking on.
Object-Based Alignment
This opon allows you to align photos with respect to other photos or elements on the Video. There are mulple opons for this sort of alignment. Select photos or other elements you wish to align using the
Ctrl key. Then click on to select the alignment opon you wish to apply to the photos from the drop list. Alternatively, use the right click buon and on the drop list click on the 'Object-based alignment' to access the sub-opons. You can undo the changes by clicking

| Object based alignment | |
| Top Left | Ctrl+Shift+7 |
| Top Center | Ctrl+Shift+8 |
| Top Right | Ctrl+Shift+9 |
| Center Left | Ctrl+Shift+4 |
| Center | Ctrl+Shift+5 |
| Center Right | Ctrl+Shift+6 |
| Bottom Left | Ctrl+Shift+1 |
| Bottom Center | Ctrl+Shift+2 |
| Bottom Right | Ctrl+Shift+3 |
| Top | Ctrl+Shift+T |
| Bottom | Ctrl+Shift+B |
| Left | Ctrl+Shift+L |
| Right | Ctrl+Shift+R |
| Horizontal Center | Alt+Shift+H |
| Vertical Center | Alt+Shift+V |
Page-Based Alignment
This opon allows you to align photos and other elements on the page with respect to the page. There are mulple opons for this sort of alignment. Select photos or other elements you wish to align using the
Ctrl key. Then click on to select the alignment opon you wish to apply to the photos from the drop list. Alternatively, use the right click buon and on the drop list click on 'Page-based alignment' to access the sub-opons. You can undo the changes by clicking on

| Page based alignment | |
| Top Left | Ctrl+7 |
| Top Center | Ctrl+8 |
| Top Right | Ctrl+9 |
| Center Left | Ctrl+4 |
| Center | Ctrl+5 |
| Center Right | Ctrl+6 |
| Bottom Left | Ctrl+1 |
| Bottom Center | Ctrl+2 |
| Bottom Right | Ctrl+3 |
| Top | Ctrl+T |
| Bottom | Ctrl+B |
| Left | Ctrl+L |
| Right | Ctrl+R |
| Horizontal Center | Shift+H |
| Vertical Center | Shift+V |
Fine Tuning – Photo Eding
Video Xpress has inbuilt photo eding tools. You can do basic eding like adjusng brightness and contrast. This secon guides you with the funcons available for photo eding.
Basic Filters
Features such as BCG correcon, RGB color modicaon, Curve, Level, Crop and Rotaon will be explained in detail in this secon. You could access these opons by clicking on 'Basic Filters' tab on the opons bar. This secon deals with the Iters one by one.
On the 'My Designs' window click on 'Edit Photo' opon on the top of the photo to go to 'Edit Photo' Window.
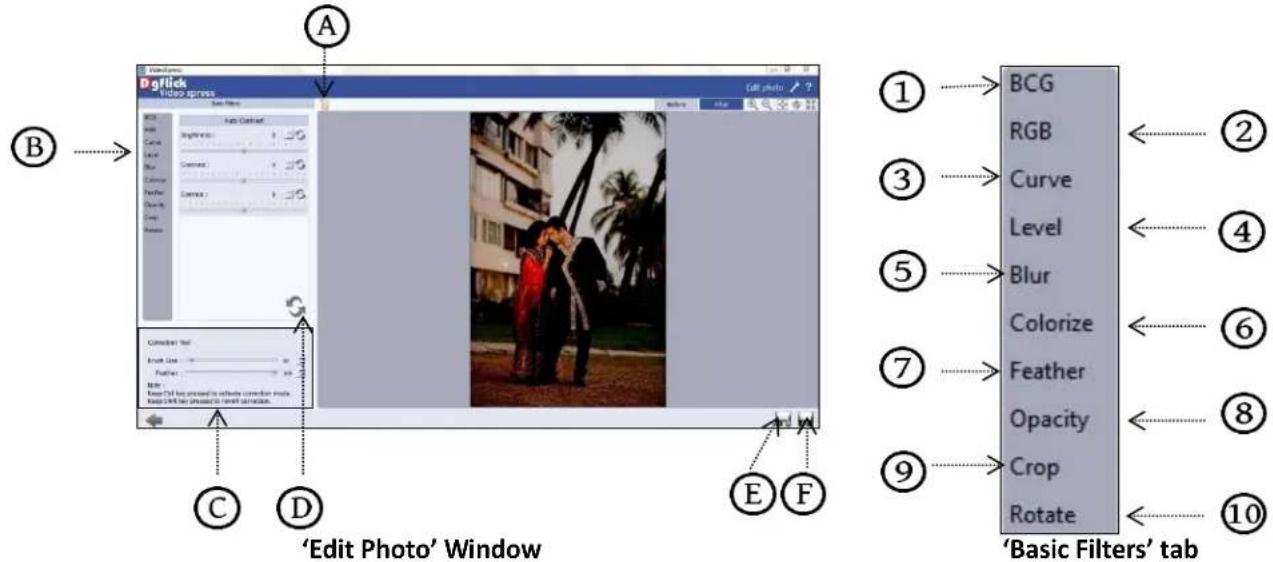
text_image
D:\click\Video progress Edit photo ① BCG RGB Curve Level Blur Colorize Feather Opacity Crop Rotate ② ③ ④ ⑤ ⑥ ⑦ ⑧ ⑨ ⑩ ⑪ ⑫ ⑬ ⑭ ⑮ ⑯ ⑰ ⑱ ⑲ ⑳ ⑪ ⑫ ⑬ ⑭ ⑮ ⑯ ⑰ ⑱ ⑲ ⑳ ⑪ ⑫ ⑬ ⑭ ⑮ ⑯ ⑰ ⑱ ⑲ ⑳ ⑪ ⑫ ⑬ ⑭ ⑮ ⑯ ⑰ ⑱ ⑲ ⑳ ⑪ ⑫ ⑬BCG (Brightness, Contrast and Gamma) Color Correcon
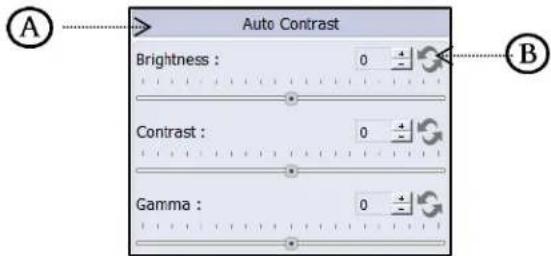
To adjust the brightness, contrast and gamma of the photo, click on the 'BCG' ^① buon on the 'Edit Photo' window.
Move the sliders of the three parameters forward and backward to achieve the desired eect.
➢ Alternatively, you could enter the values for the parameters in the value boxes above the respective sliders.
- Clicking on the 'Auto Contrast' buon at the top will adjust the contrasts automatically.
The changes can be reset by clicking on 'Reset' ^® .
text_image
Auto Contrast Brightness : 0 Contrast : 0 Gamma : 0The 'BCG' opon
RGB (Red, Green and Blue) Color Correcon
To adjust the color tones of the photos, you could use the 'RGB' ② color correcon opon.
Modify the color tone by altering the degree of 'Red', 'Green' and 'Blue' on the color sliders.
➢ Alternatively, you could enter the values manually in the value boxes above the respective sliders.
➢ Clicking on the 'Auto Color' ☐ buon at the top will adjust the color automacally.
The changes can be reset by clicking on 'Reset' ^® .

text_image
Auto Color Red : 0 Green : 0 Blue : 0 The 'RGB' oponCurve
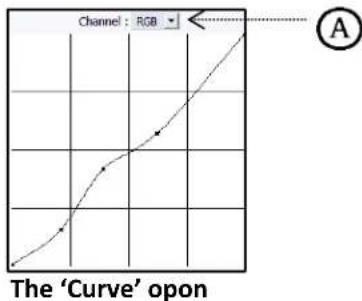
Color intensities can be adjusted by clicking on 'Curve'
③buon on the opons bar of the 'Edit Photo' window.
Select the color to be adjusted (RGB i.e. red, green or blue) from the drop list under the 'Channel' icon.
Adjust the intensity by clicking on the curve and moving it as per your requirement.
Level
To adjust the input and output levels of the photo, click on 'Level' buon on the opons bar of the 'Edit Photo' window.
Select the color for which the input and output levels need to be modified (RGB i.e. red, green or blue) from the drop list under the 'Channel' buon.
Modify the 'Input' and 'Output' level values in the value boxes as required.
text_image
Channel : RGB The 'Curve' opon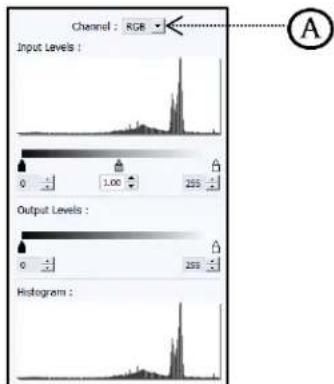
text_image
Channel : RGB Input Levels : 0 1.00 255 Output Levels : 0 255 Histogram :The 'Level' opon
Blur
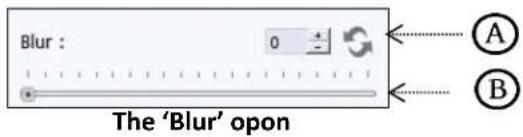
Click on 'Blur' button ⑤ to give blur effect to the photo.
Adjust the blur level from slider Ⓐ
The changes can be reset by clicking on 'Reset' ^® .
text_image
Blur : 0 The 'Blur' opon A BColorize
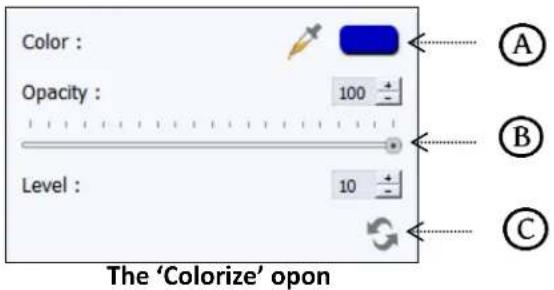
Click on 'Colorize' opon ⑥ to colorize the photo.
Select the color from 'Color Picker' or 'Color Palee'
Adjust the opacity and level from slider ^⑧ .
The changes can be reset by clicking on 'Reset'©.
text_image
Color : Opacity : 100 Level : 10 The 'Colorize' oponFeather
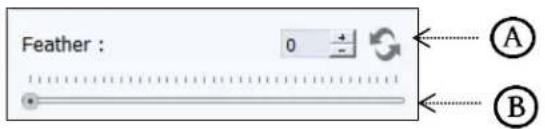
Click on 'Feather' opon ⑦ to give feather eect to the photo.
Adjust the feather level from slider.
It will help you to soon the hard edges of photograph.
The changes can be reset by clicking on 'Reset' ^B .
The 'Feather' opon
text_image
Feather : 0 A B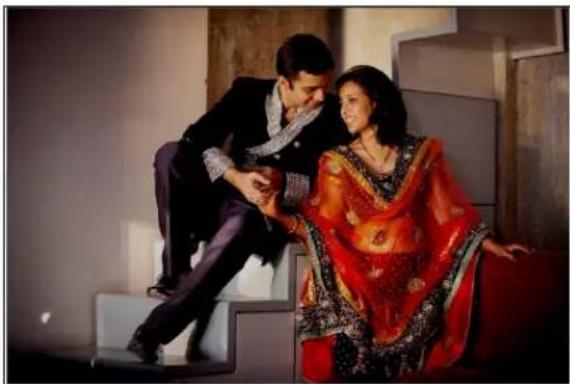
natural_image
A couple in formal attire posing together on a staircase, wearing traditional red and black attire (no visible text or symbols)(a)

natural_image
A couple posing together on a staircase, one in formal attire and the other in traditional red and orange attire (no visible text or symbols)(b)
'Feather' Eect (a) Before, (b) Aer
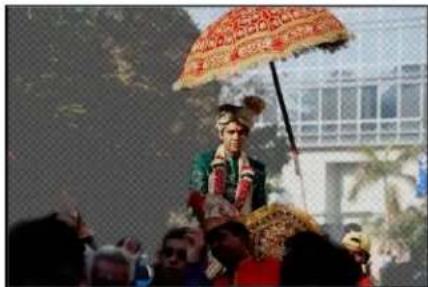
Opacity
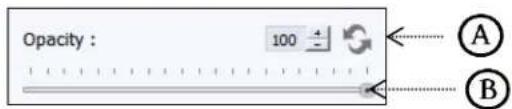
Click on 'Opacity' opon ⑧ to give opacity eect to the photo.
Adjust the opacity level from slider Ⓐ
The changes can be reset by clicking on 'Reset' ^B .
Apply the Correcon tool on the area where you don't want to apply the opacity.
text_image
Opacity : 100 A BThe 'Opacity' opon
natural_image
Street performance scene with a performer holding an umbrella, crowd watching (no visible text or symbols)Applying 'Opacity' to the photo
Crop
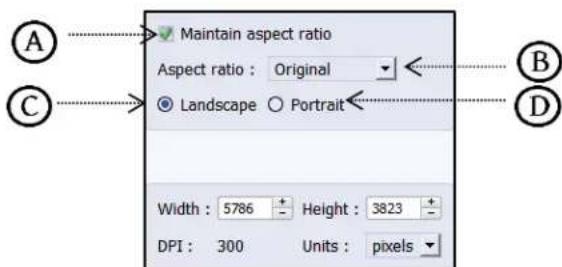
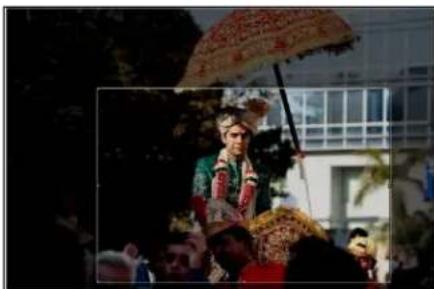
To crop the photo to the desired dimensions and orientaon, click on 'Crop' buen on the 'Edit Photo' window.
Change the aspect rao by clicking on the 'Aspect Rao' box and select the required value.
text_image
Maintain aspect ratio Aspect ratio : Original Landscape Portrait Width : 5786 Height : 3823 DPI : 300 Units : pixelsThe 'Crop' opon
Select the orientaon you desire by selecng either 'Landscape'
D or 'Portrait' D
natural_image
Street parade scene with a performer holding an umbrella, crowd watching (no visible text or symbols)(a)
natural_image
Dark outdoor scene with indistinct figures and objects, no visible text or symbols
natural_image
Person in traditional embroidered costume holding an umbrella, standing before a modern building (no visible text or symbols)(b)
Cropping: (a) Landscape; (b) portrait
You can enter the values for the width and height aer selecng the unit you want to work with. Uncheck the 'Maintain Aspect Rao' checkbox opon if you would like to proceed with free-hand cropping of the photo.
Rotate
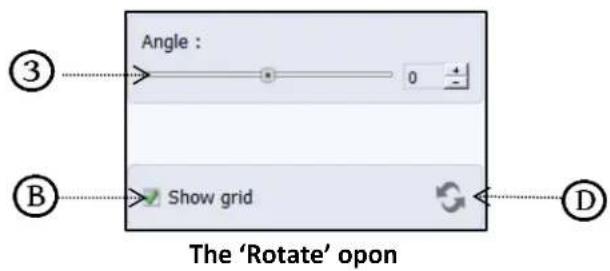
Select the 'Rotate' opon ⑩ on the opons bar and then rotate the photo to the desired angle using the slider
The changes can be reset by clicking on 'Reset' ^① .
➢ Uncheck the 'Show Grid' box to remove the grid lines.
You also have the opon of using grid lines on the photo to help align it beer while rotang. You could acvate the grids lines by checking the 'Show Grid' checkbox.
text_image
Angle : 0 Show grid The 'Rotate' opon ③ ② D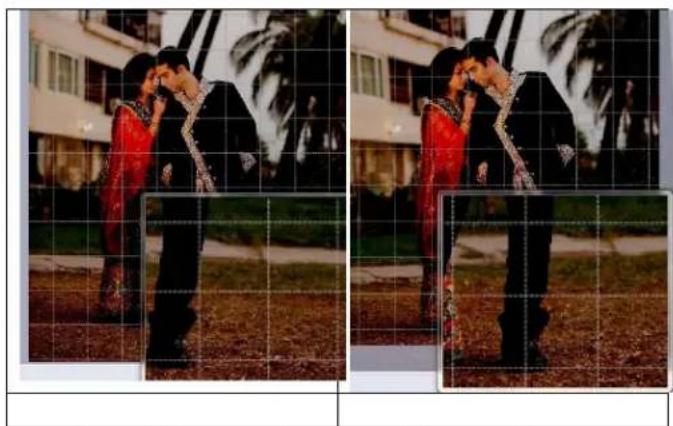
natural_image
Two side-by-side photos of a man in formal attire posing outdoors, with palm trees and buildings in the background (no visible text or symbols)Using grid lines on the photo (a) before (b) aer
! You could undo the changes by clicking on 'Reset' Ⓐ or load the original image by clicking on 'Load Original' Ⓐ at any point in the process.
Other Icons on Edit Photo window
Apart from the opons that are available under Basic Iters, there are few other 'aids' on the Video Xpress that help you as you proceed with designing the video. These are discussed below.
Correcon Tool
The correcon tool 🟢 appears with all opons and can be used to 'correct' any error that might happen while using the Iters or add to the eects already created. The brush size and feather tool can be altered by using the respective slider or by entering the value of your choice in the value box.
! Remember to keep the Ctrl key pressed to acvate the correcon mode and to keep the Shi key pressed to undo the change.
Original and Before and Aer Images
Original Image: In the course of working on the photos, you might decide to retain an original image or make a fresh set of changes. In such cases, you could load the original image once again by clicking on 'Load Original'. Once the 'Load Original' icon A is clicked the soware asks for conrmaon by displaying a text box. This text box warns that all changes made on the photo so far will be lost. You could click on 'Yes' to proceed. Clicking on 'No' will take you back to the photo with changes.
Before and Aer Images: Aer making a change, you could view how the photo looked just before the change was made by clicking on 'Before' and how the photo looks aer the change by clicking on 'Aer'. This aids in beer decision-making.
Saving the Changes
There are two 'Save' icons on the lower right-hand corner of the 'Edit Photo' window.
'Save' F: Clicking on this icon causes the old le to be rewrien and the new copy now exists for your reference. 'Save as' E: Clicking on this icon will allow you to save a copy of your work. A text box allowing you to name the copy appears and clicking on 'Ok' aer entering the name creates a new copy of your work.
Job's Done! – Saving and Generang Video Creaon
Video Xpress not only supports Video creaon but also allows you to save the le for future use and generate it as required. These features add to the versality of the soware and also simplify working on it to a great extent. This secon deals with the saving and generang procedure of les once the Video is created.
Saving the Video Creaon
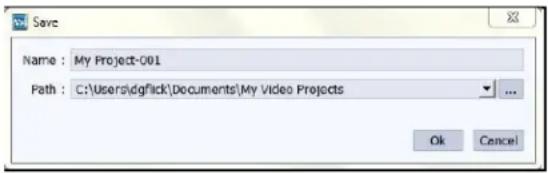
Aer the project is done, the next step is saving the project by clicking on 'Save' icon
The default path for saving the project is displayed in the textbox as 'My Documents \My Video Projects'. You could either save the project in this path or provide the path of your choice to save the project.
Click on 'Ok' to save the project or on 'Cancel' to abort the process.

text_image
Save Name : My Project-001 Path : C:\Users\dg\fack\Documents\My Video Projects Ok CancelGenerang the Video in Dierent Formats
Aer a Video project is saved, it needs to be generated so that it can be viewed as a Video.
Once the saving process is done, click on 'Generate Video' icon to start the Generang process.
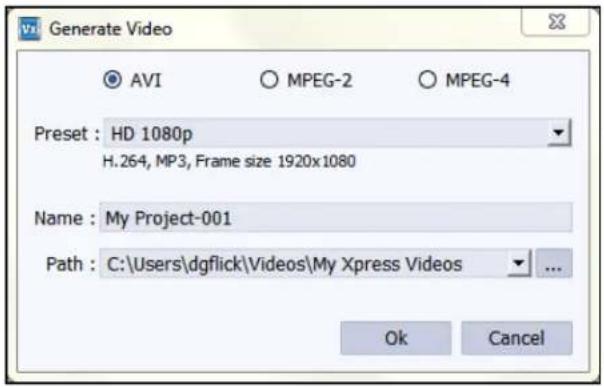
Once you click on the 'Generate Video' icon, you will see a window appeared on the screen. In this window, you have to specify the output type and some other details.
You can generate video in any of the three universal formats available in the Video Xpress.
You have the opons of AVI, MPEG-2 and MPEG-4.
In addition to the format of the video, you have to select the preset for the video i.e. the quality of output you require for the video. You have 4 opons given as follow:
○ HD 1080p
○ HD 720p
○ TV Quality
○ Mobile Quality
Neatly, you have to give a name to the video project from the 'Name' opon.
Specify the saving path for the project from 'Path' opon.
The default path for saving the video project is displayed in the textbox as 'My Videos \ My Xpress Videos'. You could either save the project in this path or provide the path of your choice to save the project.
Click on 'Ok' to generate the video or on 'Cancel' to abort the process.
text_image
Generate Video AVI MPEG-2 MPEG-4 Preset : HD 1080p H.264, MP3, Frame size 1920x1080 Name : My Project-001 Path : C:\Users\dgflick\Videos\My Xpress Videos Ok CancelOpen Saved Project
Video Xpress gives you the great advantage of opening and eding the saved projects as many mes as you want
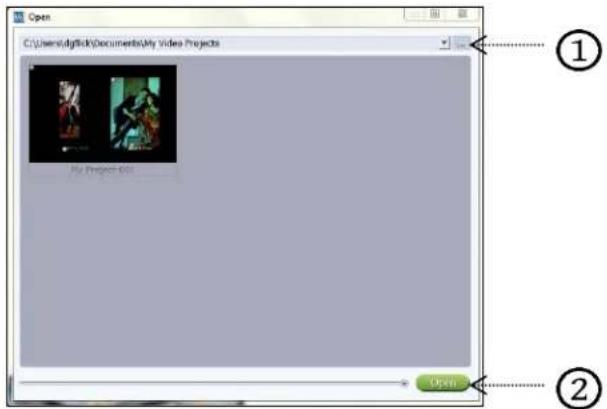
To open a project that has been saved, click on the 'Home' icon of Video Xpress.
You will be redirected to Home page where you can see 'Open' opon at right boom side.
Click on 'Open' opon.
The projects you have saved are now displayed on the screen.
Through 'Browse' buon ① you can give path of the folder where you have saved your project.
Select the project you wish to work on and then click on 'Open' buon ②
text_image
Open C:\Users\digTick\Documents\My Video Projects My Project 601 Open ① ②The 'Open Project' window
Troubleshoot
Could I use my own collection of clip-arts in place of the Video Xpress ones?
Ans: Yes. Video Xpress allows you to import any décor such as
- Clip-arts (any JPEG/PNG),
- Frames (any PNG),
Any décor used in Video Xpress will automatically be generated in 18 shades. You can also create your own packages while working on Video Xpress.
Can I color correct photos before generang videos?
Ans: Sure. Video Xpress provides photo editor tools, which are a part of the soware:
• Photo eding with RGB, BCG, Curves and Levels
Support
For additional technical support or claricaon, please contact DgFlick oces/support via:
DgFlick Soluons Pvt. Ltd.,
203/204,
Shreeji Arcade,
M. G. Road,
Borivali (E),
Mumbai - 400066
Email: support@dgick.com
Telephone: India +91 22 2968 68 68,
US +1-732-543-7676.
Table of Index
A
Album 2,8,9,13,14,16
Animaon ... 2, 13, 14, 16, 17, 18, 19, 20, 21, 22
Aspect Rao 8, 14, 17, 35
AVI 37
B
Background 12, 15, 18, 23
BCG 11, 32, 33, 38
Blend 13, 16, 18, 27, 28
Blur ...... 11, 13, 16, 18, 27, 28, 34
C
Clipart 12, 15, 18, 28
Colorize ...... 11, 13, 16, 18, 27, 34
Crop 6, 11, 12, 32, 35
Curve.... 11, 32, 33
D
DgKey 4,5
E
Edit Photo .... 2, 11, 12, 32, 33, 35, 36, 37
Eects ...... 1, 2, 12, 13, 16, 18, 27, 30
Entrance ...... 2, 6, 14, 17, 18, 19, 20
Exit 2, 6, 20, 21, 22
F
Feather..... 11, 13, 16, 18, 27, 28, 34
G
Generate 4, 6, 37
Generang 1, 2, 37
Glow 13, 16, 18, 27, 28
H
Help 5,8
L
Level 11, 32, 33
M
Mask 13, 15, 18, 19, 21, 29
MPEG-2 37
MPEG-4 37
0
Opacity ..... 11, 13, 16, 18, 27, 28, 34, 35
Outline 13, 16, 18, 27, 28
P
Photo .... 1, 2, 5, 6, 7, 8, 9, 11, 12, 15, 16, 17, 23, 24, 25, 29, 30, 32, 38
Preferences 2, 5, 8
Presets 13, 16, 18, 27, 28
Q
Quality Indicator 10, 25, 30
R
Registraon 2, 3, 4
RGB 11, 32, 33, 38
Rotate ...... 6, 10, 11, 12, 26, 29, 35, 36
Rotaon ...... 13, 16, 18, 27, 28, 30, 32
s
Serial number 4
Shadow 13, 16, 18, 27, 28
Shortcut Tools 2,6
Songs 2, 13, 14, 17, 22
System Requirements ...... 1, 2, 3
v
Video .... 1, 2, 3, 5, 6, 8, 9, 10, 12, 13, 14,
15, 16, 17, 18, 20, 22, 24, 25, 26, 29,
30, 31, 32, 36, 37, 38