
SS4VC - Hi-Fi System SONANCE - Free user manual and instructions
Find the device manual for free SS4VC SONANCE in PDF.


| Product Type | Multi-Zone Volume Control |
| Brand | Sonance |
| Model | SS4VC |
| Number of Zones | 4 |
| Number of Sources | 4 (stereo) |
| Impedance per Zone | 8 ohms (minimum) |
| Power Handling | 100 watts per channel (max) |
| Frequency Response | 20 Hz - 20 kHz (±0.5 dB) |
| Dimensions (W x H x D) | 17 x 2.5 x 6.5 inches (approx.) |
| Weight | 3.5 lbs |
| Power Supply | Passive (no external power required) |
| Mounting | 2U rack-mountable or surface mount |
| Input Connectors | 4 stereo RCA inputs |
| Output Connectors | 4 stereo speaker outputs (spring-loaded) |
| Control | Rotary volume knobs per zone, source selector per zone |
| Special Features | Impedance matching, source isolation, rear panel labeling |
| Compliance | UL, CE, RoHS |
| Operating Temperature | 32°F to 104°F |
| Maintenance | Wipe with a dry, soft cloth; do not use solvents |
| Safety Precautions | Keep away from moisture; use only with compatible amplifiers |
| Spare Parts & Repairability | Contact Sonance customer support for service or replacement parts |
Frequently Asked Questions - SS4VC SONANCE
User questions about SS4VC SONANCE
0 question about this device. Answer the ones you know or ask your own.
Ask a new question about this device
Download the instructions for your Hi-Fi System in PDF format for free! Find your manual SS4VC - SONANCE and take your electronic device back in hand. On this page are published all the documents necessary for the use of your device. SS4VC by SONANCE.
USER MANUAL SS4VC SONANCE
IMPORTANT SAFETY INSTRUCTIONS
CAUTION: Read all of these instructions before you operate and save instructions for later use.
- Read Instructions - all the safety and operating instructions should be read before the appliance is operated.
- Retain Instructions - The safety and operating instructions should be retained for future reference.
- Heed Warnings - All warnings on the appliance and in the operating instructions should be adhered to.
- Follow Instructions - All operating and use instructions should be followed.
- Water and Moisture- The appliance should not be used near water - for example, near a bathtub, washbowl, kitchen sink, laundry tub, in a wet basement, or near a swimming pool, and the like.
- Carts and Stands - The appliance should be used only with a cart or stand that is recommended by the manufacturer. An appliance and cart combination should be moved with care. Quick stops, excessive force, and uneven surfaces may cause the appliance and cart combination to overturn.
- Ventilation - The appliance should be situated so that its location or position does not interfere with its proper ventilation. For example, the appliance should not be situated on a bed, sofa, rug, or similar surface that may block the ventilation openings; or, placed in a built-in installation, such as a bookcase or cabinet that may impede the flow of air through the ventilation openings.
- Heat - The appliance should be situated away from heat sources such as radiators, heat registers, stoves, or other appliances (including amplifiers) that produce heat.
- Cleaning - The appliance should be cleaned only as recommended by the manufacturer.
- Object and Liquid Entry - Care should be taken so that objects do not fall and liquids are not spilled into the enclosure through openings.
- Damage Requiring Service - The appliance should be serviced by qualified service personnel when:
A. Objects have fallen or liquid has been spilled into the appliance; or
B. The appliance has been exposed to rain; or
C. The appliance does not appear to operate normally or exhibits a marked change in performance; or
D. The appliance has been dropped or the enclosure damaged.
- Servicing - The user should not attempt to service the appliance beyond that described in the operating instructions. All other servicing should be referred to qualified service personnel.
INSTALLATION INSTRUCTIONS
S S 4 V C / S S 6 V C

CAUTION
RISK OF ELECTRIC SHOCK DO NOT OPEN

CAUTION: TO REDUCE THE RISK OF ELECTRIC SHOCK, DO NOT REMOVE COVER (OR BACK). NO USER SERVICEABLE PARTS INSIDE. REFER SERVICING TO QUALIFIED SERVICE PERSONNEL.

The lighting flash with arrowhead symbol, within an equilateral triangle, is intended to alert the user to the presence of uninsulated dangerous voltage within the product's enclosure that may be of sufficient magnitude to constitute a risk of electric shock to persons.

The exclamation point within an equilateral triangle is intended to alert the user to the presence of important operating and maintenance (servicing) instructions in the literature accompanying the appliance.
WARNING: TO PREVENT FIRE OR SHOCK HAZARD DO NOT EXPOSE THIS APPLIANCE TO RAIN OR MOISTURE. THE APPARATUS SHALL NOT BE EXPOSED TO DRIPPING OR SPLASHING. NO OBJECTS FILLED WITH LIQUIDS, SUCH AS VASES, SHALL BE PLACED ON THE APPARATUS.

natural_image
Simple line drawing of a person using a large cart inside a circular frame (no text or symbols)WARNING MOVE WITH CARE
SS4VC/SS6VC
A

B

flowchart
graph LR
    A["SPEAKER 4 + L ... R +"] --> B["Speaker"]
    C["SPEAKER 3 + L ... R +"] --> D["Speaker"]
    E["SPEAKER 2 + L ... R +"] --> F["Speaker"]
    G["SPEAKER 1 + L ... R +"] --> H["Speaker"]
    I["PROTECTION ON OFF"] --> J["Symbol: Square, Circle, Triangle"]
    K["INPUT + L ... R +"] --> L["Symbol: Circle, Square, Triangle"]
    M["SONANCE SS4VC"] --> N["Sensor"]
    O["SONANCE SAN CLEMENTS, DA 90479"] --> P["Sensor"]
    Q["USE 8Ω SPEAKENS"] --> R["Speaker"]
    S["S/N:"] --> T["Symbol: Circle, Square, Triangle"]
A. FRONT PANEL SS4VC
- SPEAKER SELECTOR BUTTON
- VOLUME CONTROL
- DETENT FOR ZONE LABEL
B. REAR PANEL SS4VC
- OUTPUT SPEAKER CONNECTOR
- CIRCUIT PROTECTION SWITCH
- INPUT SPEAKER CONNECTOR
INTRODUCTION
Thank you for purchasing the Sonance Speaker Selector System. You have purchased one of the highest performance speaker switching devices available, carefully designed to give you years of trouble-free operation. Connection to your system is very simple. Please invest a few minutes to read the complete instructions, before beginning your wiring to assure the highest quality sound from your system.
UNPACKING
Save your carton and the styrofoam inserts for future safe transport in case you move or the unit ever requires shipping for repair.
Before you proceed, find the serial number which is located on the rear panel of the unit and note it here for future reference.
Serial #
SS4VC/SS6VC BASIC CONCEPT
The SS4VC and SS6VC are designed to connect four and six pairs of loudspeakers, respectively, to one receiver or amplifier. Each pair of speakers can be independently turned on/off. The volume control knobs give you independent volume control in all speaker locations. These systems provide impedance protection whenever its protection circuit is manually engaged by the user. When engaged, the SS4VC and SS6VC adjust the impedance load presented to the receiver or amplifier. With most amplifiers, when multiple speakers are engaged, the protection switch should be engaged. With high amplifier volume, your SS4VC and SS6VC switcher may become warm. Do not operate your system below the impedance rating of the receiver, amplifier, or the switcher. Check the owner's manual of your receiver or amplifier. Do not exceed the 75Watt RMS rating of the SS4VC/SS6VC.
USING THE PROTECTION SWITCH
As a general rule, the more speaker pairs you have on, the more the protection circuitry will be needed. Leaving the Protection switch always engaged (“on” position) will provide the safest operating condition for your receiver or amplifier. For most receivers or amplifiers, the Protection switch should be engaged when more than one Speaker button is engaged on the SS4VC and SS6VC switchers. Failure to engage the Protection switch when multiple pairs of speakers are engaged may cause damage to your receiver or amplifier. The protection switch is located on the back of the SS4VC and SS6VC switchers.Slide the red switch towards the left to engage the 3Ω protection resistors. Slide the red switch towards the right to disengage the resistors and turn off the protection circuit.
NOTE: When protection circuitry is engaged, there may be a slight, but perceivable loss of volume in the speakers that are engaged. This is simply the trade-off for using resistive protection instead of individual amp channels for each speaker pair or an impedance matching device such as the Sonance AF8. Use dedicated amplifiers if you require more dynamic range.
CUSTOM BUTTON LABELS
Sonance makes multi-room sound distribution even more user-friendly by including Custom Button Labels (Sonance PN.33-1468). You can customize your SS4VC or SS6VC with a label for each button that corresponds with the room or area in which you have a pair of speakers playing. One sheet of button labels contains 120 pressure-sensitive labels, each with a 3 to 7-letter abbreviation for nearly every room or area likely to be encountered in your installation. Each label fits the dimensions of the indentations under the buttons on your SS4VC and SS6VC. A legend of the rooms or areas is included in the package for easy reference. Consult your Authorized Sonance Dealer for more information.
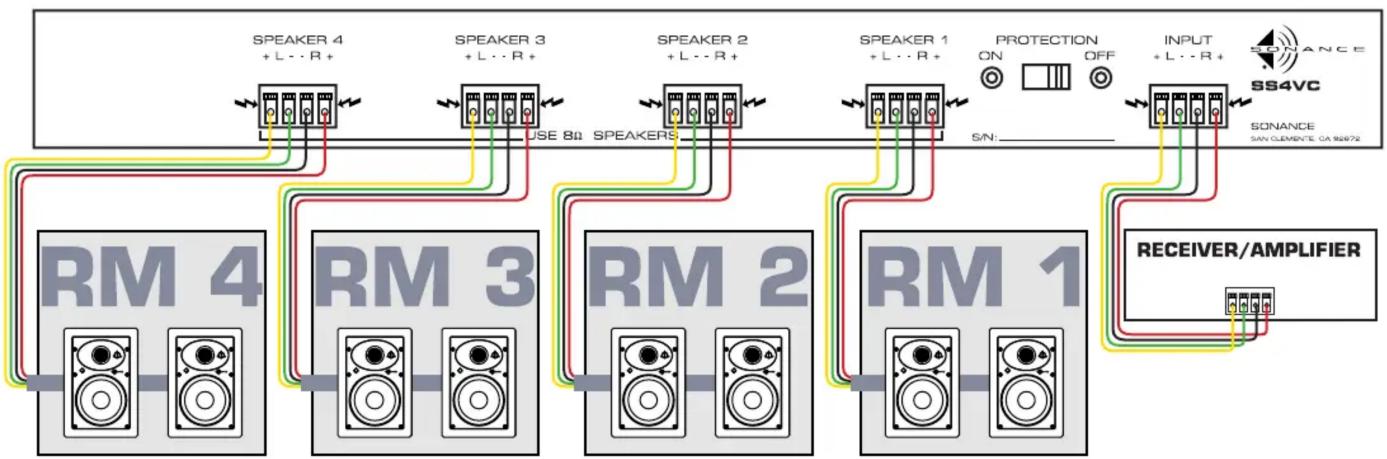
flowchart
graph TD
    A["Speaker 4 + L...R+"] --> B["Speaker 3 + L...R+"]
    B --> C["Speaker 2 + L...R+"]
    C --> D["Speaker 1 + L...R+"]
    D --> E["PROTECTION ON OFF"]
    E --> F["INPUT +L...R+"]
    F --> G["SS4VC SONANCE"]
    G --> H["Receiver/AMPLIFIER"]
    H --> I["Speaker 1"]
    I --> J["Speaker 2"]
    J --> K["Speaker 3"]
    K --> L["Speaker 4"]
    style A fill:#f9f,stroke:#333
    style B fill:#f9f,stroke:#333
    style C fill:#f9f,stroke:#333
    style D fill:#f9f,stroke:#333
    style E fill:#ccf,stroke:#333
    style F fill:#ccf,stroke:#333
    style G fill:#cfc,stroke:#333
    style H fill:#fcc,stroke:#333
    style I fill:#fcc,stroke:#333
    style J fill:#fcc,stroke:#333
    style K fill:#fcc,stroke:#333
    style L fill:#fcc,stroke:#333
Note: With the SS6VC (not shown), you can add up to 2 more rooms.
PLACEMENT
Because the SS4VC and SS6VC both contain resistors which consume power and dissipate current in the form of heat, the unit should be placed in a location that won't heat other source equipment and where there is good ventilation. If placing it in an enclosed cabinet or between shelving, make sure there is adequate space (at least two inches) on all sides and between the top of the switcher and any shelving, cabinetry, or components placed above it. A fan may be needed to draw air through the cabinet or shelving unit if components get too warm. We recommend that you do not place the unit on top of your receiver or amplifier.
Since your SS4VC and SS6VC will be used as a central switcher for multiple speaker pairs, it should be easily accessible. When placing it with other electronics, the SS4VC and SS6VC should be placed in a location that will accommodate the mass of speaker wires that will be connected between it, the speakers, and receiver or am
WIRING
IMPORTANT: Always use high grade speaker wire such as Sonance MediaLinQ™. We recommend 18 GA wire for runs of 50 feet or less, 16 GA for runs of 50-100 feet, or 14 GA for runs over 100 feet.
A. Source Connection:
- Connect the left speaker output of the receiver or amplifier to the left INPUT connector of the SS4VC/SS6VC (see diagram above). Make sure that the positive (+) terminal of the receiver or amplifier connects to the positive (+) terminal of the input connector of the SS4VC/SS6VC. The negative (-) connection should be connected to the negative (-) terminal of the input connector of the SS4VC/SS6VC.
- Repeat step 1 for the right side, connecting the right speaker output of the receiver or amplifier to the right INPUT connector of the SS4VC/SS6VC (see diagram above).
B. Speaker Connection:
- With appropriate speaker wire, connect the first pair of speakers to the left SPEAKER 1 connections on the back of the SS4VC/SS6VC. Make sure the speaker positive (+) is connected to the SS4VC/SS6VC positive (+), the speaker negative (-) to the SS4VC/SS6VC negative (-).
- Repeat step 1 for the remaining speaker pairs.
Operation of the SPEAKER Buttons:
To engage any pair of speakers, push in the button which corresponds to the pair of speakers you want to turn on. The “in” position means the speakers are on. Any combination of the speaker pairs may be played at once. To disengage any pair of speakers, push in the button which corresponds to the pair of speakers you want to turn off. The “out” position means the speakers are off.
Note: A slight decrease in volume may occur when additional speakers are engaged.
TROUBLESHOOTING
- Verify that the input connection is properly attached to the receiver or amplifier and that the receiver or amplifier is operating properly.
- Verify that the speaker selector button is pushed “in”(on position) and then verify that your speakers are properly wired.
SERVICE
If you have any questions about the operation or installation of your SS4VC/SS6VC, please call our Technical Assistance Department on any business day at: (800)582-0772 or (949)492-7777 from 7 a.m. to 5 p.m. PST.
Should your product require repair or service, contact your authorized Sonance retailer for help or use the following procedure:
- Prior to calling, note the product model number, serial number, purchase date, and original retailer's name and address.
- Contact our Technical Assistant Department at the number(s) above and describe the problem. If required a Return Merchandise Authorization (RMA) number will be issued. IMPORTANT: Do not return the unit to Sonance without first obtaining an RMA number.
- If you are directed to return the unit to Sonance for repair, pack the unit in its original shipping cartons (inner & outer). Replacement packaging can be obtained from Sonance for a small charge. Note, it is best if you place it into an additional outer "overcarton" before shipment to minimize the chance of theft in shipment.
- Contact United Parcel Service, Federal Express, or RPS to arrange prepaid (not collect) shipping. Do not use the United States Postal Service. IMPORTANT: Freight collect shipments will be refused.
- Write the Return Merchandise Authorization number on the outside of the shipping carton.
- For warranty work, please include a copy of the original bill of sale inside the package.
Ship the packaged unit to:
Technical Assistance Department
Sonance
212 Avenida Fabricante
San Clemente, CA 92672-7531
WARRANTY COVERAGE (USA ONLY)
If, within five (5) years from the date shown on the bill of sale, the unit fails due to a defect in workmanship or materials, Sonance will, at its option and at no charge to the purchaser, repair or replace the components of such unit which proves to be defective.
For this warranty to be effective, the bill of sale must show that the unit was purchased from an authorized Sonance retailer. This warranty shall apply exclusively to the original purchaser and shall not apply to units purchased for industrial or commercial use.
Furthermore, this warranty shall not apply if:
- Damage to the unit was caused by accident, abuse, or misuse;
- The unit was modified or repaired by unauthorized personnel; or
- The unit was not used as outlined in the operating instructions
Exclusions and Limitations
The warranty set forth above is in lieu of all other warranties, express or implied, of merchantability, fitness for a particular purpose, or otherwise. The warranty is limited to Sonance products registered herein and specifically excludes any damage to any associated equipment, which may result for any reason from use with this product.
Sonance shall, in no event, be liable to incidental or consequential damages arising from any breach of this warranty or otherwise. This warranty gives you specific legal rights, and you may have other rights, which vary from state to state.
SPECIFICATIONS
| Power Rating: | 75 Watts RMS Maximum input per channel |
| Switch Type: | 12 Position light touch silent rotary switch"Make Before Break" |
| Terminal Type: | Toggle Quick Disconnect 20-14 AWG wire capacity |
| Frequency Response: | 20-20KHz±1dB |
| Speaker Impedance: | 8 Ω per zone |
| Total Attenuation: | -42 dB; full clockwise position is straight-through, full counterclockwise position is off |
| Attenuation by step: | top 7 steps are -3dB per step, lowest 4 steps are -6dB per step |
| Dimensions (W x H x D): | 16 7/8" x 2 3/16" x 10 1/4" (429mm x 56mm x 260mm) |
| RMF (W x H x D): | 19" x 1 3/4" x 10 1/4" (483mm x 45mm x 260mm) |
Specifications and features subject to change without notice.
- IMPORTANT SAFETY INSTRUCTIONS
- INSTALLATION INSTRUCTIONS
- S S 4 V C / S S 6 V C
- CAUTION
- INTRODUCTION
- UNPACKING
- SS4VC/SS6VC BASIC CONCEPT
- USING THE PROTECTION SWITCH
- CUSTOM BUTTON LABELS
- PLACEMENT
- WIRING
- Source Connection:
- Speaker Connection:
- Operation of the SPEAKER Buttons:
- TROUBLESHOOTING
- SERVICE
- WARRANTY COVERAGE (USA ONLY)
- Exclusions and Limitations
- SPECIFICATIONS
Brand : SONANCE
Model : SS4VC
Category : Hi-Fi System