SS6 - Hi-Fi System SONANCE - Free user manual and instructions
Find the device manual for free SS6 SONANCE in PDF.


| Product Type | Hi-Fi System |
| Brand | Sonance |
| Model | SS6 |
| Dimensions (H x W x D) | 8.5 x 12 x 7 inches (approx.) |
| Weight | 5.2 kg (approx.) |
| Power Supply | AC 100-240V, 50/60Hz |
| Audio Output Power | 50W per channel (RMS) |
| Frequency Response | 40Hz - 20kHz |
| Impedance | 8 ohms |
| Connectivity | Bluetooth 5.0, RCA line-in, 3.5mm aux |
| Supported Audio Formats | MP3, WAV, FLAC, AAC |
| Control | Front panel buttons, remote control |
| Material | MDF cabinet with vinyl finish |
| Operating Temperature | 32°F to 104°F (0°C to 40°C) |
| Storage Temperature | -4°F to 140°F (-20°C to 60°C) |
| Safety Features | Overheat protection, surge protection |
| Care Instructions | Wipe with soft dry cloth; do not use liquid cleaners |
| Spare Parts Availability | Contact Sonance customer service |
| Warranty | 2 years limited |
Frequently Asked Questions - SS6 SONANCE
User questions about SS6 SONANCE
0 question about this device. Answer the ones you know or ask your own.
Ask a new question about this device
Download the instructions for your Hi-Fi System in PDF format for free! Find your manual SS6 - SONANCE and take your electronic device back in hand. On this page are published all the documents necessary for the use of your device. SS6 by SONANCE.
USER MANUAL SS6 SONANCE
SS6 and SS4 Speaker Selector Installation Instructions
CAUTION
Under normal operating conditions the speaker selector will become warm. If not used properly the underside of this unit can become extremely hot. Do not operate the selector with an amplifier that exceeds the Maximum Amplifier Power ratings described in the Specifications section on page 2.
To ensure safe operation follow all of these instructions carefully:
- Do not place the selector on top of or near plastic or combustible material.
- Do not place other components directly on top of the selector.
- Do not place the selector in an enclosed cabinet without providing adequate ventilation.
Introduction
The SS6 and SS4 let you connect multiple pairs of loudspeakers to one receiver or amplifier and have all sets of speakers active at one time. The SS6 lets you connect up to six pairs of speakers; the SS4 lets you connect up to four. Each pair of speakers can be turned ON and OFF independently.
Where to Place the Speaker Selector
For optimum performance, the speaker selector should be placed close to your receiver/amplifier.
If you place the selector in an enclosed cabinet or between shelving, make sure there is adequate space (at least two inches) between the top of the selector and any shelving, cabinetry, or components placed above it. Do not place the speaker selector on top of or near plastic or combustible material.
Connecting the Speaker Selector to the Amplifier
Important: Turn the receiver's or amplifier's power OFF before making any connections to the selector.
Use 16-gauge (or larger) speaker cable like Sonance MediaLinQ Gold or Bronze 16/4 speaker wire to connect the amplifier to the selector.
- Strip 14 " - 12 " of insulation from each speaker lead. Twist the strands to ensure that there are no stray strands.
- Connect the speaker leads between your amplifier's speaker outputs and the input terminals on the back of the speaker selector (see Figure 1, on page 3). To avoid a short-circuit that can damage your receiver or amplifier, be sure no stray strands of wire touch each other or the chassis' of the selector or amplifier.
Note: Double check the polarity of the speaker wires for each channel: Amplifier “+” to Selector “+” and Amplifier “-” to Selector “-”.
Connecting the Speaker Selector to Speakers
Important: Turn the receiver's or amplifier's power OFF before making any connections to the selector.
Use 16-gauge (or larger) speaker cable. It is easiest to run 4-conductor cable (for example, Sonance MediaLinQ gold or Bronze 16/4 speaker cable) from each stereo pair of speakers to one of the speaker outputs on the back of the speaker selector (see 'Room 1' in Figure 2, on page 3).
Adding Speaker Volume Controls
We recommend that you connect all your speakers to in-wall volume controls (like the Sonance VC60S/R) and then to the speaker selector (see 'Rooms 2 - 6' in Figure 2, on page 3). This gives you independent volume balancing and control in all speaker locations: Your receiver's volume control acts as the Master Volume, and each individual pair of speakers can be either OFF, or ON at its own volume level, independent of the other speakers connected in the system.
Protecting the Amplifier
The speaker selector includes a Protection switch located underneath the selector, on the right side. To protect your receiver or amplifier Sonance strongly recommends that you leave the Protection switch engaged at all times. Always operate your receiver or amplifier within its rated power range and within the power range of the speaker selector.
- To ENGAGE the Protection circuit, slide the red switch towards the back of the selector.
- To DISENGAGE the Protection circuit, slide the red switch towards the front of the selector.
Important: Turning the protection switch OFF allows greater power to your speakers, but may damage your receiver/amplifier.
Automatic Internal Fuse
The SS6 and SS4 have an internal fuse that will disconnect all of the speakers if the current draw through the unit exceeds a safe level. After the current draw returns to a safe level the fuse will automatically reset and re-connect all of the speakers.
Important: If the speaker selector continually turns the speakers OFF and ON, one or more of the following unsafe conditions exists in the audio system:
- The amplifier's volume is set too high.
- The amplifier's power output exceeds the Maximum Amplifier Power ratings as described in the Specifications section below.
- There is a short-circuit in one or more of the speaker wires.
To ensure safety, correct any and all of these conditions before operating the audio system again.
Specifications:
Power Handling:
Maximum Amplifier Power with Protection circuit ENGAGED and ALL pairs of speakers operating: 40 watts RMS per channel
Maximum Amplifier Power with Protection circuit NOT engaged and ONE (1) pair of speakers operating: 120 watts RMS per channel
Protection Circuitry: Resistive in-line
Switch Type: Slide-slide, self-cleaning
Frequency Response: 20Hz - 20kHz
Dimensions (W x H x D): SS6 - 11¼" x 2" x 7" (286mm x 51mm x 178mm)
SS4 - 8 ^1/2 " × 2" × 7" (216mm × 51mm × 178mm)
Figure 1: Connecting the Selector to The Amplifier
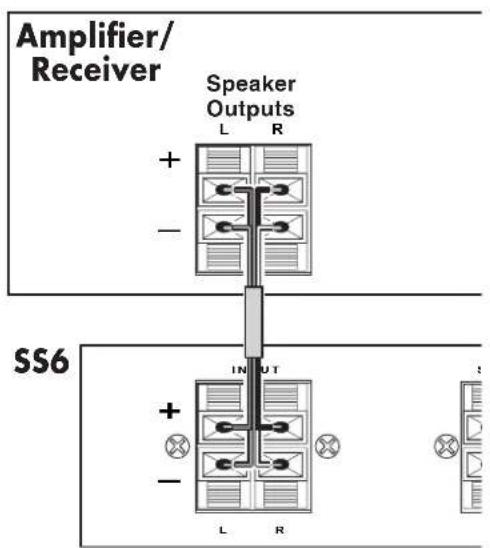
Figure 2: Connecting the Selector to Speakers (SS6 Shown)
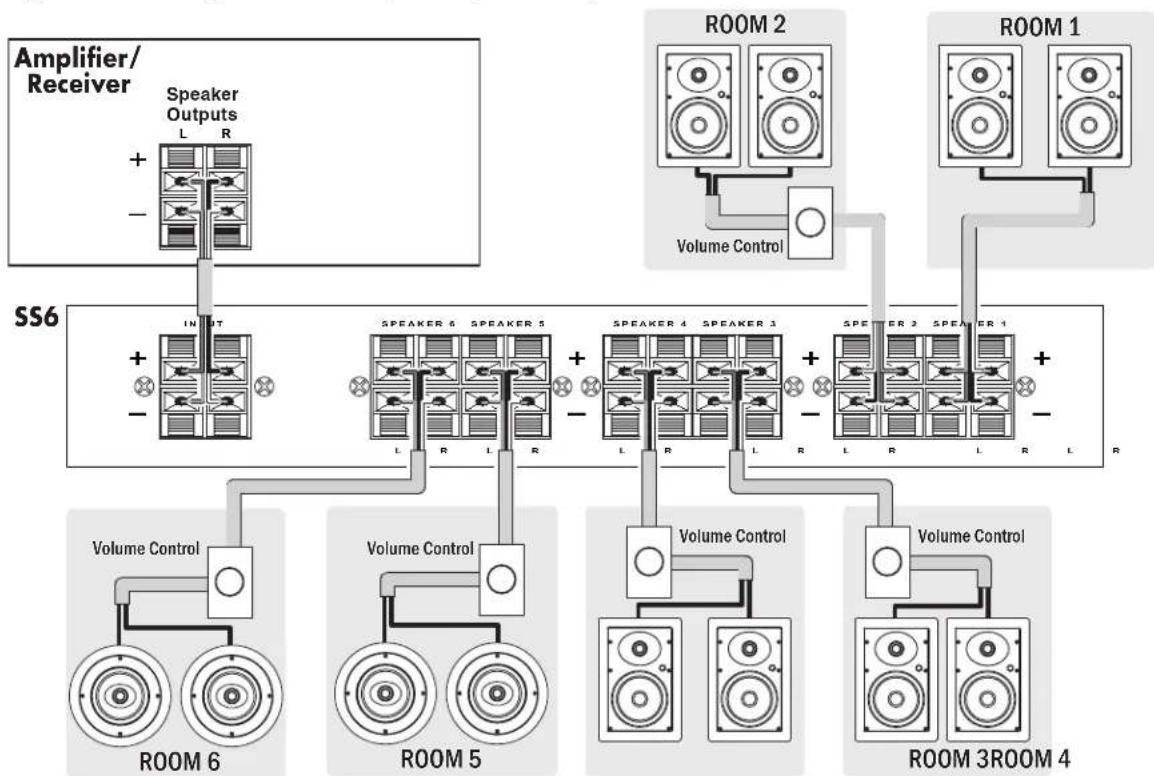
flowchart
graph TD
    A["Amplifier/Receiver"] --> B["Speaker Outputs L R"]
    B --> C["SS6"]
    C --> D["Volume Control Room 6"]
    C --> E["Volume Control Room 5"]
    C --> F["Volume Control Room 3ROOM 4"]
    D --> G["SPEAKER 6 SPEAKER 5"]
    E --> H["SPEAKER 4 SPEAKER 3"]
    F --> I["SPEAKER 2 SPEAKER 1"]
    G --> J["Volume Control Room"]
    H --> K["Volume Control Room"]
    I --> L["Volume Control Room"]
Technical Assistance and Service
If you have questions about the operation or installation of this product, please call our Technical Assistance Department on any business day at 949.492.7777 from 7am to 5pm, pacific time.
If this product should need repair or service, contact your Sonance Authorized Dealer for help, or use the following procedure:
- Prior to calling, note the product's model number, serial number, purchase date, and the name and address of the dealer where you purchased the product.
- Contact our Technical Assistance Department at the above number(s) and describe the problem the unit is experiencing. If applicable, they will issue a Return Authorization Number.
IMPORTANT: YOU MUST HAVE PRIOR AUTHORIZATION TO RETURN YOUR PRODUCT TO SONANCE!
-
If you're directed to return the unit to Sonance for repair, pack the unit in its original shipping carton. If needed, you can obtain replacement packaging from us for a small charge. Note: it is best if you place the box into an additional outer "overcarton" before shipment to minimize a chance of theft in shipment. Please include a copy of the original bill of sale inside the package.
-
Contact a package delivery service such as United Parcel Service or Federal Express to arrange prepaid (not collect) shipping. Do not use the U.S. Postal Service.
IMPORTANT: Freight collect shipments will be refused.
- Write the Return Authorization Number on the outside of the shipping carton.
- Ship the packaged unit to:
Quality Assurance Department
Sonance
991 Calle Amanecer
San Clemente, CA 92673
Limited Warranty Coverage (U.S.A. Only)
Sonance warrants to the original retail purchaser only that this Sonance product will be free from defects in materials and workmanship for a period of five (5) years, provided the product was purchased from a Sonance Authorized Dealer.
Defective products must be shipped, together with proof of purchase, prepaid insured to the Authorized Sonance Dealer from whom they were purchased, or to the Sonance factory at the address listed on this instruction manual. Freight collect shipments will be refused. It is preferable to ship this product in the original shipping container to lessen the chance of transit damage. In any case, the risk or loss or damage in transit is to be borne by the purchaser. If, upon examination at the factory or Authorized Sonance Dealer, it is determined that the unit was defective in materials or workmanship at any time during this warranty period, Sonance or the Authorized Sonance Dealer will,
at its option, repair or replace this product at no additional charge, except as set forth below. It this model is no longer available and can not be repaired effectively, Sonance, at is sole option, may replace the unit with a current model of equal or greater value. In some cases where a new model is substituted, a modification to the mounting surface may be required. If mounting surface modification is required, Sonance assumes no responsibility or liability for such modification. All replaced parts and product become the property of Sonance. Products replaced or repaired under this warranty will be returned to the original retail purchaser, within a reasonable time, freight prepaid.
This Warranty does not include service or parts to repair damage caused by accident, disaster, misuse, abuse, negligence, inadequate packing or shipping procedures, commercial use, voltage inputs in excess of the rated maximum of the unit, or service, repair or modification of the product which has not been authorized or approved by Sonance. This Warranty also excludes normal cosmetic deterioration caused by environmental conditions. This Warranty will be void if the Serial Number on the product has been removed, tampered-with or defaced. This Warranty is in lieu of all other expressed warranties. If the product is defective in materials or workmanship as warranted above, the purchaser's sole remedy shall be repair or replacement as provided above. In no event will Sonance be liable for any incidental or consequential damages arising out of the use or inability to use the product, even if Sonance or a Authorized Sonance Dealer has been advised of the possibility of such damages, or for any claim by any other party.
Some states do not allow the exclusion or limitation of consequential damages, so the above limitation and exclusion may not apply. All implied warranties on the product are limited to the duration of this expressed Warranty. Some states do not allow limitation on the length of an implied warranty. If the original retail purchaser resides in such a state, this limitation does not apply.
Exclusions and Limitations
The Warranty set forth above is in lieu of all other warranties, express or implied, of merchantability, fitness for a particular purpose, or otherwise. The Warranty is limited to Sonance products registered herein and specifically excludes any damage to loudspeakers and other allied or associated equipment which may result for any reason from use with this product. Sonance shall, in no event, be liable for incidental or consequential damages arising from any breach of this Warranty or otherwise. This Warranty gives you specific legal rights, and you may have other rights which vary from state to state.

- SS6 and SS4 Speaker Selector Installation Instructions
- CAUTION
- Introduction
- Where to Place the Speaker Selector
- Connecting the Speaker Selector to the Amplifier
- Connecting the Speaker Selector to Speakers
- Adding Speaker Volume Controls
- Protecting the Amplifier
- Automatic Internal Fuse
- Specifications:
- Technical Assistance and Service
- Limited Warranty Coverage (U.S.A. Only)
- Exclusions and Limitations
Brand : SONANCE
Model : SS6
Category : Hi-Fi System