Slide Module V3 - Uncategorized Edelkrone - Free user manual and instructions
Find the device manual for free Slide Module V3 Edelkrone in PDF.


| Product Type | Motion Control Module for SliderPLUS |
| Brand | Edelkrone |
| Model | Slide Module V3 |
| Power Supply | 2 x LP-E6 or NP-F batteries (parallel) or DC adapter (7.4V-14.8V, 1A) |
| Voltage Range | 7.4V - 14.8V |
| Current | 1A |
| Operating Temperature | -5°C to +45°C |
| Connectivity | Bluetooth / Wi-Fi (via edelkrone App) |
| Compatible Slider | Edelkrone SliderPLUS |
| Functions | Time-lapse, stop motion, smooth manual & motorized sliding |
| Ports | Shutter trigger cable port, Link port, DC IN socket, Battery bracket ports |
| Display | Information screen |
| Battery Brackets | Sold separately (LP-E6 or NP-F type) |
| Included Accessories | DC IN cable, connection screws, 2.5 mm Allen key |
| Tension Adjustment | Manual via Allen key (accessible through cover) |
| Mounting | Attaches to inclined side of SliderPLUS for inclined motion |
| Hot Swap | Batteries can be swapped without power interruption |
| Weight (Approx.) | 0.5 kg |
| Dimensions (Approx.) | 100 x 80 x 50 mm |
| Cleaning | Wipe with dry cloth; avoid chemicals |
| Storage Temperature | Avoid extreme temperatures and vibration |
| Disposal | Electronic waste – dispose at designated collection facilities |
Frequently Asked Questions - Slide Module V3 Edelkrone
User questions about Slide Module V3 Edelkrone
0 question about this device. Answer the ones you know or ask your own.
Ask a new question about this device
Download the instructions for your Uncategorized in PDF format for free! Find your manual Slide Module V3 - Edelkrone and take your electronic device back in hand. On this page are published all the documents necessary for the use of your device. Slide Module V3 by Edelkrone.
USER MANUAL Slide Module V3 Edelkrone
Before operating your edelkrone, please watch the user's manual video from the link below
http://edel.kr/sm3

edelkrone filmmaking solutions
TABLE OF CONTENTS
- WHAT'S IN THE BOX & THE BASICS
- ATTACHING BATTERY BRACKET
- MOUNTING YOUR SLIDE MODULE TO YOUR SLIDERPLUS
- ADJUSTING TENSION
- INCLINED MOTION
- HOT SWAPPING
- START USING
1. WHAT'S IN THE BOX & THE BASICS
text_image
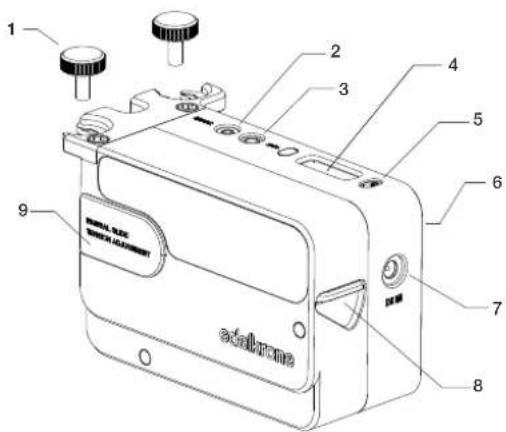
1 2 3 4 5 6 7 8 9 SINTEL RASS RASS (A) 100mm adaturna- Connection screws for Slide Module
- Shutter trigger cable port
- Link port
- Information screen
- On/Off Button
-
Battery bracket ports
-
DC IN socket & Cable
- Holder Port
2.5 mm Allen key - Manual slide tension adjustment port
2. ATTACHING BATTERY BRACKET
natural_image
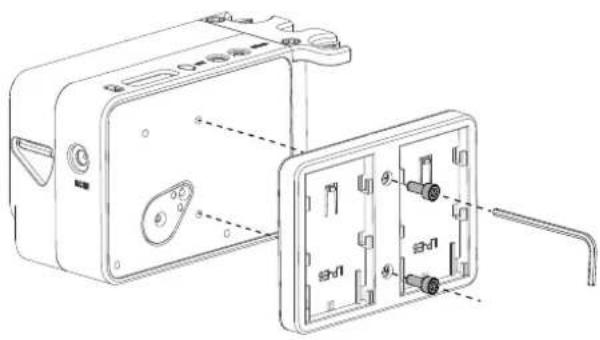
Technical line drawing of a device housing with internal components and mounting points (no text or symbols)Depending on your choice of battery, you need to mount the related battery bracket with 2 screws to Slide Module V3. Battery brackets are sold separately.

A detailed video explaining how to attach the battery bracket can be found at: http://edel.kr/sm3
3. MOUNTING YOUR SLIDE MODULE TO YOUR SLIDERPLUS
text_image
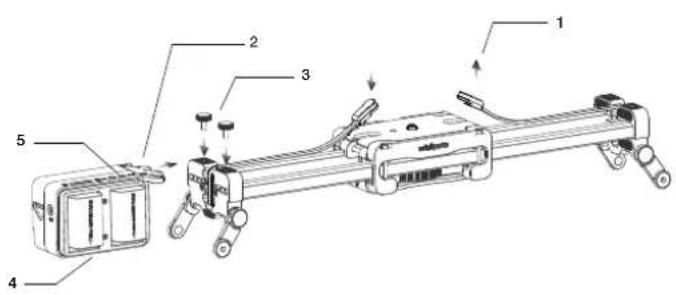
Technical diagram of a mounted device with numbered components and labeled parts- Detach manual slide control belt and attach the motion control belt.
- Attach Slide Module to SliderPLUS.
-
Place the connection screws and tighten them.
-
Connect the batteries or power adapter to the DC IN socket.
- Connect shutter trigger cable to the shutter trigger cable port Ⓞ when you intend to shoot time-lapse and stop motion.
! Connecting cables to incorrect ports may cause serious damage to the modules.
A detailed video explaining how to attach belt and mounting details can be found at http://edel.kr/sm3
4. ADJUSTING TENSION
text_image
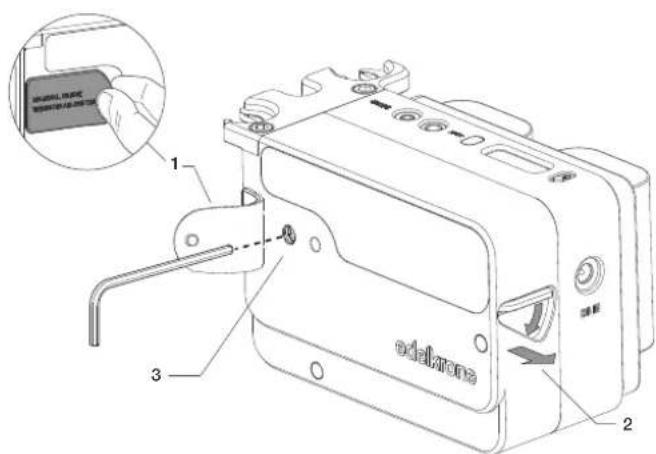
1 2 3 odelrone- Open Manual slide tension adjustment cover to reach the screw.
- Tum the allen key down and pull it out.
- Use the allen key to adjust the tension.
! If you are not able to slide manually, try loosening the tension. Make as small adjustments as possible.
A detailed video explaining how to adjust the tension of this mechanism can be found at: http://edel.kr/sm3
text_image
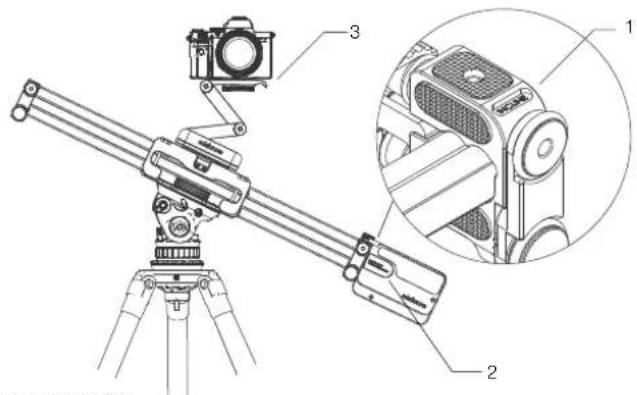
Technical diagram of a camera mounted on a tripod, with labeled parts and an inset showing the internal components.To get inclined shots,
1. You should attach your Slide Module to incline side of the SliderPLUS.
2. You should tighten slide tension of the Slide Module to get inclined motion.
3. Place your camera to FlexTILT Head or any camera head.
! If you are not able to slide manually after inclined operation, try loosening the tension. Make as small adjustments as possible.
! Please make sure that your tripod legs are opened widely to prevent falls and balance issues.
A detailed video explaining how to attach the battery bracket can be found at: http://edel.kr/sm3
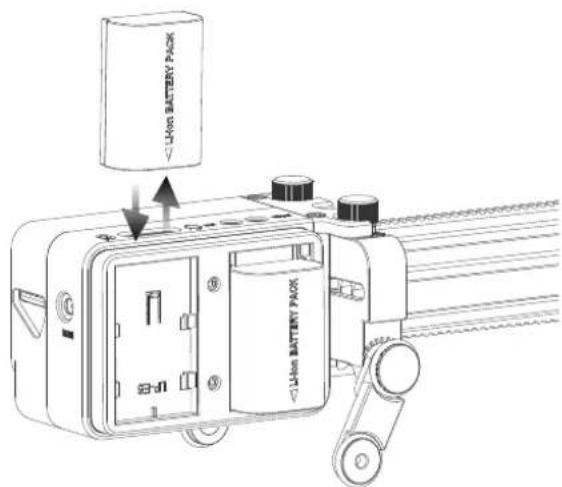
While your Slide Module V3 is in use, you may switch batteries without losing connection or experiencing an interruption.
text_image
Lithn BATTERY PACK Lithn BATTERY PACK7. START USING


- Download the edelkrone App to your mobile device from the App Store or Google Play. Links can be found at www.edelkrone.com/products/slide-module-v3
- edelkrone App will automatically pair with your Slide Module V3 through Bluetooth/Wifi.
- Slide Module V3 will turn on with a beep sound.
- You are now ready to use your Slide Module V3 for SliderPLUS. Just keep following the instructions on your mobile device or visit manuals.edelkrone.com for a detailed video instruction.
Always start using with fully charged batteries.
Make sure your mobile device's Bluetooth connection is on.
A detailed video explaining the edelkrone App can be found at: http://edel.kr/sm3
DISPOSAL OF THE PRODUCT & WARNINGS
Should the product become damaged beyond repair, or if you wish to dispose of it, it must be disposed separately from the municipal waste stream via designated collection facilities appointed by the government or the local authorities. Observe the regulations of your area and country that relate to the disposal of electronic products.
* Keep your electronic Motion Control Unit away from all sorts of liquids. * In order to preserve your Motion Control Unit and battery performance at their best, use the exact same type of batteries with an equivalent level of charge during dual-battery operation. * Do not attempt to disassemble or modify any internal parts of your Motion Control Unit. If the device appears to be malfunctioning, discontinue use immediately and contact support for qualified service.
* Never force a different type of connector into a port. * Never use or store your Motion Control Unit in areas subject to extreme temperatures, or high levels of vibration.
* If your motion control unit becomes unresponsive, disconnect and re-connect the power source. Make sure your DC adapter is plugged in or your batteries are properly charged. If the problem persists, contact our support team. * Environmental factors may affect your Motion Control Unit's performance. Keep your product away from environmental hazards such as dust or heavy resonance. Do not use chemical materials to clean your product.
* Only use included battery plate, DC adapter or equivalent power sources. Use of an inappropriate power source may permanently damage your Motion Control Unit. * If there is an impairment on the power or connector cable, stop using the Motion Control Unit immediately.
* Avoid dropping or causing physical damage to your Motion Control Unit.
* Do not place heavy objects on top of your Motion Control Unit.
**edelkrone cannot be held responsible for damage caused by improper use or modification of the product.
* Rated Voltage: 7.4V-14.8V (2 x 7.4V Parallel LP-E6 or NP-F Battery) Rated Current: 1A Operating Temperature: -5°C to +45°C
For more information and tips about your Slide Module, please watch the user's manual videos at: http://edel.kr/sm3