SliderPLUS Pro v5 - Uncategorized Edelkrone - Free user manual and instructions
Find the device manual for free SliderPLUS Pro v5 Edelkrone in PDF.


User questions about SliderPLUS Pro v5 Edelkrone
0 question about this device. Answer the ones you know or ask your own.
Ask a new question about this device
Download the instructions for your Uncategorized in PDF format for free! Find your manual SliderPLUS Pro v5 - Edelkrone and take your electronic device back in hand. On this page are published all the documents necessary for the use of your device. SliderPLUS Pro v5 by Edelkrone.
USER MANUAL SliderPLUS Pro v5 Edelkrone
Before operating your edelkrone,
please watch the user's manual video from the link below
http://edel.kr/sld5

edelkrone
fimmaking solutions
TABLE OF CONTENTS
- WHAT'S IN THE BOX & THE BASICS
- ATTACHING THE BELTS & TENSION ADJUSTMENT
- ATTACHING THE BELTS & TENSION ADJUSTMENT
- LEGS & ANGLE ADJUSTMENT
- MOUNTING SLIDERPLUS ON TRIPOD
- MOUNTING YOUR CAMERA ON SLIDERPLUS
- MOUNTING YOUR MAGIC ARM ON SLIDERPLUS
- INCLINED MOTION
- CLEANING KIT
- CAUTIONS AND TIPS
1. WHAT'S IN THE BOX & THE BASICS
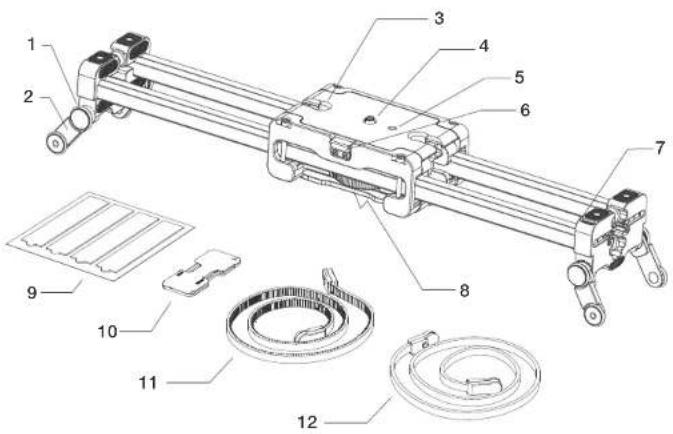
text_image
Technical diagram of a mechanical device with numbered components for identification and assembly reference.- Rubber feet
- Built-in foldable legs
- Magnetic belt clip slot
- 3/8"-16 pop-up screw
- 1/4" mounting port
-
Instant locking mechanism
-
Incline
- Mounting wheel for 3/8"-16 mounting port
- Cleaning kit (x3)
- 2.5mm-3mm allen keys
- Motion control belt (x2)
- Manual control belt (x2)
2. ATTACHING THE BELTS & TENSION ADJUSTMENT
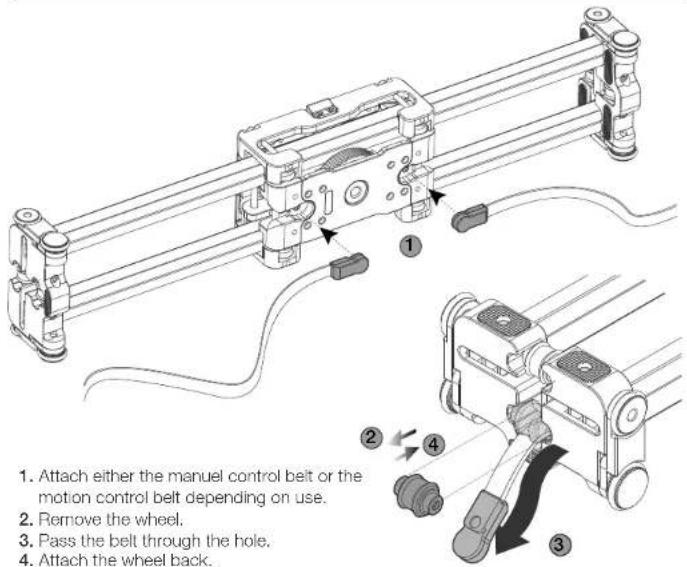
text_image
1. Attach either the manuel control belt or the motion control belt depending on use. 2. Remove the wheel. 3. Pass the belt through the hole. 4. Attach the wheel back.
A detailed video explaining how to attach the belts details can be found at: http://edel.kr/sld5
3. ATTACHING THE BELTS & TENSION ADJUSTMENT
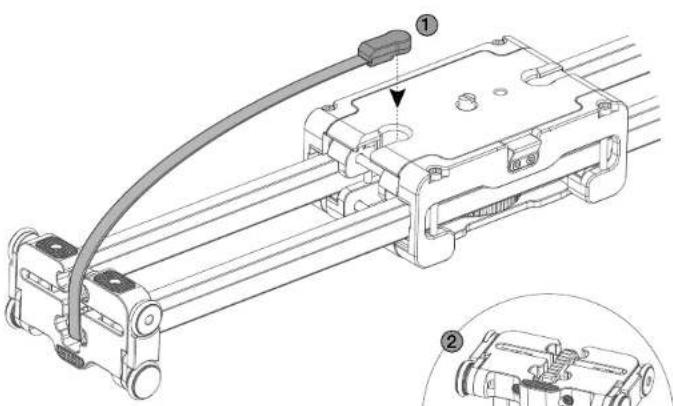
natural_image
Technical line drawing of a mechanical assembly with labeled parts (no text or symbols present)- Attach the other head of belt.
- If bolt tension is low, you may increase it by loosening the side wall screws and pulling out the side walls until desired tension is achieved.
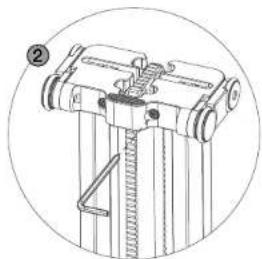
natural_image
Technical line drawing of a mechanical device with no visible text or symbols
A detailed video explaining how to attach the belts details can be found at: http://edel.kr/sld5
4. LEG & ANGLE ADJUSTMENT
text_image
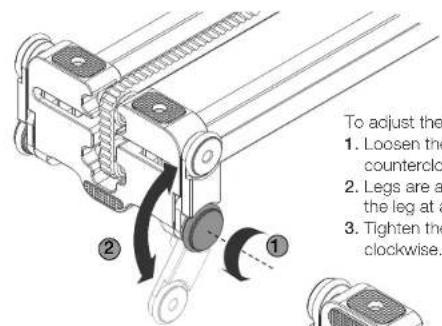
To adjust the 1. Loosen the counterclock 2. Legs are a the leg at a 3. Tighten the clockwise.To adjust the legs,
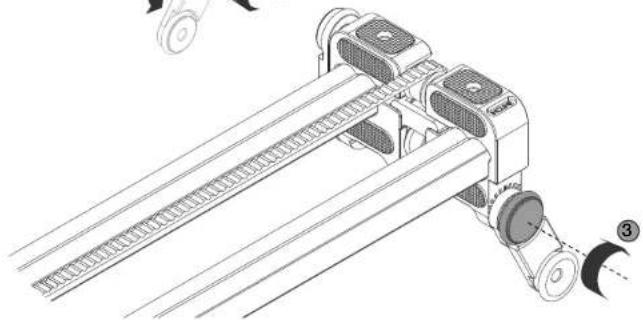
1. Loosen the wheel by turning it counterclockwise.
2. Legs are adjustable at each 15°. Adjust the leg at an appropriate angle.
3. Tighten the wheel by turning it clockwise.
natural_image
Technical line drawing of a mechanical conveyor system with rollers and guide rails (no text or symbols)
A detailed video explaining how to leg adjustment details can be found at: http://edel.kr/sld5
5. MOUNTING YOUR SLIDERPLUS TO YOUR TRIPOD
text_image
1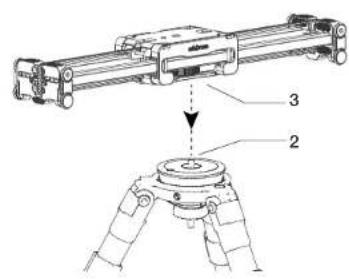
text_image
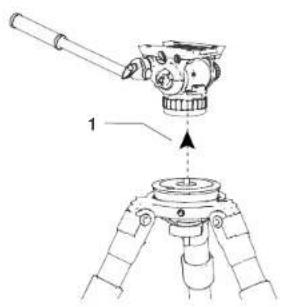
Technical diagram of a mechanical device with labeled parts 2 and 3, showing assembly steps.- Detach tripod head from your tripod.
- Place your SliderPLUS onto your tripod's 3/8"-16 mounting screw.
- Mount using the mounting wheel.
A detailed video explaining the process can be found at: http://edel.kr/sld5
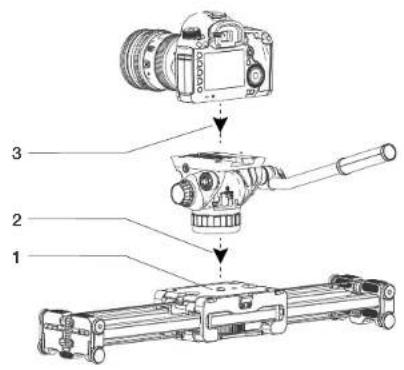
6. MOUNTING YOUR CAMERA TO YOUR SLIDERPLUS
text_image
Diagram showing assembly steps of a DSLR camera with numbered components: top view, midpiece, and front view.- SliderPLUS has 3/8"-16 screw for your tripod head hidden inside. You can access this screw with the help of a coin. Using a coin, turn the screw until it pops out. To hide the screw back again just press it down and turn it counter clockwise.
- Place your tripod head on the screw and tighten clockwise.
- Attach your camera to your tripod head.
A detailed video explaining the mounting process can be found at: http://edel.kr/sld5
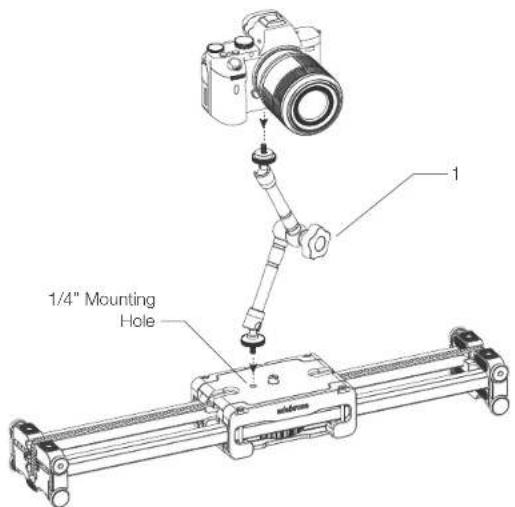
7. MOUNTING YOUR MAGIC ARM ON SLIDERPLUS 8. INCLINED MOTION
text_image
1/4" Mounting Hole- You can mount any camera head or arm to your SliderPLUS with 1/4" mounting screw.

A detailed video explaining mounting process can be found at: http://edel.kr/sld5
text_image
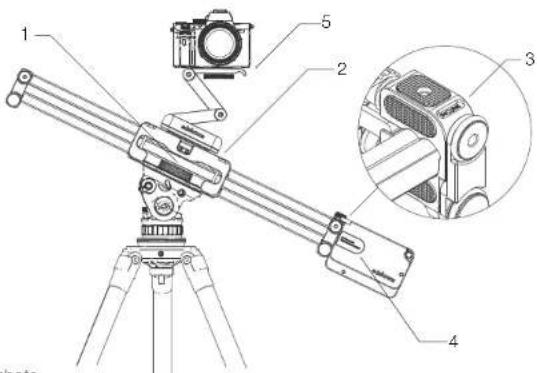
Technical diagram of a camera setup with labeled components and an inset view of the camera's internal structure.To get inclined shots,
-
Place your SliderPLUS onto 3/8"-16 mounting screw of your tripod head.
-
Attach your FlexTILT Head or any camera head onto your SliderPLUS.
-
You should attach your Slide Module to incline side of the SliderPLUS.
-
You should tighten the slide tension of the Slide Module to get inclined motion.
-
Place your camera to FlexTILT Head or any camera head.
! If you are not able to slide manually after inclined operation, try loosening the tension. Make as small adjustments as possible.
! Please make sure that your tripod legs are opened widely enough to prevent falls and balance issues.

A detailed video explaining inclined motion can be found at: http://edel.kr/sld5
9. CLEANING KIT
text_image
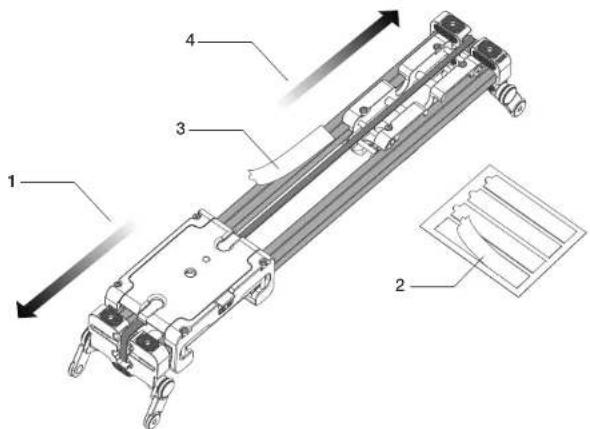
Technical diagram of a mechanical device with numbered components and directional arrows indicating motion or assembly.- Separate the slider upper and lower carriages while your slider is resting on a flat surface as shown.
- Remove a double sided sticker from the cleaning kit.
- Stick one side of sticker on slider rail as shown and peel off the white cover from the sticker.
- Slide the slider cars from one end to the other to clean the wheels.
- Repeat this process for all wheels.

A detailed video explaining how to use cleaning kit details can be found at: http://edel.kr/sld5
10. CAUTIONS AND TIPS
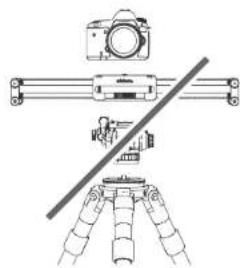
Please contact our dedicated customer care team for recommended tripod legs.
- In order to get perfect results with you SliderPLUS please attach your SliderPLUS directly to tripod legs, not to tripod head.
natural_image
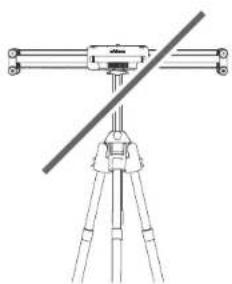
Diagram of a camera setup with tripod-mounted sensors and a diagonal line (no text or symbols)- If your tripod has a feature that allows you to extend the height from its neck, we suggest keeping it down and as tight as possible in order to prevent a rainbow effect.
natural_image
Line drawing of a tripod-mounted surveying instrument with a diagonal line intersecting it (no text or symbols)
A detailed video explaining the application usage details can be found at: http://edel.kr/sld5
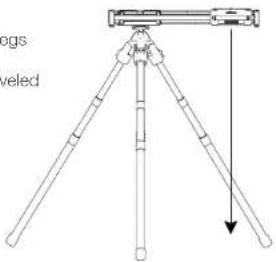
- Please make sure that your SliderPLUS withstands within the area of the tripod logs to prevent falls and balance issues. Always make sure that your system is leveled and balanced.
text_image
Bags veled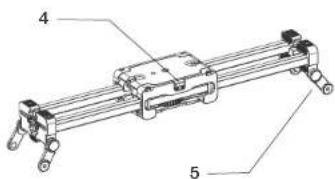
text_image
Technical diagram of a mechanical device with labeled parts 4 and 5- Always keep your slider locked while it is not in use.
- Use built-in foldable legs to level your system.
SliderPLUS can travel twice its own length when it's mounted on a tripod. When using it on its feet, it can only travel its own length.
For more tips please watch the user's manual videos at: http://edel.kr/sld5
DISCLAIMER
edelkrone cannot be held responsible for damage caused by improper use or modification of the product.
For more information and tips about your SliderPLUS, please watch the user's manual videos at: http://edel.kr/sld5
edelkrone
www.edelkrone.com