Unite 150 - Video Conferencing System ClearOne - Free user manual and instructions
Find the device manual for free Unite 150 ClearOne in PDF.


| Product Type | USB 3.0 HD Video Conferencing Camera |
| Model | Unite 150 |
| Image Sensor | 1/2.7 inch CMOS, 2.07 Megapixels |
| Video Formats | 1080p at 30/25 fps, 720p at 30/25 fps |
| Lens | 12x optical zoom, f3.5 to 42.3mm, F1.8 to F2.8 |
| Horizontal Field of View | 72.5° (wide) to 6.9° (tele) |
| Pan Range | ±170° |
| Tilt Range | -30° to +90° |
| Preset Positions | 255 (0.1° accuracy) |
| Video Interface | USB 3.0 (Type B), compatible with USB 2.0, UVC 1.0 to 1.5 |
| Audio Interface | 3.5mm Line In, AAC audio encoding |
| Control Interface | RS232 In/Out (VISCA, Pelco-D, Pelco-P) |
| Power Supply | DC 12V, 1.0A max, consumption 12W max |
| Dimensions (W x D x H) | 144 mm x 144 mm x 168 mm |
| Net Weight | 0.91 kg |
| Operating Temperature | -10°C to 40°C (14°F to 104°F) |
| Storage Temperature | -40°C to 60°C (-40°F to 140°F) |
| Maintenance | Clean with soft dry cloth; use diluted neutral detergent if necessary. Avoid solvents. |
| Safety Precautions | Do not expose to rain or moisture. Do not remove cover. Use only specified conditions. |
| Spare Parts & Repairability | Contact ClearOne Technical Support for repairs or replacement parts. |
Frequently Asked Questions - Unite 150 ClearOne
User questions about Unite 150 ClearOne
0 question about this device. Answer the ones you know or ask your own.
Ask a new question about this device
Download the instructions for your Video Conferencing System in PDF format for free! Find your manual Unite 150 - ClearOne and take your electronic device back in hand. On this page are published all the documents necessary for the use of your device. Unite 150 by ClearOne.
USER MANUAL Unite 150 ClearOne
text_image
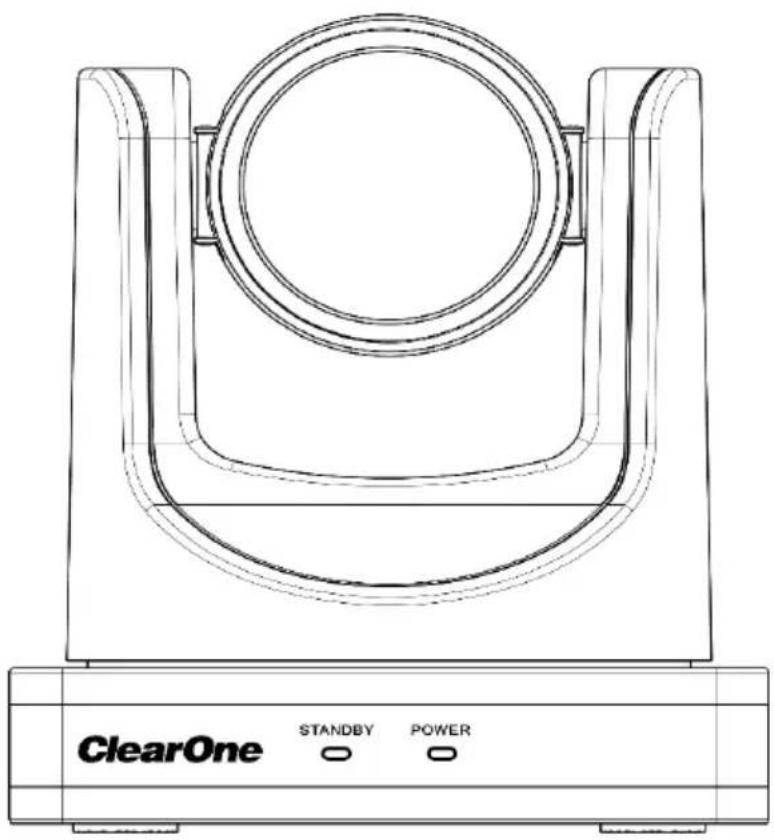
zoom CertifiedUNITE® 150 CAMERA - USER GUIDE
text_image
ClearOne STANDBY POWERCOPYRIGHT NOTICE
ClearOne
5225 Wiley Post Way
Suite 500
Salt Lake City, UT 84116
Telephone 1.801.975.7200
Tech Sales 1.801.974.3760
Fax 1.801.303.5711
E-mail collaborate.support@clearone.com
On the Web www.clearone.com
UNITE ^® 150 USER GUIDE
CLEARONE DOCUMENT
DOC-0337-001 REV 1.0 – June 2017
© 2017 ClearOne Inc. - All rights reserved. No part of this document may be reproduced in any form or by any means without written permission from ClearOne. Printed in the United States of America. ClearOne reserves specific privileges. Information in this document is subject to change without notice.
NOTICE: This Class A device complies with Part 15 of the FCC rules and Canadian ICES-003. Operation is subject to the following two conditions:
(1) this device may not cause harmful interference, and (2) this device must accept any interference received, including interference that may cause undesired operation.
CONTENTS
COPYRIGHT NOTICE.... 3
CONTENTS....4
PREFACE 5
PRECAUTIONS....5
SUPPLIED ACCESSORIES....6
QUICK START....7
FEATURES 8
PRODUCT SPECIFICATION 9
MAIN UNIT 10
SIZE 12
IR REMOTE CONTROL.... 13
SERIAL COMMUNICATION CONTROL.... 16
MENU SETTING 27
USB 3.0 35
MAINTENANCE AND TROUBLESHOOTING 35
PREFACE
This manual introduces the function, installation, and operation of the UNITE ^® 150 camera. Prior to installation and usage, please read the manual thoroughly.
PRECAUTIONS
This product can be used only under the specified conditions in order to avoid any damage to the camera:
- Do not subject the camera to rain or moisture.
- Do not remove the cover; otherwise, you may get an electric shock. In case of abnormal operation, contact ClearOne Technical Support.
- Never operate outside the specified temperature, humidity, and power supply recommendations.
- Use a soft dry cloth to clean the camera. If the camera is very dirty, clean it with diluted neutral detergent; do not use any type of solvents, which may damage the surface.
Caution to transport
Avoid stress, vibration, and moisture in transport, storage, and installation.
During installation, take the following precautions:
- Do not grasp the camera by the head when carrying the camera.
- Do not turn camera head manually. Doing so may result in mechanical damage.
- Do not apply corrosive liquid, gas or solid, to avoid damaging the plastic cover.
- Make sure there are no obstacles within the camera's rotation range.
● Never power on before installation has been completed.
Do not dismantle the camera
ClearOne is not responsible for any unauthorized modification or dismantling.
SUPPLIED ACCESSORIES
When you unpack, check that all the supplied accessories are included:
- Camera
- AC power adapter
- Power cord
- RS232 cable
- Remote controller
- User manual
- USB 3.0 cable
QUICK START
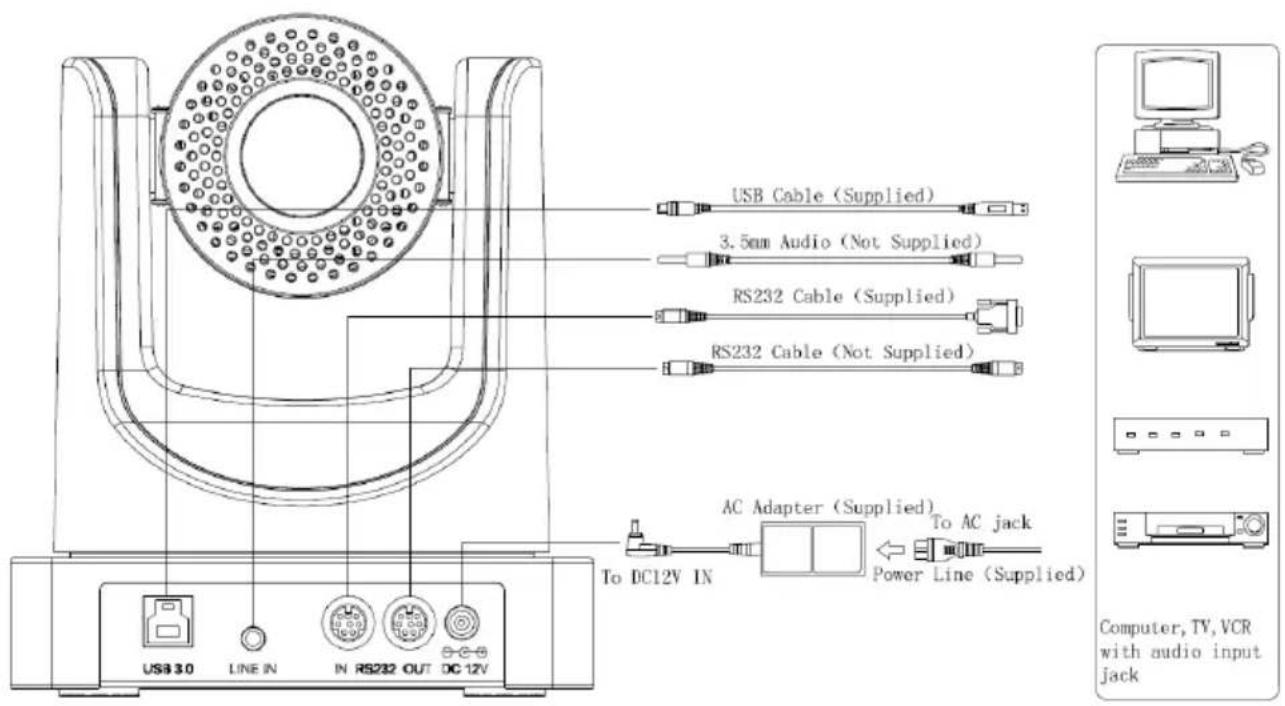
Step 1. Refer to the diagram below to make sure the connections are correct.
text_image
USB Cable (Supplied) 3.5mm Audio (Not Supplied) RS232 Cable (Supplied) RS232 Cable (Not Supplied) AC Adapter (Supplied) To AC jack Power Line (Supplied) To DC12V IN USB 30 LINE IN IN RS232 OUT DC 12V Computer, TV, VCR with audio input jackStep2. Connect to the power. The LED light on the front panel indicates the camera is powered on.
Step3. The process of initialization is completed when the camera pan-tilt rotates to the maximum position of top right and then returns to the center.
NOTE: If the position preset 0 has been stored, the position preset 0 will be called up after initialization.
FEATURES
● Full Function USB Interface
USB 3.0 ultra-high speed interface; can transfer uncompressed original video, and downward compatible with USB 2.0; support UVC, UAC protocol.
1080P Full HD
Apply Panasonic's 1/2.7 inch, 2.07 million effective pixels high quality HD CMOS sensor; can reach maximum 1920 x 1080 high resolution and achieve quality image.
- 72.5° Wide-angle Lens
A 72.5° wide-angle high quality lens supports 12x optical zoom.
- AAC Audio Encoding
Supports audio line input. Supports AAC audio encoding for better sound quality and lower bandwidth.
- Low-light
High SNR of CMOS sensor combined with 2D and 3D noise reduction algorithm effectively reduces noise. Even under low illumination conditions, the image can remain clear and sharp.
- Remote Control
All the parameters of the camera can be remotely controlled using the RS232 and USB interfaces.
- Zoom™ Certified
Unite 150 has been tested and certified for use with Zoom Rooms functionality
PRODUCT SPECIFICATION
| Details | |
| Model | UNITE® 150 |
| Name | UNITE® USB 3.0 HD Video Conference Camera |
| Camera | |
| Video System | HD: 1080p/30, 1080p/25, 720p/30, 720p/25 |
| Sensor | 1/2.7", CMOS, Effective Pixel: 2.07M |
| Scanning Mode | Progressive |
| Lens | 12x, f3.5mm ~ 42.3mm, F1.8 ~ F2.8 |
| Minimal Illumination | 0.5 Lux @ (F1.8, AGC ON) |
| Shutter | 1/30s ~ 1/10000s |
| White Balance | Auto, Indoor, Outdoor, One Push, Manual |
| Backlight Compensation | Support |
| Digital Noise Reduction | 2D & 3D Digital Noise Reduction |
| Video S/N | ≥55dB |
| Horizontal Angle of View | 72.5° ~ 6.9° |
| Vertical Angle of View | 44.8° ~ 3.9° |
| Horizontal Rotation Range | ±170° |
| Vertical Rotation Range | -30° ~ +90° |
| Pan Speed Range | 1.7° ~ 100°/s |
| Tilt Speed Range | 1.7° ~ 69.9°/s |
| H & V Flip | Support |
| Image Freeze | Support |
| Number of Preset | 255 |
| Preset Accuracy | 0.1° |
| USB Features | |
| Operate System | Windows 7, Windows 8, Windows 8.1, Windows10, Mac OSX, Linux |
| ColorSystem/Compression | YUV 4:2:2 |
| Video Format | USB 3.0: 1080p/30, 1080p/25, 720p/30, 720p/25 |
| Audio on USB | Support |
| USB VideoCommunicationProtocol | UVC 1.0 ~ UVC 1.5 |
| UVC PTZ | Support |
| Input / Output Interface | |
| USB Interface | 1xUSB 3.0: Type B female jack |
| Audio Interface | 1-ch: 3.5mm Audio Interface, Line In |
| CommunicationInterface | 1xRS232 In: 8pin Min DIN, Max Distance: 30m,Protocol: VISCA/Pelco-D/Pelco-P |
| 1xRS232 Out: 8pin Min DIN, Max Distance: 30m,Protocol: VISCA network use only | |
| Power Jack | JEITA type (DC IN 12V) |
| Generic Specification | |
| Input Voltage | DC 12V |
| Current Consumption | 1.0A (Max) |
| OperatingTemperature | -10°C ~ 40°C (14°F ~ 104°F) |
| Storage Temperature | -40°C ~ 60°C (-40°F ~ 140°F) |
| Power Consumption | 12W (Max) |
| MTBF | >30000h |
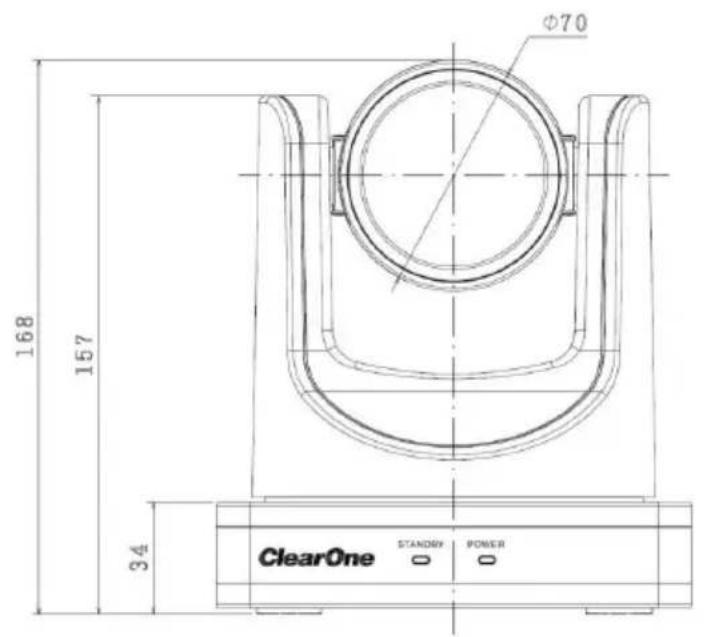
| Size | 144mm x144mm x168mm |
| Net Weight | 0.91kg |
text_image
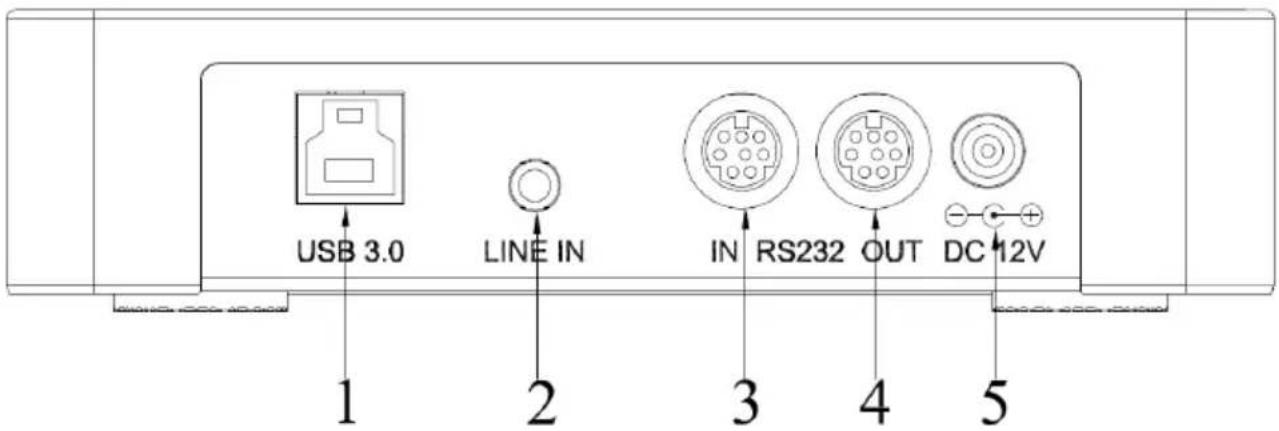
USB 3.0 LINE IN IN RS232 OUT DC 12V 1 2 3 4 5- USB 3.0 4. RS232 Out Interface
- Line In Interface 5.DC Power 12V Jack
- RS232 In Interface
SIZE
text_image
Φ70 168 157 34 ClearOne STANDS BY POWER 0 0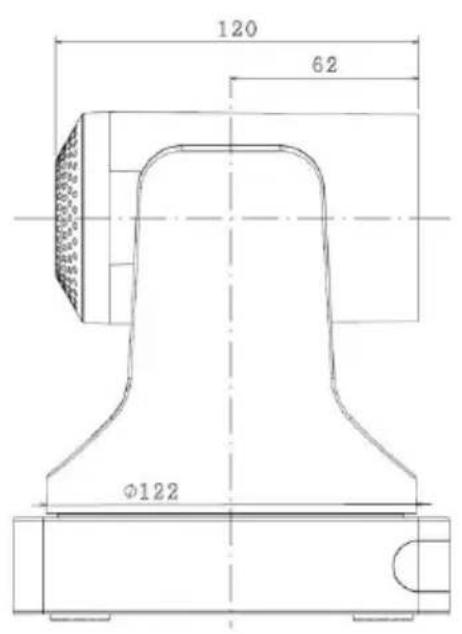
text_image
120 62 Ø122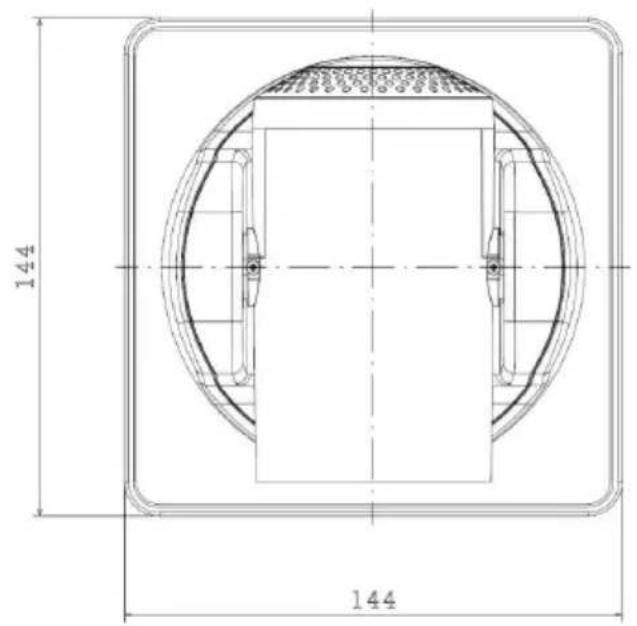
text_image
144 144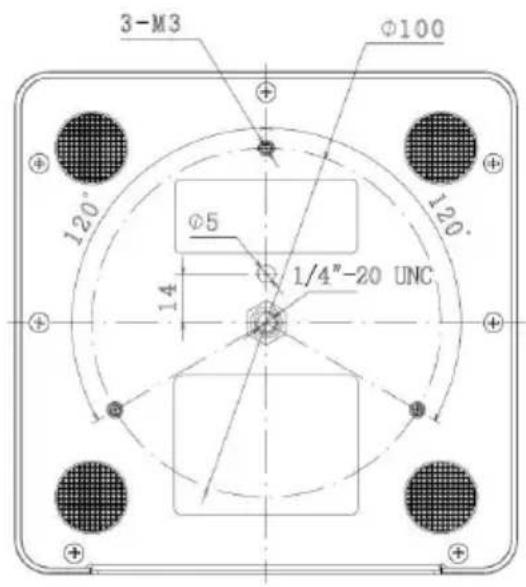
text_image
3-M3 Ø100 120° Ø5 14 1/4" - 20 UNC 120°Unit: mm
IR REMOTE CONTROL
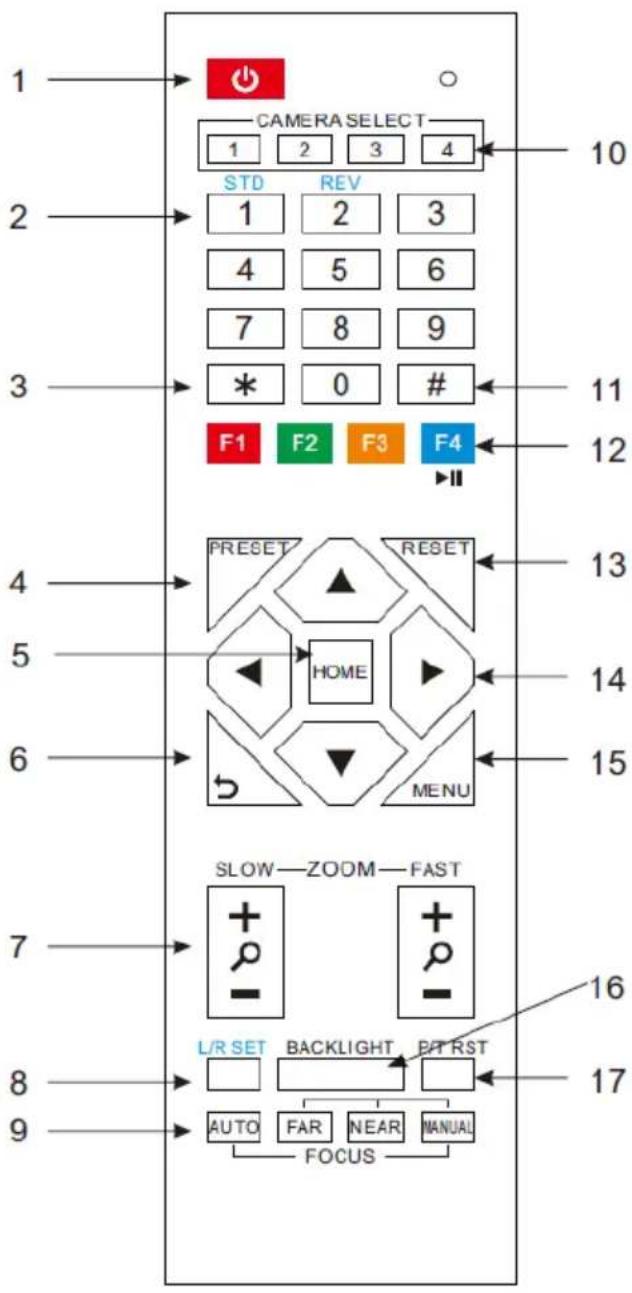
text_image
CAMERA SELECT 1 2 3 4 STD REV 1 2 3 4 5 6 7 8 9 * 0 # F1 F2 F3 F4 PRESET RESET HOME MENU SLOW—ZOOM—FAST L/R SET BACKLIGHT P/TRST AUTO FAR NEAR MANUAL FOCUS 10 11 12 13 14 15 16 171. Standby Button
Press this button to enter standby mode. Press it again to enter normal mode.
NOTE: Power consumption in standby mode is approximately half of the normal mode
2. Position Buttons
To set preset or call preset
3. \* Button
4. Set/Preset Buttons
Set a corresponding numeric key preset position [PRESET] + Numeric button (0-9)
NOTE: Preset 0-9 via remote control and the rest from keyboard and the serial port.
5. Pan-Tilt Control Buttons
Press the arrow buttons to perform panning and tilting. Press the [HOME] button to face the camera back to front.
6. Back Buttons
Press OSD menu to return to previous menu.
7. Zoom Buttons
Slow Zoom: Zoom In [+] or Zoom Out [-] slowly
Fast Zoom: Zoom In [+] or Zoom Out [-] fast
8. L/R Set Button
Press at the same time as the numeric button 1 [STD] and button 2 [REV] to set the direction of the Pan-Tilt
L/R Set +1[STD]: set the Pan-Tilt turn the same direction as the L/R Set L/R Set +2[REV]: set the Pan-Tilt turn the opposite direction as the L/R Set
9. Focus Buttons
Press [AUTO] to adjust the focus on the center of the object automatically. Press [MANUAL] to adjust the focus manually.
Press [FAR] to focus on a far object.
Press [NEAR] to focus on a near object.
10. Camera Select Buttons
Press the button corresponding to the camera you want to control with the remote controller.
11. # Button
Used with other buttons
12. Set Camera IR Address Buttons
[*]+[#]+[F1]: Address1
[*]+[#]+[F2]: Address2
[*]+[#]+[F3]: Address3
[*]+[#]+[F4]: Address4
13. Reset Buttons
Clear a specific preset: [Reset] + Numeric button (0-9)
Clear all presets: [*]+[#]+[Reset]: Erase all presets
14. Pan/Tilt Control Buttons
Press arrow buttons to perform panning and tilting. Press [HOME] button to face the camera back to front.
15. MENU
Press MENU to enter or exit the OSD menu.
16. BLC (Backlight Compensation) Button
If there is light behind the subject, the subject will appear dark.
Press this button to enable the backlight compensation. Press it again to disable the backlight compensation.
Press the backlight ON / OFF button. To cancel this function, press the backlight ON / OFF button.
NOTE: The BLC feature is effective only in auto exposure mode.
17. Pan/Tilt Reset
Reset Pan/Tilt self-test.
18. Shortcut Set
[*]+[#]+[1]: Display OSD menu in English
[*]+[#]+[3]: Display OSD menu in Chinese
[*]+[#]+[5]: Save OSD
[*]+[#]+[6]: Quickly recover the default settings
[*]+[#]+[8]: Show the camera version
[*]+[#]+[9]: Quickly set mount mode (flip/normal)
SERIAL COMMUNICATION CONTROL
In default working mode, the camera can be controlled via RS232 or RS485 (half-duplex mode). The parameters are as follows:
Baud rate: 2400/4800/9600 bit/s.
Start bit: 1 bit.
Data bit: 8 bits.
Stop bit: 1bit.
Parity bit: none.
The process of initialization is complete when the camera pan-tilt rotates to the maximum position of top right and then returns to the center.
NOTE: If the position preset 0 has been stored, the position preset 0 is called up after initialization, and users will be able to control the camera with commands in the following command list.
Control Interface Definition
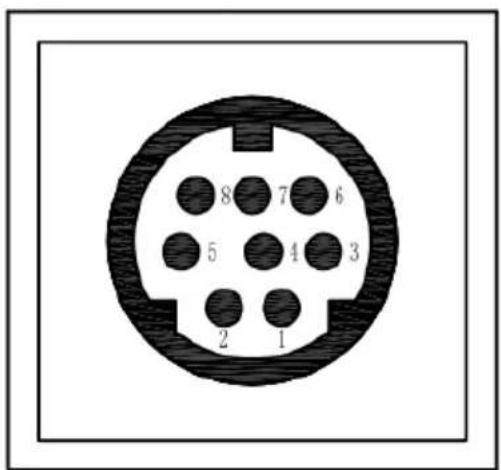
text_image
8 7 6 5 4 3 2 1| Pin No. | Function |
| 1 | DTR |
| 2 | DSR |
| 3 | TXD |
| 4 | GND |
| 5 | RXD |
| 6 | RS485- |
| 7 | IR OUT |
| 8 | RS485+ |
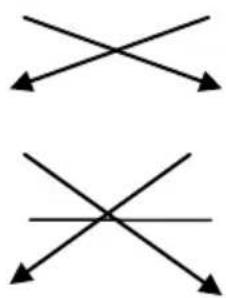
Camera Windows DB-9 Camera In Camera Out
-
DTR 1.CD 1. DTR 1.DTR
-
DSR 2.RXD 2.DSR 2.DSR
-
TXD 3. TXD 3. TXD 3. TXD
-
GND 4. DTR 4. GND 4. GND
-
RXD 5. GND 5. RXD 5. RXD
-
RS485- 6.DSR 6. RS485- 6.GND
-
IR OUT 7.RTS 7. IR OUT 7.NC
-
RS458+
8.CTS 8.RS485+
- RI
natural_image
Two abstract geometric diagrams with intersecting lines and arrows, no text or symbols presentCommand List
The camera uses the VISCA/Pelco-D/Pelco-P serial standard.
Part 1 Camera-Issued Messages
| ACK/ Completion Message | |||
| Command | Function | Command Packet | Comments |
| ACK/Completion Messages | ACK | z0 4y FF(y: Socket No.) | Returned when the command is accepted. |
| Completion | z0 5y FF(y: Socket No.) | Returned when the command has been executed. | |
^* z = Camera Address + 8
| Error Messages | |||
| Command | Function | Command Packet | Comments |
| Error Messages | Syntax Error | z0 60 02 FF | Returned when the command format is different or when a command with illegal command parameters is accepted. |
| Command Buffer Full | z0 60 03 FF | Indicates that two sockets are already being used (executing two commands) and the command could not be accepted when received. | |
| Command Canceled | z0 6y 04 FF(y: Socket No.) | Returned when a command which is being executed in a socket specified by the cancel command is canceled. The completion message for the command is not returned. | |
| No Socket | z0 6y 05 FF(y: Socket No.) | Returned when no command is executed in a socket specified by the cancel command, or when an invalid socket number is specified. | |
| Command Not Executable | z0 6y 41 FF(y: Execution command Socket No.Inquiry command: 0) | Returned when a command can't be executed due to current conditions. For example, when commands controlling the focus manually are received during auto focus. | |
Part 2 Camera Control Command
| Command | Function | Command Packet | Comments |
| AddressSet | Broadcast | 88 30 01 FF | Address setting |
| CAM_Zoom | Stop | 8x 01 04 07 00 FF | |
| Tele(Standard) | 8x 01 04 07 02 FF | ||
| Wide(Standard) | 8x 01 04 07 03 FF | ||
| Tele(Variable) | 8x 01 04 07 2p FF | p = 0(low) - 7(high) | |
| Wide(Variable) | 8x 01 04 07 3p FF | ||
| Direct | 8x 01 04 47 0p 0q 0r 0s FF | pqrs: Zoom Position | |
| CAM_Focus | Stop | 8x 01 04 08 00 FF | |
| Far(Standard) | 8x 01 04 08 02 FF | ||
| Near(Standard) | 8x 01 04 08 03 FF | ||
| Far(Variable) | 8x 01 04 08 2p FF | p = 0(low) - 7(high) | |
| Near(Variable) | 8x 01 04 08 3p FF | ||
| Direct | 8x 01 04 48 0p 0q 0r 0s FF | pqrs: Focus Position | |
| Auto Focus | 8x 01 04 38 02 FF | AF On/Off | |
| Manual Focus | 8x 01 04 38 03 FF | ||
| Auto/Manual | 8x 01 04 38 10 FF | ||
| CAM_WB | Auto | 8x 01 04 35 00 FF | Normal Auto |
| Indoor mode | 8x 01 04 35 01 FF | Indoor mode | |
| Outdoor mode | 8x 01 04 35 02 FF | Outdoor mode | |
| OnePush mode | 8x 01 04 35 03 FF | One Push WB mode | |
| Manual | 8x 01 04 35 05 FF | Manual Control mode | |
| OnePush trigger | 8x 01 04 10 05 FF | One Push WB Trigger | |
| CAM_RGain | Reset | 8x 01 04 03 00 FF | Manual Control of R Gain |
| Up | 8x 01 04 03 02 FF | ||
| Down | 8x 01 04 03 03 FF | ||
| Direct | 8x 01 04 43 00 00 0p 0q FF | pq: R Gain | |
| CAM_Bgain | Reset | 8x 01 04 04 00 FF | Manual Control of B Gain |
| Up | 8x 01 04 04 02 FF | ||
| Down | 8x 01 04 04 03 FF | ||
| Direct | 8x 01 04 44 00 00 0p 0q FF | pq: B Gain | |
| CAM_AE | Full Auto | 8x 01 04 39 00 FF | Automatic Exposure mode |
| Manual | 8x 01 04 39 03 FF | Manual Control mode | |
| Shutter priority | 8x 01 04 39 0A FF | Shutter Priority Automatic Exposure mode | |
| Iris priority | 8x 01 04 39 0B FF | Iris Priority Automatic Exposure mode | |
| Bright | 8x 01 04 39 0D FF | Bright mode (Manual control) | |
| CAM_Iris | Reset | 8x 01 04 0B 00 FF | Iris Setting |
| Up | 8x 01 04 0B 02 FF | ||
| Down | 8x 01 04 0B 03 FF | ||
| Direct | 8x 01 04 4B 00 00 0p 0q FF | pq: Iris Position | |
| CAM_Gain | Reset | 8x 01 04 0C 00 FF | Gain Setting |
| Up | 8x 01 04 0C 02 FF | ||
| Down | 8x 01 04 0C 03 FF | ||
| Direct | 8x 01 04 0C 00 00 0p 0q FF | pq: Gain Position | |
| Gain Limit | 8x 01 04 2C 0p FF | p: Gain Position | |
| CAM_Bright | Reset | 8x 01 04 0D 00 FF | Bright Setting |
| Up | 8x 01 04 0D 02 FF | ||
| Down | 8x 01 04 0D 03 FF | ||
| Direct | 8x 01 04 0D 00 00 0p 0q FF | pq: Bright Position | |
| CAM_ExpComp | On | 8x 01 04 3E 02 FF | ExposureCompensation On/Off |
| Off | 8x 01 04 3E 03 FF | ||
| Reset | 8x 01 04 0E 00 FF | ExposureCompensationAmount Setting | |
| Up | 8x 01 04 0E 02 FF | ||
| Down | 8x 01 04 0E 03 FF | ||
| Direct | 8x 01 04 4E 00 00 0p 0q FF | pq: ExpComp Position | |
| CAM_BackLight | On | 8x 01 04 33 02 FF | Back LightCompensation On/Off |
| Off | 8x 01 04 33 03 FF | ||
| CAM_NR(2D)Mode | Auto | 8x 01 04 50 02 FF | ND2D Auto/Manual |
| Manual | 8x 01 04 50 03 FF | ||
| CAM_NR(2D)Level | - | 8x 01 04 53 0p FF | p: NR Setting (0: Off, level 1 to 5) |
| CAM_NR(3D)Level | - | 8x 01 04 54 0p FF | p: NR Setting (0: Off, level 1 to 8) |
| CAM_Flicker | - | 8x 01 04 23 0p FF | p: Flicker Settings(0: Off, 1: 50Hz, 2:60Hz) |
| CAM_DHotPixel | - | 8x 01 04 56 0p FF | p: Dynamic Hot PixelSetting (0: Off, level 1 to 6) |
| CAM_ApertureMode(sharpness) | Auto | 8x 01 04 05 02 FF | Sharpness AutoSharpness Manual |
| Manual | 8x 01 04 05 02 FF | ||
| CAM_Aperture(sharpness) | Reset | 8x 01 04 02 00 FF | Aperture Control |
| Up | 8x 01 04 02 02 FF | ||
| Down | 8x 01 04 02 03 FF | ||
| Direct | 8x 01 04 42 00 00 0p 0q FF | pq: Aperture Gain | |
| CAM_PictureEffect | Off | 8x 01 04 63 00 FF | Picture Effect Setting |
| B&W | 8x 01 04 63 04 FF | ||
| CAM_Memory | Reset | 8x 01 04 3F 00 pp FF | pp: MemoryNumber(=0 to 127) |
| Set | 8x 01 04 3F 01 pp FF | ||
| Recall | 8x 01 04 3F 02 pp FF | ||
| CAM_LR_Reverse | On | 8x 01 04 61 02 FF | Image Flip HorizontalOn/Off |
| Off | 8x 01 04 61 03 FF | ||
| CAM_PictureFlip | On | 8x 01 04 66 02 FF | Image Flip VerticalOn/Off |
| Off | 8x 01 04 66 03 FF | ||
| CAM_ColorGain | Diret | 8x 01 04 49 00 00 00 0p FF | p: Color Gain setting0h (60%) to Eh(200%) |
| SYS_Menu | Off | 8x 01 06 06 03 FF | Turns on/off the menuscreen |
| On | 8x 01 06 06 02 FF | ||
| Pan_tiltDrive | Up | 8x 01 06 01 VV WW 03 01FF | VV: Pan speed 0x01(low speed) to 0x18(high speed)WW: Tilt speed 0x01(low speed) to 0x14(high speed)YYYY: Pan PositionZZZZ: Tilt Position |
| Down | 8x 01 06 01 VV WW 03 02FF | ||
| Left | 8x 01 06 01 VV WW 01 03FF | ||
| Right | 8x 01 06 01 VV WW 02 03FF | ||
| Upleft | 8x 01 06 01 VV WW 01 01FF | ||
| Upright | 8x 01 06 01 VV WW 02 01FF | ||
| DownLeft | 8x 01 06 01 VV WW 01 02FF | ||
| DownRight | 8x 01 06 01 VV WW 02 02FF | ||
| Stop | 8x 01 06 01 VV WW 03 03 FF | ||
| AbsolutePosition | 8x 01 06 02 VV WW 0Y 0Y 0Y 0Y 0Z 0Z 0Z 0Z FF | ||
| RelativePosition | 8x 01 06 03 VV WW 0Y 0Y 0Y 0Y 0Z 0Z 0Z 0Z FF | ||
| Home | 8x 01 06 04 FF | ||
| Reset | 8x 01 06 05 FF | ||
| Pan_tiltLimitSet | LimitSet | 8x 01 06 07 00 0W 0Y 0Y 0Y 0Y 0Z 0Z 0Z 0Z FF | W: 1 UpRight 0: DownLeft YYYY: Pan Limit Position ZZZZ: Tilt Position |
| LimitClear | 8x 01 06 07 01 0W 07 0F 0F 0F 07 0F 0F 0F FF | ||
| CAM_AFSensitivity | High | 8x 01 04 58 01 FF | AF Sensitivity High/Normal/Low |
| Normal | 8x 01 04 58 02 FF | ||
| Low | 8x 01 04 58 03 FF | ||
| CAM_SettingReset | Reset | 8x 01 04 A0 10 FF | Reset Factory Setting |
| CAM_Brightness | Direct | 8x 01 04 A1 00 00 0p 0q FF | pq: Brightness Position |
| CAM_Contrast | Direct | 8x 01 04 A2 00 00 0p 0q FF | pq: Contrast Position |
| CAM_Flip | Off | 8x 01 04 A4 00 FF | Single Command For Video Flip |
| Flip-H | 8x 01 04 A4 01 FF | ||
| Flip-V | 8x 01 04 A4 02 FF | ||
| Flip-HV | 8x 01 04 A4 03 FF | ||
| CAM_SettingSave | Save | 8x 01 04 A5 10 FF | Save Current Setting |
| CAM_Iridix | Direct | 8x 01 04 A7 00 00 0p 0q FF | pq: Iridix Position |
| CAM_AWBSensitivity | High | 8x 01 04 A9 00 FF | High |
| Normal | 8x 01 04 A9 01 FF | Normal | |
| Low | 8x 01 04 A9 02 FF | Low | |
| CAM_AFZone | Top | 8x 01 04 AA 00 FF | AF Zone weight select |
| Center | 8x 01 04 AA 01 FF | ||
| Bottom | 8x 01 04 AA 02 FF | ||
| CAM_ColorHue | Direct | 8x 01 04 4F 00 00 00 0p FF | p: Color Hue setting0h (-14 degrees) to Eh(+14 degrees |
Part 3 Demand Command
| Command | Command Packed | Return Values | Comments |
| CAM_ZoomPosInq | 8x 09 04 47 FF | y0 50 0p 0q 0r 0s FF | pqrs: Zoom Position |
| CAM_FocusAFModelnq | 8x 09 04 38 FF | y0 50 02 FF | Auto Focus |
| y0 50 03 FF | Manual Focus | ||
| CAM_FocusPosInq | 8x 09 04 48 FF | y0 50 0p 0q 0r 0s FF | pqrs: Focus Position |
| CAM_WBModelnq | 8x 09 04 35 FF | y0 50 00 FF | Auto |
| y0 50 01 FF | Indoor mode | ||
| y0 50 02 FF | Outdoor mode | ||
| y0 50 03 FF | OnePush mode | ||
| y0 50 05 FF | Manual | ||
| CAM_RGainInq | 8x 09 04 43 FF | y0 50 00 00 0p 0q FF | pq: R Gain |
| CAM_BGainInq | 8x 09 04 44 FF | y0 50 00 00 0p 0q FF | pq: B Gain |
| CAM_AEModelnq | 8x 09 04 39 FF | y0 50 00 FF | Full Auto |
| y0 50 03 FF | Manual | ||
| y0 50 0A FF | Shutter priority | ||
| y0 50 0B FF | Iris priority | ||
| y0 50 0D FF | Bright | ||
| CAM_ShutterPosInq | 8x 09 04 4A FF | y0 50 00 00 0p 0q FF | pq: Shutter Position |
| CAM_IrisPosInq | 8x 09 04 4B FF | y0 50 00 00 0p 0q FF | pq: Iris Position |
| CAM_BrightPosInq | 8x 09 04 4D FF | y0 50 00 00 0p 0q FF | pq: Bright Position |
| CAM_ExpCompModelInq | 8x 09 04 3E FF | y0 50 02 FF | On |
| y0 50 03 FF | Off | ||
| CAM_ExpCompPosInq | 8x 09 04 4E FF | y0 50 00 00 0p 0q FF | pq: ExpComp Position |
| CAM_BacklightModelInq | 8x 09 04 33 FF | y0 50 02 FF | On |
| y0 50 03 FF | Off | ||
| CAM_Nosise2DModelInq | 8x 09 04 50 FF | y0 50 02 FF | Auto Noise 2D |
| y0 50 03 FF | Manual Noise 3D | ||
| CAM_Nosise2DLevel | 8x 09 04 53 FF | y0 50 0p FF | Noise Reduction (2D) p: 0 to 5 |
| CAM_Noise3DLevel | 8x 09 04 54 FF | y0 50 0p FF | Noise Reduction (3D) p: 0 to 8 |
| CAM_FlickerModelInq | 8x 09 04 55 FF | y0 50 0p FF | p: Flicker Settings(0: OFF, 1: 50Hz, 2: 60Hz) |
| CAM_ApertureModelInq(Sharpness) | 8x 09 04 05 FF | y0 50 02 FF | Auto Sharpness |
| y0 50 03 FF | Manual Sharpness | ||
| CAM_ApertureInq(Sharpness) | 8x 09 04 42 FF | y0 50 00 00 0p 0q FF | pq: Aperture Gain |
| CAM_PictureEffectModelInq | 8x 09 04 63 FF | y0 50 02 FF | Off |
| y0 50 04 FF | B&W | ||
| CAM_MemoryInq | 8x 09 04 3F FF | y0 50 0p FF | p: Memory number last operated. |
| SYS_MenuModelInq | 8x 09 06 06 FF | y0 50 02 FF | On |
| y0 50 03 FF | Off | ||
| CAM_LR_Reverselnq | 8x 09 04 61 FF | y0 50 02 FF | On |
| y0 50 03 FF | Off | ||
| CAM_PictureFlipInq | 8x 09 04 66 FF | y0 50 02 FFy0 50 03 FF | OnOff |
| CAM_ColorGainInq | 8x 09 04 49 FF | y0 50 00 00 00 0p FF | p: Color Gain setting 0h (60%) to Eh (200%) |
| VideoSystemInq | 8x 09 06 23 FF | y0 50 00 FF | 1920x1080i60 |
| y0 50 01 FF | 1920x1080p30 | ||
| y0 50 02 FF | 1280x720p60 | ||
| y0 50 04 FF | NTSC | ||
| y0 50 05 FF | NTSC | ||
| y0 50 06 FF | NTSC | ||
| y0 50 07 FF | 1920x1080p60 | ||
| y0 50 08 FF | 1920x1080i50 | ||
| y0 50 09 FF | 1920x1080p25 | ||
| y0 50 0A FF | 1280x720p50 | ||
| y0 50 0C FF | PAL | ||
| y0 50 0D FF | PAL | ||
| y0 50 0E FF | PAL | ||
| Pan-tiltMaxSpeedInq | 8x 09 06 11 FF | y0 50 ww zz FF | ww: Pan Max Speedzz: Tilt Max Speed |
| Pan-tiltPosInq | 8x 09 06 12 FF | y0 50 0w 0w 0w 0w0z 0z 0z 0z FF | www: Pan Positionzzzz: Tilt Position |
| CAM_GainLimitInq | 8x 09 04 2C FF | y0 50 0q FF | p: Gain Limit |
| CAM_DHotPixelInq | 8x 09 04 56 FF | y0 50 0q FF | p: Dynamic Hot PixelSetting (0: Off, level 1 to 6) |
| CAM_AFSensitivityInq | 8x 09 04 58 FF | y0 50 01 FF | High |
| y0 50 02 FF | Normal | ||
| y0 50 03 FF | Low | ||
| CAM_BrightnessInq | 8x 09 04 A1 FF | y0 50 00 00 0p 0q FF | pq: Brightness Position |
| CAM_ContrastInq | 8x 09 04 A2 FF | y0 50 00 00 0p 0q FF | pq: Contrast Position |
| CAM_FlipInq | 8x 09 04 A4 FF | y0 50 00 FF | Off |
| y0 50 01 FF | Flip-H | ||
| y0 50 02 FF | Flip-V | ||
| y0 50 03 FF | Flip-HV | ||
| CAM_IridixInq | 8x 09 04 A7 FF | y0 50 00 00 0p 0q FF | pq: Iridix Position |
| CAM_AFZone | 8x 09 04 AA FF | y0 50 00 FF | Top |
| y0 50 01 FF | Center | ||
| y0 50 02 FF | Bottom | ||
| CAM_ColorHueInq | 8x 09 04 4F FF | y0 50 00 00 00 0p FF | p: Color Hue setting 0h (-14 dgrees) to Eh (+14 degrees |
| CAM_AWBSensitivityInq | 8x 09 04 A9 FF | y0 50 00 FF | High |
| y0 50 01 FF | Normal | ||
| y0 50 02 FF | Low |
MENU SETTING
1. MENU
Press the [MENU] button to display the main menu. Use the arrow buttons to select the item to be set. Press the [HOME] button to enter a sub-menu.
| MENU |
| ▸ Exposure |
| Color |
| Image |
| P/T/Z |
| Noise Reduction |
| Setup |
| Communication Setup |
| Restore Default |
| [Home] Enter |
| [Menu] Exit |
2. EXPOSURE
Select Exposure from the main menu and press the [HOME] button. The EXPOSURE menu appears, as shown in the following figure:
EXPOSURE
▶ Mode Auto
ExpCompMode Off
Backlight Off
Gain Limit 2
Anti-Flicker 60Hz
Meter Average
DRC 2
▲▼ Select Item
◄►Change Value
[Menu] Back
➢ Mode: Exposure mode Options:
- Auto
- Manual
• SAE
• AAE
- Bright
➢ ExpCompMode: Exposure compensation mode Note: This feature is only effective when exposure mode
is set to Auto.
Options:
- On
- Off
➢ ExpComp: Exposure compensation value Note: This feature is only effective when ExpCompMode is on. Options: -7 \~ 7
➢ Gain Limit: Maximum gain limit Note: This feature is only effective when exposure mode is set to Auto/AAE/Bright. Options: 0 \~ 15
Backlight: Set the backlight compensation Note: This feature is only effective when exposure mode is set to Auto. Options:
- On
- Off
DRC: DRC strength Options: 0 \~ 8
Bright: Intensity control Note: This feature is only effective when exposure mode is set to Bright. Options: 00\~17
Anti-Flicker Flicker: Anti-flicker
Note: This feature is only effective when exposure mode is set to Auto/Bright.
Options:
- Off
- 50Hz
- 60Hz
Meter
Options:
- Average
- Center
- Bottom
- Top
Iris: Aperture Value
Note: This feature is only effective when exposure mode is set to Manual/AAE.
Options:
• F1.8
F2.0
F2.4
F2.8
F3.4
F4.0
F4.8
F5.6
F6.8
F8.0
F9.6
• F11.0
- Close
Shutter: Shutter value
Note: This feature is only effective when exposure mode is set to Manual/SAE.
Options:
• 1/30
• 1/60
• 1/90
• 1/100
• 1/125
• 1/180
• 1/250
• 1/350
• 1/500
• 1/725
• 1/1000
• 1/1500
• 1/2000
• 1/3000
• 1/4000
• 1/6000
• 1/10000
3. COLOR
Select Color in the main menu and press the [HOME] button. The COLOR menu appears, as shown in the following figure:
COLOR
▶ WB Mode Auto
RG Tuning +6
BG Tuning 0
Saturation 100%
Hue 5
▲▼ Select Item
◀▶Change Value
[Menu] Back
WB-Mode: White balance mode Options:
- Auto
- Indoor
- Outdoor
- OnePush
- Manual
RG: Red gain Note: This feature is only effective when WB-Mode is set to Manual. Options: 0\~255
BG: Blue gain Note: This feature is only effective when WB-Mode is set
to Manual. Options: 0\~255
RG Tuning: Red gain fine-tuning
Note: This feature is only effective when AWB sens is set at Low.
Options: -10 \~ +10
BG Tuning: Blue gain fine-tuning
Note: This feature is only effective when AWB sens is set at Low.
Options: -10 \~ +10
Sat.: Saturation
Options: 60% \~ 200%
➢ Hue: Chroma adjustment
Options: 0 \~ 14
4. IMAGE
Select Image in the main menu and press the [HOME] button. The
IMAGE menu appears, as shown in the following figure:
IMAGE
▶ Luminance 7
Contrast 9
Sharpness 3
Flip-H Off
Flip-V Off
B&W-Mode Off
Gamma 0.45
Style CStyle
▲▼ Select Item
◄►Change Value
[Menu] Back
➢ Luminance: Brightness adjustment Optional items: 0 \~ 14
Contrast: Contrast adjustment Options: 0 \~ 14
Sharpness: Sharpness adjustment Options:
- Auto
• 0 \~ 15
➢ Flip-H: Image flipped horizontal Options:
- On
- Off
➢ Flip-V: Image flipped vertical Options:
- On
- Off
B&W-Mode: Image color Options:
- On
- Off
Gamma
Options:
- Default
• 0.45
• 0.5
0.56
• 0.63
Style
Options:
- Norm
- Clarity
- Bright
- CStyle
5. P/T/Z
P/T/Z
▶ SpeedByZoom On
AF Zone Center
AF-Sense High
L/R Set STD
Display Info On
Image Freeze Off
Digital Zoom Off
Call Preset Speed 24
▲▼ Select Item
Change Value
[Menu] Back
➢ SpeedByZoom: The depth of field scale switch
Options:
- On
- Off
➢ AF-Zone: Interested in focusing area
Options:
- Top
- Center
- Bottom
➢ AF-Sense: Automatic focusing sensitivity options
Options:
- Low
- Normal
• High
L/R Set
Optional items:
- STD
• REV
▶ Display Info
Options:
- On
- Off
Image Freeze
Options:
- On
- Off
Digital Zoom Options:
Select Noise Reduction in the main menu and press the [HOME] button. The NOISE REDUCTION menu appears, as shown in the following figure:
NOISE REDUCTION
▶ NR2D-Level off
NR3D-Level 3
D-HotPixel Off
▲▼ Select Item
Change Value
[Menu] Back
➢ NR2D-Level: 2D noise reduction Options:
- Off
- Auto
• 1 - 5
➢ NR3D-Level: 3D noise reduction Options:
- Off
• 1 - 8
D-HotPixel: Dynamic bad points Options:
- Off
• 1 - 5
7. SETUP
Select Setup in the main menu and press the [HOME] button. The SETUP menu appears, as shown in the following figure:
SETUP
▶ Language EN
System Freq 60HZ
▲▼ Select Item
Change Value
[Menu] Back
Language: menu language Options:
• EN
- Chinese
- Russian
System Frequency Options:
- 50Hz
- 60Hz
8. COMMUNICATION SETUP
Select Setup in the main menu and press [HOME] button. The COMMUNICATION SETUP menu appears, as shown in the following figure.
COMMUNICATION SETUP
▶ Protocol VISCA
V_Address 1
V_AddrFix Off
Net Mode Serial
Baudrate 9600
▲▼ Select Item
◄►Change Value
[Menu] Back
➢ Protocol: Control protocol type Options:
- AUTO
• VISCA - PELCO-D
- PELCO-P
V_Address: Protocol address decided according to agreement (AUTO, VISCA protocol) Options:1 \~ 7
P_D_Address: PELCO-D protocol
Options: 0 \~ 254
P_P_Address: PELCO-P
protocol
Options: 0 \~ 31
V_AddrFix: Set whether users can change VISCA address through serial port or keyboard Options:
- On (set to On, useless in 88 30 01 FF Command)
- Off
Net Mode: Set the serial port control networking Options:
- Serial
- Paral
➢ Baudrate: Serial port baud rate Options:
Select Restore Default in the main menu and press the [HOME] button.
The RESTORE DEFAULT menu appears, as shown in the following figure:
RESTORE DEFAULT
▶Restore? No
Change Value
[Home] OK
[Menu] Back
NOTE: Press [HOME] button to confirm.
USB 3.0
Camera supports UVC protocol, compatible USB 2.0 & USB 3.0.
USB 3.0 support 1920x1080p/30 max output.
Support OS: Windows 7/8/8.1/10, Linux, Mac OS, etc.
General software are as follows:
Windows: AMCAP, VLC, Debut Video Capture, etc.
Linux:V412 software driver and VLC media player, etc.
Mac OS: FaceTime. iChat, Photo Booth and Debut Video Capture, etc.
NOTE: We recommend using AMCAP version 8.0 in Windows, as its software performance is more stable. When using high version of AMCAP in a low configuration system, it will show the stream rendering.
NOTE: The first time the camera is accessed by USB cable, you must install a plug-in.
MAINTENANCE AND TROUBLESHOOTING
Camera Maintenance
- If you choose not to use your camera for a long time, turn off the power switch and disconnect AC power cord of AC adapter to the outlet.
- Use soft cloth to clean the camera cover.
- Use the soft dry cloth to clean the lens. If the camera is very dirty, clean it with diluted neutral detergent. Do not use any type of solvents, which may damage the surface.
Unqualified Application
- Do not shoot extremely bright objects for a long period of time, such as sunlight, strong light sources, etc.
- Do not operate in unstable lighting conditions, as image may flicker.
Troubleshooting
| Problem | Solution |
| No image | 1. Check whether the power cord is connected, voltage is OK, POWER lamp is lit.2. Check whether the camera can self-test after start up.3. Check the video cable to make sure it is connected correctly. |
| Abnormal display of image | Check the video cable to make sure it is connected correctly. |
| Image dithering even at widest zoom position | 1. Check whether the camera is fixed correctly.2. Make sure there is nothing nearby causing vibrations. |
| The IR remote control cannot control the camera | 1. Change the remote control battery.2. Check the camera working mode.3. Check that the IR address of the Remote Commander is set correctly. |
| Serial communication cannot control the camera | 1. Check the camera working mode.2. Check that the control cable is connected correctly. |