SecureDrive KP - External hard drive SecureData - Free user manual and instructions
Find the device manual for free SecureDrive KP SecureData in PDF.


User questions about SecureDrive KP SecureData
0 question about this device. Answer the ones you know or ask your own.
Ask a new question about this device
Download the instructions for your External hard drive in PDF format for free! Find your manual SecureDrive KP - SecureData and take your electronic device back in hand. On this page are published all the documents necessary for the use of your device. SecureDrive KP by SecureData.
USER MANUAL SecureDrive KP SecureData
natural_image
Hand interacting with a black secure drive padlock (no visible text or symbols on the device)Hardware Encrypted External Portable Drive


reddot design award winner 2019
TABLE OF CONTENTS
SECTION 1: SECUREDRIVE KP OVERVIEW ...... 2
SecureDrive Features .... 3
PIN Requirements....4
Procedural Conventions....4
Cancelling a Procedure....4
SECTION 2: USER MODE....5
Unlocking the Drive in User Mode 5
Changing the User PIN ....5
User Mode Options....6
SECTION 3: ADMIN MODE....8
Button Pressing Conventions....8
Admin PINs....8
Admin Mode Options....11
SECTION 4: MANAGING THE DRIVE....13
Verifying which PINs have Been Set....13
Deleting all Files in Admin Mode ....13
Brute Force Hacking Detection 14
Resetting (Deleting) the Drive ....15
Creating a User PIN after a Reset (Blank Drive) 15
Reformatting the Drive ....16
Troubleshooting 19
SECTION 5: CONTACT AND WARRANTY INFORMATION ....20
Contact Information 20
Warranty and RMA Information....20
SECTION 1: SECUREDRIVE KP OVERVIEW
Thank you for purchasing the SecureDrive-Keypad Model ('Drive' hereafter), an easy to use hardware encrypted USB 3.0 portable external data storage drive with on-board alphanumeric 11 button keypad for OS-independent user-authentication.
The Drive uses XTS-AES 256-bit hardware encryption, which encrypts all data on it in real time. It requires no software drivers nor updates and works on all computer and embedded systems that support standard USB protocol. Should your Drive get lost or stolen, rest assured that all data on it is protected by military grade encryption and cannot be accessed without entering the PIN (Person-Identification-Number).
The Drive can be configured with both a User and Admin PINs, making it perfect for personal use and business use such as healthcare, legal, corporate, and government. Your drive may have Cloud Backup and built-in Antivirus features installed. For more information, please contact Technical Support at support@securedrive.com.
Requirements
The Drive must be connected to a computer for access. It works on Windows, Mac, Android, Linux, or Chrome operating systems, or any embedded systems supporting USB 2.0 port, minimum.
What's Included?
- 1 SecureDrive KP
• 1 Quick Start Guide
- 1 USB 3.0 Cable
Safety Information
This icon ⚠️ indicates important information regarding the safety of the product and your data (Caution messages). Please be mindful of these messages. Contact support if you have questions.
Precautions

Do not expose the Drive to water or moisture.

Resetting the Drive will delete all stored data as well as all passwords and settings. The drive will become blank and require formatting.

Forgetting your password will render the Drive inaccessible. There is no 'backdoor.'

Any changes or modifications not expressly approved by the party responsible for compliance could void the user's authority to operate the device.
EMI Notice
The normal function of the product may be disturbed by strong Electro Magnetic Interference. If so, simply remove and reinsert the product to resume normal operation by following the instruction manual. In case the function could not resume, please use the product in another location.
2.13.2020
SecureDrive Features
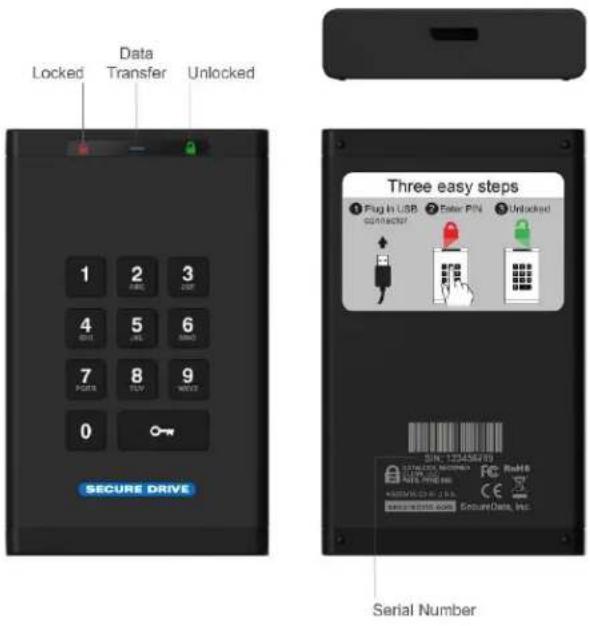
text_image
Locked Data Transfer Unlocked 1 2 3 4 5 6 7 8 9 0 Three easy steps Plug in USB Enter PIN Unlocked SECURE DRIVE Serial NumberLED Interpretations
LEDs on the SecureDrive are represented here by colored icons.
| LED | Meaning |
| (blink all together once) | Plugged into computer; LED test |
| = Red solid | Locked; Momentarily preparing for next input; or failed procedure. |
| = Red blinking1 | Locked, ready for input (other than a Setting code). Also, specific feedback1 |
| = Red blinking with Green solid | (Settings Mode) Locked & ready for keypad input within 10 seconds, or idle for 30 seconds if procedure is done. |
| = Green blinking | Unlocked and ready for keypad input |
| = Green blinking slowly | Unlocked for use in Read-Only Mode |
| Blue solidBlue blinking | Drive is powered and when blinking is transferring data.Note: The blue LED may be on or blinking during any procedure after the Drive is unlocked. |
| = Green solid | Unlocked; operation was successful. |
^1 For other LED combinations see specific status requests: Verifying Existing PIN and Determining the Version Number described in this manual.
2.13.2020
PIN Requirements
Your User PIN or Admin PIN must:
■ be between 7-15 digits in length
■ not contain only repetitive numbers, e.g. (3-3-3-3-3-3-3-3)
■ not contain only consecutive numbers, e.g. (1-2-3-4-5-6-7), (7-8-9-0-1-2-3-4), (7-6-5-4-3-2-1)
Note: Creating words (using the corresponding number key for each letter) can be more memorable than a string of numbers.
Procedural Conventions
All procedures below require the Drive to be connected to a computer with the USB cable. LED status shown is what you should see after performing each step. Unless otherwise noted, all procedures start with the Drive locked. [ ]
Note: Each step in all procedures listed below have a 10 second window to perform the next step. In general, a blinking LED times out after 10 seconds.
Cancelling a Procedure
To cancel most procedures prior to finishing, press and hold for six seconds. The exception are procedures for setting options (O→) which you can just let time out between steps.
SECTION 2: User Mode
This section describes how to unlock and lock the Drive, change the PIN, and disconnecting the Drive from your computer in User Mode. New drives are shipped with a default User PIN which is 11223344 (otherwise, your vendor will supply it). We strongly recommend changing the password once it is unlocked.

CAUTION: Risk of loss of data. If you forget your User PIN and no Admin PIN exists, or you forget both PINs, all data will be inaccessible and reformatting will be required.

CAUTION: Loss of data will occur. After ten failed attempts to unlock the Drive, the User PIN and all data on the Drive will be deleted. Refer to Brute Force Hacking Detection on page 14.
Unlocking the Drive in User Mode
Note: If the Drive is inserted into a computer when locked, its contents does not appear in your computer's File Manager (Explorer or Finder).
| STEPS | LED | ERROR STATE |
| Connect the Drive to your computer with the USB cable. | - | - |
| Press 🎯 | 💡 | - |
| Enter the User PIN. | 💡 | - |
| Press 🔍 | 💡 | - if error, the red LED fades out then turns solid. |
*The factory PIN for new Drives is 11223344. We strongly recommend changing the password once it is unlocked. See Changing the User PIN below. If your computer goes into sleep mode while the Drive is unlocked, the Drive may lock after some time depending on your power management settings regarding the USB port.
Changing the User PIN
| STEPS | LED | ERROR STATE |
| Press 🎨 | [IMAGE] | - |
| Enter the User PIN. | [IMAGE] | - |
| Press 🎨 🎨 | [IMAGE] + [IMAGE] | - |
| After you see [ ], then press 🎨 🎨 🎨 | - | |
| Enter the new User PIN. | [IMAGE] | - |
| Press 🎨 🎨 | - | |
| Re-enter the new PIN. | [IMAGE] | - |
| Press 🎨 🎨 🎨 | [IMAGE] - brieflyThen →[IMAGE] + [IMAGE] | If unsuccessful, LEDS willimmediately be:[IMAGE] + [IMAGE] |
Note: If a mistake was made or the procedure was not completed, the Drive will retain the old PIN.
2.13.2020
Disconnecting from Your Computer
Generally, you can just unplug the USB cable. However, some computer systems may require you to click the Safely Remove Hardware/Eject icon within your operating system prior to unplugging the drive cable from your computer. Wait for the red LED to light to turn solid or turn off completely indicating it is locked and ready to disconnect from the computer.
User Mode Options
The following section describe options and features requiring only a User PIN. For Administration options see Admin Mode on page 11. This section includes instructions on enabling read-only and read/write options in user mode as well as enabling and disabling a timeout lock.
Procedures that end with these LEDs [🔒].
Note: All procedures require the Drive to be connected to a computer with the USB cable. Each step in all procedures have a ten second window to start the step after it. In general, a blinking LED times out after ten seconds.
Enabling Read-Only in User Mode
The User is able to write content to the Drive and then restrict access to read-only (R-O). Once R-O Mode is activated, access is limited to reading only, until Read/Write is enabled (which can be accomplished by a User or an Administrator). Setting to Read-Only does not unlock the drive.
| STEPS | LED | ERROR STATE |
| With the Drive locked, press 🎨 | 💡 | - |
| Enter your User PIN. | 💡 | - |
| Press 🔍 🔍 🔍 | 💡 | - |
| Wait for ➕ then press 🔍 ➕ ➕ ➕ ➕ | 💡 | - |
| Press 7, 6. (R, O for Read-Only). | 💡 | - |
| Press 🔍 🔍 | 💡 - brieflyThen →💡 + 🔍 | If unsuccessful, LEDs willimmediately be:💡 + 🔍 |
If successful, the next time the Drive is unlocked it will be in R-O Mode as indicated by the slow blinking green LED (as well as messages provided by your computer when you try to save or delete a file).
Enabling Read/Write in User Mode
Read-Only (Write Restriction) can be turned off restoring Read and Write access. Note that setting the drive to R-W does not unlock the drive.
| STEPS | LED | ERROR STATE |
| With the Drive locked, press 🎯 | 💡 | - |
| Enter your User PIN. | 💡 | - |
| Press 🔍 🔍 🔍 | 💡 | - |
| Wait for 🎯 then press 🔍 🔍 🔍 🔍 🔍 | 💡 | - |
| Press 7, 9. (R, W for Read/Write). | 💡 | - |
| Press 🔍 🔍 | 💡 - brieflyThen →💡 + 🔍 | If unsuccessful, LEDs will immediately be:💡 + 🔍 |
If successful, the next time the Drive is unlocked it will be in Read/Write Mode with a solid green LED.
Setting the Timeout Lock in User Mode
To protect against unauthorized access when the Drive is connected to a host computer and unattended, the Drive can be set to automatically lock after a pre-set amount of idle time (no read or write activity).
Note: When set in User Mode, the Timeout Lock is only active in User Mode and not Admin Mode.
The default state of the Timeout Lock feature is OFF. The Timeout Lock feature can be set to activate (lock) any time between 1 and 99 minutes.
| STEPS | LED | ERROR STATE |
| With the Drive locked, press 🎨 | 💡 | - |
| Enter your User PIN. | 💡 | - |
| Press 🎨 🔍 | 💡 | - |
| Wait for 🎨 , then press 🎨 🔍 🔍 🔍 🔍 | 💡 | - |
| Press 8, 5. (T, L for Timeout Lock). | 💡 | - |
| Press 🔍 | 💡 | - |
| Enter the length of unattended time for Timeout. | ||
| Two digits required. | ||
| Examples: 01 = 1 minute99 = 99 minutes | 💡 | - |
| Press 🔍 | 💡 - brieflyThen →💡 +💡 | If unsuccessful, LEDs will immediately be:💡 +💡 |
The Timeout Lock is now set for subsequent Drive use, until changed.
Disabling the Timeout Lock in User Mode
Follow the same steps for setting the Timeout Lock (above) and enter 00 for the time delay.
The Timeout Lock is now disabled.
2.13.2020
SECTION 3: Admin Mode
Admin Mode is especially useful for corporate deployment and it can be used to ensure policy. For example:
■ Recovering data from a Drive and creating a new User PIN in the event that you or an employee has forgotten the User PIN.
- Retrieving data from a Drive if an employee leaves the company.
- Setting policies such as 'Read-Only' or 'Time Out Lock.'
- The Admin PIN can be used to override all User Mode settings.
Button Pressing Conventions
Many Admin procedures start with pressing and holding a number button down (1 or 7, for example) and while holding it, pressing 📄 button: abbreviated in the steps below as: Press and hold down 7-and then press- 🔍. In some cases, you must hold down the number while pressing and releasing 🔍 button twice: abbreviated as: Press and hold down 1-and then press- 🔍 🔍
Note: All procedures under this heading start with the Drive plugged into a computer. Each step in all procedures listed below has a 10 second window to start the step after it. In general, a blinking LED times out after 10 seconds.
The PIN requirements are the same as User Mode. Refer to PIN Requirements on page 4.
Admin PINs

CAUTION: Risk of loss of data. If you forget your User PIN and no Admin PIN exists, or you forget both PINs, all data will be inaccessible and reformatting will be required.
This section describes how to create or change an Admin PIN, create or change a User's PIN in Admin mode, and how to unlock and lock the Drive in Admin mode.
Creating an Admin PIN (No User PIN)
| STEPS | LED | ERROR STATE |
| Press 🎨 | [IMAGE] | - |
| Press and hold down 1-and then press- 🔗 🎨 🎨 | [IMAGE]rapidly | - |
| Enter a new Admin PIN. | [IMAGE]rapidly | - |
| Press 🎨 🎨 | [IMAGE] | {- fades out, then solid if PIN doesn’t meet the requirements. |
| Re-enter your new Admin PIN. | [IMAGE] | - |
| Press 🎨 🎨 | [IMAGE]→[IMAGE]+ [IMAGE] | {- if error, the red LED fades out then turns solid. |
Note: If a mistake was made or the procedure not completed, no Admin PIN will be created.
2.13.2020
Creating an Admin PIN (User PIN Exists)
| STEPS | LED | ERROR STATE |
| Press [IMAGE] | [5280] | - |
| Enter the User PIN. | [2742] | - |
| Press [IMAGE] | [4753] | - |
| Wait for [IMAGE] then press and hold down 1-and then press-O-[IMAGE] | [YZT2] | - |
| Enter a new Admin PIN. |  | [43W4] |
| [72CH] + [05SG] | ||
| Press [IMAGE] | [2772] | - |
| Re-enter your new Admin PIN. | [4C60] | [WS44] (22W7) |
| Press [IMAGE] | [46Y3] - briefly[2W2C] → | If unsuccessful, LEDS will immediate(204W) e:[47C3] + [IMAGE] |


Note: If a mistake was made or the procedure not completed, no Admin PIN will be created.
Unlocking the Drive in Admin Mode

CAUTION: Possible deletion of all data, settings, and both PINs. After ten failed attempts to unlock the Drive, it will reset to a blank factory setting. Refer to Brute Force Hacking Detection on page 14.
| STEPS | LED | ERROR STATE |
| Press and hold down 1-and then press 🎉 | [IMAGE] | - |
| Enter the Admin PIN. | [IMAGE] | - |
| Press 🎉 | [IMAGE] - brieflyThen → [IMAGE] + [IMAGE] | [IMAGE] - if error, the red LED fades outthen turns solid. |
Note: If your computer goes into sleep mode while the Drive is unlocked, the Drive may lock after some time depending on your power management settings regarding the USB port.
Creating or Changing a User PIN in Admin Mode
For PIN requirements refer to page 4.
| STEPS | LED | ERROR STATE |
| With the Drive locked, press and hold down 1-and then press- |  | - |
| Enter your Admin PIN. | [2207] | (TT7Y) - if error, the red LED fades out then turns solid. |
| Press 🎨 🎨 🎨 |  | - |
| Wait for 🏠 , then press . 🎨 🎨 🎨 | [1646] | - |
| Enter a new User PIN. | [56YA] | - |
| Press 🎨 🎨 🎨 | [9CCX] | If an error occurs:fast + slow |
| Re-enter the User PIN. | [W730] | - |
| Press 🎨 🎨 🎨 | [77DC] | (ZXXXX) - if error, the red LED fades out then turns solid. |
If an error occurs:
fast + slow
If successful, the User PIN is now added or changed.
Changing the Admin PIN
The Admin PIN cannot be changed from the User Mode. Remember that Press and hold down 1-and then press 📞 🐎 🐎 means "hold down #1 button and press the Key button twice." PIN requirements on page 4.
| STEPS | LED | ERROR STATE |
| With the Drive locked, press and hold down 1-and then press-○→ |  | - |
| Enter the Admin PIN. |  | - |
| Press ○→○→ |  | - if error, the red LED fades out then turns solid. |
| Wait for ➕ then press and hold down 1-and then press-○→○→ |  | - |
| Enter a new Admin PIN. | [30TH] | - |
| Press ○→○→ | [×3HT] | If an error occurs:fast + slow |
| Re-enter the Admin PIN. |  | - |
| Press ○→○→ |  | - if error, the red LED fades out then turns solid. |
| [435Z] | ||
 | ||
| [CCHD] |
Note: If a mistake is made while defining a new Admin PIN or the procedure is not completed, the Drive retains the old Admin PIN (as well as the old User PIN if one exists).
2.13.2020
Admin Mode Options
The following headings describe enabling options and features requiring an Admin PIN such as enabling read-only and read/write mode, and setting Timeout Lock in Admin or User Mode.
Enabling Read-Only in Admin Mode
Note: When Admin restricts access to Read-Only, the User cannot change this setting. Setting to Read-Only does not unlock the Drive.
| STEPS | LED | ERROR STATE |
| Press and hold down 1-and then press-○ | [IMAGE] | - |
| Enter the Admin PIN. | [IMAGE] | - |
| Press ○-○ | [IMAGE] | - if error, the red LED fades out then turns solid. |
| Wait for [IMAGE] then press ○-○○○ | [IMAGE] | - |
| Press 7, 6. (R, O for Read-Only). | [IMAGE] | - |
| Press ○- | [IMAGE] - briefly,then →fast + [IMAGE] slow | If an error occurs:fast + [IMAGE] slow |
If successful, the next time the Drive is unlocked it will be in R-O Mode as indicated by the slow blinking green LED (as well as messages provided by your computer when you try to save or delete a file).
Enabling Read/Write in Admin Mode
Admin can override a User-set Read-Only state by enabling Read/Write using the Admin PIN. Setting to Read-Write does not unlock the Drive.
| STEPS | LED | ERROR STATE |
| Press and hold down 1-and then press-○→ | [IMAGE] | - |
| Enter the Admin PIN. | [IMAGE] | - |
| Press ○→○→ | [IMAGE] | - if error, the red LED fades out then turns solid. |
| Wait for [IMAGE] then press ○→○→○→ | [IMAGE] | - |
| Press 7, 9. (R,W for Read/Write). | [IMAGE] | - |
| Press ○→ | [IMAGE] - briefly,then →[IMAGE] fast + [IMAGE] slow | If an error occurs:[IMAGE] fast + [IMAGE] slow |
If successful, the next time the Drive is unlocked it will be in R/W Mode as indicated by the solid green LED.
Setting the Timeout Lock in Admin Mode
To protect against unauthorized access when the Drive is connected to a computer and idle, it can be set to automatically lock after a preset amount of time.
In its default state, the Timeout Lock feature is turned off. It can be set to activate (lock the Drive) any time between 1 and 99 minutes. Admin Timeout Lock settings will override User settings.
| STEPS | LED | ERROR STATE |
| Press and hold down 1-and then press- | [7W2]  | - |
| Enter the Admin PIN. |  | - |
Press 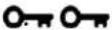 | if e n, h m i n e d a e e n t then turns solid. | |
| Wait for en press | - | |
| Press 8, 5. (T, L for Timeout Lock). | - | |
| Press | If an error occurs:fast + slow | |
| Enter the length of unattended time for Timeout. | ||
| Two digits required. | - | |
| Examples: 01 = 1 minute99 = 99 minutes | ||
| Press | -briefly,then →fast + slow | If an error occurs:fast + slow |


[Non-Text]
[Non-Text]
[Non-Text]
[Non-Text]
[Non-Text]
[Non-Text]
[Non-Text]
[Non-Text]
[Non-Text]
[Non-Text]
[Non-Text]
[Non-Text]
[Non-Text]
[Non-Text]
[Non-Text]
[Non-Text]
SECTION 4: Managing the Drive
The following headings discuss important, though less common, actions for managing your Drive. Except where noted, all procedures assume your Drive is connected to a computer and locked (red LED).
Verifying which PINs have Been Set
To determine which PINs have been set:
Press O These LEDs display for 10 seconds:
■ No PIN exists.
■ Only User PIN exists. [ ]
- Only Admin PIN exits. [ ]
■ Both PINs exist. [ ]

Deleting all Files in Admin Mode
An Administrator can delete all data stored on the Drive including User settings and PIN. All Admin settings (and only the Admin settings) will remain on the Drive. For further use, the Drive will need to be reformatted. For reformatting, refer to Reformatting the Drive on page 16.

CAUTION: The 'Delete All' procedure deletes all data, User settings, and formatting. The Drive must be reformatted for further use.
Note: All procedures under this heading start with the Drive plugged into a computer. Each step in all procedures below has a 10 second window to start the step after it. In general, a resulting status (indicated by the LEDs) times out after 10 seconds.
| STEPS | LED | ERROR STATE |
| With the Drive locked, press and hold down 1-and then press- | - | |
| Enter the Admin PIN. | - | |
| Press 🎨 🎨 🎨 | - if error, the red LED fades out then turns solid. | |
| Wait for 🎨 then press 🎨 🎨 🎨 🎨 | - | |
| Press 3, 2. (D, A for Delete All) | - | |
| Press 🎨 | ↔alternating | If an error occurs:fast + slow |
| Enter the Admin PIN again. | ↔alternating | - |
| Press 🎨 | - momentarily,then →fast + slow | If an error occurs:- briefly, then →fast + slow |
All data and User settings have now been deleted from the Drive.
2.13.2020
Brute Force Hacking Detection
Entering a User PIN
Status: Both Admin and User PINs have been created.
If a User enters an incorrect User PIN ten consecutive times, regardless of the time intervals in-between attempts, the Drive's brute force detection will trigger and the User PIN will be deleted. All data remains on the Drive and can be accessed by the Admin after entering the correct Admin PIN.
Status: Only User PIN has been created.
If a User enters an incorrect User PIN ten consecutive times regardless of the time intervals in between attempts, the Drive's brute force detection triggers and the User PIN and encryption key will be deleted and all data will become inaccessible and lost forever. The Drive will need to be formatted before it can be reused. Refer to Reformatting the Drive on page 16.
Entering an Admin PIN
Status: Admin PIN, or Admin and User PINs have been created.
If an Admin enters an incorrect Admin PIN ten consecutive times, regardless of the time intervals in-between attempts, the Drive's brute force detection triggers and both the User and Admin PINs and the encryption key will be deleted and all data will become inaccessible and lost forever. The Drive will need to be formatted before it can be reused.
This table illustrates the different PIN states and what happens when Hacking Detection triggers.
| PIN attempted to use to unlock | PINs setup on the USB at the time | After 10 consecutive incorrect PIN entries, the brute force mechanism triggers and does this: |
| User PIN | Admin & User PINs | The User PIN will be deleted. All data will remain on the USB and can only be accessed by the Admin entering the correct Admin PIN. |
| User PIN | User PIN Only | The encryption key will be deleted, and all data will be inaccessible and lost forever including the PINs. |
| Admin PIN | Admin & User PINS | |
| Admin PIN | Admin PIN Only |
2.13.2020
Resetting (Deleting) the Drive

CAUTION: Resetting the Drive will delete all data stored on it including both PINs. After Resetting, the Drive must be formatted (initialized).
In the event that both the Admin and User PINs have been forgotten, or you want to delete all data stored on the Drive including the PINs, you can perform the following Reset function. It also removes the encryption, requiring the Drive to be reformatted—to format the Drive refer to the heading Reformatting the Drive on page 16.
| STEPS | LED | ERROR STATE |
| With Drive locked, press and hold down 7-and then press 🎯 | ↔alternating | - |
| Press 999. | ↔alternating | - |
| Press and hold down 7-and then press 🎯 | & momentarily | - if error, the red LED fades out then turns solid. |
The Drive is now blank and locked.
Creating a User PIN after a Reset (Blank Drive)
Follow this procedure when the Drive is blank: such as after it has been reset or Hacking Detection has triggered.
| STEPS | LED | ERROR STATE |
| Connect the Drive to your computer with the USB cable. | - | - |
| Press 🎯 | [IMAGE] | - |
| Wait four (4) seconds, press 🎯 🎯 🎯 | [IMAGE] | - |
| Enter new User PIN. | [IMAGE] | - |
| Press 🎯 🎯 🎯 | [IMAGE] | - |
| Re-enter the new User PIN. | [IMAGE] | - |
| Press 🎯 🎯 🎯 | Fades out → [IMAGE] | If error: Fades out → [IMAGE] |
Note that the Drive still requires formatting.
2.13.2020
Reformatting the Drive
In the event that hacking detection has been triggered or the Drive has been reset, all data on the Drive will be lost forever. The Drive must then be reformatted.

CAUTION: Loss of data. All data and settings will be deleted from the Drive when formatted, whether or not the Brute Force Hacking Detection was triggered or not.
To initialize (reformat) your SecureDrive, do the following:
For a Windows OS
Admin permission on the PC is required for this procedure.
- Connect the Drive to your computer with the USB cable.
- Unlock the drive with either User or Admin PIN. (To create a User PIN if you have not already done so, see Creating a User PIN after a Reset (blank Drive) on page 15.)
- Open Explorer.
- Right-click This PC > Left-click Manage.
- In the Computer Management dialog's left column, click Storage > Disk Management and wait for it to populate.
- If the Initialize Disk dialog doesn't popup, Right-click the 'Unknown' (or 'Not Initialized'), and click Initialize disk.
- Make sure GPT is selected and then click OK.
Note: GPT is needed for drives larger than 2 TB. For drives less than 2 TB, use the MBR option.
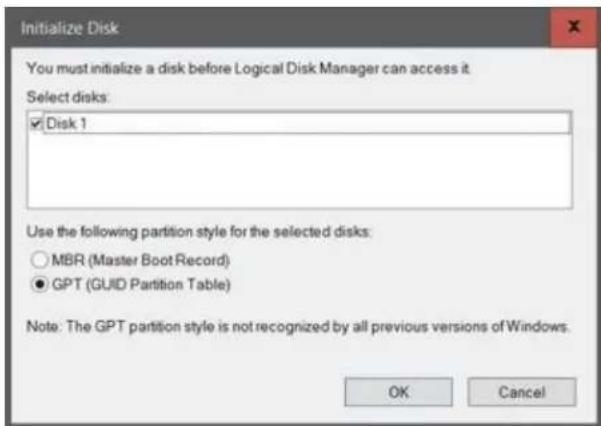
text_image
Initialize Disk You must initialize a disk before Logical Disk Manager can access it Select disks: ✓Disk 1 Use the following partition style for the selected disks: ○MBR (Master Boot Record) ●GPT (GUID Partition Table) Note: The GPT partition style is not recognized by all previous versions of Windows. OK Cancel- After Unknown changes to Online, right-click near Unallocated > New Simple Volume.
- Follow the Wizard prompts. Select a Drive letter (it generally defaults to the next available letter) and then follow the prompts in the Wizard.
- At the Format Removable Disk dialog, select a Volume Label, and select the appropriate file system.
- Continue to follow the prompts.
Note: While the SecureDrive is formatting the blue LED blinks.
- Click Finish to end and close the Wizard.
| Disk 1 | |
| Basic | New Volume (E:) |
| 1862.89 GB | 1862.89 GB NTFS |
| Online | Healthy (Primary Partition) |
The SecureDrive is displayed here as "Disk 1." It is Online and allocated (Healthy) and ready for use.
- Close the Computer Management dialog if it's still open.
2.13.2020
When finished the New Volume reads Healthy and Explorer window opens to display the Drive contents. The SATA blue and Green LED lights.
For Mac OS
- Connect to a Mac computer's USB port.
- Unlock the drive with either User or Admin PIN. (To create a User PIN if you have not already done so, see Creating a User PIN after a Reset (blank Drive) on page 15.)
- Click Initialize in the popup message (shown below). The Disk Utility Dialog displays.
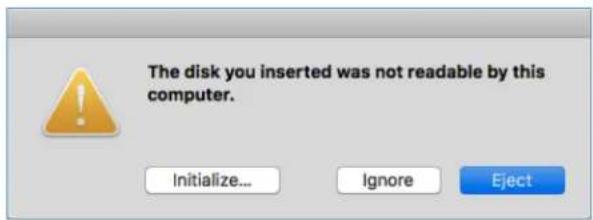
text_image
The disk you inserted was not readable by this computer. Initialize... Ignore Eject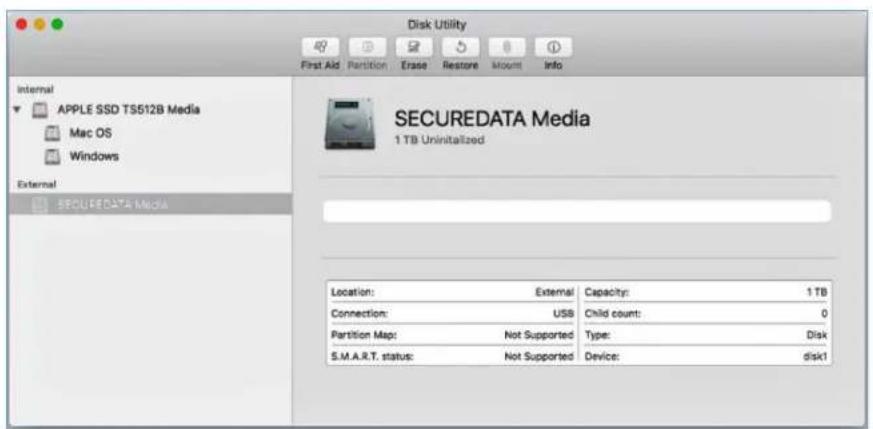
text_image
Disk Utility First Aid Partition Erase Restore Mount Info Internal APPLE SSD TS512B Media Mac OS Windows External SECUREDATA Media SECUREDATA Media 1 TB Uninitialized Location: External Capacity: 1 TB Connection: USB Child count: 0 Partition Map: Not Supported Type: Disk S.M.A.R.T. status: Not Supported Device: disk1The Disk Utility Dialog. Make sure the correct drive is highlighted.
(There is only one External drive listed in this image).
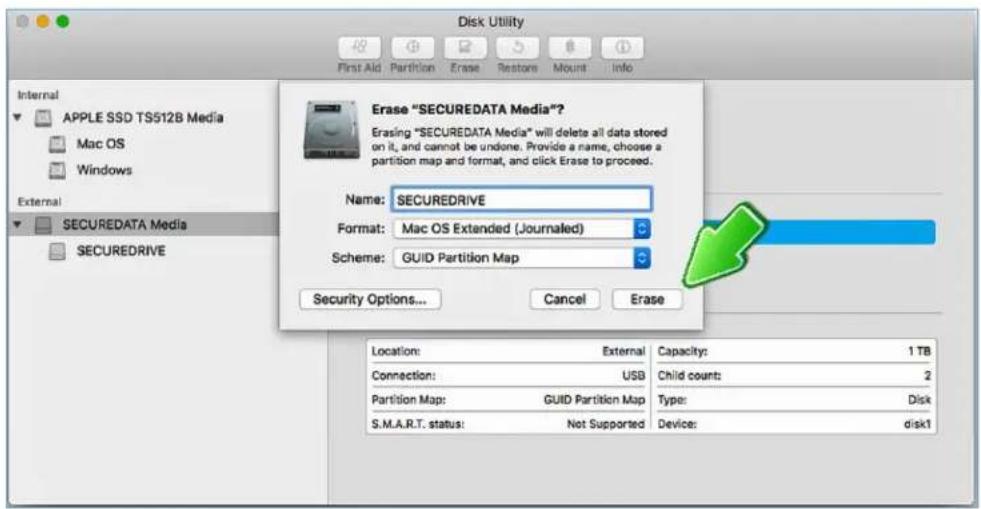
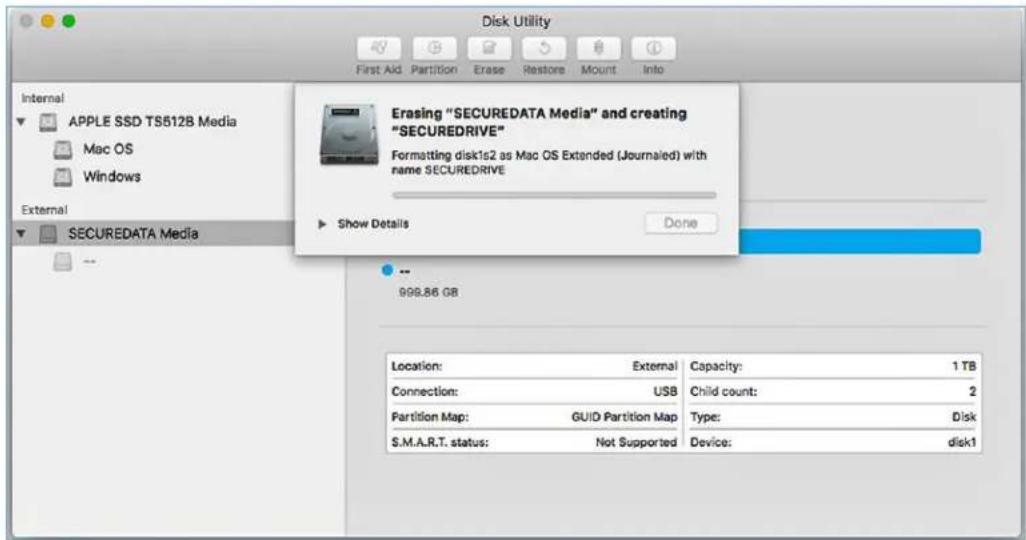
- Click Erase. The system begins erasing the external Drive.
text_image
Disk Utility First Aid Partition Erase Restore Mount Info Internal APPLE SSD TS512B Media Mac OS Windows External SECUREDATA Media SECUREDRIVE Erase "SECUREDATA Media"? Erasing "SECUREDATA Media" will delete all data stored on it, and cannot be undone. Provide a name, choose a partition map and format, and click Erase to proceed. Name: SECUREDRIVE Format: Mac OS Extended (Journalled) Scheme: GUID Partition Map Security Options... Cancel Erase Location: External Capacity: 1 TB Connection: USB Child count: 2 Partition Map: GUID Partition Map Type: Disk S.M.A.R.T. status: Not Supported Device: disk12.13.2020
text_image
Disk Utility First Aid Partition Erase Restore Mount Into Internal APPLE SSD TS512B Media Mac OS Windows External SECUREDATA Media Erasing "SECUREDATA Media" and creating "SECUREDRIVE" Formatting disk1s2 as Mac OS Extended (Journaied) with name SECUREDRIVE Show Details Done 999.86 GB Location: External Capacity: 1 TB Connection: USB Child count: 2 Partition Map: GUID Partition Map Type: Disk S.M.A.R.T. status: Not Supported Device: disk1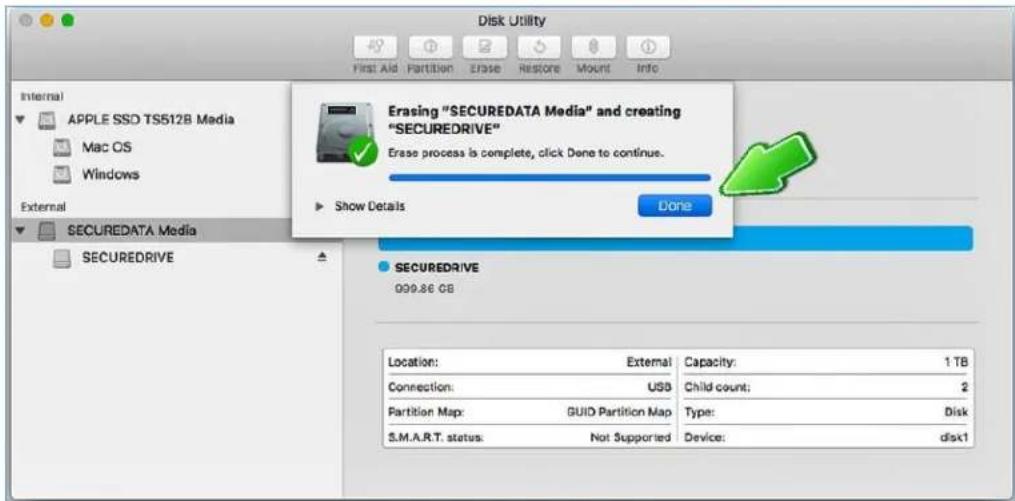
text_image
Disk Utility First Aid Partition Erase Restore Mount Info Internal APPLE SSD TS512B Media Mac CS Windows External SECUREDATA Media SECUREDRIVE Erasing "SECUREDATA Media" and creating "SECUREDRIVE" Erase process is complete, click Done to continue. Show Details Done SECUREDRIVE 999.86 GB Location: External Capacity: 1 TB Connection: USB Child count: 2 Partition Map: GUID Partition Map Type: Disk S.M.A.R.T. status: Not Supported Device: disk1SecureDrive displays under the list of External Drives when done (as well as on the desktop).
- Click Done in the message dialog when available.
Note: SecureDrive is now displayed under External in the left column.
- Close the Disk Utility.
Troubleshooting
After unlocking the Drive, your computer shows that the external Drive is connected (icon displays) but you cannot access the Drive data (it doesn't display in Explorer (Windows) or Finder (Mac).
The Drive needs to be formatted—no data exists. It may have been reset. To format the Drive Refer to Reformatting the Drive on page 16.
If you think your keypad is faulty, contact Technical Support, page 20.
Determining the Version Number
In User Mode:
| STEPS | LED |
| With the Drive locked, press 🎨 | [TAW3] |
| Enter your User PIN. | [3X82] |
| Press 🎨 🎨 | [KCH3] |
| Wait for 🎨 then press 🎨 🎨 🎨 🎨 | [OSRW] |
| Press 8, 6. (V, N for Version Number) | [15TB] |
| Press 🎨 | [052W] |
| All LEDs Blink Once Together |
Then the Red will blink the number of times that represent the major version number (left of the decimal point), and the Green will blink the number of times that represent the update version (right side of the decimal point). When the sequence has ended All LEDs blink once together, then 🔒 🔒
EXAMPLE: if the version number is 1.7, the red LED will blink once and the green LED will blink seven times.

text_image
[simultaneously briefly] [1. 7] [simultaneously briefly] [ ]In Admin Mode:
| STEPS | LED |
| Press and hold down 1-and then press- |  |
| Enter your Admin PIN. |  |
| Press 🎨 🎨 |  |
| Wait for 🎨 then press 🎨 🎨 🎨 |  |
| Press 8, 6. (V, N for Version Number) |  |
| Press 🎨 | All LEDs Blink Once Together |
2.13.2020
SECTION 5: CONTACT AND WARRANTY INFORMATION
Contact Information

SecureData, Inc.
3255 Cahuenga Blvd. West #301
Los Angeles, CA 90068-1178
Support email: support@securedrive.com
www.securedrive.com
US: 1-800-875-3230
International: 1-323-944-0822
Warranty and RMA Information
(Returned Merchandise Authorization)
TWO YEAR LIMITED WARRANTY
As explained below, SecureData, Inc. offers a two-year limited warranty on the SecureDrive™ against defects in materials and workmanship under normal use. The limited warranty period is effective from the date of purchase either directly from SecureData, Inc. or an authorized reseller.
DISCLAIMER AND TERMS OF WARRANTY
THIS LIMITED WARRANTY BECOMES EFFECTIVE ON THE DATE OF PURCHASE AND MUST BE VERIFIED WITH YOUR SALES RECEIPT OR INVOICE CLEARLY DISPLAYING THE DATE AND SOURCE OF PRODUCT PURCHASE. SECUREDATA, INC. WILL, AT NO ADDITIONAL CHARGE (EXCEPT FOR ANY DELIVERY CHARGES, WHICH REMAIN THE CUSTOMER'S RESPONSIBILITY), REPAIR OR REPLACE DEFECTIVE PARTS WITH NEW PARTS OR SERVICEABLE USED PARTS THAT ARE EQUIVALENT TO NEW IN PERFORMANCE. SECUREDATA, INC. SHALL HAVE SOLE AND COMPLETE DISCRETION ON WHETHER TO USE NEW PARTS OR SERVICEABLE USED PARTS. ALL EXCHANGED PARTS AND PRODUCTS REPLACED UNDER THIS WARRANTY WILL BECOME THE PROPERTY OF SECUREDATA, INC.
THIS WARRANTY DOES NOT EXTEND TO ANY PRODUCT NOT PURCHASED DIRECTLY FROM SECUREDATA, INC. OR AN AUTHORIZED RESELLER OR TO ANY PRODUCT THAT HAS BEEN DAMAGED OR RENDERED DEFECTIVE: 1. AS A RESULT OF ACCIDENT, MISUSE, NEGLECT, ABUSE OR FAILURE AND/OR INABILITY TO FOLLOW THE WRITTEN INSTRUCTIONS PROVIDED IN THIS INSTRUCTION GUIDE: 2. BY THE USE OF PARTS NOT MANUFACTURED OR SOLD BY SECUREDATA, INC.; 3. BY MODIFICATION OF THE PRODUCT; OR 4. AS A RESULT OF SERVICE, ALTERATION OR REPAIR BY ANYONE OTHER THAN SECUREDATA, INC. IN THE EVENT OF ANY OF THESE SITUATIONS, THIS WARRANTY SHALL BE VOID. THIS WARRANTY DOES NOT COVER NORMAL WEAR AND TEAR.
EXCEPT AS EXPRESSLY PROVIDED ABOVE, NO OTHER WARRANTY, EITHER EXPRESSED OR IMPLIED, INCLUDING ANY WARRANTY OF MERCHANTABILITY AND FITNESS FOR A PARTICULAR PURPOSE, HAS BEEN OR WILL BE MADE BY OR ON BEHALF OF SECUREDATA, INC. OR BY OPERATION OF LAW WITH RESPECT TO THE PRODUCT OR ITS INSTALLATION, USE, OPERATION, REPLACEMENT OR REPAIR.
LIMITATION OF LIABILITY
SECUREDATA, INC. SHALL NOT BE LIABLE BY VIRTUE OF ANY WARRANTY, PROMISE OR OTHERWISE, FOR ANY INDIRECT, INCIDENTAL, SPECIAL, CONSEQUENTIAL OR PUNITIVE OR MULTIPLE DAMAGES, INCLUDING WITHOUT LIMITATION ANY DAMAGES RESULTING FROM ANY LOSS OF DATA RESULTING FROM THE USE OR OPERATION OF THE PRODUCT, LOSS OF USE, LOSS OF BUSINESS, LOSS OF REVENUE, OR LOSS OF PROFITS, WHETHER OR NOT SECUREDATA, INC. WAS APPRISED OF THE POSSIBILITY OF SUCH DAMAGES. SECUREDATA, INC.'S LIABILITY SHALL BE LIMITED TO THE ACTUAL COST OF THE PRODUCT OR \$1,000.00, WHICHEVER IS GREATER. THE FOREGOING LIMITATION OF LIABILITY SHALL APPLY REGARDLESS OF THE CAUSE OF ACTION UNDER WHICH SUCH DAMAGES ARE SOUGHT.
2.13.2020
Copyright © 2019 SecureData, Inc. All rights reserved.
SecureDrive and SecureUSB products are developed and manufactured by SecureData and are based on DataLock technology licensed from ClevX, LLC. U.S. Patent.
www.clevx.com/patents
SecureDrive™ and SecureData™ are trademarks of SecureData, Inc.
| Registered Trademark | Owner |
| Android | Google, Inc. |
| Bluetooth | Bluetooth SIG, Inc. |
| DataLock, ClevX | ClevX, LLC |
| Mac, iOS | Apple, Inc. |
| SecureUSB, SecureDrive, SecureData | SecureData, Inc. |
| Windows | Microsoft |
All other trademarks and copyrights referred to are the property of their respective owners.
Distribution of the work or derivative work in any standard (paper) book form for commercial purposes is prohibited unless prior permission is obtained from the copyright holder.
DOCUMENTATION IS PROVIDED AS IS AND ALL EXPRESS OR IMPLIED CONDITIONS, REPRESENTATIONS AND WARRANTIES, INCLUDING ANY IMPLIED WARRANTY OF MERCHANTABILITY, FITNESS FOR A PARTICULAR PURPOSE OR NON-INFRINGEMENT, ARE DISCLAIMED, EXCEPT TO THE EXTENT THAT SUCH DISCLAIMERS ARE HELD TO BE LEGALLY INVALID.


RoHS