AC3000-32 - Access Point IP-COM - Free user manual and instructions
Find the device manual for free AC3000-32 IP-COM in PDF.


User questions about AC3000-32 IP-COM
0 question about this device. Answer the ones you know or ask your own.
Ask a new question about this device
Download the instructions for your Access Point in PDF format for free! Find your manual AC3000-32 - IP-COM and take your electronic device back in hand. On this page are published all the documents necessary for the use of your device. AC3000-32 by IP-COM.
USER MANUAL AC3000-32 IP-COM
Thank you for purchasing IP-COM APs! Reading this user manual will be helpful for you to configure, manage and maintain the fit APs.
Intended Users
This user manual is written mainly for the following users:
Network Planning Engineer
Technical Engineer
Network Administrator
Conventions
This user manual is applied to the following fit APs and we will take AP255 as an example.
| Product Series | Model |
| In-wall AP | AP205, AP235,AP255 |
| Indoor Coverage AP | AP325, AP340, AP355, AP365 |
| Outdoor Coverage AP | AP505, AP515 |
Typographical conventions in this user manual:
| Item | Presentation | Example |
| Button | Bold | "Click the Save button" will be simplified as "click Save". |
| Menu | Bold | The menu "System Tool" will be simplified as System Tool. |
| Continuous Menus | > | Go to System Tool > Diagnosis Tool. |
Symbols in this user manual:
| Item | Meaning | |
 | Note | This format is used to highlight information of importance or special interest. Ignoring this type of note may result in ineffective configurations, loss of data or damage to device. |
 | Tip | This format is used to highlight a procedure that will save time or resources. |
For more documents
For more documents, please go to our website http://www.ip-com.com.cn and search for the appropriate product model to get the latest documents.
Technical Support
If you need more help, please contact us with any of the following ways. We will be glad to assist you as soon as possible.

natural_image
Red telephone handset icon on white background (no text or symbols)Tel: (86 755) 2765 3089

natural_image
Red envelope icon on white background (no text or symbols)E-mail: info@ip-com.com.cn

text_image
IP-COMWebsite: http://www.ip-com.com.cn
Table of Contents
01 WEB LOGIN.... 1
02 MONITORING 3
03 NETWORK SETTING 4
04 NETWORK DIAGNOSIS 6
05 SYSTEM TOOLS 7
FIRMWARE UPGRADE 7
RESTORE DEFAULTS....7
CHANGE PASSWORD....8
REBOOT DEVICE 9
01 Web Login
After a fat AP is switched to fit AP, it will be managed by AC3000 automatically and you just need to deliver policies from AC3000 to the fit AP. Besides, when the fit AP is managed by AC3000, you can't login to the fit AP.
However, if the fit AP and AC3000 are in different networks, you need to log in to the fit AP for some settings.
To log in to the fit AP:
- Deploy AC3000 and the fat AP in the same network and switch the fat AP to fit AP.
For switching details, refer to the user manual of AC3000 Multi-service Controller Web UI for Fit AP Management and get the related configuration. - Log in to AC3000's first Web UI and go to AP Management > Modify AP to get the fit AP's IP address.
Or restore the fit AP to factory default. If so, the fit AP's login address becomes: http://192.168.0.254:8080.
Note: In the following steps, assume that the fit AP is in factory default state. - Deploy the fit AP to its correct location (in a different network with AC3000) and connect a management PC to the fit AP.
- Set up the PC's IP address as 192.168.0.X (X 为 2\~253) and subnet mask as 255.255.255.0.
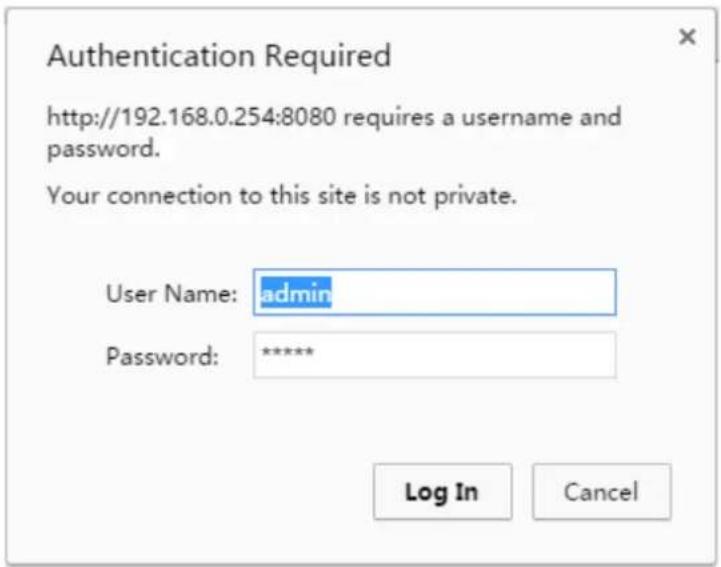
- Launch a browser and enter http://192.168.0.254:8080 in the address bar, then press Enter or Return.

text_image
IP-COM http://192.168.0.254:8080- Enter default username and password (both are admin) and click Log In.
text_image
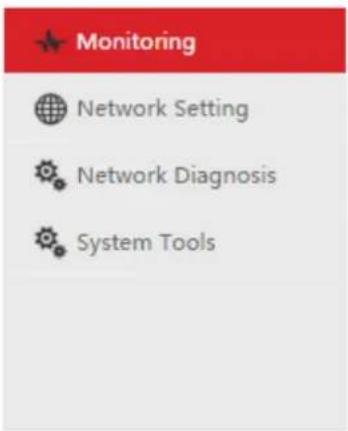
Authentication Required http://192.168.0.254:8080 requires a username and password. Your connection to this site is not private. User Name: admin Password: ***** Log In CancelThen the following page appears.
text_image
Monitoring Network Setting Network Diagnosis System ToolsMonitoring
| AP Status: | No AC found. |
| Hardware Version: | V1.0 |
| Firmware Version: | 18 |
| Uptime: | 4 min 49 s |
| LANO MAC: | 00:b0:c6:64:d0:00 |
02 Monitoring
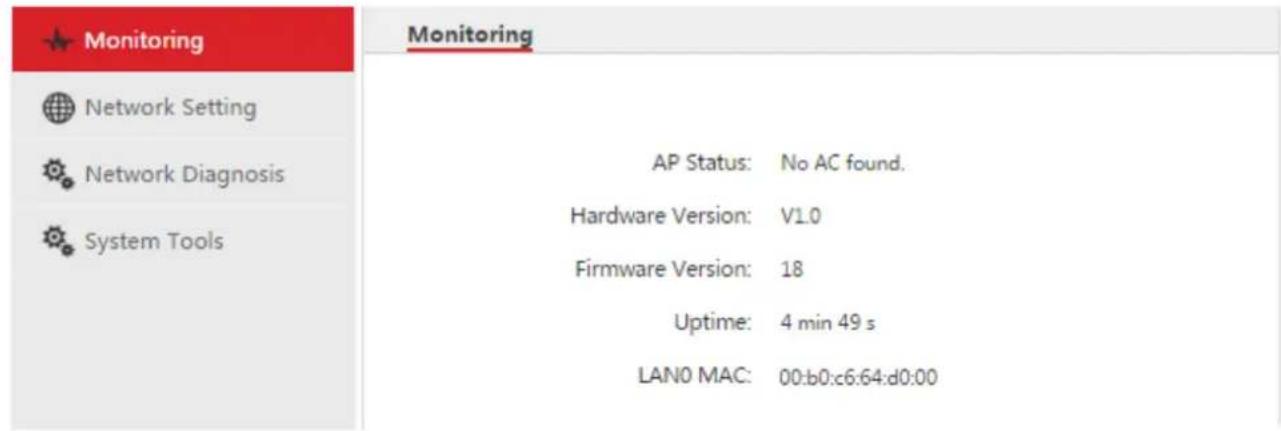
On this page, you can see some system information about the fit AP, shown as follows.
text_image
Monitoring Network Setting Network Diagnosis System Tools Monitoring AP Status: No AC found. Hardware Version: V1.0 Firmware Version: 18 Uptime: 4 min 49 s LAN0 MAC: 00:b0:c6:64:d0:00Parameter Description:
| Item | Description |
| AP Status | Display the connection status between the fit AP and AC.If you can login to the fit AP, it indicates that the fit AP is not connected to AC3000. But it can connect to other ACs. |
| Hardware Version | Display the fit AP's hardware version. |
| Firmware Version | Display the fit AP's firmware version. |
| Uptime | Display the duration of time that the fit AP has been running from last reboot. Uptime will be reset when the AP reboots. |
| LANO MAC | Display the fit AP's MAC address of LANO. |
03 Network Setting
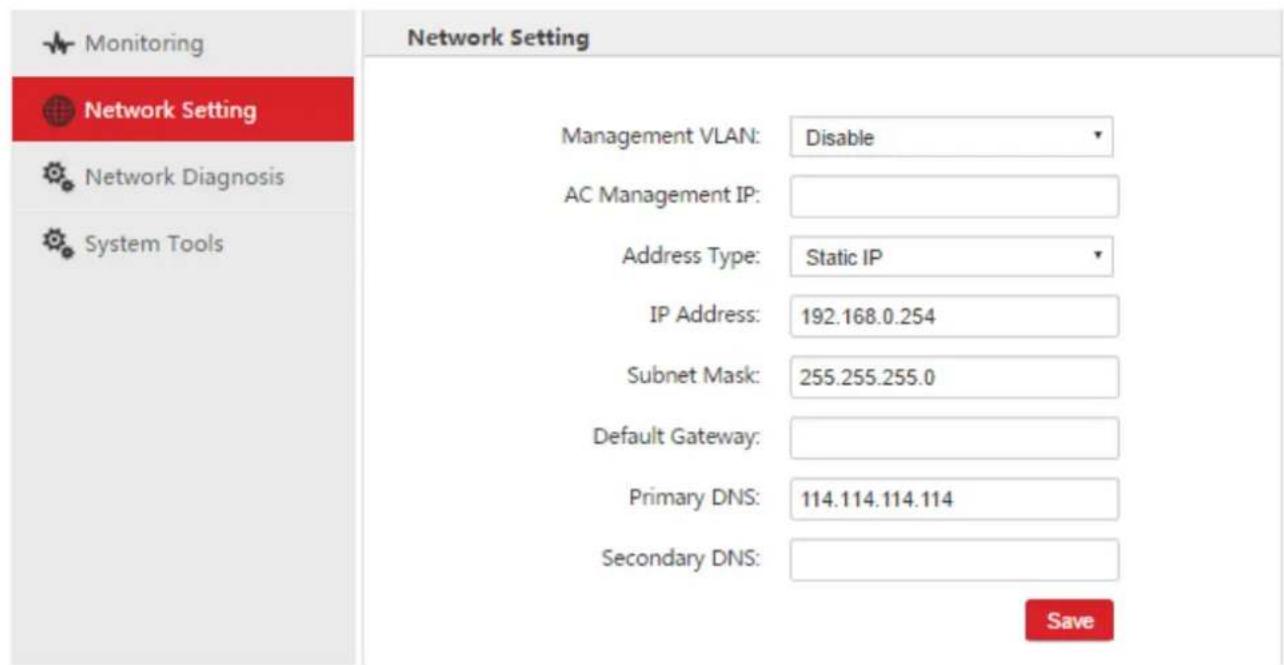
It is used to set up network information of the fit AP.
text_image
Monitoring Network Setting Network Diagnosis System Tools Network Setting Management VLAN: Disable AC Management IP: Address Type: Static IP IP Address: 192.168.0.254 Subnet Mask: 255.255.255.0 Default Gateway: Primary DNS: 114.114.114.114 Secondary DNS: SaveParameter Description:
| Item | Description |
| Management VLAN | Enable or disable the fit AP's management VLAN. |
| VLAN ID | When you enable the fit AP's management VLAN, set up its VLAN ID.After you set up the VLAN ID, make sure both the AC and the management PC are in the same VLAN with the fit AP. |
| AC Management IP | Set up the AC's IP address.If the fit AP and AC are cross Internet, please enter the WAN IP address of the AC's gateway. |
| Address Type | DHCP: If you select this option, the fit AP will obtain IP information from a DHCP server, probably the AC's DHCP server.Static: If selecting this option, you need to configure the fit AP's IP information manually. |
| IP Address | Set up the fit AP's IP address. By default, it is192.168.0.254. |
| Subnet Mask | Set up the fit AP's setnet mask. By default, it is 255.255.255.0. |
| Default Gateway | Set up the fit AP's default gateway. |
| Primary DNS | Set up the fit AP's primary DNS address. |
| Secondary DNS | (Optional) It's a backup DNS address. |
04 Network Diagnosis
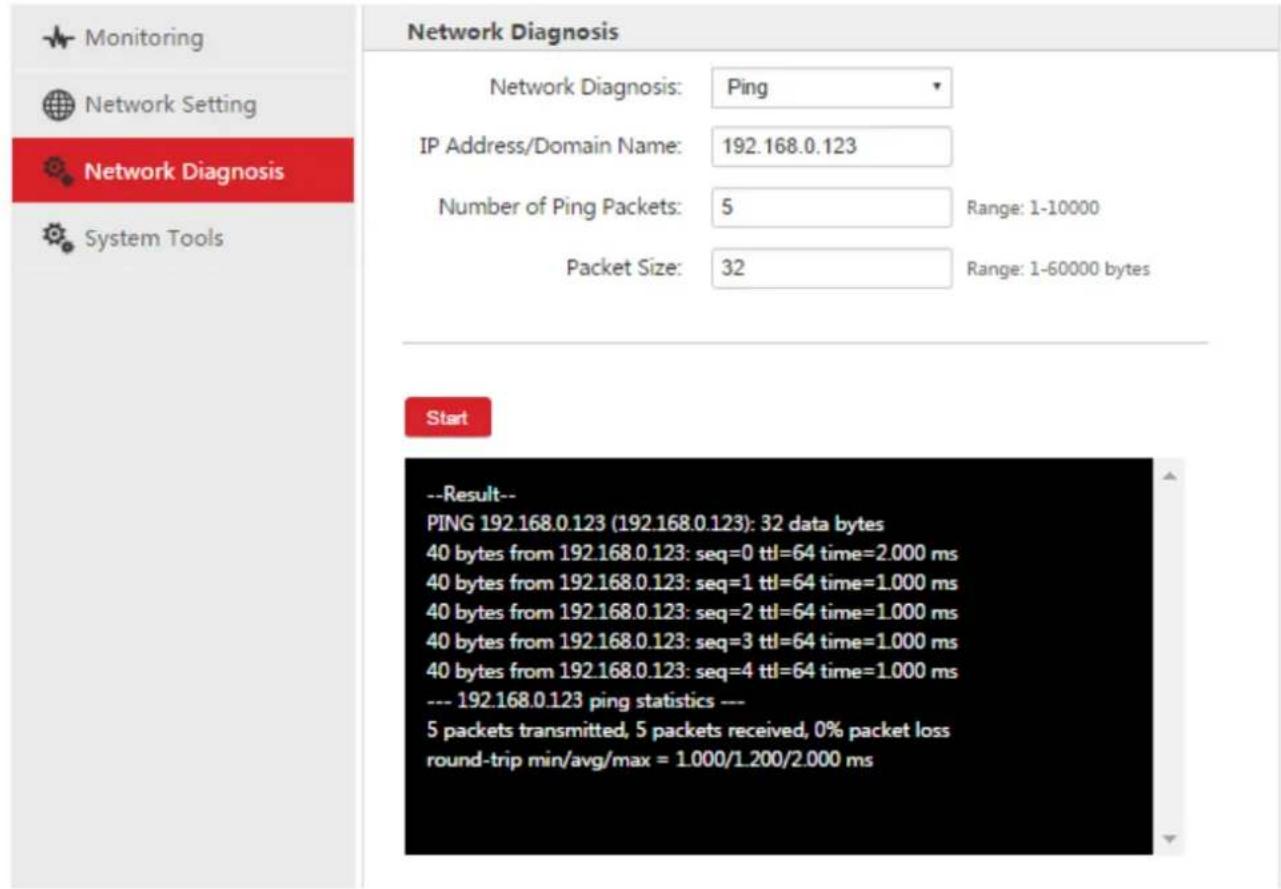
It is used to detect whether a destination address is reachable.
text_image
Monitoring Network Setting Network Diagnosis System Tools Network Diagnosis Network Diagnosis: Ping IP Address/Domain Name: 192.168.0.123 Number of Ping Packets: 5 Range: 1-10000 Packet Size: 32 Range: 1-60000 bytes Start --Result-- PING 192.168.0.123 (192.168.0.123): 32 data bytes 40 bytes from 192.168.0.123: seq=0 ttl=64 time=2.000 ms 40 bytes from 192.168.0.123: seq=1 ttl=64 time=1.000 ms 40 bytes from 192.168.0.123: seq=2 ttl=64 time=1.000 ms 40 bytes from 192.168.0.123: seq=3 ttl=64 time=1.000 ms 40 bytes from 192.168.0.123: seq=4 ttl=64 time=1.000 ms --- 192.168.0.123 ping statistics --- 5 packets transmitted, 5 packets received, 0% packet loss round-trip min/avg/max = 1.000/1.200/2.000 msDo as follows:
- IP Address/Domain Name: Enter a destination IP address or domain name, such as 192.168.0.123.
- Number of Ping Packets: Set up the amount of ping request packets.
- Packet Size: Enter the packet size of ping request. It is recommended to keep the default value. The unit is byte.
- Click Start. Then you will get the results in the following box.
05 System Tools
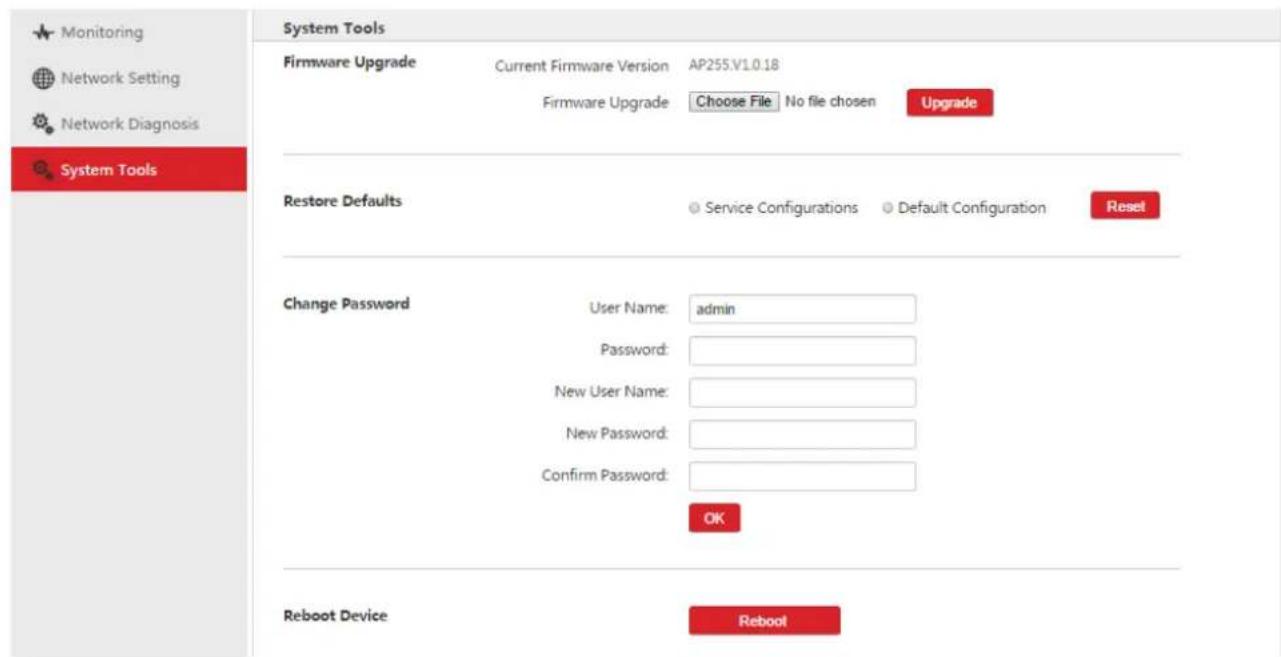
It provides four system tools to maintain the fit AP.
text_image
Monitoring Network Setting Network Diagnosis System Tools System Tools Firmware Upgrade Current Firmware Version AP255.V1.0.18 Firmware Upgrade Choose File No file chosen Upgrade Restore Defaults Service Configurations Default Configuration Reset Change Password User Name: admin Password: New User Name: New Password: Confirm Password: OK Reboot Device RebootFirmware Upgrade
It is used to upgrade a firmware for the fit AP.

Note
When an AP firmware is upgrading, DO NOT power off the AP or it may cause damage to the AP! If a sudden power off occurs, please upgrade again. If you cannot log in to the AP's Web UI after a sudden power off, please contact our technical support engineer.
Do as follows:
- Go to System Tools > Firmware Upgrade.
- Click Choose File to upload the matched firmware.
- Click Upgrade.
It will take about 2 minutes. Then you can login to the fit AP and go to this page to check whether the upgrading is successful.
Restore Defaults

text_image
Restore Defaults Service Configurations Default Configuration ResetIt is used to restore service configurations or default configuration to factory default.
| Item | Description |
| Service Configurations | Reset the fit AP's settings except network settings. Network settings includes: AP's management VLAN status (enable or disable), AP's management VLAN ID, AC's IP address, AP's IP address/subnet mask/gateway/DNS. |
| Default Configuration | Restore the fit AP to factory default. |
Restore to Factory Default through Web UI
If you want to clear service configurations or default configurations of the AC, do as follows:
-
Go to System Tools > Restore Defaults.
-
Select Service Configurations or Default Configuration.
-
Click Reset and follow onscreen instructions to restore the corresponding configurations to factory default.
Restore to Factory Default by reset button
If you can't login to the fit AP, use the reset button to restore service configurations or default configuration to factory default. Note: The pressed time is different when you reset the two kinds of configurations.
- Reset Service Configurations by reset button
When the fit AP is powered on, press the reset button on the AP's panel for about 5 seconds.
Then wait for about 45 seconds to finish the process.
- Reset Default Configuration by reset button
When the fit AP is powered on, press the reset button on the AP's panel for about 15 seconds.
Then wait for about 45 seconds to finish the process.
Change Password
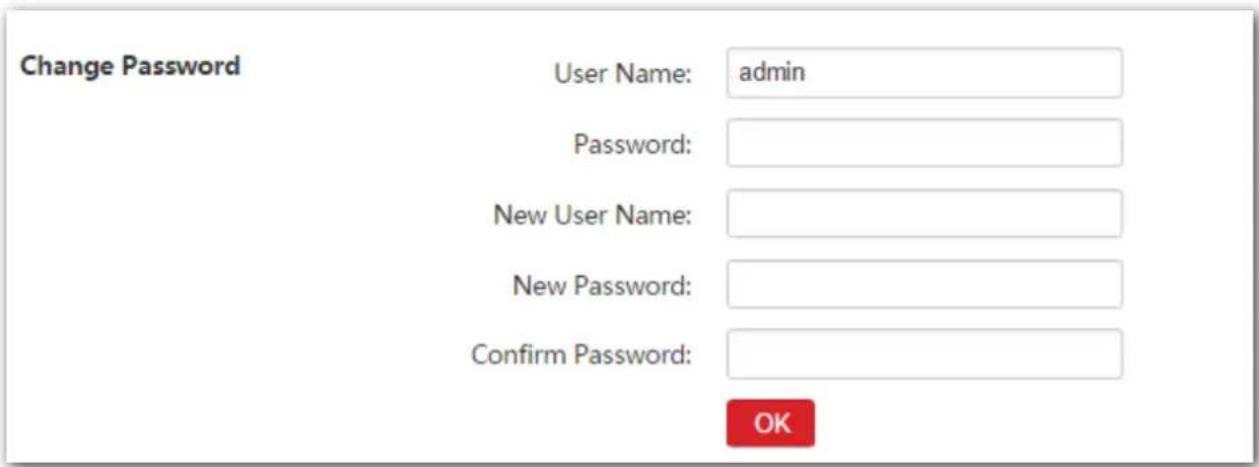
It is used to change the fit AP's login username and password.
text_image
Change Password User Name: admin Password: New User Name: New Password: Confirm Password: OKDo as follows:
- Go to System Tools > Change Password.
- User Name: Enter the current login username.
- Password: Enter the current login password.
- New User Name: Enter a new login username.
- New Password: Enter a new login password.
- Confirm Password: Re-enter the password.
- Click OK to apply your settings.
Reboot Device
Click Reboot to reboot the fit AP.
Reboot Device
Reboot