EP9 - Access Point IP-COM - Free user manual and instructions
Find the device manual for free EP9 IP-COM in PDF.


| Product Type | Access Point (part of AC1200 Enterprise Mesh WiFi System) |
| Model | EP9 |
| Brand | IP-COM |
| Wireless Standards | 802.11ac/a/b/g/n (AC1200) |
| Frequency Bands | 2.4 GHz and 5 GHz |
| Maximum Data Rate | Up to 1200 Mbps (300 Mbps on 2.4 GHz + 867 Mbps on 5 GHz) |
| Ethernet Ports | 1x WAN (10/100/1000 Mbps) + 1x LAN (configurable as second WAN) |
| Power Supply | PoE (Power over Ethernet) or 12V DC adapter (not specified) |
| Dimensions (approx.) | 200 x 200 x 40 mm (estimated for ceiling-mount) |
| Weight (approx.) | 300 g (estimated) |
| Management | IP-COM WiFi App (iOS/Android) for local and remote management |
| Main Functions | Wireless Settings, Guest Network, Access Control, Internet Settings (PPPoE, DHCP, Static IP, Bridge, PPPoE Russia, PPTP, L2TP), QoS, Fast Roaming, Capacity-oriented Mode, Captive Portal (Account, One-key, SMS authentication), Port Forwarding, UPnP, DHCP Server, DNS, Static Route, Firmware Upgrade, Maintenance Schedule, Account Authorization |
| Security | WPA2-PSK encryption, binding to IP-COM account, access control, blacklist, captive portal authentication |
| Maintenance | Firmware upgrade via app, scheduled reboot, clear cache |
| Spare Parts / Repairability | Not specified; no user-serviceable parts |
| Certifications | CE, FCC (implied) |
Frequently Asked Questions - EP9 IP-COM
User questions about EP9 IP-COM
0 question about this device. Answer the ones you know or ask your own.
Ask a new question about this device
Download the instructions for your Access Point in PDF format for free! Find your manual EP9 - IP-COM and take your electronic device back in hand. On this page are published all the documents necessary for the use of your device. EP9 by IP-COM.
USER MANUAL EP9 IP-COM
IP-COM WiFi App for AC1200 Enterprise Mesh WiFi System
Copyright Statement
© 2018 IP-COM Networks Co., Ltd. All rights reserved.
IP-COM is the registered trademark of IP-COM Networks Co., Ltd. Other brand and product names menoned herein are trademarks or registered trademarks of their respective holders. Copyright of the whole product as integraon, including its accessories and soware, belongs to IP-COM Networks Co., Ltd. No part of this publicaon can be reproduced, transmied, transcribed, stored in a retrieval system, or translated into any language in any form or by any means without the prior written permission of IP-COM Networks Co., Ltd.
Disclaimer
Pictures, images and product speciaons herein are for references only. To improve internal design, operaonal funcon, and/or reliability, IP-COM reserves the right to make changes to the products described in this document without obligaon to nofy any person or organizaon of such revisions or changes. IP-COM does not assume any liability that may occur due to the use or applicaon of the product or circuit layout(s) described herein. Every eort has been made in the preparaon of this document to ensure accuracy of the contents, but all statements, informaon and recommendaons in this document do not constute the warranty of any kind, express or implied.
Preface
Thank you for choosing IP-COM! Please read this user guide before you start with AC1200 Enterprise Mesh WiFi System.
Convenons
The typographical elements that may be found in this document are dened as follows.
| Item | Presentaon | Example |
| Cascading menus | > | System > Live Users |
| Parameter and value | Bold | Set User Name to Tom. |
| Variable | Italic | Format: XX:XX:XX:XX:XX:XX |
| UI control | Bold | On the Policy page, click the OK buon. |
| Message | “” | The “Success” message appears. |
The symbols that may be found in this document are dened as follows.
| Symbol | Meaning |
| NOTE | This format is used to highlight informaon of importance or special interest. Ignoring this type of note may result in ineece conguraons, loss of data or damage to the device. |
| TIP | This format is used to highlight a procedure that will save me or resources. |
Acronyms and Abbreviaons
| Acronym or Abbreviaon | Full Spelling |
| DHCP | Dynamic Host Conguraon Protocol |
| DNS | Domain Name Server |
| ISP | Internet Service Provider |
| Mesh node(s) | AC1200 Enterprise Mesh WiFi System node(s) |
Additional Informaon
For more informaon, search this product model on our website at hp://www.ip-com.com.cn
Technical Support
If you need more help, contact us by any of the following means. We will be glad to assist you as soon as possible.

+86-755-27653089

info@ip-com.com.cn

hp://www.ip-com.com.cn
Contents
1 Registering and Binding....1
2 Management Type....6
Local Management 6
Remote Management....6
3 My WiFi....7
4 My Prole....12
5 Wireless Setngs 13
6 Guest Network ....14
7 Access Control 15
8 Internet Sengs....18
Seng up PPPoE....19
Seng up DHCP....21
Seng up Stac IP Address 22
Seng up Bridge 23
Seng up PPPoE Russia 24
Seng up PPTP/PPTP Russia 26
Seng up L2TP/L2TP Russia....28
9 QoS....30
10 Add Mesh Device....31
11 Fast Roaming....33
12 Capacity-oriented Mode....34
13 Capve Portal 35
Adding authencaon-free clients....36
Seng up the account authencaon rule....37
Seng up the one-key authencaon rule....46
Seng up the SMS authencaon rule 49
14 Smart Assistant....57
15 Port Forwarding....58
16 UPnP 60
17 DHCP Server 61
18 DNS 62
19 Stac Route 63
20 Firmware Upgrade....67
21 Maintenance Schedule 69
22 Account Authorizaon....70
1 Registering and Binding
Binding an IP-COM account to your mesh network helps you secure your mesh network and manage it remotely.
To Register an IP-COM account
Opon 1
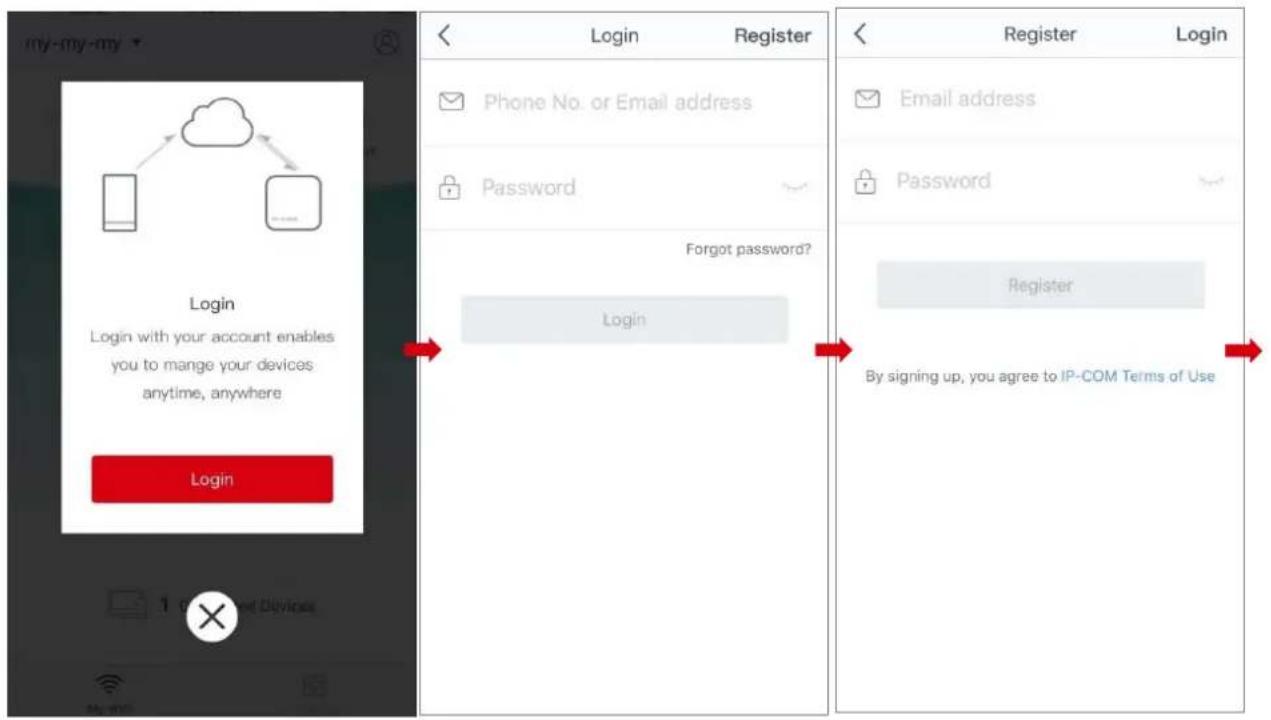
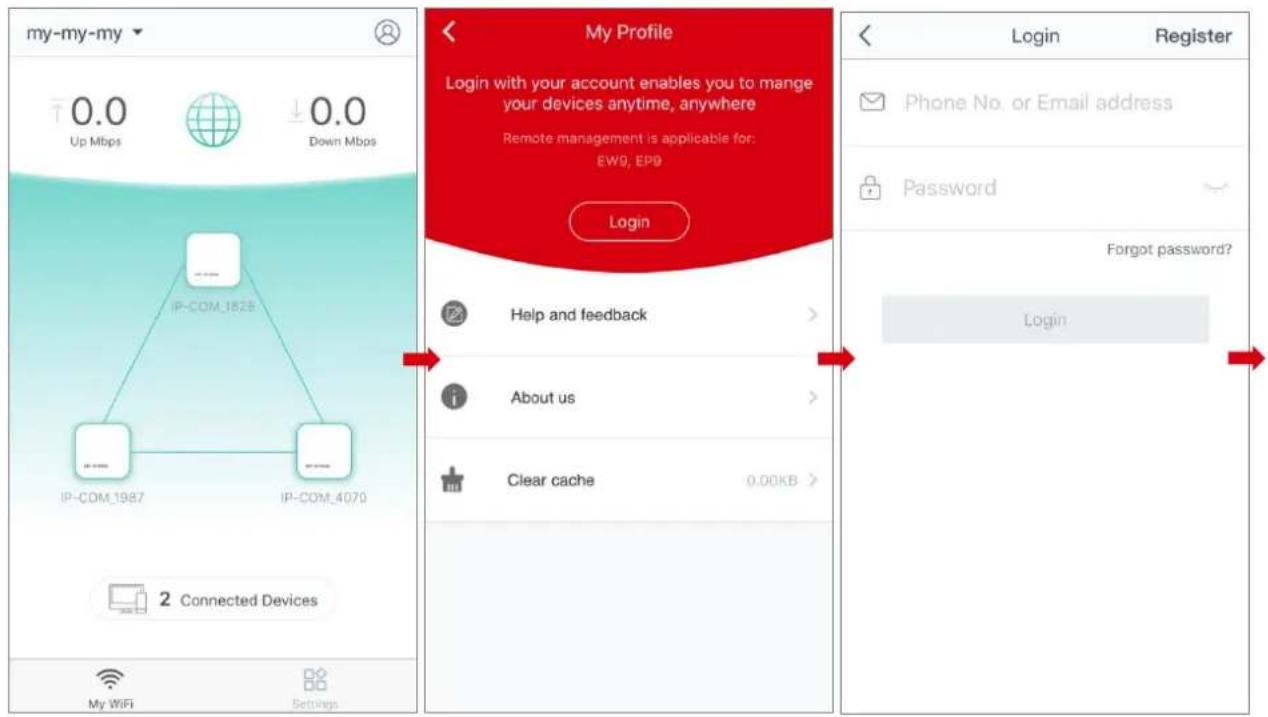
Aer you complete installaon and setup using the IP-COM WiFi App at the rst me, a login prompt page appears.
- Tap Login to enter the login page.
- Tap Register on the upper-right corner.
- Enter a valid email address.
- Customize a password for your IP-COM account.
- Tap Register.
A conrmaon email will be sent to your email inbox. Check your email and follow the instrucon to acvate your account. Aer successful acvaon, your IP-COM account is registered successfully.
text_image
my-my-my Login Login with your account enables you to mange your devices anytime, anywhere Login Login Password Phone No. or Email address Forgot password? Login Register Email address Password Register By signing up, you agree to IP-COM Terms of Use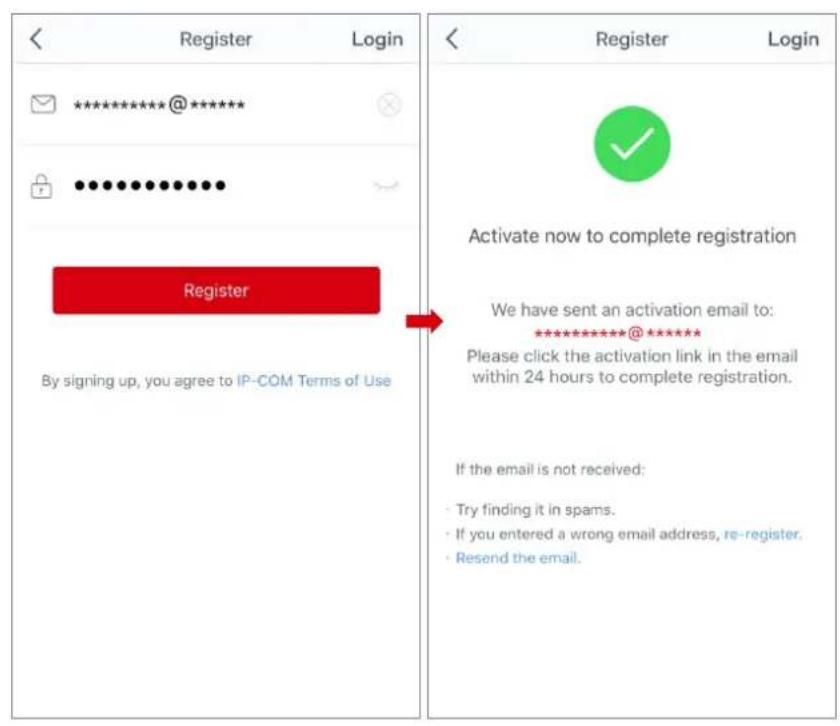
text_image
Register Login *************** @ ********** *************** * Register By signing up, you agree to IP-COM Terms of Use Activate now to complete registration We have sent an activation email to: ***************@ ********** Please click the activation link in the email within 24 hours to complete registration. If the email is not received: • Try finding it in spams. • If you entered a wrong email address, re-register. • Resend the email.Opon 2
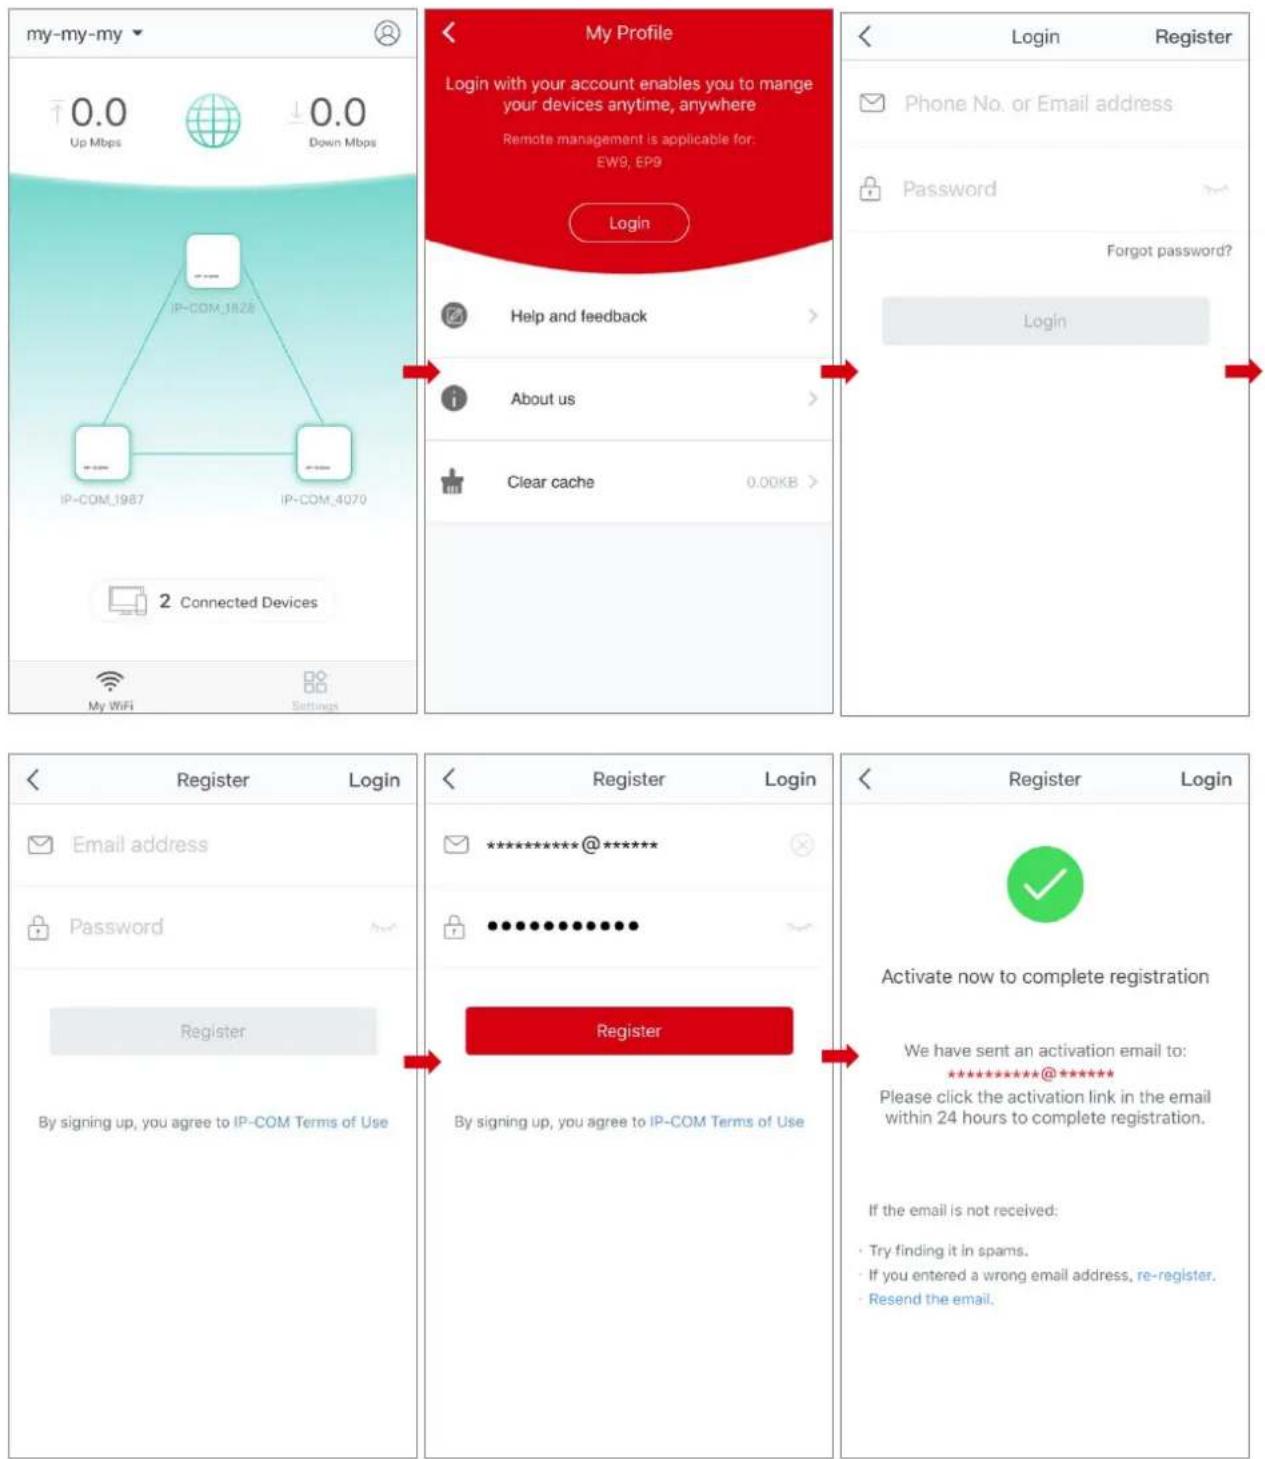
If you miss the Login prompt page, follow the steps below:
- Run the IP-COM WiFi App, and tap 🔒 on the upper-right corner.
- Tap Login.
- Tap Register on the upper-right corner.
-
Enter a valid email address.
-
Customize a password for your IP-COM account.
-
Tap Register.
A conrmaon email will be sent to your email inbox. Check your email and follow the instrucon to acvate your account. Aer successful acvaon, your IP-COM account is registered successfully.
flowchart
graph TD
    A["my-my-my"] --> B["0.0 Up Mbps"]
    A --> C["0.0 Down Mbps"]
    B --> D["IP-COM_1987"]
    C --> E["IP-COM_4070"]
    D --> F["2 Connected Devices"]
    E --> F
    F --> G["My WiFi Settings"]

    H["My Profile"] --> I["Login with your account enables you to manage your devices anytime, anywhere\nRemote management is applicable for:\nEW9, EP9\nLogin"]
    I --> J["Help and feedback"]
    I --> K["About us"]
    I --> L["Clear cache 0.00KB >"]

    M["Login"] --> N["Phone No. or Email address"]
    M --> O["Password"]
    M --> P["Forgot password?"]
    M --> Q["Login"]

    R["Register"] --> S["Email address"]
    R --> T["Password"]
    R --> U["Register"]
    R --> V["By signing up, you agree to IP-COM Terms of Use"]

    W["Register"] --> X["***************@*********"]
    W --> Y["*****************"]
    W --> Z["Register"]
    W --> AA["By signing up, you agree to IP-COM Terms of Use"]

    AB["Register"] --> AC["Activate now to complete registration\nWe have sent an activation email to: \n***************@\nPlease click the activation link in the email within 24 hours to complete registration.\nIf the email is not received:\n• Try finding it in spams.\n• If you entered a wrong email address, re-register.\n• Resend the email."]
To log in to the IP-COM WiFi App

Note
The account you use to log in to the IP-COM WiFi App at the rst me is bound to your mesh network automacally, and it is your administrator account.
- Connect your smart phone to your mesh WiFi network, and run the IP-COM WiFi App.
- Tap ⑥ on the upper-right corner.
- Tap Login.
- Enter your registered IP-COM account.
- Enter the password.
- Tap Login.
text_image
my-my-my 0.0 Up Mbps 0.0 Down Mbps IP-COM_182E IP-COM_1987 IP-COM_4070 2 Connected Devices My WiFi Settings My Profile Login with your account enables you to manage your devices anytime, anywhere Remote management is applicable for: EW9, EP9 Login Help and feedback About us Clear cache 0.00KB Login Register Phone No. or Email address Password Forgot password? Login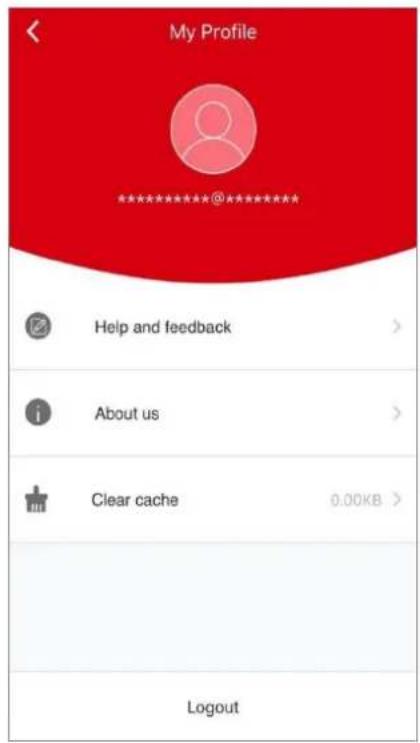
text_image
My Profile Help and feedback > About us > Clear cache 0.00KB > Logout
Note
Aer your mesh network is bound to an account, login with the account or authorized accounts is required for network management.
2 Management Type
All IP-COM AC1200 Enterprise Mesh WiFi Systems support the IP-COM WiFi App for local and remote management. You can choose either of them as needed.
Local Management
Local management indicates that you can use the IP-COM WiFi App to manage your mesh network aer connecng your smart phone to the mesh network.
Congure procedure:
- Connect your smart phone to the WiFi network of your mesh nodes.
- Run the IP-COM WiFi App on the smart phone, and then you can use the App to manage your mesh network.

If your mesh nodes are bound to an IP-COM account, you can manage them only aer login with the bound account or other accounts authorized by the account.
Remote Management
Remote management indicates that you can use the IP-COM WiFi App to manage your mesh network anytime, anywhere.
Prerequisites:
Your mesh nodes have connected to the internet successfully.
Log in with the bound or authorized account.

- A mesh network can only be bound to an account.
- If you want to use other accounts to manage your mesh network, you can authorize these accounts aer login with the administrator account.
- Only the administrator account can authorize other accounts to manage the mesh network.
3 My WiFi
Aer compleng the internet sengs, the IP-COM WiFi App shows you the following page. You can view the status of your mesh nodes, real-me upload/download speed and connected devices, and manage your mesh network.
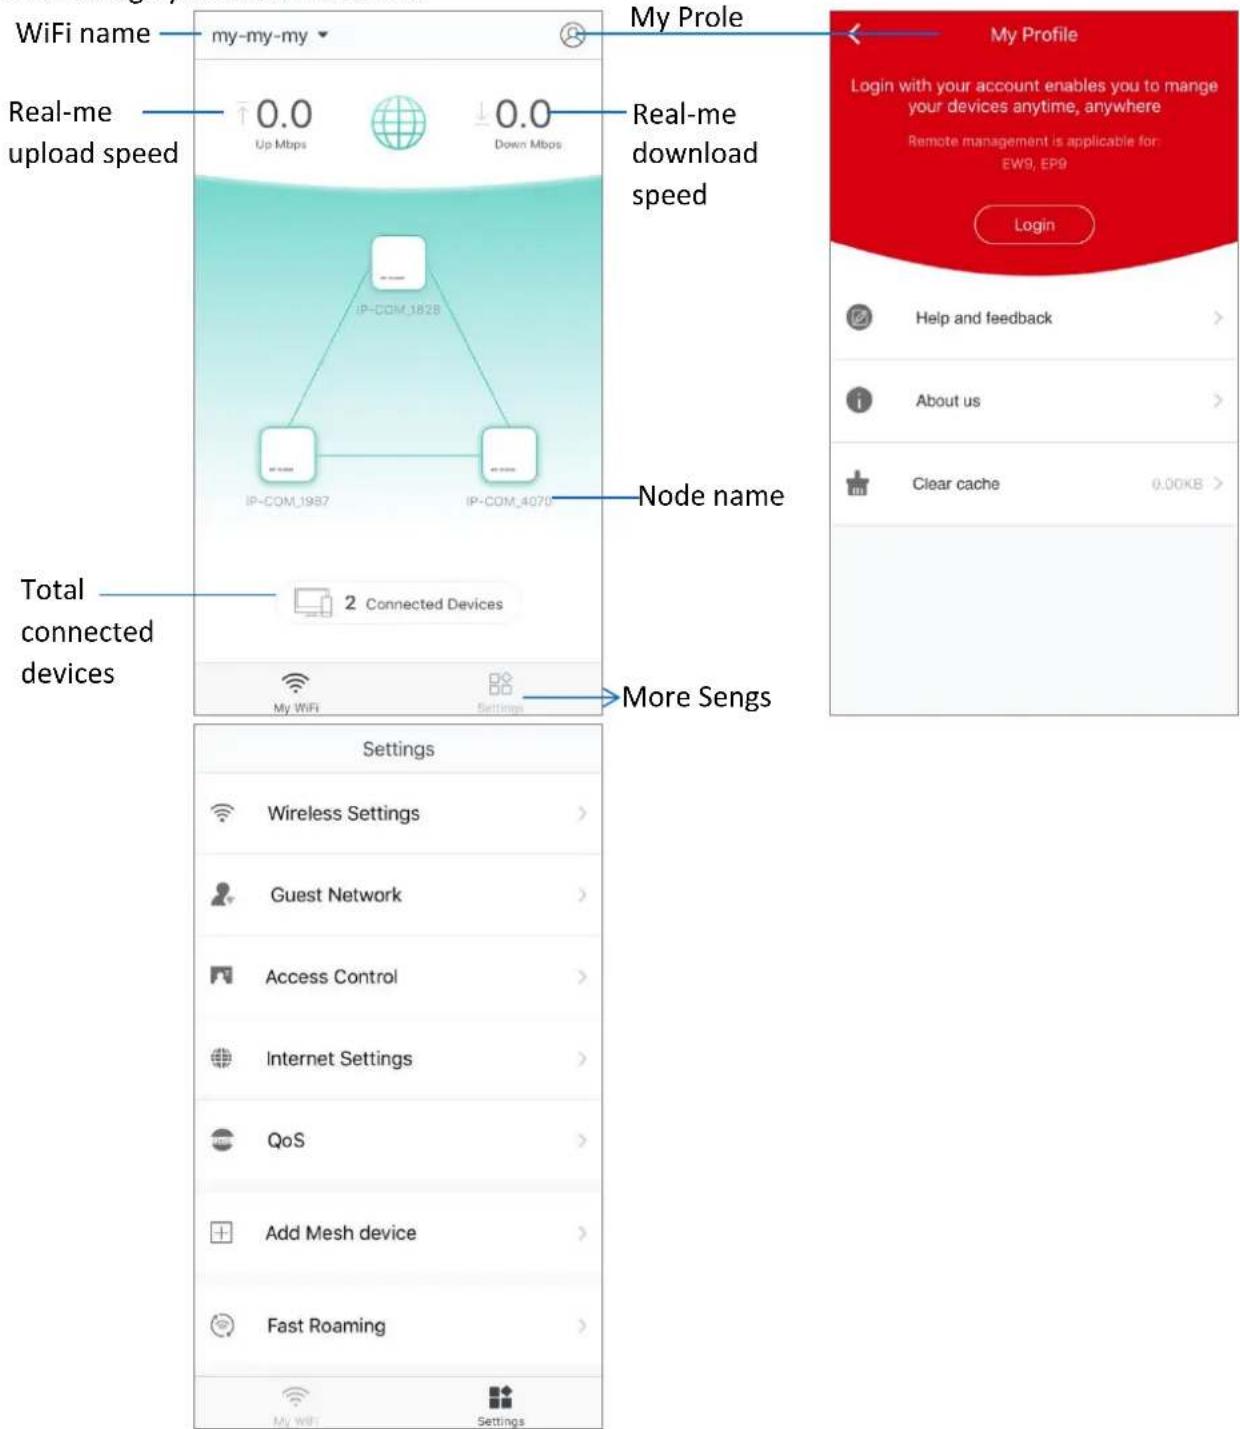
text_image
WiFi name my-my-my Real-me upload speed 0.0 Up Mbps 0.0 Down Mbps My Prole Real-me download speed Node name Total connected devices 2 Connected Devices More Sengs My Profile Login with your account enables you to mange your devices anytime, anywhere Remote management is applicable for: EW9, EP9 Login Help and feedback About us Clear cache 0.00KB > Settings Wireless Settings > Guest Network > Access Control > Internet Settings > QoS > Add Mesh device > Fast Roaming > My WiFi SettingsTo check or manage your mesh nodes
Tap the WiFi name, which is my-my-my in the following picture, on the upper-le corner of the My WiFi page to enter the following page.
All mesh nodes in a network share the same WiFi name.
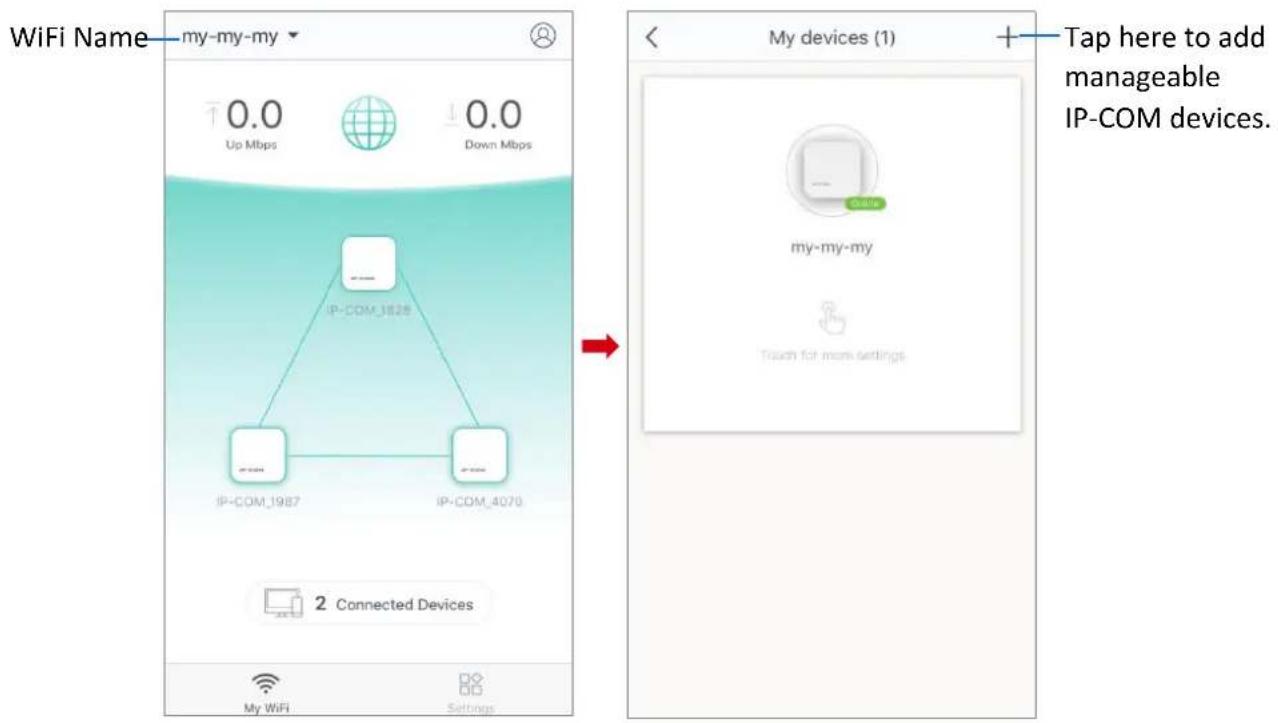
text_image
WiFi Name my-my-my ↑0.0 Up Mbps ↓0.0 Down Mbps IP-COM_1825 IP-COM_1987 IP-COM_4070 2 Connected Devices My devices (1) Tap here to add manageable IP-COM devices. My-my-my Touch for more settingsTo view details of the internet sengs
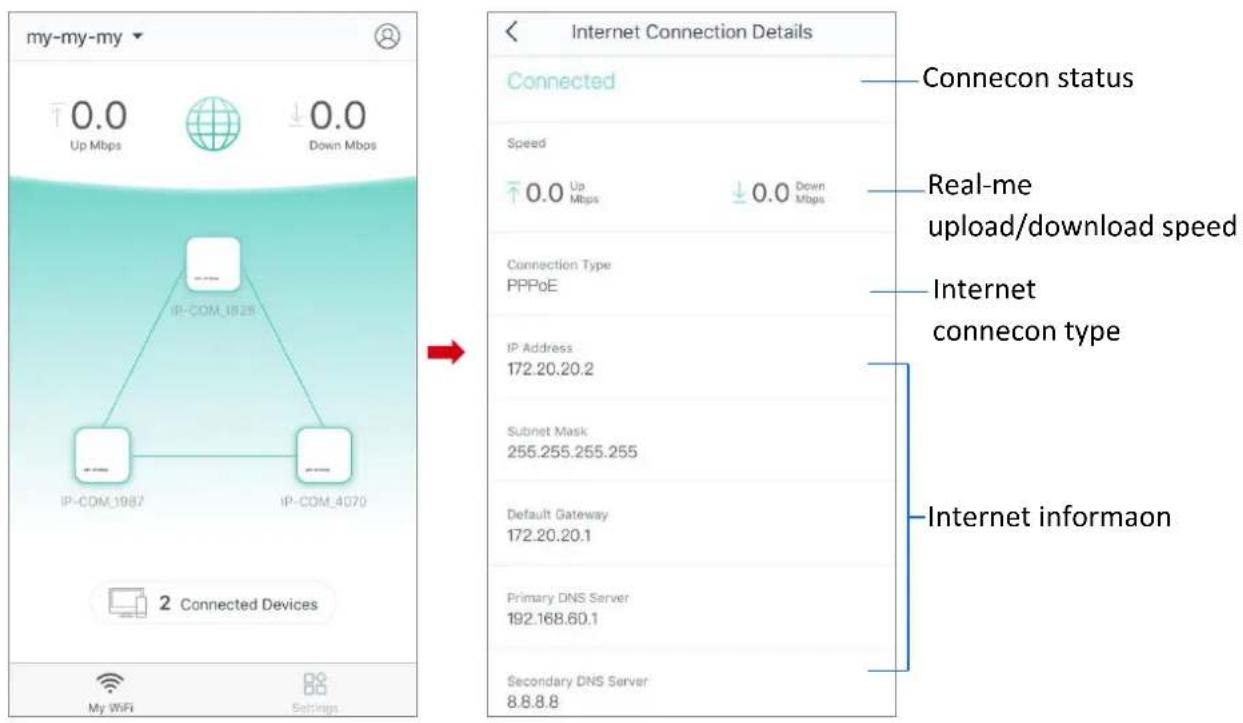
Tap the icon on the home page (My WiFi) of the App.
text_image
my-my-my 0.0 Up Mbps ↓ 0.0 Down Mbps IP-COM_1825 IP-COM_1987 IP-COM_4070 2 Connected Devices My WiFi Settings Internet Connection Details Connected Speed 0.0 Up Mbps ↓ 0.0 Down Mbps Connection Type PPPoE IP Address 172.20.20.2 Subnet Mask 255.255.255.255 Default Gateway 172.20.20.1 Primary DNS Server 192.168.60.1 Secondary DNS Server 8.8.8.8 Connecon status Real-me upload/download speed Internet connecon type Internet informaonTo view details of the nodes
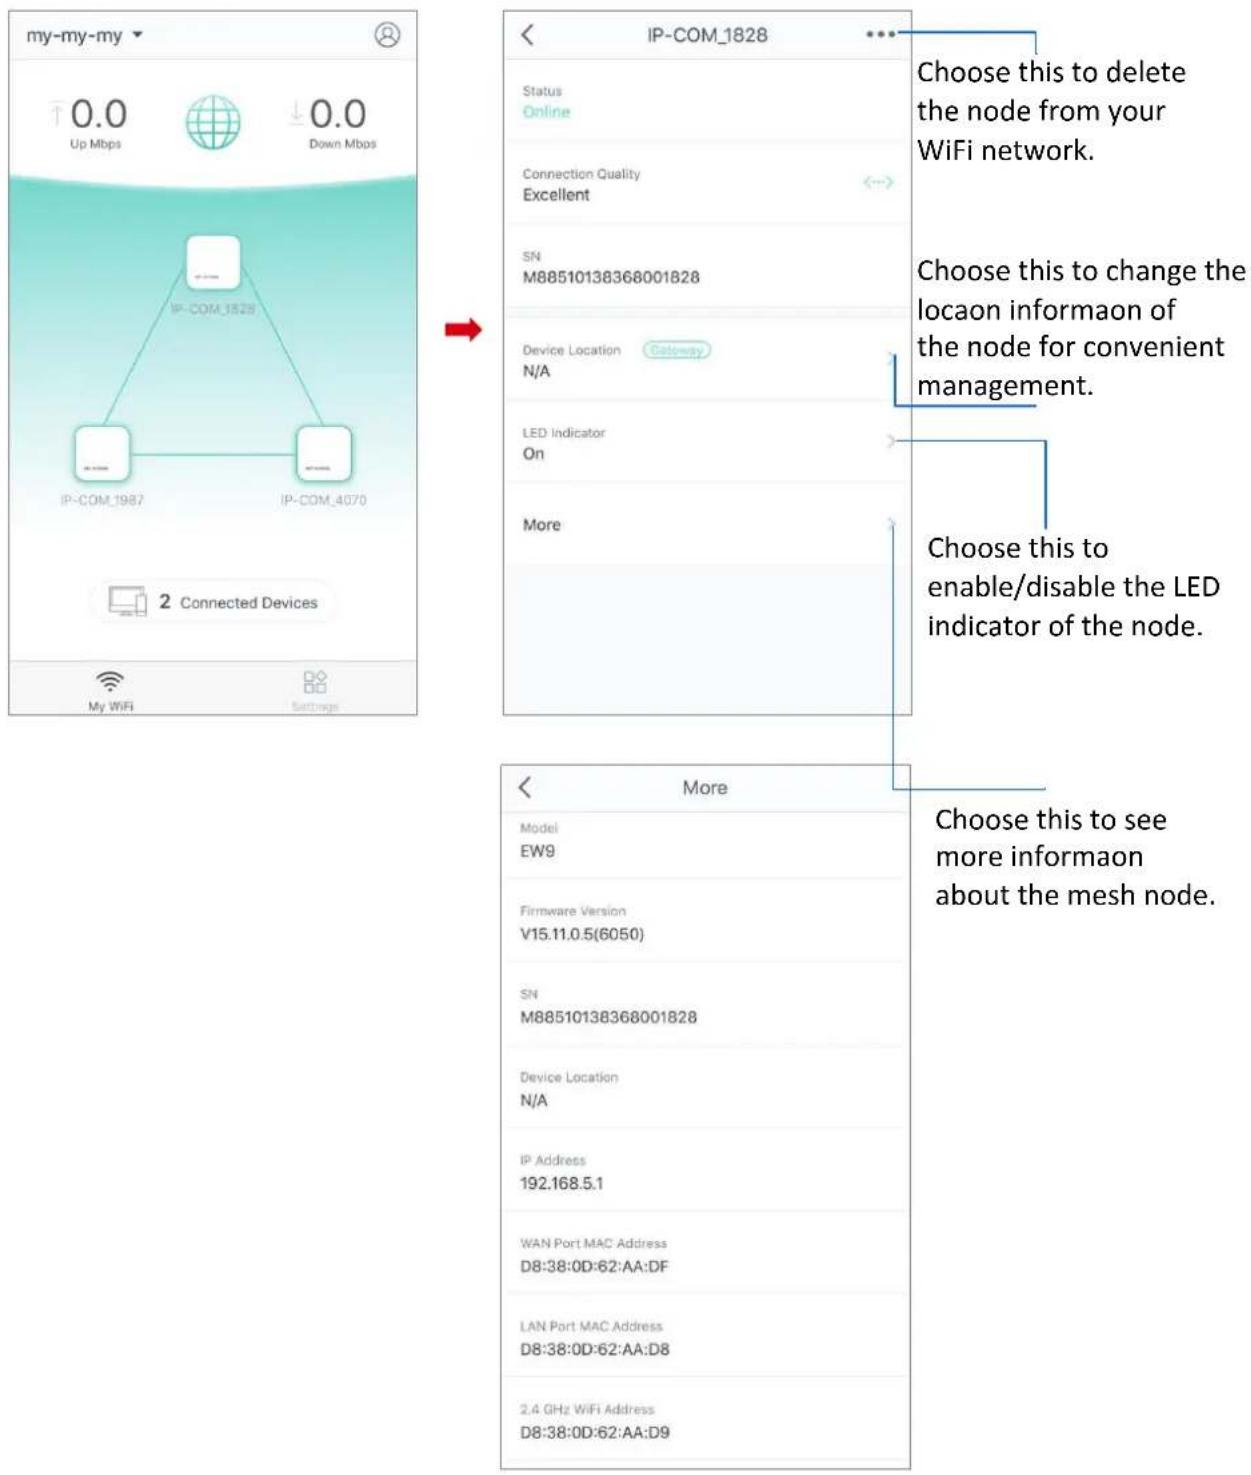
Tap the icon on the home page (My WiFi) of the App to see details of the corresponding mesh node.
text_image
my-my-my ↑0.0 Up Mbps ↓0.0 Down Mbps IP-COM_1528 IP-COM_1987 IP-COM_4070 2 Connected Devices My WiFi Settings IP-COM_1828 Status Online Connection Quality Excellent SN M88510138368001828 Device Location Gateway N/A LED Indicator On More Choose this to delete the node from your WiFi network. Choose this to change the locaon informaon of the node for convenient management. Choose this to enable/disable the LED indicator of the node. More Choose this to see more informaon about the mesh node.To view the connected devices
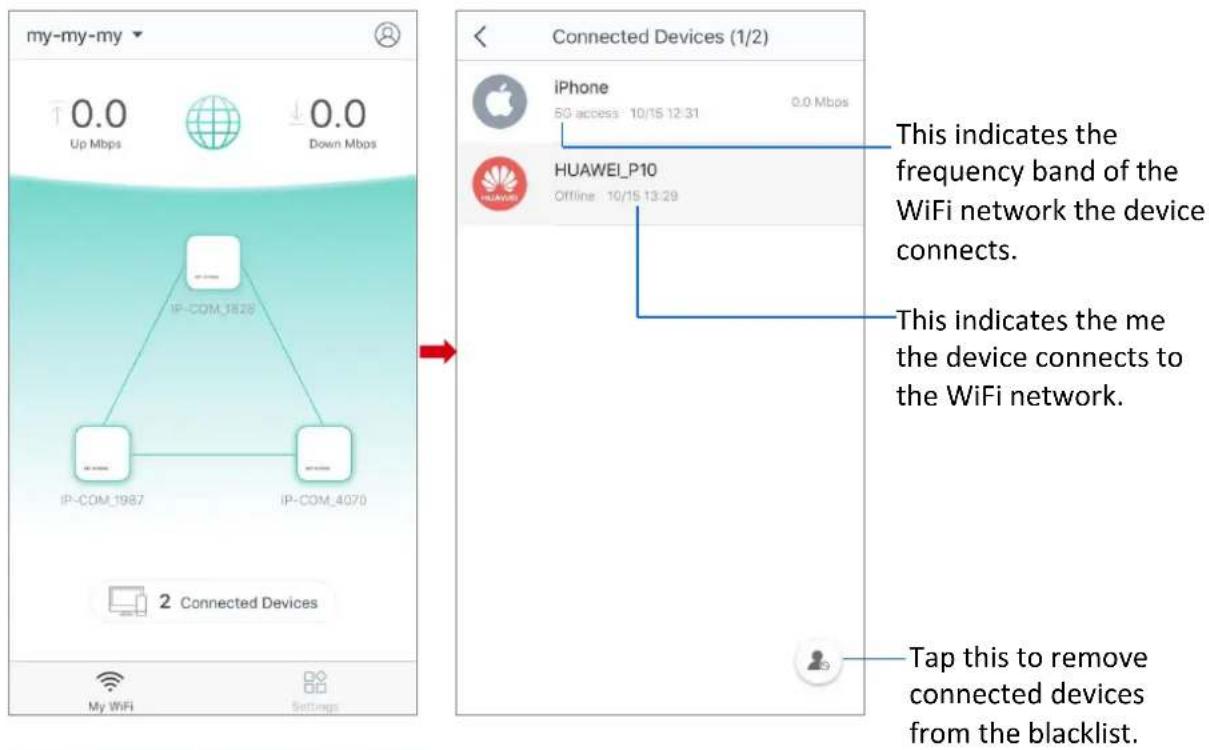
Tap the icon on the home page (My WiFi) of the App. If you want to check the details of a device or manage more closely, choose the device.
text_image
my-my-my 0.0 Up Mbps 0.0 Down Mbps Connected Devices (1/2) iPhone 50 access 10/15 12:31 0.0 Mbps HUAWEI_P10 Offline 10/15 13:29 This indicates the frequency band of the WiFi network the device connects. This indicates the me the device connects to the WiFi network. Tap this to remove connected devices from the blacklist.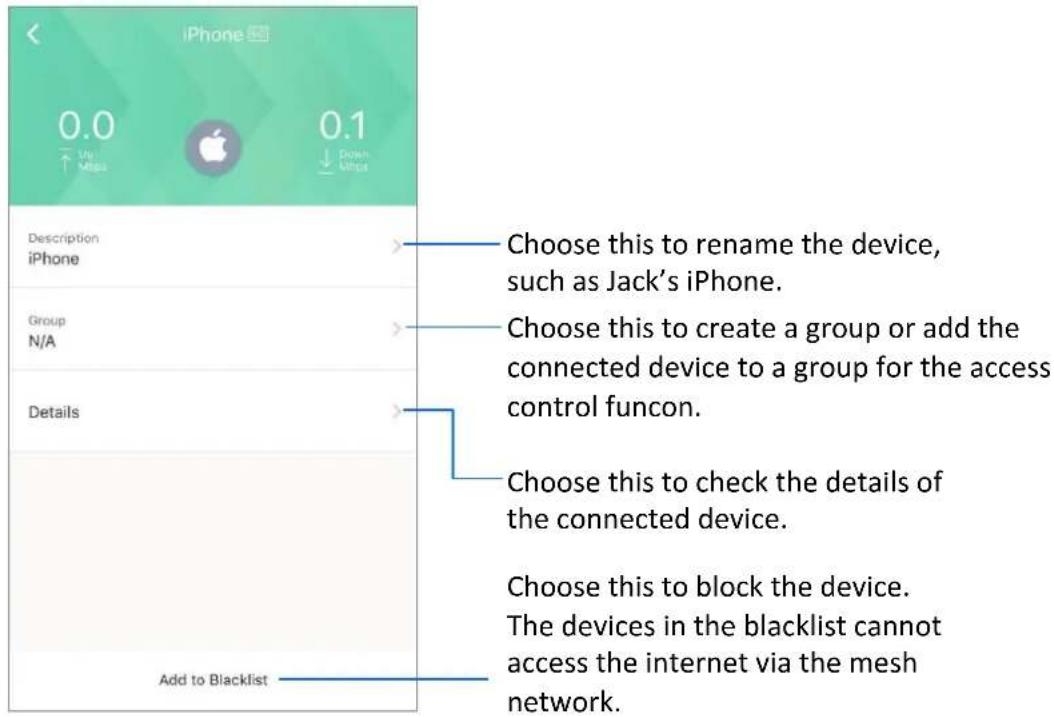
text_image
iPhone 0.0 Up Mail 0.1 Down Impact Description iPhone Group N/A Details Add to Blacklist Choose this to rename the device, such as Jack's iPhone. Choose this to create a group or add the connected device to a group for the access control funcon. Choose this to check the details of the connected device. Choose this to block the device. The devices in the blacklist cannot access the internet via the mesh network.4 My Prole
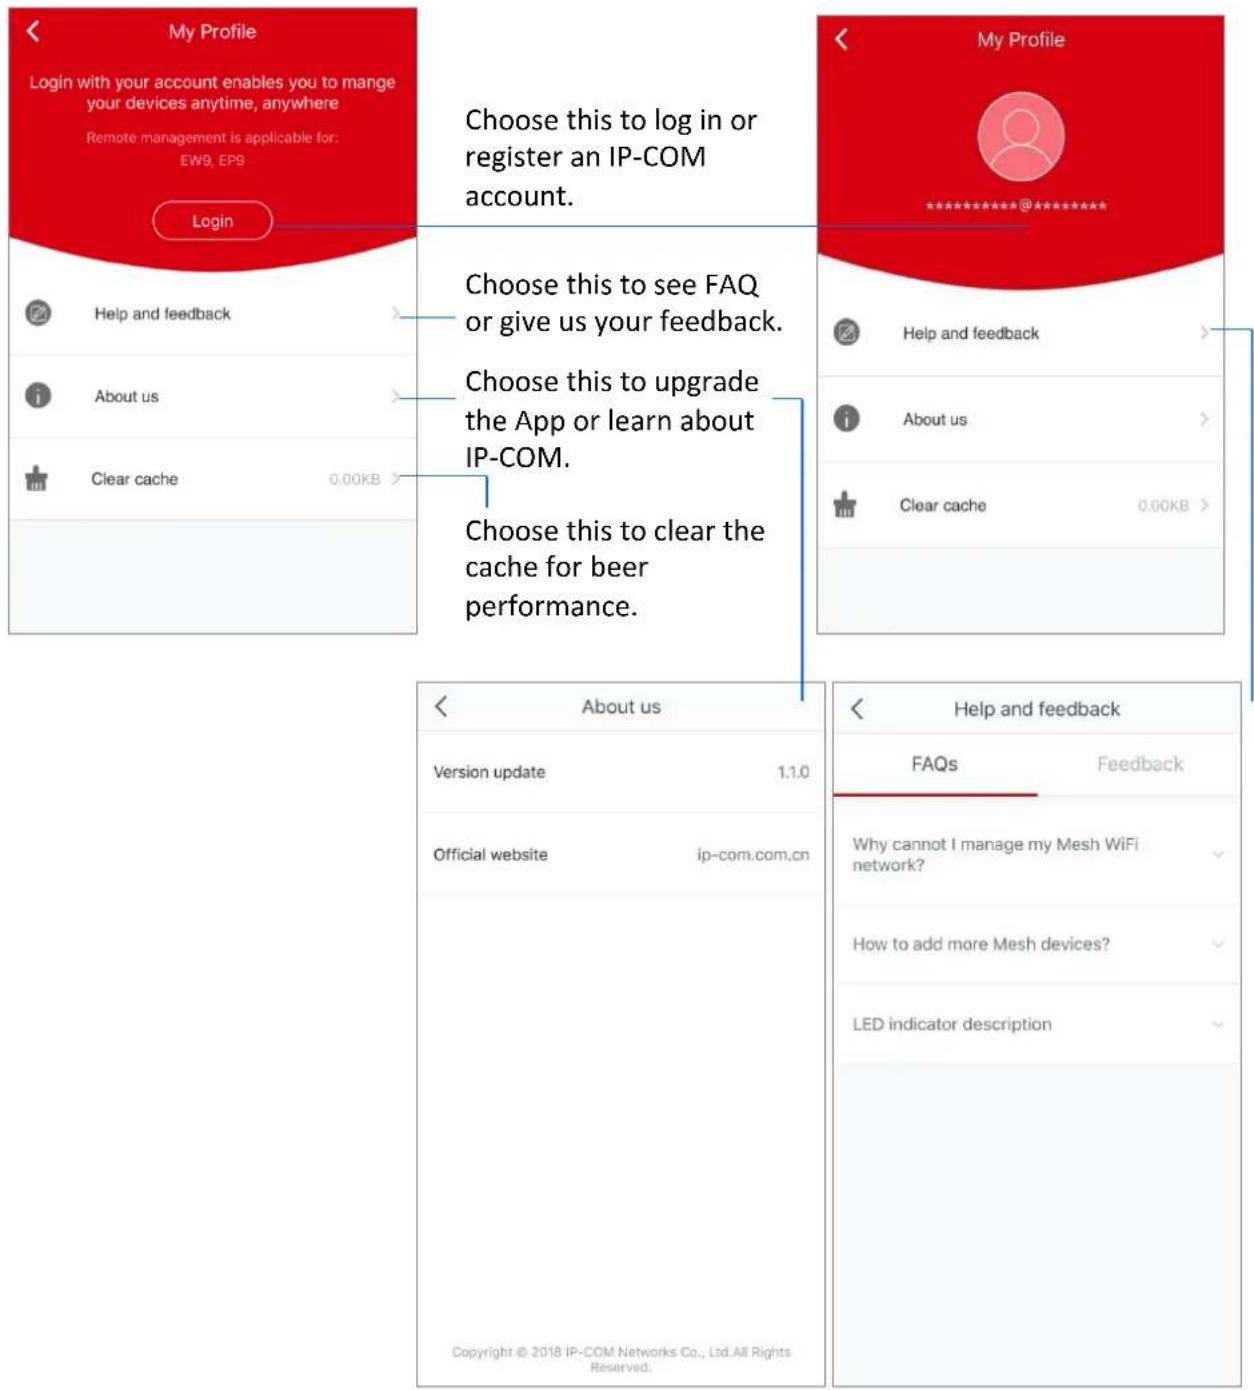
Tap the @ icon in the upper-right corner of the home page (My WiFi) for logging in or registering.
text_image
My Profile Login with your account enables you to manage your devices anytime, anywhere Remote management is applicable for: EW9, EP9 Login Choose this to log in or register an IP-COM account. Choose this to see FAQ or give us your feedback. Choose this to upgrade the App or learn about IP-COM. Choose this to clear the cache for beer performance. < About us Version update 1.1.0 Official website ip-com.com.cn Copyright © 2018 IP-COM Networks Co., Ltd.All Rights Reserved. < Help and feedback FAQs Feedback Why cannot I manage my Mesh WiFi network? How to add more Mesh devices? LED indicator description5 Wireless Sengs

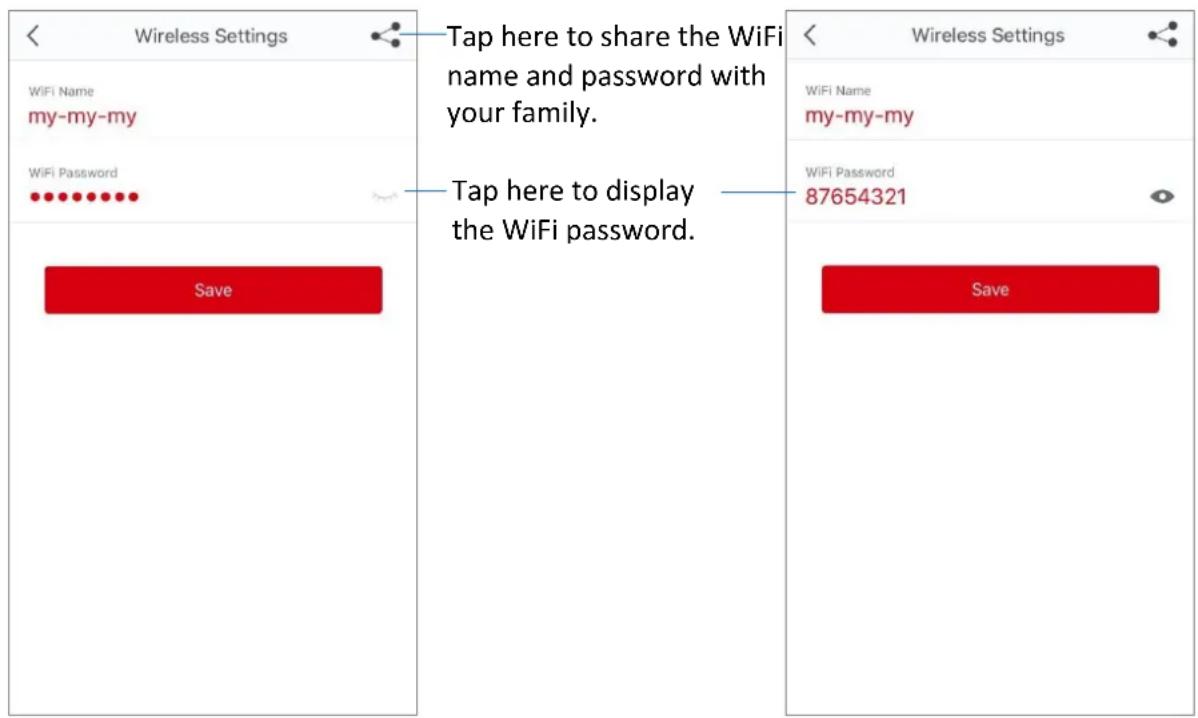
In this secon, you can change the WiFi name and password of your mesh WiFi network.
Perform the following procedure to change your WiFi name and password:
- Choose Sengs > Wireless Sengs to enter the conguraon page.
Change the WiFi name and password as required. 2.
Tap Save. 3.
text_image
Wireless Settings WiFi Name my-my-my WiFi Password Save Tap here to share the WiFi name and password with your family. Tap here to display the WiFi password. Save Wireless Settings WiFi Name my-my-my WiFi Password 87654321 Save6 Guest Network

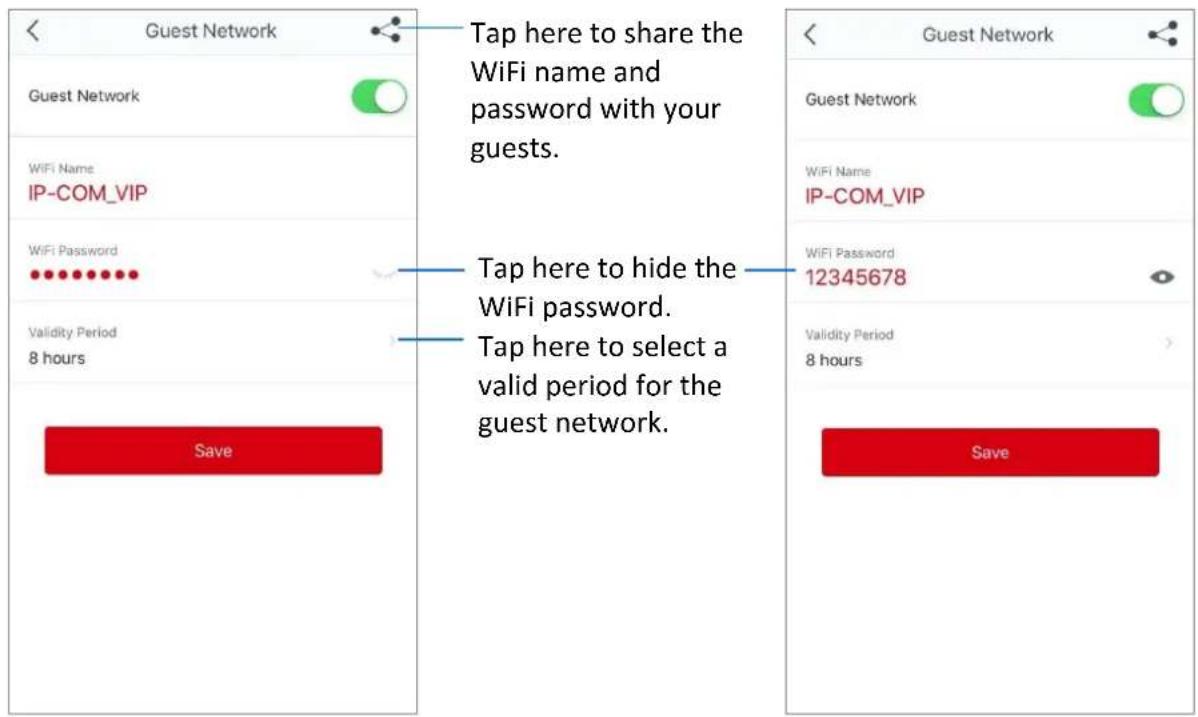
The Guest Network funcon allows you to create a separate network for your guests to secure the main network.
Perform the following procedure to enable the Guest Network:
- Choose Sengs > Guest Network to enter the conguraon page.
Set the buon to the enabled state . 2.

- Change the WiFi name, password and validity period as required.
Tap Save. 4.
text_image
Guest Network Guest Network WiFi Name IP-COM_VIP WiFi Password ••••••••• Validity Period 8 hours Save Tap here to share the WiFi name and password with your guests. Tap here to hide the WiFi password. Tap here to select a valid period for the guest network. Guest Network Guest Network WiFi Name IP-COM_VIP WiFi Password 12345678 Validity Period 8 hours Save7 Access Control

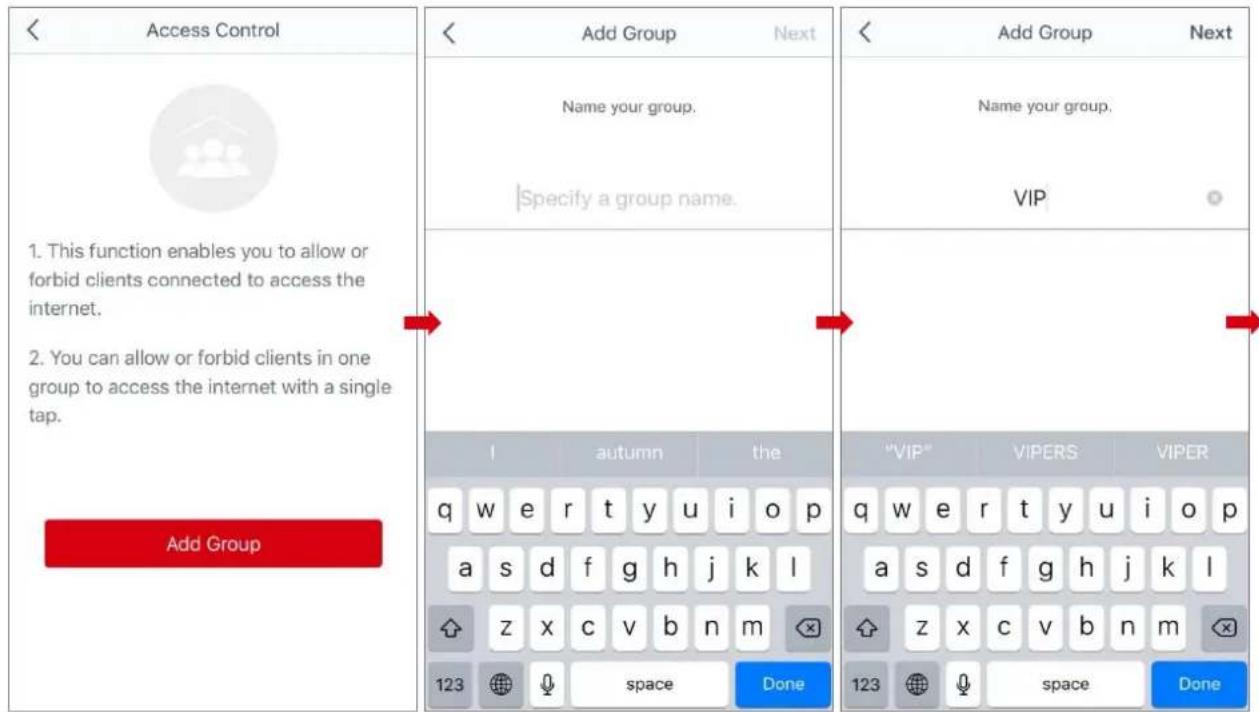
The Access Control funcon allows you to create dierent department-based groups and control their internet me.
Perform the following procedure to set up the Access Control funcon:
- Choose Sengs > Access Control to enter the conguraon page.
Create a group. 2.
(1) Tap Add Group.
(2) Enter a group name, which is VIP in this example, and tap Next.
(3) Select the devices to be added into the group.
(4) Tap Complete.
text_image
Access Control 1. This function enables you to allow or forbid clients connected to access the internet. 2. You can allow or forbid clients in one group to access the internet with a single tap. Add Group Add Group Next Name your group. Specify a group name. Add Group Name your group. VIP I autumn the qw er t y u i o p a s d f g h j k l z x c v b n m 123 space Done "VIP" VIPERS VIPER qw er t y u i o p a s d f g h j k l z x c v b n m 123 space Done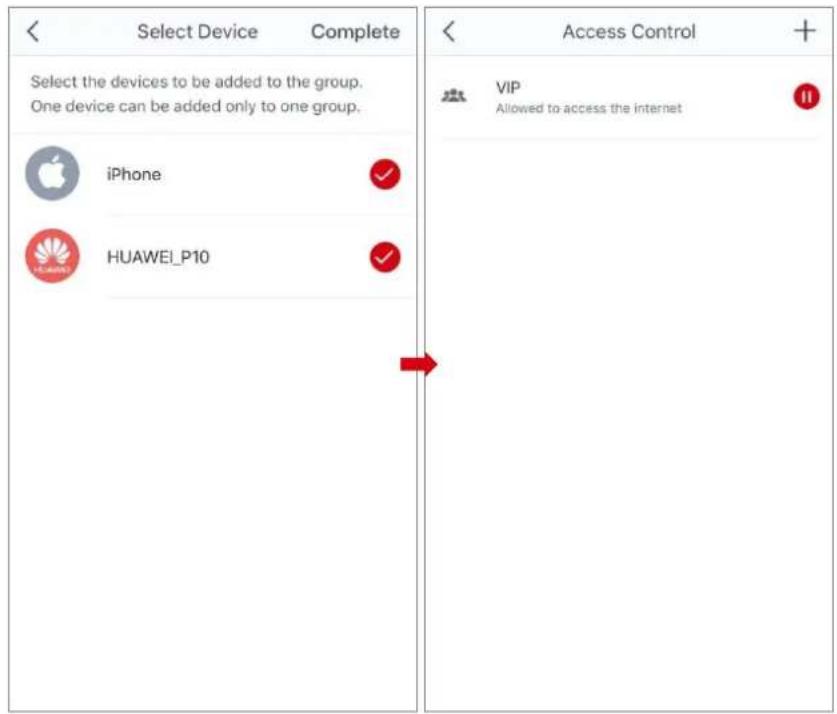
text_image
Select Device Complete Select the devices to be added to the group. One device can be added only to one group. iPhone ✓ HUAWEI_P10 ✓ Access Control + VIP Allowed to access the internet(5) Tap or to change the rules.
indicates that the devices in the group are allowed to access the internet.
indicates that the devices in the group are not allowed to access the internet.
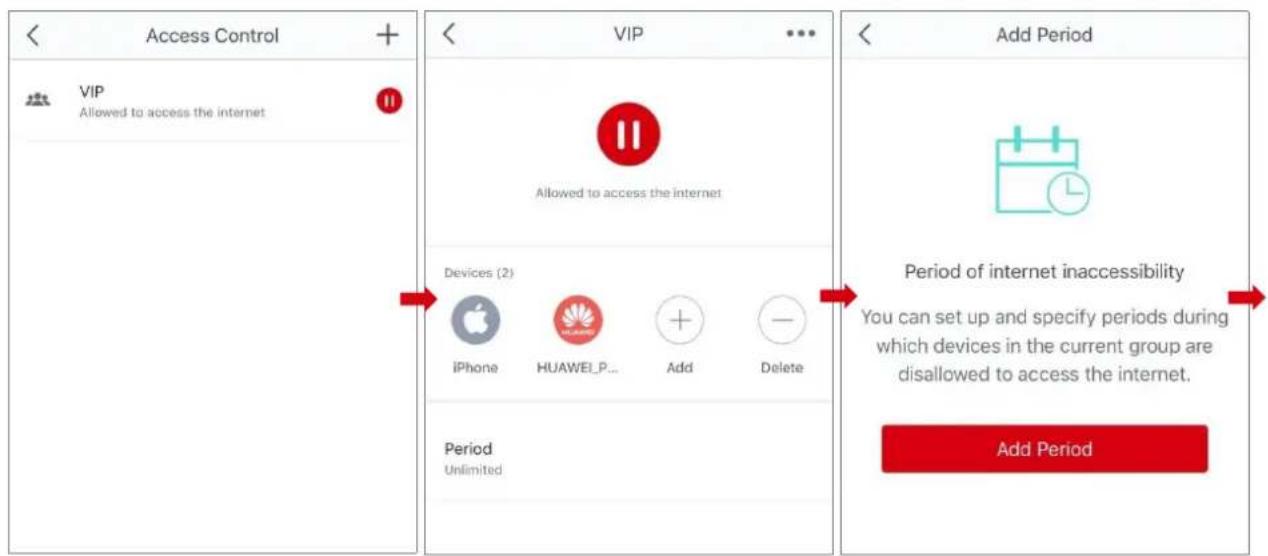
- Specify a period for the rule.
(1) Choose the group.
(2) Tap Period.
(3) Tap Add Period.
(4) Specify a Period Name, Start Time, End Time, and the dates from when the rule takes eect.
(5) Tap Save.
text_image
Access Control VIP Allowed to access the internet VIP Allowed to access the internet Devices (2) iPhone HUAWEI_P... Add Delete Period Unlimited Add Period Period of internet inaccessibility You can set up and specify periods during which devices in the current group are disallowed to access the internet. Add Period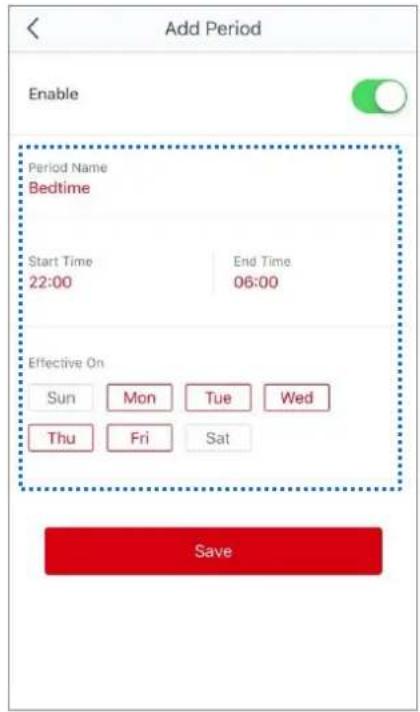
text_image
Add Period Enable Period Name Bedtime Start Time 22:00 End Time 06:00 Effective On Sun Mon Tue Wed Thu Fri Sat Save8 Internet Sengs

This secon describes how to change your conneccon type, and set the number of WAN ports.
- PPPoE: If this type is selected, you need to enter the PPPoE user name and password provided by your ISP for internet access.
- DHCP: If this type is selected, no parameter is required to enter. The mesh node obtains the dynamic IP address and other related parameters automatically from the upstream device.
- Stac IP Address: If this type is selected, you need to enter the stac IP address and other related parameters provided by your ISP for internet access.
- Bridge: If this type is selected, the mesh node can access the internet only aer being connected to another router with internet accessibility in wired manner.
The following three conncon types are available only when the language of your smart phone is set to Russian or Ukraine.
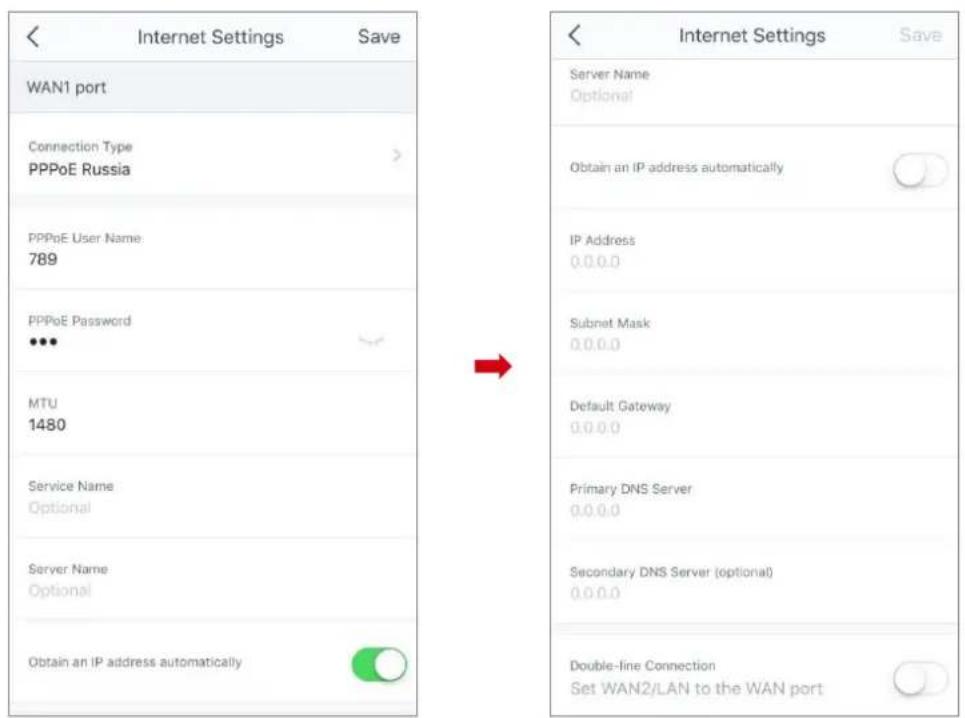
- PPPoE Russia: If this type is selected, you need to enter the PPPoE user name, PPPoE password, service name, server name, MTU value, and IP address informaon (if any) provided by your ISP for internet access.
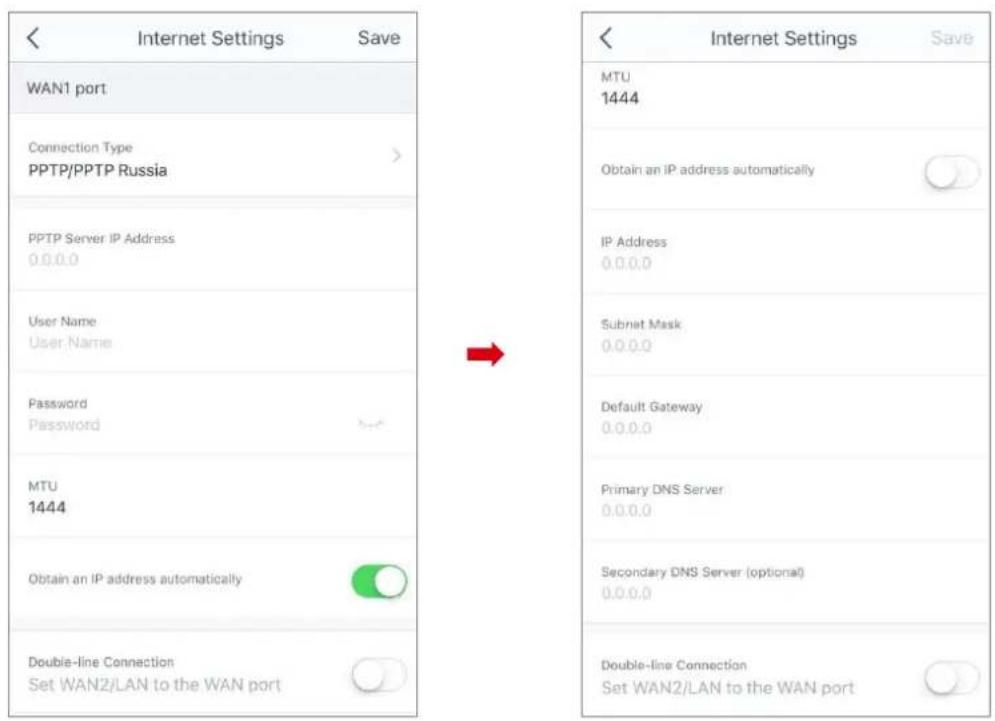
- PPTP/PPTP Russia: If this type is selected, you need to enter the IP address, user name and password of the PPTP server, MTU value, and IP address informaon (if any) provided by your ISP for internet access.
- L2TP/L2TP Russia: If this type is selected, you need to enter the IP address, user name and password of the L2TP server, MTU value, and IP address informaon (if any) provided by your ISP for internet access.
If you set the Connecon Type to Bridge, the Guest Network, Access Control, Port Forwarding, UPnP, DNS, QoS, DHCP server, and Double-line Connecon funcons become unavailable.
Seng up PPPoE
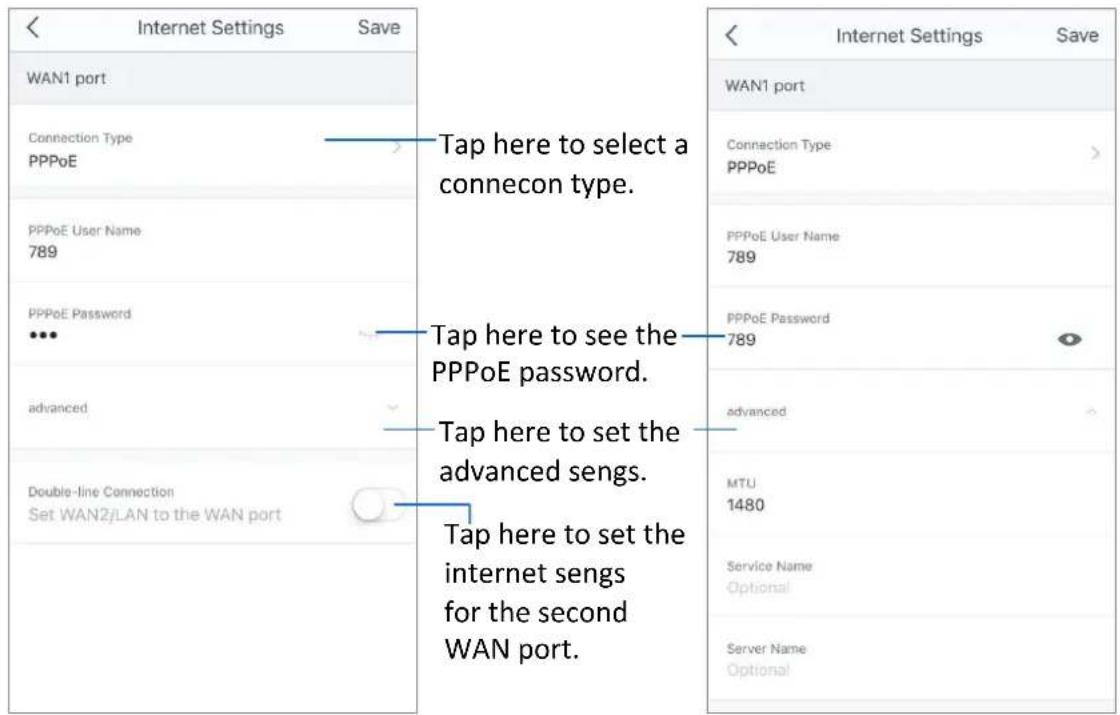
- Choose Sengs > Internet Sengs to enter the conguraon page.
- Tap Connecon Type.
- Select PPPoE.
- Enter the PPPoE user name and password provided by your ISP.
If a service name and a server name are provided, tap advanced and enter them.
- Tap Save.
text_image
Internet Settings Save WAN1 port Connection Type PPPoE PPPoE User Name 789 PPPoE Password ••• advanced Double-line Connection Set WAN2/LAN to the WAN port Tap here to select a conncon type. Tap here to see the PPPoE password. Tap here to set the advanced sengs. Tap here to set the internet sengs for the second WAN port. Internet Settings Save WAN1 port Connection Type PPPoE PPPoE User Name 789 PPPoE Password 789 advanced MTU 1480 Service Name Optional Server Name OptionalThe conguraon for WAN2 port is similar.
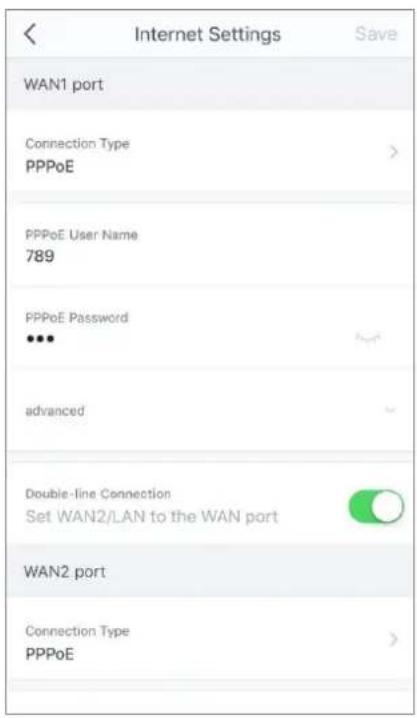
text_image
Internet Settings Save WAN1 port Connection Type PPPoE > PPPoE User Name 789 PPPoE Password ••• advanced Double-line Connection Set WAN2/LAN to the WAN port WAN2 port Connection Type PPPoE >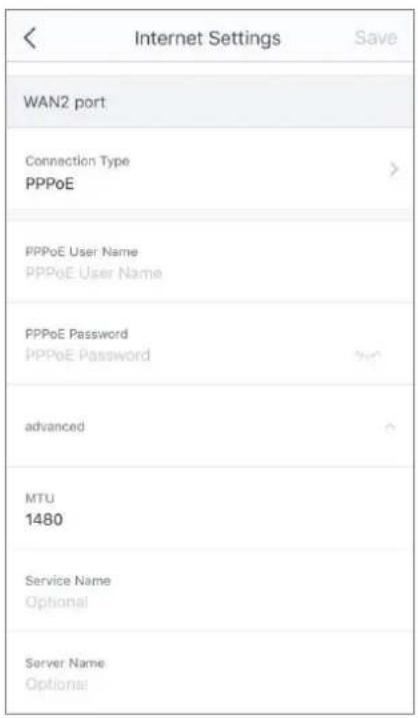
text_image
Internet Settings Save WAN2 port Connection Type PPPoE PPPoE User Name PPPoE User Name PPPoE Password PPPoE Password advanced MTU 1480 Service Name Optional Server Name OptionalSeng up DHCP
-
Choose Sengs > Internet Sengs to enter the conguraon page.
-
Tap Connecon Type.
Select DHCP. 3.
Tap Save. 4.

text_image
< Internet Settings Save WAN1 port Connection Type DHCP Double-line Connection Set WAN2/LAN to the WAN port The conguraon for WAN2 port is similar. < Internet Settings Save WAN1 port Connection Type DHCP Double-line Connection Set WAN2/LAN to the WAN port WAN2 port Connection Type DHCP Tap here to set the internet sengs for the second WAN port.Seng up Stac IP Address
-
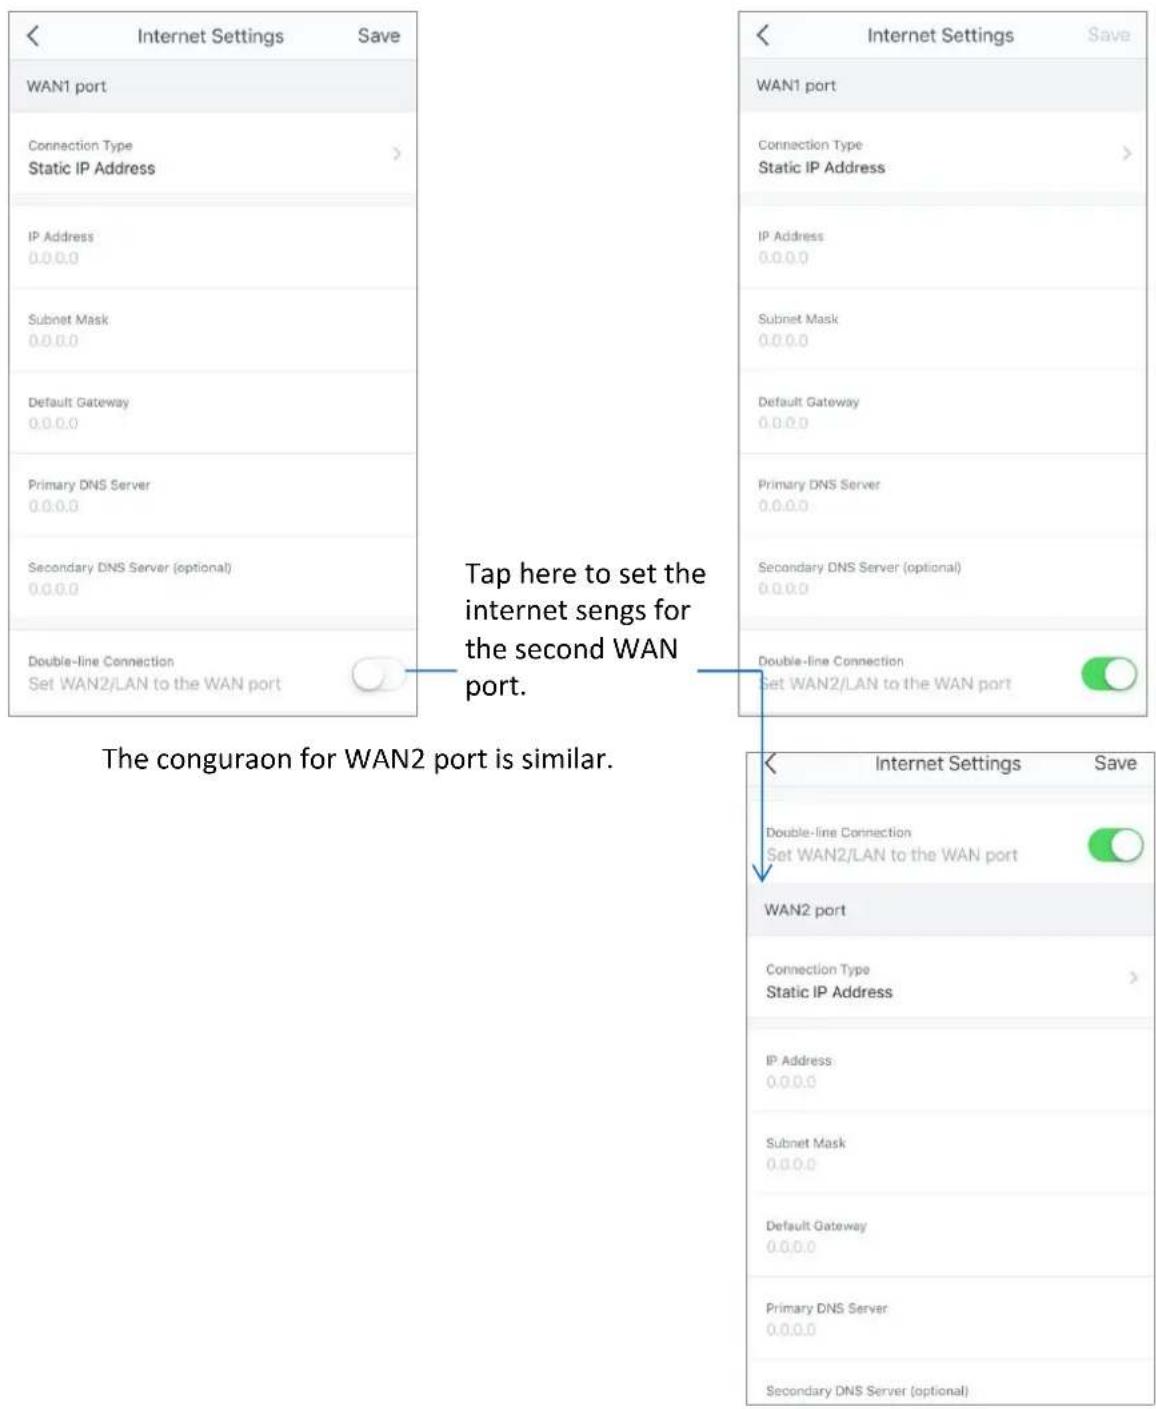
Choose Sengs > Internet Sengs to enter the conguraon page.
-
Tap Connecon Type.
Select Stac IP Address. 3.
- Enter IP Address, Subnet Mask, Default Gateway and Primary DNS Server.
If a secondary DNS server is provided, enter it as well.
- Tap Save.
text_image
Internet Settings Save WAN1 port Connection Type Static IP Address IP Address 0.0.0.0 Subnet Mask 0.0.0.0 Default Gateway 0.0.0.0 Primary DNS Server 0.0.0.0 Secondary DNS Server (optional) 0.0.0.0 Double-line Connection Set WAN2/LAN to the WAN port Tap here to set the internet sengs for the second WAN port. The congruon for WAN2 port is similar. Internet Settings Save WAN1 port Connection Type Static IP Address IP Address 0.0.0.0 Subnet Mask 0.0.0.0 Default Gateway 0.0.0.0 Primary DNS Server 0.0.0.0 Secondary DNS Server (optional) 0.0.0.0 Double-line Connection Set WAN2/LAN to the WAN portSeng up Bridge
Ensure that one of the mesh nodes in your mesh network is connected to your router with internet accessibility using an Ethernet cable.
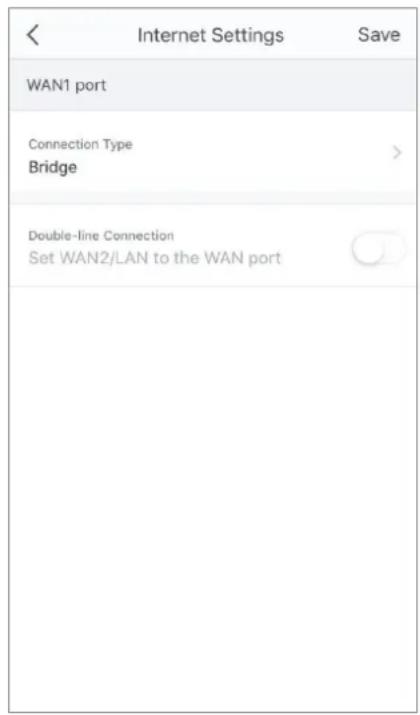
- Choose Sengs > Internet Sengs to enter the conguraon page.
Tap Connecon Type. 2.
Select Bridge. 3.
Tap Save. 4.
text_image
Internet Settings Save WAN1 port Connection Type Bridge Double-line Connection Set WAN2/LAN to the WAN port
Tip
If you set the Connecon Type to Bridge, the Guest Network, Access Control, Port Forwarding, UPnP, DNS, QoS, DHCP server, and Double-line Connecon funcons become unavailable.
The following three conneccon types are available only when the language of your smart phone is set to Russian or Ukraine.
Seng up PPPoE Russia
- Choose Sengs > Internet Sengs to enter the conguraon page.
Tap Connecon Type. 2.
Select PPPoE Russia. 3.
- Enter PPPoE User Name, PPPoE Password, Service Name and Server Name, and change the MTU value as needed.
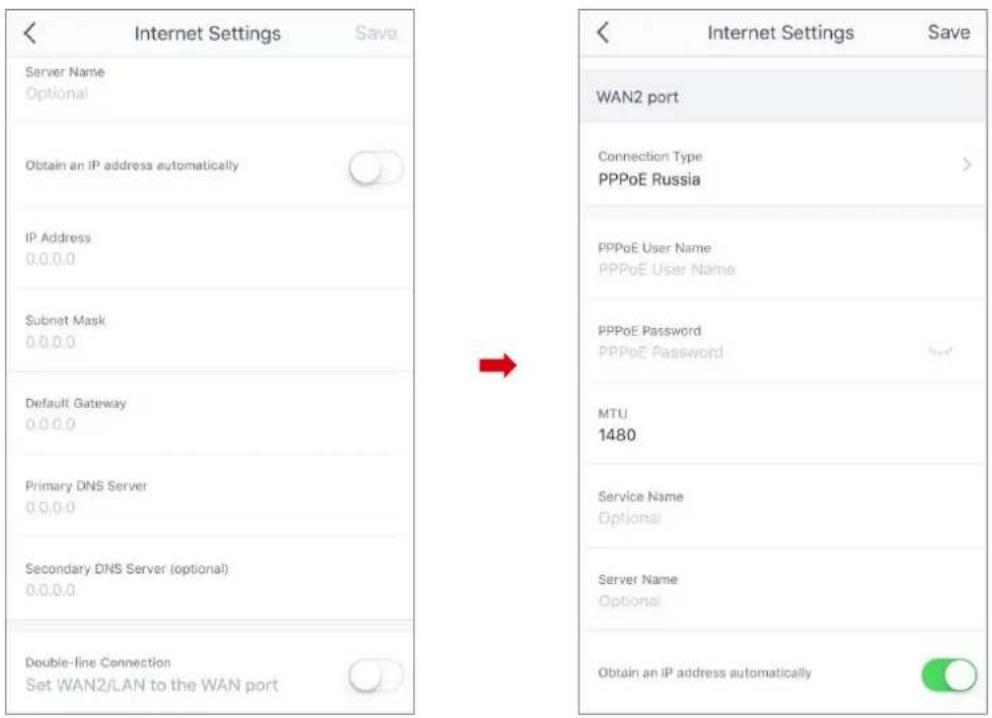
If a stac IP address and related informaon are provided, set the Obtain an IP address automacally buon to the state, and enter them as well.
Tap Save. 5.
text_image
< Internet Settings Save WAN1 port Connection Type PPPoE Russia PPPoE User Name 789 PPPoE Password ••• MTU 1480 Service Name Optional Server Name Optional Obtain an IP address automatically Internet Settings Save Server Name Optional Obtain an IP address automatically Obtain an IP address automatically IP Address 0.0.0.0 Subnet Mask 0.0.0.0 Default Gateway 0.0.0.0 Primary DNS Server 0.0.0.0 Secondary DNS Server (optional) 0.0.0.0 Double-line Connection Set WAN2/LAN to the WAN portThe conguraon for WAN2 port is similar.
text_image
< Internet Settings Save Server Name Optional Obtain an IP address automatically IP Address 0.0.0.0 Subnet Mask 0.0.0.0 Default Gateway 0.0.0.0 Primary DNS Server 0.0.0.0 Secondary DNS Server (optional) 0.0.0.0 Double-line Connection Set WAN2/LAN to the WAN port Internet Settings Save WAN2 port Connection Type PPPoE Russia PPPoE User Name PPPoE User Name PPPoE Password PPPoE Password MTU 1480 Service Name Optional Server Name Optional Obtain an IP address automaticallySeng up PPTP/PPTP Russia
-
Choose Sengs > Internet Sengs to enter the conguraon page.
-
Tap Connecon Type.
Select PPTP/PPTP Russia. 3.
- Enter PPTP Server IP Address, User Name and Password, and change the MTU value as needed.
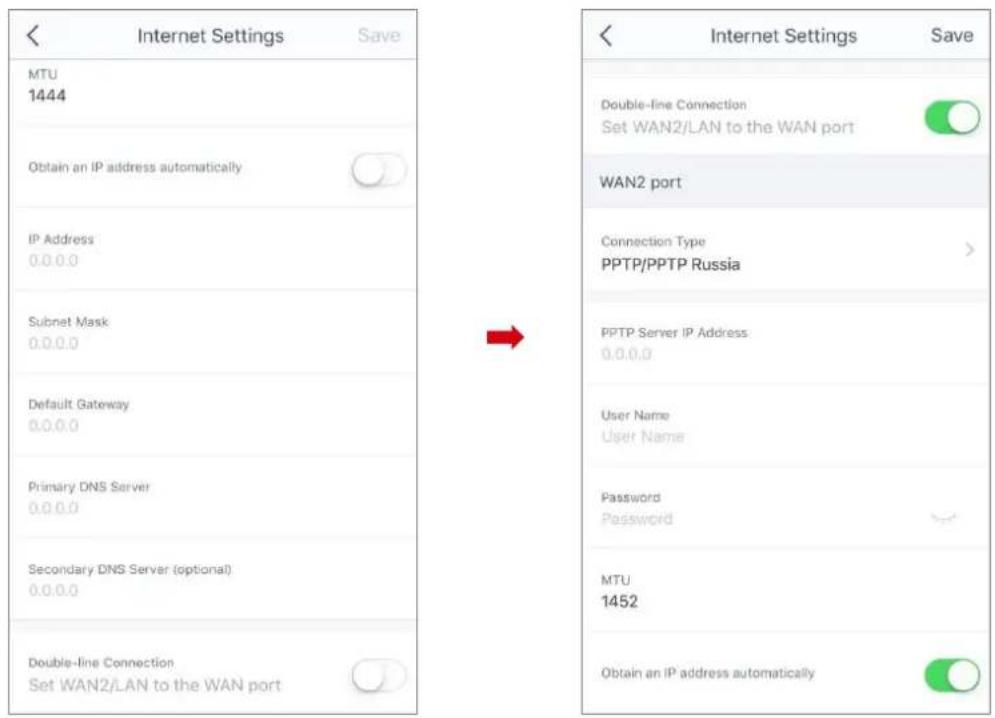
If a stac IP address and related informaon are provided, set the Obtain an IP address automacally buon to state, and enter them as well.
- Tap Save.
text_image
< Internet Settings Save WAN1 port Connection Type PPTP/PPTP Russia PPTP Server IP Address 0.0.0.0 User Name User Name Password Password MTU 1444 Obtain an IP address automatically Double-line Connection Set WAN2/LAN to the WAN port Internet Settings Save MTU 1444 Obtain an IP address automatically IP Address 0.0.0.0 Subnet Mask 0.0.0.0 Default Gateway 0.0.0.0 Primary DNS Server 0.0.0.0 Secondary DNS Server (optional) 0.0.0.0 Double-line Connection Set WAN2/LAN to the WAN portThe conguraon for WAN2 port is similar.
text_image
Internet Settings Save MTU 1444 Obtain an IP address automatically IP Address 0.0.0.0 Subnet Mask 0.0.0.0 Default Gateway 0.0.0.0 Primary DNS Server 0.0.0.0 Secondary DNS Server (optional) 0.0.0.0 Double-line Connection Set WAN2/LAN to the WAN port Internet Settings Save Double-line Connection Set WAN2/LAN to the WAN port WAN2 port Connection Type PPTP/PPTP Russia PPTP Server IP Address 0.0.0.0 User Name User Name Password Password MTU 1452 Obtain an IP address automaticallySeng up L2TP/L2TP Russia
-
Choose Sengs > Internet Sengs to enter the conguraon page.
-
Tap Connecon Type.
- Select L2TP/L2TP Russia.
- Enter L2TP Server IP Address, User Name and Password, and change the MTU value as needed.
If a stac IP address and related informaon are provided, set the Obtain an IP address automacally buon to state, and enter them as well.
- Tap Save.
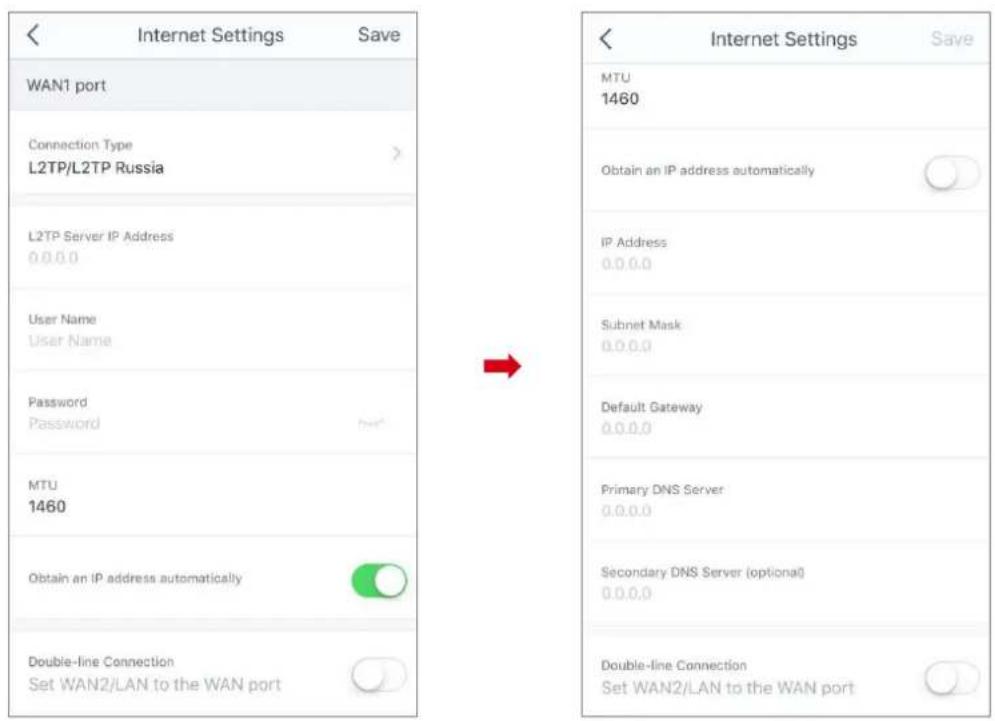
text_image
< Internet Settings Save WAN1 port Connection Type L2TP/L2TP Russia L2TP Server IP Address 0.0.0.0 User Name User Name Password Password MTU 1460 Obtain an IP address automatically Double-line Connection Set WAN2/LAN to the WAN port Internet Settings Save MTU 1460 Obtain an IP address automatically IP Address 0.0.0.0 Subnet Mask 0.0.0.0 Default Gateway 0.0.0.0 Primary DNS Server 0.0.0.0 Secondary DNS Server (optional) 0.0.0.0 Double-line Connection Set WAN2/LAN to the WAN portThe conguraon for WAN2 port is similar.
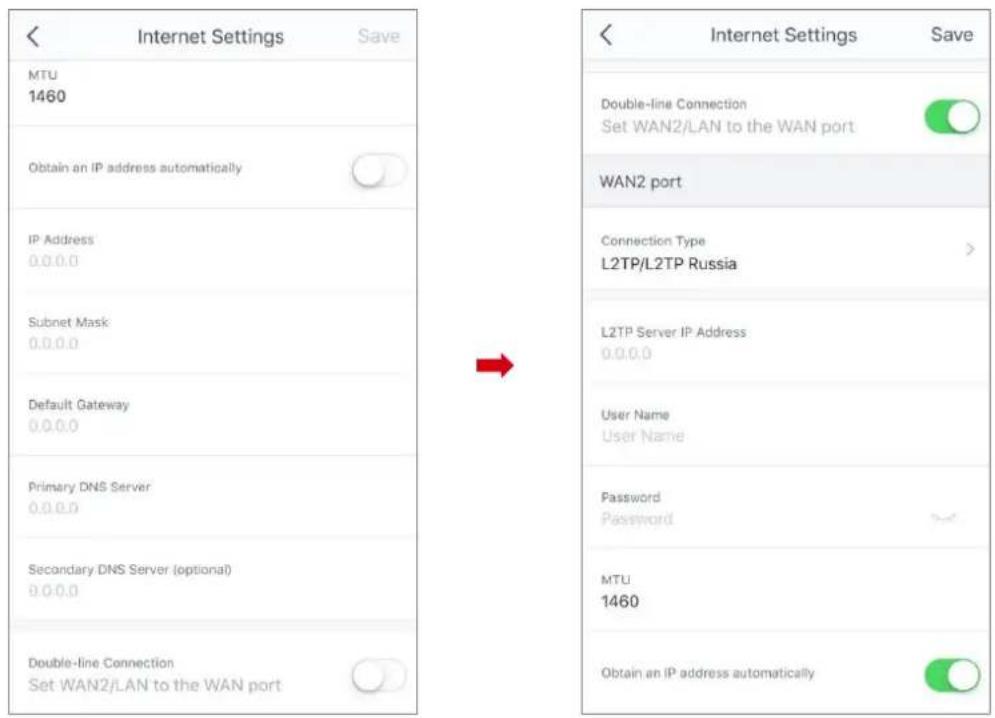
text_image
Internet Settings Save MTU 1460 Obtain an IP address automatically IP Address 0.0.0.0 Subnet Mask: 0.0.0.0 Default Gateway 0.0.0.0 Primary DNS Server 0.0.0.0 Secondary DNS Server (optional) 0.0.0.0 Double-line Connection Set WAN2/LAN to the WAN port Internet Settings Save Double-line Connection Set WAN2/LAN to the WAN port WAN2 port Connection Type L2TP/L2TP Russia L2TP Server IP Address 0.0.0.0 User Name User Name Password Password MTU 1460 Obtain an IP address automatically9 QoS

The QoS funcon prioritizes gaming and web browsing advies.
Perform the following procedure to enable the QoS funcon:
- Choose Sengs > QoS to enter the conguraon page.
Set the buon to the enabled state . 2.

- Enter download and upload speed provided by your ISP, or tap Online Test.

To get an accurate value, ensure that wireless devices connected to your mesh network have no internet acvity when tesng online.
- Tap Save.
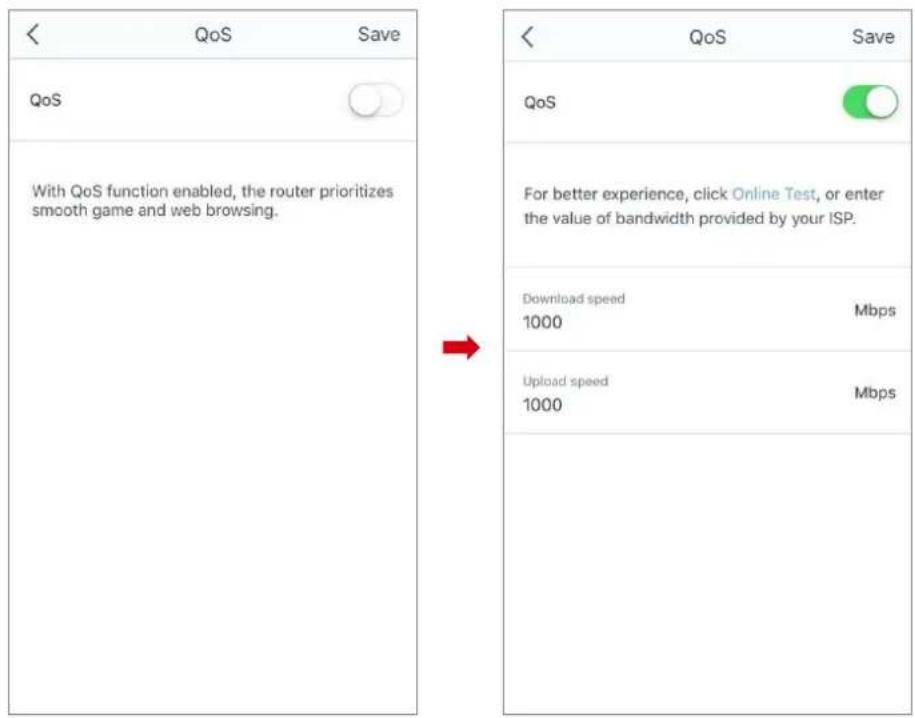
text_image
< QoS Save QoS With QoS function enabled, the router prioritizes smooth game and web browsing. → < QoS Save QoS For better experience, click Online Test, or enter the value of bandwidth provided by your ISP. Download speed 1000 Mbps Upload speed 1000 Mbps10 Add Mesh Device

If you want to expand your WiFi coverage, you can add more mesh nodes to your existing mesh network. Use the following table to help you make the best choice.
| Scenarios | Soluons |
| 3,500 sq. with 60 devices | 1 × EW9 + 1 × EP9 |
| 5,000 sq. with 80 devices | 1 × EW9 + 2 × EP9 |
| 6,000 sq. with 100 devices | 1 × EW9 + 3 × EP9 |
Perform the following procedure to add another mesh node into your existing mesh network:
- Choose Sengs > Add Mesh device to enter the conguraon page.
Follow the on-screen guide to complete the sengs. 2.
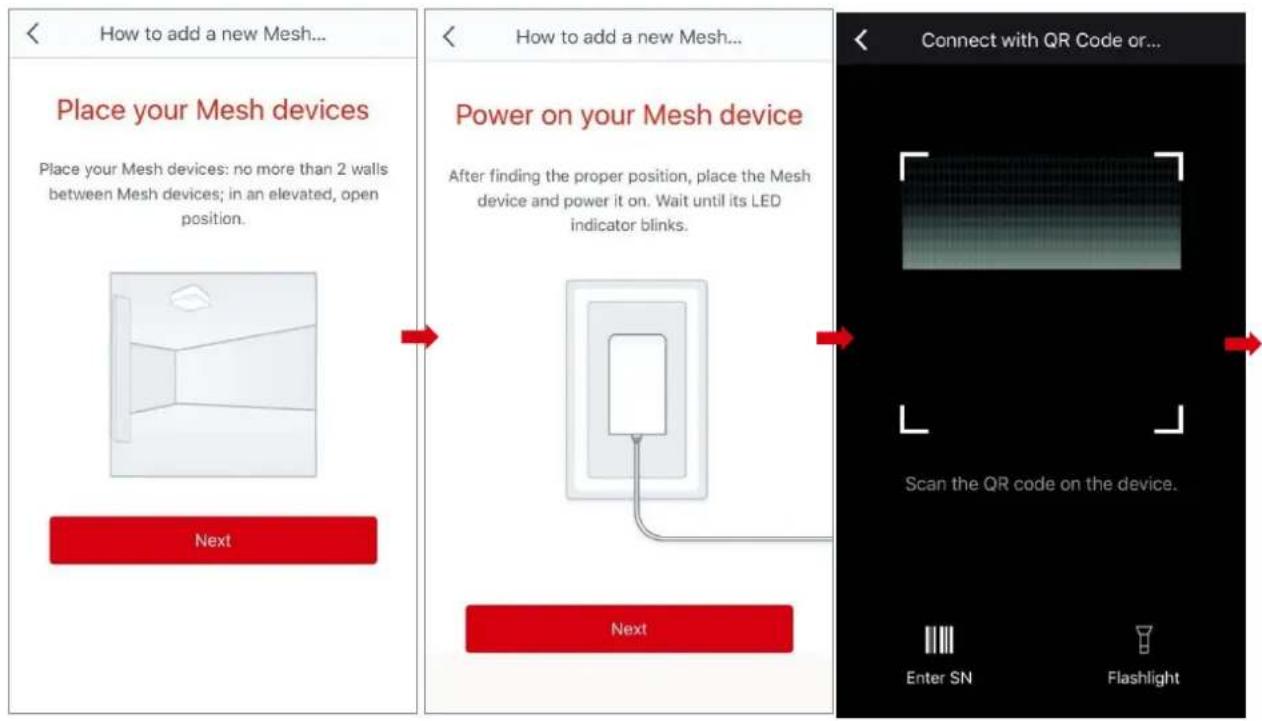
text_image
How to add a new Mesh... Place your Mesh devices Place your Mesh devices: no more than 2 walls between Mesh devices; in an elevated, open position. Next Power on your Mesh device After finding the proper position, place the Mesh device and power it on. Wait until its LED indicator blinks. Next Connect with QR Code or... Scan the QR code on the device. Enter SN Flashlight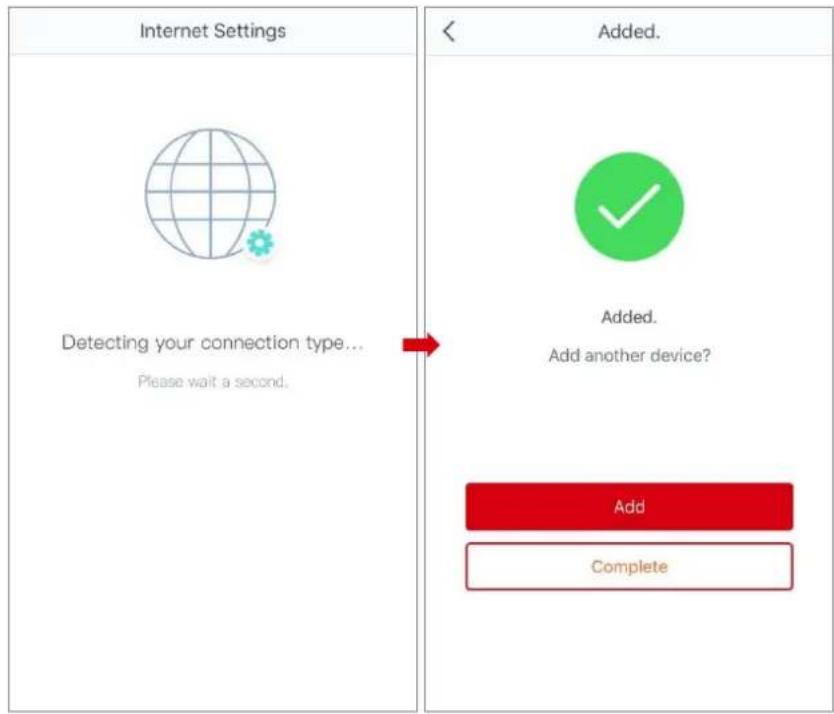
text_image
Internet Settings Detecting your connection type... Please wait a second. Added. Added. Add another device? Add Complete11 Fast Roaming

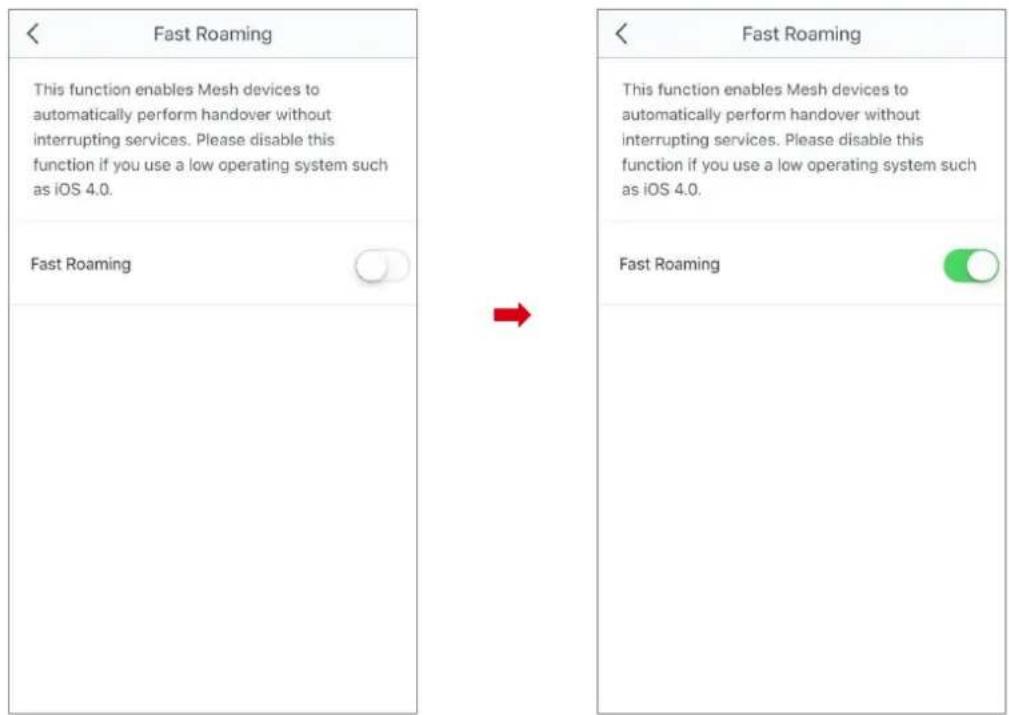
The Fast Roaming funcon lets you enjoy uninterrupted internet service when moving around the WiFi-blanketed range.
Perform the following procedure to enable the Fast Roaming funcon:
- Choose Sengs > Fast Roaming to enter the conguraon page.
Set the buon to the enabled state . 2.

text_image
< Fast Roaming This function enables Mesh devices to automatically perform handover without interrupting services. Please disable this function if you use a low operating system such as iOS 4.0. Fast Roaming → < Fast Roaming This function enables Mesh devices to automatically perform handover without interrupting services. Please disable this function if you use a low operating system such as iOS 4.0. Fast Roaming12 Capacity-oriented Mode

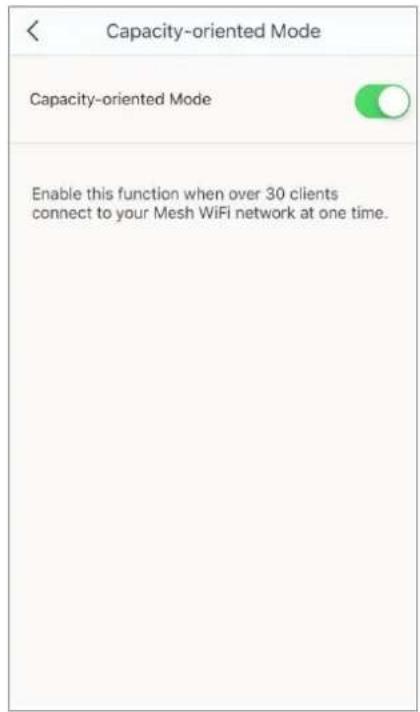
The Capacity-oriented mode ensures the internet experience when over 30 clients are connected to your mesh network at one me.
Perform the following procedure to disable/enable the Capacity-oriented Mode:
-
Choose Sengs > Capacity-oriented Mode to enter the conguraon page.
-
Alternate the status between enabled and disabled by tapping icon as required. It is recommended to keep the enabled state.
text_image
Capacity-oriented Mode Capacity-oriented Mode Enable this function when over 30 clients connect to your Mesh WiFi network at one time.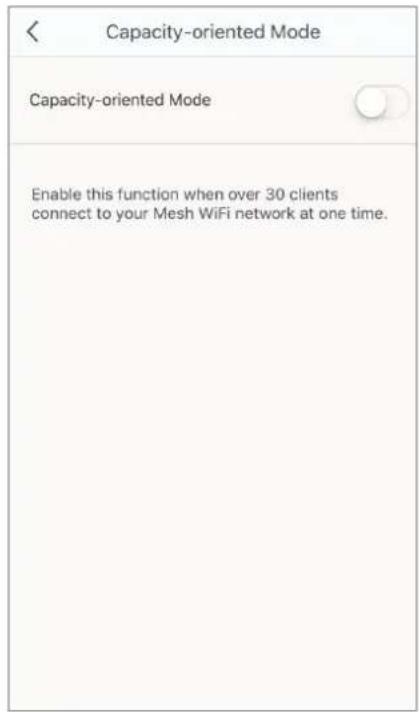
text_image
Capacity-oriented Mode Capacity-oriented Mode Enable this function when over 30 clients connect to your Mesh WiFi network at one time.13 Capve Portal

A capve portal is an entry to a network that requires users to view a splash page and agree to terms and conditions before using the network. The Mesh WiFi system support three authencaon types: account authencaon, one-key authencaon, and SMS authencaon.
• Account Authencaon
If the Account Authencaon is set, Users can access the internet only aer being authenticated with the valid user name and password.
• One-key Authencaon
If the One-key Authencaon is set, users can access the internet aer tapping the Connect button on the authencaon page.
• SMS Authencaon
If the SMS Authencaon is set, users need to enter their phone number on the authencaon page to receive a vericaon code. Then enter the vericaon code on the authencaon page for accessing the internet.
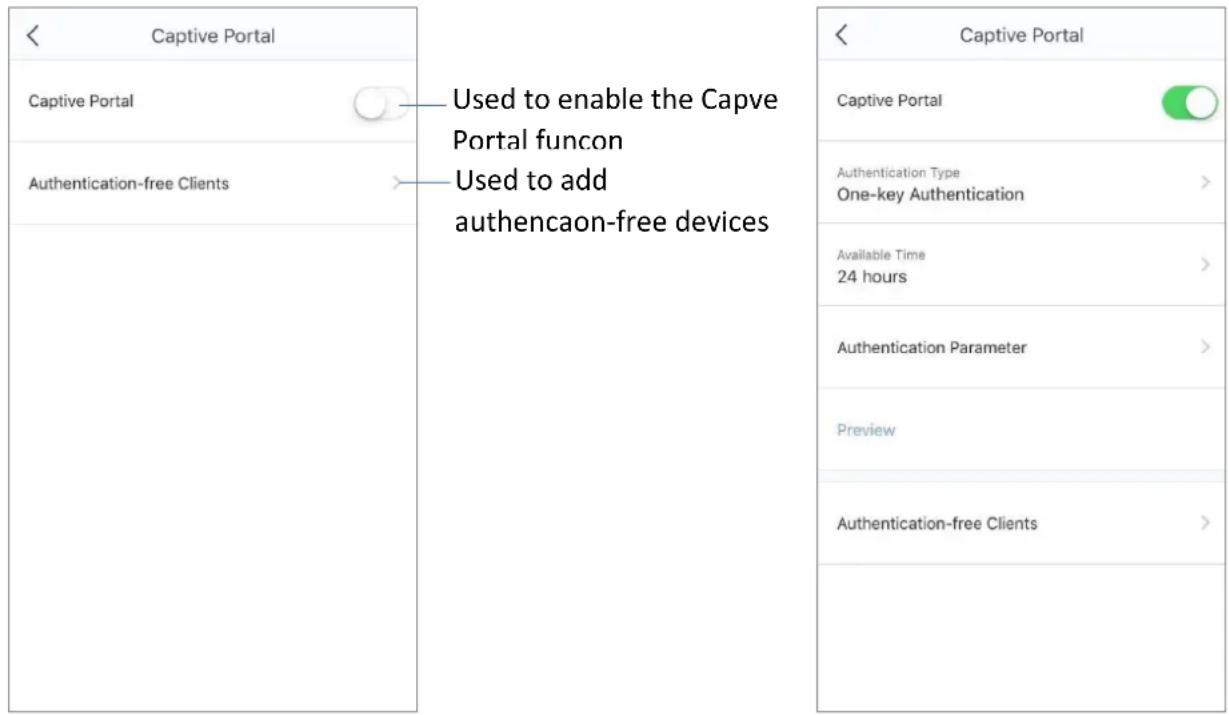
text_image
< Captive Portal Captive Portal Authentication-free Clients Used to enable the Capve Portal funcon Used to add authencaon-free devices Captive Portal Authentication Type One-key Authentication Available Time 24 hours Authentication Parameter Preview Authentication-free Clients >< Captive Portal Captive Portal Authentication Type One-key Authentication Available Time 24 hours Authentication Parameter Preview Authentication-free ClientsAdding authencaon-free clients
- Choose Sengs > Capve Portal to enter the conguraon page.
- Tap Authencaon-free Clients.
- Tap the icon on the upper-right corner.
- If the device you want to add has connected to the mesh network, directly select it in the list, and tap Save.
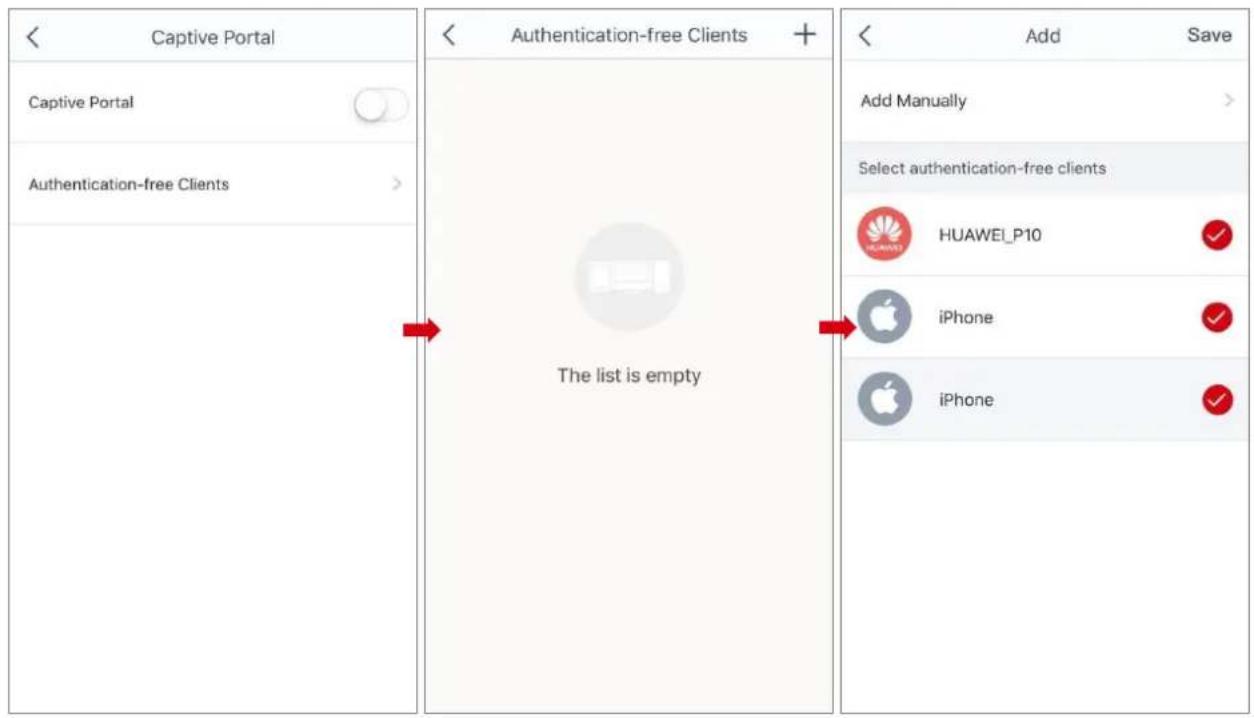
text_image
Captive Portal Captive Portal Authentication-free Clients Authentication-free Clients + The list is empty Add Save Add Manually Select authentication-free clients HUAWEI_P10 iPhone iPhoneIf it is not on the list, tap Add Manually, enter the MAC address of the device, specify remark, then tap Save.
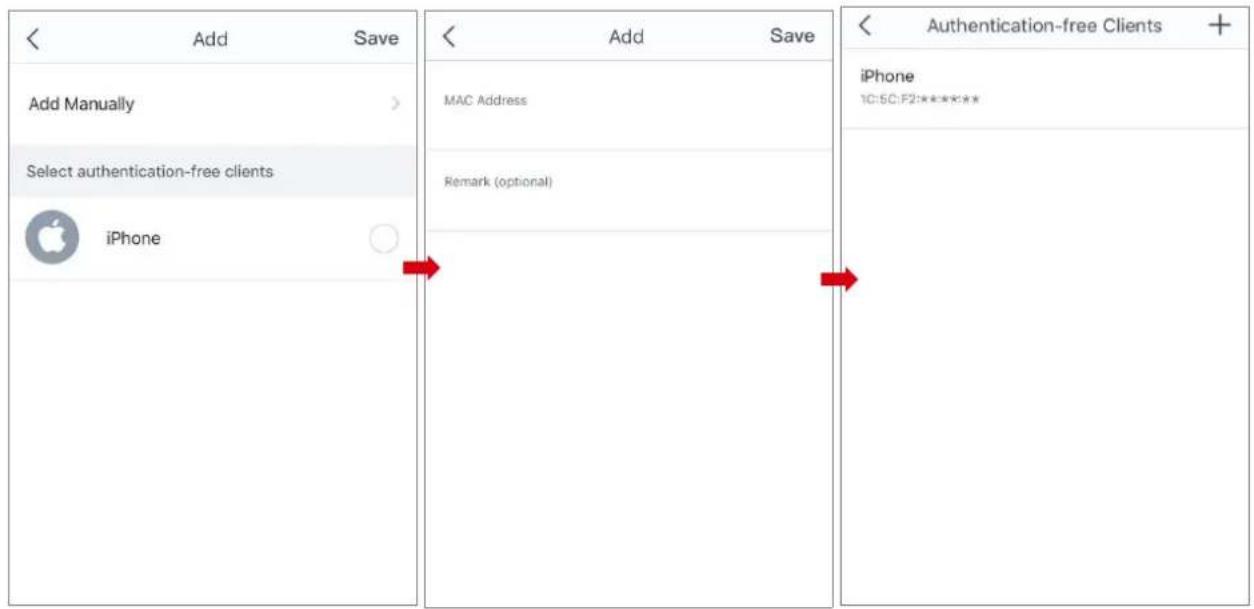
text_image
< Add Save Add Manually > Select authentication-free clients iPhone MAC Address Remark (optional) Authentication-free Clients + iPhone 10:50:F2:**** +Seng up the account authencaon rule
1. Choose Sengs > Capve Portal to enter the conguraon page.
- Set the buon to the enabled state .

- Set the Authencaon type to Account Authencaon.
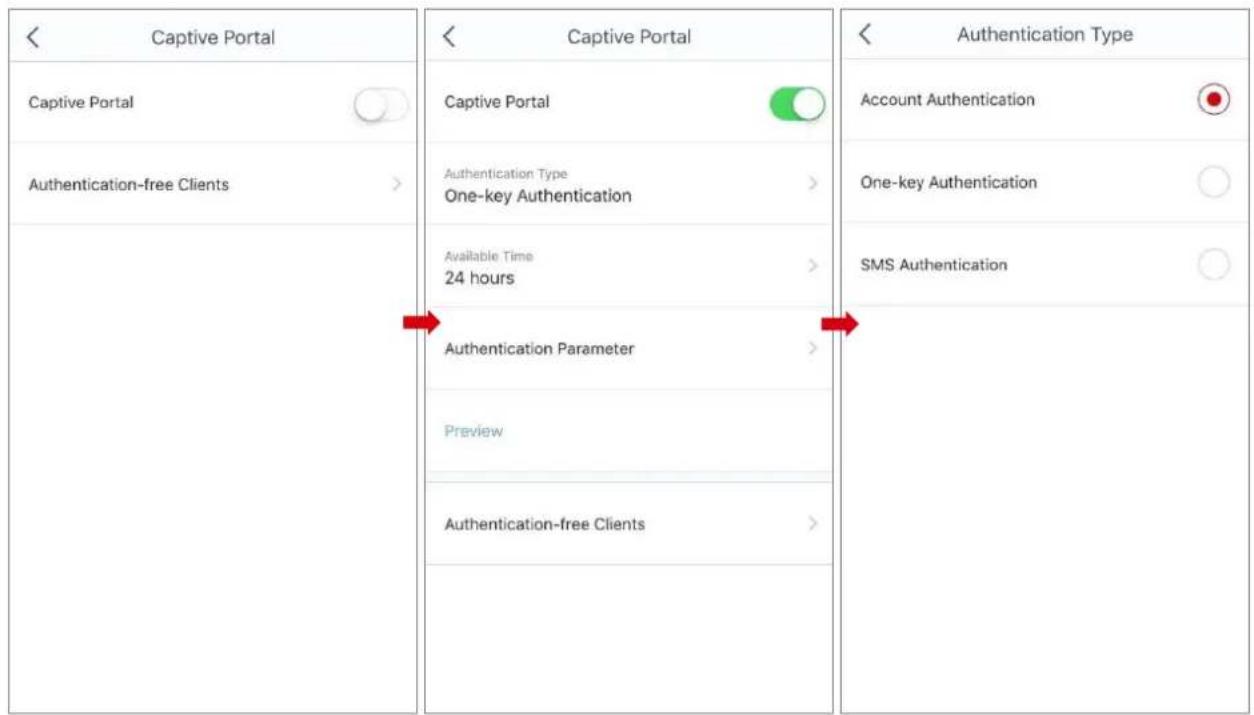
text_image
Captive Portal Captive Portal Authentication-free Clients Captive Portal Authentication Type One-key Authentication Available Time 24 hours Authentication Parameter Preview Authentication-free Clients Captive Portal Authentication Type Account Authentication One-key Authentication SMS Authentication Captive Portal Authentication Type Account Authentication One-key Authentication SMS Authentication- Select an available me for the rule, or tap Custom to manually specify an available me. Aer the available me elapses, the user is required to pass the authencaon again.
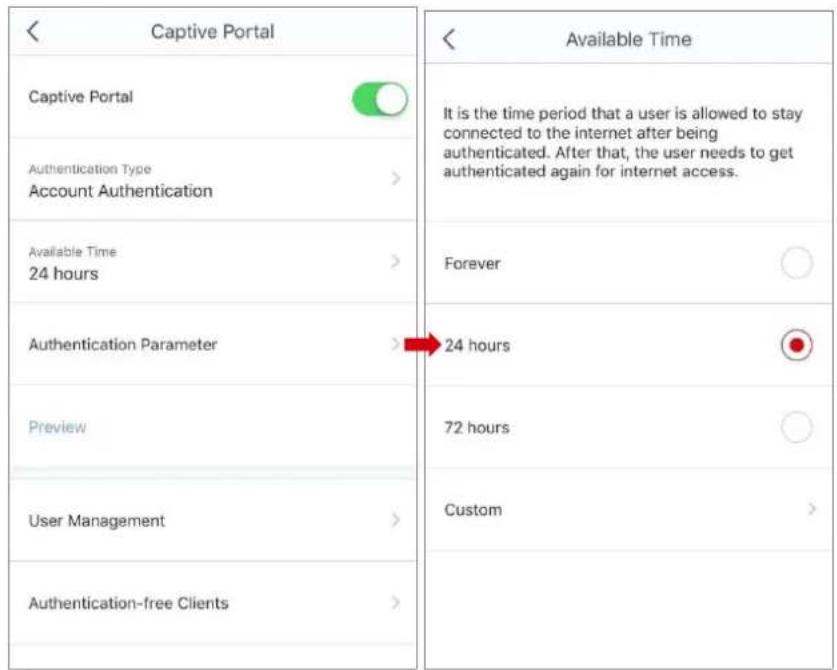
text_image
Captive Portal Captive Portal Authentication Type Account Authentication Available Time 24 hours Authentication Parameter Preview User Management Authentication-free Clients Available Time It is the time period that a user is allowed to stay connected to the internet after being authenticated. After that, the user needs to get authenticated again for internet access. Forever 24 hours 72 hours Custom- Tap Authencaon Parameter to set the parameters on the authencaon page.
(1) Tap Logo to upload a logo. This le must be .jpg, .jpeg, or .png le. The le size must be less than 30 KB, and the dimensions in pixels should be 6.5:1.
(2) Tap Headline to enter a headline, and tap Save.
(3) Tap Background Photo to upload a background le. This le must be .jpg, .jpeg, or .png le. The le size must be less than 300 KB, and the dimensions in pixels should be 16:9.
(4) Tap Disclaimer to enter the disclaimer content, and tap Save.
(5) Tap Redirect to specify a website that users will visit aer passing the authencaon, and tap Save.
- Previous web page: It species that the user will be redirected to the web page he visits before the authencaon.
- Specied web page: It species that the user will be redirected to the web page you specify here aer passing the authencaon.
(6) Tap Save.
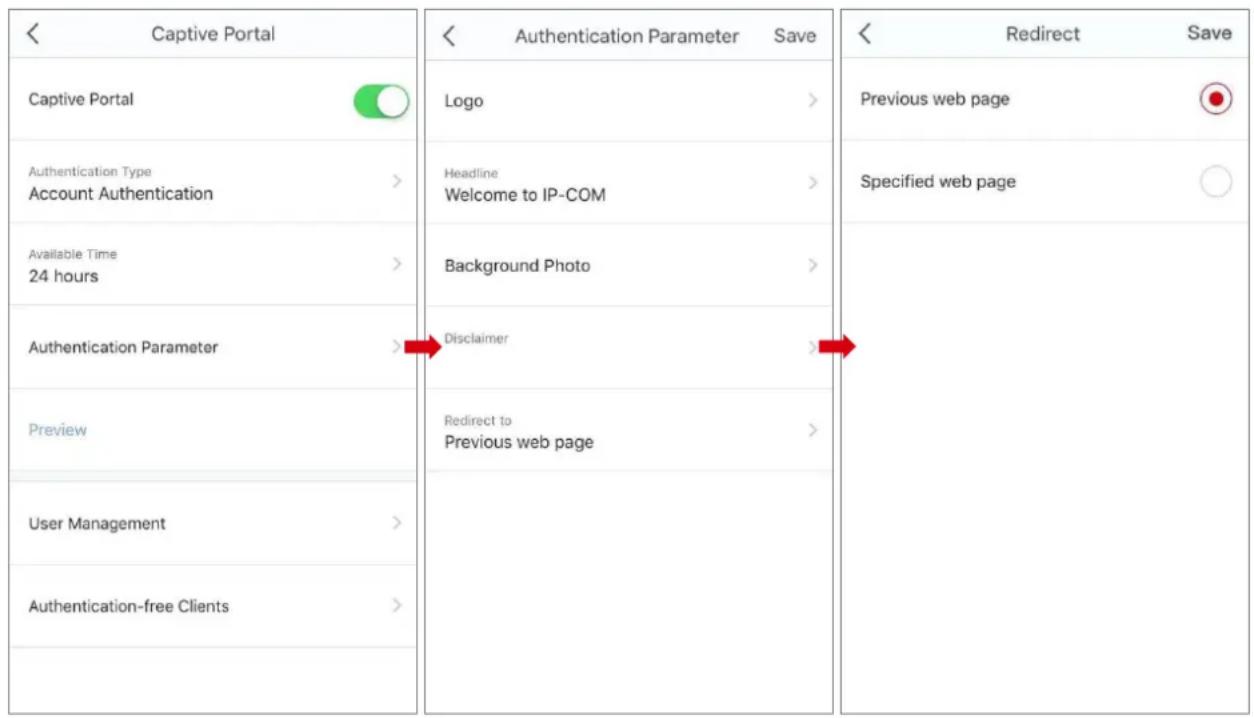
text_image
< Captive Portal Captive Portal Authentication Type Account Authentication > Available Time 24 hours > Authentication Parameter > Preview User Management > Authentication-free Clients > < Authentication Parameter Save Logo > Headline Welcome to IP-COM > Background Photo > Disclaimer > Redirect to Previous web page > < Redirect Save Previous web page Specified web page Redirect to Previous web page- Tap Preview to view the authencaon page you set.
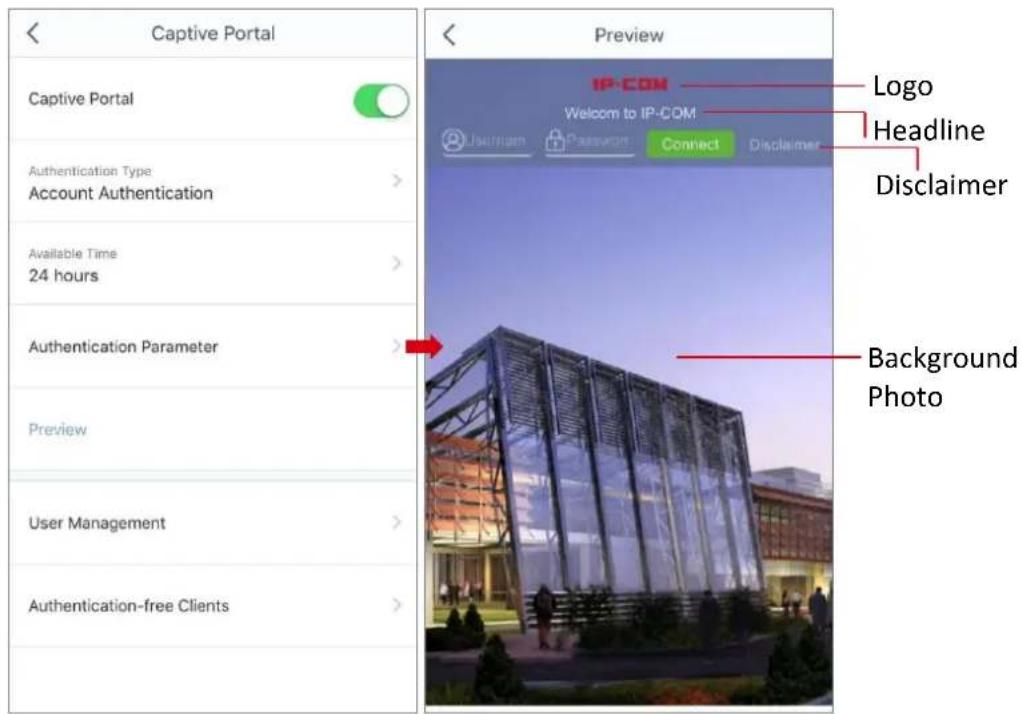
text_image
Captive Portal Captive Portal Authentication Type Account Authentication Available Time 24 hours Authentication Parameter Preview User Management Authentication-free Clients Preview IP-COM Welcome to IP-COM Userham Password Connect Disclaimer Logo Headline Disclaimer Background Photo-
Tap User Management to add accounts for users.
-
Tap the icon.
■ Adding the accounts respectively
(1) Tap Add.
(2) Specify a user name.
(3) Specify a password.
(4) Specify the number of users that can use this account to login for accessing the internet at the same me.
(5) Specify a remark.
(6) Tap Save.
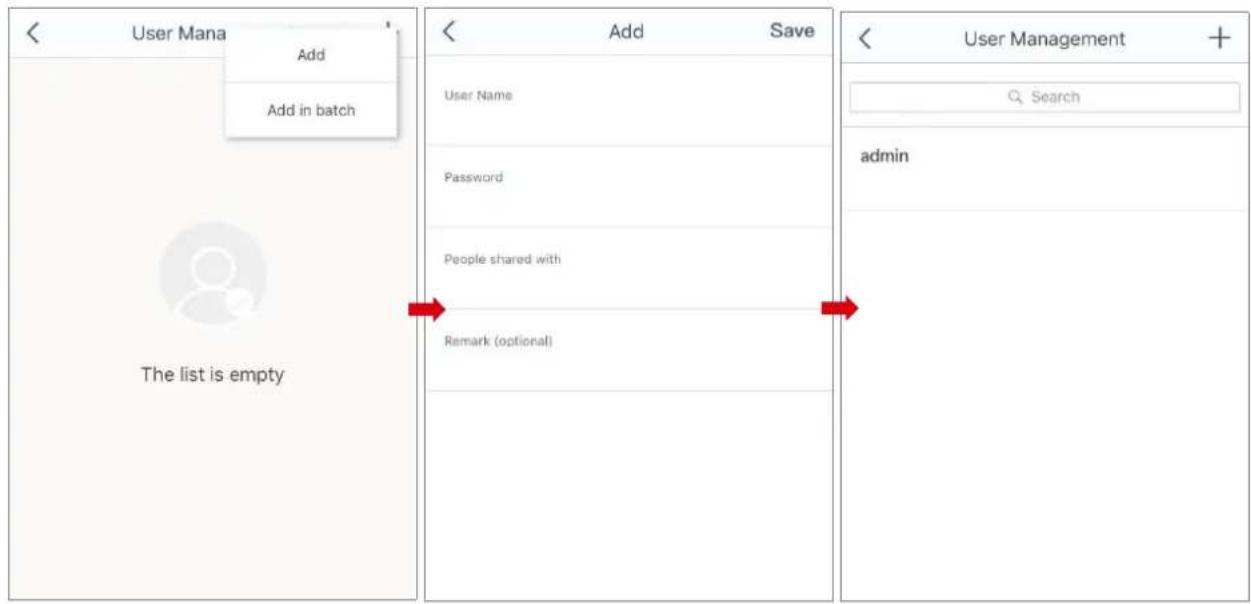
text_image
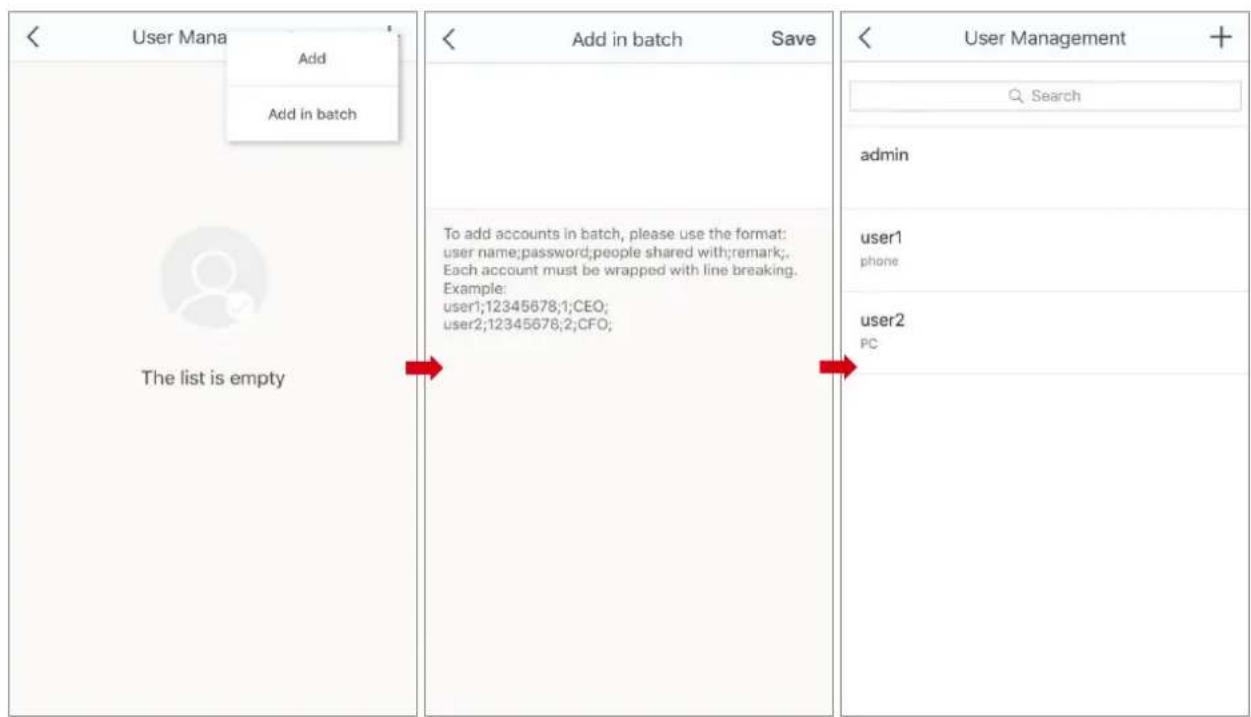
< User Mana Add Add in batch The list is empty < Add Save User Name Password People shared with Remark (optional) < User Management + Q Search admin■ Adding the accounts in batch
(1) Tap Add in batch.
(2) Enter the parameters in terms of the onscreen instrucons.
(3) Tap Save.
text_image
< User Mana Add Add in batch The list is empty Add in batch Save To add accounts in batch, please use the format: user name:password;people shared with;remark; Each account must be wrapped with line breaking. Example: user1;12345678;1;CEO; user2;12345678;2;CFO; User Management + Q Search admin user1 phone user2 PCVericaon
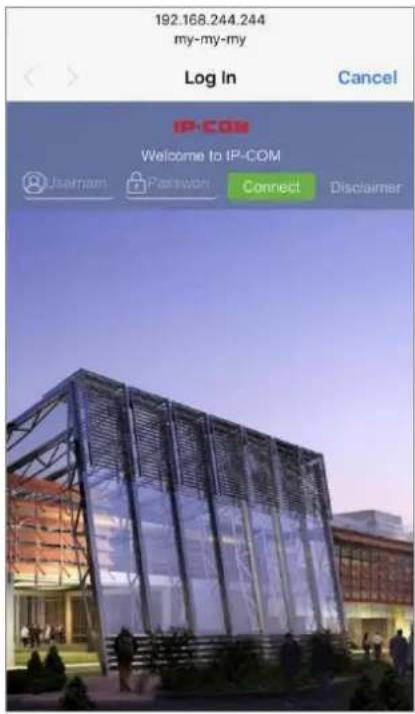
- Connect a device to the mesh network in wired or wireless manner, and start a web browser. An authencaon page appears.
- Enter a user name and password for authencaon.
- Tap Connect.
You can access the internet aer passing the authencaon.
text_image
192.168.244.244 my-my-my Log In Cancel IP-COM Welcome to IP-COM Username Password Connect DisclaimerApplicaon scenario for account authencaon
For example, a large apartment named Home uses the Mesh WiFi system to deploy its network. It requires that each room uses an account to pass the authencaon for accessing the internet.
Conguraon procedure
■ Seng up the account authencaon rule
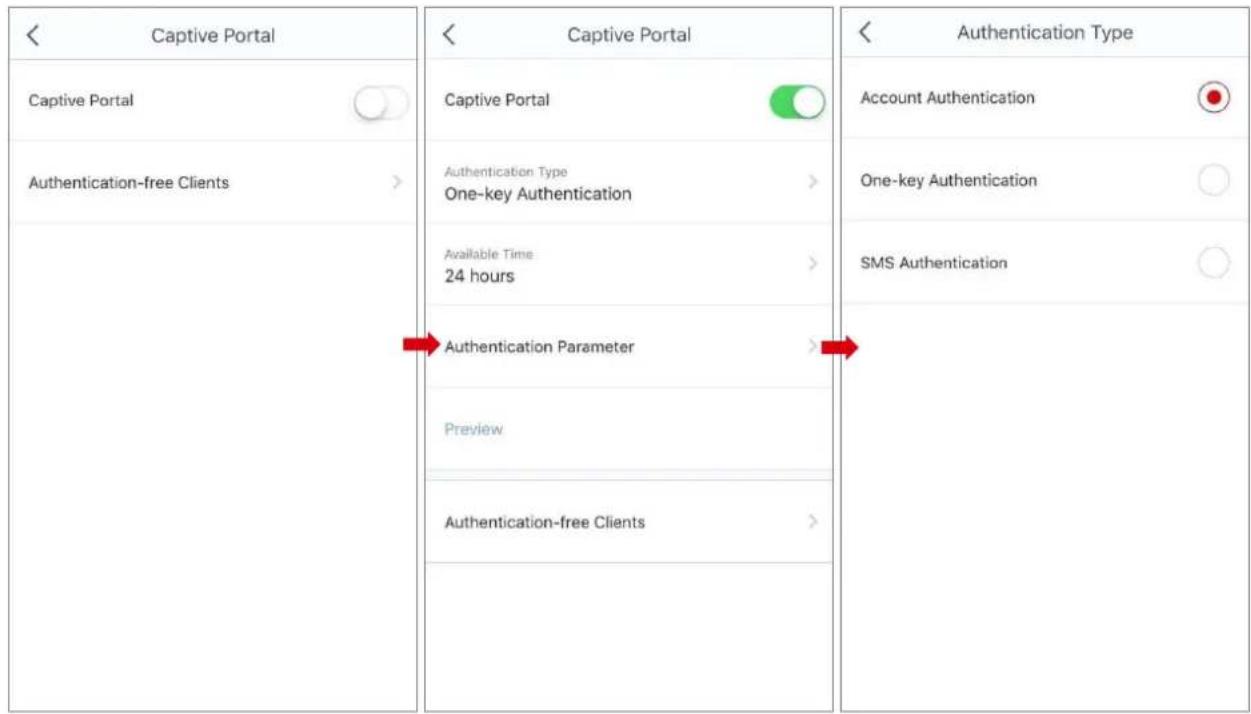
Set the buon to the enabled state . 1.

- Set the Authencaon type to Account Authencaon.
text_image
< Captive Portal Captive Portal Authentication-free Clients > Captive Portal Authentication Type One-key Authentication > Available Time 24 hours > Authentication Parameter > Preview Authentication-free Clients > < Authentication Type Account Authentication One-key Authentication SMS Authentication > <- Select or customize an available me for the rule, which is Forever in this example.

text_image
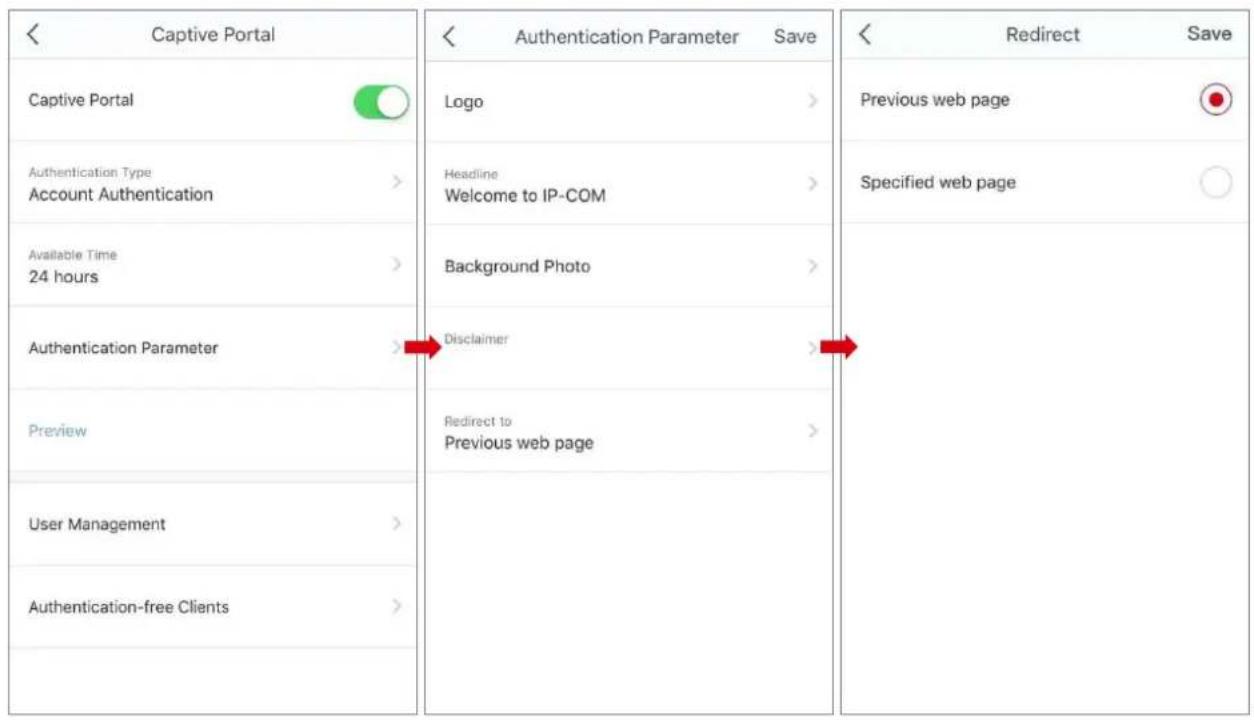
Captive Portal Captive Portal Authentication Type: Account Authentication Available Time 24 hours Authentication Parameter Preview User Management Authentication-free Clients Available Time It is the time period that a user is allowed to stay connected to the internet after being authenticated. After that, the user needs to get authenticated again for internet access. Forever 24 hours 72 hours Custom Available Time- Tap Authencaon Parameter to set the parameters on the authencaon page.
(1) Tap Logo to upload a logo. This le must be .jpg, .jpeg, or .png le. The le size must be less than 30 KB, and the dimensions in pixels should be 6.5:1.
(2) Tap Headline to enter a headline, which is Home in this example, and tap Save.
(3) Tap Background Photo to upload a background le. This le must be .jpg, .jpeg, or .png le. The le size must be less than 300 KB, and the dimensions in pixels should be 16:9.
(4) Tap Redirect to specify a website that users will visit aer passing the authencaon, which is Previous web page in this example, and tap Save.
(5) Tap Save.
text_image
Captive Portal Captive Portal Authentication Type Account Authentication Available Time 24 hours Authentication Parameter Preview User Management Authentication-free Clients Authentication Parameter Save Logo Headline Welcome to IP-COM Background Photo Disclaimer Redirect to Previous web page Redirect Previous web page Specified web page Redirect Previous web page Save- Tap Preview to view the authencaon page you set.
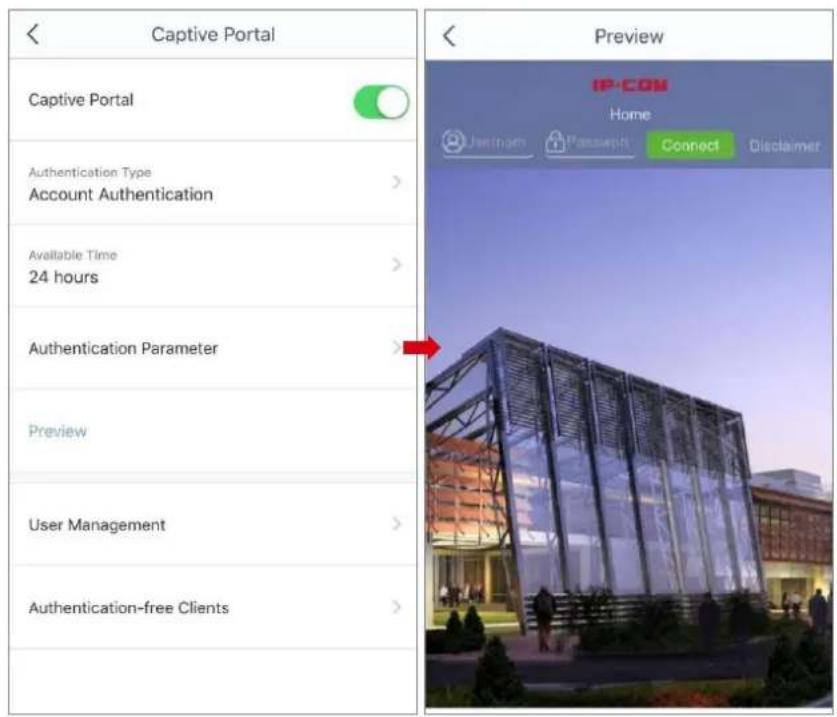
text_image
Captive Portal Captive Portal Authentication Type Account Authentication Available Time 24 hours Authentication Parameter Preview User Management Authentication-free Clients Preview IP-CON Home Jennham Password Connect Disclaimer■ Adding accounts for users
Tap User Management. 1.
Tap the icon. 2.
- Tap Add in batch.
- Enter the parameters as required, Which are "room1;good123;1;rst oor;", and "room2;good456;1;second oor;" in this example.
- Tap Save.
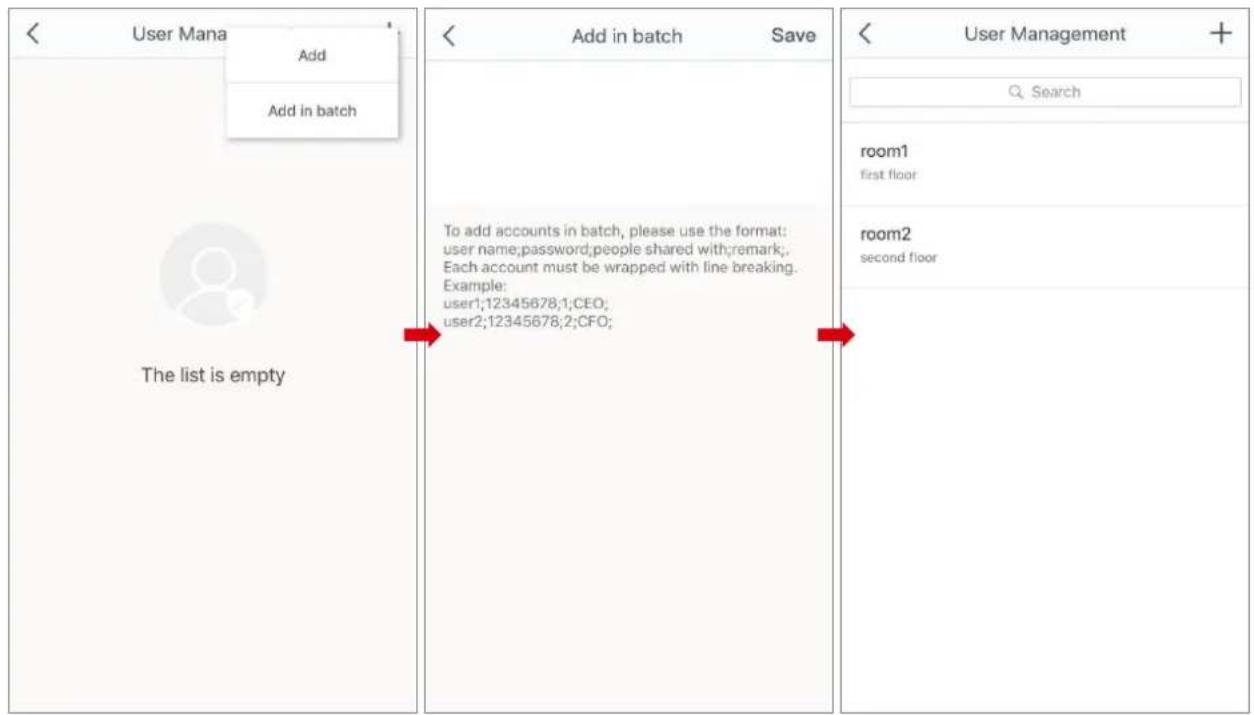
text_image
< User Mana Add Add in batch The list is empty Add in batch Save To add accounts in batch, please use the format: user name;password;people shared with;remark; Each account must be wrapped with line breaking. Example: user1;12345678;1;CEO; user2;12345678;2;CFO; < User Management + Q Search room1 first floor room2 second floorVericaon
-
Connect a device to the mesh network in wired or wireless manner, and start a web browser. An authencaon page appears.
-
Enter a user name and password for authencaon, which are room1 and good123 in this example.
-
Tap Connect.
The device can access the internet aer passing the authencaon.
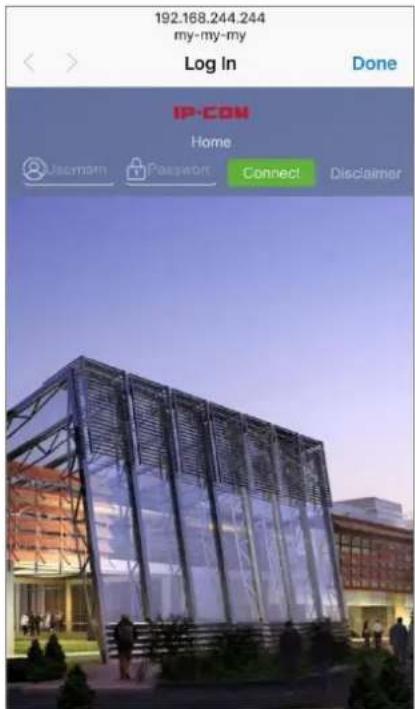
text_image
192.168.244.244 my-my-my Log In Done IP-CON Home Usamm Password Connect DisclaimerSeng up the one-key authencaon rule
1. Choose Sengs > Capve Portal to enter the conguraon page.
- Set the buon to the enabled state .

- Set the Authencaon type to One-key Authencaon.
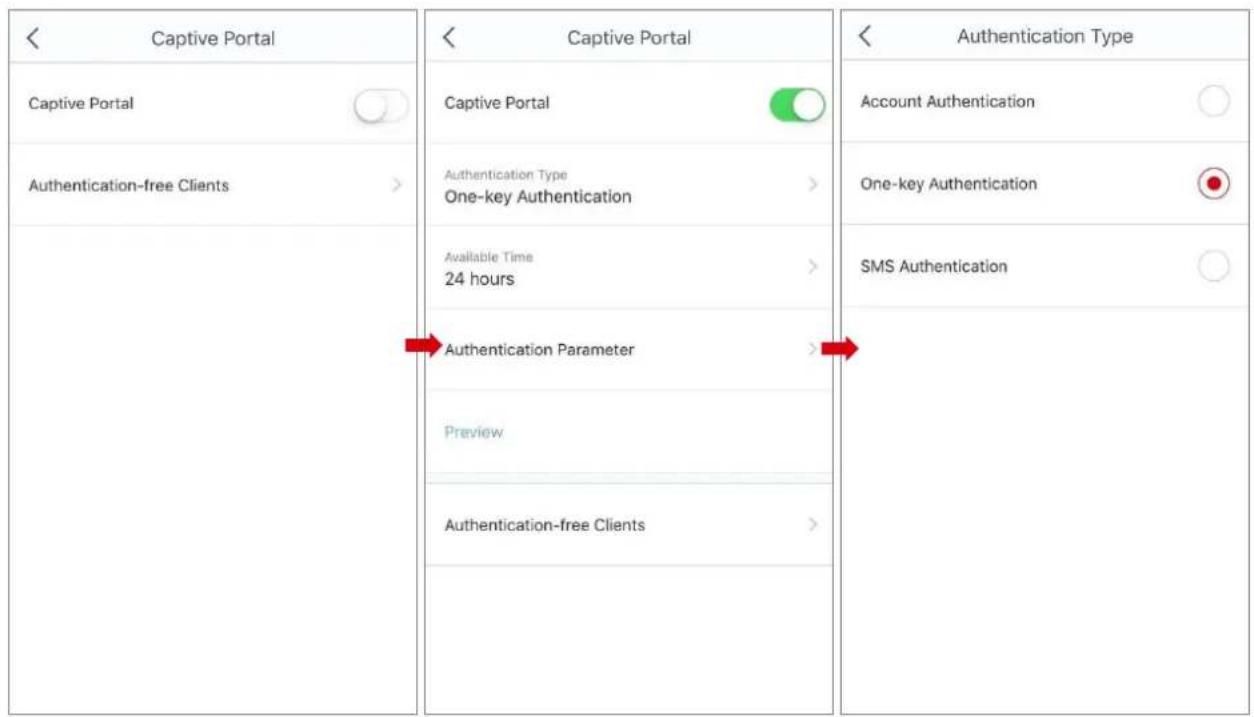
text_image
Captive Portal Captive Portal Authentication-free Clients Captive Portal Authentication Type One-key Authentication Available Time 24 hours Authentication Parameter Preview Authentication-free Clients Captive Portal Authentication Type Account Authentication One-key Authentication SMS Authentication Authentication Type- Select an available me for the rule, or tap Custom to specify an available me. Aer the available me elapses, the user is required to pass the authencaon again.
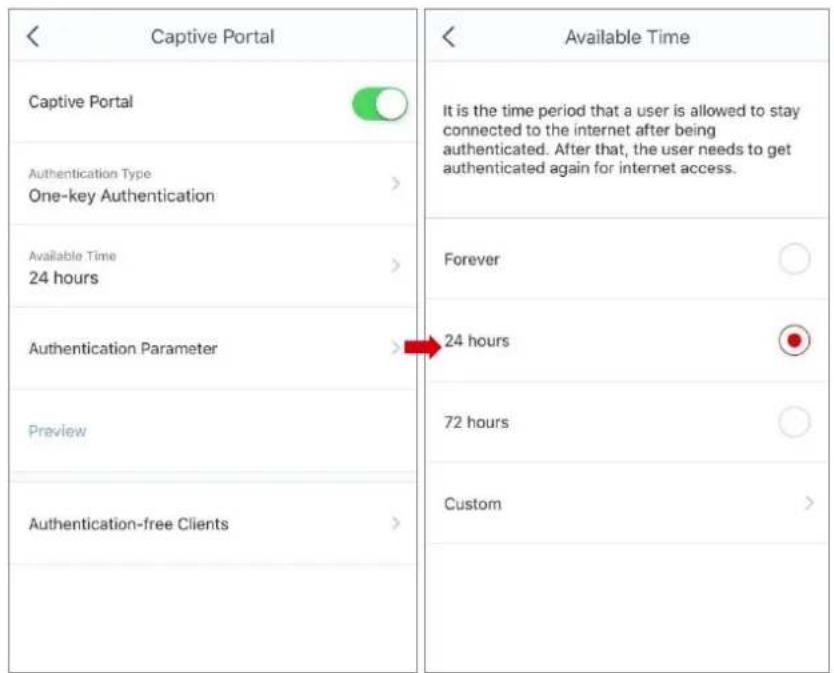
text_image
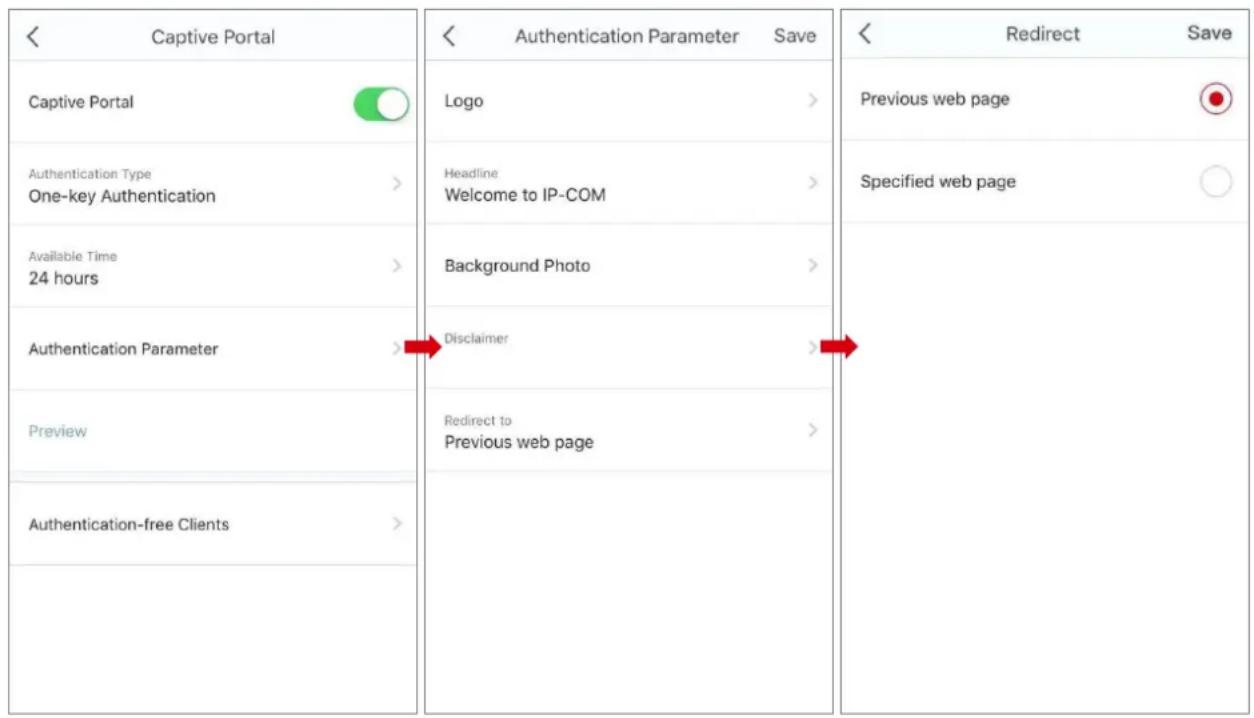
Captive Portal Captive Portal Authentication Type One-key Authentication Available Time 24 hours Authentication Parameter Preview Authentication-free Clients Available Time It is the time period that a user is allowed to stay connected to the internet after being authenticated. After that, the user needs to get authenticated again for internet access. Forever 24 hours 72 hours Custom- Tap Authencaon Parameter to set the parameters on the authencaon page.
(1) Tap Logo to upload a logo. This le must be .jpg, .jpeg, or .png le. The le size must be less than 30 KB, and the dimensions in pixels should be 6.5:1.
(2) Tap Headline to enter a headline, and tap Save.
(3) Tap Background Photo to upload a background le. This le must be .jpg, .jpeg, or .png le. The le size must be less than 300 KB, and the dimensions in pixels should be 16:9.
(4) Tap Disclaimer to enter the disclaimer content, and tap Save.
(5) Tap Redirect to specify a website that users will visit aer passing the authencaon, and tap Save.
- Previous web page: It species that the user will be redirected to the web page he visits before the authencaon.
- Specied web page: It species that the user will be redirected to the web page you specify here aer passing the authencaon.
(6) Tap Save.
text_image
< Captive Portal Captive Portal Authentication Type One-key Authentication > Available Time 24 hours Authentication Parameter > Preview Authentication-free Clients > < Authentication Parameter Save Logo > Headline Welcome to IP-COM > Background Photo > Disclaimer > Redirect to Previous web page > < Redirect Save Previous web page Specified web page Redirect Previous web page- Tap Preview to view the authencaon page you set.

text_image
Captive Portal Captive Portal Authentication Type One-key Authentication Available Time 24 hours Authentication Parameter Preview Authentication-free Clients Preview IP-COM Welcome to IP-COM Connect Disclaimer Logo Headline Disclaimer Background PhotoVericaon
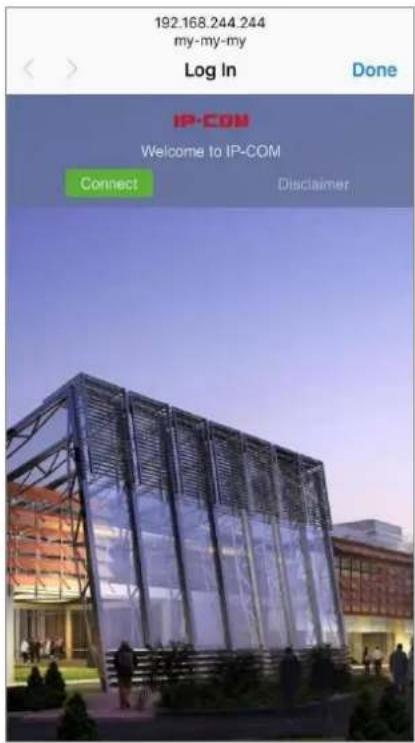
-
Connect a device to the mesh network in wired or wireless manner, and start a web browser. An authencaon page appears.
-
Tap Connect.
Then you can access the internet.
text_image
192.168.244.244 my-my-my Log In Done IP-CON Welcome to IP-COM Connect DisclaimerSeng up the SMS authencaon rule
Prerequisites
Before you set up the SMS authencaon rule, you need to have an NEXMO account and buy NEXMO SMS service.
Conguraon procedure
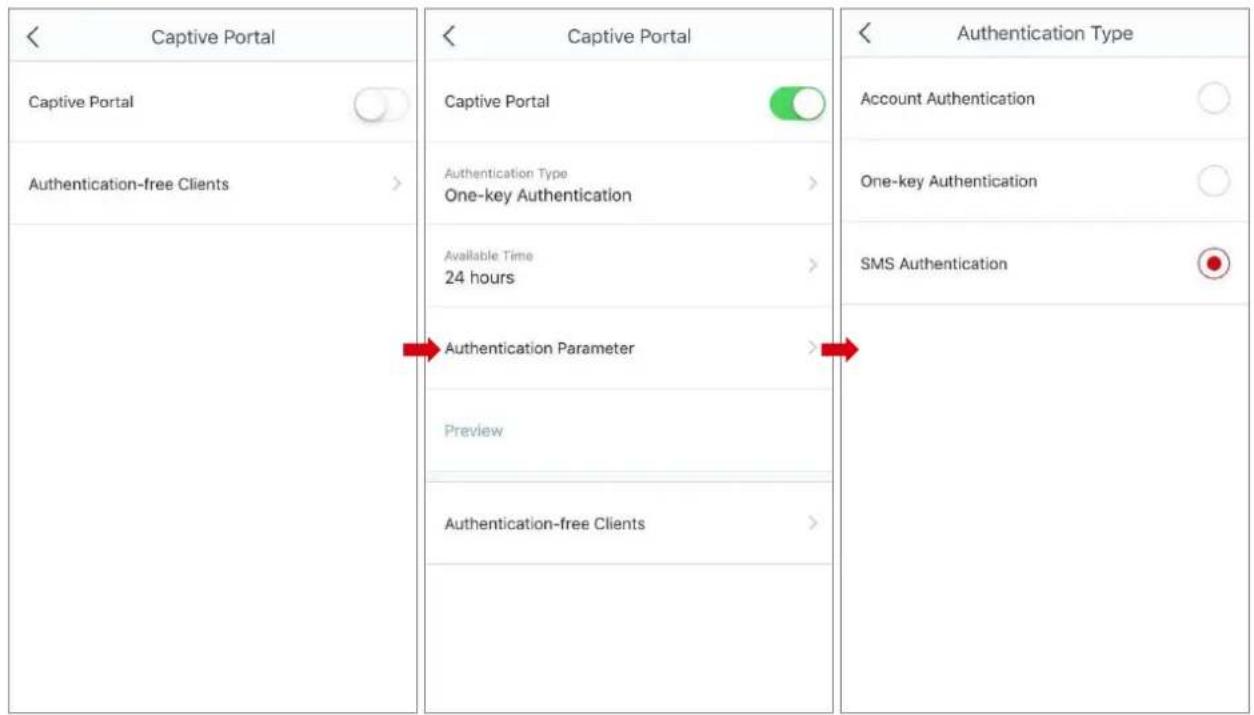
-
Choose Sengs > Capve Portal to enter the conguraon page.
-
Set the buon to the enabled state .

- Set the Authencaon type to SMS Authencaon.
text_image
< Captive Portal Captive Portal Authentication-free Clients > Captive Portal Captive Portal Authentication Type One-key Authentication > Available Time 24 hours > Authentication Parameter > Preview Authentication-free Clients > Authentication Type Account Authentication One-key Authentication SMS Authentication > < Authentication Type- Select an available me for the rule, or tap Custom to specify an available me. Aer the available me elapses, the user is required to pass the authencaon again.
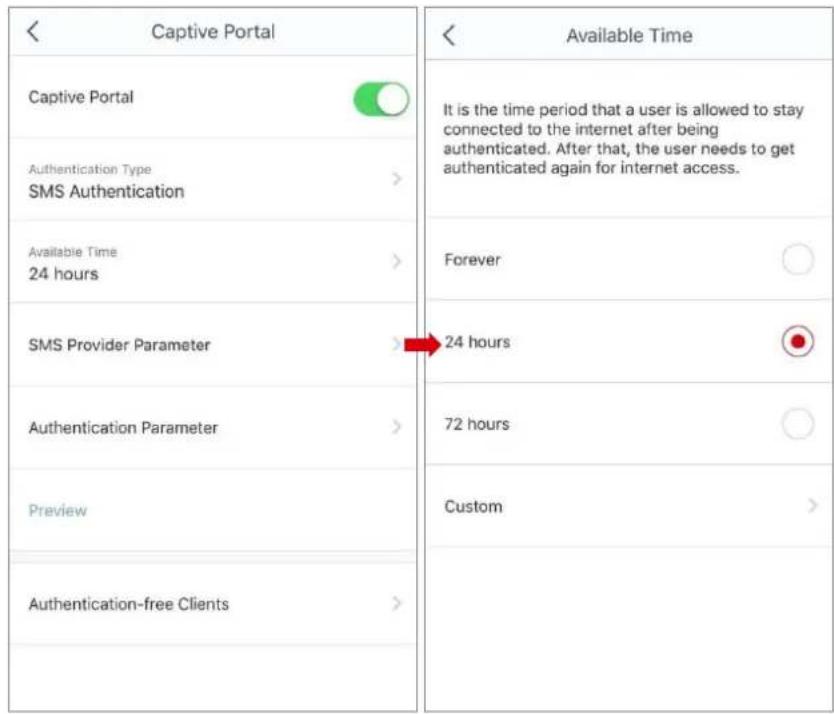
text_image
Captive Portal Captive Portal Authentication Type SMS Authentication Available Time 24 hours SMS Provider Parameter Authentication Parameter Preview Authentication-free Clients Available Time It is the time period that a user is allowed to stay connected to the internet after being authenticated. After that, the user needs to get authenticated again for internet access. Forever 24 hours 72 hours Custom5. Set up SMS Provider Parameter.
(1) Tap SMS Provider Parameter.
(2) Enter the API key provided by the NEXMO.
(3) Enter the API secret provided by the NEXMO.
(4) Edit a message text for vericaon of the users who request for accessing the internet.
(5) Tap Save.
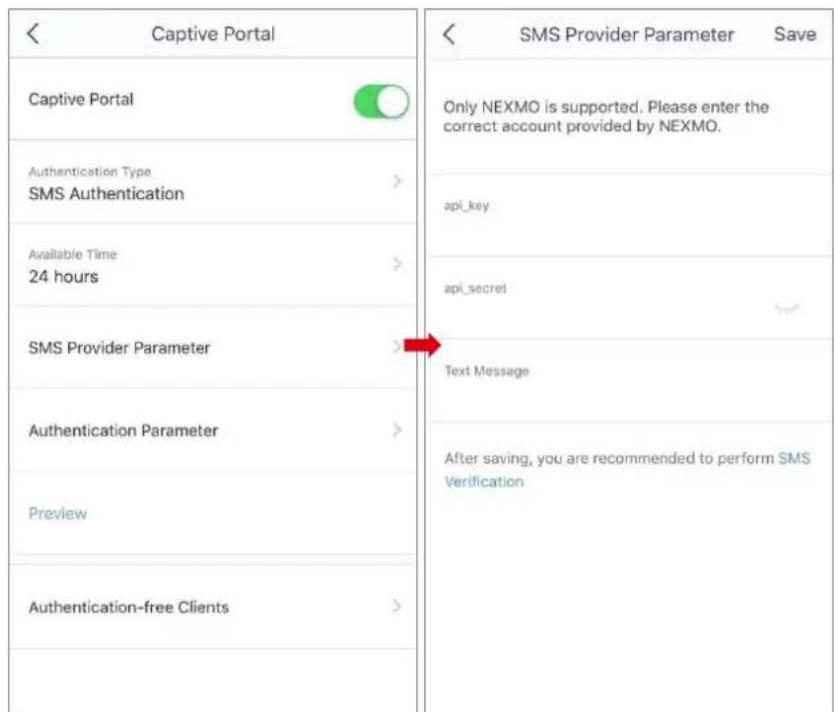
text_image
Captive Portal Captive Portal Authentication Type SMS Authentication Available Time 24 hours SMS Provider Parameter Authentication Parameter Preview Authentication-free Clients SMS Provider Parameter Save Only NEXMO is supported. Please enter the correct account provided by NEXMO. api_key api_secret Text Message After saving, you are recommended to perform SMS Verification- Tap Authencaon Parameter to set the parameters on the authencaon page.
(1) Tap Logo to upload a logo. This le must be .jpg, .jpeg, or .png le. The le size must be less than 30 KB, and the dimensions in pixels should be 6.5:1.
(2) Tap Headline to enter a headline, and tap Save.
(3) Tap Background Photo to upload a background le. This le must be .jpg, .jpeg, or .png le. The le size must be less than 300 KB, and the dimensions in pixels should be 16:9.
(4) Tap Disclaimer to enter the disclaimer content, and tap Save.
(5) Tap Redirect to specify a website that users will visit aer passing the authencaon, and tap Save.
- Previous web page: It species that the user will be redirected to the web page he visits before aer passing the authencaon.
- Specied web page: It species that the user will be redirected to the web page you specify here aer passing the authencaon.
(6) Tap Save.
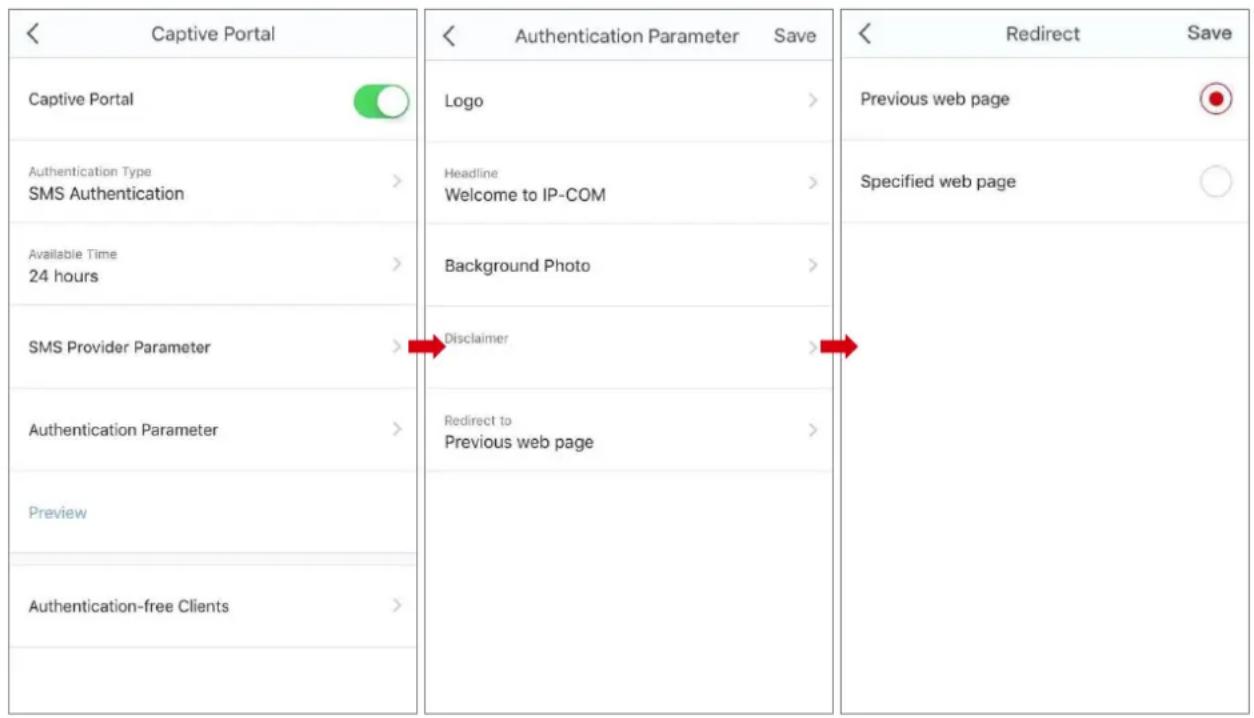
text_image
< Captive Portal Captive Portal Authentication Type SMS Authentication > Available Time 24 hours > SMS Provider Parameter > Authentication Parameter > Preview Authentication-free Clients > < Authentication Parameter Save Logo > Headline Welcome to IP-COM > Background Photo > Disclaimer > Redirect to Previous web page > < Redirect Save Previous web page Specified web page >- Tap Preview to view the authencaon page you set.
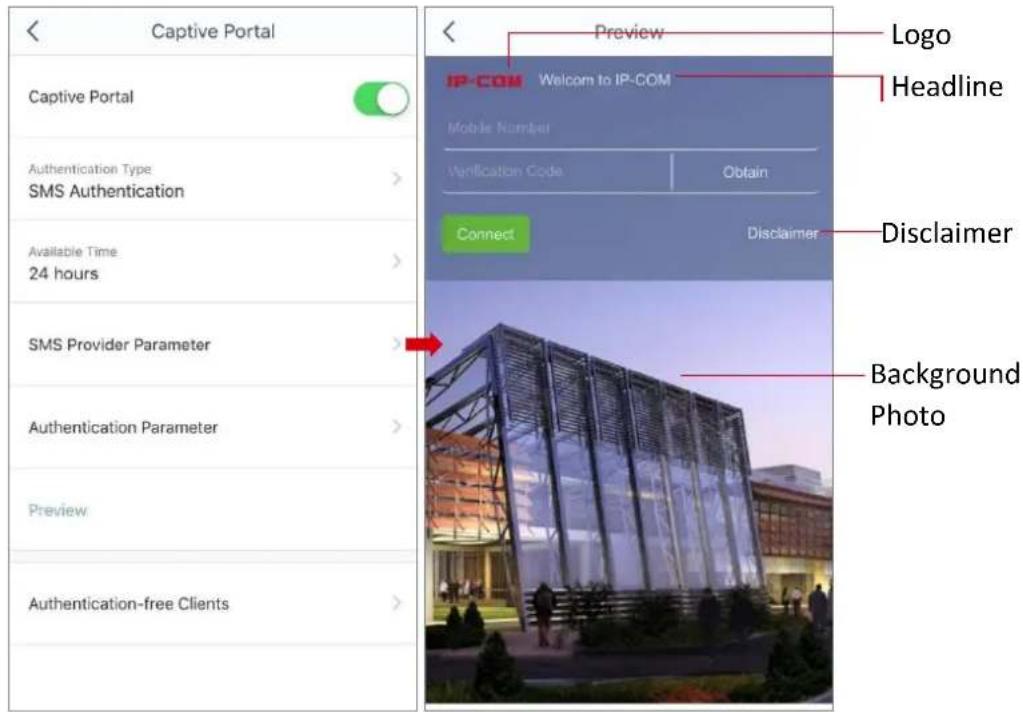
text_image
Captive Portal Captive Portal Authentication Type SMS Authentication Available Time 24 hours SMS Provider Parameter Authentication Parameter Preview Authentication-free Clients Preview IP-COM Welcome to IP-COM Mobile Number Verification Code Obtain Connect Disclaimer Logo Headline Disclaimer Background PhotoVericaon
- Connect a device to the mesh network in wired or wireless manner, and start a web browser. An authencaon page appears.
- Enter your mobile number, and tap Obtain.
- Enter the vericaon code you received.
- Tap Connect.
You can access the internet aer passing the authencaon.
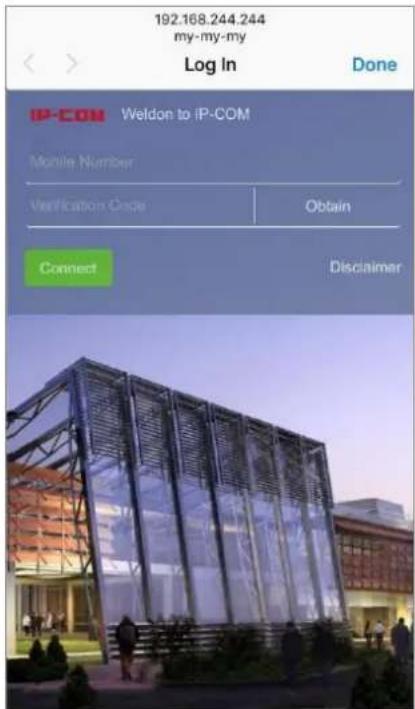
text_image
192.168.244.244 my-my-my Log In Done IP-COM Weldon to IP-COM Mobile Number Verification Order Obtain Connect DisclaimerApplicaon scenario for SMS authencaon
A coee bar named Coee uses the Mesh WiFi system to deploy its network. It requires that guests use mobile numbers to pass the authencaon for accessing the internet.
Conguraon procedure
■ Seng up the SMS authencaon rule
-
Choose Sengs > Capve Portal to enter the conguraon page.
-
Set the buon to the enabled state .

- Set the Authencaon type to SMS Authencaon.
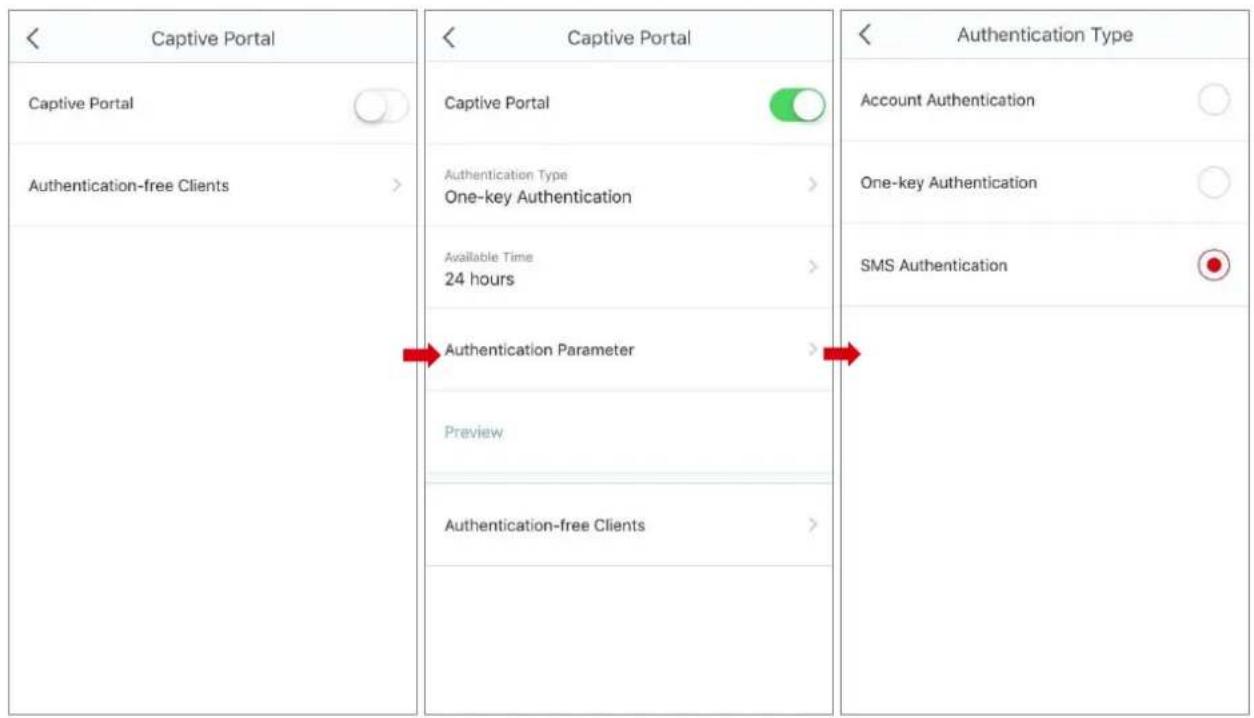
text_image
< Captive Portal Captive Portal Authentication-free Clients > Captive Portal Captive Portal Authentication Type One-key Authentication > Available Time 24 hours Authentication Parameter > Preview Authentication-free Clients > Authentication Type Account Authentication One-key Authentication SMS Authentication > < Authentication Type- Select an available me for the rule, which is 24 hours in this example.
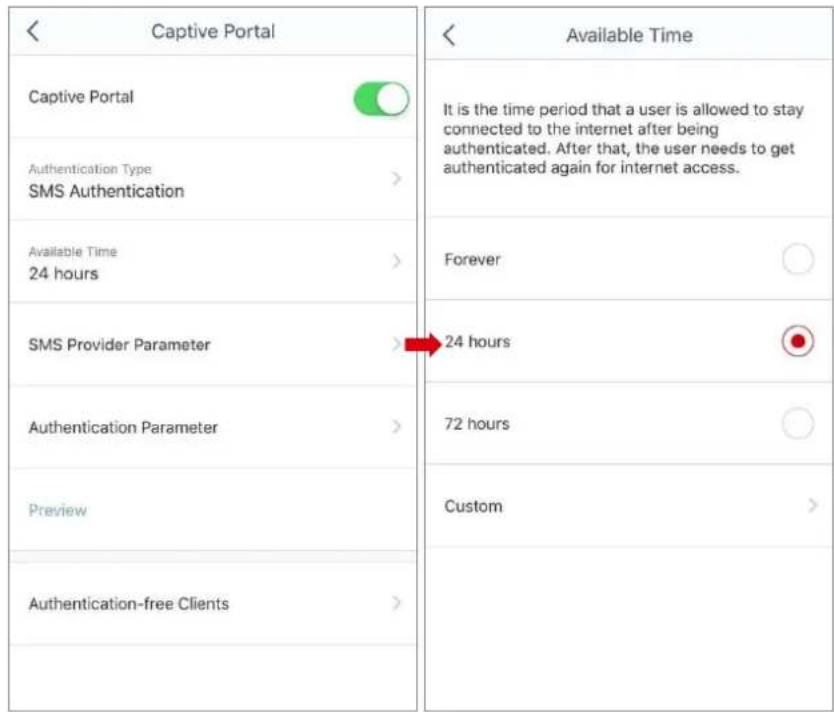
text_image
Captive Portal Captive Portal Authentication Type SMS Authentication Available Time 24 hours SMS Provider Parameter Authentication Parameter Preview Authentication-free Clients Available Time It is the time period that a user is allowed to stay connected to the internet after being authenticated. After that, the user needs to get authenticated again for internet access. Forever 24 hours 72 hours Custom- Set up SMS Provider Parameter.
(1) Tap SMS Provider Parameter.
(2) Enter the API key provided by the NEXMO.
(3) Enter the API secret provided by the NEXMO.
(4) Edit a text message sent to the users who request for accessing the internet, which is "Your vericaon code is CODE ." in this example. CODE must be included in the text.
(5) Tap Save.
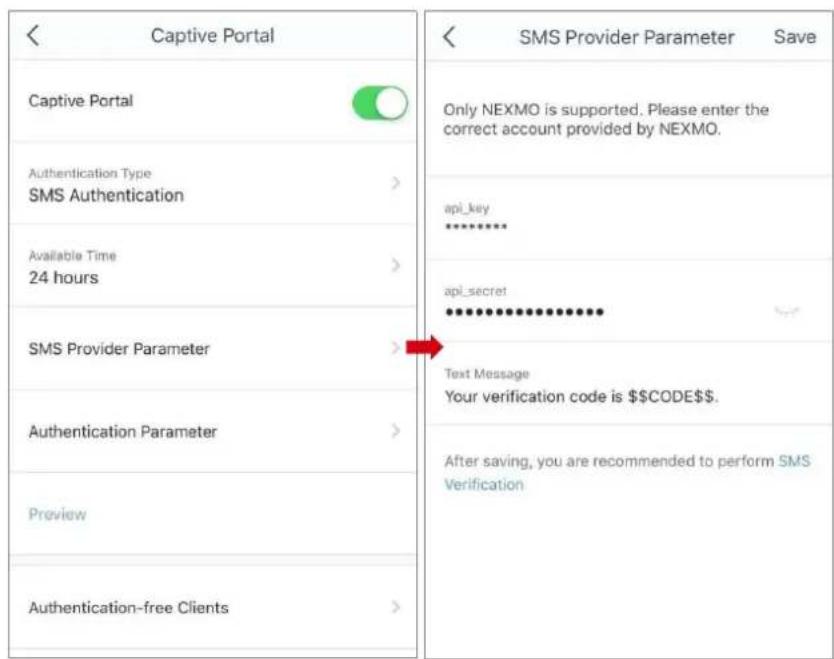
text_image
Captive Portal Captive Portal Authentication Type SMS Authentication Available Time 24 hours SMS Provider Parameter Authentication Parameter Preview Authentication-free Clients SMS Provider Parameter Save Only NEXMO is supported. Please enter the correct account provided by NEXMO. api_key ********** api_secret ************ Text Message Your verification code is CODE$. After saving, you are recommended to perform SMS Verification- Tap Authencaon Parameter to set the parameters on the authencaon page.
(1) Tap Logo to upload a logo. This le must be .jpg, .jpeg, or .png le. The le size must be less than 30 KB, and the dimensions in pixels should be 6.5:1.
(2) Tap Headline to enter a headline, which is Coee in this example, and tap Save.
(3) Tap Background Photo to upload a background le. This le must be .jpg, .jpeg, or .png le. The le size must be less than 300 KB, and the dimensions in pixels should be 16:9.
(4) Tap Disclaimer to enter the disclaimer content, and tap Save.
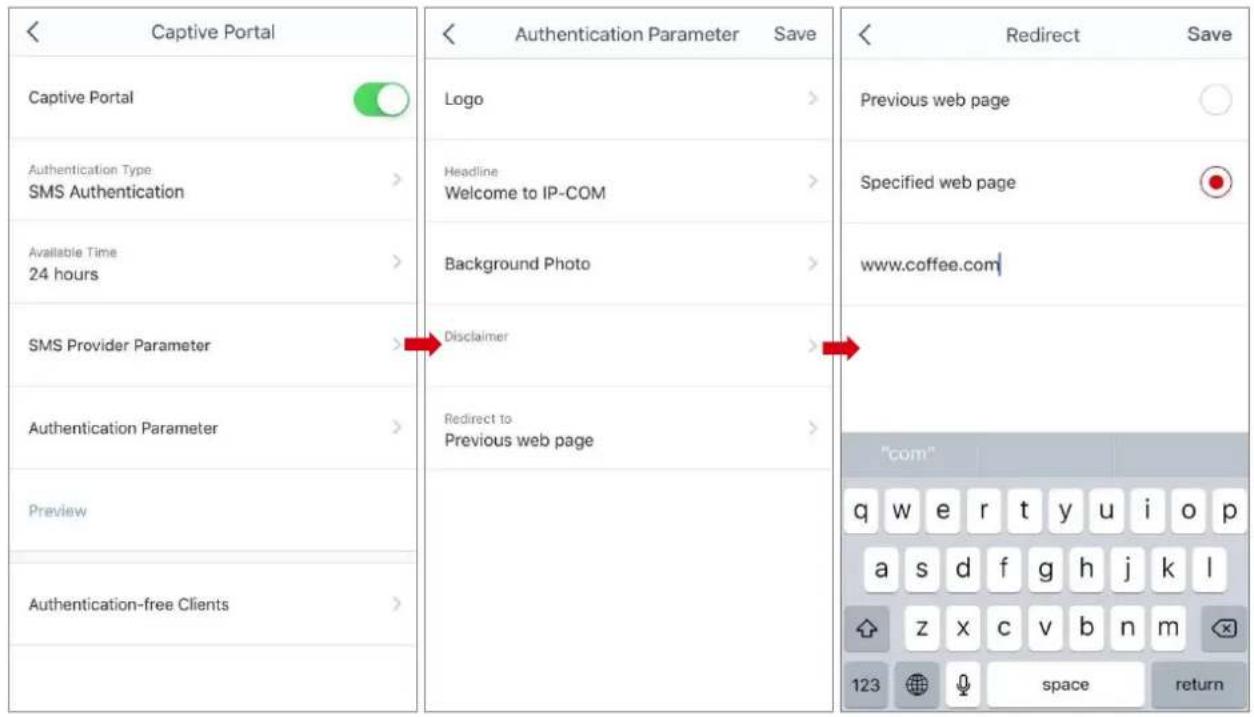
(5) Tap Redirect to, select Specied web page, enter the website, which is www.coee.com in this example, and tap Save.
(6) Tap Save.
text_image
Captive Portal Captive Portal Authentication Type SMS Authentication Available Time 24 hours SMS Provider Parameter Authentication Parameter Preview Authentication-free Clients Authentication Parameter Save Logo Headline Welcome to IP-COM Background Photo Disclaimer Redirect to Previous web page Redirect to Previous web page Previous web page Specified web page www.coffee.com/ "com" q w e r t y u i o p a s d f g h j k l z x c v b n m 123 space return- Tap Preview to view the authencaon page you set.
text_image
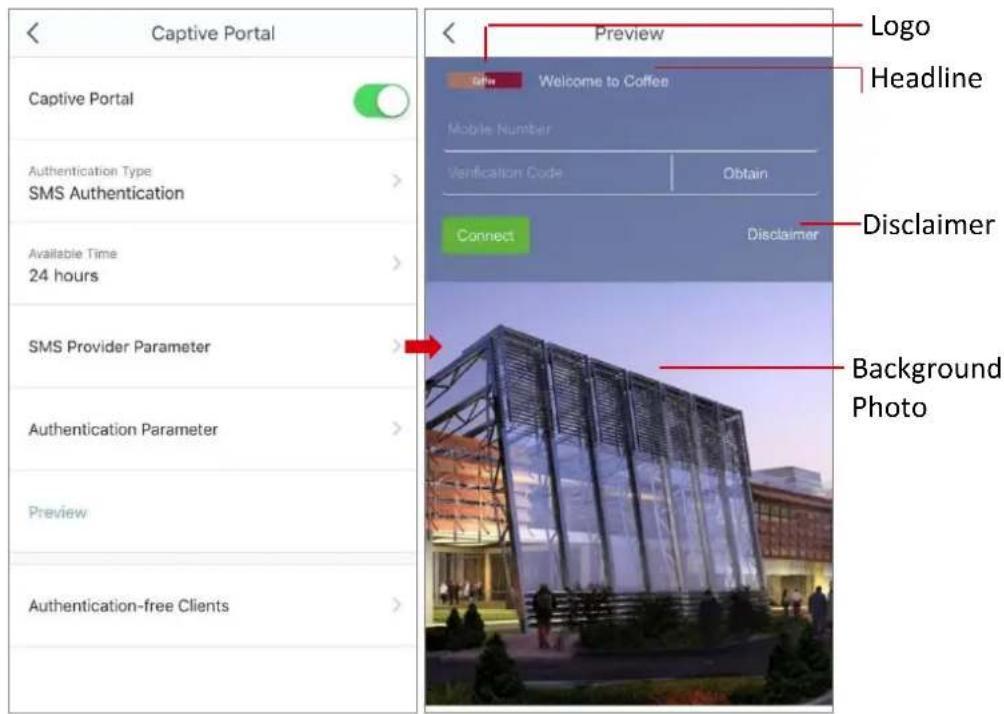
Captive Portal Captive Portal Authentication Type SMS Authentication Available Time 24 hours SMS Provider Parameter Authentication Parameter Preview Authentication-free Clients Preview Welcome to Coffee Mobile Number Verification Code Obtain Connect Disclaimer Logo Headline Disclaimer Background PhotoVericaon
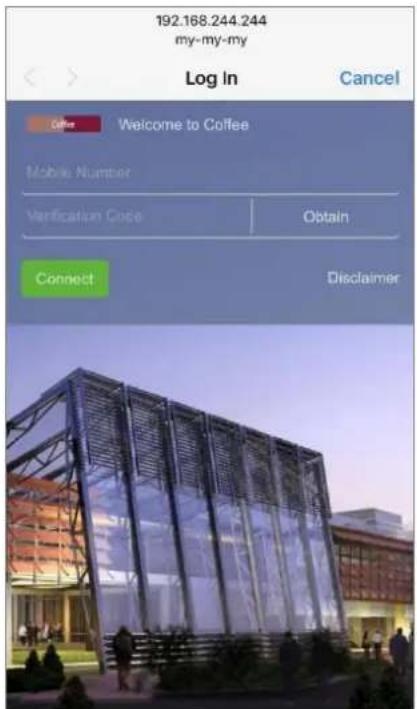
- Connect a device to the mesh network in wireless manner, and start a web browser. An authencaon page appears.
- Enter your mobile number, and tap Obtain.
- Enter the vericaon code received on your phone.
- Tap Connect.
The device can access the internet aer passing the authencaon.
text_image
192.168.244.244 my-my-my Log In Cancel Coffee Welcome to Coffee Mobile Number Verification Code Obtain Connect Disclaimer14 Smart Assistant

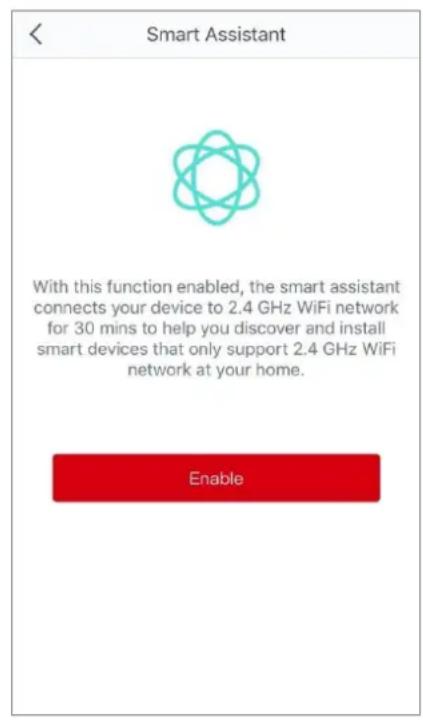
The mesh WiFi system supports 5 GHz priority. Therefore, dual-band clients, such as smart phones choose the 5 GHz band to connect for faster speed. In this case, to allow your 2.4 GHz WiFi-enabled devices such as printers, or IP cameras to join the mesh WiFi network, you can enable this function to keep your smart phone on 2.4 GHz for 30 minutes.
Perform the following procedure to enable the Smart Assistant funcon:
- Choose Sengs > Smart Assistant to enter the conguraon page.
Tap Enable. 2.
text_image
Smart Assistant With this function enabled, the smart assistant connects your device to 2.4 GHz WiFi network for 30 mins to help you discover and install smart devices that only support 2.4 GHz WiFi network at your home. Enable15 Port Forwarding

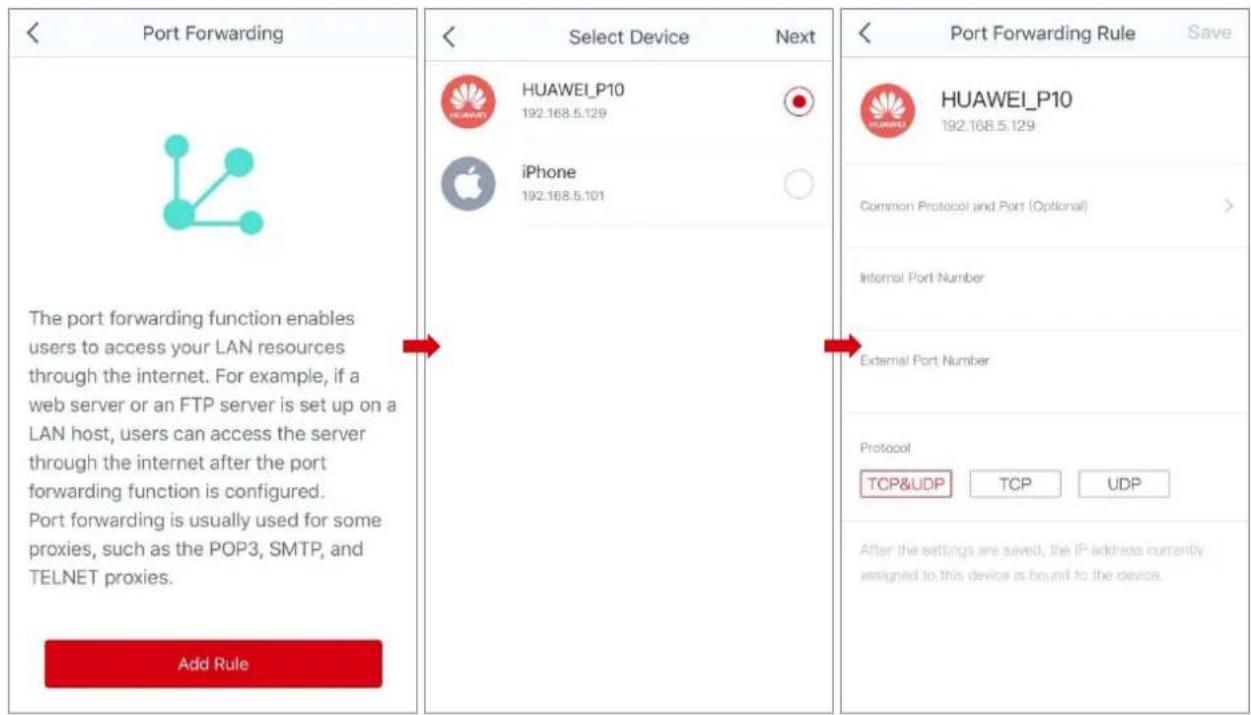
The Port Forwarding funcon enables internet users to access your LAN resources, such as resources on the web server or FTP server.
Perform the following procedure to set up the Port Forwarding funcon:
-
Choose Sengs > Port Forwarding to enter the conguraon page.
-
Tap Add Rule.
Select the device to which the rule applies. 3.
Tap Next. 4.
Set up a port forwarding rule. 5.
(1) Common Protocol/Port: oponal. The App presets some common protocols and their port numbers, such as FTP, TELNET, and so on. Make your selecon as required, the Internal Port Number and External Port Number are auto-llled. If the port numbers you want to set are not included, you can set them manually in the Internal Port Number and External Port Number boxes.
(2) Internal Port Number: Enter the service port of the corresponding server on the LAN device.
(3) External Port Number: Enter the port which is enabled for the internet users.
(4) Protocol: Select the protocol of the service. If you are uncertain about it, select TCP&UDP.
- Tap Save.
text_image
Port Forwarding The port forwarding function enables users to access your LAN resources through the internet. For example, if a web server or an FTP server is set up on a LAN host, users can access the server through the internet after the port forwarding function is configured. Port forwarding is usually used for some proxies, such as the POP3, SMTP, and TELNET proxies. Add Rule Select Device Next HUAWEI_P10 192.168.5.129 iPhone 192.168.5.101 Port Forwarding Rule Save HUAWEI_P10 192.168.5.129 Common Protocol and Port (Optional) Internal Port Number External Port Number Protocol TCP&UDP TCP UDP After the settings are saved, the IP address currently assigned to this device is bound to the device.Aer compleng the setngs, internet users can visit "Protocol name://WAN port IP address of the mesh node:External port" to access LAN resources.

Note
- Ensure that the WAN IP address of the mesh node is a public IP address, and the internal port you entered is correct.
- Security soware, antivirus soware, and the built-in OS rewall of the server may cause port forwarding funcon failures. Disable them when using this funcon.
- Manually set an IP address for the web server to avoid the service disconncon caused by the dynamic IP address.
16 UPnP

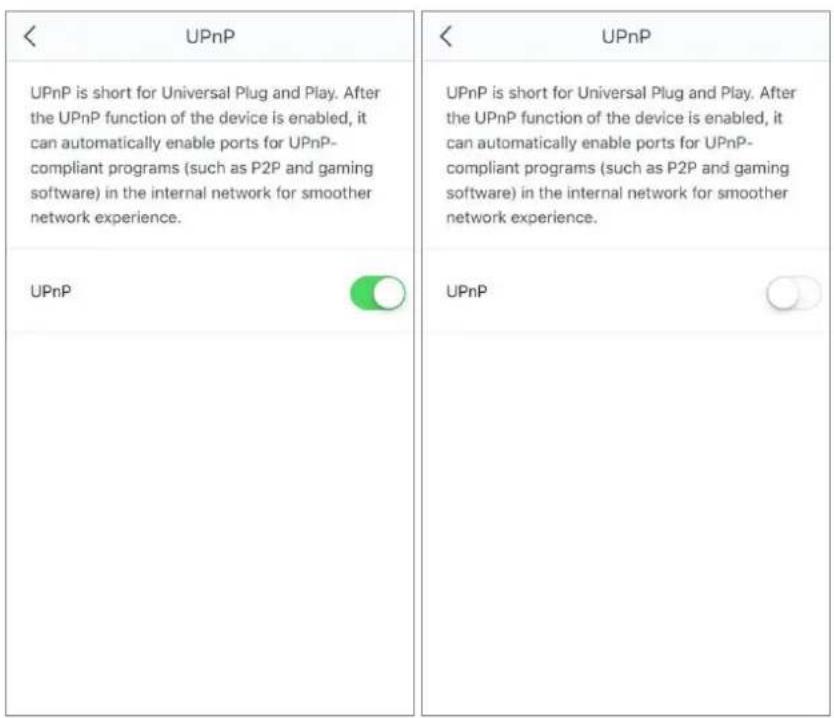
Aer the UPnP funcon is enabled, it can automatically enable ports for UPnP-supported programs, such as P2P and gaming soware, in the internal network to improve your network experience.
Perform the following procedure to enable/disable the UPnP funcon:
-
Choose Sengs > UPnP to enter the conguraon page.
-
Alternate the status between enabled and disabled by tapping icon as required.
text_image
< UPnP UPnP is short for Universal Plug and Play. After the UPnP function of the device is enabled, it can automatically enable ports for UPnP-compliant programs (such as P2P and gaming software) in the internal network for smoother network experience. UPnP UPnP is short for Universal Plug and Play. After the UPnP function of the device is enabled, it can automatically enable ports for UPnP-compliant programs (such as P2P and gaming software) in the internal network for smoother network experience. UPnP17 DHCP Server

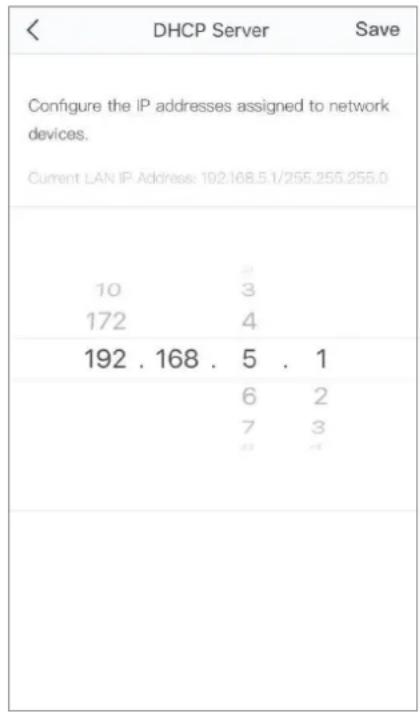
The DHCP Server funcon allows you to change the IP addresses assigned to all devices that are connected to the mesh network.
Perform the following procedure to change the LAN IP address of the mesh node:
- Choose Sengs > DHCP Server to enter the conguraon page.
Select a LAN IP address for the mesh node. 2.
Tap Save. 3.
text_image
DHCP Server Save Configure the IP addresses assigned to network devices. Current LAN IP Address: 192.168.5.1/255.255.255.0 10 3 172 4 192 . 168 . 5 . 1 6 2 7 3
If websites are inaccessible with domain names but accessible with IP addresses, it may be a DNS resolution problem. You can try changing the DNS sengs to solve the problem.
Perform the following procedure to change the DNS sengs:
- Choose Sengs > DNS to enter the conguraon page.
- Select Automac or Manual.
- Automac: If you select Automac, the device obtains the Primary DNS Server and Secondary DNS Server from the upstream device.
- Manual: If you select Manual, enter the correct DNS IP address in the Primary DNS Server box. If you have another DNS server IP address, enter it in the Secondary DNS Server (oponal) box.
3. Tap Save.
| < DNS Save | < DNS Save |
| Obtaining Method Automatic > | Obtaining Method Manual > |
| Primary DNS Server 192.168.60.1 | Primary DNS Server 0.0.0.0 |
| Secondary DNS Server (optional) 8.8.8.8 | Secondary DNS Server (optional) 0.0.0.0 |
19 Stac Route

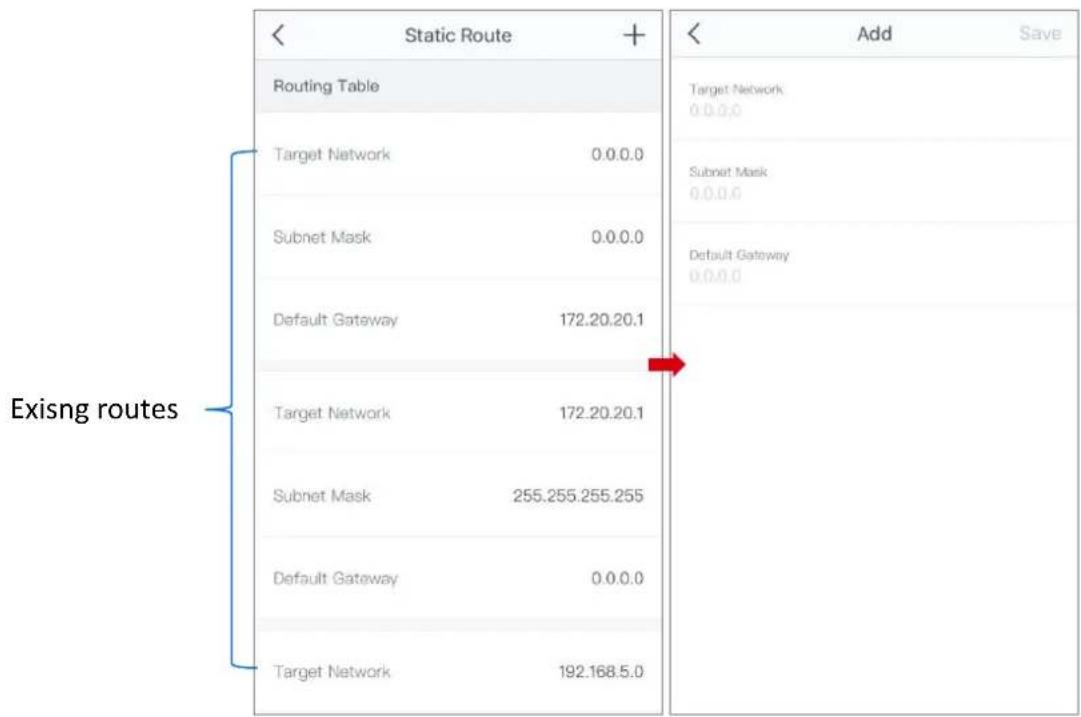
The Stac Route funcon is performed to select the best route for delivering data from a source address to a desnaon address. A stac route is a manually congured route, which is simple, ecient, and reliable. Appropriate stac routes help reduce the number of route selecon problems and reduce route selecon burden, increasing the packet forwarding speed.
Seng up a stac route
- Choose Sengs > Stac Route to enter the conguraon page.
- Tap the icon.
-
Enter a Target Network, a Subnet Mask, and a Default Gateway.
-
Target Network: It species the desnaon IP address.
- Subnet Mask: It species the subnet mask of the desnaon IP address.
-
Default Gateway: It species the IP address of the gateway. This address must be on the same LAN segment as the router.
-
Tap Save.
text_image
Static Route Routing Table Target Network 0.0.0.0 Subnet Mask 0.0.0.0 Default Gateway 172.20.20.1 Target Network 172.20.20.1 Subnet Mask 255.255.255.255 Default Gateway 0.0.0.0 Target Network 192.168.5.0 Exisng routes Add Save Target Network 0.0.0.0 Subnet Mask 0.0.0.0 Default Gateway 0.0.0.0Applicaon scenario for Stac Route
Vising mulple networks or servers at the same me
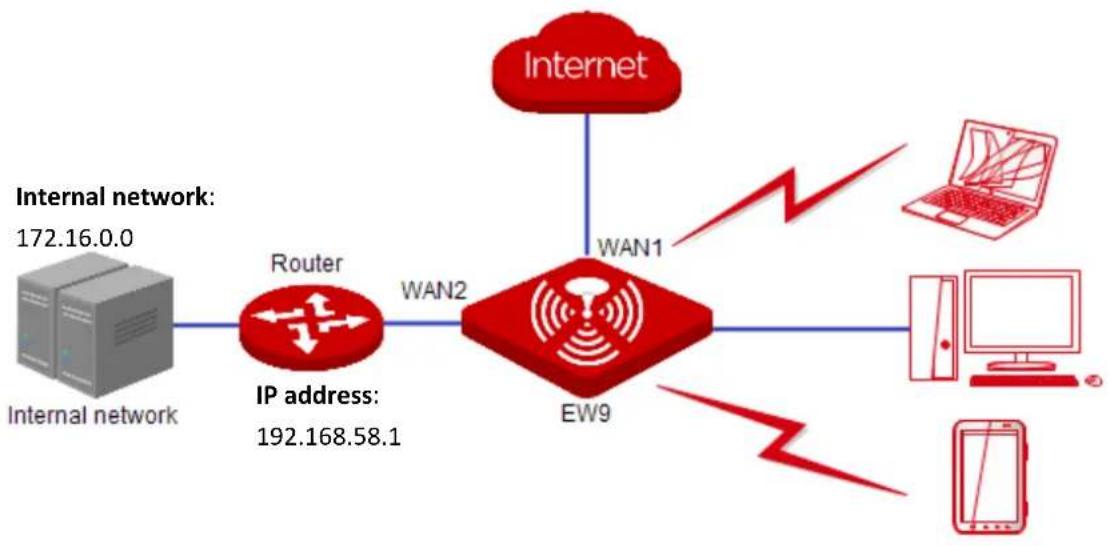
A company uses the Mesh system to deploy its networks, and its internal network is isolated from the internet. It requires that devices connected to the mesh network can access the internet and the company's server at the same me.
Soluon
Connect the WAN1 port of EW9 to the internet.
Connect the WAN2 port of EW9 to the internal network.
Set stac route rules on EW9.
Assume that:
Informaon of internal network
IP address: 172.16.0.0
Subnet mask: 255.255.0.0
Informaon for accessing the internal network:
IP address: 192.168.58.190
Subnet mask: 255.255.255.0
Gateway: 192.168.58.1
Primary DNS: 192.168.58.1
PPPoE user name and password for accessing the internet:
User name: IP-COM
Password: IP-COM
The network topology is shown as follows:
flowchart
graph TD
    A["Internal network: 172.16.0.0"] --> B["Router"]
    B --> C["WAN2"]
    C --> D["Internet"]
    D --> E["WAN1"]
    C --> F["EW9"]
    G["IP address: 192.168.58.1"] --> B
    H["Laptop"] --> D
    I["Desktop"] --> F
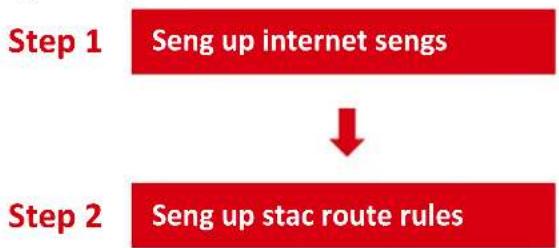
Conguraon procedure
flowchart
graph TD
    A["Step 1 Seng up internet sengs"] --> B["Step 2 Seng up stac route rules"]
■ Seng up the internet sengs
-
Choose Sengs > Internet Sengs to enter the conguraon page.
-
Tap Connecon Type of WAN1 port.
-
Select PPPoE, and enter the PPPoE User Name and PPPoE Password, which are IP-COM and IP-COM in this example.
Tap Save. 4.
- Set Double-line Connecon buon to the enabled state

Tap Connecon type of WAN2. 6.
- Select Stac IP Address, and enter the IP Address, Subnet Mask, Default Gateway, and Primary DNS Server, which are 192.168.58.190, 255.255.255.0, 192.168.58.1 and 192.168.58.1 in this example.
Tap Save. 8.
■ Seng up the stac route rules
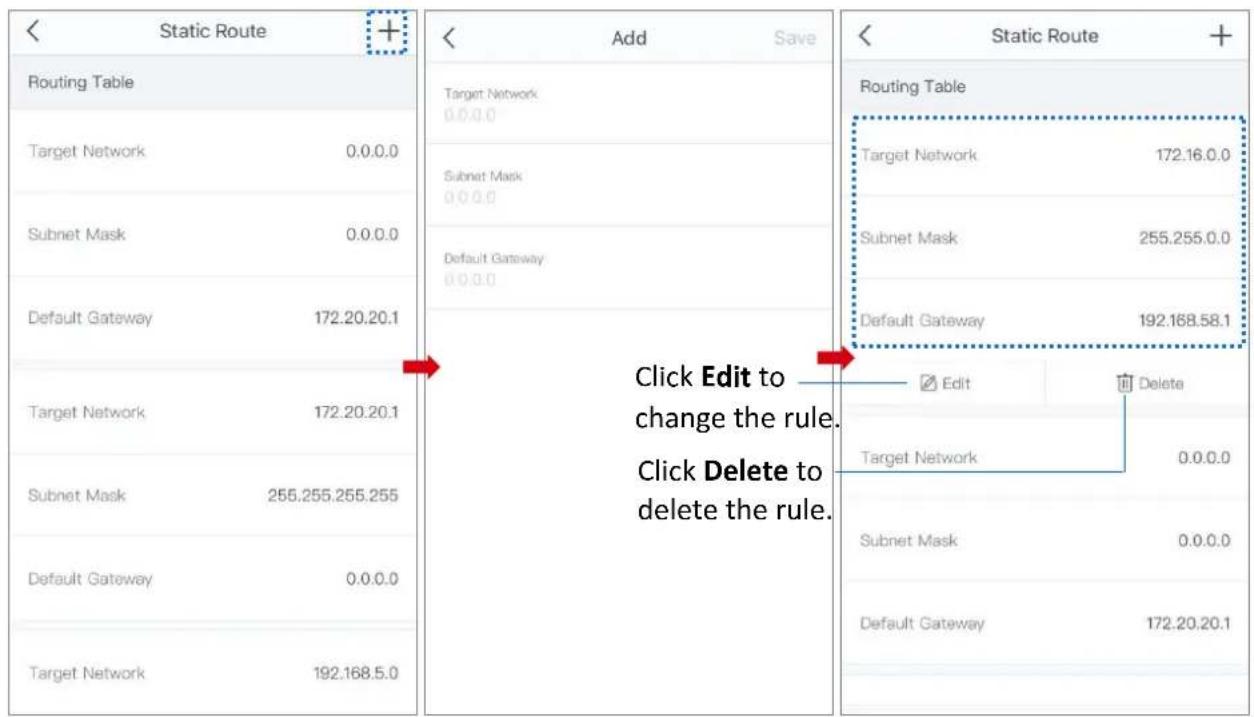
- Choose Sengs > Stac Route to enter the conguraon page.
Tap the + icon. 2.
- Enter the Target Network, Subnet Mask, and Default Gateway, which are 172.16.0.0, 255.255.0.0, and 192.168.58.1 in this example.
text_image
Static Route Routing Table Target Network 0.0.0.0 Subnet Mask 0.0.0.0 Default Gateway 172.20.20.1 Target Network 172.20.20.1 Subnet Mask 255.255.255.255 Default Gateway 0.0.0.0 Target Network 192.168.5.0 Add Save Target Network 0.0.0.0 Subnet Mask 0.0.0.0 Default Gateway 0.0.0.0 Click Edit to change the rule. Click Delete to delete the rule. Static Route Routing Table Target Network 172.16.0.0 Subnet Mask 255.255.0.0 Default Gateway 192.168.58.1 Edit Delete Target Network 0.0.0.0 Subnet Mask 0.0.0.0 Default Gateway 172.20.20.1Vericaon
Clients connected to the EW9 can access the internet and the company's server at the same me.
20 Firmware Upgrade

IP-COM is dedicated to improving its products to let users enjoy beer performance. Please update the rmware when detectcng a new available rmware version.
Perform the following procedure to update the rmware:

Note
Do not remove the power supply of the mesh nodes when upgrading.
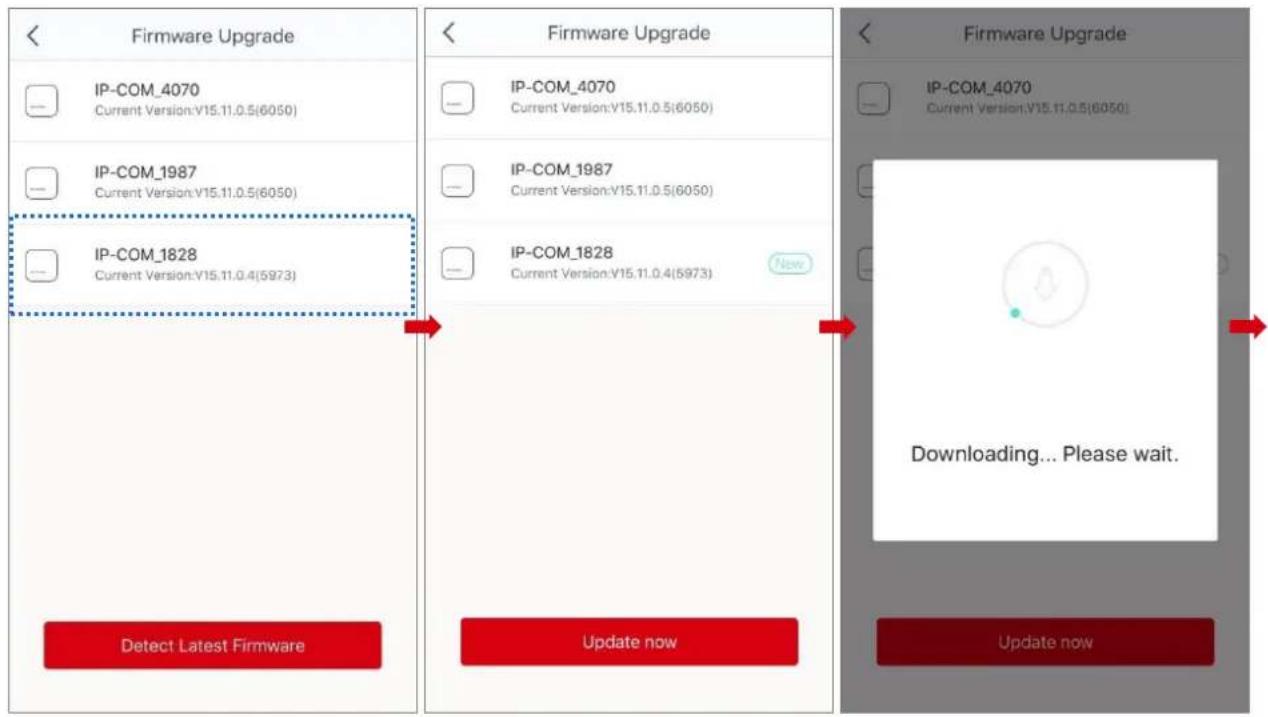
- Choose Sengs > Firmware Upgrade to enter the conguraon page.
- Tap Detect Latest Firmware.
- The New icon appears if a new rmware version is detected. Tap Update now to upgrade these nodes.
- Wait unl all nodes complete the upgrade, and then connue to manage them.
text_image
Firmware Upgrade IP-COM_4070 Current Version:V15.11.0.5(6050) IP-COM_1987 Current Version:V15.11.0.5(6050) IP-COM_1828 Current Version:V15.11.0.4(5973) Detect Latest Firmware Firmware Upgrade IP-COM_4070 Current Version:V15.11.0.5(6050) IP-COM_1987 Current Version:V15.11.0.5(6050) IP-COM_1828 Current Version:V15.11.0.4(5973) Now Update now Firmware Upgrade IP-COM_4070 Current Version:V15.11.0.5(6050) Downloading... Please wait. Update now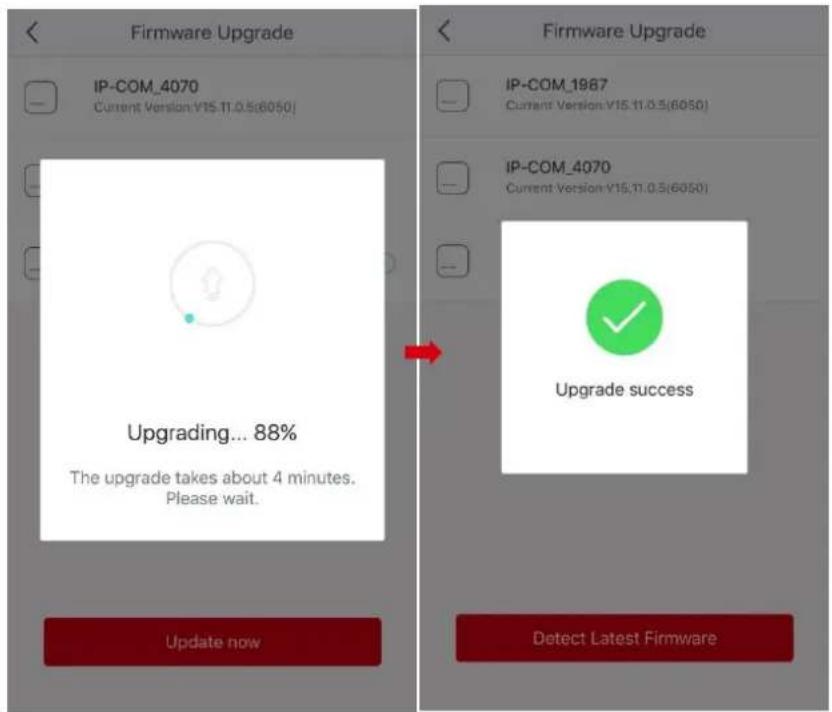
text_image
Firmware Upgrade IP-COM_4070 Current Version: V15.11.0.5(6050) Upgrading... 88% The upgrade takes about 4 minutes. Please wait. Update now Firmware Upgrade IP-COM_1987 Current Version: V15.11.0.5(6050) IP-COM_4070 Current Version: V15.11.0.5(6050) Upgrade success Detect Latest Firmware21 Maintenance Schedule

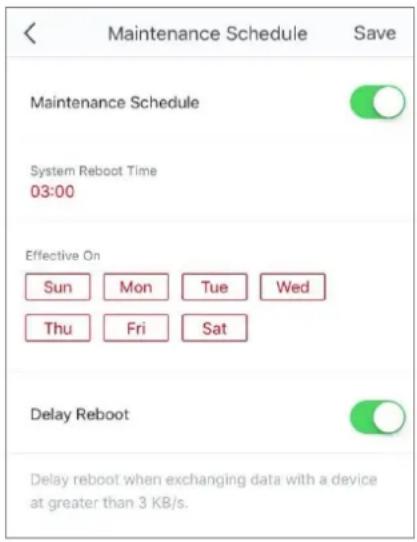
The Maintenance Schedule funcon makes the mesh nodes reboot at specied me to keep the mesh nodes in good condition.
Perform the following procedure to set up the Maintenance Schedule funcon:
- Choose Sengs > Maintenance Schedule to enter the conguraon page.
- Set the buon to the enabled state.
- Select a System Reboot Time. You are recommended to set a me when your network is idle.
- Select the dates on which the rule takes eect.
- Enable or disable the Delay Reboot funcon as required.
- Tap Save.

text_image
Maintenance Schedule Save Maintenance Schedule System Reboot Time 03:00 Effective On Sun Mon Tue Wed Thu Fri Sat Delay Reboot Delay reboot when exchanging data with a device at greater than 3 KB/s.
Tip
If the Delay Reboot funcon is enabled, the devices won't reboot at the specied me when the devices are exchanging data and the trac is greater than 3 KB/s. Within 2 hours aer the specied reboot me, the devices keep detectng the trac, and reboot once when the trac is lower than 3 KB/s. Otherwise, the devices will reboot the next day at the specied reboot me.
22 Account Authorizaon

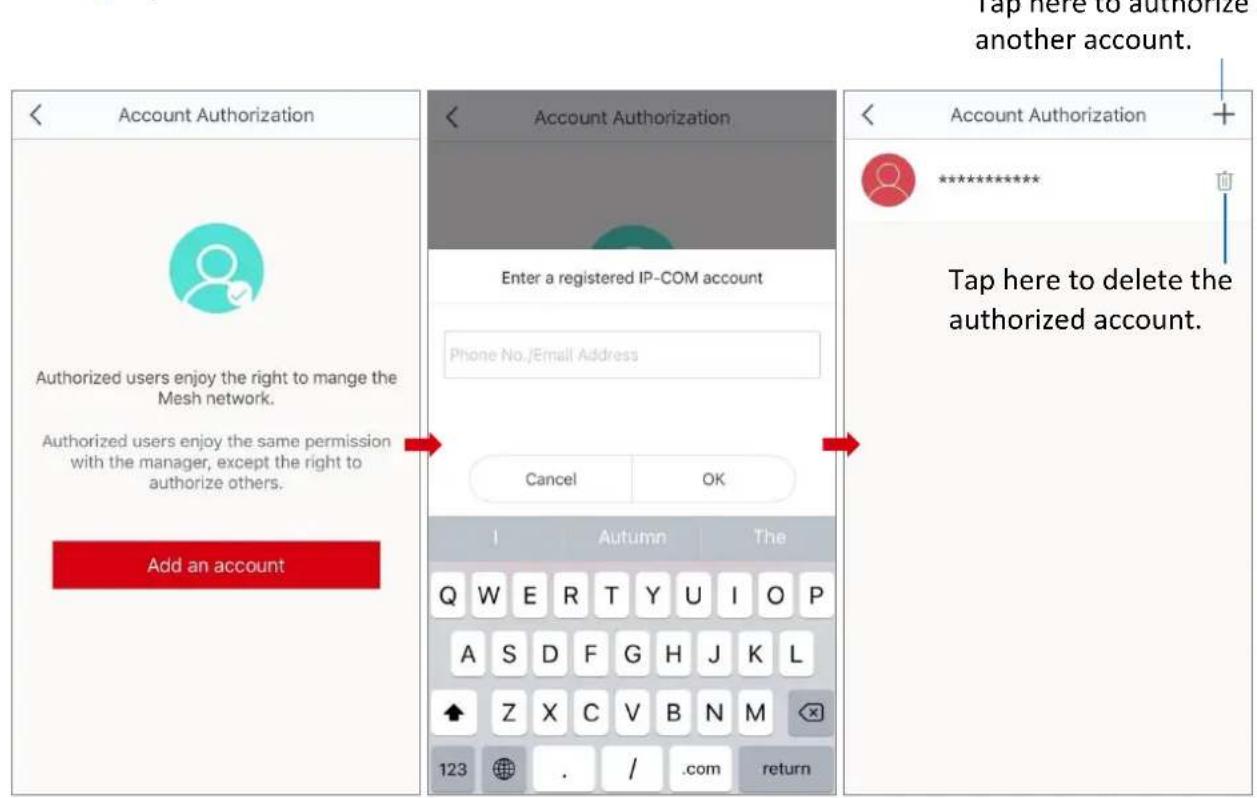
You can authorize other people to manage your mesh network. An authorized account has the same permission as the bound account excluding authorizing other accounts.
Perform the following procedure to authorize another account:
- Choose Sengs > Account Authorizaon to enter the conguraon page.
- Tap Add an account.
- Enter a registered IP-COM account.
- Tap OK.