
AAC9000 - Air conditioner BESTRON - Free user manual and instructions
Find the device manual for free AAC9000 BESTRON in PDF.


| Product type | Monoblock mobile air conditioner |
| Brand | Bestron |
| Model | AAC9000 |
| Dimensions (H x W x D) | 70 x 45 x 35 cm |
| Net weight | 28 kg |
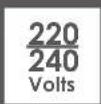
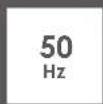
| Power supply | 220-240 V ~ 50 Hz |
| Cooling power | 9000 BTU/h (approx. 2.6 kW) |
| Energy class | A |
| Noise level | 65 dB(A) maximum |
| Main functions | Cooling, dehumidification, ventilation, timer, remote control |
| Water tank | Partial auto-evaporation, manual drainage if necessary |
| Filter | Washable and reusable |
| Maintenance and cleaning | Clean the filter every 2 weeks; clean the housing with a damp cloth |
| Safety | Automatic shut-off in case of overheating, frost protection, child safety |
| Spare parts and repairability | Filter, remote control, exhaust hose available; repair possible by a professional |
| Warranty | 2 years |
Frequently Asked Questions - AAC9000 BESTRON
User questions about AAC9000 BESTRON
0 question about this device. Answer the ones you know or ask your own.
Ask a new question about this device
Download the instructions for your Air conditioner in PDF format for free! Find your manual AAC9000 - BESTRON and take your electronic device back in hand. On this page are published all the documents necessary for the use of your device. AAC9000 by BESTRON.
USER MANUAL AAC9000 BESTRON
natural_image
White BESTRON mobile air conditioner unit with ventilation slots and ventilation duct (no visible text or symbols on device body)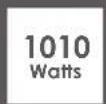

AAC9000 INSTRUCTION MANUAL
DE
Bedienungsanleitung
FR
Mode d'emploi
NL
Handleiding
EN
Instruction manual
IT
natural_image
Warning sign depicting a flame inside a triangle (no text or symbols)R. Neyman QUALITY CONTROL
natural_image
Diagram of a heat exchanger unit with cooling pipes and ventilation grilles, showing airflow direction (no text or labels)natural_image
Technical line drawing of a front-mounted air conditioner unit with cooling fins and mounting feet (no text or symbols)ACHTUNG:
natural_image
Line drawing of a front-loading air conditioner unit with a bucket being inserted (no text or symbols)natural_image
Technical line drawing of a multi-tiered industrial air conditioner unit with grid windows (no text or symbols)FEHLERBESEITIGUNG
natural_image
Warning symbol of a flame inside a triangle (no text or numbers)Attention, risque d'incendie!
R290

DÉCLARATION DE CONFORMITÉ CE
R. Neyman
Contrôle qualité
| TENSION SECTEUR 220-240 V | |
| CONSOMMATION D'ÉNERGIE 1010 W | |
| QUANTITÉ DE RÉFRIGÉRANT CA. 220 G | |
| TYPE DE RÉFRIGÉRANT R 290 | |
| DISJONCTEUR DIFFÉRENTIEL RECOMMANDÉ 30 MA | |
| PROTECTION SUR SITE 16 A |
natural_image
Diagram of a portable air conditioner unit with airflow direction arrows (no text or symbols)natural_image
Line drawing of a refrigerator with a bucket being inserted, no text or symbols presentnatural_image
Technical line drawing of a satellite or air conditioner unit with grid panels, no text or symbols presentPROBLÈME SOLUTION
WAT U MOET WETEN OVER DIT APPARAAT
natural_image
Warning symbol of a flame inside a triangle (no text or numbers)Let op, brandgevaar!
R290

R. Neyman
Quality control
| NETSPANNING 220-240 V | |
| ENERGIEVERBRUIK 1010 W | |
| HOEVEELHEID KOELMIDDEL CA. 220 G | |
| TYPE KOELMIDDEL R 290 | |
| AANBEVOLEN AARDLEKSCHAKELAAR 30 MA | |
| BESCHERMING TER PLAATSE 16 A |
WERKING - Algemeen
natural_image
Technical illustration of a mechanical device with internal components and directional arrows indicating assembly (no text or symbols)natural_image
Line drawing of a front-mounted air conditioner unit with cooling fins and wheels (no text or symbols)LET OP:
natural_image
Line drawing of a refrigerator with a bucket being inserted, no text or symbols presentREINIGING EN ONDERHOUD - Filter reinigen
natural_image
Technical line drawing of a satellite or spacecraft with four grid panels and ventilation grilles (no text or symbols)PROBLEEMOPLOSSING
Congratulations with the purchase of this Bestron product. These instructions tell you how the product works and how to use it. Read the instructions carefully before you start using the appliance. Only use the appliance in the manner described in the instructions. Keep these instructions in a safe place for future reference.
Defects:
If the appliance is defective, do not try to repair it yourself. Always have a qualified mechanic carry out any repairs.
Children:
- This appliance may be used by children over the age of 8 years old and persons with reduced physical, sensory or mental capabilities or lack of experience and know-how, but only if supervised or if they have been instructed on how to use the appliance safely and are aware of its potential dangers.
• Children are not allowed to clean and maintain the appliance, except if they are over the age of 8 years old and supervised. - Keep the appliance and the cable out of reach of children under the age of 8 years old.
- Keep an eye on children to ensure that they do not play with the appliance and the remote control.
SAFETY INSTRUCTIONS FOR THIS DEVICE WITH FLAMMABLE REFRIGERANT
- Do not use means to accelerate the defrosting process or to clean, other than those recommended by the manufacturer.
- The appliance shall be stored in a room without continuously operating ignition sources (for example: open flames, an operating gas appliance or an operating electric heater).
- Do not damage the refrigeration circuit.
- If you notice a smell, the cooling circuit may be defective. Switch off the device, open the window and door and contact customer service.
- Appliance shall be installed, operated and stored in a room with a floor area larger than 11m ^2 .
- Keep any required ventilation openings clear of obstruction:
• Servicing shall be performed only as recommended by the manufacturer. -
The appliance shall be stored in a well-ventilated area where the room size corresponds to the room area as specified for operation.
-
Any person who is involved with working on or breaking into a refrigerant circuit should hold a current valid certificate from an industry-accredited assessment authority, which authorizes their competence to handle refrigerants safely in accordance with an industry recognized assessment specification.
- Servicing shall only be performed as recommended by the equipment manufacturer.
- If you pass this device on to someone else, you must include these operating instructions with the device.
- Do not switch the device on and off in quick succession. After switching off, wait a short time before switching the device on again.
WHAT YOU SHOULD KNOW ABOUT THIS APPLIANCE
Notes:
- The air conditioning is only suitable for indoor use and is not suitable for other applications.
- Follow local grid interconnection rules while installing the air conditioning and ensure that it is properly grounded. If you have any question on electrical installation, follow the instructions of the manufacturer, and if necessary, ask a professional electrician to install it.
- Place the machine in a flat and dry place and keep a distance of above 30cm between the machine and the surrounding objects or walls.
• After the air conditioning is installed, ensure that the power plug is intact and firmly plugged into the power outlet, and place the power cord orderly to prevent someone from being tripped or pulling out the plug.
- Do not put any object into the air inlet and outlet of the air conditioning. Keep the air inlet and outlet free from obstructions.
- Do not use force to adjust the upper and lower air ducts to avoid damage.
- While adjusting the upper and lower wind-guide strips of the air outlet, pluck it with hands gently to avoid damaging wind-guide strips.
- When moving the machine, make sure that it is in an upright position.
- The machine should stay away from gasoline, flammable gas, stoves and other heat sources.
- Don't disassemble, overhaul and modify the machine arbitrarily, otherwise it will cause a
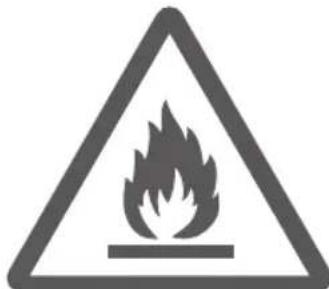
natural_image
Warning sign depicting a flame inside a triangle (no text or symbols)Caution, risk of fire!
R290

machine malfunction or even bring harm to persons and properties.
To avoid danger, if a machine failure occurs, ask the manufacturer or professionals to repair it.
- Do not install and use the air conditioning in the bathroom or other humid environments.
• Always switch off the device before removing the power plug. Do not pull on the power cord when doing this
- Do not place cups or other objects on the body to prevent water or other liquids from spilling into the air conditioning.
- Do not use insecticide sprays or other flammable substances near the air conditioning.
- Do not wipe or wash the air conditioning with chemical solvents such as gasoline and alcohol. When you need to clean the air conditioning, you must disconnect the power supply, and clean it with a half-wet soft cloth. If the machine is really dirty, scrub with a mild detergent.
- The appliance can be used by children aged from 8 years and above and persons with reduced physical, sensory or mental capabilities if they have been given supervision or instruction concerning use of the appliance in a safe way and understand the hazards involved. Children shall not play with the appliance. Cleaning and maintenance shall not be made by children without supervision.
- If the supply cord is damaged, it must be replaced by the manufacturer, its service agent or similarly qualified persons in order to avoid a hazard.
- The appliance shall be installed in accordance with national wiring regulations.
- Do not operate your air conditioner in a wet room such as a bathroom or laundry room.
- The installation of pipe-work shall be kept to a minimum x 11m ^2
- Spaces where refrigerant pipes shall be compliance with national gas regulations. Transport of equipment containing flammable refrigerants.
- When disposing of the device, observe the national regulations for the disposal of devices with flammable refrigerants. Ask your responsible waste disposal company.
- When the device is not in use, only store it in dry and frost-free rooms. The device must not be damaged during storage.
ENVIRONMENT
- Dispose of packaging material such as plastic and cardboard boxes in the designated containers.
Do not dispose of this product as normal domestic waste at the end of its life, but hand it in at a collection point for the reuse of electric and electronic equipment. Look for the symbol on the product, the user instructions or the packaging showing the type of waste.
- The materials can be used as indicated. By helping us reuse and process the materials or otherwise recycle the old equipment, you will be making an important contribution towards the protection of the environment.

Your municipality can tell you where to find the designated waste collection point in your neighbourhood.
- Dispose of the batteries of the remote control only at the designated collection points.
CE DECLARATION OF CONFORMITY
This product meets the requirements of European guidelines.
R. Neyman
QUALITY CONTROL
| MAINS VOLTAGE 220-240 V | |
| POWER CONSUMPTION 1010 W | |
| AMOUNT OF REFRIGERANT CA. 220 G | |
| TYPE OF REFRIGERANT R 290 | |
| RECOMMENDED RESIDUAL CURRENT CIRCUIT BREAKER 30 MA | |
| PROTECTION ON SITE 16 A |
OPERATION - General
The appliance is intended only for domestic use, not for professional use.
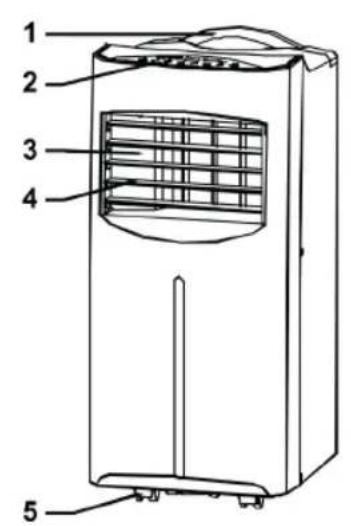
-
Handle
-
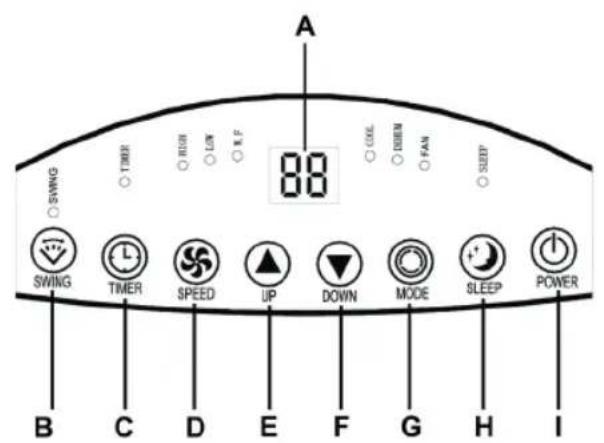
Control panel:
A. LED display
B. "SWING" swing function button
C. "TIMER" timer function button
D. Speed button ("SPEED")
E. Temperature up button "UP"
F. Temperature down button "DOWN"
G. Button mode setting "MODE"
H. Sleep button "SLEEP"
I. On / off button "POWER"
-
Air outlet
-
Slats
-
Swivel wheels
-
Condensate water drain pan
-
Cord with plug
-
Above washable grid
-
Warm air outlet
-
Under washable grid
-
Rubber cap
-
Screw cap
-
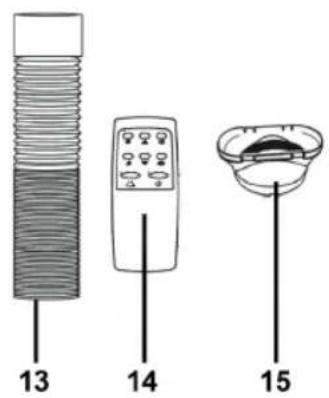
Drain hose
-
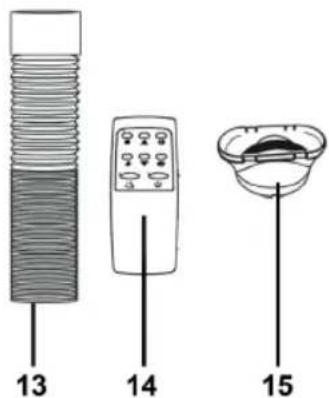
Remote control (2 x AAA battery, not included)
-
Adapter
INSTALLATION
This airconditioner must be connected to an electrical circuit which includes on building side a 16 A circuit breaker. It is to place away from easily combustible materials and a free space of 30cm around the appliance. A 30 mA residual current device is recommended additionally. In case of using an extension cable only use proper diameters, in case of multiple sockets do not overload it. The airconditioner must be placed on a flat floor with sufficient load capacity.
INSTALLATION - Installing heat exhaust
- Choose a place near a window and socket to place the device.
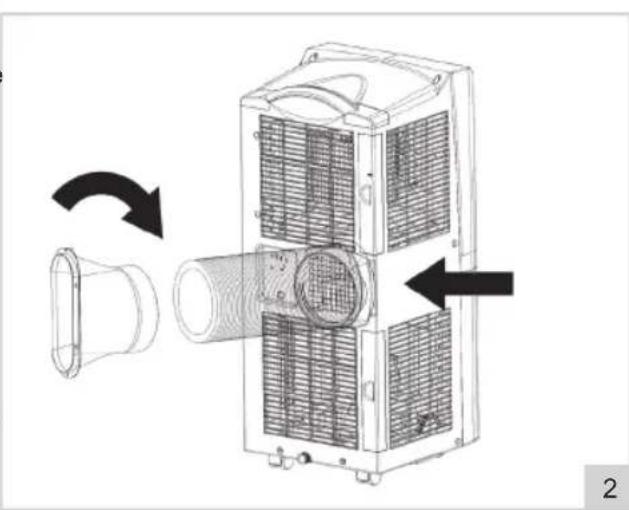
- Screw the adapter (15) on the drainage hose (see figure 2).
- Install the drainage hose onto the hot air outlet (9) on the back of the device (see figure 2).
ATTENTION:
• To prevent breaking, the exhaust host can only be twisted or deformed to a certain limit.
- The maximal length of the exhaust hose is 150 cm. Do not use extensions or other exhaust hoses; this can cause serious malfunctions.
• To prevent overheating, the outlet of the device must not be blocked.
- If you have a tilt window instead of a sliding window, purchase a window sealing kit to close off your entire window airtight.
natural_image
Diagram of a dual-chamber HVAC unit with airflow direction arrows (no text or symbols)USAGE - Turning on and off
- Put the plug in the socket. The devices peeps, which is normal. The display (figure 1, A) indicated the current room temperature.
- Push the button "POWER" (I). The device starts functioning in the last used mode. When you turn the device on for the first time, it is in the cooling mode. The indication light above the button "MODE" lights up.
- Set the desired direction of the air stream. Aim the air stream right ahead, or slightly downward by manually setting the horizontal slats (4) in desired position. You can easily turn of move the device with the sturdy castor wheels to direct the airstream into the room.
- Push the button "POWER" again to turn the device off.
- After use, pull the plug from the socket.
USAGE - Setting the mode
The device has three operating modes, with which you can ventilate, dehumidify, and cool the room.
Ventilating
- Press the button "MODE" (figure 1, G), until the indication light lights up at "FAN". The device is now functioning as a ventilator.
- Press the button "SPEED" (D) to change between low or high speed exhaust air. The indication light lights up at "LOW" (low speed) or "HIGH" (high speed).
- Press the "swing" button to activate the swing position. This leaves the air flow from the leftmove to the right.
Dehumidifying
- Press the button "MODE" (figure 1, G) once or multiple times, until the indication light lights up at "DEHUM". The device switches to the lowest speed, and will now dehumidify the air.
Cooling
- Press the button "MODE" (figure 1, G) once or multiple times, until the indication light lights up at "cool". The device is now functioning as an air cooler, and will cool the air by means of a cooling element.
-
Use the buttons "UP" (E) and "DOWN" (F) to set the cooling temperature between 16°C and 31°C.
-
Press the button "SPEED" (D) to switch between a low or high speed of exhaust air. The indication light lights up at "LOW" (low speed) and "HIGH" (high speed).
-
Press the "SWING" button to activate the swing position. This leaves the air flow from the left move to the right.
ATTENTION:
- When the internal water collection tray is full, the device stops functioning, and the indication light lights up on the control panel at "WATER FULL". You have to empty the water collection tray before you can continue using the device (see 'CLEANING AND MAINTENANCE – Water drainage').
- If you often use the device to dehumidify the air, you can also use the continuous drainage (see 'CLEANING AND MAINTENANCE – Water drainage').
USAGE - Sleep function
The device has a sleep function. If you turn on this function, the device will operate in its most silent and energy saving mode.
ATTENTION:
The sleep function only works in the "COOL" mode.
-
Press the button "SLEEP" (figure 1, H) to turn on the sleep function. The device switches to the lowest and most energy saving mode.
-
Press the button "SLEEP" again to turn off the sleep function.
ATTENTION:
After turning off the sleep fuction the device remains in the "COOL" mode.
USAGE - Timer function
The device has a time switch with which you can automatically turn the device on or off at the end of a set time.
Automatically turning on
When the device is turned off:
- Press the button "TIMER" (figure 1, C). The display starts to flicker.
- Use the "TIMER" button to set the switch-on time between 1 and 24 hours.
- Wait until the display (A) stops flickering. The switch-on time is set.
- Press the button "TIMER" again to adjust the switch-on time if desired.
Automatically turning off
When the device is turned on:
- Press the button "TIMER" (figure 1, b). The display starts to flicker.
- Use the "TIMER" button to set the switch-on time between 1 and 24 hours.
- Wait until the display (A) stops flickering. The switch-off time is set.
- Press the button "TIMER" again to adjust the switch-off time if desired.
USAGE - Remote control
The device can also be controlled with the included remote control. The remote control requires two AAA-batteries (not included). Open the battery compartment on the underside, place the batteries and close the lid. The buttons on the remote control function the same as the buttons on the control panel.
For an optimal functioning:
- Make sure the distance between the ventilator and the remote control isn't greater than 6 metres.
- Aim the remote control at the device and make sure the direction angle is smaller than 30 degrees.
CLEANING AND MAINTENANCE - General
After a period of time, dust can get into the rosters and the slats of the device.
- Turn off the device and pull the plug from the socket.
- Remove the dust of the rosters and slats with a hand brush and/or vacuum cleaner.
- Clean the casing with a soft, moist cloth. Never immerse the device in water. Make sure no moist can get into the electrical connections.
CLEANING AND MAINTENANCE - Water drainage
The device has an internal water collection tray. When it is full, the device stops functioning and the indication light lights up on the control panel at "WATER FULL".
-
Turn off the device and pull the plug from the socket.
-
Place the device on an elevation, and place a bucket or other kind of collection tray underneath the drain hole of the water collection tray.
-
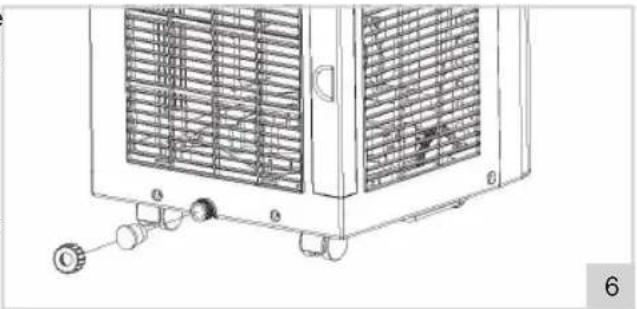
Unscrew the lid and plug of the drain hole (figure 1, No. 12), see figure 6. The water streams from the water collection tray in the bucket.
-
If the water collection tray is empty, put the lid and plug back in the drain hole, and make sure it is properly closed.
natural_image
Line drawing of a front-mounted air conditioner unit with cooling fins and attached sensors (no text or symbols)ATTENTION:
- Carefully move the device and keep it upright at all times, to prevent spillage of the water over the brim of the internal water collection tray. During emptying, you can slant the device slightly to remove the last water from the water collection tray.
- If the bucket, or other kind of collection tray, cannot collect all the water at the same time, put the lid and plug of drain hole back. Empty the bucket and repeat the steps.
Continuous drainage
If you often use the device to dehumidify the air, you can also use the continuous drainage.
-
Turn off the device and pull the plug from the socket.
-
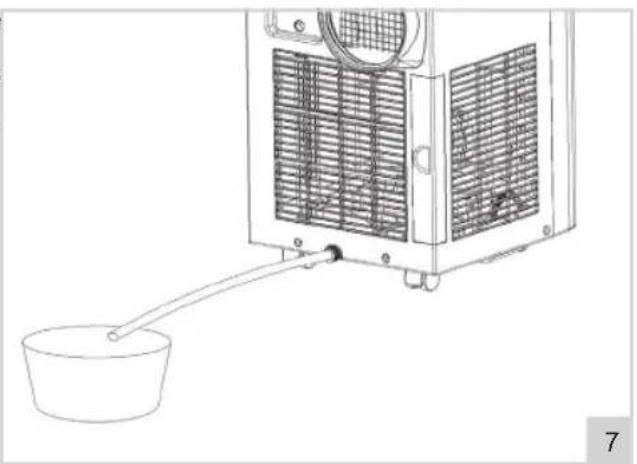
Unscrew the lid and plug from the continuous drain hole (figure 1 No. 6), see figure 7.
-
Connect a drainage hose (not included) to the continuous drain hole (zie figuur 7), and make sure the end of the hose is placed in a bucket, or other kind of collection tray.
-
Use the device as prescribed in this manual.
natural_image
Line drawing of a refrigerator with a bucket being inserted, no text or symbols presentCLEANING AND MAINTENANCE - Cleaning the filter
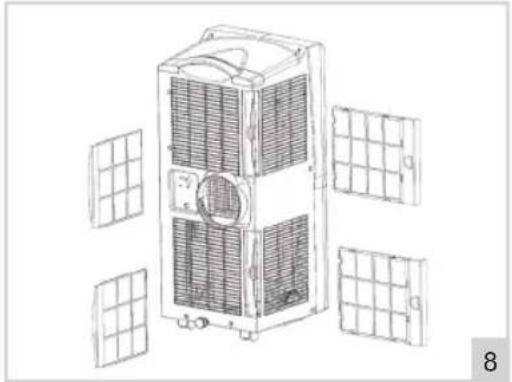
For an optimal result, you have to clean the 4 filters every two weeks, and replace at least 1x per year, or more often if the filter is visibly full. Also clean the filter before you store it for longer periods of time, or when you use it again after a long time.
-
Turn off the device and pull the plug from the socket.
-
Remove the filter from the back of the device (see figure 8).
-
Rinse the filter with lukewarm water, or have it soak in soapy water.
-
Let the filter dry properly.
-
Put the cleaned (or new) filter back in the device.
ATTENTION:
- If the filter has not dried properly, water can enter the device. This could cause (electrical) damage.
natural_image
Technical line drawing of a multi-tiered industrial air conditioner unit with grid panels, no text or symbols presentPROBLEM SOLVING
| Problem Possible | cause Advised solution | |
| The air-conditioning is not functioning | There is no electricityThe room temperature is lower than the set cooling temperatureIn the cooling mode: the room temperature is too low or too highIn the dehumidifying mode: the room temperature is too lowThe device is standing in sunlight | Check whether the socket the device is connected to, has electricityChange the set cooling temperatureThe device optimally functions at a room temperature between 7°C and 35°CThe device optimally functions at a room temperature of 17°C and higherMove the device into the shade |
| Cooling is not functioning properly | Doors or windows are openCentral heating or other sources of heatThe filter is dirty or cloggedThe inlets or outlets are blocked | Close open doors and windowsTurn off the heatingClean the filterRemove obstructions |
| The device makes a lot of noise | The device is not placed on a stable and flat surface | Place the device on a stable and flat surface |
| Compressor does not function | The device is overheated Wait | a couple of minutes until the temperature has lowered and restart the device |
| Remote control does not work | The batteries are emptyThe distance between device and remote control is too bigThe remote control is not aimed at the device | Replace the batteriesStand closer to the deviceAim the remote control at the device |
| Display indicates ‘E1’ | The outlet temperature sensor does not function properly | Have the outlet temperature sensor checked by a professional |
| Display indicates ‘E2’ | The room temperature sensor does not function properly | Have the room temperature sensor and switches checked by a professional |
WARRANTY CONDITIONS
Bestron offers a 60-month warranty on this equipment against defects resulting from manufacturing and/or material errors, subject to the following conditions.
-
No labour or material costs will be charged during this warranty period.
-
Any repairs carried out under the warranty will not extend the warranty period.
-
Faulty parts, or in the event of exchange, the faulty equipment itself, will automatically become the property of Bestron.
-
The warranty is valid for the first buyer only and is non-transferable.
-
The warranty is not valid for damage caused by:
- Accidents
- Improper use
- Wear and tear
- Neglect
- Faulty installation
- Connection to a different mains voltage than indicated on the type plate
• Unauthorised changes
• Repairs carried out by unqualified third parties
- Use in violation with the applicable statutory, technical or safety standards
- Careless transport without suitable packaging or other protection
- Warranty cannot be claimed:
- For damage during transport
- If the serial number of the appliance is removed or changed
- Items excluded from warranty are:
- Cords
- Lamps
- Glass parts
- Filters
- Batteries
-
The warranty does not entitle the purchaser to compensation for any damage other than replacement or repair of the faulty parts. Bestron cannot in any event be held liable for any indirect or consequential losses caused by or in relation to the equipment it has provided.
-
Claims under a warranty may only be submitted to your (online) retailer or directly to the Bestron Service Department. Never send items without being asked to. We may refuse the parcel and you will be liable for the costs. Contact us first and we tell you how the appliance should be packaged and sent. Each claim under a warranty must be accompanied by the relevant receipt.
SERVICE
If an unexpected problem occurs, please contact the BESTRON service department: www.bestron.com/service
COMPLIMENTI!
natural_image
Warning sign depicting a flame inside a triangle (no text or symbols)R. Neyman
Controllo qualità
| TENSIONE DI RETE 220-240 V | |
| CONSUMO DI ENERGIA 1010 W | |
| QUANTITÀ DI REFRIGERANTE CA. 220 G | |
| TIPO DI REFRIGERANTE R 290 | |
| INTERRUTTORE DIFFERENZIALE CONSIGLIATO 30 MA | |
| PROTEZIONE IN LOCO 16 A |
natural_image
Diagram of a dual-chamber air conditioning unit with pipe connection, showing internal structure and directional arrows (no text or symbols)natural_image
Line drawing of a front-mounted air conditioner unit with cooling fans and attached control knobs (no text or symbols)ATTENZIONE:
natural_image
Line drawing of a portable air conditioner unit with a bucket and handle, no text or symbols presentnatural_image
Technical line drawing of a satellite or spacecraft with visible internal components and four solar panels nearby (no text or symbols)natural_image
Warning sign depicting a flame inside a triangle (no text or symbols)R. Neyman
Control de calidad
-
Manejar
-
Panel de control:
A. Pantalla LED
natural_image
Technical illustration of a heat exchanger unit with pipe connection and directional arrows indicating assembly (no text or symbols)natural_image
Line drawing of a front-mounted air conditioner unit with cooling fins and mounting feet (no text or symbols)ATENCIÓN:
natural_image
Line drawing of a refrigerator with a bucket being inserted, no text or symbols presentLIMPIEZA Y MANTENIMIENTO - Limpieza del filtro
natural_image
Technical line drawing of a multi-tiered industrial air conditioner unit with four grid panels, no text or symbols presentNEED HELP? CHAT WITH US! WHATSAPP CUSTOMER SERVICE

BESTRON.COM/WHATSAPP

- AAC9000 INSTRUCTION MANUAL
- ACHTUNG:
- DÉCLARATION DE CONFORMITÉ CE
- WAT U MOET WETEN OVER DIT APPARAAT
- WERKING - Algemeen
- LET OP:
- REINIGING EN ONDERHOUD - Filter reinigen
- Defects:
- Children:
- SAFETY INSTRUCTIONS FOR THIS DEVICE WITH FLAMMABLE REFRIGERANT
- WHAT YOU SHOULD KNOW ABOUT THIS APPLIANCE
- Notes:
- ENVIRONMENT
- CE DECLARATION OF CONFORMITY
- OPERATION - General
- INSTALLATION
- INSTALLATION - Installing heat exhaust
- ATTENTION:
- USAGE - Turning on and off
- USAGE - Setting the mode
- Ventilating
- Dehumidifying
- Cooling
- USAGE - Sleep function
- USAGE - Timer function
- Automatically turning on
- Automatically turning off
- USAGE - Remote control
- CLEANING AND MAINTENANCE - General
- CLEANING AND MAINTENANCE - Water drainage
- Continuous drainage
- CLEANING AND MAINTENANCE - Cleaning the filter
- WARRANTY CONDITIONS
- SERVICE
- COMPLIMENTI!
- ATTENZIONE:
- ATENCIÓN:
- LIMPIEZA Y MANTENIMIENTO - Limpieza del filtro
Brand : BESTRON
Model : AAC9000
Category : Air conditioner