
VPL-CWZ10 - Vidéo-projecteur SONY - Free user manual and instructions
Find the device manual for free VPL-CWZ10 SONY in PDF.

| Product Type | Video Projector |
| Brand | Sony |
| Model | VPL-CWZ10 |
| Native Resolution | 1,280 x 800 (WXGA) |
| Light Source | Laser |
| Light Output Modes | Standard, Middle, Extended |
| Zoom | Manual zoom lever |
| Focus | Manual focus lever |
| Keystone Correction | Vertical and Horizontal (electronic) |
| Corner Keystone | Yes (4 corners adjustable) |
| Digital Shrink | Yes (90-100%) |
| Image Flip | HV, H, V, Off |
| Input Terminals | RGB/Y PB PR (Input A), HDMI x2 (Input B, C), Video, Audio, LAN, RS-232C, USB |
| Output Terminal | Audio Out (stereo mini) |
| Built-in Speaker | Yes (mono) |
| Remote Control | RM-PJ8 (with lithium battery) |
| Network | Ethernet (LAN), web browser control |
| Control Protocols | PJLink, ADCP, AMX DDDP, Crestron RoomView |
| Air Filter | Cleanable (floor or ceiling installation) |
| Security | Kensington lock, antitheft bar |
| Menu Languages | Multiple (including English) |
Frequently Asked Questions - VPL-CWZ10 SONY
User questions about VPL-CWZ10 SONY
0 question about this device. Answer the ones you know or ask your own.
Ask a new question about this device
Download the instructions for your Vidéo-projecteur in PDF format for free! Find your manual VPL-CWZ10 - SONY and take your electronic device back in hand. On this page are published all the documents necessary for the use of your device. VPL-CWZ10 by SONY.
USER MANUAL VPL-CWZ10 SONY
natural_image
White ANOS projector with visible lens and ventilation grille (no text or symbols on body)This manual is for those who encounter issues or have questions when using the Data Projector.
Not all models are available in all countries and area. Please check with your local Sony Authorized Dealer.
Before Use
Checking the Supplied Accessories
Inserting the Battery into the Remote Commander
Attaching the Air Filter (For the Customers in India only)
Parts and Controls
Parts and Controls (Main Unit)
Parts and Controls (Connection Terminals)
Parts and Controls (Remote Commander and Control Panel)
Connecting
Precautions When Connecting
Connecting to a Computer
Connecting to a Computer with an RGB Output Terminal
Connecting to a Computer with an HDMI Output Terminal
Connecting to a Computer via a Hub or Router
Connecting to Video Equipment
Connecting to a Video Device with a Video Output Terminal
Connecting to a Video Device with a Y PB PR Output Terminal
Connecting to a Video Device with an HDMI Output Terminal
Connecting to Audio Equipment
Fixing the HDMI Cable to the Projector
Projecting
Turning Power On/Off
Selecting the Menu Language
Projecting Images
Adjusting
Adjusting the Screen Focus
Adjusting the Screen Size
Adjusting the Screen Position
Changing the Screen Aspect Ratio
Correcting a Trapezoidal Screen
Correcting a Vertical Trapezoid
Correcting a Horizontal Trapezoid
Correcting Screen Distortion
Displaying Patterns
Using the Auto Adjustment Function
Useful Functions
Use the Intelligent Setting Function
Using the Digital Zoom Function
Using Eco Mode
Adjustment and Setting Menus
Navigating Menus
Projection Setting Menu
Menu Operation: Intelligent Setting
Menu Operation: Picture Mode
Menu Operation: Reset
Menu Operation: Contrast
Menu Operation: Brightness
Menu Operation: Color
Menu Operation: Hue
Menu Operation: Color Temp.
Menu Operation: Sharpness
Menu Operation: Light Settings
Menu Operation: Expert Setting
Screen Menu
Menu Operation: Aspect
Aspect Ratio
Menu Operation: Adjust Signal
Function Menu
Menu Operation: Presentation timer
Menu Operation: Volume
Menu Operation: Speaker
Menu Operation: Speaker Setting
Menu Operation: Smart APA
Menu Operation: CC Display
Menu Operation: Start Up Image
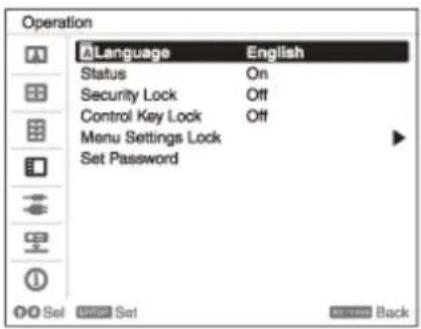
Operation Menu
Menu Operation: Language
Menu Operation: Status
Menu Operation: Security Lock
Menu Operation: Control Key Lock
Menu Operation: Menu Settings Lock
Menu Operation: Set Password
Connection/Power Menu
Menu Operation: Network Setting
Menu Operation: Communication Mode
Menu Operation: Dynamic Range
Menu Operation: Input-A Signal Sel.
Menu Operation: ECO
Menu Operation: Remote Start
Menu Operation: Standby Mode
Menu Operation: Direct Power On
Installation Menu
Menu Operation: Screen Fitting
Menu Operation: V Keystone
Menu Operation: H Keystone
Menu Operation: Corner Keystone
Menu Operation: Digital Shrink
Menu Operation: Image Flip
Menu Operation: High Altitude Mode
Information Menu
Viewing the Projector Information
Using Network Features
Uses for Network Features
Displaying the Control Window of the Projector with a Web Browser
Operating the Control Panel
Using the E-mail Report Function
Configuring the Network Settings of the Projector
Setting Projector Control Protocol
Setting Advertisement
Setting PJ Link
Setting PJ Talk
Setting ADCP
Setting AMX DDDP/Crestron Room View
Resetting the Network Settings
Setting the Date and Time
Using the Software Update Function
Using https Communication
Configuring https Communication
Connecting with https for the First Time
Installing a CA Certificate to Your Computer
Deleting a CA Certificate Installed to Your Computer
Precautions
Precautions
On Installation
On Cleaning the Lens and the Cabinet
On Illumination
On Heat Dissipation
On Screen
On Fan
On Inspection of Light Source Related Parts
On Disposing Used Products
On LCD Projector
On condensation
Notes on Security
Do not place this product close to medical devices
Disclaimer
Cleaning the Air Filter
Cleaning the Air Filter (For Installing to the Ceiling) (For the Customers in India only)
Updating Software
Specifications
Specifications
Pin Assignment
Pin Assignment (HDMI Terminal)
Pin Assignment (RGB Input Terminal)
Pin Assignment (RS-232C Terminal)
Pin Assignment (USB Terminal)
List of Compatible Signals
Compatible Signal List (Computer Signal)
Compatible Signal List (Video Signal)
Projection Distance
Projection Distance
Projection Distance/Projection Distance Formula (VPL-CWZ10)
Projection Distance/Projection Distance Formula (VPL-CXZ10)
Error Handling
Reading the Indicator
Message List
Troubleshooting
No Power
No Image is Displayed
Cannot Connect to Computer
No On-screen Display
Screen Aspect Ratio is Strange/Screen Display is Small/Part of Image Not Displayed
Trapezoidal Screen
Screen Distortion
Screen is Too Dark/Bright
Blurry Screen
Screen Noise
No Sound
Remote Commander Does Not Function
Loud Fan
Others
Notice on the Software
Notifications Related to GNU GPL/LGPL-applicable Software
Other Software
Trademarks
5-014-280-12(1) Copyright 2020 Sony Corporation
Checking the Supplied Accessories
Confirm that the following components are included. The () indicates the quantity of the component.
• Remote Commander (RM-PJ8) (1)
• Lithium battery (CR2025) (1)
The battery is already installed. Before using the Remote Commander, remove the insulation film.
• AC power cord (1)
• Mini D-sub 15-pin cable (1.8 m) (1)
(1-970-584-11/Sony)
• Air filter cover (1) ^1
• Dust cover assembly (1) ^1
- Setup Guide (1)
*1 For the customers in India only
5-014-280-12(1) Copyright 2020 Sony Corporation
Inserting the Battery into the Remote Commander
The lithium battery is attached to the Remote Commander at the time of purchase. Before using the Remote Commander, remove the insulation film.
If the Remote Commander can no longer be operated, exchange the lithium battery for a new one by the following procedure.
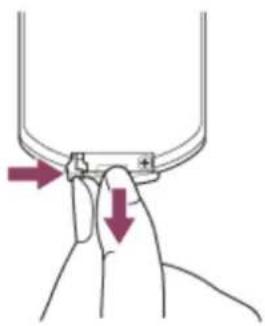
1 Pull out the lithium battery compartment.
Pull the battery compartment toward you while releasing the lock.
natural_image
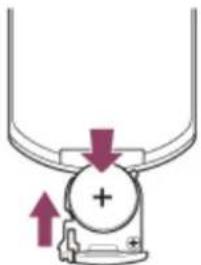
Hand holding a small mechanical component with two red arrows indicating force direction (no text or symbols)2 Insert a lithium battery.
The lithium battery should be placed in the compartment with the plus side facing up.
natural_image
Diagram of a mechanical or electrical component with arrows indicating direction (no text or symbols)3 Close the lithium battery compartment.
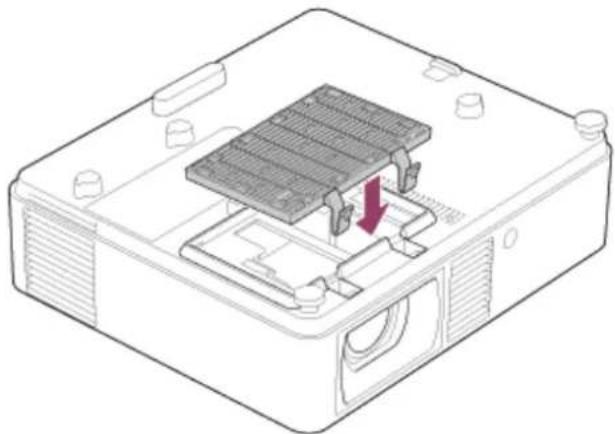
Attaching the Air Filter (For the Customers in India only)
Note
- Make sure to remove the protective cover on the unit before attaching the air filter to the unit.
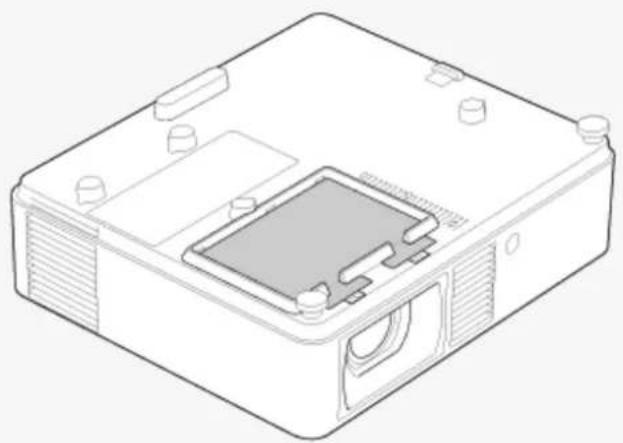
natural_image
Isometric line drawing of a rectangular electronic device with internal components and mounting holes (no text or symbols)The supplied accessories required vary depending on the installation method.
For installing to the floor

Remove the air filter (B) from the dust cover assembly (A), and then attach the air filter to the air filter cover (C).
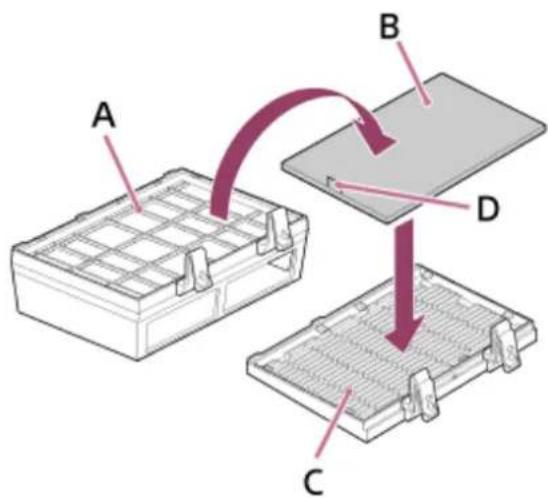
Pull the pull stick (D) upwards when removing the air filter from the dust cover assembly.
When attaching the air filter to the air filter cover, make sure the correct side is being attached so that the pull stick is protruding from the air filter.

Attach the air filter cover to the unit by pushing the two levers on it.
natural_image
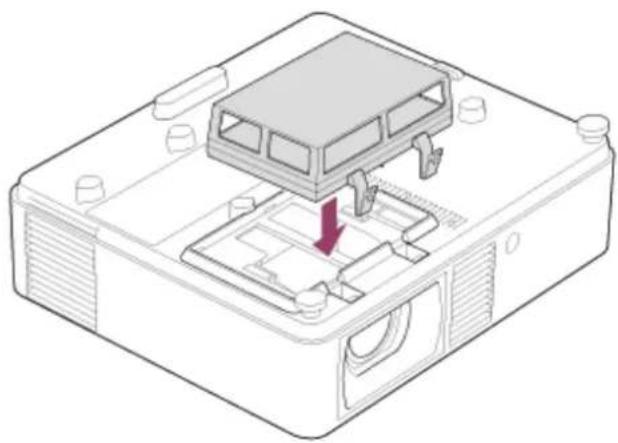
Technical line drawing of a computer chassis with a highlighted internal component (no text or symbols)For installing to the ceiling
Attach the dust cover assembly to the unit by pushing the two levers on it.
natural_image
Isometric technical diagram of a device housing with internal components and a red arrow indicating a specific part (no text or symbols present)Note
- When installing to the floor, securely attach the air filter to the air filter cover, taking care not to hit the hook of the air filter cover. If the air filter is attached to the air filter cover incorrectly, malfunction may occur.
- When installing to the ceiling, securely attach the dust cover assembly to the unit. Incorrect attachment of the dust cover assembly may cause a malfunction.
5-014-280-12(1) Copyright 2020 Sony Corporation
Parts and Controls (Main Unit)
Top/Front /Right
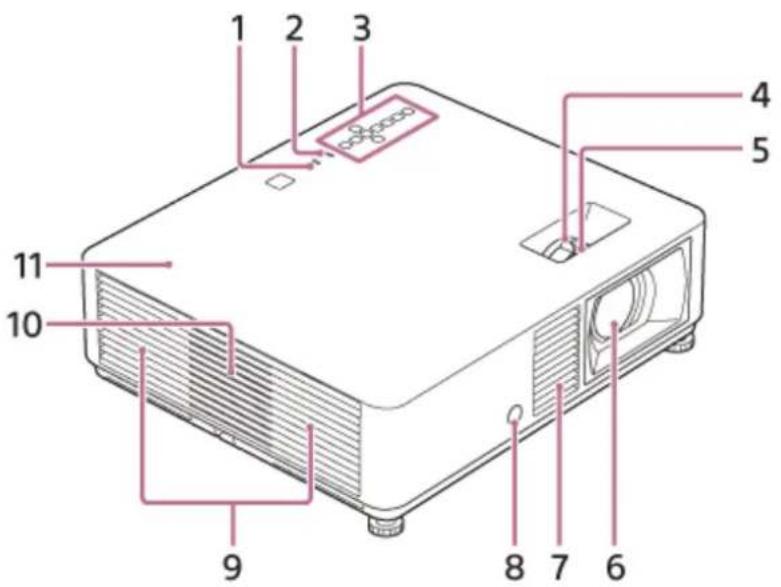
ON/STANDBY indicator1.
WARNING indicator2.
Control panel3.
Zoom lever4.
Focus lever5.
Projection lens6.
Ventilation holes (intake)7.
Remote control receiver8.
Ventilation holes (exhaust)9.
Speaker10.
Top cover11.
Rear/Bottom
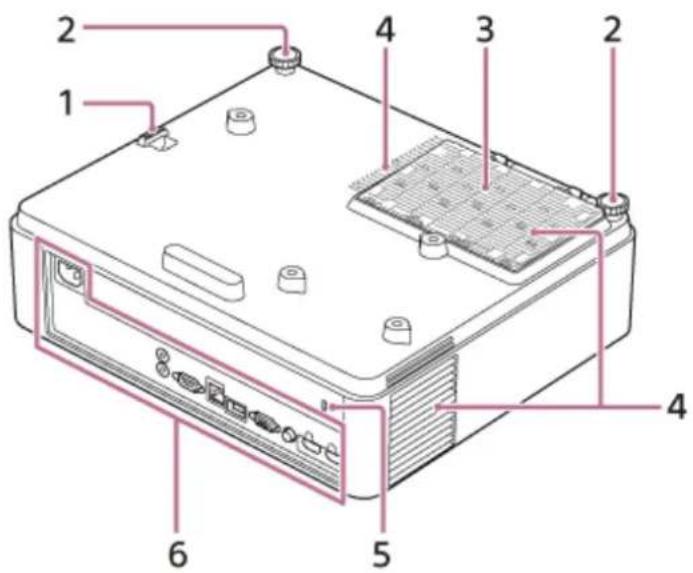
1. Antitheft bar
For attaching theft prevention chains (wires) and such sold commercially.
Front feet (adjustable)2.
Air filter cover3.
Ventilation holes (intake)4.
5. Antitheft lock
For attaching theft prevention cables manufactured by Kensington.
For details, visit the Kensington website.
http://www.kensington.com/
Terminals6.
Caution
Do not place anything near the ventilation holes. The temperature may rise inside the unit, leading to a possible malfunction or fire. Do not place your hand or easily deformable objects near the ventilation holes (exhaust) and its vicinity. Doing so may result in the burning or deformation of these objects.
Related Topic
• Parts and Controls (Connection Terminals)
• Parts and Controls (Remote Commander and Control Panel)
• Cleaning the Air Filter
- Reading the Indicator
5-014-280-12(1) Copyright 2020 Sony Corporation
Parts and Controls (Connection Terminals)
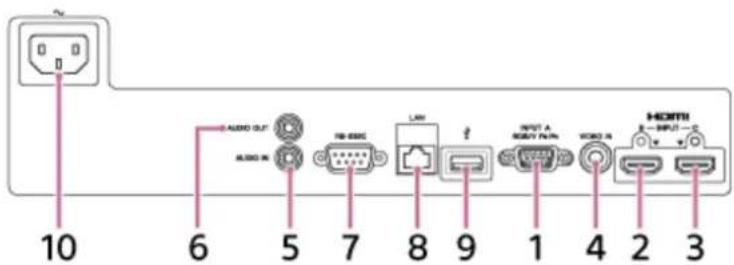
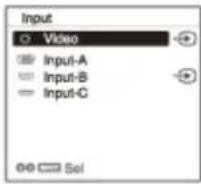
- Input A (INPUT A)
Video: RGB/Y PB PR input terminal (RGB/Y PB PR)
- Input B (INPUT B)
Video: HDMI input terminal (HDMI)
Audio: HDMI input terminal (HDMI)
- Input B (INPUT C)
Video: HDMI input terminal (HDMI)
Audio: HDMI input terminal (HDMI)
- Video (VIDEO IN)
Video: Video input terminal
- Audio (AUDIO IN)
Audio: Audio input terminal
- Audio (AUDIO OUT)
Audio: Audio output terminal
- RS-232C terminal (RS-232C)
A control terminal compliant to RS-232C. Connect to the RS-232C computer terminal with an RS-232C cable (cross). LAN terminal8.
- USB terminal (Type A) ( ◀ )
Terminal for software update.
- AC IN socket ( ∼ )
Connect the supplied AC power cord.
Related Topic
- Connecting to a Computer with an RGB Output Terminal
- Connecting to a Computer with an HDMI Output Terminal
- Connecting to a Computer via a Hub or Router
- Connecting to a Video Device with a Video Output Terminal
- Connecting to a Video Device with a Y PB PR Output Terminal
- Connecting to a Video Device with an HDMI Output Terminal
• Connecting to Audio Equipment
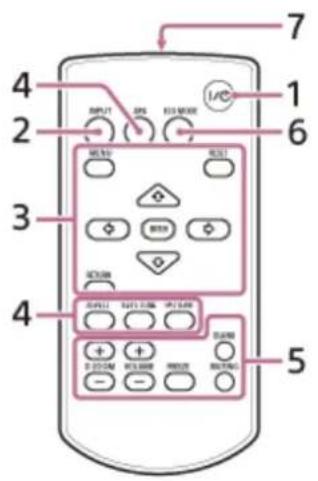
Parts and Controls (Remote Commander and Control Panel)
Remote Commander
Control panel
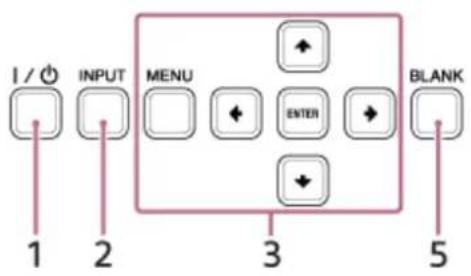
- | / (On/Standby) key
Turn on/Standby.
- INPUT (Input selection) key
Select the input.
- MENU (Menu) key
RESET (Reset) key
ENTER (Enter)/ ↑ / ↓ / ← / → (Arrow) keys
RETURN (Return) key
Perform menu operations, etc.
- ASPECT (Aspect) key
Switch the aspect ratio of the projected image.
KEYSTONE (Trapezoidal correction) key/PATTERN (Pattern) key
Adjust the projected image.
APA (Auto Pixel Alignment) key
Adjust the input signal to fit to the screen automatically when there is a computer signal being input from the RGB input terminal (Input A).
- D ZOOM (Digital zoom) +/- key
Zoom in or out on a part of the projected image. This can be used when there is a computer signal being input.
However, depending on the input signal resolution, it may not be usable.
BLANK (Eliminate image) key
Temporarily turn off the projected image. Press again to release.
MUTING (Mute) key
When sound is output, temporarily mute the audio. Press again to release.
VOLUME (Sound volume) +/- key
Adjust the sound volume.
FREEZE (Freeze) key
Temporarily freeze the image. Press again to release. This can be used when there is a computer signal being input.
6. ECO MODE (Eco Mode) key
Allows you to set to Eco Mode.
Infrared transmitter7.
Remote Commander Operation
- Direct the Remote Commander toward the remote control receiver.
- The shorter the distance between the Remote Commander and the projector, the wider the angle within which the Remote Commander can control the projector.
- If there is any obstruction between the Remote Commander and the remote control receiver on the projector, the projector may not be able to receive signals from the Remote Commander.
Related Topic
• Turning Power On/Off
- Projecting Images
• Using the Digital Zoom Function
• Using Eco Mode
- Navigating Menus
5-014-280-12(1) Copyright 2020 Sony Corporation
Precautions When Connecting
• Turn off all devices before making any connections.
• Use the proper cables for each connection.
- Firmly insert the cable plugs. Loose connections may reduce the performance of picture signals or cause a malfunction. When unplugging a cable, be sure to grip the plug, not the cable itself.
- For more information, refer also to the instruction manual of the device to be connected.
• Use a no-resistance audio cable.
5-014-280-12(1) Copyright 2020 Sony Corporation
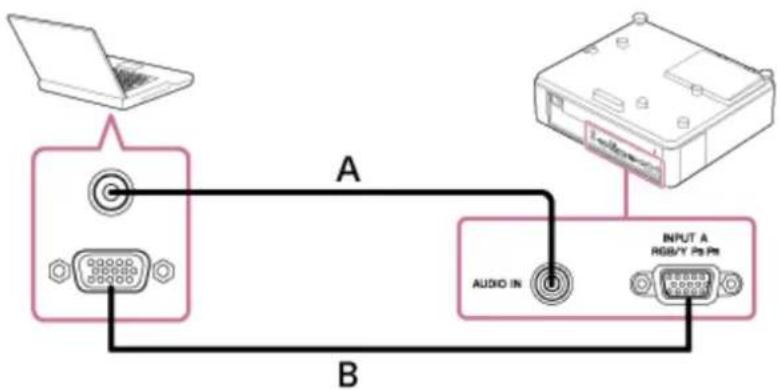
Connecting to a Computer with an RGB Output Terminal
Connect the INPUT A terminal to a computer's RGB output terminal and the AUDIO IN terminal to a computer's audio output terminal.
flowchart
graph TD
    A["Laptop"] -->|A| B["Audio IN"]
    B -->|B| C["RGB/Y PS Pt"]
    C --> D["Output"]
A: Audio cable (stereo mini plug) (not supplied)
B: Mini D-sub 15-pin cable (supplied)
Hint
- For the screen settings of your computer, it is recommended that you set the resolution of an external monitor as below;
— VPL-CWZ10: 1,280 × 800 pixels
— VPL-CXZ10: 1,024 × 768 pixels
Related Topic
• Parts and Controls (Connection Terminals)
• Precautions When Connecting
Connecting to a Computer with an HDMI Output Terminal
Connect the INPUT B terminal or INPUT C terminal to a computer's HDMI output terminal.
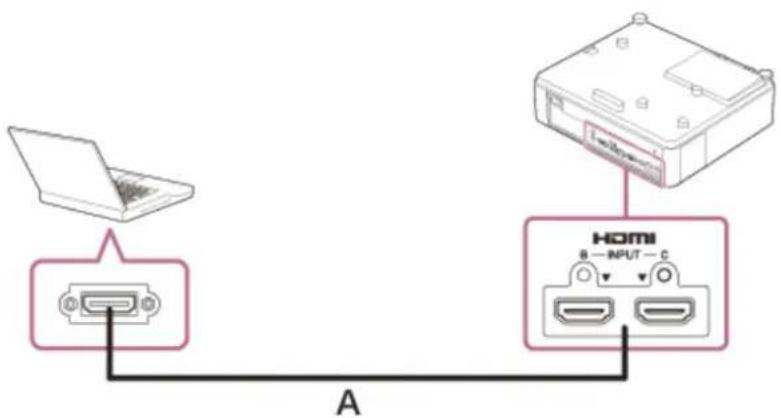
A: HDMI cable (not supplied)
Note
- Use an HDMI-compatible device with the HDMI Logo.
Use a high speed HDMI cable(s) on which the cable type logo is specified. (Sony products are recommended.) - The HDMI terminal of this projector is not compatible with DSD (Direct Stream Digital) signals and CEC (Consumer Electronics Control) signals.
Related Topic
• Parts and Controls (Connection Terminals)
• Precautions When Connecting
5-014-280-12(1) Copyright 2020 Sony Corporation
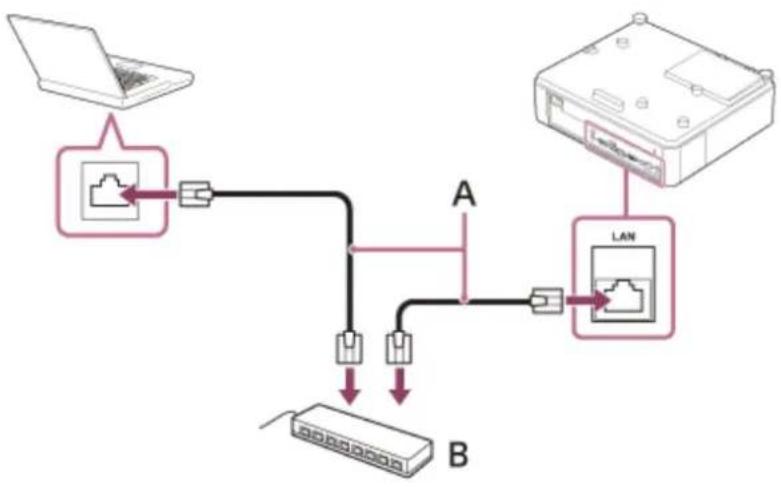
Connecting to a Computer via a Hub or Router
Connect the LAN terminal and the computer LAN terminal via a hub or router.
flowchart
graph TD
    A["Laptop"] --> B["Switch"]
    B --> C["Server Port B"]
    D["LAN"] --> E["Server Port B"]
    C --> F["Port A"]
    E --> G["Port B"]
A : LAN cable (straight) (not supplied)
B: Hub or router, etc.
Note
- Connect the projector to the network that is constructed to control the access from the internet, such as LAN. If the projector is connected directly to the internet, the security risk is increased.
- When you monitor and control the projector via the network, display the control window of the projector with a web browser and enable the desired control protocol.
Related Topic
• Parts and Controls (Connection Terminals)
• Precautions When Connecting
- Setting Advertisement
Setting PJ Link
- Setting PJ Talk
- Setting ADCP
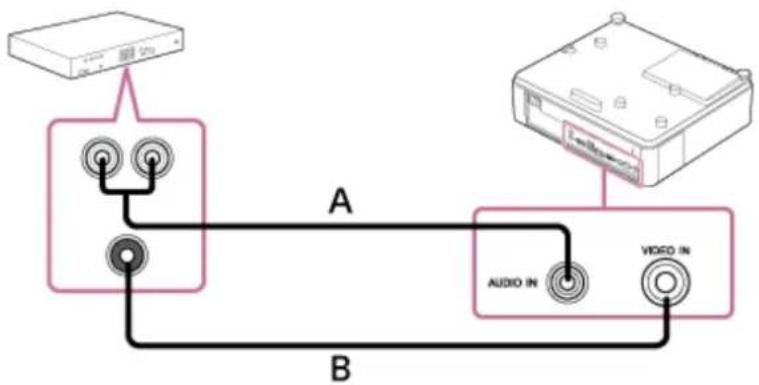
Connecting to a Video Device with a Video Output Terminal
Connect the VIDEO IN terminal to a video device's video output terminal, and the AUDIO IN terminal to a video device's audio output terminal.
flowchart
graph TD
    A["Device 1"] -->|A| B["Port A"]
    C["Device 2"] -->|B| B
    B --> D["Audio IN"]
    B --> E["Video IN"]
A : Audio cable (Pin plug x 2 - Stereo mini plug) (not supplied)
B : Video cable (not supplied)
Related Topic
• Parts and Controls (Connection Terminals)
• Precautions When Connecting
5-014-280-12(1) Copyright 2020 Sony Corporation
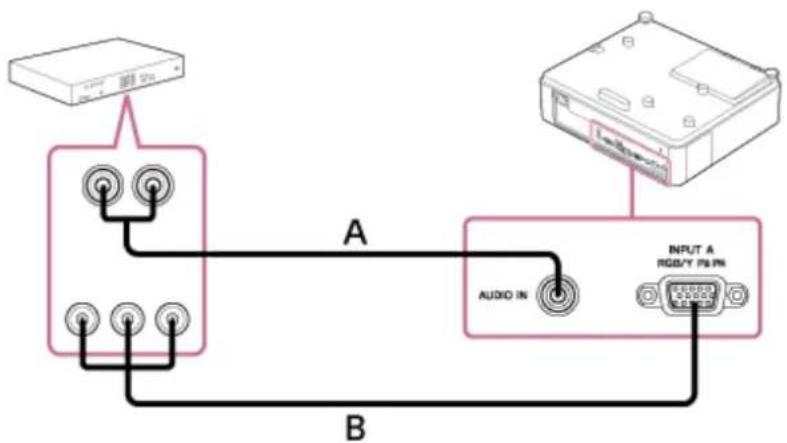
Connecting to a Video Device with a Y PB PR Output Terminal
Connect the INPUT A terminal to a video device's Y PB PR output terminal, and the AUDIO IN terminal to a video device's audio output terminal.
flowchart
graph TD
    A["Device"] -->|A| B["Audio IN"]
    A -->|B| C["Output"]
    D["Device"] -->|A| B
    D -->|B| C
A: Audio cable (Pin plug x 2 - Stereo mini plug) (not supplied)
B: Component - Mini D-sub 15-pin cable (not supplied)
Related Topic
• Parts and Controls (Connection Terminals)
• Precautions When Connecting
5-014-280-12(1) Copyright 2020 Sony Corporation
Connecting to a Video Device with an HDMI Output Terminal
Connect the INPUT B terminal or INPUT C terminal to a video device's HDMI output terminal.

A: HDMI cable (not supplied)
Note
- Use an HDMI-compatible device with the HDMI Logo.
Use a high speed HDMI cable(s) on which the cable type logo is specified. (Sony products are recommended.) - The HDMI terminal of this projector is not compatible with DSD (Direct Stream Digital) signals and CEC (Consumer Electronics Control) signals.
Related Topic
• Parts and Controls (Connection Terminals)
• Precautions When Connecting
5-014-280-12(1) Copyright 2020 Sony Corporation
Data Projector
VPL-CWZ10/CXZ10
Connecting to Audio Equipment
By connecting the AUDIO OUT terminal and the audio input terminal of speakers with built-in amplifiers or other such devices, you can output the audio fed into the projector through the audio device. When [Speaker Setting] is set to [Always On] and the light is off, Input A becomes active.
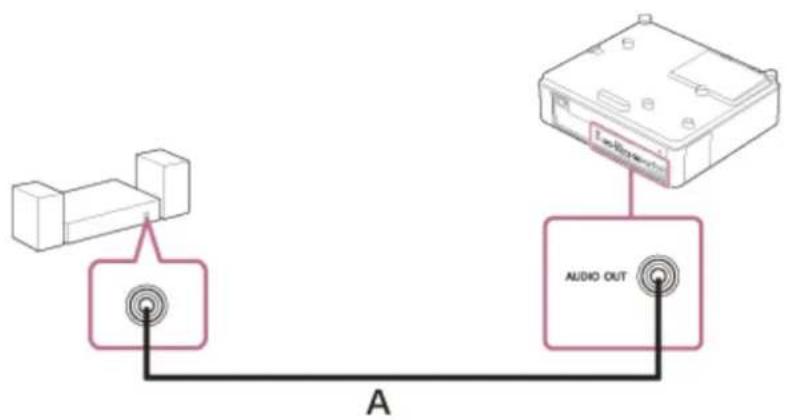
A: Audio cable (Stereo mini plug) (not supplied)
Related Topic
• Parts and Controls (Connection Terminals)
• Precautions When Connecting
- Menu Operation: Speaker Setting
5-014-280-12(1) Copyright 2020 Sony Corporation
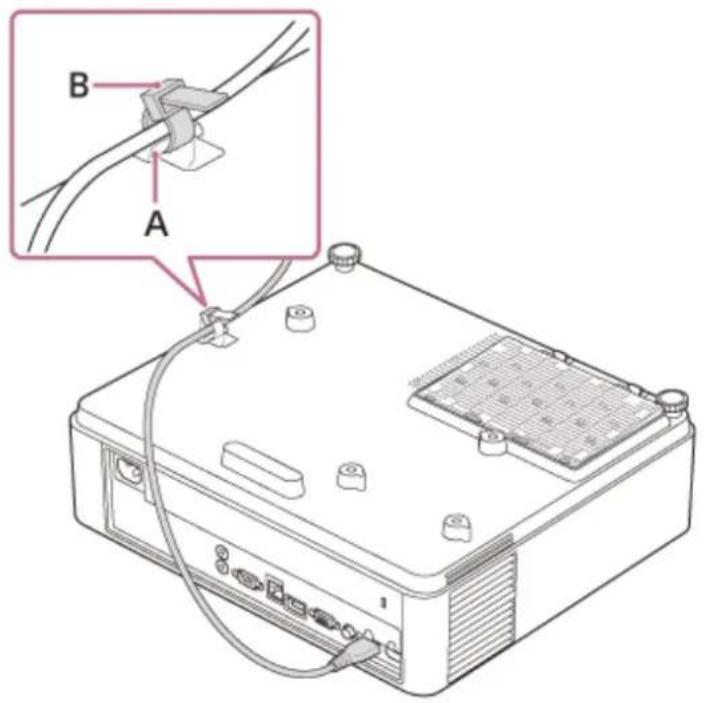
Fixing the HDMI Cable to the Projector
If you wish to fix the HDMI cable to the projector, attach a commercially available cable tie or similar item (B) to the antitheft bar (A) on the bottom surface, and secure it as shown in the image.
Related Topic
• Parts and Controls (Main Unit)
5-014-280-12(1) Copyright 2020 Sony Corporation
Turning Power On/Off
1 Plug the AC power cord into a wall outlet.
2 Turn on the projector.
Press the 1/ (On/Standby) key on the main unit or the Remote Commander.
Turning Power Off
- Press the I/ (On/Standby) key on the main unit or the Remote Commander.
The projector starts shutdown and turns off.
For long-term use, turn off the projector when not in use.
Unplug the AC power cord from the wall outlet.2.
Related Topic
• Parts and Controls (Main Unit)
• Parts and Controls (Remote Commander and Control Panel)
5-014-280-12(1) Copyright 2020 Sony Corporation
Selecting the Menu Language
The factory setting for the language for displaying menus, messages, etc. is English. To change the on-screen language, proceed as follows:
1 Press the MENU key to display the menu screen.
If the display cannot be properly seen, adjust the focus, size, and position of the projected image.
2 Select the menu language.
- Press the (Up) or Down) key to select [Operation] (Operation), then press the ENTER key.
- Press the (Up) or Down) key to select [Language] (Language), then press the ENTER key.
- Press the / (Up/Down/Left/Right) key to select a language, then press the ENTER key.
3 Press the MENU key to turn off the menu screen.
Related Topic
- Menu Operation: Language
SONY
Help Guide
Data Projector
VPL-CWZ10/CXZ10
Projecting Images
The size of the projected image changes depending on the distance from the projector to the screen (projection distance). Install the projector so that it matches the screen size.
1 Press the | / (On/Standby) key and turn on the projector.
2 Turn on the connected device.
3 Select the input source.
Press the INPUT key on the main unit or the Remote Commander to display the input select window. Press the INPUT key repeatedly or press the / p/Down) key to select the image to be projected.
4 Change the computer screen output destination to an external display.
How the output destination is changed varies depending on the computer. Ex.)

5 Adjust the focus, size and position of the projected image.
Related Topic
• Projection Distance
• Adjusting the Screen Focus
• Adjusting the Screen Size
• Adjusting the Screen Position
SONY
Help Guide
Data Projector
VPL-CWZ10/CXZ10
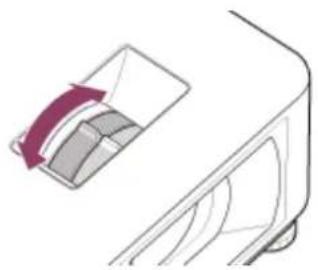
Adjusting the Screen Focus

natural_image
Black-and-white still life photo showing a fruit arrangement on a table with a red arrow pointing to the right image (no text or symbols)Turn the focus lever to adjust the focus.
natural_image
Diagram of a mechanical component with a curved arrow indicating rotation or movement (no text or symbols)Related Topic
• Parts and Controls (Main Unit)
5-014-280-12(1) Copyright 2020 Sony Corporation
SONY
Help Guide
Data Projector
VPL-CWZ10/CXZ10
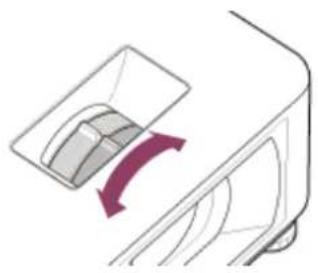
Adjusting the Screen Size
natural_image
Black-and-white still life photo of assorted fruits and berries on a table, with no visible text or symbols.Turn the zoom lever to adjust the size.
natural_image
Diagram of a mechanical component with a highlighted section (no text or symbols)Related Topic
• Parts and Controls (Main Unit)
5-014-280-12(1) Copyright 2020 Sony Corporation
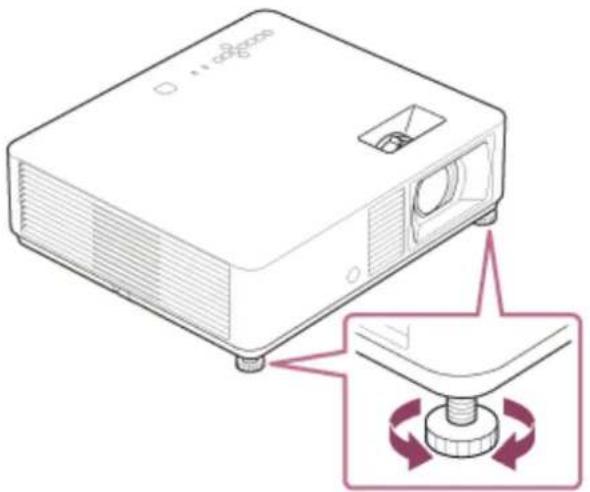
Adjusting the Screen Position
Adjust the position of the projected screen by changing the angle of the projector using the front feet (adjustable).
natural_image
Diagram of a projector with a button and rotating button, showing internal components and rotation arrows (no text or symbols)Note
- When adjusting the front feet (adjustable), be careful not to get your fingers caught.
- Do not forcefully press down on the projector with the front feet (adjustable) extended. This may result in malfunction.
Related Topic
• Parts and Controls (Main Unit)
5-014-280-12(1) Copyright 2020 Sony Corporation
SONY
Help Guide
Data Projector
VPL-CWZ10/CXZ10
Changing the Screen Aspect Ratio
Pressing the ASPECT key on the Remote Commander switches the aspect ratio of the projected screen.
Hint
The screen aspect ratio can also be set from [Aspect] in the 📄 [Screen] menu.
Related Topic
• Parts and Controls (Remote Commander and Control Panel)
- Menu Operation: Aspect
5-014-280-12(1) Copyright 2020 Sony Corporation
Correcting a Vertical Trapezoid
If the screen is trapezoidal, perform a keystone correction.
1 Press the KEYSTONE key on the Remote Commander once.
The adjustment menu will be displayed.
You can also display the adjustment menu from [V Keystone] in the ☐ [Installation] menu.
2 Adjust the value with the ↑/↓ (Up/Down/Left/Right) keys.
A: Increasing the value in the positive direction makes the upper side screen width smaller.
B: Increasing the value in the negative direction makes the lower side screen width smaller.


Press the RESET key to return to the non-corrected state.
Note
- Because keystone correction is an electronic form of correction, the image quality may be reduced.
- If vertical correction (V keystone correction) and horizontal adjustment (H keystone correction) are performed at the same time, the values in each adjustment menu may not reach the maximum.
- If you press the KEYSTONE key on the Remote Commander and switched between keystone correction and corner keystone correction, the adjustment menu value and the screen state may not match until the adjustment begins.
Related Topic
- Parts and Controls (Remote Commander and Control Panel)
- Menu Operation: V Keystone
Correcting a Horizontal Trapezoid
If the screen is trapezoidal, perform a keystone correction.
1 Press the KEYSTONE key on the Remote Commander twice.
The adjustment menu will be displayed.
You can also display the adjustment menu from [H Keystone] in the ☐ [Installation] menu.
2 Adjust the value with the ↑/↓ (Up/Down/Left/Right) keys.
A: Increasing the value in the negative direction makes the left side of the screen smaller.
B: Increasing the value in the positive direction makes the right side of the screen smaller.

flowchart
graph LR
    A[" "] -->|A| B[" "]
    B <-->|B| C[" "]
Press the RESET key to return to the non-corrected state.
Note
- Because keystone correction is an electronic form of correction, the image quality may be reduced.
- If vertical correction (V keystone correction) and horizontal adjustment (H keystone correction) are performed at the same time, the values in each adjustment menu may not reach the maximum.
- If you press the KEYSTONE key on the Remote Commander and switched between keystone correction and corner keystone correction, the adjustment menu value and the screen state may not match until the adjustment begins.
Related Topic
- Parts and Controls (Remote Commander and Control Panel)
- Menu Operation: H Keystone
Correcting Screen Distortion
You can correct image distortion using the corner keystone function.
1 Press the KEYSTONE key on the Remote Commander three times.
The guide will be displayed.
You can also display the guide menu from [Corner Keystone] - [Adjust] in the 里 [Installation] menu.
2 Select the corner you wish to correct using the ↑ / ↓ (Up/Down/Left/Right) keys.
3 Press the ENTER key.
The selected corner becomes a cursor display ( ◇ ).
natural_image
Abstract geometric pattern with layered rectangular shapes and horizontal lines (no text or symbols)Cursor display example:

Adjustable in all directions
Only adjustable horizontally or downward.
4
Adjust the corner position with the ↑ / ↓ (Up/Down/Left/Right) keys.
When a distortion adjustment reaches the limit, the cursor will disappear.
Press the RESET key to return to the non-corrected state.
Related Topic
- Parts and Controls (Remote Commander and Control Panel)
- Menu Operation: Corner Keystone
5-014-280-12(1) Copyright 2020 Sony Corporation
Displaying Patterns
Pressing the PATTERN key on the Remote Commander allows you to display the ruled line pattern, lattice pattern, or adjustment pattern on the projected screen. Every time you press the PATTERN key, the pattern to be displayed switches.
Continue pressing the PATTERN key to return to the original screen.
Hint
- The ruled line pattern and lattice pattern can be used as auxiliary lines when drawing text and figures on a whiteboard or blackboard without using a computer.
- There are 2 types of color for the lines of the ruled line pattern and lattice pattern so you can select a line that is easier to see according to the color of the projected screen.
Related Topic
• Parts and Controls (Remote Commander and Control Panel)
5-014-280-12(1) Copyright 2020 Sony Corporation
Using the Auto Adjustment Function
When feeding a computer signal from the RGB input terminal (Input A), pressing the APA (Auto Pixel Alignment) key on the Remote Commander allows the projected screen phase, pitch, and shift to be automatically adjusted.
Pressing the APA key once more during adjustment will cancel the adjustment.
Hint
- APA can also be performed from [Adjust Signal] in the 🕒 [Screen] menu.
- Selecting [On] from [Smart APA] in the ☐[Function] menu will automatically perform APA when a computer signal is fed from the RGB input terminal (Input A).
Related Topic
• Parts and Controls (Remote Commander and Control Panel)
- Menu Operation: Adjust Signal
- Menu Operation: Smart APA
5-014-280-12(1) Copyright 2020 Sony Corporation
Use the Intelligent Setting Function
Optimize the image quality settings, light settings, and system cooling (fan speed) just by choosing the location that matches the environment where the projector is being used. The [Intelligent Setting] helps the projector remain in stable operation for long periods of time.
1 Press the MENU key to display the menu screen.
2 Set [Intelligent Setting] in the 📁 [Projection Setting] menu to [On] and press the ⚡Right) key.
3 Select the location the projector is being used.
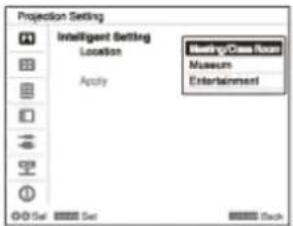
[Meeting/Class Room]
Optimizes the text and graphic quality so that they are displayed clearly. This is suitable for use in meeting rooms and classrooms.
[Museum]
Optimizes the color quality so that colors are reproduced accurately. This is suitable for use in quiet places such as galleries and museums.
[Entertainment]
Optimizes the image quality to achieve balance. This is suitable for use at theme parks, public entertainment facilities, conference rooms in the exhibition hall, and so on.
4 Select [Apply] and press the ENTER key.
Related Topic
- Menu Operation: Intelligent Setting
Using the Digital Zoom Function
Enlarge a portion of the projected image. This can be used when there is a computer signal being input. However, it may not be usable depending on the input signal resolution.
1 Press the D ZOOM + key to display the digital zoom icon on the projected screen.
2 Press the D ZOOM + key to enlarge an image.
3 Adjust the image position with the ↑/↓ (Up/Down/Left/Right) keys.
4 Repeatedly press the D ZOOM + key or the D ZOOM - key to change the magnification ratio.
The magnification ratio can be changed from 1x to 4x.
When you select 1x, you cannot adjust the image position.
To return to the original image, press the RESET key.
Related Topic
• Parts and Controls (Remote Commander and Control Panel)
5-014-280-12(1) Copyright 2020 Sony Corporation
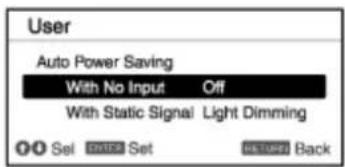
Using Eco Mode
The [With No Input] and [With Static Signal] of the Eco Mode settings are easy to use.
Note
- If [ECO Mode] is set to [ECO] or if [Standby Mode] for [User] is set to [Low], you will no longer be able to use network control functions while in Standby Mode. If performing external control via networks and network control functions and so on, either do not select [ECO] or do not set [Standby Mode] for [User] to [Low].
1 Press the ECO MODE key to display the [ECO Mode] menu.
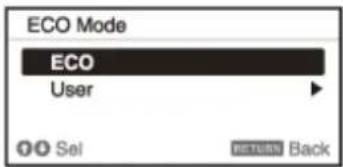
2 Press the ⚠(U▼Down) key or the ECO MODE key, then select either [ECO] or [User] mode.
- [ECO]: Set each setting to the value that saves the most energy.
— With No Input: [Standby]
— With Static Signal: [Light Dimming]
- [User]: Configure the Eco Mode settings manually.
3 Press the RETURN key to return to the previous screen.
Related Topic
• Parts and Controls (Remote Commander and Control Panel)
- Menu Operation: ECO
SONY
Help Guide
Data Projector
VPL-CWZ10/CXZ10
Navigating Menus
Various projector adjustments and settings can be performed from the menu screen. Selecting an item with an arrow (▶) after the item name will display the items to be set in the next tier.
Note
- The images used in the explanation are for reference only. Please note that the items displayed may differ depending on the device you are using.
1 Press the MENU key.
The menu screen will be displayed.
2 Press the ↑ / ↓Up/Down) key to select the menu, then press either the (Right) key or the ENTER key.
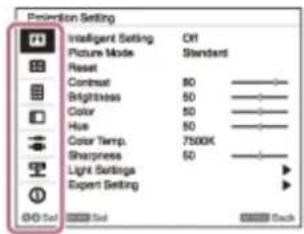
3 Press the / Up/Down) key to select an item, then press either the (Right) key or the ENTER key.
To return to the configuration menu selection, press the ← (Left) key or the RETURN key.
4 Configure and adjust the items.
The configuration method differs depending on the item.
If a further tier is displayed, select the item you wish to configure in accordance with Step 3, then press the ENTER key to confirm the configuration.
To return to the configuration item selection, press the (Left) key or the RETURN key. To reset the setting value of an item to its factory preset value, press the RESET key during setting or adjusting.
Navigating Pop-up Menus
Select items using the ↑ / ↓ (Up/Down/Left/Right) key.
Press the ENTER key to confirm the settings, and return to the previous screen.
Navigating Settings Menus
Select items using the / Up/Down) key.
Press the ENTER key to confirm the settings, and return to the previous screen.
Navigating Adjustment Menus
When increasing a value, press the (Up) or Right) key.
When decreasing a value, press the ↓ (Down) or ←left) key.
Press the ENTER key to confirm the settings, and return to the previous screen.
5
Press the MENU key to exit the menu screen.
If an operation has not been performed for some time, the menu screen will automatically disappear.
Related Topic
• Parts and Controls (Remote Commander and Control Panel)
5-014-280-12(1) Copyright 2020 Sony Corporation
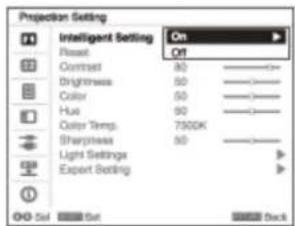
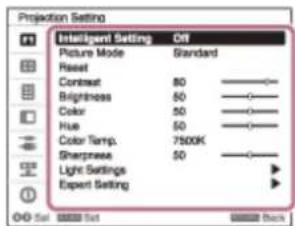
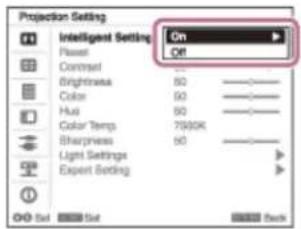
Menu Operation: Intelligent Setting
Setting [Intelligent Setting] to [On] allows you to optimize the image quality settings, light settings, and system cooling (fan speed) just by choosing the location that matches the environment where the projector is being used. This setting helps the projector remain in stable operation for long periods of time.
1 Press the MENU key.
2 Select [Projection Setting] - [Intelligent Setting] - [On] or [Off].
3 If [On] is selected, select the item you wish to configure in [Location].
Settings
[Meeting/Class Room]
Optimizes the text and graphic quality so that they are displayed clearly. This is suitable for use in meeting rooms and classrooms.
[Museum]
Optimizes the color quality so that colors are reproduced accurately. This is suitable for use in quiet places such as galleries and museums.
[Entertainment]
Optimizes the image quality to achieve balance. This is suitable for use at theme parks, public entertainment facilities, conference rooms in the exhibition hall, and so on.
Note
- If [Intelligent Setting] is [On], [Picture Mode] in the 📄 [Projection Setting] menu cannot be configured.
- If there is no usage environment that corresponds to the choices for [Location], then choose the location with the characteristics closest to your environment.
[Location] cannot be configured for each input terminal.
Related Topic
- Menu Operation: Picture Mode
SONY
Help Guide
Data Projector
VPL-CWZ10/CXZ10
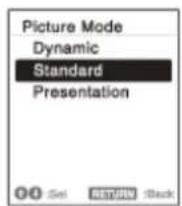
Menu Operation: Picture Mode
Configure the image quality.

Press the MENU key.

Select [Projection Setting] - [Picture Mode] - The desired setting.
Settings
[Dynamic]
Sets the image quality to achieve balance between brightness and darkness.
[Standard]
Sets the image quality to achieve smooth and natural tones.
[Presentation]
Bright image quality suitable for presentations.
Note
If [Intelligent Setting] in the 📄 [Projection Setting] menu is [On], [Picture Mode] cannot be configured.
Related Topic
- Menu Operation: Intelligent Setting
5-014-280-12(1) Copyright 2020 Sony Corporation
SONY
Help Guide
Data Projector
VPL-CWZ10/CXZ10
Menu Operation: Reset
Return the image quality settings to their default values.
1 Press the MENU key.
2 Select [Projection Setting] - [Reset].
Note
The [Intelligent Setting] and [Picture Mode] values in the ⚫ [Projection Setting] menu will not return to default.
Related Topic
• Menu Operation: Intelligent Setting
- Menu Operation: Picture Mode
5-014-280-12(1) Copyright 2020 Sony Corporation
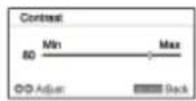
Menu Operation: Contrast
Adjust the image contrast.
1 Press the MENU key.
2 Select [Projection Setting] - [Contrast] - Adjust the values.
The higher the setting, the greater the contrast. The lower the setting, the lower the contrast.
5-014-280-12(1) Copyright 2020 Sony Corporation
Menu Operation: Brightness
Adjust the image brightness (luminance).
1 Press the MENU key.
2 Select [Projection Setting] - [Brightness] - Adjust the values.
The higher the setting, the brighter the image. The lower the setting, the darker the image.
5-014-280-12(1) Copyright 2020 Sony Corporation
SONY
Help Guide
Data Projector
VPL-CWZ10/CXZ10
Menu Operation: Color
Adjust the image color intensity.
1 Press the MENU key.
2 Select [Projection Setting] - [Color] - Adjust the values.
The higher the setting, the greater the intensity. The lower the setting, the lower the intensity.
5-014-280-12(1) Copyright 2020 Sony Corporation
Menu Operation: Hue
Adjust the image color tone.
1 Press the MENU key.
2 Select [Projection Setting] - [Hue] - Adjust the values.
The higher the setting, the more greenish the image becomes. The lower the setting, the more reddish the image becomes.
5-014-280-12(1) Copyright 2020 Sony Corporation
Menu Operation: Color Temp.
Adjust the image color temperature.

Press the MENU key.

Select [Projection Setting] - [Color Temp.] - The desired setting.
Settings
[9300K]/[7500K]/[6500K]
The higher the temperature, the bluer the image tones become, and the lower the temperature, the redder the tones become.
[Brightness Priority]
Allows for the brightest projection image.
5-014-280-12(1) Copyright 2020 Sony Corporation
Menu Operation: Sharpness
Adjust the outlines of the image.
1 Press the MENU key.
2 Select [Projection Setting] - [Sharpness] - Adjust the values.
The higher the setting, the sharper the image. The lower the setting, the softer the image.
5-014-280-12(1) Copyright 2020 Sony Corporation
Menu Operation: Light Settings
Adjust the laser light brightness.
1 Press the MENU key.
2 Select [Projection Setting] - [Light Settings] - The desired setting.
Settings
[Dynamic Control]
[On]/[Off]: If set to [On], the brightness will automatically be adjusted according to the input image. For dark images, the brightness is adjusted as they are being projected, which can help save energy. Conversely, for bright images, the image brightness is not adjusted and the image remains bright.
[Light Output Mode]
Adjust the light source brightness.
• [Standard]: The image becomes bright and energy consumption increases.
• [Middle]: Energy consumption decreases, but the image becomes dark.
- [Extended]: The image becomes dark, but projection becomes possible for long periods of time.
5-014-280-12(1) Copyright 2020 Sony Corporation
Menu Operation: Expert Setting
Set the image quality to match the use location and image source.
1 Press the MENU key.
2 Select [Projection Setting] - [Expert Setting] - The desired setting.
Settings
[Gamma Mode]
- [2.2]: This is gamma correction for making the halftone brighter. This is suitable for projecting photos and vibrant images in bright locations.
[2.4]: This is gamma correction for reproducing halftone more faithfully. This will project photos and other vibrant images with natural tones.
• [Gamma 3]: This is gamma correction for emphasizing bright portions of the image. Creates a balanced image.
5-014-280-12(1) Copyright 2020 Sony Corporation
Menu Operation: Aspect
Set what aspect ratio images will be projected for each input signal.
1 Press the MENU key.
2 Select [Screen] - [Aspect] - Item you wish to configure.
Settings
VPL-CWZ10
• For Computer Signal Input
- [4:3]: Fix the aspect ratio to 4:3 and project onto the entire screen.
— [16:9]: Fix the aspect ratio to 16:9 and project onto the entire screen.
— [Full 1]: Maintain the aspect ratio and project onto the entire screen.
— [Full 2]: Project onto the entire screen.
— [Full 3]: Maintain the aspect ratio and project fully either vertically or horizontally in a resolution no higher than 1280 × 720 .
— [Normal]: Project the original resolution onto the center of the screen without enlargement processing.
- For Video Signal Input
— [4:3]: Fix the aspect ratio to 4:3 and project onto the entire screen.
— [16:9]: Fix the aspect ratio to 16:9 and project onto the entire screen.
— [Full]: Project onto the entire screen.
- [Zoom]: Enlarge and project the center of the image.
VPL-CXZ10
• For Computer Signal Input
— [4:3]: Fix the aspect ratio to 4:3 and project onto the entire screen.
— [16:9]: Fix the aspect ratio to 16:9 and project onto the entire screen.
— [Full 1]: Maintain the aspect ratio and project onto the entire screen.
— [Normal]: Project the original resolution onto the center of the screen without enlargement processing.
- For Video Signal Input
— [4:3]: Fix the aspect ratio to 4:3 and project onto the entire screen.
— [16:9]: Fix the aspect ratio to 16:9 and project onto the entire screen.
- [Zoom]: Enlarge and project the center of the image.
Note
- Be aware that dividing, shrinking and stretching the display by the aspect ratio function for commercial purposes or public viewing at cafes, hotels, etc., may be in violation of the author's copyrights protected under copyright law.
- Depending on the input, items in [Aspect] or some settings may not be configured. In addition, the image may remain the same even if a different aspect ratio is set.
- Depending on the selected item, some parts of the screen may be displayed in black.
Related Topic
- Aspect Ratio
5-014-280-12(1) Copyright 2020 Sony Corporation
SONY
Help Guide
Data Projector
VPL-CWZ10/CXZ10
Aspect Ratio
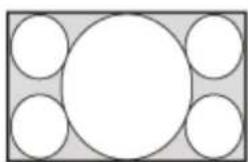
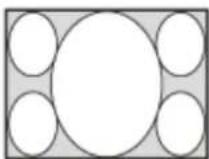
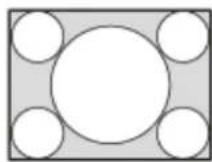
VPL-CWZ10
Computer Signal
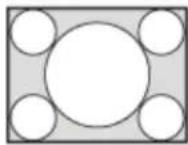
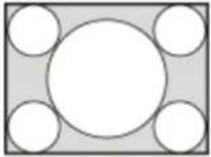
| Input signal Image projected using recommended setting values | |
4:3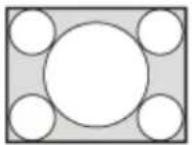 | [Full 1]*1*2*3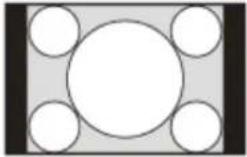 |
16:9 | [Full 1]*1*2*3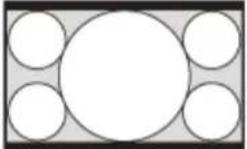 |
16:10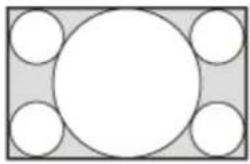 | [Full 1]*3 |
*1 Selecting [Normal] will project the image with the image signal resolution as-is without enlargement processing.
natural_image
Simple geometric diagram with a central circle surrounded by four smaller circles, no text or symbols present.
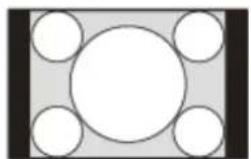
natural_image
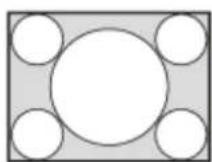
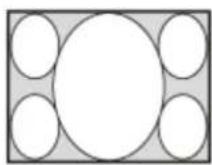
Simple geometric diagram with a central circle surrounded by four smaller circles, no text or symbols present.*2. Selecting [Full 2] will project the image onto the entire screen with the aspect ratio ignored.
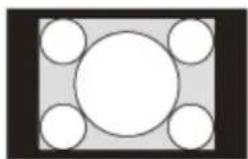
natural_image
Simple diagram with a central circle surrounded by five smaller circles, no text or symbols present.
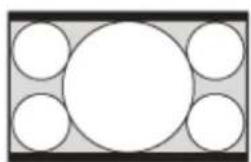
natural_image
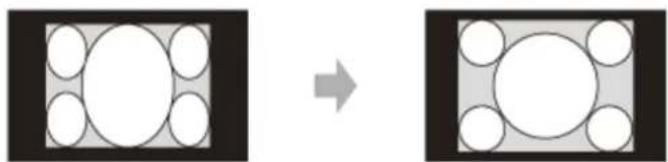
Simple geometric diagram with five circles arranged in a grid (no text or symbols)*3 When the screen display position is adjusted for a 16:9 signal, inputting a 4:3 signal may result in the image not fitting on the screen vertically. If this occurs, select [Full 3].
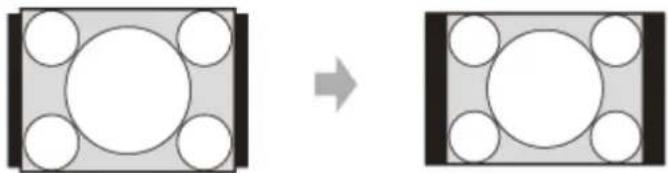
natural_image
Diagram showing a transformation from a rectangular frame with circular cutouts to a square frame with circles (no text or symbols)Video Signal
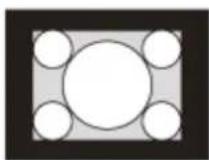
| Input signal Image projected using recommended setting values | |
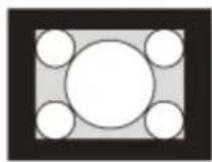
4:3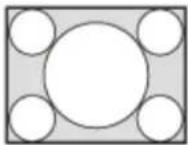 | [4:3]*1*2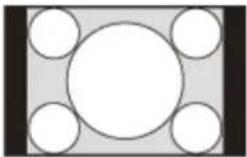 |
16:9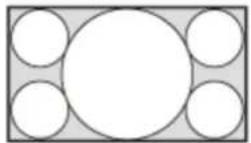 | [16:9]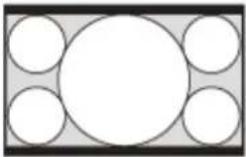 |
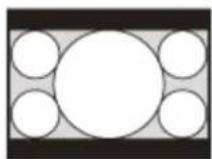
*1 Depending on the input signal, images may be displayed as follows. In this case, select [16:9].
natural_image
Diagram showing transformation of a square with internal circles to a larger square, both without any text or symbols.*2 Depending on the input signal, images may be displayed as follows. In this case, select [Zoom].
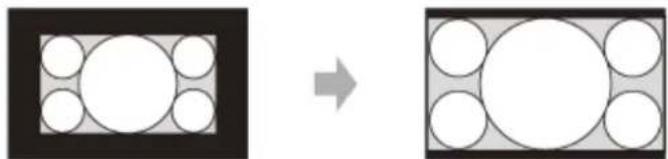
natural_image
Diagram showing transformation from a rectangular frame with circular cutouts to a grid-patterned rectangle (no text or symbols)VPL-CXZ10
Computer Signal
| Input signal Image projected using recommended setting values | |
| 4:3 | [Full 1]*1 |
 |  |
16:9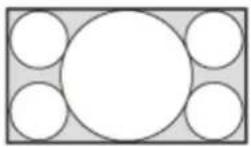 | [Full 1]^*1^*2 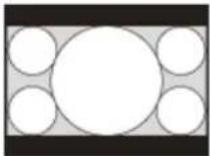 |
16:10 | [Full 1]^*1^*2 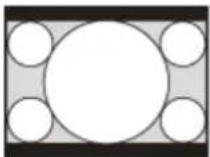 |
*1 Selecting [Normal] will project the image with the image signal resolution as-is without enlargement processing.

*2 Selecting [4:3] will project the image onto the entire screen with the aspect ratio ignored.

Video Signal
| Input signal Image projected using recommended setting values | |
4:3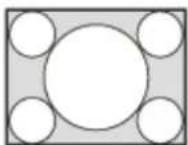 | [4:3]^*1 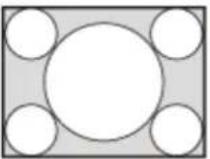 |
16:9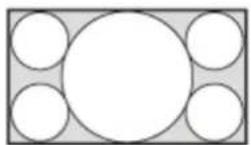 | [16:9]^*2 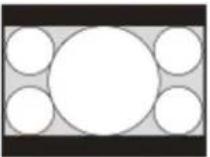 |
*1 Depending on the input signal, images may be displayed as follows. In this case, select [16:9].

*2 Depending on the input signal, images may be displayed as follows. In this case, select [Zoom].

Related Topic
- Menu Operation: Aspect
5-014-280-12(1) Copyright 2020 Sony Corporation
Menu Operation: Adjust Signal
Adjust the projected image for computer signal input. Adjust when the edges of the screen are cut off or the image quality is poor.
1 Press the MENU key.
2 Select [Screen] - [Adjust Signal] - The desired setting.
Settings
[APA]
Pressing the ENTER key will automatically modify the screen into its optimal state. This item can be selected when a computer input signal is supplied from the RGB input terminal (Input A).
[Phase]
Adjust the input signal and display the pixel phase. Set it to the value that produces the clearest image. This item can be selected when a computer input signal is supplied from the RGB input terminal (Input A).
[Pitch]
Increasing the value will make the horizontal width (pitch) of the display pixels become larger, and decreasing it will make the width become smaller. This item can be selected when a computer input signal is supplied from the RGB input terminal (Input A).
[Shift]
- [H]: Increasing the value will make the screen move to the right, and decreasing the value will make it move to the left.
• [V]: Increasing the value will make the screen move up, and decreasing the value will make it move down.
This item can be selected when a computer input signal is supplied from input terminal RGB/Y PB PR (Input A).
Note
- [APA] may not be able to function properly when there is a large black area around the projected image, and part of the image may not be displayed. In addition, depending on the input, the image may not be optimized. If this occurs, configure [Phase], [Pitch], and [Shift] manually.
The value adjusted for [Pitch] will return to its factory setting if [APA] or [Smart APA] in the ☑ [Function] menu is performed. If you wish to continue using the adjusted value, set [Smart APA] in the ☑ [Function] menu to [Off].
Related Topic
- Menu Operation: Smart APA
Menu Operation: Presentation timer
Set a timer for presentations.

Press the MENU key.

Select [Function] - [Presentation timer] - The desired setting.
Settings
[Timer Set/Start]
Set a projection duration timer. Press the ENTER key to start the timer.
[Size]
[Fixed Small]/[Fixed Large]/[Auto]: Select the timer text size. If [Auto] is selected, the timer text will be displayed larger for 3 seconds by the minute. This is convenient for alerting the presenter to how much time has elapsed.
[Position]
[Bottom Right]/[Bottom Left]/[Top Right]: Select the timer display position.
[Count UP/Down]
[Up]/[Down]: Select whether to count up toward the set time or count down.
5-014-280-12(1) Copyright 2020 Sony Corporation
SONY
Help Guide
Data Projector
VPL-CWZ10/CXZ10
Menu Operation: Volume
Adjust the volume.
1 Press the MENU key.
2 Select [Function] - [Volume] - Adjust the values.
Increasing the value will increase the volume, and decreasing it will decrease the volume.
5-014-280-12(1) Copyright 2020 Sony Corporation
Menu Operation: Speaker
Set whether sound is output from the projector speakers.
1 Press the MENU key.
2 Select [Function] - [Speaker] - [On] or [Off].
Selecting [On] causes sound to be output from the projector speakers. If you do not wish for sound to be output from the speakers, select [Off].
5-014-280-12(1) Copyright 2020 Sony Corporation
Menu Operation: Speaker Setting
Set whether the projector speakers are usable when the projector light is off. When [Speaker Setting] is set to [Always On] and the light is off, Input A becomes active.
1 Press the MENU key.
2 Select [Function] - [Speaker Setting] - [Sync with Power] or [Always On].
Selecting [Always On] allows the projector speakers to be used even when the light is off.
Note
- Selecting [Always On] for the [Speaker Setting] will also set [Standby Mode] to [Standard].
Related Topic
• Using Eco Mode
5-014-280-12(1) Copyright 2020 Sony Corporation
SONY
Help Guide
Data Projector
VPL-CWZ10/CXZ10
Menu Operation: Smart APA
When a computer signal is supplied from the RGB input terminal (Input A), APA is activated automatically, and the screen is adjusted into its optimal state.
1 Press the MENU key.
2 Select [Function] - [Smart APA] - [On] or [Off].
Selecting [On] allows APA to be activated automatically when a computer signal is supplied.
Related Topic
- Menu Operation: Adjust Signal
5-014-280-12(1) Copyright 2020 Sony Corporation
Menu Operation: CC Display
This operation controls the CC (Closed Captioning) setting.
1 Press the MENU key.
2 Select [Function] - [CC Display] - The desired setting.
Settings
[CC1]/[CC2]/[CC3]/[CC4]/[Text1]/[Text2]/[Text3]/[Text4]
Select the CC (Closed Captioning) service (subtitles or textual information) that is displayed.
[Off]
CC (Closed Captioning) is not displayed.
5-014-280-12(1) Copyright 2020 Sony Corporation
Menu Operation: Start Up Image
Set whether the startup image is displayed during startup.
1 Press the MENU key.
2 Select [Function] - [Start Up Image] - [On] or [Off].
Selecting [On] will enable the startup image to be displayed during startup.
5-014-280-12(1) Copyright 2020 Sony Corporation
SONY
Help Guide
Data Projector
VPL-CWZ10/CXZ10
Menu Operation: Language
Set the language used in the menu, messages, and so on.
1 Press the MENU key.
2 Select [Operation] - [Language] - The desired language.
Related Topic
• Selecting the Menu Language
5-014-280-12(1) Copyright 2020 Sony Corporation
SONY
Help Guide
Data Projector
VPL-CWZ10/CXZ10
Menu Operation: Status
Set whether the menu, messages, and so on are displayed.
1 Press the MENU key.
2 Select [Operation] - [Status] - [On] or [Off].
Settings
[On]
All screen displays become active.
[Off]
All screens except for the menu display, warning messages, notifications, and so on will not be displayed.
5-014-280-12(1) Copyright 2020 Sony Corporation
Menu Operation: Security Lock
Allows you to set a password and restrict users.
1 Press the MENU key.
2 Select [Operation] - [Security Lock] - [On] and press the ENTER key.
3 Enter the set password.
Turning Off Security Lock
Selecting [Off] allows you to turn off Security Lock. This also requires the password to be entered.
Note
- If the password is entered incorrectly three times in a row, further operation is not allowed. In this case, press the ⏻/⏻ (On/Standby) key to put the projector on Standby, then turn the device on again.
- If you forget the password, you will be unable to use the projector, so exercise due caution. If you contact qualified Sony personnel, you can receive the password. This will require the projector's serial number and confirmation of the customer's information. (The confirmation method differs by country/region.)
Related Topic
- Menu Operation: Set Password
5-014-280-12(1) Copyright 2020 Sony Corporation
Menu Operation: Control Key Lock
Allows operation via the control panel to be deactivated.
1 Press the MENU key.
2 Select [Operation] - [Control Key Lock] - [On] or [Off].
Selecting [On] deactivates operation via the control panel.
Operations Possible During Operation Lockout
The following operations are possible even when [Control Key Lock] is [On].
- In Standby Mode, press and hold the | / (On/Standby) key for approximately 10 seconds.
The power will turn on.
- With the power on, press and hold the MENU key for approximately 10 seconds.
[Control Key Lock] will turn [Off], and the control panel will become operational.
Related Topic
• Parts and Controls (Remote Commander and Control Panel)
5-014-280-12(1) Copyright 2020 Sony Corporation
Menu Operation: Menu Settings Lock
Lock the menu settings.

Press the MENU key.

Select [Operation] - [Menu Settings Lock] - The desired setting.
Settings
[Full]
Lock all menu settings.
[Startup]
Lock the settings when the projector is turned on. Settings can be changed while the projector is in use, but once the power is turned off, they will return to the originally locked settings.
[Update]
Selecting [Update] when [Startup] has been selected saves the changed settings and keeps them the same.
Note
- When performing [Menu Settings Lock] operations, the password must be entered. Set the password in [Set Password] in the ☐ [Operation] menu.
Related Topic
- Menu Operation: Set Password
5-014-280-12(1) Copyright 2020 Sony Corporation
SONY
Help Guide
Data Projector
VPL-CWZ10/CXZ10
Menu Operation: Set Password
Set the password for the [Security Lock] and [Menu Settings Lock] operations.
1 Press the MENU key.
2 Select [Operation] - [Set Password].
3 Use the MENU, ↑ / ↓ (Up/Down/Left/Right), and ENTER keys to enter the password.
The default factory setting password is "ENTER, ENTER, ENTER, ENTER."
4 Use the MENU, ↑ / ↓ (Up/Down/Left/Right), and ENTER keys to enter your new password.
5 Enter the new password again for confirmation.
Related Topic
- Menu Operation: Security Lock
- Menu Operation: Menu Settings Lock
5-014-280-12(1) Copyright 2020 Sony Corporation
Menu Operation: Network Setting
Set the network IP address.
1 Press the MENU key.
2 Select [Connection/Power] - [Network Setting] - [IP Address Setup] - The desired setting.
Settings
[Auto(DHCP)]
Network settings are automatically assigned via the router or another device's DHCP server function.
[Manual]
Configure the network manually.
Note
- When setting the IP address manually, enter the IP address after changing to [Manual] once and selecting [Apply].
5-014-280-12(1) Copyright 2020 Sony Corporation
SONY
Help Guide
Data Projector
VPL-CWZ10/CXZ10
Menu Operation: Communication Mode
Configure the communication mode.

Press the MENU key.

Select [Connection/Power] - [Communication Mode] - The desired setting.
Settings
[http]
Communicate with http only.
[http and https]
Communicate with both http and https.
[https]
Communicate with https only.
Related Topic
- Configuring https Communication
5-014-280-12(1) Copyright 2020 Sony Corporation
Menu Operation: Dynamic Range
Set the image input level for the INPUT B/INPUT C terminal.
1 Press the MENU key.
2 Select [Connection/Power] - [Dynamic Range] - The desired setting.
Settings
[Auto]
Identify the image input level automatically.
[Limited]
Set when the image input level is between 16 and 235.
[Full]
Set when the image input level is between 0 and 255.
Note
- If the image output settings for the HDMI connection device are not correct, the bright sections and dark sections of the image may become too bright or dark, respectively.
5-014-280-12(1) Copyright 2020 Sony Corporation
Menu Operation: Input-A Signal Sel.
Set the image signal type for when Input A is selected.
1 Press the MENU key.
2 Select [Connection/Power] - [Input-A Signal Sel.] - The desired setting.
Settings
[Auto]
Automatically choose the image signal type for when Input A is selected.
[Computer]/[Video GBR]/[Component]
The selected image signal type will be applied.
Note
- Even if [Auto] is set, the image may not be optimized depending on the input. If this occurs, configure manually in accordance with the connected device.
5-014-280-12(1) Copyright 2020 Sony Corporation
Menu Operation: ECO
1 Press the MENU key.
2 Select [Connection/Power] - [ECO] - [Auto Power Saving] - The desired setting.
Settings
[With No Input]
[Light Cutoff]: If there is no signal input for approximately 2 minutes, the light will automatically turn off and the power consumption will be reduced. Inputting a signal or operating a key will turn the light back on. When the light is off, the ON/STANDBY indicator will be orange.
[Standby]: If there is no signal input for approximately 2 minutes, the projector will automatically go into Standby Mode.
[Off]: Disable the With No Input setting function.
[With Static Signal]
[Light Dimming]: If there has been no change to the image being input into the projector (approximately 10 seconds), the light mode settings will gradually reduce the light output (by approximately 10% - 15%). In addition, if there is no change detected in the input signal for an optionally set period of time ([5 min.]/[10 min.]/[15 min.]/[20 min.]/[Demo.]), the light output will be automatically reduced to approximately 5%. While the light output is being reduced, the [Light Dimming] message will be displayed. If [Demo.] is selected, the light will begin dimming after approximately 40 seconds. When a signal change, Remote Commander operation, or control panel operation is detected, it will revert to the original brightness.
[Off]: Disable the With Static Signal setting function.
Note
- If you do not want the projector to automatically enter Standby Mode when there is no input signal, set [With No Input] to [Off].
- Light reduction works gradually over time, so you may not notice that it is being reduced. For this reason, when the input signal changes and the light returns to its original brightness, you may notice that the light was reduced.
The light output reduction amount differs depending on the [Light Output Mode] setting in the ⚠️ [Projection Setting] menu.
Related Topic
- Menu Operation: Light Settings
Menu Operation: Remote Start
Configure Remote Start. Setting [Remote Start] to [On] will turn on the projector by sending special commands even when [Standby Mode] is set to [Low].
1 Press the MENU key.
2 Select [Connection/Power] - [Remote Start] - [On] or [Off].
Selecting [On] will allow you to supply power from the computer and so on to the projector when in a network-connected environment.
Note
It is necessary to configure the network settings correctly and connect the projector to the network in advance.
- When supplying power to the projector using the Remote Start function, it is necessary to send special commands from the computer. Consult with qualified Sony personnel for details.
- Setting [Remote Start] to [On] will increase standby power consumption during Standby Mode.
Related Topic
- Menu Operation: Network Setting
5-014-280-12(1) Copyright 2020 Sony Corporation
Menu Operation: Standby Mode
Set the power consumption during Standby Mode.
1 Press the MENU key.
2 Select [Connection/Power] - [Standby Mode] - [Standard] or [Low].
Selecting [Standard] will increase the power consumption during Standby Mode.
Note
- If Standby Mode is [Low], you will no longer be able to use networks and network control functions while in Standby Mode.
Hint
Setting [Remote Start] to [On] will turn the projector on by sending special commands even when [Standby Mode] is set to [Low].
5-014-280-12(1) Copyright 2020 Sony Corporation
Menu Operation: Direct Power On
Set whether power is set to On or Standby when plugging the AC power cord into an outlet.
1 Press the MENU key.
2 Select [Connection/Power] - [Direct Power On] - [On] or [Off].
When [On] is selected, the projector is turned on and does not go into Standby Mode when the AC power cord is plugged into an outlet.
Hint
- When the power is turned off, you can disconnect the AC power cord without going into Standby Mode regardless of the [Direct Power On] settings.
Related Topic
• Turning Power On/Off
5-014-280-12(1) Copyright 2020 Sony Corporation
SONY
Help Guide
Data Projector
VPL-CWZ10/CXZ10
Menu Operation: Screen Fitting
Select the image distortion correction method.
1 Press the MENU key.
2 Select [Installation] - [Screen Fitting] - [HV Keystone] or [Corner Keystone].
When you wish to use trapezoidal correction, select [HV Keystone], and when you wish to correct distortion, select [Corner Keystone].
Related Topic
- Menu Operation: V Keystone
• Menu Operation: H Keystone
• Menu Operation: Corner Keystone
5-014-280-12(1) Copyright 2020 Sony Corporation
Menu Operation: V Keystone
Adjust the projected image to a screen that has a vertical trapezoidal shape.
This is displayed when [HV Keystone] is selected for [Screen Fitting] in the ☐ [Installation] menu.
1 Press the MENU key.
2 Select [Installation] - [V Keystone].
3 Adjust the value with the / (Up/Down/Left/Right) keys.
Increasing the value in the positive direction makes the upper side screen width smaller, and increasing it in the negative direction makes the lower side screen width smaller.
Note
- Because keystone correction is an electronic form of correction, the image quality may be reduced.
Related Topic
- Correcting a Vertical Trapezoid
- Menu Operation: Screen Fitting
5-014-280-12(1) Copyright 2020 Sony Corporation
Menu Operation: H Keystone
Adjust the projected image to a screen that has a horizontal trapezoidal shape.
This is displayed when [HV Keystone] is selected for [Screen Fitting] in the ☐ [Installation] menu.
1 Press the MENU key.
2 Select [Installation] - [H Keystone].
3 Adjust the value with the / (Up/Down/Left/Right) keys.
Increasing the value in the positive direction makes the right side of the screen smaller, and increasing it in the negative direction makes the left side of the screen smaller.
Note
- Because keystone correction is an electronic form of correction, the image quality may be reduced.
Related Topic
- Correcting a Horizontal Trapezoid
- Menu Operation: Screen Fitting
5-014-280-12(1) Copyright 2020 Sony Corporation
SONY
Help Guide
Data Projector
VPL-CWZ10/CXZ10
Menu Operation: Corner Keystone
Corrects distortion of the image.
This is displayed when [Corner Keystone] is selected for [Screen Fitting] in the ☐ [Installation] menu.
1 Press the MENU key.
2 Select [Installation] - [Corner Keystone] - [Adjust].
3 Select the corner you wish to correct using the ↑ / ↓ (Up/Down/Left/Right) keys and press the ENTER key.
4 Adjust the corner position with the / (Up/Down/Left/Right) keys.
Selecting [Reset] resets the adjusted value and returns the image to an unadjusted state.
Note
Because keystone correction is an electronic form of correction, the image quality may be reduced.
Related Topic
- Correcting Screen Distortion
- Menu Operation: Screen Fitting
5-014-280-12(1) Copyright 2020 Sony Corporation
Menu Operation: Digital Shrink
Allows you to shrink the projected image or adjust its position.
1 Press the MENU key.
2 Select [Installation] - [Digital Shrink] - The desired setting.
Settings
[Digital Shrink]
Adjust the size of the projected image. Setting the value to "0" will leave the image in its original size. The shrinkage rate is 100% - 90%.
[Shift]
Adjust the projection position. The adjustable range changes depending on the shrinkage rate.
Note
- Because digital shrinkage is an electronic form of correction, the image quality may be reduced.
- While adjusting the digital shrinkage, pressing the ENTER key will take you to a shift adjustment menu.
5-014-280-12(1) Copyright 2020 Sony Corporation
Menu Operation: Image Flip
The image flips either horizontally or vertically depending on the installation method.
1 Press the MENU key.
2 Select [Installation] - [Image Flip] - The desired setting.
Settings
[HV]
Flip the image horizontally and vertically.
[H]
Flip the image horizontally.
[M]
Flip the image vertically.
[Off]
Project the image without flipping it.
5-014-280-12(1) Copyright 2020 Sony Corporation
Menu Operation: High Altitude Mode
Set in accordance to the air pressure at the installation location.
1 Press the MENU key.
2 Select [Installation] - [High Altitude Mode] - [On] or [Off].
If using the projector in a high-altitude location (1,500 m or more above sea level), set to [On].
Note
- Using the projector with improper settings may affect the reliability of the components.
5-014-280-12(1) Copyright 2020 Sony Corporation
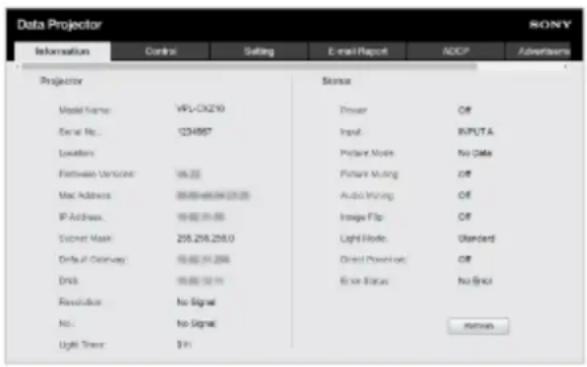
Viewing the Projector Information
View the projector model name, serial number, input signal type, light usage time, and other information.

Press the MENU key.

Select ⓘ [Information].
Items that Can be Viewed
[Model Name]
Displays the model name.
[Serial No.]
Displays the serial number.
[fH / fV]
Displays the horizontal/vertical frequency and signal type (resolution) of the current input signal.
[Light Timer]
Displays the light usage time thus far.
Note
- The horizontal/vertical frequency may not be displayed properly due to the input signal.
5-014-280-12(1) Copyright 2020 Sony Corporation
Uses for Network Features
Connecting a projector to a network allows you to do the following.
Use the projector with only necessary functions enabled.
- Confirm the current projector state using a web browser.
- Operate the projector remotely using a web browser.
- Receive a report from the projector via e-mail.
- Configure network settings for the projector.
- Perform control using various types of network surveillance and control protocol (Advertisement, ADCP, PJ Talk, PJ Link, AMX DDDP (Dynamic Device Discovery Protocol), Crestron RoomView).
- Reset the network settings.
- Set the date and time.
- Update the software.
• Use https communication.
Note
- When connecting the projector to a network, consult the network administrator. Also, use a network environment with security measures in place.
- When using the projector upon connecting it to a network, open the projector's control panel via a network and change the factory settings of the access control settings. We also recommend that you change your password periodically.
- Once you have finished configuration via the browser, close the browser to log out.
- Please note that the images used in the explanation are for reference only. Some images may differ depending on what model you are using.
- Supported web browsers are Internet Explorer (version 11 or later), Safari, and Chrome.
The only display language available is English. - When accessing the projector from a computer, if the browser is set to "use a proxy server," click the checkmark and configure it to not use a proxy server.
Related Topic
- Operating the Control Panel
• Using the E-mail Report Function - Configuring the Network Settings of the Projector
- Resetting the Network Settings
- Setting the Date and Time
• Using the Software Update Function - Configuring https Communication
Displaying the Control Window of the Projector with a Web Browser
Display the control window of the projector with a web browser and configure the network settings.
1 Connect the projector and computer to a hub or router using LAN cables.
2 Press the MENU key and configure the projector's network settings from [Connection/Power] - [Network Setting].
3 Start the web browser, enter the following into the address field, and press the Enter key.
http://xxx.xxx.xxx.xxx
(xxx.xxx.xxx.xxx: IP address of the projector)
The IP address of the projector can be confirmed from [Network Setting] in the [Connection/Power] menu.
The control panel will be displayed in the browser.
Hint
- Once the network settings have been configured, the control panel can be displayed thereafter via the operation in Step 3 alone.
- For https communication, connect with http first, then configure https communication.
Related Topic
- Connecting to a Computer via a Hub or Router
- Menu Operation: Network Setting
- Configuring https Communication
SONY
Help Guide
Data Projector
VPL-CWZ10/CXZ10
Operating the Control Panel
From the control panel displayed in your browser, you can configure access privileges and confirm the projector state.
Switching Pages
Click the page toggle tab (A) to display the page you wish to configure.
When the tab of the target page is not displayed, scroll the bar under the tab to display it.

Administrator privileges will be required to access to the pages other than Information and Control.
Setting the Password
Upon clicking [Setting] in the page toggle tab, a login window will be displayed.
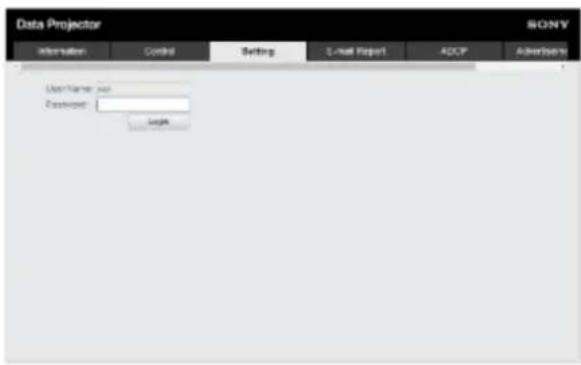
When accessing the [Setting] page for the first time, enter the password "Projector." The administrator name is fixed to "root."
When logging in for the first time, a window prompting you to change your password will be displayed. Follow the instructions displayed and change your password.
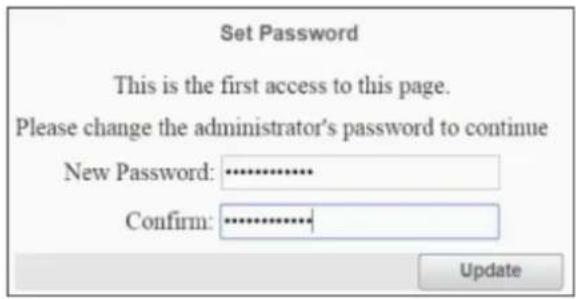
The initial password "Projector" cannot be set as the new password. To change the password, set [Password] in the [Setting] page.
To enable the new password, enter the new password, then click [Apply].
Note
- If you forget your password, contact qualified Sony personnel. Your password will be reconfigured once your approval has been obtained.
Confirming the Projector State
Clicking the [Information] page toggle tab and opening the [Information] page allows you to confirm the projector's current state.

Operating the Projector
Clicking the [Control] page toggle tab and opening the [Control] page allows you to operate the projector.
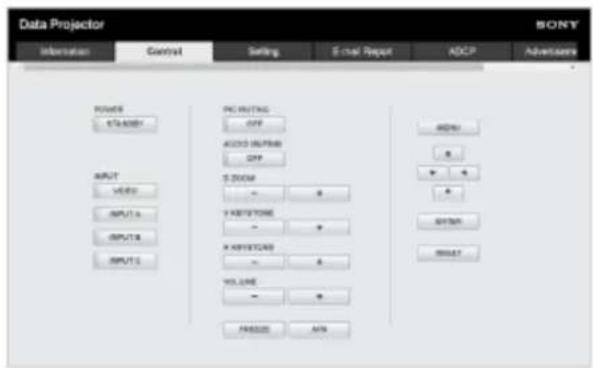
The button functions are the same as those of the keys on the Remote Commander.
Using the E-mail Report Function
Configure the e-mail report function from the [E-mail Report] page.
Note
The entered value will not be applied until [Apply] is clicked.
1 Click the [E-mail Report] tab and display the [E-mail Report] page.
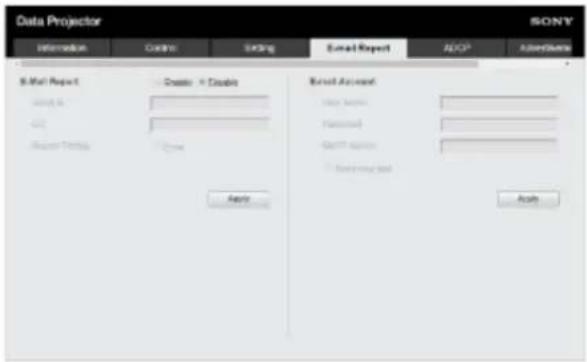
2 Select [Enable] in [E-mail Report].
3 Configure [Send to] and [CC].
4 Configure the [Report Timing] items.
5 Click [Apply].
6 Configure the [E-mail Account] items.
7 Check [Send mail test] and click [Apply].
A test e-mail will be sent to the set destination address.
Settings
[Send to], [CC]
Enter the destination e-mail address.
[Report Timing]
- [Over Light usage time]: Send a report when the light usage time elapses the specified time. [Error]: Send a report when the projector detects an error.
[E-mail Account]
- [User Name]: Enter the e-mail address.
- [SMTP Server]: Enter the transmission e-mail server (SMTP) address.
Note
- For networks performing Outbound Port25 Blocking, the e-mail report function cannot be used because the SMTP server cannot be connected to.
You cannot enter the following characters in the text box: " \ & < >
5-014-280-12(1) Copyright 2020 Sony Corporation
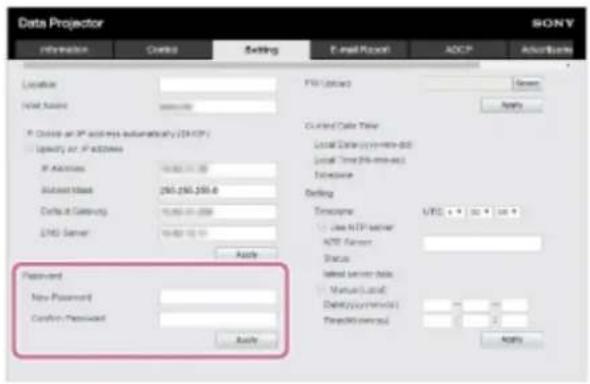
Configuring the Network Settings of the Projector
Configure the network functions from the [Setting] page.
Note
The entered value will not be applied until [Apply] is clicked.
1 Click the [Setting] tab and display the [Setting] page.
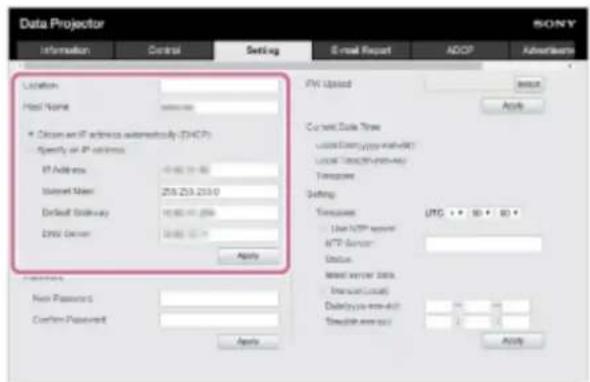
2 Configure [Location].
3 Configure [Host Name].
This host name must be the same as the Common Name (common name) of the certificate used when accessing via https communication. For details, refer to "Configuring https Communication."
4 Configure [Obtain an IP address automatically (DHCP)] or [Specify an IP address].
5 Click [Apply].
Settings
[Obtain an IP address automatically (DHCP)]
Network settings are automatically assigned via the router or other device's DHCP server function. The values allocated by the DHCP server are displayed in [IP Address], [Subnet Mask], [Default Gateway], and [DNS Server].
[Specify an IP address]
Configure the network manually.
• [IP Address]: Enter the IP address of the projector.
- [Subnet Mask]: Enter the subnet mask of the projector.
- [Default Gateway]: Enter the default gateway of the projector.
• [DNS Server]: Enter the primary DNS server of the projector.
Related Topic
- Configuring https Communication
5-014-280-12(1) Copyright 2020 Sony Corporation
Setting Advertisement
Change the Advertisement control protocol settings from the [Advertisement / PJ Talk / PJ Link] page.
Note
The entered value will not be applied until [Apply] is clicked.
1 Click the [Advertisement / PJ Talk / PJ Link] tab and display the [Advertisement / PJ Talk / PJ Link] page.
2 Configure each item under [Advertisement] and click [Apply].
Settings
[Start Advertisement Service]
Turn Advertisement on or off. The settings related to Advertisement are applied only if it is on. It is off in the default factory setting.
- [Community]: Enter the community names for Advertisement and PJ Talk. If changed, the PJ Talk community name changes as well. Only entries consisting of four alphanumeric characters are allowed. The default factory setting community name is "SONY." To avoid unauthorized access to the projector from another computer, we recommend changing the community name from the one in the factory setting.
- [Port No.]: Enter the Advertisement transmission port. The default factory setting Advertisement transmission port is "53862."
- [Interval]: Enter the Advertisement transmission interval (seconds). The Advertisement transmission interval in the default factory setting Advertisement transmission port is "30."
- [Broadcast Address]: Enter the Advertisement data transmission recipient. If nothing is entered, it will be broadcast on the same subnet.
Setting PJ Link
Change the PJ Link control protocol settings from the [Advertisement / PJ Talk / PJ Link] page.
Note
The entered value will not be applied until [Apply] is clicked.
1 Click the [Advertisement / PJ Talk / PJ Link] tab and display the [Advertisement / PJ Talk / PJ Link] page.
2 Configure each item under [PJ Link] and click [Apply].
Settings
[Start PJ Link Service]
Turn the PJ Link function on or off. The settings related to PJ Link are applied only if it is on. The function in the default factory setting is off.
- [Requires Authentication]: Turn the PJ Link authentication function on or off.
- [Password]: Enter the PJ Link authentication password. Refer to the PJ Link specifications for the default password.
5-014-280-12(1) Copyright 2020 Sony Corporation
Setting PJ Talk
Change the PJ Talk control protocol settings from the [Advertisement / PJ Talk / PJ Link] page.
Note
The entered value will not be applied until [Apply] is clicked.
1 Click the [Advertisement / PJ Talk / PJ Link] tab and display the [Advertisement / PJ Talk / PJ Link] page.
2 Configure each item under [PJ Talk] and click [Apply].
Settings
[Start PJ Talk Service]
Turn the PJ Talk setting on or off. The settings related to PJ Talk are applied only if it is on. The default factory setting function is off.
- [Community]: Enter the community names for Advertisement and PJ Talk. If changed, the Advertisement community name changes as well. Only entries consisting of four alphanumeric characters are allowed. The community name in the default factory setting is "SONY." To avoid unauthorized access to the projector from another computer, we recommend changing the community name from the one used in the factory setting.
- [Port No.]: Enter the PJ Talk server port. The default factory setting PJ Talk server port is "53484."
- [Timeout]: Enter the time (in seconds) until the connection is cut when PJ Talk communication is interrupted. The time in the default factory setting is "30."
- [Host Address]: Enter the IP address allowed to be received by the PJ Talk server. If nothing is entered, commands can be received from any IP address. Once an IP address has been entered, access will only be allowed from the entered IP address. For security purposes, we recommend entering an IP address and restricting access.
SONY
Help Guide
Data Projector
VPL-CWZ10/CXZ10
Setting ADCP
Change the ADCP control protocol settings from the [ADCP] page.
Note
The entered value will not be applied until [Apply] is clicked.
1 Click the [ADCP] tab and display the [ADCP] page.
2 Configure each item and click [Apply].
Settings
[Start ADCP Service]
Turn ADCP on or off. The settings related to ADCP are applied only if it is on. It is off in the default factory setting.
- [Requires Authentication]: Turn the ADCP authentication function on or off. The web page administrator password is set for the password.
- [Port No.]: Enter the ADCP server port. The default factory setting ADCP server port is "53595."
- [Timeout]: Enter the time (in seconds) until the connection is cut when ADCP communication is interrupted. The time in the default factory setting is "60."
- [Host Address]: Enter the IP address allowed to be received by the ADCP server. If nothing is entered, commands can be received from any IP address. Once an IP address has been entered, access will only be allowed from the entered IP address. For security purposes, we recommend entering an IP address and restricting access.
Setting AMX DDDP/Crestron Room View
Set the system service functions from the [DDDP/Crestron Control] page.
Note
The entered value will not be applied until [Apply] is clicked.
1 Click the [DDDP/Crestron Control] tab and display the [DDDP/Crestron Control] page.
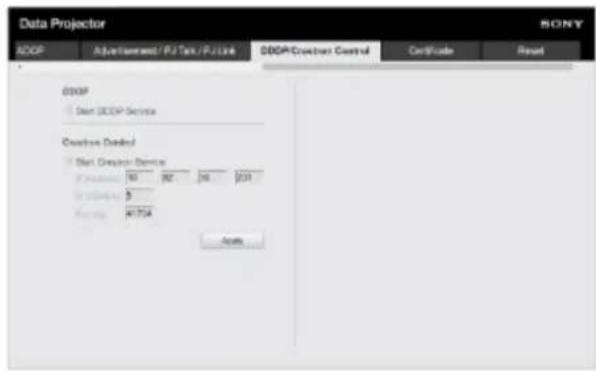
2 Configure each item and click [Apply].
Settings
[DDDP]
[Start DDDP Service]: Turn the DDDP function on or off. For details, refer to the AMX Corporation DDDP protocol specifications. The default factory setting is off.
[Crestron Control]
[Start Crestron Service]: Turn the Crestron Control function on or off. For details, refer to the Crestron Corporation product catalog and so on.
• [IP Address]: Enter the Crestron system server.
• [IP ID]: Enter the CIP protocol IP ID.
• [Port No.]: Enter the CIP protocol server port number.
Resetting the Network Settings
Return all items that can be configured via a web browser to their factory settings.
1 Click the [Reset] tab and display the [Reset] page.

2 Click [Reset].
5-014-280-12(1) Copyright 2020 Sony Corporation
Setting the Date and Time
Set the date and time.
The time can be set from either [Use NTP server] or [Manual(Local)].
1 Click the [Setting] tab and display the [Setting] page.
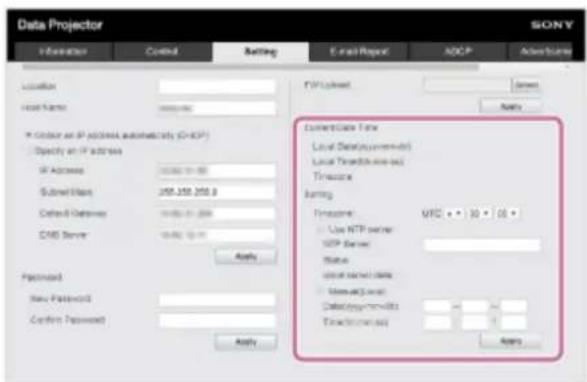
2 Configure each item under the Date and Time and click [Apply].
Settings
[Current Date Time]
The currently set time will be displayed in the local time zone.
[Setting]
Enter the following items and set the date and time.
• [Timezone]: Set the time zone. Daylight Savings Time is not supported.
- [Use NTP server]: Select this if you are retrieving the time via a network (NTP server).
— [NTP Server]: Enter the NTP server.
- [Status]: Displays the status of the connection to the NTP server.
— [latest server data]: Displays the information most recently obtained from the NTP server.
- [Manual(Local)]: Select this if you will set the date and time manually.
- [Date(yyyy-mm-dd)]: Enter the date.
- [Time(hh:mm:ss)]: Enter the time.
Using the Software Update Function
The projector software can be updated via a network.
The update file can be downloaded from the Sony website.
Note
The projector software can be updated via a network only when the projector is in Standby Mode.
1 Click the [Setting] tab and display the [Setting] page.
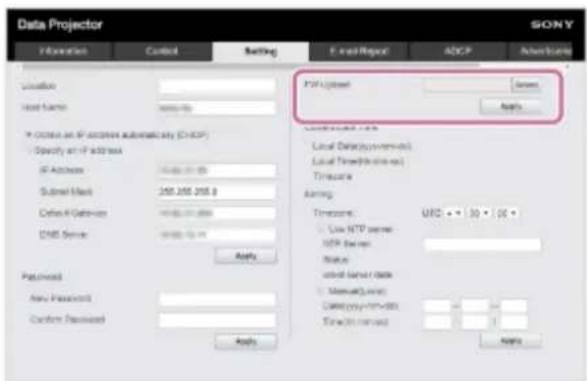
2 Click [Select] in [FW Upload] to select the file to be updated, then click [Apply].
Update preparation starts. A message will be displayed after preparation is complete.
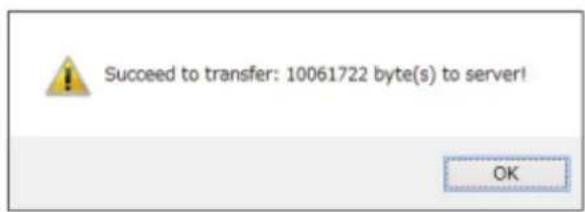
3 Click [OK].
An update confirmation message will be displayed.
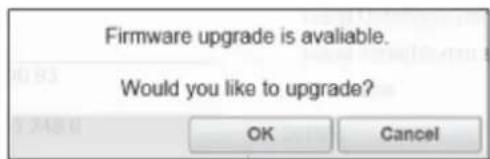
4 Click [OK].
Update starts.
The [Setting] page will be displayed again after update is complete.
Related Topic
- Updating Software
5-014-280-12(1) Copyright 2020 Sony Corporation
Configuring https Communication
Configure https communication on the [Certificate] page.
1 Click the [Certificate] tab and display the [Certificate] page.
2 Select [Communication Mode].
• [Http]: http connection only.
- [Http and Https]: https and http connection can be used at the same time.
• [Https]: https connection only.
Select [Https] for https connection. However, follow the steps in "Connecting with https for the First Time" to set up https connection for the first time.
The encryption protocol supported by the projector is TLS 1.2. In addition, the port number is set to 443.
3 Set a certificate.
- [Upload Trusted CA Certificate]: The certificate issued by a CA will be installed. Select a certificate saved in a folder on your computer.
Click [Apply] to install it.
Supported certificate
- Format: PEM
— Extension: CRT, PEM - Encryption: RSA
— Hash: SHA-256/SHA-384
— Key length: 512/1024/2048/4096 bit - Common Name: Network host name
For Common Name, use the host name set under [Host Name] on the [Setting] page. - Organization: Define by customer
- [Generate self issued certificate (for test only)]: The certificate generated within the projector (self-generating certificate) will be installed. Click [Apply] to install it.
You can use either the certificate issued by a CA or the certificate generated within the projector (self-generating certificate).
- [Status: OK]: When the certificate issued by a CA is installed and it is within the certification period.
- [Status: Expire]: When the certificate issued by a CA is installed but is past its expiration date.
- [Status: (blank)]: When a self-generating certificate is installed.
When Using the https Function
Use the host name set under [Host Name] on the [Setting] page to access the projector. Registration of the projector host name to the DNS server may be required depending on the operating environment. When accessing the projector with a different host name, such as the projector's IP address, a warning window may be displayed. In this case, continue with the procedure by referring to the instructions on the screen.
Example of the Screen for Internet Explorer (When the OS is Set to English)

There is a problem with this website's security certificate.
The security certificate presented by this website was issued for a different website's address. The security certificate presented by this website was not issued by a trusted certificate authority.
Security certificate problems may indicate an attempt to find you or intercept any data you send it the server.
We recommend that you close this webpage and do not continue to this website.
Click here to close this wflpage.
Continue to this website (not recommended).
More information
Note
- When using a self-generating certificate, proof of existence, which is one type of https communication, cannot be used for the following reasons.
— The secret key generated by the projector is self-signed.
— A value decided in advance is entered for the Distinguished Name (Common Name, etc.).
— A certificate has not been issued by a CA trusted by the user's system.
For security purposes, we recommend using a self-generating certificate in the case complete security, such as operation tests, is not necessary.
The last certificate becomes effective. - When using a self-generating certificate, [Security Warning] may be displayed when using a browser and connecting with https. In this case, continue with the procedure by referring to the instructions on the screen.
- https connections may not be possible depending on the certificate installed in the projector. In this case, install a CA certificate to your computer. For details, refer to “Installing a CA Certificate to Your Computer.”
Models sold in China do not include https functionality. - If using the https function, be sure to adjust the projector date and time before configuration. If the date and time are not accurate, you may not be able to connect via a browser.
Related Topic
- Menu Operation: Communication Mode
- Configuring the Network Settings of the Projector
• Connecting with https for the First Time
• Installing a CA Certificate to Your Computer
Connecting with https for the First Time
If the https function works improperly when connecting only with https by setting [Communication Mode] to [Https], the computer cannot access the projector. To avoid this, confirm if the https connection is possible through the following steps.
1 Click [Certificate] and display the [Certificate] page.
2 Set [Communication Mode] to [Http and Https].
3 Install a certificate.
For installing a certificate, please refer to "Set a certificate" in "Configuring https Communication."
4 Close the web browser.
5 Start the web browser to display the projector setting window with https connection.
For the connection method, please refer to "When Using the https Function" in "Configuring https Communication."
6 Confirm that the https connection is possible, and then set [Communication Mode] to [Https].
If the setting window or web browser is closed due to https connection failure during confirmation, http connection is still possible as [Http and Https] is selected. Confirm the certificate setting with the http connection, and then confirm if the https connection becomes possible again.
Note
- When [Https] is selected in [Communication Mode] on the [Certificate] page, the computer cannot access the projector if the https connection fails. In this case, press the MENU button on the projector or Remote Commander to display the menu screen, and then select [Connection/Power] - [Communication Mode] - [http] to change the communication mode.
Related Topic
- Configuring https Communication
Installing a CA Certificate to Your Computer
Depending on the type of certificate installed to the projector, it may not be possible to connect to a network because the browser (Internet Explorer) does not display a dialog where you can decide whether or not to accept the certificate. In this case, follow the procedure below and install a CA certificate to your computer. (The following screens are examples when the OS is set to English.)
1 Save the signed CA certificate that is to be installed to the projector to your computer.
The standard certificate file extension is ".cer." Double-click this file to display the certificate dialog.
2 Click [Install Certificate].
[Welcome to the Certificate Import Wizard] will be displayed.
3 Click [Next].
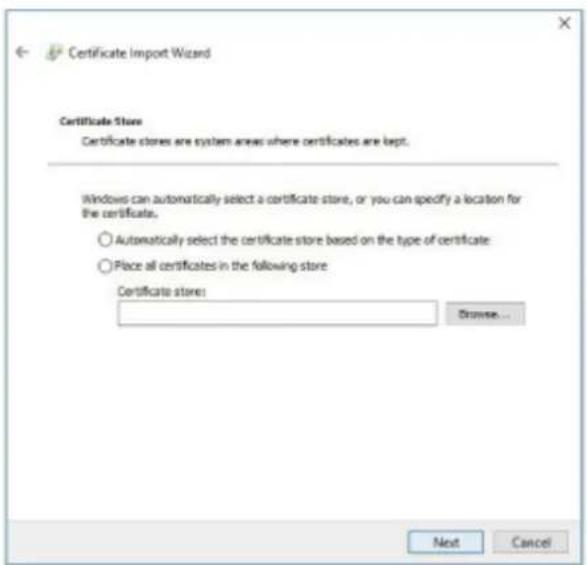
4 Select [Automatically select the certificate store based on the type of certificate] and click [Next].
[Completing the Certificate Import Wizard] will be displayed.
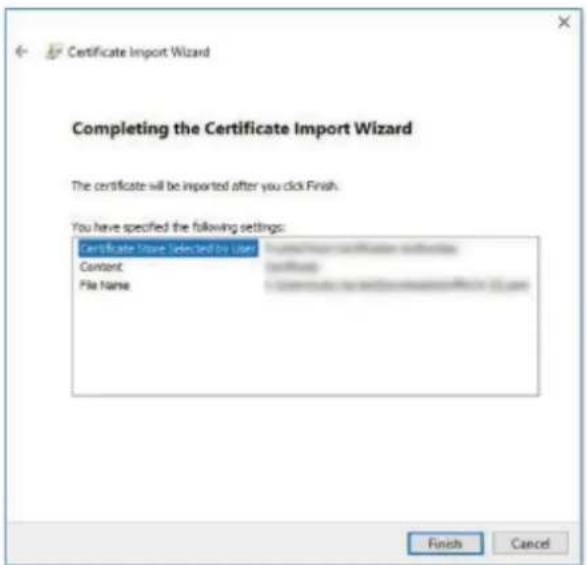
5 Confirm the content and click [Finish].
The CA certificate will be installed.
5-014-280-12(1) Copyright 2020 Sony Corporation
Deleting a CA Certificate Installed to Your Computer
Follow the procedure below to delete the CA certificate installed to your computer.
On Internet Explorer, select [Internet Options] from the [Tools] menu, select the [Contents] tab and [Certificate], then display the [Certificate] dialog.
Example of the screen when the OS is set to English
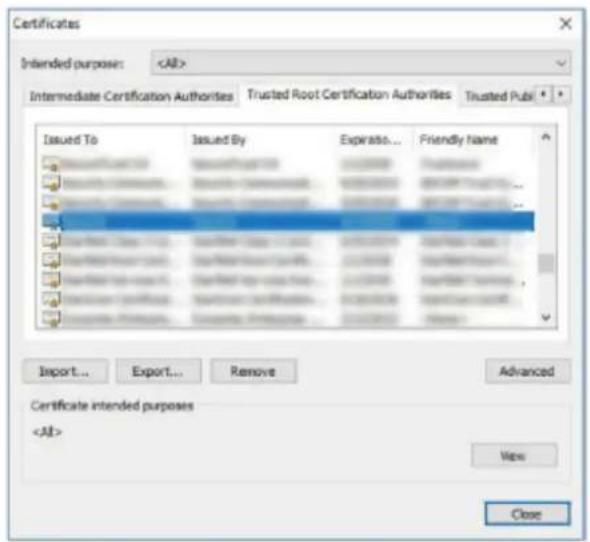
2 Select the certificate you wish to delete.
Normally, CA certificates are saved under [Trusted Root Certificate Authorities].
3 Click [Remove].
The [Delete certificate?] confirmation dialog will appear.
4 Click [Yes].
The certificate will be deleted.
Depending on the certificate type, this procedure may not be able to delete it. In this case, follow the procedure below, confirm the certificate installation status, then delete it.
Note
- Performing the following procedure requires that you log in as a user with administrator privileges.
Open [Run] from the Windows menu, enter [mmc], then click [OK].1.
- On the "Console 1" screen, select [Add/Remove Snap-in] from the [File] menu.
The [Add/Remove Snap-in] dialog will appear.
- Select [Certificate] from the list and click [Add].
[Certificates snap-in] will be displayed.
-
Select [Computer Account] as the certificate being managed for this snap-in and click [Next].
-
Select [Local Computer] as the computer being managed for this snap-in and click [Finish].
The item managing the [Certificate] will be displayed in the console root window. Confirm the certificate in question and delete it.
5-014-280-12(1) Copyright 2020 Sony Corporation
SONY
Help Guide
Data Projector
VPL-CWZ10/CXZ10
On Installation
- When installing the projector, leave space between any walls, etc. and the unit as illustrated. Top view
A: More than 50 cm (19 11/16 inches)
B: More than 50 cm (19 11/16 inches)
C: More than 50 cm (19 11/16 inches)
- Avoid using if the projector is tilted more than 15 degrees horizontally.
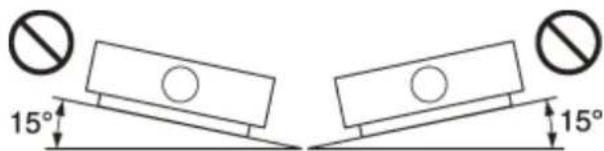
- Avoid using the projector in a location where the temperature or humidity is very high, or temperature is very low.
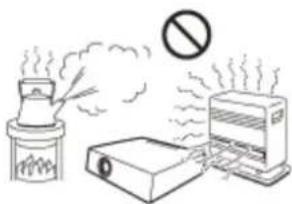
- Avoid installing the projector in a location subject to direct cool or warm air from an air-conditioner. Installing in such a location may cause malfunction of the projector due to moisture condensation or rise in temperature.
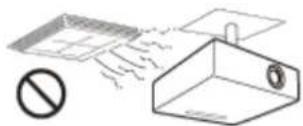
- Avoid installing the projector in a location near a heat or smoke sensor. Installing in such a location may cause malfunction of the sensor.
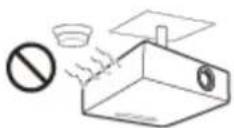
- Avoid installing the projector in a very dusty or extremely smoky environment. Otherwise, the air filter will become obstructed, and this may cause a malfunction of the projector or damage it.
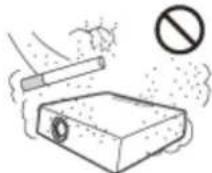
- When using the projector at an altitude of 1,500 ~m or higher, set [High Altitude Mode] in Installation] menu to [On]. Failing to set this mode when using the projector at high altitudes could have adverse effects, such as reducing the reliability of certain components.
Related Topic
• Menu Operation: High Altitude Mode
5-014-280-12(1) Copyright 2020 Sony Corporation
On Cleaning the Lens and the Cabinet
- Be sure to disconnect the AC power cord from the wall outlet before cleaning.
- If you rub on the projector with a stained cloth, the cabinet may be scratched.
- If the projector is exposed to volatile materials such as insecticide, or the projector is in contact with a rubber or vinyl resin product for a long period of time, the projector may deteriorate or the coating may come off.
- Do not touch the lens with bare hands.
- On cleaning the lens surface:
Wipe the lens gently with a soft cloth, such as a glass cleaning cloth. Stubborn stains may be removed with a soft cloth lightly dampened with water. Never use solvent such as alcohol, benzene or thinner, or acid, alkaline or abrasive detergent, or a chemical cleaning cloth.
- On cleaning the cabinet:
Clean the cabinet gently with a soft cloth. Stubborn stains may be removed with a soft cloth lightly dampened with mild detergent solution and wrung, followed by wiping with a soft dry cloth. Never use solvent such as alcohol, benzene or thinner, or acid, alkaline or abrasive detergent, or a chemical cleaning cloth.
5-014-280-12(1) Copyright 2020 Sony Corporation
On Illumination
To obtain the best picture, the front of the screen should not be exposed to direct lighting or sunlight.
5-014-280-12(1) Copyright 2020 Sony Corporation
On Heat Dissipation
The temperature of the projector cabinet may increase during or immediately after use; however, this is not a malfunction.
5-014-280-12(1) Copyright 2020 Sony Corporation
On Screen
When using a screen with an uneven surface, stripes pattern may rarely appear on the screen depending on the distance between the screen and the projector or the zooming magnifications. This is not a malfunction of the projector.
5-014-280-12(1) Copyright 2020 Sony Corporation
SONY
Help Guide
Data Projector
VPL-CWZ10/CXZ10
On Fan
Since the projector is equipped with a fan inside to prevent internal temperature from rising, there may be some noise. This is a normal result of the manufacturing process and does not indicate a malfunction. If, however, in a case of abnormal noise, consult with qualified Sony personnel.
5-014-280-12(1) Copyright 2020 Sony Corporation
On Inspection of Light Source Related Parts
Since the projector uses a laser, when performing maintenance or inspection of light source related parts, particular attention and a safe environment are necessary. Be sure to consult with qualified Sony personnel.
5-014-280-12(1) Copyright 2020 Sony Corporation
Data Projector
VPL-CWZ10/CXZ10
On Disposing Used Products
Do not dispose the used products and general garbage together.
Correctly dispose of used products to avoid harming the environment or the health of yourself and others.
Follow the disposal regulations of your area.
5-014-280-12(1) Copyright 2020 Sony Corporation
On LCD Projector
The LCD projector is manufactured using high-precision technology. You may, however, see tiny black points and/or bright points (red, blue, or green) that continuously appear on the LCD projector. This is a normal result of the manufacturing process and does not indicate a malfunction. Also, when you use multiple LCD projectors to project onto a screen, even if they are of the same model, the color reproduction among projectors may vary, since color balance may be set differently from one projector to the next.
5-014-280-12(1) Copyright 2020 Sony Corporation
Data Projector
VPL-CWZ10/CXZ10
On condensation
If the room temperature where the projector is installed changes rapidly, or if the projector is moved suddenly from a cold to a warm place, condensation in the projector may occur.
As the condensation may cause malfunction, be careful in adjusting temperature settings of the air conditioner.
If condensation occurs, leave the projector turned on for about two hours before use.
5-014-280-12(1) Copyright 2020 Sony Corporation
Notes on Security
- SONY WILL NOT BE LIABLE FOR DAMAGES OF ANY KIND RESULTING FROM A FAILURE TO IMPLEMENT PROPER SECURITY MEASURES ON TRANSMISSION DEVICES, UNAVOIDABLE DATA LEAKS RESULTING FROM TRANSMISSION SPECIFICATIONS, OR SECURITY PROBLEMS OF ANY KIND.
- Depending on the operating environment, unauthorized third parties on the network may be able to access the unit. When connecting the unit to the network, be sure to confirm that the network is protected securely.
- From a safety standpoint, when using the unit connected with the network, it is strongly recommended to access the Control window via a Web browser and change the access limitation settings from the factory preset values. Changing the password regularly is also recommended.
- Do not browse any other website in the Web browser while making settings or after making settings. Since the login status remains in the Web browser, close the Web browser when you complete the settings to prevent unauthorized third parties from using the unit or harmful programs from running.
Related Topic
• Operating the Control Panel
5-014-280-12(1) Copyright 2020 Sony Corporation
Do not place this product close to medical devices
This product (including accessories) has magnet(s) which may interfere with pacemakers, programmable shunt valves for hydrocephalus treatment, or other medical devices. Do not place this product close to persons who use such medical devices. Consult your doctor before using this product if you use any such medical device.
5-014-280-12(1) Copyright 2020 Sony Corporation
Disclaimer
- Always verify that the unit is operating properly before use. SONY WILL NOT BE LIABLE FOR DAMAGES OF ANY KIND INCLUDING, BUT NOT LIMITED TO, COMPENSATION OR REIMBURSEMENT ON ACCOUNT OF THE LOSS OF PRESENT OR PROSPECTIVE PROFITS DUE TO FAILURE OF THIS UNIT, EITHER DURING THE WARRANTY PERIOD OR AFTER EXPIRATION OF THE WARRANTY, OR FOR ANY OTHER REASON WHATSOEVER.
- SONY WILL NOT BE LIABLE FOR CLAIMS OF ANY KIND MADE BY USERS OF THIS UNIT OR MADE BY THIRD PARTIES.
- SONY WILL NOT BE LIABLE FOR THE TERMINATION OR DISCONTINUATION OF ANY SERVICES RELATED TO THIS UNIT THAT MAY RESULT DUE TO CIRCUMSTANCES OF ANY KIND.
5-014-280-12(1) Copyright 2020 Sony Corporation
Cleaning the Air Filter
When the message that prompts cleaning the air filter appears, clean the air filter. If the dust cannot be removed from the air filter even after cleaning, replace the air filter with a new one. For details on a new air filter, consult with qualified Sony personnel.
Caution
If you continue to use the projector even after the message is displayed, dust may accumulate, clogging it. As a result, the temperature may rise inside the projector, leading to a possible malfunction or fire.
1 Turn off the projector and disconnect the AC power cord from a wall outlet.
2 To remove the air filter cover, lift it up while pressing the two levers.
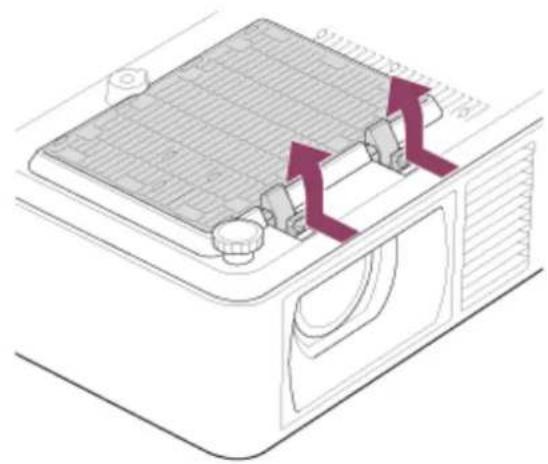
natural_image
Diagram of a solar panel installation with cooling fins and ventilation ducts (no text or symbols)3 Remove the air filter from the air filter cover.
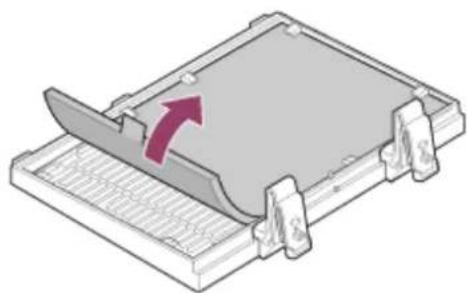
natural_image
3D diagram of a mechanical component with a red arrow indicating direction, no text or symbols present4 Clean the air filter with a vacuum cleaner.
5 Put the air filter back in the air filter cover, then attach the air filter cover to the unit.
Note
- If you remove the air filter cover while the power is turned on, you may accidentally touch the fan inside the projector, which may cause injury.
- Pull the air filter pull stick upwards when removing the air filter from the air filter cover. When attaching the air filter to the air filter cover, make sure the correct side is being attached so that the pull stick is protruding from the air filter.
- Securely attach the air filter to the air filter cover, taking care not to hit the hook of the air filter cover. If the air filter is attached to the air filter cover incorrectly, malfunction may occur.
Related Topic
Message List
5-014-280-12(1) Copyright 2020 Sony Corporation
Cleaning the Air Filter (For Installing to the Ceiling) (For the Customers in India only)
When the message that prompts cleaning the air filter appears, clean the air filter. If the dust cannot be removed from the air filter even after cleaning, replace the air filter with a new one. For details on a new air filter, consult with qualified Sony personnel.
Caution
If you continue to use the projector even after the message is displayed, dust may accumulate, clogging it. As a result, the temperature may rise inside the projector, leading to a possible malfunction or fire.
1 Turn off the projector and disconnect the AC power cord from a wall outlet.
2 Remove the dust cover assembly by pressing the two levers and lifting it up.
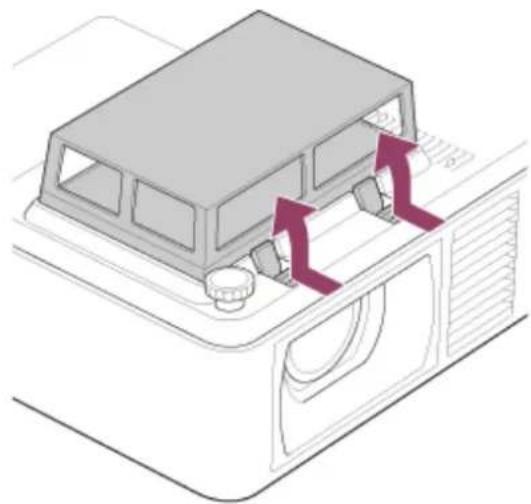
natural_image
Diagram of a vehicle door panel with directional arrows indicating movement or force (no text or symbols)3 Push all four sides of the dust cover to loosen the hook, and then remove the dust cover (A) from the filter frame (B).
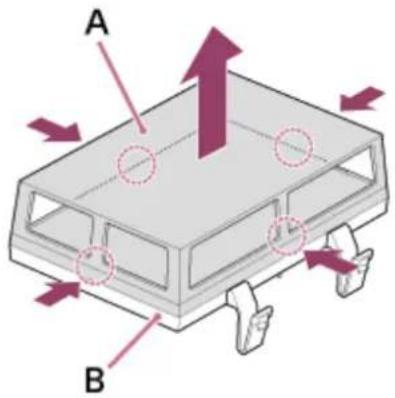
4 Remove the air filters (A) and (B) from the filter frame.
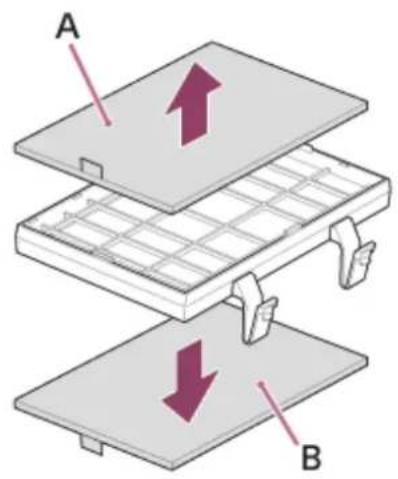
5
Clean the air filters with a vacuum cleaner.
6
Put the air filters and dust cover back into the dust cover assembly, and then attach the dust cover assembly to the unit.
Note
- If you remove the dust cover assembly while the power is turned on, you may accidentally touch the fan inside the projector, which may cause injury.
• Properly attach air filters (A) and (B) to the filter frame, making sure they do not overlap with the hooks on the filter frame. - Securely attach the dust cover to the filter frame, then attach the dust cover assembly to the unit. Incorrect attachment of the dust cover assembly may cause a malfunction.
- Do not use the unit on the floor when the dust cover is removed from the dust cover assembly. Malfunction may occur.
Related Topic
Message List
5-014-280-12(1) Copyright 2020 Sony Corporation
Updating Software
Here are instructions for updating the projector software.
Updating from a USB Drive
You can download the update file to your computer and copy it to a USB drive, then insert it into the projector's USB terminal to perform the update.
This method requires that you prepare your own USB drive, have a computer with internet connection, and be in an environment that allows the update file to be written to the USB drive.
The update file can be downloaded from the Sony website.
https://pro.sony.com
1 Copy the update file to the root folder of the USB drive.
2 Turn off the projector and unplug the AC power cord.
3 Insert the USB drive to the USB terminal of the projector.
4 Plug the AC power cord to the wall outlet while pressing the INPUT key on the projector.
The ON/STANDBY indicator lights up in red and then flashes in orange (updating software).
5 Release the INPUT key.
The ON/STANDBY indicator remains lit in red when update is complete.
6 Press the |/ (On/Standby) key with the USB drive inserted.
The ON/STANDBY indicator starts flashing in green.
When there is another update, the ON/STANDBY indicator remains lit in red and the update proceeds automatically.
When there is no additional update, the projector light turns on.
7 Remove the USB drive from the projector.
If the projector light is on, turn off the projector to remove the USB drive.
Updating by Connecting to a Network
Connecting a computer to the LAN environment that the projector is connected to allows you to update the projector via a network.
The update file can be downloaded from the Sony website.
https://pro.sony.com
For details, refer to "Using the Software Update Function."
Note
- This projector has been confirmed to be compatible with USB 2.0 drives with capacities of up to 8 GB. However, it is not guaranteed to work with all USB drives.
If formatting your USB drive, be sure that the file system is set to FAT32. Formatting with any other type of file system will make the drive incompatible with the projector.
Some USB drives may be incompatible. For details, please check the aforementioned website.
- Do not disconnect the AC power cord during the software update process.
Related Topic
• Using the Software Update Function
5-014-280-12(1) Copyright 2020 Sony Corporation
SONY
Help Guide
Data Projector
VPL-CWZ10/CXZ10
Specifications
Optical System
Projection System
3 LCD system
Display Device
Effective Display Size
VPL-CWZ10: 0.64 in (16.3 mm) × 3, 16:10 Aspect Ratio
VPL-CXZ10: 0.63 in (16.0 mm) × 3, 4:3 Aspect Ratio
Effective Pixels
VPL-CWZ10: 3,072,000 pixels (1,280 × 800 pixels × 3)
VPL-CXZ10: 2,359,296 pixels (1,024 × 768 pixels × 3)
Projection Lens
Focus Adjustment
Manual
Zoom Adjustment
Manual (1.6×)
Light Source
Laser diode
Projection Image Size
40 in - 300 in (1.02 m - 7.62 m)
Effective Light Flux (Brightness)
5,000 Im ([Light Output Mode]: [Standard])
Electric System
Speaker
16 W × 1 (Monaural)
Supported Scan Frequency ^*1
Horizontal: 15 kHz - 92 kHz, Vertical: 48 Hz - 92 Hz

Displayable Resolution ^*1
For Computer Signal Input
Maximum Display Resolution: 1,920 × 1,200 pixels
For Video Signal Input
NTSC, PAL, SECAM, 480/60i, 576/50i, 480/60p, 576/50p, 720/60p, 720/50p, 1080/60i, 1080/50i, 1080/60p, 1080/50p, 1080/24p
Color System
NTSC3.58, PAL, SECAM, NTSC4.43, PAL-M, PAL-N, PAL60
*1 For details, refer to the supported signal table.
Input/Output Terminals
For Computer/Video Input and Output
Input A
RGB/Y PB PR Input Terminal: Mini D-sub 15 pin (Female), G with sync/Y: 1 Vp-p±2 dB, sync negative, 75 Ω terminated, RGB signal/PB PR signal: 0.7 Vp-p±2 dB, 75 Ω terminated, Sync signal: TTL level, high impedance, positive-negative polarity
Audio Input Terminal: Stereo mini jack, Rated input: 500 mVrms, Input impedance: 47 kΩ or above
Input B/Input C
HDMI Input Terminal: 19-pin HDMI, HDCP
Audio Input Terminal: HDMI audio supported
Video Input
Video Input Terminal: Phono jack, 1 Vp-p±2 dB, sync negative, 75 Ω terminated
Audio Input Terminal: Shared with Input A
Output
Audio Output Terminal: Stereo mini jack, Stereo, 1 Vrms (maximum volume, when inputting 500 mVrms), Output impedance: 5 kΩ
Other Terminals
RS-232C Terminal: D-Sub 9 pin (Male)
LAN Terminal: RJ45, 10BASE-T/100BASE-TX
USB Terminal: Type A
Power Supply/Other
Operating Temperature (Operating Humidity)
0 °C to 40 °C (32 °F to 104 °F) (20% - 80% (No condensation))
Storage Temperature (Storage Humidity)
-10^ to +60^ (14 °F to 140 °F) (20% - 80% (No condensation))
Power Requirements
VPL-CWZ10: 100 V to 240 V AC, 3.4 A – 1.5 A, 50/60 Hz
VPL-CXZ10: 100 V to 240 V AC, 3.4 A – 1.5 A, 50/60 Hz
Power Consumption
AC 100 V to 120 V
VPL-CWZ10: 342 W
VPL-CXZ10: 342 W
AC 220 V to 240 V
VPL-CWZ10: 326 W
VPL-CXZ10: 326 W
Standby Power Consumption (Standby Mode)
AC 100 V to 120 V
0.5 W (When setting [Standby Mode] to [Low])
AC 220 V to 240 V
0.5 W (When setting [Standby Mode] to [Low])
Standby Power Consumption (Network Standby Mode)
AC 100 V to 120 V
2.0 W (When setting [Standby Mode] to [Low] and [Remote Start] to [On])
15.0 W (If all network ports are connected) (When setting [Standby Mode] to [Standard])
AC 220 V to 240 V
2.0 W (When setting [Standby Mode] to [Low] and [Remote Start] to [On])
15.0 W (If all network ports are connected) (When setting [Standby Mode] to [Standard])
Heat Dissipation
AC 100 V to 120 V
VPL-CWZ10: 1,167 BTU/h
VPL-CXZ10: 1,167 BTU/h
AC 220 V to 240 V
VPL-CWZ10: 1,112 BTU/h
VPL-CXZ10: 1,112 BTU/h
Standard Dimensions (W/H/D)
Approx. 371 mm × 117 mm × 319.3 mm (14 19/32 in × 4 19/32 in × 12 9/16 in)
Approx. 371 mm × 100 mm × 319.3 mm (14 19/32 in × 3 15/16 in × 12 9/16 in) (Without projecting parts)
Mass
Approx. 5.7 kg (13 lb)
Supplied Accessories
Remote Commander (RM-PJ8) (1)
Lithium battery (CR2025) (1)
AC power cord (1)
Mini D-sub 15-pin cable (1.8 m) (1) (1-970-584-11/Sony)
Air filter cover (1) ^*1
Dust cover assembly (1) ^*1
Setup Guide (1)
*1 For the customers in India only
Design and specifications of the unit, including the optional accessories, are subject to change without notice.
Related Topic
• Compatible Signal List (Computer Signal)
• Compatible Signal List (Video Signal)
5-014-280-12(1) Copyright 2020 Sony Corporation
Pin Assignment (HDMI Terminal)
HDMI Terminal (HDMI, Female)
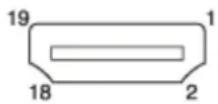
| Pin Number Function | |
| 1 T.M.D.S. Data2 + | |
| 2 T.M.D.S. Data2 Shield | |
| 3 T.M.D.S. Data2 - | |
| 4 T.M.D.S. Data1 + | |
| 5 T.M.D.S. Data1 Shield | |
| 6 T.M.D.S. Data1 - | |
| 7 T.M.D.S. Data0 + | |
| 8 T.M.D.S. Data0 Shield | |
| 9 T.M.D.S. Data0 - | |
| 10 T.M.D.S. Clock + | |
| 11 T.M.D.S. Clock Shield | |
| 12 T.M.D.S. Clock - | |
| 13 N.C. | |
| 14 RESERVED (N.C.) | |
| 15 SCL | |
| 16 SDA | |
| 17 DDC GND | |
| 18 +5V Power | |
| 19 Hot Plug Detect |
Pin Assignment (RGB Input Terminal)
RGB Input Terminal (Mini D-sub 15 pin, Female)
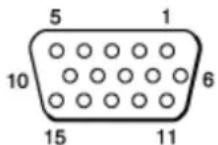
| Pin Number Function | |
| 1 Image Input (Red) R | |
| 2 Image Input (Green) G | |
| 3 Image Input (Blue) B | |
| 4 Ground | |
| 5 RESERVE | |
| 6 Ground (For red) | |
| 7 Ground (For green) | |
| 8 Ground (For blue) | |
| 9 Power input for DDC | |
| 10 Ground | |
| 11 Ground | |
| 12 DDC/SDA | |
| 13 Horizontal synchronization signal | |
| 14 Vertical synchronization signal | |
| 15 DDC/SCL | |
Pin Assignment (RS-232C Terminal)
RS-232C Terminal (D-Sub 9 pin, Male)
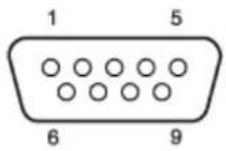
| Pin Number | Function |
| 1 | NC |
| 2 RXDA | |
| 3 TXDA | |
| 4 DTR | |
| 5 GND | |
| 6 | NC |
| 7 RTS | |
| 8 CTS | |
| 9 | NC |
5-014-280-12(1) Copyright 2020 Sony Corporation
Pin Assignment (USB Terminal)
USB Terminal (Type A, Female)
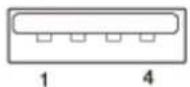
| Pin Number Function | |
| 1 V BUS (4.4 - 5.25 V) | |
| 2 Data – | |
| 3 Data + | |
| 4 Ground | |
5-014-280-12(1) Copyright 2020 Sony Corporation
Compatible Signal List (Computer Signal)
Note
The projector may not be able to display the image properly if an input signal not listed in the table is used.
- With input signals that differ from the panel display resolution, the input signal may not be displayed at the same resolution, and the text, ruled line thickness, and so on may become unbalanced.
| Resolution fH[kHz]/fV[Hz] INPUT A INPUT B / INPUT C | |||
| 640 x 350 31.5/70 Compatible | Not compatible | ||
| 640 x 350 37.9/85 Compatible | Not compatible | ||
| 640 x 400 31.5/70 Compatible | Not compatible | ||
| 640 x 400 37.9/85 Compatible | Not compatible | ||
| 640 x 480 31.5/60 Compatible | Compatible | ||
| 640 x 480 35.0/67 Compatible | Not compatible | ||
| 640 x 480 37.9/73 Compatible | Not compatible | ||
| 640 x 480 37.5/75 Compatible | Not compatible | ||
| 640 x 480 43.3/85 Compatible | Not compatible | ||
| 800 x 600 35.2/56 Compatible | Not compatible | ||
| 800 x 600 37.9/60 Compatible | Compatible | ||
| 800 x 600 48.1/72 Compatible | Not compatible | ||
| 800 x 600 46.9/75 Compatible | Not compatible | ||
| 800 x 600 53.7/85 Compatible | Not compatible | ||
| 832 x 624 49.7/75 Compatible | Not compatible | ||
| 1024 x 768 48.4/60 Compatible | Compatible | ||
| 1024 x 768 56.5/70 Compatible | Not compatible | ||
| 1024 x 768 60.0/75 Compatible | Not compatible | ||
| 1024 x 768 68.7/85 Compatible | Not compatible | ||
| 1152 x 864 64.0/70 Compatible | Not compatible | ||
| 1152 x 864 67.5/75 Compatible | Not compatible | ||
| 1152 x 864 77.5/85 Compatible | Not compatible | ||
| 1152 x 900 61.8/66 Compatible | Not compatible | ||
| 1280 x 960 60.0/60 Not compatible | Compatible | ||
| 1280 x 1024 | 64.0/60 Compatible | Compatible | |
| 1280 x 1024 | 80.0/75 Compatible | Not compatible | |
| 1280 x 1024 | 91.1/85 Compatible | Not compatible | |
| 1400 x 1050 | 65.3/60 Not compatible | Compatible | |
| 1600 x 1200 | 75.0/60 Compatible | Compatible | |
| 1280 x 768 | 47.8/60 Not compatible | Compatible | |
| 1280 x 720 | 45.0/60 Compatible | Compatible^*1 | |
| 1920 x 1080 | 67.5/60 Not compatible | Compatible^*2 | |
| 1366 x 768 | 47.7/60 Compatible | Compatible | |
| 1440 x 900 | 55.9/60 Compatible | Compatible | |
| 1680 x 1050 | 65.3/60 Not compatible | Compatible | |
| 1280 x 800 | 49.7/60 Compatible | Compatible | |
| 1920 x 1200 | 74.0/60 | Compatible^*3 | Compatible^*3 |
*1 Identified as a 720/60p video transmission signal.
*2 Identified as a 1080/60p video transmission signal.
*3 Only 720/60p VESA Reduced Blanking signals are compatible.
5-014-280-12(1) Copyright 2020 Sony Corporation
Compatible Signal List (Video Signal)
Note
The projector may not be able to display the image properly if an input signal not listed in the table is used.
- With input signals that differ from the panel display resolution, the input signal may not be displayed at the same resolution, and the text, ruled line thickness, and so on may become unbalanced.
| Signal Name fV[Hz] | VIDEO IN | INPUT A *1 | INPUT B / INPUT C |
| NTSC 60 | Not compatible Not | compatible | |
| PAL/SECAM 50 | Compatible Not compatible | Not compatible | |
| 480i 60 | Not compatible | Compatible Compatible | |
| 576i 50 | Not compatible | Compatible Compatible | |
| 480p 60 | Not compatible | Compatible Compatible | |
| 576p 50 | Not compatible | Compatible Compatible | |
| 1080i 60 | Not compatible | Compatible Compatible | |
| 1080i 50 | Not compatible | Compatible Compatible | |
| 720p 60 | Not compatible | Compatible Compatible | |
| 720p 50 | Not compatible | Compatible Compatible | |
| 1080p 60 | Not compatible | Not compatible | Compatible |
| 1080p 50 | Not compatible | Not compatible | Compatible |
| 1080p 24 | Not compatible | Not compatible | Compatible |
*1 Only compatible with G/Y signal with sync.
Projection Distance
The projection distance is the distance from the front surface of the lens to the projection surface.
The projection screen height is the distance from the point of intersection (A in the image) of the line drawn perpendicular to the surface projected from the lens center and the projection surface, to the lower edge (upper edge when installed to the ceiling) of the projection screen.
For this projector, the projection distance value for when the projector is installed to the floor and to the ceiling is the same.
When installed to the floor/ceiling (install so that the projector upper surface is parallel with the ceiling)
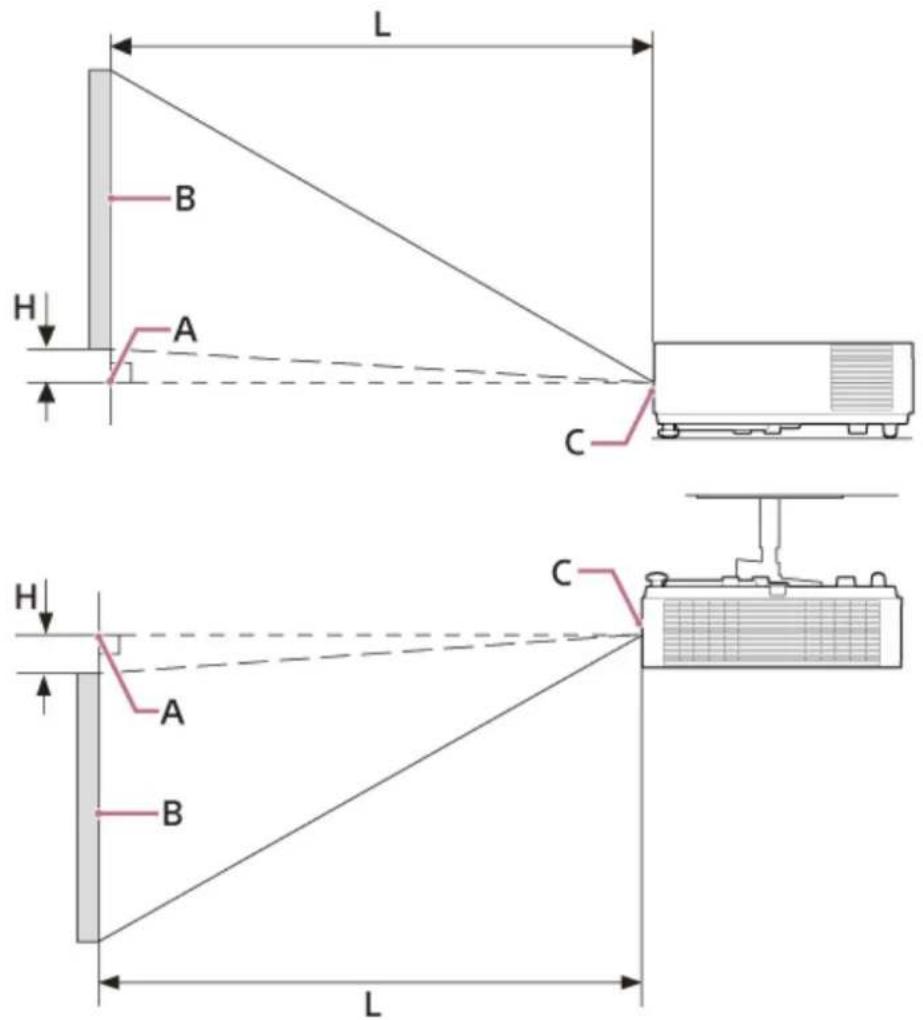
A: The point of intersection of the line drawn perpendicular to the surface projected from the lens center and the projection surface
B: Projection screen
C: Lens front surface
H: Projection screen height position
L: Projection distance
Related Topic
• Projection Distance/Projection Distance Formula (VPL-CWZ10)
• Projection Distance/Projection Distance Formula (VPL-CXZ10)
5-014-280-12(1) Copyright 2020 Sony Corporation
Projection Distance/Projection Distance Formula (VPL-CWZ10)
Projection Distance
80-inch screen size (2.03 m) (Horizontal: 1.72 m × Vertical: 1.08 m) (Width 68 in × Height 42 in)
• Projection Distance L: 2.22 m - 3.56 m (87 in - 140 in)
• Projection Screen Height Position H: -0.14 m (-5 in)
100-inch screen size (2.54 m) (Horizontal: 2.15 m × Vertical: 1.35 m) (Width 85 in × Height 53 in)
• Projection Distance L: 2.78 m - 4.45 m (109 in - 175 in)
• Projection Screen Height Position H: -0.17 m (-7 in)
120-inch screen size (3.05 m) (Horizontal: 2.58 m × Vertical: 1.62 m) (Width 102 in × Height 64 in)
• Projection Distance L: 3.33 m - 5.34 m (131 in - 210 in)
• Projection screen height position H: -0.21 m (-8 in)
150-inch screen size (3.81 m) (Horizontal: 3.23 m × Vertical: 2.02 m) (Width 127 in × Height 79 in)
• Projection Distance L: 4.17 m - 6.68 m (164 in - 263 in)
• Projection screen height position H: -0.26 m (-10 in)
200-inch screen size (5.08 m) (Horizontal: 4.31 m × Vertical: 2.69 m) (Width 170 in × Height 106 in)
• Projection Distance L: 5.57 m - 8.91 m (219 in - 351 in)
• Projection screen height position H: -0.35 m (-14 in)
Projection Distance Formula
D: Screen Size (Inches)
Ex.) If the screen size is 80 inches, enter 80 for D.
H: Height from center of lens to bottom edge of screen
Formula 1 (Unit: m (in))
- Projection Distance L (Minimum): L = 0.027909 × D - 0.0142( L = 1.100000 × D - 1.0000)
- Projection Distance L (Maximum): L = 0.044591 × D - 0.00882 ( L = 1.759091 × D - 0.88182 )
Formula 2 (Unit: m (in))
- Projection Screen Height Position H: H = -0.00174 × D ( H = -0.06817 × D )
Related Topic
Projection Distance
Projection Distance/Projection Distance Formula (VPL-CXZ10)
Projection Distance
80-inch screen size (2.03 m) (Horizontal: 1.63 m × Vertical: 1.22 m) (Width 64 in × Height 48 in)
• Projection Distance L: 2.28 m - 3.67 m (90 in - 145 in)
• Projection Screen Height Position H: -0.20 m (-8 in)
100-inch screen size (2.54 m) (Horizontal: 2.03 m × Vertical: 1.52 m) (Width 80 in × Height 60 in)
• Projection Distance L: 2.86 m - 4.61 m (113 in - 181 in)
• Projection Screen Height Position H: -0.25 m (-10 in)
120-inch screen size (3.05 m) (Horizontal: 2.44 m × Vertical: 1.83 m) (Width 96 in × Height 72 in)
• Projection Distance L: 3.45 m - 5.54 m (136 in - 218 in)
• Projection Screen Height Position H: -0.30 m (-12 in)
150-inch screen size (3.81 m) (Horizontal: 3.05 m × Vertical: 2.29 m) (Width 120 in × Height 90 in)
• Projection Distance L: 4.31 m - 6.94 m (170 in - 273 in)
• Projection Screen Height Position H: -0.38 m (-15 in)
200-inch screen size (5.08 m) (Horizontal: 4.06 m × Vertical: 3.05 m) (Width 160 in × Height 120 in)
• Projection Distance L: 5.76 m - 9.26 m (227 in - 364 in)
• Projection Screen Height Position H: -0.51 m (-20 in)
Projection Distance Formula
D: Screen Size (Inches)
Ex.) If the screen size is 80 inches, enter 80 for D.
H: Height from center of lens to bottom edge of screen
Formula 1 (Unit: m (in))
- Projection Distance L (Minimum): L = 0.028989 × D - 0.036523( L = 1.140909 × D - 1.118182)
- Projection Distance L (Maximum): L = 0.046568 × D - 0.049864 ( L = 1.827273 × D - 1.345455 )
Formula 2 (Unit: m (in))
- Projection Screen Height Position H: H = -0.00253 × D ( H = -0.10000 × D )
Related Topic
Projection Distance
SONY
Help Guide
Data Projector
VPL-CWZ10/CXZ10
Reading the Indicator
You can check the projector status or abnormality by checking the lighting/flashing status of the ON/STANDBY indicator and WARNING indicator.
If the indicators flash in red, follow the instructions under "Warning Indication and Remedies" to resolve the issue.
Top of the main unit

Status Indication
WARNING: Off, ON/STANDBY: Lights in red
WARNING ON/STANDBY


Standby mode
The power is supplied to the projector and the projector is in a standby mode according to the setting.
WARNING: Off, ON/STANDBY: Flashes in green
WARNING ON/STANDBY


Warm-up state
The projector is warming up after it is turned on.
WARNING: Off, ON/STANDBY: Lights in green
WARNING ON/STANDBY


Power on state
The projector is ready for projection.
WARNING: Off, ON/STANDBY: Lights in orange
WARNING ON/STANDBY


Other standby state
State in which no signal is set (light off).
WARNING: Off, ON/STANDBY: Flashes in orange
WARNING ON/STANDBY


Updating software
The projector software is being updated.
Warning Indication and Remedies
WARNING: Flashes in red, ON/STANDBY: Lights in red
WARNING ON/STANDBY


Number of flashes: Twice
The top cover is not properly attached.
Check the attachment of the top cover. If it has been loosened due to a strong impact to the projector, consult with qualified Sony personnel.
Number of flashes: Three times
The light source does not light properly.
Unplug the AC power cord and make sure the ON/STANDBY indicator turns off, then plug the AC power cord into the wall outlet and turn on the projector.
WARNING: Flashes in red, ON/STANDBY: Flashes in red
Both indicators flash
WARNING ON/STANDBY


Number of flashes: Twice
The temperature in the projector is abnormal.
- Check if the air filter is clogged, then clean or replace it.
- Check if the ventilation holes (intake/exhaust) are not blocked by the wall or an object and secure a sufficient gap.
- Check the ambient temperature and use the projector within the range of operating temperature.
Note
- If the indicators flash in a manner other than described above, unplug the AC power cord and make sure the ON/STANDBY indicator turns off, then plug the AC power cord into the wall outlet and turn on the projector. If the problem still persists, consult with qualified Sony personnel.
Related Topic
• Cleaning the Air Filter
Message List
If a message such as one of the following appears on the screen, follow the instructions in the table to resolve the issue.
| Message Meaning/Solution | |
| Clean the filter. Projector temperature is high. The light will turn off in 1 minute. | An increase in the inner projector temperature has been detected.Take the following measures.· Confirm that the air filter is not blocked and either clean the filter or replace it.· Confirm that the ventilation holes are not blocked by a wall or other object, and secure a sufficient gap.· Check the projector's ambient temperature and use it within a temperature range in which it is operable.· The projector's High Altitude Mode is turned [On]. Configure the setting in accordance with your usage environment. |
| Frequency is out of range! | Change the signal to one that is compatible with the projector from the playback device screen settings. |
| Please check Input-A Signal Sel. | Set [Input-A Signal Sel.] to [Auto] or a setting appropriate for the input signal. |
| Not applicable! An invalid | key was pressed. |
| The control keys are locked! | The panel key lock has been set. |
| Light Dimming | This is displayed when the light output decreases due to the settings for when there is no change in the signal. When a signal change or operation (Remote Commander or control panel) is detected, it will revert to its normal state. |
Related Topic
• Parts and Controls (Main Unit)
• Parts and Controls (Remote Commander and Control Panel)
- Menu Operation: Control Key Lock
- Menu Operation: Input-A Signal Sel.
- Menu Operation: ECO
- Cleaning the Air Filter
• Compatible Signal List (Computer Signal)
• Compatible Signal List (Video Signal)
SONY
Help Guide
Data Projector
VPL-CWZ10/CXZ10
No Power
- Confirm that the AC power cord is firmly inserted.
- If [Control Key Lock] is [On], power cannot be supplied via the 1 / (On/Standby) key on the main unit. Set [Control Key Lock] in the ☐ [Operation] menu to [Off].
Related Topic
- Menu Operation: Control Key Lock
5-014-280-12(1) Copyright 2020 Sony Corporation
No Image is Displayed
- Confirm that the cable connected to the playback device is firmly inserted.
- Confirm that the computer's output settings are set to external monitor output.
For laptops, etc., setting the output signal to be output both to the computer's LCD and the external monitor may cause the image to not be displayed correctly on the external monitor. If this occurs, configure the computer's settings so that it only outputs to the external monitor.
- Confirm that the input is selected correctly.
- Confirm that the BLANK key is not pressed and that the image is not being deleted.
Related Topic
- Parts and Controls (Remote Commander and Control Panel)
• Precautions When Connecting - Projecting Images
5-014-280-12(1) Copyright 2020 Sony Corporation
SONY
Help Guide
Data Projector
VPL-CWZ10/CXZ10
Cannot Connect to Computer
- Check the network settings.
Related Topic
• Menu Operation: Network Setting
5-014-280-12(1) Copyright 2020 Sony Corporation
SONY
Help Guide
Data Projector
VPL-CWZ10/CXZ10
No On-screen Display
- Set [Status] in the ☐ [Operation] menu to [On].
Related Topic
- Menu Operation: Status
5-014-280-12(1) Copyright 2020 Sony Corporation
Data Projector
VPL-CWZ10/CXZ10
Screen Aspect Ratio is Strange/Screen Display is Small/Part of Image Not Displayed
- The screen may not be displayed properly sometimes if the input signal is not properly determined. If this occurs, manually configure [Aspect] in the 📄 [Screen] menu.
Related Topic
- Menu Operation: Aspect
5-014-280-12(1) Copyright 2020 Sony Corporation
Trapezoidal Screen
- If the projection is diagonal relative to the projection surface, the screen will appear trapezoidal. If this occurs, you can use the keystone correction function to correct the issue.
Related Topic
- Correcting a Vertical Trapezoid
- Correcting a Horizontal Trapezoid
5-014-280-12(1) Copyright 2020 Sony Corporation
SONY
Help Guide
Data Projector
VPL-CWZ10/CXZ10
Screen Distortion
- The corner keystone setting is active. Deactivate [Corner Keystone] in the ☐ [Installation] menu.
Related Topic
- Correcting Screen Distortion
5-014-280-12(1) Copyright 2020 Sony Corporation
Data Projector
VPL-CWZ10/CXZ10
Screen is Too Dark/Bright
- The [Brightness], [Contrast], and [Light Output Mode] settings change the screen brightness. In the 📁 [Projection Setting] menu, confirm that the values are set to appropriate values.
- [With Static Signal] under [ECO] in the ➕ [Connection/Power] menu is set to [Light Dimming].
- If there is no image signal, power consumption is reduced, and the light intensity decreases.
- When using the projector in a location where the surrounding temperature is high, the luminance is sometimes reduced to protect the projector.
Related Topic
- Menu Operation: Contrast
- Menu Operation: Brightness
- Menu Operation: Light Settings
- Menu Operation: ECO
5-014-280-12(1) Copyright 2020 Sony Corporation
SONY
Help Guide
Data Projector
VPL-CWZ10/CXZ10
Blurry Screen
- Adjust the focus.
- The screen will blur if there is condensation on the lens. If there is condensation, keep the projector plugged in and let it sit for approximately two hours.
Related Topic
• Adjusting the Screen Focus
- On condensation
5-014-280-12(1) Copyright 2020 Sony Corporation
SONY
Help Guide
Data Projector
VPL-CWZ10/CXZ10
Screen Noise
- Confirm that the cable connected to the playback device is firmly inserted.
Related Topic
• Precautions When Connecting
5-014-280-12(1) Copyright 2020 Sony Corporation
SONY
Help Guide
Data Projector
VPL-CWZ10/CXZ10
No Sound
- Confirm that the cable that is connected to the playback device or the external audio device is firmly inserted.
- Confirm that the external audio device is configured correctly.
- If [Speaker] is set to [Off], there will be no sound output. Set [Speaker] in the ☑ [Function] menu to [On].
- If the MUTING key was pressed and the sound is muted, there will be no sound output. Press the MUTING key one more time.
- Confirm that the volume is not set to the minimum.
Related Topic
• Connecting to Audio Equipment
- Menu Operation: Speaker
5-014-280-12(1) Copyright 2020 Sony Corporation
SONY
Help Guide
Data Projector
VPL-CWZ10/CXZ10
Remote Commander Does Not Function
- Confirm that the batteries are inserted correctly.
- Confirm that the batteries are not depleted.
Related Topic
- Inserting the Battery into the Remote Commander
5-014-280-12(1) Copyright 2020 Sony Corporation
Loud Fan
- The noise from the fan may grow louder due to the following types of situations where it is necessary to cool the light source or other components.
- Set [Light Output Mode] in [Light Settings] in the ⚠️ [Projection Setting] menu to [Standard].
-
The projector is being used at a high altitude (set [High Altitude Mode] in the [Installation] menu to [On]).
— The projector is being used in a location where the surrounding temperature is high. -
Confirm that the air filter is not blocked and either clean the filter or replace it.
- Confirm that the ventilation holes are not blocked by a wall or other object, and a secure sufficient gap.
Related Topic
- Cleaning the Air Filter
- On Installation
5-014-280-12(1) Copyright 2020 Sony Corporation
Notifications Related to GNU GPL/LGPL-applicable Software
This product contains the following software that has received a GNU General Public License (“GPL” below) or GNU Lesser General Public License (“LGPL” below).
We hereby inform you that you have the right to obtain, alter, and redistribute the software source code in accordance with the attached GPL/LGPL conditions.
The source code is available on our website. It can be downloaded from the following URL:
http://oss.sony.net/Products/Linux
Please refrain from contacting us regarding the contents of the source code.
Listed below are the GNU GENERAL PUBLIC LICENSE and GNU LESSER GENERAL PUBLIC LICENSE.
GNU GENERAL PUBLIC LICENSE
Version 2, June 1991
Copyright © 1989, 1991 Free Software Foundation, Inc.,
51 Franklin Street, Fifth Floor, Boston, MA 02110-1301 USA
Everyone is permitted to copy and distribute verbatim copies of this license document, but changing it is not allowed.
Preamble
The licenses for most software are designed to take away your freedom to share and change it. By contrast, the GNU General Public License is intended to guarantee your freedom to share and change free software--to make sure the software is free for all its users. This General Public License applies to most of the Free Software Foundation's software and to any other program whose authors commit to using it. (Some other Free Software Foundation software is covered by the GNU Lesser General Public License instead.) You can apply it to your programs, too.
When we speak of free software, we are referring to freedom, not price.
Our General Public Licenses are designed to make sure that you have the freedom to distribute copies of free software (and charge for this service if you wish), that you receive source code or can get it if you want it, that you can change the software or use pieces of it in new free programs; and that you know you can do these things.
To protect your rights, we need to make restrictions that forbid anyone to deny you these rights or to ask you to surrender the rights. These restrictions translate to certain responsibilities for you if you distribute copies of the software, or if you modify it.
For example, if you distribute copies of such a program, whether gratis or for a fee, you must give the recipients all the rights that you have. You must make sure that they, too, receive or can get the source code. And you must show them these terms so they know their rights.
We protect your rights with two steps: (1) copyright the software, and (2) offer you this license which gives you legal permission to copy, distribute and/or modify the software.
Also, for each author's protection and ours, we want to make certain that everyone understands that there is no warranty for this free software. If the software is modified by someone else and passed on, we want its recipients to know that what they have is not the original, so that any problems introduced by others will not reflect on the original authors' reputations.
Finally, any free program is threatened constantly by software patents.
We wish to avoid the danger that redistributors of a free program will individually obtain patent licenses, in effect making the program proprietary. To prevent this, we have made it clear that any patent must be licensed for everyone's free use or not licensed at all.
The precise terms and conditions for copying, distribution and modification follow.
TERMS AND CONDITIONS FOR COPYING, DISTRIBUTION AND MODIFICATION
- This License applies to any program or other work which contains a notice placed by the copyright holder saying it may be distributed under the terms of this General Public License. The "Program", below, refers to any such program or work, and a "work based on the Program" means either the Program or any derivative work under copyright law: that is to say, a work containing the Program or a portion of it, either verbatim or with modifications and/or translated into
another language. (Hereinafter, translation is included without limitation in the term "modification".) Each licensee is addressed as "you".
Activities other than copying, distribution and modification are not covered by this License; they are outside its scope. The act of running the Program is not restricted, and the output from the Program is covered only if its contents constitute a work based on the Program (independent of having been made by running the Program).
Notifications Related to GNU GPL/LGPL-applicable Software
Whether that is true depends on what the Program does.
- You may copy and distribute verbatim copies of the Program's source code as you receive it, in any medium, provided that you conspicuously and appropriately publish on each copy an appropriate copyright notice and disclaimer of warranty; keep intact all the notices that refer to this License and to the absence of any warranty; and give any other recipients of the Program a copy of this License along with the Program. You may charge a fee for the physical act of transferring a copy, and you may at your option offer warranty protection in exchange for a fee.
- You may modify your copy or copies of the Program or any portion of it, thus forming a work based on the Program, and copy and distribute such modifications or work under the terms of Section 1 above, provided that you also meet all of these conditions:
a) You must cause the modified files to carry prominent notices stating that you changed the files and the date of any change.
b) You must cause any work that you distribute or publish, that in whole or in part contains or is derived from the Program or any part thereof, to be licensed as a whole at no charge to all third parties under the terms of this License. c) If the modified program normally reads commands interactively when run, you must cause it, when started running for such interactive use in the most ordinary way, to print or display an announcement including an appropriate copyright notice and a notice that there is no warranty (or else, saying that you provide a warranty) and that users may redistribute the program under these conditions, and telling the user how to view a copy of this License. (Exception: if the Program itself is interactive but does not normally print such an announcement, your work based on the Program is not required to print an announcement.) These requirements apply to the modified work as a whole. If identifiable sections of that work are not derived from the Program, and can be reasonably considered independent and separate works in themselves, then this License, and its terms, do not apply to those sections when you distribute them as separate works. But when you distribute the same sections as part of a whole which is a work based on the Program, the distribution of the whole must be on the terms of this License, whose permissions for other licensees extend to the entire whole, and thus to each and every part regardless of who wrote it. Thus, it is not the intent of this section to claim rights or contest your rights to work written entirely by you; rather, the intent is to exercise the right to control the distribution of derivative or collective works based on the Program. In addition, mere aggregation of another work not based on the Program with the Program (or with a work based on the Program) on a volume of a storage or distribution medium does not bring the other work under the scope of this License. - You may copy and distribute the Program (or a work based on it, under Section 2) in object code or executable form under the terms of Sections 1 and 2 above provided that you also do one of the following:
a) Accompany it with the complete corresponding machinereadable source code, which must be distributed under the terms of Sections 1 and 2 above on a medium customarily used for software interchange; or,
b) Accompany it with a written offer, valid for at least three years, to give any third party, for a charge no more than your cost of physically performing source distribution, a complete machine-readable copy of the corresponding source code, to be distributed under the terms of Sections 1 and 2 above on a medium customarily used for software interchange; or,
c) Accompany it with the information you received as to the offer to distribute corresponding source code. (This alternative is allowed only for noncommercial distribution and only if you received the program in object code or executable form with such an offer, in accord with Subsection b above.) The source code for a work means the preferred form of the work for making modifications to it. For an executable work, complete source code means all the source code for all modules it contains, plus any associated interface definition files, plus the scripts used to control compilation and installation of the executable. However, as a special exception, the source code distributed need not include anything that is normally distributed (in either source or binary form) with the major components (compiler, kernel, and so on) of the operating system on which the executable runs, unless that component itself accompanies the executable. If distribution of executable or object code is made by offering access to copy from a designated place, then offering equivalent access to copy the source code from the same place counts as distribution of the source code, even though third parties are not compelled to copy the source along with the object code. - You may not copy, modify, sublicense, or distribute the Program except as expressly provided under this License. Any attempt otherwise to copy, modify, sublicense or distribute the Program is void, and will automatically terminate your rights under this License. However, parties who have received copies, or rights, from you under this License will not have their licenses terminated so long as such parties remain in full compliance.
- You are not required to accept this License, since you have not signed it. However, nothing else grants you permission to modify or distribute the Program or its derivative works. These actions are prohibited by law if you do not accept this License. Therefore, by modifying or distributing the Program (or any work based on the Program), you indicate your
acceptance of this License to do so, and all its terms and conditions for copying, distributing or modifying the Program or works based on it.
-
Each time you redistribute the Program (or any work based on the Program), the recipient automatically receives a license from the original licensor to copy, distribute or modify the Program subject to these terms and conditions. You may not impose any further restrictions on the recipients' exercise of the rights granted herein. You are not responsible for enforcing compliance by third parties to this License.
-
If, as a consequence of a court judgment or allegation of patent infringement or for any other reason (not limited to patent issues), conditions are imposed on you (whether by court order, agreement or otherwise) that contradict the conditions of this License, they do not excuse you from the conditions of this License. If you cannot distribute so as to satisfy simultaneously your obligations under this License and any other pertinent obligations, then as a consequence you may not distribute the Program at all. For example, if a patent license would not permit royalty-free redistribution of the Program by all those who receive copies directly or indirectly through you, then the only way you could satisfy both it and this License would be to refrain entirely from distribution of the Program. If any portion of this section is held invalid or unenforceable under any particular circumstance, the balance of the section is intended to apply and the section as a whole is intended to apply in other circumstances. It is not the purpose of this section to induce you to infringe any patents or other property right claims or to contest validity of any such claims; this section has the sole purpose of protecting the integrity of the free software distribution system, which is implemented by public license practices. Many people have made generous contributions to the wide range of software distributed through that system in reliance on consistent application of that system; it is up to the author/donor to decide if he or she is willing to distribute software through any other system and a licensee cannot impose that choice. This section is intended to make thoroughly clear what is believed to be a consequence of the rest of this License.
-
If the distribution and/or use of the Program is restricted in certain countries either by patents or by copyrighted interfaces, the original copyright holder who places the Program under this License may add an explicit geographical distribution limitation excluding those countries, so that distribution is permitted only in or among countries not thus excluded. In such case, this License incorporates the limitation as if written in the body of this License.
-
The Free Software Foundation may publish revised and/or new versions of the General Public License from time to time. Such new versions will be similar in spirit to the present version, but may differ in detail to address new problems or concerns. Each version is given a distinguishing version number. If the Program specifies a version number of this License which applies to it and "any later version", you have the option of following the terms and conditions either of that version or of any later version published by the Free Software Foundation. If the Program does not specify a version number of this License, you may choose any version ever published by the Free Software Foundation.
-
If you wish to incorporate parts of the Program into other free programs whose distribution conditions are different, write to the author to ask for permission. For software which is copyrighted by the Free Software Foundation, write to the Free Software Foundation; we sometimes make exceptions for this. Our decision will be guided by the two goals of preserving the free status of all derivatives of our free software and of promoting the sharing and reuse of software generally.
NO WARRANTY
-
BECAUSE THE PROGRAM IS LICENSED FREE OF CHARGE, THERE IS NO WARRANTY FOR THE PROGRAM, TO THE EXTENT PERMITTED BY APPLICABLE LAW. EXCEPT WHEN OTHERWISE STATED IN WRITING THE COPYRIGHT HOLDERS AND/OR OTHER PARTIES PROVIDE THE PROGRAM "AS IS" WITHOUT WARRANTY OF ANY KIND, EITHER EXPRESSED OR IMPLIED, INCLUDING, BUT NOT LIMITED TO, THE IMPLIED WARRANTIES OF MERCHANTABILITY AND FITNESS FOR A PARTICULAR PURPOSE. THE ENTIRE RISK AS TO THE QUALITY AND PERFORMANCE OF THE PROGRAM IS WITH YOU. SHOULD THE PROGRAM PROVE DEFECTIVE, YOU ASSUME THE COST OF ALL NECESSARY SERVICING, REPAIR OR CORRECTION.
-
IN NO EVENT UNLESS REQUIRED BY APPLICABLE LAW OR AGREED TO IN WRITING WILL ANY COPYRIGHT HOLDER, OR ANY OTHER PARTY WHO MAY MODIFY AND/OR REDISTRIBUTE THE PROGRAM AS PERMITTED ABOVE, BE LIABLE TO YOU FOR DAMAGES, INCLUDING ANY GENERAL, SPECIAL, INCIDENTAL OR CONSEQUENTIAL DAMAGES ARISING OUT OF THE USE OR INABILITY TO USE THE PROGRAM (INCLUDING BUT NOT LIMITED TO LOSS OF DATA OR DATA BEING RENDERED INACCURATE OR LOSSES SUSTAINED BY YOU OR THIRD PARTIES OR A FAILURE OF THE PROGRAM TO OPERATE WITH ANY OTHER PROGRAMS), EVEN IF SUCH HOLDER OR OTHER PARTY HAS BEEN ADVISED OF THE POSSIBILITY OF SUCH DAMAGES.
END OF TERMS AND CONDITIONS
How to Apply These Terms to Your New Programs
If you develop a new program, and you want it to be of the greatest possible use to the public, the best way to achieve this is to make it free software which everyone can redistribute and change under these terms.
To do so, attach the following notices to the program. It is safest to attach them to the start of each source file to most effectively convey the exclusion of warranty; and each file should have at least the "copyright" line and a pointer to where the full notice is found.
This program is free software; you can redistribute it and/or modify it under the terms of the GNU General Public License as published by the Free Software Foundation; either version 2 of the License, or (at your option) any later version.
This program is distributed in the hope that it will be useful, but WITHOUT ANY WARRANTY; without even the implied warranty of MERCHANTABILITY or FITNESS FOR A PARTICULAR PURPOSE. See the GNU General Public License for more details.
You should have received a copy of the GNU General Public License along with this program; if not, write to the Free Software Foundation, Inc., 51 Franklin Street, Fifth Floor, Boston, MA 02110-1301 USA.
Also add information on how to contact you by electronic and paper mail.
If the program is interactive, make it output a short notice like this when it starts in an interactive mode:
Gnomovision version 69, Copyright © year name of author Gnomovision comes with ABSOLUTELY NO WARRANTY; for details type `show w'. This is free software, and you are welcome to redistribute it under certain conditions; type `show c' for details.
The hypothetical commands `show w' and `show c' should show the appropriate parts of the General Public License. Of course, the commands you use may be called something other than `show w' and `show c'; they could even be mouse-clicks or menu items--whatever suits your program.
You should also get your employer (if you work as a programmer) or your school, if any, to sign a "copyright disclaimer" for the program, if necessary. Here is a sample; alter the names:
Yoyodyne, Inc., hereby disclaims all copyright interest in the program `Gnomovision' (which makes passes at compilers) written by James Hacker.
This General Public License does not permit incorporating your program into proprietary programs. If your program is a subroutine library, you may consider it more useful to permit linking proprietary applications with the library. If this is what you want to do, use the GNU Lesser General Public License instead of this License.
GNU LESSER GENERAL PUBLIC LICENSE
Version 2.1, February 1999
Copyright © 1991, 1999 Free Software Foundation, Inc.
51 Franklin St, Fifth Floor, Boston, MA 02110-1301 USA
Everyone is permitted to copy and distribute verbatim copies of this license document, but changing it is not allowed.
[This is the first released version of the Lesser GPL. It also counts as the successor of the GNU Library Public License, version 2, hence the version number 2.1.]
Preamble
The licenses for most software are designed to take away your freedom to share and change it. By contrast, the GNU General Public Licenses are intended to guarantee your freedom to share and change free software--to make sure the software is free for all its users.
This license, the Lesser General Public License, applies to some specially designated software packages--typically libraries--of the Free Software Foundation and other authors who decide to use it. You can use it too, but we suggest you first think carefully about whether this license or the ordinary General Public License is the better strategy to use in any particular case, based on the explanations below.
When we speak of free software, we are referring to freedom of use, not price. Our General Public Licenses are designed to make sure that you have the freedom to distribute copies of free software (and charge for this service if you wish); that you receive source code or can get it if you want it; that you can change the software and use pieces of it in new free programs; and that you are informed that you can do these things.
To protect your rights, we need to make restrictions that forbid distributors to deny you these rights or to ask you to surrender these rights. These restrictions translate to certain responsibilities for you if you distribute copies of the library or if you modify it.
For example, if you distribute copies of the library, whether gratis or for a fee, you must give the recipients all the rights that we gave you. You must make sure that they, too, receive or can get the source code. If you link other code with the library, you must provide complete object files to the recipients, so that they can relink them with the library after making changes to the library and recompiling it. And you must show them these terms so they know their rights.
We protect your rights with a two-step method: (1) we copyright the library, and (2) we offer you this license, which gives you legal permission to copy, distribute and/or modify the library.
To protect each distributor, we want to make it very clear that there is no warranty for the free library. Also, if the library is modified by someone else and passed on, the recipients should know that what they have is not the original version, so that the original author's reputation will not be affected by problems that might be introduced by others.
Finally, software patents pose a constant threat to the existence of any free program. We wish to make sure that a company cannot effectively restrict the users of a free program by obtaining a restrictive license from a patent holder.
Therefore, we insist that any patent license obtained for a version of the library must be consistent with the full freedom of use specified in this license.
Most GNU software, including some libraries, is covered by the ordinary GNU General Public License. This license, the GNU Lesser General Public License, applies to certain designated libraries, and is quite different from the ordinary General Public License. We use this license for certain libraries in order to permit linking those libraries into nonfree programs.
When a program is linked with a library, whether statically or using a shared library, the combination of the two is legally speaking a combined work, a derivative of the original library. The ordinary General Public License therefore permits such linking only if the entire combination fits its criteria of freedom. The Lesser General Public License permits more lax criteria for linking other code with the library.
We call this license the "Lesser" General Public License because it does Less to protect the user's freedom than the ordinary General Public License. It also provides other free software developers Less of an advantage over competing non-free programs. These disadvantages are the reason we use the ordinary General Public License for many libraries.
However, the Lesser license provides advantages in certain special circumstances.
For example, on rare occasions, there may be a special need to encourage the widest possible use of a certain library, so that it becomes a de-facto standard. To achieve this, non-free programs must be allowed to use the library. A more frequent case is that a free library does the same job as widely used non-free libraries. In this case, there is little to gain by limiting the free library to free software only, so we use the Lesser General Public License.
In other cases, permission to use a particular library in non-free programs enables a greater number of people to use a large body of free software. For example, permission to use the GNU C Library in non-free programs enables many more people to use the whole GNU operating system, as well as its variant, the GNU/Linux operating system.]
Although the Lesser General Public License is Less protective of the users' freedom, it does ensure that the user of a program that is linked with the Library has the freedom and the wherewithal to run that program using a modified version of the Library.]
The precise terms and conditions for copying, distribution and modification follow. Pay close attention to the difference between a "work based on the library" and a "work that uses the library". The former contains code derived from the library, whereas the latter must be combined with the library in order to run.
TERMS AND CONDITIONS FOR COPYING, DISTRIBUTION AND MODIFICATION
-
This License Agreement applies to any software library or other program which contains a notice placed by the copyright holder or other authorized party saying it may be distributed under the terms of this Lesser General Public License (also called "this License"). Each licensee is addressed as "you". A "library" means a collection of software functions and/or data prepared so as to be conveniently linked with application programs (which use some of those functions and data) to form executables. The "Library", below, refers to any such software library or work which has been distributed under these terms. A "work based on the Library" means either the Library or any derivative work under copyright law: that is to say, a work containing the Library or a portion of it, either verbatim or with modifications and/or translated straightforwardly into another language. (Hereinafter, translation is included without limitation in the term "modification".) "Source code" for a work means the preferred form of the work for making modifications to it. For a library, complete source code means all the source code for all modules it contains, plus any associated interface definition files, plus the scripts used to control compilation and installation of the library. Activities other than copying, distribution and modification are not covered by this License; they are outside its scope. The act of running a program using the Library is not restricted, and output from such a program is covered only if its contents constitute a work based on the Library (independent of the use of the Library in a tool for writing it). Whether that is true depends on what the Library does and what the program that uses the Library does.
-
You may copy and distribute verbatim copies of the Library's complete source code as you receive it, in any medium, provided that you conspicuously and appropriately publish on each copy an appropriate copyright notice and disclaimer of warranty; keep intact all the notices that refer to this License and to the absence of any warranty; and distribute a copy of this License along with the Library. You may charge a fee for the physical act of transferring a copy, and you may at your option offer warranty protection in exchange for a fee.
-
You may modify your copy or copies of the Library or any portion of it, thus forming a work based on the Library, and copy and distribute such modifications or work under the terms of Section 1 above, provided that you also meet all of these conditions:
a) The modified work must itself be a software library.
b) You must cause the files modified to carry prominent notices stating that you changed the files and the date of any change.
c) You must cause the whole of the work to be licensed at no charge to all third parties under the terms of this License. d) If a facility in the modified Library refers to a function or a table of data to be supplied by an application program that uses the facility, other than as an argument passed when the facility is invoked, then you must make a good faith effort to ensure that, in the event an application does not supply such function or table, the facility still operates, and performs whatever part of its purpose remains meaningful. (For example, a function in a library to compute square roots has a purpose that is entirely well-defined independent of the application. Therefore, Subsection 2d requires that any
application-supplied function or table used by this function must be optional: if the application does not supply it, the square root function must still compute square roots.) These requirements apply to the modified work as a whole. If identifiable sections of that work are not derived from the Library, and can be reasonably considered independent and separate works in themselves, then this License, and its terms, do not apply to those sections when you distribute them as separate works. But when you distribute the same sections as part of a whole which is a work based on the Library, the distribution of the whole must be on the terms of this License, whose permissions for other licensees extend to the entire whole, and thus to each and every part regardless of who wrote it. Thus, it is not the intent of this section to claim rights or contest your rights to work written entirely by you; rather, the intent is to exercise the right to control the distribution of derivative or collective works based on the Library. In addition, mere aggregation of another work not based on the Library with the Library (or with a work based on the Library) on a volume of a storage or distribution medium does not bring the other work under the scope of this License.
- You may opt to apply the terms of the ordinary GNU General Public License instead of this License to a given copy of the Library. To do this, you must alter all the notices that refer to this License, so that they refer to the ordinary GNU General Public License, version 2, instead of to this License. (If a newer version than version 2 of the ordinary GNU General Public License has appeared, then you can specify that version instead if you wish.) Do not make any other change in these notices. Once this change is made in a given copy, it is irreversible for that copy, so the ordinary GNU General Public License applies to all subsequent copies and derivative works made from that copy. This option is useful when you wish to copy part of the code of the Library into a program that is not a library.
- You may copy and distribute the Library (or a portion or derivative of it, under Section 2) in object code or executable form under the terms of Sections 1 and 2 above provided that you accompany it with the complete corresponding machine-readable source code, which must be distributed under the terms of Sections 1 and 2 above on a medium customarily used for software interchange. If distribution of object code is made by offering access to copy from a designated place, then offering equivalent access to copy the source code from the same place satisfies the requirement to distribute the source code, even though third parties are not compelled to copy the source along with the object code.
-
A program that contains no derivative of any portion of the Library, but is designed to work with the Library by being compiled or linked with it, is called a "work that uses the Library". Such a work, in isolation, is not a derivative work of the Library, and therefore falls outside the scope of this License. However, linking a "work that uses the Library" with the Library creates an executable that is a derivative of the Library (because it contains portions of the Library), rather than a "work that uses the library". The executable is therefore covered by this License. Section 6 states terms for distribution of such executables. When a "work that uses the Library" uses material from a header file that is part of the Library, the object code for the work may be a derivative work of the Library even though the source code is not. Whether this is true is especially significant if the work can be linked without the Library, or if the work is itself a library. The threshold for this to be true is not precisely defined by law. If such an object file uses only numerical parameters, data structure layouts and accessors, and small macros and small inline functions (ten lines or less in length), then the use of the object file is unrestricted, regardless of whether it is legally a derivative work. (Executables containing this object code plus portions of the Library will still fall under Section 6.) Otherwise, if the work is a derivative of the Library, you may distribute the object code for the work under the terms of Section 6. Any executables containing that work also fall under Section 6, whether or not they are linked directly with the Library itself.
-
As an exception to the Sections above, you may also combine or link a "work that uses the Library" with the Library to produce a work containing portions of the Library, and distribute that work under terms of your choice, provided that the terms permit modification of the work for the customer's own use and reverse engineering for debugging such modifications. You must give prominent notice with each copy of the work that the Library is used in it and that the Library and its use are covered by this License. You must supply a copy of this License. If the work during execution displays copyright notices, you must include the copyright notice for the Library among them, as well as a reference directing the user to the copy of this License. Also, you must do one of these things:
a) Accompany the work with the complete corresponding machine-readable source code for the Library including whatever changes were used in the work (which must be distributed under Sections 1 and 2 above); and, if the work is an executable linked with the Library, with the complete machine-readable "work that uses the Library", as object code and/or source code, so that the user can modify the Library and then relink to produce a modified executable containing the modified Library. (It is understood that the user who changes the contents of definitions files in the Library will not necessarily be able to recompile the application to use the modified definitions.)
b) Use a suitable shared library mechanism for linking with the Library. A suitable mechanism is one that (1) uses at run time a copy of the library already present on the user's computer system, rather than copying library functions into the executable, and (2) will operate properly with a modified version of the library, if the user installs one, as long as the modified version is interface-compatible with the version that the work was made with.
c) Accompany the work with a written offer, valid for at least three years, to give the same user the materials specified in Subsection 6a, above, for a charge no more than the cost of performing this distribution.
d) If distribution of the work is made by offering access to copy from a designated place, offer equivalent access to copy the above specified materials from the same place.
e) Verify that the user has already received a copy of these materials or that you have already sent this user a copy. For an executable, the required form of the "work that uses the Library" must include any data and utility programs needed
for reproducing the executable from it. However, as a special exception, the materials to be distributed need not include anything that is normally distributed (in either source or binary form) with the major components (compiler, kernel, and so on) of the operating system on which the executable runs, unless that component itself accompanies the executable. It may happen that this requirement contradicts the license restrictions of other proprietary libraries that do not normally accompany the operating system. Such a contradiction means you cannot use both them and the Library together in an executable that you distribute.
- You may place library facilities that are a work based on the Library side-by-side in a single library together with other library facilities not covered by this License, and distribute such a combined library, provided that the separate distribution of the work based on the Library and of the other library facilities is otherwise permitted, and provided that you do these two things:
a) Accompany the combined library with a copy of the same work based on the Library, uncombined with any other library facilities. This must be distributed under the terms of the Sections above.
b) Give prominent notice with the combined library of the fact that part of it is a work based on the Library, and explaining where to find the accompanying uncombined form of the same work.
-
You may not copy, modify, sublicense, link with, or distribute the Library except as expressly provided under this License. Any attempt otherwise to copy, modify, sublicense, link with, or distribute the Library is void, and will automatically terminate your rights under this License. However, parties who have received copies, or rights, from you under this License will not have their licenses terminated so long as such parties remain in full compliance.
-
You are not required to accept this License, since you have not signed it. However, nothing else grants you permission to modify or distribute the Library or its derivative works. These actions are prohibited by law if you do not accept this License. Therefore, by modifying or distributing the Library (or any work based on the Library), you indicate your acceptance of this License to do so, and all its terms and conditions for copying, distributing or modifying the Library or works based on it.
-
Each time you redistribute the Library (or any work based on the Library), the recipient automatically receives a license from the original licensor to copy, distribute, link with or modify the Library subject to these terms and conditions. You may not impose any further restrictions on the recipients' exercise of the rights granted herein. You are not responsible for enforcing compliance by third parties with this License.
-
If, as a consequence of a court judgment or allegation of patent infringement or for any other reason (not limited to patent issues), conditions are imposed on you (whether by court order, agreement or otherwise) that contradict the conditions of this License, they do not excuse you from the conditions of this License. If you cannot distribute so as to satisfy simultaneously your obligations under this License and any other pertinent obligations, then as a consequence you may not distribute the Library at all. For example, if a patent license would not permit royalty-free redistribution of the Library by all those who receive copies directly or indirectly through you, then the only way you could satisfy both it and this License would be to refrain entirely from distribution of the Library. If any portion of this section is held invalid or unenforceable under any particular circumstance, the balance of the section is intended to apply, and the section as a whole is intended to apply in other circumstances. It is not the purpose of this section to induce you to infringe any patents or other property right claims or to contest validity of any such claims; this section has the sole purpose of protecting the integrity of the free software distribution system which is implemented by public license practices. Many people have made generous contributions to the wide range of software distributed through that system in reliance on consistent application of that system; it is up to the author/donor to decide if he or she is willing to distribute software through any other system and a licensee cannot impose that choice. This section is intended to make thoroughly clear what is believed to be a consequence of the rest of this License.
-
If the distribution and/or use of the Library is restricted in certain countries either by patents or by copyrighted interfaces, the original copyright holder who places the Library under this License may add an explicit geographical distribution limitation excluding those countries, so that distribution is permitted only in or among countries not thus excluded. In such case, this License incorporates the limitation as if written in the body of this License.
-
The Free Software Foundation may publish revised and/or new versions of the Lesser General Public License from time to time. Such new versions will be similar in spirit to the present version, but may differ in detail to address new problems or concerns. Each version is given a distinguishing version number. If the Library specifies a version number of this License which applies to it and "any later version", you have the option of following the terms and conditions either of that version or of any later version published by the Free Software Foundation. If the Library does not specify a license version number, you may choose any version ever published by the Free Software Foundation.
-
If you wish to incorporate parts of the Library into other free programs whose distribution conditions are incompatible with these, write to the author to ask for permission. For software which is copyrighted by the Free Software Foundation, write to the Free Software Foundation; we sometimes make exceptions for this. Our decision will be guided by the two goals of preserving the free status of all derivatives of our free software and of promoting the sharing and reuse of software generally.
NO WARRANTY
- BECAUSE THE LIBRARY IS LICENSED FREE OF CHARGE, THERE IS NO WARRANTY FOR THE LIBRARY, TO THE EXTENT PERMITTED BY APPLICABLE LAW. EXCEPT WHEN OTHERWISE STATED IN WRITING THE
COPYRIGHT HOLDERS AND/OR OTHER PARTIES PROVIDE THE LIBRARY "AS IS" WITHOUT WARRANTY OF ANY KIND, EITHER EXPRESSED OR IMPLIED, INCLUDING, BUT NOT LIMITED TO, THE IMPLIED WARRANTIES OF MERCHANTABILITY AND FITNESS FOR A PARTICULAR PURPOSE. THE ENTIRE RISK AS TO THE QUALITY AND PERFORMANCE OF THE LIBRARY IS WITH YOU. SHOULD THE LIBRARY PROVE DEFECTIVE, YOU ASSUME THE COST OF ALL NECESSARY SERVICING, REPAIR OR CORRECTION.
- IN NO EVENT UNLESS REQUIRED BY APPLICABLE LAW OR AGREED TO IN WRITING WILL ANY COPYRIGHT HOLDER, OR ANY OTHER PARTY WHO MAY MODIFY AND/OR REDISTRIBUTE THE LIBRARY AS PERMITTED ABOVE, BE LIABLE TO YOU FOR DAMAGES, INCLUDING ANY GENERAL, SPECIAL, INCIDENTAL OR CONSEQUENTIAL DAMAGES ARISING OUT OF THE USE OR INABILITY TO USE THE LIBRARY (INCLUDING BUT NOT LIMITED TO LOSS OF DATA OR DATA BEING RENDERED INACCURATE OR LOSSES SUSTAINED BY YOU OR THIRD PARTIES OR A FAILURE OF THE LIBRARY TO OPERATE WITH ANY OTHER SOFTWARE), EVEN IF SUCH HOLDER OR OTHER PARTY HAS BEEN ADVISED OF THE POSSIBILITY OF SUCH DAMAGES.
END OF TERMS AND CONDITIONS
How to Apply These Terms to Your New Libraries
If you develop a new library, and you want it to be of the greatest possible use to the public, we recommend making it free software that everyone can redistribute and change. You can do so by permitting redistribution under these terms (or, alternatively, under the terms of the ordinary General Public License).
To apply these terms, attach the following notices to the library. It is safest to attach them to the start of each source file to most effectively convey the exclusion of warranty; and each file should have at least the "copyright" line and a pointer to where the full notice is found.
Copyright ©
This library is free software; you can redistribute it and/or modify it under the terms of the GNU Lesser General Public License as published by the Free Software Foundation; either version 2.1 of the License, or (at your option) any later version.
This library is distributed in the hope that it will be useful, but WITHOUT ANY WARRANTY; without even the implied warranty of MERCHANTABILITY or FITNESS FOR A PARTICULAR PURPOSE. See the GNU Lesser General Public License for more details.
You should have received a copy of the GNU Lesser General Public License along with this library; if not, write to the Free Software Foundation, Inc., 51 Franklin St, Fifth Floor, Boston, MA 02110-1301 USA
Also add information on how to contact you by electronic and paper mail.
You should also get your employer (if you work as a programmer) or your school, if any, to sign a "copyright disclaimer" for the library, if necessary. Here is a sample; alter the names:
Yoyodyne, Inc., hereby disclaims all copyright interest in the library 'Frob' (a library for tweaking knobs) written by James Random Hacker.
That's all there is to it!
5-014-280-12(1) Copyright 2020 Sony Corporation
Other Software
This product includes the following software.
Please refrain from contacting us regarding the contents of the source code.
Boot
Boost Software License - Version 1.0 - August 17th, 2003
Permission is hereby granted, free of charge, to any person or organization obtaining a copy of the software and accompanying documentation covered by this license (the "Software") to use, reproduce, display, distribute, execute, and transmit the Software, and to prepare derivative works of the Software, and to permit third-parties to whom the Software is furnished to do so, all subject to the following:
The copyright notices in the Software and this entire statement, including the above license grant, this restriction and the following disclaimer, must be included in all copies of the Software, in whole or in part, and all derivative works of the Software, unless such copies or derivative works are solely in the form of machine-executable object code generated by a source language processor.
THE SOFTWARE IS PROVIDED "AS IS", WITHOUT WARRANTY OF ANY KIND, EXPRESS OR IMPLIED, INCLUDING BUT NOT LIMITED TO THE WARRANTIES OF MERCHANTABILITY, FITNESS FOR A PARTICULAR PURPOSE, TITLE AND NON-INFRINGEMENT. IN NO EVENT SHALL THE COPYRIGHT HOLDERS OR ANYONE DISTRIBUTING THE SOFTWARE BE LIABLE FOR ANY DAMAGES OR OTHER LIABILITY, WHETHER IN CONTRACT, TORT OR OTHERWISE, ARISING FROM, OUT OF OR IN CONNECTION WITH THE SOFTWARE OR THE USE OR OTHER DEALINGS IN THE SOFTWARE.
civetweb-1.11
ALL LICENSES
===
This document includes several copyright licenses for different aspects of the software. Not all licenses may apply depending on the features chosen.
Civetweb License
### Included with all features.
Copyright (c) 2013-2018 The CivetWeb developers ([CREDITS.md] (https://github.com/civetweb/civetweb/blob/master/CREDITS.md))
Copyright (c) 2004-2013 Sergey Lyubka
Copyright (c) 2013 No Face Press, LLC (Thomas Davis)
Copyright (c) 2013 F-Secure Corporation
Permission is hereby granted, free of charge, to any person obtaining a copy
of this software and associated documentation files (the "Software"), to deal in the Software without restriction, including without limitation the rights to use, copy, modify, merge, publish, distribute, sublicense, and/or sell copies of the Software, and to permit persons to whom the Software is furnished to do so, subject to the following conditions:
The above copyright notice and this permission notice shall be included in all copies or substantial portions of the Software.
THE SOFTWARE IS PROVIDED "AS IS", WITHOUT WARRANTY OF ANY KIND, EXPRESS OR IMPLIED, INCLUDING BUT NOT LIMITED TO THE WARRANTIES OF MERCHANTABILITY, FITNESS FOR A PARTICULAR PURPOSE AND NONINFRINGEMENT. IN NO EVENT SHALL THE AUTHORS OR COPYRIGHT HOLDERS BE LIABLE FOR ANY CLAIM, DAMAGES OR OTHER LIABILITY, WHETHER IN AN ACTION OF CONTRACT, TORT OR OTHERWISE, ARISING FROM, OUT OF OR IN CONNECTION WITH THE SOFTWARE OR THE USE OR OTHER DEALINGS IN THE SOFTWARE.
Lua License
### Included only if built with Lua support.
http://www.lua.org/license.html
Copyright (C) 1994-2015 Lua.org, PUC-Rio.
Permission is hereby granted, free of charge, to any person obtaining a copy of this software and associated documentation files (the "Software"), to deal in the Software without restriction, including without limitation the rights to use, copy, modify, merge, publish, distribute, sublicense, and/or sell copies of the Software, and to permit persons to whom the Software is furnished to do so, subject to the following conditions:
The above copyright notice and this permission notice shall be included in all copies or substantial portions of the Software.
THE SOFTWARE IS PROVIDED "AS IS", WITHOUT WARRANTY OF ANY KIND, EXPRESS OR IMPLIED, INCLUDING BUT NOT LIMITED TO THE WARRANTIES OF MERCHANTABILITY, FITNESS FOR A PARTICULAR PURPOSE AND NONINFRINGEMENT. IN NO EVENT SHALL THE AUTHORS OR COPYRIGHT HOLDERS BE LIABLE FOR ANY CLAIM, DAMAGES OR OTHER LIABILITY, WHETHER IN AN ACTION OF CONTRACT, TORT OR OTHERWISE, ARISING FROM, OUT OF OR IN CONNECTION WITH THE SOFTWARE OR THE USE OR OTHER DEALINGS IN THE SOFTWARE.
SQLite3 License
### Included only if built with Lua and SQLite support.
http://www.sqlite.org/copyright.html
2001-09-15
The author disclaims copyright to this source code. In place of a legal notice, here is a blessing:
May you do good and not evil.
May you find forgiveness for yourself and forgive others.
May you share freely, never taking more than you give.
Isqlite3 License
### Included only if built with Lua and SQLite support.
Copyright (C) 2002-2016 Tiago Dionizio, Doug Currie All rights reserved.
Author : Tiago Dionizio tiago.dionizio@ist.utl.pt
Author : Doug Currie doug.currie@alum.mit.edu
Library : Isqlite3 - an SQLite 3 database binding for Lua 5
Permission is hereby granted, free of charge, to any person obtaining a copy of this software and associated documentation files (the "Software"), to deal in the Software without restriction, including without limitation the rights to use, copy, modify, merge, publish, distribute, sublicense, and/or sell copies of the Software, and to permit persons to whom the Software is furnished to do so, subject to the following conditions:
The above copyright notice and this permission notice shall be included in all copies or substantial portions of the Software.
THE SOFTWARE IS PROVIDED "AS IS", WITHOUT WARRANTY OF ANY KIND, EXPRESS OR IMPLIED, INCLUDING BUT NOT LIMITED TO THE WARRANTIES OF MERCHANTABILITY, FITNESS FOR A PARTICULAR PURPOSE AND NONINFRINGEMENT. IN NO EVENT SHALL THE AUTHORS OR COPYRIGHT HOLDERS BE LIABLE FOR ANY CLAIM, DAMAGES OR OTHER LIABILITY, WHETHER IN AN ACTION OF CONTRACT, TORT OR OTHERWISE, ARISING FROM, OUT OF OR IN CONNECTION WITH THE SOFTWARE OR THE USE OR OTHER DEALINGS IN THE SOFTWARE.
Lua File System License
### Included only if built with Lua support.
http://keplerproject.github.io/luafilesystem/license.html
Copyright Kepler Project 2003 (http://www.keplerproject.org/luafilesystem)
Permission is hereby granted, free of charge, to any person obtaining a copy of this software and associated documentation files (the "Software"), to deal in the Software without restriction, including without limitation the rights to use, copy, modify, merge, publish, distribute, sublicense, and/or sell copies of the Software, and to permit persons to whom the Software is furnished to do so, subject to the following conditions:
The above copyright notice and this permission notice shall be included in all copies or substantial portions of the Software.
THE SOFTWARE IS PROVIDED "AS IS", WITHOUT WARRANTY OF ANY KIND, EXPRESS OR IMPLIED, INCLUDING BUT NOT LIMITED TO THE WARRANTIES OF MERCHANTABILITY, FITNESS FOR A PARTICULAR PURPOSE AND NONINFRINGEMENT. IN NO EVENT SHALL THE AUTHORS OR COPYRIGHT HOLDERS BE LIABLE FOR ANY CLAIM, DAMAGES OR OTHER LIABILITY, WHETHER IN AN ACTION OF CONTRACT, TORT OR OTHERWISE, ARISING FROM, OUT OF OR IN CONNECTION WITH THE SOFTWARE OR THE USE OR OTHER DEALINGS IN THE SOFTWARE.
LuaXML License
### Included only if built with Lua and LuaXML support.
LuaXML License
LuaXml is licensed under the terms of the MIT license reproduced below, the same as Lua itself. This means that LuaXml is free software and can be used for both academic and commercial purposes at absolutely no cost.
Copyright (C) 2007-2013 Gerald Franz, eludi.net
Permission is hereby granted, free of charge, to any person obtaining a copy of this software and associated documentation files (the "Software"), to deal in the Software without restriction, including without limitation the rights to use, copy, modify, merge, publish, distribute, sublicense, and/or sell copies of the Software, and to permit persons to whom the Software is furnished to do so, subject to the following conditions:
The above copyright notice and this permission notice shall be included in all copies or substantial portions of the Software.
THE SOFTWARE IS PROVIDED "AS IS", WITHOUT WARRANTY OF ANY KIND, EXPRESS OR IMPLIED, INCLUDING BUT NOT LIMITED TO THE WARRANTIES OF MERCHANTABILITY, FITNESS FOR A PARTICULAR PURPOSE AND NONINFRINGEMENT. IN NO EVENT SHALL THE AUTHORS OR COPYRIGHT HOLDERS BE LIABLE FOR ANY CLAIM, DAMAGES OR OTHER LIABILITY, WHETHER IN AN ACTION OF CONTRACT, TORT OR OTHERWISE, ARISING FROM, OUT OF OR IN CONNECTION WITH THE SOFTWARE OR THE USE OR OTHER DEALINGS IN THE SOFTWARE.
Duktape License
### Included only if built with Duktape support.
https://github.com/svaarala/duktape/blob/master/LICENSE.txt
Duktape license
(http://opensource.org/licenses/MIT)
Copyright (c) 2013-2017 by Duktape authors (see AUTHORS.rst)
Permission is hereby granted, free of charge, to any person obtaining a copy of this software and associated documentation files (the "Software"), to deal in the Software without restriction, including without limitation the rights to use, copy, modify, merge, publish, distribute, sublicense, and/or sell copies of the Software, and to permit persons to whom the Software is furnished to do so, subject to the following conditions:
The above copyright notice and this permission notice shall be included in all copies or substantial portions of the Software.
THE SOFTWARE IS PROVIDED "AS IS", WITHOUT WARRANTY OF ANY KIND, EXPRESS OR IMPLIED, INCLUDING BUT NOT LIMITED TO THE WARRANTIES OF MERCHANTABILITY, FITNESS FOR A PARTICULAR PURPOSE AND NONINFRINGEMENT. IN NO EVENT SHALL THE AUTHORS OR COPYRIGHT HOLDERS BE LIABLE FOR ANY CLAIM, DAMAGES OR OTHER LIABILITY, WHETHER IN AN ACTION OF CONTRACT, TORT OR OTHERWISE, ARISING FROM,
OUT OF OR IN CONNECTION WITH THE SOFTWARE OR THE USE OR OTHER DEALINGS IN THE SOFTWARE.
zlib License
### Included only if built with zlib support.
https://www.zlib.net/zlib_license.html
zlib.h -- interface of the 'zlib' general purpose compression library version 1.2.11, January 15th, 2017
Copyright (C) 1995-2017 Jean-loup Gailly and Mark Adler
This software is provided 'as-is', without any express or implied warranty. In no event will the authors be held liable for any damages arising from the use of this software.
Permission is granted to anyone to use this software for any purpose, including commercial applications, and to alter it and redistribute it freely, subject to the following restrictions:
- The origin of this software must not be misrepresented; you must not claim that you wrote the original software. If you use this software in a product, an acknowledgment in the product documentation would be appreciated but is not required.
- Altered source versions must be plainly marked as such, and must not be misrepresented as being the original software.
- This notice may not be removed or altered from any source distribution.
Jean-loup Gailly Mark Adler
jloup@gzip.org madler@alumni.caltech.edu
fastpbkd2 cc0 1.0
CC0 1.0 Universal
Statement of Purpose
The laws of most jurisdictions throughout the world automatically confer exclusive Copyright and Related Rights (defined below) upon the creator and subsequent owner(s) (each and all, an "owner") of an original work of authorship and/or a database (each, a "Work").
Certain owners wish to permanently relinquish those rights to a Work for the purpose of contributing to a commons of creative, cultural and scientific works ("Commons") that the public can reliably and without fear of later claims of infringement build upon, modify, incorporate in other works, reuse and redistribute as freely as possible in any form whatsoever and for any purposes, including without limitation commercial purposes. These owners may contribute to the Commons to promote the ideal of a free culture and the further production of creative, cultural and scientific works, or to gain reputation or greater distribution for their Work in part through the use and efforts of others.
For these and/or other purposes and motivations, and without any expectation of additional consideration or compensation, the person associating CC0 with a Work (the "Affirmer"), to the extent that he or she is an owner of Copyright
and Related Rights in the Work, voluntarily elects to apply CC0 to the Work and publicly distribute the Work under its terms, with knowledge of his or her Copyright and Related Rights in the Work and the meaning and intended legal effect of CC0 on those rights.
- Copyright and Related Rights. A Work made available under CC0 may be protected by copyright and related or neighboring rights ("Copyright and Related Rights"). Copyright and Related Rights include, but are not limited to, the following:
i. the right to reproduce, adapt, distribute, perform, display, communicate, and translate a Work;
ii. moral rights retained by the original author(s) and/or performer(s);
iii. publicity and privacy rights pertaining to a person's image or likeness depicted in a Work;
iv. rights protecting against unfair competition in regards to a Work, subject to the limitations in paragraph 4(a), below;
v. rights protecting the extraction, dissemination, use and reuse of data in a Work;
vi. database rights (such as those arising under Directive 96/9/EC of the European Parliament and of the Council of 11 March 1996 on the legal protection of databases, and under any national implementation thereof, including any amended or successor version of such directive); and
vii. other similar, equivalent or corresponding rights throughout the world based on applicable law or treaty, and any national implementations thereof.
-
Waiver. To the greatest extent permitted by, but not in contravention of, applicable law, Affirmer hereby overtly, fully, permanently, irrevocably and unconditionally waives, abandons, and surrenders all of Affirmer's Copyright and Related Rights and associated claims and causes of action, whether now known or unknown (including existing as well as future claims and causes of action), in the Work (i) in all territories worldwide, (ii) for the maximum duration provided by applicable law or treaty (including future time extensions), (iii) in any current or future medium and for any number of copies, and (iv) for any purpose whatsoever, including without limitation commercial, advertising or promotional purposes (the "Waiver"). Affirmer makes the Waiver for the benefit of each member of the public at large and to the detriment of Affirmer's heirs and successors, fully intending that such Waiver shall not be subject to revocation, rescission, cancellation, termination, or any other legal or equitable action to disrupt the quiet enjoyment of the Work by the public as contemplated by Affirmer's express Statement of Purpose.
-
Public License Fallback. Should any part of the Waiver for any reason be judged legally invalid or ineffective under applicable law, then the Waiver shall be preserved to the maximum extent permitted taking into account Affirmer's express Statement of Purpose. In addition, to the extent the Waiver is so judged Affirmer hereby grants to each affected person a royalty-free, non transferable, non sublicensable, non exclusive, irrevocable and unconditional license to exercise Affirmer's Copyright and Related Rights in the Work (i) in all territories worldwide, (ii) for the maximum duration provided by applicable law or treaty (including future time extensions), (iii) in any current or future medium and for any number of copies, and (iv) for any purpose whatsoever, including without limitation commercial, advertising or promotional purposes (the "License"). The License shall be deemed effective as of the date CC0 was applied by Affirmer to the Work. Should any part of the
License for any reason be judged legally invalid or ineffective under applicable law, such partial invalidity or ineffectiveness shall not invalidate the remainder of the License, and in such case Affirmer hereby affirms that he or she will not (i) exercise any of his or her remaining Copyright and Related Rights in the Work or (ii) assert any associated claims and causes of action with respect to the Work, in either case contrary to Affirmer's express Statement of Purpose.
4. Limitations and Disclaimers.
a. No trademark or patent rights held by Affirmer are waived, abandoned, surrendered, licensed or otherwise affected by this document.
b. Affirmer offers the Work as-is and makes no representations or warranties of any kind concerning the Work, express, implied, statutory or otherwise, including without limitation warranties of title, merchantability, fitness for a particular purpose, non infringement, or the absence of latent or other defects, accuracy, or the present or absence of errors, whether or not discoverable, all to the greatest extent permissible under applicable law.
c. Affirmer disclaims responsibility for clearing rights of other persons that may apply to the Work or any use thereof, including without limitation any person's Copyright and Related Rights in the Work. Further, Affirmer disclaims responsibility for obtaining any necessary consents, permissions or other rights required for any use of the Work.
d. Affirmer understands and acknowledges that Creative Commons is not a party to this document and has no duty or obligation with respect to this CC0 or use of the Work.
For more information, please see
http://creativecommons.org/publicdomain/zero/1.0/
interprocess-boost
Boost Software License - Version 1.0 - August 17th, 2003
Permission is hereby granted, free of charge, to any person or organization obtaining a copy of the software and accompanying documentation covered by this license (the "Software") to use, reproduce, display, distribute, execute, and transmit the Software, and to prepare derivative works of the Software, and to permit third-parties to whom the Software is furnished to do so, all subject to the following:
The copyright notices in the Software and this entire statement, including the above license grant, this restriction and the following disclaimer, must be included in all copies of the Software, in whole or in part, and all derivative works of the Software, unless such copies or derivative works are solely in the form of machine-executable object code generated by a source language processor.
THE SOFTWARE IS PROVIDED "AS IS", WITHOUT WARRANTY OF ANY KIND, EXPRESS OR IMPLIED, INCLUDING BUT NOT LIMITED TO THE WARRANTIES OF MERCHANTABILITY, FITNESS FOR A PARTICULAR PURPOSE, TITLE AND NON-INFRINGEMENT. IN NO EVENT SHALL THE COPYRIGHT HOLDERS OR ANYONE DISTRIBUTING THE SOFTWARE BE LIABLE FOR ANY DAMAGES OR OTHER LIABILITY, WHETHER IN CONTRACT, TORT OR OTHERWISE, ARISING FROM, OUT OF OR IN CONNECTION WITH THE SOFTWARE OR THE USE OR OTHER DEALINGS IN THE SOFTWARE.
jpeg-lib-6b
this software is based in part on the work of the Independent JPEG Group
jwt-cpp
MIT License
Copyright (c) 2018 Dominik Thalhammer
Permission is hereby granted, free of charge, to any person obtaining a copy of this software and associated documentation files (the "Software"), to deal in the Software without restriction, including without limitation the rights to use, copy, modify, merge, publish, distribute, sublicense, and/or sell copies of the Software, and to permit persons to whom the Software is furnished to do so, subject to the following conditions:
The above copyright notice and this permission notice shall be included in all copies or substantial portions of the Software.
THE SOFTWARE IS PROVIDED "AS IS", WITHOUT WARRANTY OF ANY KIND, EXPRESS OR IMPLIED, INCLUDING BUT NOT LIMITED TO THE WARRANTIES OF MERCHANTABILITY, FITNESS FOR A PARTICULAR PURPOSE AND NONINFRINGEMENT. IN NO EVENT SHALL THE AUTHORS OR COPYRIGHT HOLDERS BE LIABLE FOR ANY CLAIM, DAMAGES OR OTHER LIABILITY, WHETHER IN AN ACTION OF CONTRACT, TORT OR OTHERWISE, ARISING FROM, OUT OF OR IN CONNECTION WITH THE SOFTWARE OR THE USE OR OTHER DEALINGS IN THE SOFTWARE.
openssl 1.0.2t
LICENSE ISSUES
The OpenSSL toolkit stays under a double license, i.e. both the conditions of the OpenSSL License and the original SSLeay license apply to the toolkit. See below for the actual license texts. Actually both licenses are BSD-style Open Source licenses. In case of any license issues related to OpenSSL please contact openssl-core@openssl.org.
OpenSSL License
Copyright (c) 1998-2018 The OpenSSL Project. All rights reserved.
Redistribution and use in source and binary forms, with or without modification, are permitted provided that the following conditions are met:
-
Redistributions of source code must retain the above copyright notice, this list of conditions and the following disclaimer.
-
Redistributions in binary form must reproduce the above copyright notice, this list of conditions and the following disclaimer in the documentation and/or other materials provided with the distribution.
-
All advertising materials mentioning features or use of this software must display the following acknowledgment:
"This product includes software developed by the OpenSSL Project for use in the OpenSSL Toolkit. (http://www.openssl.org/)" - The names "OpenSSL Toolkit" and "OpenSSL Project" must not be used to endorse or promote products derived from this software without prior written permission. For written permission, please contact openssl-core@openssl.org.
- Products derived from this software may not be called "OpenSSL" nor may "OpenSSL" appear in their names without prior written permission of the OpenSSL Project.
- Redistributions of any form whatsoever must retain the following acknowledgment:
"This product includes software developed by the OpenSSL Project for use in the OpenSSL Toolkit (http://www.openssl.org/)"
THIS SOFTWARE IS PROVIDED BY THE OpenSSL PROJECT ``AS IS" AND ANY EXPRESSED OR IMPLIED WARRANTIES, INCLUDING, BUT NOT LIMITED TO, THE IMPLIED WARRANTIES OF MERCHANTABILITY AND FITNESS FOR A PARTICULAR PURPOSE ARE DISCLAIMED. IN NO EVENT SHALL THE OpenSSL PROJECT OR ITS CONTRIBUTORS BE LIABLE FOR ANY DIRECT, INDIRECT, INCIDENTAL, SPECIAL, EXEMPLARY, OR CONSEQUENTIAL DAMAGES (INCLUDING, BUT NOT LIMITED TO, PROCUREMENT OF SUBSTITUTE GOODS OR SERVICES; LOSS OF USE, DATA, OR PROFITS; OR BUSINESS INTERRUPTION) HOWEVER CAUSED AND ON ANY THEORY OF LIABILITY, WHETHER IN CONTRACT, STRICT LIABILITY, OR TORT (INCLUDING NEGLIGENCE OR OTHERWISE) ARISING IN ANY WAY OUT OF THE USE OF THIS SOFTWARE, EVEN IF ADVISED OF THE POSSIBILITY OF SUCH DAMAGE.
This product includes cryptographic software written by Eric Young (eay@cryptsoft.com). This product includes software written by Tim Hudson (tjh@cryptsoft.com).
Original SSLeay License
Copyright (C) 1995-1998 Eric Young (eay@cryptsoft.com) All rights reserved.
This package is an SSL implementation written by Eric Young (eay@cryptsoft.com).
The implementation was written so as to conform with Netscapes SSL.
This library is free for commercial and non-commercial use as long as the following conditions are aheared to. The following conditions apply to all code found in this distribution, be it the RC4, RSA, Ihash, DES, etc., code; not just the SSL code. The SSL documentation included with this distribution is covered by the same copyright terms except that the holder is Tim Hudson (tjh@cryptsoft.com).
Copyright remains Eric Young's, and as such any Copyright notices in the code are not to be removed.
If this package is used in a product, Eric Young should be given attribution as the author of the parts of the library used.
This can be in the form of a textual message at program startup or in documentation (online or textual) provided with the package.
Redistribution and use in source and binary forms, with or without modification, are permitted provided that the following conditions are met:
- Redistributions of source code must retain the copyright notice, this list of conditions and the following disclaimer.
- Redistributions in binary form must reproduce the above copyright notice, this list of conditions and the following disclaimer in the documentation and/or other materials provided with the distribution.
- All advertising materials mentioning features or use of this software must display the following acknowledgement:
"This product includes cryptographic software written by Eric Young (eay@cryptsoft.com)"
The word 'cryptographic' can be left out if the routines from the library being used are not cryptographic related :-). - If you include any Windows specific code (or a derivative thereof) from the apps directory (application code) you must include an acknowledgement: "This product includes software written by Tim Hudson (tjh@cryptsoft.com)"
THIS SOFTWARE IS PROVIDED BY ERIC YOUNG "AS IS" AND ANY EXPRESS OR IMPLIED WARRANTIES, INCLUDING, BUT NOT LIMITED TO, THE IMPLIED WARRANTIES OF MERCHANTABILITY AND FITNESS FOR A PARTICULAR PURPOSE ARE DISCLAIMED. IN NO EVENT SHALL THE AUTHOR OR CONTRIBUTORS BE LIABLE FOR ANY DIRECT, INDIRECT, INCIDENTAL, SPECIAL, EXEMPLARY, OR CONSEQUENTIAL DAMAGES (INCLUDING, BUT NOT LIMITED TO, PROCUREMENT OF SUBSTITUTE GOODS OR SERVICES; LOSS OF USE, DATA, OR PROFITS; OR BUSINESS INTERRUPTION) HOWEVER CAUSED AND ON ANY THEORY OF LIABILITY, WHETHER IN CONTRACT, STRICT LIABILITY, OR TORT (INCLUDING NEGLIGENCE OR OTHERWISE) ARISING IN ANY WAY OUT OF THE USE OF THIS SOFTWARE, EVEN IF ADVISED OF THE POSSIBILITY OF SUCH DAMAGE.
The licence and distribution terms for any publicly available version or derivative of this code cannot be changed. i.e. this code cannot simply be copied and put under another distribution licence [including the GNU Public Licence.]
7-Zip source code
License for use and distribution
7-Zip Copyright (C) 1999-2016 Igor Pavlov.
Licenses for files are:
1) CPP/7zip/Compress/Rar* files: GNU LGPL + unRAR restriction
2) All other files: GNU LGPL
The GNU LGPL + unRAR restriction means that you must follow both GNU LGPL rules and unRAR restriction rules.
GNU LGPL information
This library is free software; you can redistribute it and/or modify it under the terms of the GNU Lesser General Public License as published by the Free Software Foundation; either version 2.1 of the License, or (at your option) any later version.
This library is distributed in the hope that it will be useful,
but WITHOUT ANY WARRANTY; without even the implied warranty of MERCHANTABILITY or FITNESS FOR A PARTICULAR PURPOSE. See the GNU Lesser General Public License for more details.
You should have received a copy of the GNU Lesser General Public License along with this library; if not, write to the Free Software Foundation, Inc., 51 Franklin Street, Fifth Floor, Boston, MA 02110-1301 USA
unRAR restriction
The decompression engine for RAR archives was developed using source code of unRAR program.
All copyrights to original unRAR code are owned by Alexander Roshal.
The license for original unRAR code has the following restriction:
The unRAR sources cannot be used to re-create the RAR compression algorithm, which is proprietary. Distribution of modified unRAR sources in separate form or as a part of other software is permitted, provided that it is clearly stated in the documentation and source comments that the code may not be used to develop a RAR (WinRAR) compatible archiver.
Igor Pavlov
zlib-1.2.7
ZLIB DATA COMPRESSION LIBRARY
zlib 1.2.7 is a general purpose data compression library. All the code is thread safe. The data format used by the zlib library is described by RFCs (Request for Comments) 1950 to 1952 in the files http://tools.ietf.org/html/rfc1950 (zlib format), rfc1951 (deflate format) and rfc1952 (gzip format).
All functions of the compression library are documented in the file zlib.h (volunteer to write man pages welcome, contact zlib@gzip.org). A usage example of the library is given in the file test/example.c which also tests that the library is working correctly. Another example is given in the file test/minigzip.c. The compression library itself is composed of all source files in the root directory.
To compile all files and run the test program, follow the instructions given at the top of Makefile.in. In short "./configure; make test", and if that goes well, "make install" should work for most flavors of Unix. For Windows, use one of the special makefiles in win32/ or contrib/vstudio/. For VMS, use make_vms.com.
Questions about zlib should be sent to zlib@gzip.org, or to Gilles Vollant info@winimage.com for the Windows DLL version. The zlib home page is http://zlib.net/. Before reporting a problem, please check this site to verify that you have the latest version of zlib; otherwise get the latest version and check whether the problem still exists or not.
PLEASE read the zlib FAQ http://zlib.net/zlib_faq.html before asking for help.
Mark Nelson markn@ieee.org wrote an article about zlib for the Jan. 1997
issue of Dr. Dobb's Journal; a copy of the article is available at http://marknelson.us/1997/01/01/zlib-engine/.
The changes made in version 1.2.7 are documented in the file ChangeLog.
Unsupported third party contributions are provided in directory contrib/.
zlib is available in Java using the java.util.zip package, documented at http://java.sun.com/developer/technicalArticles/Programming/compression/.
A Perl interface to zlib written by Paul Marquess pmqs@cpan.org is available at CPAN (Comprehensive Perl Archive Network) sites, including http://search.cpan.org/\~pmqs/IO-Compress-Zlib/.
A Python interface to zlib written by A.M. Kuchling amk@amk.ca is available in Python 1.5 and later versions, see http://docs.python.org/library/zlib.html.
zlib is built into tcl: http://wiki.tcl.tk/4610.
An experimental package to read and write files in .zip format, written on top of zlib by Gilles Vollant info@winimage.com, is available in the contrib/minizip directory of zlib.
Notes for some targets:
- For Windows DLL versions, please see win32/DLL_FAQ.txt
- For 64-bit Irix, deflate.c must be compiled without any optimization. With -O, one libpng test fails. The test works in 32 bit mode (with the -n32 compiler flag). The compiler bug has been reported to SGI.
- zlib doesn't work with gcc 2.6.3 on a DEC 3000/300LX under OSF/1 2.1 it works when compiled with cc.
- On Digital Unix 4.0D (formely OSF/1) on AlphaServer, the cc option -std1 is necessary to get gzprintf working correctly. This is done by configure.
- zlib doesn't work on HP-UX 9.05 with some versions of /bin/cc. It works with other compilers. Use "make test" to check your compiler.
- gzdopen is not supported on RISCOS or BEOS.
- For PalmOs, see http://palmzlib.sourceforge.net/
Acknowledgments:
The deflate format used by zlib was defined by Phil Katz. The deflate and zlib specifications were written by L. Peter Deutsch. Thanks to all the people who reported problems and suggested various improvements in zlib; they are too numerous to cite here.
Copyright notice:
(C) 1995-2012 Jean-Ioup Gailly and Mark Adler
This software is provided 'as-is', without any express or implied warranty. In no event will the authors be held liable for any damages arising from the use of this software.
Permission is granted to anyone to use this software for any purpose, including commercial applications, and to alter it and redistribute it freely, subject to the following restrictions:
- The origin of this software must not be misrepresented; you must not claim that you wrote the original software. If you use this software in a product, an acknowledgment in the product documentation would be appreciated but is not required.
- Altered source versions must be plainly marked as such, and must not be misrepresented as being the original software.
- This notice may not be removed or altered from any source distribution.
Jean-loup Gailly Mark Adler
jloup@gzip.org madler@alumni.caltech.edu
If you use the zlib library in a product, we would appreciate *not* receiving lengthy legal documents to sign. The sources are provided for free but without warranty of any kind. The library has been entirely written by Jean-loup Gailly and Mark Adler; it does not include third-party code.
If you redistribute modified sources, we would appreciate that you include in the file ChangeLog history information documenting your changes. Please read the FAQ for more information on the distribution of modified source versions.
5-014-280-12(1) Copyright 2020 Sony Corporation
Trademarks
- Kensington is a registered trademark of Kensington Technology Group.
- The terms HDMI and HDMI High-Definition Multimedia Interface, and the HDMI Logo are trademarks or registered trademarks of HDMI Licensing Administrator, Inc. in the United States and other countries.
- Internet Explorer is a registered trademark of Microsoft Corporation in the United States and/or other countries.
- Safari is a registered trademark of Apple Corporation in the United States and/ or other countries.
- Chrome is a trademark of Google LLC.
PJLink is a registered trademark of Japan Business Machine and Information System Industries Association.
• AMX is a trademark of AMX Corporation. - Crestron RoomView is a trademark of Crestron Corporation.
- All other trademarks and registered trademarks are trademarks or registered trademarks of their respective holders. In this manual, ^TM and ^® marks are not specified.
HDMI
5-014-280-12(1) Copyright 2020 Sony Corporation
