
Orbi RBS50Y - Home Automation NETGEAR - Free user manual and instructions
Find the device manual for free Orbi RBS50Y NETGEAR in PDF.


| Product Type | Outdoor WiFi Satellite |
| Model | Orbi RBS50Y |
| Dimensions | 8.3 x 2.7 x 10.6 in (210.82 x 68.58 x 269.24 mm) |
| Weight | 3.06 lb (1.387 kg) |
| Power Adapter | Input: 120V, 60Hz; Output: 12V, 2.5A DC |
| Operating Temperature | 4°F to 122°F (-20°C to +50°C) |
| Operating Humidity | 90% maximum relative humidity, noncondensing |
| Ingress Protection (IP) Rating | IP66 |
| WiFi Standards | IEEE 802.11b/g/n 2.4 GHz, 802.11a/n/ac 5 GHz |
| Maximum Data Rate | 2.4 GHz: 400 Mbps, 5 GHz Front haul: 866 Mbps, 5 GHz Back haul: 1733 Mbps |
| Security | WPA-PSK [TKIP], WPA2-PSK [AES] |
| Sync Button | Used for WPS connection and syncing with router |
| LED Indicators | Power LED (solid green/amber), Top and Bottom Light LEDs (white, blue, amber, magenta) |
| Mounting Options | Wall-mount bracket or stand (included) |
| Compatibility | Compatible with Orbi AC routers (not WiFi 6 models) |
| Firmware Update | Via router web interface (orbilogin.com) or manual upload |
| LED Lighting Control | On/off, brightness adjustment, scheduling via router interface |
| Package Contents | Orbi Outdoor Satellite, power adapter, wall-mount bracket, stand, screws, lock |
Frequently Asked Questions - Orbi RBS50Y NETGEAR
User questions about Orbi RBS50Y NETGEAR
0 question about this device. Answer the ones you know or ask your own.
Ask a new question about this device
Download the instructions for your Home Automation in PDF format for free! Find your manual Orbi RBS50Y - NETGEAR and take your electronic device back in hand. On this page are published all the documents necessary for the use of your device. Orbi RBS50Y by NETGEAR.
USER MANUAL Orbi RBS50Y NETGEAR
Orbi Outdoor Satellite
Model RBS50Y
NETGEAR, Inc.
350 E. Plumeria DriveJuly 2020
San Jose, CA 95134, USA202-11831
Support and Community
Visit_netgear.com/support to get your questions answered and access the latest downloads.
You can also check out our NETGEAR Community for helpful advice at community.netgear.com.
Regulatory and Legal
(If this product is sold in Canada, you can access this document in Canadian https://www.netgear.com/support/download/)
For regulatory compliance information including the EU Declaration of Conformity, https://www.netgear.com/about/regulatory/.
See the regulatory compliance document before connecting the power supply.
For NETGEAR's Privacy Policy, visit https://www.netgear.com/about/privacy-policy.
By using this device, you are agreeing to NETGEAR's Terms and Conditions at https://www.netgear.com/about/terms-and-conditions. If you do not agree, return the device to your place of purchase within your return period.
Trademarks
©NETGEAR, Inc. NETGEAR and the NETGEAR Logo are trademarks of NETGEAR, Any non-NETGEAR trademarks are used for reference purposes only.
Contents
Chapter 1 Overview
Supported Orbi Routers....6
Package Contents....6
Hardware Overview....7
Power LED....8
Bottom Light LED....8
Wall-Mount or Attach to Stand....9
Wall-Mount Your Satellite....9
Attach the Satellite to the Stand....11
Lock the Satellite....12
Lock the Satellite to the Wall-Mount Bracket....12
Lock the Satellite to the Stand....13
Label....14
Place Your Satellite....14
Sync Your Orbi Outdoor Satellite....15
Sync Your Satellite Using the Sync Button....15
Sync Your Satellite Using the Router Web Interface......16
Download the NETGEAR Orbi App....17
Chapter 2 Manage Your Orbi Outdoor Satellite
Update the Router and Satellite Firmware....20
Check for rmware updates....20
Manually update rmware....21
Manually update satellite rmware....21
Manually update router rmware....22
Enable the Sync button....23
Turn the satellite LED lighting on or off....23
Set LED lighting brightness....24
Schedule when to turn on LED lighting....25
View Satellite Information....26
View satellite status....27
Chapter 3 Troubleshooting
The Router and Satellite Do Not Sync....30
Cannot Log In to the Router....31
Orbi Outdoor Satellite
Appendix A Supplemental Information
Factory Settings....33
Technical Specifications....34
1
Overview
This manual covers how to set up your Orbi Outdoor Satellite and congregate its from the Orbi router web interface. For information about how to congregate your router's settings, see the user manual for your Orbi router. You can view your manual at https://www.netgear.com/support/download/default.aspx.
This chapter contains the following sections:
• Supported Orbi Routers
• Package Contents
- Hardware Overview
- Power LED
- Bottom Light LED
• Wall-Mount or Attach to Stand
- Lock the Satellite
- Label
- Place Your Satellite
- Sync Your Orbi Outdoor Satellite
- Download the NETGEAR Orbi App
For more information about the topics covered in this manual, visit the support at _support.netgear.com.
Supported Orbi Routers
To add the Orbi Outdoor Satellite to your WiFi network, you must own an O The Orbi Outdoor Satellite is compatible with residential and business Orbi AC
Note: The Orbi Outdoor Satellite is not compatible with Orbi WiFi 6 models. Netgear.com/support for more information about which Orbi models your Orbi Out Satellite is compatible with.
Package Contents
Your package contains the following items.
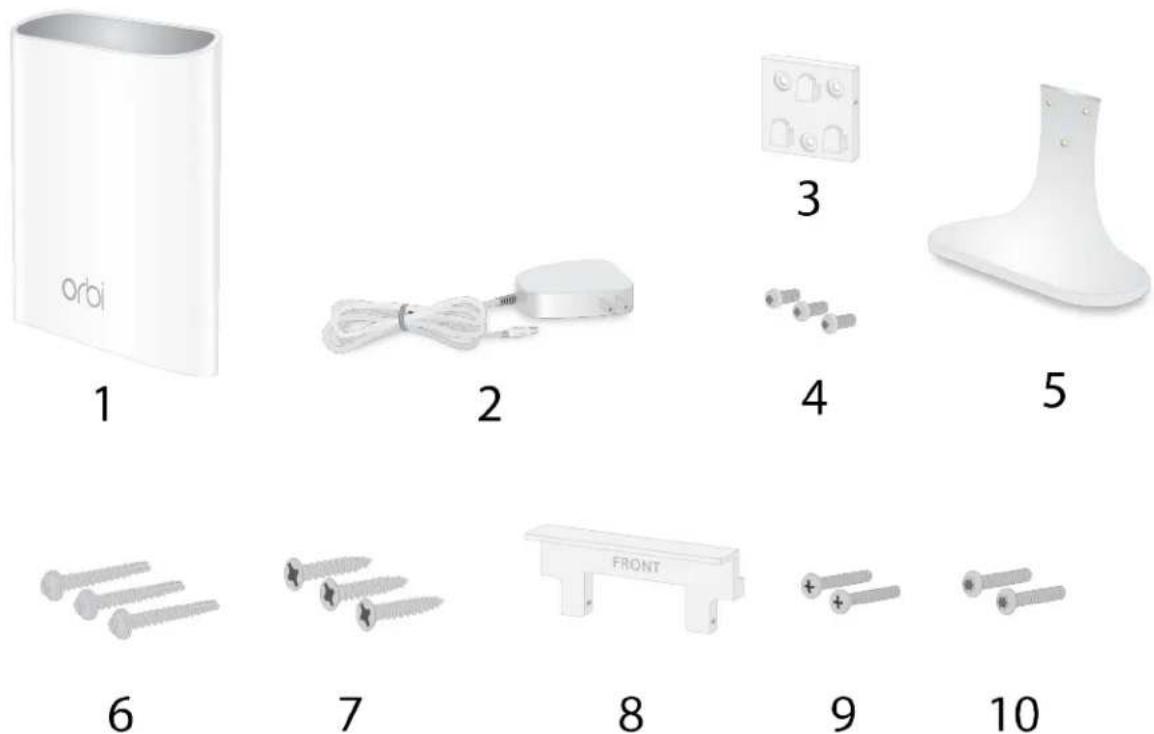
Figure 1. Package contents
- Orbi Outdoor Satellite (Model RBS50Y)
- Power adapter (varies by region)
- Wall-mount bracket
- Machine screws
Orbi Outdoor Satellite
- Stand
- Stucco or concrete screws
- Wood screws
- Wall-mount bracket lock
- Phillips screws
- Torx screw
Hardware Overview
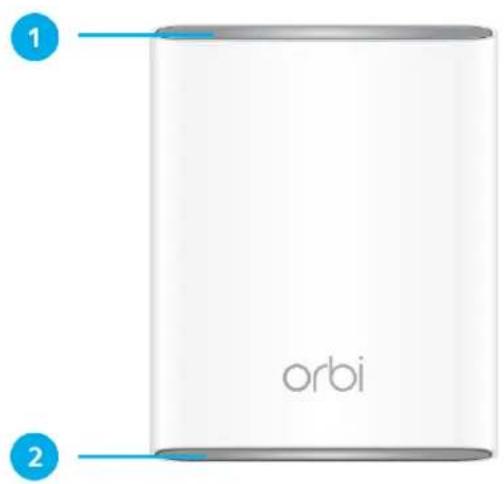
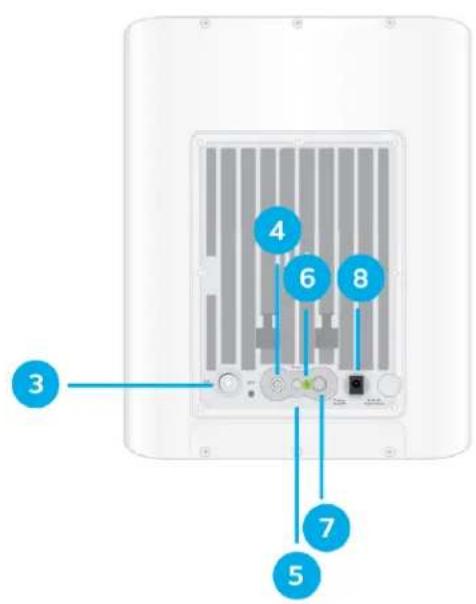
Figure 2. Front and back views
- Top Light LED
- Bottom Light LED
- LED On/Off button
- Sync button (also used for WPS connection)
- Reset button
- Power LED
- Power On/Off button
- Power connector
Power LED
The Power LED is located above the Power On/Off button on the rear panel.
The following is the LED behavior for the Power LED:
• Solid green. Power is on.
• Solid amber. The satellite is booting.
- Blinking amber. The satellite is resetting to factory default settings.
- Blinking red. The rmware is corrupted.
• Off. Power is not supplied.
Bottom Light LED
You can use the top and bottom Light LEDs to provide light to your outdoor can also use the bottom Light LED behavior to help you determine the status satellite. The top Light LED only provides light.
The following table describes the bottom Light LED behavior.
Table 1. Bottom Light LED behavior
| Bottom Light LED behaviorColor | |
| The satellite is booting.Pulsing white | |
| The satellite is ready to sync with the Orbi router.Solid | |
| Pulsing white(Note that the bottom Light LED pulses white aLED aight pulse white for about six minutes.the Sync button is pressed.) | The satellite is trying to sync with the Orbi router. The LED aight pulse white for about six minutes.After the LED pluses white, it lights blue, amber, or magenta. See the next table for more information. |
| Pulsing amber | The satellite is warming up because its temperature is less than 41°F (5°C). This might take about 15 minutes if the surrounding temperature is less than 4°F (-20°C). |
After the Sync button is pressed, the bottom Light LED pulses white. Then the Light LED lights one of the following colors for about 3 minutes and then tur
Table 2. Sync colors
| LED BehaviorColor | |
| Blue | The Orbi router and satellite successfully synced, and the connection between the router and satellite is good. |
| Amber | The Orbi router and satellite successfully synced, and the connection between the router and satellite is fair. Consider moving the satellite closer to the router. |
| The Orbi router and satellite failed to sync. Move the satellite closer to the router and trip | |
| Pulsing magenta | If the bottom Light LED pulses magenta for about 30 seconds, the satellite's Sync button disabled. Log in to the router, enable the Sync button, and repeat the sync process. For information, see Enable the Sync button on page 23. |
Wall-Mount or Attach to Stand
You can wall-mount your satellite or attach it to the stand that came with you
Wall-Mount Your Satellite
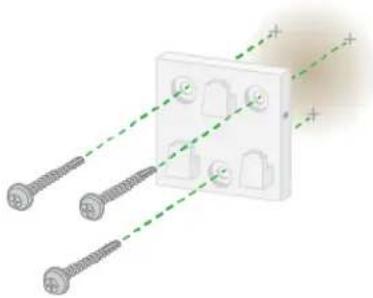
To wall-mount your satellite:
-
Use the wall-mount bracket as a template to mark three holes on the wall.
-
Drill holes where you marked on the wall using a 5/32-inch drill bit
-
Place the wall-mount bracket where you drilled the holes and secure the br the wall using the stucco or concrete screws or the wood screws.
natural_image
Diagram of two screws inserted into a white socket with green dashed lines indicating alignment or wiring (no text or symbols)Orbi Outdoor Satellite
- Slide the satellite onto the wall-mount bracket.
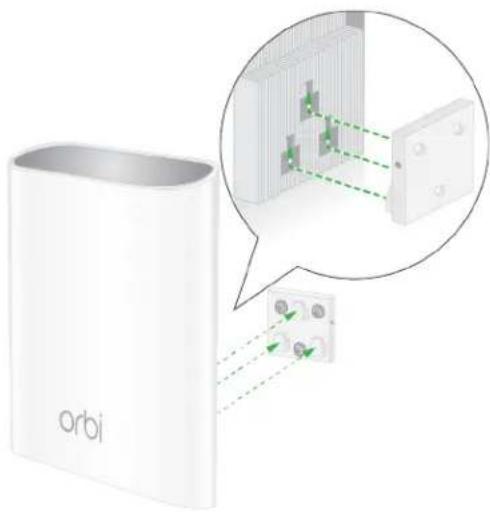
natural_image
Diagram of a white rectangular device labeled 'orbi' connected to a grid panel with green arrows indicating connection (no text or symbols on the diagram itself)Attach the Satellite to the Stand
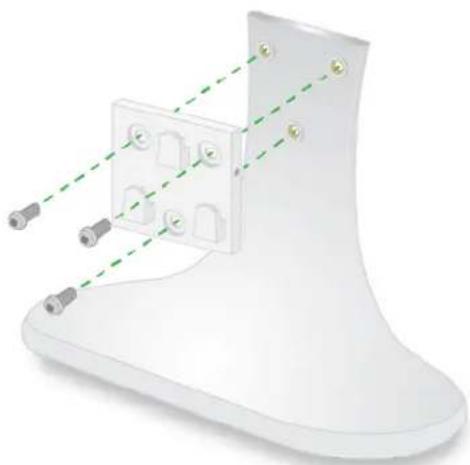
To attach the satellite to the stand:
- Attach the wall-mount bracket to the stand using the machine screws.
natural_image
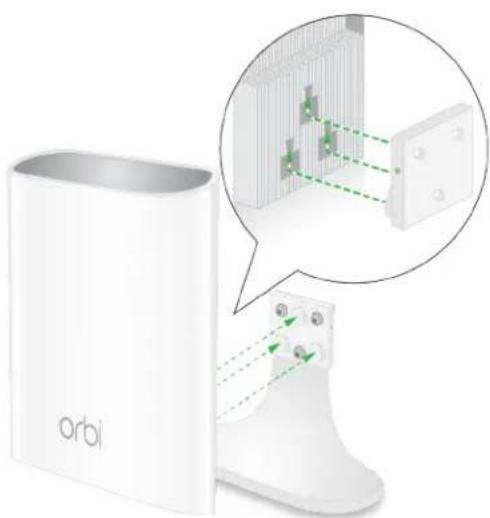
3D rendering of a white sock with attached electrical outlet and connectors (no text or symbols)- Slide the Orbi satellite onto the wall-mount bracket.
natural_image
White orbi-branded electronic device with a close-up inset showing internal components and wiring (no text or symbols visible)Lock the Satellite
After you wall-mount your satellite or attach it to the stand, you can lock you to the wall-mount bracket or stand.
Lock the Satellite to the Wall-Mount Bracket
After you wall-mount your satellite, you can lock your satellite to the wall-mount. For more information about how to wall-mount your satellite, see Wall-Mount You Satellite on page 9.
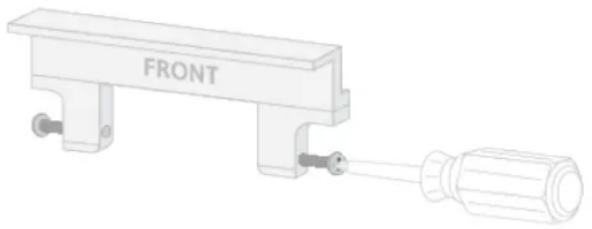
To lock your satellite to the wall-mount bracket:
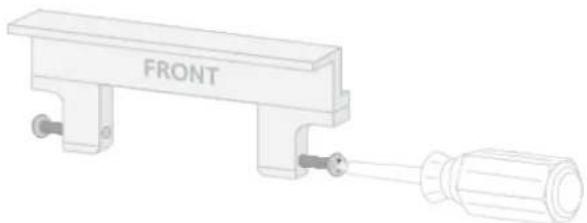
- Insert the Phillips screws or torx screws that came with your package into a wall-mount bracket lock.
The screws must be ush with the lock.
natural_image
Technical line drawing of a mechanical component labeled 'FRONT' with no other text or symbols- Place the lock on top of the wall-mount bracket.
Orbi Outdoor Satellite
- Tighten the screws to secure the lock to the bracket.
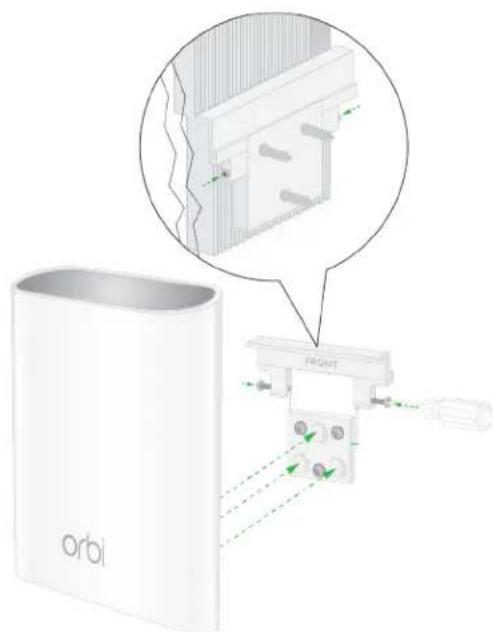
Lock the Satellite to the Stand
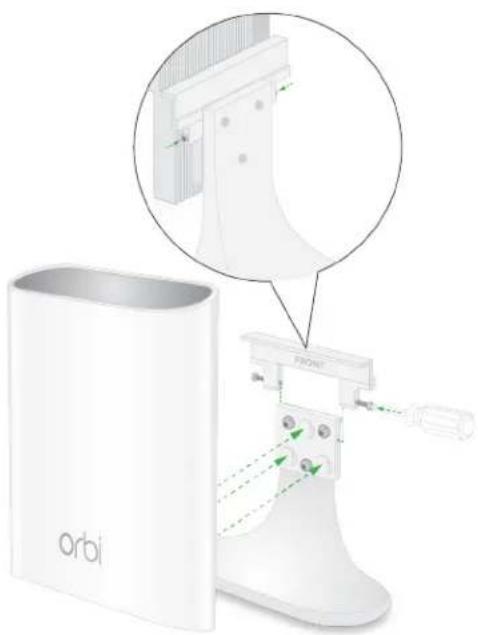
After you attach the satellite to the stand, you can lock your satellite to the more information about how to wall-mount your satellite, see Attach the Satellite Stand on page 11.
To lock your satellite to the stand:
- Insert the Phillips screws or torx screws that came with your package into a wall-mount bracket lock.
The screws must be ush with the lock.
natural_image
Technical line drawing of a mechanical component labeled 'FRONT' with no other text or symbols- Place the lock on top of the wall-mount bracket.
Orbi Outdoor Satellite
- Tighten the screws to secure the lock to the bracket.
natural_image
Diagram of a white orbi-branded hand mixer with a magnified inset showing the internal structure (no text or symbols present)Label
The satellite label shows the WiFi network name (SSID), network key (password), satellite's serial number, and the satellite's MAC address. The label can be found satellite. The following is an example of what the label looks like:

Figure 3. Satellite label
Place Your Satellite
The rst time you set up your satellite, we recommend that you set it up ind your Orbi router. After your router and satellite are synced, you can place you outdoors.
Note: Your satellite's Ingress Protection (IP) rating is IP66. When placing your sat outdoors, do not place your satellite in an area that could expose your satellite weather and environmental conditions. The recommend temperature range for your satellite is 4°F to 122°F (-20°C to +50°C).
Sync Your Orbi Outdoor Satellite
Use the Sync button on your Orbi Outdoor Satellite to sync your satellite with router. You can also log in to your Orbi router and use the router web into your satellite.
Sync Your Satellite Using the Sync Button
After your satellite syncs with your router, the satellite's Sync button is disabled security reasons. If you press the Sync button and the satellite's bottom Light L magenta, this LED behavior indicates that the Sync button is disabled. To enable Sync button, log in to the router and go to the Attached Devices page. For information, see Enable the Sync button on page 23.
To sync your satellite using the Sync button:
-
Place your satellite in an area near your Orbi router. For more information, see Place Your Satellite on page 14.
-
Connect your satellite to a power source.
The Power LED on the back of the Orbi lights. If the Power LED does not the Power On/Off button.
- Wait for the bottom Light LED to light white.
The following is the LED behavior during booting:
- Pulsing white. The satellite is booting.
-
Solid white. The satellite nished booting and is ready to sync with your
-
Press the Sync button on the back of your satellite, and within two minutes the Sync button on the back of your Orbi router.
-
Wait for the satellite to sync with the router.
The bottom Light LED on the satellite lights white while it attempts to sync Orbi router. It might take about six minutes for your satellite to sync.
Orbi Outdoor Satellite
After the bottom Light LED lights white, it lights one of the following colors three minutes and then turns off:
- Blue. The Orbi router and satellite successfully synced, and the connection between the router and satellite is good.
- Amber. The Orbi router and satellite successfully synced, and the connection between the router and satellite is fair. Consider moving the Orbi satellite to the Orbi router.
-
Magenta. The Orbi router and satellite failed to sync. Move the satellite to the router and try again.
-
Move your satellite outdoors and connect it to a power source.
Note: The recommend temperature range for your satellite is 4^ F to 122^ F (to +50^ C).
- Make sure that the bottom Light LED lights blue to indicate a good conneth the router.
Sync Your Satellite Using the Router Web Interface
You can use the router web interface to add a satellite to your Orbi network.
To add a satellite to your Orbi network using the router web interface:
- Launch a web browser from a computer or mobile device that is connected Orbi network.
-
Enter orbilogin.com.
A login window opens. -
Enter the router admin user name and password.
The user name is admin. The default password is password. The user name and password are case-sensitive.
The BASIC Home page displays.
- Select Add Orbi Satellite.
The Place Your Satellite page displays.
-
Follow the instructions for where to place your satellite in your house.
-
Connect the satellite to a power source.
-
If the Power LED on the back of the satellite does not light, press the Pc button.
Orbi Outdoor Satellite
- Click the NEXT button.
- Wait about two minutes for the satellite's bottom Light LED to light solid w
- Press the Sync button on the satellite.
- Wait for the bottom Light LED to light white.
The following is the LED behavior during booting:
- Pulsing white. The satellite is booting.
-
Solid white. The satellite nished booting and is ready to sync with your router.
-
Click the SYNC button in the router web interface.
- Wait for the satellite to sync with the router.
The bottom Light LED on the satellite lights white while it attempts to sync Orbi router. It might take about six minutes for your satellite to sync.
After the bottom Light LED lights white, it lights one of the following colors three minutes and then turns off:
- Blue. The Orbi router and satellite successfully synced, and the connection between the router and satellite is good.
- Amber. The Orbi router and satellite successfully synced, and the connection between the router and satellite is fair. Consider moving the Orbi satellite to the Orbi router.
- Magenta. The Orbi router and satellite failed to sync. Move the satellite (to the router and try again.
Download the NETGEAR Orbi App
You can use the NETGEAR Orbi app to set up your Orbi network.
To nd the app, scan a QR code or search for NETGEAR Orbi in the Apple or Google Play Store. Launch the NETGEAR Orbi app on your mobile device at the prompts.

Figure 4. NETGEAR Orbi app icon
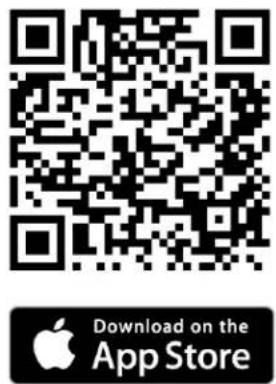

Figure 5. NETGEAR Orbi app download QR codes
2
Manage Your Orbi Outdoor Satellite
This chapter describes how to manage your satellite's settings from your Orbi re web interface.
The chapter contains the following sections:
- Update the Router and Satellite Firmware
- Enable the Sync button
- Turn the satellite LED lighting on or off
- Set LED lighting brightness
- Schedule when to turn on LED lighting
• View Satellite Information
• View satellite status
Update the Router and Satellite Firmware
To manage your satellite using the router web interface, make sure that your r satellite are updated with the latest rmware. You can use the router web interf check if new rmware is available and update the rmware for your router and or you can manually update the rmware for your router and satellite.
Check for rmware updates
To check for new rmware and update your router and satellite:
- Launch a web browser from a computer or mobile device that is connected Orbi network.
- Enter orbilogin.com.
A login window opens.
- Enter the router admin user name and password.
The user name is admin. The password is the one that you specied the rs that you logged in. The user name and password are case-sensitive.
The BASIC Home page displays.
- Select ADVANCED > Administration > Firmware Update > Online Update.
The Firmware Update page displays.
- Click the Check button.
The router checks to see if new rmware is available for the router and sat
- If new rmware is available, click the Update All button.
The router locates and downloads the firmware for the router and satellite and the update.
Note: To avoid the risk of corrupting the rmware, do not interrupt the upg. For example, do not close the browser, click a link, or load a new page. off the router or satellite.
When the upload is complete, your router and satellite restart. The update p typically takes about one minute. Read the new rmware release notes to nd you must recongure the router after updating.
Orbi Outdoor Satellite
Manually update rmware
If a satellite is connected to your router, you can log in to the router to make the rmware on your satellite.
WARNING: We recommend that you always update the rmware on your satellite and then update your router. Also, do not update the rmware on your router satellite at the same time, and do not update more than one Orbi device (ro satellite) at a time. If you need to update more than one Orbi device, wait f Orbi device to nish updating before updating your next Orbi device.
To manually update the rmware on your Orbi router and satellite, follow the high level steps:
- Visit_netgear.com/support and download the rmware for both your Orbi router satellite.
- Update the rmware on your Orbi satellite.
For more information, see Manually update satellite rmware on page 21. - Update the rmware on your Orbi router.
For more information, see Manually update router rmware on page 22.
Manually update satellite rmware We recommend that you update your satellite's rmware before you update the router's rmware.
To manually update your satellite's rmware:
- Launch a web browser from a computer or mobile device that is connected Orbi network.
- Enter orbilogin.com.
A login window opens. -
Enter the router admin user name and password.
The user name is admin. The password is the one that you specied the rs that you logged in. The user name and password are case-sensitive.
The BASIC Home page displays. -
Select ADVANCED > Administration > Firmware Update > Manual Update.
The Firmware Update page displays.
- Select the check box next to your satellite's model name.
If you have more than one satellite, only update one satellite at a time. You for the rst satellite to nish updating before updating the next satellite.
- Click the Update button.
Orbi Outdoor Satellite
The Orbi satellite Firmware Update window opens.
- If the browser asks you for the admin password, enter the same password - entered for the router.
- Click the BROWSE button.
- Locate and select the satellite rmware le that you downloaded.
The rmware le name ends in .img or .chk.
- Click the UPLOAD button.
It takes a few minutes to complete the process.
- After Orbi satellite nishes updating, select Status and double-check the rmware version on the Status page.
The rmware on your Orbi satellite is updated.
Manually update router firmware We recommend that you update your remote software after you update the satellite's rmware.
WARNING: Make sure that your satellite completes its rmware update before you update your router's rmware.
To manually update your router's rmware:
- Launch a web browser from a computer or mobile device that is connected Orbi network.
- Enter orbilogin.com.
A login window opens.
- Enter the admin user name and password.
The user name is admin. The password is the one that you specied the rs that you logged in. The user name and password are case-sensitive.
The BASIC Home page displays.
- Select ADVANCED > Administration > Firmware Update > Manual Update.
The Firmware Update page displays.
- Click the Browse button.
- Locate and select the router rmware le you downloaded.
The rmware le name ends in .img.
- Click the Upload button.
The rmware is updated.
Enable the Sync button
After your satellite syncs with your router, the satellite's Sync button is disabled security reasons. If you press the Sync button and the satellite's bottom Light L magenta, this LED behavior indicates that the Sync button is disabled. To enable Sync button, log in to the router and go to the Attached Devices page.
After syncing your satellite and placing your satellite outdoors, we recommend the disable the Sync button to prevent an unauthorized user from connecting to yo satellite.
To enable your satellite's Sync button using the router web interface:
- Launch a web browser from a computer or mobile device that is connected Orbi network.
- Enter orbilogin.com.
A login window opens.
- Enter the router admin user name and password.
The user name is admin. The default password is password. The user name and password are case-sensitive.
The BASIC Home page displays.
- Select Attached Devices.
The Attached Devices page displays.
- Select your satellite.
The Edit Device page displays.
- In the Sync Button section, click the Disabled button.
The Sync button is enabled. You can now use the Sync button to sync your satellite to your router.
Turn the satellite LED lighting on or off
You can use the satellite's top and bottom Light LEDs to provide light to you area.
Orbi Outdoor Satellite
To turn the top and bottom LED lighting on or off:
- Launch a web browser from a computer or mobile device that is connected Orbi network.
- Enter orbilogin.com.
A login window opens.
- Enter the router admin user name and password.
The user name is admin. The default password is password. The user name and password are case-sensitive.
The BASIC Home page displays.
- Select Attached Devices.
The Attached Devices page displays. - Select your satellite.
The Edit Device page displays. - To turn the LED lighting on, in the LED On/Off section, click the Off button. The top and bottom Light LEDs turn on.
- To turn the LED lighting off, in the LED On/Off section, click the On button. The top and bottom Light LEDs turn off.
- Click the APPLY button.
Your settings are saved.
Set LED lighting brightness
After you turn on the satellite's LED lighting, you can set its brightness percent
To set the satellite's LED lighting brightness:
- Launch a web browser from a computer or mobile device that is connected Orbi network.
- Enter orbilogin.com.
A login window opens.
- Enter the router admin user name and password.
The user name is admin. The password is the one that you specied the rs that you logged in. The user name and password are case-sensitive.
The BASIC Home page displays.
Orbi Outdoor Satellite
- Select Attached Devices.
The Attached Devices page displays.
- Select your satellite.
The Edit Device page displays.
-
Make sure that the LED On/Off slider is set to ON.
-
If the LED lighting is turned off, click the LED On/Off slider to turn the L The top and bottom Light LEDs turn on.
-
Select an LED lighting brightness percentage from the LED Lighting Brightness menu.
-
Click the APPLY button.
Your settings are saved.
Schedule when to turn on LED lighting
You can schedule when to turn on the satellite's LED lighting:
To schedule the LED lighting:
- Launch a web browser from a computer or mobile device that is connected Orbi network.
- Enter orbilogin.com.
A login window opens.
- Enter the router admin user name and password.
The user name is admin. The password is the one that you specied the rs that you logged in. The user name and password are case-sensitive.
The BASIC Home page displays.
- Select Attached Devices.
The Attached Devices page displays.
- Select your satellite.
The Edit Device page displays.
- Make sure that the LED On/Off slider is set to ON.
- If the LED lighting is turned off, click the LED On/Off slider to turn the L The top and bottom Light LEDs turn on.
Orbi Outdoor Satellite
- Select the Schedule LED Lighting check box.
- Click the ADD A NEW PERIOD button.
The LED Lighting Schedule page displays.
-
Specify the lighting schedule settings:
-
Start. Select a start time from the menu.
• End. Select an end time from the menu. -
Recurrence Pattern. Select if you want the Light LEDs to turn on daily specific days.
-
Click the APPLY button.
The Edit Device page displays. The schedule is added.
- Click the APPLY button.
Your settings are saved.
View Satellite Information
You can view information about your satellite from the Attached Devices page i router web interface.
To view information about your satellite:
- Launch a web browser from a computer or mobile device that is connected Orbi network.
- Enter orbilogin.com.
A login window opens.
- Enter the router admin user name and password.
The user name is admin. The password is the one that you specied the rs that you logged in. The user name and password are case-sensitive.
The BASIC Home page displays.
- Select Attached Devices.
Orbi Outdoor Satellite
The Attached Devices page displays the following information in the Connected Satellites section:
- Device Name. This section displays the satellite model, name, LED status, button status, and IP address.
- IP Address. This section displays the satellite IP address. The satellite's IP can change because the router assigns an IP address to each satellite who joins the network.
- MAC Address. This section displays the satellite MAC address. The unique address for each satellite does not change.
- Connection Type. This section displays how the satellite is connected to the network through a wired Ethernet connection or 2G or 5G WiFi connection
- Connected Orbi. This section displays the Orbi router or satellite that the is connected to. The Orbi router's or satellite's MAC address also displays.
-
Backhaul Status. This section displays the backhaul connection status between the satellite and router or another satellite.
-
To update this page, click the Refresh button.
View satellite status
To view your satellite's status, it must be connected to your Orbi network.
To view your satellite's status:
- Launch a web browser from a computer or mobile device that is connected Orbi network.
- Enter orbilogin.com.
A login window opens.
- Enter the router admin user name and password.
The user name is admin. The password is the one that you specied the rs that you logged in. The user name and password are case-sensitive.
The BASIC Home page displays.
- Select Attached Devices.
The Attached Devices page displays.
- In the Connected Satellites section, nd your satellite's IP address.
- Enter your satellite's IP address in your web browser's address bar.
A login window opens.
Orbi Outdoor Satellite
- Enter the same admin user name and password that you entered for the rc The satellite's status displays.
3
Troubleshooting
This chapter provides information to help you diagnose and solve problems you experience with your Orbi Outdoor satellite. If you do not nd the solution here the NETGEAR support site at support.netgear.com for product and contact informa If you need help with your Orbi router, see your Orbi router's user manual. Y your router's manual at https://www.netgear.com/support/download/default.aspx.
This chapter contains the following sections:
• The Router and Satellite Do Not Sync
- Cannot Log In to the Router
The Router and Satellite Do Not Sync
If you are experiencing difficulty syncing the router and the satellite, we recommend that you move the satellite into the same room as the router during the sync. The satellite to a different location.
To sync the router and the satellite:
- Place the satellite in the same room as the Orbi router.
Use this satellite location only during the sync process.
- Connect the satellite to a power source.
- If the Power LED on the back of the satellite does not light, press the Pc button.
- Wait for the satellite's bottom Light LED to light solid white.
- Press the Sync button on the router and then within two minutes, press the Sync button on the satellite.
The satellite's bottom Light LED pulses white, then lights one of the following for about three minutes, and then turns off:
- Blue. The Orbi router and satellite successfully synced, and the connection between the router and satellite is good.
-
Amber. The Orbi router and satellite successfully synced, and the connection between the router and satellite is fair. Consider moving the Orbi satellite to the Orbi router.
-
Move the satellite outdoors.
- Connect the satellite to a power source.
- If the Power LED on the back of the satellite does not light, press the Pc button.
The satellite's ring LED pulses white, then lights one of the following colors three minutes and then turns off:
- Blue. The Orbi router and satellite successfully synced, and the connection between the router and satellite is good.
- Amber. The Orbi router and satellite successfully synced, and the connection between the router and satellite is fair. Consider moving the Orbi satellite to the Orbi router.
- Magenta. The Orbi router and satellite failed to sync. Move the satellite to the router and try again.
Cannot Log In to the Router
Make sure that your computer or mobile device is connected to the Orbi WiFi If you do not want to use a WiFi connection, you can connect your computer router with an Ethernet cable.
If you changed the admin password and you forgot what it is, see your Orbi user manual for more information.
A
Supplemental Information
This appendix covers the following topics:
- Factory Settings
• Technical Specifications
Orbi Outdoor Satellite
Factory Settings
The following table shows the factory default settings for the Orbi Outdoor Sate
Table 3. Factory default settings for the satellite
| Default SettingFeature | ||
| orbilogin.comUser login URLRouter login | ||
| adminUser name (case-sensitive) | ||
| passwordDefault login password | ||
| Use default hardware addressWAN MAC addressInternet cc | ||
| 1500WAN MTU size | ||
| AutoSensingPort speed | ||
| 192.168.1.250LAN IPLocal network (LAN) | ||
| 255.255.255.0Subnet mask | ||
| DisabledDHCP server | ||
| Time zone | GMT for WW except NA and GR, GMT+1 for GR, GMT-8 for NA | |
| saving time | DisabledTime zone adjusted for daylight | |
| DisabledSNMP | ||
| Firewall | Inbound (communications coming in from the Internet) | Disabled (except trafc on port 80, the HTTP port) |
| Outbound (communications going out to the Internet) | Enabled (all) | |
| DisabledSource MAC Itering | ||
Orbi Outdoor Satellite
Table 3. Factory default settings for the satellite (Continued)
| Default SettingFeature | |
| EnabledWiFi communicationWiFi | |
| See satellite labelSSID name | |
| WPA2-PSK (AES)Security | |
| EnabledBroadcast SSID | |
| Transmission speed | Auto^1 |
| United States in the USCountry/region | |
| RF channel | 2.4 GHz front and back haul: Auto5 GHz front haul: Channel 485 GHz back haul: Channel 157 |
^1 Maximum wireless signal rate derived from IEEE Standard 802.11 specifications. Actual throughput can vary. Network conditions and environmental factors, including volume of network traffic, building materials and construction, and network overhead, lower actual data throughput rate.
Technical Specifications
The following table shows the technical specifications for the Orbi Outdoor Satellite
Table 4. Orbi Outdoor Satellite specifications
| DescriptionFeature | |
| Data and routing protocols | TCP/IP, RIP-1, RIP-2, DHCP, PPPoE, PPTP, Bigpond, Dynamic DNS, UPnP, and SMB |
| Power adapter | 120V, 60 Hz, input12V, 2.5A DC, output |
| 8.3 x 2.7 x 10.6 in. (210.82 x 68.58 x 269.24 mm)Dimensions | |
| 3.06 lb (1.387 kg)Weight | |
| 4°F to 122°F (-20°C to +50°C)Operating temperature | |
| Operating humidity | 90% maximum relative humidity, noncondensing |
| IP rating | IP66 |
| Electromagnetic emissions | FCC Part 15 Class BVCCI Class BEN 55 022 (CISPR 22), Class B C-Tick N10947 |
| WiFi | Maximum wireless signal rate complies with the IEEE 802.11 standard. |
| Radio data rates | 2.4 GHz: Max. 400 Mbps5 GHz Front haul: Max. 866 Mbps5 GHz Back haul: Max. 1733 Mbps |
| Data encoding standards | IEEE 802.11b/g/n 2.4 GHz-256 QAM supportIEEE 802.11a/n/ac 5 GHz-256 QAM support |
| Maximum number of computer per wireless network | limited by the amount of WiFi network traffic generated by each node (typically 50-70 nodes)2.4 GHz: 1275 GHz (front haul): 127 |
| Operating frequency range | 2.4 GHz: 2.412-2.462 GHz5 GHz:5.18 GHz-5.24 GHz5.745 GHz-5.825 GHz |
| WPA-PSK [TKIP], WPA2-PSK [AES]802.11 security |
^2 Maximum wireless signal rate derived from IEEE Standard 802.11 specifications. Actual throughput can vary. Network conditions and environmental factors, including volume of network traffic, building materials and construction, and network overhead, lower actual data throughput rate.



- Support and Community
- Regulatory and Legal
- Trademarks
- Contents
- Chapter 1 Overview
- Chapter 2 Manage Your Orbi Outdoor Satellite
- Chapter 3 Troubleshooting
- Orbi Outdoor Satellite
- Appendix A Supplemental Information
- 1
- Overview
- Supported Orbi Routers
- Package Contents
- Hardware Overview
- Power LED
- Bottom Light LED
- Wall-Mount or Attach to Stand
- Wall-Mount Your Satellite
- To wall-mount your satellite:
- Attach the Satellite to the Stand
- To attach the satellite to the stand:
- Lock the Satellite
- Lock the Satellite to the Wall-Mount Bracket
- To lock your satellite to the wall-mount bracket:
- Lock the Satellite to the Stand
- To lock your satellite to the stand:
- Label
- Place Your Satellite
- Sync Your Orbi Outdoor Satellite
- Sync Your Satellite Using the Sync Button
- To sync your satellite using the Sync button:
- Download the NETGEAR Orbi App
- 2
- Manage Your Orbi Outdoor Satellite
- Update the Router and Satellite Firmware
- Check for rmware updates
- To check for new rmware and update your router and satellite:
- Manually update rmware
- To manually update the rmware on your Orbi router and satellite, follow the high level steps:
- To manually update your satellite's rmware:
- To manually update your router's rmware:
- Enable the Sync button
- To enable your satellite's Sync button using the router web interface:
- Turn the satellite LED lighting on or off
- To turn the top and bottom LED lighting on or off:
- Set LED lighting brightness
- To set the satellite's LED lighting brightness:
- Schedule when to turn on LED lighting
- To schedule the LED lighting:
- View Satellite Information
- To view information about your satellite:
- View satellite status
- To view your satellite's status:
- 3
- Troubleshooting
- The Router and Satellite Do Not Sync
- To sync the router and the satellite:
- Cannot Log In to the Router
- A
- Supplemental Information
- Factory Settings
- Technical Specifications
Brand : NETGEAR
Model : Orbi RBS50Y
Category : Home Automation