
Orbi Pro - Home Automation NETGEAR - Free user manual and instructions
Find the device manual for free Orbi Pro NETGEAR in PDF.


| Product Type | WiFi Mesh System (Router + Satellite) |
| Model | Orbi Pro Router SRR60 / Satellite SRS60 |
| Dimensions (Router & Satellite) | 6.8 x 3.3 x 9.7 in (174 x 85 x 247 mm) |
| Weight (Router & Satellite) | 2.06 lb (0.93 kg) each |
| Power Input | AC 100-240V, 50/60 Hz (adapter output: 12V DC, 3.5A) |
| Wireless Standards | IEEE 802.11 a/b/g/n/ac, 2.4 GHz (400 Mbps) + 5 GHz (866 Mbps fronthaul, 1733 Mbps backhaul) |
| Security | WPA2-PSK (AES), WPA-PSK+TKIP, WPA2-Enterprise, MAC ACL, Access Control List, SPI Firewall |
| Number of LAN Ports | 4 x Gigabit Ethernet (router), 2 x Gigabit Ethernet (satellite) |
| WAN Port | 1 x Gigabit Ethernet (router) |
| IPv6 Support | Yes (Auto Detect, PPPoE, DHCP, 6rd, 6to4, Pass-Through, Fixed) |
| VPN Support | OpenVPN server, VPN client pass-through |
| Guest Network | Up to 4 separate SSIDs (Admin, Employee, IoT, Guest) with captive portal |
| Maximum Devices | Up to 127 per band (2.4 GHz and 5 GHz) |
| Mounting | Wall or ceiling mount (bracket included) |
| Operating Temperature | 0°C to 40°C (32°F to 104°F) |
| Humidity | Up to 90% non-condensing |
| Firmware Update | Manual or automatic via web interface |
| Reset | Factory reset via paperclip (hold Reset button 7+ seconds) |
| LED Indicators | Power LED, Ring LED (white/blue/amber/magenta) |
| Included Accessories | Power adapters (one per unit), Ethernet cable, mounting hardware |
Frequently Asked Questions - Orbi Pro NETGEAR
User questions about Orbi Pro NETGEAR
0 question about this device. Answer the ones you know or ask your own.
Ask a new question about this device
Download the instructions for your Home Automation in PDF format for free! Find your manual Orbi Pro - NETGEAR and take your electronic device back in hand. On this page are published all the documents necessary for the use of your device. Orbi Pro by NETGEAR.
USER MANUAL Orbi Pro NETGEAR
Support and Community
Visit_netgear.com/support to get your questions answered and access the latest downloads.
You can also check out our NETGEAR Community for helpful advice at community.netgear.com.
Regulatory and Legal
(If this product is sold in Canada, you can access this document in Canadian https://www.netgear.com/support/download/)
For regulatory compliance information including the EU Declaration of Conformity, https://www.netgear.com/about/regulatory/.
See the regulatory compliance document before connecting the power supply.
For NETGEAR's Privacy Policy, visit https://www.netgear.com/about/privacy-policy.
By using this device, you are agreeing to NETGEAR's Terms and Conditions at https://www.netgear.com/about/terms-and-conditions. If you do not agree, return the device to your place of purchase within your return period.
Trademarks
© NETGEAR, Inc., NETGEAR, and the NETGEAR Logo are trademarks of NETGEA. Any non-NETGEAR trademarks are used for reference purposes only.
Revision History
| Number | CommentsPublish DatePublication Part | |
| March 2020202-1 | 1824-07ded the following sections:Enable the network access control list and specify the access rule on page 54 and subsectionsManage the IoT WiFi network settings on page 87 and subsectionsSet up a guest WiFi network and captive portal on page 90 and Set u guest WiFi network with open access or password authentication on page 90Enable or disable Protected Management Frames on page 102Manage the automatic backup options on page 123We made major changes to the following sections:Manage MAC access control lists for WiFi networks and the LAN on page 48 and subsectionsChange the admin WiFi password or security level on page 81Change the employee WiFi password or security level on page 85Manage the download bandwidth per SSID on page 95View satellites, WiFi devices, and wired devices connected to the Orbi network on page 117View and manage logs of router activity on page 119Set up a syslog server on page 120We made minor changes and adjustments to other sections. | |
| November 2019 | 2021-1824-06 the following new sections:Manage MAC access control lists for WiFi networks and the LAN on page 48Manage the download bandwidth per SSID on page 95Set up a syslog server on page 120 |
Contents
Chapter 1 Overview
Supported Orbi Pro models....10
Orbi Pro router and satellite hardware overviews....10
Orbi Pro router model SRR60 hardware overview....10
Orbi Pro satellite model SRS60 hardware overview......11
LED behavior....11
Orbi Pro WiFi system LEDs....12
Add-on Orbi Pro satellite LEDs....12
Wall mount or ceiling mount your Orbi Pro router....13
Wall-mount your Orbi Pro....13
Ceiling-mount your Orbi Pro....14
Orbi Pro router label and Orbi Pro satellite label....16
Connect your Orbi Pro router....17
Place your satellite....18
Sync your Orbi Pro satellite....18
Sync a satellite from an Orbi Pro WiFi system....18
Sync an add-on Orbi Pro satellite....19
Add satellites to your network using the router web interface.20
Set up your Orbi network with the NETGEAR Insight app......21
Chapter 2 Connect to the Orbi Pro Network and Access the Router
Connect to the network....23
Wired connection....23
WiFi connection....23
WiFi connection using WPS....24
Types of logins....24
Use a web browser to access the router....24
Use the automatic Internet setup option....25
Log in to the Orbi router web interface....26
Change the language....27
Chapter 3 Specify Your Internet Settings
Use the Internet Setup Wizard....29
Manually set up the Internet connection....29
Specify an Internet connection without a login....29
Specify an Internet connection that uses a login....31
Orbi Pro Router SRR60 and Orbi Pro Satellite SRS60
Manage an IPv6 Internet connection....33
Requirements for entering IPv6 addresses....33
Specify IPv6 Internet connections....33
Use auto detection for an IPv6 Internet connection....34
Use auto conguration for an IPv6 Internet connection......35
Set up an IPv6 6rd tunnel Internet connection....36
Set up an IPv6 6to4 tunnel Internet connection....38
Set up an IPv6 pass-through Internet connection....40
Set up an IPv6 xed Internet connection....40
Set up an IPv6 DHCP Internet connection....41
Set up an IPv6 PPPoE Internet connection....43
Change the MTU size....45
Chapter 4 Control Access to the Internet
Manage MAC access control lists for WiFi networks and the LAN.48
Enable a MAC ACL for a specific network....49
Add automatically detected devices to a MAC ACL....50
Manually add, remove, or change the information for a device on a MAC ACL....51
Disable a MAC ACL for a specific network....52
Manage the Orbi network access control list....53
Enable the network access control list and specify the access rule....54
Manage the allowed devices on the network access control list....55
Manage the blocked devices on the network access control list....57
Use keywords to block Internet sites....58
Delete keywords that are used to block Internet sites....59
Avoid blocking on a trusted computer....60
Block services from the Internet....60
Schedule when to block Internet sites and services....62
Set up security event email notifications....63
Chapter 5 Specify Network Settings
View or change WAN settings....66
Manage Dynamic DNS....67
Set up a new Dynamic DNS account....67
Specify a DNS account that you already created....68
Change the Dynamic DNS settings....69
Set up a default DMZ server....69
Change the router's device name....70
Change the LAN TCP/IP settings....71
Use the router as a DHCP server....73
Orbi Pro Router SRR60 and Orbi Pro Satellite SRS60
Disable the DHCP server feature in the router....74
Manage reserved LAN IP addresses....75
Reserve an IP address....75
Edit a reserved IP address....76
Delete a reserved IP address entry....76
Manage custom static routes....77
Set up a static route....77
Edit a static route....78
Delete a static route....79
Change the admin WiFi network settings....80
Change the admin WiFi network name and channel.....80
Change the admin WiFi password or security level......81
Manage the employee WiFi network settings....83
Enable the employee WiFi network and change the settings..83
Change the employee WiFi password or security level......85
Manage the IoT WiFi network settings....87
Enable the IoT WiFi network and change the settings.....87
Change the IoT WiFi password or security level......88
Set up a guest WiFi network and captive portal....90
Set up a guest WiFi network with open access or password authentication....90
Set up a guest network with a captive portal....92
Set up Facebook Wi-Fi....93
Manage the download bandwidth per SSID....95
View or change advanced WiFi settings....97
Use the router as a WiFi access point....98
Set up router mode....99
Generate a new backhaul password....99
Enable or disable implicit beamforming....100
Enable or disable MU-MIMO....101
Enable or disable Protected Management Frames....102
Check your Internet bandwidth....103
Set up a bridge for a port group or VLAN tag group......103
Set up a bridge for a port group....104
Set up a bridge for a VLAN tag group....104
Improve network connections with Universal Plug and Play.....106
Chapter 6 Manage Your Network
Update the router and satellite rmware....109
Enable the automatic rmware update feature....109
Check for rmware updates....109
Manually update rmware....110
Manually update satellite rmware....111
Manually update router rmware....111
Orbi Pro Router SRR60 and Orbi Pro Satellite SRS60
Change the admin password....112
Enable admin password reset....113
Reset the admin password....114
View router status and usage information....114
Display Internet port statistics....115
Check the Internet connection status....116
View satellites, WiFi devices, and wired devices connected to the
Orbi network....117
View satellite status....118
View and manage logs of router activity....119
Set up a syslog server....120
Monitor Internet trafc....121
Manage the router conguration le....122
Back up settings....122
Manage the automatic backup options....123
Erase the current conguration settings....123
Restore conguration settings....124
Set up remote management....125
Use remote access....126
Chapter 7 Customize Internet Trafc Rules for Ports
Manage port forwarding to a local server....128
Set up port forwarding to a local server....128
Add a custom port forwarding service....129
Edit a port forwarding service....130
Delete a port forwarding entry....131
Application example: Make a local web server public......131
How the router implements the port forwarding rule......132
Manage port triggering....132
Add a port triggering service....133
Enable port triggering....134
Application example: Port triggering for Internet Relay Chat.134
Chapter 8 Use VPN to Access Your Network
Set up a VPN connection....137
Specify VPN service in the router....137
Install OpenVPN software....138
Install OpenVPN software on your Windows-based computer.138
Install OpenVPN software on your Mac computer....141
Install OpenVPN software on an iOS device....142
Install OpenVPN software on an Android device....142
Use a VPN tunnel on your Windows-based computer......143
Use VPN to access your Internet service at home....145
Set up VPN client Internet access in the router......145
Orbi Pro Router SRR60 and Orbi Pro Satellite SRS60
Block VPN client Internet access in the router.....146
Use a VPN tunnel to access your Internet service at home....147
Chapter 9 Troubleshooting
Quick tips....149
Sequence to restart your network....149
WiFi settings....149
Network settings....149
The router and satellite do not sync....149
You cannot log in to the router....151
You cannot access the Internet....151
Troubleshoot Internet browsing....152
Troubleshoot PPPoE....153
Troubleshoot WiFi connectivity....154
Troubleshoot your network using the ping utility....154
Test the LAN path to your router....154
Test the path from your computer to a remote device......155
Appendix A Supplemental Information
Factory settings....158
Factory settings for Orbi Pro router model SRR60......158
Factory settings for Orbi Pro satellite model SRS60......160
Technical specifications....162
Technical specifications for Orbi Pro router model SRR60....162
Technical specifications for Orbi Pro satellite model SRS60..163
1
Overview
The Orbi Pro creates dedicated high-speed WiFi connections to your Internet ser The Orbi Pro router connects to your modem or gateway. The Orbi Pro satelli the WiFi signal throughout your home.
This chapter contains the following sections:
• Supported Orbi Pro models
- Orbi Pro router and satellite hardware overviews
- LED behavior
• Wall mount or ceiling mount your Orbi Pro router
- Orbi Pro router label and Orbi Pro satellite label
- Connect your Orbi Pro router
- Place your satellite
- Sync your Orbi Pro satellite
- Set up your Orbi network with the NETGEAR Insight app
For more information about the topics covered in this manual, visit the support at _support.netgear.com.
Note: This manual refers to the Orb Pro router as the router and refers to the Orbi Pro satellite as the satellite.
Supported Orbi Pro models
This user manual describes the following Orbi Pro models:
- Orbi Pro Router (Model SRR60)
• Orbi Pro Satellite (Model SRS60)
This user manual does not describe the following Orbi Pro satellites:
• Orbi Outdoor Satellite (Model RBS50Y)
• Orbi Pro Ceiling Satellite (Model SRC60)
For more information about these Orbi Pro satellites, see their user manuals, what available at https://www.netgear.com/support/.
Note: To manage your Orbi Pro router and any Orbi Pro satellites that are co to your Orbi Pro network, you must manage them from your Orbi Pro router interface.
Orbi Pro router and satellite hardware overviews
The following sections display the hardware features available for the Orbi Pro I (model SRR60) and Orbi Pro satellite (model SRS60).
Orbi Pro router model SRR60 hardware overview
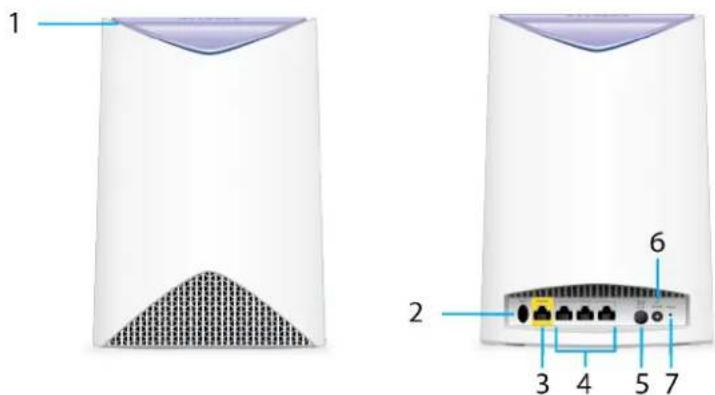
Figure 1. Orbi Pro router model SRR60, front and back views
- Ring LED (not shown in image)
- Sync button (also used for WPS connection)
- Internet port
- Ethernet ports
- Power On/Off button and Power LED
- DC Power connector
- Reset button
Orbi Pro satellite model SRS60 hardware overview
1
natural_image
Pure diagram of a device with a mesh base and a V-shaped top, no text or symbols present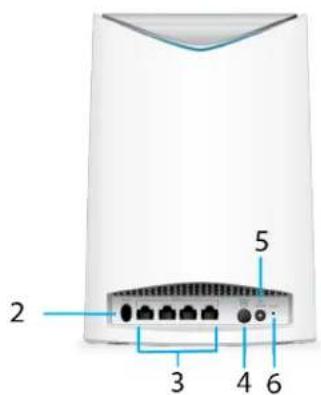
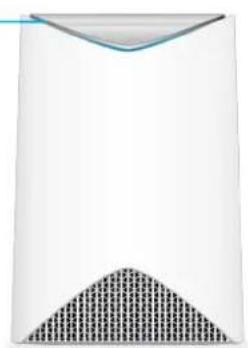
Figure 2. Orbi Pro satellite model SRS60, front and back views
- Ring LED (not shown in image)
- Sync button (also used for WPS connection)
- Ethernet ports
- Power On/Off button and Power LED
- DC Power connector
- Reset button
LED behavior
When you sync an Orbi Pro satellite to the Orbi Pro router, the LED behavior that comes in an Orbi Pro WiFi system is different from the LED behavior for Orbi Pro satellites.
Orbi Pro WiFi system LEDs
The following table describes the LED behavior for an Orbi Pro router (model and Orbi Pro satellite (model SRS60) that are purchased together and come in package.
Table 1. Orbi ProWiFi System router and satellite LED descriptions
| LED BehaviorLED | |
| Power LED | The Power LED is located above thePower On/Offbutton on the rear panel.Solid green.Power is on.Solid amber.The router or satellite is booting.Blinking amber.The router or satellite is resetting to factory default settings.Blinking red.The rmware is corrupted.Off.Power is not supplied. |
| Router ring LED | The ring LED is located on the top.Pulsing white.The router is booting or someone pressed theSyncbutton.Off.The router nished booting and is working normally.Solid white.The router is resetting to factory default settings.Solid magenta.The router cannot connect to theInternet.See Youcannot access theInterneton page 151. |
| Satellite ring LED | This satellite is included when you buy an Orbi router. The ring LED is located on the top.Pulsing white.The satellite is booting.Blue for three minutes.The connection between the satellite and the router is good.Amber for three minutes.The connection between the satellite and the router is fair.Magenta.The satellite failed to sync to therouter.See The routerand satellite do notsyncon page 149.Off.The satellite synced to the router and is working normally. |
Add-on Orbi Pro satellite LEDs
The following table describes the LED behavior for an add-on Orbi Pro satellite SRS60) that was purchased separately from the Orbi Pro kit.
Table 2. Orbi Pro add-on satellite (model SRS60) LED description
| LED BehaviorLED | |
| Power LED | The Power LED is located above the Power On/Off button on the rear panel.Solid green. Power is on.Solid amber. The satellite is rebooting.Blinking amber. The satellite is resetting to factory default settings.Blinking red. The rmware is corrupted.Off. Power is not supplied. |
| Add-on satellite ring LED | Optional add-on satellites are sold separately and can be added to your Orbi network. ring LED is located on the top.Pulsing white. The satellite is booting.Solid white. The satellite is ready to sync to the router (press the Sync button).Blue for three minutes. The connection between the satellite and the router is good.Amber for three minutes. The connection between the satellite and the router is fair.Magenta. The satellite is not connected to the router or is not getting an IP addressOff. The satellite synced to the router and is working normally. |
Wall mount or ceiling mount your Orbi router
Your package contains wall-mounting and ceiling-mounting items. Before you can mount or ceiling mount your Orbi Pro router (model SRR60) or Orbi Pro satellite SRS60), you must attach the mount base and cover to your router or satellite.
Wall-mount your Orbi Pro
After you attach the mount base and cover to your router or satellite, you can your router or satellite to the wall.
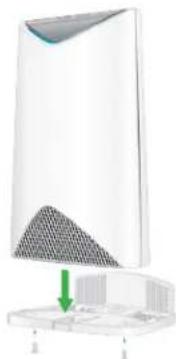
To wall mount your router or satellite:
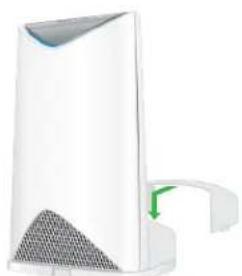
- Place your Orbi router or satellite on the mount base and attach the router to the base with the provided screws.
natural_image
Diagram of a device with a mesh grille and green arrow indicating a component (no text or symbols)- Attach the mount cover to the mount base.
natural_image
White electronic device with a mesh grille and green arrow indicating rotation (no text or symbols)- Use the wall anchors with screws to attach the wall bracket to the wall.
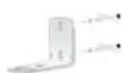
- Slide the mount base onto the wall bracket.
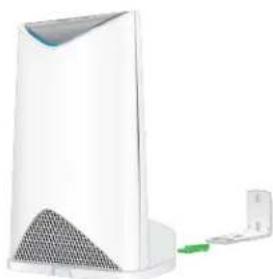
natural_image
White electronic device with a mesh grille and a green connector, shown against a plain white background (no text or symbols visible)Ceiling-mount your Orbi Pro
The following instructions require a drop ceiling.
To ceiling mount your router or satellite:
- Place your Orbi router or satellite on the mount base and attach the router to the base with the provided screws.
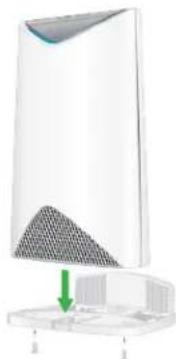
natural_image
3D diagram of a white electronic device with a mesh grille and green arrow indicating a component (no text or symbols)- Attach the mount cover to the mount base.
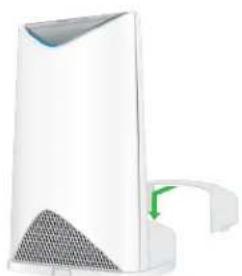
natural_image
White electronic device with a mesh grille and a green arrow indicating a component (no text or symbols visible)- Attach the T-bracket to the ceiling bracket with the T-bracket screws.
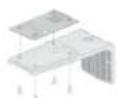
-
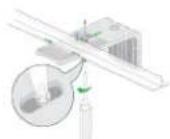
Loosen the screw so that the locking plate can slide.
-
Secure the T-bracket to the T-bar and tighten the screw.
- Slide the mount base into the ceiling bracket.
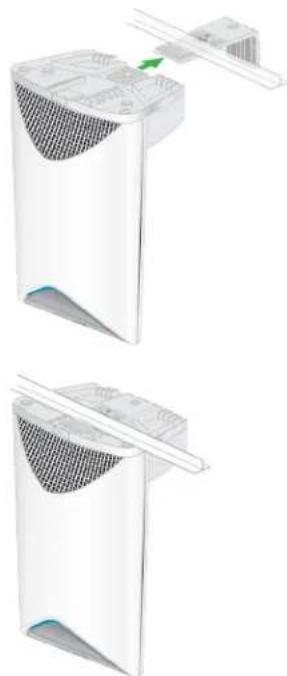
natural_image
Two-step diagram showing a device with a mesh chamber and a handle, no text or symbols present.Orbi Pro router label and Orbi Pro sate label
The Orbi Pro router label shows the login information, the WiFi network name password, the router's MAC address, and the router's serial number. The following an example of what the router label might look like:
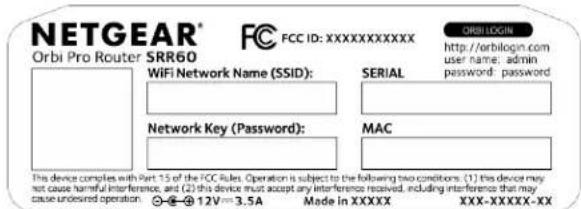
Figure 3. Orbi Pro router label
The Orbi Pro satellite label shows the WiFi network name and password, the s MAC address, and the satellite's serial number. The following is an example of satellite label might look like:
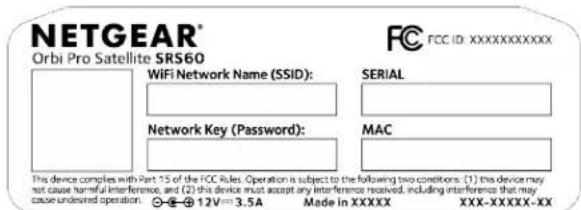
Figure 4. Orbi Pro satellite label
Connect your Orbi Pro router
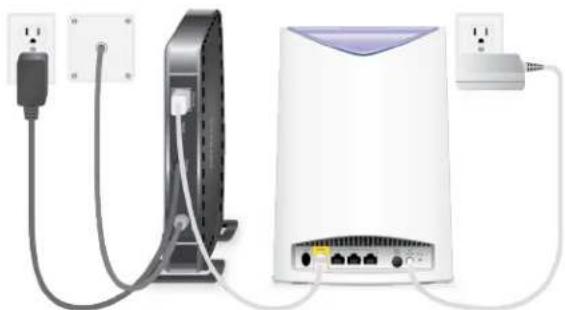
If you want to connect your Orbi Pro router to an existing gateway, we recon you turn off your existing gateway's WiFi.
To cable your router:
-
Unplug your modem's power, leaving the modem connected to the wall jack your Internet service. If your modem uses a battery backup, remove the battery, and then put the back in.
-
Plug in and turn on your modem.
-
Connect your modem to the Internet port of your router with the Ethernet came with your router.
-
Connect the power adapter to your router and plug the power adapter into outlet.
natural_image
Diagram of a network device with connected ports and cables, no visible text or symbols- If the Power LED does not light, press the Power On/Off button on the rear of the router.
Place your satellite
Your satellites must be within range of your router's WiFi signal in order for i with the router. Use the satellite's ring LED to help you determine where to p satellite.
Sync your Orbi Pro satellite
The sync process for your Orbi Pro satellite depends on whether your satellite with your Orbi Pro WiFi system, or if your satellite is an add-on satellite.
Sync a satellite from an Orbi Pro WiFi system
The Orbi Pro WiFi System includes an Orbi Pro router and a Orbi Pro satellite pro satellite in the WiFi system is preset to automatically nd and sync to the from the Orbi Pro router in the same WiFi system.
To sync your Orbi Pro satellite:
- Place your satellite.
For more information, see Place your satellite on page 18.
-
Connect the satellite to a power source.
-
If the Power LED on the back of the satellite does not light, press the Pc button.
The satellite ring LED pulses white. The satellite automatically nds the Orbi r WiFi signal and attempts to sync to the Orbi router.
The satellite ring LED lights one of the following colors for about three min then turns off:
- Blue. The Orbi router and satellite successfully synced, and the connection between the router and satellite is good.
- Amber. The Orbi router and satellite successfully synced, and the connection between the router and satellite is fair. Consider moving the Orbi satellite to the Orbi router.
- Magenta. The Orbi router and satellite failed to sync.
- If the satellite ring LED is magenta, move the satellite closer to the router sync the satellite to the router:
a. Press the Sync button on the back of the router.
b. Within two minutes, press the Sync button on the back of the satellite. The satellite attempts to sync to the Orbi router. The satellite ring LED I amber, or magenta as described in Step 3 of this procedure and then to
Sync an add-on Orbi Pro satellite
If you already set up an Orbi Pro router and satellite are adding an optional Pro satellite (sold separately), follow these steps.
To sync your add-on Orbi Pro satellite:
- Place your satellite.
For more information, see Place your satellite on page 18.
- Connect the satellite to a power source.
- If the Power LED on the back of the satellite does not light, press the Pc button.
- Wait about two minutes for the satellite ring LED to light solid white.
- Press the Sync button on the back of the satellite and within two minutes, Sync button on the back of your Orbi router.
The satellite ring LED pulses white, then lights one of the following colors f three minutes, and then turns off:
- Blue. The Orbi router and satellite successfully synced, and the connection between the router and satellite is good.
- Amber. The Orbi router and satellite successfully synced, and the connection between the router and satellite is fair. Consider moving the Orbi satellite to the Orbi router.
- Magenta. The Orbi router and satellite failed to sync. Move the satellite to the router and try again.
Add satellites to your network using the router web ir
You can use the router web interface to add a satellite to your Orbi network.
To add a satellite to your Orbi network using the router web interface:
- Launch a web browser from a computer or mobile device that is connected Orbi network.
- Enter orbilogin.com.
A login window opens.
- Enter the router admin user name and password.
The user name is admin. The default password is password. The user name and password are case-sensitive.
The BASIC Home page displays.
- Select Add Orbi Satellite.
The Place Your Satellite page displays.
- Follow the instructions about where to place your satellite in your house.
- Connect the satellite to a power source.
- If the Power LED on the back of the satellite does not light, press the Pc button.
- Click the NEXT button.
- Wait about two minutes for the satellite's ring LED to light solid white.
- Press the Sync button on the satellite.
The satellite's ring LED pulses white.
- Click the SYNC button in the router web interface.
The router attempts to sync with the satellite.
The satellite's ring LED lights one of the following colors for about three m and then turns off:
- Blue. The Orbi router and satellite successfully synced, and the connection between the router and satellite is good.
- Amber. The Orbi router and satellite successfully synced, and the connection between the router and satellite is fair. Consider moving the Orbi satellite to the Orbi router.
- Magenta. The Orbi router and satellite failed to sync. Move the satellite (to the router and try again.
Set up your Orbi network with the NET Insight app
You can use the NETGEAR Insight app to set up your Orbi network.
To nd the app, search for NETGEAR Insight in the Apple App Store or Goog Store. Then launch the NETGEAR Insight app on your mobile device and follow prompts. For more information about the NETGEAR Insight app, visit https://www.netgear.com/insight/.
natural_image
Purple square icon with a white network diagram and the text 'NETGEAR' below it (no additional symbols or text)

2
Connect to the Orbi Pro Network and Access the Router
To manage your Orbi Pro router and any Orbi Pro satellites that are connected. Orbi Pro network, you must manage them from your Orbi Pro router web inte. This chapter contains the following sections:
- Connect to the network
- Types of logins
• Use a web browser to access the router - Change the language
Connect to the network
You can connect to the Orbi network through a wired or WiFi connection. If your computer to use a static IP address, change the settings so that it uses Host Conguration Protocol (DHCP).
Wired connection
You can connect your computer to the router using an Ethernet cable and join router's local area network (LAN).
To connect your computer to the router with an Ethernet cable:
- Make sure that the router is receiving power (its Power LED is lit).
- Connect an Ethernet cable to an Ethernet port on your computer.
- Connect the other end of the Ethernet cable to one of the router's Ethernet. Your computer connects to the local area network (LAN). A message might on your computer screen to notify you that an Ethernet cable is connected.
WiFi connection
If you're installing your Orbi router for the rst time, you can connect to the WiFi network by scanning the QR code on your router with the camera app or mobile device. To scan the QR code with your camera app, your mobile device have iOS version 11 or later or Android version 10 or later.
You can also manually nd and select the Orbi router's WiFi network from your WiFi-enabled computer or mobile device.
To nd and select the WiFi network:
- Make sure that the router or satellite is receiving power (its Power LED is
- On your WiFi-enabled computer or mobile device, nd and select the WiFi net. The WiFi network name is on the router label. The WiFi network name is for the router and the satellite in the Orbi WiFi System.
Note: If you bought the router and the satellite separately, their default WiFi names are different.
- Join the WiFi network and enter the WiFi password.
The password is on the router label.
Your WiFi-enabled computer or mobile device connects to the WiFi network.
WiFi connection using WPS
You can connect to the router's WiFi network with Wi-Fi Protected Setup (WPS) can nd and select the WiFi network.
To use WPS to connect to the WiFi network:
- Make sure that the router is receiving power (its Power LED is lit).
- Check the WPS instructions for your computer or WiFi device.
- Press the Sync button on the router.
- Within two minutes, on your WiFi-enabled computer or mobile device, press its WPS button or follow its instructions for WPS connections.
Your computer or mobile device connects to the WiFi network.
Types of logins
Separate types of logins serve different purposes. It is important that you under the difference so that you know which login to use when.
Types of logins:
- Internet service login. The login that your Internet service provider (ISP) gave logs you in to your Internet service. Your service provider gave you this log information in a letter or some other way. If you cannot nd this login infor contact your service provider.
- WiFi network key or password. Your router and satellite are preset with the WiFi network name (SSID) and password for WiFi access. This information is router label and the satellite label.
- Router login. This logs you in to the router interface from a web browser
Use a web browser to access the route
When you connect to the network (either with WiFi or with an Ethernet cable), use a web browser to access the router to view or change its settings. The access the router, the NETGEAR installation assistant automatically checks to see router can connect to your Internet service.
Use the automatic Internet setup option
You can set up your router automatically, or you can use a web browser to router and set up your router manually. Before you start the setup process, ge information and make sure that the computers and devices in the network use settings described here.
When your Internet service starts, your Internet service provider (ISP) typically give all the information needed to connect to the Internet. For DSL service, you might the following information to set up your router:
- The ISP congruration information for your DSL account
- ISP login name and password
- Fixed or static IP address settings (special deployment by ISP; this setting is
If you cannot locate this information, ask your ISP to provide it. When your In connection is working, you no longer need to launch the ISP login program or computer to access the Internet. When you start an Internet application, your ro automatically logs you in.
Installation and basic setup takes about 15 minutes to complete.
To automatically set up your router:
- Power on your router.
- Make sure that your WiFi-enabled computer or mobile device is connected to router with an Ethernet cable (wired) or wirelessly with the preset security set listed on the label.
Note: If you want to change the router's WiFi settings, use a wired connecti avoid being disconnected when the new WiFi settings take effect.
- Launch a web browser.
The page that displays depends on whether you accessed the router before:
- The rst time that you set up the Internet connection for your router, the goes to orbilogin.com, and the Orbi login page displays.
-
If you already set up the Internet connection, enter orbilogin.com in the a eld for your browser to start the installation process.
-
Follow the onscreen instructions.
The router connects to the Internet.
- If the browser does not display the web page, do the following:
- Make sure that the computer is connected to one of the four LAN Ether or over WiFi to the router.
• Make sure that the router is receiving power, and that its Power LED is
- Close and reopen the browser or clear the browser cache.
- Browse to orbilogin.com.
- If the computer is set to a static or xed IP address (this setting is unchanged it to obtain an IP address automatically from the router.
- If the router does not connect to the Internet, do the following:
a. Review your settings.
b. Make sure that you selected the correct options and typed everything cor
c. Contact your ISP to verify that you are using the correct configuration info
d. Read Troubleshooting on page 148.
If problems persist, register your NETGEAR product and contact NETGEAR technical support.
Log in to the Orbi router web interface
When you log in to the Orbi, the browser displays the router web interface. Use the router web interface to change the router or satellite settings.
To log in to your Orbi:
-
Launch a web browser from a computer or mobile device that is connected Orbi network.
-
Enter orbilogin.com.
A login window opens.
- Enter the router admin user name and password.
The user name is admin. The password is the one that you specied the rs that you logged in. The user name and password are case-sensitive.
The BASIC Home page displays.
Change the language
By default, the language is set as Auto.
To change the language:
- Launch a web browser from a computer or mobile device that is connected Orbi network.
- Enter orbilogin.com.
A login window opens.
- Enter the router admin user name and password.
The user name is admin. The password is the one that you specied the rs that you logged in. The user name and password are case-sensitive.
The BASIC Home page displays.
- In the upper right corner, select a language from the menu.
- When prompted, click the OK button to conrm this change.
The page refreshes with the language that you selected.
3
Specify Your Internet Settings
Usually, the quickest way to set up the router to use your Internet connection Orbi to detect the Internet connection when you rst access the router with a browser. You can also customize or specify your Internet settings.
This chapter contains the following sections:
• Use the Internet Setup Wizard
• Manually set up the Internet connection
- Manage an IPv6 Internet connection
- Change the MTU size
Use the Internet Setup Wizard
You can use the Setup Wizard to detect your Internet settings and automatically your router.
To use the Setup Wizard:
- Launch a web browser from a computer or mobile device that is connected Orbi network.
- Enter orbilogin.com.
A login window opens.
- Enter the admin user name and password.
The user name is admin. The password is the one that you specied the rs that you logged in. The user name and password are case-sensitive.
The BASIC Home page displays.
- Select ADVANCED > Setup Wizard.
The Setup Wizard page displays.
- Select the Yes radio button.
If you select No, you are taken to the Internet Setup page (see Manually's Internet connection on page 29).
- Click the Next button.
The Setup Wizard searches your Internet connection for servers and protocols determine your ISP conguration and checks your operation mode.
Manually set up the Internet connection
You can view or change the router's Internet connection settings.
Specify an Internet connection without a login
To specify the Internet connection settings:
- Launch a web browser from a computer or mobile device that is connected Orbi network.
- Enter orbilogin.com.
A login window opens.
- Enter the admin user name and password.
The user name is admin. The password is the one that you specied the rs that you logged in. The user name and password are case-sensitive.
The BASIC Home page displays.
- Select Internet.
The Internet Setup page.
-
Leave the Does your Internet connection require a login No radio button sel
-
If your Internet connection requires an account name or host name, type it Account Name (If Required) eld.
-
If your Internet connection requires a domain name, type it in the Domain I Required) eld.
For the other sections in this page, the default settings usually work, but you change them.
- Select an Internet IP Address radio button:
- Get Dynamically from ISP. Your ISP uses DHCP to assign your IP address. ISP automatically assigns these addresses.
- Use Static IP Address. Enter the IP address, IP subnet mask, and the gate address that your ISP assigned. The gateway is the ISP router to which y connects.
- Select a Domain Name Server (DNS) Address radio button:
- Get Automatically from ISP. Your ISP uses DHCP to assign your DNS serve. Your ISP automatically assigns this address.
- Use These DNS Servers. If you know that your ISP requires specific servers, this option. Enter the IP address of your ISP's primary DNS server. If a DNS server address is available, enter it also.
- Select a Router MAC Address radio button:
- Use Default Address. Use the default MAC address.
- Use Computer MAC Address. The router captures and uses the MAC address of the computer that you are now using. You must use the one computer ISP allows.
- Use This MAC Address. Enter the MAC address that you want to use.
- Click the Apply button.
Your settings are saved.
- Click the Test button to test your Internet connection.
Specify an Internet connection that uses a login
To view or change the basic Internet setup:
- Launch a web browser from a computer or mobile device that is connected Orbi network.
- Enter orbilogin.com.
A login window opens.
- Enter the admin user name and password.
The user name is admin. The password is the one that you specified the rs that you logged in. The user name and password are case-sensitive.
The BASIC Home page displays.
- Select Internet.
The Internet Setup page displays. - Select the Does your Internet connection require a login Yes radio button. The page adjusts.
- From the Internet Service Provider menu, select the encapsulation method: The selections are PPPoE, PPTP, or L2TP.
- In the Login eld, enter the login name your ISP gave you. This login name is often an email address.
- In the Password eld, type the password that you use to log in to your In service.
- If your ISP requires a service name, type it in the Service Name (if Require
- From the Connection Mode menu, select Always On, Dial on Demand, or Manually Connect.
- To change the number of minutes until the Internet login time out, in the I (In minutes) eld, type the number of minutes.
This is how long the router keeps the Internet connection active when no c network is using the Internet connection. A value of 0 (zero) means never lo
-
Select an Internet IP Address radio button:
-
Get Dynamically from ISP. Your ISP uses DHCP to assign your IP address. ISP automatically assigns these addresses.
-
Use Static IP Address. Enter the IP address, IP subnet mask, and gateway address that your ISP assigned. The gateway is the ISP router to which y connects.
-
Select a Domain Name Server (DNS) radio button:
-
Get Automatically from ISP. Your ISP uses DHCP to assign your DNS serve. Your ISP automatically assigns this address.
-
Use These DNS Servers. If you know that your ISP requires specific servers, this option. Enter the IP address of your ISP's primary DNS server. If a DNS server address is available, enter it also.
-
Select a Router MAC Address radio button:
-
Use Default Address. Use the default MAC address.
- Use Computer MAC Address. The router captures and uses the MAC address of the computer that you are now using. You must use the one computer ISP allows.
-
Use This MAC Address. Enter the MAC address that you want to use.
-
Click the Apply button.
Your settings are saved.
- Click the Test button to test your Internet connection.
Manage an IPv6 Internet connection
The router supports many different types of IPv6 Internet connections for which specify the settings manually.
Requirements for entering IPv6 addresses
IPv6 addresses are denoted by eight groups of hexadecimal quartets that are set by colons. You can reduce any four-digit group of zeros within an IPv6 address single zero or omit it. The following errors invalidate an IPv6 address:
• More than eight groups of hexadecimal quartets
• More than four hexadecimal characters in a quartet
• More than two colons in a row
Specify IPv6 Internet connections
You can set up an IPv6 Internet connection if the router does not detect it a
To set up an IPv6 Internet connection:
- Launch a web browser from a computer or mobile device that is connected Orbi network.
- Enter orbilogin.com.
A login window opens.
- Enter the admin user name and password.
The user name is admin. The password is the one that you specied the rs that you logged in. The user name and password are case-sensitive.
The BASIC Home page displays.
- Select ADVANCED > Advanced Setup > IPv6.
The IPv6 page displays.
-
From the Internet Connection Type menu, select the IPv6 connection type:
-
If you are not sure, select Auto Detect so that the router detects the IPv that is in use.
- If your Internet connection does not use PPPoE, DHCP, or xed, but is IP Auto Cong.
Your Internet service provider (ISP) can provide this information. For more information about IPv6 Internet connection, see the following sections:
Orbi Pro Router SRR60 and Orbi Pro Satellite SRS60
• Use auto detection for an IPv6 Internet connection on page 34
• Use auto conguration for an IPv6 Internet connection on page 35
- Set up an IPv6 6rd tunnel Internet connection on page 36
- Set up an IPv6 6to4 tunnel Internet connection on page 38
- Set up an IPv6 pass-through Internet connection on page 40
- Set up an IPv6 xed Internet connection on page 40
- Set up an IPv6 DHCP Internet connection on page 41
- Set up an IPv6 PPPoE Internet connection on page 43
- Click the Apply button.
Your settings are saved.
Use auto detection for an IPv6 Internet connection
To set up an IPv6 Internet connection through auto detection:
- Launch a web browser from a computer or mobile device that is connected Orbi network.
- Enter orbilogin.com.
A login window opens.
- Enter the admin user name and password.
The user name is admin. The password is the one that you specied the rs that you logged in. The user name and password are case-sensitive.
The BASIC Home page displays.
- Select ADVANCED > Advanced Setup > IPv6.
The IPv6 page displays.
- From the Internet Connection Type menu, select Auto Detect.
The page adjusts.
The router automatically detects the information in the following elds:
- Connection Type. This eld indicates the connection type that is detected.
- Router's IPv6 Address on WAN. This field shows the IPv6 address that is ad for the router's WAN (or Internet) interface. The number after the slash (/).
length of the prex, which is also indicated by the underline (_) under the address. If no address is acquired, the eld displays Not Available.
- Router's IPv6 Address on LAN. This field shows the IPv6 address that is ad for the router's LAN interface. The number after the slash (/) is the length prex, which is also indicated by the underline (_) under the IPv6 address. address is acquired, the eld displays Not Available.
-
Select an IP Address Assignment radio button:
-
Use DHCP Server. This method passes more information to LAN devices, b some IPv6 systems might not support the DHCv6 client function.
• Auto Cong. This is the default setting.
This setting species how the router assigns IPv6 addresses to the devices on home network (the LAN).
- (Optional) Select the Use This Interface ID check box and specify the interface to be used for the IPv6 address of the router's LAN interface.
If you do not specify an ID here, the router generates one automatically from address.
- Click the Apply button.
Your settings are saved.
Use auto congruration for an IPv6 Internet connection
To set up an IPv6 Internet connection through auto conguration:
- Launch a web browser from a computer or mobile device that is connected Orbi network.
- Enter orbilogin.com.
A login window opens.
- Enter the admin user name and password.
The user name is admin. The password is the one that you specied the rs that you logged in. The user name and password are case-sensitive.
The BASIC Home page displays.
- Select ADVANCED > Advanced Setup > IPv6.
The IPv6 page displays.
- From the Internet Connection Type menu, select Auto Cong.
The page adjusts.
The router automatically detects the information in the following elds:
- Router's IPv6 Address on WAN. This field shows the IPv6 address that is added for the router's WAN (or Internet) interface. The number after the slash (/) length of the prex, which is also indicated by the underline (_) under the address. If no address is acquired, the eld displays Not Available.
- Router's IPv6 Address on LAN. This field shows the IPv6 address that is ad for the router's LAN interface. The number after the slash (/) is the length prex, which is also indicated by the underline (_) under the IPv6 address. address is acquired, the eld displays Not Available.
- (Optional) In the DHCP User Class (If Required) eld, enter a host name.
Most people can leave this eld blank, but if your ISP gave you a speci I enter it here.
-
(Optional) In the DHCP Domain Name (If Required) eld, enter a domain name You can type the domain name of your IPv6 ISP. Do not enter the domain the IPv4 ISP here. For example, if your ISP's mail server is mail.xxx.yyy.zzz, t xxx.yyy.zzz as the domain name. If your ISP provided a domain name, type field. For example, Earthlink Cable might require a host name of home, and sometimes supplies a domain name.
-
Select an IP Address Assignment radio button:
- Use DHCP Server. This method passes more information to LAN devices, b some IPv6 systems might not support the DHCv6 client function.
• Auto Cong. This is the default setting.
-
(Optional) Select the Use This Interface ID check box and specify the interface that you want to be used for the IPv6 address of the router's LAN interface. If you do not specify an ID here, the router generates one automatically from address.
-
Click the Apply button.
Your settings are saved.
Set up an IPv6 6rd tunnel Internet connection
The 6rd protocol makes it possible to deploy IPv6 to sites using a service provider. IPv4 network. 6rd uses the service provider's own IPv6 address prex. This limits operational domain of 6rd to the service provider's network and is under direct of the service provider. The IPv6 service provided is equivalent to native IPv6. mechanism relies on an algorithmic mapping between the IPv6 and IPv4 address
are assigned for use within the service provider's network. This mapping allows automatic determination of IPv4 tunnel endpoints from IPv6 prexes, allowing statel operation of 6rd.
With a 6rd Tunnel conguration, the router follows the RFC5969 standard, support two ways to establish a 6rd tunnel IPv6 WAN connection:
- Auto Detect Mode. In IPv6 Auto Detect mode, when the router receives option from the DHCPv4 option, auto detect selects the IPv6 as 6rd Tunnel setting. router uses the 6rd option information to establish the 6rd connection.
- Manual Mode. Select 6rd. If the router receives option 212, the elds are automatically completed. Otherwise, you must enter the 6rd settings.
To set up an IPv6 6rd Tunnel Internet connection:
- Launch a web browser from a computer or mobile device that is connected Orbi network.
- Enter orbilogin.com.
A login window opens.
- Enter the admin user name and password.
The user name is admin. The password is the one that you specied the rs that you logged in. The user name and password are case-sensitive.
The BASIC Home page displays.
- Select ADVANCED > Advanced Setup > IPv6.
The IPv6 page displays.
- In the Internet Connection Type menu, select 6rd.
The page adjusts.
The router automatically detects the information in the following sections:
- 6rd (IPv6 Rapid Development) Conguration. The router detects the service provider's IPv4 network and attempts to establish an IPv6 6rd Tunnel conn If the IPv4 network returns 6rd parameters to the router, the page adjusts display the correct settings in this section.
-
Router's IPv6 Address on LAN. This field shows the IPv6 address that is ad for the router's LAN interface. The number after the slash (/) is the length prex, which is also indicated by the underline (_) under the IPv6 address. address is acquired, the eld displays Not Available.
-
Select an IPv6 Domain Name Server (DNS) Address radio button:
-
Get Automatically from ISP. Your ISP uses DHCP to assign your DNS serve. Your ISP automatically assigns this address.
-
Use These DNS Servers. If you know that your ISP requires specific servers, this option. Enter the IP address of your ISP's primary DNS server. If a DNS server address is available, enter it also.
-
Select an IP Address Assignment radio button:
-
Use DHCP Server. This method passes more information to LAN devices, b some IPv6 systems might not support the DHCv6 client function.
• Auto Cong. This is the default setting.
This setting species how the router assigns IPv6 addresses to the devices on home network.
- (Optional) Select the Use This Interface ID check box and specify the interface that you want to be used for the IPv6 address of the router's LAN interface. If you do not specify an ID here, the router generates one automatically from address.
- Click the Apply button.
Your settings are saved.
Set up an IPv6 6to4 tunnel Internet connection
The remote relay router is the router to which your router creates a 6to4 tune sure that the IPv4 Internet connection is working before you apply the 6to4 tune settings for the IPv6 connection.
To set up an IPv6 Internet connection by using a 6to4 tunnel:
- Launch a web browser from a computer or mobile device that is connected Orbi network.
- Enter orbilogin.com.
A login window opens. -
Enter the admin user name and password.
The user name is admin. The password is the one that you specied the rs that you logged in. The user name and password are case-sensitive.
The BASIC Home page displays. -
Select ADVANCED > Advanced Setup > IPv6.
The IPv6 page displays.
- From the Internet Connection Type menu, select 6to4 Tunnel.
The page adjusts.
The router automatically detects the information in the Router's IPv6 Address LAN eld. This eld shows the IPv6 address that is acquired for the router's interface. The number after the slash (/) is the length of the prex, which is indicated by the underline (_) under the IPv6 address. If no address is acquired displays Not Available.
-
Select a Remote 6to4 Relay Router radio button:
-
Auto. Your router uses any remote relay router that is available on the I This is the default setting.
-
Static IP Address. Enter the static IPv4 address of the remote relay router. IPv6 ISP usually provides this address.
-
Select an IPv6 Domain Name Server (DNS Address) radio button:
-
Get Automatically from ISP. Your ISP uses DHCP to assign your DNS serve. Your ISP automatically assigns this address.
-
Use These DNS Servers. If you know that your ISP requires specific servers, this option. Enter the IP address of your ISP's primary DNS server. If a DNS server address is available, enter it also.
-
Select an IP Address Assignment radio button:
-
Use DHCP Server. This method passes more information to LAN devices, b some IPv6 systems might not support the DHCv6 client function.
• Auto Cong. This is the default setting.
This setting species how the router assigns IPv6 addresses to the devices on home network.
-
(Optional) Select the Use This Interface ID check box and specify the interface that you want to be used for the IPv6 address of the router's LAN interface. If you do not specify an ID here, the router generates one automatically from address.
-
Click the Apply button.
Your settings are saved.
Set up an IPv6 pass-through Internet connection
In pass-through mode, the router works as a Layer 2 Ethernet switch with two and WAN Ethernet ports) for IPv6 packets. The router does not process any IP packets.
To set up a pass-through IPv6 Internet connection:
- Launch a web browser from a computer or mobile device that is connected Orbi network.
- Enter orbilogin.com.
A login window opens.
- Enter the admin user name and password.
The user name is admin. The password is the one that you specied the rs that you logged in. The user name and password are case-sensitive.
The BASIC Home page displays.
- Select ADVANCED > Advanced Setup > IPv6.
The IPv6 page displays.
- From the Internet Connection Type menu, select Pass Through.
The page adjusts, but no additional elds display.
- Click the Apply button.
Your settings are saved.
Set up an IPv6 xed Internet connection
To set up a xed IPv6 Internet connection:
- Launch a web browser from a computer or mobile device that is connected Orbi network.
- Enter orbilogin.com.
A login window opens.
- Enter the admin user name and password.
The user name is admin. The password is the one that you specied the rs that you logged in. The user name and password are case-sensitive.
The BASIC Home page displays.
- Select ADVANCED > Advanced Setup > IPv6.
The IPv6 page displays.
- From the Internet Connection Type menu, select Fixed.
The page adjusts.
-
Congure the xed IPv6 addresses for the WAN connection:
-
IPv6 Address/Prex Length. The IPv6 address and prex length of the router WAN interface.
- Default IPv6 Gateway. The IPv6 address of the default IPv6 gateway for the router's WAN interface.
- Primary DNS Server. The primary DNS server that resolves IPv6 domain na records for the router.
- Secondary DNS Server. The secondary DNS server that resolves IPv6 domain name records for the router.
Note: If you do not specify the DNS servers, the router uses the DNS server are congured for the IPv4 Internet connection on the Internet Setup page. (S Manually set up the Internet connection on page 29.)
-
Select an IP Address Assignment radio button:
-
Use DHCP Server. This method passes more information to LAN devices, b some IPv6 systems might not support the DHCv6 client function.
• Auto Cong. This is the default setting.
This setting species how the router assigns IPv6 addresses to the devices on home network.
- In the IPv6 Address/Prex Length elds, specify the static IPv6 address and pre length of the router's LAN interface.
If you do not specify an ID here, the router generates one automatically from address.
- Click the Apply button.
Your settings are saved.
Set up an IPv6 DHCP Internet connection
To set up an IPv6 Internet connection with a DHCP server:
- Launch a web browser from a computer or mobile device that is connected Orbi network.
- Enter orbilogin.com.
A login window opens.
- Enter the admin user name and password.
The user name is admin. The password is the one that you specied the rs that you logged in. The user name and password are case-sensitive.
The BASIC Home page displays.
- Select ADVANCED > Advanced Setup > IPv6.
The IPv6 page displays.
- From the Internet Connection Type menu, select DHCP.
The page adjusts.
The router automatically detects the information in the following elds:
- Router's IPv6 Address on WAN. This field shows the IPv6 address that is added for the router's WAN (or Internet) interface. The number after the slash (/) length of the prex, which is also indicated by the underline (_) under the address. If no address is acquired, the eld displays Not Available.
- Router's IPv6 Address on LAN. This field shows the IPv6 address that is ad for the router's LAN interface. The number after the slash (/) is the length prex, which is also indicated by the underline (_) under the IPv6 address. address is acquired, the eld displays Not Available.
- Select an IPv6 Domain Name Server (DNS) Address radio button:
- Get Automatically from ISP. Your ISP uses DHCP to assign your DNS serve. Your ISP automatically assigns this address.
- Use These DNS Servers. If you know that your ISP requires specific servers, this option. Enter the IP address of your ISP's primary DNS server. If a DNS server address is available, enter it also.
- (Optional) In the User Class (If Required) eld, enter a host name.
Most people can leave this eld blank, but if your ISP gave you a speci h enter it here.
- (Optional) In the Domain Name (If Required) eld, enter a domain name.
You can type the domain name of your IPv6 ISP. Do not enter the domain the IPv4 ISP here. For example, if your ISP's mail server is mail.xxx.yyy.zzz, t xxx.yyy.zzz as the domain name. If your ISP provided a domain name, type field. For example, Earthlink Cable might require a host name of home, and sometimes supplies a domain name.
-
Select an IP Address Assignment radio button:
-
Use DHCP Server. This method passes more information to LAN devices, b some IPv6 systems might not support the DHCv6 client function.
• Auto Cong. This is the default setting.
This setting species how the router assigns IPv6 addresses to the devices on home network (the LAN).
- (Optional) Select the Use This Interface ID check box and specify the interface that you want to be used for the IPv6 address of the router's LAN interface. If you do not specify an ID here, the router generates one automatically from address.
- Click the Apply button.
Your settings are saved.
Set up an IPv6 PPPoE Internet connection
To set up a PPPoE IPv6 Internet connection:
- Launch a web browser from a computer or mobile device that is connected Orbi network.
- Enter orbilogin.com.
A login window opens.
- Enter the admin user name and password.
The user name is admin. The password is the one that you specied the rs that you logged in. The user name and password are case-sensitive.
The BASIC Home page displays.
- Select ADVANCED > Advanced Setup > IPv6.
The IPv6 page displays.
- From the Internet Connection Type menu, select PPPoE.
The page adjusts.
The router automatically detects the information in the following elds:
- Router's IPv6 Address on WAN. This field shows the IPv6 address that is as for the router's WAN (or Internet) interface. The number after the slash (/).
length of the prex, which is also indicated by the underline (_) under the address. If no address is acquired, the eld displays Not Available.
- Router's IPv6 Address on LAN. This field shows the IPv6 address that is ad for the router's LAN interface. The number after the slash (/) is the length prex, which is also indicated by the underline (_) under the IPv6 address. address is acquired, the eld displays Not Available.
- In the Login eld, enter the login information for the ISP connection.
This is usually the name that you use in your email address. For example, mail account is JerAB@ISP.com, you would type JerAB in this eld. Some ISPs Mindspring, Earthlink, and T-DSL) require that you use your full email address you log in. If your ISP requires your full email address, type it in this eld.
-
In the Password eld, enter the password for the ISP connection.
-
In the Service Name eld, enter a service name.
If your ISP did not provide a service name, leave this eld blank.
Note: The default setting of the Connection Mode eld is Always On to provide a steady IPv6 connection. The router never terminates the connection. If the conn is terminated, for example, when the modem is turned off, the router attempt reestablish the connection immediately after the PPPoE connection becomes available again.
- Select an IPv6 Domain Name Server (DNS) Address radio button:
- Get Automatically from ISP. Your ISP uses DHCP to assign your DNS serve. Your ISP automatically assigns this address.
- Use These DNS Servers. If you know that your ISP requires specific servers, this option. Enter the IP address of your ISP's primary DNS server. If a DNS server address is available, enter it also.
-
(Optional) Select the Use This Interface ID check box and specify the interface that you want to be used for the IPv6 address of the router's LAN interface. If you do not specify an ID here, the router generates one automatically from address.
-
Click the Apply button.
Your settings are saved.
Change the MTU size
The maximum transmission unit (MTU) is the largest data packet a network devi transmits. When one network device communicates across the Internet with another the data packets travel through many devices along the way. If a device in that uses a lower MTU setting than the other devices, the data packets must be s "fragmented" to accommodate the device with the smallest MTU.
The best MTU setting for NETGEAR equipment is often the default value. In sc situations, changing the value xes one problem but causes another. Leave the M unchanged unless one of these situations occurs:
- You experience problems connecting to your ISP or other Internet service, and technical support of either the ISP or NETGEAR recommends changing the MTU setting. These web-based applications might require an MTU change:
- A secure website that does not open, or displays only part of a web p
- Yahoo email
- MSN portal
- You use VPN and experience severe performance problems.
- You used a program to optimize MTU for performance reasons, and now yo experiencing connectivity or performance problems.
Note: An incorrect MTU setting can cause Internet communication problems. For example, you might not be able to access certain websites, frames within websi secure login pages, or FTP or POP servers.
To change the MTU size:
- Launch a web browser from a computer or mobile device that is connected Orbi network.
- Enter orbilogin.com.
A login window opens.
- Enter the admin user name and password.
The user name is admin. The password is the one that you specied the rs that you logged in. The user name and password are case-sensitive.
The BASIC Home page displays.
- Select ADVANCED > Setup > WAN Setup.
The WAN Setup page displays.
- In the MTU Size eld, enter a value from 64 to 1500.
- Click the Apply button.
Your settings are saved.
If you suspect an MTU problem, a common solution is to change the MTU. If you are willing to experiment, you can gradually reduce the MTU from the value of 1500 until the problem goes away. The following table describes cc MTU sizes and applications.
Table 3. Common MTU sizes
| ApplicationMTU | |
| 1500 | The largest Ethernet packet size. This setting is typical for connections that do not use PPPoE c and is the default value for NETGEAR routers, adapters, and switches. |
| Used in PPPoE environments.1492 | |
| Maximum size to use for pinging. (Larger packets are fragmented.)1472 | |
| Used in some DHCP environments.1468 | |
| Used in PPTP environments or with VPN.1436 | |
| Typical value to connect to dial-up ISPs.576 | |
4
Control Access to the Internet
The router comes with a built-in rewall that helps protect your home network if unwanted intrusions from the Internet.
This chapter includes the following sections:
- Manage MAC access control lists for WiFi networks and the LAN
- Manage the Orbi network access control list
• Use keywords to block Internet sites - Delete keywords that are used to block Internet sites
- Avoid blocking on a trusted computer
• Block services from the Internet - Schedule when to block Internet sites and services
- Set up security event email notifications
Manage MAC access control lists for Wil networks and the LAN
A MAC access control list (ACL) for a WiFi network (that is, an SSID) or the (that is, the LAN) allows or denies a device access to the network based only MAC address of the device. If you block a device for one WiFi network or f network, the device is blocked only for that WiFi network or for the wired ne can set up an independent MAC ACL for each WiFi network and for the wire (The router supports a total of ve MAC ACLs.) With a MAC ACL, you can all access to a device on a speci WiFi network or the wired network.
Note: A MAC ACL differs from the network access control list (see Manage the network access control list on page 53). The network access control list is not to a particular WiFi network or to the wired network but is based on both V devices that the router detects on the entire Orbi network. To allow or deny a device on a specific WiFi network or the wired network, use a MAC ACL. M and the network access control list are mutually exclusive. Use either MAC ACLs network access control list.
If you set up a MAC ACL with a policy that allows access to a specific network on the MAC ACL are an exception to the default policy:
- A device for which you place the MAC address on the MAC ACL is denied that network.
- All other devices are allowed access to that network.
If you set up a MAC ACL with a policy that denies access to a specific network on the MAC ACL are an exception to the default policy: - A device for which you place the MAC address on the MAC ACL is allowed to that work.
- All other devices are denied access to that network.
A blocked device can still get an IP address from the router but cannot commit with other devices on the network or connect to the Internet.
Note: Each network device owns a MAC address, which is a unique 12-character address, containing the hexadecimal characters 0-9, a-f, or A-F (uppercase or lower only, and separated by colons (for example, 00:09:AB:CD:EF:01). Typically, the MAC address is on the label of a device. If you cannot see the label, you can disaddress using the network congruration utilities of a computer. You might also in MAC addresses on Attached Devices page of the router (see View satellites, WiFi and wired devices connected to the Orbi network on page 117).
Enable a MAC ACL for a specific network
When you enable a MAC ACL for a specific network, you must specify the def for that network. The default policy determines whether devices that you add to MAC ACL are allowed or denied access to that specific network.
You can set up an independent MAC ACL for each of the four WiFi networks the wired network. That is, the router supports a total of ve MAC ACLs.
To enable a MAC ACL for a specific network:
- Launch a web browser from a computer or mobile device that is connected Orbi network.
- Enter orbilogin.com.
A login window opens.
- Enter the router admin user name and password.
The user name is admin. The password is the one that you specied the rs that you logged in. The user name and password are case-sensitive.
The BASIC Home page displays.
- Select ADVANCED > Security > MAC ACL.
The MAC ACL page displays.
- Go to the section for the network for which you want to set up a MAC The rst section is for the admin WiFi network, the second for the employee network, the third for the IoT WiFi network, the fourth for the guest WiFi and the fth for the wired network.
- For the specific network, click the Enable MAC Access Control Disabled button The button changes to the green Enabled button.
Note: If you enabled the network access control list (see Enable the network control list and specify the access rule on page 54), you cannot enable any ACLs. The network access control list and MAC ACLs are mutually exclusive. either the network access control list or MAC ACLs.
-
From the Default Policy menu, select one of the following options:
-
Allow. The policy is to allow all devices access except for the devices that add to the MAC ACL. Devices on the MAC ACL are denied access to the network.
- Deny. The policy is to deny all devices access except for the devices that add to the MAC ACL. Devices on the MAC ACL are allowed access to network.
You can now add and manage devices on the MAC ACL. For more information following sections:
- Add automatically detected devices to a MAC ACL on page 50
- Manually add, remove, or change the information for a device on a MAC A page 51
Add automatically detected devices to a MAC ACL
After you set up a MAC ACL for a network and specify the default policy fo ACL, the router automatically detects devices that are connected or were connec the network for which you set up the MAC ACL.
You can select one or multiple devices from the detected list and add them ACL.
To add automatically detected devices to a MAC ACL:
- Launch a web browser from a computer or mobile device that is connected access point/router network.
- Enter orbilogin.com.
A login window opens.
- Enter the router admin user name and password.
The user name is admin. The password is the one that you specied the rs that you logged in. The user name and password are case-sensitive.
The BASIC Home page displays.
- Select ADVANCED > Security > MAC ACL.
The MAC ACL page displays.
- Go to the section for the network for which you want to manage the MAC The rst section is for the admin WiFi network, the second for the employee network, the third for the IoT WiFi network, the fourth for the guest WiFi and the fth for the wired network.
- Click the ADD DEVICE button.
The Manual Access Management pop-up window opens.
- Select the check boxes for the devices that you want to add to the MAC
- Click the ADD button.
The devices are added to the MAC ACL on the MAC ACL page. Devices ACL are an exception to the default policy:
- If the default policy of the MAC ACL is to allow access, the added dev denied access.
- If the default policy of the MAC ACL is to deny access, the added dev allowed access.
Manually add, remove, or change the information for device on a MAC ACL
After you set up a MAC ACL for a network and specify the default policy for ACL, you can manually add a device, remove a device, or change the name (the MAC address) for a device on the MAC ACL.
By manually adding a device, you can proactively control access for a device t or not yet detected, or that was not detected by the router.
To manually add, remove, or change the name for a device on a MAC ACL:
-
Launch a web browser from a computer or mobile device that is connected Orbi Pro network.
-
Enter orbilogin.com.
A login window opens.
- Enter the router admin user name and password.
The user name is admin. The password is the one that you specied the rs that you logged in. The user name and password are case-sensitive.
The BASIC Home page displays.
- Select ADVANCED > Security > MAC ACL.
The MAC ACL page displays.
-
Go to the section for the network for which you want to manage the MAC. The rst section is for the admin WiFi network, the second for the employee network, the third for the IoT WiFi network, the fourth for the guest WiFi and the fth for the wired network.
-
To manually add a device to the MAC ACL, do the following:
a. Click the ADD button.
The Manual Access Management pop-up window opens.
b. Enter the MAC address and device name for the device that you want to
Orbi Pro Router SRR60 and Orbi Pro Satellite SRS60
c. In the Manual Access Management pop-up window, click the ADD button. The device is added to the MAC ACL on the MAC ACL page. Devices MAC ACL are an exception to the default policy:
- If the default policy of the MAC ACL is to allow access, the added or denied access.
-
If the default policy of the MAC ACL is to deny access, the added allowed access.
-
To remove a device from the MAC ACL, do the following:
a. Select the check box for the device.
b. Click the REMOVE DEVICE button.
The device is removed from the MAC ACL.
- To change the name for a device on the MAC ACL, do the following:
a. Next to the device in the table., click the EDIT button. The Manual Access Management pop-up window opens.
b. Change the device name.
c. In the Manual Access Management pop-up window, click the EDIT button. The device name is changed in the MAC ACL on the MAC ACL page.
Disable a MAC ACL for a specific network
You can disable a MAC ACL that you already set up. The devices are not re the MAC ACL, but all devices on the MAC ACL can connect to the network you setup the MAC ACL, even if the default policy of the MAC ACL is to c the devices.
To disable a MAC ACL for a specific network:
- Launch a web browser from a computer or mobile device that is connected Orbi network.
- Enter orbilogin.com.
A login window opens.
- Enter the router admin user name and password.
The user name is admin. The password is the one that you specied the rs that you logged in. The user name and password are case-sensitive.
The BASIC Home page displays.
- Select ADVANCED > Security > MAC ACL.
The MAC ACL page displays.
-
Go to the section for the network for which you want to disable the MAC. The rst section is for the admin WiFi network, the second for the employee network, the third for the IoT WiFi network, the fourth for the guest WiFi and the fth for the wired network.
-
For the specific network, click the Enable MAC Access Control Enabled button. The button changes to the gray Disabled button. The MAC ACL is disabled.
Manage the Orbi network access control
You can use the network access control list (ACL) to block or allow access to Orbi network. An ACL functions with the MAC addresses of WiFi and wired de the router detects on the Orbi network and that you can either allow access to network or deny access to your network. That is, the router can detect the MAC of devices that are or were connected to the Orbi network and list the MAC of these devices.
Note: The network access control list differs from a MAC ACL (see Manage MAC control lists for WiFi networks and the LAN on page 48). A MAC ACL is specified particular WiFi network or to the wired network but is not based on devices that router detects on the entire Orbi network. With a MAC ACL, you can allow access to a device on a specific WiFi network or the wired network. The network control list and MAC ACLs are mutually exclusive. Use either the network access list or MAC ACLs.
If you set up a network ACL with an access rule that allows access to the (devices on the network ACL are an exception to the access rule:
- A device for which you place the MAC address on the network ACL is de to the Orbi network.
- All other devices are allowed access to the Orbi network.
If you set up a network ACL with an access rule that denies access to the devices on the network ACL are an exception to the access rule:
- A device for which you place the MAC address on the network ACL is allowed to the Orbi network.
- All other devices are denied access to the Orbi network.
Note: Each network device owns a MAC address, which is a unique 12-character address, containing the hexadecimal characters 0-9, a-f, or A-F (uppercase or lower only, and separated by colons (for example, 00:09:AB:CD:EF:01). Typically, the MAC address is on the label of a device. If you cannot see the label, you can disaddress using the network congruration utilities of a computer. You might also in MAC addresses on Attached Devices page of the router (see View satellites, WiFi and wired devices connected to the Orbi network on page 117).
Enable the network access control list and specify the rule
When you enable network access control, you must select whether new devices allowed to access the Orbi network or are blocked from accessing the network. default, connected devices are allowed access to the Orbi network, but you can block these devices from accessing the Orbi network.
To enable and manage the network access control list for the entire Orbi network:
- Launch a web browser from a computer or mobile device that is connected Orbi network.
- Enter orbilogin.com.
A login window opens.
- Enter the admin user name and password.
The user name is admin. The password is the one that you specied the rs that you logged in. The user name and password are case-sensitive.
The BASIC Home page displays.
- Select ADVANCED > Security > Access Control.
The Access Control page displays.
- Select the Turn on Access Control check box.
You must select this check box before you can specify an access rule and ALLOW and BLOCK buttons. When the Turn on Access Control check box is cleared, all devices are allowed to connect, even if a device is in the list of block
Note: If you enabled one or more MAC ACLs (see Enable a MAC ACL for network on page 49), you cannot use the ALLOW and BLOCK buttons. MAC ACLs and the network access control list are mutually exclusive. Use either MAC A the network access control list.
- Click the Apply button.
Your settings are saved.
-
Select an access rule for new devices:
-
Allow all new devices to connect. With this setting, if you add a new device can access the Orbi network. You do not need to enter its MAC address page. We recommend that you leave this radio button selected.
- Block all new devices from connecting. With this setting, if you add a new before it can access the Orbi network, you must enter its MAC address f Ethernet connection and its MAC address for a WiFi connection in the allc list. For more information, see .
The access rule does not affect previously blocked or allowed devices. It appears only to devices joining the Orbi network in the future after you apply these
-
To manage access for devices that are connected or were connected to the network, do the following:
-
If you blocked all new devices from connecting, to allow the device that currently using to continue to access the Orbi network, select the check b to your computer or device in the table, and click the ALLOW button.
-
To either continue to allow or to block other computers and devices that are connected or were connected, select the check box next to the device in and click either the ALLOW button or the BLOCK button.
-
Click the Apply button.
Your settings are saved.
Manage the allowed devices on the network access of list
If you set up an access list that blocks all new devices from accessing the C you must specify which devices are allowed to access the Orbi network.
You can add a device, remove a device, or edit the information for a device.
To manage devices that are allowed to access to Orbi network:
- Launch a web browser from a computer or mobile device that is connected Orbi network.
- Enter orbilogin.com.
A login window opens.
- Enter the admin user name and password.
The user name is admin. The password is the one that you specied the rs that you logged in. The user name and password are case-sensitive.
The BASIC Home page displays.
- Select ADVANCED > Security > Access Control.
The Access Control page displays.
- Click the View list of allowed devices not currently connected to the network link.
A table displays the detected device name, MAC address, and connection type the devices that are not connected but allowed to access the Orbi network.
- To add a device to the allowed list, do the following:
a. Click the ADD button.
The Add Allowed Device page displays.
b. Enter the MAC address and device name for the device that you want to
c. On the Add Allowed Device page, click the Apply button.
The device is added to the allowed list on the Access Control page.
- To remove a device from the allowed list, do the following:
a. Select the check box for the device.
b. Click the REMOVE FROM THE LIST button.
The device is removed from the allowed list.
- To change the information for a device on the allowed list, do the following
a. Select the check box for the device.
b. Click the EDIT button.
The Edit Allowed Device page displays.
c. Change the access rule, MAC address, or device name.
d. On the Edit Allowed Device page, click the Apply button.
The device is changed on the allowed list on the Access Control page.
- Click the Apply button.
Your settings are saved.
Manage the blocked devices on the network access co list
If you set up an access list that allows all new devices to access the Orbi r you want to block some devices from accessing the Orbi network, you must sp devices that you want to block.
You can add a device, remove a device, or change the information for a dev
To manage devices that are blocked from accessing the Orbi network:
- Launch a web browser from a computer or mobile device that is connected Orbi network.
- Enter orbilogin.com.
A login window opens.
- Enter the admin user name and password.
The user name is admin. The password is the one that you specied the rs that you logged in. The user name and password are case-sensitive.
The BASIC Home page displays.
- Select ADVANCED > Security > Access Control.
The Access Control page displays.
- Click the View list of blocked devices not currently connected to the network link.
The Access Control page displays.
A table displays the detected device name, MAC address, and connection type, the devices that are not connected and are blocked from accessing the Orbi
- To add a device to the blocked list, do the following:
a. Click the ADD button.
The Add Blocked Device page displays.
b. Enter the MAC address and device name for the device that you want to
c. On the Add Blocked Device page, click the Apply button.
The device is added to the blocked list on the Access Control page.
- To remove a device from the blocked list, do the following:
a. Select the check box for the device.
b. Click the REMOVE FROM THE LIST button.
The device is removed from the blocked list.
- To change the information for a device on the blocked list, do the following
a. Select the check box for the device.
b. Click the EDIT button.
The Edit Blocked Device page displays.
c. Change the access rule, MAC address, or device name.
d. On the Edit Blocked Device page, click the Apply button.
The device is changed on the blocked list on the Access Control page.
- Click the Apply button.
Your settings are saved.
Use keywords to block Internet sites
You can use keywords to block certain Internet sites from your network. You c blocking all the time or based on a schedule.
To block Internet sites:
- Launch a web browser from a computer or mobile device that is connected Orbi network.
- Enter orbilogin.com.
A login window opens.
- Enter the admin user name and password.
The user name is admin. The password is the one that you specied the rs that you logged in. The user name and password are case-sensitive.
The BASIC Home page displays.
- Select ADVANCED > Security > Block Sites.
The Block Sites page displays.
-
Select a keyword blocking option:
-
Per Schedule. Turn on keyword blocking according to a schedule that you (See Schedule When to Block Internet Sites and Services on page 56.)
-
Always. Turn on keyword blocking all the time, independent of the Sched page.
-
In the Type keyword or domain name here eld, enter a keyword or domain you want to block.
For example:
- Specify XXX to block http://www.badstuff.com/xxx.html.
- Specify .com if you want to allow only sites with domain sufxes such as .gov.
-
Enter a period (.) to block all Internet browsing access.
-
Click the Add Keyword button.
The keyword is added to the keyword list. The keyword list supports up to
- Click the Apply button.
Keyword blocking takes effect.
Delete keywords that are used to block Internet sites
To delete keywords that are used to block Internet sites:
- Launch a web browser from a computer or mobile device that is connected Orbi network.
- Enter orbilogin.com.
A login window opens.
- Enter the admin user name and password.
The user name is admin. The password is the one that you specied the rs that you logged in. The user name and password are case-sensitive.
The BASIC Home page displays.
- Select ADVANCED > Security > Block Sites.
The Block Sites page displays.
-
Do one of the following:
-
To delete a single word, select it and click the Delete Keyword button. The keyword is removed from the list.
- To delete all keywords on the list, click the Clear List button.
All keywords are removed from the list.
- Click the Apply button.
Your settings are saved.
Avoid blocking on a trusted computer
You can exempt one trusted computer from blocking. The computer that you exist must be assigned a xed IP address. You can use the reserved IP address feature specify the IP address. See Manage reserved LAN IP addresses on page 75.
To specify a trusted computer:
- Launch a web browser from a computer or mobile device that is connected Orbi network.
- Enter orbilogin.com.
A login window opens.
- Enter the admin user name and password.
The user name is admin. The password is the one that you specied the rs that you logged in. The user name and password are case-sensitive.
The BASIC Home page displays.
- Select ADVANCED > Security > Block Sites.
The Block Sites page displays.
- Scroll down and select the Allow trusted IP address to visit blocked sites che box.
- In the Trusted IP Address eld, enter the IP address of the trusted computer.
- Click the Apply button.
Your settings are saved.
Block services from the Internet
You can block Internet services on your network based on the type of service. block the services all the time or based on a schedule.
To block services:
- Launch a web browser from a computer or mobile device that is connected Orbi network.
- Enter orbilogin.com.
A login window opens.
- Enter the admin user name and password.
The user name is admin. The password is the one that you specied the rs that you logged in. The user name and password are case-sensitive.
The BASIC Home page displays.
- Select ADVANCED > Security > Block Services.
The Block Services page displays.
-
Specify when to block the services:
-
To block the services all the time, select the Always radio button.
- To block the services based on a schedule, select the Per Schedule radio
For information about how to specify the schedule, see Schedule when to bl Internet sites and services on page 62.
- Click the Add button.
The Block Services Setup page displays.
- To add a service that is in the Service Type list, select the application or
The settings for this service automatically display in the elds.
- To add a service or application that is not the list, select User Dened.
a. If you know that the application uses either TCP or UDP, select the appr protocol.
Otherwise, select TCP/UDP (both).
b. Enter the starting port and ending port numbers.
- If the service uses a single port number, enter that number in both e
-
To find out which port numbers the service or application uses, you car the publisher of the application, ask user groups or newsgroups, or sea on the Internet.
-
To specify how to liter the services, select one of the following radio button
-
Only This IP Address. Block services for a single computer.
- IP Address Range. Block services for a range of computers with consecutive addresses on your network.
-
All IP Addresses. Block services for all computers on your network.
-
Click the Add button. Your settings are saved.
Schedule when to block Internet sites ar services
When you schedule blocking, the same schedule is used to block sites and to services. For information about how to specify what you want the router to block Use keywords to block Internet sites on page 58 and Avoid blocking on a true computer on page 60.
To schedule blocking:
-
Launch a web browser from a computer or mobile device that is connected Orbi network.
-
Enter orbilogin.com. A login window opens.
-
Enter the admin user name and password. The user name is admin. The password is the one that you specified the rs that you logged in. The user name and password are case-sensitive.
The BASIC Home page displays.
-
Select ADVANCED > Security > Schedule.
-
Specify when to block keywords and services:
- Days to Block. Select the check box for each day that you want to block keywords or select the Every Day check box, which automatically selects the check boxes for all days.
- Time of Day to Block. Select a start and end time in 24-hour format, or All Day for 24-hour blocking.
-
Select your time zone from the list.
-
If you live in a region that observes daylight saving time, select the Automat adjust for daylight savings time check box.
-
Click the Apply button. Your settings are saved.
Set up security event email notifications
The router can email you its logs of router activity. The log records router access security events such as attempts to access blocked sites or services.
To set up email notifications:
- Launch a web browser from a computer or mobile device that is connected Orbi network.
- Enter orbilogin.com.
A login window opens.
- Enter the admin user name and password.
The user name is admin. The password is the one that you specied the rs that you logged in. The user name and password are case-sensitive.
The BASIC Home page displays.
- Select ADVANCED > Security > E-mail.
The E-mail page displays.
- Select the Turn Email Notification On check box.
- In the Primary E-mail Address field, enter the email address to which logs are sent.
This email address is also used for the From address. If this eld is blank, alert messages are not sent.
- In the Your Outgoing Mail Server eld, enter the name of your ISP outgoing mail server (such as mail.myISP.com).
You might be able to nd this information in the conguration window of you program. If you leave this eld blank, log and alert messages are not sent.
- In the Outgoing Mail Server Port Number eld, enter your mail server's port number.
You might be able to nd this information in the conguration window of you program.
-
If your outgoing email server requires authentication, select the My Mail Serve requires authentication check box and do the following:
-
In the User Name eld, type the user name for the outgoing email server.
-
In the Password eld, type the password for the outgoing email server.
-
To send alerts immediately, select the Send Alerts Immediately check box.
Orbi Pro Router SRR60 and Orbi Pro Satellite SRS60
Email alerts are sent immediately when someone attempts to visit a blocked
-
To send logs based on a schedule, specify these settings:
-
From Send logs according to this schedule menu, select the schedule type.
• From the Day menu, select the day. -
From the Time menu, select the time, and select the am or pm radio button.
-
Click the Apply button.
Your settings are saved.
Logs are sent automatically. If the log lls before the specied time, it is set the log is sent, it is cleared from the router memory. If the router cannot log and the log buffer lls, the router overwrites the log.
5
Specify Network Settings
This chapter includes the following sections:
• View or change WAN settings
- Manage Dynamic DNS
- Set up a default DMZ server
- Change the router's device name
- Change the LAN TCP/IP settings
• Use the router as a DHCP server
- Disable the DHCP server feature in the router
- Manage reserved LAN IP addresses
- Manage custom static routes
- Change the admin WiFi network settings
- Manage the employee WiFi network settings
- Manage the IoT WiFi network settings
- Set up a guest WiFi network and captive portal
- Manage the download bandwidth per SSID
• View or change advanced WiFi settings
• Use the router as a WiFi access point
- Set up router mode
- Generate a new backhaul password
- Enable or disable implicit beamforming
- Enable or disable MU-MIMO
- Enable or disable Protected Management Frames
• Check your Internet bandwidth
- Set up a bridge for a port group or VLAN tag group
- Improve network connections with Universal Plug and Play
View or change WAN settings
You can view or conjure wide area network (WAN) settings for the Internet port can set up a DMZ (demilitarized zone) server, change the maximum transmit unsize, and enable the router to respond to a ping to its WAN (Internet) port.
To view the WAN settings:
- Launch a web browser from a computer or mobile device that is connected Orbi network.
- Enter orbilogin.com.
A login window opens.
- Enter the admin user name and password.
The user name is admin. The password is the one that you specied the rs that you logged in. The user name and password are case-sensitive.
The BASIC Home page displays.
- Select ADVANCED > Setup > WAN Setup
The WAN Setup page displays.
-
View or change the following settings:
-
Disable Port Scan and DoS Protection. DoS protection protects your LAN again denial of service attacks such as Syn ood, Smurf Attack, Ping of Death, a others. Select this check box only in special circumstances.
- Default DMZ Server. This feature is sometimes helpful when you are playing online games or videoconferencing, but it makes the firewall security less eff See Set up a default DMZ server on page 69.
- Respond to Ping on Internet Port. This feature allows your router to be discovered. Use this feature only as a diagnostic tool or if you have a s reason.
- Disable IGMP Proxying. IGMP proxying allows a computer on the local are network (LAN) to receive the multicast traffic it is interested in from the In If you do not need this feature, select this check box to disable it.
- MTU Size (in bytes). The normal MTU (maximum transmit unit) value for m Ethernet networks is 1500 bytes, or 1492 bytes for PPPoE connections. Ch the MTU only if you are sure that it is necessary for your ISP connection Change the MTU size on page 45.
- NAT Filtering. Network Address Translation (NAT) determines how the router processes inbound traffic. Secured NAT protects computers on the LAN from attacks from the Internet, but might prevent some Internet games, point-to-p
applications, or multimedia applications from working. Open NAT provides a much less secured rewall, but allows almost all Internet applications to wor
- Click the Apply button.
Your settings are saved.
Manage Dynamic DNS
Internet service providers (ISPs) assign numbers called IP addresses to identify each Internet account. Most ISPs use dynamically assigned IP addresses. This means the IP address can change at any time. You can use the IP address to access your remotely, but most people don't know what their IP addresses are or when this changes.
To make it easier to connect, you can get a free account with a Dynamic DI that lets you use a domain name to access your home network. To use this must set up the router to use Dynamic DNS. Then the router notices the Dyna service provider whenever its IP address changes. When you access your Dynami account, the service finds the current IP address of your home network and aut connects you.
If your ISP assigns a private WAN IP address (such as 192.168.x.x or 10.x.x.x), t DNS service does not work because private addresses are not routed on the I
Set up a new Dynamic DNS account
To set up Dynamic DNS and register for a free NETGEAR account:
- Launch a web browser from a computer or mobile device that is connected Orbi network.
- Enter orbilogin.com.
A login window opens.
- Enter the admin user name and password.
The user name is admin. The password is the one that you specied the rs that you logged in. The user name and password are case-sensitive.
The BASIC Home page displays.
- Select ADVANCED > Advanced Setup > Dynamic DNS.
The Dynamic DNS page displays.
-
Select the Use a Dynamic DNS Service check box.
-
In the Service Provider list, select NETGEAR.
- Select the No radio button.
- In the Host Name eld, type the name that you want to use for your URL. The host name is sometimes called the domain name. Your free URL include host name that you specify, and ends with mynetgear.com. For example, spec MyName.mynetgear.com.
- In the Email eld, type the email address that you want to use for your ac
- In the Password (6-32 characters) eld, type the password for your account.
- Click the Register button.
- Follow the onscreen instructions to register for your NETGEAR Dynamic DNS s
- To check that Dynamic DNS is enabled in the router, click the Show Status button.
A message displays the Dynamic DNS status.
Specify a DNS account that you already created
If you already own a Dynamic DNS account with NETGEAR, no-IP, or Dyn, you up the router to use your account.
To set up Dynamic DNS if you already created an account:
- Launch a web browser from a computer or mobile device that is connected Orbi network.
- Enter orbilogin.com.
A login window opens.
- Enter the admin user name and password.
The user name is admin. The password is the one that you specified the rs that you logged in. The user name and password are case-sensitive.
The BASIC Home page displays.
- Select ADVANCED > Advanced Setup > Dynamic DNS.
The Dynamic DNS page displays.
- Select the Use a Dynamic DNS Service check box.
- In the Service Provider list, select your provider.
- Select the Yes radio button.
The page adjusts and displays to show the Status, Cancel, and Apply buttons.
- In the Host Name eld, type the host name (sometimes called the domain na for your account.
- For a no-IP Dyn account, in the User Name field, enter the user name for y
- For a NETGEAR account at no-IP, in the Email eld, type the email address account.
- In the Password (6-32 characters) eld, type the password for your DDNS acc
- Click the Apply button.
Your settings are saved.
- To verify that your Dynamic DNS service is enabled in the router, click the Status button.
A message displays the Dynamic DNS status.
Change the Dynamic DNS settings
To change your settings:
- Launch a web browser from a computer or mobile device that is connected Orbi network.
- Enter orbilogin.com.
A login window opens.
- Enter the admin user name and password.
The user name is admin. The password is the one that you specied the rs that you logged in. The user name and password are case-sensitive.
The BASIC Home page displays.
- Select ADVANCED > Advanced Setup > Dynamic DNS.
The Dynamic DNS page displays.
- Change your DDNS account settings as necessary.
- Click the Apply button.
Your settings are saved.
Set up a default DMZ server
The default DMZ server feature is helpful when you are using some online gar videoconferencing applications that are incompatible with Network Address Translation (NAT). The router is programmed to recognize some of these applications and
correctly with them, but other applications might not function well. In some case local computer can run the application correctly if the IP address for that component entered as the default DMZ server.
DMZ servers pose a security risk. A computer designated as the default DMZ is loses much of the protection of the rewall and is exposed to exploits from the If compromised, the DMZ server computer can be used to attack other computer your network.
The router usually detects and discards incoming traffic from the Internet that is response to one of your local computers or a service that you congured in the Forwarding/Port Triggering page. Instead of discarding this traffic, you can specify the router forwards the traffic to one computer on your network. This computer the default DMZ server.
To set up a default DMZ server:
- Launch a web browser from a computer or mobile device that is connected Orbi network.
- Enter orbilogin.com.
A login window opens.
- Enter the admin user name and password.
The user name is admin. The password is the one that you specied the rs that you logged in. The user name and password are case-sensitive.
The BASIC Home page displays.
- Select ADVANCED > Setup > WAN Setup.
The WAN Setup page displays.
- Select the Default DMZ Server check box.
- Type the IP address.
- Click the Apply button.
Your settings are saved.
Change the router's device name
The router's device name is its model number. This device name displays in a manager when you browse your network.
To change the router's device name:
- Launch a web browser from a computer or mobile device that is connected Orbi network.
- Enter orbilogin.com.
A login window opens.
- Enter the admin user name and password.
The user name is admin. The password is the one that you specified the rs that you logged in. The user name and password are case-sensitive.
The BASIC Home page displays.
- Select ADVANCED > Setup > Device Name.
The Device Name page displays.
- In the Device Name eld, type a new name.
- Click the Apply button.
Your settings are saved.
Change the LAN TCP/IP settings
The router is precongured to use private IP addresses on the LAN side and t a DHCP server. The router's default LAN IP conguration is as follows:
• LAN IP address. 192.168.1.1
- Subnet mask. 255.255.255.0
These addresses are part of the designated private address range for use in p networks and are suitable for most applications. If your network requires a diffe addressing scheme, you can change these settings.
You might want to change these settings if you need a specific IP subnet that more devices on the network uses, or if you use competing subnets with the scheme.
To change the LAN TCP/IP settings:
- Launch a web browser from a computer or mobile device that is connected Orbi network.
- Enter orbilogin.com.
A login window opens.
- Enter the admin user name and password.
The user name is admin. The password is the one that you specified the rs that you logged in. The user name and password are case-sensitive.
The BASIC Home page displays.
- Select ADVANCED > Setup > LAN Setup.
The LAN Setup page displays.
-
In the IP Address eld, type the IP address.
-
In the IP Subnet Mask, type the subnet mask of the router.
The IP address and subnet mask identities which addresses are local to a sp device and which must be reached through a gateway or router.
- Change the RIP settings.
Router Information Protocol (RIP) allows a router to exchange routing information with other routers.
a. Select the RIP direction:
- Both. The router broadcasts its routing table periodically and incorporates information that it receives.
- Out Only. The router broadcasts its routing table periodically.
- In Only. The router incorporates the RIP information that it receives.
b. Select the RIP version:
- Disabled. This is the default setting.
- RIP-1. This format is universally supported. It is adequate for most network unless you are using an unusual network setup.
-
RIP-2. This format carries more information. Both RIP-2B and RIP-2M send routing data in RIP-2 format. RIP-2B uses subnet broadcasting. RIP-2M uses multicasting.
-
Click the Apply button.
Your settings are saved.
If you changed the LAN IP address of the router, you are disconnected when change takes effect.
- To reconnect, close your browser, relaunch it, and log in to the router.
Use the router as a DHCP server
By default, the router acts as a Dynamic Host Conguration Protocol (DHCP) serv router assigns IP, DNS server, and default gateway addresses to all computers co to the LAN. The assigned default gateway address is the LAN address of the
These addresses must be part of the same IP address subnet as the router's address. Using the default addressing scheme, dene a range between 192.168.1.2 and 192.168.1.254, although you can save part of the range for devices with x addresses.
To use the router as a DHCP server and specify the pool of IP addresses that the router assigns:
- Launch a web browser from a computer or mobile device that is connected Orbi network.
- Enter orbilogin.com.
A login window opens.
- Enter the admin user name and password.
The user name is admin. The password is the one that you specied the rs that you logged in. The user name and password are case-sensitive.
The BASIC Home page displays.
- Select ADVANCED > Setup > LAN Setup.
The LAN Setup page displays.
- If you previously disabled the DHCP server feature, select the Use Router as Server check box.
- Specify the range of IP addresses that the router assigns:
a. In the Starting IP Address eld, enter the lowest number in the range. This IP address must be in the same subnet as the router. The default address is 192.168.1.2.
b. In the Ending IP Address eld, enter the number at the end of the range addresses.
This IP address must be in the same subnet as the router. The default address is 192.168.1.254.
- Click the Apply button.
Your settings are saved.
The router delivers the following parameters to any LAN device that requests
- An IP address from the range that you dened
- Subnet mask
- Gateway IP address (the router's LAN IP address)
• DNS server IP address (the router's LAN IP address)
Disable the DHCP server feature in the
By default, the router acts as a DHCP server. The router assigns IP, DNS service default gateway addresses to all computers connected to the LAN. The assigned gateway address is the LAN address of the router.
You can use another device on your network as the DHCP server, or specify settings of all your computers.
To disable the DHCP server feature in the router:
- Launch a web browser from a computer or mobile device that is connected Orbi network.
- Enter orbilogin.com.
A login window opens.
- Enter the admin user name and password.
The user name is admin. The password is the one that you specied the rs that you logged in. The user name and password are case-sensitive.
The BASIC Home page displays.
- Select ADVANCED > Setup > LAN Setup.
The LAN Setup page displays.
- Clear the Use Router as DHCP Server check box.
- Click the Apply button.
- (Optional) If this service is disabled and no other DHCP server is on your set your computer IP addresses manually so that they can access the router.
Manage reserved LAN IP addresses
When you specify a reserved IP address for a computer on the LAN, that can always receive the same IP address each time it accesses the router's DHCP s Assign reserved IP addresses to computers or servers that require permanent IP.
Reserve an IP address
To reserve an IP address:
- Launch a web browser from a computer or mobile device that is connected Orbi network.
- Enter orbilogin.com.
A login window opens.
- Enter the admin user name and password.
The user name is admin. The password is the one that you specied the rs that you logged in. The user name and password are case-sensitive.
The BASIC Home page displays.
- Select ADVANCED > Setup > LAN Setup.
The LAN Setup page displays.
- In the Address Reservation section of the page, click the Add button.
- In the IP Address eld, type the IP address to assign to the computer or so The page adjusts.
- Choose an IP address from the router's LAN subnet, such as 192.168.1.x.
- Type the MAC address of the computer or server.
Tip: If the computer is already on your network, you can copy its MAC ad the Attached Devices page and paste it here.
- Click the Apply button.
The reserved address is entered into the table.
The reserved address is not assigned until the next time the computer conta router's DHCP server. Reboot the computer, or access its IP conguration and a DHCP release and renew.
Edit a reserved IP address
To edit a reserved address entry:
- Launch a web browser from a computer or mobile device that is connected Orbi network.
- Enter orbilogin.com.
A login window opens.
- Enter the admin user name and password.
The user name is admin. The password is the one that you specied the rs that you logged in. The user name and password are case-sensitive.
The BASIC Home page displays.
- Select ADVANCED > Setup > LAN Setup.
The LAN Setup page displays.
- Select the radio button next to the reserved address.
- Click the Edit button.
The Address Reservation page displays.
- Change the settings.
- Click the Apply button.
Your settings are saved.
Delete a reserved IP address entry
To delete a reserved address entry:
- Launch a web browser from a computer or mobile device that is connected Orbi network.
- Enter orbilogin.com.
A login window opens.
- Enter the admin user name and password.
The user name is admin. The password is the one that you specied the rs that you logged in. The user name and password are case-sensitive.
The BASIC Home page displays.
- Select ADVANCED > Setup > LAN Setup.
The LAN Setup page displays.
- Select the radio button next to the reserved address.
- Click the Delete button.
The address is removed.
Manage custom static routes
Typically, you do not need to add static routes unless you use multiple routers IP subnets on your network.
As an example of when a static route is needed, consider the following case:
- Your main Internet access is through a cable modem to an ISP.
- Your home network includes an ISDN router for connecting to the company you are employed. This router's address on your LAN is 192.168.1.100.
- Your company's network address is 134.177.0.0.
When you set up your router, two implicit static routes were created. A default was created with your ISP as the gateway, and a second static route was created local network for all 192.168.1.x addresses. With this conguration, if you try to a device on the 134.177.0.0 network, your router forwards your request to the ISP forwards your request to the company where you are employed, and the firewall is likely to deny the request.
In this case you must dene a static route, telling your router to access 134.17 through the ISDN router at 192.168.1.100. Here is an example:
- The Destination IP Address and IP Subnet Mask elds specify that this static route applies to all 134.177.x.x addresses.
- The Gateway IP Address eld species that all trafc for these addresses will be forwarded to the ISDN router at 192.168.1.100.
- A metric value of 1 works because the ISDN router is on the LAN.
- The Private check box is selected only as a precautionary security measure in RIP is activated.
Set up a static route
To set up a static route:
-
Launch a web browser from a computer or mobile device that is connected Orbi network.
-
Enter orbilogin.com.
Orbi Pro Router SRR60 and Orbi Pro Satellite SRS60
A login window opens.
- Enter the admin user name and password.
The user name is admin. The password is the one that you specied the rs that you logged in. The user name and password are case-sensitive.
The BASIC Home page displays.
- Select ADVANCED > Advanced Setup > Static Routes.
The Static Routes page displays.
- Click the Add button.
The page adjusts.
-
In the Route Name eld, type a name for this static route (for identification p only.)
-
To limit access to the LAN only, select the Private check box.
If Private is selected, the static route is not reported in RIP.
-
Select the Active check box to make this route take effect.
-
Type the IP address of the nal destination.
-
Type the IP subnet mask for this destination.
If the destination is a single host, type 255.255.255.255.
- Type the gateway IP address.
This address must be on the same LAN segment as the router.
- Type a number from 1 through 15 as the metric value.
This value represents the number of routers between your network and the destination. Usually, a setting of 2 or 3 works, but if this is a direct connection to 1.
- Click the Apply button.
The static route is added.
Edit a static route
To edit a static route:
-
Launch a web browser from a computer or mobile device that is connected Orbi network.
-
Enter orbilogin.com.
A login window opens.
- Enter the admin user name and password.
The user name is admin. The password is the one that you specied the rs that you logged in. The user name and password are case-sensitive.
The BASIC Home page displays.
- Select ADVANCED > Advanced Setup > Static Routes.
The Static Routes page displays.
-
In the table, select the radio button for the route.
-
Click the Edit button.
The Static Routes page adjusts.
-
Edit the route information.
-
Click the Apply button.
Your settings are saved.
Delete a static route
To delete a static route:
- Launch a web browser from a computer or mobile device that is connected Orbi network.
- Enter orbilogin.com.
A login window opens.
- Enter the admin user name and password.
The user name is admin. The password is the one that you specied the rs that you logged in. The user name and password are case-sensitive.
The BASIC Home page displays.
- Select ADVANCED > Advanced Setup > Static Routes.
The Static Routes page displays.
- In the table, select the radio button for the route.
- Click the Delete button.
The route is removed from the table.
Change the admin WiFi network settings
You can set up four WiFi networks for your Orbi Pro network: one for admini access, one for employee access, one for Internet of things (IoT) devices, and guest access.
Your Orbi Pro router and satellite come preset with the same admin WiFi netw (SSID) and WiFi network key (password). You can nd the admin SSID and pass on the router label and on the satellite label. The preset WiFi settings on the for your admin WiFi network. When you log in to the router and change the the router automatically sends the new settings to the satellite.
Note: The router web interface calls the admin WiFi network the Wireless 1 ne
Change the admin WiFi network name and channel
If you change your WiFi settings, make a note of the new settings and store place where you can easily nd it.
If your computer or mobile device is using a WiFi connection when you change network name (SSID) or other WiFi security settings, you are disconnected when click the Apply button. To avoid this problem, use a computer with a wired c to access the router.
Note: The router web interface calls the admin WiFi network the Wireless 1 ne
To change the admin WiFi settings:
- Launch a web browser from a computer or mobile device that is connected Orbi network.
- Enter orbilogin.com.
A login window opens.
- Enter the admin user name and password.
The user name is admin. The password is the one that you specied the rs that you logged in. The user name and password are case-sensitive.
The BASIC Home page displays.
- Select Wireless.
The Wireless Settings page displays the admin WiFi settings.
- To change the admin network name (SSID), type a new name in the Name eld.
The name can be up to 32 characters long and it is case-sensitive. The de is randomly generated and is on the router label. If you change the name, to write down the new name and keep it in a safe place.
- To change the 2.4 GHz or 5 GHz WiFi channel, select a number from the menus.
In some regions, not all channels are available. Do not change the channel you experience interference (shown by lost connections or slow data transfers). This happens, experiment with different channels to see which channel works I for your.
When you use multiple routers, satellites, or extenders in your network (access points), you experience less interference if adjacent access points use different. recommended channel spacing NETGEAR recommends a minimum of four channels between adjacent access points (for example, use channels 1 and 5, or 6 a
- Click the Apply button.
Your settings are saved. The router sends the new settings to the satellite.
If you are using a WiFi connection and you changed the SSID, you are dis from the network.
-
Make sure that you can connect to the WiFi network with its new settings. If you cannot connect using WiFi, check the following:
-
Is your WiFi-enabled computer or mobile device connected to another WiFi network in your area? Some WiFi devices automatically connect to the rst network without WiFi security that they discover.
- Is your computer or WiFi device trying to connect to your network with settings (before you changed the settings)? If so, update the WiFi network selection in your computer or WiFi device to match the current settings for network.
Change the admin WiFi password or security level
We recommend that you do not disable security for your WiFi network.
Note: The router web interface calls the admin WiFi network the Wireless 1 ne
To change the admin WiFi password or WPA settings:
-
Launch a web browser from a computer or mobile device that is connected Orbi network.
-
Enter orbilogin.com.
A login window opens.
- Enter the admin user name and password.
The user name is admin. The password is the one that you specied the rs that you logged in. The user name and password are case-sensitive.
The BASIC Home page displays.
- Select Wireless.
The Wireless Settings page displays the admin WiFi settings.
- Under Security Options, select a WPA option:
- WPA2-PSK [AES]. The WPA2 option uses the newest standard for the stor security, but some older computers and WiFi devices cannot use WPA2. When you select this option, the Password (Network Key) eld displays. Do following:
a. In the Password (Network Key) eld, enter the network key (password) th you want to use.
It is a text string from 8 to 63 characters.
b. Write down the new password and keep it in a secure place for future reference.
- WPA-PSK [TKIP] + WPA2-PSK [AES]. If your network includes old computers and WiFi devices, select this radio button.
When you select this option, the Password (Network Key) eld displays. Do following:
a. In the Password (Network Key) eld, enter the network key (password) th you want to use.
It is a text string from 8 to 63 characters.
b. Write down the new password and keep it in a secure place for future reference.
- WPA2 Enterprise. If your network is connected to a RADIUS server that can provide authentication, select this radio button. WPA2 Enterprise can provide the highest level of security. Before a WiFi client can connect to the Wi-Fi network, the WiFi client must be congured on the RADIUS server and authenticated against the RADIUS server. The router functions as the authentic between the WiFi client and the RADIUS server, which provides the actual authentication.
When you select this option, additional elds display so that you can spec RADIUS server. Do the following:
a. In the IP address eld, enter the IP address of the RADIUS server to v the router must connect.
b. In the Port eld, enter the port number that the router must use to communicate with the RADIUS server.
By default, the port number is 1812.
c. In the Shared Secret eld, enter the password that the router must use communicate with the RADIUS server.
This password must be congured on the RADIUS server. This password used to authenticate the router (not a WiFi client) against the RADIUS
- Click the Apply button.
Your settings are saved.
Manage the employee WiFi network settin
You can set up four WiFi networks for your Orbi Pro network: one for admini access, one for employee access, one for Internet of things (IoT) devices, and guest access.
When employee devices connect to the employee WiFi network, they cannot see devices that are connected to the network and cannot access the local area net (LAN).
Note: The router web interface calls the employee WiFi network the Wireless 2
Enable the employee WiFi network and change the se
Before you can set up the employee WiFi network, you must enable it. You're connected to the admin network to enable the employee WiFi network and cha settings.
When employee devices connect to the employee WiFi network, they cannot see devices that are connected to the network and cannot access the local area net (LAN).
Note: The router web interface calls the employee WiFi network the Wireless 2
To enable the employee WiFi network and change the WiFi settings:
- Launch a web browser from a computer or mobile device that is connected Orbi network.
- Enter orbilogin.com.
A login window opens.
- Enter the admin user name and password.
The user name is admin. The password is the one that you specied the rs that you logged in. The user name and password are case-sensitive.
The BASIC Home page displays.
- Select Wireless > Wireless 2.
The WiFi settings for the Wireless 2 network display on the page.
- To enable the Wireless 2 network, select the Enable Wireless 2 network checked by default, the Wireless 2 network is disabled.
- To broadcast the Wireless 2 network SSID, select the Enable SSID Broadcast box.
By default, the broadcast is enabled.
- To allow your employees to see each other on the Wireless 2 network, and them to access resources on the local network, select the Allow employees to each other and access my local network check box.
By default, employees are not allowed to see each other and cannot access resources on the Wireless 2 network.
- To change the Wireless 2 network name (SSID), type a new name in the Network Name (SSID) eld.
The name can be up to 32 characters long and it is case-sensitive. The de is randomly generated and is on the router's label. If you change the name sure to write down the new name and keep it in a safe place.
- To separate the single SSID for the Wireless 2 network in an SSID for the band and another SSID for the 5 GHz band, select the Enable SSID separat 2.4G/5GHz check box.
For each band, a Wireless 2 Network Name (SSID) eld displays. The SSID for GHz band is prepended with _5G, but you can also type another name.
By default, the Wireless 2 network provides a single SSID for both bands.
- Click the Apply button.
Your settings are saved. The router sends the new settings to the satellite.
- Make sure that a user can connect to the WiFi network with its new setti If you cannot connect using WiFi, check the following:
- Is your WiFi-enabled computer or mobile device connected to another WiFi network in your area? Some WiFi devices automatically connect to the rst network without WiFi security that they discover.
- Is your computer or mobile device trying to connect to your network with settings (before you changed the settings)? If so, update the WiFi network selection in your computer or WiFi device to match the current settings for network.
Change the employee WiFi password or security level
You must be connected to the admin network to change the employee password security level.
Note: The router web interface calls the employee WiFi network the Wireless 2
To change the employee WiFi network password or WPA settings:
- Launch a web browser from a computer or mobile device that is connected Orbi network.
- Enter orbilogin.com.
A login window opens.
- Enter the admin user name and password.
The user name is admin. The password is the one that you specied the rs that you logged in. The user name and password are case-sensitive.
The BASIC Home page displays.
- Select Wireless > Wireless 2.
The WiFi settings for the wireless 2 network display on the page.
- Under Security Options, select a WPA option:
- WPA2-PSK [AES]. The WPA2 option uses the newest standard for the strong security, but some older computers and WiFi devices cannot use WPA2.
When you select this option, the Password (Network Key) eld displays. Do following:
a. In the Password (Network Key) eld, enter the network key (password) th you want to use. It is a text string from 8 to 63 characters.
b. Write down the new password and keep it in a secure place for future reference.
- WPA-PSK [TKIP] + WPA2-PSK [AES]. If your network includes old computers and WiFi devices, select this radio button.
When you select this option, the Password (Network Key) eld displays. Do following:
a. In the Password (Network Key) eld, enter the network key (password) th you want to use. It is a text string from 8 to 63 characters.
b. Write down the new password and keep it in a secure place for future reference.
- WPA2 Enterprise. If your network is connected to a RADIUS server that c provide authentication, select this radio button. WPA2 Enterprise can provide the highest level of security. Before a WiFi client can connect to the WiR network, the WiFi client must be congured on the RADIUS server and authenticated against the RADIUS server. The router functions as the authentic between the WiFi client and the RADIUS server, which provides the actual authentication.
When you select this option, additional elds display so that you can spec RADIUS server. Do the following:
a. In the IP address eld, enter the IP address of the RADIUS server to v the router must connect.
b. In the Port eld, enter the port number that the router must use to communicate with the RADIUS server. By default, the port number is 1812.
c. In the Shared Secret eld, enter the password that the router must use communicate with the RADIUS server. This password must be congured on the RADIUS server. This password used to authenticate the router (not a WiFi client) against the RADIUS
- Click the Apply button.
Your settings are saved.
Manage the IoT WiFi network settings
You can set up four WiFi networks for your Orbi Pro network: one for admini access, one for employee access, one for Internet of things (IoT) devices, and guest access.
When IoT devices connect to the IoT WiFi network, they cannot see other dev are connected to the network and cannot access the local area network (LAN).
Note: The router web interface calls the IoT WiFi network the Wireless 3 network
Enable the IoT WiFi network and change the settings
Before you can set up the IoT WiFi network, you must enable it. You must k to the admin network to enable the IoT WiFi network and change the settings. When IoT devices connect to the IoT WiFi network, they cannot see other dev are connected to the network and cannot access the local area network (LAN).
Note: The router web interface calls the IoT WiFi network the Wireless 3 network
To enable the IoT WiFi network and change the WiFi settings:
- Launch a web browser from a computer or mobile device that is connected Orbi network.
- Enter orbilogin.com.
A login window opens.
- Enter the admin user name and password.
The user name is admin. The password is the one that you specied the rs that you logged in. The user name and password are case-sensitive.
The BASIC Home page displays.
- Select Wireless > Wireless 3.
The WiFi settings for the Wireless 3 network display on the page.
-
To enable the Wireless 3 network, select the Enable Wireless 3 network checked by default, the Wireless 3 network is disabled.
-
To broadcast the Wireless 3 network SSID, select the Enable SSID Broadcast box.
By default, the broadcast is enabled.
- To allow the IoT devices to see each other on the Wireless 3 network, an them to access resources on the local network, select the Allow IoT devices each other and access my local network check box.
By default, IoT devices are not allowed to see each other and access local on the Wireless 3 network.
- To change the Wireless 3 network name (SSID), type a new name in the Network Name (SSID) eld.
The name can be up to 32 characters long and it is case-sensitive. The de is NETGEAR_IOT. If you change the name, make sure to write down the ne and keep it in a safe place.
- To separate the single SSID for the Wireless 3 network in an SSID for the band and another SSID for the 5 GHz band, select the Enable SSID separat 2.4G/5GHz check box.
For each band, a Wireless 3 Network Name (SSID) eld displays. The SSID for GHz band is prepended with _5G (NETGEAR_IOT_5G), but you can also type name.
By default, the Wireless 3 network provides a single SSID for both bands.
- Click the Apply button.
Your settings are saved. The router sends the new settings to the satellite.
- Make sure that an IoT device can connect to the WiFi network with its nIf you cannot connect using WiFi, check the following:
- Is your WiFi-enabled computer or mobile device connected to another WiFi network in your area? Some WiFi devices automatically connect to the rst network without WiFi security that they discover.
- Is your computer or mobile device trying to connect to your network with settings (before you changed the settings)? If so, update the WiFi network selection in your computer or WiFi device to match the current settings for network.
Change the IoT WiFi password or security level
You must be connected to the admin network to change the IoT password and level.
Note: The router web interface calls the IoT WiFi network the Wireless 3 network
To change the IoT WiFi network password or WPA settings:
- Launch a web browser from a computer or mobile device that is connected Orbi network.
- Enter orbilogin.com.
A login window opens.
- Enter the admin user name and password.
The user name is admin. The password is the one that you specied the rs that you logged in. The user name and password are case-sensitive.
The BASIC Home page displays.
- Select Wireless > Wireless 3.
The WiFi settings for the wireless 3 network display on the page.
- Under Security Options, select a WPA option:
- WPA2-PSK [AES]. The WPA2 option uses the newest standard for the strong security, but some older computers and WiFi devices cannot use WPA2.
When you select this option, the Password (Network Key) eld displays. Do following:
a. In the Password (Network Key) eld, enter the network key (password) th you want to use. It is a text string from 8 to 63 characters.
b. Write down the new password and keep it in a secure place for future reference.
- WPA-PSK [TKIP] + WPA2-PSK [AES]. If your network includes old computers and WiFi devices, select this radio button.
When you select this option, the Password (Network Key) eld displays. Do following:
a. In the Password (Network Key) eld, enter the network key (password) th you want to use. It is a text string from 8 to 63 characters.
b. Write down the new password and keep it in a secure place for future reference.
- WPA2 Enterprise. If your network is connected to a RADIUS server that can provide authentication, select this radio button. WPA2 Enterprise can provide the highest level of security. Before a WiFi client can connect to the Wi-Fi network, the WiFi client must be congured on the RADIUS server and authenticated against the RADIUS server. The router functions as the authentic
between the WiFi client and the RADIUS server, which provides the actual authentication.
When you select this option, additional elds display so that you can spec RADIUS server. Do the following:
a. In the IP address eld, enter the IP address of the RADIUS server to v the router must connect.
b. In the Port eld, enter the port number that the router must use to communicate with the RADIUS server.
By default, the port number is 1812.
c. In the Shared Secret eld, enter the password that the router must use communicate with the RADIUS server.
This password must be congured on the RADIUS server. This password used to authenticate the router (not a WiFi client) against the RADIUS
- Click the Apply button.
Your settings are saved.
Set up a guest WiFi network and captiv portal
You can set up a guest WiFi network (guest portal), which allows visitors to a Internet using a dedicated SSID. You can also set up a captive portal for the With a captive portal, when visitors connect to the guest portal and open a k access the Internet, they are redirected to a splash page where they must agree Terms of Conditions before they can access Internet.
By default, visitors do not need to enter a password to connect to the guest data is not encrypted. Open access without security might be a good option for shop. For situations in which authentication is required, you can use Facebook or set a password.
When using this network, visitors cannot see other devices that are connected to guest portal (or any other WiFi network on the router) and they cannot access area network (LAN).
Set up a guest WiFi network with open access or authentication
A guest WiFi network is also referred to as a guest portal.
To set up a guest network:
- Launch a web browser from a computer or mobile device that is connected Orbi network.
- Enter orbilogin.com.
A login window opens.
- Enter the Orbi admin user name and password.
The user name is admin. The password is the one that you specied the rs that you logged in. The user name and password are case-sensitive.
The BASIC Home page displays.
- Select Guest Portal.
The Guest Portal Settings page displays.
- To enable the guest portal, select the Enable Guest Portal Network check bc By default, the guest portal is disabled.
- Leave the Enable SSID Broadcast check box selected.
Allowing the router to broadcast its WiFi network name (SSID) makes it easier your network and connect to it. If you clear this check box, that creates a network.
- To change the network name, type a new name in the Guest Portal Netwo (SSID) eld.
The name can be up to 32 characters long and it is case-sensitive. If you name, make sure to write down the new name and keep it in a safe place
- In the Authentication Mode section, leave the Local radio button selected.
-
In the Authentication Options section, either specify an open network or set authentication password by doing one of the following:
-
None. To specify an open network without authentication, select the None radio button.
- Password Authentication. To set an authentication password, select the Password Authentication radio button and specify a password in the eld. The password must be a minimum of 8 characters and can be a maximum of 10 characters.
Note: In order for visitors to access the Internet, they must enter this past in the guest portal.
- To set an expiration time for how long visitors can access the Internet, sele from the Expiration menu. After visitors are authenticated, they can access the Internet for that period of time.
If you select Never from the menu, visitor access time is not restricted to a
- Click the Apply button.
Your settings are saved. The router sends the new settings to the satellite.
Set up a guest network with a captive portal
A captive portal is an entry to a guest network that requires guests to view and agree to terms and conditions before using the network. When using capita guest networks visitors cannot see other devices that are connected and they can access the local area network (LAN).
To set up a guest network with a captive portal:
- Launch a web browser from a computer or mobile device that is connected Orbi network.
- Enter orbilogin.com.
A login window opens.
- Enter the admin user name and password.
The user name is admin. The password is the one that you specied the rs that you logged in. The user name and password are case-sensitive.
The BASIC Home page displays.
- Select Guest Portal.
The Guest Portal Settings page displays.
- Select the Enable Guest Portal check box.
- Leave the Enable SSID Broadcast check box selected.
Allowing the router to broadcast its WiFi network name (SSID) makes it easier your network and connect to it. If you clear this check box, that creates a network.
- To change the network name, type a new name in the Guest Portal Netwo (SSID) eld.
The name can be up to 32 characters long and it is case-sensitive. If you name, make sure to write down the new name and keep it in a safe place
- In the Authentication Mode section, select the Local radio button.
The page adjusts.
- To set a guest portal password, select the Password Authentication radio but and enter the password in the eld.
The password must be a minimum of 8 characters and can be a maximum characters.
Note: In order for visitors to access the Internet, they must enter this password the guest portal and click the AGREE button to accept terms and conditions.
- To set an expiration time for how long users can access the Internet, select from the Expiration menu.
After visitors are authenticated, they can access the Internet for that period c. After the period expires, visitors are redirected to the Terms and Conditions
- To include a custom Terms and Conditions page, click the Browse button in the Terms and Conditions section.
- Locate and select the terms and conditions le on your computer.
The le must be a .txt le, encoded in UTF8 format, and can be up to 1
- To include a custom logo le, click the Browse button in the Logo section.
- Locate and select the logo le on your computer.
The le must be a .jpg, .jpeg, .gif, or .png le. The le size must be up to the dimensions must be 200 x 200 pixels.
- To preview the guest portal, click the Preview button.
To preview the Terms and Conditions page, either the terms and conditions logo les must both be set to Default or you must upload new les for bot cannot preview the Terms and Conditions page if one le is set to Default.
- To set up a redirect URL, select the URL radio button and enter the URL to which you want to redirect users to in the eld.
After visitors agree to the terms and conditions, they are redirected to this
- Click the APPLY button.
Your settings are saved.
Set up Facebook Wi-Fi
You can set up Facebook Wi-Fi on your Orbi WiFi network to offer your cust WiFi access if they check in to your existing Facebook business page.
ATTENTION: If a user attempts to access a website over HTTP (by default, over 80), the user is directed to the Facebook Login page. If a user attempts to secure website over HTTPS (by default, over port 443), a Security Waning window in their web browser. The user must click the Allow button on the Security Window to see the see the Facebook Login page.
To set up Facebook Wi-Fi:
- Launch a web browser from a computer or mobile device that is connected Orbi network.
- Enter orbilogin.com.
A login window opens.
- Enter the Orbi admin user name and password.
The user name is admin. The password is the one that you specied the rs that you logged in. The user name and password are case-sensitive.
The BASIC Home page displays.
- Select Guest Portal.
The Guest Portal Settings page displays.
- Select the Enable Guest Portal check box.
- Select the Enable SSID Broadcast check box.
By default, this check box is selected. Allowing the router to broadcast its \ network name (SSID) makes it easier to nd your network and connect to it. clear this check box, that creates a hidden network.
- To change the network name, type a new name in the Guest Portal Netwo (SSID) eld.
The name can be up to 32 characters long and it is case-sensitive. If you name, make sure to write down the new name and keep it in a safe place
- In the Authentication Mode section, select the Facebook Wi-Fi radio button.
The page adjust and displays the Add Page button.
- Click the Add Page button.
The Facebook Login page displays.
- Log in to your Facebook business account.
The Facebook Wi-Fi Conguration page displays.
- On the Facebook Wi-Fi Conguration page, do the following:
a. From the Select a Page menu, select a Facebook business page.
b. Select the bypass mode option:
- Skip check-in link. To allow customers to skip check-in, select the Skip check-in link radio button. If you enable this option, users can either check in to the selected Fa business page or skip the check-in.
- Require Wi-Fi code. To require users to enter a WiFi code before they gain WiFi access, select the Require Wi-Fi code radio button and type a code in the eld that displays. If you enable this option, users can either check in to the selected Fa business page or skip the check-in by using the WiFi code.
c. From the Session Length menu, select the period after which users are automatically logged out.
d. To add terms of service to the Facebook check-in page, select the Terms Service check box and type or copy the terms of service.
e. Click the Save Settings button. The Facebook Wi-Fi settings are saved.
The name of the selected Facebook business page displays in the Facebook Page eld in the router web interface along with the Change Page button, lets you replace the selected Facebook business page with another one.
f. Return to the Guest Portal Settings page in the router web interface.
- On the Guest Portal Settings page, click the APPLY button.
Your settings are saved.
Manage the download bandwidth per SSI
You can set up four WiFi networks for your Orbi Pro network: one for admini access, one for employee access, one for Internet of things (IoT) devices, and guest access. You can manage the download bandwidth per WiFi network (SSID) assigning a percentage of the total bandwidth (100 percent) to each SSID. The download bandwidth on an SSID determines the network priority for devices con to the SSID.
If the download bandwidth usage on an SSID exceeds the assigned bandwidth SSID, the router limits the bandwidth on the SSID, which might affect the down speed for devices connected to the SSID.
In setting the download bandwidth ratio for an SSID, consider the number and devices that connect to the SSID and the typical download bandwidth usage for devices. For example, more devices might connect to the IoT WiFi network than employee network, but the typical bandwidth usage for IoT devices might be lo than for employee devices.
Note: The router does not control the uplink bandwidth, that is, the bandwidth devices to the router.
To set the download bandwidth ratios for the SSIDs:
- Launch a web browser from a computer or mobile device that is connected Orbi network.
- Enter orbilogin.com.
A login window opens.
- Enter the router admin user name and password.
The user name is admin. The password is the one that you specied the rs that you logged in. The user name and password are case-sensitive.
The BASIC Home page displays.
- Select Wireless.
The Wireless Settings page displays the admin WiFi settings.
Note: Even though this is the page for the admin WiFi settings, the bandwidth that you specify on this page apply to the admin WiFi network, employee \ network, IoT WiFi network, and guest WiFi network. (All bandwidth ratios together must add up to 100 percent.) Similarly, if you specify bandwidth ratios on the employee WiFi settings page, IoT WiFi settings page, or the guest WiFi netw page, they also apply to all other WiFi networks.
- Select the Enable Bandwidth per SSID check box.
In the Bandwidth per SSID graphic, the colored icons are enabled.
- Specify the bandwidth ratios by moving the icons on the bandwidth line.
The icons represent the following WiFi networks:
• Blue. Admin WiFi network (Wireless 1).
- Green. Employee WiFi network (Wireless 2).
- Purple. IoT WiFi network (Wireless 3).
- Gray. Guest WiFi network.
As you move an icon, the bandwidth ratio for the WiFi network changes an percentage displays in the icon.
All bandwidth ratios together add up to 100 percent of the available download bandwidth. If you change one ratio, the ratio for another WiFi network might change.
- Click the Apply button.
Your settings are saved. The router sends the new settings to the satellite.
View or change advanced WiFi settings
To view or change advanced WiFi settings:
- Launch a web browser from a computer or mobile device that is connected Orbi network.
- Enter orbilogin.com.
A login window opens.
- Enter the admin user name and password.
The user name is admin. The password is the one that you specified the rs that you logged in. The user name and password are case-sensitive.
The BASIC Home page displays.
- Select ADVANCED > Advanced Setup > Wireless Settings.
The Advanced Wireless Settings page displays.
Note: The backhaul password is a security key that is used in WiFi commun between the router and the satellite. For information about generating a new k password, see Generate a new backhaul password on page 99.
- In the Region list, select your region.
In some locations, you cannot change this setting.
- To control the SSID broadcast, select or clear the Enable SSID Broadcast che box.
When this check box is selected, the router broadcasts its network name (SS that it displays when you scan for local WiFi networks on your computer or device.
- Click the Apply button.
Your settings are saved.
Use the router as a WiFi access point
You can set up the router to run as an access point (AP) on the same local another router or gateway.
For example, you can use the Orbi router as a WiFi access point that connects gateway or modem router that you already use for your Internet service. In this, you do not need to change the settings for the gateway or modem router.
To set up the Orbi router as an AP after you set up your Internet connection:
- Use an Ethernet cable to connect the Internet port of this router to a LAN your existing router or gateway.
- Launch a web browser from a computer or mobile device that is connected Orbi network.
- Enter orbilogin.com.
A login window opens.
- Enter the admin user name and password.
The user name is admin. The password is the one that you specied the rs that you logged in. The user name and password are case-sensitive.
The BASIC Home page displays.
- Select ADVANCED > Advanced Setup > Router/AP Mode.
The Router/AP Mode page displays.
- Select the AP Mode radio button.
The page adjusts.
-
Select the IP address setting:
-
Get dynamically from existing router. The other router on the network assign an IP address to this router while this router is in AP mode.
- Enable xed IP settings on this device (not recommended). Use this setting if you want to manually assign a specific IP address to this router while mode. Using this option effectively requires advanced network experience.
Note: To avoid interference with other routers or gateways in your network, I recommend that you use different WiFi settings on each router. You can also off the WiFi radio on the other router or gateway and use the Orbi only access.
- Click the Apply button.
The IP address of the router changes, and you are disconnected.
- To reconnect, close and restart your browser and enter orbilogin.com.
Set up router mode
If you set up your router as an access point, you can change it back to a
To set up the Orbi router as a router:
- Launch a web browser from a computer or mobile device that is connected Orbi network.
- Enter orbilogin.com.
A login window opens.
- Enter the admin user name and password.
The user name is admin. The password is the one that you specied the rs that you logged in. The user name and password are case-sensitive.
The BASIC Home page displays.
- Select ADVANCED > Advanced Setup > Router/AP Mode.
The Router/AP Mode page displays.
- Select the Router Mode radio button.
The page adjusts.
- Click the Apply button.
Your settings are saved.
Generate a new backhaul password
The backhaul password is a security key that is used in WiFi communication by the router and the satellite. You can generate a new backhaul password. After generate a new backhaul password, you must use the Sync button to build a backhaul connection so that the router and satellite can communicate with each using WiFi.
To generate a new backhaul password:
- Launch a web browser from a computer or mobile device that is connected Orbi network.
- Enter orbilogin.com.
A login window opens.
- Enter the admin user name and password.
The user name is admin. The password is the one that you specied the rs that you logged in. The user name and password are case-sensitive.
The BASIC Home page displays.
- Select ADVANCED > Advanced Setup > Wireless Settings.
The Advanced Wireless Settings page displays.
- In the Backhaul Password section, click the GENERATE button.
The router generates a new backhaul password.
Enable or disable implicit beamforming
Implicit beamforming means that the router can use information from client device that support beamforming to improve the WiFi signal.
To enable or disable implicit beamforming:
- Launch a web browser from a computer or mobile device that is connected Orbi network.
- Enter orbilogin.com.
A login window opens.
- Enter the admin user name and password.
The user name is admin. The password is the one that you specied the rs that you logged in. The user name and password are case-sensitive.
The BASIC Home page displays.
- Select ADVANCED > Advanced Setup > Wireless Settings.
The Advanced Wireless Settings page displays.
- To enable Implicit beamforming, select the Enable Implicit BEAMFORMING check box.
-
To disable Implicit beamforming, clear the Enable Implicit BEAMFORMING check box.
-
Click the Apply button.
Your settings are saved.
If you connected over WiFi to the network, you are disconnected from the and must reconnect.
Enable or disable MU-MIMO
Multiuser multiple input, multiple output (MU-MIMO) improves performance when multiple MU-MIMO-capable WiFi clients transfer data at the same time. WiFi client must support MU-MIMO, and they must be connected to a 5 GHz WiFi band.
To enable or disable MU-MIMO:
- Launch a web browser from a computer or mobile device that is connected Orbi network.
- Enter orbilogin.com.
A login window opens.
- Enter the admin user name and password.
The user name is admin. The password is the one that you specied the rs that you logged in. The user name and password are case-sensitive.
The BASIC Home page displays.
- Select ADVANCED > Advanced Setup > Wireless Settings.
The Advanced Wireless Settings page displays.
-
To enable or disable daisy-chain topology, do one of the following:
-
To enable MU-MIMO, select the Enable MU-MIMO check box.
-
To disable MU-MIMO, clear the Enable MU-MIMO check box.
-
Click the Apply button.
Your settings are saved.
If you connected over WiFi to the network, you are disconnected from the and must reconnect.
Enable or disable Protected Management Frames
Protected Management Frames (PMF), according to the 802.11w standard, is a set feature that protects unicast and multicast management frames from being interce and changed for malicious purposes.
The PMF feature is disabled by default, but you can enable it as a require management frames. However, some legacy devices might not be capable of supp PMF and might not be able to connect. As a solution, you can enable PMF which lets the router activate PMF based on whether devices can support PMF.
Make sure that you understand the technology before enabling this feature.
Note: If you enable PMF, some incompatible client devices might disconnect. If use the combined WPA-PSK [TKIP] + WPA2-PSK [AES] security option and congu PMF as a requirement, PMF might not take effect.
To enable or disable PMF:
- Launch a web browser from a computer or mobile device that is connected Orbi network.
- Enter orbilogin.com.
A login window opens.
- Enter the admin user name and password.
The user name is admin. The password is the one that you specied the rs that you logged in. The user name and password are case-sensitive.
The BASIC Home page displays.
- Select ADVANCED > Advanced Setup > Wireless Settings.
The Advanced Wireless Settings page displays.
-
At the bottom of the page, make one of the following selections from the Management Frames (802.11w) menu:
-
Disable. PMF is disabled. This is the default settings.
- Optional. PMF is optional for all WiFi networks.
• Required. PMF is required.
Your selection applies to all WiFi networks on the router and satellites.
- Click the Apply button.
Your settings are saved.
Check your Internet bandwidth
You can use Ookla Speedtest to detect your Internet bandwidth.
To check your Internet bandwidth using Speedtest:
- Launch a web browser from a computer or mobile device that is connected Orbi network.
- Enter orbilogin.com.
A login window opens.
- Enter the admin user name and password.
The user name is admin. The password is the one that you specied the rs that you logged in. The user name and password are case-sensitive.
The BASIC Home page displays.
- Select Speedtest.
The Speedtest page displays.
- Click the Take a Speedtest button.
Your Internet's download and upload speeds display.
Set up a bridge for a port group or group
Some devices, such as an IPTV, cannot function behind the router's Network Ad Translation (NAT) service or rewall. Based on what your Internet service provider requires, for the device to connect to the ISP's network directly, you can enable bridge between the device and the router's Internet port or add new VLAN tag to the bridge.
Note: If your ISP provides directions on how to set up a bridge for IPTV and service, follow those directions.
Note: This feature is only supported if the router is in router mode.
Set up a bridge for a port group
If the devices that are connected to the router's Ethernet port an IPTV device, might require you to set up a bridge for a port group for the router's Interr
A bridge with a port group prevents packets that are sent between the IPTV the router's Internet port from being processed through the router's network adc translation (NAT) service.
To congregate a port group and enable the bridge:
- Launch a web browser from a computer or mobile device that is connected Orbi network.
- Enter orbilogin.com.
A login window opens.
- Enter the admin user name and password.
The user name is admin. The password is the one that you specied the rs that you logged in. The user name and password are case-sensitive.
The BASIC Home page displays.
- Select ADVANCED > Advanced Setup > VLAN/Bridge Settings.
The VLAN/IPTV Setup page displays.
- Select the Enable VLAN/Bridge Setup check box.
The page expands.
- Select the By bridge group radio button.
- In the Wired Ports section, select the Ethernet port on the router that your is connected to.
- To enable the VLAN ID, select the Enable VLAN ID check box and enter a from 1 to 4094.
- Click the Apply button.
Your settings are saved.
Set up a bridge for a VLAN tag group
If the devices that are connected to the router's Ethernet LAN ports include an device, your ISP might require you to set up a bridge for a VLAN tag group router's Internet interface.
If you are subscribed to IPTV service, the router might require VLAN tags to be between the Internet traffic and the IPTV traffic. A bridge with a VLAN tag gro
packets that are sent between the IPTV device and the router's Internet port from processed through the router's Network Address Translation (NAT) service.
You can add VLAN tag groups to a bridge and assign VLAN IDs and priority each VLAN tag group.
To add a VLAN tag group and enable the bridge:
- Launch a web browser from a computer or mobile device that is connected Orbi network.
- Enter orbilogin.com.
A login window opens.
- Enter the Orbi admin user name and password.
The user name is admin. The password is the one that you specied the rs that you logged in. The user name and password are case-sensitive.
The BASIC Home page displays.
- Select ADVANCED > Advanced Setup > VLAN/Bridge Settings.
The VLAN/Bridge Settings page displays.
- Select the Enable VLAN/Bridge Group check box.
The page expands.
- Select the By VLAN tag group radio button.
The section expands.
- Click the Add button.
The Add VLAN Rule page displays.
- Specify the settings as described in the following table.
| DescriptionField | |
| Name | Enter a name for the VLAN tag group.The name can be up to 10 characters. |
| Enter a value from 1 to 4094.VLAN ID |
(Continued)
DescriptionField
Enter a value from 0 to 7. Priority
Select the check box for a wired Ethernet port.
If your device is connected to an Ethernet port on the router, select the Ethernet port check box t corresponds to the Ethernet port on the router to which the device is connected.
You must select at least one Ethernet port. You can select more than one port.
- Click the Add button.
The VLAN tag group is added.
- Click the Apply button.
Your settings are saved.
Improve network connections with Universa Plug and Play
Universal Plug and Play (UPnP) helps devices, such as Internet appliances and core access the network and connect to other devices as needed. UPnP devices can automatically discover the services from other registered UPnP devices on the next. If you use applications such as multiplayer gaming, peer-to-peer connections, or real communications such as instant messaging or remote assistance, enable UPnP.
To enable Universal Plug and Play:
- Launch a web browser from a computer or mobile device that is connected Orbi network.
- Enter orbilogin.com.
A login window opens.
- Enter the admin user name and password.
The user name is admin. The password is the one that you specied the rs that you logged in. The user name and password are case-sensitive.
The BASIC Home page displays.
- Select ADVANCED > Advanced Setup > UPnP.
The UPnP page displays.
- Select the Turn UPnP On check box.
By default, this check box is selected. UPnP for automatic device congruration be enabled or disabled. If the Turn UPnP On check box is cleared, the route not allow any device to automatically control router resources, such as port forwarding.
- Type the advertisement period in minutes.
The advertisement period species how often the router broadcasts its UPnP information. This value can range from 1 to 1440 minutes. The default period minutes. Shorter durations ensure that control points receive current device status at the expense of more network traffic. Longer durations can compromise the freshness of the device status but can significantly reduce network traffic.
- Type the advertisement time to live in hops.
The time to live for the advertisement is measured in hops (steps) for each packet sent. Hops are the steps a packet takes between routers. The numbe can range from 1 to 255. The default value for the advertisement time to hops, which should be ne for most home networks. If you notice that some are not being updated or reached correctly, it might be necessary to increase value.
- Click the Apply button.
The UPnP Portmap Table displays the IP address of each UPnP device that is the router and which ports (internal and external) that device opened. The U Portmap Table also displays what type of port is open and whether that pc active for each IP address.
- To refresh the information in the UPnP Portmap Table, click the Refresh button
6
Manage Your Network
This chapter describes the router settings for administering and maintaining your and home network.
The chapter includes the following sections:
- Update the router and satellite rmware
- Change the admin password
- Enable admin password reset
- Reset the admin password
• View router status and usage information
• Display Internet port statistics - Check the Internet connection status
• View satellites, WiFi devices, and wired devices connected to the Orbi network
• View satellite status
• View and manage logs of router activity - Set up a syslog server
• Monitor Internet trafc - Manage the router conguration le
- Set up remote management
• Use remote access
Update the router and satellite rmware
You can use the router web interface to check if new rmware is available and your router and satellite, or you can manually update the rmware for your rout satellite.
Enable the automatic rmware update feature
You can let the router automatically update its rmware and the rmware for any satellites on the network.
To enable the automatic rmware update feature:
- Launch a web browser from a computer or mobile device that is connected Orbi network.
- Enter orbilogin.com.
A login window opens.
- Enter the router admin user name and password.
The user name is admin. The password is the one that you specied the rs that you logged in. The user name and password are case-sensitive.
The BASIC Home page displays.
- Select ADVANCED > Administration > Firmware Update.
The Firmware Update page displays. - In the Orbi Router Auto Firmware Update section, select the Enable radio button.
- Click the Apply button.
Your settings are saved.
Check for rmware updates
To check for new rmware and update your router and satellite:
- Launch a web browser from a computer or mobile device that is connected Orbi network.
- Enter orbilogin.com.
A login window opens.
- Enter the router admin user name and password.
The user name is admin. The password is the one that you specified the rs that you logged in. The user name and password are case-sensitive.
The BASIC Home page displays.
- Select ADVANCED > Administration > Firmware Update > Online Update.
The Firmware Update page displays.
- Click the Check button.
The router checks to see if new rmware is available for the router and sat
- If new rmware is available, click the Update All button.
The router locates and downloads the firmware for the router and satellite and the update.
Note: To avoid the risk of corrupting the rmware, do not interrupt the upgr. For example, do not close the browser, click a link, or load a new page. off the router or satellite.
When the upload is complete, your router and satellite restart. The update p typically takes about one minute. Read the new rmware release notes to nd you must recongure the router after updating.
Manually update rmware
If a satellite is connected to your router, you can log in to the router to make the rmware on your satellite.
WARNING: We recommend that you always update the rmware on your satellite and then update your router. Also, do not update the rmware on your router satellite at the same time, and do not update more than one Orbi device (ro satellite) at a time. If you need to update more than one Orbi device, wait f Orbi device to nish updating before updating your next Orbi device.
To manually update the rmware on your Orbi router and satellite, follow these high level steps:
-
Visit_netgear.com/support and download the rmware for both your Orbi router satellite.
-
Update the rmware on your Orbi satellite.
For more information, see Manually update satellite rmware on page 111.
- Update the rmware on your Orbi router.
For more information, see Manually update router rmware on page 111.
Manually update satellite rmware We recommend that you update your satellite's rmware before you update the router's rmware.
To manually update your satellite's rmware:
- Launch a web browser from a computer or mobile device that is connected Orbi network.
- Enter orbilogin.com.
A login window opens.
- Enter the router admin user name and password.
The user name is admin. The password is the one that you specied the rs that you logged in. The user name and password are case-sensitive.
The BASIC Home page displays.
- Select ADVANCED > Administration > Firmware Update > Manual Update.
The Firmware Update page displays.
- Select the check box next to your satellite's model name.
If you have more than one satellite, only update one satellite at a time. You for the rst satellite to nish updating before updating the next satellite.
- Click the Update button.
The Orbi satellite Firmware Update window opens.
- If the browser ask you for the admin password, enter the same password that entered for the router.
- Click the BROWSE button.
- Locate and select the satellite rmware le that you downloaded.
The rmware le name ends in .img or .chk.
- Click the UPLOAD button.
It takes a few minutes to complete the process.
- After Orbi satellite nishes updating, select Status and double-check the rmware version on the Status page.
The rmware on your Orbi satellite is updated.
Manually update router firmware We recommend that you update your router mware after you update the satellite's rmware.
WARNING: Make sure that your satellite completes its rmware update before you update your router's rmware.
To manually update your router's rmware:
- Launch a web browser from a computer or mobile device that is connected Orbi network.
- Enter orbilogin.com.
A login window opens.
- Enter the admin user name and password.
The user name is admin. The password is the one that you specied the rs that you logged in. The user name and password are case-sensitive.
The BASIC Home page displays.
- Select ADVANCED > Administration > Firmware Update > Manual Update.
The Firmware Update page displays.
- Click the Browse button.
- Locate and select the router rmware le you downloaded.
The rmware le name ends in .img.
- Click the Upload button.
The rmware is updated.
Change the admin password
This feature let you change the default password that is used to log in to the user name admin. This password is not the one that you use to access a network.
Note: Be sure to change the password for the user name admin to a secure. The ideal password contains no dictionary words from any language and contain uppercase and lowercase letters, numbers, and symbols. It can be up to 30 ch
To set the password for the user name admin:
- Launch a web browser from a computer or mobile device that is connected Orbi network.
- Enter orbilogin.com.
A login window opens.
- Enter the admin user name and password.
The user name is admin. The password is the one that you specified the rs that you logged in. The user name and password are case-sensitive.
The BASIC Home page displays.
- Select ADVANCED > Administration > Set Password.
The Set Password page displays.
-
Type the old password, and type the new password twice.
-
To be able to reset the password, select the Enable Password Reset check We recommend that you enable password reset.
-
Click the Apply button.
Your settings are saved.
Enable admin password reset
The router admin password is used to log in to your router web interface. We that you enable the password reset feature so that you can reset the password forgotten. This reset process is supported in Internet Explorer, Firefox, and Chron browsers but not in the Safari browser.
To enable password reset:
- Launch a web browser from a computer or WiFi device that is connected to network.
- Enter http://www.routerlogin.net.
A login window opens.
- Enter the admin user name and password.
The user name is admin. The default password is password. The user name and password are case-sensitive.
The BASIC Home page displays.
- Select ADVANCED > Administration > Set Password.
The Set Password page displays.
- Select the Enable Password Reset check box.
- Select two security questions and provide answers to them.
- Click the Apply button.
Your settings are saved.
Reset the admin password
If you set up the password reset feature, you can reset your router admin pass you forgot it.
To reset your admin password:
- Launch a web browser from a computer or mobile device that is connected Orbi network.
- Enter orbilogin.com.
A login window opens.
- Click the Cancel button.
If password reset is enabled, you are prompted to enter the router's serial You can nd the router's serial number on the router label.
- Enter the router's serial number in the eld.
- Click the Continue button.
You are requested to enter a new admin password and to set new security
- Enter your new admin password, set new security questions, and click the N button.
Your settings are saved.
- Click the Login button.
A login window opens.
- With your new admin password, log in to the router.
View router status and usage information
To view router status and usage information:
- Launch a web browser from a computer or mobile device that is connected Orbi network.
- Enter orbilogin.com.
A login window opens.
- Enter the admin user name and password.
The user name is admin. The password is the one that you specified the rs that you logged in. The user name and password are case-sensitive.
The BASIC Home page displays.
- Click the ADVANCED tab.
The ADVANCED Home page displays the router status.
Display Internet port statistics
To display Internet port statistics:
- Launch a web browser from a computer or mobile device that is connected Orbi network.
- Enter orbilogin.com.
A login window opens.
- Enter the admin user name and password.
The user name is admin. The password is the one that you specied the rs that you logged in. The user name and password are case-sensitive.
The BASIC Home page displays.
- Click the ADVANCED tab.
- In the Internet Port pane, click the Show Statistics button.
The Show Statistics window opens and displays following information:
- System Up Time. The time elapsed since the router was last restarted.
-
Port. The statistics for the WAN (Internet) and LAN (Ethernet) ports. For export, the page displays the following information:
-
Status. The link status of the port.
- TxPkts. The number of packets transmitted on this port since reset or clear.
- RxPkts. The number of packets received on this port since reset or m clear.
- Collisions. The number of collisions on this port since reset or manual
- Tx B/s. The current transmission (outbound) bandwidth used on the WAN and LAN ports.
-
Rx B/s. The current reception (inbound) bandwidth used on the WAN a LAN ports.
-
Up Time. The time elapsed since this port acquired the link.
-
Poll Interval. The interval at which the statistics are updated in this page
-
To change the polling frequency, enter a time in seconds in the Poll Interval and click the Set Interval button.
- To stop the polling entirely, click the Stop button.
Check the Internet connection status
To check the Internet connection status:
- Launch a web browser from a computer or mobile device that is connected Orbi network.
- Enter orbilogin.com.
A login window opens.
- Enter the admin user name and password.
The user name is admin. The password is the one that you specied the rs that you logged in. The user name and password are case-sensitive.
The BASIC Home page displays.
- Click the ADVANCED tab.
- In the Internet Port pane, click the Connection Status button.
The Connection Status window opens and displays the following information
- IP Address. The IP address that is assigned to the router.
- Subnet Mask. The subnet mask that is assigned to the router.
- Default Gateway. The IP address for the default gateway that the router communicates with.
- DHCP Server. The IP address for the Dynamic Host Configuration Protocol s that provides the TCP/IP conguration for all the computers that are connected to the router.
- DNS Server. The IP address of the Domain Name Service server that prov translation of network names to IP addresses.
- Lease Obtained. The date and time when the lease was obtained.
-
Lease Expires. The date and time that the lease expires.
-
To return the status of all items to 0, click the Release button.
-
To refresh the page, click the Renew button.
- To exit the page, click the Close Window button.
View satellites, WiFi devices, and wired devices connected to the Orbi network
You can view all satellites, WiFi devices, and wired devices that are connected Orbi network.
To view devices connected to your network:
- Launch a web browser from a computer or mobile device that is connected Orbi network.
- Enter orbilogin.com.
A login window opens.
- Enter the router admin user name and password.
The user name is admin. The password is the one that you specied the rs that you logged in. The user name and password are case-sensitive.
The BASIC Home page displays.
- Select Attached Devices.
The Attached Devices page displays.
The Wired Devices table displays the following information:
• Device Name. The device model, name, type, and IP address.
- IP Address. The device IP address. The device's IP address can change by the router assigns an IP address to each device when it joins the network
- MAC Address. The device MAC address. The unique MAC address for each device does not change.
- Connection Type. The device is connected to the Orbi network through a Ethernet connection.
- Connected Orbi. The Orbi router or satellite that the device is connected Orbi router's or satellite's MAC address also displays.
The Wireless Devices table displays the following information:
• Device Name. The device model, name, type, and IP address.
- IP Address. The device IP address. The device's IP address can change by the router assigns an IP address to each device when it joins the network
- MAC Address. The device MAC address. The unique MAC address for each device does not change.
• Channel. The channel on which the device is connected to the WiFi netw
• SSID. The radio band of the WiFi network to which the device is connected - Connected Orbi. The Orbi router or satellite that the device is connected Orbi router's or satellite's MAC address also displays.
- TX/RX Rate (Mbps). The average rate in Mbps at which the device transm and receives (RX) trafc.
- Association Time. The period in hours, minutes, and seconds that the devi connected to the WiFi network.
-
Link Status. The quality and strength in dBm of the WiFi connection of th
-
To update the page with the most recent information, click the Refresh button
View satellite status
To view your satellite's status, it must be connected to your Orbi network.
To view your satellite's status:
- Launch a web browser from a computer or mobile device that is connected Orbi network.
- Enter orbilogin.com.
A login window opens.
- Enter the router admin user name and password.
The user name is admin. The password is the one that you specied the rs that you logged in. The user name and password are case-sensitive.
The BASIC Home page displays.
- Select Attached Devices.
The Attached Devices page displays.
- In the Connected Satellites section, nd your satellite's IP address.
- Enter your satellite's IP address in your web browser's address bar.
A login window opens.
- Enter the same admin user name and password that you entered for the ro The satellite's status displays.
View and manage logs of router activity
The log is a detailed record of the websites users accessed or attempted to many other router actions. You can specify which actions are logged. Up to 25 can be stored in the log.
To view and manage logs:
- Launch a web browser from a computer or mobile device that is connected Orbi network.
- Enter orbilogin.com.
A login window opens.
- Enter the admin user name and password.
The user name is admin. The password is the one that you specied the rs that you logged in. The user name and password are case-sensitive.
The BASIC Home page displays.
- Select ADVANCED > Administration > Logs.
The Logs page displays the following information:
- Date and time. The date and time the log entry was recorded.
- Source IP. The IP address of the initiating device for this log entry.
- Target address. The name or IP address of the website or news group \ to which access was attempted.
-
Action. The action that occurred, such as whether Internet access was blocked or allowed.
-
To manage the actions that the router logs, check or clear the check boxes following actions:
-
Attempted access to allowed sites. Selected by default.
- Attempted access to blocked sites and services. Selected by default.
- Connections to the Web-based interface of this Router. Selected by default.
- Router operation (startup, get time etc). Selected by default.
- Known DoS attacks and Port Scans. Selected by default.
- Port Forwarding / Port Triggering. Selected by default.
- Wireless access. Selected by default.
• VPN Service. Selected by default.
• Insight. Cleared by default.
- To refresh the log page, click the Refresh button.
- To clear the log entries, click the Clear Log button.
- To email the log immediately, click the Send Log button.
Set up a syslog server
If a syslog server is present on your network, you can congregate the router to system logs to the syslog server.
To enable the syslog function and specify the syslog server:
- Launch a web browser from a computer or mobile device that is connected Orbi network.
- Enter orbilogin.com.
A login window opens.
- Enter the router admin user name and password.
The user name is admin. The password is the one that you specied the rs that you logged in. The user name and password are case-sensitive.
The BASIC Home page displays.
- Select Advanced > Administration > Logs.
The Logs page displays.
- At the bottom of the page, in the Syslog Server section, select the Enable radio button.
The Syslog elds become available.
-
Specify the IP address and port number for the syslog server:
-
Syslog Server IP Address. Enter the IP address of the syslog server on your network.
-
Syslog Port. Enter the port number through with the router can reach the server. By default, the port number is 514.
-
Click the Apply button.
Your settings are saved. The router send its logs to the syslog server.
Monitor Internet trafc
Trafc metering allows you to monitor the volume of Internet trafc that passes the router Internet port. You can set limits for trafc volume.
To monitor Internet trafc:
- Launch a web browser from a computer or mobile device that is connected Orbi network.
- Enter orbilogin.com.
A login window opens.
- Enter the admin user name and password.
The user name is admin. The password is the one that you specied the rs that you logged in. The user name and password are case-sensitive.
The BASIC Home page displays.
- Select ADVANCED > Advanced Setup > Trafc Meter.
The Trafc Meter page displays. - Select the Enable Trafc Meter check box.
- To control the volume of Internet traffic, use either the traffic volume control or the connection time control feature:
- Select the Trafc volume control by radio button and then select one of the following options:
- No Limit. No restriction is applied when the trafc limit is reached.
- Download only. The restriction is applied to incoming trafc only.
- Both Directions. The restriction is applied to both incoming and outgoing trafc.
- Select the Connection time control radio button and enter the allowed hou in the Monthly limit eld.
- If your ISP charges for extra data volume when you make a new connection the extra data volume in MB in the Round up data volume for each connect eld.
- In the Trafc Counter section, set the trafc counter to begin at a specific time date.
To start the trafc counter immediately, click the Restart Counter Now button.
- If you want the router to issue a warning message before the monthly limit or hours is reached, in the Trafc Control section, enter a numeric value.
By default, the value is 0 and no warning message is issued.
-
To stop the Internet connection when the limit is attained, select the Disconnect and disable the Internet connection check box.
-
Click the Apply button.
The Internet Trafc Statistics section helps you to monitor the data trafc.
-
To update the Internet Trafc Statistics section, click the Refresh button.
-
To display more information about the data traffic on your router and to charge poll interval, click the Internet Traffic Status button.
Manage the router conguration le
The congruration settings of the router are stored within the router in a congrur le. You can back up (save) this le to your computer, restore it, or reset it to default settings.
Back up settings
To back up the router's conguration settings:
- Launch a web browser from a computer or mobile device that is connected Orbi network.
- Enter orbilogin.com.
A login window opens.
- Enter the admin user name and password.
The user name is admin. The password is the one that you specied the rs that you logged in. The user name and password are case-sensitive.
The BASIC Home page displays.
- Select ADVANCED > Administration > Backup Settings.
The Backup Settings page displays.
- Click the BACK UP button.
- Specify a location on your network.
A copy of the current settings is saved in the location you specied.
Manage the automatic backup options
You can let the router automatically back up conguration settings before a rmw upgrade.
You can also schedule an automatic backup at a regular interval.
To manage the automatic backup options:
- Launch a web browser from a computer or mobile device that is connected Orbi network.
- Enter orbilogin.com.
A login window opens.
- Enter the admin user name and password.
The user name is admin. The password is the one that you specied the rs that you logged in. The user name and password are case-sensitive.
The BASIC Home page displays.
- Select ADVANCED > Administration > Backup Settings.
The Backup Settings page displays.
- To let the router automatically back up conguration settings before a rmware upgrade, select the Backup before upgrade check box.
- To schedule automatic backups, next to Back up periodically, enter the a nu from 1 to 365 in the Day(s) eld.
If you enter 1, the backup occurs daily, if you enter 2, the backup occurs day, and so on. By default, the entry is 0 and no automatic backup occurs
- Click the Apply button.
Your settings are saved.
Erase the current conguration settings
You can erase the current conguration and restore the factory default settings. ' might want to do this if you move the router to a different network.
To erase the conguration settings:
- Launch a web browser from a computer or mobile device that is connected Orbi network.
- Enter orbilogin.com.
A login window opens.
- Enter the admin user name and password.
The user name is admin. The password is the one that you specified the rs that you logged in. The user name and password are case-sensitive.
The BASIC Home page displays.
- Select ADVANCED > Administration > Backup Settings.
The Backup Settings page displays.
- Click the ERASE button.
The factory default settings are restored. The user name is admin, the passw password, and the LAN IP address is 192.168.1.1. DHCP is enabled.
Restore conguration settings
To restore conguration settings that you backed up:
- Launch a web browser from a computer or mobile device that is connected Orbi network.
- Enter orbilogin.com.
A login window opens.
- Enter the admin user name and password.
The user name is admin. The password is the one that you specied the rs that you logged in. The user name and password are case-sensitive.
The BASIC Home page displays.
- Select ADVANCED > Administration > Backup Settings.
The Backup Settings page displays.
- Click the Browse button to nd and select the .cfg le.
- Click the RESTORE button.
The le is uploaded to the router and the router reboots.
WARNING: Do not interrupt the reboot process.
Set up remote management
You can access your router over the Internet to view or change its settings. Y know the router's WAN IP address to use this feature. For information about D DNS, see Manage Dynamic DNS on page 67.
Note: Be sure to change the password for the user name admin to a secure. The ideal password contains no dictionary words from any language and contain uppercase and lowercase letters, numbers, and symbols. It can be up to 30 ch. See Change the admin password on page 112.
To set up remote management:
- Launch a web browser from a computer or mobile device that is connected Orbi network.
- Enter orbilogin.com.
A login window opens.
- Enter the admin user name and password.
The user name is admin. The password is the one that you specied the rs that you logged in. The user name and password are case-sensitive.
The BASIC Home page displays.
- Select ADVANCED > Advanced Setup > Remote Management.
The Remote Management page displays.
- Select the Turn Remote Management On check box.
- In the Allow Remote Access By section, specify the external IP addresses to access the router's remote management.
Note: For enhanced security, restrict access to as few external IP addresses a practical.
Select one of the following:
- To allow access from a single IP address on the Internet, select the Only Computer radio button. Enter the IP address to be allowed access.
- To allow access from a range of IP addresses on the Internet, select the Range radio button. Enter a beginning and ending IP address to denote the allowed range.
-
To allow access from any IP address on the Internet, select the Everyone button.
-
Specify the port number for accessing the router.
Normal web browser access uses the standard HTTP service port 80. For gre security, enter a custom port number for the remote router access. Choose a from 1024 to 65535, but do not use the number of any common service; default is 8080, which is a common alternate for HTTP.
- Click the Apply button.
Your settings are saved.
Use remote access
To use remote access:
- Launch a web browser on a computer that is not on your home network.
- Type your router's WAN IP address into your browser's address or location followed by a colon (:) and the custom port number.
For example, if your external address is 134.177.0.123 and you use port nun 8080, enter http://134.177.0.123:8080 in your browser.
7
Customize Internet Trafc Rules for Ports
You can use port forwarding and port triggering to set up rules for Internet t need networking knowledge to set up these features.
This chapter includes the following sections:
- Manage port forwarding to a local server
- Manage port triggering
Manage port forwarding to a local serve
If your home network includes a server, you can allow certain types of incoming to reach the server. For example, you might want to make a local web server or game server visible and available to the Internet.
The router can forward incoming traffic with specific protocols to computers on your local network. You can specify the servers for applications and you can also specify default DMZ server to which the router forwards all other incoming protocols.
Set up port forwarding to a local server
To forward specific incoming protocols:
- Decide which type of service, application, or game you want to provide.
- Find the local IP address of the computer on your network that will provide service.
The server computer must always use the same IP address. To specify this: use the reserved IP address feature. See Manage reserved LAN IP addresses page 75. -
Launch a web browser from a computer or mobile device that is connected Orbi network.
-
Enter orbilogin.com.
A login window opens.
- Enter the admin user name and password.
The user name is admin. The password is the one that you specied the rs that you logged in. The user name and password are case-sensitive.
The BASIC Home page displays.
- Select ADVANCED > Advanced Setup > Port Forwarding/Port Triggering.
The Port Forwarding/Port Triggering page displays.
-
Leave the Port Forwarding radio button selected as the service type.
-
In the Service Name menu, select the service name.
If the service that you want to add is not in the list, create a custom set a custom port forwarding service on page 129.
-
In the Server IP Address eld, enter the IP address of the computer that will the service.
-
Click the Add button.
Orbi Pro Router SRR60 and Orbi Pro Satellite SRS60
The service displays in the list.
Add a custom port forwarding service
To add a custom service:
- Find out which port number or range of numbers the application uses. You can usually nd this information by contacting the publisher of the applic or user groups or news groups.
- Launch a web browser from a computer or mobile device that is connected Orbi network.
- Enter orbilogin.com.
A login window opens.
- Enter the admin user name and password.
The user name is admin. The password is the one that you specified the rs that you logged in. The user name and password are case-sensitive.
The BASIC Home page displays.
- Select ADVANCED > Advanced Setup > Port Forwarding/Port Triggering.
The Port Forwarding/Port Triggering page displays.
- Leave the Port Forwarding radio button selected as the service type.
- Click the Add Custom Service button.
The Ports - Custom Services page displays.
- In the Service Name eld, enter a descriptive name.
- In the Protocol menu, select the protocol.
If you are unsure, select TCP/UDP.
- In the External Port range eld, enter the port numbers.
-
Specify the internal ports by one of these methods:
-
Leave the Use the same port range for Internal port check box selected.
-
Type the port numbers in the Internal port range eld.
-
Type the IP address in the Internal IP address elds or select the radio button an attached device listed in the table.
- Click the Apply button.
The service is now in the list on the Port Forwarding/Port Triggering page.
Edit a port forwarding service
To edit a port forwarding entry:
- Launch a web browser from a computer or mobile device that is connected Orbi network.
- Enter orbilogin.com.
A login window opens.
- Enter the admin user name and password.
The user name is admin. The password is the one that you specied the rs that you logged in. The user name and password are case-sensitive.
The BASIC Home page displays.
- Select ADVANCED > Advanced Setup > Port Forwarding/Port Triggering.
The Port Forwarding/Port Triggering page displays. - Leave the Port Forwarding radio button selected as the service type.
- In the table, select the radio button next to the service name.
- Click the Edit Service button.
The Ports - Custom Services page displays.
- Specify changes to any of the following settings:
• Service Name. Type the service name.
- Protocol. If you are unsure, select TCP/UDP.
• External port range.
- For the internal ports, leave the Use the same port range for Internal port box selected or enter the ports in the Internal port range eld.
- Internal IP address. Type the IP address in the Internal IP address elds, or select the radio button for an attached device listed in the table.
- Click the Apply button.
Your settings are saved.
Delete a port forwarding entry
To delete a port forwarding entry:
- Launch a web browser from a computer or mobile device that is connected Orbi network.
- Enter orbilogin.com.
A login window opens.
- Enter the admin user name and password.
The user name is admin. The password is the one that you specied the rs that you logged in. The user name and password are case-sensitive.
The BASIC Home page displays.
- Select ADVANCED > Advanced Setup > Port Forwarding/Port Triggering.
The Port Forwarding/Port Triggering page displays.
- Select the Port Forwarding radio button as the service type.
- In the table, select the radio button next to the service name.
- Click the Delete Service button.
Application example: Make a local web server public
If you host a web server on your local network, you can use port forwarding web requests from anyone on the Internet to reach your web server.
To make a local web server public:
- Assign your web server either a xed IP address or a dynamic IP address u address reservation.
In this example, your router always gives your web server an IP address of 192.168.1.33.
- In the Port Forwarding/Port Triggering page, congregate the router to forward the HTTP service to the local address of your web server at 192.168.1.33.
HTTP (port 80) is the standard protocol for web servers.
- (Optional) Register a host name with a Dynamic DNS service, and specify that on the Dynamic DNS page of the router.
Dynamic DNS makes it much easier to access a server from the Internet be can type the name in the Internet browser. Otherwise, you must know the I that the ISP assigned, which typically changes.
How the router implements the port forwarding rule
The following sequence shows the effects of a port forwarding rule:
-
When you type the URL www.example.com in your browser, the browser send web page request message with the following destination information:
-
Destination address. The IP address of www.example.com, which is the add of your router.
-
Destination port number. 80, which is the standard port number for a web process.
-
Your router receives the message and nds your port forwarding rule for incc port 80 trafc.
-
The router changes the destination in the message to IP address 192.168.1.1 sends the message to that computer.
-
Your web server at IP address 192.168.1.123 receives the request and sends message to your router.
-
Your router performs Network Address Translation (NAT) on the source IP add and sends the reply through the Internet to the computer or WiFi device that the web page request.
Manage port triggering
Port triggering is a dynamic extension of port forwarding that is useful in these
- An application must use port forwarding to more than one local computer (k simultaneously).
- An application must open incoming ports that are different from the outgoing
With port triggering, the router monitors traffic to the Internet from an outbound port that you specify. For outbound traffic from that port, the router saves the of the computer that sent the traffic. The router temporarily opens the incoming or ports that you specify in your rule and forwards that incoming traffic to that
Port forwarding creates a static mapping of a port number or range of ports local computer. Port triggering can dynamically open ports to any computer when needed and close the ports when they are no longer needed.
Add a port triggering service
To add a port triggering service:
- Launch a web browser from a computer or mobile device that is connected Orbi network.
- Enter orbilogin.com.
A login window opens.
- Enter the admin user name and password.
The user name is admin. The password is the one that you specied the rs that you logged in. The user name and password are case-sensitive.
The BASIC Home page displays.
- Select ADVANCED > Advanced Setup > Port Forwarding/Port Triggering.
The Port Forwarding/Port Triggering page displays.
- Select the Port Triggering radio button.
The page adjusts.
- Click the Add Service button.
The Port Triggering - Services page displays.
- In the Service Name eld, type a descriptive service name.
-
In the Service User menu, select Any, or select Single address and enter the IP address of one computer:
-
Any (the default) allows any computer on the Internet to use this service.
-
Single address restricts the service to a particular computer.
-
Select the service type, either TCP or UDP or TCP/UDP (both).
If you are not sure, select TCP/UDP.
- In the Triggering Port eld, enter the number of the outbound trafc port that open the inbound ports.
- Enter the inbound connection port information in the Connection Type, Starting
Port, and Ending Port elds.
- Click the Apply button.
The service is now in the Portmap Table. You must enable port triggering by the router used port triggering for the service that you added. See Enable triggering on page 134.
Enable port triggering
To enable port triggering:
- Launch a web browser from a computer or mobile device that is connected Orbi network.
- Enter orbilogin.com.
A login window opens.
- Enter the admin user name and password.
The user name is admin. The password is the one that you specied the rs that you logged in. The user name and password are case-sensitive.
The BASIC Home page displays.
- Select ADVANCED > Advanced Setup > Port Forwarding/Port Triggering.
The Port Forwarding/Port Triggering page displays.
- Select the Port Triggering radio button.
The page adjusts.
- Clear the Disable Port Triggering check box.
If this check box is selected, the router does not use port triggering even specied port triggering settings.
- In the Port Triggering Timeout eld, enter a value up to 9999 minutes.
This value controls how long the inbound ports stay open when the router no activity. This value is required because the router cannot detect when the application terminates.
Application example: Port triggering for Internet Relay C
Some application servers, such as FTP and IRC servers, send replies to multiple numbers. Using port triggering, you can tell the router to open more incoming when a particular outgoing port starts a session.
An example is Internet Relay Chat (IRC). Your computer connects to an IRC seed destination port 6667. The IRC server not only responds to your originating source but also sends an "identify" message to your computer on port 113. Using port you can tell the router, "When you initiate a session with destination port 6667
also allow incoming traffic on port 113 to reach the originating computer." The sequence shows the effects of the port triggering rule you dene:
- You open an IRC client program to start a chat session on your computer.
- Your IRC client composes a request message to an IRC server using a des port number of 6667, the standard port number for an IRC server process. computer then sends this request message to your router.
- Your router creates an entry in its internal session table describing this comm session between your computer and the IRC server. Your router stores the information, performs Network Address Translation (NAT) on the source address and port, and sends this request message through the Internet to the IRC s
- Noting your port triggering rule and observing the destination port number of your router creates another session entry to send any incoming port 113 traffic your computer.
- The IRC server sends a return message to your router using the NAT-assigne port (for example, port 33333) as the destination port. The IRC server also "identify" message to your router with destination port 113.
- When your router receives the incoming message to destination port 33333, it its session table to see if a session is active for port number 33333. Findir session, the router restores the original address information replaced by NAT sends this reply message to your computer.
- When your router receives the incoming message to destination port 113, it its session table and nds an active session for port 113 associated with you computer. The router replaces the message's destination IP address with your computer's IP address and forwards the message to your computer.
- When you finish your chat session, your router eventually senses a period of in the communications. The router then removes the session information from session table, and incoming traffic is no longer accepted on port numbers 33113.
8
Use VPN to Access Your Network
You can use OpenVPN software to remotely access your router using virtual private networking (VPN). This chapter explains how to set up and use VPN access.
This chapter includes the following sections:
- Set up a VPN connection
- Specify VPN service in the router
• Install OpenVPN software
• Use a VPN tunnel on your Windows-based computer
• Use VPN to access your Internet service at home
Set up a VPN connection
A virtual private network (VPN) lets you use the Internet to securely access you when you aren't home.
This type of VPN access is called a client-to-gateway tunnel. The computer is t and the router is the gateway. To use the VPN feature, you must log in to enable VPN, and you must install and run VPN client software on the compute VPN uses DDNS or a static IP address to connect with your router.
To use a DDNS service, register for an account with a host name (sometimes domain name). You use the host name to access your network. The router sup these accounts: NETGEAR, No-IP, and Dyn.
If your Internet service provider (ISP) assigned a static WAN IP address (such as or 10.x.x.x) that never changes to your Internet account, the VPN can use that to connect to your home network.
Specify VPN service in the router
You must specify the VPN service settings in the router before you can use a connection.
To specify the VPN service:
- Launch a web browser from a computer or mobile device that is connected Orbi network.
- Enter orbilogin.com.
A login window opens.
- Enter the admin user name and password.
The user name is admin. The password is the one that you specied the rs that you logged in. The user name and password are case-sensitive.
The BASIC Home page displays.
- Select ADVANCED > Advanced Setup > VPN Service.
The VPN Service page displays.
- Select the Enable VPN Service check box.
By default, the VPN uses the UDP service type and uses port 12974. If you customize the service type and port, we recommend that you change these before you install the OpenVPN software.
- To change the service type, scroll down and select the TCP radio button.
- To change the port, scroll down to the Service Port eld, and type the port that you want to use.
- Click the Apply button.
Your settings are saved. VPN is enabled in the router, but you must install up OpenVPN software on your computer before you can use a VPN connect
Install OpenVPN software
You must install this software on each Windows-based computer, Mac computer, device, or Android device that you plan to use for VPN connections to your
Install OpenVPN software on your Windows-based computer
You must install this software on each Windows-based computer that you plan to for VPN connections to your router.
To install VPN client software on your Windows-based computer:
- Launch a web browser from a computer or mobile device that is connected Orbi network.
- Enter orbilogin.com.
A login window opens.
- Enter the admin user name and password.
The user name is admin. The password is the one that you specied the rs that you logged in. The user name and password are case-sensitive.
The BASIC Home page displays.
- Select ADVANCED > Advanced Setup > VPN Service.
The VPN Service page displays.
- Make sure that the Enable VPN Service check box is selected.
- Specify any VPN service settings on the page.
For more information, see Specify VPN service in the router on page 137.
- Click the For Windows button to download the OpenVPN conguration les.
-
Visit openvpn.net/index.php/download/community-downloads.html to download the OpenVPN client utility.
-
In the Windows Installer section of the page, double-click the openVPN-install-xxx.exe link.
-
Download and install the Open VPN software on your computer, click the openVPN-install-xxx.exe le.
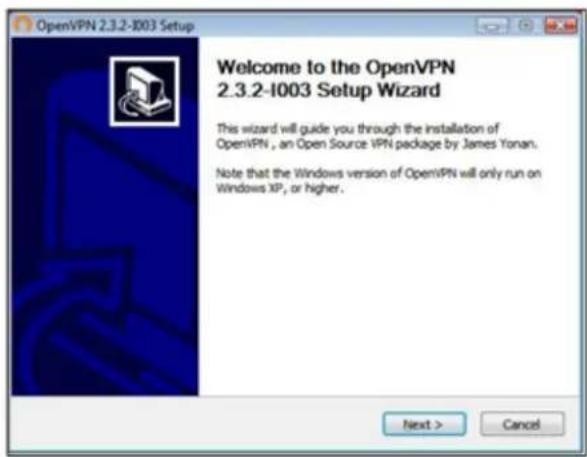
-
Click the Next button.
-
When prompted, read the License Agreement and click the I Agree button.
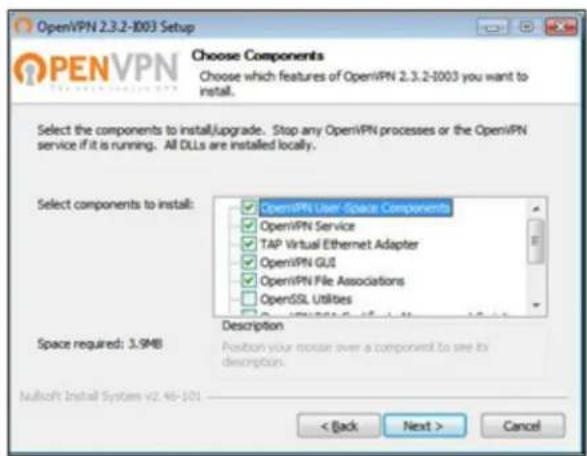
-
Leave the check boxes selected, and click the Next button.
-
To specify the destination folder, click the Browse button and select a destin folder.
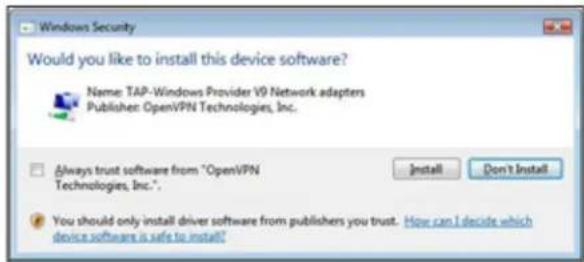
- Click the Install button.
The window displays the progress of the installation and then displays the main installation page.
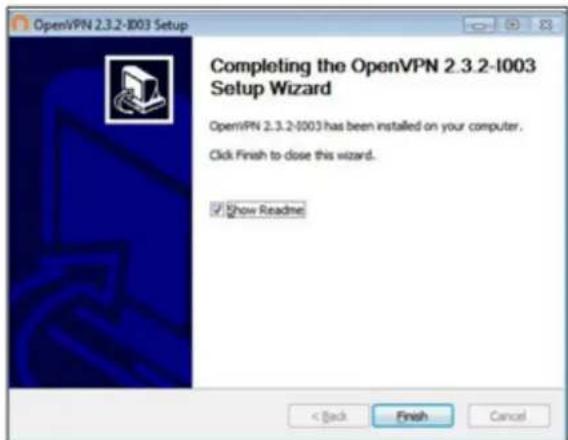
-
Click the Finish button.
-
Unzip the configuration files that you downloaded and copy them to the folder, the VPN client is installed on your device.
For a client device with Windows 64-bit system, the VPN client is installed at C:\Programles\OpenVPN\cong\ by default.
- For a client device with Windows, modify the VPN interface name to NETGEA
a. On your computer, go to the Networks page. If you are using Windows Control Panel > Network and Sharing Center > Change adapter settings.
b. In the local area connection list, nd the local area connection with the d name TAP-Windows Adapter.
c. Select the local area connection and change its name (not its device nan NETGEAR-VPN.
If you do not change the VPN interface name, the VPN tunnel connection
Orbi Pro Router SRR60 and Orbi Pro Satellite SRS60
For more information about using OpenVPN on your Windows-based computer visit
https://openvpn.net/index.php/open-source/documentation/howto.html#quick.
Install OpenVPN software on your Mac computer
You must install this software on each Mac computer that you plan to use for connections to your router.
To install VPN client software on your Mac computer:
- Launch a web browser from a computer or mobile device that is connected Orbi network.
- Enter orbilogin.com.
A login window opens.
- Enter the admin user name and password.
The user name is admin. The password is the one that you specied the rs that you logged in. The user name and password are case-sensitive.
The BASIC Home page displays.
- Select ADVANCED > Advanced Setup > VPN Service.
The VPN Service page displays.
- Make sure that the Enable VPN Service check box is selected.
- Specify any VPN service settings on the page.
For more information, see Specify VPN service in the router on page 137.
- Click the FOR MAC OS button to download the OpenVPN conguration les.
- Visit https://tunnelblick.net/index.html to download the OpenVPN client utility for Mac OS X.
- Download and install the le.
- Unzip the configuration files that you downloaded and copy them to the folder, the VPN client is installed on your device.
The client utility must be installed by a user with administrative privileges.
For more information about using OpenVPN on your Mac computer, visit https://openvpn.net/vpn-server-resources/installation-guide-for-openvpn-connect-client-on-macos/.
Install OpenVPN software on an iOS device
You must install this software on each iOS device that you plan to use for VPN to your router.
To install VPN client software on an iOS device:
- Launch a web browser from a computer or mobile device that is connected Orbi network.
- Enter orbilogin.com.
A login window opens.
- Enter the admin user name and password.
The user name is admin. The password is the one that you specied the rs that you logged in. The user name and password are case-sensitive.
The BASIC Home page displays.
- Select ADVANCED > Advanced Setup > VPN Service.
The VPN Service page displays.
- Make sure that the Enable VPN Service check box is selected.
- Specify any VPN service settings on the page.
For more information, see Specify VPN service in the router on page 137.
- Click the FOR SMART PHONE button to download the OpenVPN conguration les.
- On your iOS device, download and install the OpenVPN Connect app from the app store.
- On your computer, unzip the conguration les that you downloaded and send les to your iOS device.
Note that when you open the .ovpn le, a list of apps displays. Select the Connect app to open the .ovpn le.
For more information about using OpenVPN on your iOS device, visit http://www.vpngate.net/en/howto_openvpn.aspx#ios.
Install OpenVPN software on an Android device
You must install this software on each Android device that you plan to use fc connections to your router.
To install VPN client software on an Android device:
- Launch a web browser from a computer or mobile device that is connected Orbi network.
- Enter orbilogin.com.
A login window opens. -
Enter the admin user name and password.
The user name is admin. The password is the one that you specified the rs that you logged in. The user name and password are case-sensitive.
The BASIC Home page displays. -
Select ADVANCED > Advanced Setup > VPN Service.
The VPN Service page displays.
-
Make sure that the Enable VPN Service check box is selected.
-
Specify any VPN service settings on the page.
For more information, see Specify VPN service in the router on page 137.
-
Click the FOR SMART PHONE button to download the OpenVPN conguration les.
-
On your Android device, download and install the OpenVPN Connect app fro Google Play Store.
-
On your computer, unzip the conguration les that you downloaded and send les to your Android device.
-
Open the les on your Android device.
-
Open the .ovpn le using the OpenVPN Connect app.
For more information about using OpenVPN on your Android device, visit http://www.vpngate.net/en/howto_openvpn.aspx#android.
Use a VPN tunnel on your Windows-base computer
After you set up the router to use VPN and install the OpenVPN application of computer, you can open a VPN tunnel from your computer to your router over Internet.
For the VPN tunnel to work, the local LAN IP address of the remote router is different LAN IP scheme from that of the local LAN where your VPN client co
connected. If both networks use the same LAN IP scheme, when the VPN tunn established, you cannot access your home router or your home network with the OpenVPN software.
The default LAN IP address scheme for the router is 192.x.x.x. The most common schemes are 192.x.x.x, 172.x.x.x, and 10.x.x.x. If you experience a conict, change IP scheme either for your home network or for the network with the client VPN. For information about changing these settings, see Change the LAN TCP/IP setting page 71.
To open a VPN tunnel:
- Launch the OpenVPN application with administrator privileges.
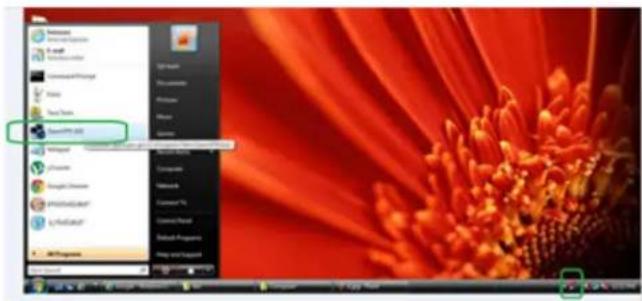
Figure 5. The OpenVPN icon displays in the Windows taskbar.
TIP: You can create a shortcut to the VPN program, then use the shortcut the settings and select the run as administrator check box. Then every time use this shortcut, OpenVPN automatically runs with administrator privileges.
- Right-click the OpenVPN icon.
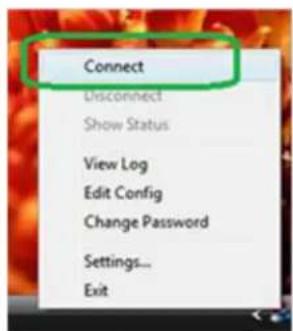
- Select Connect.
The VPN connection is established. You can launch a web browser and log router.
Use VPN to access your Internet service home
When you're away from home and you access the Internet, you usually use a lot of service provider. For example, at a coffee shop you might be given a code that use the coffee shop's Internet service account to surf the web.
Orbi Pro lets you use a VPN connection to access your own Internet service away from home. You might want to do this if you travel to a geographic lot doesn't support all the Internet services that you use at home. For example, you account might work at home but not in a different country.
Set up VPN client Internet access in the router
By default, the router is set up to allow VPN connections only to your home but you can change the settings to allow Internet access. Accessing the Internet through a VPN might be slower than accessing the Internet directly.
To allow VPN clients to use your home Internet service:
- Launch a web browser from a computer or mobile device that is connected Orbi network.
- Enter orbilogin.com.
A login window opens.
- Enter the admin user name and password.
The user name is admin. The password is the one that you specied the rs that you logged in. The user name and password are case-sensitive.
The BASIC Home page displays.
- Select ADVANCED > Advanced Setup > VPN Service.
The VPN Service page displays.
- Select the Enable VPN Service radio button.
- Scroll down to the Clients will use this VPN connection to access section, a the All sites on the Internet & Home Network radio button.
When you access the Internet with the VPN connection, instead of using a Internet service, you use the Internet service from your home network.
- Click the Apply button.
Your settings are saved.
- Click the FOR WINDOWS or FOR MACOSX button and download the configuration les for your VPN clients.
- Unzip the congruration les and copy them to the folder where the VPN clier installed on your device.
For a client device with Windows 64-bit system, the VPN client is installed at C:\Programles\OpenVPN\cong\ by default.
Block VPN client Internet access in the router
By default, the router is set up to allow VPN connections only to your home not to the Internet service for your home network. If you changed this setting Internet access, you can change it back.
To allow VPN clients to access only your home network:
- Launch a web browser from a computer or mobile device that is connected Orbi network.
- Enter orbilogin.com.
A login window opens.
- Enter the admin user name and password.
The user name is admin. The password is the one that you specied the rs that you logged in. The user name and password are case-sensitive.
The BASIC Home page displays.
- Select ADVANCED > Advanced Setup > VPN Service.
The VPN Service page displays.
- Select the Enable VPN Service radio button.
- Scroll down to the Clients will use this VPN connection to access section, a the Home Network only radio button.
This is the default setting. The VPN connection is only to your home network, the Internet service for your home network.
- Click the Apply button.
Your settings are saved.
- Click the FOR WINDOWS or FOR MACOSX button and download the conguration les for your VPN clients.
- Unzip the congruration les and copy them to the folder where the VPN clier installed on your device.
Orbi Pro Router SRR60 and Orbi Pro Satellite SRS60
For a client device with Windows 64-bit system, the VPN client is installed at C:\Programles\OpenVPN\cong\ by default.
Use a VPN tunnel to access your Internet service at
To access your Internet service:
- Set up the router to allow VPN access to your Internet service.
See Specify VPN service in the router on page 137. - On your computer, launch the OpenVPN application.
The OpenVPN icon displays in the Windows taskbar. - Right-click the icon and select Connect.
- When the VPN connection is established, launch your Internet browser.
9
Troubleshooting
This chapter provides information to help you diagnose and solve problems you experience with your Orbi router or satellite. If you do not nd the solution he the NETGEAR support site at support.netgear.com for product and contact informa This chapter includes the following sections:
- Quick tips
• The router and satellite do not sync - You cannot log in to the router
- You cannot access the Internet
- Troubleshoot Internet browsing
- Troubleshoot PPPoE
- Troubleshoot WiFi connectivity
- Troubleshoot your network using the ping utility
Quick tips
This section describes tips for troubleshooting some common problems.
Sequence to restart your network
When you restart your network, follow this sequence:
- Turn off and unplug the modem.
- Turn off the router.
- Plug in the modem and turn it on. Wait two minutes.
- Turn on the router and wait two minutes.
WiFi settings
Make sure that the WiFi settings in the WiFi-enabled computer or mobile device the router match.
The WiFi network name (SSID) and WiFi security settings must match exactly.
If you set up an access list, you must add each WiFi-enabled computer or mol MAC address to the router's access list.
Network settings
Make sure that the network settings of the computer are correct. Wired and w connected computers must use network (IP) addresses on the same network as router. The simplest way to do this is to configure each computer to obtain a automatically using DHCP.
Some cable modem service providers require you to use the MAC address of computer initially registered on the account. You can view the MAC address on Attached Devices page.
The router and satellite do not sync
If you are experiencing difficulty syncing the router and the satellite, we recommend that you move the satellite into the same room as the router during the sync. The satellite to a different location.
To sync the router and the satellite:
- Place the satellite in the same room as the Orbi router. Use this satellite location only during the sync process.
- Connect the satellite to a power source.
- If the Power LED on the back of the satellite does not light, press the Pc button.
- Wait for the satellite's ring LED to light solid white or magenta.
- Press the Sync button on the router and then within two minutes, press the Sync button on the satellite.
- Wait for the satellite to sync with the router.
The satellite's ring LED pulses white while it attempts to sync with the route the LED bar pulses white, it lights one of the following colors for about th and then turns off:
- Blue. The Orbi router and satellite successfully synced, and the connection between the router and satellite is good.
- Amber. The Orbi router and satellite successfully synced, but the connection between the router and satellite is only fair. Consider moving the Orbi sa closer to the Orbi router.
-
Magenta. The Orbi router and satellite did not sync.
-
Do one of the following:
-
The sync failed. If the sync failed, try to sync again by repeating Step 56. If the sync keeps failing, try a different location or position.
-
The sync is successful. If the sync is successful, move the satellite to the where you want to install it and continue with Step 8.
-
At the new location, connect the satellite to a power source.
-
At the new location, resync the satellite with the router by repeating Step 6.
If the satellite's ring LED lights blue or amber, the satellite synced successful satellite's ring LED lights blue, the connection is good. If the satellite's ring lights amber, consider moving the satellite closer to the router so that you a good connection instead of a fair connection.
-
If the satellite's ring LED lights magenta, the satellite did not resync with the if they successfully synced when they were placed in the same room, do or following:
-
Move the satellite closer to the router and try again. The router must be the satellite's WiFi cover area for a good or fair connection to the satellite
- Place another satellite between the router and the satellite that you are tr sync. Then try to sync between the two satellites. With daisy chain network your satellites can connect to each other or to the router, depending on connection is best.
You cannot log in to the router
Make sure that your computer or mobile device is connected to the Orbi WiFi. If you do not want to use a WiFi connection, you can connect your computer router with an Ethernet cable.
If you changed the admin password and you forgot what it is, see Reset the password on page 114.
You cannot access the Internet
Check your network and Internet connections:
- Make sure that your WiFi-enabled computer or mobile device is connected to Orbi network.
- If you are connected to Orbi but you cannot access the Internet, check to Internet connection is working.
-
Launch a web browser from a computer or WiFi device that is connected to network.
-
Enter orbilogin.com.
A login window opens.
- Enter the router admin user name and password.
The user name is admin. The default password is password. The user name and password are case-sensitive.
The BASIC Home page displays.
- Click the ADVANCED tab.
The ADVANCED Home page displays.
- Check that an IP address is shown for the Internet port.
If 0.0.0.0 is shown, your router did not obtain an IP address from your Internet provider (ISP).
If your router cannot obtain an IP address from the ISP, you can force your modem to recognize your new router by restarting your network. For more info see Sequence to restart your network on page 149.
If your router is still unable to obtain an IP address from the ISP, the problem one of the following:
- Your Internet service provider (ISP) might require a login program. Ask your whether they require PPP over Ethernet (PPPoE) or some other type of login
- If your ISP requires a login, the login name and password might be set in
- Your ISP might check for your computer's host name. Assign the computer h name of your ISP account as the account name on the Internet Setup page
- If your ISP allows only one Ethernet MAC address to connect to Internet an for your computer's MAC address, do one of the following:
- Inform your ISP that you bought a new network device and ask them to router's MAC address.
- Congure your router to clone your computer's MAC address.
Troubleshoot Internet browsing
If your router can obtain an IP address but your computer is unable to load pages from the Internet, it might be for one of the following reasons:
- The trafc meter is enabled, and the limit was reached.
By conguring the trafc meter not to block Internet access when the trafc line reached, you can resume Internet access. If your ISP sets a usage limit, they charge you for the overage. - Your computer might not recognize any DNS server addresses. A DNS server host on the Internet that translates Internet names (such as www addresses) to IP addresses.
Typically, your ISP provides the addresses of one or two DNS servers for yo. If you entered a DNS address during the router's configuration, restart your cc Alternatively, you can conjure your computer manually with a DNS address, a explained in the documentation for your computer. - The router might not be congured as the default gateway on your computer
Reboot the computer and verify that the router address (www.routerlogin.net) is listed by your computer as the default gateway address.
- You might be running login software that is no longer needed. If your ISP a program to log you in to the Internet (such as WinPoET), you no longer run that software after installing your router. You might need to go to Internet and select Tools > Internet Options, click the Connections tab, and select Never dial a connection. Other browsers provide similar options.
Troubleshoot PPPoE
If you are using PPPoE, try troubleshooting your Internet connection.
To troubleshoot a PPPoE connection:
- Launch a web browser from a computer or WiFi device that is connected to network.
- Enter orbilogin.com.
A login window opens.
- Enter the router admin user name and password.
The user name is admin. The default password is password. The user name and password are case-sensitive.
The BASIC Home page displays.
- Click the ADVANCED tab.
The ADVANCED Home page displays.
- In the Internet Port pane, click the Connection Status button.
The Connection Status window opens.
- Check the Connection Status window to see if your PPPoE connection is active working.
If the router is not connected, click the Connect button.
The router continues to attempt to connect indenitely.
- If you cannot connect after several minutes, the router might be set up with incorrect service name, user name, or password, or your ISP might be exper a provisioning problem.
Unless you connect manually, the router does not authenticate using PPPoE data is transmitted to the network.
Troubleshoot WiFi connectivity
If you are experiencing trouble connecting to the Orbi WiFi network, try to iso problem:
- Does the WiFi-enabled computer or mobile device that you are using nd your network?
If you disabled the router's SSID broadcast, then your WiFi network is hidden does not display in the list of networks that your computer or WiFi device default, SSID broadcast is enabled.) - Does your WiFi-capable device support the security that you are using for your network (WPA or WPA2)?
- To view the WiFi settings for the router, use an Ethernet cable to connect to a LAN port on the router. Then log in to the router, and select BASIC
Note: Be sure to click the Apply button if you change settings.
- If you are trying to connect to the 5 GHz 1 or 5 GHz 2 band, does yo computer or mobile device support this standard?
- Did your computer or WiFi device automatically connect to a different WiFi in your area, such as a WiFi hotspot?
Troubleshoot your network using the ping utility
Most network devices and routers contain a ping utility that sends an echo rec packet to the designated device. The device then responds with an echo reply. easily troubleshoot a network using the ping utility in your computer or worksta
Test the LAN path to your router
You can ping the router from your computer to verify that the LAN path to is set up correctly.
To ping the router from a Windows computer:
- From the Windows toolbar, click the Start button and select Run.
- In the eld provided, type ping followed by the IP address of the router, as example:
ping www.routerlogin.net
3. Click the OK button.
You should see a message like this one:
Pinging with 32 bytes of data
If the path is working, you see this message:
Reply from < IP address>: bytes=32 time=NN ms TTL=xxx
If the path is not working, you see this message:
Request timed out
If the path is not functioning correctly, you might be experiencing one of the problems:
- Wrong physical connections
For a wired connection, make sure that the numbered LAN port LED is lit to which you are connected.
Check that the appropriate LEDs are on for your network devices. If your ro computer are connected to a separate Ethernet switch, make sure that the li LEDs are lit for the switch ports that are connected to your computer and - Wrong network conguration
Verify that the Ethernet card driver software and TCP/IP software are both installed and congured on your computer.
Verify that the IP address for your router and your computer are correct an the addresses are on the same subnet.
Test the path from your computer to a remote device
After verifying that the LAN path works correctly, test the path from your comp a remote device.
To test the path from your computer to a remote device:
- From the Windows toolbar, click the Start button and select Run.
- In the Windows Run window, type:
ping -n 10
where
If you do not receive replies, check the following:
- Check to see that the IP address of your router is listed as the default gate your computer. If DHCP assigns the IP congruration of your computers, this information is not visible in your computer Network Control Panel. Verify that address of the router is listed as the default gateway.
- Check to see that the network address of your computer (the portion of the specified by the subnet mask) is different from the network address of the re device.
- Check to see that your cable or DSL modem is connected and functioning.
- If your ISP assigned a host name to your computer, enter that host name account name on the Internet Setup page.
- Your ISP might be rejecting the Ethernet MAC addresses of all but one of computers.
Many broadband ISPs restrict access by allowing traffic only from the MAC address your broadband modem. Some ISPs additionally restrict access to the MAC address a single computer connected to that modem. If your ISP does this, congregate you to "clone" or "spoof" the MAC address from the authorized computer.
A
Supplemental Information
This appendix covers the following topics:
- Factory settings
• Technical specifications
Factory settings
The following factory settings information are for the Orbi Pro router (model SR and the Orbi Pro satellite (model SRS60).
You can return the Orbi Pro router or satellite to its factory settings. Use the paper clip or a similar object to press and hold the Reset button on the back router or satellite for at least seven seconds. The router or satellite resets, and to the factory settings.
Factory settings for Orbi Pro router model SRR60
The following table shows the factory default settings for the Orbi Pro router.
Table 4. Factory default settings for the router
| Default SettingFeature | |
| Router login | |
| orbilogin.comUser login URL | |
| adminUser name (case-sensitive) | |
| passwordLogin password (case-sensitive) | |
| Internet connection | |
| Use default hardware addressWAN MAC address | |
| 1500WAN MTU size | |
| AutoSensingPort speed | |
| Local network (LAN) | |
| 192.168.1.1LAN IP | |
| 255.255.255.0Subnet mask | |
| EnabledDHCP server | |
| 192.168.1.2 to 192.168.1.254DHCP range | |
| 192.168.1.2DHCP starting IP address | |
| 192.168.1.254DHCP ending IP address | |
| DMZ | Disabled |
Table 4. Factory default settings for the router (Continued)
| Default SettingFeature | |
| Time zone | GMT for WW, except NA and GR GMT+1 for GR GMT-8 for NA |
| DisabledTime zone adjusted for daylight saving time | |
| DisabledSNMP | |
| Firewall | |
| Disabled (except trafc on port 80, the HTTP port)Inbound (c) | |
| Enabled (all)Outbound (communications going out to the Inter | |
| DisabledSource MAC Itering | |
| WiFi | |
| EnabledWiFi communication | |
| See router labelSSID name | |
| WPA2-PSK (AES)Security | |
| EnabledBroadcast SSID | |
| Transmission speed | Auto^1 |
| Country/region | United States in the US Otherwise, varies by region |
| AutoRF channel 2.4 GHz fronthaul | |
| AutoRF channel 2.4 GHz backhaul | |
| RF channel 5 GHz fronthaul | Channel 48 for NA, AU, and CA Channel 36 for EU |
| RF channel 5 GHz backhaul | Channel 48 for NA, AU, and CA Channel 36 for EU |
^1 Maximum wireless signal rate derived from IEEE Standard 802.11 specifications. Actual throughput can vary. Network conditions and environmental factors, including volume of network traffic, building materials and construction, and network overhead, lower actual data throughput rate.
Factory settings for Orbi Pro satellite model SRS60
The following table shows the factory default settings for the Orbi Pro satellite.
Table 5. Factory default settings for the satellite
^2 Maximum wireless signal rate derived from IEEE Standard 802.11 specifications. Actual throughput can vary. Network conditions and environmental factors, including volume of network traffic, building materials and construction, and network overhead, lower actual data throughput rate.
| Default SettingFeature | |
| Router login | |
| orbilogin.comUser login URL | |
| adminUser name (case-sensitive) | |
| passwordLogin password (case-sensitive) | |
| Internet connection | |
| Use default hardware addressWAN MAC address | |
| 1500WAN MTU size | |
| AutoSensingPort speed | |
| Local network (LAN) | |
| 192.168.1.250LAN IP | |
| 255.255.255.0Subnet mask | |
| EnabledDHCP server | |
| 192.168.1.2 to 192.168.1.254DHCP range | |
| 192.168.1.2DHCP starting IP address | |
| 192.168.1.254DHCP ending IP address | |
| DisabledDMZ | |
| Time zone | GMT for WW except NA and GR GMT+1 for GR GMT-8 for NA |
| DisabledTime zone adjusted for daylight saving time | |
| DisabledSNMP | |
| Firewall | |
| Inbound (communications coming in from the Internet) | Disabled (except trafc on port 80, the HTTP port) |
| Outbound (communications going out to the Entabled) (all) | |
| DisabledSource MAC Itering | |
| WiFi | |
| EnabledWiFi communication | |
| See satellite labelSSID name | |
| WPA2-PSK (AES)Security | |
| EnabledBroadcast SSID | |
| Transmission speed | Auto^2 |
| Country/region | United States in the USOtherwise, varies by region |
| AutoRF channel 2.4 GHz fronthaul | |
| AutoRF channel 2.4 GHz backhaul | |
| RF channel 5 GHz fronthaul | Channel 48 for NA, AU, and CAChannel 36 for EU |
| RF channel 5 GHz backhaul | Channel 48 for NA, AU, and CAChannel 36 for EU |
Technical specifications
The following are the technical specifications for Orbi Pro router (model SRR60) and Orbi Pro satellite (SRS60).
Technical specifications for Orbi Pro router model SRR6(
The following table shows the technical specifications for the router.
Table 6. Orbi Pro router specifications
| DescriptionFeature | |
| Data and routing protocols | TCP/IP, RIP-1, RIP-2, DHCP, PPPoE, PPTP, Bigpond, Dynamic DNS, UPnP, and SMB |
| Power adapter | North America: 120V, 60 Hz, inputUK, Australia: 240V, 50 Hz, inputEurope: 230V, 50 Hz, inputAll regions (output): 12V, 3.5A DC output |
| 6.8 x 3.3 x 9.7in (174 x 85 x 247 mm)Dimensions | |
| 2.06 lb (0.93 kg)Weight | |
| 0° to 40°C (32° to 104°F)Operating temperature | |
| 90% maximum relative humidity, noncondensingOperating humic | |
| Electromagnetic emissions | FCC Part 15 Class BVCCI Class BEN 55 022 (CISPR 22), Class B C-Tick N10947 |
| 10BASE-T or 100BASE-TX or 1000BASE-T, RJ-45LAN | |
| 10BASE-T or 100BASE-TX or 1000BASE-T, RJ-45WAN | |
| WiFi | Maximum wireless signal rate complies with the IEEE 802.11 standard. |
| Radio data rates | 2.4 GHz: Max. 400 Mbps5 GHz Front haul: Max. 866 Mbps5 GHz Back haul: Max. 1733 Mbps |
| Data encoding standards | IEEE 802.11b/g/n 2.4 GHz-256 QAM supportIEEE 802.11a/n/ac 5 GHz-256 QAM support |
| Maximum number of computers per wireless network by the amount of WiFi network traffic generated by each node (typically 50-70 nodes)2.4 GHz: 1275 GHz (front haul): 127 | |
Table 6. Orbi Pro router specifications (Continued)
| DescriptionFeature | ||
| 2.412-2.462Operating frequency range 2.4 GHz (US) | ||
| 2.412-2.472 GHzOperating frequency range 2.4 GHz (Europe I) | ||
| Operating frequency range 5 GHz (US) | 5.18 GHz-5.24 GHz5.745 GHz-5.825 GHz | |
| Operating frequency range 5 GHz (EU) | 5.18 GHz-5.24 GHz5.26 GHz-5.32 GHz5.5 GHz-5.7 GHz | |
| 802.11 security | WPA2-PSK [AES]WPA-PSK [TKIP] + WPA2-PSK [AES]WPA2-Enterprise | |
^3 Maximum wireless signal rate derived from IEEE Standard 802.11 specifications. Actual throughput can vary. Network conditions and environmental factors, including volume of network traffic, building materials and construction, and network overhead, lower actual data throughput rate.
Technical specifications for Orbi Pro satellite model SRS The following table shows the technical specifications for the satellite.
^4 Maximum wireless signal rate derived from IEEE Standard 802.11 specifications. Actual throughput can vary. Network conditions and environmental factors, including volume of network traffic, building materials and construction, and network overhead, lower actual data throughput rate.
Table 7. Orbi Pro satellite specifications
| DescriptionFeature | |
| Data and routing protocols | TCP/IP, RIP-1, RIP-2, DHCP, PPPoE, PPTP, Bigpond, Dynamic DNS, UPnP, and SMB |
| Power adapter | North America: 120V, 60 Hz, inputUK, Australia: 240V, 50 Hz, inputEurope: 230V, 50 Hz, inputAll regions (output): 12V, 3.5A DC output |
| 6.8 x 3.3 x 9.7in (174 x 85 x 247 mm)Dimensions | |
| 2.06 lb (0.93 kg)Weight | |
| 0° to 40°C (32° to 104°F)Operating temperature | |
| 90% maximum relative humidity, noncondensingOperating humic | |
| Electromagnetic emissions | FCC Part 15 Class BVCCI Class BEN 55 022 (CISPR 22), Class B C-Tick N10947 |
| 10BASE-T or 100BASE-TX or 1000BASE-T, RJ-45LAN | |
| 10BASE-T or 100BASE-TX or 1000BASE-T, RJ-45WAN | |
| WiFi | Maximum wireless signal rate complies with the IEEE 802.11 standard. |
| Radio data rates | 2.4 GHz: Max. 400 Mbps5 GHz Front haul: Max. 866 Mbps5 GHz Back haul: Max. 1733 Mbps |
| Data encoding standards | IEEE 802.11b/g/n 2.4 GHz-256 QAM supportIEEE 802.11a/n/ac 5 GHz-256 QAM support |
| Maximum number of computers per wireless network by the amount of WiFi network traffic generated by each node (typically 50-70 nodes).2.4 GHz: 1275 GHz (front haul): 127 | |
| 2.412-2.462 GHzOperating frequency range 2.4 GHz (US) | |
| 2.412-2.472 GHzOperating frequency range 2.4 GHz (Europe I | |
| Operating frequency range 5 GHz (US) | 5.18 GHz-5.24 GHz5.745 GHz-5.825 GHz |
| Operating frequency range 5 GHz (EU) | 5.18 GHz-5.24 GHz5.26 GHz-5.32 GHz5.5 GHz-5.7 GHz |
| 802.11 security | WPA2-PSK [AES]WPA-PSK [TKIP] + WPA2-PSK [AES]WPA2-Enterprise |



- Support and Community
- Regulatory and Legal
- Trademarks
- Contents
- Chapter 1 Overview
- Chapter 2 Connect to the Orbi Pro Network and Access the Router
- Chapter 3 Specify Your Internet Settings
- Orbi Pro Router SRR60 and Orbi Pro Satellite SRS60
- Chapter 4 Control Access to the Internet
- Chapter 5 Specify Network Settings
- Chapter 6 Manage Your Network
- Chapter 7 Customize Internet Trafc Rules for Ports
- Chapter 8 Use VPN to Access Your Network
- Chapter 9 Troubleshooting
- Appendix A Supplemental Information
- 1
- Overview
- Supported Orbi Pro models
- Orbi Pro router and satellite hardware overviews
- LED behavior
- Orbi Pro WiFi system LEDs
- Add-on Orbi Pro satellite LEDs
- Wall mount or ceiling mount your Orbi router
- Wall-mount your Orbi Pro
- To wall mount your router or satellite:
- Ceiling-mount your Orbi Pro
- To ceiling mount your router or satellite:
- Orbi Pro router label and Orbi Pro sate label
- Connect your Orbi Pro router
- To cable your router:
- Place your satellite
- Sync your Orbi Pro satellite
- Sync a satellite from an Orbi Pro WiFi system
- To sync your Orbi Pro satellite:
- Sync an add-on Orbi Pro satellite
- To sync your add-on Orbi Pro satellite:
- To add a satellite to your Orbi network using the router web interface:
- Set up your Orbi network with the NET Insight app
- 2
- Connect to the Orbi Pro Network and Access the Router
- Connect to the network
- Wired connection
- To connect your computer to the router with an Ethernet cable:
- WiFi connection
- To nd and select the WiFi network:
- WiFi connection using WPS
- To use WPS to connect to the WiFi network:
- Types of logins
- Use a web browser to access the route
- Use the automatic Internet setup option
- To automatically set up your router:
- Log in to the Orbi router web interface
- To log in to your Orbi:
- Change the language
- To change the language:
- 3
- Specify Your Internet Settings
- Use the Internet Setup Wizard
- To use the Setup Wizard:
- Manually set up the Internet connection
- Specify an Internet connection without a login
- To specify the Internet connection settings:
- Specify an Internet connection that uses a login
- To view or change the basic Internet setup:
- Manage an IPv6 Internet connection
- Requirements for entering IPv6 addresses
- Specify IPv6 Internet connections
- To set up an IPv6 Internet connection:
- Use auto detection for an IPv6 Internet connection
- To set up an IPv6 Internet connection through auto detection:
- To set up an IPv6 Internet connection through auto conguration:
- Set up an IPv6 6rd tunnel Internet connection
- To set up an IPv6 6rd Tunnel Internet connection:
- To set up a pass-through IPv6 Internet connection:
- To set up a xed IPv6 Internet connection:
- To set up an IPv6 Internet connection with a DHCP server:
- To set up a PPPoE IPv6 Internet connection:
- Change the MTU size
- To change the MTU size:
- 4
- Control Access to the Internet
- Manage MAC access control lists for Wil networks and the LAN
- Enable a MAC ACL for a specific network
- To enable a MAC ACL for a specific network:
- Add automatically detected devices to a MAC ACL
- To add automatically detected devices to a MAC ACL:
- Manually add, remove, or change the information for device on a MAC ACL
- Disable a MAC ACL for a specific network
- Manage the Orbi network access control
- To enable and manage the network access control list for the entire Orbi network:
- Manage the blocked devices on the network access co list
- To manage devices that are blocked from accessing the Orbi network:
- Use keywords to block Internet sites
- To block Internet sites:
- Delete keywords that are used to block Internet sites
- To delete keywords that are used to block Internet sites:
- Avoid blocking on a trusted computer
- To specify a trusted computer:
- Block services from the Internet
- To block services:
- Schedule when to block Internet sites ar services
- To schedule blocking:
- Set up security event email notifications
- To set up email notifications:
- 5
- Specify Network Settings
- View or change WAN settings
- To view the WAN settings:
- Manage Dynamic DNS
- To set up Dynamic DNS and register for a free NETGEAR account:
- To set up Dynamic DNS if you already created an account:
- Change the Dynamic DNS settings
- To change your settings:
- Set up a default DMZ server
- To set up a default DMZ server:
- Change the router's device name
- To change the router's device name:
- Change the LAN TCP/IP settings
- To change the LAN TCP/IP settings:
- Use the router as a DHCP server
- To use the router as a DHCP server and specify the pool of IP addresses that the router assigns:
- Disable the DHCP server feature in the
- To disable the DHCP server feature in the router:
- Manage reserved LAN IP addresses
- Reserve an IP address
- To reserve an IP address:
- Edit a reserved IP address
- To edit a reserved address entry:
- Delete a reserved IP address entry
- To delete a reserved address entry:
- Manage custom static routes
- Set up a static route
- To set up a static route:
- Edit a static route
- To edit a static route:
- Delete a static route
- To delete a static route:
- Change the admin WiFi network settings
- Change the admin WiFi network name and channel
- To change the admin WiFi settings:
- To change the admin WiFi password or WPA settings:
- Manage the employee WiFi network settin
- To enable the employee WiFi network and change the WiFi settings:
- To change the employee WiFi network password or WPA settings:
- Manage the IoT WiFi network settings
- Enable the IoT WiFi network and change the settings
- To enable the IoT WiFi network and change the WiFi settings:
- Change the IoT WiFi password or security level
- To change the IoT WiFi network password or WPA settings:
- Set up a guest WiFi network and captiv portal
- Set up a guest WiFi network with open access or authentication
- To set up a guest network:
- Set up a guest network with a captive portal
- To set up a guest network with a captive portal:
- Set up Facebook Wi-Fi
- To set up Facebook Wi-Fi:
- Manage the download bandwidth per SSI
- To set the download bandwidth ratios for the SSIDs:
- View or change advanced WiFi settings
- To view or change advanced WiFi settings:
- Use the router as a WiFi access point
- To set up the Orbi router as an AP after you set up your Internet connection:
- Set up router mode
- To set up the Orbi router as a router:
- Generate a new backhaul password
- To generate a new backhaul password:
- Enable or disable implicit beamforming
- To enable or disable implicit beamforming:
- Enable or disable MU-MIMO
- To enable or disable MU-MIMO:
- Enable or disable Protected Management Frames
- To enable or disable PMF:
- Check your Internet bandwidth
- To check your Internet bandwidth using Speedtest:
- Set up a bridge for a port group or group
- Set up a bridge for a port group
- To congregate a port group and enable the bridge:
- Set up a bridge for a VLAN tag group
- To add a VLAN tag group and enable the bridge:
- DescriptionField
- Improve network connections with Universa Plug and Play
- To enable Universal Plug and Play:
- 6
- Manage Your Network
- Update the router and satellite rmware
- Enable the automatic rmware update feature
- To enable the automatic rmware update feature:
- Check for rmware updates
- To check for new rmware and update your router and satellite:
- Manually update rmware
- To manually update the rmware on your Orbi router and satellite, follow these high level steps:
- To manually update your satellite's rmware:
- To manually update your router's rmware:
- Change the admin password
- To set the password for the user name admin:
- Enable admin password reset
- To enable password reset:
- Reset the admin password
- To reset your admin password:
- View router status and usage information
- To view router status and usage information:
- Display Internet port statistics
- To display Internet port statistics:
- Check the Internet connection status
- To check the Internet connection status:
- View satellites, WiFi devices, and wired devices connected to the Orbi network
- To view devices connected to your network:
- View satellite status
- To view your satellite's status:
- View and manage logs of router activity
- To view and manage logs:
- Set up a syslog server
- To enable the syslog function and specify the syslog server:
- Monitor Internet trafc
- To monitor Internet trafc:
- Manage the router conguration le
- Back up settings
- To back up the router's conguration settings:
- Manage the automatic backup options
- To manage the automatic backup options:
- Erase the current conguration settings
- To erase the conguration settings:
- Restore conguration settings
- To restore conguration settings that you backed up:
- Set up remote management
- To set up remote management:
- Use remote access
- To use remote access:
- 7
- Customize Internet Trafc Rules for Ports
- Manage port forwarding to a local serve
- Set up port forwarding to a local server
- To forward specific incoming protocols:
- Add a custom port forwarding service
- To add a custom service:
- Edit a port forwarding service
- To edit a port forwarding entry:
- Delete a port forwarding entry
- To delete a port forwarding entry:
- Application example: Make a local web server public
- To make a local web server public:
- How the router implements the port forwarding rule
- Manage port triggering
- Add a port triggering service
- To add a port triggering service:
- Enable port triggering
- To enable port triggering:
- Application example: Port triggering for Internet Relay C
- 8
- Use VPN to Access Your Network
- Set up a VPN connection
- Specify VPN service in the router
- To specify the VPN service:
- Install OpenVPN software
- Install OpenVPN software on your Windows-based computer
- To install VPN client software on your Windows-based computer:
- Install OpenVPN software on your Mac computer
- To install VPN client software on your Mac computer:
- Install OpenVPN software on an iOS device
- To install VPN client software on an iOS device:
- Install OpenVPN software on an Android device
- To install VPN client software on an Android device:
- Use a VPN tunnel on your Windows-base computer
- To open a VPN tunnel:
- Use VPN to access your Internet service home
- Set up VPN client Internet access in the router
- To allow VPN clients to use your home Internet service:
- Block VPN client Internet access in the router
- To allow VPN clients to access only your home network:
- To access your Internet service:
- 9
- Troubleshooting
- Quick tips
- Sequence to restart your network
- WiFi settings
- Network settings
- The router and satellite do not sync
- To sync the router and the satellite:
- You cannot log in to the router
- You cannot access the Internet
- Troubleshoot Internet browsing
- Troubleshoot PPPoE
- To troubleshoot a PPPoE connection:
- Troubleshoot WiFi connectivity
- Troubleshoot your network using the ping utility
- Test the LAN path to your router
- To ping the router from a Windows computer:
- ping www.routerlogin.net
- Click the OK button.
- Pinging with 32 bytes of data
- Reply from < IP address>: bytes=32 time=NN ms TTL=xxx
- Request timed out
- Test the path from your computer to a remote device
- To test the path from your computer to a remote device:
- A
- Supplemental Information
- Factory settings
- Factory settings for Orbi Pro router model SRR60
- Factory settings for Orbi Pro satellite model SRS60
- Technical specifications
- Technical specifications for Orbi Pro router model SRR6(
Brand : NETGEAR
Model : Orbi Pro
Category : Home Automation