
OptiPlex 7470 - Desktop computer DELL - Free user manual and instructions
Find the device manual for free OptiPlex 7470 DELL in PDF.


User questions about OptiPlex 7470 DELL
0 question about this device. Answer the ones you know or ask your own.
Ask a new question about this device
Download the instructions for your Desktop computer in PDF format for free! Find your manual OptiPlex 7470 - DELL and take your electronic device back in hand. On this page are published all the documents necessary for the use of your device. OptiPlex 7470 by DELL.
USER MANUAL OptiPlex 7470 DELL
Dell OptiPlex 7470 All-in-One
Service Manual
Notes, cautions, and warnings
NOTE: A NOTE indicates important information that helps you make better use of your product.
CAUTION: A CAUTION indicates either potential damage to hardware or loss of data and tells you how to avoid the problem.
WARNING: A WARNING indicates a potential for property damage, personal injury, or death.
Contents
Chapter 1: Working on your computer....6
Safety instructions....6
Turning off your computer — Windows 10....6
Before working inside your computer....7
After working inside your computer....7
Chapter 2: Technology and components....8
DDR4....8
USB features....10
HDMI....12
Chapter 3: Major components of your system .... 13
Chapter 4: Removing and Installing components....15
Recommended tools....15
Screw size list....16
System board layout....17
Rubber feet....19
Removing the rubber feet....19
Installing the rubber feet....19
Cable cover - optional....20
Removing the cable cover....20
Installing the cable cover....21
Stand 22
Removing the stand....22
Installing the stand....23
Back cover....24
Removing the back cover....24
Installing the back cover....25
Hard drive....26
Removing the hard drive assembly....26
Installing the hard drive assembly....27
Memory module....28
Removing the memory module....28
Installing the memory module....29
System board shield....30
Removing the system board shield....30
Installing the system board shield....31
Intel Optane 32
Removing the Intel Optane card....32
Installing the Intel Optane card....33
Solid State Drive -SSD 34
Removing the SSD card....34
Installing the SSD card....35
Solid State Drive -2230.... 36
Removing the 2230 SSD card....36
Installing the 2230 SSD card.... 37
WLAN card....38
Removing the WLAN card....38
Installing the WLAN card....40
System fan....42
Removing the system fan....42
Installing the system fan....43
Heat sink....44
Removing the heat sink - dGPU....44
Installing the heat sink - dGPU 45
Removing the heat sink - UMA....46
Installing the heat sink - UMA....46
Pop-Up Camera....47
Removing the pop-up camera....47
Installing the pop-up camera....49
Coin cell battery....51
Removing the coin cell battery....51
Installing the coin cell battery....51
Processor....52
Removing the processor....52
Installing the processor....53
Base cover....54
Removing the base cover....54
Installing the base cover....56
Power supply unit - PSU....57
Removing the power supply unit -PSU....57
Installing the power supply unit -PSU....59
Power supply unit fan - PSU fan....60
Removing the power supply unit fan -PSU fan....60
Installing the power supply unit -PSU fan....61
Input and Output bracket....62
Removing the Input and Output bracket....62
Installing the Input and Output bracket....64
System board....65
Removing the system board....65
Installing the system board....68
Speakers....71
Removing the speakers....71
Installing the speakers....72
Power button board....73
Removing the power button board....73
Installing the power button board....74
Microphones....75
Removing the microphones....75
Installing the microphones....76
Input and Output board....77
Removing the Input and Output board....77
Installing the input and output board....79
Headset port 81
Removing the headset port....81
Installing the headset port....82
Antennas....83
Removing the antennas....83
Installing the antennas....84
Display panel....85
Removing the display panel....85
Installing the display panel....87
Display cable....89
Removing the display cable....89
Installing the display cable....90
Middle frame....91
Removing the middle frame....91
Installing the middle frame....93
Chapter 5: Troubleshooting your computer....96
Enhanced Pre-Boot System Assessment — ePSA diagnostics.... 96
Running the ePSA Diagnostics....96
Diagnostics....96
LCD built in self test - BIST 97
Chapter 6: Getting help....99
Contacting Dell....99
Working on your computer
Topics:
•Safety instructions
• Turning off your computer — Windows 10
•Before working inside your computer
•After working inside your computer
Safety instructions
Use the following safety guidelines to protect your computer from potential damage and to ensure your personal safety. Unless otherwise noted, each procedure included in this document assumes that the following conditions exist:
- You have read the safety information that shipped with your computer.
- A component can be replaced or, if purchased separately, installed by performing the removal procedure in the reverse order.
NOTE: Disconnect all power sources before opening the computer cover or panels. After you finish working inside the computer, replace all covers, panels, and screws before connecting to the power source.
NOTE: Before working inside your computer, read the safety information that shipped with your computer. For additional safety best practices information, see the Regulatory Compliance Homepage at www.dell.com/regulatory_compliance
CAUTION: Many repairs may only be done by a certified service technician. You should only perform troubleshooting and simple repairs as authorized in your product documentation, or as directed by the online or telephone service and support team. Damage due to servicing that is not authorized by Dell is not covered by your warranty. Read and follow the safety instructions that came with the product.
CAUTION: To avoid electrostatic discharge, ground yourself by using a wrist grounding strap or by periodically touching an unpainted metal surface that is grounded to ground yourself before you touch the computer to perform any disassembly tasks.
CAUTION: Handle components and cards with care. Do not touch the components or contacts on a card. Hold a card by its edges or by its metal mounting bracket. Hold a component such as a processor by its edges, not by its pins.
CAUTION: When you disconnect a cable, pull on its connector or on its pull-tab, not on the cable itself. Some cables have connectors with locking tabs; if you are disconnecting this type of cable, press in on the locking tabs before you disconnect the cable. As you pull connectors apart, keep them evenly aligned to avoid bending any connector pins. Also, before you connect a cable, ensure that both connectors are correctly oriented and aligned.
NOTE: The color of your computer and certain components may appear differently than shown in this document.
Turning off your computer — Windows 10
CAUTION: To avoid losing data, save and close all open files and exit all open programs before you turn off your computer or remove the side cover.
- Click or tap

- Click or tap and then click or tap Shut down.

NOTE: Ensure that the computer and all attached devices are turned off. If your computer and attached devices did not automatically turn off when you shut down your operating system, press and hold the power button for about 6 seconds to turn them off.
Before working inside your computer
- Ensure that your work surface is flat and clean to prevent the computer cover from being scratched.
- Turn off your computer.
- Disconnect all network cables from the computer (if available).

CAUTION: If your computer has an RJ45 port, disconnect the network cable by first unplugging the cable from your computer.
- Disconnect your computer and all attached devices from their electrical outlets.
- Open the display.
- Press and hold the power button for few seconds, to ground the system board.

CAUTION: To guard against electrical shock unplug your computer from the electrical outlet before performing Step # 8.

CAUTION: To avoid electrostatic discharge, ground yourself by using a wrist grounding strap or by periodically touching an unpainted metal surface at the same time as touching a connector on the back of the computer.
- Remove any installed ExpressCards or Smart Cards from the appropriate slots.
After working inside your computer
After you complete any replacement procedure, ensure that you connect external devices, cards, and cables before turning on your computer.

CAUTION: To avoid damage to the computer, use only the battery designed for this particular Dell computer. Do not use batteries designed for other Dell computers.
- Connect any external devices, such as a port replicator or media base, and replace any cards, such as an ExpressCard.
- Connect any telephone or network cables to your computer.

CAUTION: To connect a network cable, first plug the cable into the network device and then plug it into the computer.
- Connect your computer and all attached devices to their electrical outlets.
- Turn on your computer.
Technology and components
This chapter details the technology and components available in the system.
Topics:
•DDR4
- USB features
•HDMI
DDR4
DDR4 (double data rate fourth generation) memory is a higher-speed successor to the DDR2 and DDR3 technologies and allows up to 512 GB in capacity, compared to the DDR3's maximum capacity of 128 GB per DIMM. DDR4 synchronous dynamic random-access memory is keyed differently from both SDRAM and DDR to prevent the user from installing the wrong type of memory into the system.
DDR4 needs 20 percent less or just 1.2 volts, compared to DDR3 which requires 1.5 volts of electrical power to operate. DDR4 also supports a new, deep power-down mode that allows the host device to go into standby without needing to refresh its memory. Deep power-down mode is expected to reduce standby power consumption by 40 to 50 percent.
Key Specifications
The following table lists the specifications' comparison between DDR3 and DDR4:
Table 1. DDR3 vs DDR4
| Feature/Option DDR3 DDR4 DDR 4 Advantages | |||
| Chip Densities 512 Mb-8 Gb 4 Gb | 16 Gb Larger DIMM capacities | ||
| Data rates 800 Mb/s-2133 Mb/s | 1600 Mb/s-3200 Mb/s Migration to higher speed I/O | ||
| Voltage 1.5 V 1.2 V Reduced memory power | demand | ||
| Low voltage standard Yes (DDR3L at 1.35V) Anticipated at 1.05V Memory Power Reductions | |||
| Internal banks | 8 | 16 | Higher data rates |
| Bank groups (BG) | 0 | 4 | Faster burst accesses |
| VREF inputs | 2 —DQs and CMD/ADDR | 1 — CMD/ADDR | VREFDQ Now Internal |
| tCK — DLL Enabled 300 Mhz-800 Mhz | 667Mhz-1.6Ghz | Higher data rates | |
| tCK — DLL Disabled | 10MHz – 125MHz (optional) | Undefined to 125MHz | DLL-off now fully supported |
| Read Latency | AL+CL | AL+CL | Expanded values |
| Write Latency | AL+CWL | AL+CWL | Expanded values |
| DQ Driver (ALT) | 40&Omega | 48&Omega | Optimal for PtP Applications |
| DQ Bus SSTL15 POD12 | Less I/O Noise and Power | ||
| RTT Values (in &Omega) | 120,60,40,30,20 | 240,120,80,60,48,40,34 | Support for higher data rates |
| RTT not allowed | READ Bursts | Disables during READ Bursts | Ease of use |
| Feature/Option DDR3 DDR4 DDR4 DDR4 Advantages | |||
| ODT Modes Nominal, Dynamic Nominal, Dynamic,Park Add'l Control Mode; OTF Value Change | |||
| ODT Control ODT Signaling Required ODT Signaling Not Required Ease of ODT Control; Allows Non-ODT Routing, PtP Apps | |||
| Multi-Purpose Register Four Registers – 1 Defined, 3 RFU | Four Registers – 3 Defined, 1 RFU | Provides Additional Specialty Readout | |
| DIMM Types RDIMM, LRDIMM, UDIMM, SODIMM | RDIMM, LRDIMM, UDIMM, SODIMM | ||
| DIMM Pins 240 (R, LR, U); 204 (SODIMM) | 288 (R, LR, U); 260 (SODIMM) | ||
| RAS ECC CRC, Parity, Addressability, | GDM | More RAS features; improved data integrity | |
DDR4 Details
There are subtle differences between DDR3 and DDR4 memory modules, as listed below.
Key notch difference
The key notch on a DDR4 module is in a different location from the key notch on a DDR3 module. Both notches are on the insertion edge, but the notch location on the DDR4 is slightly different, to prevent the module from being installed into an incompatible board or platform.

natural_image
Two views of a DDR3 and DDR4 integrated circuit chips (no text or symbols on the chips themselves)Figure 1. Notch difference
Increased thickness
DDR4 modules are slightly thicker than DDR3, to accommodate more signal layers.
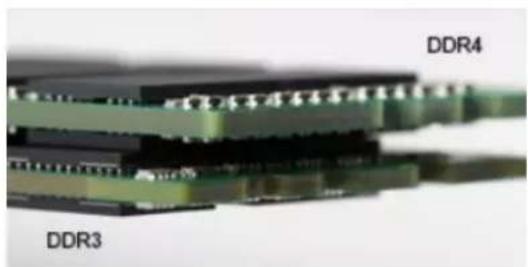
natural_image
Close-up of a multi-layer electronic component with labeled DDR3 and DDR4 (no additional text or symbols visible)Figure 2. Thickness difference
Curved edge
DDR4 modules feature a curved edge to help with insertion and alleviate stress on the PCB during memory installation.
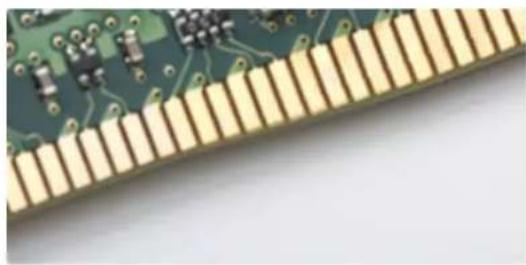
natural_image
Close-up of a green printed circuit board with gold traces, showing solder pads and components (no text or symbols visible)Figure 3. Curved edge
USB features
Universal Serial Bus, or USB, was introduced in 1996. It dramatically simplified the connection between host computers and peripheral devices like mice, keyboards, external drivers, and printers.
Let's take a quick look on the USB evolution referencing to the table below.
Table 2. USB evolution
| Type Data Transfer Rate | Category Introduction Year | ||
| USB 2.0 480 Mbps High | Speed 2000 | ||
| USB 3.0/USB 3.1 Gen 1 | 5 Gbps Super Speed 2010 | ||
| USB 3.1 Gen 2 10 Gbps | Super Speed 2013 |
USB 3.0/USB 3.1 Gen 1 (SuperSpeed USB)
For years, the USB 2.0 has been firmly entrenched as the de facto interface standard in the PC world with about 6 billion devices sold, and yet the need for more speed grows by ever faster computing hardware and ever greater bandwidth demands. The USB 3.0/USB 3.1 Gen 1 finally has the answer to the consumers' demands with a theoretically 10 times faster than its predecessor. In a nutshell, USB 3.1 Gen 1 features are as follows:
●Higher transfer rates (up to 5 Gbps)
●New power management features
●Full-duplex data transfers and support for new transfer types
●Backward USB 2.0 compatibility
●New connectors and cable
- Increased maximum bus power and increased device current draw to better accommodate power-hungry devices
The topics below cover some of the most commonly asked questions regarding USB 3.0/USB 3.1 Gen 1.

Speed
Currently, there are 3 speed modes defined by the latest USB 3.0/USB 3.1 Gen 1 specification. They are Super-Speed, Hi-Speed and Full-Speed. The new SuperSpeed mode has a transfer rate of 4.8Gbps. While the specification retains Hi-Speed, and Full-Speed USB mode, commonly known as USB 2.0 and 1.1 respectively, the slower modes still operate at 480Mbps and 12Mbps respectively and are kept to maintain backward compatibility.
USB 3.0/USB 3.1 Gen 1 achieves the much higher performance by the technical changes below:
- An additional physical bus that is added in parallel with the existing USB 2.0 bus (refer to the picture below).
- USB 2.0 previously had four wires (power, ground, and a pair for differential data); USB 3.0/USB 3.1 Gen 1 adds four more for two pairs of differential signals (receive and transmit) for a combined total of eight connections in the connectors and cabling.
- USB 3.0/USB 3.1 Gen 1 utilizes the bidirectional data interface, rather than USB 2.0's half-duplex arrangement. This gives a 10-fold increase in theoretical bandwidth.
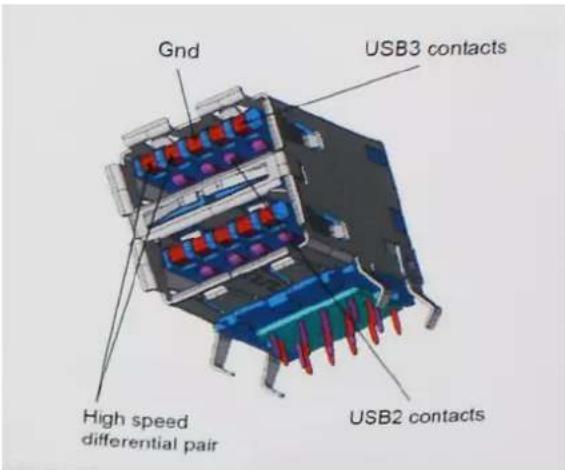
text_image
Gnd USB3 contacts High speed differential pair USB2 contactsWith today's ever increasing demands placed on data transfers with high-definition video content, terabyte storage devices, high megapixel count digital cameras etc., USB 2.0 may not be fast enough. Furthermore, no USB 2.0 connection could ever come close to the 480Mbps theoretical maximum throughput, making data transfer at around 320Mbps (40MB/s) — the actual real-world maximum. Similarly, USB 3.0/USB 3.1 Gen 1 connections will never achieve 4.8Gbps. We will likely see a real-world maximum rate of 400MB/s with overheads. At this speed, USB 3.0/USB 3.1 Gen 1 is a 10x improvement over USB 2.0.
Applications
USB 3.0/USB 3.1 Gen 1 opens up the laneways and provides more headroom for devices to deliver a better overall experience. Where USB video was barely tolerable previously (both from a maximum resolution, latency, and video compression perspective), it's easy to imagine that with 5-10 times the bandwidth available, USB video solutions should work that much better. Single-link DVI requires almost 2Gbps throughput. Where 480Mbps was limiting, 5Gbps is more than promising. With its promised 4.8Gbps speed, the standard will find its way into some products that previously weren't USB territory, like external RAID storage systems.
Listed below are some of the available SuperSpeed USB 3.0/USB 3.1 Gen 1 products:
●External Desktop USB 3.0/USB 3.1 Gen 1 Hard Drives
- Portable USB 3.0/USB 3.1 Gen 1 Hard Drives
- USB 3.0/USB 3.1 Gen 1 Drive Docks & Adapters
- USB 3.0/USB 3.1 Gen 1 Flash Drives & Readers
- USB 3.0/USB 3.1 Gen 1 Solid-state Drives
- USB 3.0/USB 3.1 Gen 1 RAIDs
• Optical Media Drives
- Multimedia Devices
●Networking
- USB 3.0/USB 3.1 Gen 1 Adapter Cards & Hubs
Compatibility
The good news is that USB 3.0/USB 3.1 Gen 1 has been carefully planned from the start to peacefully co-exist with USB 2.0. First of all, while USB 3.0/USB 3.1 Gen 1 specifies new physical connections and thus new cables to take advantage of the higher speed capability of the new protocol, the connector itself remains the same rectangular shape with the four USB 2.0 contacts in the exact same location as before. Five new connections to carry receive and transmitted data independently are present on USB 3.0/USB 3.1 Gen 1 cables and only come into contact when connected to a proper SuperSpeed USB connection.
Windows 8/10 will be bringing native support for USB 3.1 Gen 1 controllers. This is in contrast to previous versions of Windows, which continue to require separate drivers for USB 3.0/USB 3.1 Gen 1 controllers.
Microsoft announced that Windows 7 would have USB 3.1 Gen 1 support, perhaps not on its immediate release, but in a subsequent Service Pack or update. It is not out of the question to think that following a successful release of USB 3.0/USB 3.1 Gen 1 support in Windows 7, SuperSpeed support would trickle down to Vista. Microsoft has confirmed this by stating that most of their partners share the opinion that Vista should also support USB 3.0/USB 3.1 Gen 1.
HDMI
This topic explains the HDMI 1.4/2.0 and its features along with the advantages.
HDMI (High-Definition Multimedia Interface) is an industry-supported, uncompressed, all-digital audio/video interface. HDMI provides an interface between any compatible digital audio/video source, such as a DVD player, or A/V receiver and a compatible digital audio and/or video monitor, such as a digital TV (DTV). The intended applications for HDMI TVs, and DVD players. The primary advantage is cable reduction and content protection provisions. HDMI supports standard, enhanced, or high-definition video, plus multichannel digital audio on a single cable.

NOTE: The HDMI 1.4 will provide 5.1 channel audio support.
HDMI 1.4 - HDMI 2.0 Features
- HDMI Ethernet Channel - Adds high-speed networking to an HDMI link, allowing users to take full advantage of their IP-enabled devices without a separate Ethernet cable
- Audio Return Channel - Allows an HDMI-connected TV with a built-in tuner to send audio data "upstream" to a surround audio system, eliminating the need for a separate audio cable
- 3D - Defines input/output protocols for major 3D video formats, paving the way for true 3D gaming and 3D home theater applications
- Content Type - Real-time signaling of content types between display and source devices, enabling a TV to optimize picture settings based on content type
• Additional Color Spaces - Adds support for additional color models used in digital photography and computer graphics - 4K Support - Enables video resolutions far beyond 1080p, supporting next-generation displays that will rival the Digital Cinema systems used in many commercial movie theaters
- HDMI Micro Connector - A new, smaller connector for phones and other portable devices, supporting video resolutions up to 1080p
- Automotive Connection System - New cables and connectors for automotive video systems, designed to meet the unique demands of the motoring environment while delivering true HD quality
Advantages of HDMI
● Quality HDMI transfers uncompressed digital audio and video for the highest, crispest image quality.
- Low -cost HDMI provides the quality and functionality of a digital interface while also supporting uncompressed video formats in a simple, cost-effective manner
- Audio HDMI supports multiple audio formats from standard stereo to multichannel surround sound
- HDMI combines video and multichannel audio into a single cable, eliminating the cost, complexity, and confusion of multiple cables currently used in A/V systems
- HDMI supports communication between the video source (such as a DVD player) and the DTV, enabling new functionality
Major components of your system
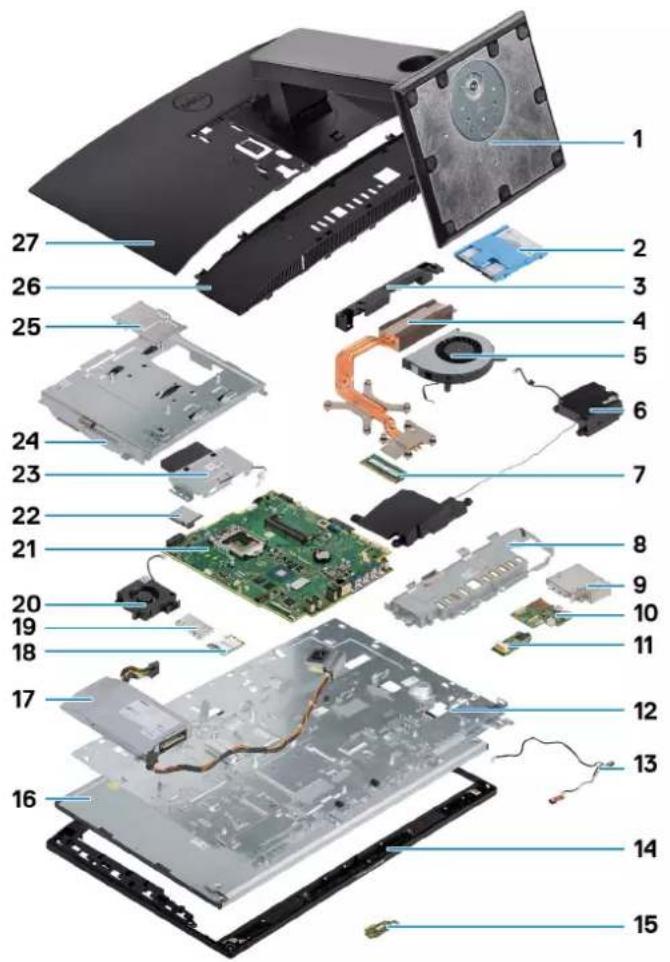
text_image
Exploded view diagram of a computer motherboard with numbered parts for identificationMajor components of your system
- Stand
- Hard drive
- Camera assembly cover
- Heat sink
- System fan
- Speakers
- Memory module
- Input and Output bracket
- Input and Output board shield
- Input and Output board
- Headset port
- Middle frame
- Microphone
- Display assembly
- Power button board
- Display panel
-
Power supply unit - PSU
-
WLAN card
- WLAN card shield
- Power supply unit fan - PSU fan
- System board
- Processor
- Pop-Up Camera
- System board shield
- DIMM door
- Base cover
- Back cover
NOTE: Dell provides a list of components and their part numbers for the original system configuration purchased. These parts are available according to warranty coverages purchased by the customer. Contact your Dell sales representative for purchase options.
Removing and Installing components
Topics:
•Recommended tools
- Screw size list
•System board layout
•Rubber feet
• Cable cover - optional
•Stand
- Back cover
- Hard drive
- Memory module
•System board shield
- Intel Optane
•Solid State Drive -SSD
•Solid State Drive -2230
•WLAN card
•System fan
- Heat sink
- Pop-Up Camera
- Coin cell battery
- Processor
- Base cover
•Power supply unit - PSU
- Input and Output bracket
•System board
- Speakers
•Power button board
- Microphones
• Input and Output board
- Headset port
- Antennas
• Display panel
• Display cable
- Middle frame
The procedures in this document require the following tools:
- Phillips #0 screwdriver
- Phillips #1 screwdriver
- Plastic scribe

NOTE: The #0 screw driver is for screws 0-1 and the #1 screw driver is for screws 2-4
Screw size list
Table 3. OptiPlex 7470 All-in-One
| Component Screw type Quantity Screw image | |||
| Cable cover M3x9 1 |  | ||
| System board shield M3x5 5 |  | ||
| Solid-state drive/Intel Optane card | M2x2.5 1 |  | |
| WLAN card shield M2x2.5 2 |  | ||
| WLAN card M2x2.5 1 |  | ||
| System fan M3x5 3 |  | ||
| Pop-up camera assembly M3x5 2 |  | ||
| Pop-up camera bezel M3x5 3 |  | ||
| Base cover M3x5 4 |  | ||
| PSU cable M3x5 1 |  | ||
| Power supply unit—PSU M3x5 1 |  | ||
| Power supply unit fan—PSU fan | M3x5 2 |  | |
| Input and Output bracket M3x5 3 |  | ||
| System board | M3x5 9 |  | |
| Speakers | M3x4+7.1 6 | 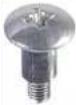 | |
| Power button board M3x5 1 |  | ||
| Component Screw type Quantity Screw image | |||
| Microphones (2 modules) M2x2.5 | 2 |  | |
| Input and Output board shield M3x5 2 |  | ||
| Input and Output board M3x5 2 |  | ||
| Headset port M3x5 1 |  | ||
| Antennas M2x2.5 2 |  | ||
| Display panel M3x5 11 |  | ||
| Middle frame M3x5 15 |  | ||
System board layout
OptiPlex 7470 All-in-One
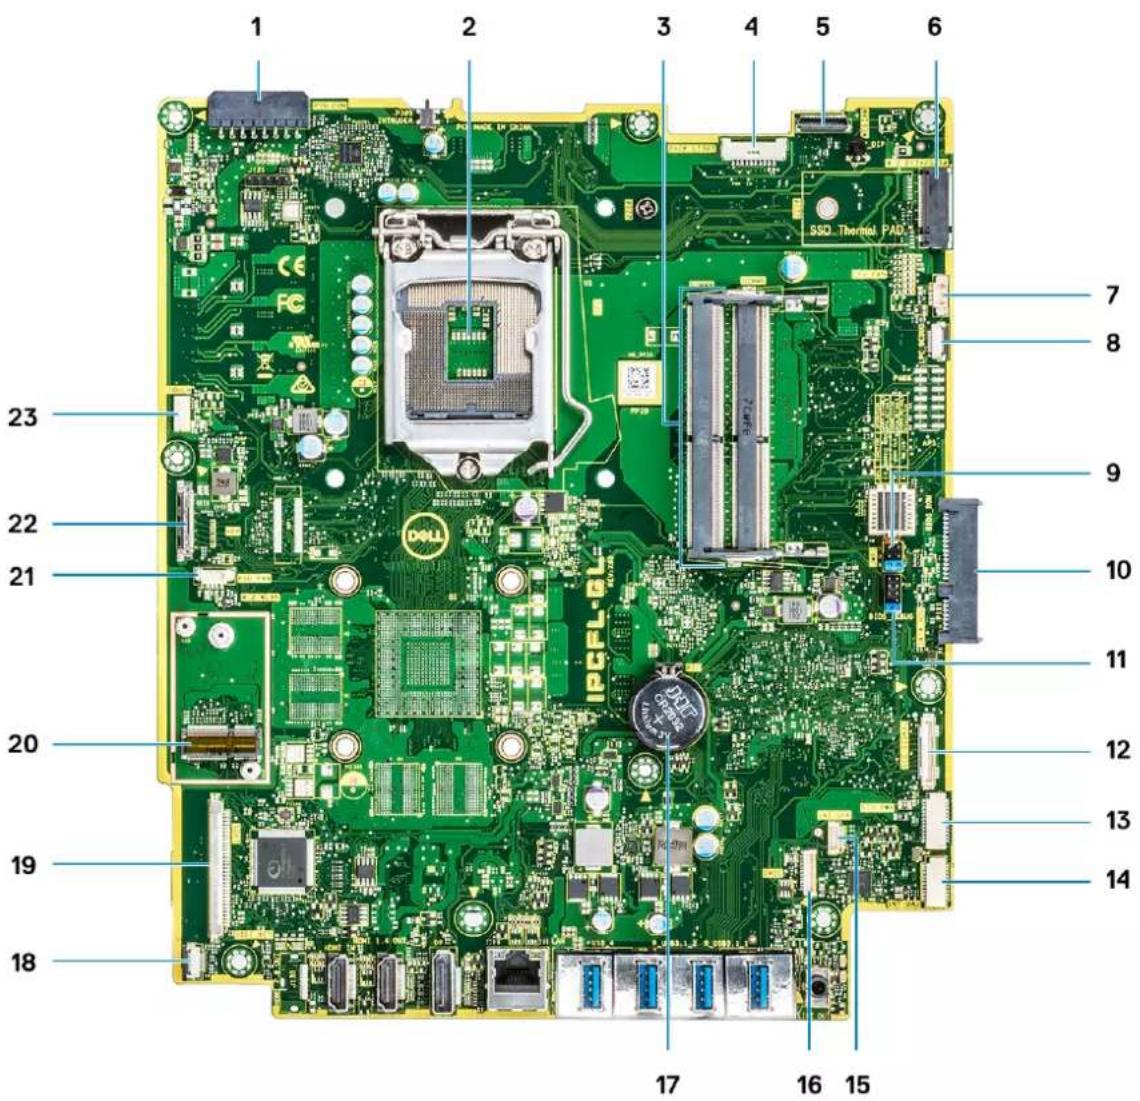
text_image
1 2 3 4 5 6 7 8 9 10 11 12 13 14 15 16 17 18 19 20 21 22 23 DCL-PLC SSO Thermal PAD- PSU power connector 2. Processor
- Memory slots 4. Back light connector
- Webcam connector 6. M.2 PCIe/SATA slot
- System fan connector 8. LPC_Debug
- Service mode jumper/Password clear jumper/CMOS clear jumper
- SPI header 12. SIO_signal connector
- SIO_power connector 14. UAJ connector
- INT_SPK connector 16. DMIC connector
- Coin cell battery 18. Power board button connector
- LVDS connector 20. M.2 WLAN slot
- PSU fan
-
Touch cable connector
-
SATA HDD connector
-
eDP cable connector
Rubber feet
Removing the rubber feet
- Follow the procedure in Before working inside your computer.
- Remove the Stand.
- Pry the rubber feet at the bottom edge from the display assembly base and pull it out.
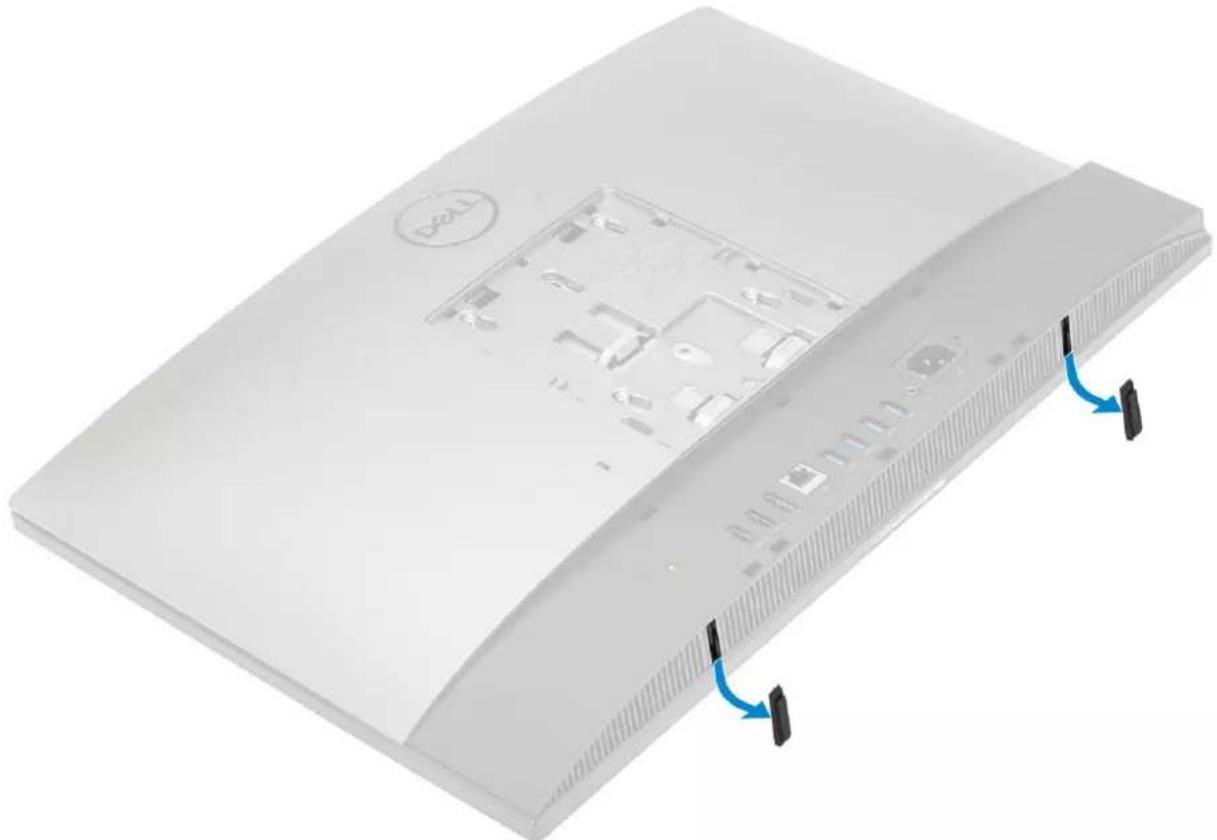
natural_image
3D rendering of a white electronic device casing with ventilation slots and a logo, showing internal components and blue directional arrows indicating rotation (no text or symbols)Installing the rubber feet
- Align the rubber feet with the slots on the display assembly base and push it firmly in place.
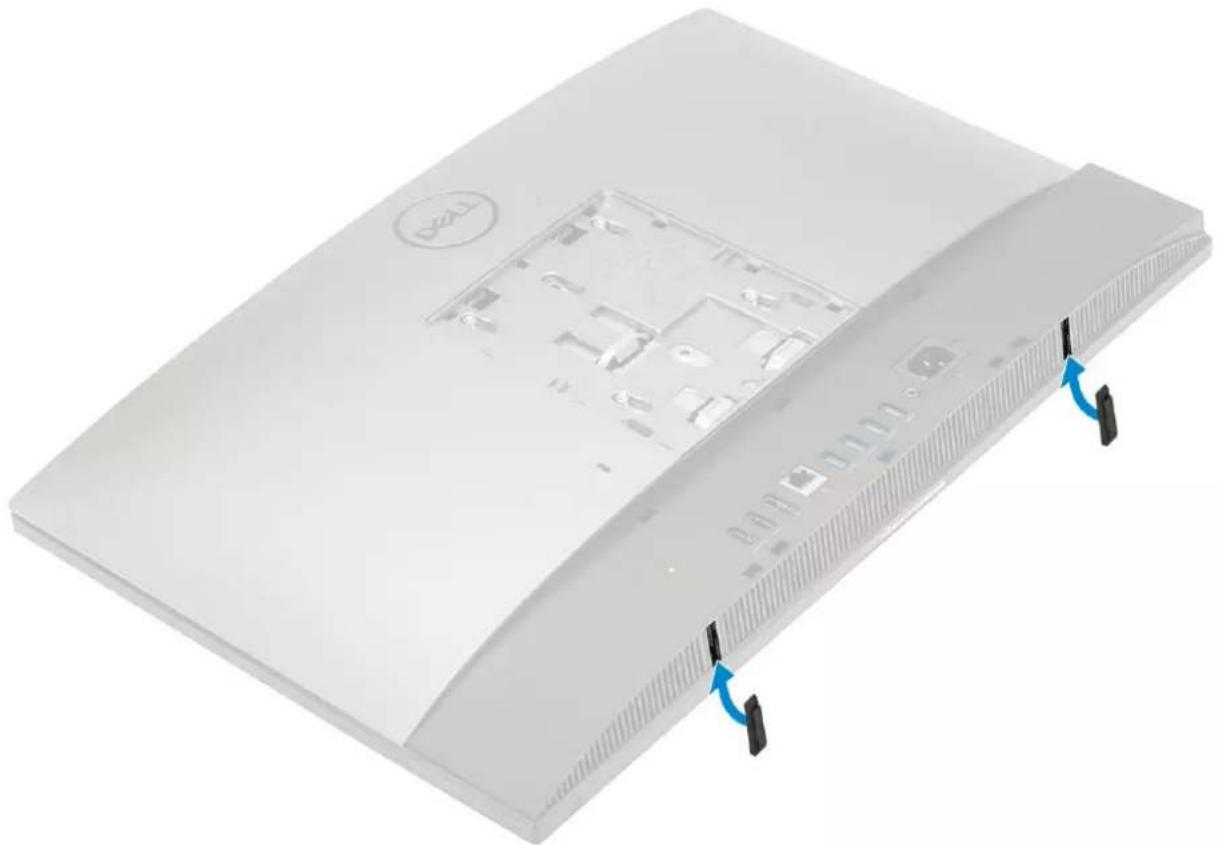
natural_image
3D rendering of a white electronic device casing with ventilation slots and a central internal component (no text or symbols visible)- Install the Stand.
- Follow the procedure in After working inside your computer
Cable cover - optional
Removing the cable cover
- Follow the procedure in Before working inside your computer.
- Remove the Stand.
- Remove the single (M3x9) screw that secures the cable cover to the base cover [1].
- Lift the cable cover off the base cover [2].
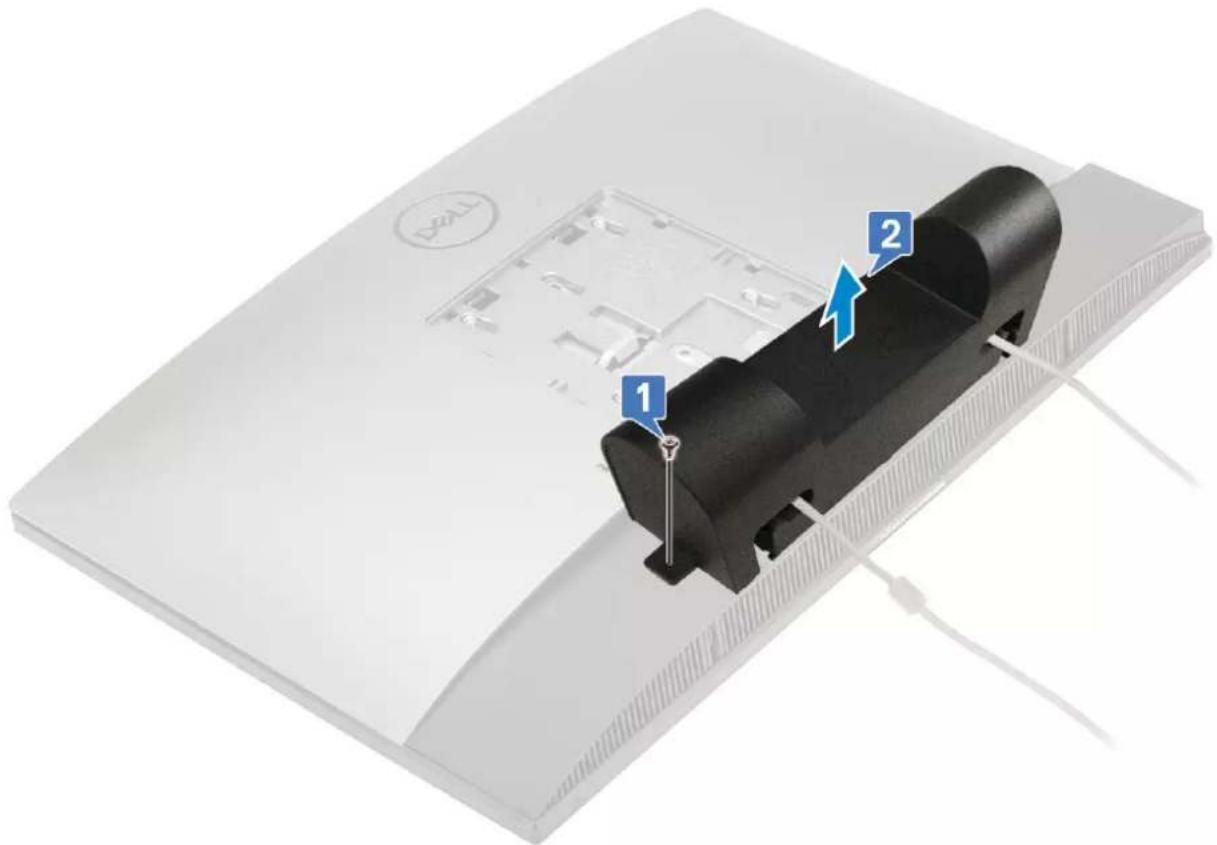
text_image
1 2Installing the cable cover
- Place the cable cover on the base cover [1].
- Replace the single (M3x9) screw the secures the cable cover to the base cover [2].
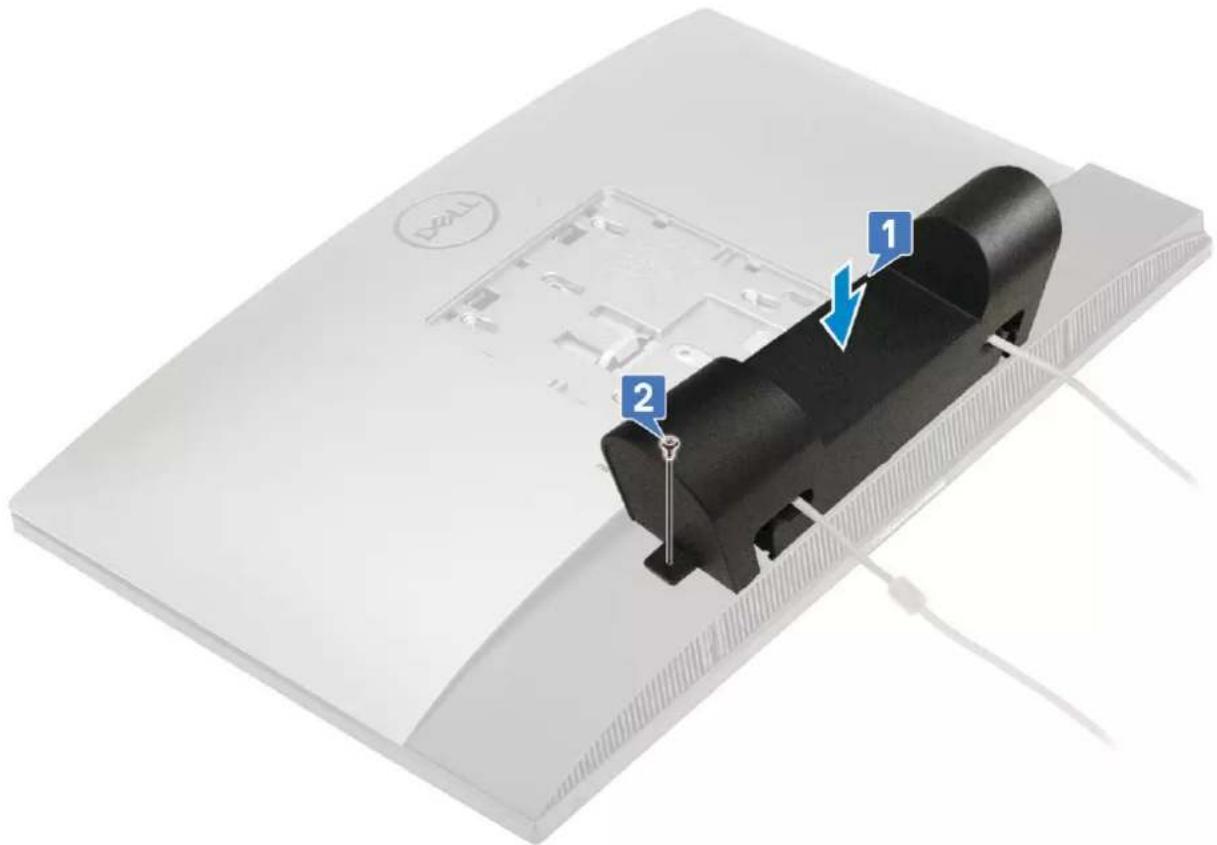
text_image
1 2- Install the Stand.
- Follow the procedure in After working inside your computer
Stand
Removing the stand
The following procedure applies only to systems that are shipped with a Basic All-in-One stand:
- Follow the procedure in Before working inside your computer.
- To avoid damaging the display, place the system on a flat, soft, and clean surface.
- To remove the stand:
a. Press and slide the release tab forward on the cover [1].
b. Hold the tab in the release position and lift the stand upward [2].
c. Slide downward to lift the stand off the back cover [3].
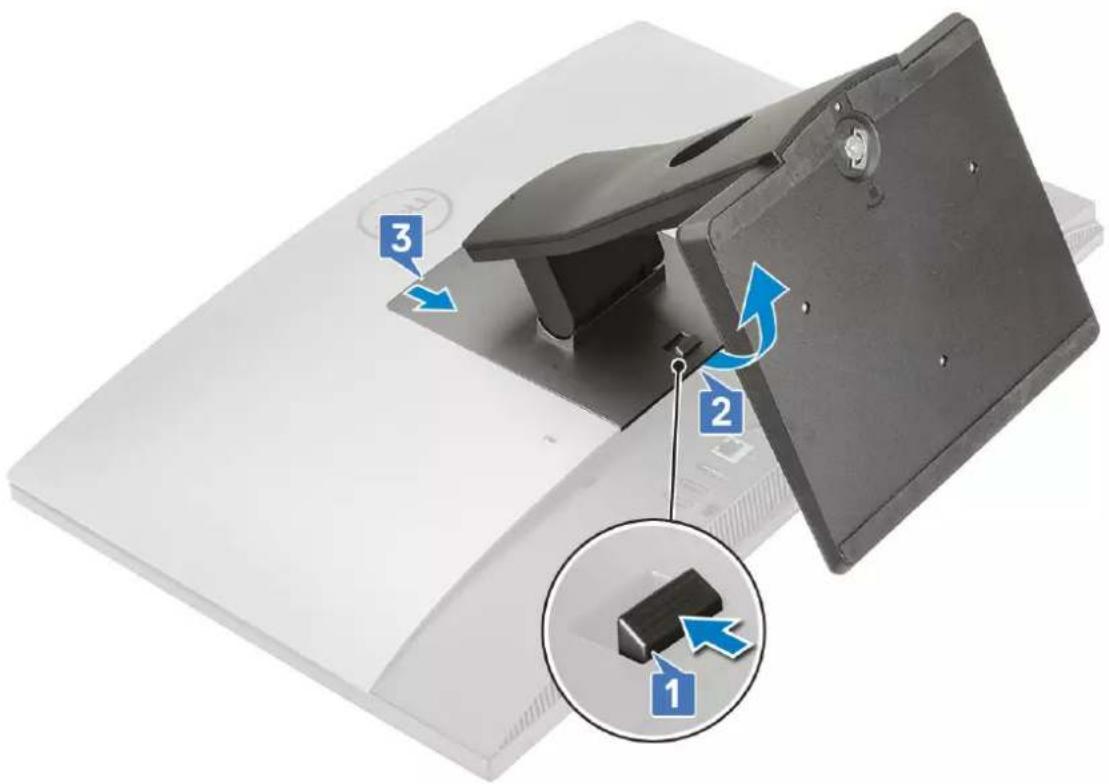
text_image
Diagram showing a device with labeled parts (1, 2, 3) and an inset view of a black component, likely illustrating a mechanical or electronic assembly.Installing the stand
The following procedure applies only to systems that are shipped with a Basic All-in-One stand:
- To install the stand :
a. Align the tabs on the stand [1].
b. Snap the stand into place on the back cover [2].
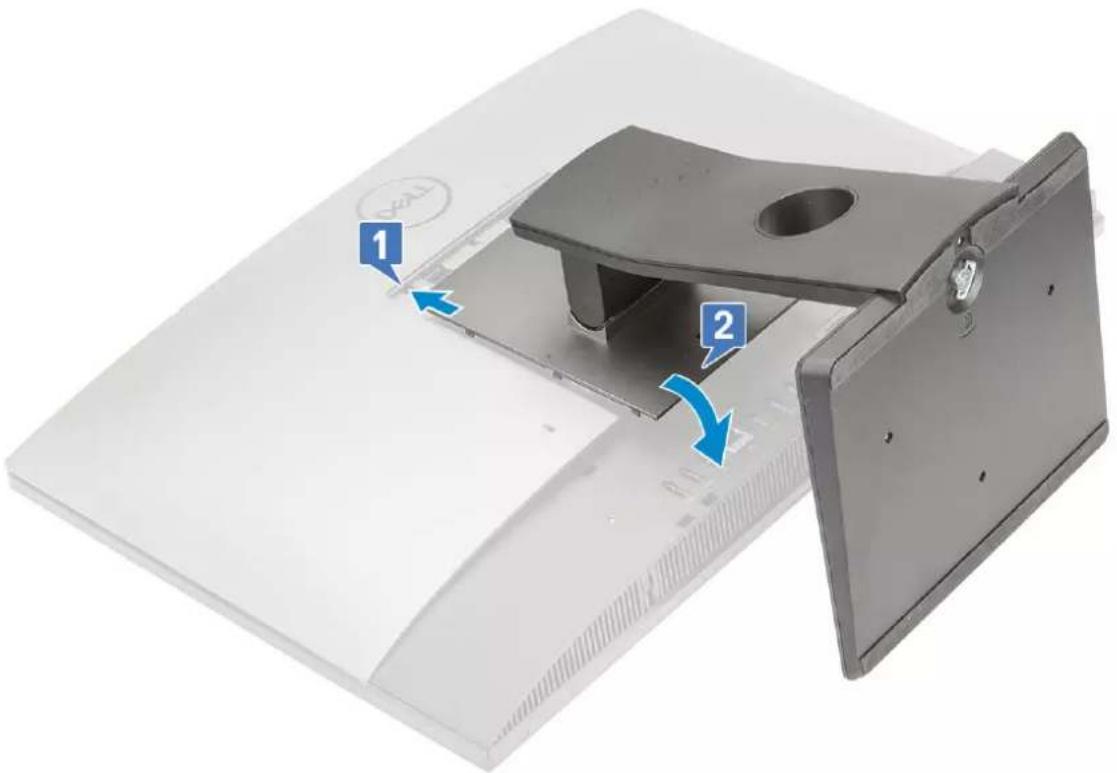
text_image
1 2- Follow the procedure in After working inside your computer
Back cover
Removing the back cover
- Follow the procedure in Before working inside your computer.
- Remove the Stand.
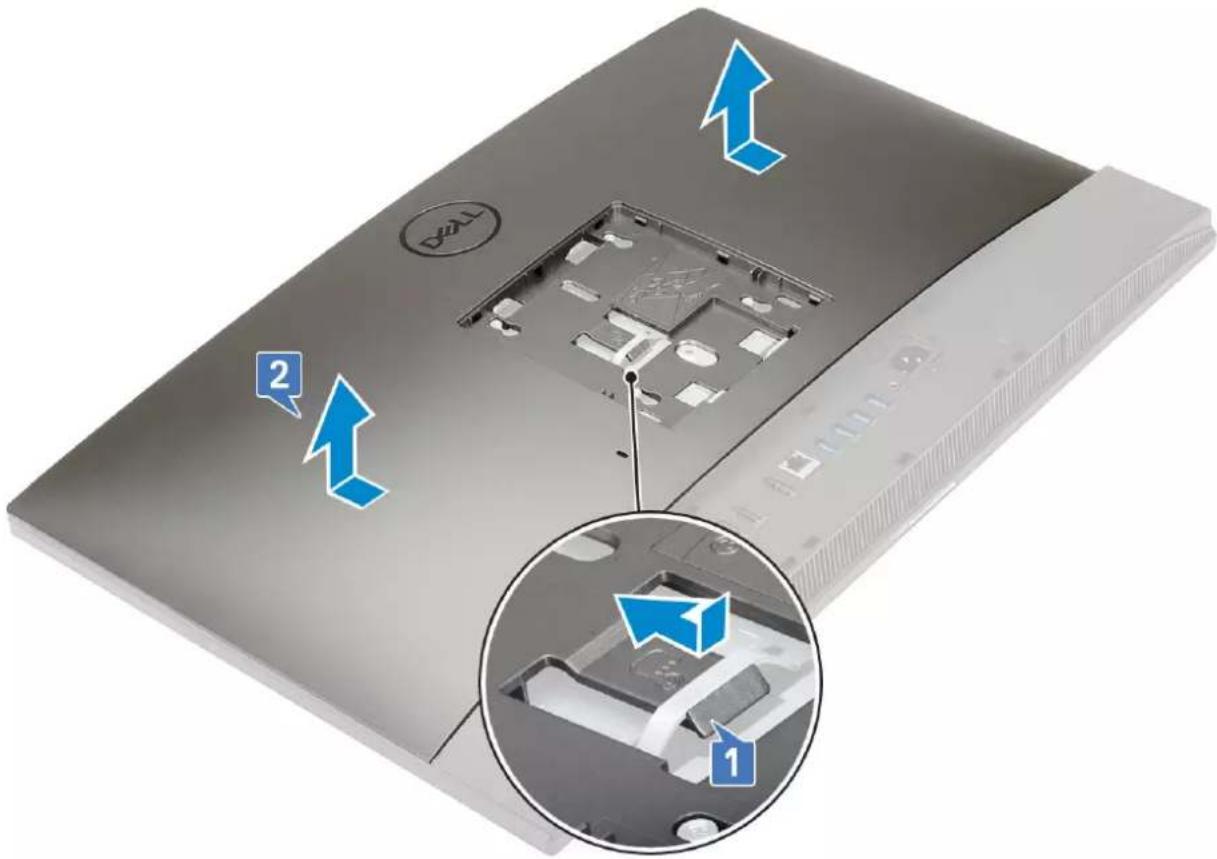
- Press and hold the tab on the back cover to release it from the latch on the system-board shield and slide the back cover in the direction shown to release it from the middle frame [1].
- Lift the back cover from the middle frame and the system-board shield [2].
text_image
D20L 2 1Installing the back cover
- Place the back cover on the system.
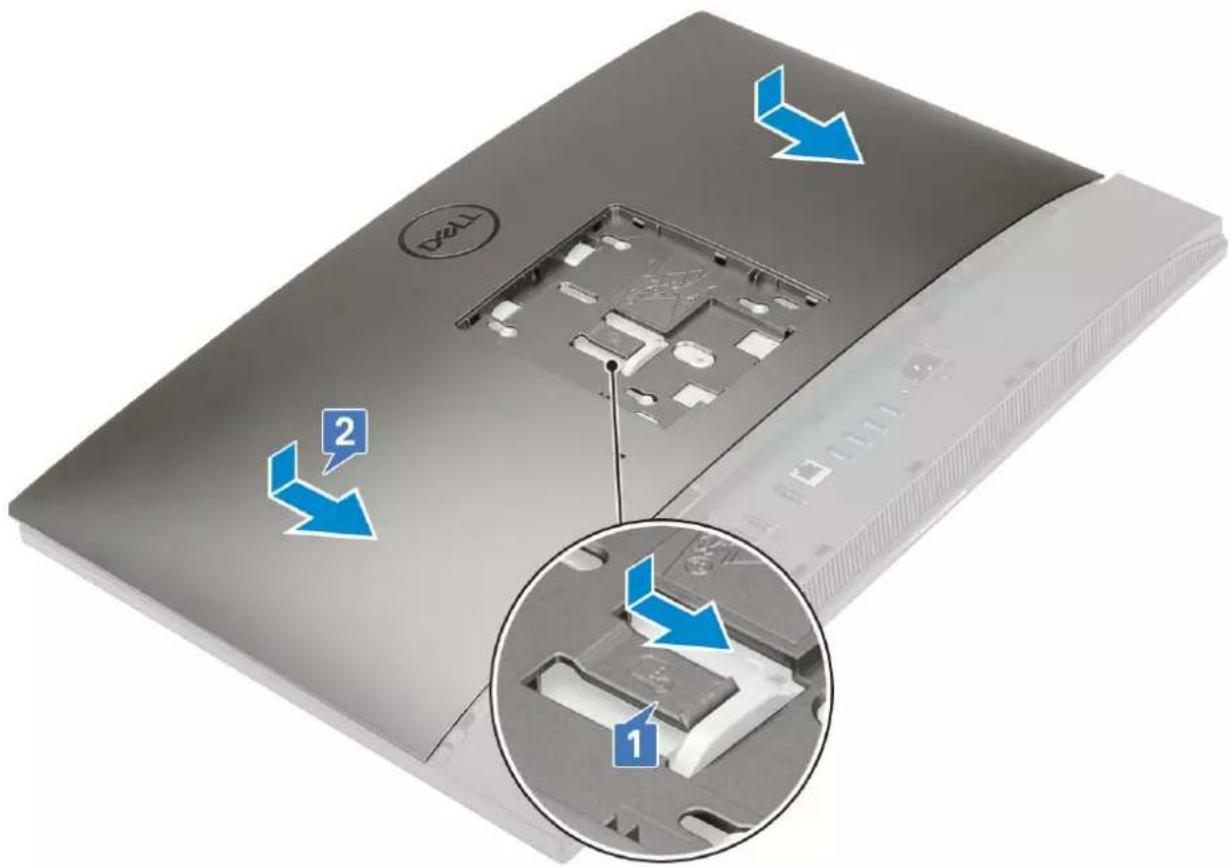
- Press and hold the tab [1], and align the notches on the back cover with the slots on the middle frame.
- Slide the back cover in the direction shown to lock the back cover tab under the latch on the system-board shield [2].
text_image
DZL1 2 1- Install the Stand.
- Follow the procedure in After working inside your computer.
Hard drive
Removing the hard drive assembly
- Follow the procedure in Before working inside your computer.
- Remove the following components:
a. Stand
b. Back cover
- To remove the hard drive assembly:
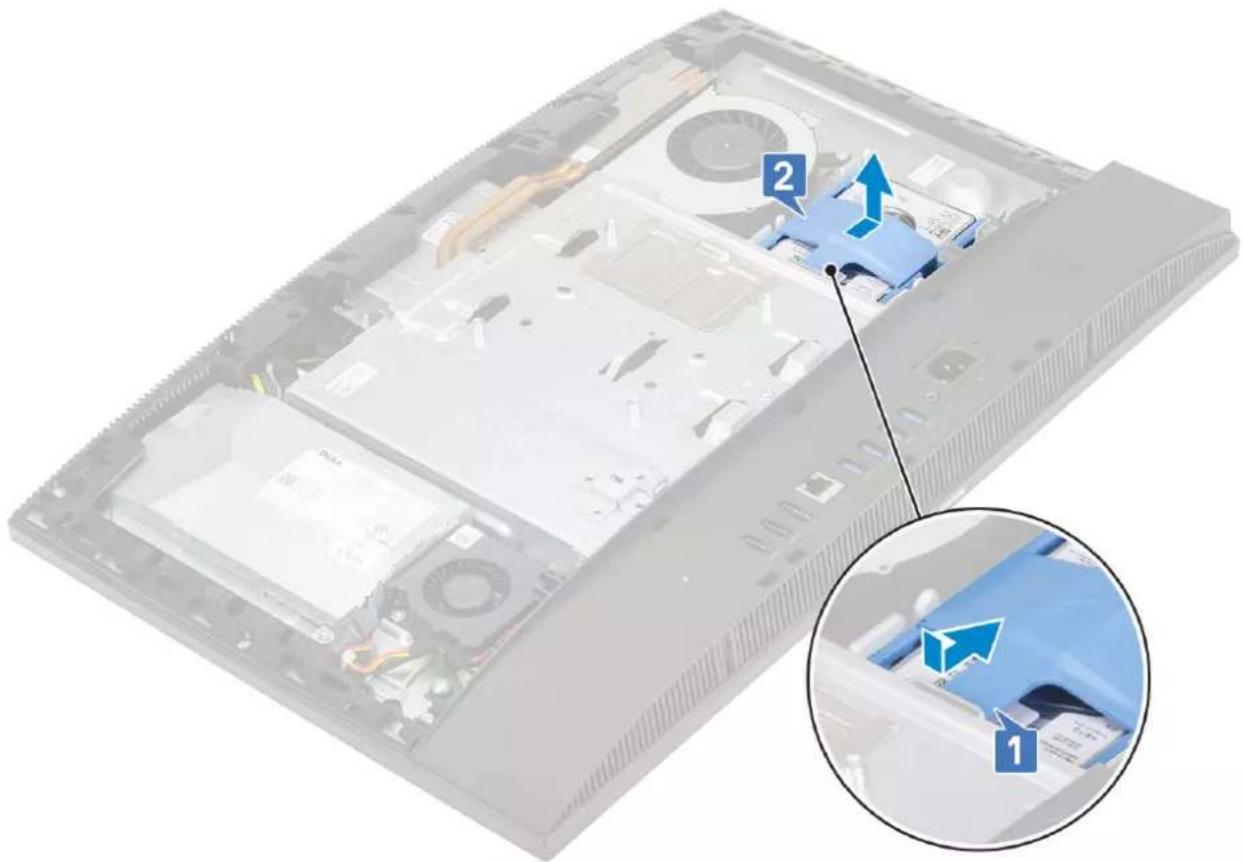
a. Press down the tab securing the hard drive assembly to the system board shield [1].
b. Slide and lift the hard drive assembly from the slot on the display assembly base [2].
natural_image
Interior view of a computer case showing internal components and a magnified inset highlighting a blue component (no text or symbols visible)- To remove the hard drive bracket:
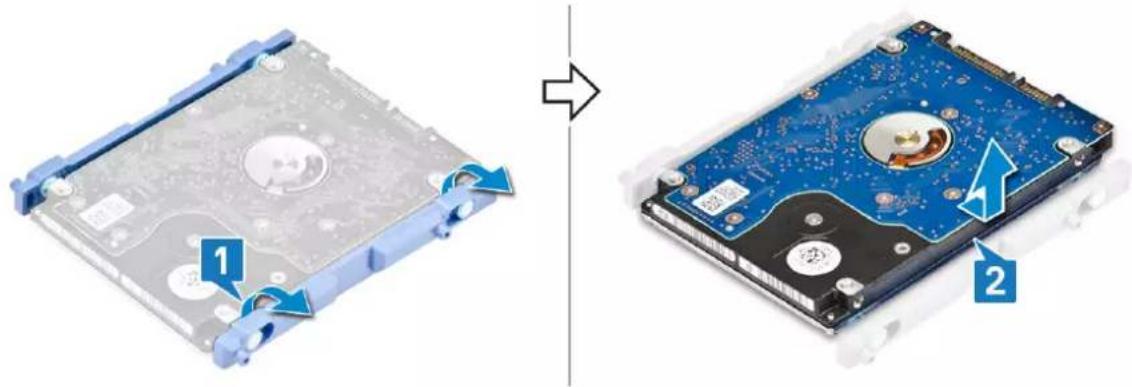
a. Pry the tabs on hard drive bracket from its slots on the hard drive [1].
b. Slide the hard drive, and lift it away from the bracket [2].
text_image
Diagram showing the installation of a hard disk drive into a blue internal circuit board, with numbered annotations indicating component locations.Installing the hard drive assembly
- To install the hard drive bracket:
a. Align the tabs on the hard drive bracket with the slots on the hard drive [1].
b. Flex the hard drive bracket, and replace the remaining tabs on the hard drive bracket with the slots on the hard drive [2]
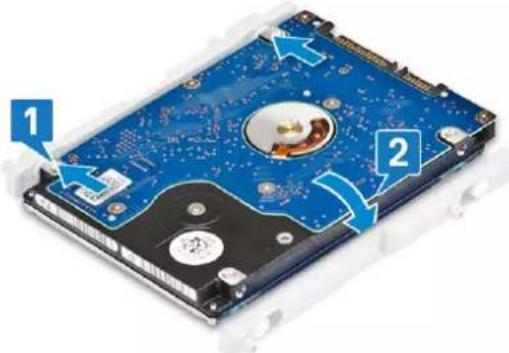
text_image
Labeled diagram of a hard disk drive showing internal components and parts with numbered annotations- To install the hard drive assembly:
a. Place the hard drive assembly into the slot [1].
b. Slide it to lock the blue tab on the hard drive assembly to the metal tab on the display assembly base [2].
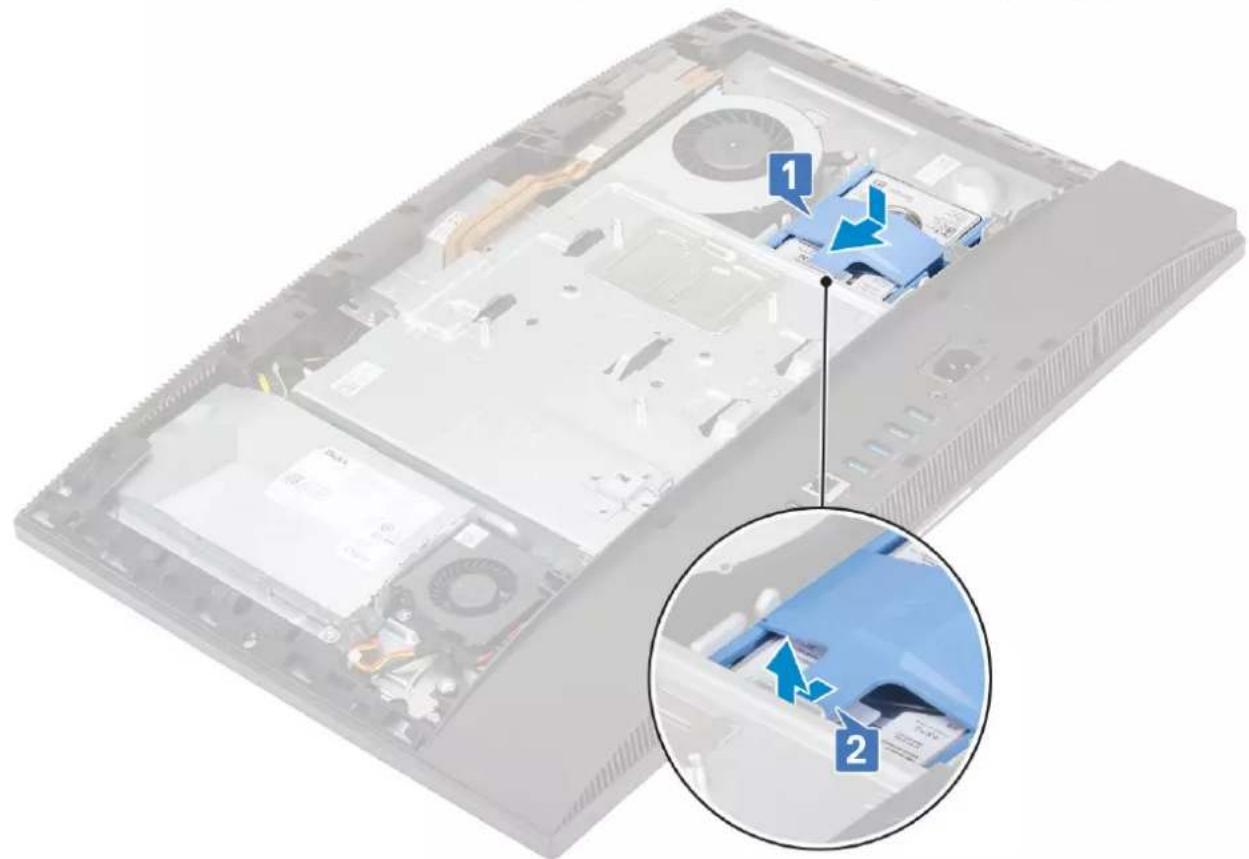
natural_image
Interior view of a computer case showing internal components and a magnified inset highlighting a blue component (no text or symbols visible)- Install the following components:
a. Back cover
b. Stand
- Follow the procedure in After working inside your computer.
Memory module
Removing the memory module
- Follow the procedure in Before working inside your computer.
- Remove the following components:
a. Stand
b. Back cover
- To locate the memory module on the system board, pry open the DIMM door on the system board shield [1].
- Pry the retention clips at each end of the memory module slot until the memory module pops up [2].
- Lift the memory module from the memory module slot [3].

NOTE: Depending on the configuration ordered, your system may have up to two memory modules installed on the system board.
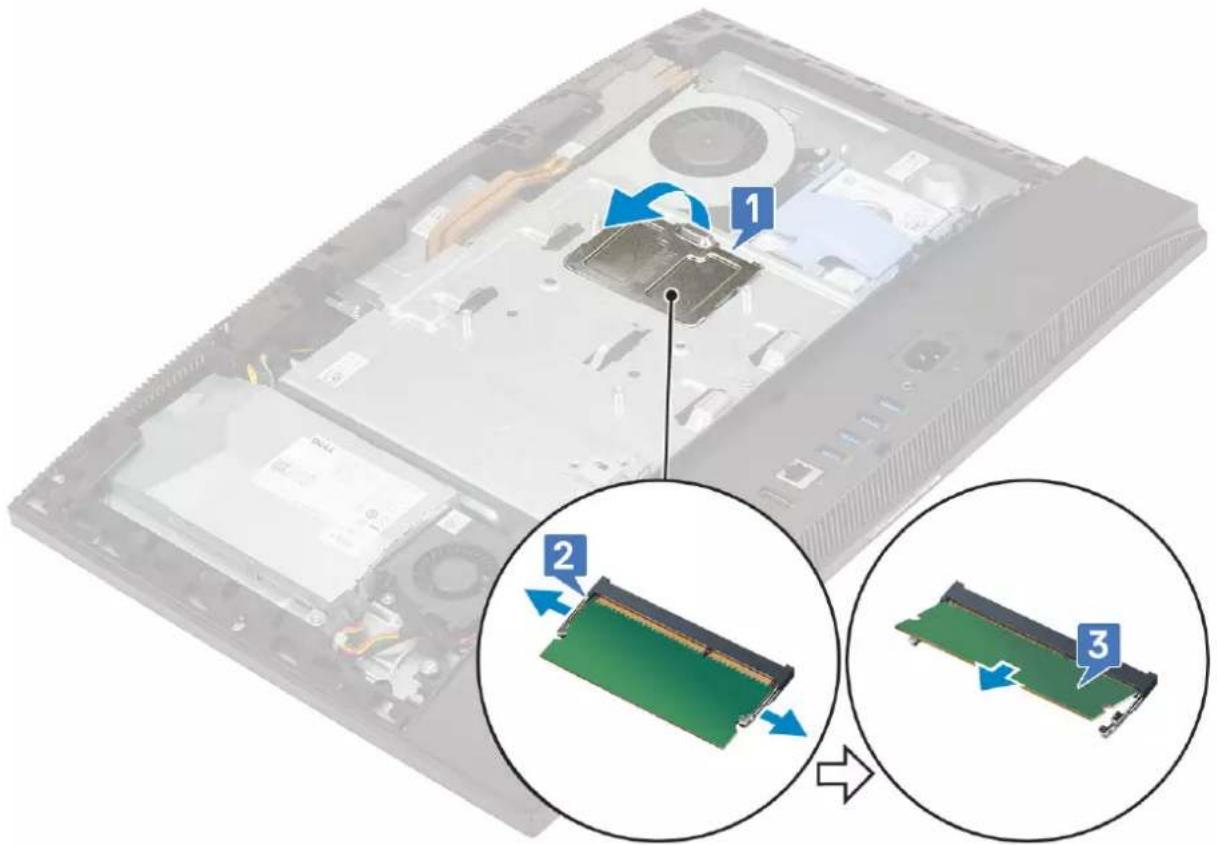
text_image
Diagram showing three views of a computer motherboard with labeled components and arrows indicating assembly or disassembly steps.Installing the memory module
- Align the notch on the memory module with the tab on the memory module slot, and slide it firmly into the slot at an angle [1].
- Press the memory module down until it clicks into place [2].
- Align the tabs on the DIMM door with the slots on the system board shield and snap it into place [3].

text_image
Diagram showing a computer motherboard with labeled components and close-up insets highlighting two hardware chips.- Install the following components:
a. Back cover
b. Stand
- Follow the procedure in After working inside your computer.
System board shield
Removing the system board shield
- Follow the procedure in Before working inside your computer.
- Remove the following components:
a. Stand
b. Back cover
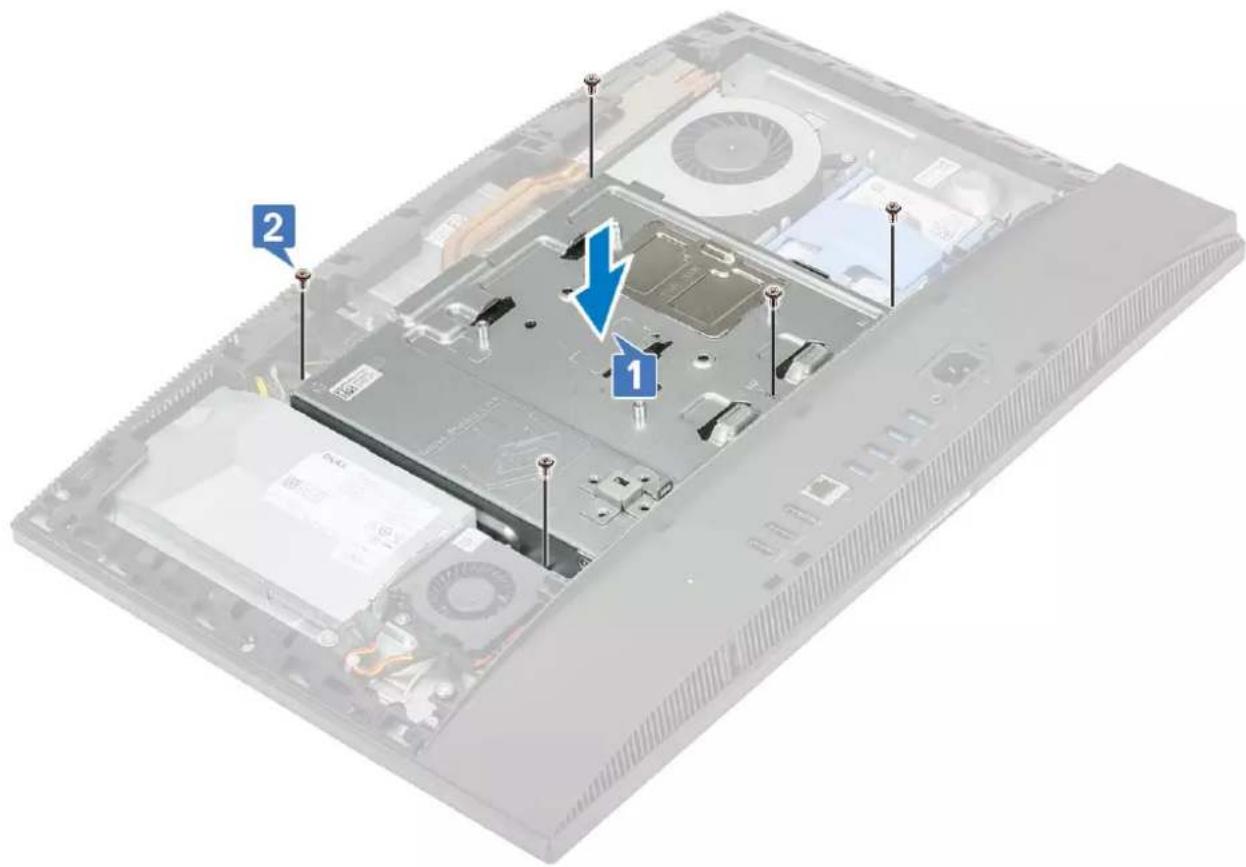
- Remove the five (M3x5) screws that secure the system board shield to the display assembly base [1].
- Lift the system board shield off the display assembly base [2].
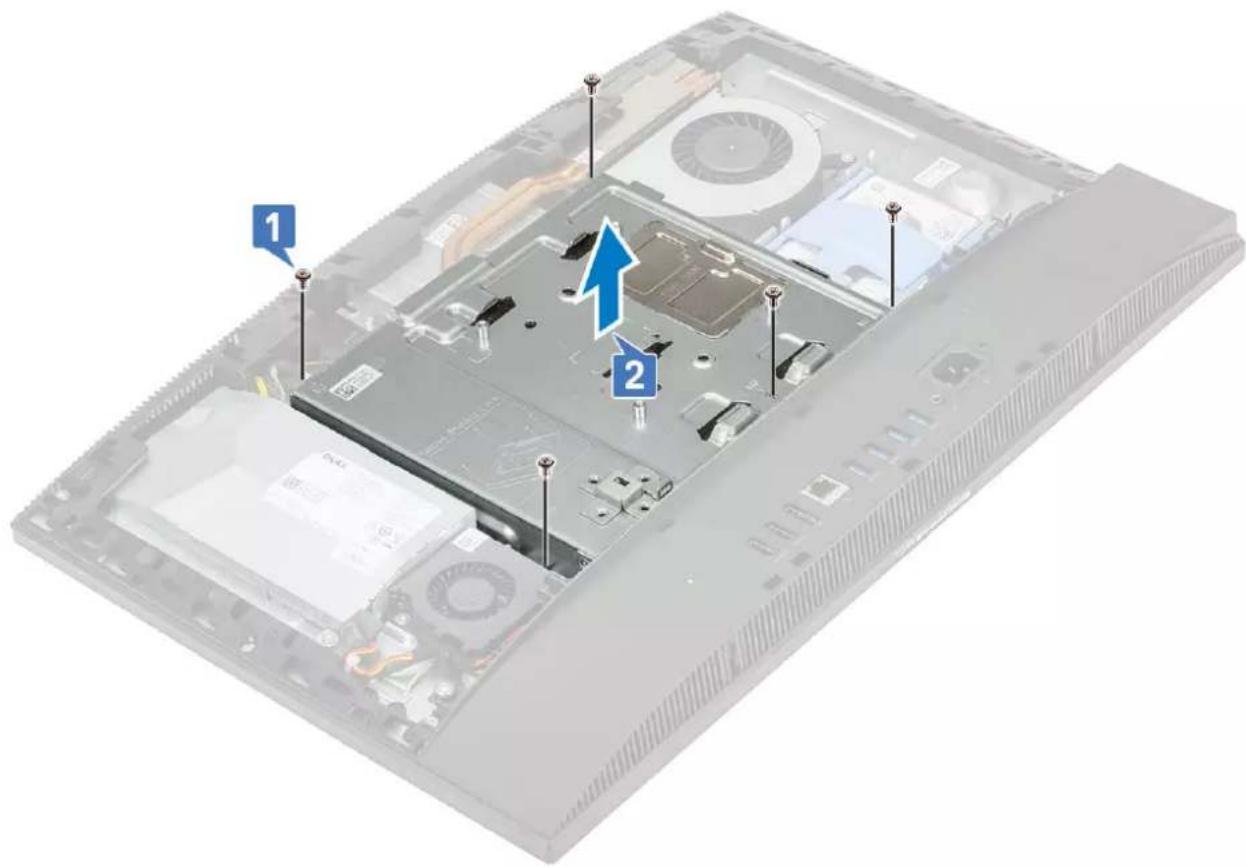
text_image
Diagram of an open computer case with labeled components and a blue arrow indicating a specific area.Installing the system board shield
- Place the system board shield on system board.
- Align the slots on the system board shield with the slots on the display assembly base [1].
- Replace the five screws (M3x5) that secure the system-board shield to the display assembly base [2].
text_image
Internal view of a computer drive bay with labeled components and blue arrows indicating features- Install the following components:
a. Back cover
b. Stand
- Follow the procedure in After working inside your computer.
Intel Optane
Removing the Intel Optane card
- Follow the procedure in Before working inside your computer.
- Remove the following components:
a. Stand
b. Back cover
c. System board shield
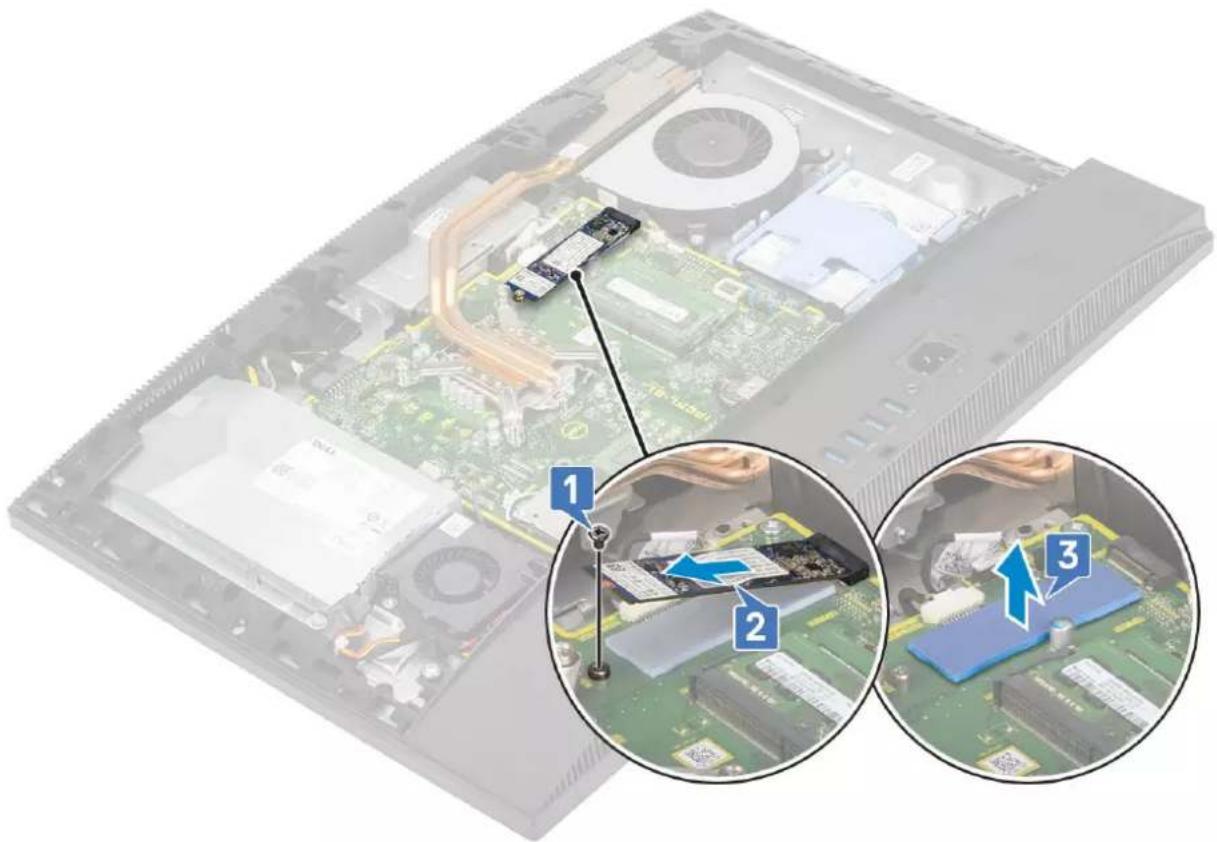
- Remove the screw (M2x2.5) that secures the Intel Optane card to the system board [1].
- Slide and remove the Intel Optane card from the card slot on the system board [2].
- Remove the thermal pad [3].
text_image
Laptop CPU interior with labeled components and zoomed-in views showing internal circuit board and memory driveInstalling the Intel Optane card
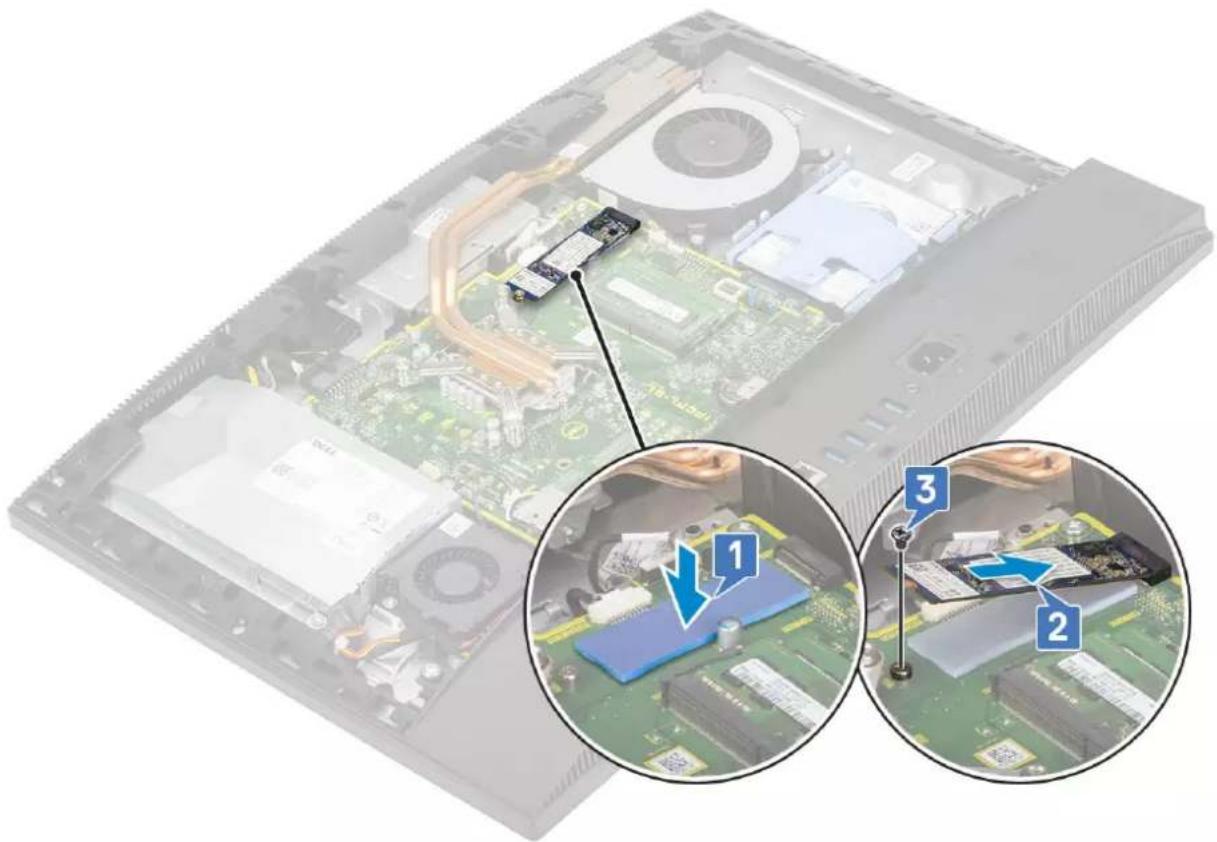
- Replace the thermal pad on the rectangular outline marked on the system board [1].
- Insert the Intel Optane card into the card slot on the system board [2].
- Replace the screw (M2x2.5) that secures the Intel Optane card to the system board [3].

NOTE: Intel Optane modules must be installed with a thermal pad.
natural_image
Interior view of a computer with visible circuit board and hardware components, showing three zoomed-in views (1, 2, 3) of the internal structure.- Install the following components:
a. System board shield
b. Back cover
c. Stand
- Follow the procedure in After working inside your computer.
Solid State Drive -SSD
Removing the SSD card
- Follow the procedure in Before working inside your computer.
- Remove the following components:
a. Stand
b. Back cover
c. System board shield
- Remove the screw (M2x2.5) that secures the SSD card to the system board [1].
- Slide and remove the SSD card from the card slot on the system board [2].
- Remove the thermal pad [3].

NOTE: M.2 PCIe SSD with capacity over 512G (512G/1TB/2TB) must be installed with a thermal pad. M.2 SATA SSD and M.2 PCIe SSD with 128G and 256G do not require a thermal pad.
text_image
Diagram showing a computer motherboard with labeled components and directional arrows indicating assembly or repair steps.Installing the SSD card
- Replace the thermal pad on the rectangular outline marked on the system board [1].
NOTE: M.2 PCIe SSD with capacity over 512G (512G/1TB/2TB) must be installed with a thermal pad. M.2 SATA SSD and M.2 PCIe SSD with 128G and 256G do not require a thermal pad.
- Insert the SSD card into the card slot on the system board [2].
- Replace the screw (M2x2.5) that secures the SSD card to the system board [3].
text_image
Diagram of an open computer case with labeled components and annotations in Chinese, showing internal circuitry and component disassembly.- Install the following components:
a. System board shield
b. Back cover
c. Stand
- Follow the procedure in After working inside your computer.
Solid State Drive -2230
Removing the 2230 SSD card
- Follow the procedure in Before working inside your computer.
- Remove the following components:
a. Stand
b. Back cover
c. System board shield
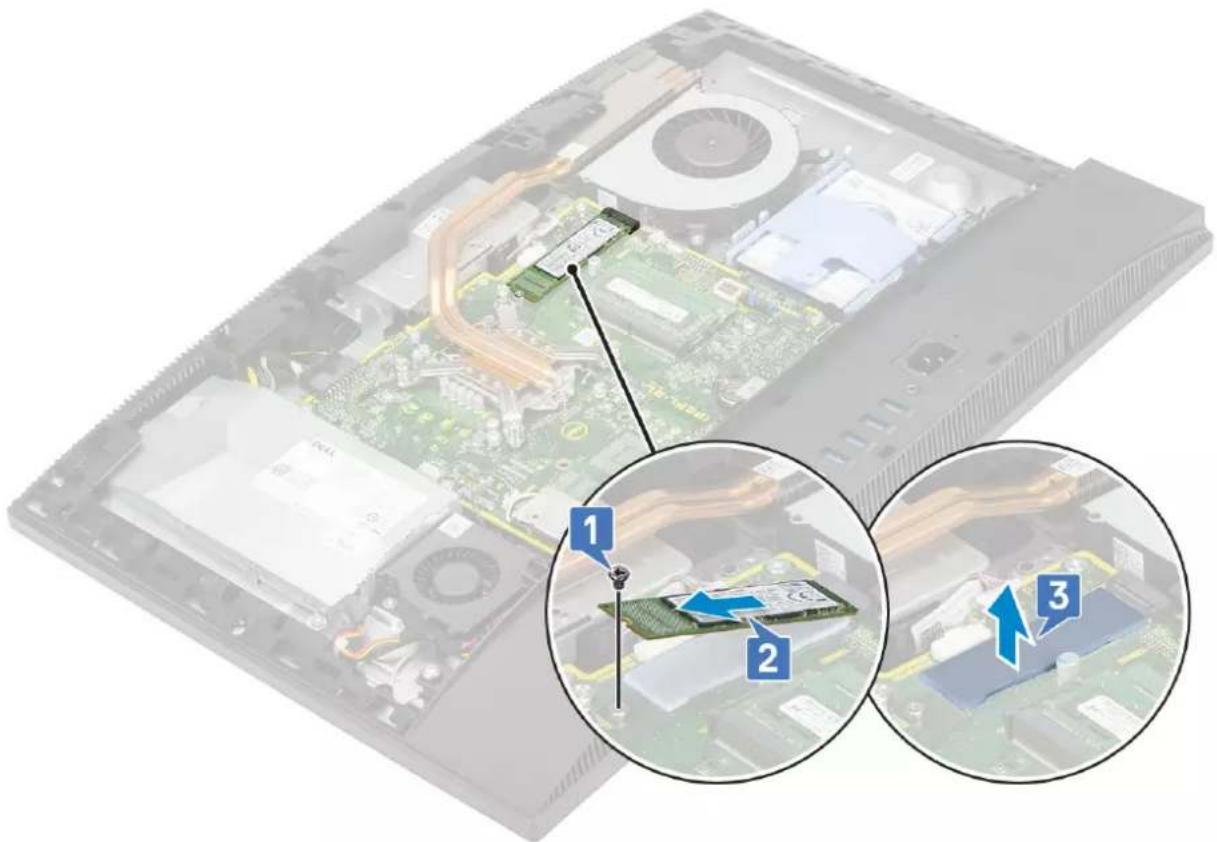
- Remove the screw (M2x2.5) that secures the SSD card to the system board [1].
- Slide and remove the SSD card from the card slot on the system board [2].
- Remove the thermal pad [3].
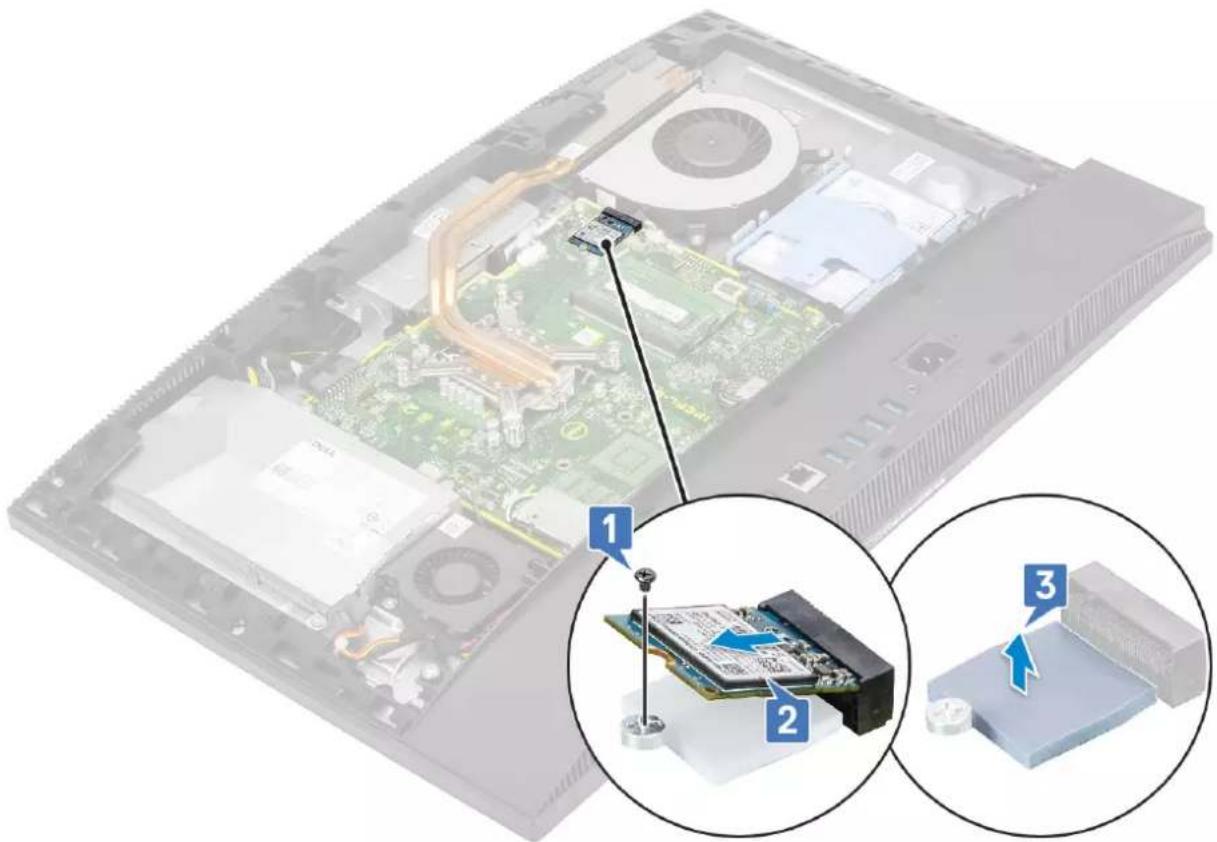
natural_image
Interior view of a computer with an open circuit board and three zoomed-in views showing internal components (no text or symbols visible)Installing the 2230 SSD card
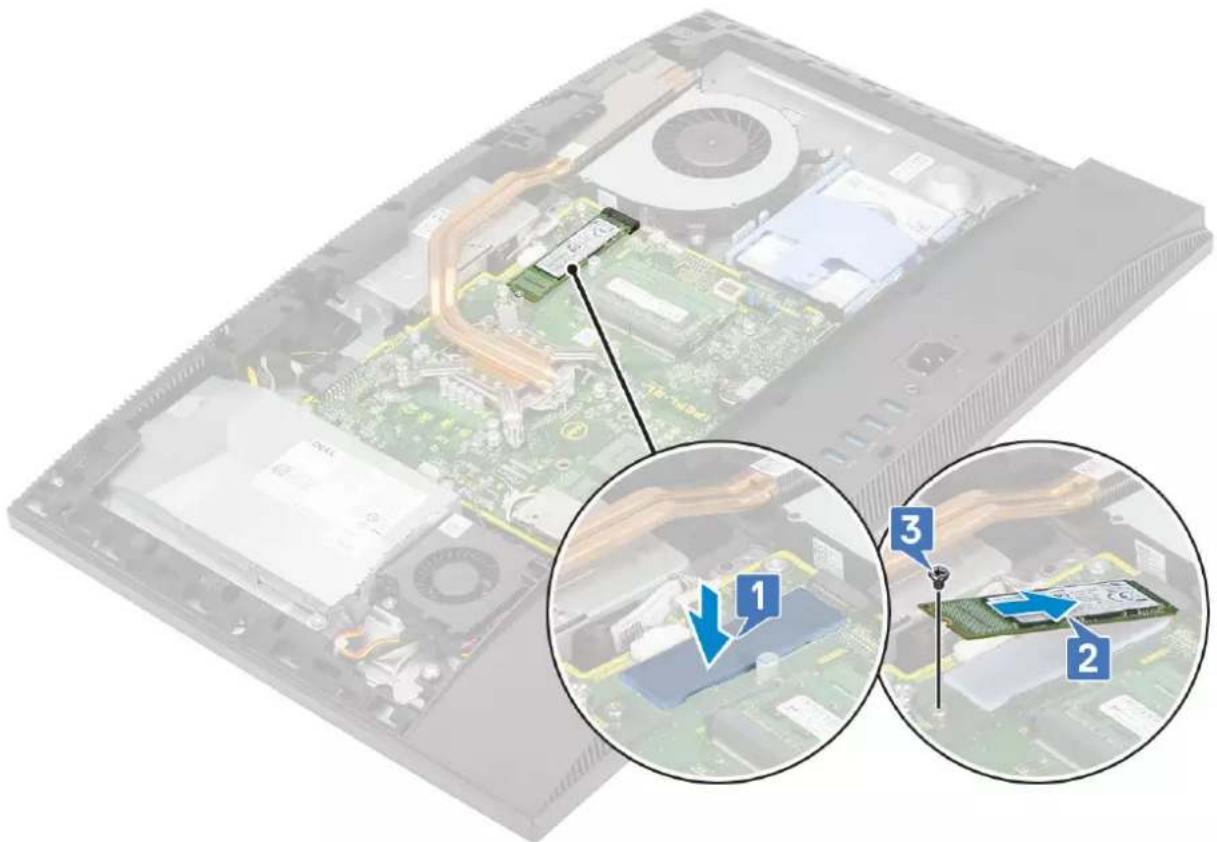
- Replace the thermal pad on the rectangular outline marked on the system board [1].
- Insert the SSD card into the card slot on the system board [2].
- Replace the screw (M2x2.5) that secures the SSD card to the system board [3].
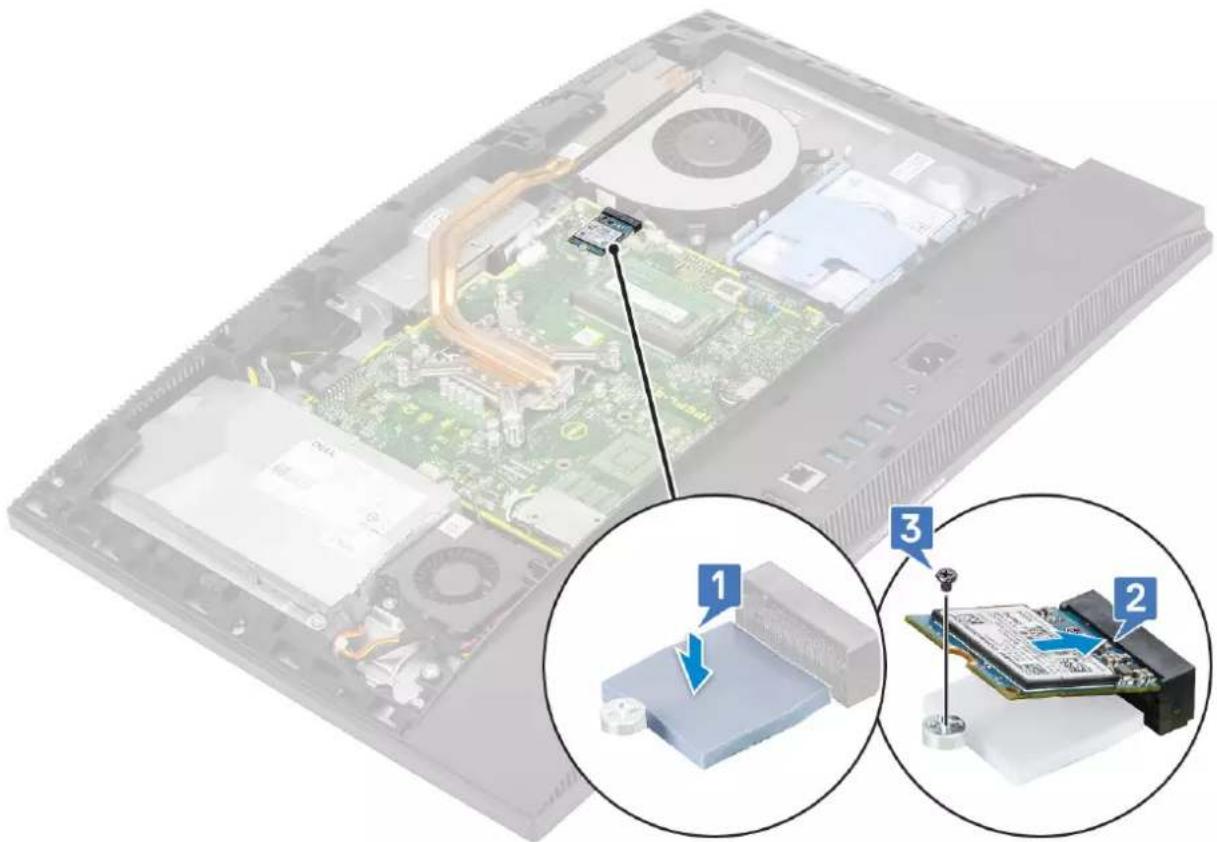
natural_image
Interior view of a computer with visible circuit board and components, showing three zoomed-in views (1, 2, 3) of a device's internal structure.- Install the following components:
a. System board shield
b. Back cover
c. Stand
- Follow the procedure in After working inside your computer.
WLAN card
Removing the WLAN card
- Follow the procedure in Before working inside your computer.
- Remove the following components:
a. Stand
b. Back cover
c. System board shield
- To remove the WLAN card shield:
a. Unroute the antenna cable from the routing channel [1].
b. Remove the two screws (M2x2.5) that secure the WLAN card shield to the system board [2].
c. Remove the WLAN card shield from the system board [3].
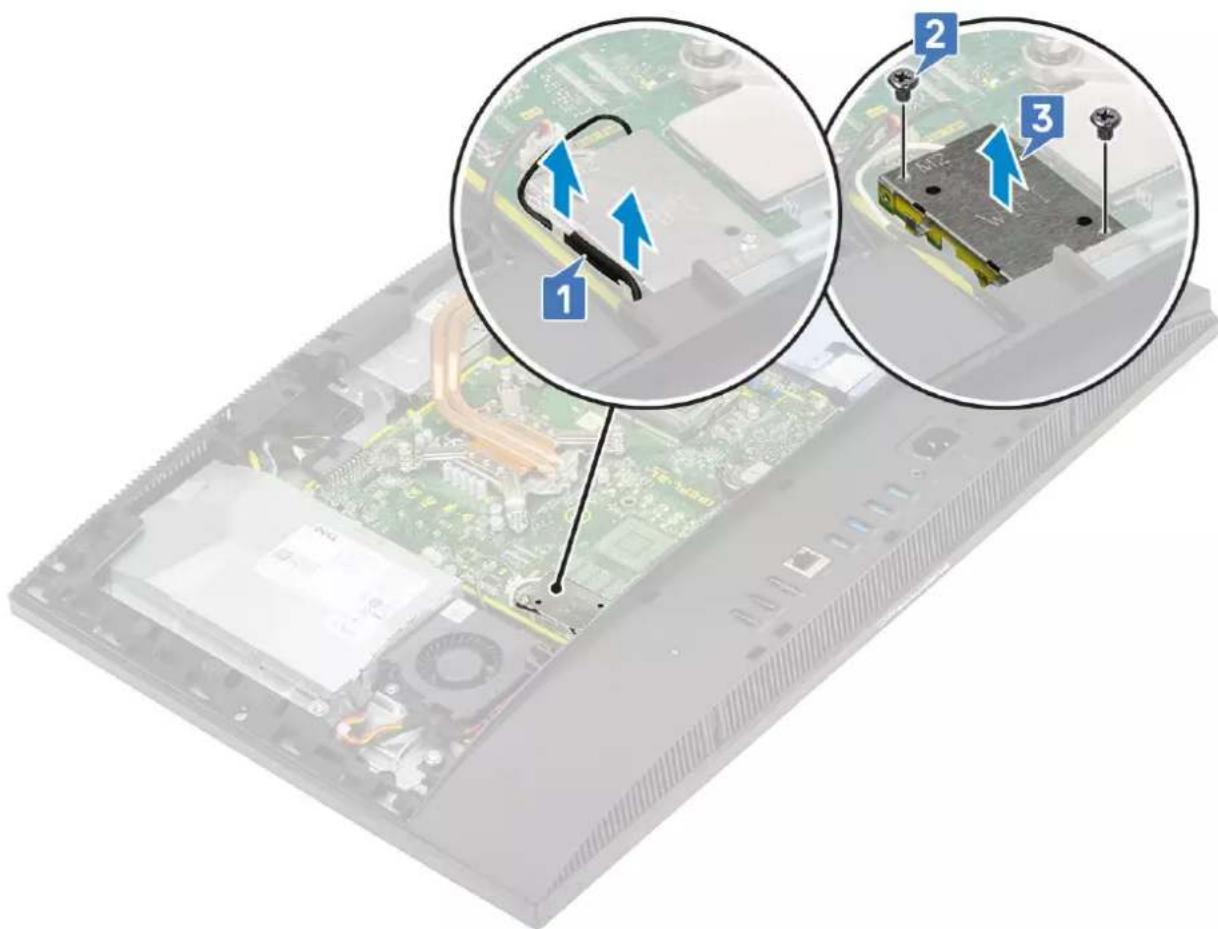
text_image
Diagram showing three views of an electronic device with labeled components and directional arrows indicating assembly or connection.- To remove the WLAN card:
a. Remove the screw (M2x2.5) that secures the WLAN card bracket and the WLAN to the system board [1].
b. Slide and lift the WLANs card bracket off the WLAN card [2].
c. Disconnect the antenna cables from the WLAN card [3].
d. Slide and remove the WLAN card out of the WLAN card slot [4].
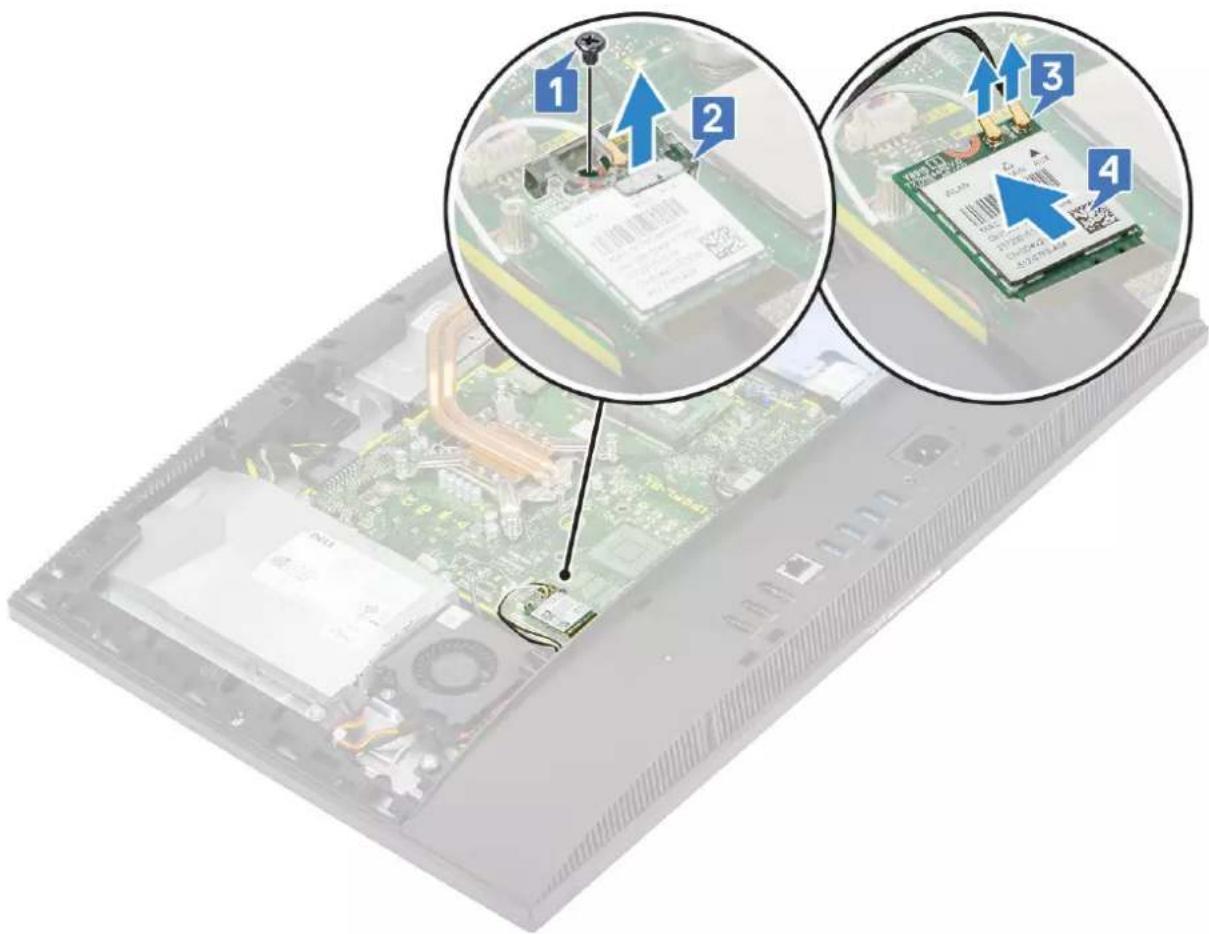
text_image
Diagram showing a computer motherboard with four labeled components and an upward arrow indicating assembly or connection.Installing the WLAN card
- To install the WLAN card:
a. Align and replace the WLAN card into the WLAN card slot [1].
b. Connect the antenna cables to the WLAN card [2].
c. Replace the WLAN card bracket on the WLAN card [3].
d. Replace the screw (M2x2.5) that secures the WLAN card bracket and the WLAN to the system board [4].
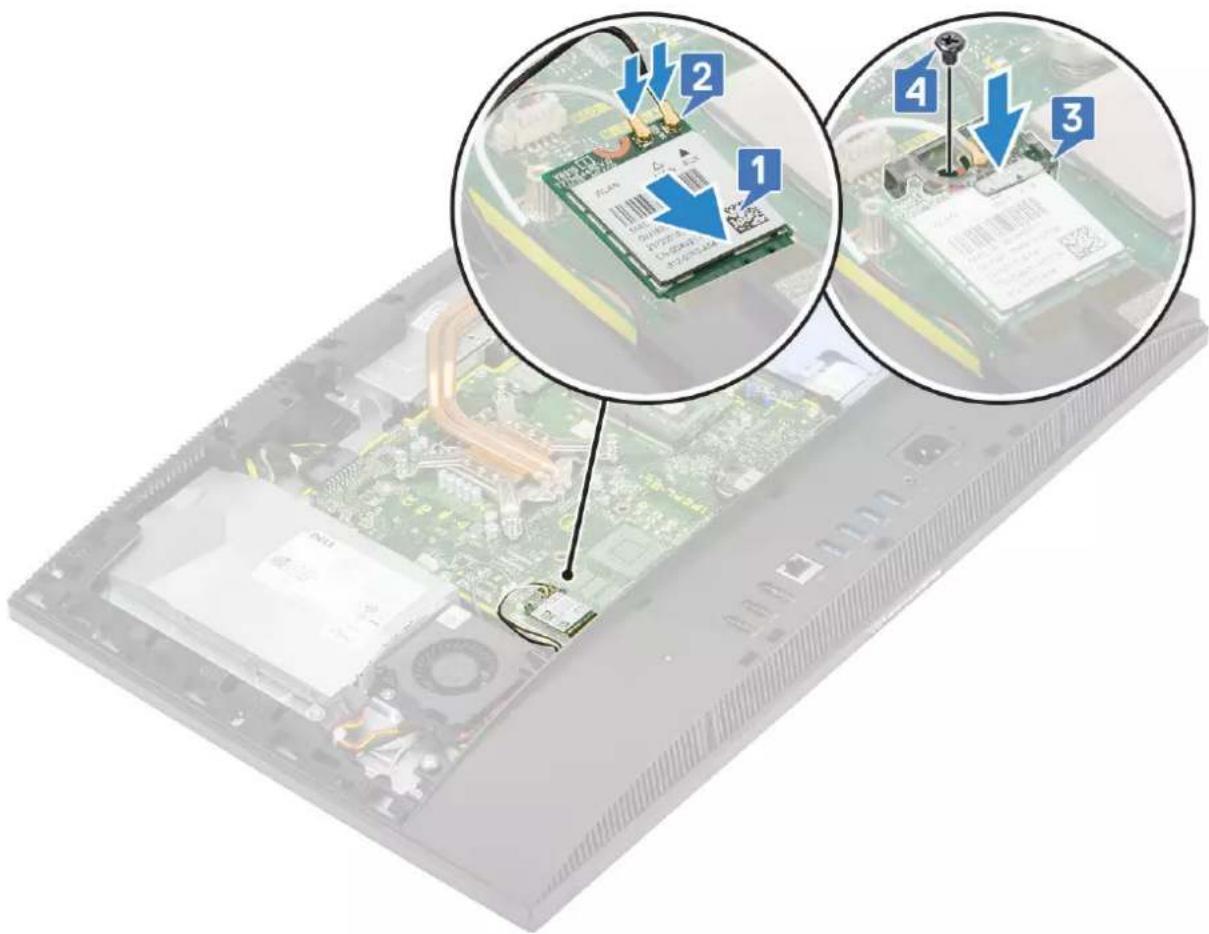
text_image
Diagram showing a computer motherboard with labeled components and arrows indicating assembly or installation steps- To install the WLAN card shield:
a. Align the screw slot on the WLAN card shield with the screw slot on the system board and place the WLAN card shield on the system board [1].
b. Replace the two screws (M2x2.5) that secure the WLAN card shield to the system board [2]
c. Reroute the antenna cable through to the routing channel [3].
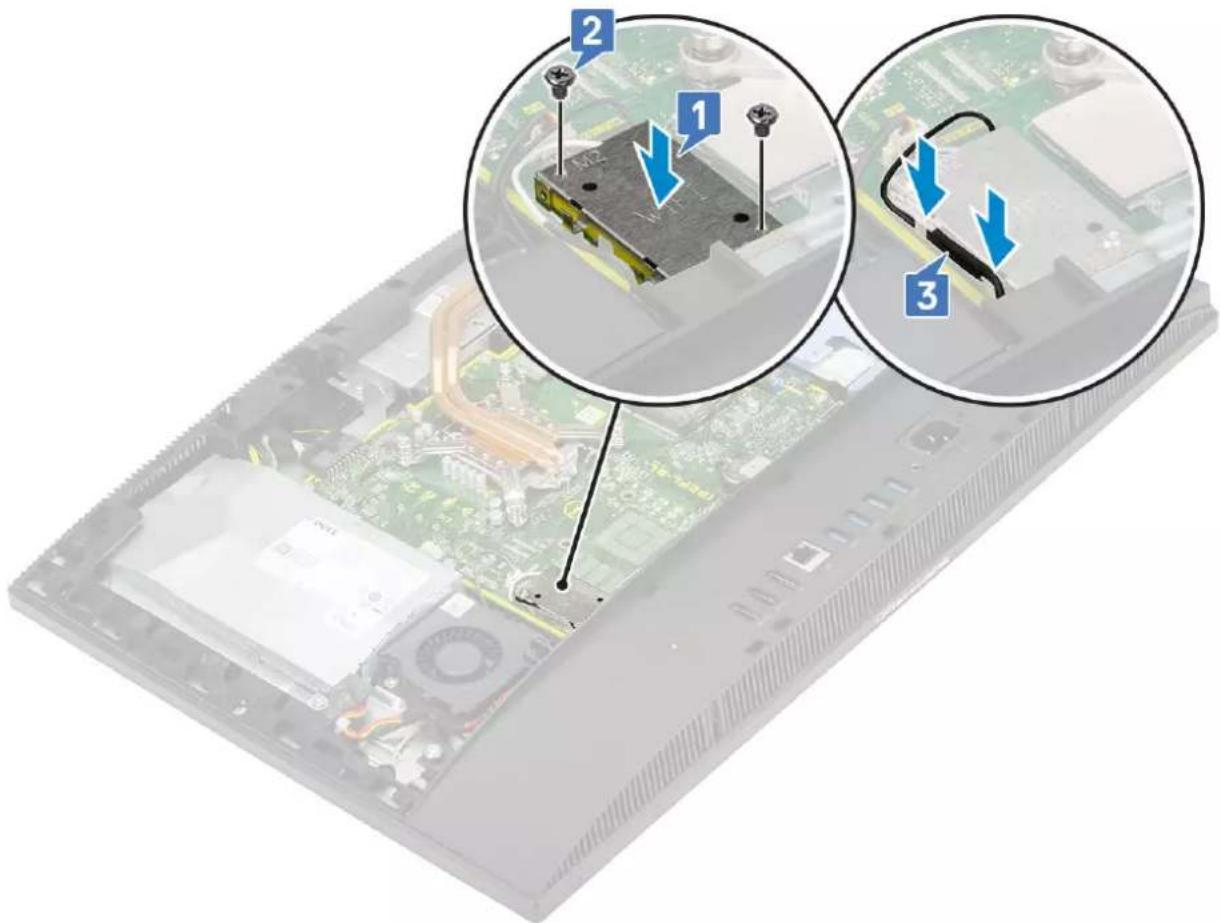
text_image
Labeled diagram of an electronic device showing internal components and cable connections, with numbered annotations pointing to specific parts.- Install the following components:
a. system board shield
b. Back cover
c. Stand
- Follow the procedure in After working inside your computer.
System fan
Removing the system fan
- Follow the procedure in Before working inside your computer.
- Remove the following components:
a. Stand
b. Back cover
c. System board shield
- Disconnect the system fan cable from the socket on the system board [1].
- Remove the three screws (M3x5) that secure the system fan to the display assembly base [2].
- Lift the system fan away from the system [3].
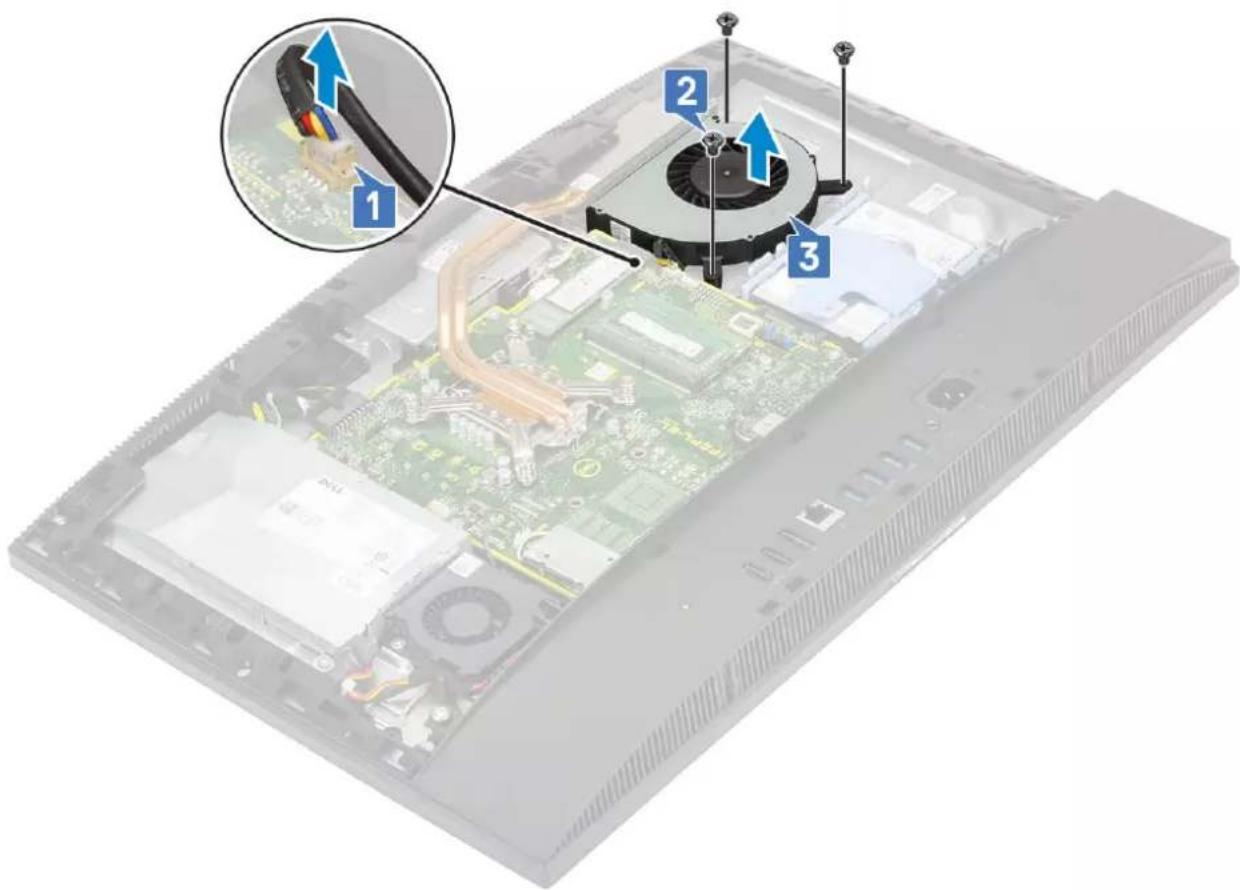
text_image
Diagram of an open computer case with labeled components and a magnified inset showing cable installation details.Installing the system fan
- Align the screw slots on the system fan with the screw slots on the display assembly base [1].
- Replace the three screws (M3x5) that secure the system fan to the display assembly base [2].
- Connect the system fan cable to the socket on the system board [3].
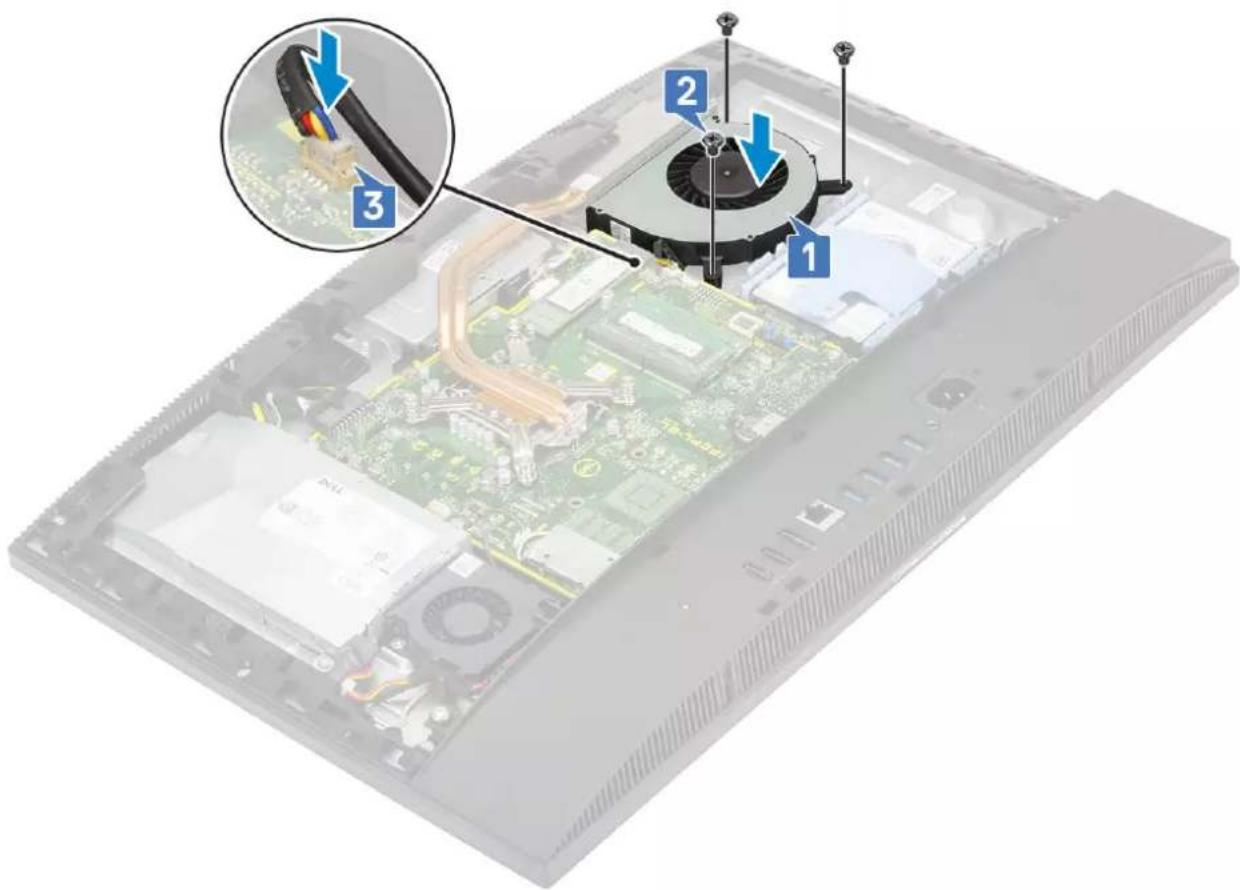
text_image
Diagram of an open computer case with labeled components and a magnified inset showing cable installation steps- Install the following components:
a. System board shield
b. Back cover
c. Stand
- Follow the procedure in After working inside your computer.
Heat sink
The following topics lists heat sink removing and installing steps for unified memory architecture (UMA) and discrete graphics processing unit (dGPU).
Removing the heat sink - dGPU
- Follow the procedure in Before working inside your computer.
- Remove the following components:
a. Stand
b. Back cover
c. System board shield
d. System fan
- In the reverse order (as indicated on the heat sink), loosen the nine captive screws that secure the heat sink to the system board and display assembly base [1].
- Lift the heat sink off the system board and display assembly base [2].
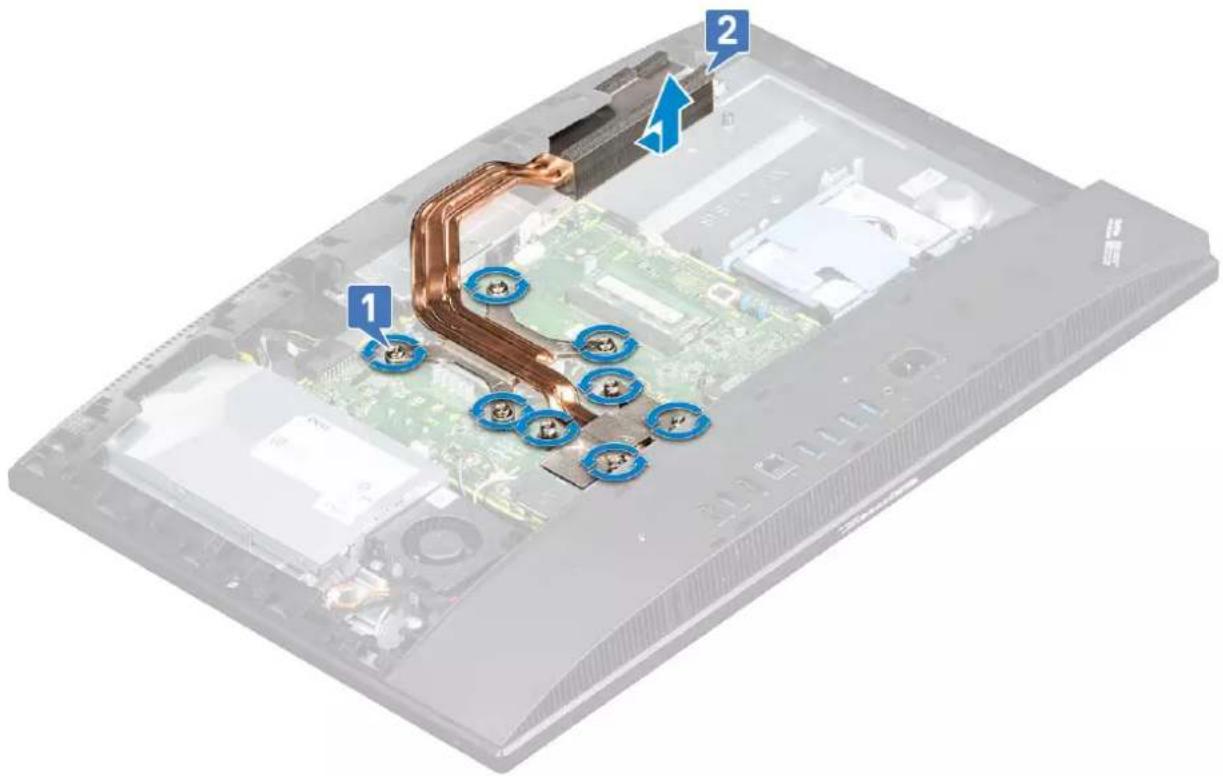
text_image
Labeled diagram of a computer motherboard showing copper cooling pipes and numbered componentsInstalling the heat sink - dGPU
- Align the captive screws on the heat sink with the screw slots on the system board and the display assembly base [1].
- In the sequential order (as indicated on the heat sink), tighten the captive screws that secure the heat sink to the system board and display assembly base [2].
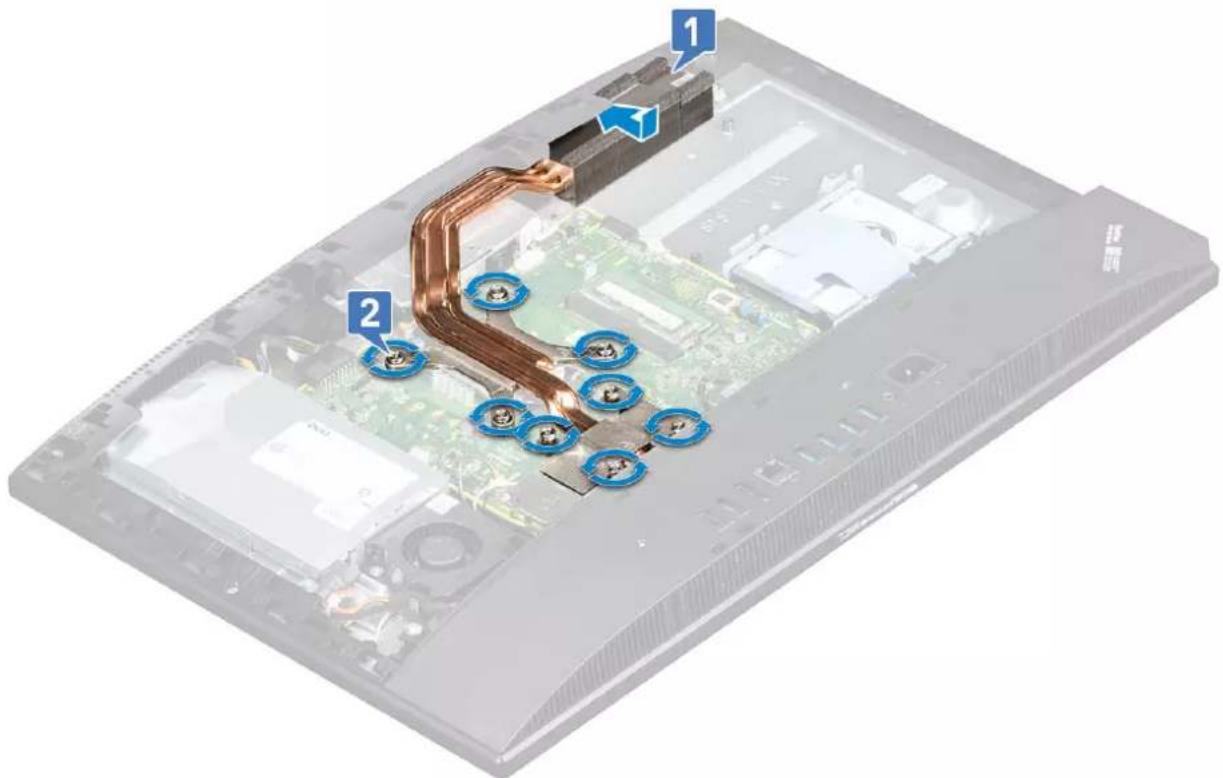
text_image
Labeled diagram of a computer motherboard showing copper insulation and blue circular components with numbered annotations- Install the following components:
a. System fan
b. System board shield
c. Back cover
d. Stand
- Follow the procedure in After working inside your computer.
Removing the heat sink - UMA
- Follow the procedure in Before working inside your computer.
- Remove the following components:
a. Stand
b. Back cover
c. System board shield
d. System fan
- Loosen the five captive screws in a sequential order [1,2,3,4,5] as mentioned on the heat sink.[1].
- Lift the heat sink off the system board and display assembly base [2].
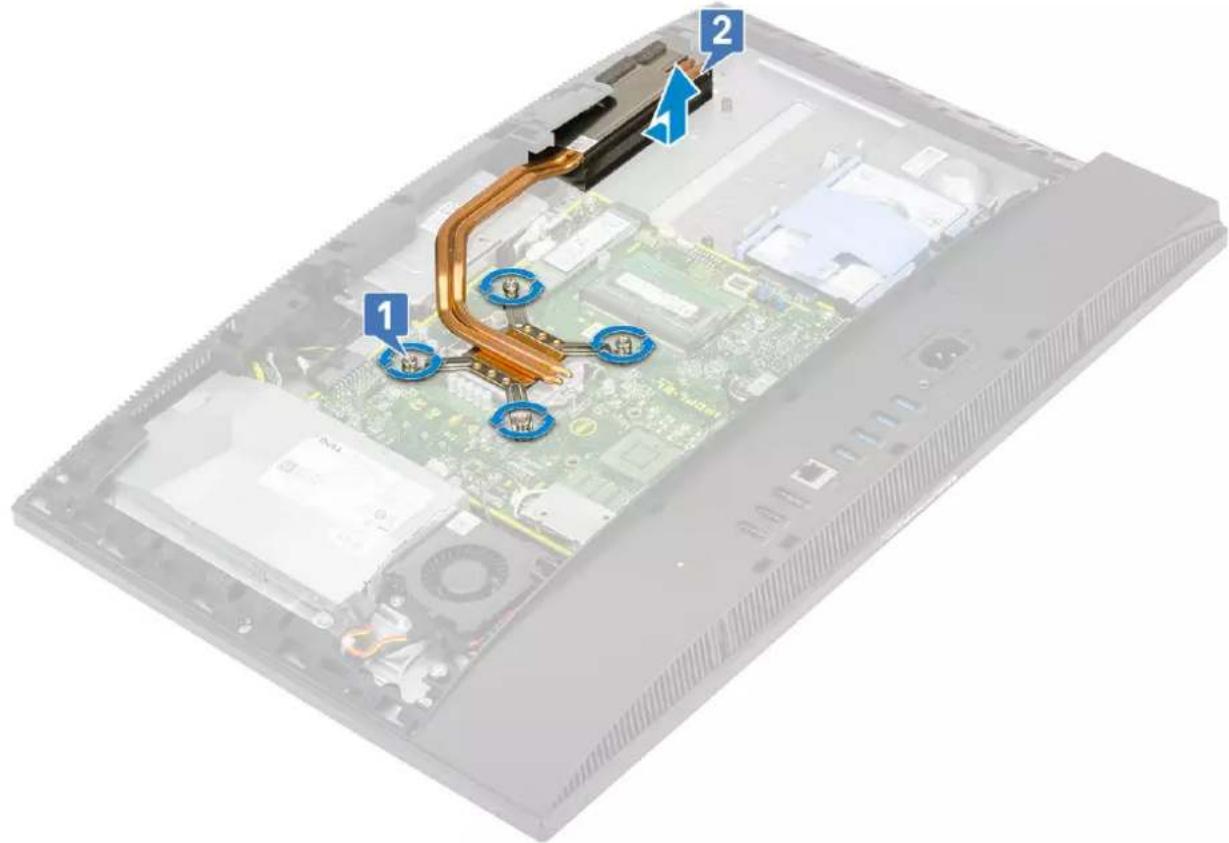
text_image
Diagram of an open computer case with labeled components, showing a flexible circuit board and connectors.Installing the heat sink - UMA
- Align the captive screws on the heat sink with the screw slots on the system board and the display assembly base .[1].
- Tighten the five captive screws in a sequential order [1,2,3,4,5] to secure the heat sink to the system board and display assembly base.[2].
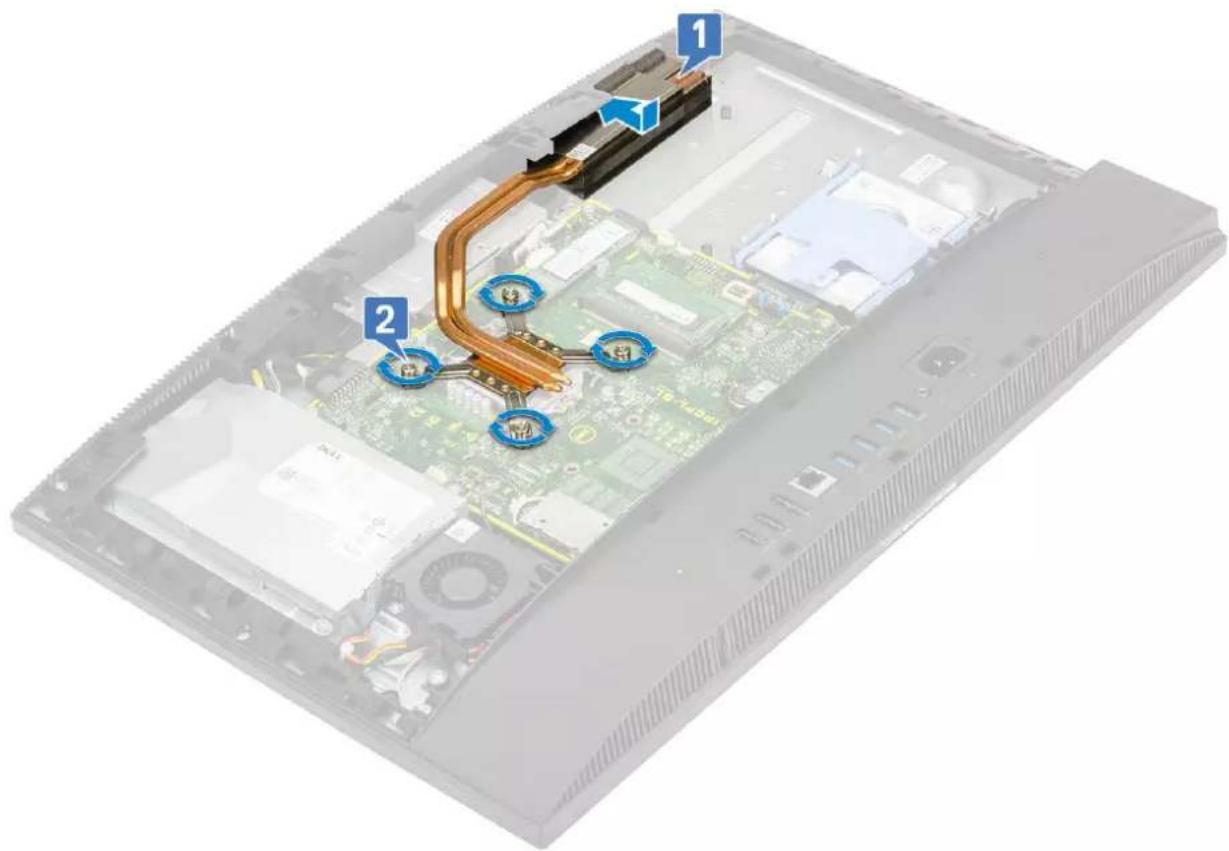
text_image
Labeled diagram of an open computer case showing internal components with numbered annotations- Install the following components:
a. System fan
b. System board shield
c. Back cover
d. Stand
- Follow the procedure in After working inside your computer.
Pop-Up Camera
Removing the pop-up camera
- Follow the procedure in Before working inside your computer.
- Remove the following components:
a. Stand
b. Back cover
c. System board shield
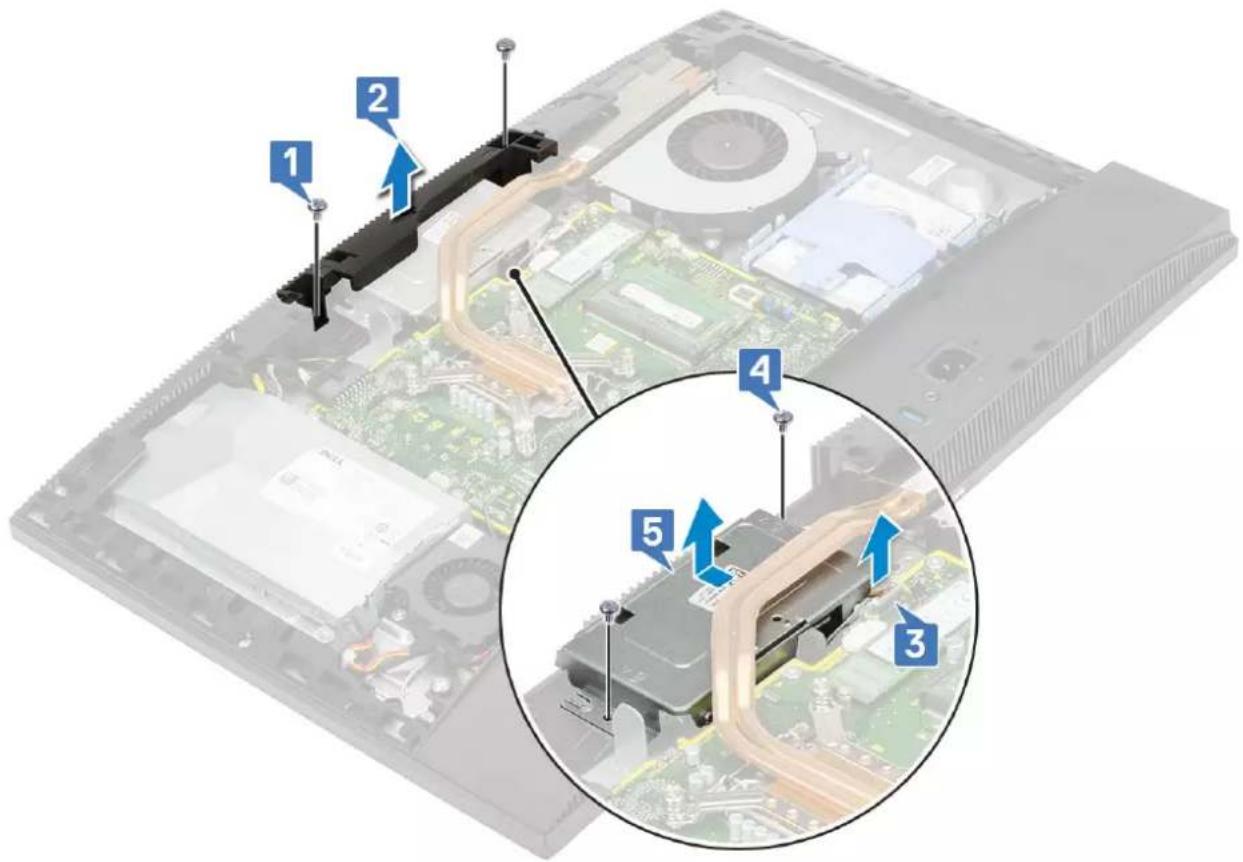
- To remove the camera assembly:
a. Remove the two screws (M3x5) that secure the camera assembly cover to the middle frame [1].
b. Lift the camera assembly cover away from the middle frame [2].
c. Disconnect the camera cable from the system board and unroute the camera cable from the routing channel [3].
d. Remove the two screws (M3x5) that secure the pop-up camera assembly to the middle frame [4].
e. Slide and remove the pop-up camera assembly off the middle frame [5].
text_image
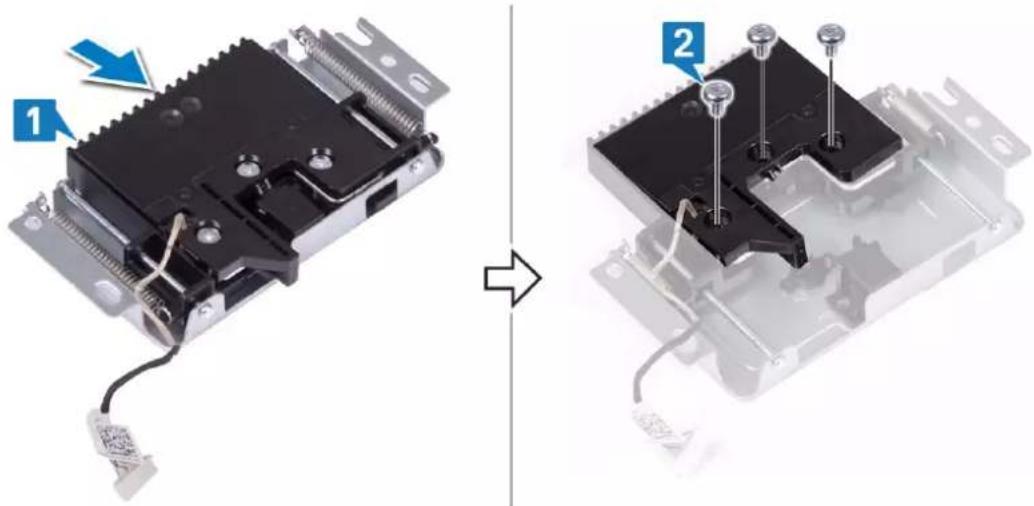
Diagram of an open computer motherboard showing labeled components and a magnified view of the circuit board with numbered annotations.- To remove the camera bezel:
a. Press the top of the pop-up camera assembly to extend the pop-up camera [1].
b. Remove the three screws (M3x5) that secure the bezel to the pop-up camera assembly [2].
text_image
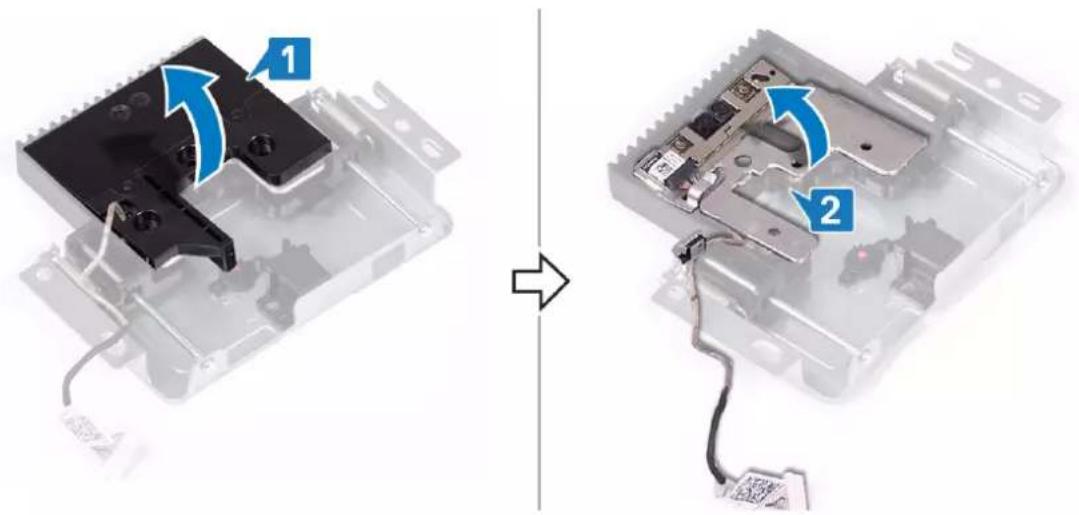
Diagram showing assembly of an electronic component with labeled parts and directional arrow indicating transformation- To remove the pop-up camera module:
a. Lift the pop-up camera bezel off the pop-up camera assembly [1].
b. Remove the camera module along with the camera cable off the pop-up camera assembly [2]
text_image
Diagram showing device assembly process with labeled components and directional arrows indicating transformationInstalling the pop-up camera
- Follow the procedure in After working inside your computer.
- To replace the camera module:
a. Replace the camera module along with the camera cable in the slot on the pop-up camera assembly [1].
b. Align the screw slots on the pop-up camera bezel with the screw slots on the pop-up camera assembly [2].
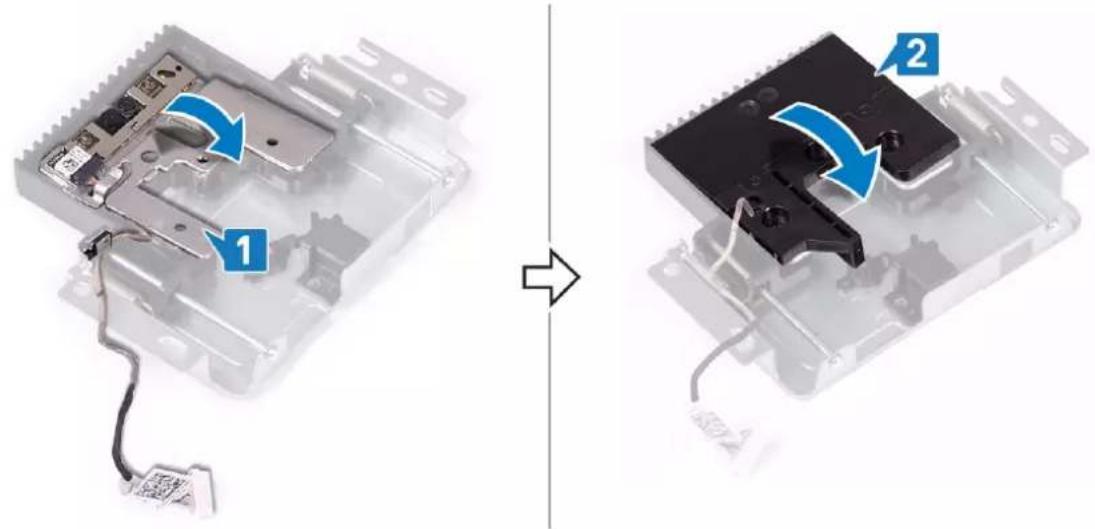
text_image
Diagram showing two views of an electronic device with labeled components and blue arrows indicating rotation or assembly.- To replace the camera bezel:
a. Replace the three screws (M3x5) that secure the pop-up camera bezel to the pop-up camera assembly [1].
b. To retract the pop-up camera, press the top of the pop-up camera assembly [2].
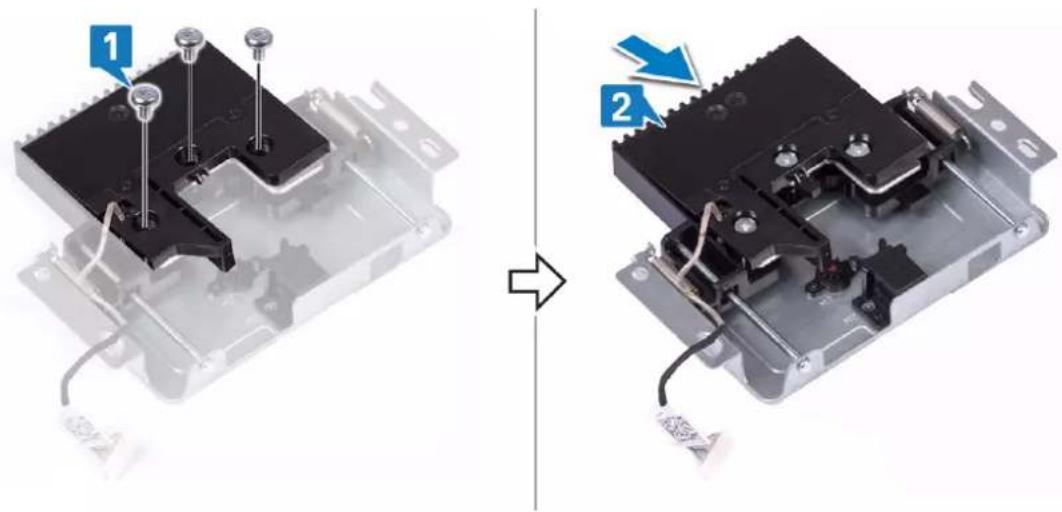
text_image
Diagram showing two views of an electronic component with labeled parts, indicating assembly or repair process.- To replace the camera assembly:
a. Align and place the pop-up camera assembly on the display panel base and route the camera cable through to the routing channel [1].
b. Replace the two screws (M3x5) that secure the pop-up camera assembly to the middle frame [2].
c. Connect the camera cable to the system board [3].
d. Align and place the pop-up camera assembly cover on the middle frame [4].
e. Replace the two screws (M3x5) that secure the camera assembly cover to the middle frame [5].
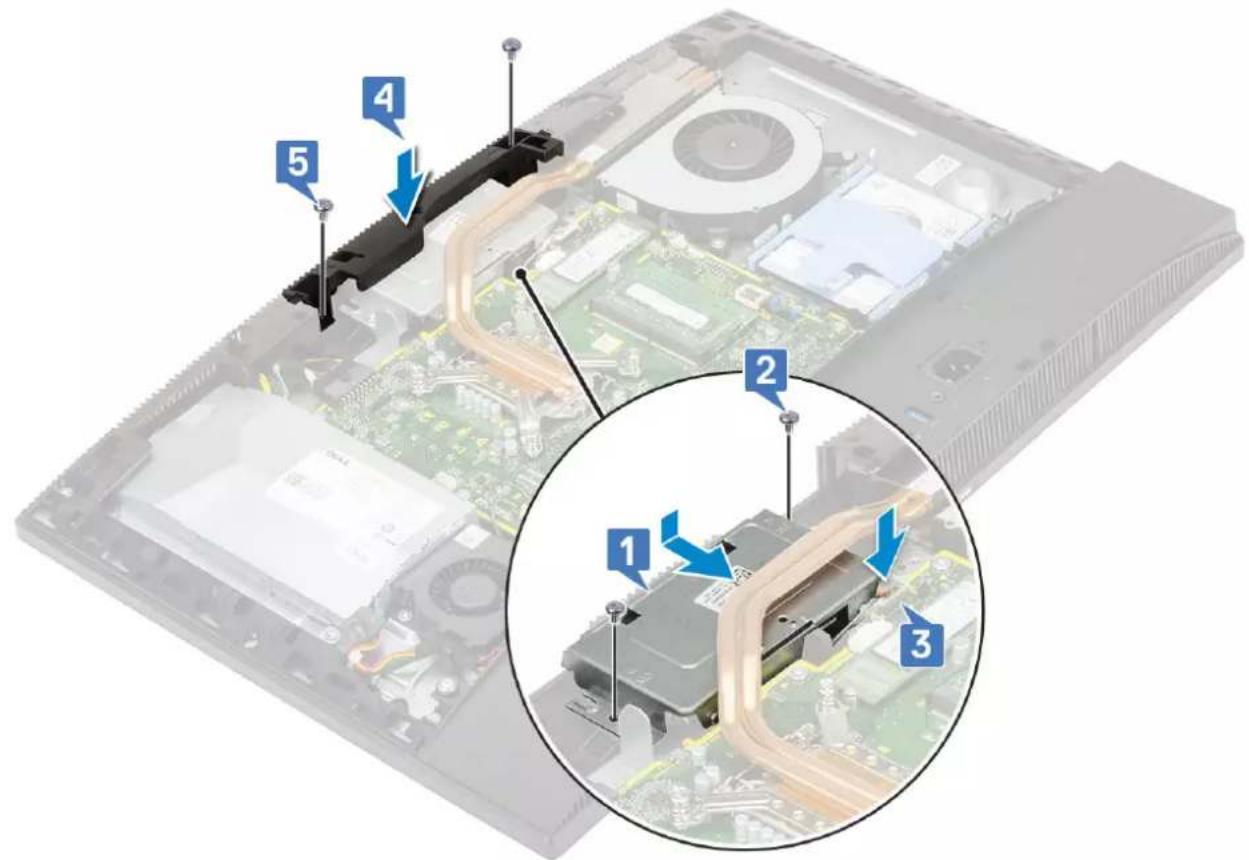
text_image
Labeled diagram of an electronic device showing internal components and a magnified view with numbered annotations.- Install the following components:
a. System board shield
b. Back cover
c. Stand
Coin cell battery
Removing the coin cell battery
- Follow the procedure in Before working inside your computer.
- Remove the following components:
a. Stand
b. Back cover
c. System board shield
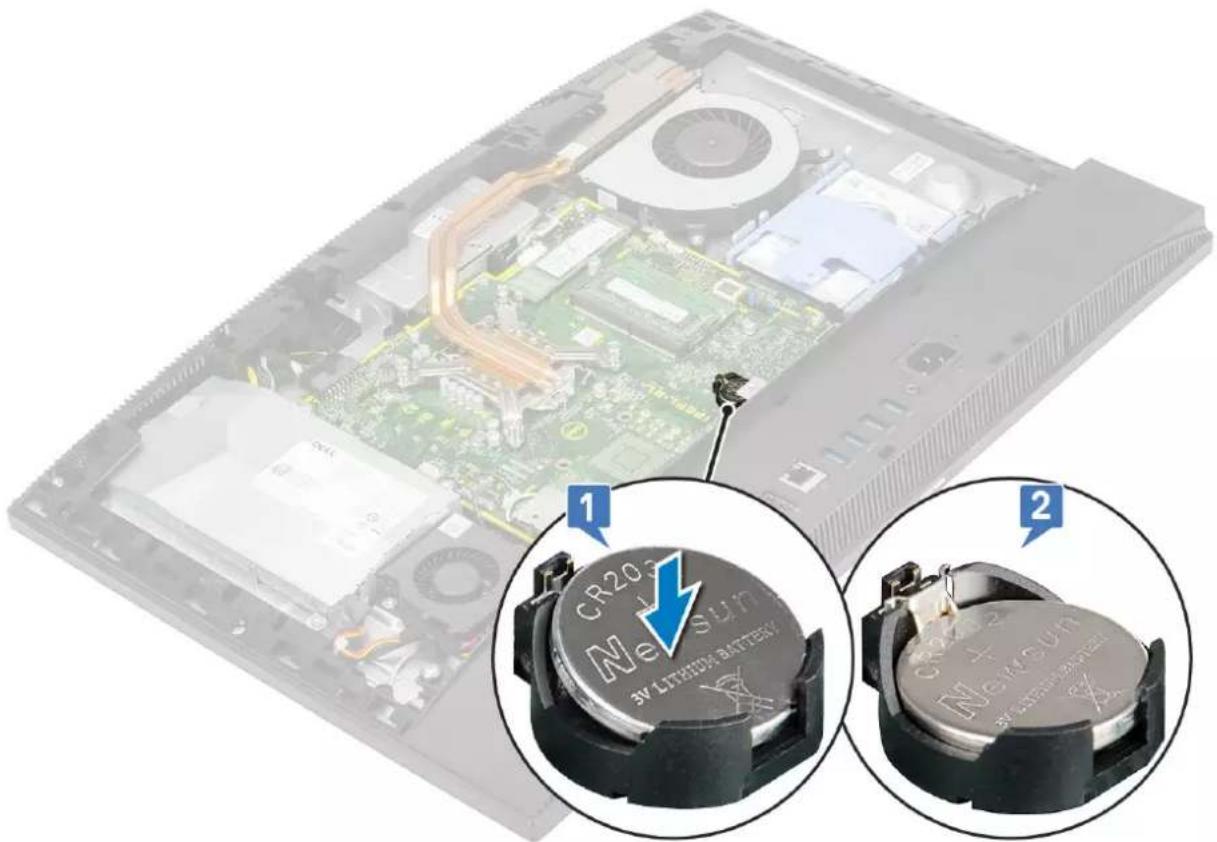
- Press the tab on the coin cell battery socket until the coin cell battery pops up [1].
- Lift the coin cell battery out of the coin cell battery socket [2].
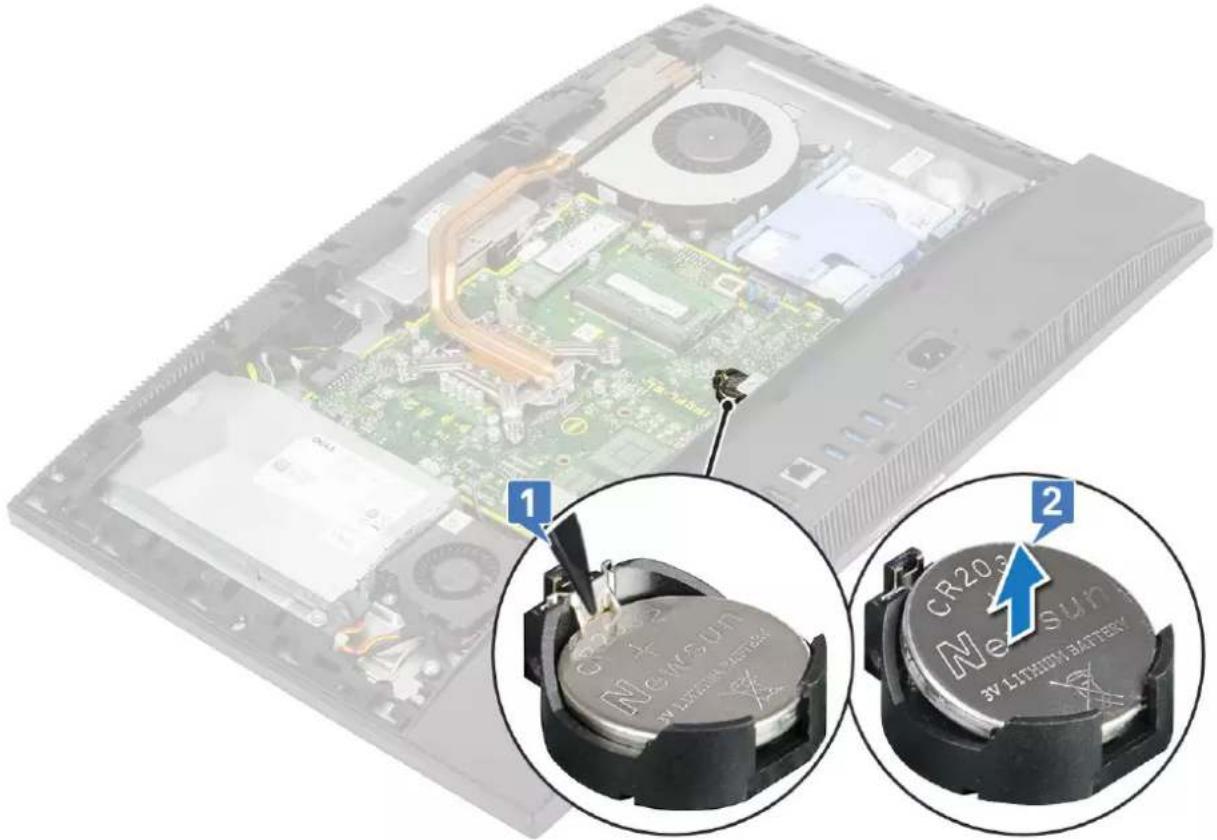
text_image
Technical diagram showing a device with labeled components and two circular insets highlighting the 'CR203' and 'Nexiun' battery.Installing the coin cell battery
- Insert the coin cell battery into the battery socket on the system board, with the positive side facing up [1].
- Press down the battery into place until it fits securely [2].
text_image
1 CR203 Neusium 3V LITHION BATTERY 2- Install the following components:
a. System board shield
b. Back cover
c. Stand
- Follow the procedure in After working inside your computer.
Processor
Removing the processor
- Follow the procedure in Before working inside your computer.
- Remove the following components:
a. Stand
b. Back cover
c. System board shield
d. Heat sink
- To remove the processor:
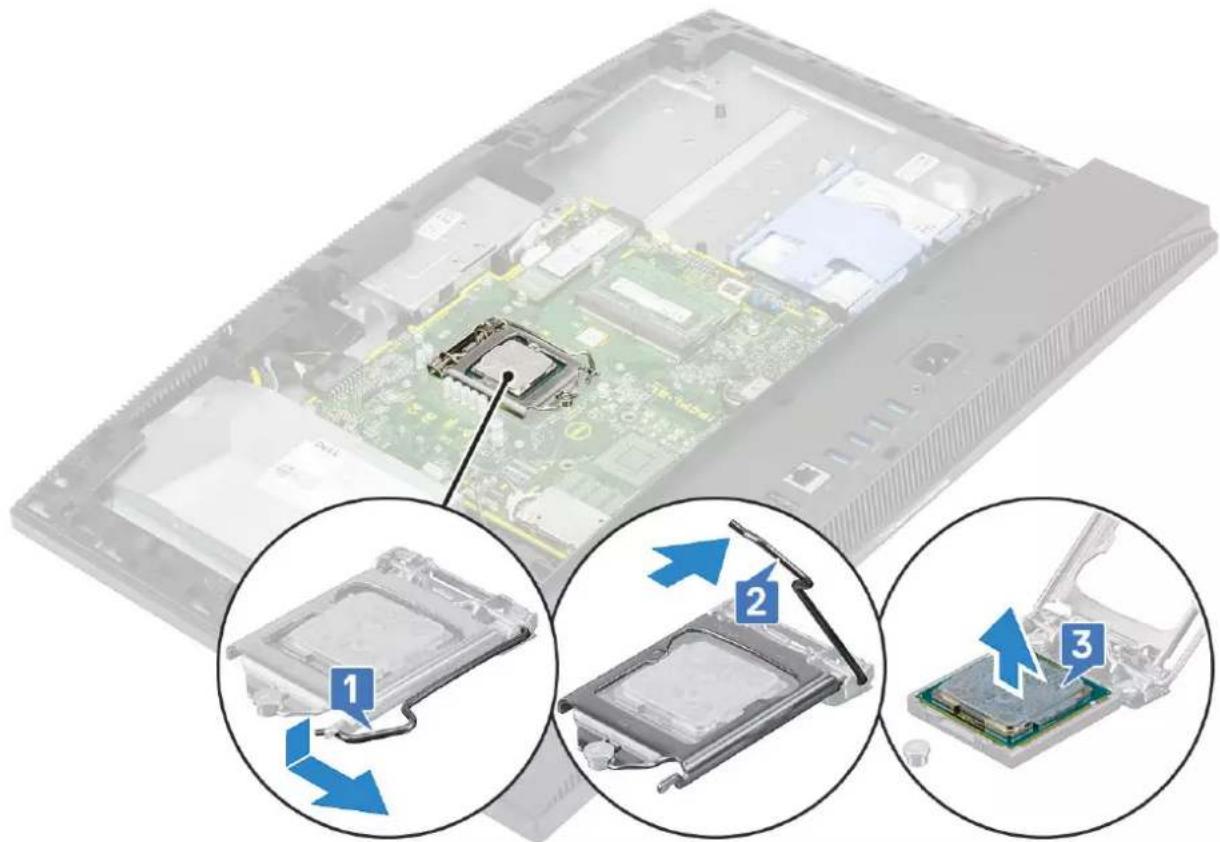
a. Release the socket lever by pushing the lever down and out from under the tab on the processor shield [1].
b. Lift the lever upward, and lift the processor shield [2].

CAUTION: The processor socket pins are fragile and can be permanently damaged. Be careful not to bend the pins in the processor socket when removing the processor out of the socket.
c. Lift the processor and remove it from the processor socket [3].

NOTE: After removing the processor, place it in an antistatic container for reuse, return, or temporary storage. Do not touch the bottom of the processor to avoid damage to the processor contacts. Touch only the side edges of the processor.
natural_image
Close-up of a computer motherboard with three circular insets showing internal components and blue arrows indicating motion (no text or symbols)Installing the processor
- To install the processor:
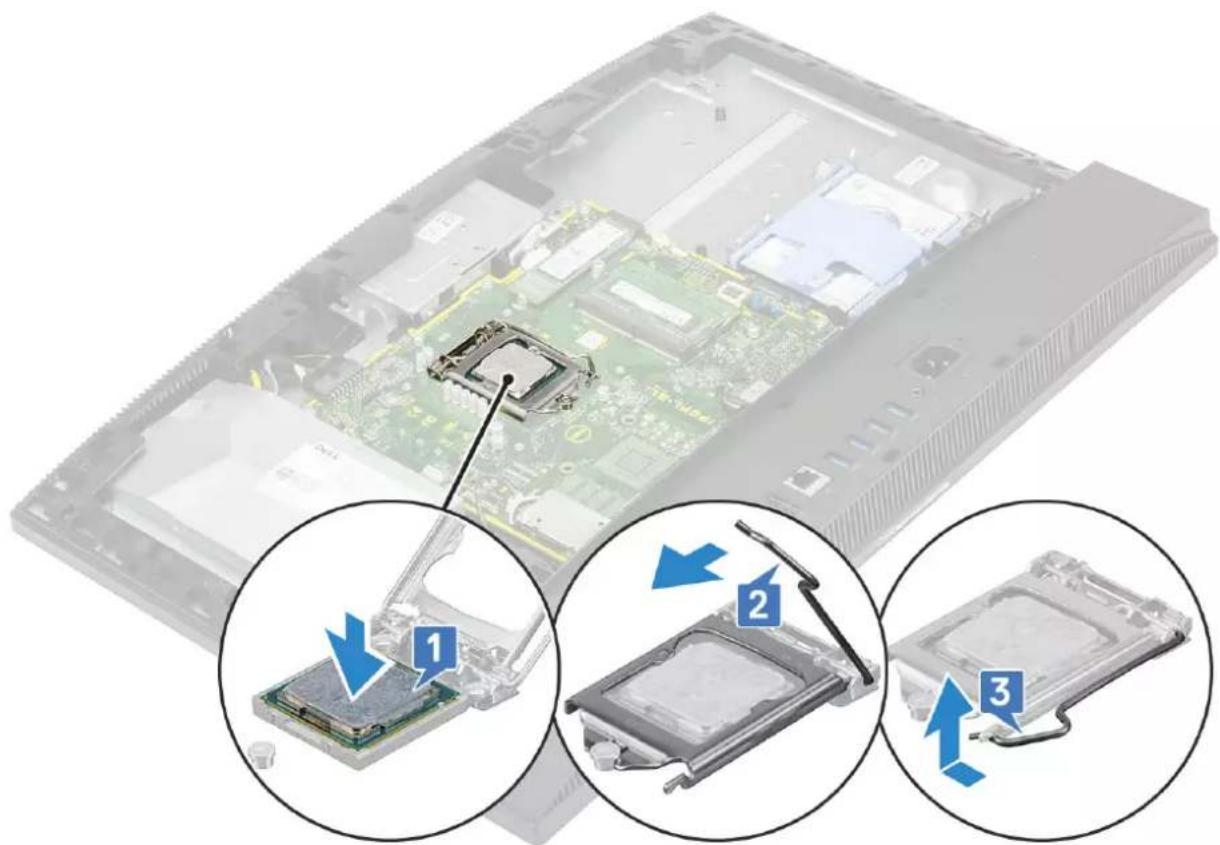
a. Ensure that the release lever on the processor socket is fully extended in the open position. Align the notches on the processor with the tabs on the processor socket and place the processor in the processor socket [1].

CAUTION: The pin-1 corner of the processor has a triangle that aligns with the triangle on the pin-1 corner on the processor socket. When the processor is properly seated, all four corners are aligned at the same height. If one or more corners of the processor are higher than the others, the processor is not seated properly.
b. Close the processor shield by sliding it under the retention screw [2].
c. Lower the socket lever and push it under the tab to lock it [3].
text_image
Diagram showing three views of a computer motherboard with labeled components and blue arrows indicating disassembly or repair steps.- Install the following components:
a. Heat sink
b. System board shield
c. Back cover
d. Stand
- Follow the procedure in After working inside your computer.

NOTE: If the processor is replaced, use the thermal grease provided in the kit to ensure that thermal conductivity is achieved.
Base cover
Removing the base cover
- Follow the procedure in Before working inside your computer.
- Remove the following components:
a. Stand
b. Cable cover (optional)
c. Back cover
d. System board shield
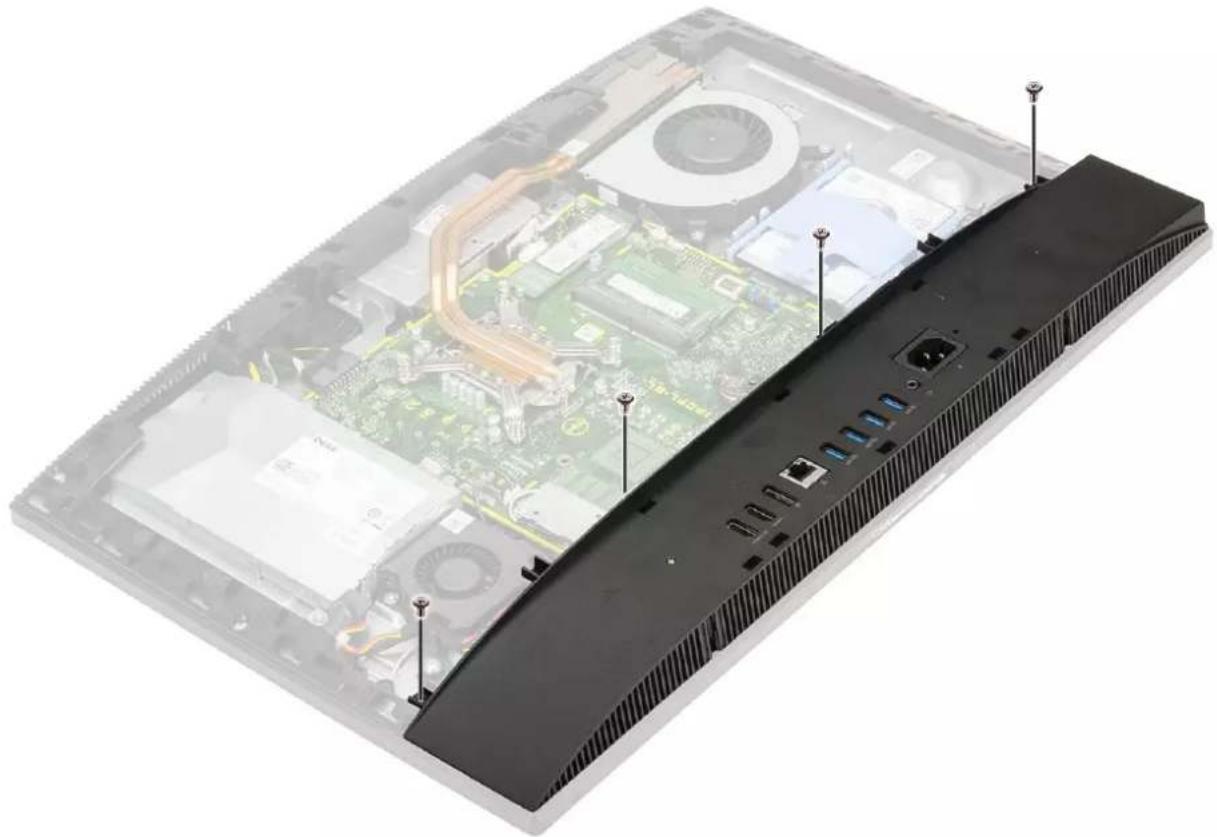
- Remove the four screws (M3x5) that secure the base cover to the display assembly base.
natural_image
Interior view of a computer monitor showing the circuit board, ventilation ducts, and ventilation slots (no text or symbols visible)- Pry and lift the base cover off the middle frame.
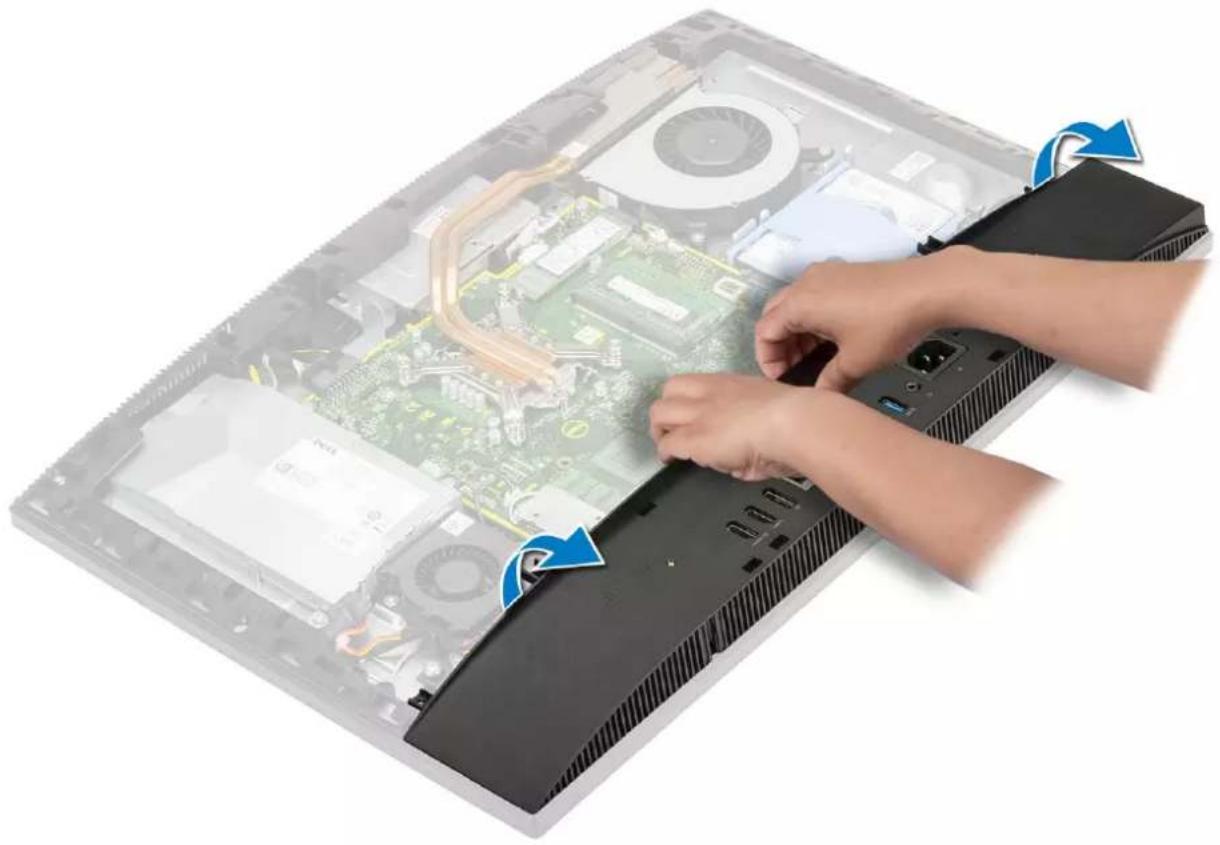
natural_image
Close-up of hands installing or adjusting a computer motherboard with a laptop case (no visible text or symbols)Installing the base cover
- Align and place the tabs on the base cover with the slots on the middle frame [1].
- Press the base cover down until it snaps into place on the middle frame [2].
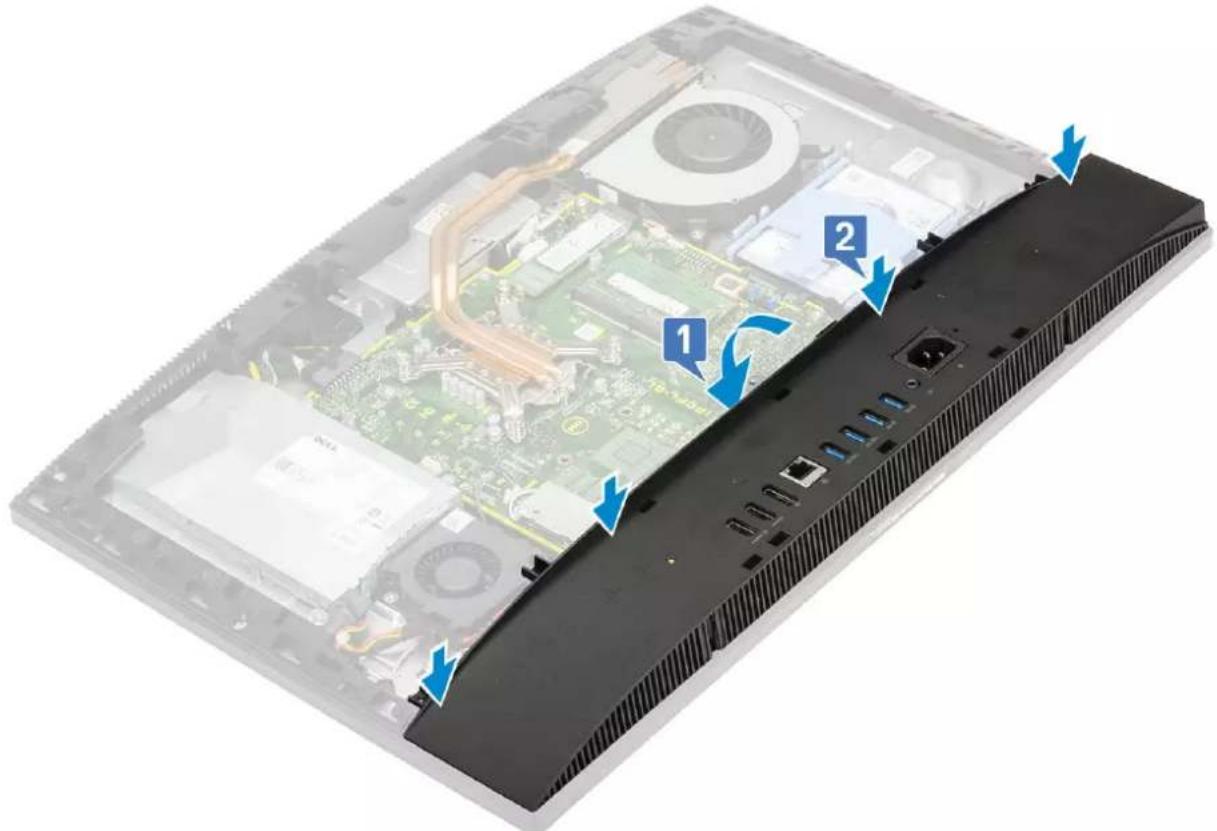
text_image
Labeled diagram of an electronic device showing internal components and parts with numbered annotations- Replace the four screws (M3x5) that secure the base cover to the display assembly base.
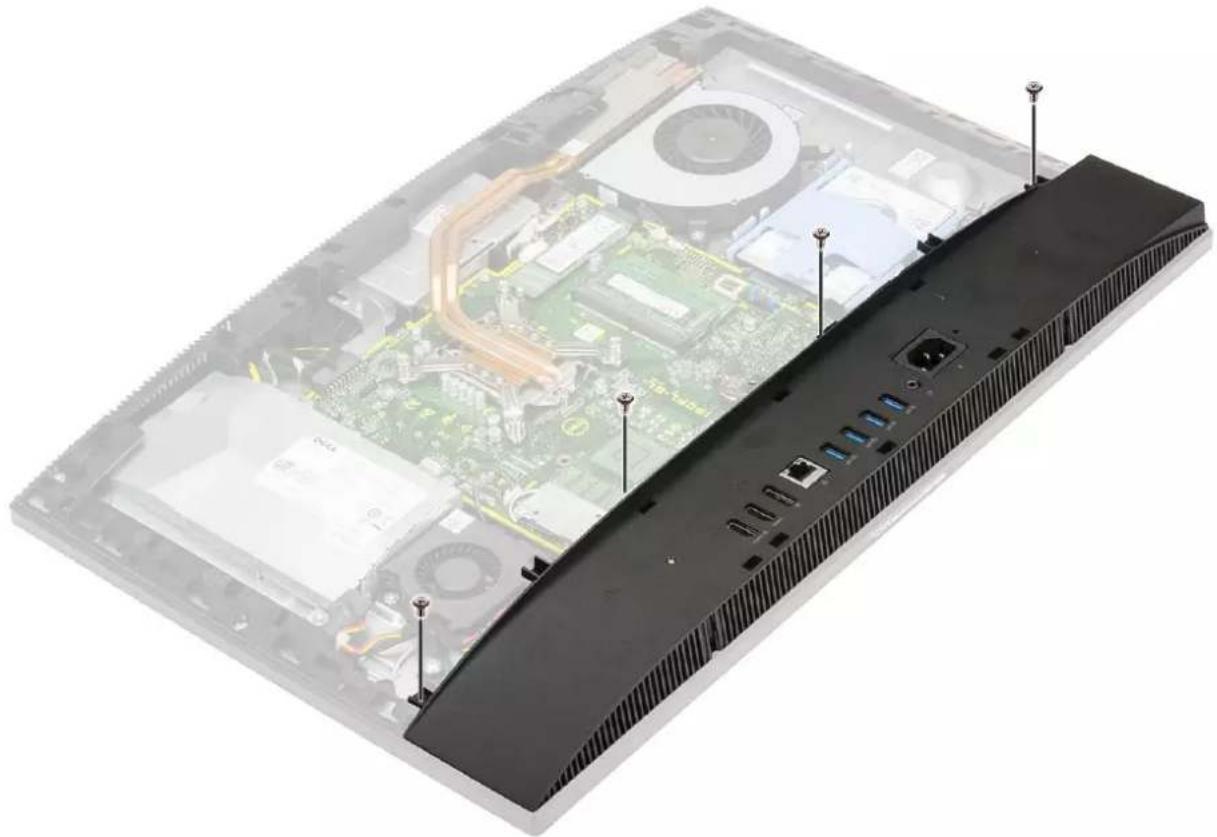
natural_image
Interior view of a computer monitor showing the circuit board and ventilation slots (no text or symbols visible)- Install the following components:
a. System board shield
b. Back cover
c. Cable cover
d. Stand
- Follow the procedure in After working inside your computer.
Power supply unit - PSU
Removing the power supply unit -PSU
- Follow the procedure in Before working inside your computer.
- Remove the following components:
a. Stand
b. Back cover
c. System board shield
d. Base cover
- To release the PSU cable:
a. Remove the single (M3x5) screw securing the power supply socket to the I/O bracket [1].
b. Slide the power supply socket away to remove it from the system [2].
c. Unroute the power supply cables from the retention clips in the chassis [3].
d. Disconnect the power supply cable from the socket on the system board [4].

NOTE: Press the clip downward to release the power supply cable from the system board.
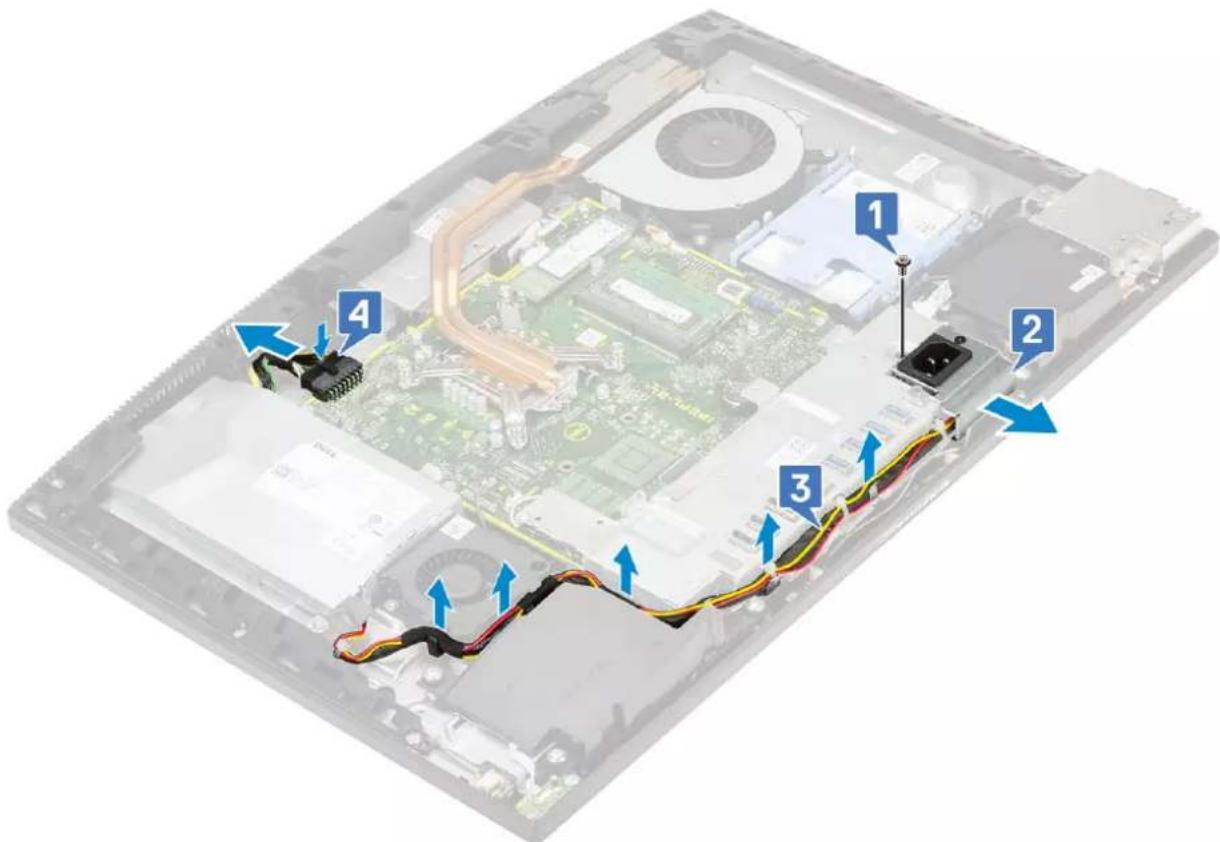
text_image
Labeled diagram of an open computer motherboard showing cable routing and component annotations- To remove the PSU:
a. Remove the single (M3x5) screw that secures the PSU to the display assembly base [1].
b. Slide the PSU, and lift it away from the chassis [2].
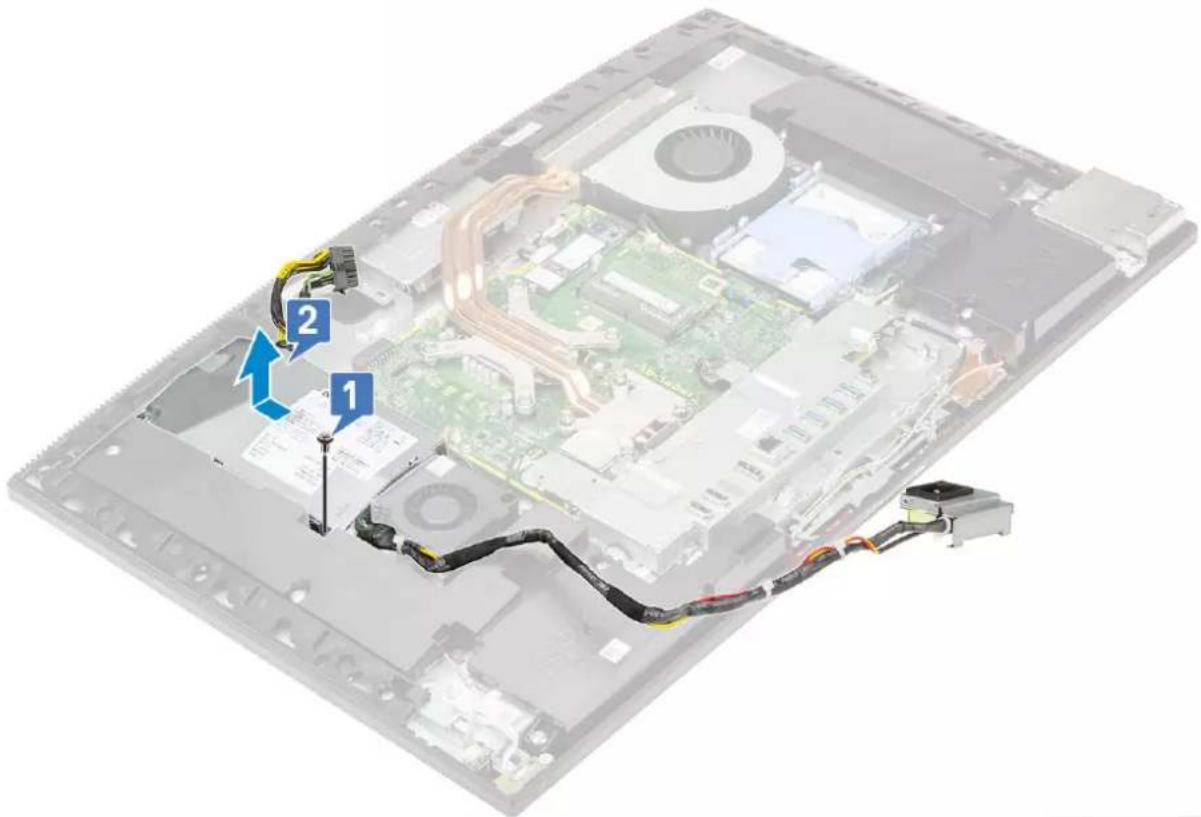
natural_image
Interior view of a computer motherboard showing cable routing and component labels (no readable text or symbols)Installing the power supply unit -PSU
- To install the PSU:
a. Align and slide the PSU, in to the slot on the display assembly base [1].
b. Replace the single screw (M3x5) that secures the PSU to the chassis [2].
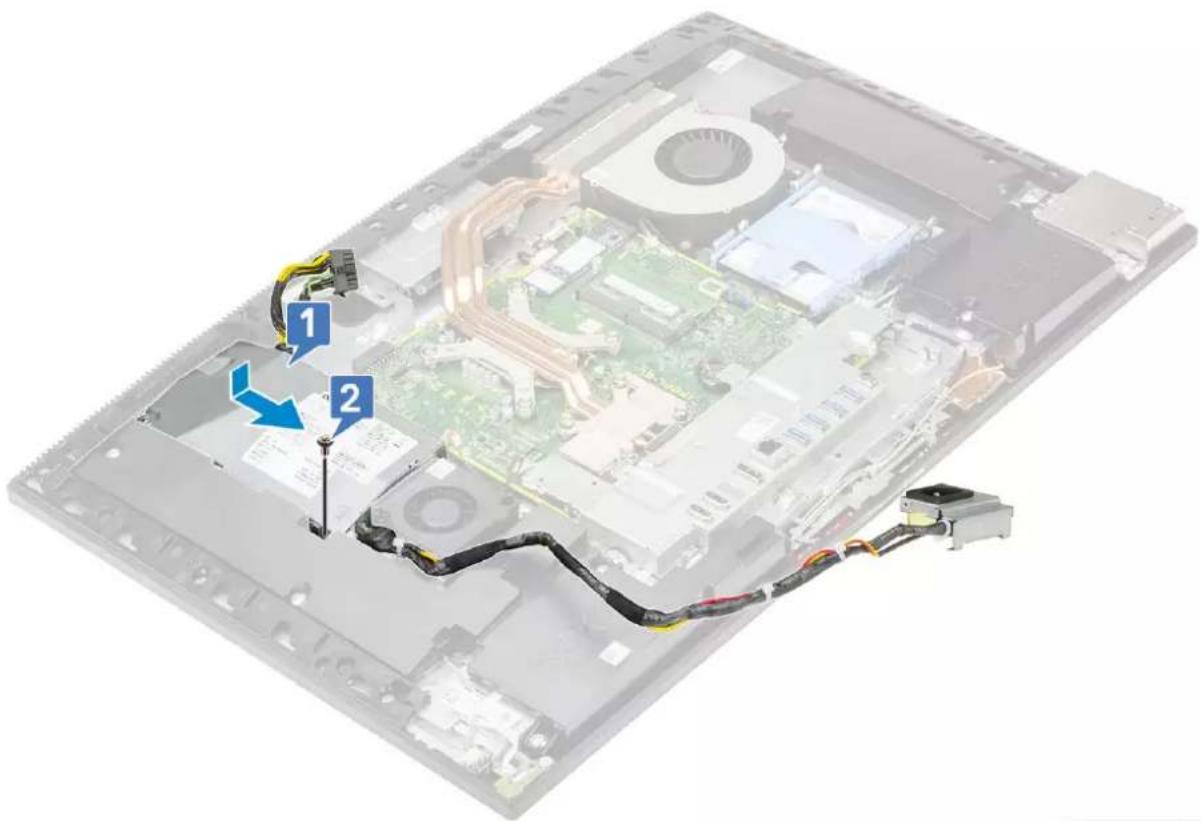
natural_image
Interior view of a computer motherboard showing CPU socket, drive cables, and cable routing (no text or symbols visible)- To install the PSU cable:
a. Connect the power supply cable to the socket on the system board [1].
b. Route back the power supply cables through the retention clips in the I/O bracket [2].
c. Slide and replace the power supply socket on the chassis [3].
d. Replace the single (M3x5) screw securing the power supply socket to the I/O bracket [4].
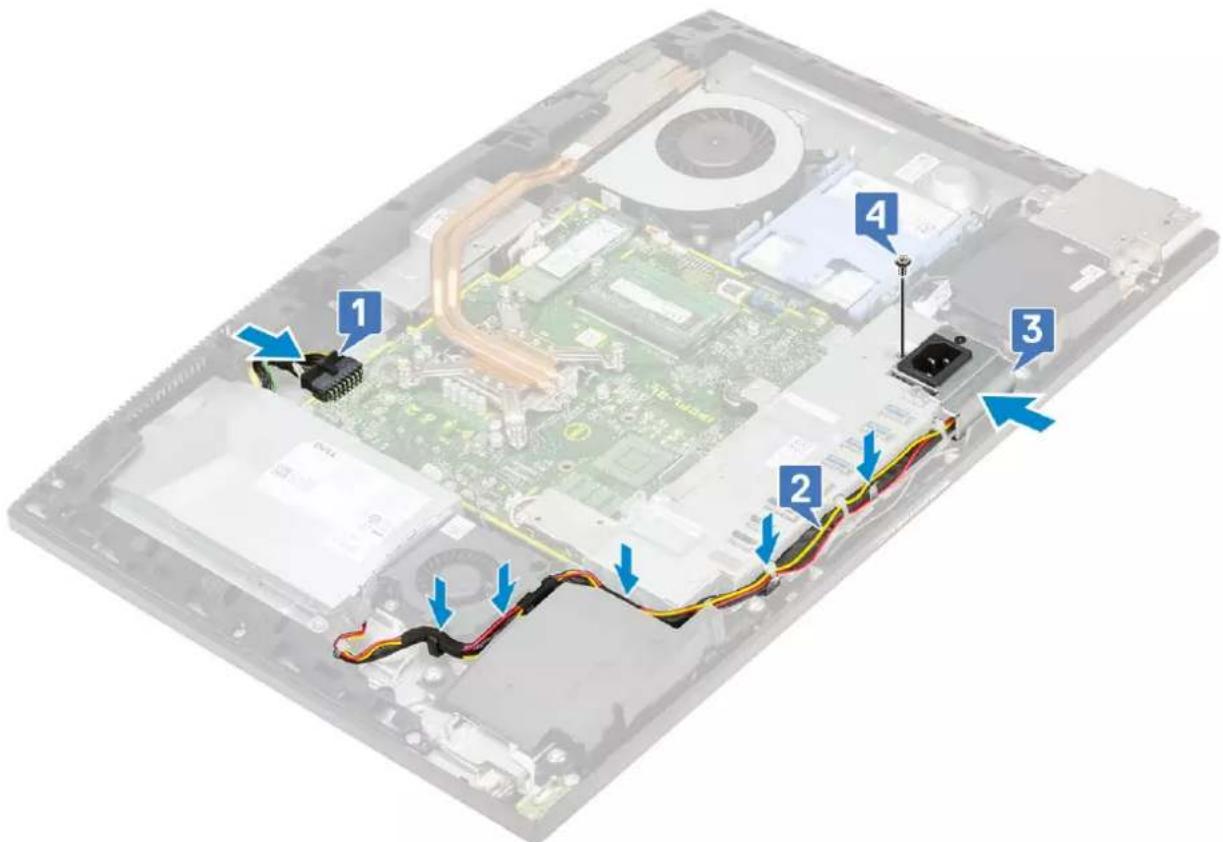
text_image
Labeled diagram of an open computer motherboard showing internal components and cable routing with numbered annotations- Install the following components:
a. Base cover
b. System board shield
c. Back cover
d. Stand
- Follow the procedure in After working inside your computer.
- Follow the procedure in Before working inside your computer.
- Remove the following components:
a. Stand
b. Back cover
c. System board shield
d. Base cover
- To remove the PSU fan:
a. Unroute the power supply cables from the retention clips in the PSU fan.
b. Disconnect the PSU fan cable form the socket on the system board [1].
c. Remove two (M3x5) screws that secure the PSU fan to the display assembly base [2].
d. Lift the PSU fan away from the chassis [3].
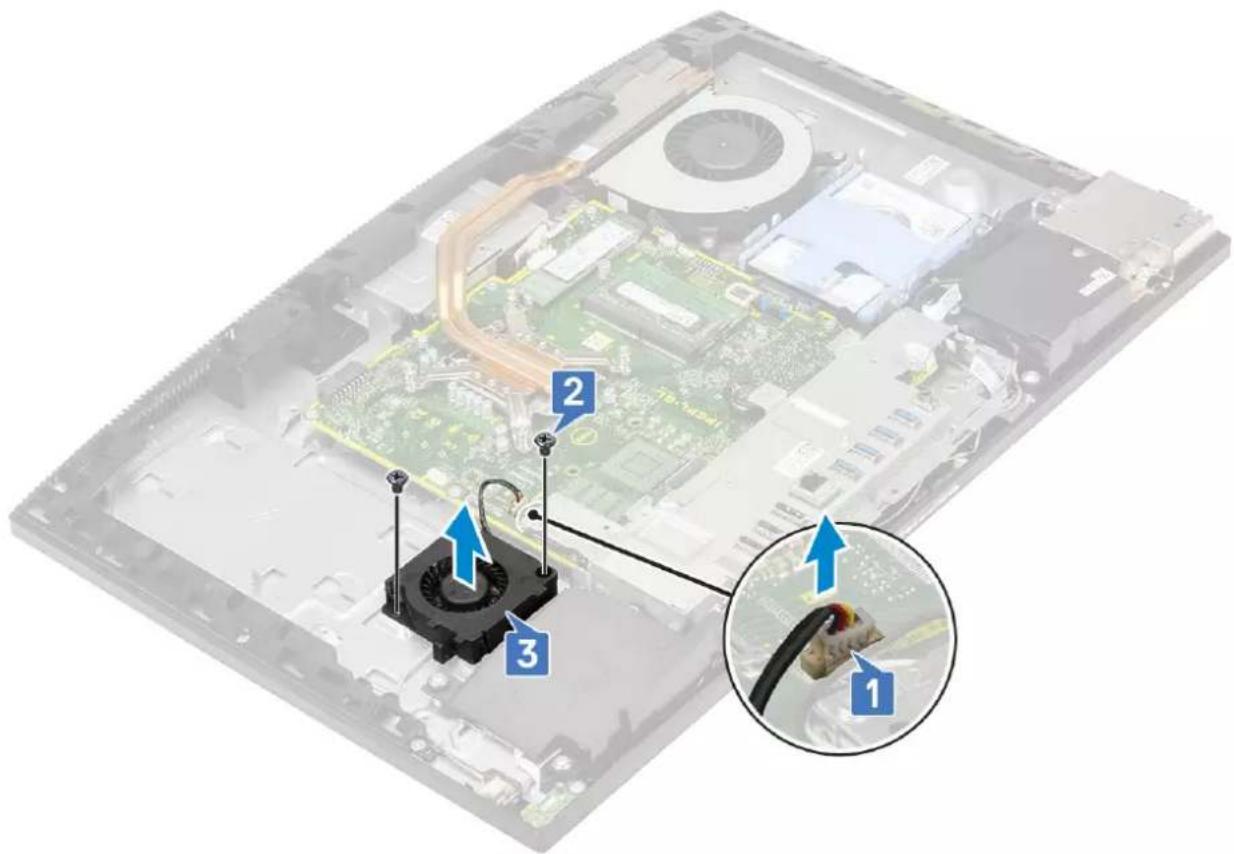
text_image
Labeled diagram of an open computer motherboard showing three components: power cord, cable, and socket with numbered annotations.Installing the power supply unit -PSU fan
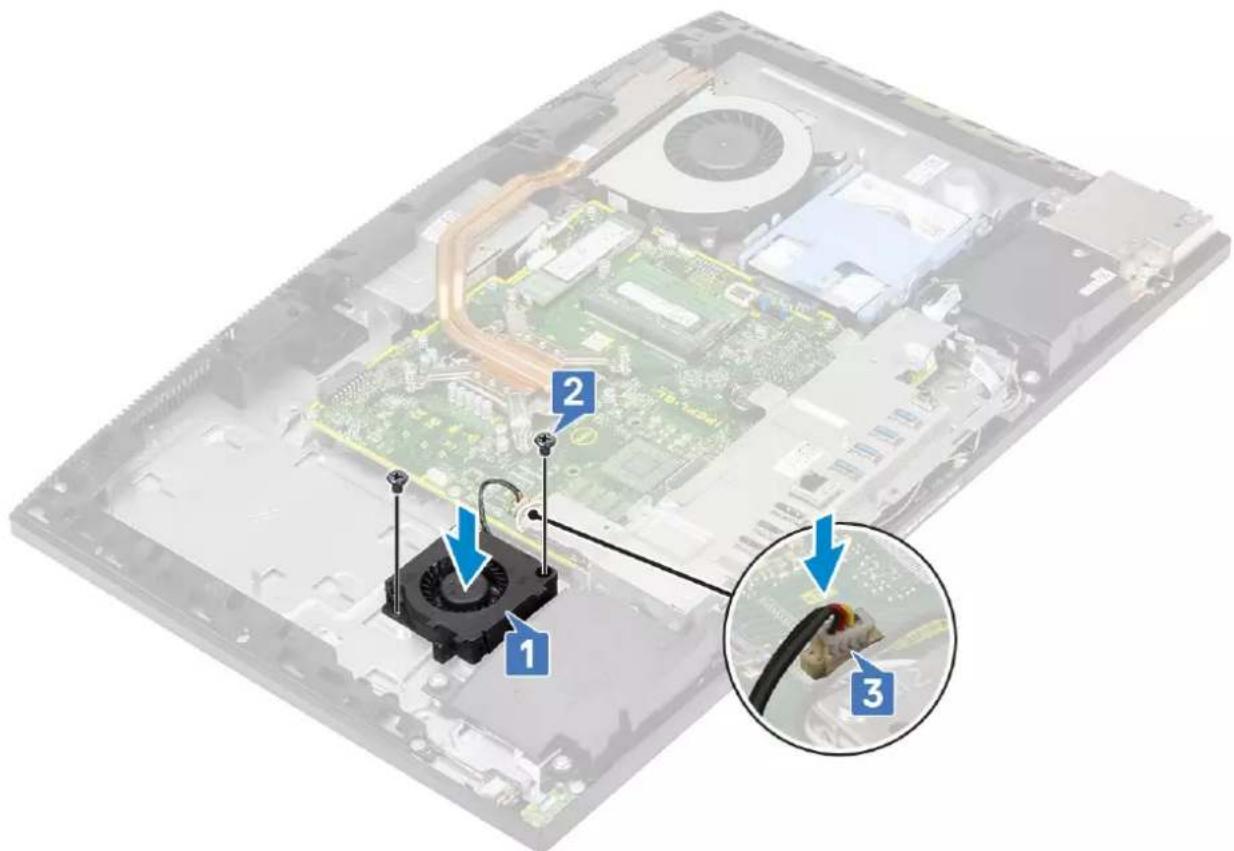
- To install the PSU fan:
a. Align and place the PSU fan on the chassis [1].
b. Replace the two (M3x5) screws that secure the PSU fan to the display assembly base [2].
c. Connect the PSU fan cable to the socket on the system board [3].
d. Route the power supply cables to the retention clips on the PSU fan.
text_image
Labeled diagram of an electronic device showing internal components and cable connection, with numbered annotations pointing to parts 1, 2, and 3.- Install the following components:
a. Base cover
b. System board shield
c. Back cover
d. Stand
- Follow the procedure in After working inside your computer.
Input and Output bracket
Removing the Input and Output bracket
- Follow the procedure in Before working inside your computer.
- Remove the following components:
a. Stand
b. Back cover
c. System board shield
d. Base cover
-
Release the PSU cable to remove the Input and Output (I/O) bracket.
-
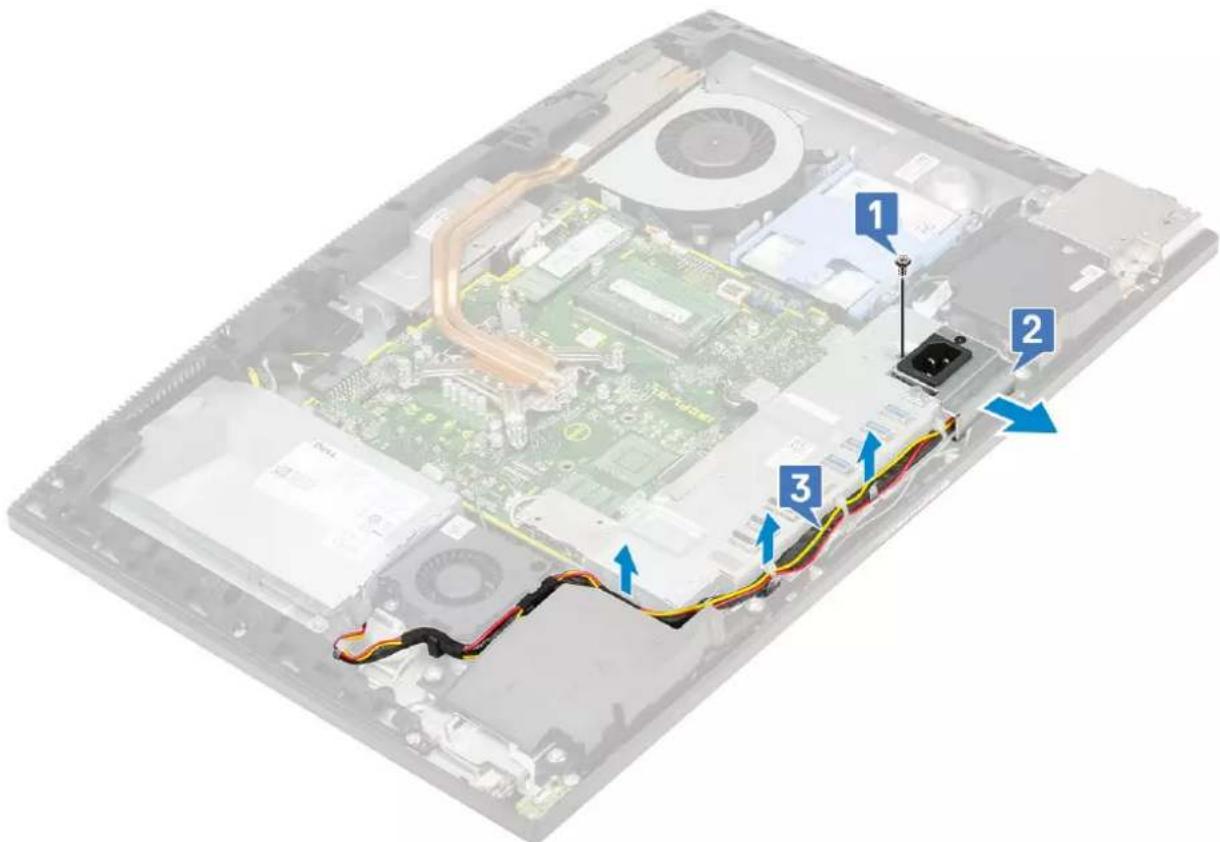
To release the PSU cable:
a. Remove the single (M3x5) screw securing the power supply socket to the Input and Output (I/O) bracket [1].
b. Slide the power supply socket away to remove it from the system [2].
c. Unroute the power supply cables from the retention clips in the chassis [3].
text_image
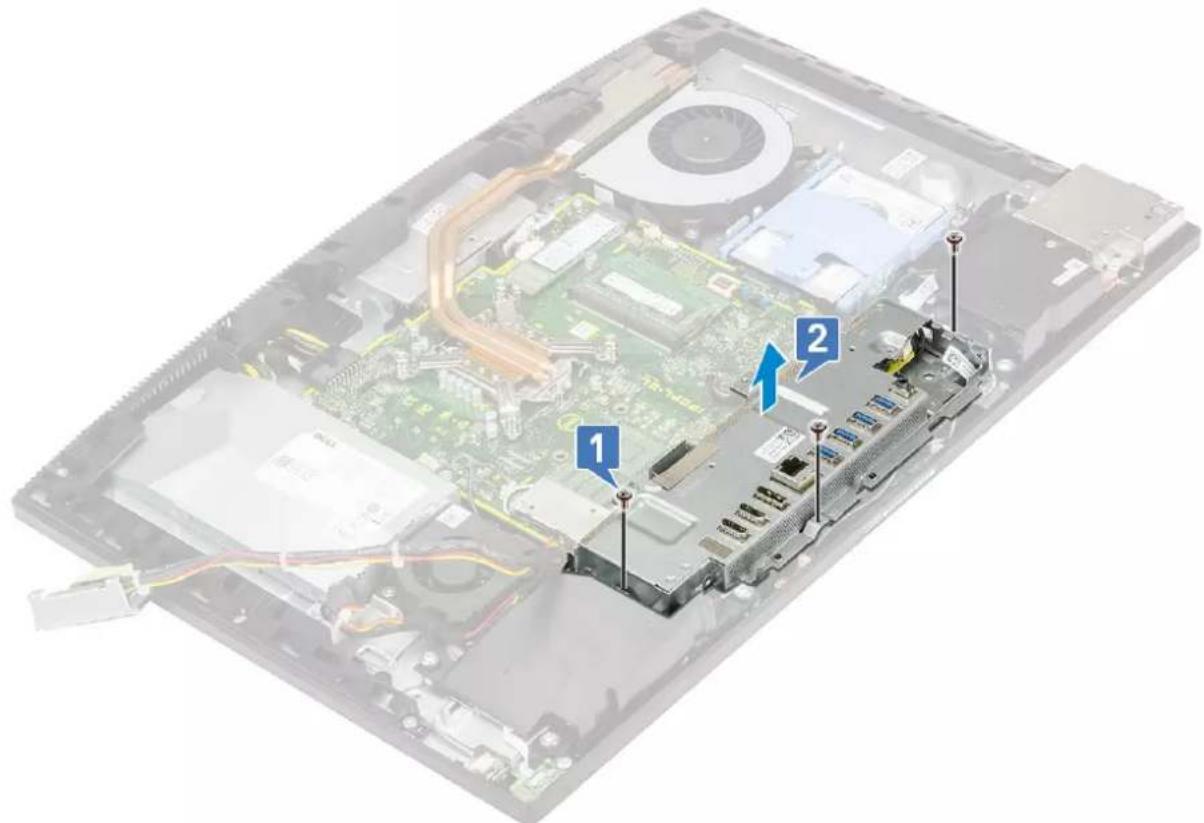
Labeled diagram of an open computer motherboard showing cable routing and component annotations- To remove the Input and Output (I/O) bracket:
a. Remove the three (M3x5) screws that secure the I/O bracket to the display assembly base [1].
b. Lift the I/O bracket off the display assembly base [2].
text_image
Labeled diagram of an open computer motherboard showing CPU socket, drive, and cable connections with numbered annotations.Installing the Input and Output bracket
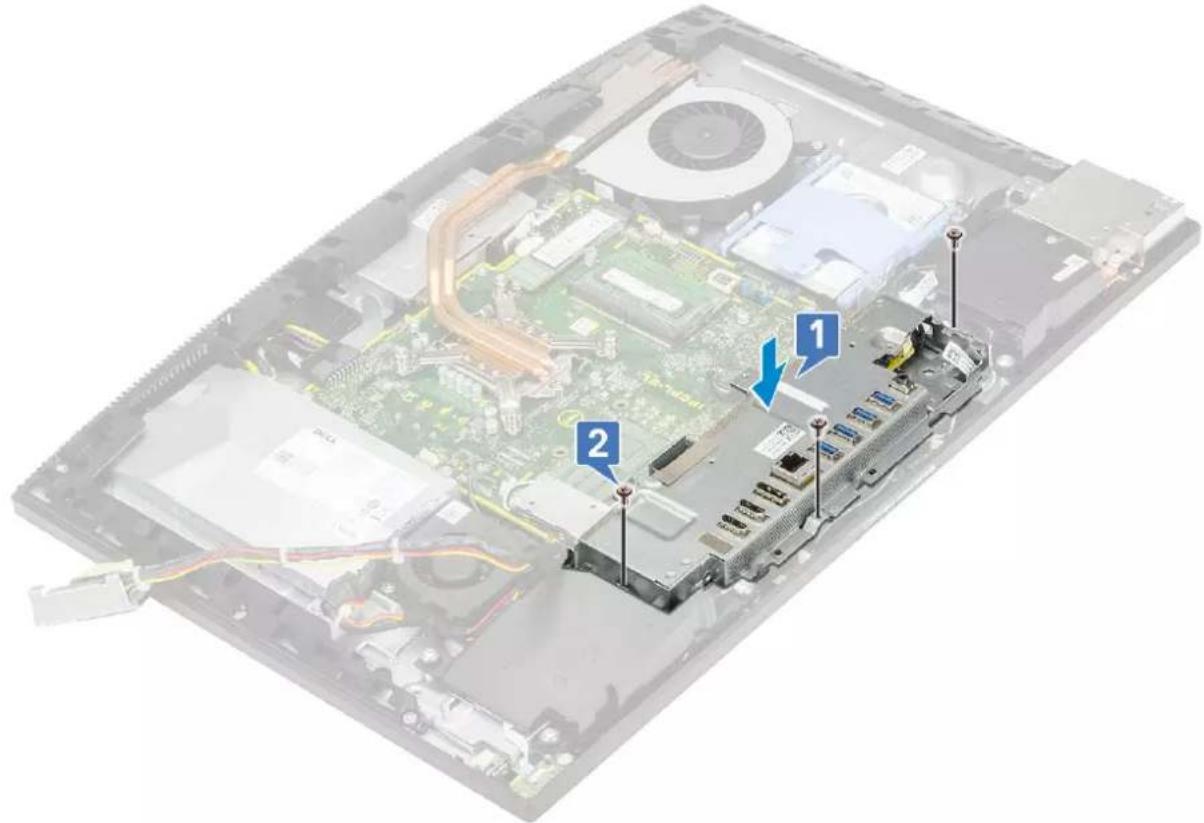
- To install the Input and Output bracket (I/O) bracket:
a. Align the slots on the Input and Output bracket (I/O) bracket with the ports on the system board [1].
b. Replace the three screws (M3x5) that secure the I/O bracket to the display assembly base [2].
text_image
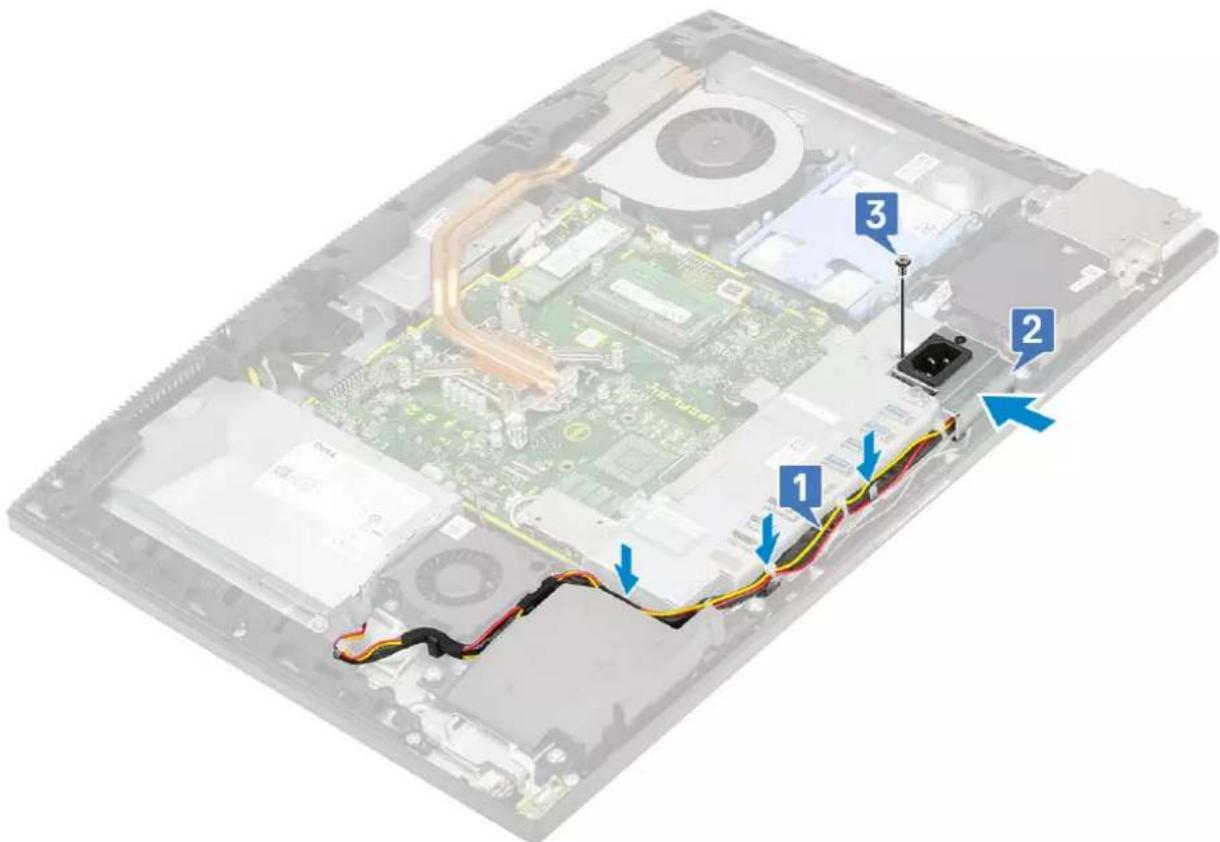
Labeled diagram of an open computer motherboard showing CPU socket, drive, and cable connections with numbered annotations- To install the PSU cable:
a. Route back the power supply cables through the retention clips in the chassis [1].
b. Slide and replace the power supply socket on the chassis [2].
c. Replace the single (M3x5) screw securing the power supply socket to the I/O bracket [3].
text_image
Labeled diagram of an open computer motherboard showing cable routing and component annotations- Install the following components:
a. Base cover
b. System board shield
c. Back cover
d. Stand
- Follow the procedure in After working inside your computer.
System board
Removing the system board
- Follow the procedure in Before working inside your computer.
- Remove the following components:
a. Stand
b. Back cover
c. Hard drive
d. Memory
e. System board shield
f. Intel Optane
g. SSD
h. WLAN card
i. System fan
j. Heat sink
k. Processor
I. Base cover
m. I/O bracket.
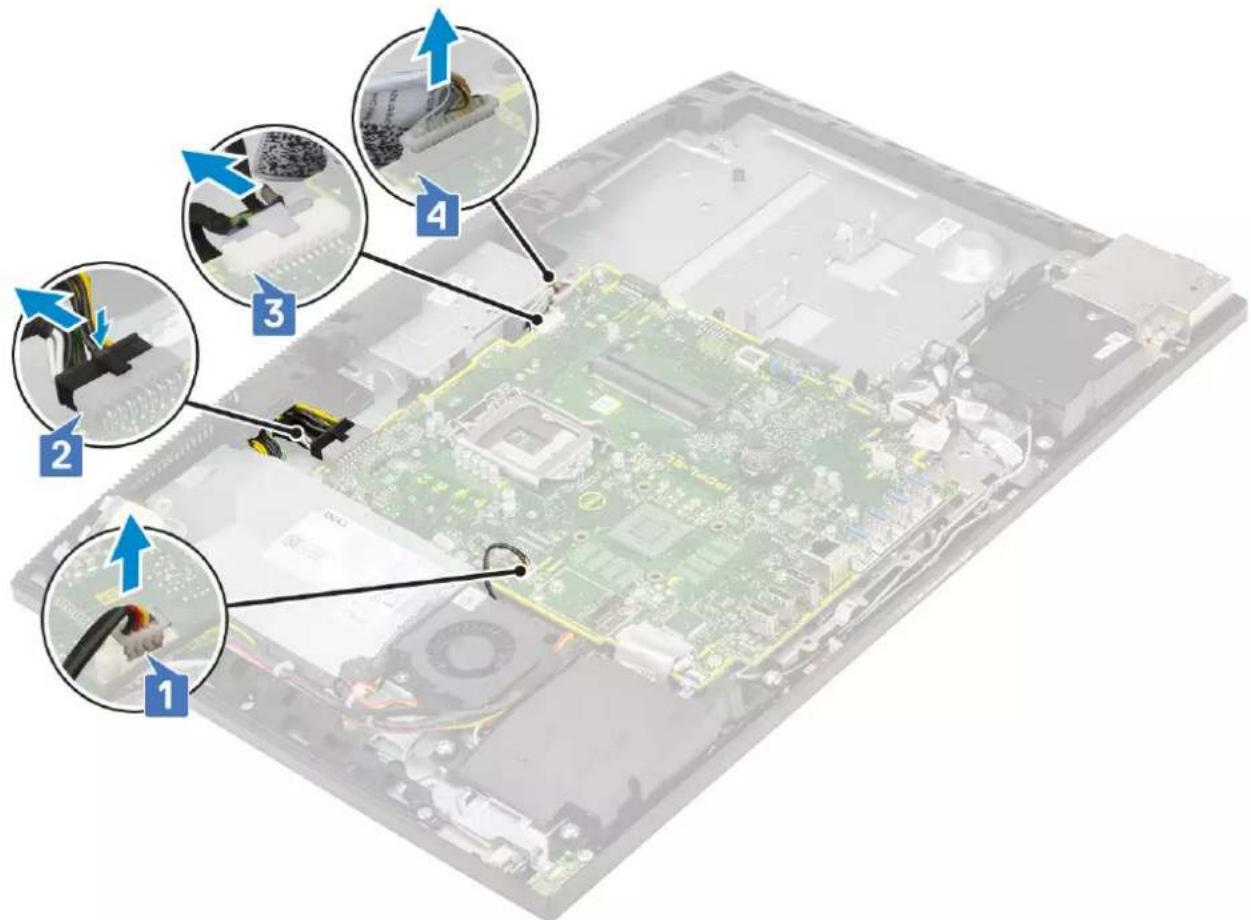
-
Disconnect the following cables from the system board:
-
PSU fan cable [1]
●Power supply unit cable [2] - Backlight cable [3]
- Camera cable [4]
text_image
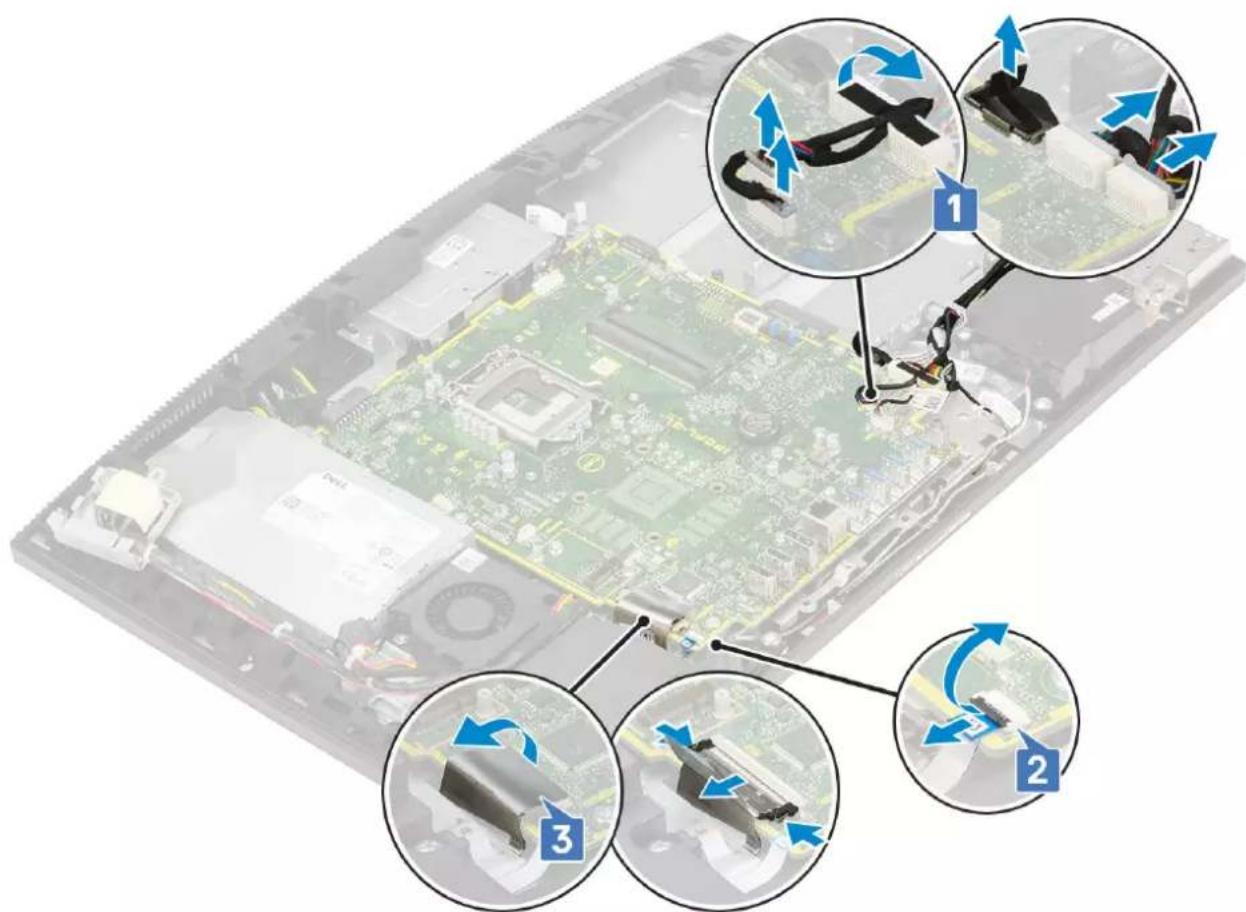
Labeled diagram of an electronic device showing internal components and cable connections, with numbered annotations pointing to specific parts.- SIO_signal, SIO power, INT_speaker, and DMIC cables [1]
●Power button board cable [2] - LVDS cable [3]
text_image
Laptop interior with close-up views of circuit board and hardware, annotated with numbered instructions for assembly or repair.- Remove the nine screws (M3x5) that secure the system board to the display assembly base [1].
- Lift the system board off the display assembly base [2].

text_image
Labeled diagram of a computer motherboard showing two numbered components with annotationsInstalling the system board
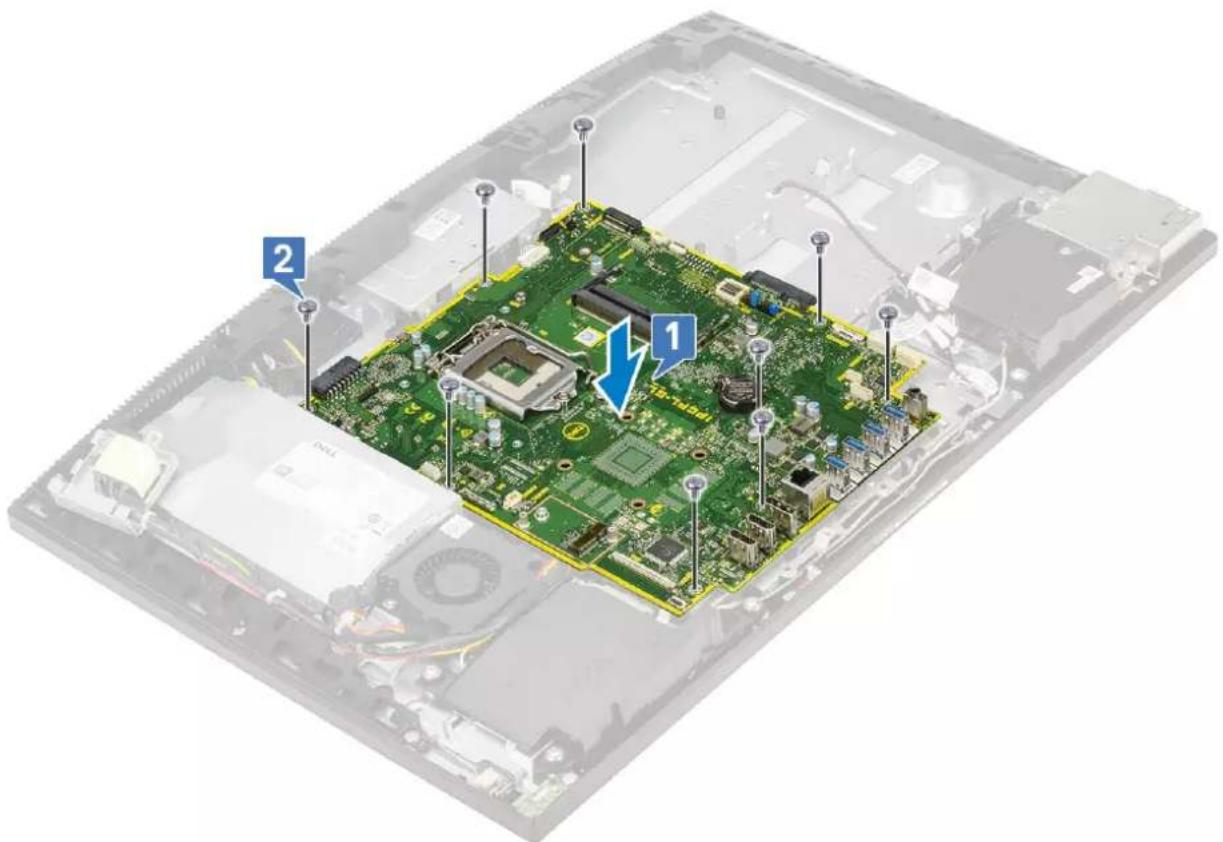
- Align the screw slots on the system board with the screw slots on the display assembly base [1].
- Replace the nine screws (M3x5) that secure the system board to the display assembly base [2].
text_image
Labeled diagram of a computer motherboard showing components with numbered annotations-
Connect the following cables to the system board:
-
Camera cable [1]
-Backlight cable [2]
●Power supply unit cable [3] -
PSU fan cable [4]
-
LVDS cable [1]
• Power button board cable [2] - SIO_signal, SIO power, INT_ speaker, and DMIC cables [3]
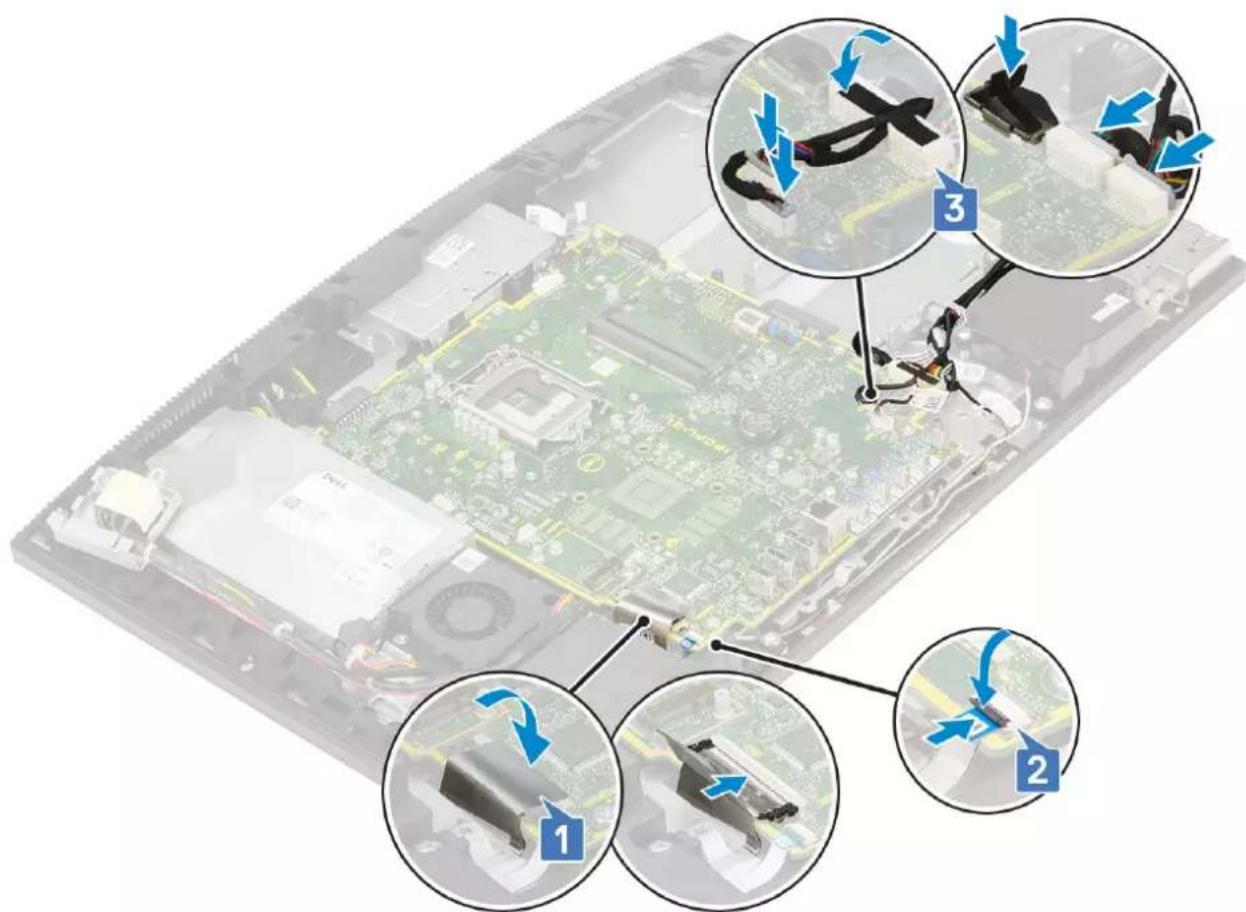
text_image
Laptop CPU internal components with numbered annotations highlighting cable and cable routing steps- Install the following components:
a. I/O bracket
b. Base cover
c. Processor
d. Heat sink
e. System fan
f. WLAN card
g. SSD
h. Intel Optane
i. System board shield
j. Memory
k. Hard drive
I. Back cover
m. Stand
- Follow the procedure in After working inside your computer
Speakers
Removing the speakers
- Follow the procedure in Before working inside your computer.
- Remove the following components:
a. Stand
b. Back cover
c. System board shield
d. Base cover
e. I/O bracket
- To disconnect the speakers:
a. Disconnect the speaker cable from the system board [1].
b. Remove the six screws (M3x4+7.1) that secure the speakers to the display-assembly base [2].
c. Unroute the speaker cable from the routing guide on the display assembly base [3].
d. Lift the speakers and the speaker cable off the display assembly base [4].
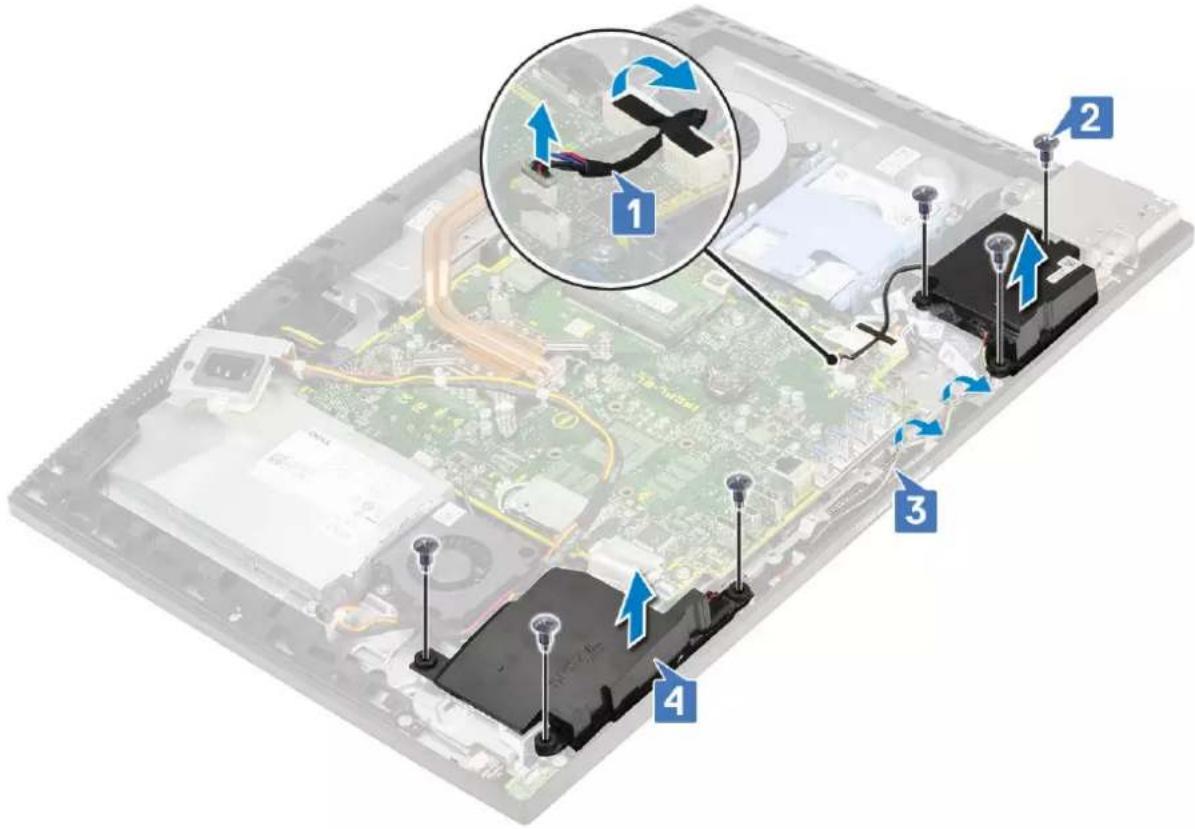
text_image
Laptop interior with labeled components and a magnified view showing cable routing and wiring changes.Installing the speakers
- To replace the speakers:
a. Place the speakers on the display assembly base and align the screw slots on the speakers with the screw slots on the display assembly base [1].
b. Route the speaker cable through the routing guides on the display assembly base [2].
c. Replace the six screws (M3x4+7.1) that secure the speakers to the display assembly base [3].
d. Connect the speaker cable to the socket on the system board [4].
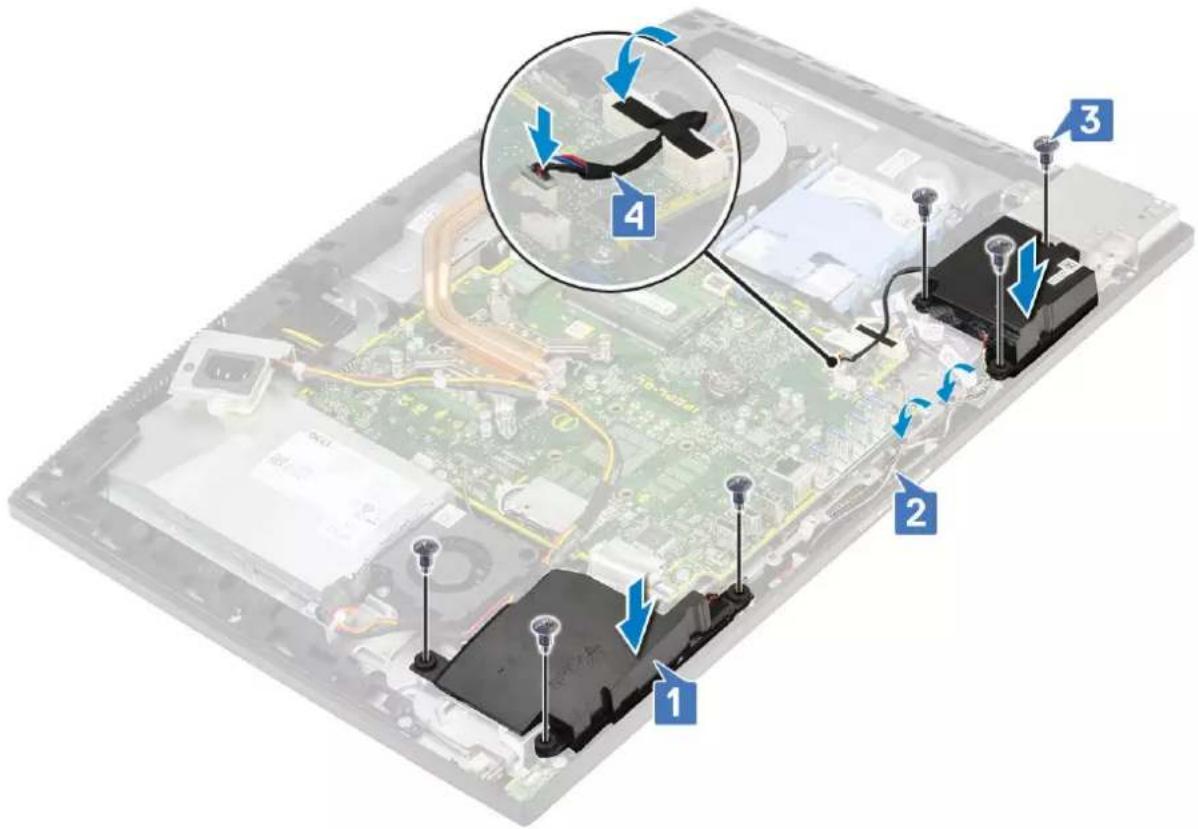
text_image
Laptop interior diagram with numbered components and a magnified view of a cable or cable connector detail- Install the following components:
a. I/O bracket
b. Base cover
c. System board shield
d. Back cover
e. Stand
- Follow the procedure in After working inside your computer.
Power button board
Removing the power button board
- Follow the procedure in Before working inside your computer.
- Remove the following components:
a. Stand
b. Back cover
c. System board shield
d. Base cover
e. I/O bracket
f. Speakers
- To remove the power button board:
a. Open the latch, and disconnect the power button board cable from the system board [1].
b. Peel off the power button board cable from the display assembly base [2].
c. Remove the single screw (M3x5) that secures the power button board to the middle frame [3].
d. Lift the power-button board, along with its cable, off the middle frame [4].
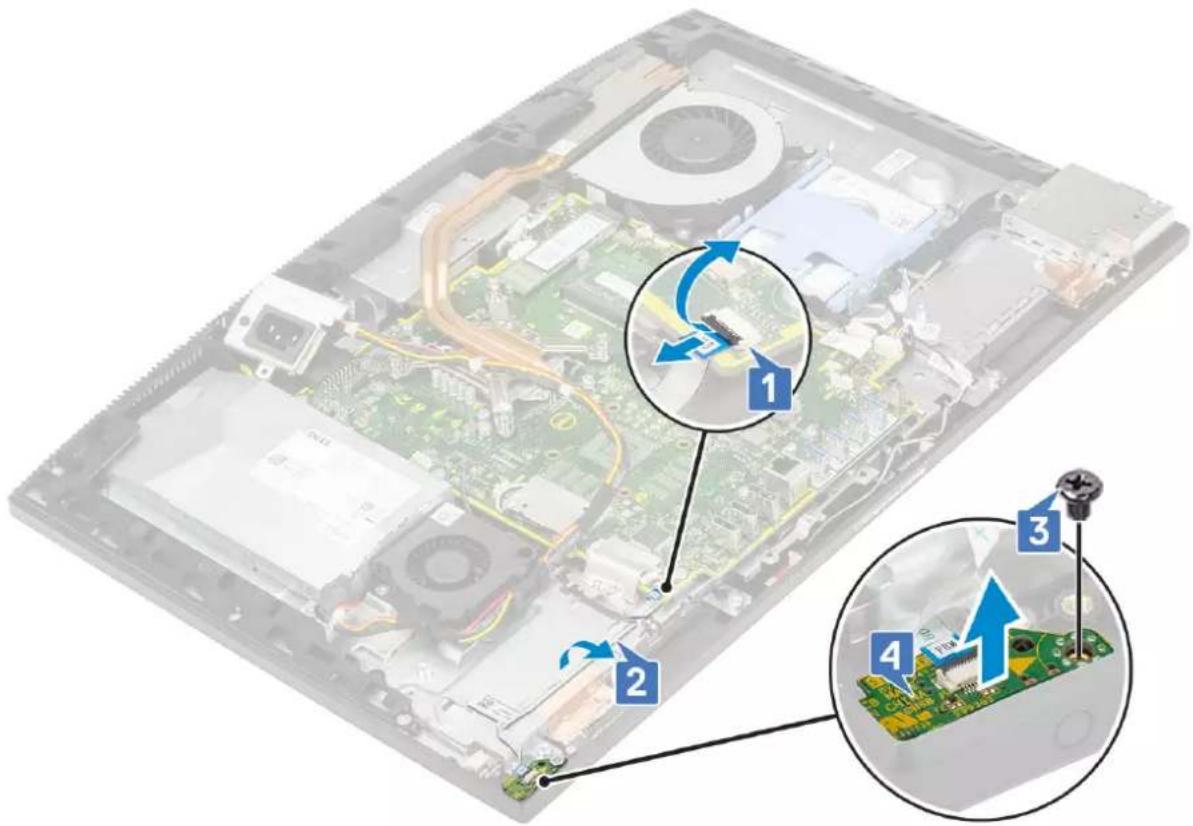
text_image
Labeled diagram of an electronic device showing internal components and a close-up view with numbered annotations.Installing the power button board
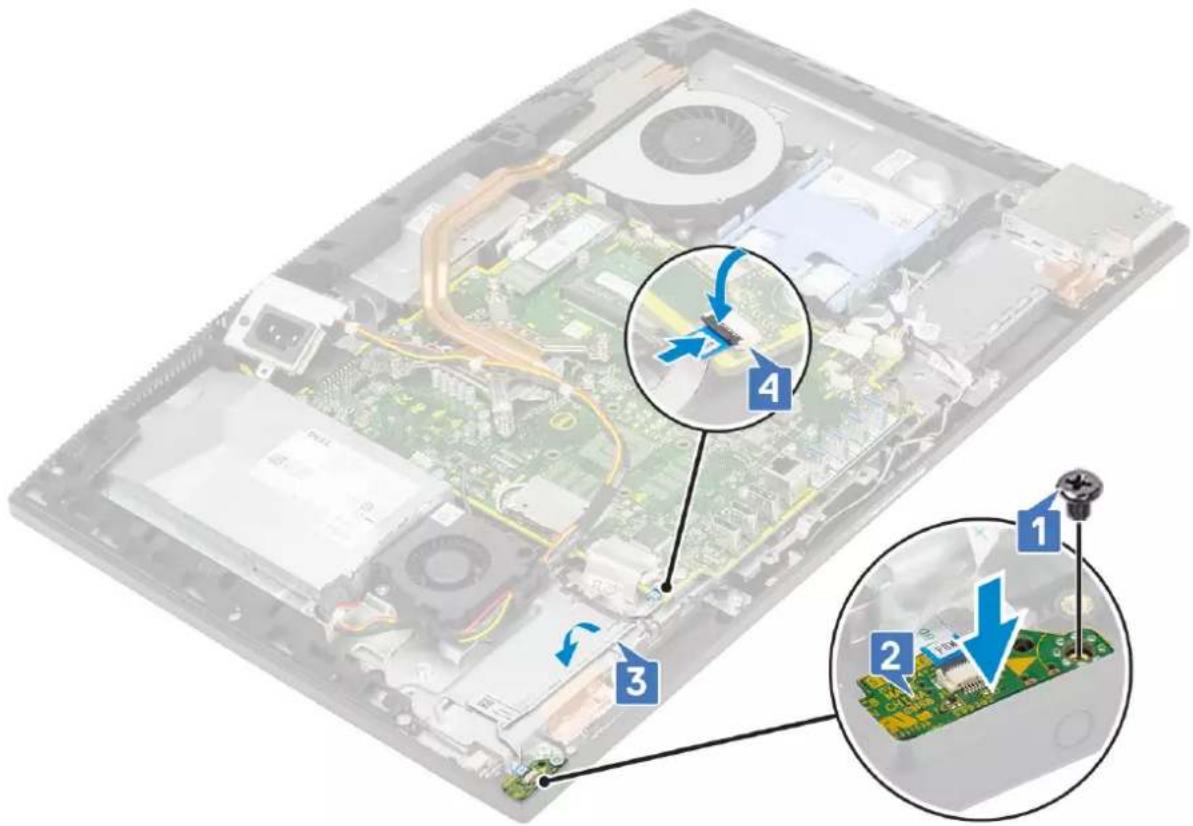
- To install the speakers:
a. Using the alignment post, place the power button board into its slot on the middle frame [1].
b. Replace the single screw (M3x5) that secures the power button board to the middle frame [2].
c. Slide the power button board cable under the antenna cable, then adhere the power button board cable to the display assembly base [3].
d. To secure the cable, slide the power button board cable into the socket on the system board and close the latch [4].
text_image
Labeled diagram of an open computer case showing internal components and a close-up of a circuit board with numbered annotations.- Install the following components:
a. Speakers
b. I/O bracket
c. Base cover
d. System board shield
e. Back cover
f. Stand
- Follow the procedure in After working inside your computer.
Microphones
Removing the microphones
- Follow the procedure in Before working inside your computer.
- Remove the following components:
a. Stand
b. Back cover
c. System board shield
d. Base cover
e. I/O bracket
f. Speakers
g. PSU
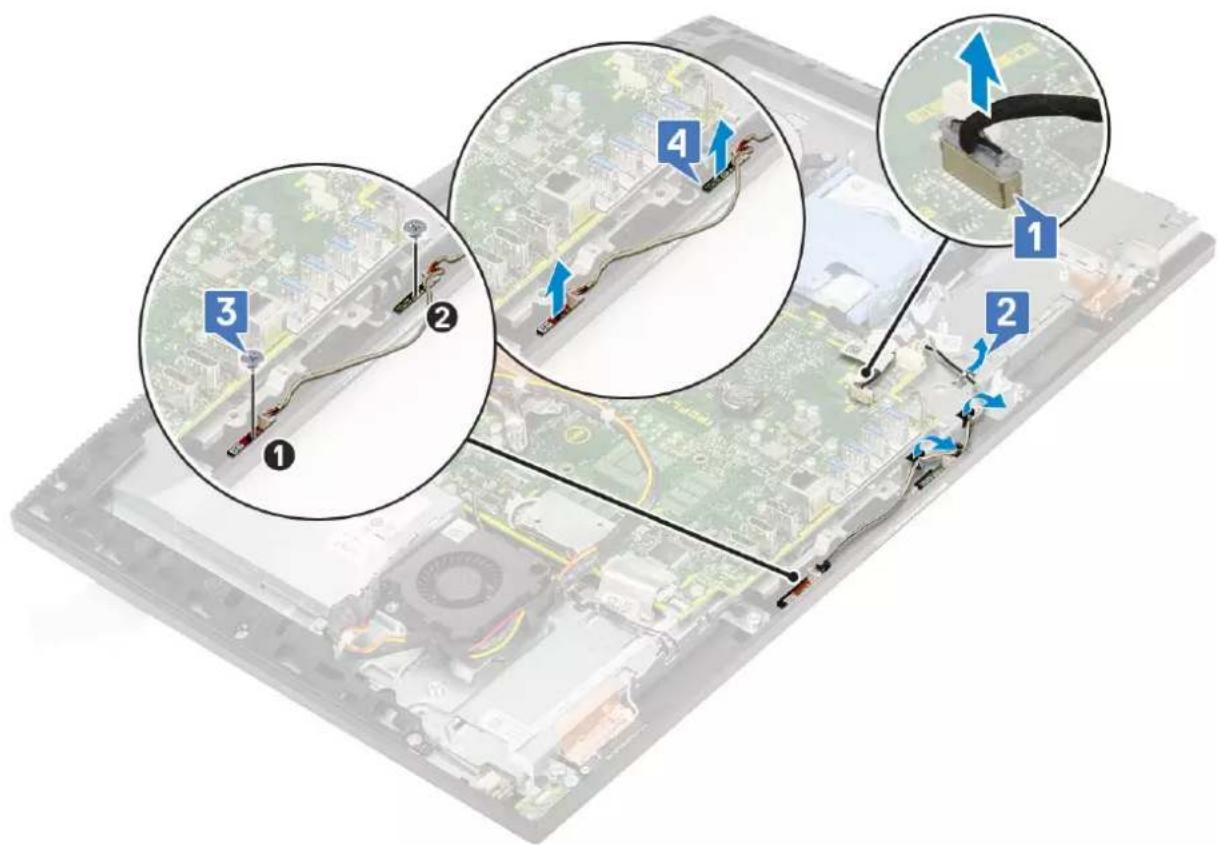
- To remove the microphone and cable:
a. Disconnect the microphone module cable from the system board [1].
b. Remove the microphone module cable from the routing guides on the display assembly base [2].
c. Remove the two screws (M2x2.5) that secure the microphone modules to the middle frame [3].
d. Lift the microphone modules off the slots on the middle frame [4].
text_image
Diagram showing cable installation steps on a computer motherboard, with numbered annotations indicating sequence of connection points.Installing the microphones
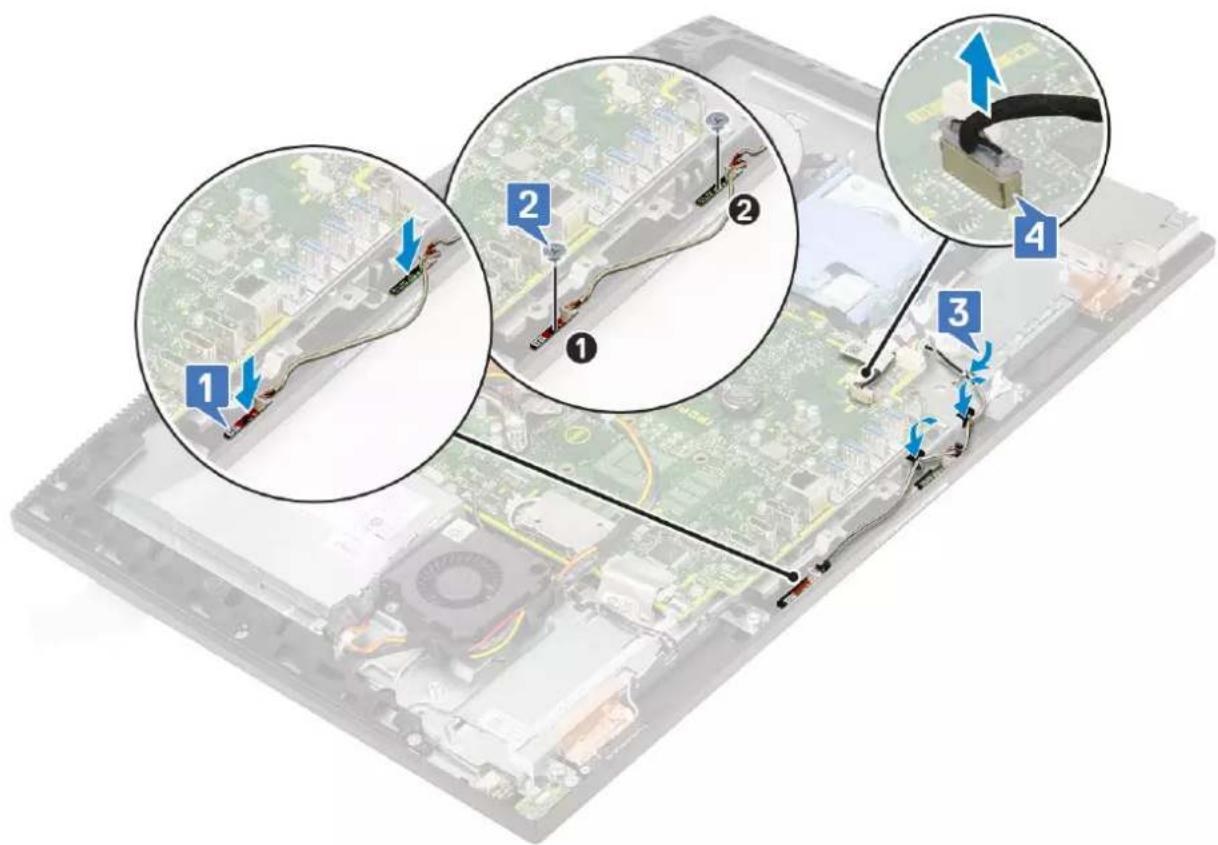
- To install the microphone and cable:
a. Align and place the microphone modules to the slots on the middle frame [1].
NOTE: Match the numbers on the microphone modules to the numbers on the middle frame while placing the microphone modules on the middle frame.
b. Replace the two screws (M2x2.5) that secure the microphone modules to the middle frame [2].
c. Route the microphone module cable through the routing guides on the display assembly base [3].
d. Connect the microphones module cable to the socket on the system board [4].
text_image
Diagram showing cable installation steps on a computer motherboard, with numbered annotations indicating connection points and cable movement.- Install the following components:
a. PSU
b. Speakers
c. I/O bracket
d. Base cover
e. System board shield
f. Back cover
g. Stand
- Follow the procedure in After working inside your computer.
Input and Output board
Removing the Input and Output board
- Follow the procedure in Before working inside your computer.
- Remove the following components:
a. Stand
b. Back cover
c. System board shield
d. Base cover
e. I/O bracket
f. Speakers
g. Hard drive
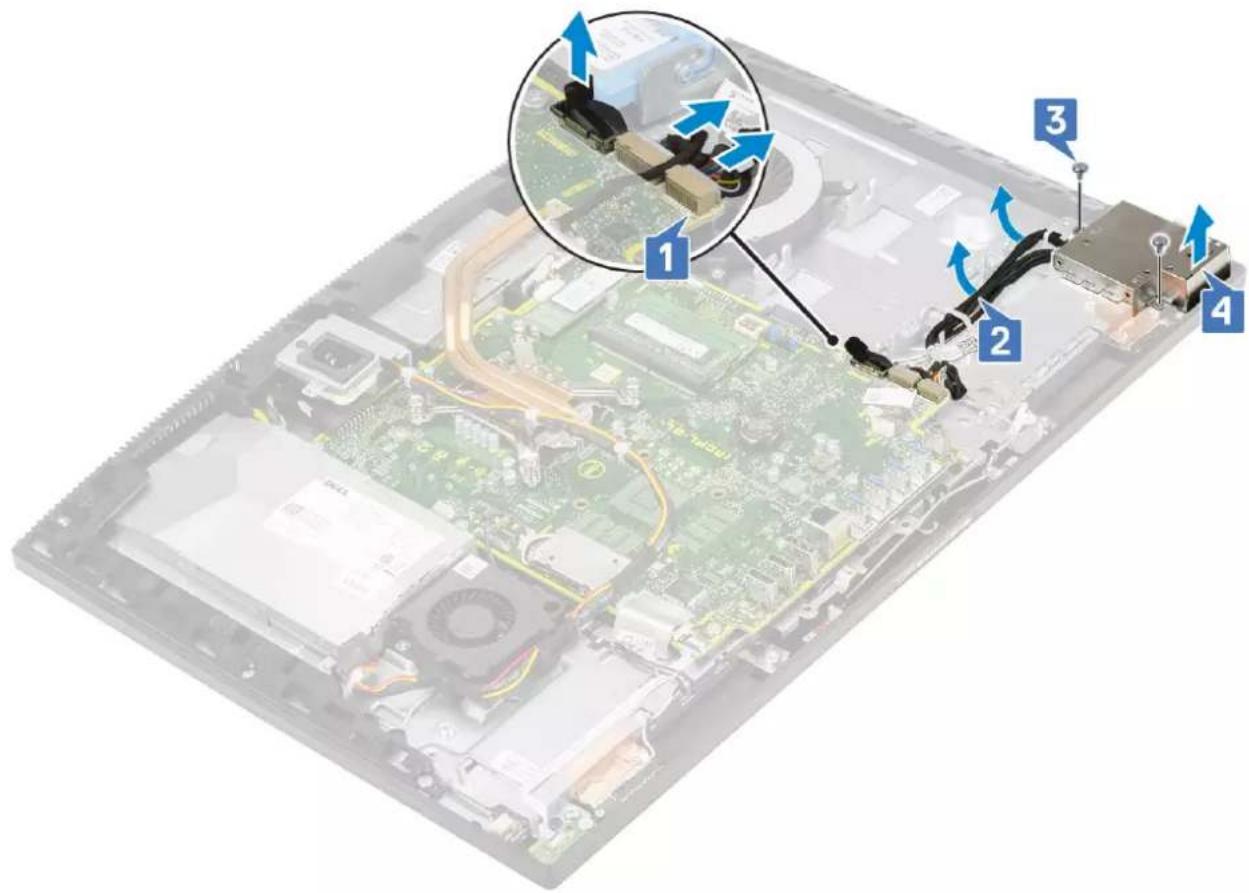
- To remove the Input and Output board (I/O) board shield:
a. Disconnect the I/O board cable, I/O board power cable, and headset port cable from the system board [1].

NOTE: Use the pull tab to disconnect the I/O board cable from the system board.
b. Remove the I/O board cable, I/O-board power cable, and headset port cable from the routing guides on the display assembly base [2].
c. Remove the two screws (M3x5) securing the I/O board shield to the display assembly base [3].
d. Lift the I/O board shield from the display assembly base [4].
text_image
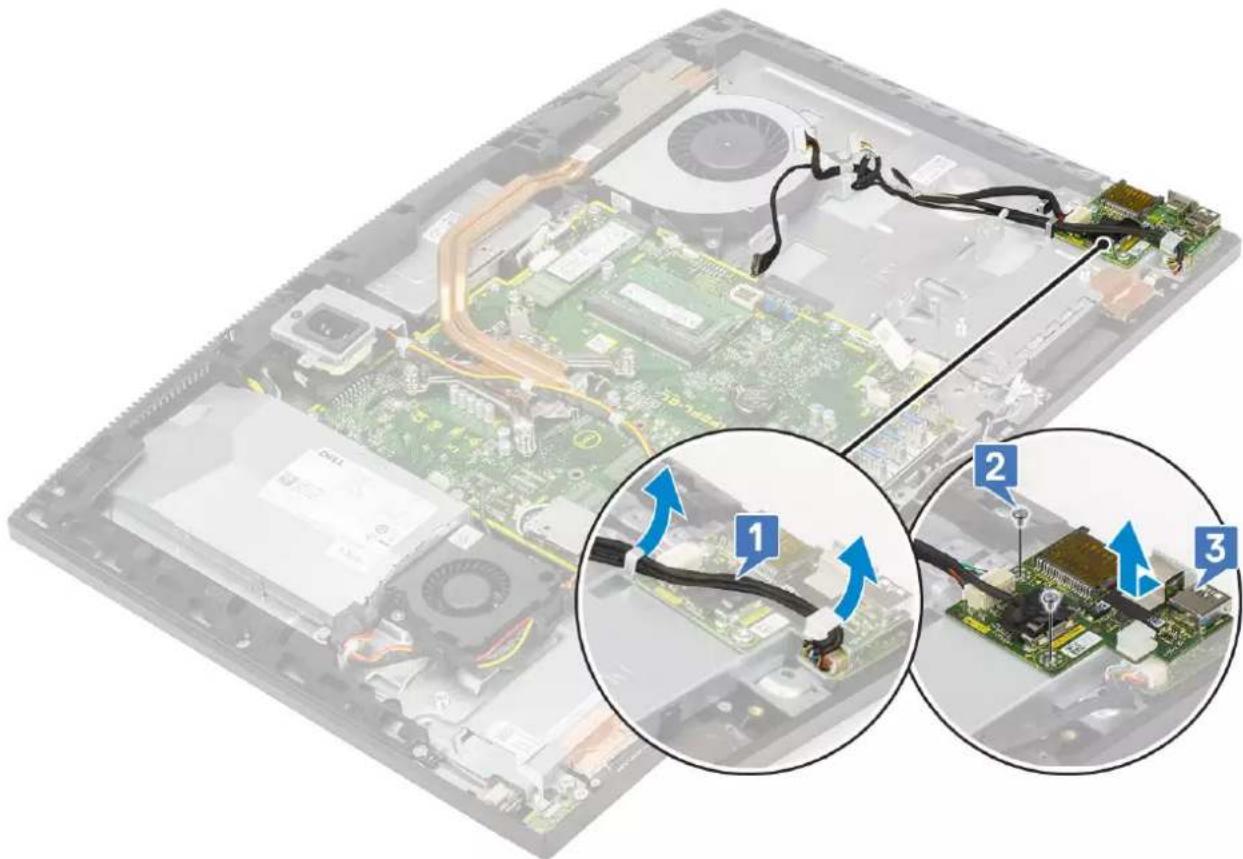
Labeled diagram of an electronic device showing internal components and a magnified view of the circuit board with numbered annotations.- To remove the I/O board:
a. Remove the headset port cable from the routing guide on the I/O board [1].
b. Remove the two screws (M3x5) that secure the I/O board to the display assembly base [2].
c. Lift the I/O board with its cables from the display assembly base [3].
natural_image
Laptop interior showing internal circuit board and cable connections, with three zoomed-in views highlighting cable routing (no text or symbols present)Installing the input and output board
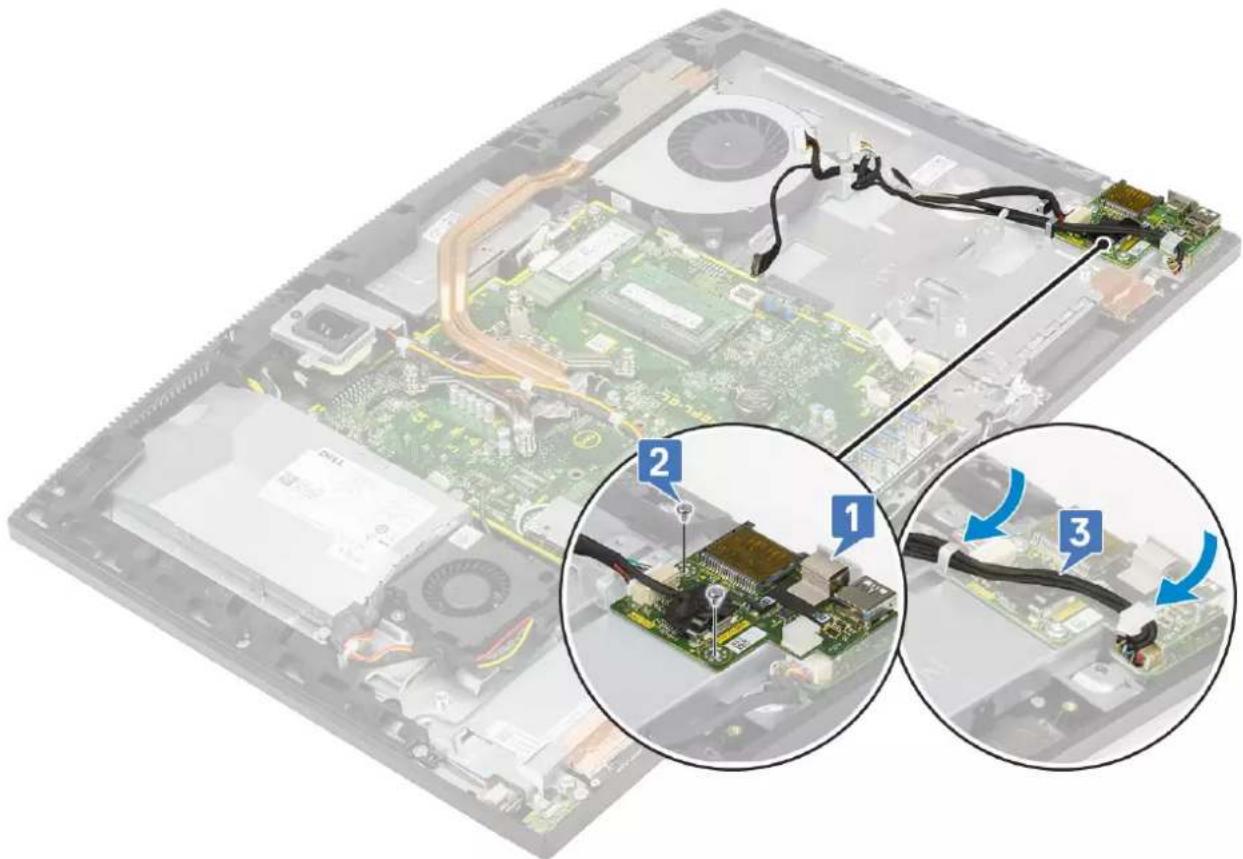
- To replace the I/O board:
a. Place and align the Input and Output board (I/O) board onto the display assembly base [1].
b. Replace the two screws (M3x5) that secure the I/O board to the display assembly base [2].
c. Route the headset port cable through the routing guide on the I/O board [3].
natural_image
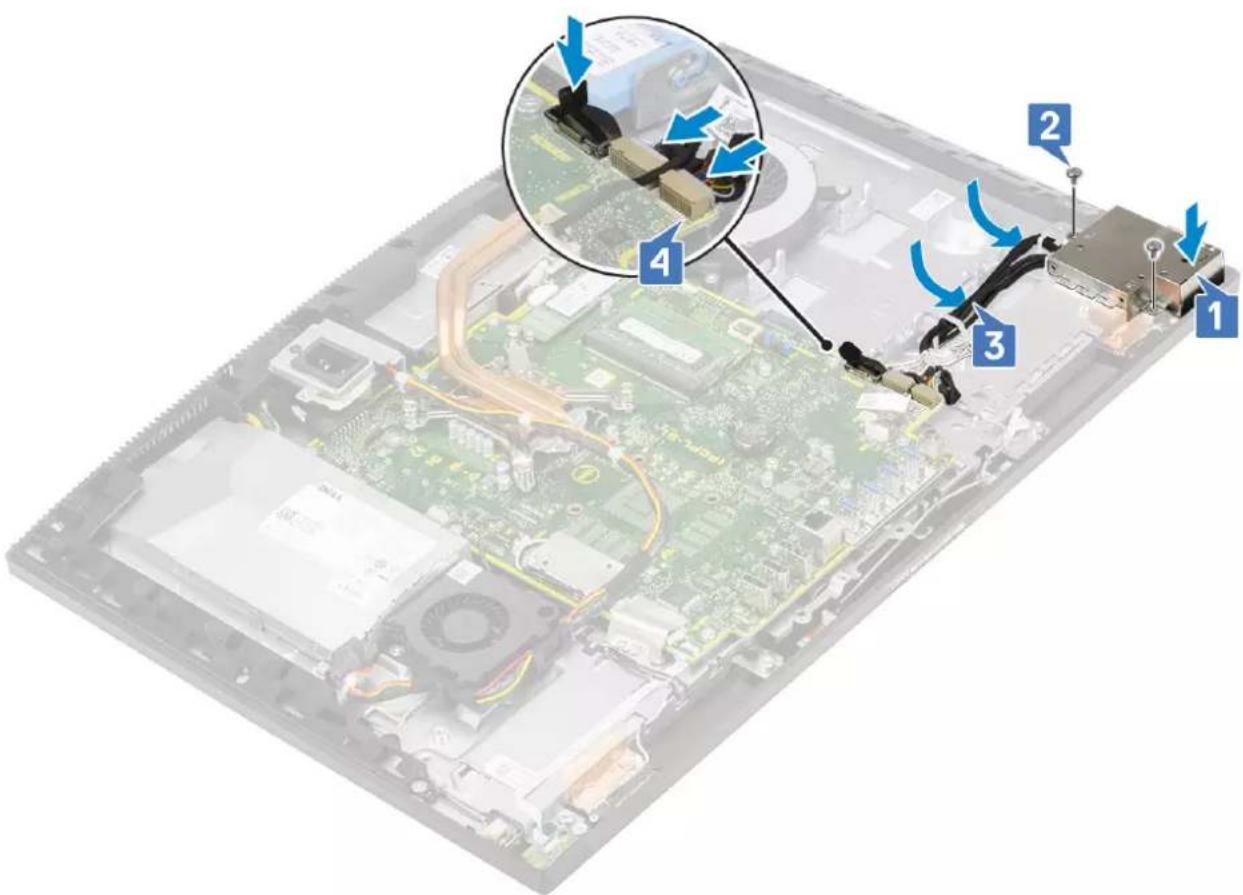
Laptop interior showing circuit board with cable and connectors, annotated with three zoomed-in views (no text or symbols present)- To replace the I/O board shield:
a. Place and align the screw slots on the I/O board shield to the slots on the display assembly base [1].
b. Replace the two screws (M3x5) that secure the I/O board shield to the display assembly base [2].
c. Route the headset port cable, I/O board cable, and I/O board power cable through the routing guides on the display assembly base [3].
d. Connect the I/O board cable, I/O board power cable, and headset port cable to the system board [4].
text_image
Labeled diagram of an electronic device showing internal components and a magnified view of the circuit board with numbered parts.- Install the following components:
a. Hard drive
b. Speakers
c. I/O bracket
d. Base cover
e. System board shield
f. Back cover
g. Stand
- Follow the procedure in After working inside your computer.
Headset port
Removing the headset port
- Follow the procedure in Before working inside your computer.
- Remove the following components:
a. Stand
b. Back cover
c. System board shield
d. Base cover
e. I/O bracket
f. Speakers
g. Hard drive
h. I/O board
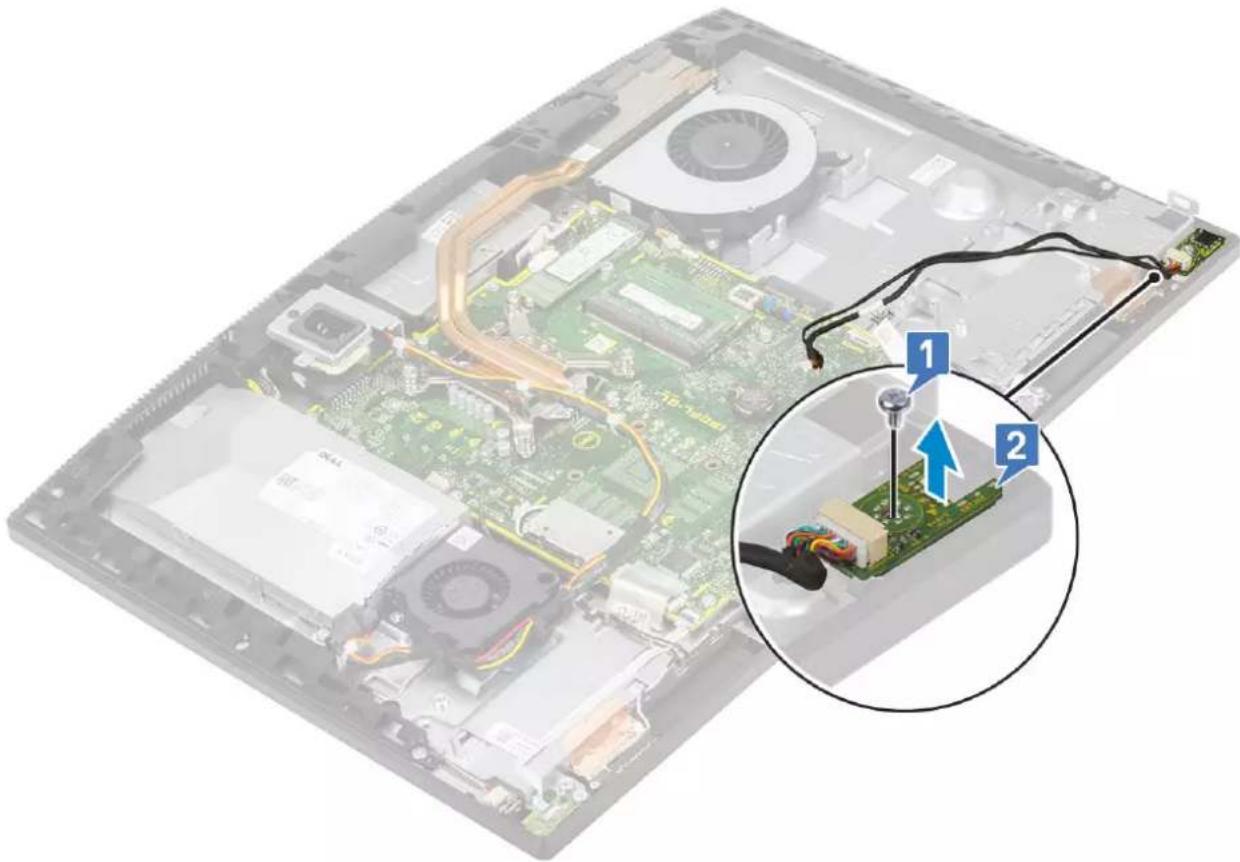
- Remove the single (M3x5) screw that secures the headset port to the display assembly base [1].
- Lift the headset port with its cable from the display assembly base [2].
natural_image
Interior view of a computer motherboard with visible CPU socket and wiring, showing a close-up of a component being inserted (no text or symbols present)Installing the headset port
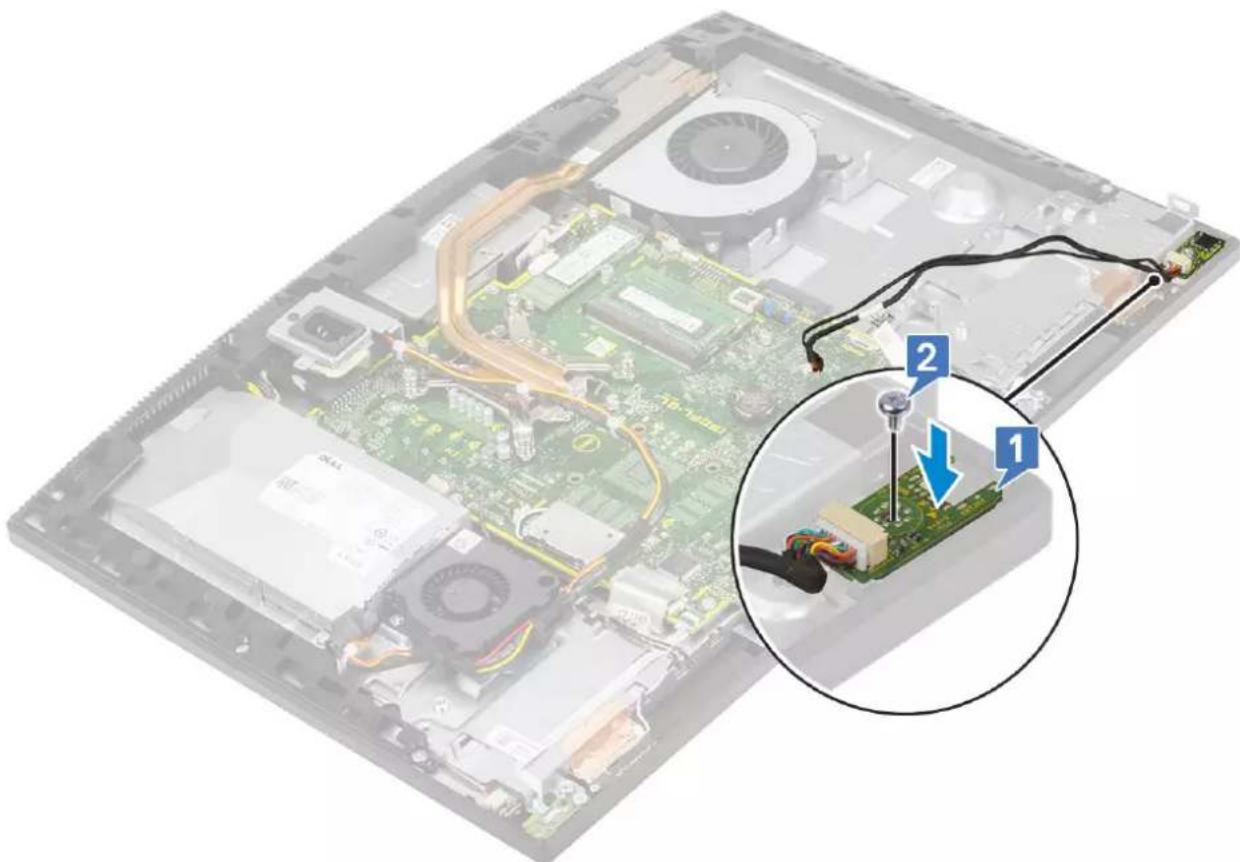
- Slide the headset port into its slot on the middle frame and align the screw slot on the headset port to the screw slot on the display assembly base [1].
- Replace the single (M3x5) screw that secures the headset port to the display assembly base [2].
natural_image
Interior view of a computer motherboard with visible circuit boards and wiring, showing a close-up of a component being inserted (no text or symbols present)- Install the following components:
a. I/O board
b. Hard drive
c. Speakers
d. I/O bracket
e. Base cover
f. System board shield
g. Back cover
h. Stand
- Follow the procedure in After working inside your computer.
Antennas
Removing the antennas
- Follow the procedure in Before working inside your computer.
- Remove the following components:
a. Stand
b. Back cover
c. System board shield
d. Base cover
e. I/O bracket
f. Speakers
g. WLAN card
h. I/O board
i. PSU
j. PSU fan
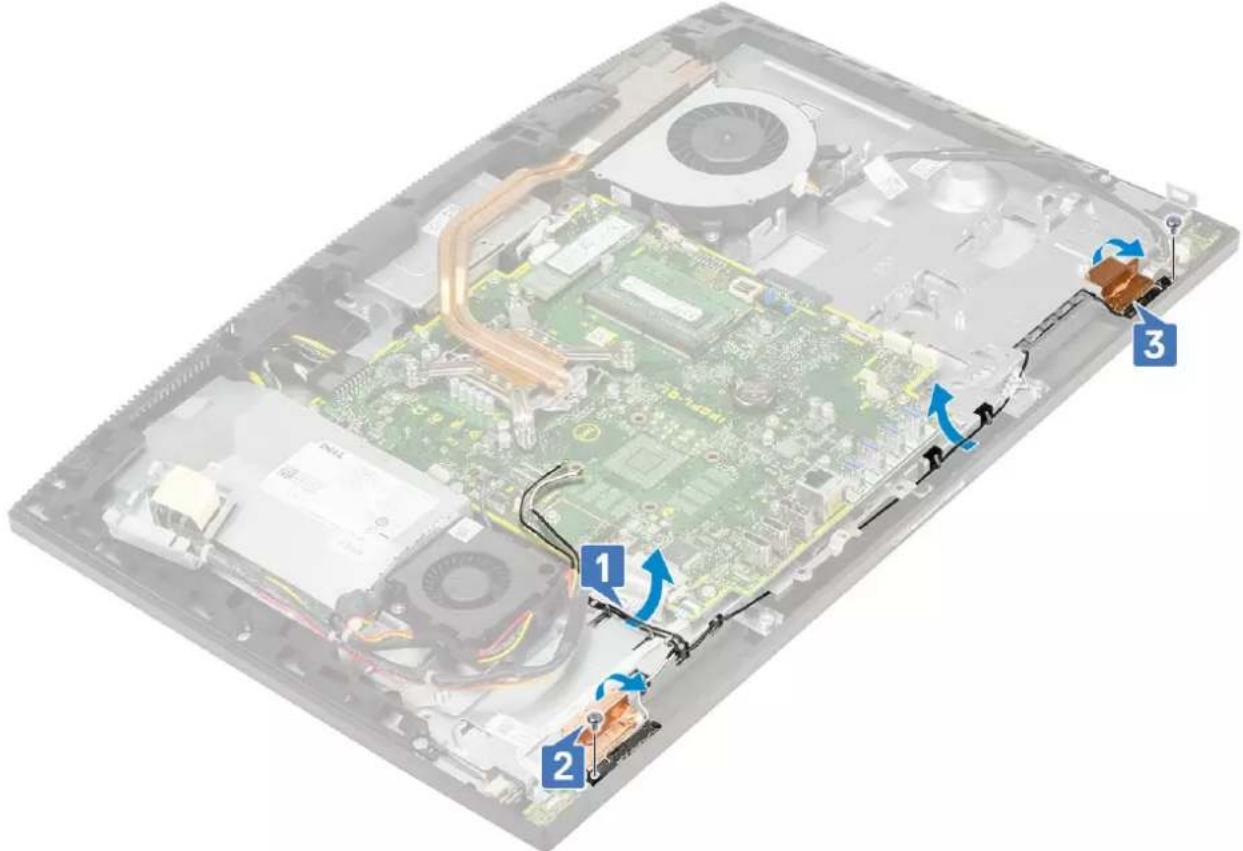
- To remove the antenna:
a. Remove the antenna cables from the routing guides on the display assembly base [1].
b. Remove the two screws (M2x2.5) that secure the antenna modules (2) to the middle frame [2].
c. Carefully peel the tape that secures the antenna cables (2) to the middle frame [3].
d. Release the antenna modules (2) from the tabs and lift the antenna modules off the middle frame.
text_image
Labeled diagram of an electronic device showing internal components and wiring, with numbered annotations indicating parts 1, 2, and 3.Installing the antennas
- To replace the antenna modules:
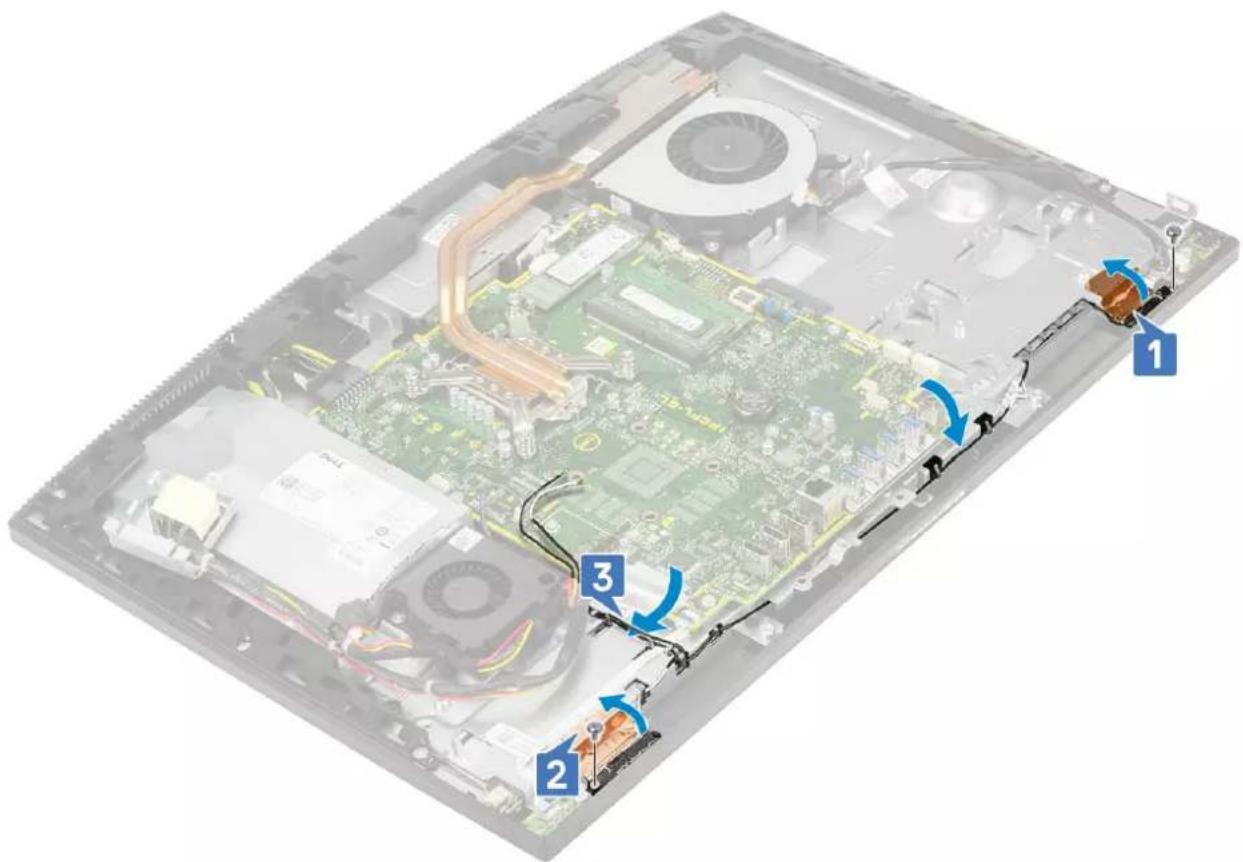
a. Align the antenna modules (2) with the slots on the middle frame.
b. Adhere the tape that secures the antenna cables (2) to the middle frame [1].
c. Replace the two screws (M2x2.5) that secure the antenna modules (2) to the middle frame [2].
d. Route the antenna cables through the routing guides on the display assembly base [3].
text_image
Labeled diagram of an electronic device showing internal components and cable connections with numbered annotations- Install the following components:
a. PSU fan
b. PSU
c. I/O board
d. WLAN card
e. Speakers
f. I/O bracket
g. Base cover
h. System board shield
i. Back cover
j. Stand
- Follow the procedure in After working inside your computer.
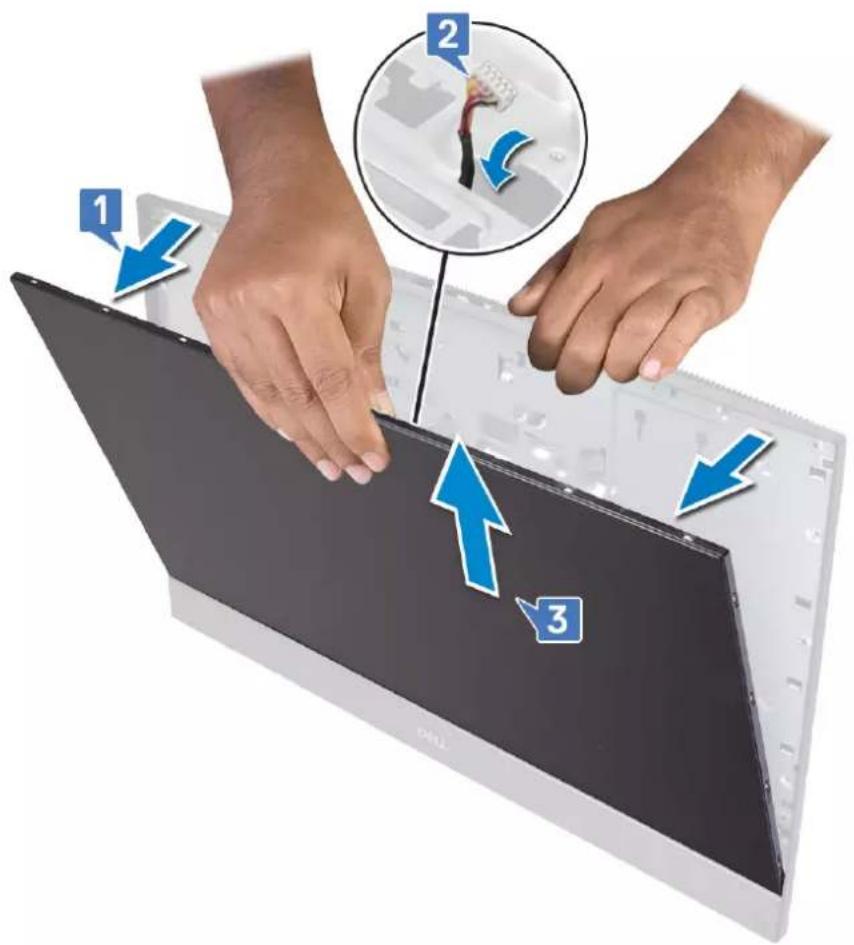
Display panel
Removing the display panel
- Follow the procedure in Before working inside your computer.
- Remove the following components:
a. Stand
b. Back cover
c. System board shield
d. Base cover
e. I/O bracket
f. System fan
g. Hard drive
h. WLAN card
i. System board
j. PSU
k. PSU fan
I. Camera
-
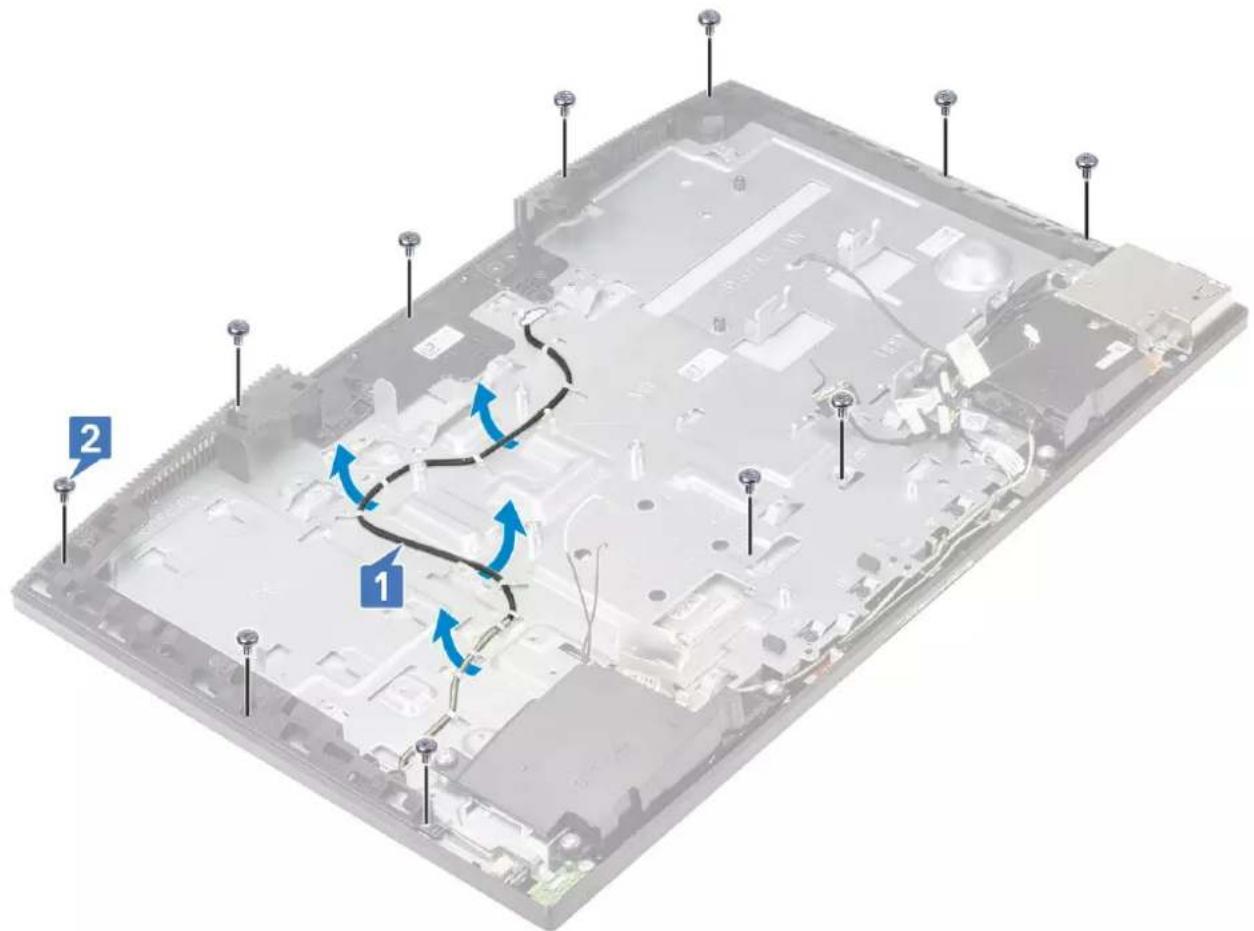
Remove the display backlight cable from the routing guides on the display assembly base [1].
-
Remove the 11 screws (M3x5) that secure the middle frame and display assembly base to the display panel [2].

NOTE: The screws that secure the middle frame and display assembly base to the display panel are silver in color and etched with "LCD" around the screw holes.
text_image
Technical diagram of an electronic device with labeled components and directional arrows indicating motion or flow.-
Place the system in upright position, holding the display panel and display assembly base, carefully release the display panel from middle frame and display assembly base [1].
-
Slide the display backlit cable through the slot on the display assembly base [2].
-
Lift the display panel off the middle frame and display assembly base [3].
text_image
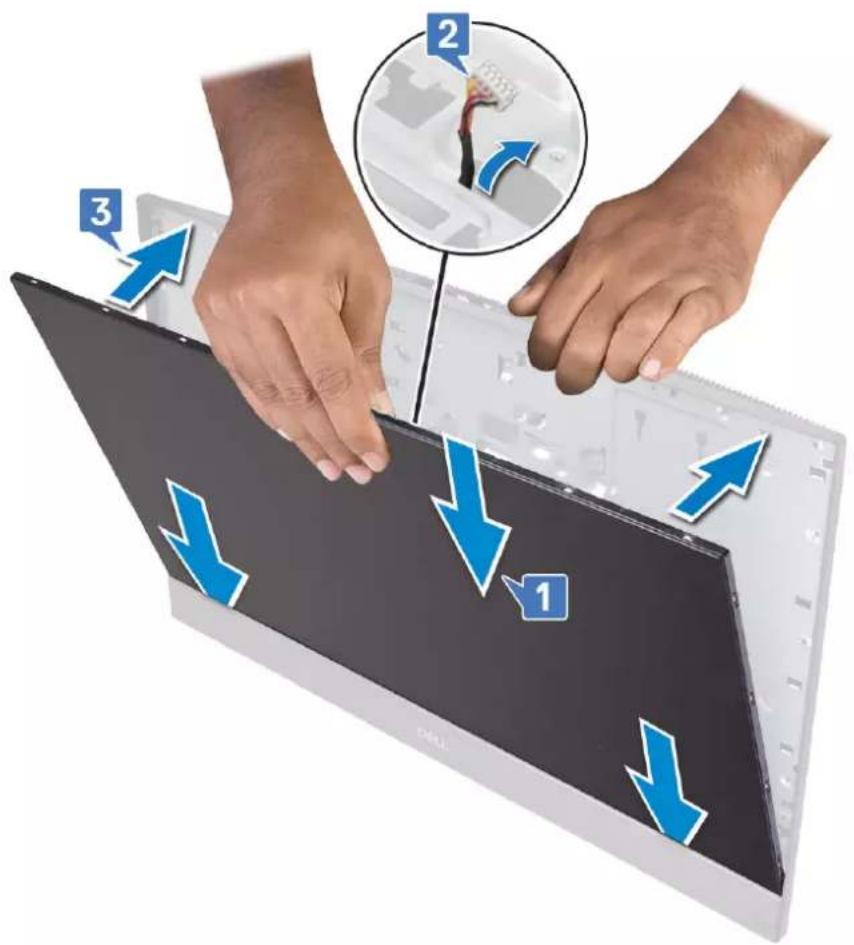
Diagram showing hands installing a device panel with three labeled steps and a magnified inset showing the process.Installing the display panel
- Place the display assembly base in its upright position, and slide the display panel into the slot between the middle frame and the display assembly base [1].
- Route the touchscreen cable through the routing guide on the display assembly base.
- Push the display backlight cable through the slots on the display assembly base [2].
- Push the display panel towards the display assembly base, closing the gap between the display panel and the middle frame [3].
NOTE: Ensure the display cable, touchscreen cable, and display backlight cable has been fully threaded through the slots on the display assembly base before closing the gap between the display panel and the middle frame.

text_image
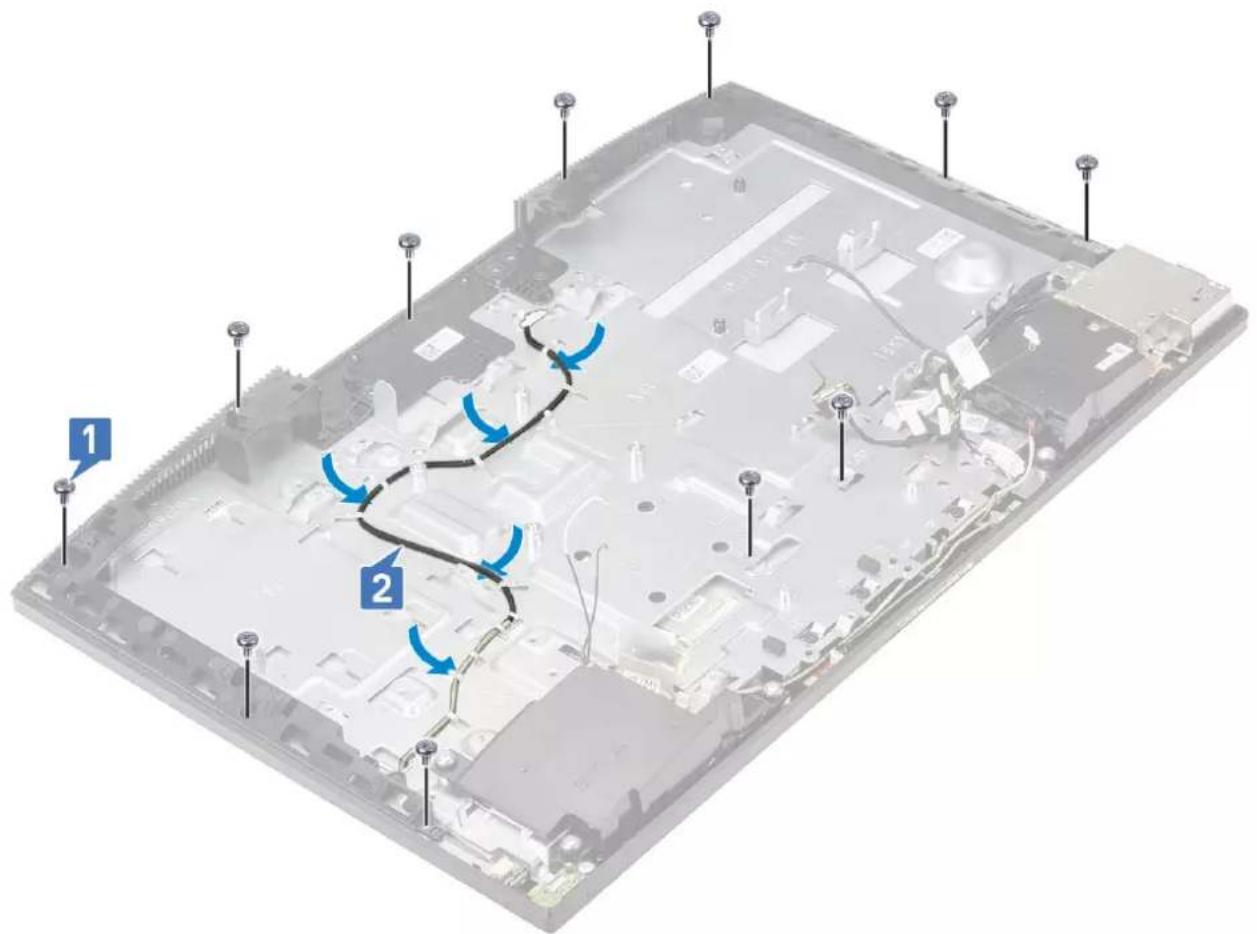
1 2 3- Place the display assembly base on a clean and flat surface with the display panel facing down.
- Replace the 11 (M3x5) screws that secure the display panel to the middle frame and display assembly base [1].
- Route the display backlit cable through the routing guides on the display assembly base [2].

NOTE: The screws that secure the middle frame and display assembly base to the display panel are silver in color and etched with "LCD" around the screw holes.
text_image
Labeled diagram of an electronic device showing internal components with numbered annotations and blue arrows indicating motion paths.- Install the following components:
a. Camera
b. PSU fan
c. PSU
d. System board
e. WLAN card
f. Hard drive
g. System fan
h. I/O bracket
i. Base cover
k. Back cover
I. Stand
j. System board shield
- Follow the procedure in After working inside your computer.
Display cable
Removing the display cable
- Follow the procedure in Before working inside your computer.
- Remove the following components:
a. Stand
b. Back cover
c. Hard drive
d. System board shield
e. WLAN card
f. System fan
g. Camera
h. Base cover
i. PSU
j. PSU fan
k. I/O bracket
I. System board
m. Speakers
n. Power button board
o. Microphones
p. I/O board
q. Headset port
r. Antennas
s. Display panel
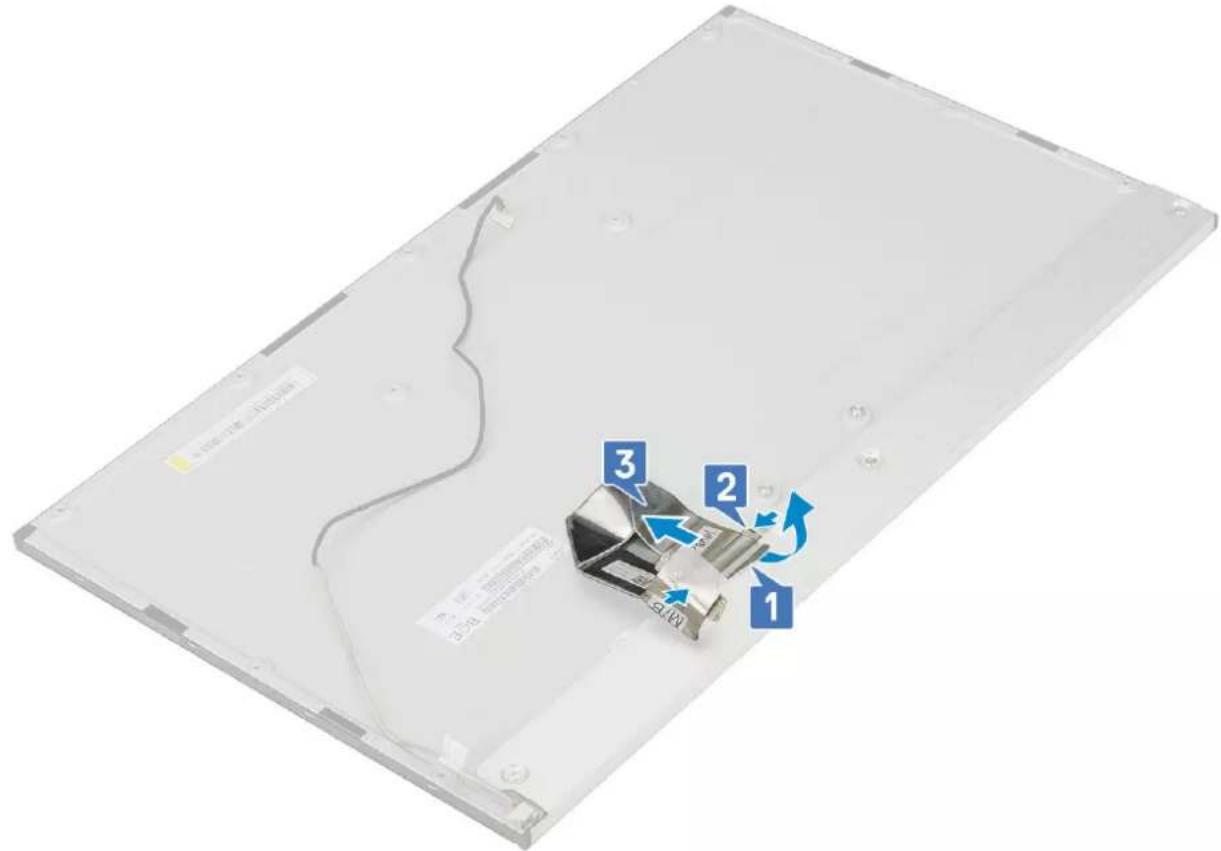
- To remove the display cable:
a. Fold the securing tape inward [1].
b. To release the cable, press the tabs on both sides [2].
c. Disconnect the cable, and lift it away from the display assembly base [3].
text_image
1 2 3 4 5 6 7 8 9 10 11 12 13 14 15 16 17 18 19 20 21 22 23 24 25 26 27 28 29 30 31 32 33 34 35 36 37 38 39 40 41 42 43 44 45 46 47 48 49 50 51 52 53 54 55 56 57 58 59 60 61 62 63 64 65 66 67 68 69 70 71 72 73 74 75 76 77 78 79 80 81 82 83 84 85 86 87 88 89 90 91 92 93 94 95 96 97 98 99 100Installing the display cable
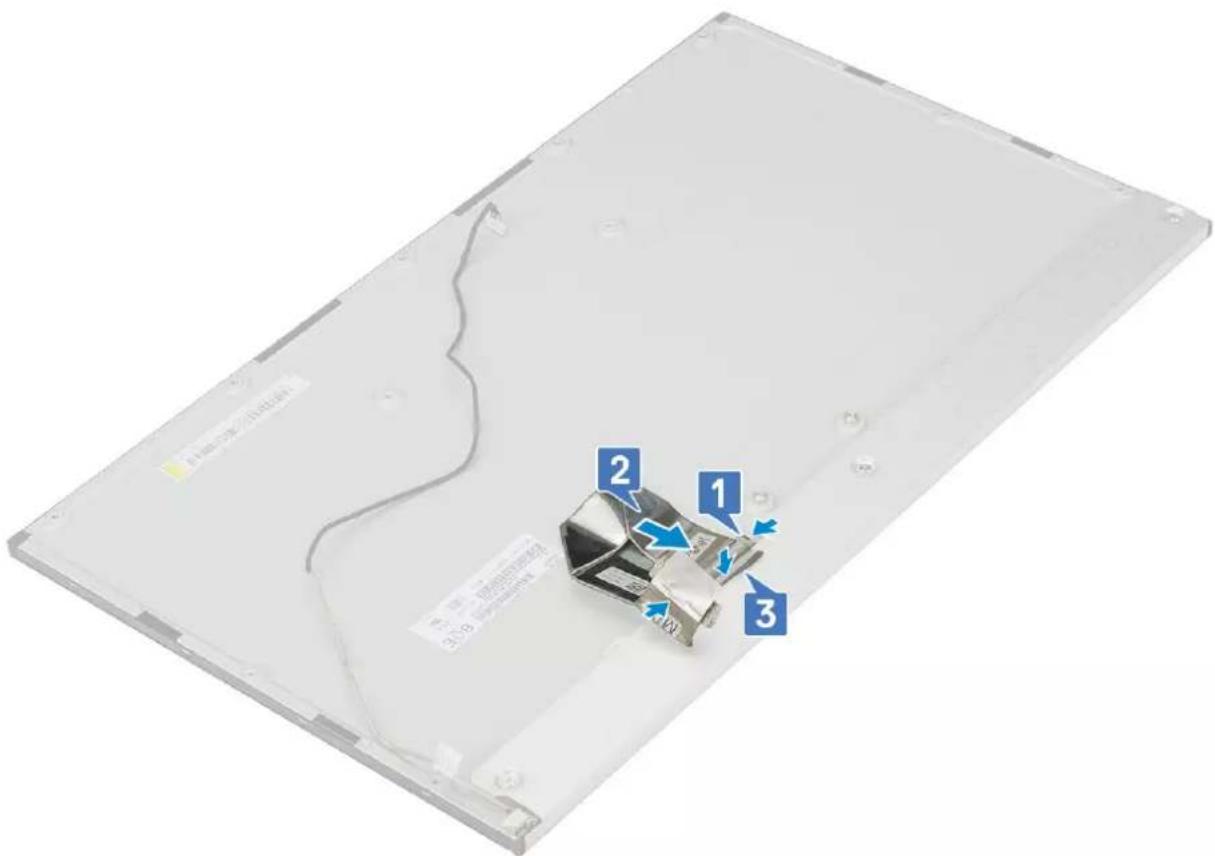
- To install the display cable:
a. Press and hold the tabs on both sides [1].
b. Connect the cable to the display assembly base [2].
c. Fold the securing tape outward [3].
text_image
1 2 3 1 2 3- Install the following components:
a. Display panel
b. Antennas
c. Headset port
d. I/O board
e. Microphones
f. Power button board
g. Speakers
h. System board
i. I/O bracket
j. PSU fan
k. PSU
I. Base cover
m. Camera
n. System fan
o. WLAN card
p. System board shield
q. Hard drive
r. Back cover
s. Stand
- Follow the procedure in After working inside your computer.
Middle frame
Removing the middle frame
-
Follow the procedure in Before working inside your computer.
-
Remove the following components:
a. Stand
b. Back cover
c. Hard drive
d. System board shield
e. WLAN card
f. System fan
g. Camera
h. Base cover
i. PSU
j. PSU fan
k. I/O bracket
I. System board
m. Speakers
n. Power button board
o. Microphones
p. I/O board
q. Headset port
r. Antennas
s. Display panel
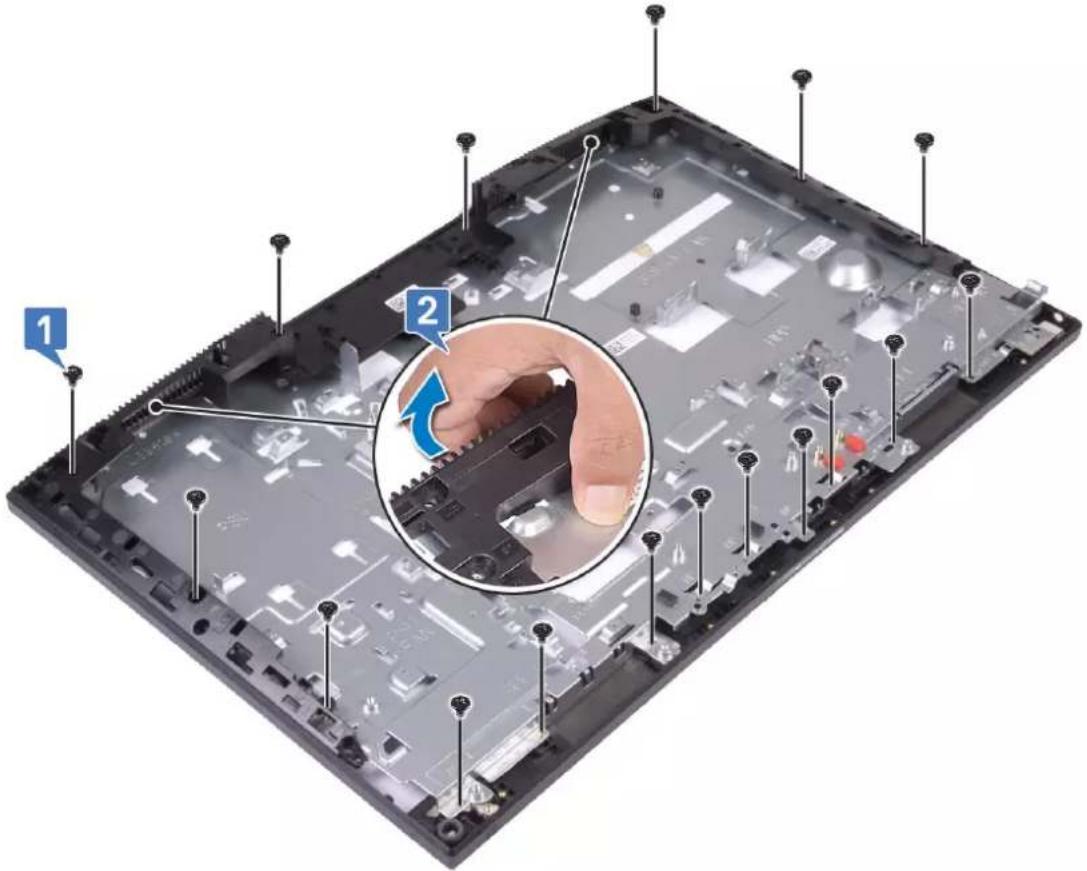
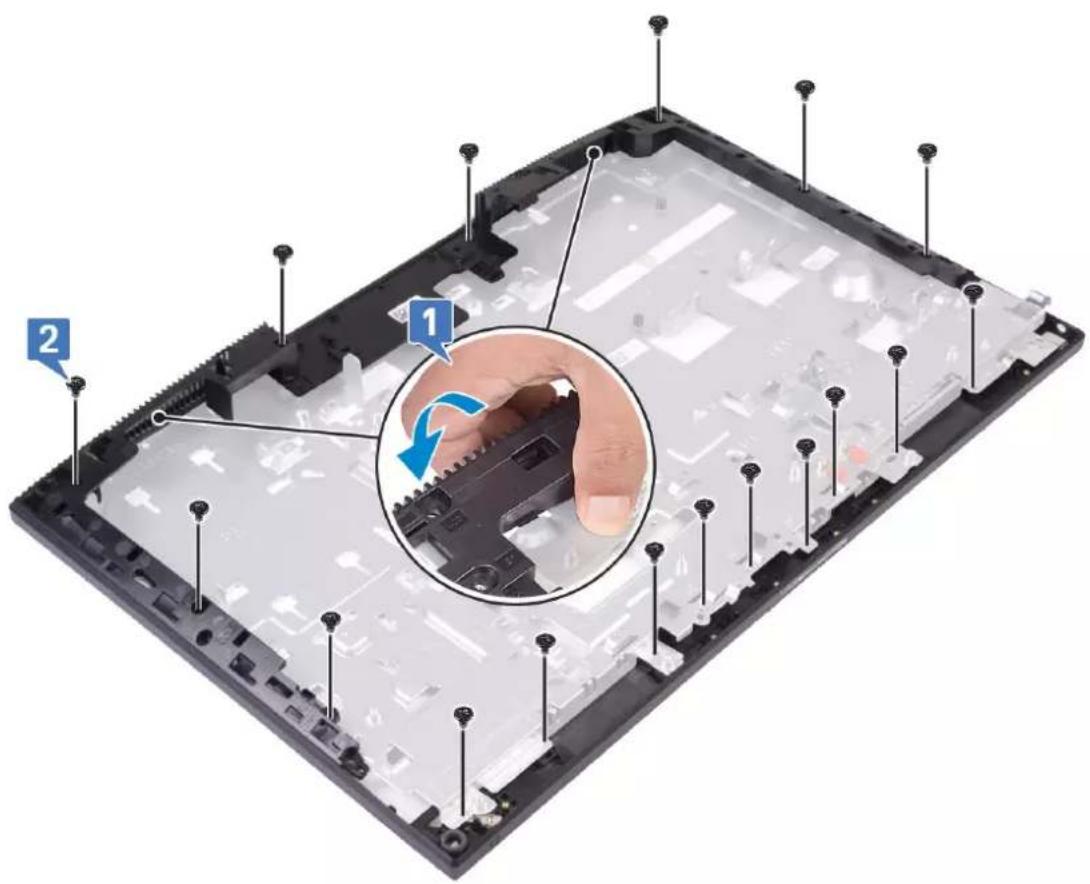
- Remove the 15 screws (M3x5) that secure the middle frame to the display assembly base [1].
- Slide and lift to release the tabs on the middle frame from the slots on the display assembly base [2].
text_image
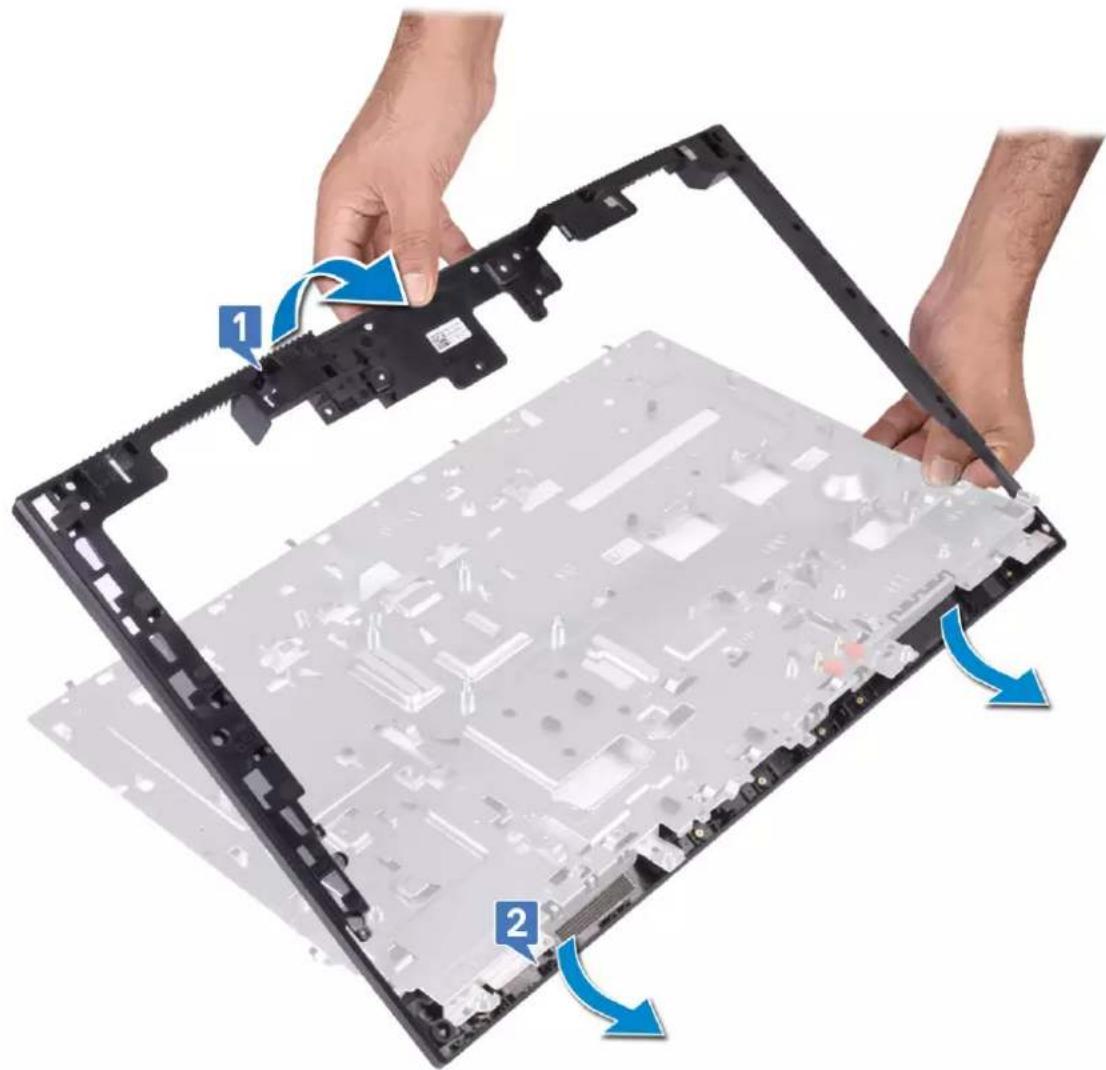
Laptop screen with labeled parts and a magnified inset showing a finger pressing a key component- Lift the middle frame off the display assembly base [1].
natural_image
Two hands installing a device into a plastic panel, showing internal components and blue directional arrows (no text or symbols)Installing the middle frame
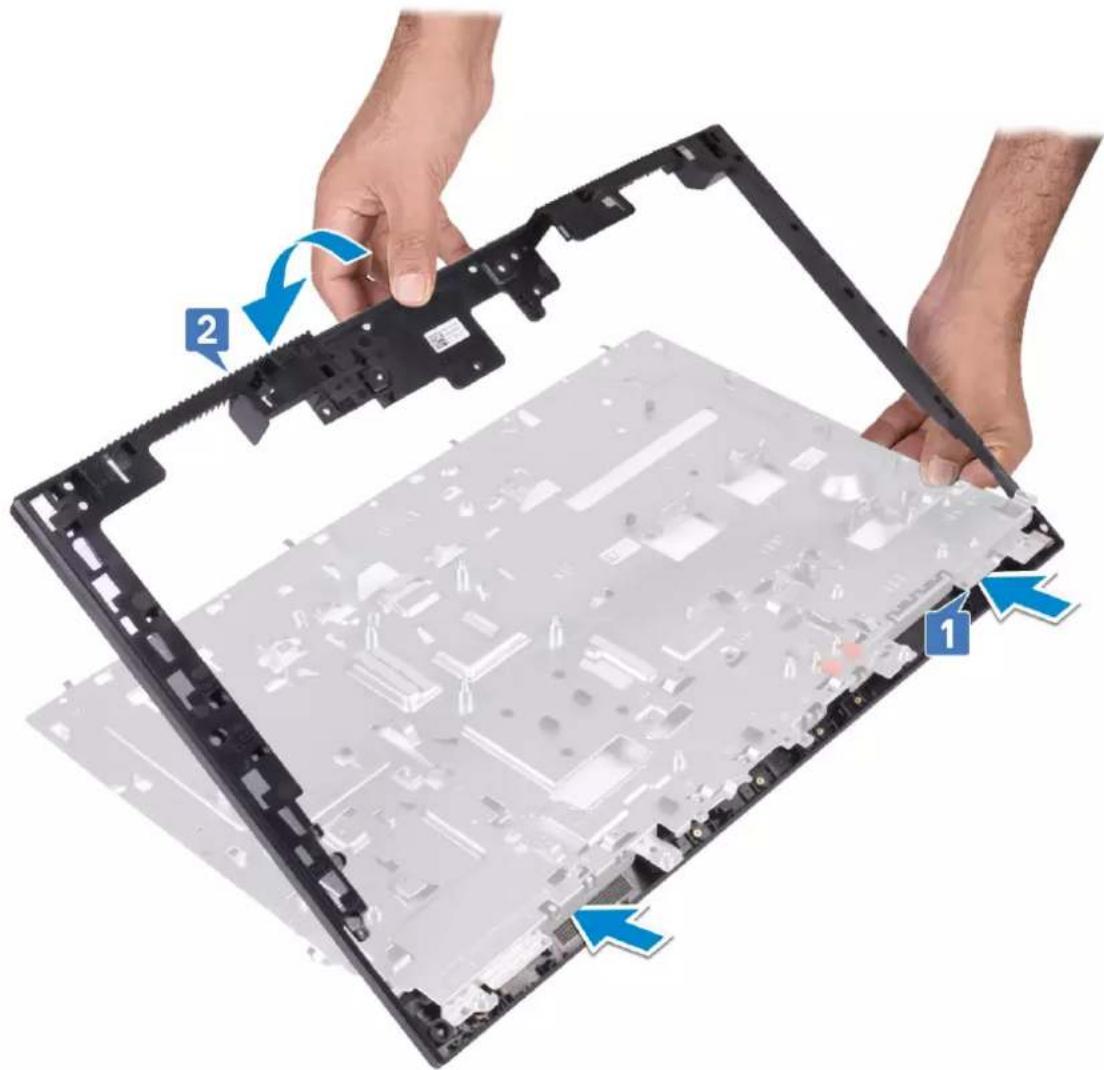
- Starting from the location shown, slide and align the middle frame to the slots on the display assembly base, and then snap the middle frame into place on the display assembly base [1,2].
text_image
Diagram showing hands installing a device into a plastic panel with labeled components and blue arrows indicating steps 1 and 2.- Press and secure and the tabs on the middle frame to the slots on the display assembly base [1].
- Replace the 15 screws (M3x5) that secure the middle frame to the display assembly base [2].
text_image
Diagram of a computer motherboard with labeled parts and a magnified inset showing hand press adjustment.- Install the following components:
a. Display panel
b. Antennas
c. Headset port
d. I/O board
e. Microphones
f. Power button board
g. Speakers
h. System board
i. I/O bracket
j. PSU fan
k. PSU
I. Base cover
m. Camera
n. System fan
o. WLAN card
p. System board shield
q. Hard drive
r. Back cover
s. Stand
- Follow the procedure in After working inside your computer.
Troubleshooting your computer
You can troubleshoot your computer using indicators like diagnostic lights, beep codes, and error messages during the operation of the computer.
Topics:
•Enhanced Pre-Boot System Assessment — ePSA diagnostics
• Diagnostics
•LCD built in self test - BIST
Enhanced Pre-Boot System Assessment — ePSA diagnostics
The ePSA diagnostics (also known as system diagnostics) performs a complete check of your hardware. The ePSA is embedded with the BIOS and is launched by the BIOS internally. The embedded system diagnostics provides a set of options for particular devices or device groups allowing you to:
The ePSA diagnostics can be initiated by the FN+PWR buttons while powering on the computer.
●Run tests automatically or in an interactive mode
- Repeat tests
- Display or save test results
- Run thorough tests to introduce additional test options to provide extra information about the failed device(s)
- View status messages that inform you if tests are completed successfully
- View error messages that inform you of problems encountered during testing

NOTE: Some tests for specific devices require user interaction. Always ensure that you are present at the computer terminal when the diagnostic tests are performed.
Running the ePSA Diagnostics
Invoke diagnostics boot by either of the methods that are suggested below:
- Power on the computer.
- As the computer boots, press the F12 key when the Dell logo is displayed.
- In the boot menu screen, use Up/Down arrow key to select the Diagnostics option and then press Enter.
NOTE: The Enhanced Pre-boot System Assessment window displays, listing all devices detected in the computer. The diagnostics starts running the tests on all the detected devices.

-
Press the arrow in the lower-right corner to go to the page listing.
The detected items are listed and tested. -
To run a diagnostic test on a specific device, press Esc and click Yes to stop the diagnostic test.
-
Select the device from the left pane and click Run Tests.
-
If there are any issues, error codes are displayed. Note the error code and contact Dell.
Diagnostics
Power status light: Indicates the power status.
Solid Amber - The system is unable to boot to the operating system. This indicates that the power supply or another device in the system is failing.
Blinking Amber - The system is unable to boot to the operating system. This indicates that the power supply is normal but another device in the system is failing or not installed properly.

NOTE: To determine the device that is failing, see the light patterns.
Off – System is in hibernation or turned off.
The power status light blinks amber along with beep codes indicating failures.
For example, the power status light blinks amber two times followed by a pause, and then blinks white three times followed by a pause. This 2,3 pattern continues until the computer is turned off indicating the Recovery image is not found.
The following table shows different light patterns and what they indicate:
Table 4. Diagnostic LED/Beep codes
| LED # of Flashes Problem | description Faults | |
| 2,1 Faulty system board Faulty system board | ||
| 2,2 Faulty system board, power supply unit (PSU), or cabling | Faulty system board, power supply unit (PSU), or cabling | |
| 2,3 Faulty system board, CPU, or DIMMS Faulty system board, power supply unit (PSU), or DIMMS | ||
| 2,4 Faulty coin cell battery Faulty coin cell battery | ||
| 2,5 BIOS Recovery AutoRecovery trigger, recovery image is not found or is invalid | ||
| 2,6 CPU CPU Error | ||
| 2,7 Memory Memory SPD failure | ||
| 3,3 Memory No memory detected | ||
| 3,5 Memory Modules incompatible or invalid configuration | ||
| 3,6 BIOS Recovery On-demand trigger, recovery image is not found | ||
| 3,7 BIOS Recovery On-demand trigger, recovery image is invalid | ||
The system may emit a series of beeps during start-up if the errors or problems cannot be displayed. The repetitive beep codes help the user troubleshoot problems with the system.
Camera status light: Indicates whether the camera is in use.
- Solid white – Camera is in use.
- Off – Camera is not in use.
LCD built in self test - BIST
All-in-One (AIO) systems supports LCD BIST similar to any other Dell systems that have BIST test implemented. It allows the user to isolate the LCD during troubleshooting to determine which sub-system is at fault. The main difference is the lack of an integrated keyboard scan controller in the AIO. When BIST is initiated, an internal generated pattern from the LCD will be emitted for user's observation. This pattern will go by sequence through this pattern, Red-Green-Blue-White-Blue where each pattern is emitted for 2 to 3 seconds.
The following images displays the pattern of the colors on the LCD:
Standard display
text_image
PATTERN 1WHITE
= > 2sec

text_image
PATTERN 2BLACK
==> 2sec
text_image
PATTERN 3RED
==> To PATTERN 4
2sec
text_image
PATTERN 4 ==> 2secGREEN
text_image
PATTERN 5BLUE
==> To PATTERN 1
2sec
Alternative display
text_image
PATTERN 1Black
=>2sec
text_image
PATTERN 2White
==>
2sec
text_image
PATTERN 3RED
==> To PATTERN 4
2sec
text_image
PATTERN 4 ==> 2secGREEN
=>2sec
text_image
PATTERN 5BLUE
==>
2sec
To PATTERN 1
Invoking BIST
To invoke the LCD BIST, turn on the system and press and hold the Display Built-in Self Test button plus the Power button together. Release the buttons when Red- Green-Blue-White-Blue pattern is displayed on screen.
Getting help
Topics:
- Contacting Dell
Contacting Dell

NOTE: If you do not have an active Internet connection, you can find contact information on your purchase invoice, packing slip, bill, or Dell product catalog.
Dell provides several online and telephone-based support and service options. Availability varies by country and product, and some services may not be available in your area. To contact Dell for sales, technical support, or customer service issues:
- Go to Dell.com/support.
- Select your support category.
- Verify your country or region in the Choose a Country/Region drop-down list at the bottom of the page.
- Select the appropriate service or support link based on your need.