
BLBD10GSS - Blender BLACK & DECKER - Free user manual and instructions
Find the device manual for free BLBD10GSS BLACK & DECKER in PDF.


User questions about BLBD10GSS BLACK & DECKER
0 question about this device. Answer the ones you know or ask your own.
Ask a new question about this device
Download the instructions for your Blender in PDF format for free! Find your manual BLBD10GSS - BLACK & DECKER and take your electronic device back in hand. On this page are published all the documents necessary for the use of your device. BLBD10GSS by BLACK & DECKER.
USER MANUAL BLBD10GSS BLACK & DECKER
Accessories/Parts (USA)
1-800-738-0245
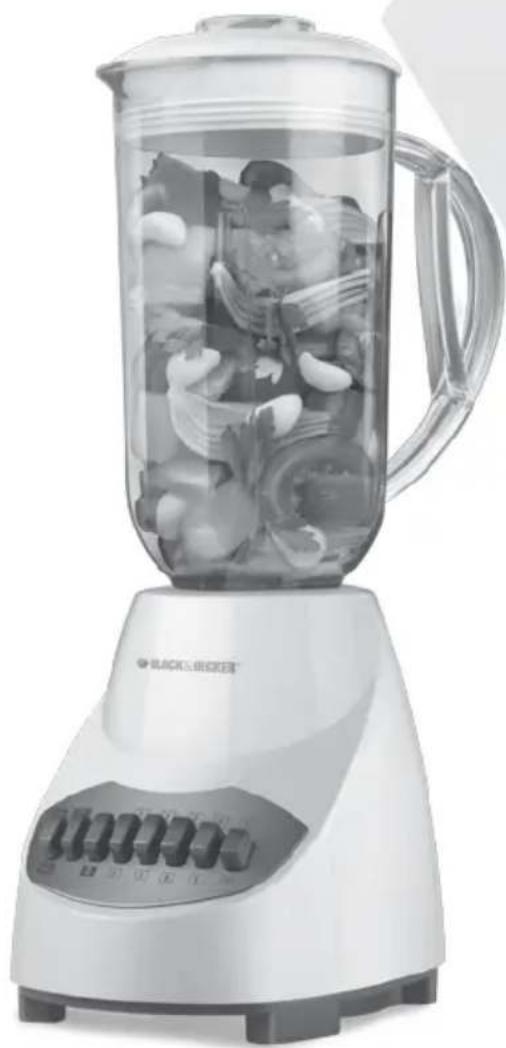
natural_image
White blender with glass lid filled with chopped vegetables, no visible text or symbols on the device itself.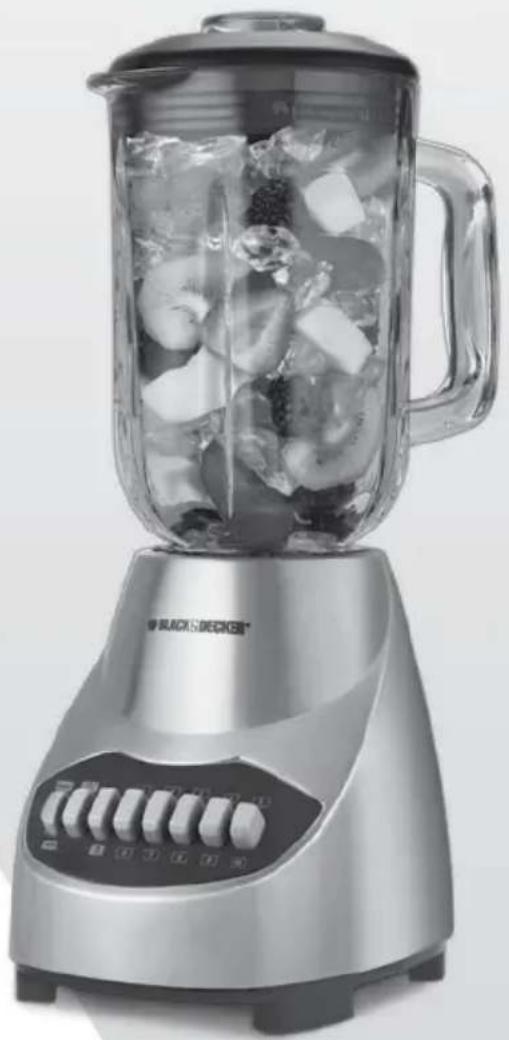
natural_image
Black-and-yellow blender with glass lid and food being mixed, no visible text or symbols on the device itself.MODELOS/MODELS
text_image
Labeled diagram of a blender with numbered parts for identificationnatural_image
Close-up of a hand holding a transparent bottle with a black arrow indicating rotation (no text or symbols visible)natural_image
Close-up of a glass pitcher with liquid and small dark fragments, no visible text or symbolsnatural_image
Close-up of hands shaping a cylindrical object into a container (no visible text or symbols)natural_image
Close-up of a hand pouring liquid into a container (no visible text or symbols)servicente@servicenter.cl
Colombia
PLINARES
Avenida Quito # 88A-09
Bogotá, Colombia
San Jose, Costa Rica
Tel.: (506) 257-5716 / 223-0136
Ecuador
Col. Centro, Cuauhtemoc,
México, D.F.
Tel. 01 800 714 2503
Nicaragua
ServiTotal
City Market Nivel Plaza Local 153
Diagonal Hotel Melia,
Caracas.
Tel. (582) 324-0969
www.applicaservice.com
servicio@applicamail.com
C.U.I.T No. 30-69729892-0
Importado por / Imported by:
APPLICA MANUFACTURING, S. DE R. L. DE C. V.
Please Read and Save this Use and Care Book.
IMPORTANT SAFEGUARDS
When using electrical appliances, basic safety precautions should always be followed, including the following:
○ Read all instructions.
To protect against risk of electrical shock do not immerse cord, plugs or appliance in water or other liquid.
- Close supervision is necessary when any appliance is used by or near children.
○ Unplug from outlet when not in use, before putting on or taking off parts, and before cleaning.
○ Avoid contacting moving parts.
Do not operate any appliance with a damaged cord or plug or after the appliance malfunctions, or is dropped or damaged in any manner. Return appliance to the nearest authorized service facility or call the appropriate toll-free number on the front of this manual for examination, repair or electrical or mechanical adjustment. Or, call the appropriate toll-free number on the cover of this manual.
The use of attachments, including canning jars, not recommended by the manufacturer may cause fire, electric shock or injury.
○ Do not use outdoors.
○ Do not let cord hang over edge of table or counter.
Keep hands and utensils out of container while blending to reduce the risk of severe injury to persons or damage to the blender. A scraper may be used, but must be used only when the blender is not running.
- Blades are sharp. Handle carefully.
To reduce the risk of injury, never place cutter-assembly blades on base without jar properly attached.
○ Always operate blender with cover in place.
- When blending hot liquids, remove center piece of two-piece cover.
SAVE THESE INSTRUCTIONS.
This product is for household use only.
POLARIZED PLUG (120V Models Only)
This appliance has a polarized plug (one blade is wider than the other). To reduce the risk of electric shock, this plug is intended to fit into a polarized outlet only one way. If the plug does not fit fully into the outlet, reverse the plug. If it still does not fit, contact a qualified electrician. Do not attempt to modify the plug in any way.
TAMPER-RESISTANT SCREW
Warning: This appliance is equipped with a tamper-resistant screw to prevent removal of the outer cover. To reduce the risk of fire or electric shock, do not attempt to remove the outer cover. There are no user-serviceable parts inside. Repair should be done only by authorized service personnel.
ELECTRICAL CORD
a) A short power-supply cord (or detachable power-supply cord) is to be provided to reduce the risk resulting from becoming entangled in or tripping over a longer cord.
b) Longer detachable power-supply cords or extension cords are available and may be used if care is exercised in their use.
c) If a long detachable power-supply cord or extension cord is used,
1) The marked electrical rating of the detachable power-supply cord or extension cord should be at least as great as the electrical rating of the appliance,
2) If the appliance is of the grounded type, the extension cord should be a grounding-type 3-wire cord, and
3) The longer cord should be arranged so that it will not drape over the countertop or tabletop where it can be pulled on by children or tripped over.
Note: If the power supply cord is damaged, it should be replaced by qualified personnel; in Latin America, by an authorized service center.
Product may vary slightly from what is illustrated.
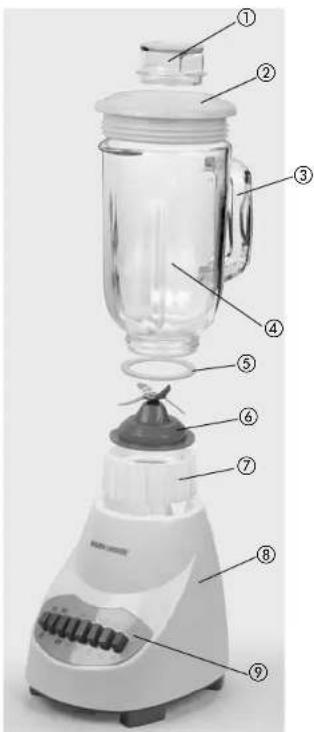
text_image
Labeled diagram of a blender with numbered parts for identification- Lid cap
- Lid
- Handle
- Blending jar: BLBD10GW: Glass, 42-oz. (1.25 L) BLBD10PW: Plastics, 50-oz. (1.5 L) BLBD10GSS: Vidrio, 42 onzas (1.25 L)
- Gasket
- Blade assembly
- Jar base
- Blender base
- Control panel
How to Use
This product is for household use only.
GETTING STARTED
- Remove all packing material and any stickers from the product.
- Remove and save literature.
- Wash all removable parts as instructed in CARE AND CLEANING section of this manual.
- Wipe outside of appliance with a damp cloth; dry thoroughly.
BLENDER JAR ASSEMBLY
- Turn blending jar upside down and place flat on countertop or work surface.
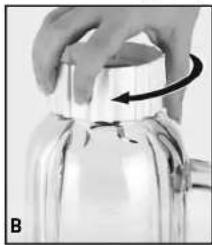
natural_image
Close-up of a hand holding a plastic jar with a black arrow indicating rotation (no text or symbols visible)- Put gasket on top of blade assembly. Place blade assembly with gasket into bottom opening of the jar with blades facing down.
- Place jar base onto jar and rotate clockwise until it is tight (B).
- Turn assembled jar right side up.
- Place lid with lid cap onto blending jar.
- Uncoil power cord from storage area under the base.
Note: Do not plug in the cord.
natural_image
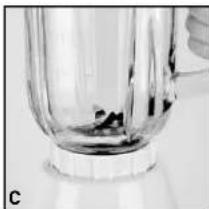
Close-up of a glass pitcher with liquid and small dark pieces inside, no visible text or symbols- Place jar assembly on base, making sure it is pressed firmly into place. (Jar base should not extend more than 18 -inch above the rim at the top of the base.) (C).
- Blender is now ready for use.
USING YOUR BLENDER
- Make sure appliance is OFF.
- Place foods to be blended into jar.
- Place lid on jar; make sure lid cap is in place.
- Plug power cord into outlet.
Note: When in use, do not leave blender unattended. When using hard foods, such as ice, cheese, nuts and coffee beans, keep one hand on the lid to keep blender in place. -
Press the High (HI) or Low (LO) button; then select the speed that best suits your desired task. To switch speeds, press the High (HI) or Low (LO) button and the new speed desired. [See SPEED CHART on page 23.]
-
When blending thick mixtures, such as smoothies, power drinks and milkshakes press the Pulse button several times to begin the blending process. Press the Pulse button for no more than 5 seconds at a time. This helps break up the ice and distribute the ingredients.
natural_image
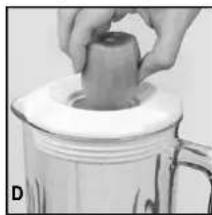
Close-up of hands shaping a cylindrical object into a white ceramic pot (no text or symbols visible)- Open the lid cap to add ingredients while the blender is running and drop ingredients through the opening (D).
Important: Do not remove the lid while the blender is running.
- When finished, press the Pulse/Off button. Make sure blades have completely stopped before attempting to remove the blending jar from the base.
-
To remove the jar, grasp the handle and lift straight up. Do not twist the jar.
-
Remove lid to pour.
-
Always unplug the appliance when not in use.
BLENDING TIPS AND TECHNIQUES
- Cut food into pieces no larger than 34 -inch for use in the blender.
- When preparing foods that have several different kinds of ingredients, always add liquid ingredients first.
- When ingredients splatter onto the sides of the jar or the mixture is very thick, press the OFF button to turn appliance off. Remove the lid and use a rubber spatula to scrape down the sides of the jar and to redistribute the food pushing food toward the blades. Replace the lid and continue blending.
Important: Blender should always have lid in place when in use.
Caution: Do not place blending jar on base when motor is running.
natural_image
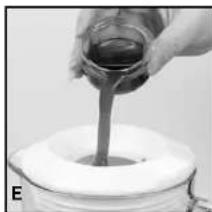
Close-up of a hand pouring liquid into a white container (no visible text or symbols)- The lid cap holds up to 1½ oz. liquid and can be used as a measure and when adding ingredients such as juices, milk, cream and liquor (E).
- When making bread crumbs, chopping nuts or grinding coffee beans make sure blending jar is completely dry.
-
When using Pulse function use short bursts. Allow the blades to stop rotating between pulses. Do not use Pulse for more than 2 minutes.
-
Use the Pulse button to begin the blending process when preparing beverages that include ice cubes; this helps to produce a smoother texture.
- The PULSE function is helpful when short bursts of power are needed such as when preparing thick smoothies or milkshakes, chopping nuts or grinding coffee beans.
-
It is helpful to begin the blending process on the lowest speed and then increase to a higher speed, if necessary.
-
To stop blending, press the Off button at any time
- When blending hot liquids always let them cool at least 5 minutes before blending. Before beginning to blend, remove the lid cap and put it back with the opened side tilted away from you. Cover lid with a cloth to avoid splattering and only use lowest speed. Do not blend more than 2 12 to 3 cups at a time
- DO NOT place any of the following in the blender:
o Large pieces of frozen foods
o Tough foods such as raw turnips, sweet potatoes and potatoes
o Bones
o Hard salami, pepperoni and hard sausages
o Boiling liquids (cool for 5 minutes before placing in blending jar)
• Several other DON'TS:
o Do not operate blender without the lid on the blending jar.
o Do not store foods in the blending jar.
Do not overfill the blender. (The blender is more efficient with less rather than more.)
Do not use pulse for more than 10 seconds at a time. Release the PULSE button; allow the blender to rest briefly, then continue.
Do not run blender for longer than 30 seconds when using dry foods and 2 minutes when blending liquids. Scrape down sides on blending jar, if necessary and continue blending.
o Do not use if blender jar is chipped or cracked.
- Tasks NOT recommended for the blender:
o Whipping cream
o Beating egg whites
o Mixing dough
o Mashing potatoes
o Grinding meats
o Extracting juice from fruits and vegetables
| SPEED CHART | |
| Pulse/Off • Use for thick mixtures | |
| LOW (LO) | |
| 1) Fast Clean • Combine | drop of dishwashing liquid and hot water to clean blender |
| 2) Stir/Mix • Prepare sauces | Remove lumps from graviesReconstitute frozen juices, drink mixes and condensed soupsPrepare salad dressingsPuree hot liquids |
| 3) Blend • Mix puddings | Combine pancake and waffle batter or mixesBeat eggs for omelets and custards |
| 4) Grate • Grate hard cheeses and coconutMake superfine sugarMake cookie, cereal and bread crumbsGrind coffee beans, spices and chocolate | |
| 5) Beat • Beat eggs for omelets and custards | |
| HIGH (HI) | |
| 6) Puree • Puree baby foods-fruits and vegetablesBlend protein drinks | |
| 7) Crumb | Make cookie, cereal and bread crumbs |
| 8) Chop | Chop fruits and vegetablesChop cooked meatsChop nuts, coarse-to-fine |
| 9) Liquefy | Liquefy frozen drinks |
| 10) Smoothies / IceCrush | Crush icePrepare smoothies and milkshakes |
Care and Cleaning
This product contains no user serviceable parts. Refer service to qualified service personnel.
CLEANING
- Before cleaning, turn off and unplug appliance.
- Lift blending jar by handle off power base.
- Remove jar base by turning counterclockwise until loose.
- Remove gasket and blade assembly.
Caution: Blades are sharp, handle carefully.
-
Remove lid and lid cap.
-
Wash removable parts by hand or in your dishwasher. Place jar on bottom rack and rest of parts on top-rack only.
Important:
- Do not place jar parts in boiling liquids.
- Do not immerse base in liquid. Wipe base with damp cloth and dry thoroughly.
- Remove stubborn spots by rubbing with damp cloth and non abrasive cleaner.
Note: If liquids spill onto base, wipe with damp cloth and dry thoroughly. Do not use rough scouring pads or cleansers on parts or finish.
QUICK CLEANING
For quick cleanup, combine 1 cup hot water and a drop of liquid dish soap in the blending jar. Cover and blend on Speed 1 for about 30 seconds. Discard liquid and rinse jar thoroughly.
STORAGE
For convenient storage, wrap the cord around the feet on the bottom of the blender base.
TROUBLESHOOTING
| PROBLEM POSSIBLE CAUSE SOLUTION | ||
| Jar bottom does not come off of jar. | A vacuum has been formed. | Place the jar on the blender and turn counter clockwise until jar is released from the bottom. |
| Liquid is leaking from bottom of jar. | Gasket is either missing or not in place correctly. | Check that jar is assembled correctly. |
| Appliance does not turn on. | Appliance is not plugged in. | Check that appliance is plugged into a working outlet. |
| Mixture in blender does not seem to be blending. | Not enough liquid in mixture being blended or too much ice. | Turn the blender off and use a rubber spatula to redistribute the food; add some liquid and pulse the mixture to aid in the blending process. |
| Herbs or bread are sticking to sides of blender and not getting chopped. | Blender jar, food to be chopped and blade are not dry. | Always make sure that the jar, the blade and the food to be chopped are dry. |
| Food chopped is too fine or watery. | Food is over processed. | Use Pulse in short bursts or blend for a shorter time. |
RECIPES
WILD BERRY YOGURT COOLER
2 cups pineapple juice
1 cup wild berry frozen yogurt
1 cup frozen cubed mango
1 cup frozen hulled strawberries
Combine all ingredients in order listed into blending jar and close with lid. Pulse for several seconds (three to four times). Select Speed 10 and let cycle run until mixture is smooth and well blended; about 30 seconds.
Makes about 4½ cups.
PEAR BERRY DELIGHT
1½ cups pear nectar
1 cup pineapple/passion fruit sorbet
2 cups fresh strawberries
2 cups ice cubes
In blending jar, combine all ingredients in order listed. Place lid on jar. Pulse several times, for about 5 seconds each time, to blend ingredients and begin crushing ice. Select Speed 9 and run until smooth and well blended; about 30 seconds. Turn blender OFF and serve immediately.
Makes about 3 cups.
MANGO RASPBERRY FIZZ
1½ cups pineapple mango juice
1½ cups raspberry sorbet
1 cup frozen sliced peaches
Cold club soda
Mint sprigs
Combine first 3 ingredients in order listed in blending jar. Close lid. Pulse for several seconds (three to four times). Select Speed 10 and let run until mixture is smooth and well blended; about 30 seconds.
Fill tall beverage glasses half-full with raspberry mixture; top off with club soda. Stir to blend. Garnish with mint sprig.
Makes 4 to 6 drinks.
MANGO AND CORN SALSA
12 cup orange pepper, cut into 34 -inch chunks
12 cup purple onion, cut in 12 -inch pieces
2 to 3 medium jalapeños, seeded and quartered
2 large cloves garlic
Juice of 1 lime
1½ cups tomato, cubed
1 large mango, cubed
12 cup fresh cilantro leaves
1 cup canned whole kernel corn
In blending jar, combine pepper, onion, jalapenos and garlic. Place lid on jar. Pulse several times, for about 5 seconds each, to chop ingredients. Add lime juice, tomato, mango and cilantro and Pulse several times until vegetables are chopped and mixture is blended. Spoon mixture into bowl; stir in corn. Cover and refrigerate until ready to serve.
Serve with tortilla chips.
Makes about 4½ cups.
NEED HELP?
For service, repair or any questions regarding your appliance, call the appropriate 800 number on cover of this book. Please DO NOT return the product to the place of purchase. Also, please DO NOT mail product back to manufacturer, nor bring it to a service center. You may also want to consult the website listed on the cover of this manual.
TWO-YEAR LIMITED WARRANTY
(Does not apply in México, the United States or Canada)
What does it cover?
- Any defect in material or workmanship provided; however, Applica's liability will not exceed the purchase price of product.
For how long?
- Two years from the date of original purchase with proof of such purchase.
What will we do to help you?
- Provide you with a reasonably similar replacement product that is either new or factory refurbished.
How do you get service?
- Save your receipt as proof of date of sale.
- Visit the online service website at www.prodprotect.com/applica, or call toll-free 1-800-231-9786, for general warranty service.
- If you need parts or accessories, please call 1-800-738-0245.
What does your warranty not cover?
• Damage from commercial use
• Damage from misuse, abuse or neglect
- Products that have been modified in any way
- Products used or serviced outside the country of purchase
- Glass parts and other accessory items that are packed with the unit
- Shipping and handling costs associated with the replacement of the unit
- Consequential or incidental damages (Please note, however, that some states do not allow the exclusion or limitation of consequential or incidental damages, so this limitation may not apply to you.)
How does state law relate to this warranty?
- This warranty gives you specific legal rights. You may also have other rights that vary from state to state or province to province.
BLACK&DECKER is a registered trademark of The Black & Decker Corporation, Towson, Maryland, USA
Made and Printed in People's Republic of China