
IronSpeed SRD4108021 - Iron HOOVER - Free user manual and instructions
Find the device manual for free IronSpeed SRD4108021 HOOVER in PDF.
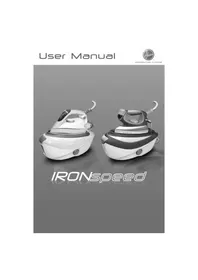


| Product type | Steam iron |
| Brand | Hoover |
| Model | IronSpeed SRD4108021 |
| Dimensions (L x W x H) | 27 x 12 x 15 cm |
| Weight | 1.2 kg |
| Power supply | 220-240 V ~ 50/60 Hz |
| Power | 2200 W |
| Water tank capacity | 300 ml |
| Soleplate | Ceramic soleplate |
| Main functions | Continuous steam, steam burst, spray, anti-drip function, auto shut-off |
| Adjustable steam level | Yes, with dial |
| Anti-calc system | Yes, removable scale collector |
| Cord length | 2.5 m |
| Care and cleaning | Clean the soleplate with a damp cloth, empty the tank after each use, use the self-cleaning function regularly |
| Safety | Auto shut-off in vertical and horizontal position, thermal fuse |
| Spare parts and repairability | Available from Hoover after-sales service (tank, soleplate, buttons) |
| Supplied accessories | Measuring cup, instruction manual |
| Energy class | A+ |
Frequently Asked Questions - IronSpeed SRD4108021 HOOVER
User questions about IronSpeed SRD4108021 HOOVER
0 question about this device. Answer the ones you know or ask your own.
Ask a new question about this device
Download the instructions for your Iron in PDF format for free! Find your manual IronSpeed SRD4108021 - HOOVER and take your electronic device back in hand. On this page are published all the documents necessary for the use of your device. IronSpeed SRD4108021 by HOOVER.
USER MANUAL IronSpeed SRD4108021 HOOVER
IRONspeed
Summary
English....1
Français....13
Deutsch....25
Italiano....37
Nederlands....49
Português....61
Español....73
Slovenčina....85
Parts Description
English
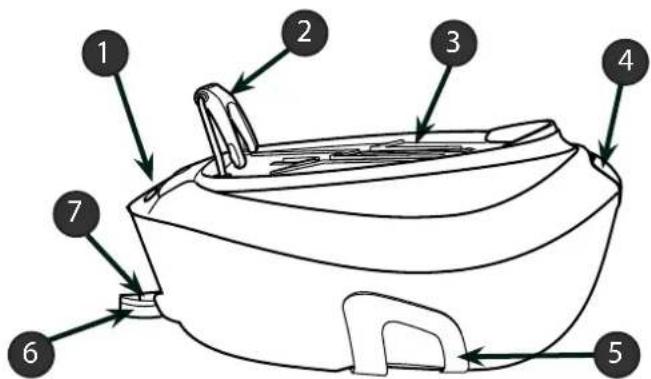
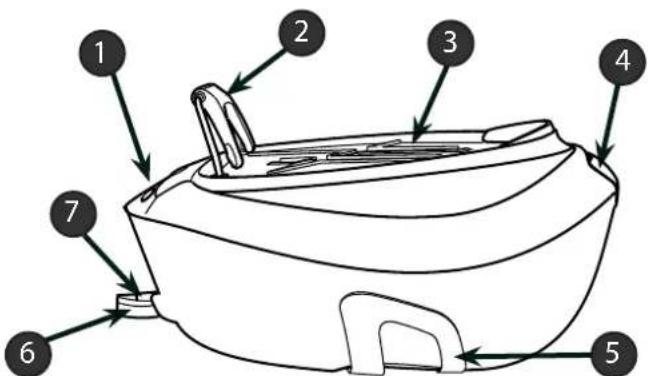
Fig. 1: Base and Tank Description
| 1 Control Panel |
| 2 Iron Lock System |
| 3 Iron Resting Mat |
| 4 Water Tank Filler Cover |
| 5 Cord Storage for Hose & Mains |
| 6 Supply Hose |
| 7 Mains |
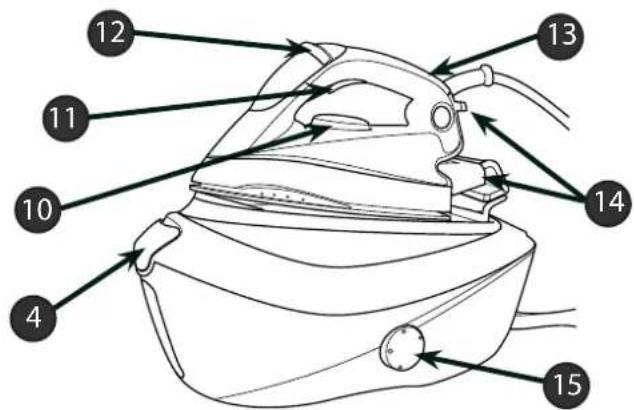
Fig. 2: Domestic Iron Description
| 10 Temperature Dial |
| 11 Steam Trigger |
| 12 Multi Steam Technology Selector |
| 13 Temperature Dial Indicator |
| 14 Pads for Vertical Positioning |
| 15 Calc Clean Knob |
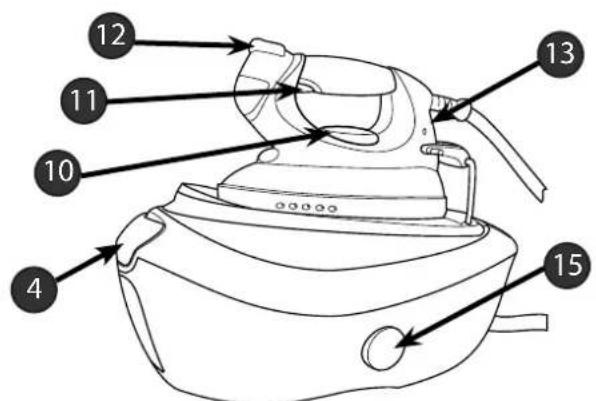
1 - GB Fig. 3: Pro Iron Description
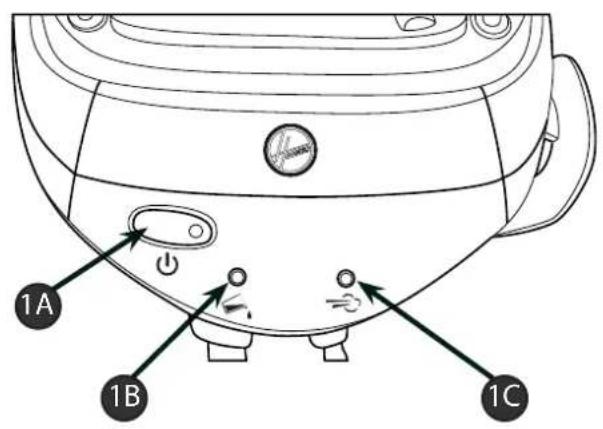
Fig. 4: Domestic Iron Control Panel
| 1A On/Off Switch |
| 1B "Water Tank Empty" Light |
| 1C "Steam Ready" Light |
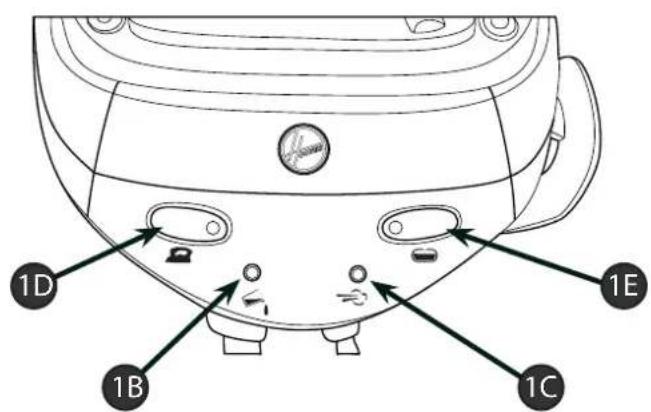
Fig. 5: Pro Iron Control Panel
| 1D On/Off Iron |
| 1E On/Off Boiler |
2-GB
IRONspeed

GENERATION FUTURE
Introduction
Dear customer,
Congratulations on the purchase of your new Hoover ironing system. This appliance has been manufactured to the highest standards. Used correctly, your Hoover ironing system will deliver many years of quick, hassle-free ironing.
Before using your new Hoover appliance, please take the time to read this user manual carefully. If you need further information or if you encounter any issues which are not dealt with in this manual, please contact your local dealer.
Important Safety Instructions
Please read this user manual carefully before your first use and save it for future reference.
- This product has been designed for domestic use only. In case of any commercial use, inappropriate use or failure to comply with the instructions, the manufacturer is not responsible and the guarantee will be invalid.
- Before connecting your appliance, check if the main voltage is the same as the voltage indicated on your appliance and that the power outlet is connected to the earth.
- Ensure before each use that the electric cord or any other important part is not damaged.
- This appliance is not intended for use by children or persons with reduced physical, sensory or mental capabilities, unless they are adequately supervised in its operation and use by an adult responsible for their safety. Children should be supervised to ensure that they do not play with the appliance.
- The iron must be used and placed on a flat and stable surface. When you replace the iron on its stand, make sure that the surface on which you place it is stable.
- Never direct the steam towards persons or animals. Never direct the steam jet towards any other electrical or/and electronic appliances.
- Do not use the appliance if it has fallen down, or if the appliance shows evidence of breakdown, malfunction, leakages. Please have the product checked by authorized Service Centre to avoid any danger.
- Always make sure the appliance is switched off, unplugged and cooled down before doing any maintenance work.
- Never leave the appliance unattended when plugged in and before it has cooled down.
- Do not unplug the appliance by pulling on the cord or on the appliance.
- Never immerse the iron, the stand, the cable or the plugs in water. Never hold them under the water tap.
- The soleplate of the iron can become extremely hot and may cause burns if touched. Never touch the electric cords with the soleplate.
- If the supply cord is damaged, it must be replaced by the manufacturer, service agent or similarly qualified persons in order to avoid a hazard.
Chapter 1.1 - Control Panel
On/off switch (1a): A light on the switch will illuminate to indicate that the appliance is switched on. (domestic irons models only)
On/off iron (1d): By switching it on, the iron soleplate will start to heat up. Recommended for dry ironing session. (only with professional iron)
On/off boiler (1e): By switching it on, the boiler will start to heat up. Please note that iron switch (1d) needs to be switched on to heat up the boiler. (only with professional iron)

When the appliance is switched on and "Steam ready" light (1c) is off, it means that steam is ready. You can press the steam trigger and steam will escape from the soleplate. Please note that during use, the steam light will switch on but you can continue steam ironing.
"Water tank empty" light (1b) is on: There is no more water in the tank. Please refill the tank following the instructions in chapter 2.2.
Chapter 1.2 - Lock System
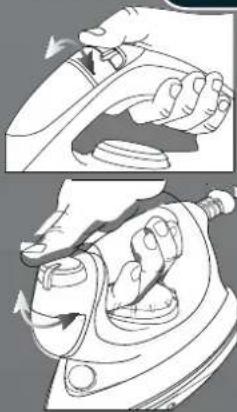
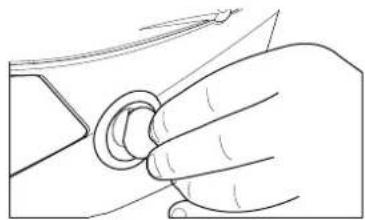
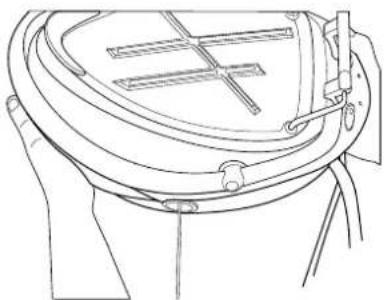
In order to facilitate the carrying and storage of your ironing system, your appliance is designed with a lock system (2). This system locks the iron on the upper tray. It's therefore very easy to move and store the appliance. Please follow the instructions below to lock the iron on the resting mat (3).
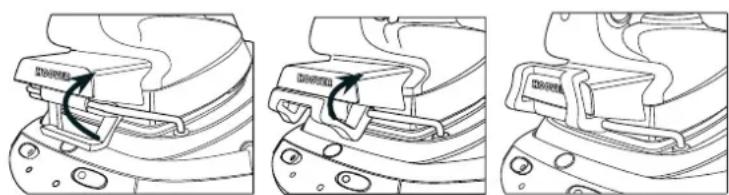
Fig. 6: Domestic Iron Lock System
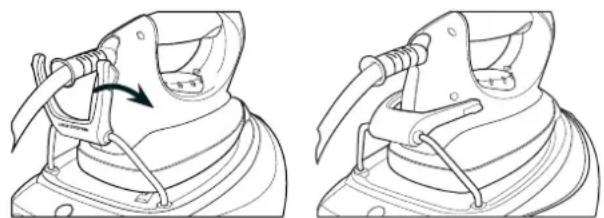
Fig. 7: Pro Iron Lock System
To unlock it, do the opposite of the instructions above.
Warning: Do not carry your appliance by the iron.
4 - GB
Chapter 2: Preparation for Use
Due to the powerful output of steam, Hoover recommends the use of an active ironing board with blowing and vacuuming function which allows escape of any excess steam.
Place the ironing system on a stable and level surface, for example on the hard part of an ironing board or on a heat-resistant surface.
Chapter 2.1 - What Kind of Water May be Used?
The Hoover ironing system has been designed to be used with tap water only. There is no need to use distilled or pure distilled water. Nevertheless, in case you live in a hard water area, you can mix 50% of distilled water with 50% of tap water. Do not use any other kind of water or do not add any contents to the removable water tank as it can damage your appliance.
Chapter 2.2 - Filling the Water Tank
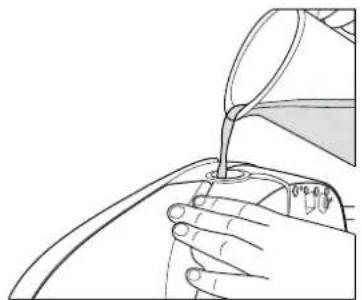
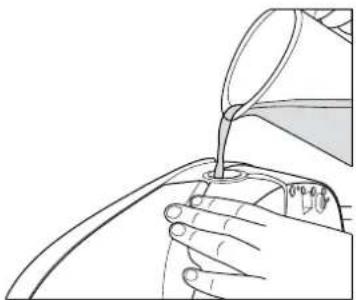
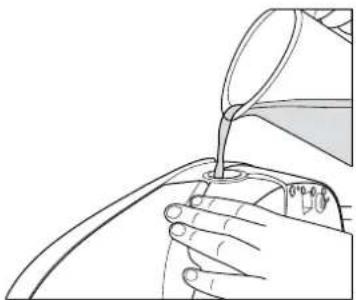
Open the water tank filler cover (4) to gain access to the water tank. Fill it with tap water with the help of a bottle. Do not exceed the max mark.
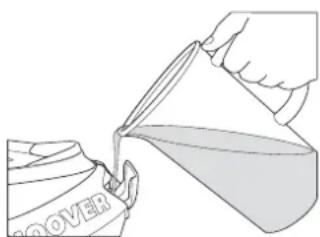
Fig. 8: Water Tank Filling
Warning: Do not add vinegar, hot water, perfume, or any other kind of chemical agents or any other contents in the water tank. It could damage the steam generator and shorten its life use.
Chapter 2.3 - Switching On the Appliance
Domestic Iron Models:
Connect the appliance with the mains cord to an earthed socket and switch on the power. Press the on/off switch. The light (1a) will illuminate, this tells you that the appliance is working and that the boiler is heating up.
After approximately 2 minutes, the "steam ready" led will light off and you can now start to use the steam feature.
Professional Iron Models:
Connect the appliance with the main cord to an earthed socket. Press the iron on/off switch (1d) and the boiler on/off switch (1e). The lights of both switches should light up and inform you that the appliance is working and the iron soleplate and boiler are heating up.


N.B.
The first time the appliance is used, you may find some fumes and a noticeable smell appear. This is quite normal and will disappear quickly.
Chapter 3: Using Your Steam Generator
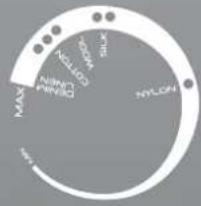
Select the temperature of the soleplate by turning the dial (10) on the iron to the desired position. Wait a few moments until the temperature indicator (13) is off. It will indicate to you that the soleplate has reached the requested temperature.
While ironing, the temperature dial indicator may turn on and off, the temperature adjusts without interrupting your ironing.
Help
Check the laundry care label of the garment to select the best temperature for each textile. Please note that during use, the temperature light goes on from time to time. It signifies that the iron is heating up to the set temperature. If your garment is made with various kinds of fibers, always select the soleplate temperature to reflect the most delicate fabric.
If the temperature is too low, some drops of water could escape from the soleplate. Please raise the temperature above the 2 dots (●●) to avoid this issue.
Chapter 3.2 - Ironing
Dry Ironing
Domestic Iron Models:
Select the temperature of the soleplate following the indications of chapter 3.1. When the soleplate reaches the required temperature, start your ironing without pressing the steam trigger (11).
Professional Iron Models:
Only turn on the iron switch (1d). Select the temperature of the soleplate following the instructions in chapter 3.1. Start your ironing when the soleplate reaches the appropriate temperature.
Steam Ironing
Select the temperature of the soleplate following the instructions in chapter 3.1. On the stand, when the steam function is ready, the dedicated lamp (1d) will turn off. Starting from that time you can begin your ironing and press the steam trigger (11). The steam flow stops when you release the trigger.
You have the possibility to regulate the steam flow with the Multi Steam Technology selector (12). In order to achieve the best results, please refer to the dedicated chapter 3.3 for more information.





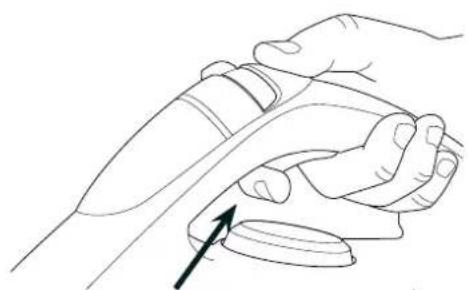
Fig. 9: Pressing Steam Trigger Graphic
Professional Iron Models Only
Steam lock function: The steam lock allows you to steam iron without pressing the steam trigger. Steam will therefore flow continuously. To activate or deactivate the steam lock, slide the steam lock forwards or backwards.
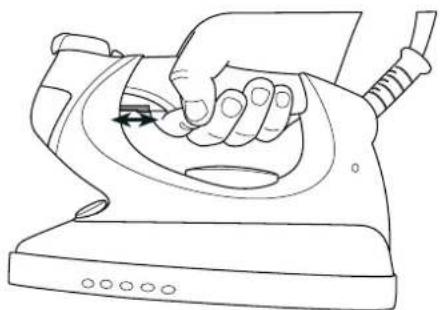
Fig. 10: Steam Trigger Lock Graphic
N.B.
During use, you may hear noise coming from your steam generator. This is normal. It signifies that a pump is injecting water into the boiler. Ideally, avoid using the steam trigger at this precise moment to avoid a fall in pressure.
Chapter 3.3 - How to Choose the Correct Soleplate Temperature and Steam?
7-GB
To obtain the best results, it is really important to set the correct temperature of the soleplate and the steam flow you are using. Your Hoover appliance has a unique Multi Steam Technology selector (12). If correctly used, it will simplify your ironing and provide outstanding results, making ironing easier and faster.
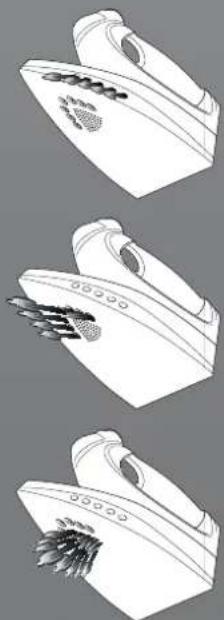
Your iron features innovative Multi Steam Technology, you can use steam on most textiles to give great results. You have the choice between 3 preset settings: Diffuse Caresse, Profound Care and Precise Power. Each setting will adapt the humidity, power and direction of the steam flow, so you can adapt the steam flow to suit the garment giving outstanding results.
8-GB
| Textile Steam Type Soleplate T°C | ||
| Wrinkled Textiles Precise Power .../Max | ||
| Tricky Zone Precise Power .../... | ||
| Jeans Profound Care Max | ||
| Cotton Profound Care ... | ||
| Linen Profound Care Max | ||
| Starched Clothes Profound Care ... | ||
| Velvet/Alcantara Profound Care ... | ||
| Wool | Profound Care | .. |
| Silk | Diffuse Caresse | .. |
| Cashmere | Diffuse Caresse | .. |
| Rayon | Diffuse Caresse | .. |
| Polyester | No | • |
| Nylon | No | • |
| Acrylic | No | • |
| Lycra | No | • |
| Polyamid | No | • |
Diffuse Caresse
This steam flow is dedicated to iron with great care the most delicate textiles like silk and cashmere with a soft and delicate flow. A reduced steam flow is spread carefully in front of the iron on a large part of textile. Fibres are better loosened in order to take away delicately and faster all the creases.
Precise Power
The flow is directed towards the tip. It permits to access the most difficult zones, like buttons, sleeves and loops through the concentrated flow in the tip and offers a constant, concentrated and powerful sprout. Difficult zones are better humidified and hence creases removed faster.
Profound Care
This vertical steam flow allows removing wrinkles more easily and quickly on all textiles with a strong and humid jet. Steam impregnates the fibres better, and the large soleplate dries the textile. Wrinkles are therefore removed faster.
Help
When steam ironing clothes on which shiny patches may occur, we recommend you to set the soleplate temperature to a lower temperature or iron the garment on the reverse.
Start with the fabrics that need to be ironed at a lower temperature (●) and finish with those that need to be ironed at the higher temperature (●●●/Max).


Chapter 3.4 - Vertical Steam Ironing
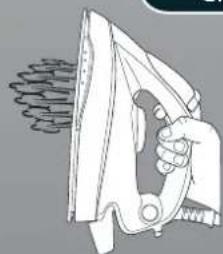
Set the soleplate temperature to the max temperature and set the Multi Steam Technology selector (12) to the Profound care program.
Hang curtains and clothes (jackets, suits, coats). Hold the iron in vertical position at a short distance from the fabric to avoid burning it. Press the steam trigger (11) to steam iron, moving it from top to bottom.
Warning: Do not direct the steam jet towards people or animals.
Chapter 3.5 - Refilling the Water Tank During Usage
You can fill the water tank at any time during use.
When the water tank is empty, the "Empty water tank" light (1b) will switch on. No more steam escapes from the soleplate. Open the water tank filler cover (4) and refill the water tank with the help of a bottle of water without exceeding the max mark level.
Please refer to chapter 2.2 for more detailed instructions.
Chapter 4: Maintenance and Cleaning
To prevent any risk of burns, all maintenance and cleaning operations should only be carried out when the unplugged appliance has cooled down for at least 2 hours.
Chapter 4.1 - Cleaning the Appliance
Do not use any detergent or descaling products for cleaning the soleplate. Regularly clean it with a humid and non-metallic pad.
Empty the water tank after each use before storing it.
To clean the plastic parts of the stand, please use soft clothes.
Chapter 4.2 - Rinsing the Boiler for Scale Maintenance
In order to maximise the life of your appliance, you should rinse the boiler every 2 months to avoid scale deposit in the boiler.
Before proceeding, be sure that the appliance is cooled down and unplugged for at least 2 hours.
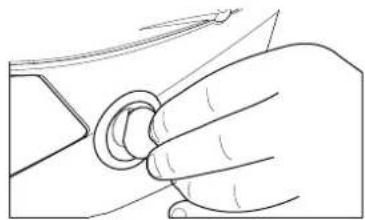
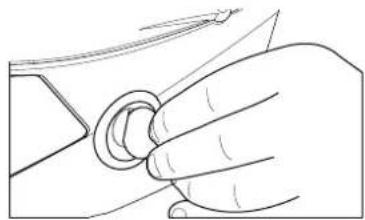
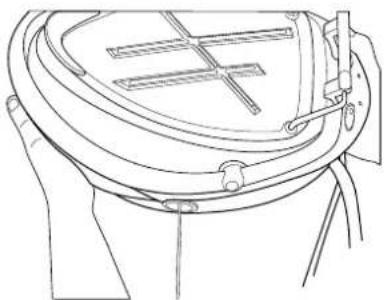
Place the stand on the edge of your sink and place the iron on a flat surface. Remove the calc removal cap (15). Unscrew the boiler rinse safety cap anti-clockwise with a coin and remove it. Fill the boiler with 0.2 liters of tap water using a funnel and a bottle. Shake the stand and then empty the boiler completely, pouring out the water in the sink. We recommend repeating this operation twice. Screw the boiler rinse safety cap with a coin and put back the calc removal cap (15).


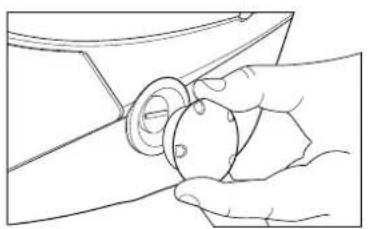
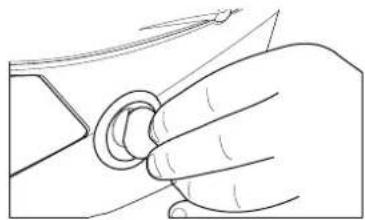
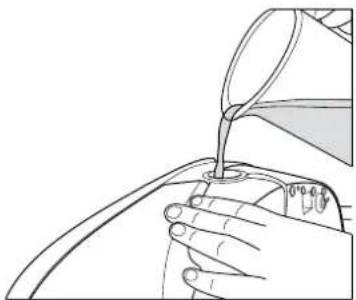
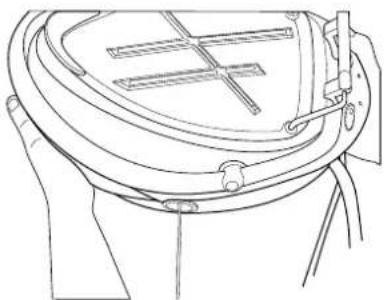
Fig. 11: Cleaning Operation
In any case, do not use any descaling products to clean or rinse the boiler.
Chapter 4.3 - Storage
Switch off the appliance and unplug it.
Put the iron on the heat-resistant iron resting mat (3). Wait at least 30 minutes allowing the soleplate and the generator to cool down.
Lock the iron with the iron lock system (2). Please refer to the dedicated chapter 1.2 for further instructions.
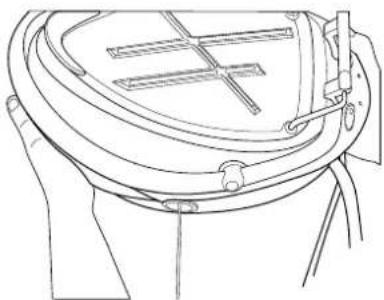
Store both steam and electrical cables in the cord storage feature (5).
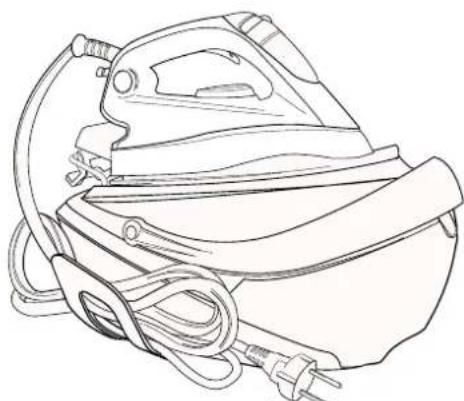
Fig. 12: Cord Storage
Then you can take away your appliance in order to store it safely and easily.
10-GB

Ironspeed_SF_1-12_union.indd 10 19-10-2009 17:57:55





Troubleshooting
| Problem Cause Solution | ||
| The appliance does not become hot | There is a connection problemThe appliance is not switched onThe soleplate temperature is too low | Check the mains cord, the plug and the wall socketPress on the on/off switchSet a higher temperature of the soleplate |
| The appliance does not produce steam | The appliance is not switched onThe boiler has not yet heated upThe water tank may be emptyYou are not pressing the steam triggerThe soleplate temperature is set to the maximum | Press on the on/off switchWait a few moments until the steam ready LED is offRefill the water tankPress the steam triggerIt works but steam is not visible as very hot and dry. |
| Steam escapes from the calc removal cap when ironing | The calc removal valve is not tightened enoughThe anti-scale valve is damaged | Switch off the appliance and let it cool down.Remove the calc removal cap and tighten the valve correctlyContact your after sales service |
| The empty water tank LED is on | There is no more water in the tank | Refill the water tank with water |
| The soleplates becomes dirty or brown | There should be chemical or additives in the water used for ironingThe linen is still dirty Clean the | Never use any chemical or additives in the water.Contact your after sales service if the linen is still dirtysoleplate with a non-metallic sponge |
| Water stripes appear on the textile | Your ironing board cover is saturated in water | Change the cover or use a mesh ironing board |
| Some scale deposit appears on the soleplate | Your boiler has not been rinsed for a while | Follow the indications in the appropriate chapter |
Important Information
Hoover spares and Consumables
Always replace parts with genuine Hoover spares. These are available from your local Hoover dealer or direct from Hoover. When ordering spare parts, always check your model number.
Hoover Service
Should you require service at any time, please contact your local Hoover Service Office. Please see all the contact details below.
Safety
Hoover believes that independent approval is the best way of demonstrating safety in design and manufacture. “Istituto del Marchio di Qualità” (IMQ), the independent Italian national authority for the safety of domestic electrical appliances, ensures that European safety standards are met and maintained throughout the production life of an appliance. All appliances that pass the requirements are permitted to carry the IMQ mark of safety.
Quality
ISO 9001
Hoover's factories have been independently assessed for quality. Our products are made using a quality system which meets the requirements of ISO 9001.
The Environment
This appliance is marked according to the European Directive 2002/96/EC on Waste Electrical and Electronic Equipment (WEEE).
By ensuring this product is disposed of correctly, you will help prevent potential negative consequences for the environment and human health, which could otherwise be caused by inappropriate waste handling of this product.
The symbol on the product indicates that this product may not be treated as household waste. Instead, it shall be handed over to the appliance collection point for recycling of electrical and electronic equipment.
Disposal must be carried out in accordance with the local environmental regulations for waste disposal.
For more detailed information about treatment, recovery and recycling of this product, please contact your local city office, your household waste disposal service or the shop where you purchased the product.
Your Guarantee
The guarantee conditions for this appliance are as defined by our representative in the country in which it is sold. Details regarding these conditions can be obtained from the dealer from whom the appliance was purchased. The bill of sale or receipt must be produced when making any claim under the terms of this guarantee.
Subject to change without notice.
Description
French
19-EN
20-EN
| Tissus Type de vapeur T°C semelle | ||
| Tissus froncés Precise Power .../Max | ||
| Zones délicates Precise Power .../... | ||
| Jeans Profound Care Max | ||
| Coton Profound Care ... | ||
| Lin Profound Care Max | ||
| Vêtements amidonnés Profound Care ... | ||
| Velours/alcantara Profound Care ... | ||
| Laine | Profound Care ... | |
| Soie | Diffuse Caresse | ... |
| Cachemire | Diffuse Caresse | ... |
| Viscose | Diffuse Caresse | ... |
| Polyester | No | • |
| Nylon | No | • |
| Acrylique | No | • |
| Lycra | No | • |
| Polyamide | No | • |
Diffuse Caresse
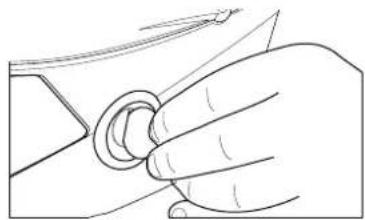
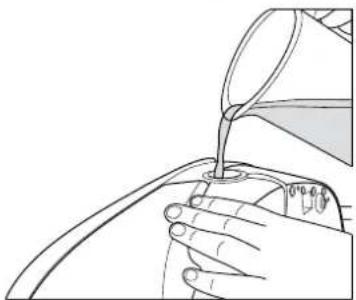
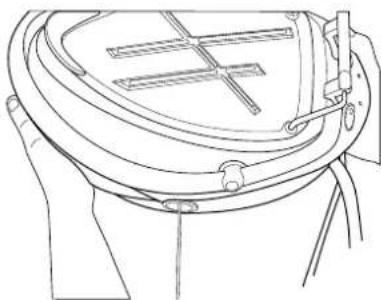
fig. 12: Cord storage
31-DE
32-DE
| Textil Dampfart | Bodenplattentemperatur in °C | |
| Textilien mit Knittereffekt | Precise Power .../Max | |
| Schwierige Bereiche Precise Power .../... | ||
| Jeans Profound care Max | ||
| Baumwolle Profound care ... | ||
| Leinen Profound care Max | ||
| Gestärkte Kleidung Profound care ... | ||
| Samt/Alcantara Profound care ... | ||
| Wolle Profound care ... | ||
| Seide Diffuse Caresse | .. | |
| Kaschmir | Diffuse Caresse | .. |
| Rayon Diffuse Caresse | .. | |
| Polyester | Nein | . |
| Nylon | Nein | . |
| Acryl | Nein | . |
| Lycra | Nein | . |
| Polyamid | Nein | . |
Diffuse Caresse
43 - IT
44 - IT
| Tessuto Tipo di vapore T°C piastra | ||
| Tessuti con molte pieghe | Precise Power .../Max | |
| Zone difficili Precise Power .../... | ||
| Jeans Profound care Max | ||
| Cotone Profound care ... | ||
| Lino Profound care Max | ||
| Indumenti inamidati Profound care ... | ||
| Velvet/Alcantara Profound care ... | ||
| Lana Profound care ... | ||
| Seta Diffuse caresse ... | ||
| Cashmere | Diffuse caresse ... | |
| Rayon | Diffuse caresse ... | |
| Poliestere | No | • |
| Nylon | No | • |
| Acrilico | No | • |
| Lycra | No | • |
| Polyamid | No | • |
Diffuse Caresse
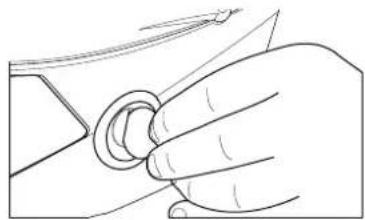
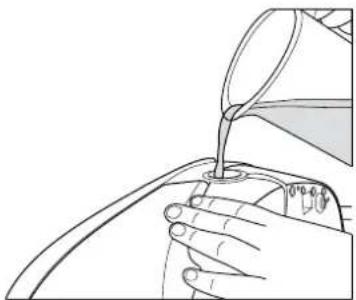
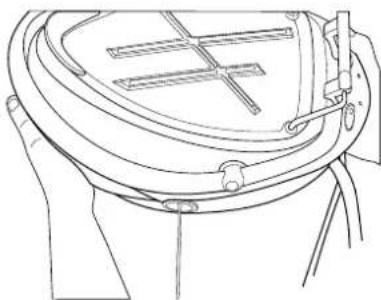
fig. 10: Steam button lock
N.B.
55 - NL
56 - NL
| Stof Stoomsoort T°C strijkvoet | ||
| Gekreukelde stoffen Precise Power .../Max | ||
| Moeilijke plek Precise Power ••/•• | ||
| Jeans Profound Care Max | ||
| Katoen Profound Care •• | ||
| Linnen Profound Care Max | ||
| Gesteven kleding Profound Care •• | ||
| Fluweel/Alcantara Profound Care •• | ||
| Wol Profound Care •• | ||
| Zijde | Diffuse Caresse | •• |
| Kasjmier | Diffuse Caresse | •• |
| Kunstzijde | Diffuse Caresse | •• |
| Polyester | Nee | • |
| Nylon | Nee | • |
| Acryl | Nee | • |
| Lycra | Nee | • |
| Polyamide | Nee | • |
Diffuse Caresse
67-PT
68-PT
Chapter 3.4 - Vertical steam ironing
Set the temperature of the heating plate to maximum and the Multi Steam Technology selector (12) to the Deep Care program.
| 1D Plancha encendida/apagada (on/off) |
| 1E Caldera encendida/apagada (on/off) |

Dear Customer,
| Tejido Tipo de vapor T°C suela | ||
| Tejidos arrugados Precise Power .../Máx. | ||
| Partes difíciles Precise Power .../... | ||
| Jeans/vaqueros Profound care Máx. | ||
| Algodón Profound care ... | ||
| Lino Profound care Máx. | ||
| Vestidos almidonados Profound care ... | ||
| Terciopelo / alcántara Profound care ... | ||
| Lana Profound care ... | ||
| Seda | Diffuse Caresse | ... |
| Cachemira | Diffuse Caresse | ... |
| Rayón | Diffuse Caresse | ... |
| Poliéster | No | • |
| Náilon | No | • |
| Acrilico | No | • |
| Lycra | No | • |
| Poliamido | No | • |
Diffuse Caresse
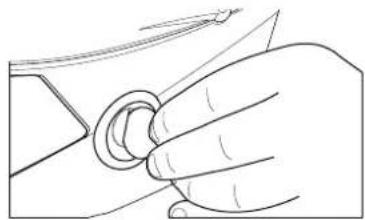
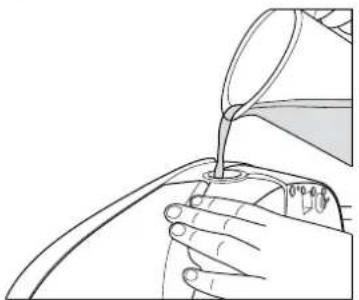
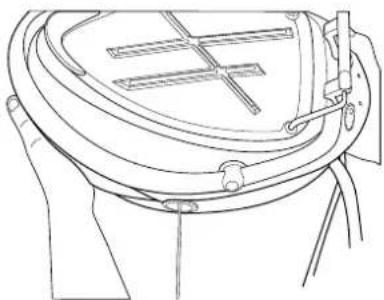
Figure 1: Description of the base and container
Figure 3: Description of the Pro iron
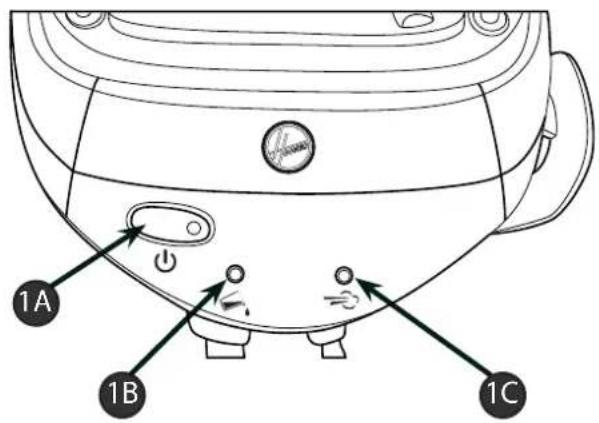
Figure 7: Locking system of the Pro iron
Figure 9: Display of the activated steam button
Only professional ironing models
Continuous steam function: The continuous steam button allows you to iron with steam without pressing the steam button. Steam will therefore be supplied continuously. To turn the continuous steam on or off, pull the continuous steam button forward or backward.
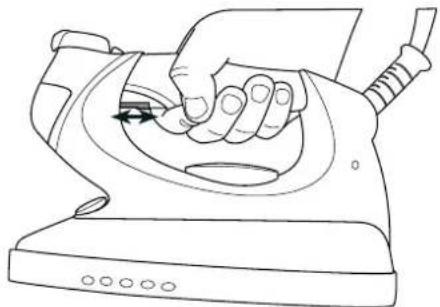
Figure 10: Display of the continuous steam button
Important
| Tekstil Parni način T°C likalne plošče | ||
| Nagubani tekstili Način | Natančna moč(Precise Power) | .../Maks. |
| Težavni predeli Način | Natančna moč(Precise Power) | .../... |
| Jeans Globinski način Maks. | ||
| Bombaž Globinski način | ... | |
| Lan Globinski način Maks. | ||
| Toga oblačila Globinski način | ... | |
| Žamet Globinski način | ||
| Volna Globinski način | ||
| Svila Razpršeni način | ||
| Kašmir | Razpršeni način | |
| Umetna svila | Razpršeni način | |
| Poliester | Ne | • |
| Najlon | Ne | • |
| Acril | Ne | • |
| Elastan | Ne | • |
| Poliamid | Ne | • |
Dispersion mode
Chapter 3.4 - Ironing with vertical steam
Set the temperature of the soleplate to the maximum temperature and set the Multi Steam technology (12) to the Deep mode program.

- SUMMARY
- PARTS DESCRIPTION
- ENGLISH
- IRONSPEED
- INTRODUCTION
- IMPORTANT SAFETY INSTRUCTIONS
- CHAPTER 1.1 - CONTROL PANEL
- CHAPTER 1.2 - LOCK SYSTEM
- CHAPTER 2: PREPARATION FOR USE
- CHAPTER 2.1 - WHAT KIND OF WATER MAY BE USED
- CHAPTER 2.2 - FILLING THE WATER TANK
- CHAPTER 2.3 - SWITCHING ON THE APPLIANCE
- DOMESTIC IRON MODELS
- PROFESSIONAL IRON MODELS
- N.B
- CHAPTER 3: USING YOUR STEAM GENERATOR
- HELP
- CHAPTER 3.2 - IRONING
- CHAPTER 3.3 - HOW TO CHOOSE THE CORRECT SOLEPLATE TEMPERATURE AND STEAM
- DIFFUSE CARESSE
- PRECISE POWER
- PROFOUND CARE
- CHAPTER 3.4 - VERTICAL STEAM IRONING
- CHAPTER 3.5 - REFILLING THE WATER TANK DURING USAGE
- CHAPTER 4: MAINTENANCE AND CLEANING
- CHAPTER 4.1 - CLEANING THE APPLIANCE
- CHAPTER 4.2 - RINSING THE BOILER FOR SCALE MAINTENANCE
- CHAPTER 4.3 - STORAGE
- IMPORTANT INFORMATION
- HOOVER SPARES AND CONSUMABLES
- HOOVER SERVICE
- SAFETY
- QUALITY
- THE ENVIRONMENT
- YOUR GUARANTEE
- DESCRIPTION
- FRENCH
- DISPERSION MODE
- CHAPTER 3.4 - IRONING WITH VERTICAL STEAM
Brand : HOOVER
Model : IronSpeed SRD4108021
Category : Iron