
Stelvio Racer Pro i - Exercise bike Flow Fitness - Free user manual and instructions
Find the device manual for free Stelvio Racer Pro i Flow Fitness in PDF.


| Product Type | Exercise Bike (Indoor Cycling) |
| Model | Stelvio Racer Pro i |
| Brand | Flow Fitness |
| Dimensions (L x W x H) | 120 x 55 x 90 cm (approx.) |
| Weight | 35 kg (approx.) |
| Maximum User Weight | 130 kg |
| Power Supply | Self-powered (dynamo) or optional 6V DC adapter |
| Resistance System | Magnetic (Electromagnetic) with 16 levels |
| Display | LCD screen showing time, distance, speed, calories, pulse, RPM |
| Programs | 12 pre-set programs + 1 manual mode |
| Heart Rate Monitoring | Pulse grip sensors on handlebars |
| Flywheel Weight | 8 kg |
| Pedals | Adjustable toe cages |
| Seat Adjustment | Vertical and horizontal (tool-free) |
| Handlebar Adjustment | Vertical (tool-free) |
| Transport Wheels | Yes (2 front wheels) |
| Leveling Feet | Yes (adjustable) |
| Water Bottle Holder | Yes |
| Maintenance | Periodic cleaning and lubrication of moving parts |
| Safety | Emergency brake (pull cord) and stable frame |
| Spare Parts | Available through Flow Fitness dealers and online |
| Warranty | 2 years on frame and mechanics, 1 year on electronics |
Frequently Asked Questions - Stelvio Racer Pro i Flow Fitness
User questions about Stelvio Racer Pro i Flow Fitness
0 question about this device. Answer the ones you know or ask your own.
Ask a new question about this device
Download the instructions for your Exercise bike in PDF format for free! Find your manual Stelvio Racer Pro i - Flow Fitness and take your electronic device back in hand. On this page are published all the documents necessary for the use of your device. Stelvio Racer Pro i by Flow Fitness.
USER MANUAL Stelvio Racer Pro i Flow Fitness
natural_image
Line drawing of a stationary exercise bike with visible components and wheels (no text or symbols)Manual (English) 50 - 64
Copyright © Flow Fitness
All rights reserved. Nothing in this instruction manual may be used or reproduced in any form or way without the express written permission of Flow Fitness.
2.2 Specifications 7
3. Fitness 8
5.1 Training schema's 32
5.2 Exploded view 34
5.3 Probleemoplossen 36
6. Garantie 37
6.1 Garantie 37
1.1 Gezondheid
natural_image
Silhouettes of a person performing various stretching or exercise poses (no text or symbols)Head Roll
Stap 2
Stap 3
Stap 4
Starten of stoppen van training.
MODE
natural_image
Simple icon of a tablet device with blank screen (no text or symbols)iPad 3 of nieuwer iPad air 1 of nieuwer iPad pro 1 of nieuwer
iPad Mini of nieuwer
iPhone 4s of nieuwer
iPod touch (5gen) of nieuwer

Android tablet OS4.3 of hoger
Android Phone
OS4.3 of hoger
https://itunes.apple.com/us/app/ic-training/id1347028353?mt=8
Google Android Play Store
https://play.google.com/store/apps/details?id=com.changyow.icp4th
https://www.flowfitness.com/handleiding/iconsole.html
3.6 Onderhoud
4.1 Training schema's
Cooling down 5 minutes.
Trainingsschema week 3 en 4
Cooling down 5 minutes.
Trainingsschema week 5 en 6
Cooling down 5 minutes.
https://www.flowfitness.com/nl/registreer-uw-product/
natural_image
Line drawing of a stationary exercise bike with visible components and wheels (no text or symbols)1. Important information 40
1.1 Health 40
1.2 Safety 40
2. Introduction 42
2.1 Important parts 43
2.2 Specifications 43
3. Fitness 44
3.1 Training by heart rate 44
3.2 Warming up and cooling down 46
4. Use 47
4.1 Assembly 47
4.2 Use of the computer 56
4.3 Maintenance 67
5. General information 68
5.1 Training schedule 68
5.2 Exploded view 70
5.3 Troubleshooting 72
6. Warranty 73
6.1 Warranty 73
1.1 Health
Important: read this instruction manual first and follow the instructions carefully before using the product.
- Consult an expert to determine the training level that is most suitable for you.
- If you experience any dizziness, nausea or any other physical discomfort while training, cease the training immediately and consult a physician.
- Watch your heart beat during the training and immediately stop training when values are inconsistent.
- We advise you to do warming up and cooling down exercises during five to ten minutes before and after use of the product. This way your heart rate can increase and decrease gradually and you can prevent painful muscles.
1.2 Safety
-Only use this product as described in this instruction manual.
- Before using this product check that the product functions as it should. In case of malfunction or a defect stop training immediately and contact your vendor.
-Do not use the product when there is a malfunction.
- The product is only meant for use in the home and it has to be positioned on a flat surface.
-The product can only be used by one person at the time.
- The product can be used by persons with a body weight of up to 140 kilos.
- Always make sure that there is at least one meter of free space in all directions around the product when you are training.
-Don't stick any objects in any opening of the equipment.
-Keep children and pets away from the product.
- Handicapped persons should get consent from a medical expert and follow their directions for training with the product.
-Do not place hands or feet under the product.
- Never hold your breath during a training session. Your breathing should be at a normal interval depending on the intensity of the training.
-Start your training schedule slowly and build it up gradually.
- Always wear appropriate clothing during training. Don't wear anything that's too loose and can get caught between moving parts of the equipment.
- When moving the equipment always use the appropriate lifting techniques to prevent back injury.
-Check screws and bolts regularly and fasten them if they are loose.
- The owner of the product is responsible for all users to be aware of the warnings and instructions as mentioned in this instruction manual.
- This product is intended for use in a clean and dry environment. Storage in cold and / or moist areas could lead to problems with the product.
- This product is not suitable for therapeutic supports / or professionally use in physical therapy.
WARNING
Have your physical condition checked by a licensed physician before you start training. This is particularly important for persons over 35 years old or persons who have any problems with their health. Read all instructions before using the equipment. Flow Fitness is not responsible for any personal injury or damage to property caused by the use of this equipment.
2. Introduction
In this instruction manual you will find all information necessary to use the Speed bike. Also you will find tips and advice on how to make the most of your training sessions.
We advise you to carefully read this instruction manual before using the Stelvio Racer Pro i Speed Bike, so that you can use it safely and benefit from it maximally.
Flow Fitness wishes you successful and enjoyable training sessions.
2.1 Important parts
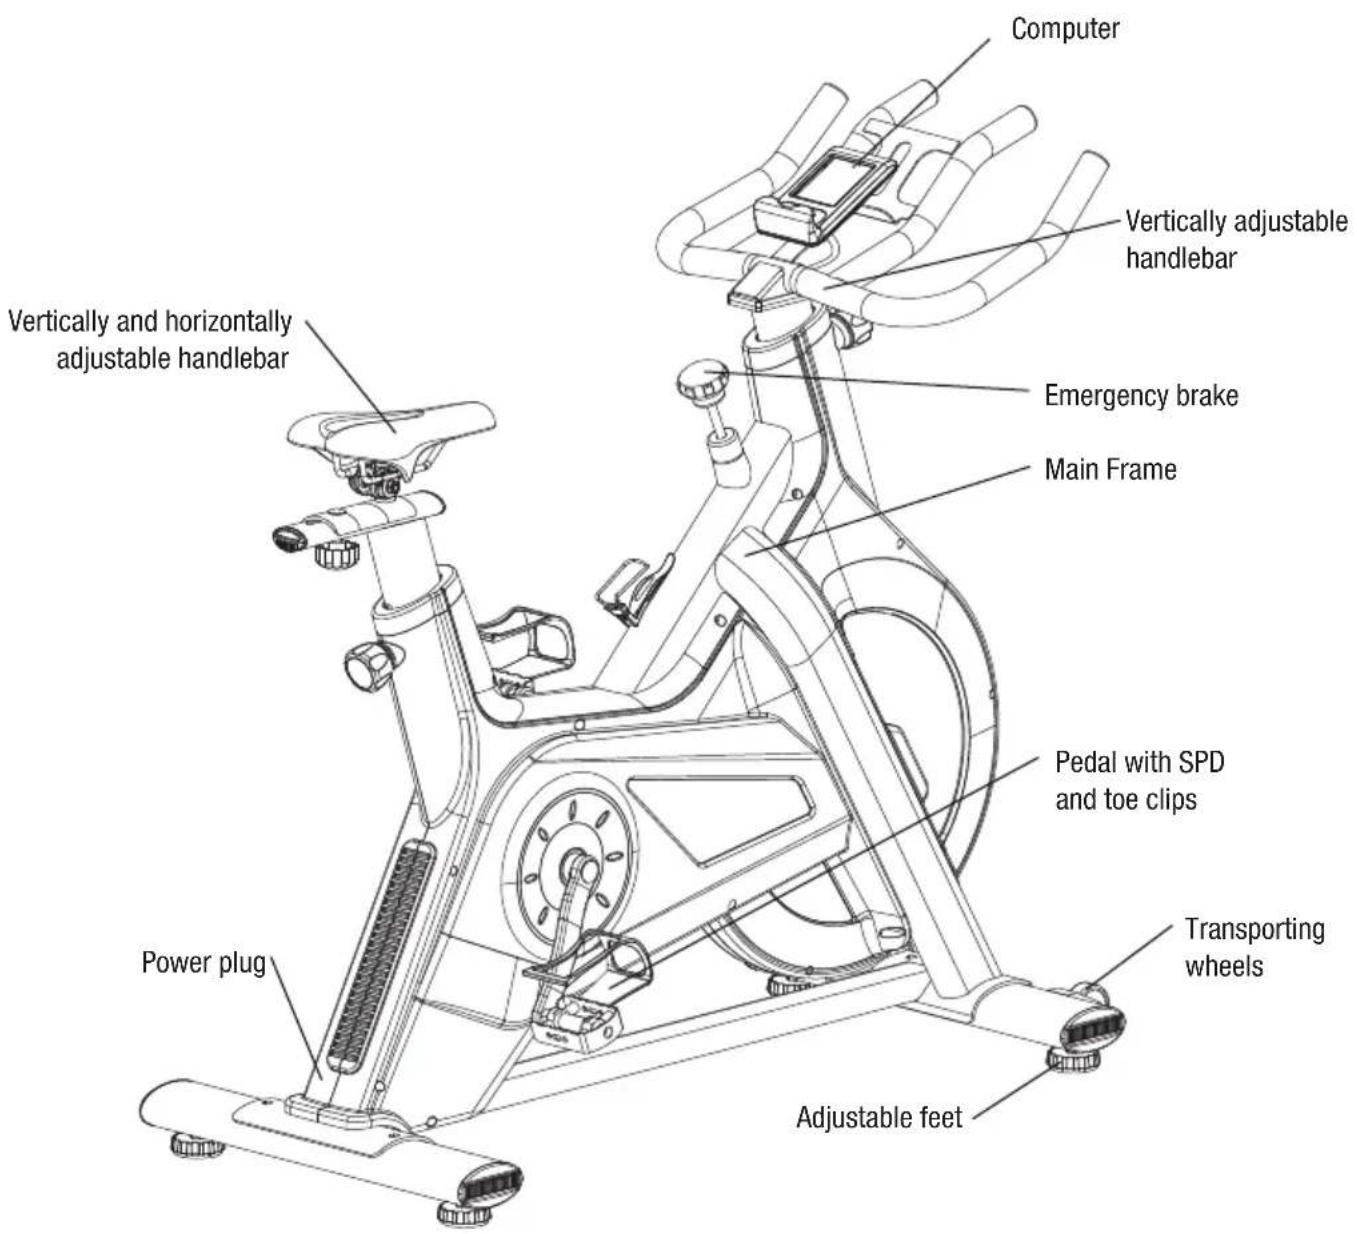
Length: 120 cm
Height: 120 cm
Width: 851 cm
Weight: 47 kg
What is fitness? In general a fitness exercise can be described as an activity that makes your heart pump more oxygen from your lungs to your muscles by means of circulating the blood. The more strenuous the training, the more fuel (oxygen) the muscles need and the more work the heart has to do to pump oxygen rich blood to the muscles. If you are in good physical shape your heart can pump more blood to the muscle with each contraction. This means the heart doesn't have to contract as many times to transport the necessary oxygen to your muscles. Your resting heart beat and heart beat when exercising will therefore decrease.
3.1 Training by heart rate
While training it is important to monitor your heart rate. The heart rate is essential for the result of your training. Your best training heart rate depends firstly on your age. Your maximum heart beat can be determined by this. Secondly the most effective heart rate depends on your training goals. If your training goal is to lose weight, then the most effective training is at 60% of your maximum heart rate. If your training goal is to improve your stamina, then you should train at 85% of your maximum heart rate.
The body stores energy in two forms: carbohydrates and fat. When we exercise we use a combination of these two energy supplies. If the training intensity is at a high level the body will mostly choose the energy that burns fast: carbohydrates. Since there is a limited supply of these carbohydrates you can't continue this for a long period of time. When training at a low intensity the body will mostly choose to use a long lasting source of energy: fat. Since this is stored in large quantities in the body, you can continue this kind of training for a longer time.
Below you will find a schedule allowing you to calculate the best heart rate for your training. In this schedule each age category has a range that your heart rate should be in during your training. The middle column has the values you should try to maintain if you want to lose weight. If you want to improve your stamina you should try to maintain the rates in the right column.
| Age | Weight lost (beats per minute) 60% | Improve stamina (beats per minute) 85% |
| 20 -24 120 - 118 170 | -167 | |
| 25 - 29 117 - 115 166 | - 163 | |
| 30 - 34 114 - 112 162 | - 158 | |
| 35 - 39 111 - 109 157 | - 154 | |
| 40 - 44 108 - 106 153 | - 150 | |
| 45 - 49 105 - 103 149 | - 145 | |
| 50 - 54 102 - 100 144 | - 141 | |
| 55 - 59 99 - 97 140 | - 137 | |
| 60 and older 96 - 94 136 | - 133 |
For each individual the best way to start training is different. If you have not exercised in some time or are overweight, you should start your training schedule slowly and gradually increase the level of activity.
In the last chapter of this instruction manual you will find several different training schedules (chapter 5. general information). You can use these schedules to reach your training goals. The schedules are divided in two phases. The first phase can be used for beginners or persons who start training after a long period of inactivity. During this phase the level of intensity is built up gradually. After six weeks the second phase begins. You can then choose a training schedule to lose weight or improve your stamina.
3.2 Warming up and cooling down
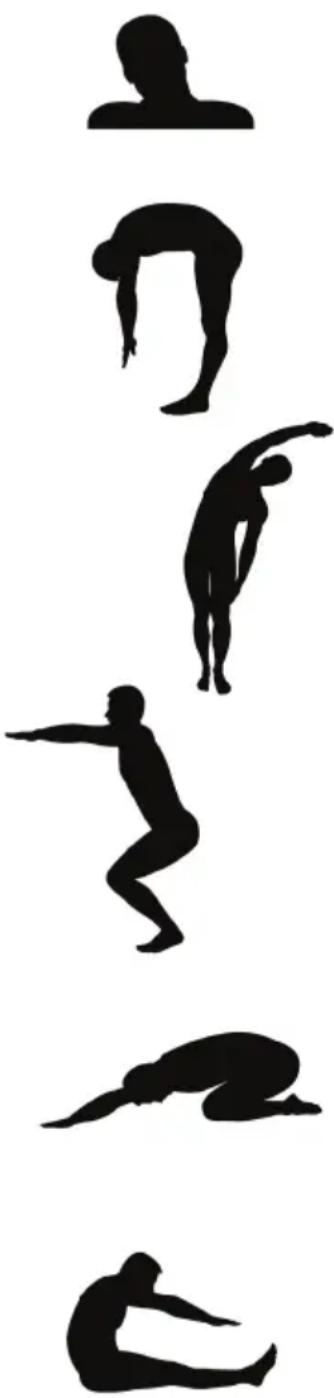
A good training schedule starts with a good warming up and ends with a cooling down of the muscles. This will prevent painful muscles and injury. Below you will find some suitable exercises.
Head Roll
Tilt your head to the right. Hold this for one second, so that you feel a little pull in the muscles on the left side of your neck. Do the same for the other side, front and back. Repeat two or three times.
Toe Touch
Slowly bend forward with your back and arms relaxed. Bend as far as you can and hold the position for ten seconds. Repeat this two or three times.
Side Stretch
Extend both your arms up in the air and reach as high as you can with your right arm. Lean a bit to the left so that the muscles in the right side of your torso are stretched. Hold this position for one second. Relax and make the same motion on the other side of your body. Repeat this three or four times.
Knee bend
Set your feet shoulder-width apart and your stretched your hands out. Lower yourself no more than 10cm by bending your knees. Come back up again and repeat several times.
Lower back stretch
Begin on all fours. Stretch your arms out in front of you, allowing your face to lower to a position near the floor. Gently sit back. Rest your glutes just above your heels. Ease back and feel the gentle stretch in your lower back.
Hamstring Stretch
Sit down on the floor with your right leg extended in front of you and place the sole of your left foot on the inside of your right upper leg. Bend forward in the direction of your right foot and hold this position for ten seconds. Relax and then do the same with your other leg. Repeat two or three times.
natural_image
Silhouettes of various human postures in various poses, including stretching, squatting, and stretching (no text or symbols)3.3 Assembly
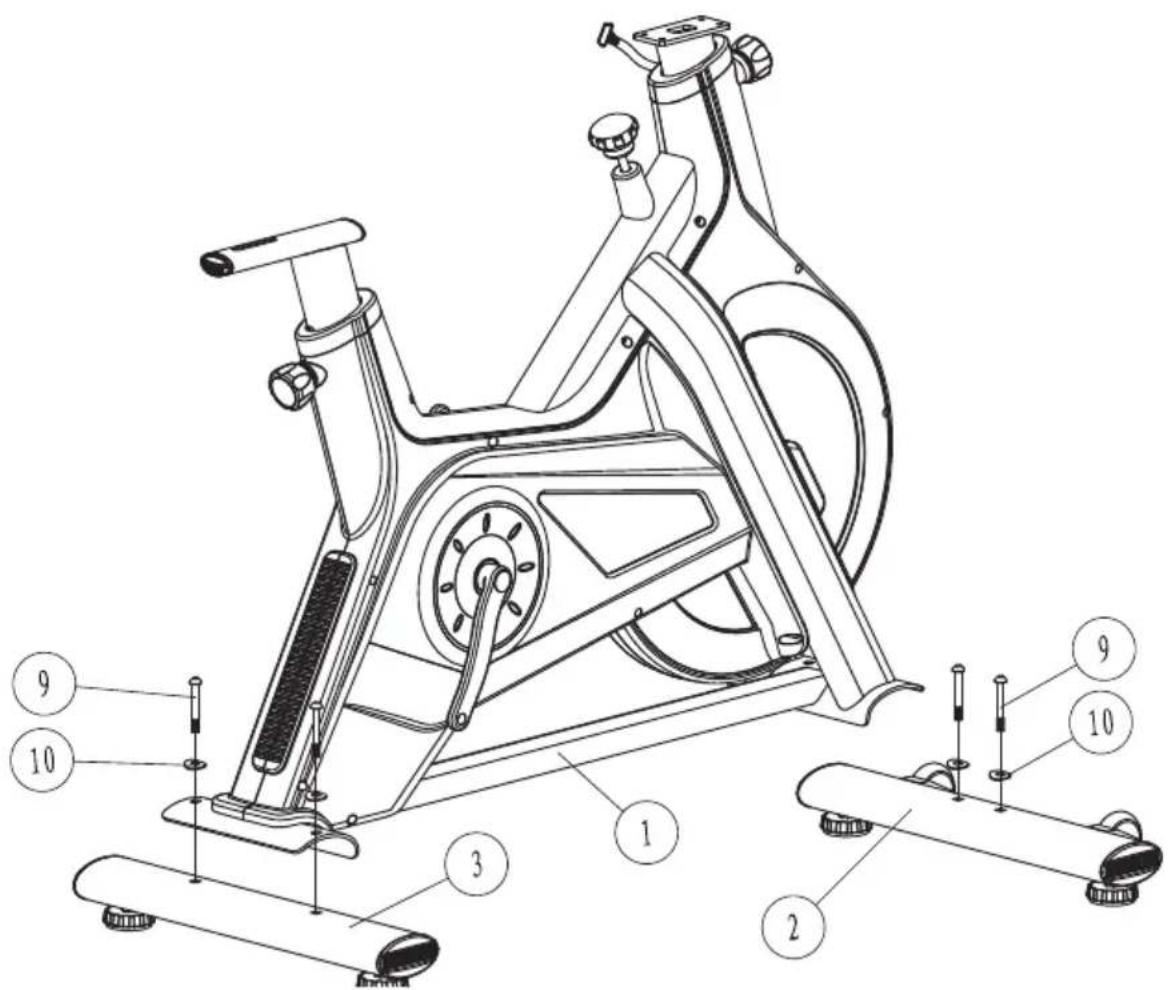
Step 1
- Attach the front stabilizer (2) to the main frame (1) by assembling the two allen bolts (9) with washer (10).
- Attach the front stabilizer (3) to the main frame (1) by assembling the two allen bolts (9) with washer (10).
Step 2
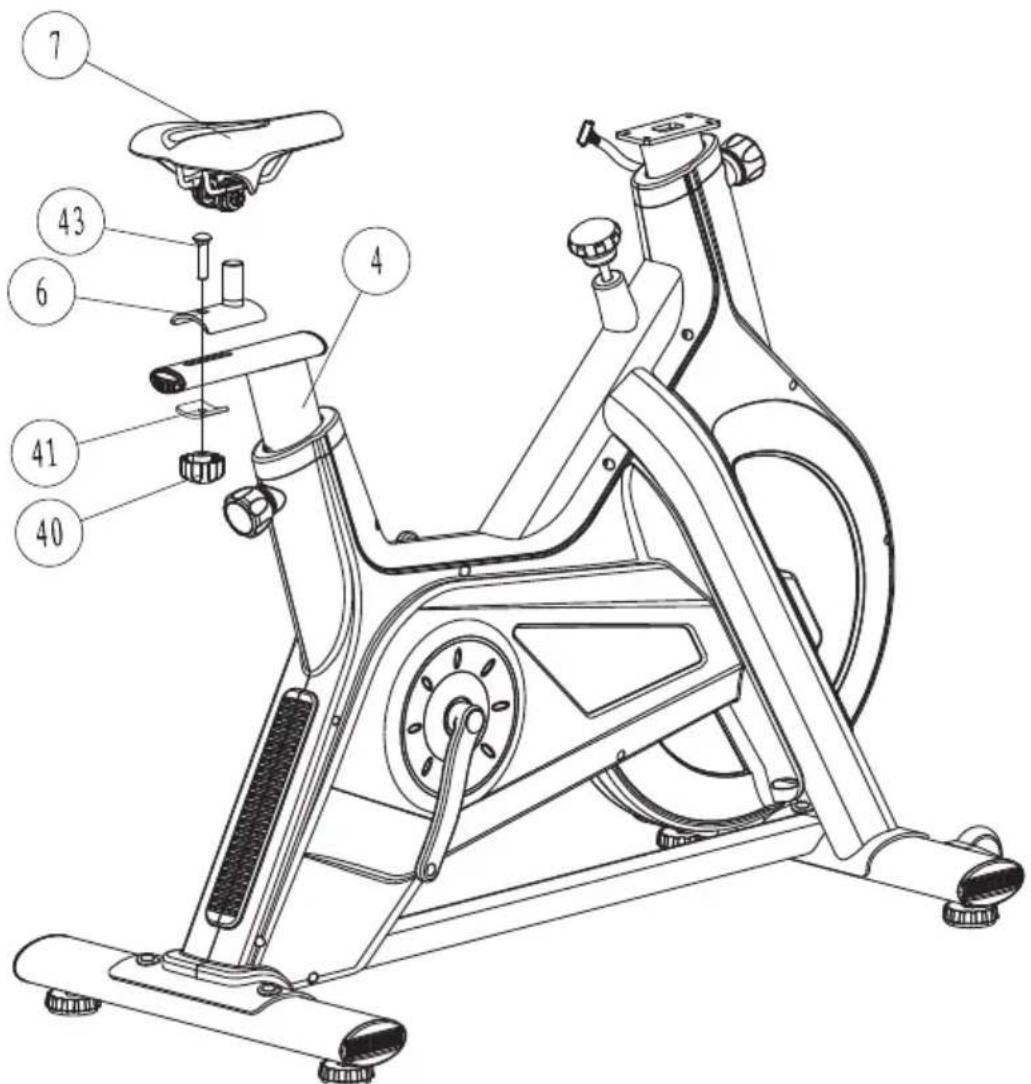
- Put the seat slider (6) onto the seat post (4) together with bolt (43)
- Then place bracket (41) and fix the assembly by placing knob (40).
- Before placing the seat (7) onto the seat post (4), the two nuts underneath the seat need to be loosened with the included wrench. Now slide the seat onto the seat post and adjust the angle of the seat into your preferred position. Make sure the front if the seat is pointing straight to the front of the speed bike. Now fasten the two nuts underneath the seat tightly.
Step 3
- Before assembling the computer (71) feed the data cable at the back of the computer trough the square hole. Then assemble the computer (71) by fastening the for bolts (80).
- Assemble the handlebar to the main frame by fastening bolts (73) together with the washer (72).
- Now connect the data cable form the frame with the data cable from the back of the computer (80).
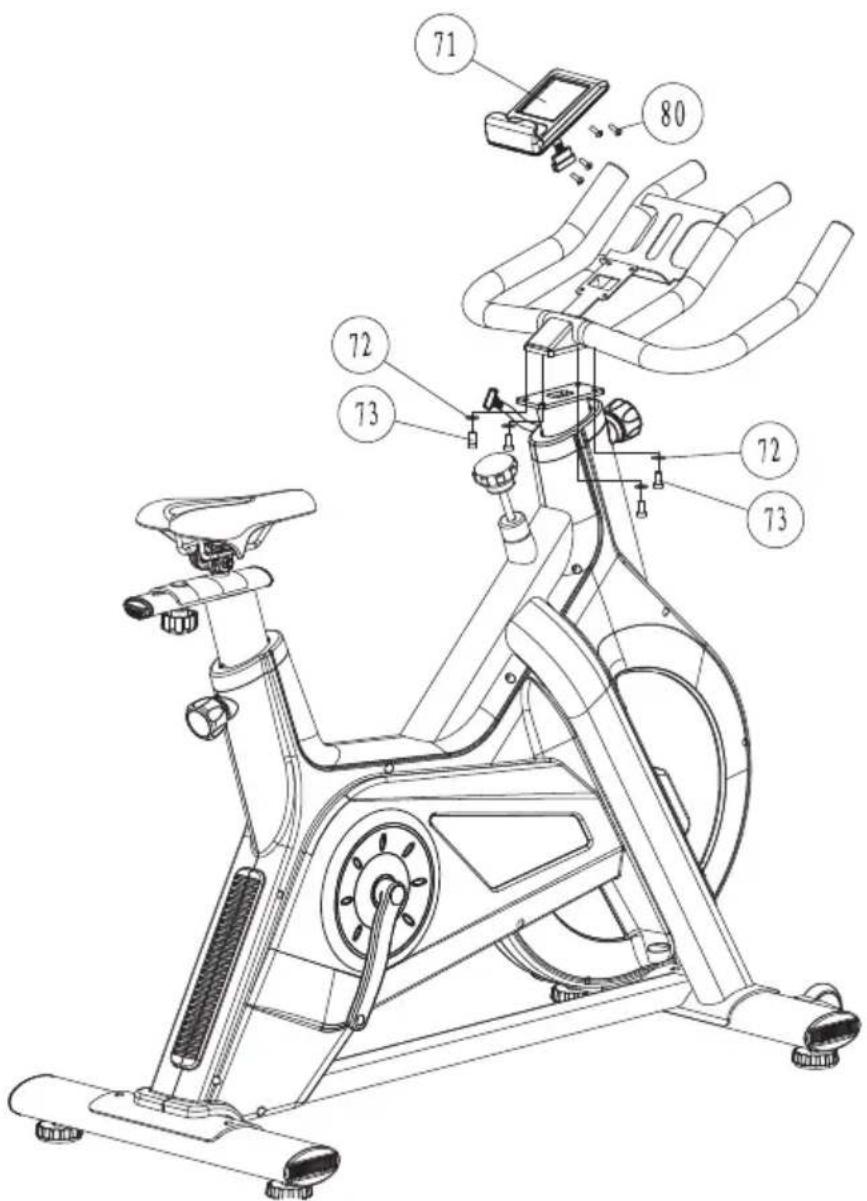
Step 4
- The pedals (30L and 30R) are marked "L" and "R"- left and right.
- Assemble the right pedal (30R) to the right crank on the right-hand side of the speed bike as you sit on it. The right pedal needs to be fastened clockwise.
- Assemble the left pedal (30L) to the left crank on the left-hand side of the speed bike as you sit on it. The left pedal needs to be fastened counter-clockwise.
- Assemble the bottle cage (83) by fastening bolts (24) into the main frame.
- Connect the adapter.

3.4 Use of the computer
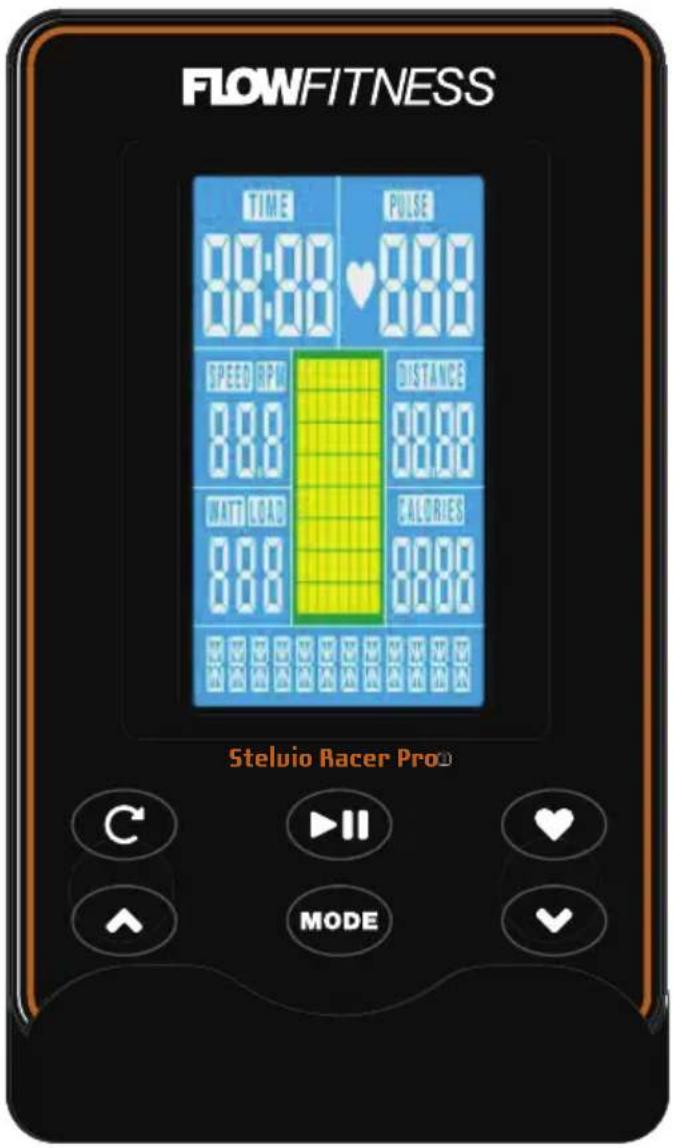
RESET
Back to the main menu. Press and hold for 5 seconds to restart the console.
UP
Selection of the training exercises or increase a training value. Increase the resistance during a training.
STAR/STOP
Starting or stopping a training exercise.
MODE
Confirm the setting or selection.
RECOVERY
Stamina test based on the recovery of your heart rate.
DOWN
Selection of the training exercises or decrease a training value. Decrease the resistance during a training.
Display Values
TIME Your elapsed or remaining time depending on the setting.
SPEED Your current speed in KPH.
RPM Your current Rotations Per Minute.
The RPM value is displayed in a chart on the left side of the screen above the speed value.
DISTANCE Your elapsed or remaining distance depending on the setting.
CALORIES An indication of you burned calories.
PULSE Display of your heart rate in BPM (Beats Per Minute). This value is only visible when wearing an optional 5kHz Flow Fitness Chest belt. The PULSE value is also displayed in a chart on the right side of the screen.
WATT The current output in WATT.
Power up
Connect the adapter to the speed bike and outlet for powering up the screen as displayed below. When powering up the computer will give a sound signal.
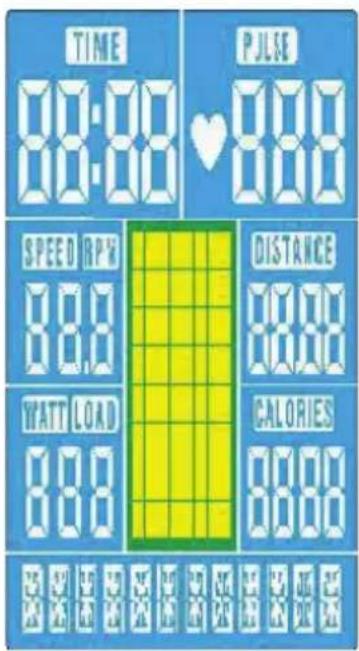
Quick Start
To quickly start a training exercise press START/STOP. All training values on the screen of the console will start to increase.
Manual Training
The MANUAL program is a program with a consistence resistance with preselected target values for TIME, DISTANCE, CALORIES, PULSE. If the values
- Select MANUAL program with the UP and DOWN buttons. Press MODE to confirm the selection. Press START/STOP to start the training or set one or more of the following target values; TIME, DISTANCE, CALORIES, PULSE.
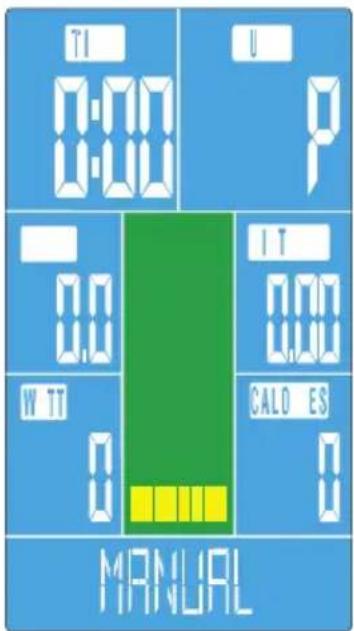

- Set the preferred training duration with the UP and DOWN buttons. Confirm the selection by pressing MODE.
- Set the preferred distance with the UP and DOWN buttons. Confirm the selection by pressing MODE.
- Set the preferred calorie target with the UP and DOWN buttons. Confirm the selection by pressing MODE.
- Set the preferred heart rate target with the UP and DOWN buttons. Confirm the selection by pressing MODE.
- Press START/STOP to start the training program
You can use the UP and DOWN buttons during a training session to adjust the resistance level.
The program is finished when one of the target values reaches zero.
Preprogrammed: Beginne / Advanced / Sporty
You can choose for one of the preset programs. With a preset program the resistance will vary according to the selected profile. In total there are 12 different profiles categorized in 3 groups; BEGINNER, ADVANCED and SPORTY.
- Select BEGINNER, ADVANCED or SPORTY training with the UP and DOWN buttons. Press MODE to confirm the selection.
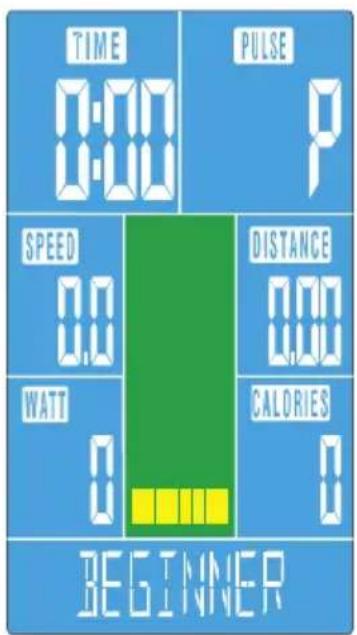
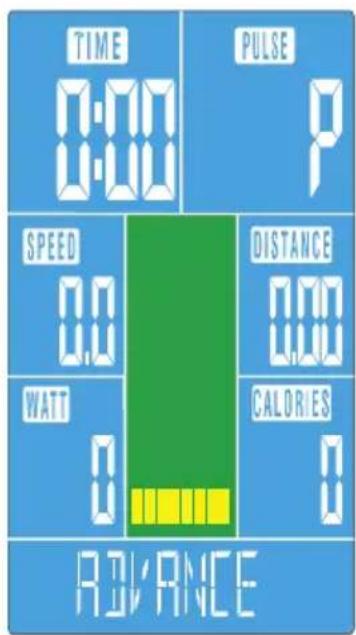
- Choose the desired training profile (1/4) with the with the UP and DOWN buttons. Confirm the selection by pressing MODE.
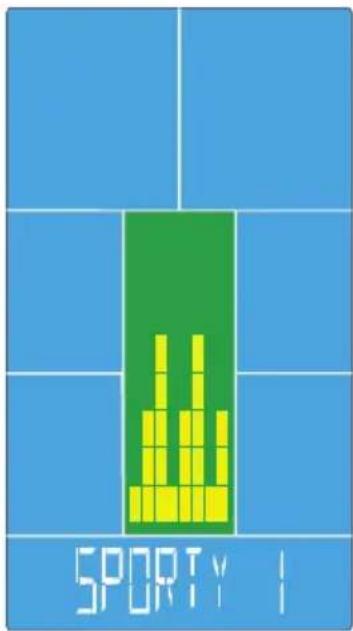
-
Set the preferred training duration with the UP and DOWN buttons. Confirm the selection by pressing MODE.
-
Press START/STOP to start the training program
Use the UP and DOWN buttons to adjust the resistance level during the exercise. The program is finished when the set training time has elapsed.
Heart Rate Controlled training: Cardio
With this training it is possible to train by using your heart rate. For this training program you need to wear a optional chest belt. There are 4 different levels: 55%, 75%, 90% or Target Heart Rate (TAG). The level is a percentage of your maximal heart rate, which is calculated on the base of your age.
- Select CARDIO with the UP and DOWN buttons. Press MODE to confirm the selection.
- Set your age with the UP and DOWN buttons. Confirm the selection by pressing MODE.
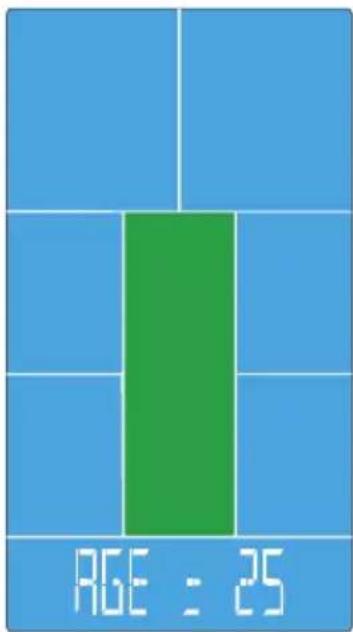
- Set your heart rate level; 55%, 75%, 90% or TAG with the UP and DOWN buttons. Confirm the selection by pressing MODE.
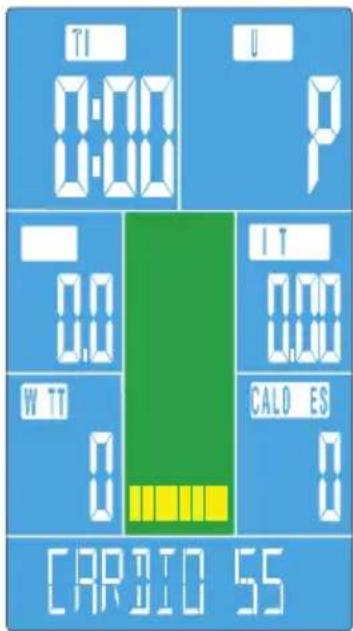
- When you have selected TAG in the previous step set your target heart rate with the UP and DOWN buttons. Confirm the selection by pressing MODE. If you have selected one of the percentages you can skip this step.
- Set the preferred training duration with the UP and DOWN buttons. Confirm the selection by pressing MODE.
- Press START/STOP to start the training program.
Please note: When there is no pulse detected for 6 seconds the display will show PULSE INPUT.
The program is finished when one of the target values reaches zero.
Watt training
With this training you can select on with output you want to train. The computer will automatically adjust the resistance to keep your output consistent.
- Select WATT with the UP and DOWN buttons. Press MODE to confirm the selection.
- Set the preferred output (WATT) with the UP and DOWN buttons. Confirm the selection by pressing MODE.

- Set the preferred training duration with the UP and DOWN buttons. Confirm the selection by pressing MODE.
- Press START/STOP to start the training program.
The program is finished when the set training time has elapsed.
Recovery Test
After a workout it is possible to check your stamina level. For the recovery test you need an optional 5kHz chest belt. Press the RECOVERY button directly after finishing a training session. All values will disappear from the screen and a countdown from 60 to 0 seconds will be visible.
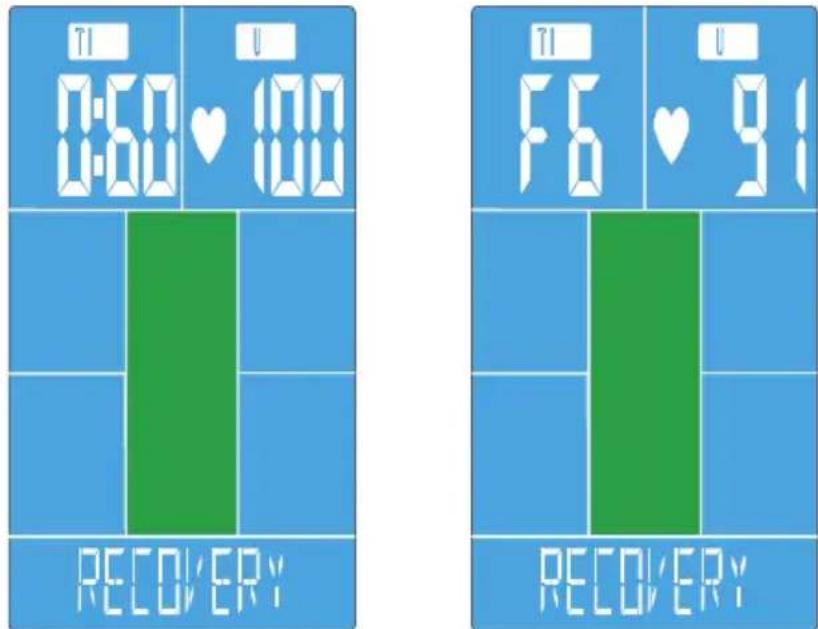
After the countdown a code will appear. This code displays your stamina level. Explanation of the code is shown in the table below:
| F1: | Excellend | |
| F2: | Good | |
| F3: | Average | |
| F4: | Below | average |
| F5: | Bad |
F6: Very bad / no correct measurement
Important:
- The RECOVERY stamina test will only start when a heart rate is detected by an optional Flow Fitness 5kHz chest belt.
- Your stamina is based upon the time in which your heart rate returns to rest level. Therefore the RECOVERY program can only be done after a intense workout of at least 150 BPM.
With the Stelvio Racer Pro i Speed Bike you are able to train using your smartphone or tablet. The following Smartphones and Tablets are supported.

natural_image
Simple icon of a tablet device with blank screen (no text or symbols)iPad 3 or newer iPad air 1 or newer iPad pro 1 or newer
iPad Mini or newer

iPhone 4s or newer
iPod touch (5gen) or newer

Android tablet OS4.3 of higher
Android Phone OS4.3 of higher
Follow the steps below to connect your mobile device with the Stelvio Racer Pro i using a bluetooth conneciton.
- Go to the settings on your mobile device and turn bluetooth on.
- Follow the instructions of the supported apps.
For training with smartphone or tablet you need to download one of the apps. The apps compatible with the Stelvio Racer Pro i Speed Bike are listed below. If new apps will become available they will be listed on our website; www.flowfitness.com.

Kinomap
Turn your Stelvio Racer Pro i Speed Bike into a powerful and fun fitness product. Choose from the geotagged video on Kinomap and go! Your position is shown in the video and icon on the map and in the altitude graph: your goal is to keep pace with the original video. A multiplayer mode is also available up to 10 players can train on the same video.
Download the Kinomap app in the app or play store by searching for 'Kinomap Fitness' or follow one of the links below.
Apple iOS App store
https://itunes.apple.com/nl/app/kinomap/id611177969?mt=8
Google Antroid Play Store
https://play.google.com/store/apps/details?id=com.kinomap.training
For further support please visit
https://www.flowfitness.com/manual/kinomap.html

iConsole + Training
The iC+ training app lets you control the Stelvio Racer Pro i Speed Bike with your smartphone or tablet. You can also log your training results or train virtually anywhere in the world using the google maps and street view. The iConsole+ training app is completely free.
Download the iC+ training app in the app or play store by searching for 'iC+ training' in the app store / 'iConsole+ training' in the play store or follow one of the links below.
Apple iOS App store
https://itunes.apple.com/us/app/ic-training/id1347028353?mt=8
https://play.google.com/store/apps/details?id=com.changyow.icp4th
For further support please visit
https://www.flowfitness.com/manual/iconsole.html
3.5 Maintenance
The metal and plastic parts of the product can be cleaned by using Flow Fitness Shine and Protect. However, make sure that all parts are completely dry before they are used again.
Flow Fitness advises to fasten nuts and bolts, check and fasten pivot points once every six weeks. For fastening use the tool supplied with the product. To prevent unnecessary wear, the product can only be used indoors and in a dry environment.
4.1 Training schedule
Introduction schedule
Schedule week 1 and 2
Train at 60% of your maximum heart rate. Max. 3 times a week.
Warming up 5 - 10 minutes.
Train 4 minutes.
Rest 1 minute.
Train 2 minutes.
Calmly train 1 minute.
Cooling down 5 minutes.
Schedule week 3 and 4
Train at 60% of your maximum heart rate. Max. 4 times a week.
Warming up 5 - 10 minutes.
Train 5 minutes.
Rest 1 minute.
Train 3 minutes.
Calmly train 1 minute.
Cooling down 5 minutes.
Schedule week 5 and 6
Train at 60% of your maximum heart rate. Max. 5 times a week.
Warming up 5 - 10 minutes.
Train 6 minutes.
Rest 1 minute.
Train 4 minutes.
Calmly train 3 minutes.
Cooling down 5 minutes.
After completing the introduction training schedule for six weeks, you can choose the follow-up training schedule that is best suited to your needs. You can choose a schedule that will maximize your weight loss, or one that will improve your stamina. Both training schedules are on the next pages.
Training schedule to improve stamina
(follow-up to introduction training schedule)
Schedule week 7 and 8
Train at 90% of your maximum heart rate. Max. 6 times a week.
Warming up 5 - 10 minutes.
Train 7 minutes.
Rest 1 minute.
Train 5 minutes.
Calmly train 1 minute.
Cooling down 5 minutes.
Schedule week 9 and beyond
Train at 90% of your maximum heart rate. Max. 6 times a week.
Warming up 5 - 10 minutes.
Train 10 minutes.
Rest 1 minute.
Train 10 minutes.
Repeat training 2 or 3 times.
Calmly train 1 minute.
Cooling down 5 minutes.
Training schedule to lose weight
(follow-up to introduction training schedule)
Schedule week 7 and 8
Train at 60% of your maximum heart rate.
Max. 6 times a week.
Warming up 5 - 10 minutes.
Train 7 minutes.
Rest 1 minute.
Train 5 minutes.
Calmly train 1 minute.
Cooling down 5 minutes.
Schedule week 9 and beyond
Train at 60% of your maximum heart rate.
Max. 6 times a week.
Warming up 5 - 10 minutes.
Train 10 minutes.
Rest 1 minute.
Train 10 minutes.
Repeat training 2 or 3 times.
Calmly train 1 minute.
Cooling down 5 minutes.
5. General information
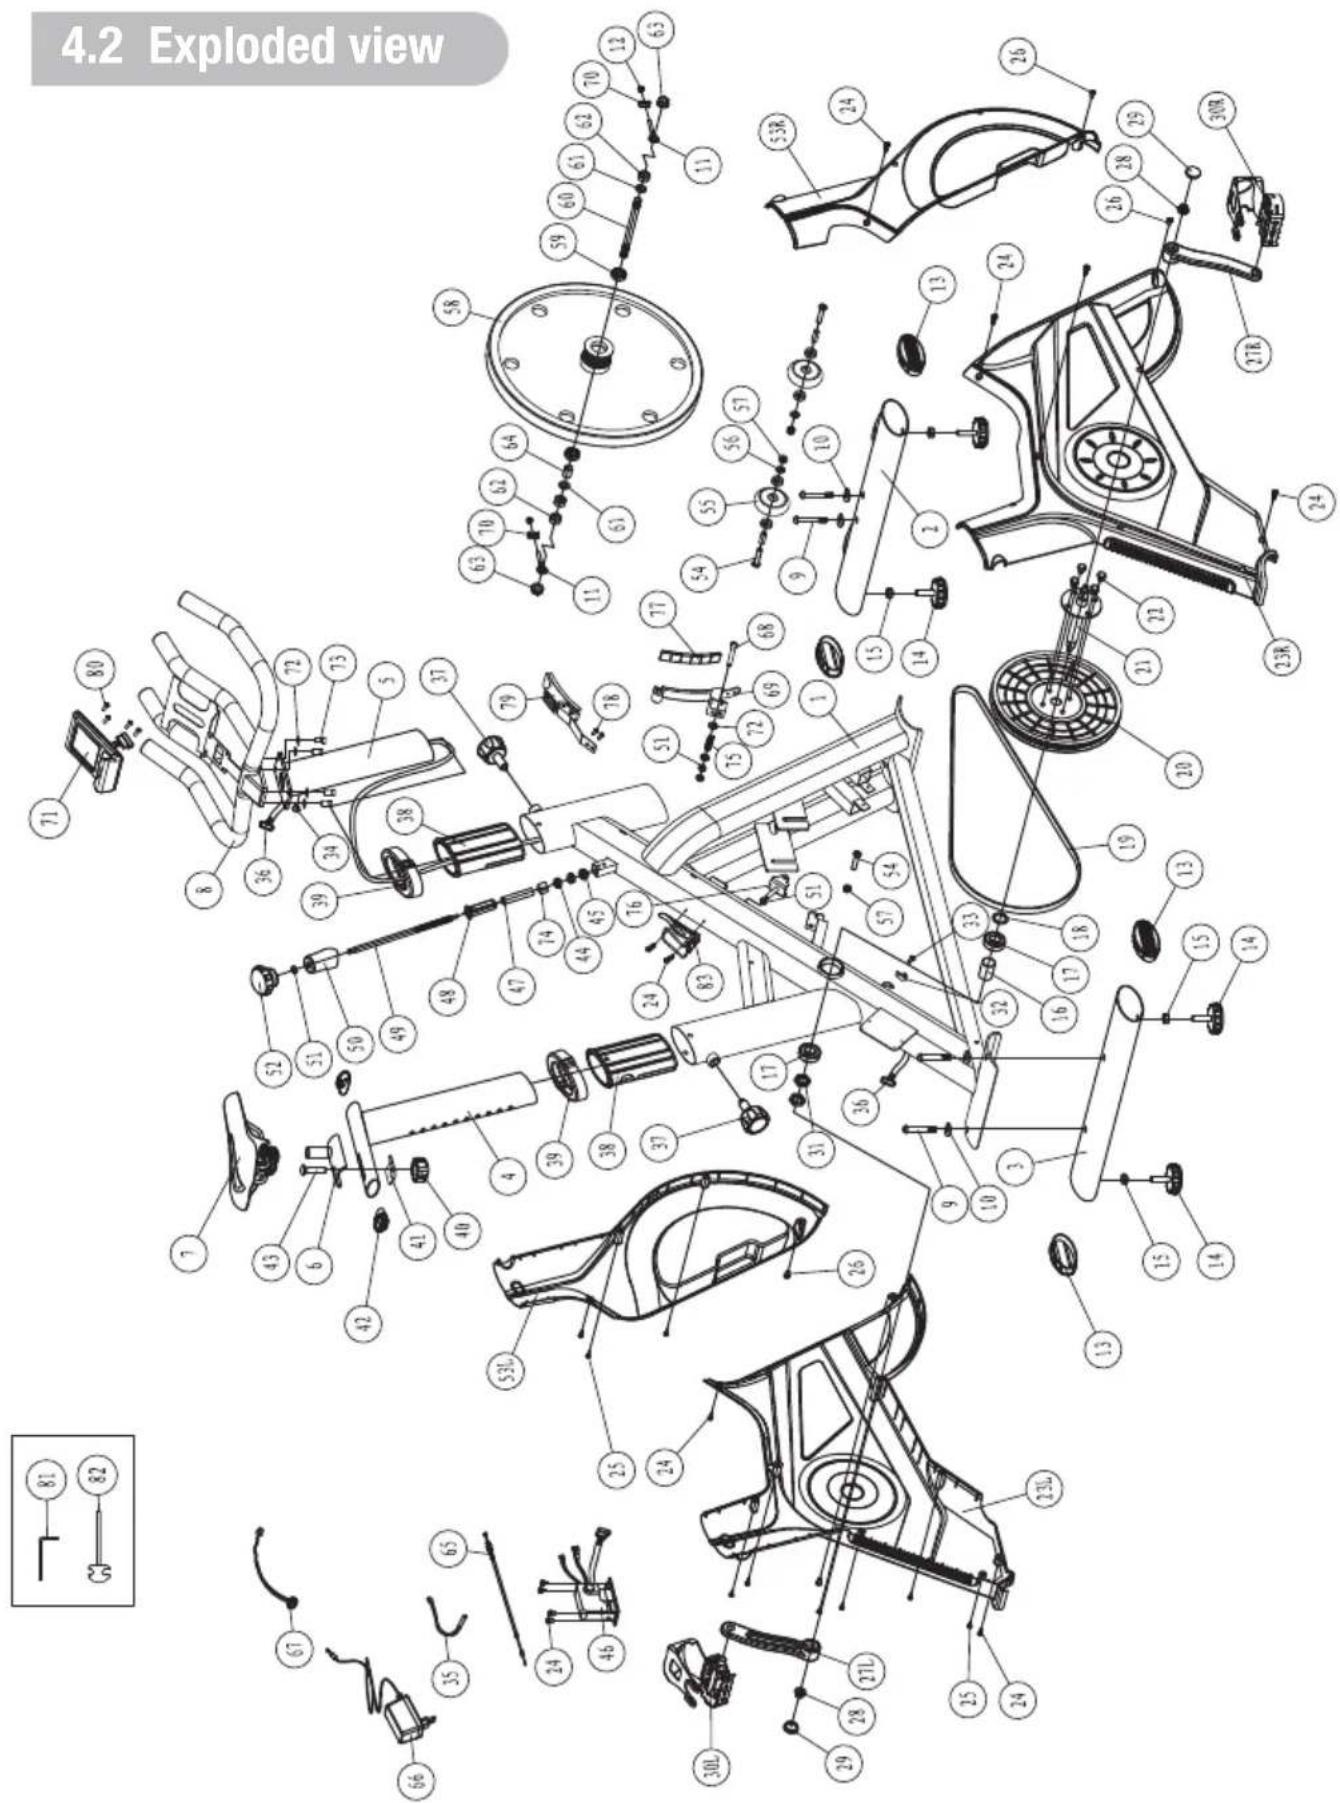
| No. | Part | QTY | No. | Part | ||
| 1 | Main frame 1 | 43 | Carriage bolt M10*40L | 1 | ||
| 2 | Front tube 1 | 44 | Hexagon nut | 2 | ||
| 3 | Rear tube 1 | 45 | Cap | 1 | ||
| 4 | Seat post 1 | 46 | Motor | 1 | ||
| 5 | Handlebar post 1 | 47 | Brake limit tube | 1 | ||
| 6 | Slider 1 | 48 | Brake Bushing | 1 | ||
| 7 | Seat | 1 49 | Brake bar 1 | |||
| 8 | Handlebar | 50 1 | Brake trim cover | 1 | ||
| 9 | Hexagon nut M8*60L 4 | 51 | Hexagon nut | 4 | ||
| 10 | Washer | 4 52 | Brake knob 1 | |||
| 11 | Adjuster | 2 53 | Front cover(L+R) | 1 | ||
| 12 | Nylon cap M6 | 2 | 54 | Hexagon screw | 3 | |
| 13 | End cap | 55 4 | Wheel | 2 | ||
| 14 | Food pad | 56 4 | Washer | 2 | ||
| 15 | Hexagon nut M10 | 4 | 57 | Nylon cap M8 | 4 | |
| 16 | Bushing | 1 58 | Flywheel | 1 | ||
| 17 | Bearing | 2 59 | Bearing | 2 | ||
| 18 | Washer | 60 3 | Flywheel axle pipe | 1 | ||
| 19 | Belt | 1 61 | Washer | 3 | ||
| 20 | Belt pulley 1 | 62 | Hexagon nut M12 | 3 | ||
| 21 | Axle | 1 63 | Flange nut M12 | 2 | ||
| 22 | Hexagon screw M8*10L | 4 64 | Bushing 1 | |||
| 23 | Rear cover(L+R) | 1 | 65 | Conductor | ||
| 24 | Drilling screw M4.2*19L | 3 66 | Adapter | 1 | ||
| 25 | Tapping screw M4*20L | 7 | 67 | DC wire 1 | ||
| 26 | Round screw M5*10 | 2 | 68 | Hexagon screw M8*70L | 1 | |
| 27 | Crank(L+R) | 1 69 | Magnetic steel frame | 1 | ||
| 28 | Flange nut M10 | 2 | 70 | Board | 2 | |
| 29 | Crank plug | 71 2 | Console | 1 | ||
| 30 | Pedal(L+R) | 1 72 | Washer | 6 | ||
| 31 | Hexagon nut | 2 | 73 | Hexagon screw | 4 | |
| 32 | C-clamp | 1 74 | Square nut | 1 | ||
| 33 | Flat screw M5*12L | 1 | 75 | Limit spring 1 | ||
| 34 | Stopper | 2 76 | Fixing for magnetic steel frame | 1 | ||
| 35 | Sensor cable | 1 | 77 | Magnet | 6 | |
| 36 | Flexible Flat Cable | 1 | 78 | Hexagon screw | 2 | |
| 37 | Knob | 79 2 | Brake pad | 1 | ||
| 38 | Tube clamp | 80 2 | Cross screw | 4 | ||
| 39 | Trim cover 1 | 81 | Hexagon wrench | 1 | ||
| 40 | Round knob 1 | 82 | Open end wrench | 1 | ||
| 41 | Washer | 1 83 | Bottle cage | |||
| 42 | End cap | 2 |
4.3 Troubleshooting
Problem
During a training the Speed Bike makes beeping or scratching noises.
Solution
Check the pivot points of the Speed Bike, if needed add grease. You can add Flow Fitness Treadmill Lotion or PTFE Spray
Problem
My iOS or Android device is not connecting with the Stelvio Racer Pro i Speed Bike.
Solution
- Go to the bluetooth setting on your mobile device and select the option 'Forget this device'.
- Close all apps on your mobile device.
- Unplug the Speed Bike for 5 seconds.
- Repeat the bluetooth connection steps in this user manual.
In case your problem is not resolved or not described, consult the fitness dealer where you purchased this product.
5.1 Warranty
The warranty is provided by the Flow Fitness distributor of your country and the reseller where you have purchased your product. Please check
https://www.flowfitness.com/en/dealers/
for contact information.
FLOWFITNESS
Prestige Stelvio Racer Pro i


- Copyright © Flow Fitness
- Fitness 8
- Garantie 37
- Gezondheid
- Head Roll
- Stap 2
- Stap 3
- Stap 4
- MODE
- Onderhoud
- Training schema's
- Trainingsschema week 3 en 4
- Trainingsschema week 5 en 6
- https://www.flowfitness.com/nl/registreer-uw-product/
- Important information 40
- Introduction 42
- Fitness 44
- Use 47
- General information 68
- Warranty 73
- Health
- Important: read this instruction manual first and follow the instructions carefully before using the product.
- Safety
- WARNING
- Introduction
- Important parts
- Training by heart rate
- Warming up and cooling down
- Toe Touch
- Side Stretch
- Knee bend
- Lower back stretch
- Hamstring Stretch
- Assembly
- Step 1
- Step 2
- Step 3
- Step 4
- Use of the computer
- RESET
- UP
- STAR/STOP
- RECOVERY
- DOWN
- Display Values
- Power up
- Quick Start
- Manual Training
- Preprogrammed: Beginne / Advanced / Sporty
- Heart Rate Controlled training: Cardio
- Watt training
- Recovery Test
- Important:
- Kinomap
- iConsole + Training
- Maintenance
- Training schedule
- Introduction schedule
- Schedule week 1 and 2
- Schedule week 3 and 4
- Schedule week 5 and 6
- Training schedule to improve stamina
- Schedule week 7 and 8
- Schedule week 9 and beyond
- Training schedule to lose weight
- General information
- Troubleshooting
- Problem
- Solution
- Warranty
- FLOWFITNESS
Brand : Flow Fitness
Model : Stelvio Racer Pro i
Category : Exercise bike