KH 1219 - Corkscrew SILVERCREST - Free user manual and instructions
Find the device manual for free KH 1219 SILVERCREST in PDF.

| Product Type | Electric Wine Bottle Opener |
| Brand | SilverCrest |
| Model | KH 1219 |
| Power Supply Input | 230 V ~ 50 Hz, 50 mA |
| Power Supply Output | 6.0 V = 100 mA |
| Battery | 3.6 V DC rechargeable |
| Charging Time (initial) | 10 hours |
| Charging Time (subsequent) | 8 - 10 hours |
| Protection Class | II |
| Scope of Delivery | Wine bottle opener, charging unit with power supply, capsule cutter, instructions |
| Color | Black |
| Activation Buttons | Upper (eject cork), Lower (extract cork) |
| Capsule Cutter | Included, stored in charging unit |
| Charge Indicator | LED on charging unit illuminates when placed correctly |
| Intended Use | Standard wine bottles (corks only) |
| Safety Features | Do not use near water or heat sources; use only supplied charger; avoid liquid ingress |
| Cleaning | Wipe with damp cloth; do not submerge in water |
| Warranty | 3 years from date of purchase |
| Disposal | Do not dispose with household waste; recycle according to local regulations; battery must be removed and disposed separately |
| Manufacturer | KOMPERNASS GMBH, BURGSTRASSE 21, 44867 BOCHUM, GERMANY |
Frequently Asked Questions - KH 1219 SILVERCREST
User questions about KH 1219 SILVERCREST
0 question about this device. Answer the ones you know or ask your own.
Ask a new question about this device
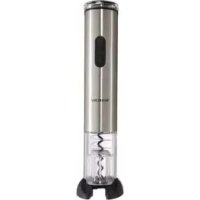
Download the instructions for your Corkscrew in PDF format for free! Find your manual KH 1219 - SILVERCREST and take your electronic device back in hand. On this page are published all the documents necessary for the use of your device. KH 1219 by SILVERCREST.
USER MANUAL KH 1219 SILVERCREST
natural_image
Black wine dispenser with 'Mallon' branding, next to a wine bottle (no visible text or symbols on the device itself)KH 1219
1. Index
- Safety instructions ....2
- Usage 4
- Scope of delivery ....5
- Components and operating elements ....5
- Technical data .... 6
- Prepare the wine bottle opener for operation ......6
- Using the wine bottle opener ....9
- Charging the wine bottle opener ....12
- Cleaning the wine bottle opener 14
- Troubleshooting ....14
11.1. The wine bottle opener is not functioning 14
11.2. The wine bottle opener is not functioning despite charging 14
11.3. Other malfunctions .... 15 - Disposing of the wine bottle opener 16
- Warranty & Service ....17
- Importer ....18
2. Safety instructions
Danger!
Do not place the wine bottle opener and the battery charging unit ...
→ n areas exposed to direct sunlight. This could cause the wine bottle opener or battery charging unit to overheat and be damaged irreparably. This could cause a fire!
→ in the immediate vicinity of heat sources such as ovens, heaters and similar devices or vent openings of other electrical devices. Do not place open flames such as burning candles near the wine bottle opener or the battery charging unit. Otherwise the wine bottle opener and the battery charging unit could be damaged irreparably. This could cause a fire!
→ in damp environments. Otherwise, moisture can collect in the wine bottle opener or the battery charging unit. This could cause danger of electric shock!
→ in the immediate vicinity of water, such as bath tubs or swimming pools. Upon use, please make sure no liquid flows into the wine bottle opener/the battery charging unit. Never clean the wine bottle opener and battery charging unit by submerging in water or holding under running water! This could cause danger of electric shock!

Danger!
Use only the accompanying battery charging unit to charge the wine bottle opener. Never use the accompanying battery charging unit to charge other devices. Otherwise, the wine bottle opener, battery charging unit, power supply unit or other implemented devices could be damaged beyond repair. Danger of electrical shock and fire!
This appliance is not intended for use by persons (including children) with reduced physical, sensorial or mental cabilities, or lack of experience and knowledge, unless they have been given supervision or instruction concerning use of the appliance by a person responsible for their safety.
Children should be supervised to ensure that they do not play with the appliance.

Warning!
The wine bottle opener, battery charging unit and power supply contain no user-serviceable parts. The warranty is voided if the casing of the wine bottle opener, the battery charging unit and/or the power supply are opened!
To avoid the risk of injury, arrange for defective power plugs and/or cables to be replaced as soon as possible by a qualified technician or by our Customer Service Department to avoid the risk of injury.

Note:
No liability will be taken and no guarantee will be made for damages ...
→ resulting from opening the casing of the wine bottle opener, battery charging unit and/or power supply
→ resulting from repair attempts not made by qualified experts
→ resulting from charging the wine bottle opener with a battery charging unit other than the one delivered
→ to other devices caused by charging them with the wine bottle opener battery charging unit
→ resulting from use of the wine bottle opener, battery charging unit and/or power supply for purposes other than intended!
3. Usage
The wine bottle opener is exclusively intended ...
→ to remove the corks from standard wine bottles
→ for private and not for commercial use.
The wine bottle opener is not suitable for opening/removing other types of bottle tops such as crown caps or screw tops.
4. Scope of delivery
√ Wine bottle opener KH 1219
√ Battery charging unit with power supply and capsule cutter
√ These instructions
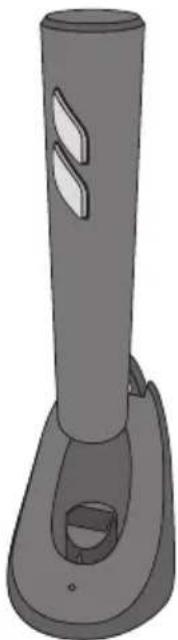
5. Components and operating elements
Battery charging unit
① Capsule cutter
② Power supply
3 Capsule cutter compartment
4 Charge indicator
Wine bottle opener
⑤ Upper activation button
6 Lower activation button
6. Technical data
Mains power adapter ②:
Input voltage: 230 V 50 Hz , 50 mA
Output voltage: 6,0 V = 100 mA ⊙ ⊙ ⊕
Protection class: ......II / □
Appliance:
Input voltage:....6,0 V = 100 mA
Battery: 3,6 V DC
7. Prepare the wine bottle opener for operation
1 Take the wine bottle opener and the battery charging unit with the power supply ② out of the packaging.
2 Connect the mains power adapter ② with the charging station.
3 Place the battery charging unit on a level, flat, scratchproof, non-slip surface.

Danger!
Do not place the wine bottle opener and the battery charging unit ...
→ in areas exposed to direct sunlight. This could cause the wine bottle opener or battery charging unit to overheat and be damaged irreparably. This could cause a fire!
→ in the immediate vicinity of heat sources such as ovens, heaters and similar devices or vent openings of other electrical devices. Do not place open flames such as burning candles near the wine bottle opener or the battery charging unit. Otherwise the wine bottle opener and the battery charging unit could be damaged irreparably. This could cause a fire!
→ in damp environments. Otherwise, moisture can collect in the wine bottle opener or the battery charging unit. This could cause danger of electric shock!
→ in the immediate vicinity of water, such as bath tubs or swimming pools. Upon use, please make sure no liquid flows into the wine bottle opener / the battery charging unit. Never clean the wine bottle opener and battery charging unit by submerging in water or holding under running water! This could cause danger of electric shock!
4 Plug the battery charging unit power supply ② into a power outlet.
5 The wine bottle opener contains rechargeable batteries that have to be charged using the battery charging unit. Therefore the wine bottle opener does not require a power supply cable of its own. Place the wine bottle opener in the battery charging unit to charge its batteries.
natural_image
3D rendered illustration of a vertical cylindrical device with a handle and internal components (no text or symbols)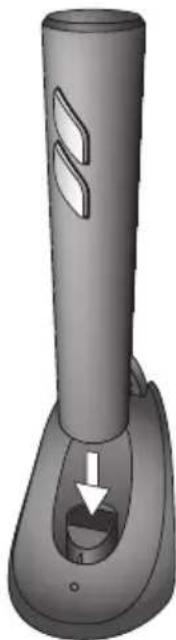
natural_image
3D rendered image of a cylindrical device with a handle and internal component, no visible text or symbolsFig. 1
Upon placing the wine bottle opener in the battery charging unit, please make sure that ...
→ its opening is facing down,
→ the front sides of the activation buttons 5/6 point in the direction of the charge indicator 4 on the charging station and ...
→ the wine bottle opener audibly clicks into the battery charging unit.
If the wine bottle opener has been placed in the battery charging unit properly, then the charge level indicator ^4 is illuminated. The wine bottle opener will now be charged.
Before using the wine bottle opener for the first time, allow it to fully charge for 10 hours. After it has been fully charged, it is ready for use.

Danger!
Use only the accompanying battery charging unit to charge the wine bottle opener. Never use the accompanying battery charging unit to charge other devices. Otherwise, the wine bottle opener, battery charging unit, power supply ^2 unit or other implemented devices could be damaged beyond repair. Danger of electrical shock and fire!
No liability will be taken and no guarantee will be made for damages ...
→ resulting from charging the wine bottle opener with a battery charging unit other than the one delivered
→ to other devices caused by charging them with the wine bottle opener battery charging unit!
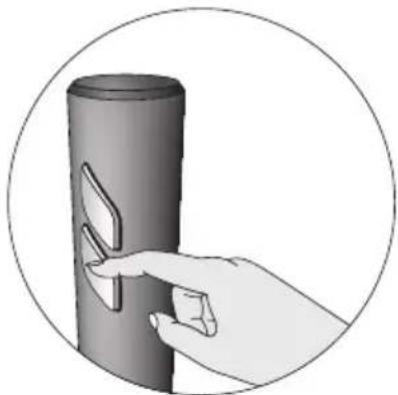
8. Using the wine bottle opener
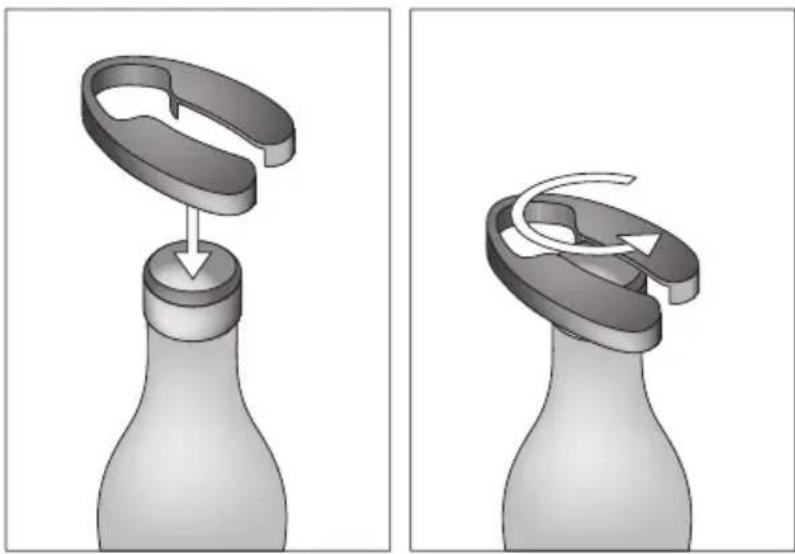
1 Take the capsule cutter ① out of its compartment in the battery charging unit.
2 In order to cut open the foil sleeve covering the cork: Place the capsule cutter ① on the closed wine bottle as shown is figure 2. Press it together using your thumb and index finger. Hold the wine bottle tightly with the other hand so it can not fall.
natural_image
Two 3D illustrations of a bottle being opened with a curved mechanical component, showing the process (no text or symbols)Fig. 2
3 Turn the wine bottle 360 degrees. In some cases, you may need to repeat this several times until you can easily remove the capsule of the foil sleeve.
4 Hold the wine bottle tightly with one hand so it can not fall. Place the wine bottle opener on the wine bottle. Press it down strongly until the corkscrew has clearly punctured the cork.
5 Then press and hold the lower activation button ⑥. The corkscrew will be turned into the cork and then starts to remove it from the neck of the bottle. Continue to hold the wine bottle and the bottle opener firmly. Do not release the lower activation button ⑥ until the cork has been completely removed from the neck of the bottle.

natural_image
Illustration of a hand using a tool to cut or mark a cylindrical object, enclosed in a circular frame (no text or symbols)Fig. 3

Danger!
Upon use, please make sure no liquid flows into the wine bottle opener/the battery charging unit. This could cause danger of electric shock!
6 Now take the wine bottle opener away from the bottle and hold it with the opening facing downwards. Press on the upper activation button ⑤. The cork will now be turned out from the inside of the wine bottle opener. Release the upper activation button ⑤ as soon as the cork has fallen out of the wine bottle opener.
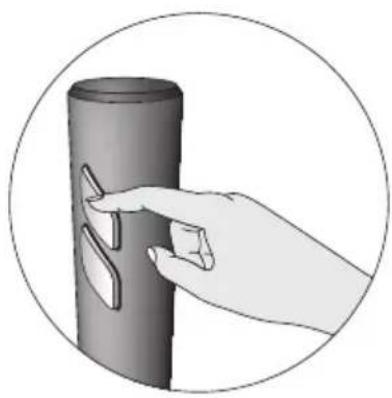
natural_image
Hand placing a small object into a cylindrical container (no text or symbols visible)Fig. 4
7 After usage: Place the wine bottle opener back in the battery charging unit so as to prevent it from falling. Upon placing the wine bottle opener in the battery charging unit, please make sure that ...
→ its opening is facing down,
→ the front sides of the activation buttons 5/6 point in the direction of the charge indicator 4 on the charging station and ...
→ the wine bottle opener audibly clicks into the battery charging unit.
If the wine bottle opener does not require charging, unplug the battery charging unit ② from the power outlet.
9. Charging the wine bottle opener
If the wine bottle opener becomes weaker after using it several times, then it should be charged. To do this, place the wine bottle opener in the battery charging unit. Upon placing the wine bottle opener in the battery charging unit, please make sure that ...
→ its opening is facing down,
→ the front sides of the activation buttons 5/6 point in the direction of the charge indicator 4 on the charging station and ...
→ the wine bottle opener audibly clicks into the battery charging unit.
If the wine bottle opener has been placed in the battery charging unit properly, then the charge level indicator ^4 will be illuminated. The wine bottle opener will now be charged. Leave the wine bottle opener in the battery charging unit for between 8 and 10 hours. The length of time required to recharge the batteries depends on how weak the batteries were. After charging is complete, the wine bottle opener is ready for use again.

Note:
Before initial use, the wine bottle opener should be fully charged for a period of 10 hours to ensure proper operation.

Danger!
Use only the accompanying battery charging unit to charge the wine bottle opener. Never use the accompanying battery charging unit to charge other devices. Otherwise, the wine bottle opener, battery charging unit, power supply unit ^2 or other implemented devices could be damaged beyond repair. Danger of electrical shock and fire!

Note:
No liability will be taken and no guarantee will be made for damages ...
→ resulting from charging the wine bottle opener with a battery charging unit other than the one delivered
→ to other devices caused by charging them with the wine bottle opener battery charging unit!
10. Cleaning the wine bottle opener

Danger!
Never clean the wine bottle opener and battery charging unit by submerging in water or holding under running water! This could cause electrical shock!
Only use a slightly damp cloth to clean the casing of the wine bottle opener and the battery charging unit. To remove persistent dirt, add a few drops of dishwashing liquid to the damp cloth. When cleaning the device, please make sure that no moisture seeps into the wine bottle opener!
11. Troubleshooting
11.1. The wine bottle opener is not functioning
In most cases, the wine bottle opener needs recharging. To do this, place the wine bottle opener in the battery charging unit. This is explained in detail in chapter 9. “Charging the wine bottle opener”.
11.2. The wine bottle opener is not functioning despite charging
A Make sure you have placed the wine bottle opener in the battery charging unit properly. Upon placing the wine bottle opener in the battery charging unit, please make sure that ...
→ its opening is facing down,
→ the front sides of the activation buttons 5/6 point in the direction of the charge indicator 4 on the charging station and ...
→ the wine bottle opener audibly clicks into the battery charging unit.
If the wine bottle opener has been placed in the battery charging unit properly, then the charging level indicator ^4 is illuminated.
If the malfunction persists:
B Check to make sure that the battery charging unit ② power supply has been connected to the power outlet properly.
Check to make sure that the power outlet that the battery charging unit ② power supply is plugged into is working properly. To do this, connect device which is known to be functioning to this power outlet.
11.3. Other malfunctions
Please contact your nearest service partner if ...
→ the malfunctions described in sections 11.1. and 11.2. can not be rectified as described or
→ other malfunctions occur upon operating the wine bottle opener.
! Warning!
The wine bottle opener, battery charging unit ^2 and power supply contain no user-serviceable parts. The warranty is voided if the casing of the wine bottle opener, the battery charging unit ^2 and/or the power supply are opened!
Note:
No liability will be taken and no guarantee will be made for damages ...
→ resulting from opening the casing of the wine bottle opener, battery charging unit ② and/or power supply
→ resulting from repair attempts not made by qualified experts!
12. Disposing of the wine bottle opener
Do not dispose of the appliance in your normal domestic waste. This product is subject to the European guideline 2002/96/EC.
Dispose of the appliance through an approved dis-posal centre or at your community waste facility. Observe the currently applicable regulations. In case of doubt, please contact your waste disposal centre.
Battery disposal!
Batteries may not be disposed of with normal domestic waste. All consumers are statutorily obliged to dispose of batteries at the collection point in their community/district or with the original supplier. The purpose of this obligation is to ensure that batteries can be disposed of in an environmentally friendly manner. Only dispose of batteries when they are fully discharged.

Dispose of all packaging materials in an environmentally responsible manner.
13. Warranty & Service
The warranty for this appliance is for 3 years from the date of purchase. This appliance has been manufactured with care and meticulously examined before delivery. Please retain your receipt as proof of purchase date. Should a claim need to be made under the warranty, please make contact by telephone with our service department. Only in this way can a post-free despatch for your goods be assured. The warranty covers ONLY claims for material and manufacturing defects, not for wearing or consumable or for damage to fragile components. This product is for private use only and is not intended for commercial applications. The warranty will become void in the event of abusive and improper handling, use of force and internal tampering not carried or approved by our authorized service branch. Your statutory rights are not restricted in any way by this warranty.
GB DES Ltd
Units 14-15
Bilston Industrial Estate
Oxford Street
Bilston
WV14 7EG
Tel.: 0870/787-6177
Fax: 0870/787-6168
e-mail: support.uk@kompernass.com
IE Kompernass Service Ireland
Tel: 1850 930 412 (0,082 EUR/Min.)
Standard call rates apply. Mobile operators may vary.
e-mail: support.ie@kompernass.com
14. Importer
KOMPERNASS GMBH
BURGSTRASSE 21
44867 BOCHUM, GERMANY
www.kompernass.com
1. Index
Akumulator: 3,6 V DC
natural_image
Illustration of a cylindrical device with two side slots and a handle, no text or symbols present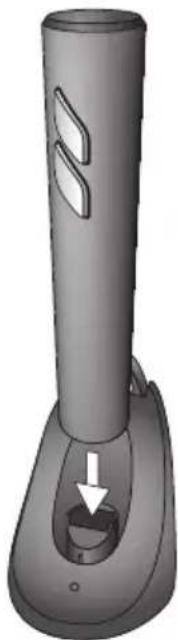
natural_image
3D rendered image of a cylindrical device with a handle and arrow indicator (no text or symbols)Rys.1
natural_image
Two 3D diagrams showing a mechanical device with a curved component inserted into a bottle, no text or symbols present.Rys.2
natural_image
Illustration of a hand inserting a card into a cylindrical device (no text or symbols)Rys.3

Niebezpieczeństwo!
natural_image
Hand holding a cylindrical object with a small inset showing a slot, enclosed in a circle (no text or symbols)Rys. 4
Ulazni napon: 6,0 V = 100 mA
Akumulator: 3,6 V DC
7. Priprema električnog vadičepa
1 Izvadite električni vadičep, punjač i mrežni element ② iz pakiranja i odstranite materijal pakiranja.
2 Povežite mrežni element ② sa punjačem.
3 Postavite punjač na ravnu i vodoravnu podlogu koja ne klizi i ne grebe.

Opasnost!
Električni vadičep i punjač ne postavljajte ...
natural_image
Two identical 3D-rendered mechanical components with curved ends and a central slot, shown from different angles (no text or symbols)Slika 1
Prilikom umetanja električnog vadičepa u punjač mora...
natural_image
3D illustration of a bottle being lifted by a curved mechanical component, shown from two different angles (no text or symbols)3 Okrenite vinsku bocu za 360 stupnjeva. Ovaj postupak eventualno morate u više navrata ponoviti, sve dok ne možete skinuti kapsulu folijske manšete.
4 Vinsku bocu čvrsto obuhvatite jednom rukom, kako ne bi mogla pasti. Postavite električni vadičep na vinsku bocu. Čvrsto ga pritisnite, sve dok spirala osjetno ne prodre u čep.
5 Zatim držite donju aktivacijsku tipku ⑥ pritisnutu. Spirala okretno prodire u čep i zatim isti izvlači iz grla boce. Pritom vinsku bocu i električni vadičep držite čvrsto obuhvaćeno. Donju aktivacijsku tipku ⑥ pustite tek nakon što je čep potpuno izvućen iz grla boce.
natural_image
Hand inserting a card into a cylindrical device (no text or symbols visible)Slika 3
Opasnost!
Obratite pažnju na to, da prilikom uporabe ne dospije tekućina u unutrašnjost električnog vadičepa/punjača. U protivnom postoji opasnost strujnog udara!
natural_image
Hand holding a cylindrical object with two triangular cutouts, enclosed in a circle (no text or symbols)Slika 4
7 Nakon uporabe: Električni vadičep ponovo umetnite u punjač, kako ne bi mogao pasti ili se prevrnuti. Pritom mora...
natural_image
Two identical 3D-rendered mechanical components with cutouts and a white arrow indicating a feature (no text or symbols)Abb.1
natural_image
Two 3D illustrations of a bottle being opened with a curved mechanical component, showing the process (no text or symbols)natural_image
Illustration of a hand using a tool to press or install a cylindrical object, enclosed in a circular frame (no text or symbols)Abb. 3

Gefahr!
natural_image
Hand inserting a small object into a cylindrical container (no text or symbols visible)Abb. 4
47623 Kevelaer, Germany
Tel.: +49 (0) 180 5 008107