Baby 1080p HD Monitoring Camera - Security Camera ARLO - Free user manual and instructions
Find the device manual for free Baby 1080p HD Monitoring Camera ARLO in PDF.


User questions about Baby 1080p HD Monitoring Camera ARLO
0 question about this device. Answer the ones you know or ask your own.
Ask a new question about this device
Download the instructions for your Security Camera in PDF format for free! Find your manual Baby 1080p HD Monitoring Camera - ARLO and take your electronic device back in hand. On this page are published all the documents necessary for the use of your device. Baby 1080p HD Monitoring Camera by ARLO.
USER MANUAL Baby 1080p HD Monitoring Camera ARLO
Arlo Baby 1080p HD Monitoring Camera User Manual
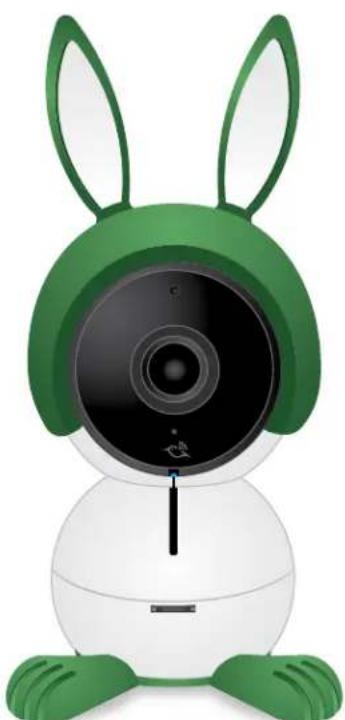
natural_image
Illustration of a green and white cartoon rabbit wearing a camera lens (no text or symbols)Support
For product updates and web support, visit http://www.arlo.com/en-us/support/.
Trademarks
© NETGEAR, Inc., NETGEAR and the NETGEAR Logo are trademarks of NETGEAR, Inc. Any non-NETGEAR trademarks are used for reference purposes only.
Compliance
For the current EU Declaration of Conformity, visit
http://support.netgear.com/app/answers/detail/a_id/11621/.
For regulatory compliance information, visit
http://www.netgear.com/about/regulatory/.
See the regulatory compliance document before connecting the power supply.
Safety Instructions

WARNING Heed all warnings in this manual and warning labels attached to the camera, cords, and accessories. Failure to do so could result in injury.
- STRANGULATION HAZARD – Children have STRANGLED in cords. Keep cord out of the reach of children (more than 3ft (0.9m) away).
- NEVER place the camera or cord in or near crib or playpen. Secure the cord at least three feet away from crib or playpen.
- NEVER mount the camera directly above crib or playpen to avoid the risk of injury.
- NEVER use extension cords with AC adapters. Only use the AC adapters provided.
- CHOKING HAZARD – This product contains small parts which may cause choking. Keep small parts away from children.
- ELECTRIC SHOCK WARNING - Never use this device near water, including near a bathtub, sink, laundry tube, wet basement, etc.
- This product and accompanying accessories are NOT toys. Do not allow children to play with them.
- This product is NOT intended to replace proper supervision of children. You MUST check your child's activity regularly.
- This product is not intended for use as a medical camera and its use should not replace adult supervision.
- Only a battery pack of the same type should be inserted by an authorized NETGEAR service centers. There is a risk of explosion if the battery is replaced by an incorrect type.
- Unplug product during lightning storms.
Recommended Safe Use
- It is essential that you check the operating range and condition of the camera on initial installation, and on a regular basis after that
- Check reception regularly. Test the camera before use and after changing camera location.
-
Some adult assembly or installation is required. Keep small parts away from children when assembling.
-
This product is intended for indoor use only.
- Clean the camera with dry cloth only.
- Do not block any ventilation openings.
- Do not install near any heat sources such as radiators, heat registers, stoves, or other devices that produce heat.
- Only use attachments and accessories specified by the manufacturer.
- Only use with the stand, mount, and mounting screws specified by the manufacturer, or sold with the device.
- Unplug this device when unused for long periods of time.
- Do not touch the plug contacts with sharp or metal objects.
- This product should only be serviced by authorized NETGEAR service centers. Contact Arlo Support at arlo.com/support for RMA information.
Contents
Safety Instructions....2
1. Set Up Arlo Baby 8
Plug in Your Camera 8
Get the Arlo app....8
Set Up Your Arlo Baby Camera....9
Place Your Camera....11
Camera Position....12
Charge Your Arlo Baby Camera....12
Turn the Arlo Baby Battery Power Off and On....12
Camera LED Guide....13
2. View Live Video and Recordings 14
View the Camera Image Status....14
Access Your Live Camera Images....15
Record Clips From Live Video....16
Take a Snapshot From Live Video....16
Talk and Listen 17
Manage Your Cameras and Devices....17
Cloud Recording....19
View Recordings and Snapshots 20
3. Do More With Arlo Baby 23
Always Listening....23
Play Sounds and Music 23
Manage the Playlist....24
Set the Music Timer....28
Play a Single Track on a Loop....29
Shuffle the Tracks in the Playlist....29
Use the Night Light 30
Air Sensors 32
View Live Sensor Data 34
View Air Sensor Data History 34
Edit the Temperature Sensor Settings....34
Edit the Humidity Sensor Settings....35
Edit Air Quality Data Collection and Notification....36
Arlo Baby Character Sets....36
4. Personalize Your Camera 38
Name Your Camera 38
Profile Settings....38
Grant Access to Friends....40
5. Modes, Rules, and Smart Alerts 43
Select a Mode....43
Change Motion Sensitivity 44
Change Audio Sensitivity 45
Manage Alerts....46
Set Up Geofencing....47
Geofencing With Multiple Mobile Devices....49
Geofencing Accuracy 50
Geofencing First In Last Out....50
Create a Schedule....51
Add a Mode....52
Motion Detection Activity Zones....54
6. Settings 56
Turn the Arlo App Fingerprint ID Login On and Off 56
Change the WiFi Network 56
Change the Time Zone....57
Change the Video Resolution....58
Turn Night Vision On and Off 58
Turn the Microphone Off and On....59
Change the Speaker Settings....59
View Device Information....60
Update the Firmware....61
Restart the Camera....62
Reset the Camera to Its Factory Settings....62
Remove a Camera From Your Account....63
7. Manage Your Subscription Plan 64
Subscription Plans 64
Renew Your Service Plan....64
Select a Premier or Elite Subscription Plan....64
Start or Stop a Continuos Video Recording Plan....65
8. Continuous Video Recording 66
View the Timeline....66
Navigate Through the Timeline 66
View the Timeline Calendar....67
9. Arlo Connect 68
Use Arlo With IFTTT 68
Use Arlo With SmartThings....68
Use Arlo With Stringify....68
10. Use SmartThings With Arlo Cameras 71
Prepare Arlo to Work With SmartThings....71
Integrate Your Arlo Cameras With the SmartThings App 72
Adjust the Motion Sensitivity Level....74
Adjust Push Notifications....75
11. Troubleshooting 76
Arlo Baby Is Not Streaming on a Mobile Device....76
Cannot View Arlo Live Streaming in a Web Browser 76
Not Receiving Push Notifications....77
Recalibrate the Air Sensors....79
1. Set Up Arlo Baby
Setting up your Arlo Baby camera involves a few simple steps. Your Arlo account lets you view videos from any Internet-connected computer or mobile device. You can use the same Arlo app to set up and manage Arlo Baby and other Arlo cameras.
Plug in Your Camera
-
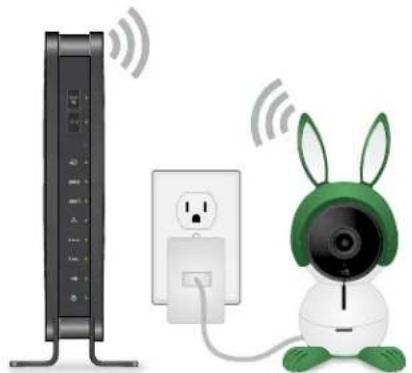
Connect one end of the USB power cable to the port on the camera.
-
Plug the other end of the USB cable into the adapter.
-
Plug the USB power adapter into a wall socket and wait for the camera LED to blink amber.
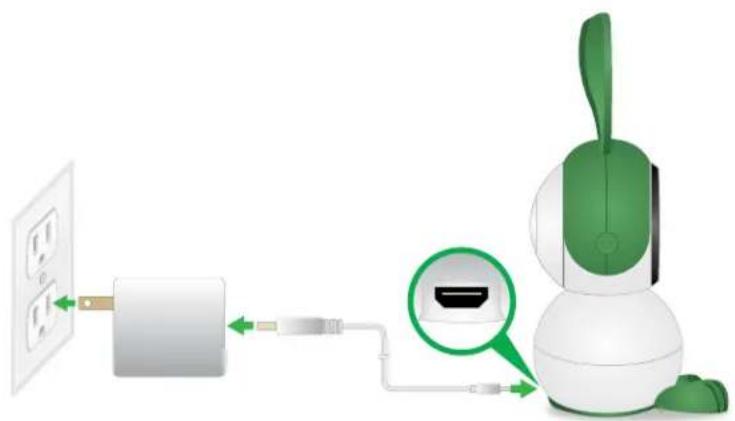
text_image
Diagram showing connection between a power outlet and a robot device with labeled ports and cable connectionsGet the Arlo app
For the best experience, download the Arlo app by scanning this QR code or searching for Arlo in the app store.
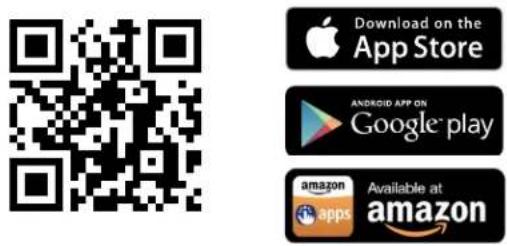
Note: If you already use the Arlo app, make sure that you are using the latest version. To find out if an update is available, go to the app store and search for Arlo.
Set Up Arlo Baby
Set Up Your Arlo Baby Camera
Use the Arlo app and your Arlo account to set up your Arlo Baby camera. If you already set up an Arlo account, you can add the Arlo Baby camera to your account.
To set up your Arlo Baby camera:
- Tap the Arlo icon

on your mobile device.
If you are using a computer, enter arlo.netgear.com in the address bar of a browser.
-
If you already set up an Arlo account, log in, and tap or click Add Device.
-
If you are setting up a new Arlo account, tap or click New to Arlo?
The Setup page displays.
- Tap or click Arlo Baby.
A message displays warning you to keep cords out of reach of babies and children.
- Tap or click I Understand.
The Plug in Your Camera page displays.
-
Plug in your Arlo Baby camera.
-
Tap or click Continue.
The Connect to Network page displays.
- Enter your WiFi network name and password.
The Arlo Baby camera joins your WiFi network.
natural_image
Illustration of a wireless router connected to a white electrical outlet and a green rabbit mascot (no text or symbols)Set Up Arlo Baby
The Press Sync Button page displays.
Syncing the Arlo Baby camera connects it to your Arlo account.
-
Press the Sync button on the camera.
-
Tap or click Continue.
The How to QR Code Pair page displays.
- Tap or click Continue.
The Scan QR Code displays.
-
Hold the QR code 4 to 8 inches (10 to 20 cm) in front of the camera until you hear a chime sound.
-
When you hear a chime sound, tap or click Yes.
If you do not hear a chime sound, follow the onscreen instructions.
The Arlo app discovers the Arlo Baby camera and the Claim Your Device page displays..
- If the Arlo app does not discover the camera, do the following:
a. Make sure that the smartphone or mobile device that you are using is connected to the same WiFi network as the Arlo Baby camera.
b. Check that you typed the SSID and the password correctly.
c. Follow the onscreen instructions.
- Enter a name for your Arlo Baby camera.
The Account Setup page displays.
- Enter your account settings and tap or click Next.
The Select a Plan page displays.
- Choose a service plan.
Note: For more information, see Subscription Plans on page 62.
The Arlo Baby Tour displays.
- Follow the Arlo Baby Tour to learn how to use Arlo Baby's main features.
Set Up Arlo Baby
Your Arlo Baby camera is set up.
Place Your Camera
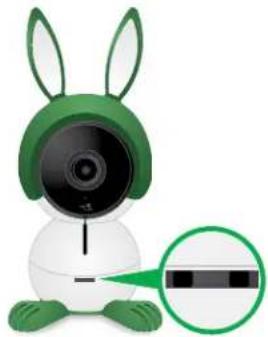
You can place your camera on a flat surface or mount it on the wall.
natural_image
Illustration of a green rabbit-shaped robot with a camera lens, shown with a magnified inset showing a segmented screen (no text or symbols)Note: Do not cover or obstruct the inlet holes for the air quality sensors
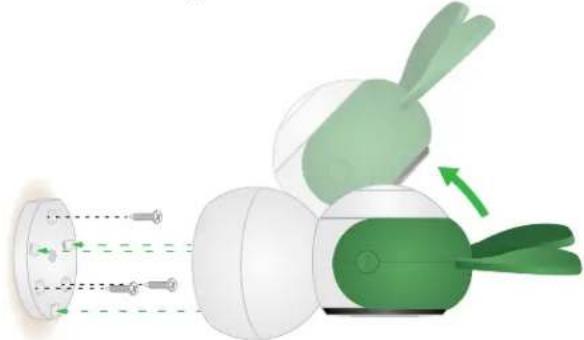
To mount the camera on a wall:
- Place the wall plate and secure it with three screws.
natural_image
Illustration of a rabbit toy with green and white parts, showing motion lines and arrows (no text or symbols)-
Align the wall plate with the holes on the base of the camera and rotate the base until it snaps into place.
-
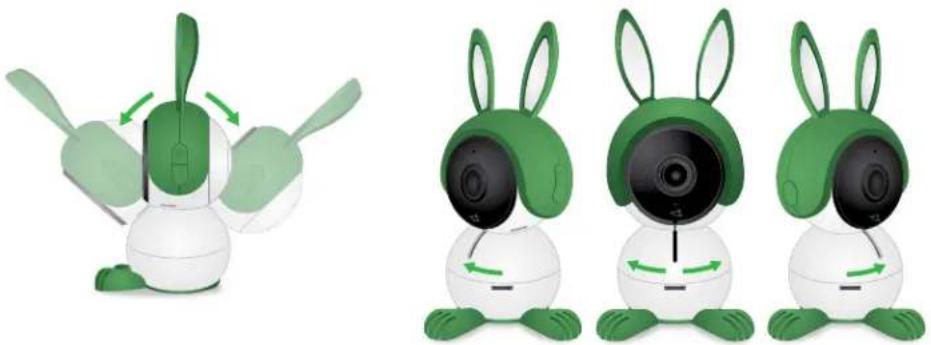
Use Arlo Baby's tilt and swivel functions to position the camera so that it captures the area that you want to monitor.
natural_image
Illustration of three identical cartoon robots with green ears and white heads, showing front, side, and side views (no text or symbols)Set Up Arlo Baby
Camera Position
When placing your camera, keep these tips in mind:
- Avoid placing the camera in an area that gets a lot of light shining directly into the camera lens.
- Infrared lights can reflect off walls and negatively impact video quality. Try to aim your camera away from walls.
- You can move and zoom the field of view.
- Arlo Baby provides a 110-degree viewing angle as the default. You can change the field of view to 90, 100, 120 or 130 degree field of view in the Camera Settings. Position your camera so that the space that you want to monitor is within the camera's field of view.
- To help with placing your camera, do a live stream from the Arlo Baby camera. Aim the camera while watching the video feed on your Arlo smartphone app to make near-real-time adjustments to the camera's position.
Charge Your Arlo Baby Camera
The Arlo Baby battery is partially charged when it leaves the factory.
To charge the battery:
- Connect the smaller end of the USB power cable to the port on the camera.
- Plug the larger end of the USB cable into the power adapter.
- Plug the USB power adapter into a wall socket.
The LED blinks fast blue for three seconds when the power adapter is connected.
The battery's charge percentage displays in the Settings page for your Arlo Baby. To access the Settings page, launch the Arlo app or log in to arlo.netgear.com. Then tap or click ••• at the upper right of the camera feed and select Device Settings.
Turn the Arlo Baby Battery Power Off and On
Your Arlo Baby camera has a rechargeable battery. You can place the camera in locations where you cannot connect it to an AC wall outlet. Arlo Baby can work for several hours at a time using the rechargeable battery.
Set Up Arlo Baby
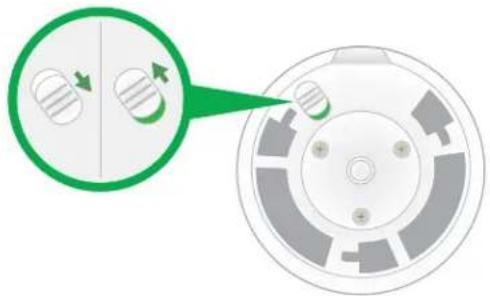
Use the switch on the bottom of the camera to power Arlo Baby camera's battery off and on. The camera's battery is on when the green color displays.
natural_image
Diagram showing a circular device with internal components and a magnified view of internal structures (no text or symbols)To avoid draining the battery, switch the battery off if you are not using it or if you are moving the camera to a new location.
Camera LED Guide
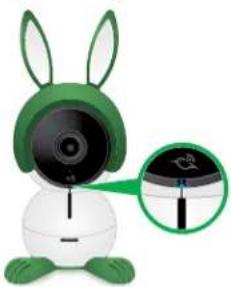
The Arlo Baby camera LED lights in different colors to indicate how the camera is operating.
natural_image
Green rabbit-shaped robot with white body and green ears, shown with a magnified inset showing a small black icon (no text or symbols)Camera LED Guide

Solid amber
The camera is booting.

Solid blue
The camera powered on and is connected to the Internet.

Solid purple
The camera is connected to a WiFi network. However, it is not connected to the Internet.

Double blink amber every 10 seconds
The battery charge is low.

Fast blinking blue
The camera is connecting to the Internet

Blinking purple
The camera is too far away from the router.

Fast blinking amber
The camera is not connected to a WiFi network.

Fast blinking blue for three seconds
The camera was just connected to a charger.

Blinking blue and amber
A firmware update is in progress. DO NOT TURN OFF THE CAMERA.
Off. The camera is powered off or the battery has less than 10% charge.
2. View Live Video and Recordings
You can access your live camera images at any time to view the feed and talk and listen to your baby. You can also manage the Arlo Baby music player, night light, and check the air conditions. Arlo Baby securely stores recorded videos and snapshots in a library in the cloud. You can view your recordings, mark them as favorites, and search using the filter.
View the Camera Image Status
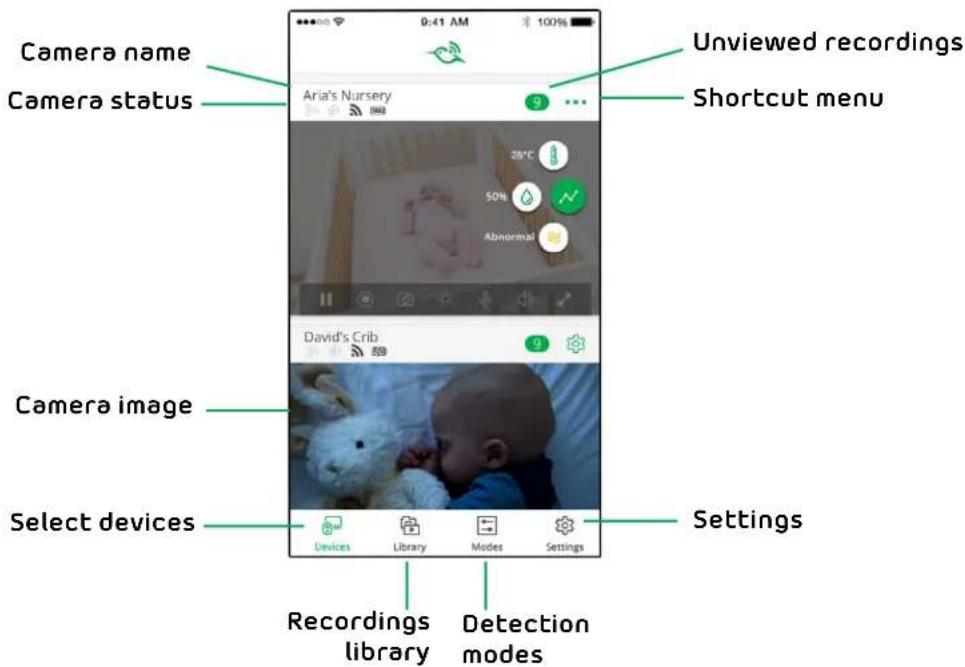
When you launch the Arlo app, the Devices page displays camera images.
text_image
Camera name Camera status Unviewed recordings Shortcut menu Camera image Select devices Recordings library Detection modes 9 28°C 50% Abnormal 9 Devices Library Modes Settings| Camera Status Icons | Display is based on the mode and camera setup |
 | When this icon is orange, it means that the camera is seeing motion. |
 | When this icon is orange, it means that the camera is hearing sound |
 | WiFi signal |
 | Battery |
| [22GB] | AC power |
View Live Video and Recordings
Access Your Live Camera Images
You can access your live camera images at any time to view the feed and talk and listen to your baby. You can also manage the Arlo Baby music player, night light, and check the air conditions.
To access live camera images:
1. Tap the Arlo icon

on your mobile device.
You can also enter arlo.netgear.com in the address bar of a browser.
The Devices page displays. For information about these icons, see View the Camera Image Status on page 14.
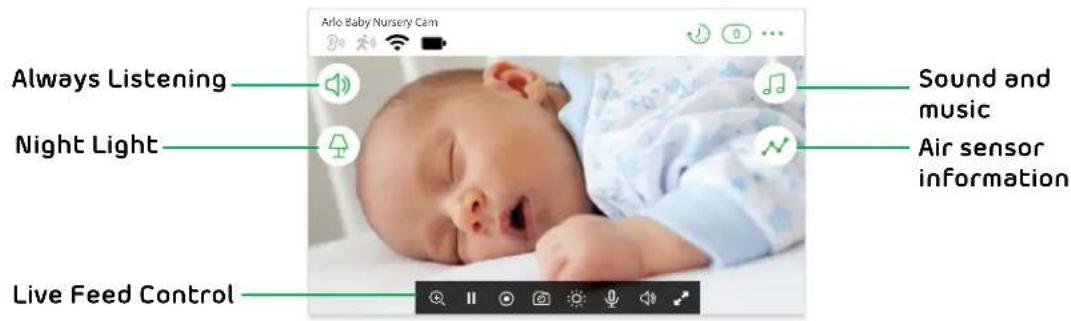
- To view and listen to a live feed, tap or click Live on the camera image.
text_image
Arlo Baby Nursery Cam Always Listening Night Light Live Feed Control Sound and music Air sensor information| Arlo Baby Icons | Description Live Feed | Control Icons | Description |
| Non-stop audio monitoring even when your phone is locked. | Pause. | ||
| Night light. Record video manually. | |||
| Music player. Snapshot | |||
| Air sensor information. Brightness. | |||
| Microphone. Start using Talk and Listen. | |||
| Full screen. |
Record Clips From Live Video
To record clips from live video:
- Tap the Arlo icon

on your mobile device.
You can also enter arlo.netgear.com in the address bar of a browser.
The Devices page displays.
- Tap or click Live in the camera image.
The camera image icons display at the bottom of the camera image.
- Tap or click Record Video
This icon turns red to indicate that you are recording the live feed.
- To stop recording, tap or click Record Video

To configure your Arlo Baby camera to stop recording when motion stops:
- Launch the Arlo app or log in to your Arlo account at arlo.netgear.com.
- Tap or click Mode.
- Tap or click the device whose mode you want to edit.
If you only have one device, it is preselected. - Tap the pencil icon or click Edit or next to the mode that you want to edit.
- Under Then do the following, tap the pencil icon or click Edit next to Record video.
- Select Record until activity stops (up to 300 sec).
Take a Snapshot From Live Video
To take a snapshot from live video:
- Tap the Arlo icon

on your mobile device.
If you are using a computer, enter arlo.netgear.com in the address bar of a browser.
The Devices page displays.
View Live Video and Recordings
-
Tap or click Live in the camera image.
-
Tap or click Snapshot

The snapshot is saved in your library.
Talk and Listen
To talk and listen:
- Tap the Arlo icon

on your mobile device.
You can also enter arlo.netgear.com in the address bar of a browser.
The Devices page displays.
-
Tap or click Live in the camera image.
-
Tap or click Microphone 📋.
A microphone button displays.
- Wait for the button to turn bright green.
This can take up to five seconds. When the button is bright green, Talk and Listen is ready.
- Tap and hold or click and hold the microphone button and speak.
Manage Your Cameras and Devices
If you use more than one camera, you can change the order in which the camera images are displayed on the Devices page. You can also zoom, invert, or rotate the camera image.
Change the Camera Order
To change the camera order on the Devices page:
- Tap the Arlo icon

on your mobile device.
You can also enter arlo.netgear.com in the address bar of a browser.
The Devices page displays.
- Tap or click Settings.
The Settings page displays.
View Live Video and Recordings
- Under System, tap or click Camera Order.
A list of cameras displays in the order that they display on the Devices page..
- Tap or click Edit at the top of the page.
A list icon displays.
-
Tap and hold or right-click the list icon and drag the camera to the correct position on the list.
-
Tap or click Done.
Your settings are saved.
Zoom a Camera Image
To zoom a camera image:
- Tap the Arlo icon

on your mobile device.
You can also enter arlo.netgear.com in the address bar of a browser.
The Devices page displays.
- Tap or click Settings > My Devices.
A list of cameras displays.
- Tap or click the camera.
The camera settings display.
-
Tap or click Video Settings.
-
Under Activity Zones, tap or click Zoom

-
Resize and position the image box as necessary.
-
Tap or click Save.
Your settings are saved.
Note: To zoom an image temporarily while a camera is streaming, pinch the camera screen on your mobile device.
View Live Video and Recordings
Rotate a Camera Image
You can invert the video feed image.
To rotate the camera image:
- Tap the Arlo icon on your mobile device.
You can also enter arlo.netgear.com in the address bar of a browser.
The Devices page displays.
- Tap or click Settings.
The Settings page displays.
- Tap or click My Devices.
A list of cameras displays.
- Tap or click the camera.
The settings for the camera display.
- Tap or click Video Settings.
The Video Settings page displays.
- Tap or click Rotate Image.
The camera image is inverted.
Cloud Recording
With cloud recording, everything the Arlo Baby camera records is sent to the cloud for secure storage in your library. You can access these recordings from anywhere you are using a mobile device, or on a Windows or Mac computer. All recordings are encrypted with the user name and password that you create. No one else can access your recordings.
We provide free cloud storage for the life of the Arlo Baby cameras. We store a rolling 7 days of recordings that are created when the Arlo Baby camera detects motion or sound. You can pay to store recordings in the cloud for 14 days or 30 days. You can download recordings and save them to your mobile device or computer for long-term storage.
View Recordings and Snapshots
Your Arlo Baby camera stores recordings and snapshots in the library. You can use the filter and the calendar to find and view specific recordings.
Use the Library
You can use the library to find and view recordings based on the date.
To use the library:
- Tap the Arlo icon

You can also enter arlo.netgear.com in the address bar of a browser.
The Devices page displays.
- Tap or click Library.
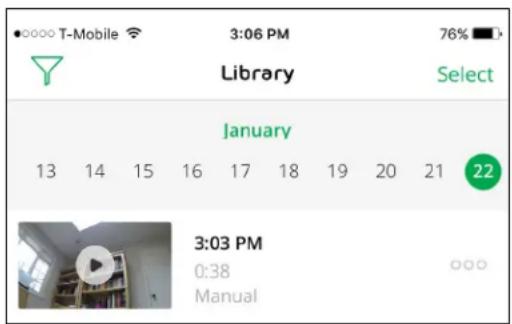
The calendar displays on the top of the page.
- If it is more than one month since you started recording, use the arrows on either side of the month to choose a month to view.
text_image
T-Mobile 3:06 PM 76% Library Select January 13 14 15 16 17 18 19 20 21 22 3:03 PM 0:38 ManualDays on which a video clip was recorded are indicated with a green circle.
- Tap or click a highlighted date.
Recordings from that date display below the calendar.
Use the Filter
You can use the filter to find and view recordings based on criteria that you select.
To use the filter to view your library:
- Tap the Arlo icon

You can also enter arlo.netgear.com in the address bar of a browser.
View Live Video and Recordings
The Devices page displays.
- Tap or click Library.
- Tap or click the Filter icon in the upper left corner of the page.
The filter page displays.
- Tap or click filtering criteria.
- To remove filtering, tap or click Reset.
- Tap or click Done.
The Filter icon Y becomes solid green to show that you are using filtering. Recordings that match your filter selections display. Dates with recordings are highlighted in dark green.
Turn Off the Filter
The Filter icon on the Library page is solid green when you are using filtering. When filtering is used, only the recordings in your library that match your filter criteria display. You can turn off filtering.
To turn off filtering for your library:
- Tap the Arlo icon

You can also enter arlo.netgear.com in the address bar of a browser.
The Devices page displays.
-
Tap or click Library.
-
Tap or click the Filter icon
in the upper left corner of the page.
The Filter page displays.
- Tap or click Reset at the bottom of the page.
Filtering is turned off. The Filter icon becomes an outline to show that filtering is not in use.
Share and Download Clips
To share and download clips from the library:
- Tap the Arlo icon

on your mobile device.
View Live Video and Recordings
You can also enter arlo.netgear.com in the address bar of a browser.
The Devices page displays.
- Tap or click Library.
The Library page displays.
-
Tap or click a snapshot or video.
-
Tap or click Share
-
Tap or click the method that you want to use to share the video.
The available methods depend on which apps you use on your smartphone or computer.
3. Do More With Arlo Baby
Arlo Baby comes with a built-in music player, a night light, and air quality sensors.
Always Listening
You can set Arlo Baby to be always listening for non-stop audio monitoring even when your phone is locked.
To turn Always Listening on and off:
- Tap the Arlo icon

on your mobile device.
The Devices page displays your camera feeds.
- Tap
You can lock your mobile device and still hear the audio from Arlo Baby. You can pause and restart the audio stream from your mobile device's lock screen.
Play Sounds and Music
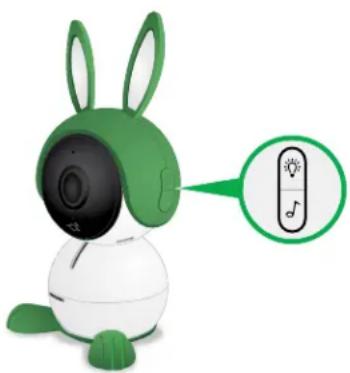
Use the Arlo app or the 📋 button on the right side of the camera to play and pause sounds, music, and lullabies.
Play Sounds and Music With the Arlo Baby Button
To play sounds and music:
- Press the ♪ button on the side of Arlo Baby.
natural_image
Illustration of a green rabbit-shaped robot with black head and white body, connected to a green speech bubble containing musical notes (no text or symbols on the robot itself)Arlo Baby begins to play sounds and music.
- To adjust the sound, use the Arlo app.
Do More With Arlo Baby
Play Sounds and Music From the Arlo App
To play sounds and music:
- Tap the Arlo icon

on your mobile device.
You can also enter arlo.netgear.com in the address bar of a browser.
The Devices page displays.
- Tap or click 🎯.
The Music controls expand.
- Tap or click ▶.
The sounds and music in your playlist begin to play.
Manage the Playlist
Arlo Baby comes with a playlist of 10 lullabies, white noises, and nature sounds, which can be played with a timer for the duration that you set. You can add tracks from the Arlo Cloud Library or add recordings of your own voice to the playlist. You can also specify the order of the playlist and delete files you don't want from the playlist. You can turn shuffle off and on and you can set a file to loop. The loop feature is helpful for playing white noises or nature sounds.
Add New Files to the Playlist From the Cloud Library
To add a sound from the cloud library:
- Tap the Arlo icon

on your mobile device.
You can also enter arlo.netgear.com in the address bar of a browser.
The Devices page displays your camera feeds.
- Tap or click ♩.
The music player controls display.
-
Tap or click +.
-
Tap or click Download from Cloud Library.
The Arlo Baby Cloud Library page displays.
Do More With Arlo Baby
- Tap or click for the sound or melody.
Arlo Baby checks to make sure that there is enough storage to add the file. If there is not enough storage available, you must delete a file before you can add another file.
- To view to your playlist, tap or click Arlo Baby Playlist.
The file displays on the bottom of your Arlo Baby playlist..
Record a Sound
Arlo Baby comes with a cloud library of sounds and music, but you can record additional sounds such your own voice.
To record a sound and add it to Arlo Baby:
- Tap the Arlo icon arlo on your mobile device.
The Devices page displays.
- Tap ♪ to access the Music controls.
The Music controls expand.
- Tap ≡♪.
The Playlist page displays.
- Tap + to add a sound.
The Add Sound page displays.
- Tap Record your voice.
The Voice Recorder page displays.
- Tap the red dot to begin recording.
Arlo Baby begins recording.
If this is your first sound recording on Arlo Baby, you might need to give your mobile device's operating system permission for the Arlo app to use your device's microphone. After you give permission, if you are unable to record sounds, log out of the Arlo app, log back in, and return to step 2.
Do More With Arlo Baby
The available amount of time you can record is displayed on the screen. If you want to record for a longer duration, you must delete some tracks from your playlist.
- When you are finished, tap the black square.
Arlo Baby stops recording.
-
Tap the play button to listen to your recording.
-
Tap SAVE to keep the current recording or Try Again to discard it.
-
If you discarded the recording, repeat steps 6-9 until you have a recording that you want to keep.
-
Tap SAVE.
The Save Recording page displays.
-
Enter a name for the recording.
-
Tap Save.
Your new recording is saved and it is added to the playlist.
Rename a Sound Recording
Note: You can only rename files that you recorded. You cannot rename files in the Arlo Baby Cloud Library.
To rename a sound recording:
- Tap the Arlo icon on your mobile device.
You can also enter arlo.netgear.com in the address bar of a browser.
The Devices page displays.
- Tap or click ♩.
The Music controls expand.
- Tap or click ≡.
The Playlist page displays.
Do More With Arlo Baby
- Tap or click the name of the sound.
The Rename File page displays.
-
Tap or click Edit.
-
Enter a new name for the file and tap or click Done.
Your settings are saved.
Change the Playlist Order
To change the playlist order:
- Tap the Arlo icon

on your mobile device.
You can also enter arlo.netgear.com in the address bar of a browser.
The Devices page displays.
- Tap or click ♩.
The Music controls expand.
- Tap or click ≡.
The Playlist page displays.
-
Tap or click Edit.
-
Drag and drop the sounds and recordings to change the order and tap or click Done.
Your settings are saved.
Delete a File From the Playlist
To delete a file from the playlist:
- Tap the Arlo icon

on your mobile device.
You can also enter arlo.netgear.com in the address bar of a browser.
The Devices page displays.
- Tap or click 🎯.
The Music controls expand.
Do More With Arlo Baby
- Tap or click
The Playlist page displays.
-
Tap or click Edit.
-
Select the file.
-
Tap or click Delete.
A confirmation message displays.
- Tap or click Yes, Delete.
The file is deleted.
Set the Music Timer
To set the music timer:
- Tap the Arlo icon

on your mobile device.
You can also enter arlo.netgear.com in the address bar of a browser.
The Devices page displays your camera feeds.
- Tap or click 🎯.
The music player controls display.
- Tap or click 📄.
The Music Player Timer page displays.
- Tap or click Auto-off.
The Music Player Timer toggles off and on.
- To set the duration for the timer, tap or click

The Auto-off page displays.
-
Drag the slider to the number of minutes.
-
Tap or click Done.
-
Tap or click Save.
Your settings are saved.
Play a Single Track on a Loop
To play a single track on a loop:
- Tap the Arlo icon

on your mobile device.
You can also enter arlo.netgear.com in the address bar of a browser.
The Devices page displays your camera feeds.
- Tap or click ♩.
The music player controls display.
-
Select the sound or music.
-
Tap or click ▶.
The sound or music plays.
- Tap or click ①.
This track plays on a loop until you turn off the Music Player or until the timer completes if you set a timer.
Shuffle the Tracks in the Playlist
To shuffle the tracks in the playlist:
- Tap the Arlo icon

on your mobile device.
You can also enter arlo.netgear.com in the address bar of a browser.
The Devices page displays your camera feeds.
- Tap or click ♩.
The music player controls display.
-
Select the sound or music.
-
Tap or click ≡♪.
The Playlist page displays.
- Tap or click ↗.
The playlist is shuffled until you turn off the Music Player or until the timer completes if you set a timer.
Do More With Arlo Baby
Use the Night Light
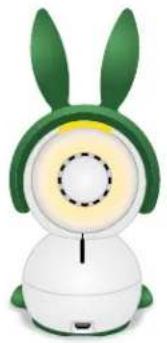
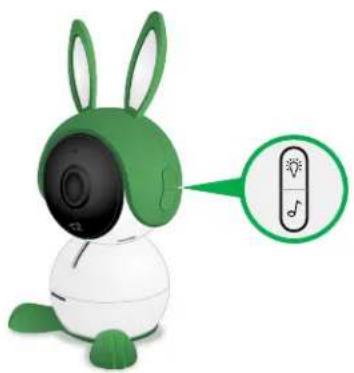
You can turn the night light off and on with a button on the side of Arlo Baby or by using the Arlo app.
natural_image
Illustration of a green rabbit-themed robot with a white body and yellow head, no text or symbols present.Turn the Night Light Off and On With the Night Light Button
The button on the right side of the camera turns the night light off and on.
natural_image
Illustration of a green rabbit-shaped robot with black head and white body, connected to a green circular button labeled 'Light' and '2', no text or symbols on the robot itself.Turn the Night Light Off and On From the Arlo App
To turn the Night Light Off and On from the Arlo app:
-
Tap the Arlo icon on your mobile device. You can also enter arlo.netgear.com in the address bar of a browser. The Devices page displays.
-
Tap or click 📋. The Night Light controls expand.
-
Tap or click ⏻. The night light toggles off and on.
Do More With Arlo Baby
Set the Night Light Color
Arlo Baby comes with a multi-colored night light that allows you to choose from thousands of colors and adjust the brightness using the Arlo app..
To set the night light color:
- Tap the Arlo icon

on your mobile device.
You can also enter arlo.netgear.com in the address bar of a browser.
The Devices page displays.
- Tap or click
The Night Light controls expand.
- Tap or click
The color picker page displays.
- Select Colors or Whites and pick a color.
Your settings are saved.
Set the Night Light Timer
To set the night light timer:
- Tap the Arlo icon

on your mobile device.
You can also enter arlo.netgear.com in the address bar of a browser.
- Tap or click
The Night Light controls expand.
- Tap or click 📄.
The Night Light Timer page displays.
- Tap or click Auto-off.
The timer toggles off and on.
- To set the duration for the timer, tap or click

The Auto-off page displays.
Do More With Arlo Baby
- Drag the slider to the number of minutes.
- Tap or click Done.
- Tap or click Save.
Your settings are saved.
Turn on a Light Show
The Arlo Baby night light automatically changes colors slowly in Light Show mode.
To turn on a light show:
- Tap the Arlo icon on your mobile device.
You can also enter arlo.netgear.com in the address bar of a browser.
The Devices page displays.
- Tap or click
The Night Light controls expand.
- Tap or click
The color picker page displays.
-
Tap or click Light Show.
-
Adjust the night light brightness.
-
Tap or click Done.
The light show plays until you turn off the nightlight or until the timer completes if you set a timer.
Air Sensors
Arlo Baby comes with air sensors that measure temperature, humidity, and air quality.
Do More With Arlo Baby
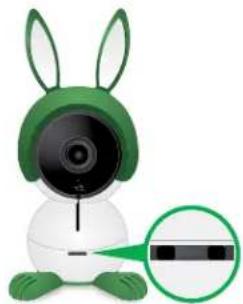
The inlet holes for the sensors are located on the front of Arlo Baby.
natural_image
Illustration of a green rabbit-shaped robot with white body and green ears, showing a close-up of its camera lens (no text or symbols)Note: Do not cover or obstruct the inlet holes.
You can view live air sensor data and air sensor data history. You can edit the air sensor settings and alerts.
Air Quality Sensors
The Arlo Baby air sensors that measure air quality measure the level of VOCs (Volatile Organic Compounds) in the room. VOCs are made up of hydrocarbons and can easily become vapors or gases at room temperature. VOCs are released from sources like burning fuel, solvents, paints, glues, air freshener, cleaning supplies, or hair spray.
Arlo Baby can detect overall changes in air quality caused by gases such as
- Iso-butane
- Carbon monoxide
- Hydrogen
- Ethanol
- Methane
Note: While Arlo Baby's air quality sensor can detect carbon monoxide, it is not a replacement for a dedicated carbon monoxide or smoke detector.
After you power Arlo Baby on for the first time, it takes about 24 hours for the air quality sensor to finish calibrating and establishing a "Normal" baseline measurement of your home's air quality. During this time, place the camera in a well-ventilated area where it has access to fresh air.
If Arlo Baby suddenly reports an Abnormal or Very Abnormal reading, try to discover the reason. The air quality sensor can react strongly to chemicals found in cleaning products, hair spray, or cooking odors. Try opening your doors or windows
Do More With Arlo Baby
to let fresh air in. The air quality should go back to normal after a while. If the air quality reading remains Abnormal for a long period of time, make sure that you remove products that might contain VOCs away from Arlo Baby.
View Live Sensor Data
To view the live air reporting:
1. Tap the Arlo icon

on your mobile device.
You can also enter arlo.netgear.com in the address bar of a browser.
The Devices page displays. The ↗ ↙ ↖ icons display within each camera. feed These icons are color coded. so that you can tell at a glance if the sensor data is within the normal range for you home.
- View the current temperature, humidity, and air quality.
View Air Sensor Data History
To view the air sensor data history:
1. Tap the Arlo icon

on your mobile device.
You can also enter arlo.netgear.com in the address bar of a browser.
The Devices page displays.
- To view a history of the past seven days, tap or click √ and then tap or click one of the three sensor icons ⚠, or , or ≈
The Environment Status page displays.
Edit the Temperature Sensor Settings
You can specify the thresholds that Arlo Baby uses to indicate whether the temperature is normal. If the temperature exceeds your set range, you are alerted with a push notification or an email. You can turn notifications off and on.
To customize the temperature sensor settings:
1. Tap the Arlo icon

on your mobile device.
You can also enter arlo.netgear.com in the address bar of a browser.
The Devices page displays.
Do More With Arlo Baby
- Tap the air sensor icon on the camera image.
- Tap or click 🔒.
The Environment Status page displays.
- Tap or click Edit.
The Sensor Settings page displays.
- To specify the temperature display unit, tap or click Display Unit and select Celsius or Fahrenheit.
- To specify the acceptable temperature range, drag the sliders to set the lower and higher temperature thresholds.
- If you do not want the sensors to track temperature conditions, toggle Collect Data off.
- If you do not want to receive temperature alerts, toggle Notifications off.
Edit the Humidity Sensor Settings
You can specify the thresholds that Arlo Baby uses to indicate whether the relative humidity level is normal. If the humidity level gets outside of your set range, you are alerted with a push notification or an email. You can turn notifications off and on.
To customize the humidity sensor settings:
- Tap the Arlo icon

on your mobile device.
You can also enter arlo.netgear.com in the address bar of a browser.
The Devices page displays.
- Tap or click 🔍.
The Environment Status page displays.
- Tap or click Edit.
The Sensor Settings page displays.
- To specify the acceptable humidity range, drag the sliders to set the lower and upper humidity thresholds.
Do More With Arlo Baby
If the humidity level is outside of your set range, you are alerted with a push notification or an email.
- If you do not want the sensors to track the humidity levels, toggle Collect Data off.
- If you do not want to receive humidity level alerts, toggle Notifications off.
Edit Air Quality Data Collection and Notification
You can turn data collection and notifications off and on.
To manage air quality notifications:
- Tap the Arlo icon on your mobile device.
You can also enter arlo.netgear.com in the address bar of a browser.
The Devices page displays.
- Tap or click √.
The Environmental Status page displays.
- Tap or click Edit.
The Sensor Settings page displays.
- If you do not want the sensors to track the air quality conditions, toggle Collect Data off.
- If you do not want to receive air quality alerts, toggle Notifications off.
- To receive alerts when the air quality is Abnormal, tap or click.
- To receive alerts when the qir quality is Very Abnormal, tap or click
Arlo Baby Character Sets
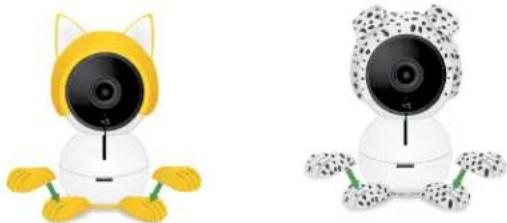
Arlo Baby cameras come with a bunny character set. You can remove the bunny character set and replace it with other Arlo Baby characters, sold separately.
Do More With Arlo Baby
To change the Arlo Baby character set:
- Pull the character ears up to remove them.
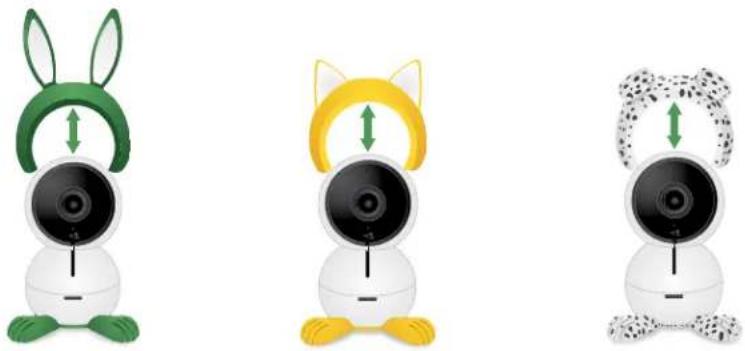
- To install character ears, align the ears with the camera lens and press them onto the camera..
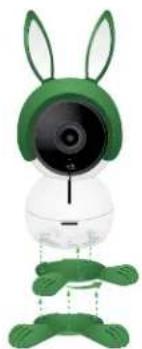
- Rotate the character feet and pull them off to remove them.
natural_image
Illustration of a green rabbit-themed robot head with a black camera lens (no text or symbols)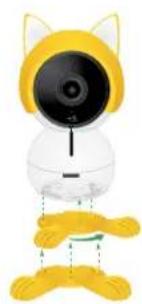
natural_image
Illustration of a yellow cat-shaped robot with black head and yellow limbs, standing with dotted lines indicating legs (no text or symbols)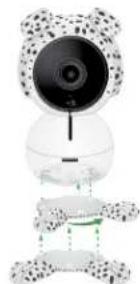
natural_image
Illustration of a snow leopard-themed robot with a camera lens and articulated limbs (no text or symbols)- To install character feet, align the foot plate with the holes on the bottom of the camera and rotate the foot plate until it clicks into place.
natural_image
Two cartoon mice with yellow and white fur heads, one wearing a camera lens (no text or symbols)4. Personalize Your Camera
You can customize Arlo Baby settings such as the camera name to make it easier to manage. You can grant access to friends and set up cloud recording.
Name Your Camera
You can easily customize your Arlo Baby camera by renaming it.
To rename your Arlo Baby camera:
- Tap the Arlo icon

You can also enter arlo.netgear.com in the address bar of a browser.
The Devices page displays.
- Tap or click Settings.
The Settings page displays.
- Tap or click My Devices.
A list of Arlo cameras displays.
-
Tap or click the Arlo Baby camera.
-
In the Name field, delete the current name and enter a new name that reminds you of the camera's location.
Camera names are limited to 32 characters.
- Tap or click Save.
Your settings are saved.
Profile Settings
When you use New Setup, the email address and password that you enter are saved as your profile. You can change the password and the user name (your email address). In the mobile app, you are automatically logged in when you launch the Arlo app, but you can turn Auto Login off and on.
Personalize Your Camera
Change Your Password and User Name
To change your password and user name:
- Tap the Arlo icon

on your mobile device.
You can also enter arlo.netgear.com in the address bar of a browser.
The Devices page displays.
- Tap or click Settings.
The Settings page displays.
- Under Account, tap or click Profile.
The Profile page displays.
- If you are using a smartphone, tap Edit at the top of the page.
The Profile page displays.
-
Type the new entries in the password and name fields.
-
Tap or click Done.
Your settings are saved.
Turn Auto Login On or Off for a Smartphone
When Auto Login is turned on, launching the Arlo app on your smartphone automatically logs you in with the email address and password you used the last time you logged in.
To turn Auto Login on your smartphone on or off:
- Tap the Arlo icon

on your mobile device.
You can also enter arlo.netgear.com in the address bar of a browser.
The Devices page displays.
- Tap or click Settings.
The Settings page displays.
Personalize Your Camera
- Under Account, tap or click Profile.
The Profile page displays.
- Tap Auto Login.
Your settings are saved.
Grant Access to Friends
You can add friends to your Arlo account. Friends can view live streams from your cameras, record video clips, and view, share, mark as favorite, and delete clips from your library, and take snapshots. Friends are granted limited access to some of the settings and features of your Arlo account. You can select which cameras friends can see and what administrative rights are available to them.
Add a Friend
To add a friend to your Arlo Account:
- Tap the Arlo icon

on your mobile device.
You can also enter arlo.netgear.com in the address bar of a browser.
The Devices page displays.
- Tap or click Settings.
The Settings page displays.
-
Under Account, tap or click Grant Access.
-
Tap or click Add or the + symbol.
-
Enter the first name, last name, and email address of the person that you want to add as a friend.
-
Tap or click the cameras that you want the friend to be able to access.
-
Tap or click Send Invite.
An email is sent inviting the friend to create an Arlo account. This friend's name is displayed with the status Pending. When the friend accepts your invitation, the status changes to Accepted.
Personalize Your Camera
Edit a Friend's Access Privileges
To edit a friend's access privileges:
- Tap the Arlo icon

on your mobile device.
You can also enter arlo.netgear.com in the address bar of a browser.
The Devices page displays.
- Tap or click Settings.
- Under Account, tap or click Grant Access.
A list of your friends displays with the status of their accounts.
- Tap or click the friend, and tap or click Edit

The Edit page displays.
- Tap or click cameras to select or deselect them.
- Tap or click Allow Access Rights.
Selecting the Allow Access Rights allows this friend to change your account and camera settings.
- Tap or click Done.
Your settings are saved.
Delete a Friend
To delete a friend's privileges:
- Tap the Arlo icon

on your mobile device.
You can also enter arlo.netgear.com in the address bar of a browser.
The Devices page displays.
- Tap or click Settings.
- Under Account, tap or click Grant Access.
A list of your friends displays with the status of their accounts.
Personalize Your Camera
- Select the friend, and tap or click Edit

The Edit page displays.
-
Tap or click Delete Friend.
-
Tap or click Yes.
The friend is deleted.
5. Modes, Rules, and Smart Alerts
Modes let you use rules to set and control automated actions. With modes, Arlo Baby can monitor your baby, even when you are not using the Arlo app.
Arlo Baby comes with the following modes:

Monitoring On. The Arlo Baby camera is monitoring motion or sound.

Monitoring Off. The Arlo Baby camera is not monitoring sound or motion.

Schedule. Manage monitoring based on a schedule.

Geofencing. You can use geofencing to turn monitoring on or off, or to resume using a schedule that you set when you arrive at or leave based on the location of your mobile device.
Note: If you tap or click ⋯. to use a shortcut and change motion or sound sensitivity or alerts, a temporary mode displays on the list while you are using your override settings.
If you add new modes, each new mode is listed in the Arlo app with the Custom Mode icon.
You can customize the modes that come with Arlo Baby and you can add new modes. For instance, you might want the Arlo Baby camera to monitor sounds but not motion during naptime.
Note: You can create different modes for the same camera, but the camera can use only one mode at a time.
Select a Mode
You can turn modes on and off manually or set modes to activate according to a schedule. Use the following method when you are not using a schedule to control a mode or to override an existing schedule. You must use at least one mode. The Arlo Baby camera is always in a mode, even if that mode is set to do nothing.
To select a mode for a camera:
- Tap the Arlo icon

on your mobile device.
You can also enter arlo.netgear.com in the address bar of a browser.
Modes, Rules, and Smart Alerts
The Devices page displays.
- Tap or click Mode.
A list of cameras displays.
- Tap or click the Arlo Baby camera.
The Mode page displays.
- Tap or click a mode to activate it.
The mode that you selected turns on immediately. The mode stays active until you change it.
When you view the camera feeds, the icons that display at the top of each the camera feed are based on the currently selected mode. One or both of the following icons display:

Motion. Motion detection is on.

Sound. Audio detection is on.
Change Motion Sensitivity
You can easily change the sensitivity level for Arlo Baby cameras.
To change the sensitivity level for a camera:
- Tap the Arlo icon

our mobile device.
You can also enter arlo.netgear.com in the address bar of a browser.
The Devices page displays.
- Tap or click Mode.
A list of cameras displays.
- Tap or click the Arlo Baby camera.
The Mode page displays..
- Tap or click Edit

next to the mode.
The Edit Rule page displays.
Modes, Rules, and Smart Alerts
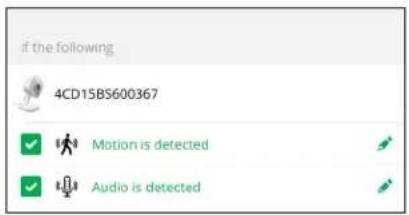
- Tap or click Edit next to the rule that you want to edit.
text_image
if the following 4CD15BS600367 ✓ Motion is detected ✓ Audio is detected- Under If the following, tap or click Edit next to Motion is detected.
The Motion detection settings page displays.
- Move the slider to adjust the sensitivity level for motion detection for this camera.
If you used a mobile device to specify the settings, your settings are saved.
- If you used a browser to specify the settings, click Save.
Your settings are saved.
Change Audio Sensitivity
To change audio sensitivity for a camera:
- Tap the Arlo icon on your mobile device.
You can also enter arlo.netgear.com in the address bar of a browser.
The Devices page displays.
- Tap or click Mode.
A list of cameras displays.
- Tap or click the Arlo Baby camera.
A list of modes displays.
- Tap or click Edit next to the mode name.
The Edit Rule page displays.
Modes, Rules, and Smart Alerts
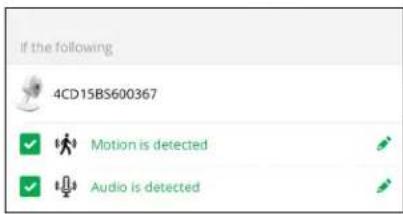
- Tap or click Edit next to the rule.
text_image
If the following 4CD15BS600367 ✓ Motion is detected ✓ Audio is detected-
Under If the following, tap or click Edit next to Audio is detected.
-
Move the slider to the desired level of audio detection.
If you used a mobile device to specify the settings, your settings are saved.
- If you used a browser to specify the settings, click Save.
Your settings are saved.
Manage Alerts
Arlo can push notifications to your smartphone, send you email alerts, or do both. To receive Arlo notifications on your phone, you must get the Arlo app.
Note: If you log out of the Arlo app on your smartphone or mobile device, you will stop receiving push notifications.
To change the alert settings for a camera:
- Tap the Arlo icon on your mobile device.
You can also enter arlo.netgear.com in the address bar of a browser.
The Devices page displays.
- Tap or click Mode.
A list of cameras displays.
- Tap or click the Arlo Baby camera.
A list of modes displays.
- Tap or click Edit next to the mode name.
The Edit Rule page displays.
Modes, Rules, and Smart Alerts
- Under If the following, specify the motion detection and audio detection settings.
- Under Then do the following, specify the settings for Arlo Baby to respond to motion or sound detection by recording video or taking a snapshot.
- Under Alert, tap or click Push Notification to turn alerts on and off for your mobile device.
- For email notifications, make sure that the Email Alerts check box is selected.
- To specify an email address, tap or click Edit next to Email Alerts and enter the email address.
Set Up Geofencing
Geofencing is a virtual fence that helps you discover when something or someone enters or exits a predefined zone. You can use Arlo geofencing to turn on monitoring, turn off monitoring, or resume schedule modes, when your mobile device is in zone or out of zone.
To set up geofencing, you must use your mobile device and you must allow the Arlo app to use your location.
Configure Your Mobile Device
To configure your mobile device for more accurate geofencing:
- Enable GPS or location services so that Arlo can locate your device.
- Enable WiFi.
Set Up Geofencing for the First Time and Set Up Modes
To set up geofencing for the first time and set up modes:
- Tap the Arlo icon on your mobile device.
The Cameras page displays.
- Tap Mode.
A list of cameras displays.
- Tap or click the camera.
A list of available modes displays.
Modes, Rules, and Smart Alerts
4. Tap Geofencing.
The Arlo Would Like to Use your Location prompt displays.
5. Tap Allow.
Geofencing works only if Arlo can locate your mobile device. The Location Address page displays your current address.
- To change the address, tap the Address field, type the address for your location, and then tap Next.
The geofence radius displays as Medium.
- To change your radius setting, tap the radius icon, select a radius size, and tap Next.
Radius size options are Small, Medium, or Large (approximately 150 meters, 250 meters, and 500 meters, respectively).
- Enter a name for your location and tap Next.
The Away Mode page displays a list of available modes. The away mode is the detection mode used by the camera when you are away from the location that you specified.
- Select an away mode and tap Next.
Note: When your mobile device is out of zone, the Arlo device defaults to the away mode.
- Select a home mode and tap Next.
Note: When your mobile device is in zone, the Arlo device defaults to the home mode.
If you use more than one enabled mobile device, you might be asked to select an Arlo device to connect it to.
-
To select the preferred mobile device, tap the device and then tap Next.
-
Tap Save.
Geofencing With Multiple Mobile Devices
If you want to use Arlo geofencing on more than one mobile device, make sure that the required conditions are met, and then follow the steps to enable or disable geofencing for the devices.
Make sure that these conditions are met:
- Your Arlo Baby camera and other Arlo devices are online.
- Your geofencing feature is enabled.
- Your friend's mobile device is added to your account.
For more information about adding devices, see Enable or Disable Geofencing for Friends' Mobile Devices on page 49.
- (Required when your friend wants to participate in geofencing) Your friend is logged in to the Arlo App on his or her mobile device.
- (Required when your friend wants to participate in geofencing) The GPS or location service enabled on your friend's mobile device.
Enable or Disable Geofencing for Friends' Mobile Devices
To enable or disable geofencing for your friends' mobile devices:
- Tap the Arlo icon 📂 on your mobile device.
The Cameras page displays.
- Tap Mode.
A list of cameras displays.
- the camera.
A list of available modes displays.
- Tap the Geofencing edit icon.
The Geofencing editing page displays.
- Tap Enabled Devices.
The Enabled Device page displays a list of geofencing-enabled mobile devices.
- Tap the mobile devices that you want to enable for geofencing.
A check mark appears next to the device name when geofencing is enabled.
Modes, Rules, and Smart Alerts
Note: The device location displays as either In Zone or Out of Zone.
- (Optional) To disable geofencing, tap the mobile device again.
The check mark disappears when geofencing disabled.
For more information, see Set Up Geofencing on page 47.
Geofencing Accuracy
For accuracy, geofencing uses a combination of GPS, cellular data, and WiFi data. The local environment affects geofencing as follows:
- In urban environments, where the cell towers and WiFi routers are more dense, geofencing accuracy can reach 100–200 meters.
Note: If you live in a skyscraper, geofencing might not work reliably due to GPS inaccuracies. Using the Large radius setting might help.
- In more rural areas, where cell towers and WiFi routers are sparse, geofencing accuracy can reach several hundred meters.
To improve geofencing accuracy, ensure that your mobile device meets these conditions:
- WiFi is turned on.
• GPS or location services are turned on.
Geofencing First In Last Out
Arlo Baby cameras use the first in, last out principal within the geofencing feature when more than one family member use geofencing. First in, last out allows you to come and go without worrying about turning Arlo Baby camera monitoring off and on. For example, if one family member leaves the house before you, your Arlo Baby camera can keep monitoring until you leave the house with the baby because you are still in the house or geofence. After you leave the house and both mobile devices are outside the geofence, your Arlo Baby camera stops monitoring.
For more information about managing multiple devices, see Geofencing With Multiple Mobile Devices on page 49.
Modes, Rules, and Smart Alerts
Create a Schedule
You can set a schedule to activate and deactivate cameras automatically.
Schedules recur weekly. For example, the schedule for Tuesday is repeated every Tuesday as long as the schedule is turned on. Arlo Baby is preconfigured with the following schedule:
• Monday through Friday, 8:00 a.m. to 5:00 p.m. All motion sensors are on.
- All other times. All motion sensors are off.
To set a schedule for a camera:
- Tap the Arlo icon

on your mobile device.
You can also enter arlo.netgear.com in the address bar of a browser.
The Devices page displays.
- Tap or click Mode.
A list of cameras displays.
- Tap or click the Arlo Baby camera.
A list of available modes displays.
- Tap or click Schedule

- Tap or click Edit

next to Schedule.
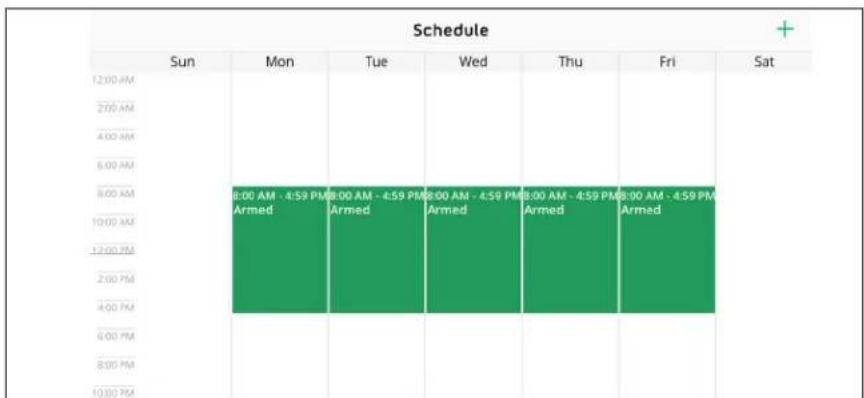
text_image
Schedule Sun Mon Tue Wed Thu Fri Sat 12:00 AM 2:00 AM 4:00 AM 6:00 AM 8:00 AM 10:00 AM 12:00 PM 2:00 PM 4:00 PM 6:00 PM 8:00 PM 10:00 PM 8:00 AM - 4:59 PM Armed 8:00 AM - 4:59 PM Armed 8:00 AM - 4:59 PM Armed 8:00 AM - 4:59 PM Armed 8:00 AM - 4:59 PM Armed 8:00 AM - 4:59 PM-
Drag the dividers to change the start and stop times.
-
To set a schedule across a couple of days, 9:00 pm Monday to 5:00 am Tuesday, for example, create two schedules, 9:00 pm to 11:59 pm Monday and 12:00 am to 5:00 am Tuesday.
Modes, Rules, and Smart Alerts
Add a Mode
You can add new modes to tell your Arlo Baby camera what to do in certain situations. For example, you can set your Arlo Baby camera to record videos when the motion sensor is activated and to alert you with an email message.
You can use the rules you create within modes and schedules to customize your Arlo Baby camera. With Arlo Baby cameras, you can create one rule for each mode.
To add a mode for a camera:
- Tap the Arlo icon

on your mobile device.
You can also enter arlo.netgear.com in the address bar of a browser.
The Devices page displays.
- Tap or click Mode.
A list of cameras displays.
-
Tap or click the camera..
-
Tap or click Add a Mode.
The New Mode page displays.
- Enter a name for the mode and tap or click Next.
The Trigger Device page displays.
- Tap or click a device to select it and then tap or click Next.
Note: If you only use one device, your device is preselected.
- If you want the selected device to perform an action only when motion is detected, tap or click Next.
Otherwise, select the check box for each trigger that you want to use and tap or click Next.
- Set the motion sensitivity, motion detection zones, and audio detection sensitivity using the sliders and tap or click Next.
If you are using the Arlo mobile app, the Motion Sensitivity and Audio Detection Sensitivity sliders are on separate pages.
Modes, Rules, and Smart Alerts
You can use the sliders to adjust the sensitivity of the motion sensor:
- Raise the sensitivity percentage to increase the number of videos that the Arlo Baby camera captures.
- Lower the sensitivity percentage to decrease the number of videos that the Arlo Baby camera captures.
- To specify motion detection zones, tap or click the zone.
Note: If you're not sure what motion sensitivity to use, you can use the motion detection test after you finish creating the mode. Go to your camera's settings to turn on the motion detection test.
- Select the device that you want to record video when motion or audio is detected and tap or click Next.
If you only use one device, your device is preselected.
- Specify what you want your device to do when motion or audio is detected.
You can select Record video, Take Snapshot, or Do nothing.
-
Tap or click Next.
-
If you selected Record video, use the slider to specify how long you want your device to record when motion or audio is detected and tap or click Next.
-
Select the notifications that you want to receive.
-
If you are using the Arlo mobile app, tap Next.
-
If you selected Send email alert, enter the email addresses that you want to receive alerts.
-
If you are using the Arlo mobile app, tap Next.
If you are using a web browser, click Finish.
- Review the summary of your settings and tap or click Save.
Your new mode is saved. You can now select it from the mode menu.
Motion Detection Activity Zones
You can identify zones within the camera view where you want the camera to detect motion. These zones are called activity zones. You can also select which activity zone or zones detect motion.
Create an Activity Zone
To create an activity zone:
1. Tap the Arlo icon

on your mobile device.
If you are using a computer, enter arlo.netgear.com in the address bar of a browser.
The Cameras page displays.
2. Settings > My Devices.
A list of cameras displays.
3. the camera.
The camera settings display.
4. If you are using the Arlo App on a mobile device, tap Video Settings.
The Video Settings page displays.
5. At the bottom of the page, Create New Zone.
An activity zone box displays in the camera feed image.
6. Move the box to the desired activity zone.
You can resize the box using the corner arrows.
7. Save.
Your settings are saved.
Modes, Rules, and Smart Alerts
Select an Activity Zone for a Rule
To select the activity zone where you want motion to be detected:
- Tap the Arlo icon

on your mobile device.
If you are using a computer, enter arlo.netgear.com in the address bar of a browser.
The Cameras page displays.
- Mode.
A list of cameras displays.
- Select the camera.
A list of modes displays.
- Tap or click Edit

next to the mode.
The Edit Rule page displays.
- Under If the following, tap or click Edit

next to Motion is detected.
The Motion Detection page displays.
- Under Motion Detection Zones, the zone where you want the camera to detect motion.
If you used a mobile device to specify the settings, your settings are saved.
- If you used a browser to specify the settings, click Save.
Your settings are saved.
6. Settings
You can view and change the Arlo Baby settings.
Turn the Arlo App Fingerprint ID Login On and Off
The Arlo app supports Touch ID fingerprint identity sensors. If you are using a mobile device with this feature, you can turn the Arlo app Touch ID login on and off.
To turn the Arlo app Touch ID login on and off:
- Tap the Arlo icon

on your mobile device.
The Cameras page displays.
- Tap Settings.
The Settings page displays.
- Tap Profile.
The Profile page displays.
- Tap Log in with Touch ID.
Tapping this button turns Log in with Touch ID on and off.
Change the WiFi Network
To change the WiFi network that Arlo connects to:
- Tap the Arlo icon

on your mobile device.
If you are using a computer, enter arlo.netgear.com in the address bar of a browser.
The Cameras page displays.
- Tap or click Settings > My Devices.
A list of cameras displays.
- Tap or click the camera.
The camera settings display.
Settings
- Tap or click SSID.
The Connect Network page displays.
-
Enter the WiFi network name and password.
-
Tap or click Continue.
-
Follow the prompts to connect your Arlo Baby camera to the WiFi network. If you are using a mobile device, your settings are saved.
-
If you are using a computer, click Save.
Your settings are saved.
Change the Time Zone
To change the time zone:
- Tap the Arlo icon

on your mobile device.
You can also enter arlo.netgear.com in the address bar of a browser.
The Devices page displays.
- Tap or click Settings.
The Settings page displays.
- Tap or click My Devices.
A list of cameras displays.
- Tap or click the camera.
The settings for the camera display.
- Tap or click Time Zone.
The Time Zone page displays.
-
Tap or click a time zone.
-
Tap or click Done.
Your settings are saved.
Settings
Change the Video Resolution
The default video resolution is 1080p. You can change this setting to a higher or lower resolution. Decreasing the resolution of Arlo Baby videos reduces the required WiFi bandwidth.
To change the video resolution:
- Tap the Arlo icon

on your mobile device.
You can also enter arlo.netgear.com in the address bar of a browser.
The Devices page displays.
- Tap or click ....
The Shortcut menu displays.
- Tap or click Device Settings.
The Video Settings page displays.
- Tap or click Video Resolution.
The Video Resolution page displays.
-
Tap or click a setting.
-
Tap or click Done.
Your settings are saved.
Turn Night Vision On and Off
We recommend that you turn off night vision if the Arlo Baby camera is facing reflective surfaces, such as windows.
To turn night vision on and off:
- Tap the Arlo icon

on your mobile device.
You can also enter arlo.netgear.com in the address bar of a browser.
The Devices page displays.
- Tap or click ....
The Shortcut menu displays.
Settings
- Tap or click Device Settings.
The Video Settings page displays.
- Tap or click Night Vision..
The night vision setting toggles on or off.
Turn the Microphone Off and On
Note: You can set Arlo Baby to be always listening for non-stop audio monitoring even when your phone is locked. See Always Listening on page 21.
To turn the microphone off and on:
- Tap the Arlo icon

on your mobile device.
You can also enter arlo.netgear.com in the address bar of a browser.
The Devices page displays.
- Tap or click Settings.
The Settings page displays.
- Tap or click My Devices.
A list of cameras displays.
-
Tap or click the camera.
-
Tap or click Audio Settings.
The Audio Settings page displays.
- Tap or click Microphone.
The microphone setting toggle on or off.
Change the Speaker Settings
You can turn the speaker off and on and you can control the volume on your speakers.
To change the speaker settings:
- Tap the Arlo icon

on your mobile device.
You can also enter arlo.netgear.com in the address bar of a browser.
Settings
The Devices page displays.
- Tap or click Settings.
The Settings page displays.
- Tap or click My Devices.
A list of cameras displays.
-
Tap or click the camera.
-
Tap or click Audio Settings.
The Audio Settings page displays.
- To turn the speaker off and on, tap or click Speaker.
The speaker toggles on or off.
- To change the speaker volume, move the Speaker Volume slider.
Your settings are saved.
View Device Information
To view device information:
- Tap the Arlo icon

on your mobile device.
You can also enter arlo.netgear.com in the address bar of a browser.
The Devices page displays.
- Tap or click Settings.
The Settings page displays.
- Tap or click My Devices.
A list of cameras displays.
- Tap or click the camera.
The settings for the camera display.
- Scroll down to the Version heading and view the firmware version, hardware version, and the serial number.
Settings
Update the Firmware
Firmware updates are released automatically to all connected Arlo devices.
Automatic updates happen between 3:00 a.m. and 5:00 a.m. to minimize camera downtime. If the firmware update is a major one, you might be unable to stream from your camera until your firmware is updated.
You can wait until the update happens automatically between 3:00 a.m. and 5:00 a.m., or you can update your firmware manually.
Note: Even when you cannot view your camera live, motion and sound detection still work and your camera still records based on the currently selected mode.
To update your Arlo Baby firmware manually:
1. Tap the Arlo icon

on your mobile device.
You can also enter arlo.netgear.com in the address bar of a browser.
The Devices page displays.
2. Tap or click Settings > My Devices.
The My Devices page displays.
3. Select the Arlo Baby camera that you want to update.
4. Tap or click Device Info > Firmware > Update.
WARNING: Do not disconnect your camera while the firmware update is in progress.
5. Wait for the firmware update to complete.
The camera's LED blinks amber and blue while the firmware is downloading and installing. After the firmware is installed, the camera reboots and the LED is off. When the LED lights again and the pattern stops changing, your camera is available to stream.
Settings
Restart the Camera
To restart the camera:
- Tap the Arlo icon

on your mobile device.
You can also enter arlo.netgear.com in the address bar of a browser.
The Devices page displays.
- Tap or click Settings.
The Settings page displays.
- Tap or click My Devices.
A list of cameras displays.
- Tap or click the camera.
The settings for the camera display.
- Scroll down and tap or click Restart.
The camera restarts.
Reset the Camera to Its Factory Settings
Resetting the camera to its factory settings erases the camera's current settings and removes the camera feed from your Arlo app.
To reset the camera to its factory settings:
-
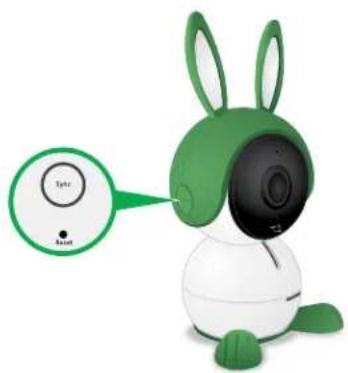
Use a paperclip to press and hold the Reset button for ten seconds.
-
Release the Reset button.
Arlo Baby returns to its factory settings and restarts.
natural_image
Green and white cartoon rabbit-shaped robot with earbuds, connected via a green control panel (no text or symbols visible)Settings
Remove a Camera From Your Account
To remove a camera from your account:
- Tap the Arlo icon

on your mobile device.
You can also enter arlo.netgear.com in the address bar of a browser.
The Devices page displays.
- Tap or click Settings.
The Settings page displays.
- Tap or click My Devices.
A list of cameras displays.
- Tap or click the camera.
The settings for the camera display.
- Scroll down and click Remove Device.
The camera is removed from your account and its settings are deleted.
7. Manage Your Subscription Plan
Every Arlo Baby camera includes free Basic service that offers basic features and functionality. When activating your Arlo Baby camera, you can choose between the Basic, Premier, and Elite service plans.
Subscription Plans
Upgrading to a paid service level gives you the ability to expand your Arlo Baby camera storage capacity to suit your specific needs. Depending on your service level, you can add cameras or cloud storage and share recordings with friends and family. For information about service plans, visit bit.ly/1AQGR9k.
You can upgrade a Basic or Premier subscription at any time. When you upgrade from a paid subscription to a higher service level, the system calculates any unused portion of the current term and deducts that prorated amount from the total cost of the upgrade. You can also select a Continuos Video Recording (CVR) plan.
Renew Your Service Plan
Monthly plans automatically renew each month until you upgrade to an annual plan or cancel, effective the next billing cycle. Annual plans autorenew by default but can be configured to expire at the end of the current annual term.
Select a Premier or Elite Subscription Plan
To select a Premier or Elite subscription plan:
- Tap the Arlo icon

on your mobile device.
You can also enter arlo.netgear.com in the address bar of a browser.
The Devices page displays.
- Tap or click Settings.
The Settings page displays.
- Under Account, tap or click Subscription.
The Subscription page displays.
- Tap or click Change Subscription.
Manage Your Subscription Plan
The Subscription Plan page displays.
- To change to a Premier or Elite plan, tap or click SELECT.
- Follow the onscreen instructions to change your subscription.
After your payment is processed, your service level information is updated on the Subscription page.
Start or Stop a Continuos Video Recording Plan
Continuous video recording, or CVR, is an optional feature available on Arlo Baby cameras. CVR records all the action 24/7 so that you can rewind any camera to any minute of any day and catch anything you missed.
To start or stop a CVR subscription plan:
- Tap the Arlo icon

on your mobile device.
You can also enter arlo.netgear.com in the address bar of a browser.
The Devices page displays.
- Tap or click Settings.
The Settings page displays.
- Under Account, tap or click Subscription.
The Subscription page displays.
- Tap or click Change Subscription.
The Subscription Plan page displays.
- Tap or click No changes? Continue.
The Continuous Video Recording (CVR) plan page displays.
- Follow the onscreen instructions.
An email message is sent to you to confirm the service level update, the effective date, and any prorated refund amount for any unused portion of the current term.
8. Continuous Video Recording
Continuous video recording, or CVR, is an optional feature available on Arlo Baby cameras. CVR records all the action 24/7 so that you can rewind any camera to any minute of any day and catch anything you missed. CVR captures everything in the background, and you can access any time by tapping or clicking 🤒 above the camera feed.
Arlo Baby records CVR in addition to recordings that the camera records because of rules. This feature is available when you purchase an optional CVR plan. For information about how to sign up for a CVR plan, see Start or Stop a Continuos Video Recording Plan on page 63.
View the Timeline
To view the timeline:
- Tap the Arlo icon

on your mobile device.
You can also enter arlo.netgear.com in the address bar of a browser.
The Devices page displays.
- Tap or click 📋 above the camera feed..
The Timeline page displays.
Green lines indicate motion recordings and blue lines indicate sound recordings.
- To return to the Cameras page, tap or click the Back button.
Navigate Through the Timeline
To navigate through the timeline:
- Tap the Arlo icon

on your mobile device.
You can also enter arlo.netgear.com in the address bar of a browser.
The Devices page displays.
- Tap or click 📊 above the camera feed.
The Timeline page displays.
Continuous Video Recording
- Tap or click and hold the timeline.
- On a smartphone or mobile device, drag the timeline.
- To go back in time, drag the timeline to the left (either 14 or 30 days back, depending on your CVR plan).
• To move toward more recent recordings, drag the timeline to the right.
- If you are using a browser, click to navigate to a specific time or click and drag to scroll through the timeline.
- To return to the live feed, tap or click the Go Live button at the bottom.
View the Timeline Calendar
As the camera records CVR content, it notes when motion or sound was detected during the continuous recording. For these indicators to display in the timeline, monitoring must be tuned on. For information about modes, see Select a Mode on page 41.
To view the timeline calendar:
- Tap the Arlo icon

on your mobile device.
You can also enter arlo.netgear.com in the address bar of a browser.
The Devices page displays.
- Tap or click

above the camera feed.
The Timeline page displays.
- Click the Calendar icon.
The Calendar page displays.
The calendar page displays a row of dates. Small green dots represent the days that the CVR feature recorded. A large green dot represents the current day.
-
To see a more detailed view of the timeline, do one of the following:
-
On a smartphone or mobile device, pinch and zoom. To go to landscape mode, rotate your device or tap the Enlarge icon.
-
If you are using a browser, click 24 hr, 1 hr, or 5 min to change your timeline detail.
-
To hide or display the timeline, tap TIMELINE.
The timeline display toggles off and on.
9. Arlo Connect
Arlo Connect is a simple way to integrate Arlo devices into other smart home platforms using standard and secure cloud integration.
Use Arlo With IFTTT
You can use the Arlo app with IFTTT (If This Then That), a free cloud-based service that connects smart home devices and applications.
To add Arlo to your IFTTT app, visit ifttt.com/arlo.
To learn more about Arlo and IFTTT, visit arlo.com/community.
Use Arlo With SmartThings
You can integrate Arlo Baby into the SmartThings app, so all your smart devices work together. For example, if your Arlo Baby camera detects motion, SmartThings can tell your Aeon Labs Siren to trigger your alarm. For more information, see Chapter 10. Use SmartThings With Arlo Cameras on page 71
Use Arlo With Stringify
Stringify is an iOS app that transforms the way you connect your life by bringing your physical and digital things together to help you create experiences, save time, save money, stay healthy, and have fun.
Integrating your Arlo cameras into the Stringify app allows them to connect and interact with more than 600 smart home products and digital services. Stringify connects your smart products and services using flows that you can download, modify, or create using the Stringify app on your iOS device.
Motion, audio, or low battery notifications from Arlo cameras can be triggers for Stringify flows, or Stringify flows can instruct Arlo cameras to arm, disarm, and record video clips.
If you are using an iOS device with the Stringify app installed, you can visit the following link to download pictured flows directly to the Stringify app:
Add Arlo Cameras to the Stringify App
Stringify is compatible with Arlo Baby cameras. Your Arlo Baby camera must be in Monitoring On mode or in a custom mode to detect motion or audio and report it to Stringify. When an Arlo Baby camera is in Monitoring Off mode, it does not
inform Stringify about motion or audio detected, but it still responds to requests to change modes and record clips.
You can also create custom modes to detect motion or audio or both, but not record a video clip. This can be useful for advanced flows where you want to use the Arlo camera as a detection device, but not capture video unless other conditions in the flow are met. For more information about creating custom modes, see Add a Mode on page 52.
In advanced Stringify flows, you can use the same Arlo camera twice in the same flow. For example, if your Arlo front door camera detects motion, it's after 5 p.m., and you're away from home, you can tell Stringify to trigger a 20-second recording from your Arlo front door camera and a 40-second recording from your Arlo driveway camera.
To add Arlo cameras to the Stringify app and use them in a flow:
- Install the Arlo app, create an account, and complete the setup process.
- Download the Stringify app from the App Store.
- To create a free Stringify account, from the main screen of the Stringify app, select Things and tap New at the top right of the screen.
- Scroll down to Netgear Arlo Cameras and tap the Arlo icon.
- Tap Connect and log in with your Arlo user name and password.
- Accept the terms and conditions.
A list of discovered cameras displays. Your Arlo cameras are now connected to your Stringify account.
-
Tap Done to return to the previous menu.
-
From the main screen, tap Flows > Create.
-
Tap the + button to add devices, including Arlo cameras, to your flow.
-
Drag from one icon to another to connect your Things.
To download pictured flows directly to the Stringify app, visit https://community.netgear.com/t5/Arlo-Knowledge-Base/What-is-Stringify-and-how-do-l-use-it-with-my-Arlo-cameras/tə-p/1160647
- Tap each item in your flow to set its trigger or action.
- Give your flow a name and tap Enable Flow when finished.
Visit stringify.com for more information about how to create flows and for premade example flows that include Arlo cameras.
10. Use SmartThings With Arlo Cameras
With Samsung SmartThings, you can integrate your Arlo cameras into the SmartThings app, so all your smart devices can work together. For example, if your Arlo camera detects motion, SmartThings tells your Aeon Labs Siren to trigger your alarm.
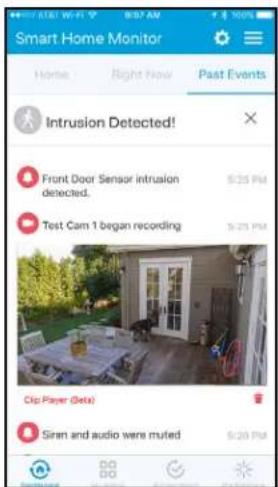
text_image
Smart Home Monitor Home Right Now Past Events Intrusion Detected! Front Door Sensor intrusion detected. $25 PM Test Cam 1 began recording $25 PM Clip Player (Beta) Siren and audio were muted $20 PMArlo camera feed integrated into the SmartThings app
After you integrate your Arlo Wire-Free Cameras into the SmartThings app, you must use the SmartThings app to configure your modes and rules. If you try to edit your modes and rules in the Arlo app, you will disarm the SmartThings mode. You can continue to use the Arlo app to view the library.
Note: After syncing your Arlo cameras with the SmartThings app, a SmartThings mode displays in your Arlo app. Your Arlo system must remain in the SmartThings mode for your system to work correctly with the SmartThings app. All mode configuration must be done in the SmartThings app. If you choose to no longer use the SmartThings app, delete the SmartThings mode in your Arlo app, and delete the Arlo cameras from the things menu in the SmartThings mobile app.
Prepare Arlo to Work With SmartThings
Use Arlo Camera Names That Are Easy to Recognize
Before integrating your cameras with the SmartThings app, make sure that the names of your cameras are easy to understand. If you choose not to rename your cameras, the camera's serial number becomes the camera's name in the SmartThings app.
For information about how to change the camera names, see Name Your Camera on page 36.
Use SmartThings With Arlo Cameras
Disarm Your Cameras
When you integrate your Arlo Wire-Free cameras with SmartThings, a new SmartThings mode is created in the Arlo app. Because SmartThings manages your Arlo cameras, they must be in Disarmed mode before you can begin the integration setup. You cannot use Schedule mode or Geofencing mode at the same time as SmartThings mode. You must also disable any IFTTT recipes that change the Arlo system mode.
To disarm your cameras:
- Tap the Arlo icon

on your mobile device.
If you are using a computer, enter arlo.netgear.com in the address bar of a browser.
The Cameras page displays.
- Click or tap Mode.
A list of cameras displays.
- Click or tap the camera.
The Mode page displays.
-
Tap Disarmed.
-
Exit the Arlo app.
Integrate Your Arlo Cameras With the SmartThings App
To integrate your Arlo cameras into the SmartThings app:
- Make sure that your cameras are disarmed in the Arlo app.
See Disarm Your Cameras on page 72.
-
Launch the SmartThings mobile app.
-
If you do not own a SmartThings account, visit https://support.smartthings.com/hc/en-us/articles/205380634-Setting-up-an-account-the-Hub-and-Things to create an account.
-
Log in to your SmartThings app.
-
Tap Marketplace > Things > Safety and Security.
Use SmartThings With Arlo Cameras
-
Tap Cameras > Netgear Arlo.
-
Tap Arlo (connect).
-
Tap Connect to Arlo.
-
Enter your Arlo login credentials
-
On the bottom of the page, accept the Privacy Policy.
-
Tap Done at the upper-right corner.
-
Tap Connect to Arlo Cameras and select the cameras that you want to sync with the SmartThings app.
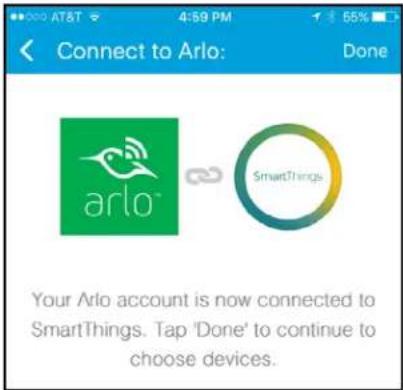
text_image
Connect to Arlo: Done arlo™ SmartThings Your Arlo account is now connected to SmartThings. Tap 'Done' to continue to choose devices.- Tap Done > Next > Done.
- Tap My Home > Things.
- To change your camera's settings, tap the settings icon.
Note: Repeat this step for each camera that you synced with your SmartThings app.
Your Arlo Wire-Free Cameras are in the SmartThings mode in your Arlo app.
For more information about integrating your Arlo cameras into the SmartThings app visit
https://support.smartthings.com/hc/en-us/articles/209529506-Netgear-Arlo-Wire-Free-Camera.
Use SmartThings With Arlo Cameras
Adjust the Motion Sensitivity Level
When you integrate Arlo into the SmartThings app, the motion sensitivity for each camera is set to a default of 80. If your camera works more effectively at a different setting, you can use the Arlo app to change it.
To adjust the motion sensitivity level:
- Tap the Arlo icon

on your mobile device.
If you are using a computer, enter arlo.netgear.com in the address bar of a browser.
The Cameras page displays.
- Click or tap Mode.
A list of cameras displays.
- Click or tap the camera.
The Mode page displays.
- If you are not sure what motion sensitivity level you have been using, click or tap Edit ✅ next to Armed mode.
The Edit Rule page displays.
-
Click or tap Edit next to the rule that you want to edit.
-
Under If the following, click or tap Edit next to Motion is detected.
The Motion detection settings page displays.
-
Note the motion sensitivity setting, but do not select Armed mode..
-
Return to the Mode page.
-
Click or tap Edit next to SmartThings mode.
The Edit Rule page displays.
-
Click or tap Edit ➕ next to the rule that you want to edit.
-
Under If the following, click or tap Edit next to Motion is detected.
The Motion detection settings page displays.
- Set the motion sensitivity level to match the setting that you viewed in Step 7.
Adjust Push Notifications
When you integrate Arlo with SmartThings, the Arlo app sends push notifications to the SmartThings app. Then the SmartThings app sends you notifications about Arlo and your other smart things. If you still receive push notifications from Arlo, on your smartphone, use your smartphone settings to turn off the Arlo notifications. Email notifications are not needed.
11. Troubleshooting
Arlo Baby Is Not Streaming on a Mobile Device
Note: The Arlo Baby Monitor includes an option for offline use. For information about the Arlo Baby Monitor, see the Arlo Baby Monitor instructions.
To troubleshoot problems with your Arlo Baby video stream:
- Check the WiFi signal strength.
- Make sure that your Arlo Baby camera is at least 6½ feet (2 meters) away from any WiFi enabled devices, major electrical equipment, large metal or concrete objects, or other sources of signal interference.
- Make sure that your Arlo Baby cameara's battery is not low.
A low battery can cause the camera to stream intermittently. - If you still cannot see Arlo Baby video streams after completing these troubleshooting steps, contact Arlo support to speak to an expert.
Cannot View Arlo Live Streaming in a Web Browser
Note: The Arlo Baby Monitor includes an option for offline use. For information about the Arlo Baby Monitor, see the Arlo Baby Monitor instructions.
Your Arlo Baby camera, your computer, your web browser, or your Internet network might be causing the streaming problem.
The Arlo web client uses the Adobe Flash plug-in to display your camera streams in a browser. Make sure that your browser is not blocking the plug-in and that you are using the latest version of Adobe Flash.
Your router might be blocking the ports to which Arlo sends data. To ensure that Arlo can stay connected, you must keep the ports 443 and 80 open on your router:
Troubleshooting
Not Receiving Push Notifications
You must be logged in to the Arlo app to receive Arlo alerts on your smartphone or mobile device. Arlo registers your device for push notification when you log in. If you used the logout option instead of simply exiting the app, you must log back in to the app. You receive Arlo alerts even if your device is sleeping.
If you did all of the following and are still not getting Arlo Baby alerts, contact NETGEAR support.
Check Air Sensor Notification Settings
Arlo Baby comes with air sensors that measure temperature, humidity, and air quality. You can view live air sensor data and air sensor data history. You can edit the air sensor settings and alerts.
To view or edit air sensor alerts:
- Tap the Arlo icon on your mobile device.
You can also enter arlo.netgear.com in the address bar of a browser.
The Devices page displays. The ↙ icons display within each camera. feed
- Tap or click a sensor icon
The Environment Status page displays.
- Tap or click Edit.
The Sensor Settings page displays.
- View or change the alert settings.
Check the Rules Settings for the Camera Modes
Check the rules in your modes. Make sure that push notification is enabled in the Monitoring On mode or in a custom mode if you created one.
To check push notification in the Arlo app:
- Tap the Arlo icon on your mobile device.
You can also enter arlo.netgear.com in the address bar of a browser.
The Devices page displays.
- Tap or click ⋯ on the upper right.
Troubleshooting
The Shortcut menu displays.
- Tap or click Motion & Audio Settings..
The Alert Settings page displays.
- Make sure that the Push Notification check box is selected.
Check the Arlo App Settings on an iOS Device
Make sure that you allow the Arlo app to receive push notifications. The Arlo app push notifications can be disabled on iOS and Android devices.
To allow Arlo push notifications on iOS devices:
- Tap the Settings icon for your iOS device.
- Select Notifications > Arlo.
The Arlo notification settings display.
- Make sure that Allow Notification is selected.
Check the Arlo App Settings on an Android Device
To allow Arlo push notifications on Android devices:
- Tap the Settings icon for your Android device.
- Select Application Manager > Arlo.
The Arlo notification settings display.
- Make sure that the Show Notifications setting is enabled.
If You Said No to Push Notifications at Installation
You can enable and disable push notifications at three levels: the mode level, the Arlo app level, and the iOS or Android system level. If you still want to receive some Arlo notifications, but only in certain modes, you must edit the notification settings for each mode that is not sending you notifications. If you want to start or stop receiving all Arlo notifications for a while, you can enable or disable Arlo notifications in the Arlo app. If you always want to receive Arlo notifications or never want to receive Arlo notifications, you can enable or disable notifications at the iOS or Android system level.
Recalibrate the Air Sensors
If you move your Arlo Baby to a new location, you might notice that you receive more alerts than usual due to different temperature, humidity, and air quality in the camera's new location.
If you recently moved your Arlo Baby to a new location and you are receiving too many alerts, you can power cycle your Arlo Baby to recalibrate the sensors so that they adjust to the new location and you receive fewer alerts.
To recalibrate your Arlo Baby's sensors:
- Unplug your Arlo Baby's power adapter.
- If your Arlo Baby's LED is still on, turn off battery power using the switch on the bottom of your Arlo Baby.
-
Wait ten seconds, then plug Arlo Baby back in or turn battery power back on.
Your Arlo Baby's sensors recalibrate over the next 24 hours. -
If you are still receiving too many alerts, change your notification settings and alert thresholds from the Devices tab of the Arlo app.
For information about air sensors, see Air Sensors on page 30.