
UA Band - Smartwatch HTC - Free user manual and instructions
Find the device manual for free UA Band HTC in PDF.


| Product Type | Smartwatch / Fitness Band |
| Brand | HTC |
| Model | UA Band |
| Display | Touch screen |
| Sensors | Built-in heart rate monitor, accelerometer, sleep detection |
| Connectivity | Bluetooth (phone pairing) |
| Water Resistance | 2ATM (splash resistant, not for swimming) |
| Dust Resistance | IP6 (dust-tight) |
| Battery Type | Rechargeable lithium-ion |
| Charging | Via supplied USB cable; LED red when charging, green when full |
| Compatible Systems | iOS and Android (requires UA Record app) |
| Main Functions | Sleep tracking, step counting, heart rate monitoring, workout recording (run, bike, gym, walk), alarms, timer, stopwatch, music control, notifications (calls, messages, calendar) |
| Strap | Replaceable; extra strap included for smaller wrists |
| Care and Cleaning | Wipe with water or alcohol; avoid immersion in liquid chemicals; dry charging connectors before use |
| Safety | Not a medical device; consult physician before fitness routine; avoid electrical short circuits |
| Firmware Update | Via UA Record app on phone; battery must be at least 30% |
| Indicator LED Colors | Red (charging), Green (full), Blue (pairing), plus zone colors with UA Heart Rate |
Frequently Asked Questions - UA Band HTC
User questions about UA Band HTC
0 question about this device. Answer the ones you know or ask your own.
Ask a new question about this device
Download the instructions for your Smartwatch in PDF format for free! Find your manual UA Band - HTC and take your electronic device back in hand. On this page are published all the documents necessary for the use of your device. UA Band by HTC.
USER MANUAL UA Band HTC
natural_image
Red and white abstract logo resembling a stylized 'H' or symmetrical shape (no text or symbols)UNDER ARMOUR.
UA Band™
User guide
2 Contents
Contents
Getting started
Events, messages, and notifications 19
Product care 20
Settings
Trademarks and copyrights
About this guide
In this user guide, we use the following symbols to indicate useful and important information:

This is a note. A note often gives additional information, such as what happens when you choose to do or not to do a certain action. A note also provides information that may only be applicable to some situations.

This is a tip. A tip gives you an alternative way to do a particular step or procedure, or lets you know of an option that you may find helpful.

This indicates important information that you need in order to accomplish a certain task or to get a feature to work properly.

This provides safety precaution information, that is, information to which you must pay careful attention to avoid potential problems.
Important Notices
H RECORD
Any and all data synced with UA Record ^™ is subject to the Under Armour Terms and Conditions of Use and Privacy Policy. You can review both notices at UA.com.
BAND
UA Band ^™ is not a healthcare device and should not be used as a substitute for medical care. The accuracy of the data captured is not verified. You should never disregard medical advice or delay seeking medical advice or treatment because of any content presented on or through UA Band, and you should never use the content presented on or through UA Band for diagnosing or treating a health condition. Please consult your healthcare provider before beginning any wellness or fitness routine.
Getting started
About your UA Band
The UA Band automatically tracks your sleep, steps, and resting heart rate. Use it to record your workouts, set an alarm, and more. You can also conveniently get notifications and listen to music from your phone.
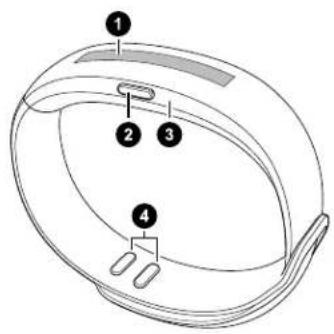
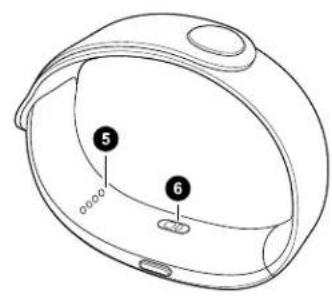
1 Touch screen
2 Home button/Power button
3 Indicator LED
4 Strap pins
5 Charging connector
6 Built-in heart rate monitor
- Make sure that connectors on UA Band are dry before you use the charging cable, since the charging cable is not water-resistant.
- To avoid electrical short circuits, unplug the charging cable from the power source when not charging UA Band.
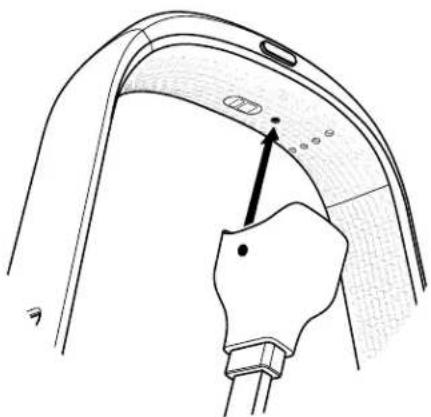
- Connect your UA Band to the supplied charging cable.

Make sure that the dot marker on the charger is aligned with the marker on the band. The charging cable will still attach when put on backwards, but will not charge.
natural_image
Diagram of a hand holding a connector to a curved device component (no text or symbols visible)The indicator LED will turn red when charging.
- Plug the USB cable end into a power source. The indicator LED shows green when charging is complete.
Turning your UA Band on or off
The first time you turn your UA Band on, the device will vibrate and prompt you to open the UA Record app on your phone to initiate device pairing.

Make sure that you've downloaded and installed the UA Record app on your phone to complete the setup. For more information, see UA Record app on page 7.
Do one of the following:
- Press and hold the Home button for a few seconds, and then tap √ to confirm.
■ Through the UA Band settings:
a) On the Home screen, tap .
b) Tap
c) Tap, and then to confirm.
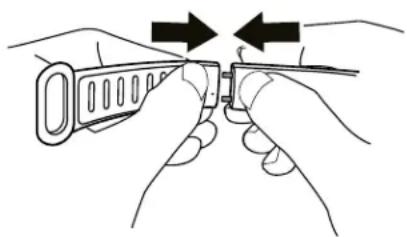
You can replace the strap for your UA Band, which comes with an extra strap that can fit smaller wrist sizes.
- Insert the provided pin into the small hole on the underside of the strap, and then carefully pull out the current strap.
- Attach the replacement strap to the main portion of the band. Push and press the two towards one another firmly to lock them in place.
natural_image
Illustration of two hands holding a tool, with arrows indicating direction (no text or symbols)- After attaching the strap, gently pull on the strap to check if it is securely fastened.
UA Record app
Download and install the UA Record app on your phone to set up your UA Band and explore all of its great features.
- Track your training performance and check your progress toward your fitness goals.
- Connect to a social network of trainers, coaches, and athletes.
- Manage your UA Band settings from your phone using UA Record.

The first time you open the UA Record app, make sure to create or sign in with your Under Armour account to sync your fitness data and enjoy the other features.
Downloading and installing the UA Record app

Before downloading the UA Record app, please make sure that your phone meets the minimum system requirements indicated on the UA Record app's download page.
- On your phone, open the Play Store or App Store ^® .
- Search for UA Record.
- Download and install the UA Record app.
To set up your UA Band, you need to pair it with UA Record.

Make sure that you've:
■ Downloaded and installed UA Record on your phone.
- Turned on Bluetooth® on your phone.
- Placed your UA Band near your phone.
- On your phone, open the UA Record app.
- Do one of the following:
If you are a new UA Record user...
-
Tap Register to create your UA Record account.
-
Once signed in, choose .H BAND
If you already have a UA Record account...
-
Sign in to your UA Record account.
-
Tap > GenBECN
-
When prompted, enter or confirm the passkey displayed on your UA Band.

If you're using an Android ^® phone and you don't see your passkey displayed, check your notification panel.
- Tap Continue to complete the setup on your phone.
Using your UA Band
Basics
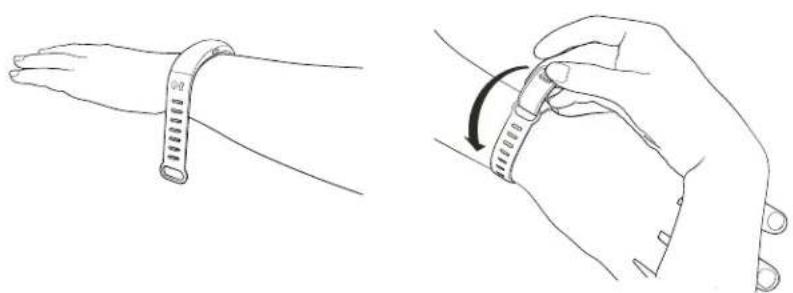
- Place the UA Band on your wrist, and then insert the other end of the strap though the buckle.
natural_image
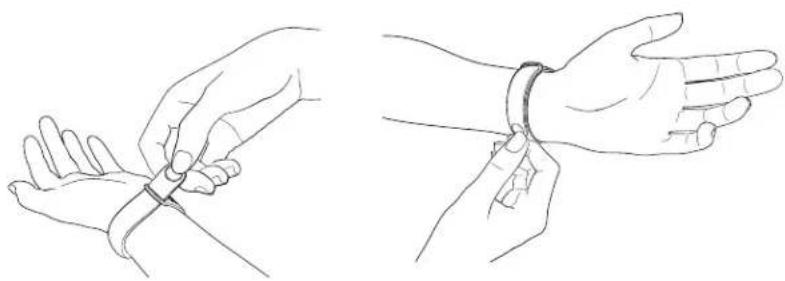
Line drawings showing a wrist strap being adjusted to a wrist, with no text or symbols present.- Adjust the strap until UA Band fits snugly, and then fasten the clasps.
natural_image
Line drawings of two hands demonstrating a wrist massage technique (no text or symbols present)- For best heart rate results, wear your band further up your arm, approximately one finger width up from our wrist
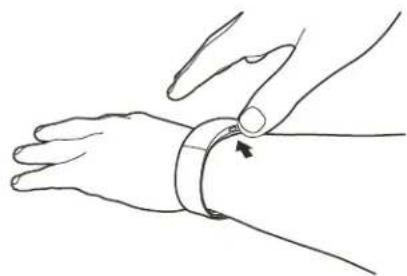
Home button
- To turn the band on and off, press and hold the Home button.
- When the display is off, press the Home button to go to the last viewed screen.
- When the display is on, press the Home button to return to the Home screen.
natural_image
Line drawing of a wrist with a finger pressing a circular button, showing a finger movement (no text or symbols)Switching between UA Band screens
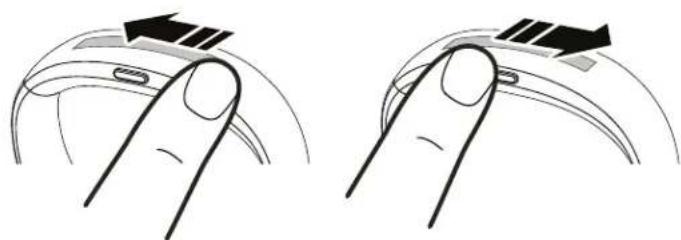
- On the Home screen, swipe left or right to switch between screens on the Home row.
natural_image
Illustration of two finger pressing tips on a curved surface, showing motion direction (no text or symbols)- On some screens, you can tap or to view more options.
UA Band screens
Explore the different screens of your UA Band.
- Use the Home screen to check the time, access apps and settings, and view notifications.

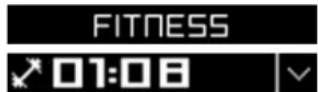
- Use the Fitness screen to track different workout types, including running, cycling, weights, and customized workouts. See Tracking your workout on page 12.
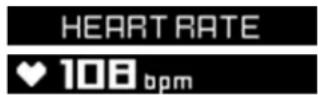
- Use the Heart rate screen to quickly get a reading of your current heart rate. See Checking your heart rate on page 13.
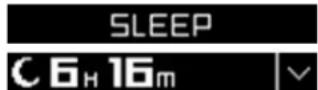
- Use the Sleep screen to view your previous sleep duration or to manually record your sleep. See Recording your sleep on page 16.
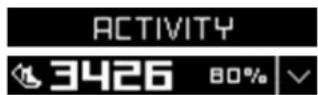
- Use the Activity screen to check your daily step count, as well as your progress, distance traveled, and calories burned. See Reviewing your daily steps on page 15.
Indicator LED
The indicator LED shows as:
■ Red when your UA Band is charging.
- Green when your UA Band is connected to the power adapter or a computer and the battery is fully charged.
- Flashing blue when your UA Band is trying to pair via Bluetooth with your phone.
When your UA Band and UA Heart Rate ^™ are connected, your heart rate zone is indicated by different colors on the LED. For more information, see Tracking workouts with your UA Heart Rate on page 14.
Workout
Tracking your workout
Track information on distance, duration, calorie burn, and more.

The locked workout feature is only available in UA Band software update 1.15 and higher.
- On the Home screen, swipe left or right until you get to the Fitness screen.


The duration of your workout session will not be shown until you start recording it.
- Tap to see the workout types.
- Tap an icon to choose a workout type.

Run

Bike

Gym

Walk

You can add your favorite workout as an option. See How can I add a customized workout? on page 13.
- Tap to start recording your workout. Your UA Band will start the workout counter and automatically lock it to prevent accidental interruptions while recording.

- While your workout is in progress, you can do the following:
| Navigate to other areas of your UA Band | 1. Press the Home button to unlock the screen.2. Press the Home button again to go to Home screen.3. To quickly return to the workout screen, tap the workout type icon on the Home screen. |
| Check your workout data | Tap to see your progress. |
Pause your workout 1. Press the Home button to unlock the screen.
- Tap .||
End your workout 1. Press the Home button to unlock the screen.
- Tap


- Tap
to save your workout.

- To get more information from your workout, use your UA Band with UA Heart Rate. See Tracking workouts with your UA Heart Rate on page 14.
- You can choose to keep the screen on or continue receiving notifications while working out, among other options. See Changing your UA Band workout settings on page 22.
How can I add a customized workout?
You can add your favorite workout type on UA Band, like basketball or yoga.
- On your phone, open the UA Record app.
- On the main screen of the UA Record app, tap .
- Under My Apps & Devices, tap . H BAND
- Under Preferences, tap Workout Settings.
- Tap Customize workout.
- Scroll the list for options, and then tap the workout type you want added to UA Band.
The option will replace the right-most workout type icon on the Fitness screen.
Heart rate monitor
Checking your heart rate
Use the built-in heart rate monitor in UA Band to check your current heart rate.
- On the Home screen, swipe left or right until you get to the Heart rate screen.
- Wait to get a reading. It can take up to a few seconds.

108 bpm
What can I do if my heart rate can't be detected?
Try these steps to troubleshoot the issue:
- Keep your arm and wrist steady while your heart rate is being measured.
- Make sure that UA Band is sufficiently charged. Heart rate detection is disabled when the battery falls below 5%.
- Check if there's any dust or dirt on the heart rate monitor sensor. Wipe it with a damp cloth, and then wipe it dry.
- If the temperature is cold, do some warm up exercises first before measuring your heart rate. Cold weather will affect your blood circulation and therefore make it more difficult for the sensors to measure your heart rate.
- Make sure that you're wearing UA Band properly. For more information, see Wearing your UA Band on page 9. Try wearing UA Band on your other arm as well.
Tracking workouts with your UA Heart Rate
Your UA Band works together with your UA Heart Rate to track your workout sessions.

Your UA Band and UA Heart Rate must both be linked to the same UA Record account.
- Put on your UA Band and your UA Heart Rate.
- On your UA Band, press the Home button to turn on the display.
-
Swipe left or right until you see the Fitness screen.
-
Tap .

- Select the type of workout you want, and then tap. You'll see a confirmation that UA Heart Rate is connected to UA Band.

Connected
-
While working out, you can:
-
See your heart rate zone indicated by the color shown on the indicator LED on UA Band.
- Tap to see your calories burned, current heart rate, and more.
- Tap to pause tracking your workout.

While your workout is paused, you can tap to resume or to finish tracking your workout.
LED color Heart rate zone
Blue Low/resting heart rate (50-59% of max)
Green Light (60-69% of max)
Yellow Moderate (70-79% of max)
Orange Vigorous (80-89% of max)
Red Peak heart rate (90-100% of max)
Fitness data
Reviewing your daily steps
Monitor your progress towards your daily activity goals.
- On the Home screen, swipe left or right until you get to the Activity screen.
- Tap to scroll through your data, including calories burned and distance traveled.

3426


You can set a new Steps goal at any time in the UA Record app. On your profile page, tap My goals > Activity to set your new goal.
Recording your sleep

Your UA Band is set by default to automatically detect your sleep patterns. To adjust this setting, see Setting UA Band to record your sleep on page 16.
Wear your UA Band to bed each night to automatically track your sleep and resting heart rate.
If you wake up in the middle of the night, you can toggle between sleep time elapsed and the current time by tapping.

Sleep Time Elapsed

Current Time
If you want to manually record your sleep, follow these steps:
- On the Home screen, swipe left or right until you get to the Sleep screen.
- Tap to go to the Log manual screen.
- Tap to start recording.
- Tap to pause, and then tap to stop recording.
- Tap to save your data.
Setting UA Band to record your sleep
- On your phone, open the UA Record app.
- On the main screen of the UA Record app, tap .
- Under My Apps & Devices, tap . H BAND
- Under Preferences, tap Band Customization.
- Toggle the Sleep Auto-Detect switch to turn auto detection on or off.
Checking your stats
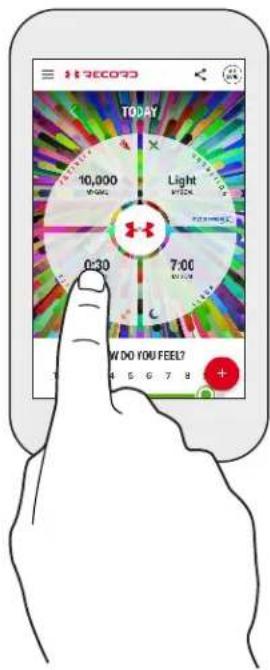
Check UA Record to see a history of your fitness and activity data.
-
On your phone, open the UA Record app.
-
On the main screen of the UA Record app, tap a tile to check your current stats and trends.
Other apps
Controlling music playback on your phone

Make sure that you've opened a music player on your phone.
-
On the Home screen, tap .
-
Tap
-
Use the controls to play and pause the music, go to the next or previous track, or adjust the volume.
Creating an alarm
You can use your UA Band to set an alarm to wake you up or remind you when it's time to eat your next meal.
-
On the Home screen, tap .
-
Tap ⏱
-
Tap

- To set the time, tap the number you want to change. While it's flashing, tap or to edit the time.
You can also tap another number to edit or change to AM/PM.
- When done editing, tap the flashing character.
The alarm will automatically be turned on once the time is set. To dismiss, tap Alarm set. If you want to disable the alarm, tap the checkbox to remove the checkmark.
You'll see the alarm icon on the Home screen after you've created the alarm.
Using the timer
-
On the Home screen, tap .
-
Tap . ⏱
-
Tap .
-
To set the time, tap the number you want to change. While it's flashing, tap or to edit the time.
You can also tap another number to edit.
-
When done editing, tap the flashing number.
-
Tap .
-
After the time is up, tap the screen to dismiss the timer.
Using the stopwatch
-
On the Home screen, tap .
-
Tap . ⏱
-
Tap .
-
Tap to start.
-
Tap to record the lap time.
-
Tap to pause. If you've recorded several laps, tap the time, and then tap to review your data.
-
Tap to start over.
Checking the remaining battery power
-
On the Home screen, tap .
-
Tap . You'll see the battery life as a percentage.
Events, messages, and notifications
Checking calendar events
Quickly see what's coming up on your schedule.

To receive notifications on your UA Band, you'll need to adjust your preferences in the UA Record app. To find out how, see Managing notifications on your UA Band on page 21.
- On the Home screen, tap the notification counter.

-
Find the notification with the icon.
-
Swipe from right to left to read the details, or tap on the notification to move on to the next one.

-
At the end of the details, tap . >
-
When prompted, tap to snooze the event or tap to dismiss it.

You can also find an app shortcut for your calendar events. On the Home screen, tap ▼ > 🏠>
Getting notified of incoming calls

To receive notifications on your UA Band, you'll need to adjust your preferences on the UA Record app. To find out how, see Managing notifications on your UA Band on page 21.
Depending on your notification settings, your UA Band will vibrate when you receive an incoming call on your phone. If you're an Android user, you can tap to decline the call. To answer the call, you'll need to accept the call from your phone.
Viewing missed call notifications
Check if anyone's called you while you're training.
- On the Home screen, tap the notification counter.

-
Find the notification with the icon.
-
Swipe from right to left to read the details, or tap on the notification to move on to the next one.

Viewing text messages

To receive notifications on your UA Band, you'll need to adjust your preferences on the UA Record app. To find out how, see Managing notifications on your UA Band on page 21.
Read text messages while you're on the go.
- On the Home screen, tap the notification counter.

-
Find the notification with the icon.
-
Swipe from right to left to read the details, or tap on the notification to move on to the next one.

Product care
UA Band meets the 2ATM waterproof and IP6 dustproof standards. Follow these tips to properly care for your UA Band.
Do's
- Use a few drops of water or alcohol and gently wipe the surface of your UA Band. If your UA Band gets stained with cosmetics, use makeup remover to clean it.
- If you have trouble charging your UA Band, check if there's dirt on the band's contact pin. Clean the dirt to resume charging.
- If the charging connector gets wet, hold it and shake off the water. Make sure to let the connector port dry completely before charging your UA Band.
- In case the charging connector has had contact with salt water or liquid chemicals, rinse using fresh water. These contaminants may damage the connector pins.
Don'ts
- Avoid immersing your UA Band or letting the charging connectors come in contact with liquid chemicals such as liquid soap or detergent. Also, never immerse the device in tap water, sea water, swimming pools, hot springs, alcohol, or any liquid.
- Your UA Band does not float in water. Do not drop it into deep water.
Settings
Adjusting the display brightness
- On the Home screen, tap .
- Tap
- Tap consecutively until you've chosen your desired brightness level.
Turning airplane mode on or off
When you enable Airplane mode, the Bluetooth function on your UA Band is turned off.
- On the Home screen, tap .
- Tap
- Tap .
- Tap to confirm.
When airplane mode is turned on, you'll see the icon on the Home screen. You can tap the icon on the Home screen or in Settings to turn airplane mode off.
Checking hardware information
Check your device model, serial numbers, software version, and more.
- On the Home screen, tap .
- Tap
- Tap, and then tap.
- Swipe to review the details.
Managing notifications on your UA Band
Choose which types of notifications and how you receive them on your UA Band.
- On your phone, open the UA Record app.
- On the main screen of the UA Record app, tap .SYNC
-
Under My Apps & Devices, tap .BAND
-
Under Preferences, tap Notifications.
-
Do any of the following:
-
Tap Phone Notifications to choose whether to receive notifications from supported apps installed on your phone.
- Tap Calendar Notifications to choose whether to receive event reminders from your calendar.
- Tap 24/7 Activity Notifications to choose whether to receive achievement and idle time messages.
Changing your UA Band workout settings
Change how you want to use your UA Band while you're working out, such as whether to receive notifications, keep the screen on, track GPS, and more.
- On your phone, open the UA Record app.
- On the main screen of the UA Record app, tap .
- Under My Apps & Devices, tap . BAND
- Tap Workout Settings.
- Tap an option to change the settings.
Changing the display timeout
Choose how long you want the display to remain active before it turns off.

The shorter the display timeout you set, the longer your UA Band battery life will be.
- On your phone, open the UA Record app.
- On the main screen of the UA Record app, tap .
- Under My Apps & Devices, tap . H BAND
- Under Preferences, tap Band Customization.
- Tap Screen Timeout, and then choose an option from the list.
Choosing your UA Band screen orientation
Choose whether UA Band shows upside down relative to the Home button.
- On your phone, open the UA Record app.
- On the main screen of the UA Record app, tap .
- Under My Apps & Devices, tap . BAND
- Under Preferences, tap Band Customization.
- Tap Screen Orientation, and then choose an option.
Updating and resetting your UA Band
Checking for firmware updates
A firmware update for UA Band includes improved features and bug fixes. When an update is available, a numbered badge will appear next to the icon and next to the your device on the Manage Apps & Devices screen.

Make sure that your phone is near your UA Band while the firmware is updating. The battery must be at least 30% charged to update the firmware.
-
On your phone, open the UA Record app.
-
On the main screen of the UA Record app, tap .
-
Under My Apps & Devices, tap . H BAND
-
Tap Software Version.
-
When an update is available, tap Install.
Wait for the transfer progress to finish, which may take a couple of minutes. While the update is in progress, the pairing between your phone and UA Band will be temporarily disconnected. You'll see a confirmation when the update is complete.
Disconnecting your UA Band from your phone

Your fitness data from your Under Armour account won't get deleted even if you've disconnected your UA Band from the UA Record app.
-
On the Home screen, tap .
-
Tap .
-
Tap .
-
Swipe to read the warning, and at the end of the details, tap.
-
When asked to confirm, tap . √
Your fitness data from your Under Armour account won't get deleted even if you've disconnected your UA Band from the UA Record app.
-
On your phone, open the UA Record app.
-
On the main screen of the UA Record app, tap . SYNC
-
Under My Apps & Devices, tap . H BAND
-
Tap Bluetooth Settings > Forget this device.
-
Tap Forget to confirm.
Performing a factory reset (hard reset)
Do a factory reset to return UA Band to its original state.
- On the Home screen, tap .
- Tap
- Tap, and then tap.
- Swipe to read the warning, and at the end of the details, tap .
- When asked to confirm, tap √.
Trademarks and copyrights
©2016 HTC Corporation. All Rights Reserved. Made in Taiwan.
Under Armour, UA, and UA Record are trademarks of Under Armour, Inc.
Android and Google Play are trademarks of Google Inc.
Apple, the Apple logo, App Store, and iPhone are trademarks of Apple Inc., registered in the U.S. and other countries.
The Bluetooth® word mark and logos are registered trademarks owned by Bluetooth SIG, Inc.
All other company, product, and service names are the property of their respective owners and their use does not indicate an affiliation with, association with, or endorsement of or by HTC Corporation.
Screen images contained herein are simulated. HTC shall not be liable for technical or editorial errors or omissions contained herein, nor for incidental or consequential damages resulting from furnishing this material. The information is provided "as is" without warranty of any kind and is subject to change without notice. HTC also reserves the right to revise the content of this document at any time without prior notice.
No part of this document may be reproduced or transmitted in any form or by any means, electronic or mechanical, including photocopying, recording or storing in a retrieval system, or translated into any language in any form without prior written permission of HTC.


- UA Band™
- User guide
- Contents
- Getting started
- Settings
- Trademarks and copyrights
- About this guide
- Important Notices
- H RECORD
- BAND
- About your UA Band
- Turning your UA Band on or off
- UA Record app
- Downloading and installing the UA Record app
- Using your UA Band
- Basics
- Home button
- Switching between UA Band screens
- UA Band screens
- Indicator LED
- Workout
- Tracking your workout
- How can I add a customized workout?
- Heart rate monitor
- Checking your heart rate
- What can I do if my heart rate can't be detected?
- Tracking workouts with your UA Heart Rate
- Connected
- LED color Heart rate zone
- Fitness data
- Reviewing your daily steps
- 3426
- Recording your sleep
- Setting UA Band to record your sleep
- Checking your stats
- Other apps
- Creating an alarm
- Using the timer
- Using the stopwatch
- Checking the remaining battery power
- Events, messages, and notifications
- Checking calendar events
- Getting notified of incoming calls
- Viewing missed call notifications
- Viewing text messages
- Product care
- Do's
- Don'ts
- Adjusting the display brightness
- Turning airplane mode on or off
- Checking hardware information
- Managing notifications on your UA Band
- Changing your UA Band workout settings
- Changing the display timeout
- Choosing your UA Band screen orientation
- Updating and resetting your UA Band
- Checking for firmware updates
- Disconnecting your UA Band from your phone
- Performing a factory reset (hard reset)
Brand : HTC
Model : UA Band
Category : Smartwatch