Architect Model P2280 - Receiver AudioControl - Free user manual and instructions
Find the device manual for free Architect Model P2280 AudioControl in PDF.


User questions about Architect Model P2280 AudioControl
0 question about this device. Answer the ones you know or ask your own.
Ask a new question about this device
Download the instructions for your Receiver in PDF format for free! Find your manual Architect Model P2280 - AudioControl and take your electronic device back in hand. On this page are published all the documents necessary for the use of your device. Architect Model P2280 by AudioControl.
USER MANUAL Architect Model P2280 AudioControl
text_image
ARCHITECT Model P2260 is Channel Audio-Box Amplifier AudioControl Power Protection Channel 1/2 Channel 3/4 Channel 5/4 Channel 7/8 Channel 9/10 Channel 11/12
text_image
ARCHITECT Model P2280 EQ 32 Channel Mark Size Analyzer with FL Channel 1.2 Channel 1.4 Channel 1.6 Channel 1.8 Channel 2.0 Channel 2.2 Channel 2.4 Channel 2.6 Channel 2.8 Channel 3.0 AudioControl Channel 1.0 Channel 1.2 Channel 1.4 Channel 1.6 Channel 1.8 Channel 2.0 Channel 2.2 Channel 2.4 Channel 2.6 Channel 2.8 Channel 3.0 Power Protection
text_image
ARCHITECT Model 2660 Hi Channel Audio-Case Amplifier AudioControl Power Properties Channel 1-2 Channel 3-4 Channel 5-6 Channel 7-8 Channel 9-10 Channel 11-12 Channel 13-14 Channel 15-16
text_image
ARCHITECT Model P7560 In Channel Auto-Size Amplifier AudioControl Power Protection Channel 1.2 Channel 3.4 Channel 5.6 Channel 7.8 Channel 9.18 Channel 11.12 Channel 13.14 Channel 15.16
text_image
ARCHITECT Channel 1-2 Channel 3-4 Channel 9-12 Channel 13-14 Channel 14 Channel 17-12 Channel 18-16 Model P7583 EQ In Channel Auto-Con icon(See WEB EQ) Power Protection Channel 1-3 Channel 3-4 Channel 9-4 Channel 14 Channel 9-12 Channel 13-12 Channel 17-14 AudioControlARCHITECT™ SERIES
12 and 16 CHANNEL MULTI-ZONE POWER AMPLIFIERS with and without EQ
Models P2260, P2280 EQ, 2660, P2660, P2680 EQ
Important Safety Instructions
- Read these instructions.
- Keep these instructions.
- Heed all warnings.
- Follow all instructions.
- Do not use this apparatus near water.
- Clean only with a dry cloth.
- Do not block any ventilation openings. Install in accordance with the manufacturer's instructions.
- Do not install near any heat sources such as radiators, heat registers, stoves, or other apparatus (including amplifiers) that produce heat.
- Protect the power cord from being walked on or pinched particularly at plugs, convenience receptacles, and the point where they exit from the apparatus.
- Only use attachments/accessories specified by the manufacturer.
- Unplug this apparatus during lightning storms or when unused for long periods of time.
- Refer all servicing to qualified service personnel. Servicing is required when the apparatus has been damaged in any way, such as power-supply cord or plug is damaged, liquid has been spilled or objects have fallen into the apparatus, the apparatus has been exposed to rain or moisture, does not operate normally, or has been dropped.
- This apparatus shall not be exposed to dripping or splashing, and no object filled with liquids, such as vases or glasses, shall be placed on the apparatus.

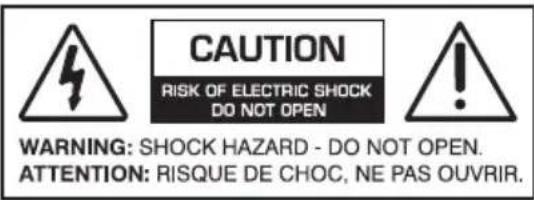
The lightning flash with arrowhead symbol within an equilateral triangle is intended to alert the user to the presence of uninsulated "dangerous voltage" within the product's enclosure, that may be of sufficient magnitude to constitute a risk of electric shock to persons.

The exclamation point within an equilateral triangle is intended to alert the user of the presence of important operating and maintenance (servicing) instructions in the literature accompanying the appliance.
AudioControl®
text_image
CAUTION RISK OF ELECTRIC SHOCK DO NOT OPEN WARNING: SHOCK HAZARD - DO NOT OPEN. ATTENTION: RISQUE DE CHOC, NE PAS OUVRIR.Caution: to reduce the risk of electric shock, do not remove the top cover. There are no user-serviceable parts inside. Refer servicing to qualified personnel.
This equipment has been tested and found to comply with the limits for a Class B digital device, pursuant to part 15 of the FCC Rules.
These limits are designed to provide reasonable protection against harmful interference in a residential installation.
This equipment generates, uses, and can radiate radio frequency energy and, if not installed and used in accordance with the instructions, may cause harmful interference to radio communications. However, there is no guarantee that interference will not occur in a particular installation.
If this equipment does cause harmful interference to radio or television reception, which can be determined by turning the equipment off and on, the user is encouraged to try to correct the interference by one or more of the following measures:
• Reorient or relocate the receiving antenna.
- Increase the separation between the equipment and the receiver.
- Connect the equipment into an outlet on a circuit different from that to which the receiver is connected.
- Consult the dealer or an experienced radio/TV technician for help.
CAUTION: Changes or modifications to this device not expressly approved by AudioControl Inc. could void the user's authority to operate the equipment under FCC rules.
Recycling notice: If the time comes and this apparatus has fulfilled its destiny, do not throw it out into the trash. It has to be carefully recycled for the good of mankind, by a facility specially equipped for the safe recycling of electronic apparatii. Please contact your local or state recycling leaders for assistance in locating a suitable nearby recycling facility. Or, contact us and we might be able to repair it for you.
Table of Contents
Important Safety Instructions ..... 2
Introduction 4
Congratulations! 4
Features 5
Complimentary bullet points....6
Quick View ....7
Getting Started 8
An Important note about Triggering. . 8
Home Installation 9
Commercial Installation ..... 9
Front Panel Features ....10
LED Function Table 12
Ventilation 13
Rear Panel Features .... 14
AC section 14
Bus A and B Sections....16
DIP Switch Function Table ..... 17
Speaker Connections ..... 19
Speaker and Wiring Impedance.....20
Troubleshooting 21
Block Diagrams 23
Specifications....25
Service....30
The Warranty 31
Installation Notes 33
Basic Cha Cha 36
Introduction
When a whole-house audio system demands high levels of audio performance, but the physical installation space is limited, the AudioControl Architect models are an ideal solution. Requiring only two rack spaces, these 12 or 16 channel power amplifiers produce plenty of clean high-quality power for your system. Extensive protection features prevent damage to your loudspeakers.
Congratulations!
You are now installing a component which will dramatically improve the performance of any distributed audio system, especially those utilizing in-wall, in-ceiling, and invisible speakers.
The Architect model 12 or 16 channel power amplifiers provide high levels of power, pristine sound quality, flexible input switching, plus a number of installation-friendly features that makes them the perfect product for performance oriented audio systems. The EQ models provide a versatile 5-band stereo EQ for each zone. These amplifiers are American-designed and built, "set and forget" components which will provide a lifetime of trouble-free service for your multi-room audio system.
The Architect models are designed and manufactured by AudioControl, the only electronics company in the world that specializes in amplifiers, equalizers, signal processors and audio analyzers. Our passion for high quality, meticulous attention to detail, and pro sound heritage shows itself in the dozens of awards we have won for our designs, products, and service.
Now, as when we began, our greatest satisfaction is our reputation for sonic excellence and reliability among people just like you throughout the world.
This manual is designed to help you get the best out of this amplifier. So, even though you're dying to see it in action, please take a few minutes to slog through our not-so-weighty prose and learn how to get the most from your Architect power amplifier.

text_image
ARCHITECT Model 2560 34 Channel: 8000000000000000 AudioControl Power Protection Channel 7-8 Channel 3-4 Channel 3-6 Channel 7-9 Channel P-10 Channel 11-12 Channel 13-14 Channel 15-16
text_image
ARCHITECT® MILKINI 1800 RUSA Syst Piant USB USB USB USB USB USB USB USB USB USB USB USB USB USB USB USB USB USB USB USB USB USB USB USB USB USB USB USB USB USB USB USB USB USB USB USB USB USB USB USB USB USB USB USB USB USB USB USB USB USB AudioControl® Cable USB (62.5) Cable USB (62.5) Cable USB (62.5) Cable USB (62.5) Cable USB (62.5) Cable USB (62.5) Cable USB (62.5) Cable USB (62.5) Cable USB (62.5) Cable USB (62.5) Cable USB (62.5) Cable USB (62.5) CE FE Cable USB (62.5) Cable USB (62.5) Cable USB (62.5) Cable USB (62.5) Cable USB (62.5) Cable USB (62.5) Cable USB (62.5) Cable USB (62.5) Cable USB (62.5) Cable USB (62.5) Cable USB (62.5)AudioControl®
Making Good Sound Great™
Features
Here are some of the features that make the Architect models very unique products, unlike any other amplifiers:
• Superior Sound Quality
Pristine sonics happens first in all AudioControl designs and is not compromised by any other feature. (You often get the feeling that sound quality is an afterthought with products from other companies.)
• High Power Levels
There are 12 or 16 channels of 100 Watts each into 8 Ohms, or 200 Watts into 4 Ohms. Each channel pair can also be run in bridged mono at 400 Watts into 8 Ohms.
The Architect Model 2660 provides 16 channels of 65 Watts each into 8 Ohms, or 100 Watts into 4 Ohms. Each channel pair can also be run in bridged mono at 175 Watts into 8 Ohms.
Each high-efficiency amplifier is discretely made from discrete components.
• Bussable Digital and Analog Inputs
Each zone can select either Bus A, Bus B, or a local input. The Bus A S/PDIF digital input uses a high resolution DAC that converts up to 192 kHz. The digital source is available to play in any zone. The Bus B analog input uses a pair of RCA connectors. The analog source is available to play in any zone. A pair of RCA connectors is also available as a loop output, for example: to share the source with another Architect Model amplifier. Each zone has its own local pair of analog input connectors.
• Unparalleled Energy Efficiency
Whether from the point of view of saving electricity, or from the viewpoint of less heat in the rack, the Architect model amplifier has no equal. It is VERY energy efficient during operation, and equally impressive during standby.
• LightDrive Anti-clipping
With durability in mind, AudioControl's LightDrive anti-clipping protection defends the system against clipping, distortion, damage, and even teenage parties. The Architect models feature the latest evolution of LightDrive which adds a power-supply-tracking instantaneous dynamic control to the smooth sound of the traditional AudioControl LightDrive.
- Self Resetting Protection Features
Protection features are extensive and include thermal, short circuit, clipping, ultrasonic and DC offset among others. If the fault is removed, the Architect model resets.
• Pacific Northwest Heritage
Hard to believe, but we make this product in the USA. We are very proud of that fact. What is more important is the care we craft in at every step, and the extensive knowledge we have in all aspects of the product. Plus, we back this up with a conditional five year warranty.
ARCHITECT™
Models P2260, P2280 EQ
2660, P2660, P2680 EQ
Installation Manual
Complimentary bullet points
• 12 or 16 channels of AudioControl amplification
- EQ models are fitted with a five band EQ for each zone
- EQ models are also supplied with a magnetic face plate to hide the EQ controls from the meddling fingers of evil rodeo clowns who have wronged you
• Efficient power amplifiers and power supplies
• Power consumption is less than 0.5 Watts in standby
- Rack mountable 2U form factor
- Removable rack ears
- Light weight
- Stackable with other AudioControl Architect and Director Matrix models (maximum of four per stack)
• Signal sense independent for each zone
- Bus assignment independent for each zone
- 40 Hz infrasonic filter independent for each zone
- 12V Trigger independent for each zone, usable with contact closure or 12V external source
- 12V Master trigger
- BUS A S/PDIF input with premium Wolfson digital to analog converter
- BUS B analog input pair with loop-through outputs
Quick View
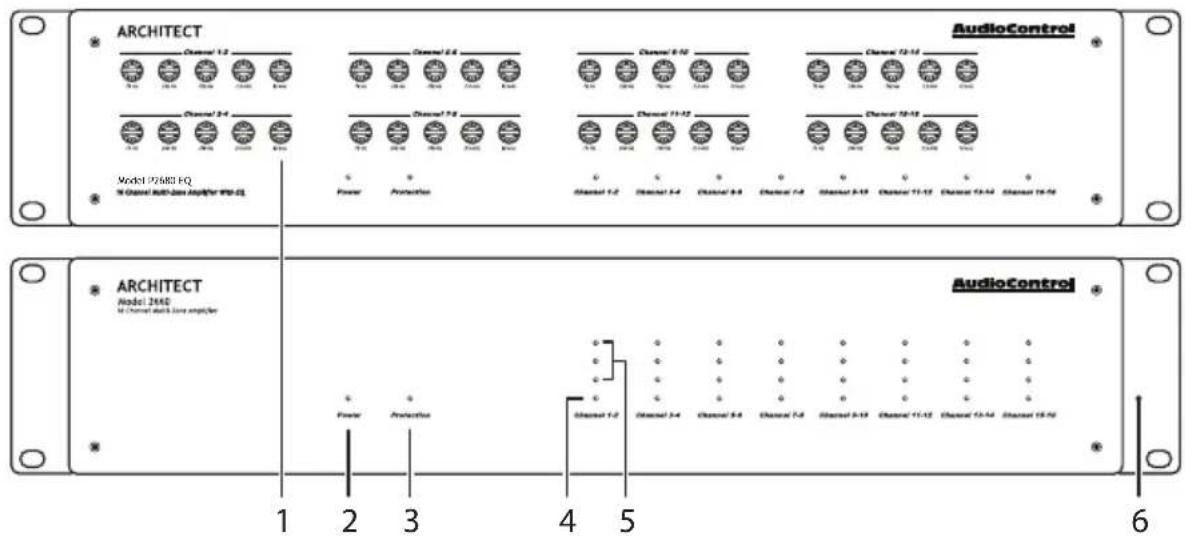
Front Panel
text_image
ARCHITECT Channel 1-2 Channel 2-4 Channel 3-4 Channel 4-4 Channel 5-4 Channel 6-4 Channel 7-4 Channel 8-4 Channel 9-4 Channel 10-4 Channel 11-4 Channel 12-4 Channel 13-4 Channel 14-4 Channel 15-4 Channel 16-4 AudioControl Model P75683 EQ % Channel Multi-Box Amplifier WPS-D Power Protection Channel 1-2 Channel 1-4 Channel 1-8 Channel 1-4 Channel 1-19 Channel 11-12 Channel 13-14 Channel 16-16 ARCHITECT Model 2660 % Channel Multi-Box amplifier Power Protection Channel 1-2 Channel 1-4 Channel 1-8 Channel 1-4 Channel 1-19 Channel 11-12 Channel 13-14 Channel 16-16 AudioControl 1 2 3 4 5 6-
5-band Stereo EQ per Zone*
-
Zone Status LED
-
Power LED
-
Zone Level LED Ladder**
-
Protection LED
-
Rack Mount Ears
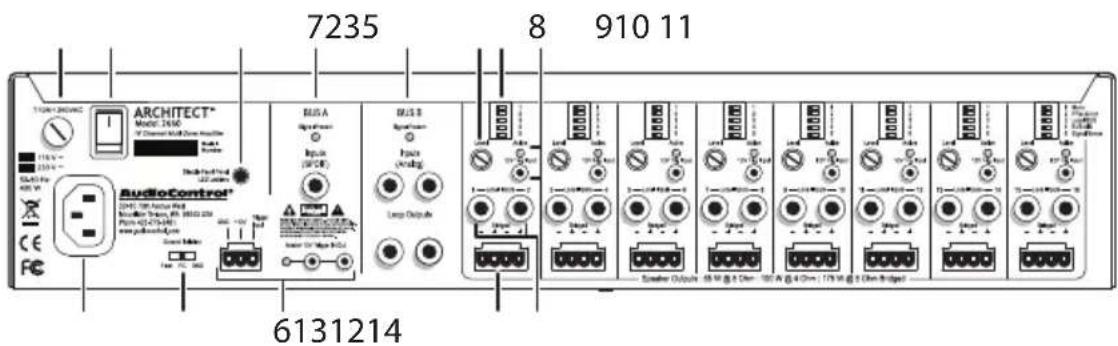
Rear Panel
text_image
7235 8 910 11 ARCHITECT® MODEL 2400 AVI Channel Control System Model A AC/AC Power DC Power AudioControl® DCM-10000000000000000000000000000000000000000000000000000000000000000000000 6131214-
AC Input
-
DIP Switches
-
AC Fuse
1 Mono/Stereo
- AC Power Switch
2 PFM 40 Hz
- Ground Isolation Switch
3 Local/Bus
- Disable Front Panel LED Ladders**
4 Bus A/B
- Master Trigger
5 Signal Sense
-
BUS A Digital Input
-
12V Local Trigger
-
BUS B Analog Input and Loop Output
-
Local Analog Inputs
-
Zone Level Control
-
Speaker Outputs
* EQ models only
ARCHITECT™
** Non-EQ models only
Models P2260, P2280 EQ
2660, P2660, P2680 EQ
Installation Manual
Getting Started
- Turn off power to all com-

ponents before making any connections.
-
When making connections, designate red RCA plugs as right, and designate white, black, or grey plugs as left. This is a good idea for all signal connections made in your audio system. The key is consistency. Stick with the same color coding and you'll reduce possible problems.
-
Whenever possible, keep power cords away from signal cables to prevent induced hum. This is especially important if you bundle the cables to keep the installation neat looking.
-
Use quality interconnect cables. We know from experience that really cheap cables can cause a multitude of problems. They tend to break inside or corrode, causing a loss of signal or hum. They also have poor shielding.
-
If you need to run the RCA audio cables more than 20 feet, consider using an active balanced line driver for the signals. This will provide better noise rejection against nasty things like hum, spikes, local talk radio, and metaphysical paranormal phenomena, etc. The AudioControl balanced line driver components (BLD-10, BLR-10 and BLX-10) are an excellent way to send audio over long distances with standard Cat-5 wiring. Check them out at audiocontrol.com.
-
If you are using the Bus A digital input, and running higher resolution sample rates (96 kHz - 192 kHz), use high-quality interconnect cables.
Installation Examples
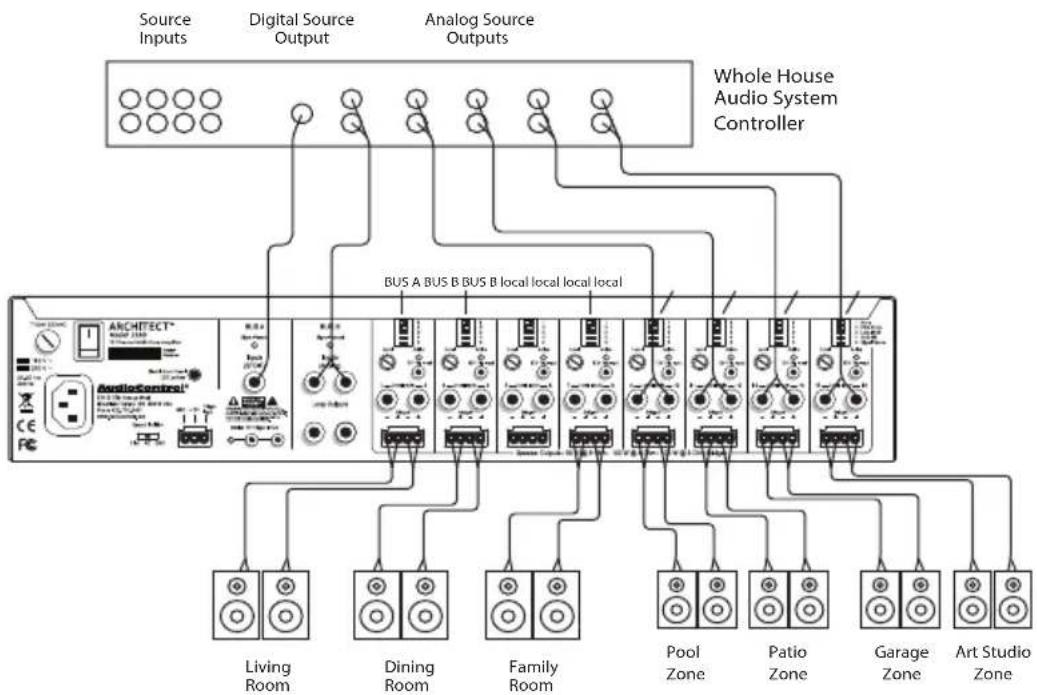
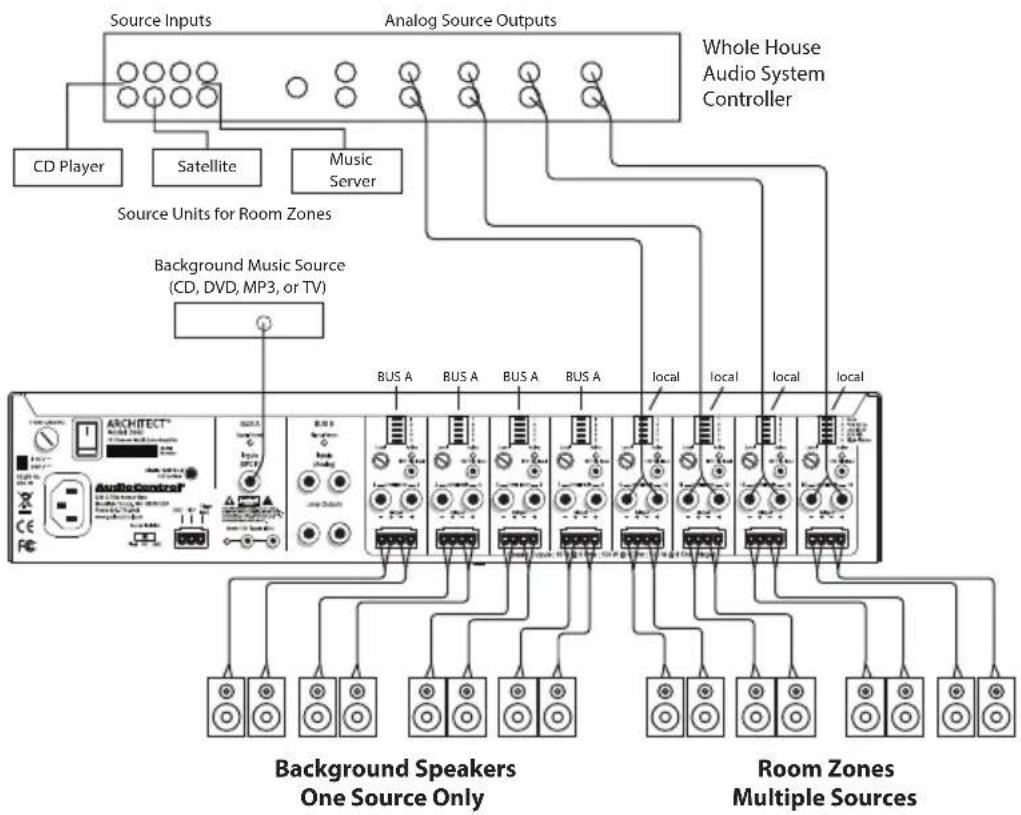
The next page shows two typical installations (Architect Model P266o shown).
The first example is a home installation with four separate zones, each playing a different local analog source. Two other zones are playing the Bus B analog source, and one is playing the Bus A digital source.
The second example is a bar or restaurant installation where multiple speakers in the main seating area are playing the Bus A digital source, and separate room zones are playing individual local analog sources.
The versatile DIP switches of each zone allow the selection of the local inputs, BUS A input, and BUS B input to play in that zone.
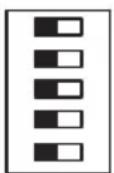
1 Mono
2 PFM 40 Hz
3 Local/BUS
4 BUS A/B
5 Signal Sense
An Important Note about Triggering
The Architect's rear panel master trigger connectors (two TS 1/8" and a 3-pin block) are used to turn on the unit or place it into standby mode.

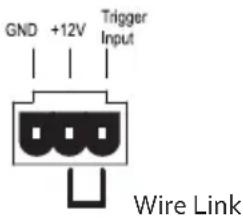
If no trigger voltage is present at any of these trigger inputs, then the unit will be in standby, with all zones muted. If you are not using master triggering, then you must install a short wire link from the 12V output pin to the trigger input pin of the 3-pin connector.
To put the unit into standby, remove the link.
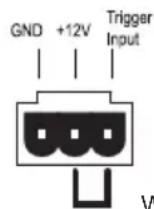
Wire Link
Home Installation
flowchart
graph TD
    A["Source Inputs"] --> B["Digital Source Output"]
    B --> C["Analog Source Outputs"]
    C --> D["Whole House Audio System Controller"]
    D --> E["Living Room"]
    D --> F["Dining Room"]
    D --> G["Family Room"]
    D --> H["Pool Zone"]
    D --> I["Patio Zone"]
    D --> J["Garage Zone"]
    D --> K["Art Studio Zone"]
    E --> L["AudioControl"]
    F --> L
    G --> L
    H --> L
    I --> L
    J --> L
    K --> L
Commercial Installation
flowchart
graph TD
    A["CD Player"] --> B["Source Inputs"]
    C["Satellite"] --> D["Analog Source Outputs"]
    E["Music Server"] --> F["Whole House Audio System Controller"]
    G["Background Music Source (CD, DVD, MP3, or TV)"] --> H["Source Units for Room Zones"]
    I["ARCHITECT®"] --> J["Background Speakers One Source Only"]
    K["Room Zones Multiple Sources"] --> L["Local"]
    style A fill:#f9f,stroke:#333
    style C fill:#f9f,stroke:#333
    style E fill:#f9f,stroke:#333
    style G fill:#f9f,stroke:#333
    style I fill:#f9f,stroke:#333
    style K fill:#f9f,stroke:#333
ARCHITECT™
Models P2260, P2280 EQ
2660, P2660, P2680 EQ
Installation Manual
Front Panel Features (non-EQ models)
text_image
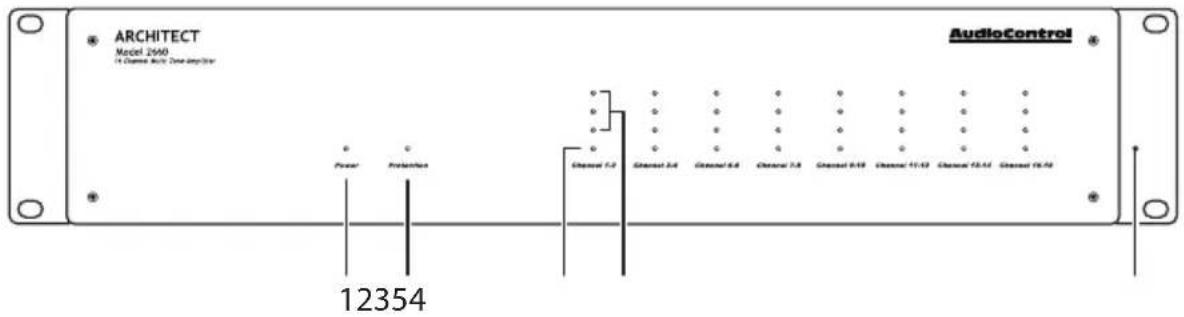
ARCHITECT Model 2640 14 Channel Multi-Data Analog/Str Power Protection Channel 1.2 Channel 2.4 Channel 3.6 Channel 5.8 Channel 8.18 Channel 11.42 Channel 13.54 Channel 16.76 AudioControl 12354- Power LED – This dual color LED indicates when the unit is in standby, on, or off (see LED table on page 12).
Red: The unit is in standby mode and is ready to be turned on via 12V triggering
Blue: The unit is on
Green: Coffee brewed
OFF: The unit is powered off
-
Protection LED – This red LED will illuminate briefly during turn on/off phases, and if a fault is detected in any amplifier or the power supply (such as overheating, over-current, or DC offset). If a fault is detected, then the unit will go into its protection mode to prevent any damage to loudspeakers, and to allow cooling.
-
Zone Status LED – This dual-color LED indicates when the zone is in fault mode, active, or in standby.
Red: The zone has detected a fault, such as a DC offset or a load short circuit.
Blue: The zone is active
OFF: The zone is in standby
- Zone Level LEDs – These three LEDs (on the non-EQ models) light from the bottom to the top depending on the zone's output level (-33, -20, -10 dBFS). These LEDs can be defeated by engaging the rear panel switch "Disable Front LED Ladders."
text_image
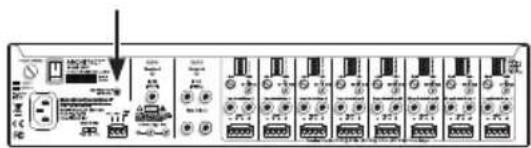
Diagram of an electronic device rear panel with labeled ports and indicators, including a warning arrow pointing to a component.- Rack Mount Ears – The unit comes supplied with removable rack mount ears. These allow the unit to be rack mounted in a standard 19" wide rack, with a 2U height. Use standard rack mount screws and washers to secure the unit in a rack. The unit does not have to be supported at the rear if the rack is located in a fixed location.
To remove the rack ears (making the unit 17" wide), first unplug the power cord, and then locate and undo the four screws securing each ear to the side of the chassis, and remove the ears. Replace the screws securely back into the chassis. Do not remove any of the other screws from the chassis or top cover. There are hazardous voltages inside the unit. Keep the rack ears in a safe place.
Front Panel Features (EQ models)
text_image
ARCHITECT Channel 1-2 Channel 3-4 Channel 5-6 Channel 7-8 Channel 9-10 Channel 11-12 Channel 13-14 Channel 15-16 AudioControl Model P2680 EQ % Channel Band Size Exp/For WBLQ Power Production Channel 12 Channel 3-4 Channel 5-6 Channel 7-8 Channel 9-10 Channel 11-12 Channel 13-14 Channel 15-16 12356-
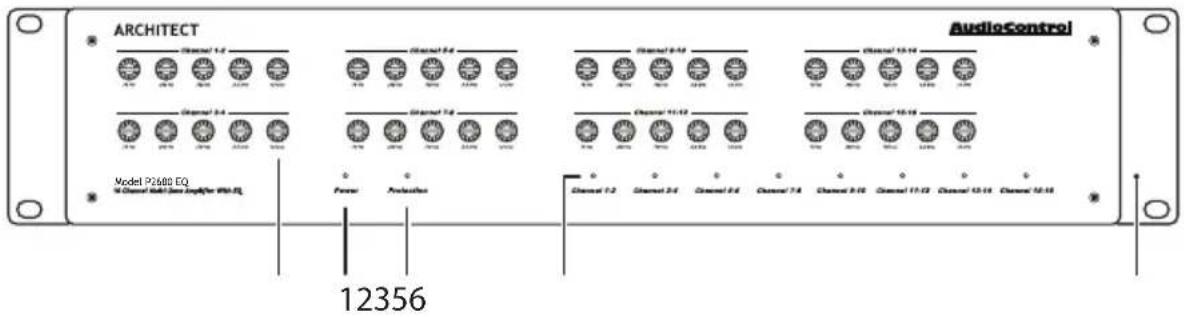
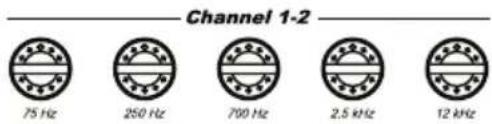
EQ Controls – Each zone has a 5-Band stereo EQ, with controls at 75 Hz, 250 Hz, 700 Hz, 2.5 kHz and 12 kHz. Rotate the controls with a small flat screwdriver to boost (clockwise) or cut (counter-clockwise) the output level at these frequencies. At the center detent position, there is no boost and cut. Use the EQ controls wisely for the good of mankind. Better yet, use one of our audio measurement systems such as the SA-4100i measurement microphone to measure the audio properties of each room and optimize the system performance.
-
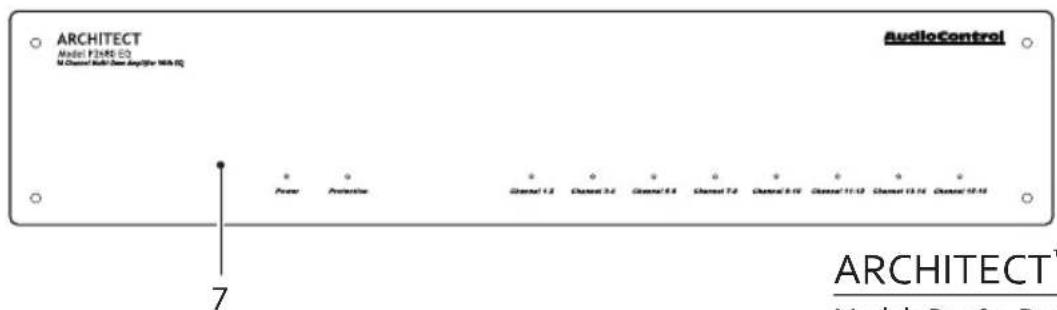
EQ Controls Cover Plate – Each Architect EQ model comes with a separate front panel that hides the EQ controls. This reduces the chance of evil rodeo clowns mentioned previously from adjusting the EQ settings. It also presents a cleaner and athletically-pleasing front panel look. Offer the cover plate up close to the front panel, say the magic words (Walla-Walla-Washington) and the cover will snap into
text_image
Channel 1-2 75 Hz 200 Hz 700 Hz 2.5 kHz 12 kHz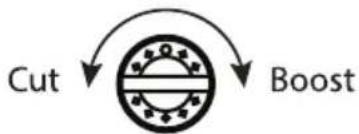
flowchart
graph TD
    A["Cut"] --> B((Circular Component))
    B --> C["Boost"]
place. The magnets are quite strong, so be careful not to pinch your fingers or trap your favorite tie between the cover plate and the unit. Be careful not to leave the cover plate close to any magnetic media or anything liable to be affected/wiped/damaged by the strong magnetic fields. Holes in the cover plate allow the LEDs to be seen.
text_image
ARCHITECT Model P285 EQ M Channel Audio-See Analyzer MBA EQ AudioControl Power Protection Channel 1.3 Channel 3.4 Channel 6.4 Channel 7.4 Channel 9.10 Channel 11.13 Channel 13.14 Channel 15.15 ARCHITECT™ Model Res/ResARCHITECT™
Models P2260, P2280 EQ
2660, P2660, P2680 EQ
Installation Manual
LED Function Table
| LED Color Description | |
| Power | Red The unit is in standby mode |
| Blue The unit is on | |
| Off The unit is powered off, or all the lights are off in your town | |
| Protection | Red The unit has detected a fault and is in protect mode* |
| Off The unit is operating normally, or it is powered off | |
| ZONE LEDs Color Description | |
| ○ | Blue -10 dBFS zone output level |
| ○ | Blue -20 dBFS zone output level |
| ○ | Blue -33 dBFS zone output level |
| Channel 1-2 | Red The zone has detected a fault, or a smooth-jazz saxophone solo, and is in protect mode |
| Blue The zone is active | |
| Off The zone is in standby | |
*The protection LED also comes on for a short time during power up or down
Ventilation
This may be as good a time as any to have "the talk" about ventilation. The Architect models feature cool-running efficient switch mode power supplies and Class D amplifiers, and they are equipped with thermally controlled fans. They are still 12 or 16 channel amplifiers, and therefore require plenty of good ventilation to properly cool.

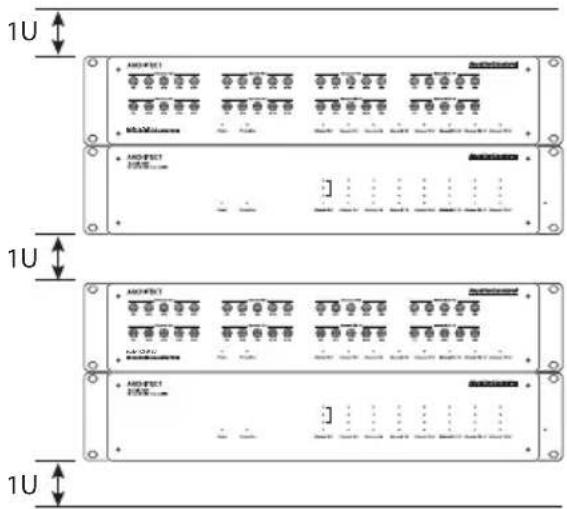
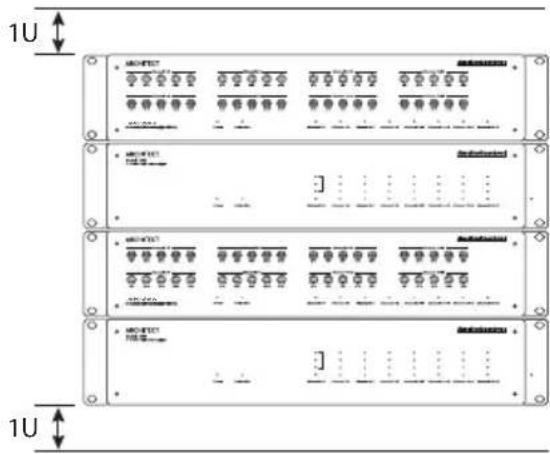
Please be advised that no more than 4 Architect models may be stacked together. Any more than that, then a rack space above and below is required for adequate ventilation.

Review the heat load specifications and ensure that your rack room meets these requirements.
If the amplifier should overheat, a thermal sensor will put it into standby mode, allowing the heatsink to cool down. Once the amplifier has cooled to a safe operating temperature, the amplifier will reactivate. If this occurs often, identify the cause of the problem and take corrective action, for example:
Provide additional ventilation
Do not install in a sealed location with limited or no airflow
Install a fan in the rack
Make sure that the amplifiers are not overloaded with speaker impedances below the recommended minimum
Check that there are no short circuits in the speaker cables or speakers.
Note: Each zone will shut off independently when a short circuit is detected.
Ideal Spacing 1U rack space or more above and below each pair
text_image
1U AM/F/DC1 AM/F/DC2 1U AM/F/DC1 1U AM/F/DC2 1U 1U
No more than four units can be stacked without a rack space between them. Allow 1U rack space or more above and below each stack of four.
text_image
1U 1UARCHITECT™
Models P2260, P2280 EQ
2660, P2660, P2680 EQ
Installation Manual
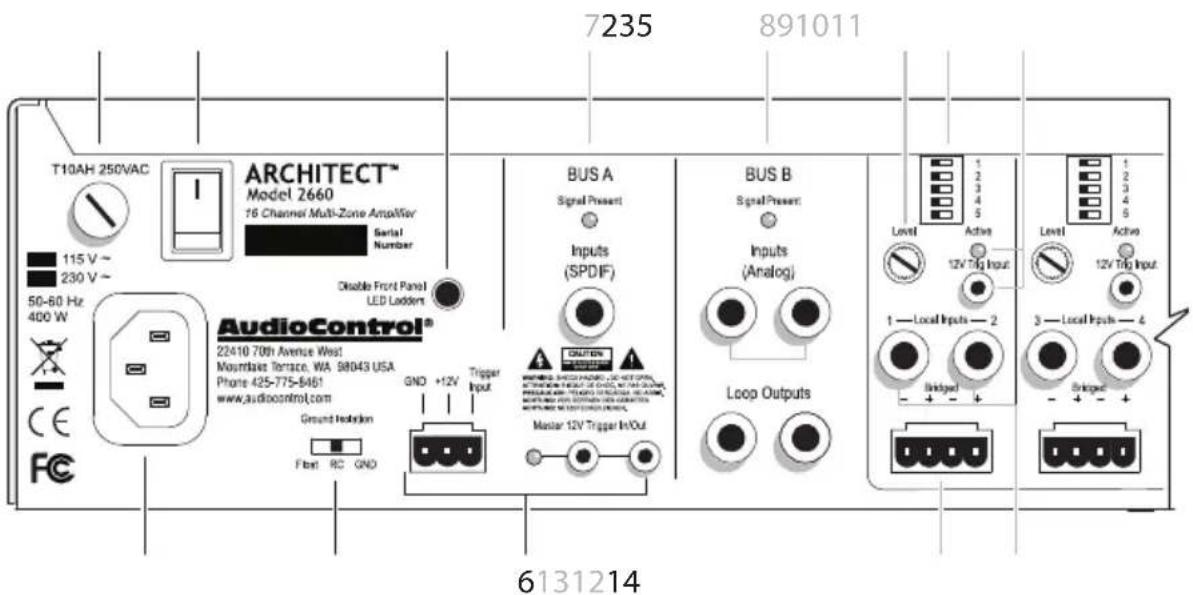
Rear Panel Features
text_image
7235 891011 T10AH 250VAC ARCHITECT™ Model 2660 16 Channel Multi-Zone Amplifier Serial Number Disable Front Panel LED Ladder AudioControl® 22410 70th Avenue West Mountains Terrace, WA 98043 USA Phone 425-775-8461 www.audiocontrol.com Ground Rotation First RC GND GND +12V Trigger Input Signal Present Inputs (SPDIF) OUTPUT Master 12V Trigger In/Out BUS A Signal Present Inputs (Analog) BUS B Signal Present Inputs Loop Outputs Level Active 12V Trig Input 1 — Local Inputs — 2 Bridged Level Active 12V Trig Input 3 — Local Inputs — 4 Bridged 6131214AC section

When rack-mounting the unit, make sure that the power cord and the AC power switch remain readily accessible.
-
AC Input – Connect the supplied AC power cord securely to this input. Plug the other end into an AC mains outlet of the correct voltage rating for your unit. They are either 100 - 120 VAC (50 - 60 Hz) or 220 - 240 VAC (50 - 60 Hz); look at the check box to see how your unit has been configured. The voltage setting is not user-settable. This unit is a class 1 device, do not defeat the safety ground connection or use a power cord that does not have the safety ground pin.
-
AC Fuse – The main power supply fuse may be checked or replaced. Make sure that the power cord is unplugged from the AC mains first. Then use a flat-headed screwdriver to undo the fuse carrier from the fuse holder. Inspect the fuse and replace with the exact same type indicated on the unit.
The use of any other type of fuse may lead to an unsafe condition. If the fuse blows again immediately, then unplug the power cord and contact our fine folks in customer service. Do not open the unit, as there are no user-serviceable parts inside, and dangerous voltages exist.
- AC Power Switch – This switch shuts off the main AC power. Normally the only time you need to turn this off is if the system is going to be shut down for an extended period of time. Use the master trigger inputs to switch the unit between standby and on.
Also turn the power switch off during lightning storms, wind storms with frequent power outages, or closer to the time when the sun reaches the end of its red giant phase and you suspect it is about to go Supernova.
-
Ground Isolation Switch – This switch selects the level of isolation between the audio signal ground and the AC earth ground. In normal operation this switch should be in the GND Ground position. If there is trouble with an AC ground hum, try the other two settings for the best operation. For safety, the chassis is always connected to the earth ground regardless of the switch.
-
Disable Front Panel LED Ladders (non-EQ models only) – The front panel LED ladders show the output levels of each zone. If this is a distraction, or your pets keep getting hypnotized, press this switch in to turn off the LED ladders. This switch does not affect the Power, Protection, or Zone Status LEDs.
-
Master Trigger – The TS 1/8" connectors and the 3-pin block connector are used to turn on the unit or place it into standby mode. Any one of these three connections can be used as a trigger input.
If no trigger voltage is present at any of these trigger inputs, then the unit will be in standby, with all zones muted. See the next page for important details if you are not using the master trigger.
LED indicator – This LED is blue when the master trigger input is active, and off when it is inactive.
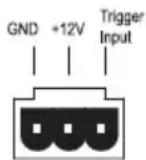
3-pin connector – To remotely turn on the unit, use either a contact closure between the Trigger Input and the +12V output, or an external +12V trigger between the Trigger In and GND terminals. The +12V output is not designed to power other pieces of equipment or jump start your car.
Pinout:
GND Ground
+12V Output
+12V Trigger Input
1/8" TS mono jacks – These are wired in parallel to each other, and work in conjunction with the 3-pin connector. Either input can receive a +12V trigger which will turn on the unit. This will then allow the unused jack to output +12V that can be used to turn-on a second unit. If the 3-pin connector is used to trigger the unit, then both of the 1/8" jacks can be used to provide output triggers to other units.
Pinout:
$$ \text { Tip } = + 1 2 \mathrm{V} \text { Trigger Input } $$
$$ \text { Sleeve } = \text { Ground } $$
Power Up Process: When a +3 to +12V signal is sensed at the trigger input of either of the 1/8" TS connectors, or the 3-pin connector, the rear panel master trigger indicator LED will change from off to blue. All the zones will be held in standby for about 2 seconds until the power supplies have fully charged and performed their self-tests. During this short process, the front panel Power and Protection LEDs will be red. Once this is complete, the Power LED will turn blue and the Protection LED will turn off.
Power Down Process: As soon as a oV signal is sensed at the master trigger inputs, all zones will be muted and placed in standby, and the rear panel master trigger LED will change from blue to off. The front panel Power LED will remain on, as the main power supplies will be still energized.
If the master trigger Inputs remain at oV for 2 seconds, the main power supplies will shut off; the front panel Power LED will change from blue to red. The Protection LED will flash red once during the power-down process.
ARCHITECT™
Models P2260, P2280 EQ
2660, P2660, P2680 EQ
Installation Manual
text_image
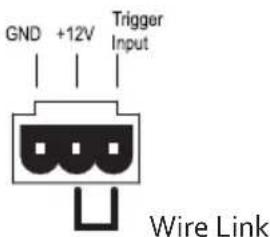
7235 891011 T10AH 250VAC ARCHITECT™ Model 2660 16 Channel Multi-Zone Amplifier Serial Number 115 V~ 230 V~ 50-60 Hz 400 W AudioControl® 22410 70th Avenue West Mountlake Terrace, WA 98043 USA Phone 425-775-8461 www.audiocontrol.com Ground Isolation Floor RC GND GND +12V Trigger Input Bus A Signal Present Inputs (SPDIF) CAUTION Master 12V Trigger In/Out Bus B Signal Present Inputs (Analog) Loop Outputs Level Active 12V Trip Input 1—Local Inputs—2 Bridges—+ - + - 3—Local Inputs—4 Level Active 12V Trip Input Bridges—+ - + - 6131214The trigger input is biased towards ground. This keeps the unit in standby when nothing is connected.

If you are not using master triggering, then you must install a short wire link from the +12V output to the trigger input. To put the unit into standby, remove the link.
text_image
GND +12V Trigger Input Wire LinkTo trigger ON with a contact closure:
Connect the contact closure between +12V and Trigger Input
To trigger OFF with a contact closure:
Connect a 1 kΩ resistor between +12V and Trigger Input
Connect the contact closure between Trigger Input and GND
To use an external 12V trigger:
Connect the external ground to the Architect model GND
Connect the external +12V output voltage to the Architect model Trigger Input
Bus A and B Sections
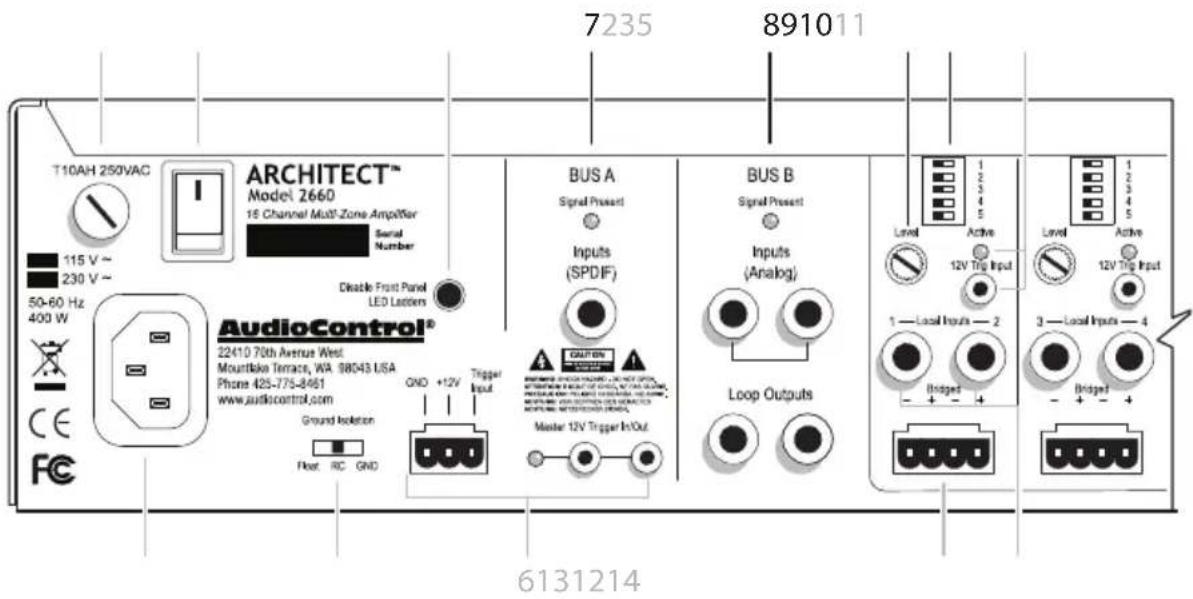
- BUS A Input – This S/PDIF digital input uses a standard RCA coaxial connector.
The digital signals are converted into two analog channels by the unit's fine internal digital to analog converters. The two audio channels are then available to any zone that has its DIP switch 4 set to Bus A (left), and switch 3 set to Bus (right).
The Signal Present LED lights whenever a signal is present at the Bus A input.
- BUS B Input – This pair of standard RCA coaxial connectors accepts line-level analog audio signals from source equipment such as CD players, DVD players, and MP3 players etc. The two audio channels are then available to any zone that has DIP switch 4 set to Bus B (right), and switch 3 set to Bus (right).
AudioControl®
Making Good Sound Great™
The loop outputs allow a copy of the Bus B analog inputs to be sent out and shared with other units. The loop outs are directly wired internally to the Bus B analog inputs, and will pass signals to other units, even if the host unit is powered off.
The Signal Present LED lights whenever a signal is present at the Bus B input.
Zone Section
(all details are the same for each zone)
-
Zone Level Control – This control sets the output level for the zone, independent of the levels of all the other zones. Turn the controls with your fingers to make the adjustments. You may have to readjust the level if you change the source to that zone, from Bus A, Bus B, or Local.
-
DIP Switches – These five switches allow each zone to be set up individually:
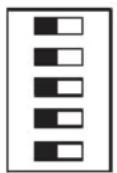
1 Mono
2 PFM 40 Hz
3 Local/BUS
4 BUS A/B
5 Signal Sense
Switch 1. MONO: Left is Stereo, Right is Mono, and the inputs are summed.
Switch 2. PFM 40 Hz – This is a high-pass filter to reduce signal levels below 40 Hz that are not reproduced well by small speakers. Left is off, Right is on.
Switch 3. LOCAL/BUS – Left selects the Local input as the zone's input, Right selects the BUS Input, either A or B, depending on the position of switch 4.
Switch 4. BUS A/BUS B Selector – This switch is only active when switch 3 is set to BUS (right). Left selects BUS A (S/PDIF) as the zone's input, Right selects BUS B (Analog).
Switch 5. Signal Sense – This switch controls whether the zone is always active when the master 12V trigger is active, or if the zone stays in standby until a signal is sensed. If signal sense is on (switch right) the zone will stay in standby until an audio signal greater than 5 mV is detected. The zone will remain active whenever a signal is present. After two minutes with no signal detected, the zone will return to standby.
DIP Switch Function Table
| Switch Label Left (OFF) | Right (ON) | ||
| 1 Mono | The zone is Stereo | The zone is Mono | |
| 2 PFM 4 | 0 Hz The 40 Hz | high pass filter is off | The 40 Hz high pass filter is on |
| 3 Local/BUS | The zone is using the Local input | The zone is using the BUS input selected by switch 4 | |
| 4 BUS A/B | The zone is using the BUS A input (S/PDIF), if switch 3 is set to BUS | The zone is using the BUS B input (Analog), if switch 3 is set to BUS | |
| 5 | Signal Sense | Signal sense is off | Signal sense is on |
ARCHITECT™
Models P2260, P2280 EQ
2660, P2660, P2680 EQ
Installation Manual
text_image
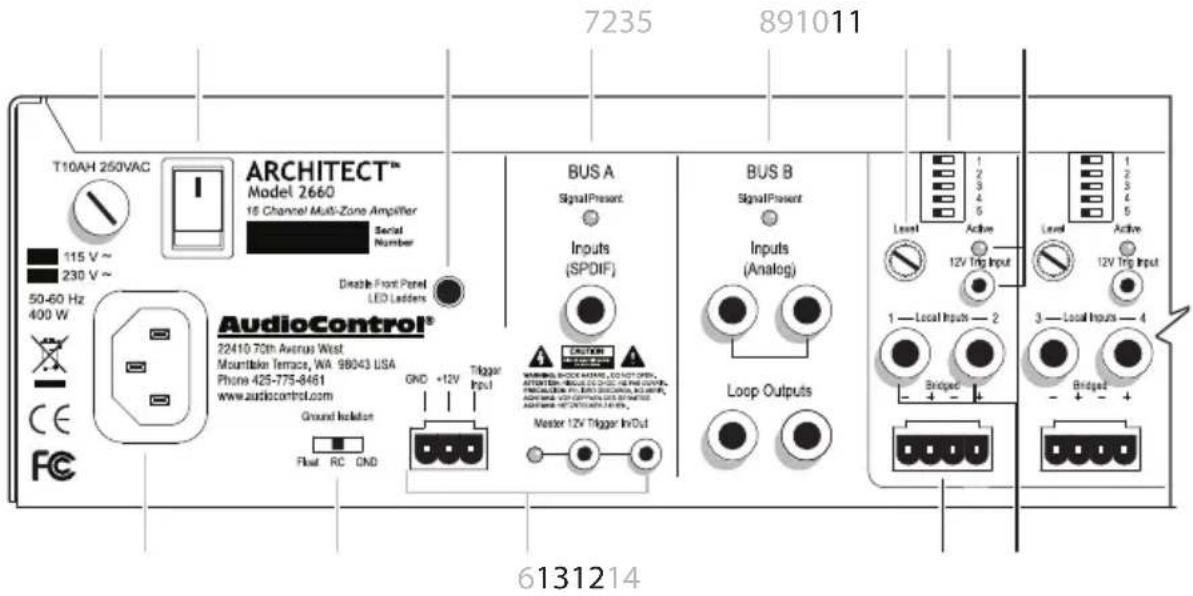
7235 891011 T10AH 250VAC ARCHITECT™ Model 2660 15 Channel Multi-Zone Amplifier Serial Number 115 V~ 230 V~ 50-60 Hz 400 W Disable Front Panel LED Ladders AudioControl® 22410 70th Avenue West Mountlake Terrace, WA 98043 USA Phone 425-775-8461 www.audiocontrol.com Ground Isolation Float RC OND GND +12V Trigger Input Bus A SignalPresent Inputs (SPDIF) BUS B SignalPresent Inputs (Analog) CAUTION WARNING BLOCK NAME, LO NOT OPEN, AUTO DRIP, NO OR FOR CHAPIC PRC, NO CONTAINING, PRODUCTION NO. EQUISANCE, NO SWITCH, AUTO DRIP, NO SWITCH AND CONTROL AND INFORMATION AND CONTROL INPUTS. Master 12V Trigger In/Out Loop Outputs Level Active 12V Trig Input 1 Local Inputs - 2 Bridged 3 Local Inputs - 4 + + - + - + - + - + - + - + - + - + - + - + - + - + - + - + - + - + - + - + - + - + - + - + - + - + - + - + - + - + - + - + - + - + - + - + - + - + - + - + - + - + - + - + - + - + - + - + - + - + - + - + 6131214- 12V Local Trigger – This TS 1/8" connector allows each zone to be individually turned on or put into standby.
The local 12V trigger takes priority over the signal sense circuit. Whenever a plug is inserted into the 12V trigger input jack, signal sense is disabled in that zone.
Note: The local 12V trigger can- not activate a zone unless the master trigger is also activated or jumpered on.
Pinout:
Tip = Input
Sleeve = Ground
Using a contact closure:
An open connection will set the zone to active.
Shorting the tip to the sleeve will set the zone to standby.
Using a 12V trigger source:
Connect the source ground to the sleeve.
Connect the source output to the tip. A voltage of +3V to +12V will set the zone to active; oV will set the zone to standby.
Zone Active LED – This LED will turn blue whenever the zone is active. The LED will be off whenever the zone is in standby.
- Local Inputs – These are line-level analog RCA stereo inputs. These local inputs may be selected to play in this zone by setting DIP switch 3 to the left.
Local Inputs may not be bussed to other zones. For Matrix bussing capability (and a plethora of other really cool features) please see our Director Matrix models.
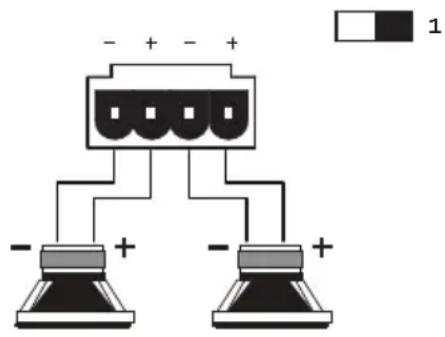
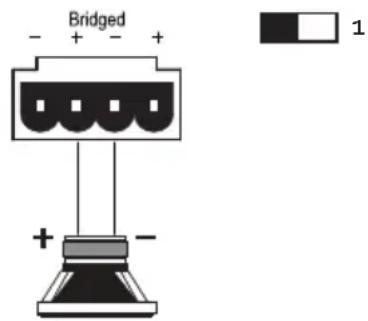
- Speaker Outputs – This 4-pin connector allows easy connection of two speakers for stereo operation, or one speaker for bridged mono operation.
Stereo Speaker Connection:
Set the zone's Dip switch 1 to the left (stereo). Note the polarity markings.

The speaker impedance should be 4 Ohms minimum in stereo operation.
text_image
- + - + - + - + - + +Bridged Mono Speaker Connection:
Set the zone's Dip switch 1 to the right (mono). Note the polarity markings. In this mode, the input signals are combined in mono, and the power from both channels is combined to drive a single speaker.
The speaker impedance should

be 8 Ohms minimum in bridged mono operation.
text_image
Bridged - + - + + -To run two speakers in dual-mono, connect them in the same way as shown in the stereo speaker diagram above.
Speaker Connections
Establish a standard connection color code and stick with it. One conductor of the speaker wire is normally marked by a different color (silver versus copper) or there is a ribbing on one side. Typically this marked conductor is used for the positive (+) speaker leads. Really good wire has Positive and Negative printed right onto the wire jacket.
Match the polarity markings on the unit with the polarity markings on your speakers.
See the next page for some handy information about speaker and wiring impedance.
ARCHITECT™
Models P2260, P2280 EQ
2660, P2660, P2680 EQ
Installation Manual
Speaker and Wiring Impedance
Speaker impedance often is and should be straight forward. Speakers, like other resistors, if wired in parallel "show" lower values than the individual components. Here are two examples for calculating speakers wired in parallel:
Calculating Impedance
For three 8 Ohm speakers wired in parallel (pluses connected to pluses) the impedance is 1/8 + 1/8 + 1/8 = 3/8 Then take the inverse or 8/3 = 2.66
For two 8 Ohm speakers wired in parallel (pluses connected to pluses) the impedance is 1/8 + 1/8 = 2/8 . Then take the inverse or 8/2 = 4
Often the real world is more complicated than theory, and for speakers this is the case. An eight Ohm speaker is not eight Ohms at all frequencies. Plus passive crossover networks add their own changing conditions. Be aware of speakers that
have significant dips from "nominal" values in portions of their frequency range, and speakers that are rated at unusual impedances, for example 3.5 Ohms. The Architect model is tolerant of lower impedance loads, however, all good designs use some margin of error.
Your choice of speaker wire gauge and the length of the runs, also affects the speaker impedance load presented to the amplifiers. As you can see in this table, even fairly short speaker runs can have significant resistance if you use a smaller wire gauge. This can be a benefit if you are paralleling lots of speakers. The wire itself acts as an impedance limiter, since the amplifier cannot see a speaker load lower than the resistance of the wire. The downside of this wire resistance is that you waste some part of the total power available to the speakers.
Speaker Wire Resistance:
Wire Gauge versus Run Length
| Wire Gauge Run Length | |||||
| 25' 50' 100' 250' 500' | |||||
| 24 GA 1.3Ω 2.6 | Ω 5.1Ω 12.8Ω | 25.7Ω | |||
| 22 GA 0.8Ω 1.6 | Ω 3.24Ω | 8.1Ω 16.0Ω | |||
| 20 GA 0.5Ω | 1.0Ω 2.0 | Ω 5.0Ω | 10.1Ω | ||
| 18 GA 0.3Ω | 0.6Ω 1.2 | 8Ω 3.2Ω | 6.4Ω | ||
| 16 GA 0.2Ω 0.4 | Ω 0.8Ω | 2.0Ω | 4.0Ω | ||
| 14 GA 0.1Ω | 0.25Ω | 0.5Ω 1.2 | 6Ω 2.5Ω | ||
| 12 GA | 0.08Ω | 0.16Ω | 0.32Ω | 0.8Ω | 1.6Ω |
Troubleshooting
Many problems can be eliminated by re-checking the wiring and settings of the unit. If a problem cannot be solved using the guide below, please call the AudioControl team for further assistance, or e-mail us at sound.great@audiocontrol.com
1. No Sound
a. Verify the Power LED is Blue.
b. Verify Protection LED is Off.
c. Verify Zone Status LED is Blue.
d. If you are not using master triggering, check that there is a wire link between the +12V pin and the Trigger Input pin of the Master Trigger 3-pin connector block.
text_image
GND +12V Trigger Input Wire Linke. Verify the source unit is operating.
f. Check the speaker connector plugs on the rear panel.
g Unplug the power cord and check the AC Power Fuse on the rear panel.
2. Protection LED is off, but none of the Zone Status LEDs are on:
a. Defeat the signal-sense circuits using the zone DIP switches on the rear panel. All of the zone status LEDs should turn on. If they do not, call AudioControl's customer service.
b. Verify the source unit is operating.
c. Increase the preamp volume if signal sense is engaged, or just going steady.
d. Adjust the rear panel zone gain controls clockwise.
3. Channel Status LED is Red:
a. Check speaker leads for a short.
Swap speaker connectors on rear to
see if the problem moves with the
wires.
b. If the unit is excessively hot, turn down the volume and allow it to cool off. The protection LED should turn off after a short while. Verify that any ventilation holes have not become blocked.
c. The speaker impedance may be too low. Use an ohmeter to measure the impedance on the speaker wires.
4. Speaker channels are cutting in and out:
a. If using external volume controls, check that they can handle the power output.
b. Make sure the speaker impedance is not less than 4 Ohms, or 8 Ohms when used in bridged mono.
c. There may be a short in the wires. Suspect a short if the problem happens only at the highest volumes.
5. Protection LED is Red:
a. Disconnect power from the unit for 3 to 4 minutes and reconnect to power.
b. Disconnect all speaker wires. If it still turns red, and the unit has cooled, something rather serious has happened inside the unit. Call AudioControl's lonely folks in customer service.
ARCHITECT™
Models P2260, P2280 EQ
2660, P2660, P2680 EQ
Installation Manual
6. Speaker Buzzing or Crackling at high volume:
a. Reduce any preamplifier/equalizer low-frequency boost.
b. Turn off your chainsaw and bacon-frying "Sounds of the Pacific Northwest" CD.
7. There is no audio input signal, but the Zone Status LEDs are still blue:
a. Check the signal-sense switches on the rear panel. If they are not engaged, the zone status LEDs will stay on as long as the master trigger is enabled.
b. The zone status LEDs stays on for 2 minutes (depending on music volume) after the audio signal has stopped. This delay helps prevent prematurely muting during quiet passages or song changes.
8. The unit is on but you cannot trigger it off
- The unit will stay on if either the 12v master trigger is on, or jumpered on.
9. Is an in-wall volume control rated at 100 Watts (continuous) adequate?
- Just barely is the simple answer. Go for one with a higher rating if you want a reliable long-lasting system. Though most Architect models are rated at 100 Watts, it is a conservative number, and they can put out more power if only a few channels are driven. In contrast to the conservative rating of the Architect models, the wall volume control may be rated using favorable assumptions. Also make sure the volume control power rating is continuous not peak. The continuous rating is about one-third of peak.
10. The Architect model looks like this:

text_image
R000000 J31040Ya. It has been installed upside down. b. You are trying a new Yoga position.
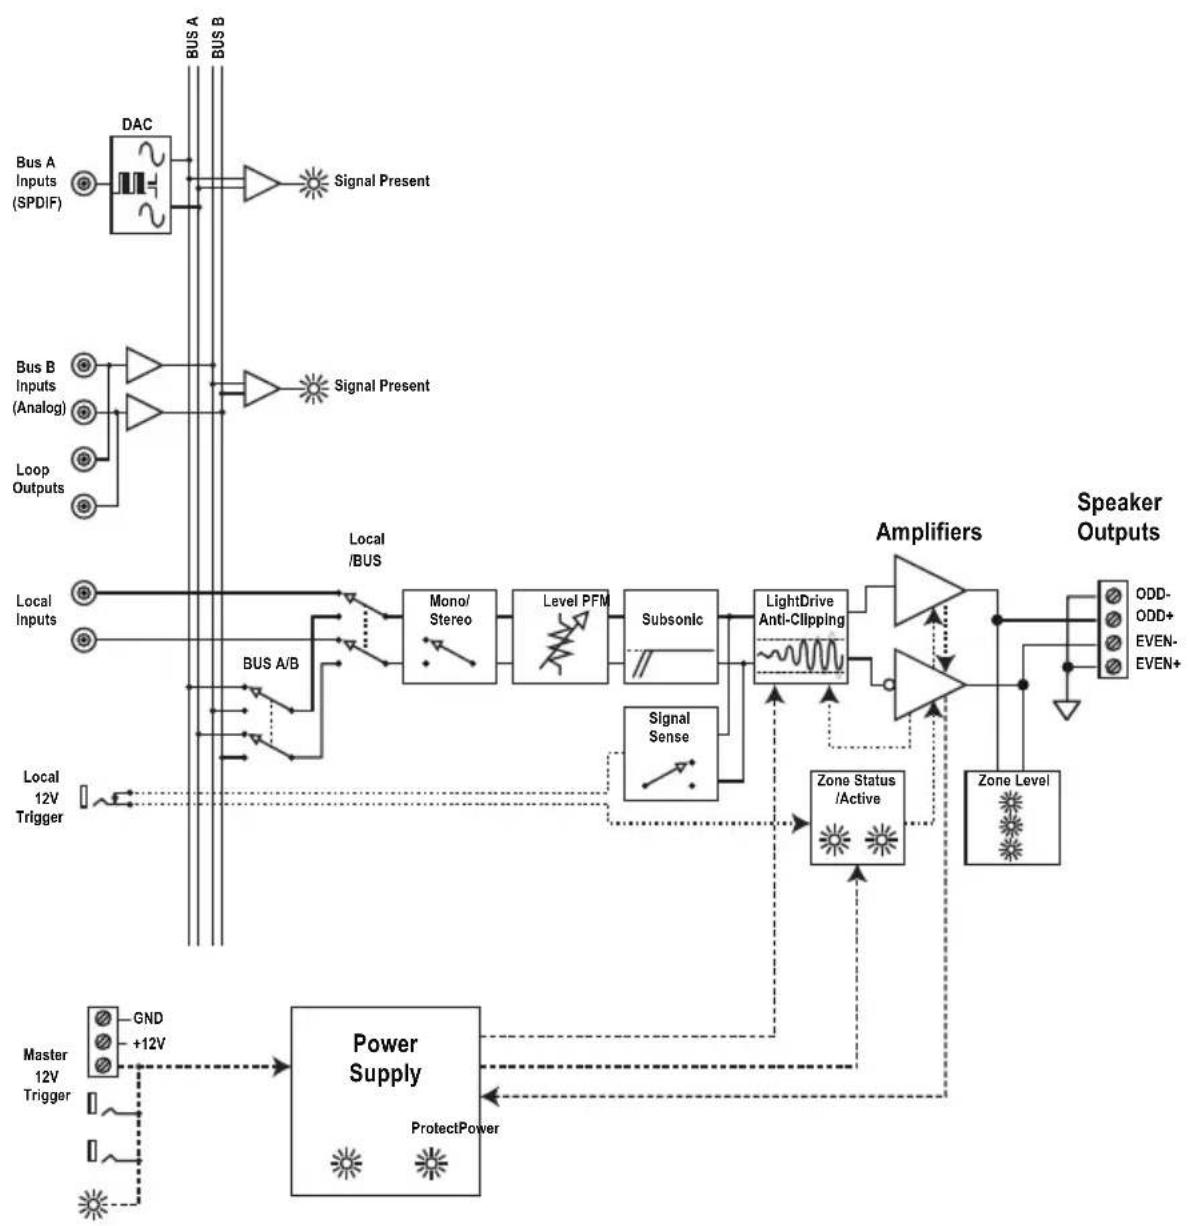
Block Diagram (non EQ models)
flowchart
graph TD
    A["Bus A Inputs (SPDIF)"] --> B["DAC"]
    C["Bus B Inputs (Analog)"] --> D["Signal Present"]
    E["Loop Outputs"] --> F["Signal Present"]
    G["Local Inputs"] --> H["Local /BUS"]
    I["Local 12V Trigger"] --> J["BUS A/B"]
    K["Master 12V Trigger"] --> L["GND +12V"]
    M["Power Supply"] --> N["ProtectPower"]
    O["Speaker Outputs"] --> P["ODD- ODD+ EVEN- EVEN+"]
    Q["Amplifiers"] --> R["LightDrive Anti-Clipping"]
    S["Zone Status /Active"] --> T["Signal Sense"]
    U["State Light"] --> V["Level PFM"]
    W["State Power Supply"] --> X["Power Supply"]
    Y["State State Light"] --> Z["Power Supply"]
    style A fill:#f9f,stroke:#333
    style C fill:#f9f,stroke:#333
    style E fill:#f9f,stroke:#333
    style G fill:#f9f,stroke:#333
    style K fill:#f9f,stroke:#333
    style M fill:#f9f,stroke:#333
    style Q fill:#f9f,stroke:#333
    style N fill:#ccf,stroke:#333
    style O fill:#ccf,stroke:#333
    style P fill:#cfc,stroke:#333
    style Q fill:#cfc,stroke:#333
    style R fill:#fcc,stroke:#333
    style S fill:#fcc,stroke:#333
    style T fill:#fcc,stroke:#333
    style U fill:#fcc,stroke:#333
    style V fill:#fcc,stroke:#333
    style W fill:#fcc,stroke:#333
    style X fill:#fcc,stroke:#333
    style Y fill:#fcc,stroke:#333
ARCHITECT™
Models P2260, P2280 EQ
2660, P2660, P2680 EQ
Installation Manual
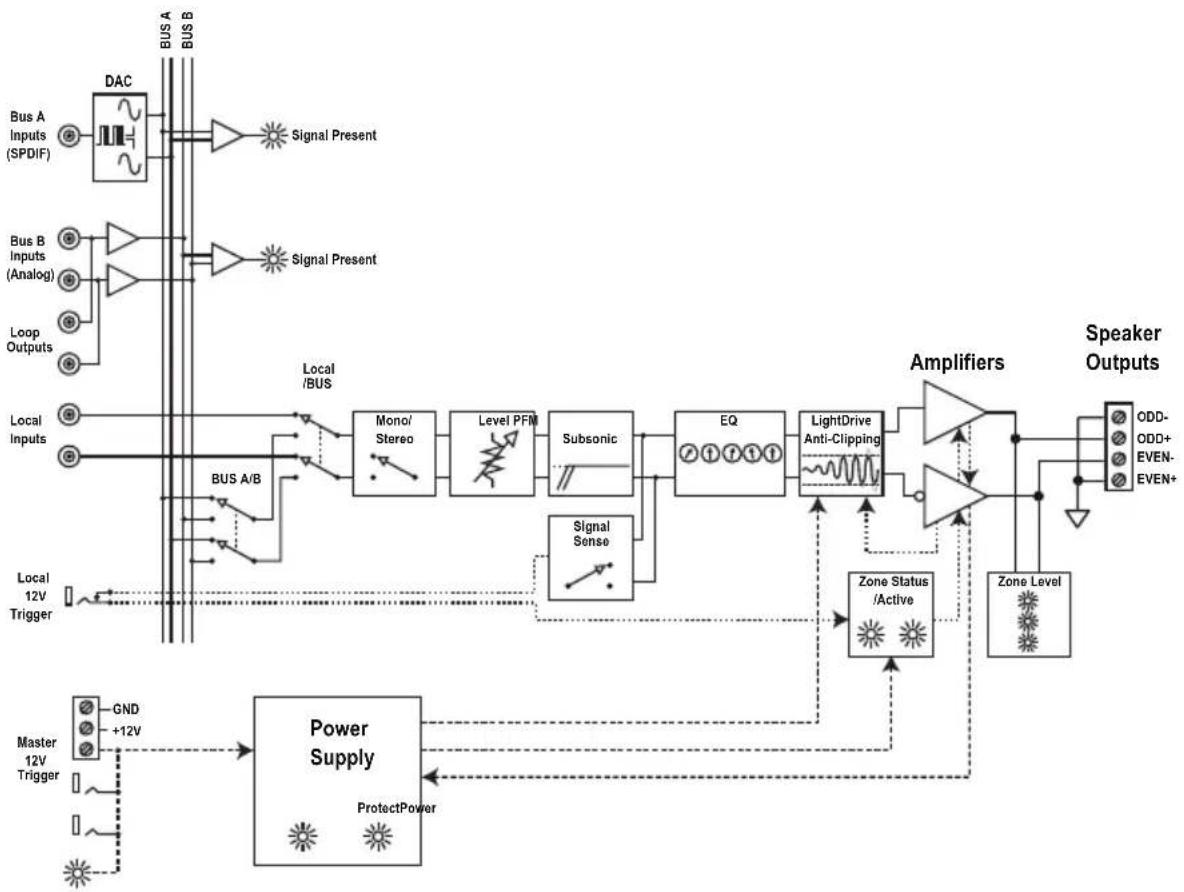
Block Diagram EQ models
flowchart
graph TD
    A["Bus A Inputs (SPDIF)"] --> B["DAC"]
    C["Bus B Inputs (Analog)"] --> D["Signal Present"]
    E["Loop Outputs"] --> F["Signal Present"]
    G["Local Inputs"] --> H["Local /BUS"]
    I["Local 12V Trigger"] --> J["BUS A/B"]
    K["Master 12V Trigger"] --> L["GND +12V"]
    M["Power Supply"] --> N["ProtectPower"]
    O["Amplifiers"] --> P["ODD- ODD+ EVEN- EVEN+"]
    Q["Zone Status /Active"] --> R["Zone Level"]
    S["Level PFM"] --> T["Subsonic"]
    U["EQ"] --> V["LightDrive Anti-Clipping"]
    W["Signal Sense"] --> X["Monol Stereo"]
    Y["Local /BUS"] --> Z["Local /BUS"]
    AA["Power Supply"] --> AB["ProtectPower"]
    AC["Speaker Outputs"] --> AD["ODD- ODD+ EVEN- EVEN+"]
Simplified Block Diagram
text_image
In OutPower
Specifications 2660
Output Power
Per Channel 65 Watts @ 8 Ohm, 100 Watts @ 4 Ohm
Bridged Mono....175 Watts @ 8 Ohm
Signal to Noise Ratio ....> 105 (A wtd, ref full output)
Crosstalk ....>80 dB @ 1 kHz
Damping Factor ....> 200
Gain 27 dB
Analog Input Sensitivity ....1 Vrms for full output, level at maximum
DAC Specifications....32 – 192 kHz sample rate, 16/24 bit depth
AC Power Requirements
Standby....0.4 Watts
Idle (main power on, all channels off).... 27 Watts
All channels active 74 Watts
All channels 1/8th rated power....227 Watts
Full Power....1300 Watts
BTU/hr Output
Standby 1.4 BTU/hr
Idle (main power on, all channels off)....94 BTU/hr
All channels active 252 BTU/hr
All channels 1/8th rated power....297 BTU/hr
Full Power (20A residential service limited) 890 BTU/hr
Dimensions
Height 3.5" (2U)
Width (ears on) 19.0"
Width (ears off)....17.0"
Depth 15.5"
Weight....16 lbs
Please note: Because of AudioControl's bold and daring quest to push back the frontiers of audio perfection, all specifications are subject to change without notice, and at any time, including (and not limited to) breaktime, lunchtime, and afternoon tea on the lawn.
ARCHITECT™
Models P2260, P2280 EQ
2660, P2660, P2680 EQ
Installation Manual
Specifications P266o
Output Power
Per Channel .... 100 Watts @ 8 Ohm, 200 Watts @ 4 Ohm
Bridged Mono 400 Watts @ 8 Ohm
Signal to Noise Ratio .... > 105 (A wtd, ref full output)
Crosstalk .... > 80 dB @ 1 kHz
Damping Factor ....> 300
Gain 30 dB
Analog Input Sensitivity ....1 Vrms for full output, level at maximum
DAC Specifications....32 – 192 kHz sample rate, 16/24 bit depth
AC Power Requirements
Standby....0.9 Watts
Idle (main power on, all channels off)....42 Watts
All channels active 90 Watts
All channels 1/8th rated power....338 Watts
Full Power (20A residential service limited) 2400 Watts
BTU/hr Output
Standby 3.1 BTU/hr
Idle (main power on, all channels off)....144 BTU/hr
All channels active 307 BTU/hr
All channels 1/8th rated power....415 BTU/hr
Full Power (20A residential service limited) 2124 BTU/hr
Dimensions
Height 3.5" (2U)
Width (ears on) 19.0"
Width (ears off).... 17.0"
Depth 15.5"
Weight....20.5lbs
Specifications P268o EQ
Output Power
Per Channel 100 Watts @ 8 Ohm, 200 Watts @ 4 Ohm
Bridged Mono 400 Watts @ 8 Ohm
Signal to Noise Ratio ....>105 (A wtd, ref full output)
Crosstalk ....> 80 dB @ 1 kHz
Damping Factor ....> 300
Gain 30 dB
Analog Input Sensitivity ....1 Vrms for full output, level at maximum
DAC Specifications....32 – 192 kHz sample rate, 16/24 bit depth
AC Power Requirements
Standby....0.9 Watts
Idle (main power on, all channels off).... 58 Watts
All channels active 106 Watts
All channels 1/8th rated power.... 354 Watts
Full Power (20A residential service limited) 2400 Watts
BTU/hr Output
Standby 3.1 BTU/hr
Idle (main power on, all channels off).... 201 BTU/hr
All channels active 361 BTU/hr
All channels 1/8th rated power....470 BTU/hr
Full Power (20A residential service limited) 2124 BTU/hr
EQ Section
Centers....75 Hz, 250 Hz, 700 Hz, 2.5 kHz, 12 kHz
Range....+/- 12 dB
Dimensions
Height 3.5" (2U)
Width (ears on) 19.0"
Width (ears off).... 17.0"
Depth 15.5"
Weight....21 lbs
ARCHITECT™
Models P2260, P2280 EQ
2660, P2660, P2680 EQ
Installation Manual
Specifications P2260
Output Power
Per Channel 100 Watts @ 8 Ohm, 200 Watts @ 4 Ohm
Bridged Mono 400 Watts @ 8 Ohm
Signal to Noise Ratio ....>105 (A wtd, ref full output)
Crosstalk .... > 80 dB @ 1 kHz
Damping Factor ....> 300
Gain 30 dB
Analog Input Sensitivity ....1 Vrms for full output, level at maximum
DAC Specifications....32 – 192 kHz sample rate, 16/24 bit depth
AC Power Requirements
Standby....0.9 Watts
Idle (main power on, all channels off)....40 Watts
All channels active ....75 Watts
All channels 1/8th rated power....253 Watts
Full Power (20A residential service limited) 2400 Watts
BTU/hr Output
Standby 3.1 BTU/hr
Idle (main power on, all channels off)....136 BTU/hr
All channels active 256 BTU/hr
All channels 1/8th rated power....320 BTU/hr
Full Power (20A residential service limited) 2194 BTU/hr
Dimensions
Height 3.5" (2U)
Width (ears on) 19.0"
Width (ears off).... 17.0"
Depth 15.5"
Weight....19.5lbs
Specifications P228o EQ
Output Power
Per Channel 100 Watts @ 8 Ohm, 200 Watts @ 4 Ohm
Bridged Mono 400 Watts @ 8 Ohm
Signal to Noise Ratio ....>105 (A wtd, ref full output)
Crosstalk .... > 80 dB @ 1 kHz
Damping Factor ....> 300
Gain 30 dB
Analog Input Sensitivity ....1 Vrms for full output, level at maximum
DAC Specifications 32 - 192 kHz sample rate, 16/24 bit depth
AC Power Requirements
Standby 0.9 Watts
Idle (main power on, all channels off) 52 Watts
All channels active 87 Watts
All channels 1/8th rated power....265 Watts
Full Power (20A residential service limited) 2400 Watts
BTU/hr Output
Standby 3.1 BTU/hr
Idle (main power on, all channels off)....178 BTU/hr
All channels active 270 BTU/hr
All channels 1/8th rated power.... 361 BTU/hr
Full Power (20A residential service limited) 2194 BTU/hr
EQ Section
Centers....75 Hz, 250 Hz, 700 Hz, 2.5 kHz, 12 kHz
Range +/- 12 dB
Dimensions
Height 3.5" (2U)
Width (ears on) 19.0"
Width (ears off) 17.0"
Depth 15.5"
Weight....20 lbs
ARCHITECT™
Models P2260, P2280 EQ
2660, P2660, P2680 EQ
Installation Manual
What to do if you need service
First, if you need service, it is probably best to go and see a trained health care professional.
If the Architect Model 2660 needs service, then please contact AudioControl, either by e-mail or phone. We will verify if there is anything wrong in the system that you can correct yourself, or if it needs to be sent back to our factory for repair.
Please include the following items when returning the unit:
- A copy of your proof of purchase. No originals please. We cannot guarantee returning them to you.
- A brief explanation of the trouble you are having with the unit. (You'd be surprised how many people forget this.) If you can supply a really detailed description of the problem, this would be so much better, and our service technicians may add you to their Christmas Card list. Please include any notes about the system and other components you are using. Is it an intermittent problem that only occurs on the first full moon of Spring?
- A return street address. (No PO Boxes, please).
-
A daytime phone number in case our technicians have a question about the problem you are having, or if they are just feeling lonely.
-
Package the unit in the original packaging if you still have it, and if the cat hasn't had three litters of kittens in the box. Use great care and plenty of good packing materials to protect the unit and prevent it from moving about inside the box. Do not use loose materials like packing peanuts or real peanuts.
You are responsible for the freight charges to us, but we'll pay the return freight back as long as the unit is under warranty. We match whatever shipping method you use to send it to us, so if you return the unit overnight freight, we send it back overnight. We recommend United Parcel Service (UPS) for most shipments.
Repair service is available at:
Attention: Service Department
22410 70th Avenue West,
Mountlake Terrace,
WA 98043 USA
Phone 425-775-8461
FAX 425-778-3166
e-mail: sound.great@audiocontrol.com
The Warranty
In just the same way as being covered in honey and thrown into a dark pit full of hungry woodchucks, people are scared of warranties. Lots of fine print. Months of waiting around. Well, fear no more. This warranty is designed to make you rave about AudioControl. It's a warranty that looks out for you and your client, plus helps you resist the temptation to have your friend Sparky, who's "good with electronics," try to repair your AudioControl product. So go ahead, read this warranty, then register the information at www.audiocontrol.com/product-registration and include your comments.
Our warranty has conditional conditions! "Conditional" doesn't mean anything ominous. The Federal Trade Commission tells all manufacturers to use the term to indicate that certain conditions have to be met before they'll honor the warranty. If you meet all of these conditions, AudioControl will, at its discretion, repair or replace any AudioControl products that exhibit defects in materials and/or workmanship during the warranty on your product for five (5) years from the date you bought it, and we will fix or replace it, at our option, during that time.
Here are the conditional conditions:
- You must fully register your purchase within 15 days of the purchase date by going to the AudioControl product registration page at www.audiocontrol.com/product-registration. Failure to register your product will negate the warranty.
-
You need to hold on to your sales receipt! All warranty service requires original sales receipt documentation. The warranty only applies to the original purchaser from an authorized AudioControl dealer. Note: Products purchased from unauthorized dealers are not covered under warranty.
-
If an authorized AudioControl dealer installs your AudioControl product, the warranty is five years, otherwise the warranty is limited to one year.
- Our warranty covers AudioControl products that have been installed according to the instructions in the installation manual.
- You cannot let anybody who isn't: (A) the AudioControl factory; or (B) somebody authorized in writing by AudioControl service your AudioControl product. If anyone other than (A), or (B) messes with your AudioControl product, the warranty is void.
- The warranty is void if the serial number is altered, defaced or removed, or if your product has been used improperly. Now that may sound like a big loophole, but here is what we mean by this: Unwarranted abuse is: (A) physical damage (don't use your product to level your dining room table); (B) improper connections (120 volts into the RCA jacks can fry the poor thing); (C) sadistic things! This is the best product we know how to build, but for example if you mount it to the front bumper of your car, drop it over the Niagara Falls or use it for Clay Pigeon shooting practice, something will go wrong.
Assuming you conform to 1 through 6, and it really isn't all that hard to do, we get the option of fixing your product or replacing it with a new one at our discretion.
In the event that your product is out of warranty or not covered under our warranty you may request to have any damage repaired at our normal "Out of Warranty" repair cost.
ARCHITECT™
Models P2260, P2280 EQ
2660, P2660, P2680 EQ
Installation Manual
Legalese Section
This is the only warranty issued by Audio-Control. This warranty gives you specific legal rights, and you may also have rights that vary from state to state. Promises of how well your AudioControl product will work are not implied by this warranty.
Other than what we've said we'll do in this warranty, we have no obligation, express or implied. We make no warranty of merchantability or fitness for any particular purpose. Also neither we nor anyone else who has been involved in the development or manufacture of the unit will have any liability of any incidental, consequential, special or punitive damages, including but not limited to any lost profits or damage to other parts of your system by hooking up to the unit (whether the claim is one for breach of warranty, negligence of other tort, or any other kind of claim). Some states do not allow limitations of consequential damages.
Installation Notes
| Installation: | |||||||
| Installer: | |||||||
| Zone Room Local Bus A Bus B Signal | Sense | 40 Hz | Mono Stereo | ||||
| 1 | |||||||
| 2 | |||||||
| 3 | |||||||
| 4 | |||||||
| 5 | |||||||
| 6 | |||||||
| 7 | |||||||
| 8 | |||||||
| 9 | |||||||
| 10 | |||||||
| 11 | |||||||
| 12 | |||||||
| 13 | |||||||
| 14 | |||||||
| 15 | |||||||
| 16 | |||||||
| Notes | |||||||
ARCHITECT™
Models P2260, P2280 EQ
2660, P2660, P2680 EQ
Installation Manual
Installation Notes
| Installation: | |||||||
| Installer: | |||||||
| Zone | Room Local Bus A Bus B Signal | Sense | 40 Hz | Mono Stereo | |||
| 1 | |||||||
| 2 | |||||||
| 3 | |||||||
| 4 | |||||||
| 5 | |||||||
| 6 | |||||||
| 7 | |||||||
| 8 | |||||||
| 9 | |||||||
| 10 | |||||||
| 11 | |||||||
| 12 | |||||||
| 13 | |||||||
| 14 | |||||||
| 15 | |||||||
| 16 | |||||||
| Notes | |||||||
Installation Notes
| Installation: | |||||||
| Installer: | |||||||
| Zone Room Local Bus A Bus B Signal | Sense | 40 Hz | Mono Stereo | ||||
| 1 | |||||||
| 2 | |||||||
| 3 | |||||||
| 4 | |||||||
| 5 | |||||||
| 6 | |||||||
| 7 | |||||||
| 8 | |||||||
| 9 | |||||||
| 10 | |||||||
| 11 | |||||||
| 12 | |||||||
| 13 | |||||||
| 14 | |||||||
| 15 | |||||||
| 16 | |||||||
| Notes and Poems | |||||||
ARCHITECT™
Models P2260, P2280 EQ
2660, P2660, P2680 EQ
Installation Manual
Basic Cha-Cha
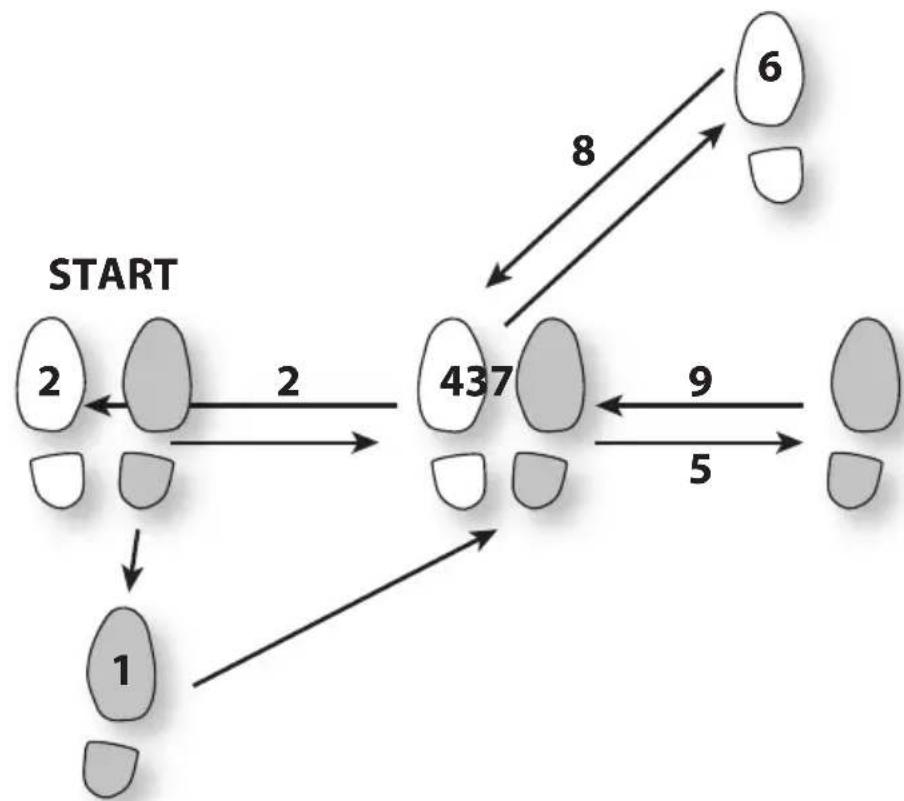
flowchart
graph TD
    A["START"] -->|2| B["2"]
    B -->|2| C["437"]
    C -->|8| D["6"]
    C -->|9| E["5"]
    E --> F["End"]