Rialto 600 - Receiver AudioControl - Free user manual and instructions
Find the device manual for free Rialto 600 AudioControl in PDF.


User questions about Rialto 600 AudioControl
0 question about this device. Answer the ones you know or ask your own.
Ask a new question about this device
Download the instructions for your Receiver in PDF format for free! Find your manual Rialto 600 - AudioControl and take your electronic device back in hand. On this page are published all the documents necessary for the use of your device. Rialto 600 by AudioControl.
USER MANUAL Rialto 600 AudioControl
text_image
AudioControlRialto ^400TM
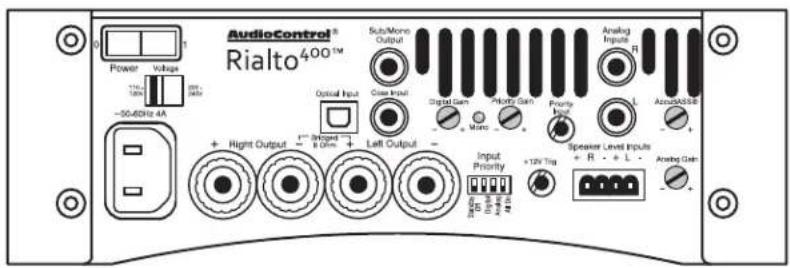
text_image
AudioControl® Rialto400™ Power Voltage -50.60Hz 4A Sub/Micro Output Optical Input Gase Input Digital Gain Micro Priority Gain Priority Input Analog Inputs R AnalogASSB + Right Output +1" - Input & Drive + Left Output - Input Priority +12V Tag Speaker Level Inputs + R - + L - Analog GainHigh Power Audiophile Amplifier and DAC
Perfect for Streaming Audio Systems
Important Safety Instructions
Rialto ^400^TM
- Read these instructions.
- Keep these instructions.
- Heed all warnings.
- Follow all instructions.
- Do not use this apparatus near water.
- Clean only with a dry cloth.
- Do not block any ventilation openings. Install in accordance with the manufacturer's instructions.
- Do not install near any heat sources such as radiators, stoves or any other apparatus (including amplifiers) that produce heat.
- Protect the power cord from being walked on or pinched particularly at plugs, convenience receptacles, and the point where they exit from the apparatus.
- Only use attachments/accessories specified by the manufacturer.
- Do not 'Hot Plug'. When changing inputs or outputs, switch the Rialto 400 off before making changes. Once changes have been made, then switch the Rialto 400 back on.
-
Unplug this product during lightning storms or when unused for long periods of time which we hope will be rarely!
-
Refer all servicing to qualified service personnel. Servicing is required when the apparatus has been damaged in any way, such as power-supply cord or plug is damaged, liquid has been spilled or objects have fallen into the apparatus, the apparatus has been exposed to rain or moisture, does not operate normally, or has been dropped.
-
This apparatus shall not be exposed to dripping or splashing, and no object filled with liquids, such as vases or glasses, shall be placed on the apparatus.
- Exposure to high sound pressure levels may lead to permanent hearing loss. Take every precaution to protect your hearing.
- The remote control comes with a non-rechargeable Lithium battery installed. Take every precaution when handling and installing new Lithium batteries, and follow all local and state guidelines for safe disposal of old batteries. Keep all batteries away from children.

The lightning flash with arrowhead symbol within an equilateral triangle is intended to alert the user to the presence of uninsulated "dangerous voltage" within the product's enclosure, that may be of sufficient magnitude to constitute a risk of electric shock to persons.

The exclamation point within an equilateral triangle is intended to alert the user of the presence of important operating and maintenance (servicing) instructions in the literature accompanying the appliance.
Caution: to reduce the risk of electric shock, do not disassemble the apparatus. There are no user-serviceable parts inside. Refer servicing to qualified personnel.

Recycling notice: If the time comes and this apparatus has fulfilled its destiny, do not throw it out into the trash. It has to be carefully recycled for the good of mankind, by a facility specially equipped for the safe recycling of electronic apparatii. Please contact your local or state recycling leaders for assistance in locating a suitable nearby recycling facility. Or, contact us and we might be able to repair it for you.
Table of Contents
Important Safety Instructions 2
Chapter 1: Introduction....4 Introduction....4 Ready to Rumble! - A Quick Look at the Rialto 400....5
Chapter 2: Quick Start Guide ....6 Quick View ....6 Quick Start ....7
Chapter 3: Hookup Diagrams ....8 Typical Three-Source Setup ....8 2.1 Speaker Setup and 4.1 Parallel Speaker Setup ....9 Using the Speaker-Level Inputs ....10 Stereo and Mono Passive Subwoofer Speaker Setup ....11
Chapter 4: Installation....12 Installation....12 Speaker Connections....13
Chapter 5: Features ....14 Front Panel Features....14 Rear Panel Features....15 Voice-Enabled Device Example ....19 Additional Features and Support....20
Chapter 6: Adjustments....21 Adjusting the AccuBASS ^ ....21
Chapter 7: Troubleshooting .....22 Troubleshooting .....22
Chapter 8: Specifications .....23 Specifications .....23
Chapter 9: Service ....24 Service....24
Chapter 10: Please Remain Calm. 25
The Warranty. 25
Legalese Section. 26
Rialto ^400^TM
Introduction
Thank you and congratulations for purchasing your AudioControl Rialto 400. This installation manual is your guide to installing and using the Rialto 400 Amplifier and DAC, including information on its more advanced features. The table of contents will help you navigate to the area of the manual you are looking for. It is a good idea to read the whole manual in order to acclimatize yourself with the full workings and features of the Rialto 400, and to keep the technical writer's Mom happy!
Established in Seattle four decades ago, we have always been dedicated to designing, engineering and building world-class audio products from the ground up. In the process, we've earned a reputation worldwide for operating at the highest levels of reliability and performance with a mission of 'Making Good Sound Great'.
We trust that you will get many years of satisfying and trouble-free operation from your Rialto 400. If you require more information about this or any of our AudioControl products, please visit our website at www.audiocontrol.com or contact us at sound.great@audiocontrol.com. In addition, do not hesitate to talk to our dealers worldwide, or contact us directly at our Seattle base in the misty rainforests of the Pacific Northwest, USA. The days can be rainy and cold but there is always a warm welcome and a hot cup of coffee available all year round.
Contents
• Rialto 400
- AC Power Cord
- Optical Cable
- RCA to 1/8" adapter
- 4 stick-on feet
• 4-pin speaker connector (attached to unit)
• This installation manual
- A shipping box full of fresh air from the wooded slopes of Mountlake Terrace, WA
Ready to Rumble! - A Quick Look at the Rialto 400
The Rialto 400 has been updated to combine its legendary high-powered, audiophile performance and features, with an input stage devoted to voice-enabled devices, such as Amazon's Echo® or Google Home®. This allows super-fast, accurate signal-sense switching when you expect it, while going about your daily activities.
For example, if you are listening to music (from the digital input source) or watching TV (from the analog input source) but you need to add something to your shopping list. Have your voice-enabled device connected to the rear panel 3.5 mm jack (which is always prioritized). Ask your question, and the Rialto 400 will auto-magically switch to the voice-enabled device to answer your question or confirm your addition to the list. Then it immediately switches back to your music, just as smooth as (insert your favorite analogy here).
The Rialto 400 is in its own class of compact, high-powered amplifiers, with a built-in audiophile-grade DAC designed specifically to provide greater performance and higher sound quality for all analog and digital systems, including streaming audio components like Sonos® home entertainment.
The Rialto 400's powerful amplifier delivers 100 Watts of power per channel into 8 Ohms and 200 Watts per channel into 4 Ohms. Additionally, the Rialto 400 can be bridged to perform as a 400 Watt mono-block amplifier.
The state of the art Rialto 400 features a built-in high-performance Wolfson® DAC (digital to analog converter) that dramatically improves audio quality and performance.
Digital and analog audio-systems can now reach their full potential across the whole house whether the speakers are free-standing, in-wall, in-ceiling, invisible, desktop, gaming, in the garden shed etc.
Equipped with AudioControl's unique patented AccuBASS® circuitry, the Rialto 400 also rejuvenates the bass response lost in most digital compression schemes. This results in a richer and fuller audio performance with better bass and mid-bass response.
The net effect is that you will enjoy a more complete listening experience and hear music with a richness and vibrancy much closer to the way the artist intended their music to be enjoyed.
AudioControl®
Making Good Sound Great"
Quick View
Rialto ^400^TM
text_image
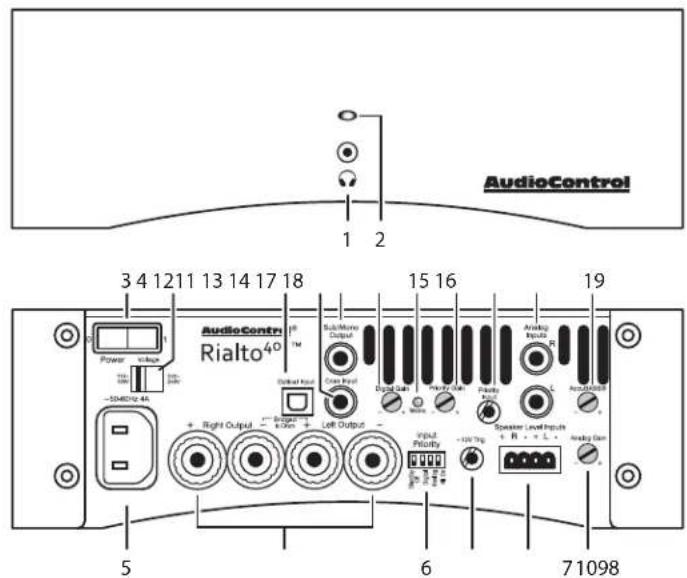
AudioControl 1 2 3 4 12 11 13 14 17 18 15 16 19 Power Vcc -10MΩ/16.4A AudioContr Rialto40 Sub/Micro Output Digital Gain Power Gain Audio Input L AudioPan + Right Output - + Left Output - Signal Sponsor Level Input + R - + L - AudioPan 5 6 71098-
Headphone Output
-
Power LED
-
Power On/Off Switch
-
AC Voltage Selector
-
AC Input
-
Speaker Outputs
-
Control Switches
-
+12V Trigger Output
-
Speaker Level Inputs
-
Analog Gain
-
Optical Digital Input
-
Coaxial Digital Input
-
Sub/Mono Output
-
Digital Gain
-
Mono LED
text_image
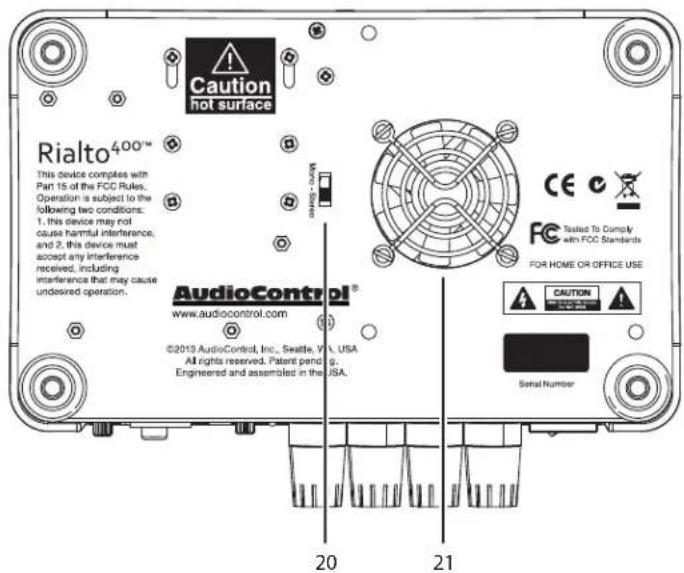
Caution hot surface Rialto 400™ This device complies with Part 15 of the FCC Rules. Operation is subject to the following two conditions: 1. this device may not cause harmful interference, and 2. this device must accept any interference received, including interference that may cause undesired operation. AudioControl® www.audiocontrol.com ©2015 AudioControl, Inc., Seattle, VA USA All rights reserved. Patent pend g. Engineered and assembled in the USA. CE C FC Tested To Comply with FCC Standards FOR HOME OR OFFICE USE CAUTION Signal Number 20 21- Priority Gain
- Priority Input
- Analog Input L/R
19.AccuBASS ^® Level - Mono Switch
- Cooling Fan
Quick Start
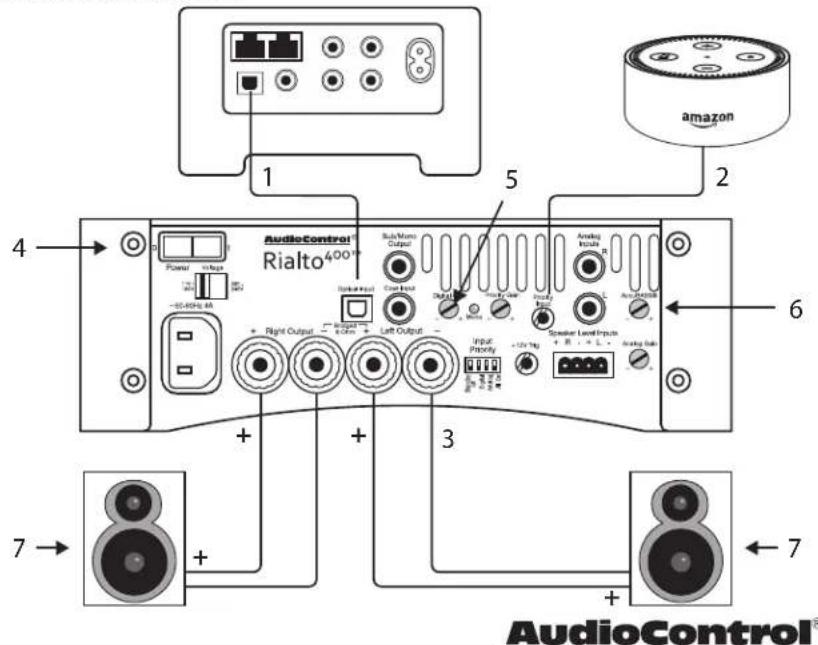
It takes just a few steps to get your AudioControl Rialto 400 up and running. The steps below are explained in more detail throughout this manual. This example shows a typical single-source digital setup and a voice-enabled device. (The numbers in the illustration correspond to the numbers in the procedure steps.)
- Connect one source component (for example a digital music player, SONOS™ CONNECT, television, receiver, CD player, Xbox, etc.) to the digital input of the Rialto 400.
- Connect a voice-enabled device to the 3.5 mm Priority Input. (For best results, the device's volume level should be set to 50% or more.)
- Connect a pair of your favorite speakers to the Rialto 400, ensuring that the polarity matches.
- After all connections have been made, turn on power to all devices, with the Rialto 400 last.
- Before playing your music, turn down the Rialto 400 gain controls. Then play your music and increase the gain for the desired volume level.
- Adjust the AccuBASS ^® control to the desired amount of bass response to add bass and richness back to your music.
- Pour sonic goodness into your room, and enjoy "Making Good Sound Great!"
text_image
AudioControl® Rialto400™ Power Volume -55.625mA + Right Output + Sub-Mass Output Sub-Mass Input Left Output Digital Audio Input Audio Output Speaker Level Inputs + R 1 + L 2 Audio Input + Uth Tg + Audio Gain Amazon 1 2 3 4 5 6 7 AudioControl®Making Good Sound Great"
Rialto ^400^TM
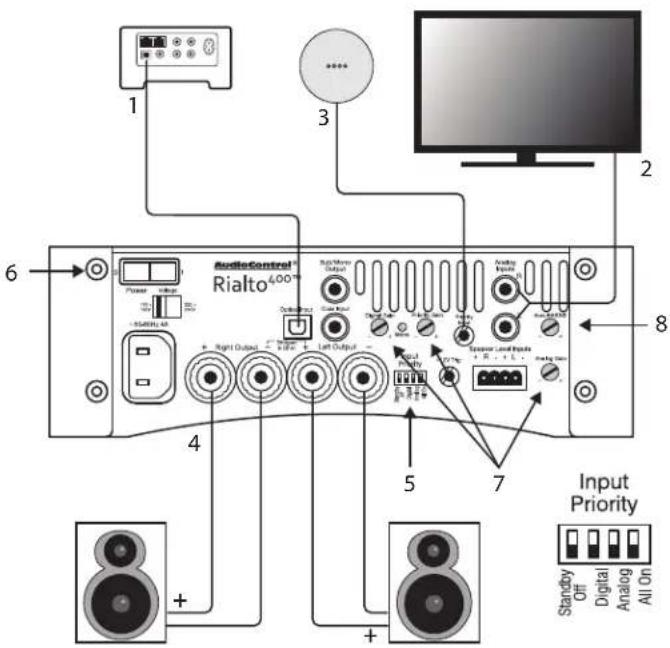
Typical Three-Source Setup
The Rialto 400 allows multiple sources to be connected to the various L/R analog inputs, the digital input (coax or optical) and the priority 3.5 mm input.
- Connect a digital source to the Rialto 400 using the digital input (coaxial or optical).
- Connect an analog source to the Rialto 400 using the right (R) and left (L) analog input RCA jacks.
- Connect a voice-enabled device such as a Google Home ^® to the 3.5 mm Priority Input. (For best results, the device's volume level should be set to 50% or more.)
- Connect a pair of your favorite speakers to the Rialto 400, ensuring that the polarity matches.
- Set the priority switches to Analog, Digital, or All, depending on your preference.
- After all connections have been made, turn on power to all devices, with the Rialto 400 last.
- Before playing your music, turn down the Rialto 400 gain controls. Then play your music and increase the gains for the desired volume level.
- Adjust the AccuBASS ^® control to the desired amount of bass response to add bass and richness back to your music.
- Enjoy "Making Good Sound Great!"
text_image
1 2 3 6 AudioControl® Rialto400™ Power + Right Output - Left Output + Right Input + Right Output + Right Input + Right Output + Right Input + Right Output 8 4 5 7 Input Priority Standby Off Digital Analog All On2.1 Speaker Setup and 4.1 Parallel Speaker Setup
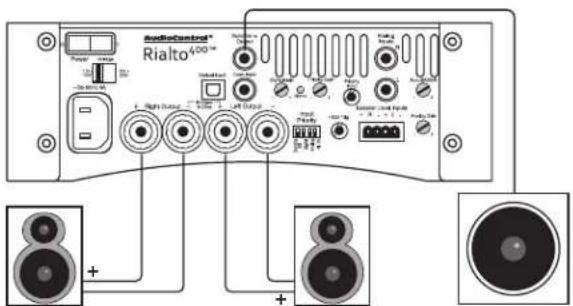
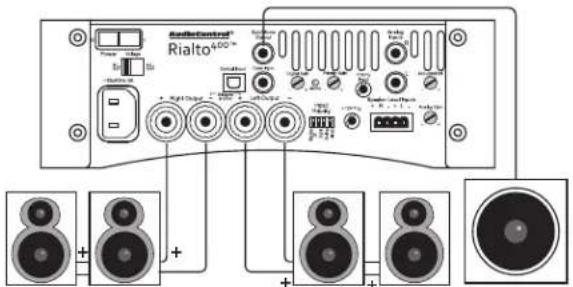
The Rialto 400 has been designed to equalize and improve the performance of all speaker set-ups. The power of the amplifier combined with the audio performance and quality of AudioControl's Wolfson-engineered, digital to analog converter (DAC) results in a dramatic improvement in the performance of all speaker set-ups throughout the house.
Shown on the right are just two of the many types of speaker configurations that the Rialto 400 can work with. The 4.1 speaker set-up takes advantage of the Rialto 400 amplifier's stability at 4 Ohms powering four speakers. In addition, the Rialto 400 can be used as an incredible Mono amplifier with power ratings up to 400 Watts (see page 11).
In both systems shown, the mono subwoofer output sends the line-level audio to a powered subwoofer.
text_image
AudioControl® Rialto 400™ Power Signal Radio Signal Signal Signal Signal Signal Signal Signal Signal Signal Signal Signal Signal Signal Signal Signal Signal Signal Signal Signal Signal Signal Signal Signal Signal Signal Signal Signal Signal Signal Signal Signal Signal Signal Signal Signal Signal Signal Signal Signal Signal Signal Signal Signal Signal Signal Signal Signal Signal Signal Signal + - + - + - - + - - + - - + - - + - - + - - + - - + - - + - - + - - + - - + - - + - - + - - + - - + - - + - - + - - + - - + - - + - - + - - + - - + - - + - - + - - + - - + - - + - - + - - + - - + - - + - - + - - - + - - - + - - - + - - - + - - - + - - - + - - - + - - - + - - - + - - - + - - - + - - - + - - - + - - - + - - - + - - - + - - - + - - - + - - - + - - - + - - - + - - - + - - - + - - - + - - - + + - + + - + + - + + - + + - + + - + + - + + - + + - + + - + + - + + - + + - + + - + + - + + - + + - + + - + + - + + - + + - + + - + + - + + - + + - + + - + + - + + - + + - + + - + + - + + - + + - + +- + + + + + + + + + + + + + + + + + + + + + + + + + + + + + + + + + + + + + + + + + + + + + + + + + + + + + + + + + + + + + + + + + + + + + + + + + + + + + + + + + + + + + + + + + + + + + + + + + + + + + - - - - - - - - - - - - - - - - - - - - - - - - - - - - - - - - - - - - - - - - - - - - - - - - - - - - - - - - - - - - - - - - - - - - - - - - - - - - - - - - - - - - - - - - - - - - - - - - - - - - -4 or 8 Ohms 4 or 8 Ohms Powered Subwoofer
text_image
Radiocontrol® Rialto® + - + - + - + - + - + - + - + - + - + - + - + - + - + - + - + - + - + - + - + - + - + - + - + - + - + - + - + - + - + - + - + - + - + - + + + + + + + + + + + + + + + + + + + + + + + + + + + + + + + + + + + + + + + + + + + + + + + + + + + + + + + + + + + + + + + + + + + + + + + + + + + + + + + + + + + + + + + + + + + + + + + + + + + + - Rialto® Rialto® Rialto® Rialto® Rialto® Rialto® Rialto® Rialto® Rialto® Rialto® Rialto® Rialto® Rialto® Rialto® Rialto® Rialto® Rialto® Rialto® Rialto® Rialto® Rialto®8 Ohms8 Ohms 8 Ohms 8 Ohms Powered Subwoofer
2.1 Speaker Set-up
The standard set-up for a 2.1 speaker system with two 4 or 8 Ohm speakers plus a powered subwoofer.
4.1 Speaker Set Up
The standard set-up where four 8 Ohm speakers are connected in parallel to form a 4 Ohm load per channel. (The minimum speaker impedance for this configuration is 8 Ohms.)
AudioControl®
Making Good Sound Great™
Using the Speaker-Level Inputs
Rialto ^400^TM
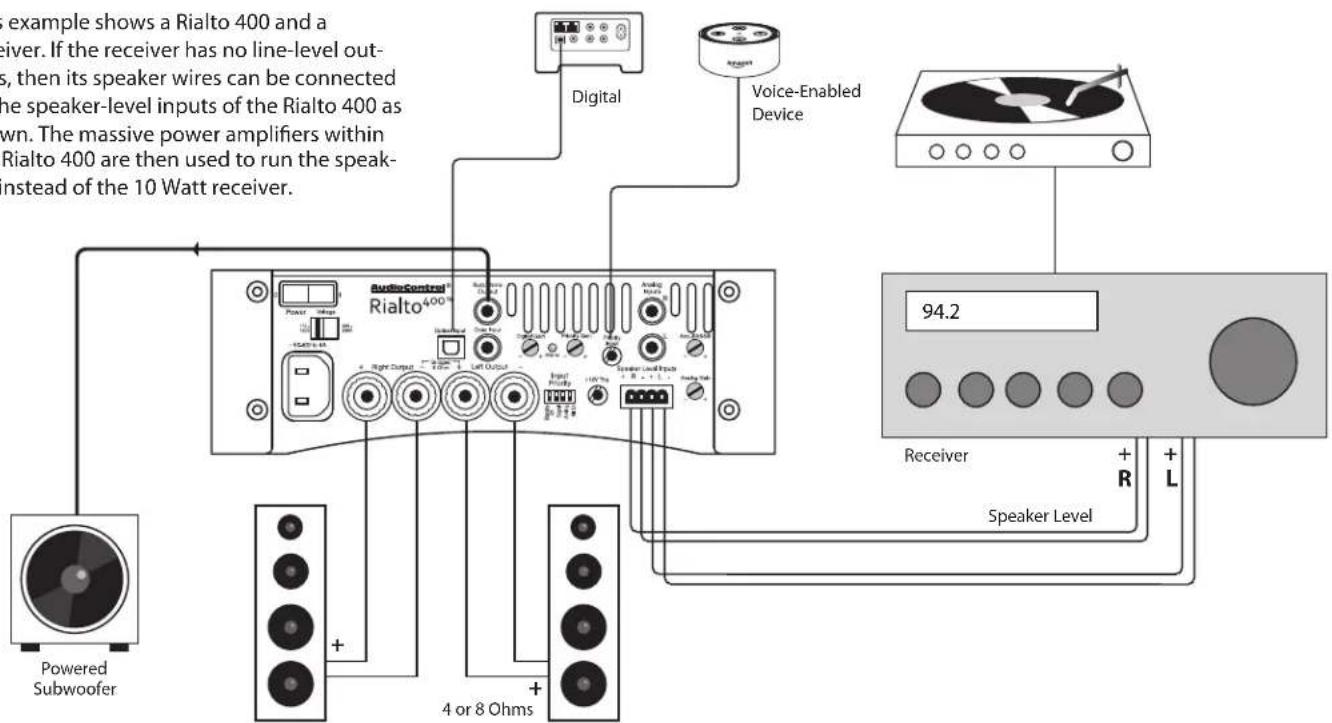
This example shows a Rialto 400 and a receiver. If the receiver has no line-level outputs, then its speaker wires can be connected to the speaker-level inputs of the Rialto 400 as shown. The massive power amplifiers within the Rialto 400 are then used to run the speakers instead of the 10 Watt receiver.
text_image
example shows a Rialto 400 and a ceiver. If the receiver has no line-level out- s, then its speaker wires can be connected the speaker-level inputs of the Rialto 400 as own. The massive power amplifiers within Rialto 400 are then used to run the speak- instead of the 10 Watt receiver. Digital Voice-Enabled Device 94.2 Receiver + R + L Speaker Level + - Power Power -5kΩ x 5A + - Power + - Power + - Power + - Power + - Power + - Power + - Power + - Power + - Power + - Power + - Power + - Power + - Power + - Power + - Power + - Power + - Power + - Power + - Power + - Power + - Power + - Power + - Power + - Power + - Power + - Powered Subwoofer AudioControl Rialto400™ Signal Input Signal Output Signal Power Signal Value Signal Output Signal Power Signal Value Signal Power Signal Value Signal Power Signal Value Signal Power Signal Value Signal Power Signal Value Signal Power Signal Value Signal Power Signal Value Signal Power Signal Value Signal Power Signal Value Signal Power Signal Value Signal Power Signal Value Signal Power Signal Value Signal Power Signal Value Signal Power Signal Value Signal Power Signal Value Signal Power Signal Value Signal Power Signal Value Signal PowerInstallation Manual
Stereo and Mono Passive Subwoofer Speaker Setup
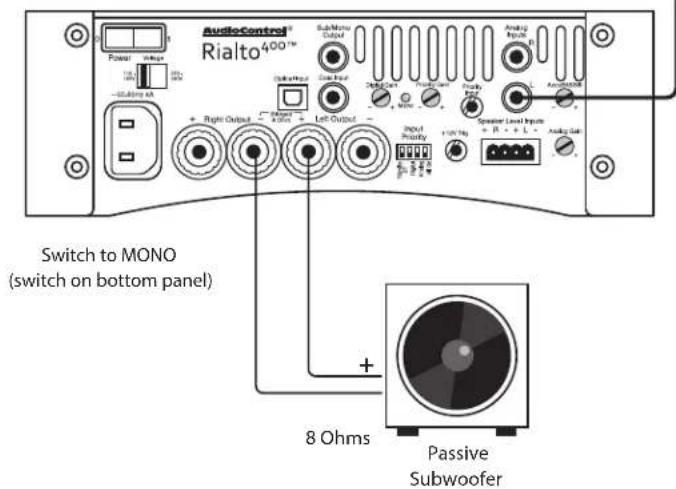
This system shows one Rialto 400 being used in stereo, and the second being used in bridged mono to power a passive subwoofer.
text_image
AudioControl® Rialto400™ Sub-Menu Output Analog Input Power Inverter 120V 100V -0.5A/mo A Sub-Menu Output Analog Input 120V 100V -0.5A/mo A Sub-Menu Output Analog Input 120V 100V -0.5A/mo A Sub-Menu Output Analog Input 120V 100V -0.5A/mo A Sub-Menu Output Analog Input 120V 100V -1.5A/mo A Sub-Menu Output Analog Input 120V 100V -1.5A/mo A Sub-Menu Output Analog Input 120V 100V -1.5A/mo A Sub-Menu Output Analog Input 120V 100V -1.5A/mo A Sub-Menu Output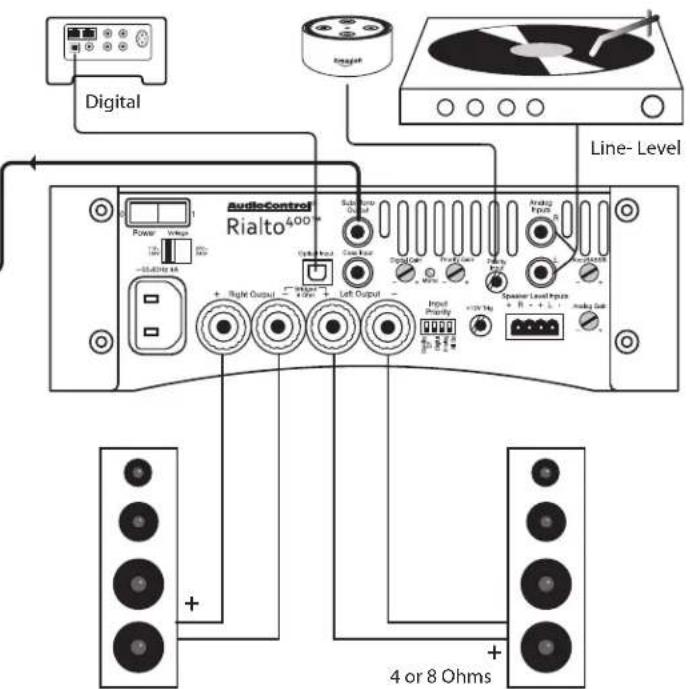
text_image
Digital Line-Level AudioControl Rialto 400 Power Wireless Ground Signal Substrate Output Circuit Signal Digital Power Signal Signal Signal Output Signal Signal Output Signal Output + Right Output + Left Output - Input Priority + 120 Hz + 8 Ohms + 4 or 8 OhmsAudioControl®
Making Good Sound Great"
Installation
Rialto ^400^TM
The Rialto 400 is a compact yet high performance amplifier and audiophile DAC. As such, it delivers incredible sound performance.
- Care should be taken in finding the best location to place the unit for optimal performance.
- The Rialto 400 loves speakers and can be situated to fit in with any speaker set up from the most powerful free-standing speakers to the smallest desktop configuration.
- As with all products made in the USA by AudioControl, the Rialto 400 should not be deep fried or sautéed!
Placement
This may be as good a time as any to have "the talk" about ventilation. The Rialto 400 features cool-running efficient switch mode power supplies and Class D amplifiers. It is still an amplifier, and therefore requires good ventilation to cool.
- Place the Rialto 400 on a level, firm surface, avoiding direct sunlight and sources of heat and damp.
- Do not place the Rialto 400 on top of another power amplifier or other source of heat.
-
Do not place the Rialto 400 in an enclosed space such as a book-case or closed cabinet unless there is good provision for ventilation. The Rialto 400 will run warm during normal operation.
-
Do not obstruct the ventilation vents on the bottom and rear panels of the unit. "It likes to breathe."
- Do not place the unit on carpeting, a large sleeping dog or any thick material that could block the vents.
Cables
We recommend the use of high-quality analog and/or digital cables. All cables should be kept as short as practically possible. Power cabling should be kept as far away as possible from audio cables.
Speakers
The Rialto 400 is designed to work with all 8 Ohm and 4 Ohm speaker setups. The Rialto 400 is versatile and flexible and works with the following speaker installations and more!
• Free-standing speakers
- Invisible speakers – in-wall and in-ceiling
• Extra zone speakers including outdoor
• Televisions and sound bars
• Desktop speakers and gaming speakers
And more..... The Rialto 400 loves speakers and speakers love the Rialto 400! See the next page for more speaker details.
Speaker Connections
Establish a standard connection color code and stick with it. One conductor of the speaker wire is normally marked by a different color (silver versus copper) or there is ribbing on one side. Typically this marked conductor is used for the positive (+) speaker leads. Really good wire has Positive and Negative printed right onto the wire jacket.
Match the polarity markings on the unit with the polarity markings on your speakers.
Speaker and Wiring Impedance
Speakers, like other resistors, if wired in parallel "show" lower values than the individual components. The important thing is to make sure your speakers are 4 Ohms or greater per channel in stereo or 8 Ohms or greater when connected in bridged mono mode.
Here is an example for calculating speakers wired in parallel:
Calculating Impedance
For two 8 Ohm speakers wired in parallel (pluses connected to pluses) the impedance is 1/8 + 1/8 = 2/8
Then take the inverse or 8/2 = 4 Ω
Often the real world is more complicated than theory, and for speakers this is the case. An 8 Ohm speaker is not 8 Ohms at all frequencies. Plus passive crossover networks add their own changing conditions. Be aware of speakers that have significant dips from "nominal" values
in portions of their frequency range, and speakers that are rated at unusual impedances, for example 3.5 Ohms. The Rialto 400 is tolerant of impedance loads down to 4 Ohms, however, all good designs use some margin of error.
Your choice of speaker wire gauge and the length of the runs, also affects the speaker impedance load presented to the amplifiers. Even fairly short speaker runs can have significant resistance if you use a smaller wire gauge. The downside of this wire resistance is that you waste some part of the total power available to the speakers.
Note: Do not use the Rialto 400 in systems that are "common-grounded," where the negative left and negative right speaker terminals are joined together.
AudioControl®
Making Good Sound Great™
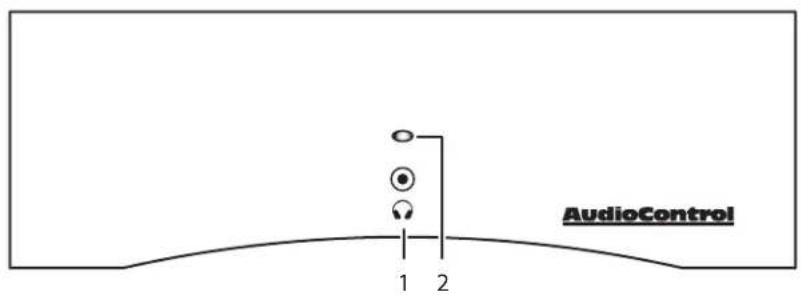
Front Panel Features
Rialto ^400^TM
text_image
AudioControl 1 2- Headphone Connection – This 3.5 mm TRS stereo output allows you to connect your favourite headphones.
Warning: To reduce the possibility of damage to your hearing, please make sure that the volume is turned down before putting on your headphones, or turning on your system. Bring up the volume to a safe and reasonable listening level.
- On/Standby LED –
Blue - Normal Operation
Dim Red - Standby Mode
Bright Red - Amplifier in Protection Mode
Flashing Red – Speaker Fault
Green - Coffee brewed
Rear Panel Features
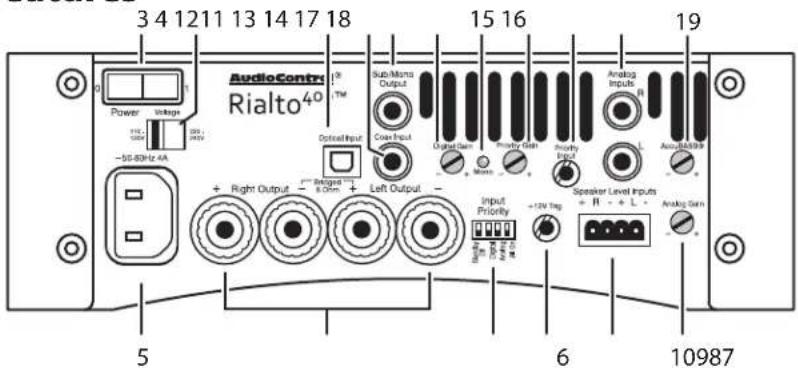
text_image
3 4 12 11 13 14 17 18 AudioContr Rialto40 Power Voltage -55/60Hz 6A 19 Sub-Micro Output Coast Input Optical Input + Right Output - Regarded 8.0Vrms + Left Output - Input Priority +12V Tag Speaker Level Inputs + H - + L - Analog Inputs L AudioResist Analog Gain 5 6 10987-
Power Switch – In the OFF position, the AC line voltage is disconnected from all internal circuits, and no amount of audio input signals playing, telepathy, or loud yelling will turn it back on. Turn off the power switch when you are not using the amplifier for long periods of time, such as a nice two-week vacation to a golden sandy beach somewhere (sigh), or during lightning storms, electrical power outages, or zombie apocalypse. Keep the amplifier turned off when making connections or when disconnecting. The Rialto 400 can only be used in the ON position, where it will be a lot more useful and fun, and not just a pleasant white brick in your living room. Do not turn it on until all connections have been made, and you are sure the voltage selection switch is set to the correct local AC voltage.
-
Voltage Selection Switch – This slide switch allows you to set the amplifier to your local AC voltage. WARNING: Always make sure it is in the correct position before connecting the AC power cord, as the incorrect setting will damage the amplifier.
- AC Input – This is where you connect the supplied AC power cord. First make sure that the power switch is off, and the voltage selection switch is in the correct position, and then push in the power connector firmly to make a secure connection.
AudioControl® Making Good Sound Great™
Rialto ^400^TM
- Speaker Connector – This is where joy meets world: the speaker-level output of the amplifier connects to the wiring of your speakers. Make a note of the polarity markings and make sure they match those of your speakers (positive to positive or red speaker terminal, negative to negative or black speaker terminal). If wired incorrectly, then there will be phase cancellation and disappointing bass performance.
In mono operation (with the bottom-panel switch set to Mono) the power of both internal amplifiers is combined to power a single speaker. In this case, only the 2 inner speaker posts are used. Observe the markings for the correct polarity.
- Control Switches of Destiny – The Rialto 400 features the AudioControl SMART Input Priority feature that allows it to prioritize certain source inputs for a variety of operational conditions.
These 4-DIP switches allow you to set up the am-
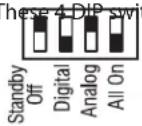
plifier just the way you like it. Well, it is not going to put the kettle on, make your morning tea, and then wake you up with soothing waking-up music. That would be your mom.
The ON position is when the little white switch is down. The four settings are as follows:
Standby Off/Sleep – In the 'on' position the Rialto 400 will not switch automatically into standby/sleep mode and will remain on continuously.
Digital – In the 'on' position the Rialto 400 will prioritize a digital signal input ahead of an analog signal. If the digital signal stops, the Rialto 400 will switch back to an incoming analog signal if present.
Analog – In the 'on' position the Rialto 400 will prioritize an analog signal input ahead of a digital signal. If the analog signal stops, the Rialto 400 will switch back to an incoming digital signal if present.
All On – In the 'on' position the Rialto will have no overriding priority and all inputs will play. Play back should be controlled by the various sources, as 'All-On' could result in both digital and analog sources being heard as no prioritization has been set.
The optimal set-up for the Rialto 400 is as a single-source or two-source set-up with one digital and/or one analog input allowing for prioritization between the two inputs depending on what is required for your desired set-up. The addition of a voice-enabled device allows it to play and take priority over the currently-playing analog or digital program.
Notes:
Turn OFF the power switch before changing the switches.
Various switches can be ON at the same time.
The 3.5 mm priority input is not affected by the switches. It will always take priority over the analog or digital sources when an audio signal is detected at the priority input.
Use great care when moving the switches, using a small tool such as a toothpick or a jeweler's flat screwdriver.
text_image
3 4 12 11 13 14 17 18 AudioContr Rialto 40 Power Voltage -55.80Hz AA 18 TM Sub-Mono Output Coast Input Output Gain Primary Gain Priority Input Analog Inputs R Audio/Rebease + - + - + - + - + - + - + - + - + - + - + - + - + - + - + - + - + - + - + - + - + - + - 6 71098 5 6-
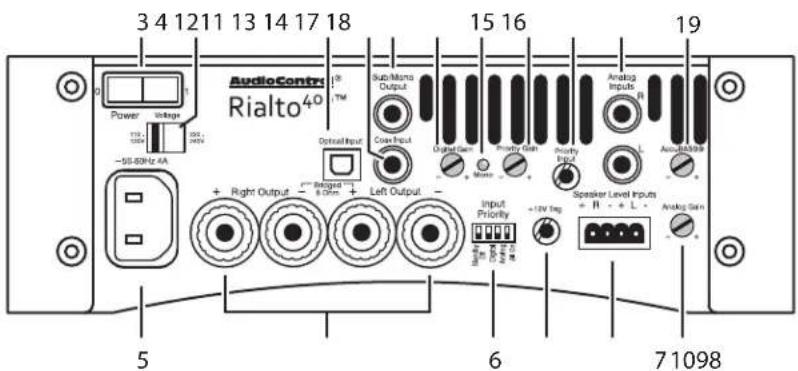
12V Output – This 1/8" TS 12 Volt output is useful for triggering external sub-woofers etc.
-
Speaker-Level Inputs – These inputs allow you to connect the speaker level outputs from an old receiver (for example) to the Rialto 400. In this way you can connect your speakers to the Rialto 400 and it will play whatever the receiver is tuned to. This allows you keep the lovely features of your receiver, such as input switching, volume control, FM tuner, and have the powerful amplifiers of the Rialto 400 run your speakers with efficiency.
-
Analog Gain - This rotary control is used to vary the level of the analog inputs. Use this in addition to our analog source's volume control to create the best listening levels.
-
Digital Input (Optical) – The optical input accepts digital signals from the digital optical output of your source equipment. Alternatively, you can use the coaxial digital input if your source has no optical output. Do not connect both at the same time.
-
Digital Input (Coaxial) – The RCA input accepts coaxial S/PDIF digital signals from the digital output of your source equipment. Alternatively, you can use the optical input, if you have that option. Do not connect both at the same time.
The Rialto 400's high-quality digital to analog converter (DAC) converts the incoming stream of digital data into left and right analog audio signals.
AudioControl® Making Good Sound Great™
Rialto ^400^TM
- Sub/Mono Out – This RCA line-level output is used to send a mono output to feed either a powered subwoofer or a subwoofer amplifier/passive subwoofer combination. The output is a line-level gently-mono mix of the left and right currently-selected input, and it is affected by the volume level and AccuBass ^® level.
- Digital Gain - Adjust this to vary the level of the digital input. Use this to create the best listening levels and balance between the digital and analog sources.
- MONO LED – This LED will come on when the MONO switch on the bottom panel is set to Mono. In normal stereo use, it is off.
- Priority Gain – This adjusts the signal level coming into the priority input. Use this in addition to your voice-enabled device's volume control to create the best listening levels when the device is on. We recommend having the voice-enabled device's volume set to 50% or more. Adjust this priority gain control until a clear and comfortable level is reached when activated.
-
Priority Input – Ths 3.5mm input connects to the line-level audio output from a voice-enabled device. Any audio coming in here will automatically take priority over anything currently playing. Then it will quickly revert to the previous program when the announcement is over.
-
Analog Inputs – These RCA line-level inputs accept the left and right analog inputs from your source equipment, such as a CD player, DVD player, MP3 player, or a computer or mobile/cell phone's headphone output.
Make sure that you use high-quality connection cables, but not those that need a three-ton press to get on or off. Some need a little twisting action, like we did last summer.
If you are using the Rialto 400 in Mono mode (with the bottom panel Mono switch on) then only the Left RCA input is used. - AccuBASS ^® Gain – Increase the AccuBass ^® level by slowly turning the gain clockwise until the amount of bass being restored meets your own personal preferences. You will hear the bass being restored to the music as you increase the level, and the richness of the audio will steadily improve as bass frequencies are restored.
- Mono Switch – In the Mono position, the two internal power amplifiers are combined in bridged-mono to run large and powerful speakers. The MONO LED will come on, as if by magic.
- Fan - The cooling fan is always on, to provide cooling ventilation to the power amplifiers. Do not obstruct the fan and vents.
Bottom Panel (not shown)
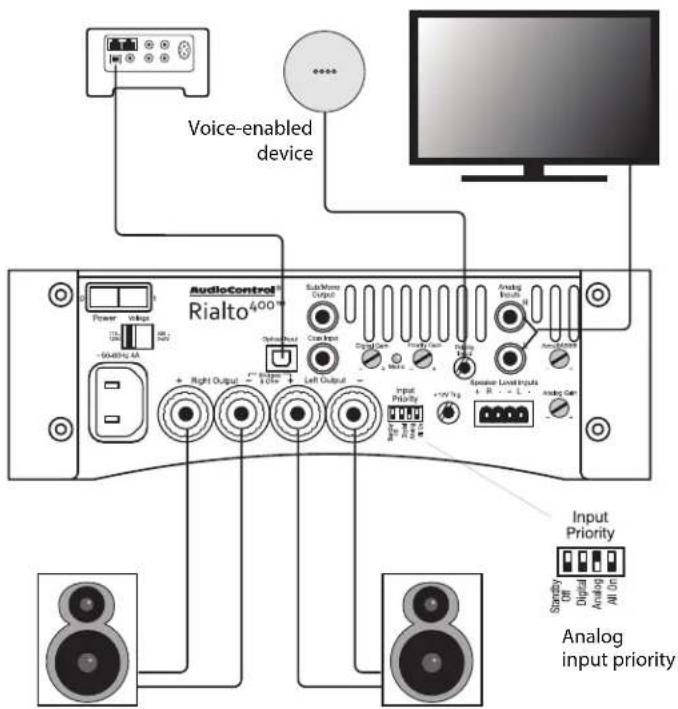
Voice-Enabled Device Example
In this example, there is a digital input source/Sonos ^® and an analog input source from a TV. The analog input source is set as the prioritized input, using the dip switches. A voice-enabled device is connected to the Priority jack.
Let's pretend the following:
- You are cooking a healthy jumbo-monster-clam TV dinner, while listening to the Sonos/digital device.
- You finish cooking and sit down at the TV while the music is still playing.
- When the TV turns on, the Rialto 400 senses the analog TV signal, and automatically switches over to the analog input.
- You munch away, enjoying the clams and the show, until you notice something familiar and say "Alexa, where was this show filmed?"
- Within the first syllable of the first word from Alexa, the Rialto 400 will switch from the analog source to the priority input.
- Alexa tells you where the show was filmed (nowhere familiar) and you focus back on the TV. The Rialto 400 now quickly switches back to the previously prioritized input – analog TV audio.
- The clams and the show are done, then you turn the TV off, and the Rialto 400 switches back to the digital input where music resumes.
text_image
Voice-enabled device AudioControl® Rialto 400™ Sub-Mono Output Download Close Input Digital Care Audio Gain Analog Input Priority + Right Output - + Left Output - + 1/2 Hz + 1/2 L Speaker Level Inputs + R - + L - Analog Gain Input Priority Serial Power Digital Analog All On Analog input priorityAudioControl®
Making Good Sound Great™
Additional Features and Support
Rialto ^400^TM
Additional information on the features below, as well as great support and hints and tips on the Rialto 400 can be found on our website: www.audiocontrol.com (navigate to the download section of the Rialto 400 product page).
Alternatively, email our team at sound.great@audiocontrol.com for further information or to have a chat over a cup of coffee!
Sleep Mode
The unit will go into standby if an audio signal is not detected after approximately 8 minutes. It will come back on when an audio signal is detected. Additional information on the sleep mode and the variety of options this allows can be found on our website.
12V Trigger Output
The rear panel 12V Trigger output is useful for triggering external sub-woofers etc.
Adjusting the AccuBASS®
AccuBASS® Bass Level Adjustment
AudioControl's AccuBASS® circuit is designed to help recover the bass that goes missing in compressed music files, or when volume is increased and the bass frequencies roll away. The AccuBASS® is adjusted using the rear panel control to give your system great bass at all volume levels, and add back in an incredible-sounding richness to your music.
- Start playing some dynamic bass-rich music, and adjust the amount of AccuBASS® by rotating the rear panel control to adjust and maintain bass dynamics in your music.
- You will hear bass and richness being restored to the music as you increase the level of AccuBASS ^® , as well as hearing and experiencing the richness of the audio steadily improve as bass frequencies are restored.
- Continue to fine tune the AccuBASS® level to adjust to your personal preferences..
- You're done! You will have smooth, seamless bass and richness to your music and you can even adjust the AccuBASS® level to give a little (or a lot!) of extra boost to the bass if you like more bass in your music. It's your music your way and the way the artist intended it to be heard!
AudioControl®
Making Good Sound Great"
Troubleshooting
Rialto ^400^TM
Many problems can be eliminated by re-checking the wiring and settings of the unit. If a problem cannot be solved using the guide below, please call the AudioControl team for further assistance, or e-mail us at sound.great@audiocontrol.com
1. No Sound
a. Check the unit is plugged in and the front panel On/Standby LED is blue. When it is dim red, the unit is in standby mode, and if it is bright red, it is in protection mode.
b. Check all cables are securely connected.
c. Check the source unit is on and playing.
d. Check the speaker connections are secure, and not shorted together by loose wire strands or a puddle the cat left behind.
2. In Protection
The amplifier in the Rialto 400 will protect itself if it experiences an unusually large power surge, overheats, experiences a short in the speaker wires or the speakers, or detects an accordion solo. The protection circuit helps prevent damage to the Rialto 400 and speakers. Turn down the volume and the unit will normally resume playing after a short period of time to cool down. A flashing red LED on the front of the unit indicates that the unit is operating at its 'current limit' and in danger of going into protection. In this situation you may have too many speakers attached, you are driving the amplifier too hard,
or the speaker impedance is below 4 Ohms and you may need to reduce the load. Check the speaker wiring and speakers for any short circuits. Make sure that there is plenty of ventilation available.
3. Signal Sensing
If the unit does not sense an input signal, it will switch to standby mode after approximately 8 minutes of silence. It will turn back on again as soon as an input signal is detected.
During quiet passages, or lengthy silent spaces in music or a TV program, the Rialto 400 may believe that the audio signal has stopped and may sulk and go into standby mode.
More Troubleshooting
For additional troubleshooting, support and technical advice, please visit our website at www.audiocontrol.com and navigate to the Rialto 400 product page.
Specifications
As technology advances, AudioControl reserves the right to continuously change our specifications, like our Pacific Northwest weather, although we are working on changing that as well.
Digital Inputs .... 1 x Optical Toslink and 1 x Coax SPDIF
Analog Inputs. Stereo L/R RCA unbalanced
Speaker Level Outputs ....5-way gold plated binding posts
Sub/Mono Output .... Single RCA unbalanced
Headphone Output 1/8"TRS stereo
Power Output.... 100 Watts per channel into 8 Ohms
200 Watts per channel into 4 Ohms
400 Watts into 8 Ohms (mono)
Minimum Speaker Load....4 Ohms (stereo), 8 Ohms (mono)
Power Consumption, Typical Listening....40 Watts
Power Consumption, Maximum 520 Watts
AC Line Voltage ..... 100-120 VAC/200-240 VAC Manually Switchable
Signal to Noise Ratio ....>95dB
Total Harmonic Distortion 0.09%
Minimum Voltage to Drive Max Power
RCA Analog inputs: 230 mV
Speaker level inputs: 2 V
Signal Sense Trigger Minimum
RCA Analog Inputs 10 mV
Digital Inputs....10 mV (DAC output)
Bass Adjustment....AudioControl AccuBASS®
Digital Analog Converter (DAC).... Wolfson High Performance
32-192 kHz, 16/24 Bit
Weight 4.5 lbs
Dimensions 8.5"W x 5.4"D x 2.9"H
AudioControl Power Rating ......Awesome!
Country of Origin ....USA Engineered and Assembled
......in the great Pacific Northwest Rainforest
Limited Warranty 5 Years
For additional specifications, technical details, and downloads, please visit www.audiocontrol.com
This manual was written, designed, printed and carefully placed right side up into the box in the USA on a wet and rainy day by a team of music lovers dedicated to making good sound great.
© AudioControl 2018, All Rights Reserved. AudioControl®, Rialto 400™ and AccuBASS® are trademarks of AudioControl Inc.
Additional copies of this installation manual are available on our website, or by contacting AudioControl.
AudioControl®
Making Good Sound Great
Rialto ^400^TM
Service
AudioControl has a reputation for providing some of the best support and service in our industry. Our technical team takes pride in ensuring we respond to any customer needs, by providing support through our website and live on the phone from our base here in Seattle, USA.
If the unit needs service, first contact your local dealer or international distributor for advice. You can also contact our tech support team either by email or phone from 8am-5pm Pacific Standard Time (PST). We will verify if there is anything that you can correct yourself.
If we ask you to return the unit, please include the following items:
- A copy of your proof of purchase. No originals please. We cannot guarantee returning them to you.
- A brief explanation of the trouble you are having with the unit. (You'd be surprised how many people forget this.) If you can supply a really detailed description of the problem, this would be so much better, and our service technicians may add you to their Christmas Card list. Please include any notes about the system and other components you are using. Is it an intermittent problem, or all the time?
- A return street address. (No PO Boxes, please).
-
A daytime phone number in case our technicians have a question about the problem you are having, or if they are just feeling lonely.
-
Package the unit in the original packaging if you still have it, and if the children have not used it for art supplies or an ant farm. Use great care and plenty of good packing materials to protect the unit and prevent it from moving about inside the box. Do not use loose materials like packing peanuts or real peanuts, \$5 notes etc.
You are responsible for the freight charges to us, but we'll pay the return freight back as long as the unit is under warranty. We match whatever shipping method you use to send it to us, so if you return the unit overnight freight, we send it back overnight. We recommend United Parcel Service (UPS) for most shipments.
Repair service is available at:
Attention: Service Department
22410 70th Avenue West,
Mountlake Terrace,
WA 98043 USA
Phone 425-775-8461
FAX 425-778-3166
e-mail: sound.great@audiocontrol.com
The Warranty
People are confused by warranties! Lots of fine print. Months of waiting around. Well, fear no more AudioControl is here. Our warranty is designed to make you rave about AudioControl. It's a warranty that looks out for our customers, plus helps you resist the temptation to have your friend, "who is good with electronics", try to repair your AudioControl product. So go ahead, read this warranty, then register your AudioControl product at www.audiocontrol.com/product-registration.
Our warranty has conditional conditions! "Conditional" doesn't mean anything ominous. The Federal Trade Commission tells all manufacturers to use the term to indicate that certain conditions have to be met before they'll honor the warranty. If you meet all of these conditions, AudioControl will, at its discretion, repair or replace any AudioControl products that exhibit defects in materials and/or workmanship during the warranty on your product for five (5) years from the date you bought it, and we will fix or replace it, at our option, during that time.
Here are the conditional conditions:
- You must fully register your purchase within 15 days of the purchase date by going to the AudioControl product registration page at www.audiocontrol.com/product-registration. Failure to register your product will negate the warranty.
-
You need to hold on to your sales receipt! All warranty service requires original sales receipt documentation. The warranty only applies to the original purchaser from an authorized AudioControl dealer. Note: Products purchased from unauthorized dealers are not covered under warranty.
-
If an authorized AudioControl dealer installs your AudioControl product, the warranty is five years, otherwise the warranty is limited to one year.
- Our warranty covers AudioControl products that have been installed according to the instructions in the owner's manual.
- You cannot let anybody who isn't: (A) the AudioControl factory; or (B) somebody authorized in writing by AudioControl service your AudioControl product. If anyone other than (A), or (B) messes with your AudioControl product, the warranty is void.
- The warranty is void if the serial number is altered, defaced or removed, or if your product has been used improperly. Now that may sound like a big loophole, but here is what we mean by this: Unwarranted abuse is: (A) physical damage (don't use your product to level your dining room table); (B) improper connections (120 volts into the RCA jacks can fry the poor thing); (C) sadistic things! This is the best product we know how to build, but for example if you mount it to the front bumper of your car, drop it over the Niagara Falls or use it for Clay Pigeon shooting practice, something will go wrong.
Assuming you conform to 1 through 6, and it really isn't all that hard to do, we get the option of fixing your product or replacing it with a new one at our discretion.
In the event that your product is out of warranty or not covered under our warranty you may request to have any damage repaired at our normal "Out of Warranty" repair cost.
AudioControl®
Making Good Sound Great"
Legalese Section
Rialto ^400^TM
This is the only warranty issued by AudioControl. This warranty gives you specific legal rights, and you may also have rights that vary from state to state. Promises of how well your AudioControl product will work are not implied by this warranty. Other than what we've said we'll do in this warranty, we have no obligation, express or implied. We make no warranty of merchantability or fitness for any particular purpose. Also neither we nor anyone else who has been involved in the development or manufacture of the unit will have any liability of any incidental, consequential, special or punitive damages, including but not limited to any lost profits or damage to other parts of your system by hooking up to the unit (whether the claim is one for breach of warranty, negligence of other tort, or any other kind of claim). Some states do not allow limitations of consequential damages.
AudioControl®
Making Good Sound Great™
Rialto ^400TM
flowchart
graph TD
    A["START"] -->|2| B["437"]
    B -->|8| C["6"]
    B -->|9| D["10"]
    B -->|5| E["1"]
    A --> F["1"]
    F --> A
Installation Manual PN 913-133-0 Rev B