
JGS524 - Network switch NETGEAR - Free user manual and instructions
Find the device manual for free JGS524 NETGEAR in PDF.


| Product Type | Network Switch |
| Brand | Netgear |
| Model | JGS524 |
| Port Count | 24 |
| Port Speed | 10/100/1000 Mbps (auto-sensing) |
| Management | Web-based via ProSafe Plus Switch Utility (Windows only) |
| VLAN Support | Port-Based and 802.1Q VLAN |
| QoS | Port-Based and 802.1p priority, Rate Limiting, Broadcast Filtering |
| IGMP Snooping | Yes, with static router port option |
| Link Aggregation (LAG) | Yes, static LAG groups |
| Loop Detection | Yes, system-wide |
| Port Mirroring | Yes |
| Cable Testing | Yes, on supported models |
| Power Supply | Internal, 100-240V AC, 50/60Hz |
| Dimensions (approx.) | 17.3 x 8.6 x 1.7 in (440 x 218 x 44 mm) |
| Weight (approx.) | 5.5 lbs (2.5 kg) |
| Operating Temperature | 32° to 104°F (0° to 40°C) |
| Safety Cautions | Use only supplied power adapter; ensure proper ventilation; avoid water and moisture. |
| Maintenance | Password change, firmware upgrade, factory reset, configuration backup/restore via utility. |
| Spare Parts | Not provided; power supply internal, no user-serviceable parts. |
| User Manual | Available on NETGEAR support site and included CD. |
Frequently Asked Questions - JGS524 NETGEAR
User questions about JGS524 NETGEAR
0 question about this device. Answer the ones you know or ask your own.
Ask a new question about this device
Download the instructions for your Network switch in PDF format for free! Find your manual JGS524 - NETGEAR and take your electronic device back in hand. On this page are published all the documents necessary for the use of your device. JGS524 by NETGEAR.
USER MANUAL JGS524 NETGEAR
ProSafe Plus Switch Utility
© NETGEAR, Inc. All rights reserved
No part of this publication maybe reproduced, transmitted, transcribed, stored in a retrieval system, or translated into any language in any form or by any means without the written permission of NETGEAR, Inc.
NETGEAR, the NETGEAR logo, and Connect with Innovation are trademarks and/or registered trademarks of NETGEAR, Inc. and/or its subsidiaries in the United States and/or other countries. Information is subject to change without notice. Other brand and product names are registered trademarks or trademarks of their respective holders.
Technical Support
Thank you for choosing NETGEAR. Register your product, get the latest product updates, get support online, or for more information about the topics covered in this manual, visit the Support website at:
http://support.netgear.com
Phone (US & Canada only): 1-888-NETGEAR
Phone (Other Countries): Check the list of phone numbers at:
http://support.netgear.com/app/answers/detail/a_id/984
Statement of Conditions
To improve internal design, operational function, and/or reliability, NETGEAR reserves the right to make changes to the products described in this document without notice. NETGEAR does not assume any liability that might occur due to the use, or application of, the product(s) or circuit layout(s).
Revision History
| Publication Part Number Publish Date Comments | |
| 202-10524-05 December 2012 Updated document, new template. | |
| 202-10524-04 May 2012 LAG and registration features were added. | |
| 202-10524-03 September 2010 Multicast and IGMP Snooping features were added. | |
| 202-10524-02 February 2010 Multiple language support added to menus,cable testing, Rate Limiting, and Broadcast Filtering features were added. | |
| 202-10524-01 September 2009 First publication. | |
Contents
Chapter 1 Getting Started
Install the ProSafe Plus Switch Utility....6
WinPCap Workaround for Windows 8....8
Registration 8
Discovering Switches 9
Utility Features Overview ....10
Network....10
System 10
VLAN 11
QoS....11
Help 11
Switch Settings....11
Uninstall the Utility 12
Chapter 2 Network and System Configuration
Network Switch Access 14
System Features 14
Network 16
Switch Selection....16
Switch Information 18
DHCP Mode Selection ....18
Set the IP Address Information....19
Maintenance....19
Change Password 19
Device Reboot 19
Reset Factory Defaults ....20
Firmware Upgrade ....20
Save Configuration 20
Restore Configuration....21
Monitoring....21
Port Statistics....21
Port Mirroring .....21
Cable Test 22
MultiCast....22
IGMP Snooping 22
Management....23
LAG 24
Chapter 3 Virtual LAN Configuration
VLAN Overview .....26
Port-Based Configuration .....27
ProSafe Plus Switch Utility
Basic Port-Based VLAN Configuration.....27
Advanced Port-Based VLAN Configuration .....27
802.1Q-Based Configuration 28
Basic 802.1Q VLAN Configuration .....28
Advanced 802.1Q VLAN Configuration .....28
VLAN Configuration .....28
VLAN Membership 29
Port PVID 29
Port Tagging....30
Chapter 4 Quality of Service
QoS Overview 32
QoS Global Configuration. 32
Rate Limiting 35
Broadcast Filtering 35
Chapter 5 Help
Online Help. 38
User Guide ....39
Support Information....39
About the Utility 39
Registration 40
Appendix A Default Settings
Index
This chapter contains the following topics:
• Install the ProSafe Plus Switch Utility
• WinPCap Workaround for Windows 8
- Registration
• Discovering Switches
• Utility Features Overview
- Switch Settings
- Uninstall the Utility
Install the ProSafe Plus Switch Utility
To take advantage of the enhanced features on ProSafe Plus switches, you can install and use the ProSafe Plus Switch Utility. The utility is on the Resource CD shipped with ProSafe Plus switches.
The utility is supported only on systems that use Microsoft Windows. It can be installed on any Windows computer on the same network as the switches to be managed. If an earlier version of the utility is present on your computer, installing this version replace the older version. Newer versions of the utility are backward-compatible and support all previously released ProSafe Plus switches. If the version of the utility you are trying to install is older than the one already installed on the computer, the installation is not performed.
To install the utility:
- Insert the Resource CD that came with your switch into the computer that you want to use to manage your switches.
The Resource CD home screen displays.
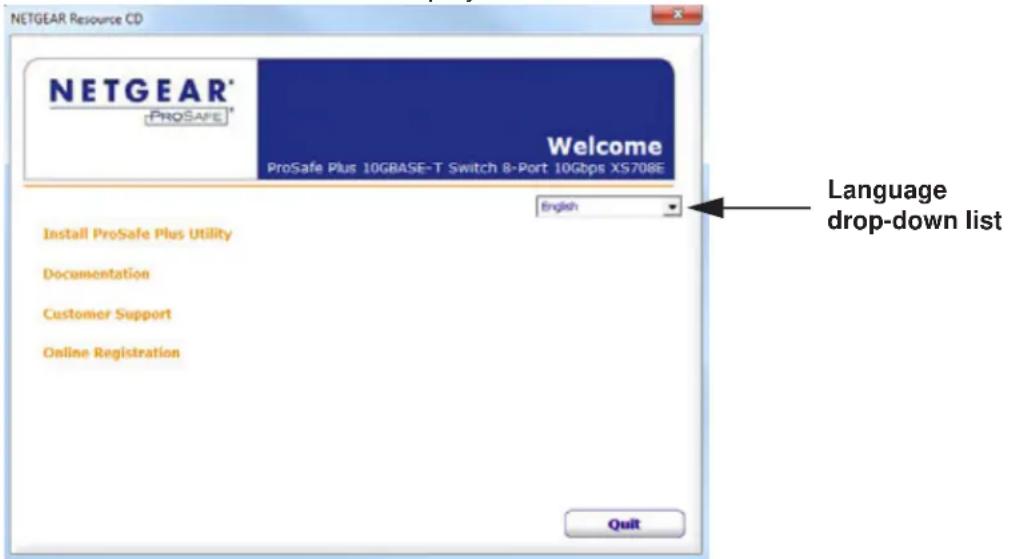
Resource CD screens and the installation guide for the switch can be displayed in several languages. To select the desired language, use the drop-down list in the upper right corner of the resource CD home screen.
ProSafe Plus Switch Utility
If the resource CD home screen does not display, your computer might have the Autorun feature disabled. You can enable your computer's Autorun feature or use the computer's file manager to navigate to the CD and double-click Autorun.exe.
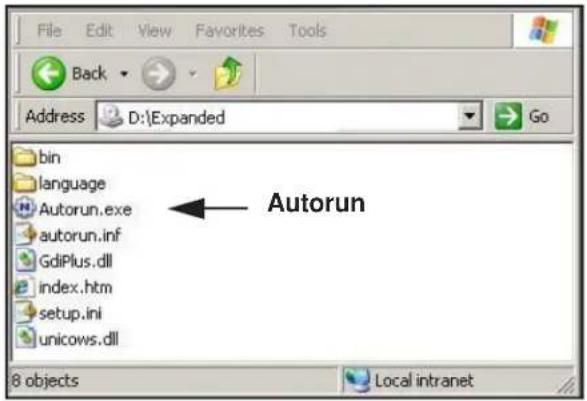
Note: The utility name might vary slightly between different ProSafe Plus switch models.
2. Click the Install ProSafe Plus Utility link.
The utility uses two network programs, WinPcap and Adobe AIR, to process network commands. WinPcap is used to manage FS116E and JFS524E switches. If not already installed on your computer, these two programs also are installed and placed in your program directory.
The WinPcap and Adobe AIR programs might be used by other network applications and might already be installed on your computer. If so, a message displays asking if you want to reinstall WinPcap.
Note: WinPcap is not supported on Windows 8. If your computer uses Windows 8, a WinPcap error message displays during installation.
If you are not managing FS116E or JFS524E switches, ignore the message.
If you are managing FS116E or JFS524E switches using Windows 8, WinPcap must be re-installed using Windows 7 compatibility mode.
For more information, see the WinPCap Workaround for Windows 8 on page 8.
ProSafe Plus Switch Utility
a. Click OK if you think the currently installed WinPcap program is an older version or might be corrupted.
b. Click Cancel if you do not want to overwrite the program already installed. Clicking Cancel ends the WinPcap portion of installation, but the remaining components are installed.
c. If the Adobe AIR program is already installed, an "already installed" message displays. Click Close to end the Adobe AIR portion of installation.
- Follow the prompts to install the utility.
The installation process creates a NETGEAR subdirectory under the \Program Files directory on your computer, copies the utility program into the \Program Files\Netgear\ProSafe Plus Utility directory, and places a utility icon on the computer desktop.

The installation is complete. When the InstallShield Wizard Complete screen displays, select the Launch ProSafe Plus Utility check box if you want to launch the utility immediately. Click Finish. To launch the utility later, click the utility icon.
WinPCap Workaround for Windows 8
If your computer uses the Windows 8 operating system, a workaround is required.
To install WinPCap on a Windows 8 system:
- Download the latest WinPCap installer for Windows from http://www.winpcap.org/ and save it on the computer.
- Right-click the WinPCap installer program and select Properties.
- Click the Compatibility tab and select Run this program in compatibility mode for:
- Select W indows 7.
- Click Apply.
Registration
The first time that you select a switch, the Registration screen displays. It has three buttons:
- Turn Off. The Registration screen closes. The pop-up screen displays again if the switch is selected 24 hours after the switch is restored to factory default settings.
- Remind Me Later. The Registration screen closes. If over 24 hours have passed, and you again select the switch, the Registration screen displays again.
- Register Now. If you have an Internet connection, you can register your product at the NETGEAR website.
Discovering Switches
When the utility is launched, it immediately searches the network for ProSafe Plus switches.
Local computer firewall applications such as Symantec Endpoint Protection can prevent the utility from communicating with the switches. If the utility is unable to discover your switches and you are using a local firewall, you must turn off the firewall function for discovery to work properly. After a few seconds, the utility discovers and lists all ProSafe Plus switches in your network or in the same broadcast domain. Discovery continues through the network until blocked by a router or firewall.
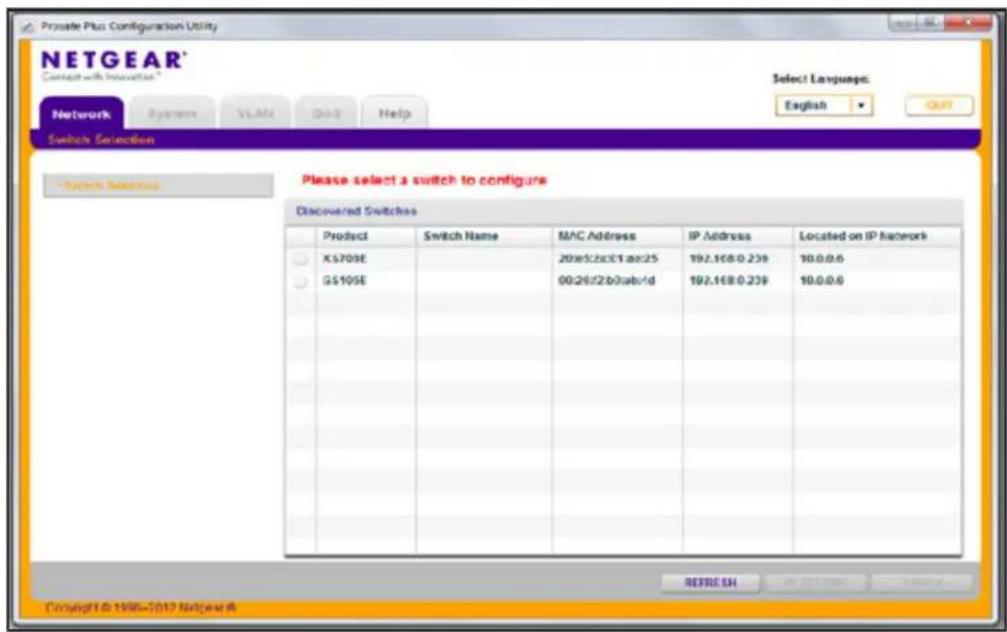
The discovered switches are listed as shown.
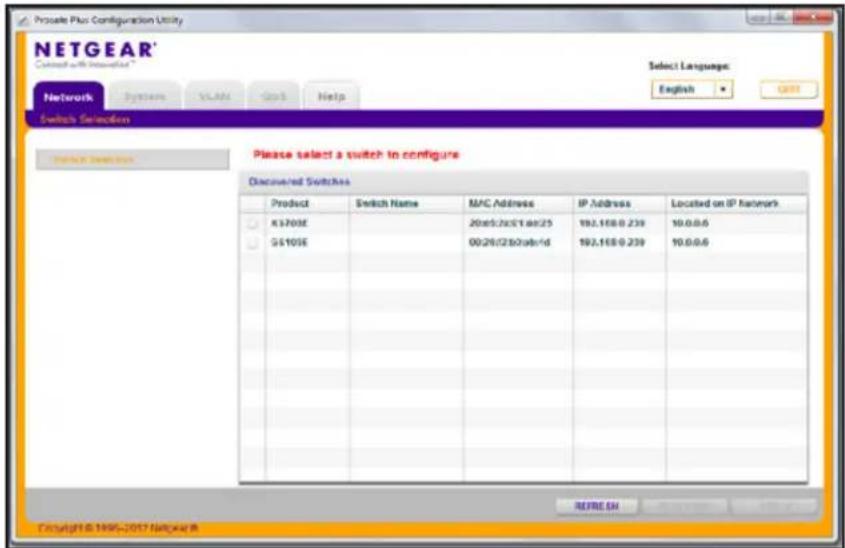
You can now select a switch to configure or display its status.
Note: For you log in to a switch, the computer that you are using must be on the same subnet as the switch. If you are using a standalone computer, you must either change the IP and subnet of your computer or use the IP Setting menu option on the utility to change the switch's IP and subnet.
ProSafe Plus Switch Utility
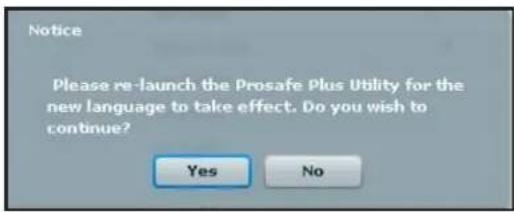
You can select a language for the utility user interface. In the Select Language drop-down list, select a language. You are asked to restart the utility to enable the selected language.
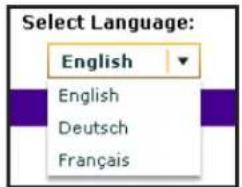
Utility Features Overview
The utility configures switch features and provides status and support information. The features are arranged on tabs.

Note: The manager IP address and the switches to be managed must be in the same subnet. If they are not in the same subnet, only the Network tab and the Help tab are available for use.
Network
This screen displays all the Plus switches that the utility discovered. You can select a switch to see its IP settings, change the DHCP mode, and change the IP settings.
System
The System tab provides access to general configuration information, including the following:
- Status. Indicates the operational status of each port of the selected switch. If your switch supports the switch information feature, you can also display information such as the MAC address, IP address, subnet mask, and gateway address as well as changing the switch password for all switches.
- Maintenance. Allows you to change the administrator password, reboot the switch, reset to factory default settings, and if your switch supports it, upgrade switch firmware and save and restore configuration settings.
ProSafe Plus Switch Utility
- Monitoring. Displays port statistics (bytes sent or received) and CRC error packets, tests cable connections, and allows you to mirror ports.
- MultiCast. Allows you to change the IGMP snooping settings.
• Management. Allows you to enable or disable the system-wide setting for loop detection. - LAG . Allows you to enable or disable link aggregation groups (LAG).
VLAN
A VLAN is a virtual LAN network. The VLAN tab has the following options:
- Port Based. Allows you to assign ports to virtual networks.
• 802.1Q . Allows you to create virtual networks using 802.1Q criteria.
QoS
The QoS (Quality of Service) tab has the following options:
- Port Based. Allows you to assign communication priorities to ports.
• 802.1p Based. Uses communication priorities from 802.1p tags in the data. - Rate Limit . Allows you to set maximum data rate for the device or on some devices per port.
- Broadcast Filtering. Protects your network from broadcast packet storms that can interfere with the processing of normal data.
Help
The Help tab has the following information:
• Online Help. Provides online access to technical support information and this manual.
- About the Utility. Provides version and copyright information.
- Registration. If you have an Internet connection, provides a way you can register your product at the NETGEAR website.
Switch Settings
Default settings for the management features are listed in Appendix A, Default Settings.
Note: It is possible to specify port settings that block further access to the switch you are configuring. You can reset the switch manually to restore access. If you do reset the switch manually, your previous settings are lost.
Uninstall the Utility
You can uninstall the ProSafe Plus Utility.
To uninstall the utility:
- Select Start > Control Panel > Add or Remove Programs.
- Select ProSafe Plus Utility and click Change/Remove.
You are prompted to confirm the remove command.
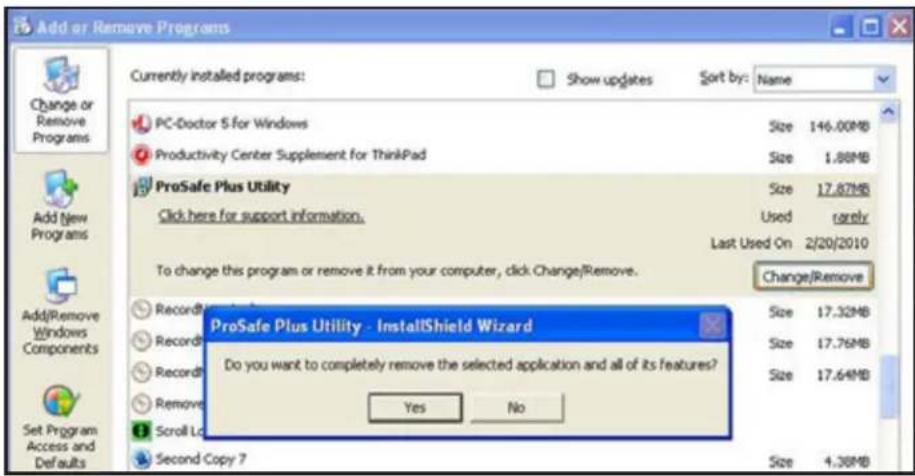
- Click the Yes button.
The utility is removed.
Network and System Configuration
2
This chapter contains the following topics:
• Network Switch Access
- System Features
- Network
- Maintenance
• Monitoring
- MultiCast
- Management
• LAG
Network Switch Access
When you click the Network tab, a list of discovered Plus switches in your network displays. You can select a switch to display general information, enable DHCP, and configure the IP address, subnet mask, and gateway of the selected switch.
To access the switch information, from the Network screen, select the switch, then click the IP Setting button at the bottom right of the screen. The IP Settings screen displays.
Note: If the management IP and switch are not on the same subnet, you see an error message and cannot access the other top-level tabs except for the Help tab.
The switch selection remains in effect until you select a different switch, or quit the utility.
System Features
To access a switch for further information or configuration, you must select the switch and then click Apply to log in.
System features include the following:
ProSafe Plus Switch Utility
- Status. Indicates the selected switch and its operational status.
- Maintenance. Allows you to change the administrator password, reboot the switch, reset to factory default settings, and if supported by the selected switch, upgrade switch firmware and use the configuration save and restore feature.
• Monitoring. Displays port statistics (packets sent or received), tests cable connections, and allows you to mirror ports. - MultiCast . Allows you to change the IGMP snooping settings.
• Management. Allows you to enable or disable the system-wide setting for loop detection. - LAG. Allows you to enable or disable LAGs (link aggregation group).
Table 1. Features available from the System tab
| Feature Description | |
| Status | |
| Switch Status Displays the selected switch and the operational status of each port, and enables you to assign a name to the switch. | |
| Switch Information Displays general information for the selected switch and enables you to change the DHCP mode, IP address, subnet mask, and gateway address. | |
| Maintenance | |
| Change Password Changes password for the selected switch. | |
| Device Reboot Restarts the selected switch using configured settings. | |
| Factory Default Restarts the selected switch with factory default settings. | |
| Firmware Upgrade Updates the selected switch with a firmware update saved on the computer. | |
| Save Configuration Provides a field for entering the path to save the backed-up configuration settings as a file. | |
| Restore Configuration | Provides a field for entering the path from which a saved configuration can be retrieved. |
| Monitoring | |
| Port Statistics Displays port network traffic for the selected switch. | |
| Mirroring Allows a port to receive data sent to another port. | |
| Cable Tester Checks cable connections for the ports of the selected switch. | |
| MultiCast | |
| IGMP Snooping Allows switch to selectively forward multicast traffic. | |
| LAG | Allows multiple Ethernet links to be combined to a single logical link. Only the JGS524E and XS708E switches support LAGs. |
Network
The Network screen displays a list of the discovered Plus switches in your network. You must select a switch and click Apply to display further information and access it for further configuration.
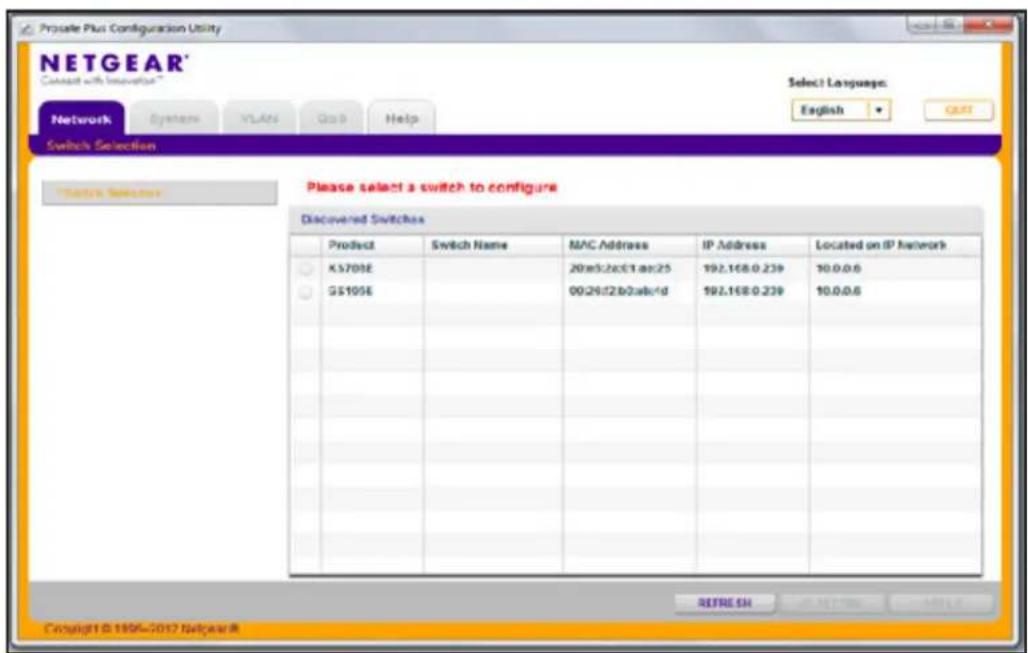
Switch Selection
To use any of the System tab features, you must first select a switch.
Note: To log in to a switch for further configuration, the computer that you are using must be on the same subnet as the switch. If you are using a standalone computer, you must either change the IP address and subnet of your computer or use the IP Setting menu option on the utility to change the switch's IP and subnet.
To select a switch:
- Select the row for the desired switch and click Apply.
You are asked to enter the password. The default password for all switches is password. - Enter the switch password and click Login.
ProSafe Plus Switch Utility
The port status for the switch displays.
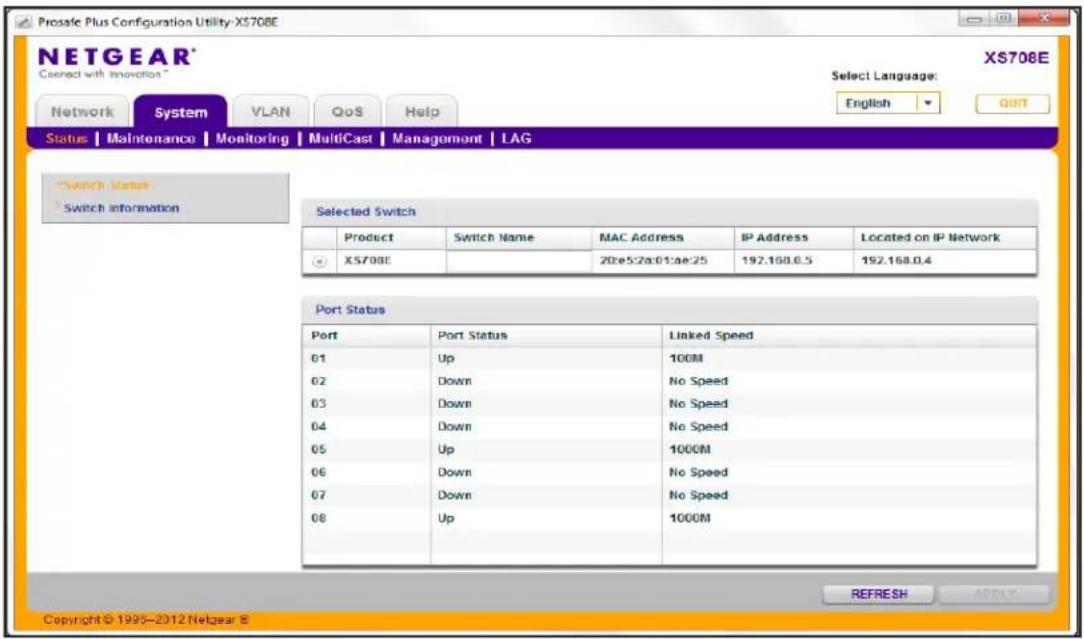
This screen displays the status (up or down) of the ports on the switch and the speed of the device connected to the port. The switch automatically senses the speed of the device connected to each port.
You can assign a name to the selected switch by entering the name in the Switch Name field. The switch name can be up to 20 characters. The switch is updated with a new name after you click Apply.
Switch Information
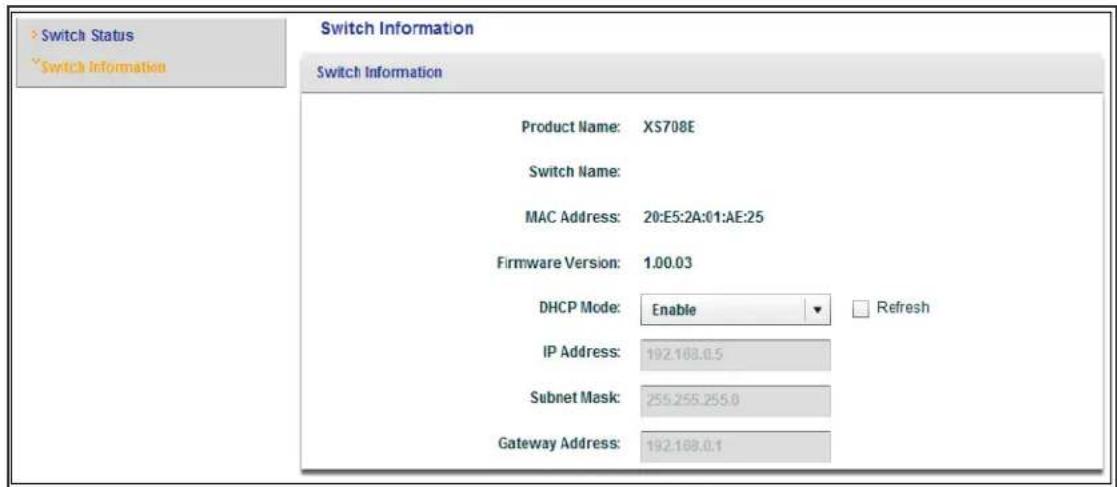
The Switch Information screen displays more information about the selected switch. This information varies depending on the switch model. If the selected switch supports the Switch Information feature, you can view or set the IP address, subnet mask, and gateway address.
DHCP Mode Selection
The Switch Information screen contains a field for DHCP (Dynamic Host Configuration Protocol) Mode selection. When you enable this feature, the switch obtains a network IP address from a DHCP server in the network. Each time the switch is powered on or reset, it requests an IP address from a DHCP server in the network. This is called a dynamic IP address. If your network does not have a DHCP server, a time-out message displays. If the switch fails to retrieve an IP address from a DHCP server, a default IP address of 192.168.0.239 is entered.
To enable DHCP operation:
- Select System > Switch Information.
The Switch Information screen displays.
-
In the DHCP Mode list, select Enable.
-
Click Apply.
The IP Address, Subnet Mask, and Gateway Address fields are disabled (grayed out).
To disable DHCP address assignment, repeat the previous procedure and select Disable. When you click Apply, the IP Address, Subnet Mask, and Gateway Address information fields are enabled again.
To have the DHCP server assign an IP address again, make sure that the DHCP Mode is enabled, then select the Refresh check box next to the DHCP Mode selection list and click Apply.
ProSafe Plus Switch Utility
Set the IP Address Information
Enter IP address and subnet mask values for the switch as well as the address of the gateway device used by the switch.
To specify IP interface information:
- Select System > Status > Switch Information. The Switch Information screen displays.
- In the DHCP Mode list, select Disable. The IP Address, Subnet Mask, and Gateway Address fields are enabled.
- Enter the IP address, subnet mask, and if available, the gateway address, and click Apply.
Maintenance
The Maintenance feature allows you to change the password for the selected switch, perform a device reboot, reset the switch to its factory default settings, or upgrade the switch firmware.
Change Password
To change the password for a switch:
- Select System > Maintenance. The Maintenance menu and Change Password screen display.
- Enter the old password (the default is password) and then enter the new password.
- Click Apply.
Device Reboot

WARNING:
Rebooting the switch to briefly disrupts network traffic through the switch.
To reboot the selected switch:
- Select System > Maintenance > Device Reboot. The Device Reboot screen displays.
- Select the check box in the Device Reboot screen.
- Click Apply.
Reset Factory Defaults

WARNING:
Resetting the switch to factory defaults can briefly disrupt network traffic through the switch.
To reset the selected switch to factory default settings:
- Select System > Maintenance > Factory Default. The Factory Default screen.
- Select the check box in the Factory Default screen.
- Click Apply.
Firmware Upgrade
Note: After firmware downloading is complete, the switch automatically reboots. This briefly disrupts network traffic through the switch.
To upgrade switch firmware, first download a firmware upgrade file for the selected switch from the NETGEAR support website to your computer.
To upgrade firmware on the selected switch:
- Select System > Maintenance > Firmware Upgrade.
The Firmware Upgrade screen displays. - Click the Browse button and navigate to the location on your computer containing the firmware upgrade file.
- Select the upgrade file and click Apply.
The firmware is downloaded from your computer to the switch and the switch automatically reboots.

WARNING:
Do not disconnect the link or power down the switch during firmware upgrade.
Save Configuration
To save the current configuration on the selected switch:
- Select System > Maintenance > Save Configuration.
ProSafe Plus Switch Utility
The Save Configuration screen displays.
- Click the Browse button and navigate to the location on your computer where you want to save the configuration.
- Click Apply.
The configuration is saved in the designated file.
Restore Configuration
To restore a previously saved configuration to the selected switch:
- Select System > Maintenance > Restore Configuration.
The Restore Configuration screen displays.
- Click the Browse button and navigate to the location on your computer where the desired configuration is stored.
- Click Apply.
The chosen configuration is restored to the selected switch.
Monitoring
The screen you access from the Monitoring menu provide statistics on port data volume and allow you to configure port mirroring, and on some switch models, perform cable testing.
Port Statistics
To view port statistics, select System > Monitoring. The port statistics for the selected switch are displayed in bytes received, bytes sent, and packet errors.
Port Mirroring
Port mirroring allows a port to see the data on another port.
To allow a switch port to see the data on another port:
- Select Systems > Monitoring > Mirroring.
The Mirroring screen displays. - Enable Mirroring.
- In the Source drop-down list, select the source port or ports.
- In the Destination Port drop-down list, select the port.
- Click Apply.
Data on the source port is routed to the destination port.
ProSafe Plus Switch Utility
Cable Test
Some switch models have a cable testing feature that allows you to check for cable faults. If a cable fault is found on a port, the cable test gives an estimate of the distance of the fault from the switch.
To perform a cable test:
- Click System > Monitoring > Cable Tester.
The Cable Tester screen displays.
- Select the ports to be tested and click TEST SELECTED PORT.
If a problem with the cable is found, the approximate distance to the cable fault is displayed.
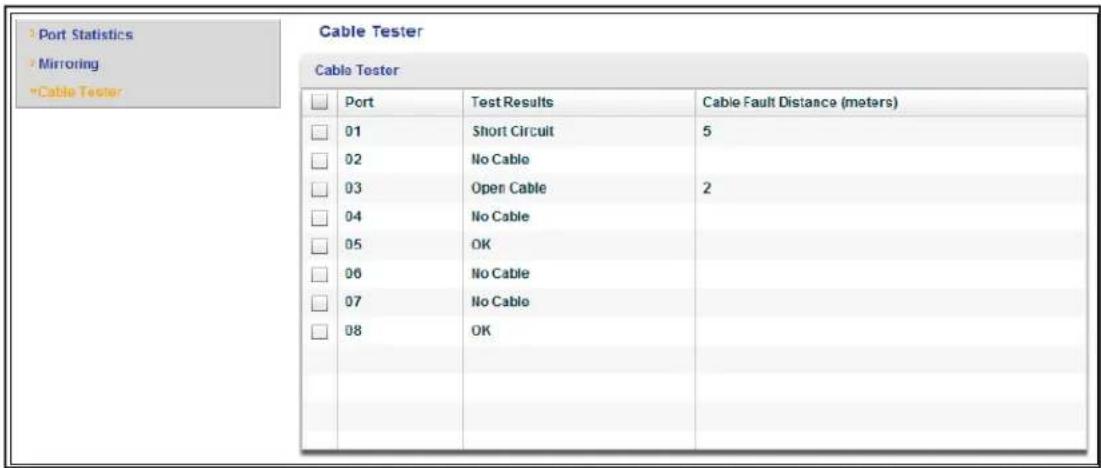
Note: The distance to the cable fault can be up to 5 meters from the actual fault.
MultiCast
IGMP Snooping
Internet Group Management Protocol (IGMP) snooping allows a switch to forward multicast traffic intelligently on the switch. Multicast IP traffic is traffic that is destined to a host group. Host groups are identified by class D IP addresses, which range from 224.0.0.0 to 239.255.255.255. Based on the IGMP query and report messages, the switch forwards traffic
ProSafe Plus Switch Utility
only to the ports that request the multicast traffic. This feature prevents the switch from broadcasting the traffic to all ports and possibly affecting network performance.
To enable or disable IGMP snooping, in the IGMP Snooping Status list, select Enable or Disable and click Apply.
You can also change the VLAN for which the IGMP snooping is enabled. In the VLAN ID Enabled for IGMP Snooping field, enter a valid VLAN ID, and click Apply. This field is dimmed if VLAN is not enabled.
Validate IGMPv3 IP header
Some network devices might not conform to the IGMPv3 standard. When the Validate IGMPv3 IP header option is enabled, IGMP messages are required to have TTL = 1, ToS Byte = 0xC0 (Internetwork Control), and the router alert IP option (9404) set; otherwise, the packets are ignored.
Block Unknown MultiCast Address
When this feature is enabled, multicast packets are forwarded only to the ports that are in the multicast group learned from IGMP snooping. All unknown multicast packets are dropped.
IGMP Snooping Static Router Port
You can select a port to be the dedicated IGMP snooping static router port if no IGMP query exists in the network for the switch to discover the router port dynamically. After a port is selected as the static router port, all IGMP Join and Leave reports are forwarded to it. If you select any in this field, IGMP Join and Leave packets are sent to every port of the switch. Only some models support the any setting in this field.
Management
Loop detection is indicated on the switch when the LEDs of a port blink at a constant speed.
To enable or disable loop detection:
- Select System > Management.
- In the Loop Detection list, select Enable or Disable.
LAG
Link aggregation groups (LAGs) allow you to combine multiple Ethernet links to a single logical link. Network devices treat the aggregation as if it were a single link, which increases fault tolerance and load sharing. Configure the LAG members before you enable the LAG.
Note: Static LAG is available only for JGS524E and XS708E switches.
To enable or disable a LAG:
- Select System > LAG > LAG Configuration.
- Select the LAG ID that you want to configure.
- In the Admin Mode list, select Enable or Disable.
- Click Apply.
To add ports to be LAG members:
- Select System > LAG > LAG Membership.
- Select the LAG ID you want to configure.
- Select the ports that you want to be the LAG ID member ports.
- Click Apply.
Virtual LAN Configuration
3
This chapter contains the following topics:
- VLAN Overview
- Port-Based Configuration
• 802.1Q-Based Configuration
VLAN Overview
Virtual LANs are made up of networked devices that are grouped logically into separate networks. You can group ports on a switch to create a virtual network made up of the devices connected to the ports. VLANs can be grouped using port-based or 802.1Q criteria.
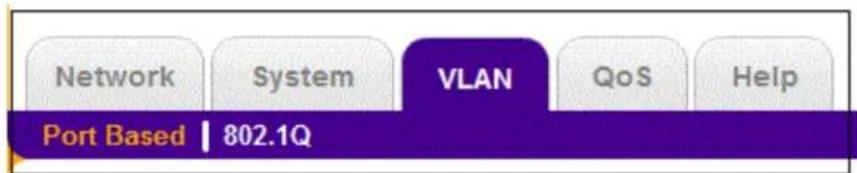
The VLAN tab has the following options:
- Port Based. Allows you to assign ports to virtual networks. Data from a port that is a member of a VLAN group is restricted to other members of that VLAN group. This feature provides an easy way to partition a network into private sub networks.
- 802.1Q . Allows you to create virtual networks using 802.1Q criteria. When using 802.1Q VLAN configuration, you configure ports to be a part of a VLAN group. When a port receives data tagged for a VLAN group, the data is discarded unless the port is a member of the VLAN group. This technique is useful for communicating with devices outside of your local network as well as still receiving data from other ports not in your VLAN group. It requires that you know the VLAN group IDs used.
Port-Based Configuration
Port-based virtual LAN configuration assigns ports on the selected switch to a virtual LAN group. The number of VLANs that can be created is limited to the number of ports on the switch.
Basic Port-Based VLAN Configuration
The Basic Port Based VLAN Configuration screen lets you partition your network into different segments. Ports with the same ID are grouped into the same VLAN group.
To assign members of a VLAN group:
- Select the switch.
- Select VLAN.
The Basic Port-Based VLAN Configuration screen displays.
- Select Enable.
A message displays asking if you want to delete previous VLAN settings.
- Click Ye s.
The Basic Port Based VLAN Configuration screen displays.
- For each port to be added to the group, enter the ID of the VLAN group.
If all the VLAN groups share an uplink to the Internet or servers, enter all in the VLAN Group field for the port that you want to use for the uplink.
- When you are finished adding ports to the VLAN group, click Apply.
Advanced Port-Based VLAN Configuration
The advanced port-based configuration uses a slightly different user interface to allow you to assign ports to multiple VLAN groups.
To assign members of a VLAN group:
- Select the switch.
- Click the VLAN tab.
The Port-Based VLAN Configuration screen displays.
- Select Advanced.
The Advanced Port-Based VLAN Configuration screen displays.
- Select Enable.
A message displays asking if you want to delete previous VLAN settings.
- Click Ye s.
ProSafe Plus Switch Utility
The Advanced Port-Based VLAN Configuration screen displays.
Note: VLAN IDs are limited to the number of ports on the switch, 1–5 for a five-port switch.
- Select a VLAN ID from the VLAN identifier list and select the ports that you want to add to the VLAN.
- Click Apply.
If you want to create more VLANs, repeat these steps with another VLAN ID.
802.1Q-Based Configuration
802.1Q VLAN configuration can be done using basic or advanced methods.
Basic 802.1Q VLAN Configuration
In Basic 802.1Q VLAN configuration, you configure ports to a VLAN group ID (1–4093 or all).
To configure ports using 802.1Q criteria:
- Select the switch.
- Select VLAN.
The Port-Based VLAN Configuration screen displays.
- Select 802.1Q on the menu.
- Select Enable.
- For each port to be configured, enter the VLAN group ID (1–4093 or all) in the field below the port.
- When you are finished configuring ports, click Apply.
Advanced 802.1Q VLAN Configuration
In advanced 802.1Q VLAN configuration, you configure ports to a VLAN group ID (1–4093 or all). The advanced configuration feature allows you to create and update VLAN groups with more information.
VLAN Configuration
The VLAN Configuration screen lists the currently defined VLANs and the ports assigned to each.
ProSafe Plus Switch Utility
To add VLAN groups:
In the VLAN ID field at the bottom right of the screen, enter the VLAN ID (1-4094) for the VLAN you want to configure and click Add. The new VLAN group is displayed in the VLAN ID column.
- After you create a new VLAN ID, click VLAN Membership to add ports to the group. See VLAN Membership on page 29.
To delete a VLAN group:
- Select the check boxes for the VLANs to be deleted.
Selecting the check box at the top of the column selects all VLAN IDs.
- Click Delete.
The selected VLAN groups are deleted.
VLAN Membership
To add ports to a VLAN group:
- Select VLAN Membership from the menu on the left.
The VLAN Membership screen displays.
-
In the VLAN Identifier drop-down list, select the VLAN group you want to configure.
-
Select the check boxes for the ports you want to add to the VLAN group. You can use the Group Operation commands to add all ports or clear the current selections.
Note: Some switches allow port tagging on the VLAN Membership screen. See Port Tagging on page 30.
-
Click Apply.
-
Return to the VLAN Configuration screen to verify your selections.
Port PVID
A Port Default VLAN ID (PVID) is a VLAN ID tag that the switch assigns to data packets it receives that are not already addressed (tagged) for a particular VLAN group. If you have a computer on port 6 and you want it to be a part of VLAN group 2, configure port 6 to automatically add a PVID of 2 to all data received from the computer. This step ensures that the data from the computer on port 6 can be seen only by other members of VLAN group 2.
You can assign only one PVID to a port.
To assign a PVID to a port:
- Select a switch.
ProSafe Plus Switch Utility
- Select VLAN > 802.1Q > Advanced > Port PVID.
The Port PVID screen displays.
- Select the port you want to configure.
- Enter the PVID you want to assign to the ports and click Apply.
Port Tagging
Port tagging allows a port to add VLAN ID tags to data packets sent through the port. The tag identifies the VLAN to receive the data.
Some switches allow port tagging to be done on the VLAN Membership screen. If so, the port check boxes allow you to select U (un tagged) or T (tagged) in addition to adding the port to the VLAN group. This step causes the data for an individual port to be tagged (associated) with a VLAN group.
To tag data from ports:
- Click the VLAN tab and select 802.1Q > Advanced > Port Tagging.
The Port Tagging screen displays. - Select the ports whose data you want tagged.
- Select T agging Control.
- Click Apply.
To untag data from ports:
- Click the VLAN tab and select 802.1Q > Advanced > Port Tagging.
The Port Tagging screen displays. - Select the ports whose data you want untagged.
- Select UnT ag Tagging Control.
- Click Apply.
Quality of Service
4
This chapter contains the following topics:
- QoS Overview
- Rate Limiting
- Broadcast Filtering
QoS Overview
Many different classes of data can be sent across a network. Depending on the volume of traffic on the network and the capacity of the equipment in the network, data can be delayed, or lost and retransmitted before reaching its destination. Normally, lost or delayed data is not a problem because the data is reassembled at the destination.
If the data consists of text or numeric data to be stored on the destination computer, you would not notice the delay. But if the data was voice, streaming video, or other delay-sensitive data, delays would be undesirable. Video sequences would be jerky and voice communication would have annoying gaps.
The QoS (Quality of Service) feature in the ProSafe Plus switches allows you to control the flow of data passing through the switch.

The QoS tab has these options:
- QoS. Assigns priorities to data.
• Rate Limit. Set limits on transmission rates for data passing through the switch. - Broadcast Filtering . Blocks mass transmissions of broadcast packets from being forwarded to all ports. All the QoS features have default settings. It is not necessary to configure any settings to use the ProSafe Plus switches. The following table lists the default settings.
Table 2. QoS Global Configuration Default Settings
| Feature Setting | |
| QoS Mode 802.1p Based | |
| Port Priority Low priority for each port | |
| Rate Limit | |
| Ingress No limit | |
| Egress No limit | |
| Broadcast Filtering Disabled |
QoS Global Configuration
Global configuration allows you to assign priorities for how the switch transmits data. You can assign priority by port number (port based) or by the type of data being transmitted (802.1p based). You typically assign a low priority for normal classes of data (email, Internet
ProSafe Plus Switch Utility
browsing, and ordinary data transfers) and high priority to video, voice, and other delay-sensitive data.
Port-Based Priority
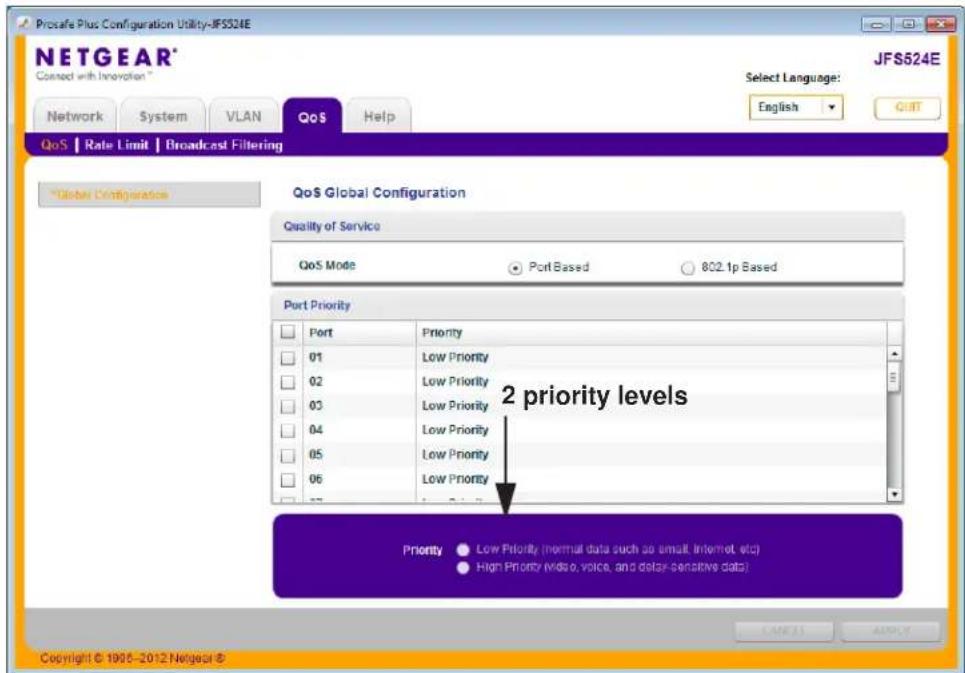
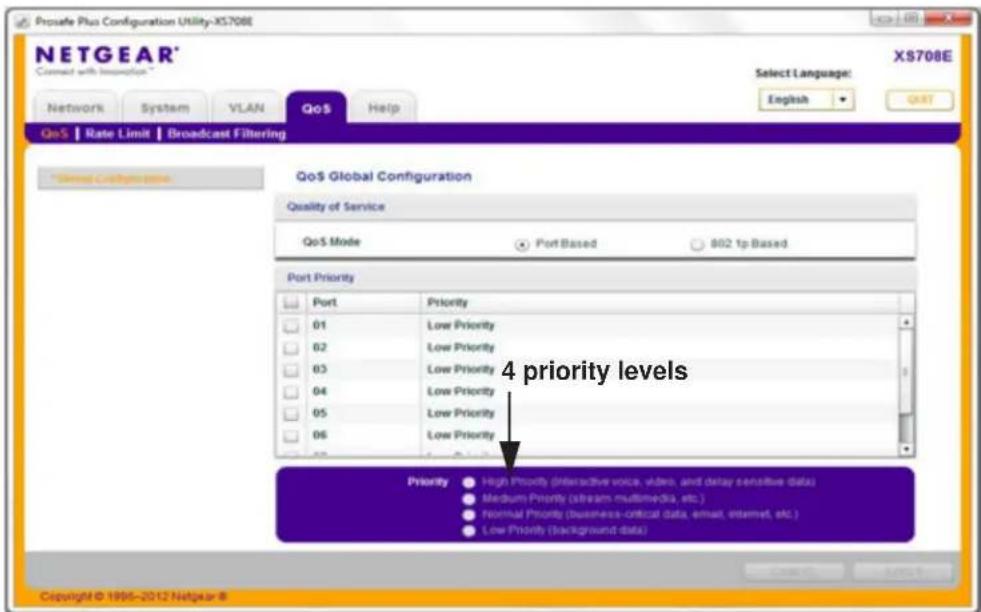
Port-based priority works by assigning a priority to all data passing through a particular port. A higher priority transmits data with a minimum of delays. If packets arrive at several ports at the same time, the ports configured as higher priority transmit their packets first. You must determine which ports are going to carry delay-sensitive data.
Some switches allow you to select between two priority levels (High and Low).
ProSafe Plus Switch Utility
Other switches allow four levels (High, Medium, Normal, and Low).
To assign port-based priorities:
- Click the System tab and select the radio button for the switch that you want to configure.
- Click the QoS tab.
The QoS Global Configuration screen displays.
-
Select the ports that you want to have a particular priority.
-
Select the priority level that you want to assign from the list at the bottom of the screen.
-
Click Apply.
The selected ports are displayed with the new priority.
- Repeat for the remaining ports.
802.1p-Based Priority
802.1p-based priority uses a header in the data packet that identifies the class of data in the packet (for example, voice or video). When 802.1p-based priority is used, the switch reads information in the packet header to determine the priority to assign to the packet. All ports on the switch check the packet header and transmit the packet with a priority determined by the packet content.
To assign 802.1p-based priority:
- Click the System tab and select the radio button for the switch that you want to configure.
- Click the QoS tab. The QoS Global Configuration screen displays.
ProSafe Plus Switch Utility
- Select the 802.1p Based radio button.
A message displays warning you that previous QoS settings for the switch will be lost.
- Click Yes.
Data is now processed based on 802.1p priority tags in the data.
Rate Limiting
You can limit the rate at which the switch accepts incoming data and the rate that it retransmits outgoing data. You can set rate values. The rate choices vary depending on the switch model.
Rate limiting can be set for a port in addition to other QoS settings. If a port has a rate limit set, the switch restricts the acceptance or retransmission of data to the values configured.
To configure rate limiting:
- Click the System tab and select the radio button for the switch that you want to configure.
- Select QoS > Rate Limit.
The QoS Rate Limit screen displays.
- Select one or more ports, and then select ingress and egress rates.
- Click Apply.
The rates are displayed opposite the selected ports.
- Repeat for the remaining ports.
Broadcast Filtering
A switch can be configured to block massive transmission of broadcast packets being forwarded to every port on the same VLAN. This feature is also known as broadcast storm protection.
Failure to block broadcast storm packets can cause a delay or halt to other data. Some switches allow you to select a storm control rate for each port; others assign a predetermined storm control rate for all ports on the switch.
To configure broadcast filtering:
- Click the System tab and select the radio button for the switch you want to configure.
- Select QoS > Broadcast Filtering.
- The QoS Broadcast Filtering screen displays.
- Select Enable.
ProSafe Plus Switch Utility
If the selected switch supports configuring individual ports, a Storm Control Rate screen displays. If the selected switch does not support individual port configuration, all of the ports are set to a predetermined storm control rate.
- If the ports can be configured, select one or more ports and the desired storm control rate.
- Click Apply.
Help
5
This chapter contains the following topics:
- Online Help
- About the Utility
- Registration
ProSafe Plus Switch Utility
Online Help
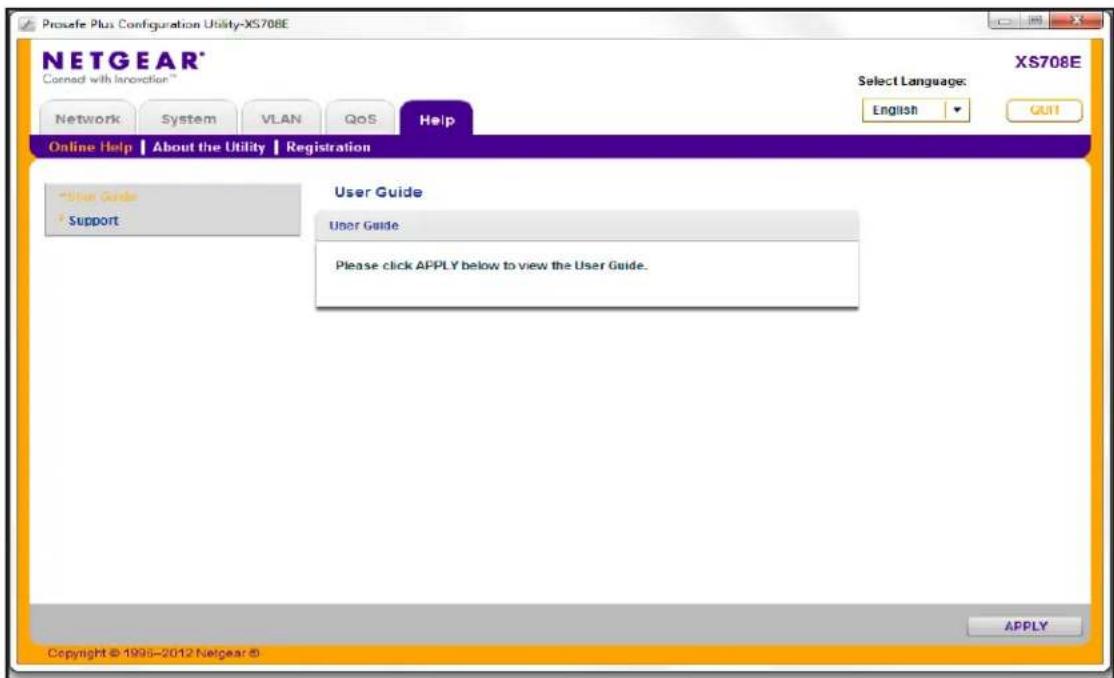
The Help tab provides access to the NETGEAR support website and to the online user guide for the ProSafe Plus Switch Utility (the latest copy of this manual).
User Guide
If the computer running the utility has access to the Internet, you can select User Guide and click Apply to open the latest version of this user guide. You can then download a copy to your computer. After installing a new ProSafe Plus switch, check this website for the latest version of this manual.
Support Information
If the computer running the utility has access to the Internet, you can display the support screen for a selected switch. Select Support and click Apply.
The support page provides access to the NETGEAR Knowledge Base, additional documentation, downloads, and product forums for the selected product.
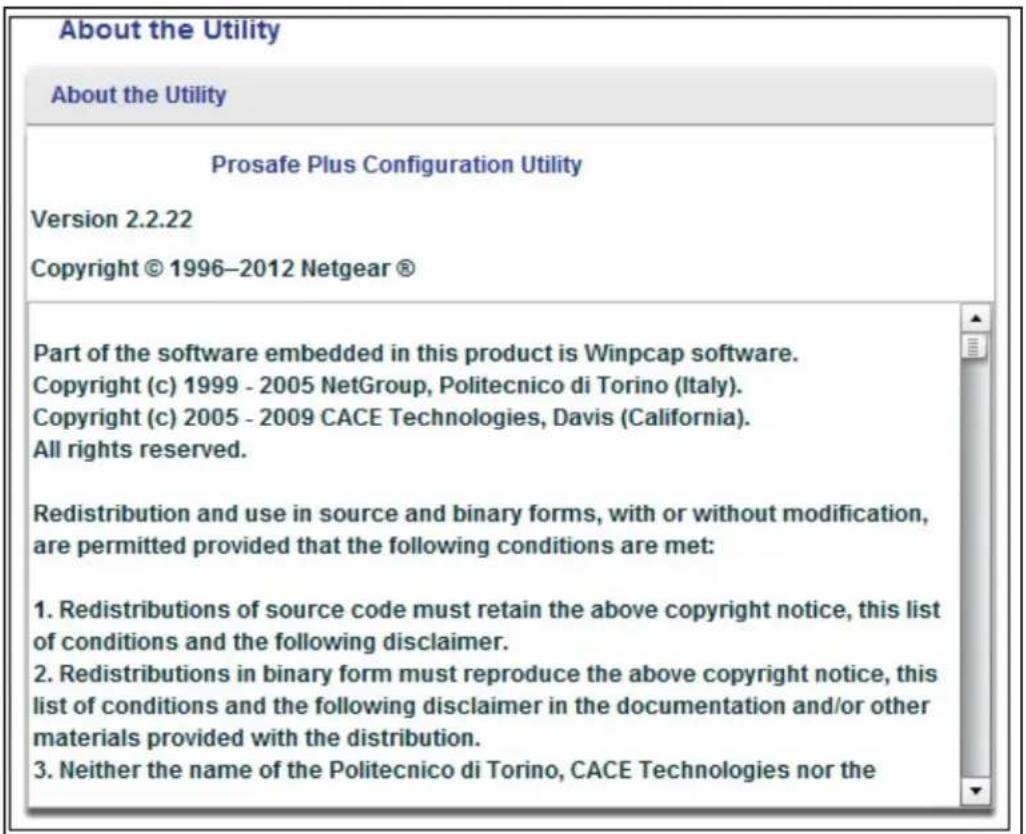
About the Utility
To view the utility software version, select About the Utility on the Help screen.
ProSafe Plus Switch Utility
Registration
If the computer running the utility has access to the Internet, you can register your products.
To register your product:
- Select Help > Registration to display the following screen:
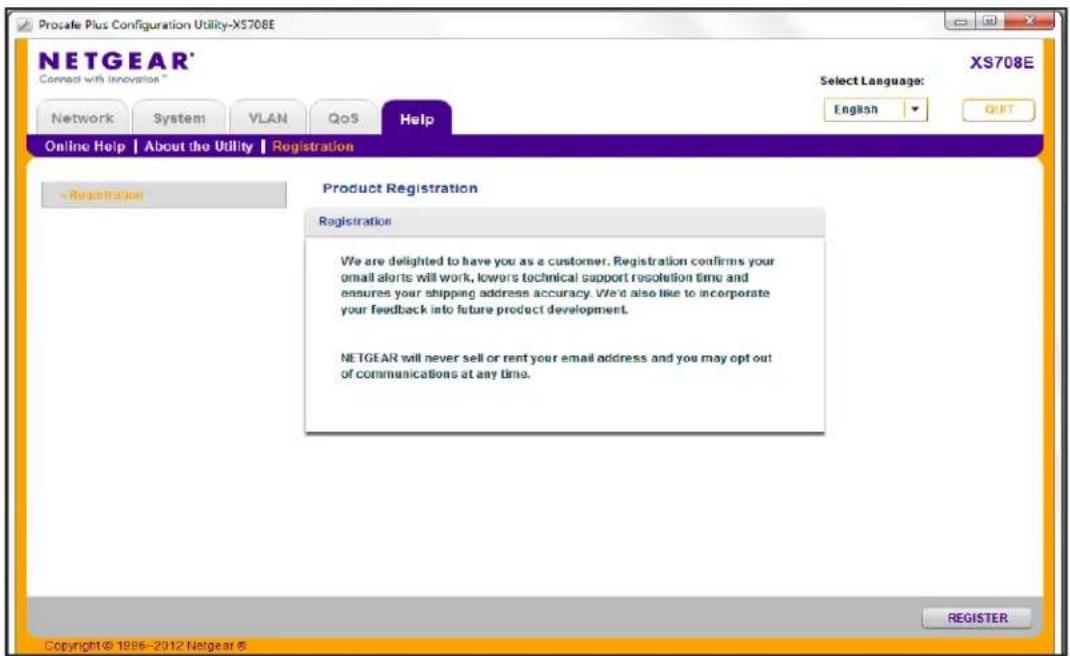
- Click REGISTER.
Your computer connects to NETGEAR product registration server.
- Follow the on screen prompts.
All ProSafe Plus switch features have default settings. You do not need to configure any settings to use the ProSafe Plus switches. The following table lists the default values for switch settings.
Table 3. Default switch settings
| Tab Menu Feature Default Value | |||
| Network Switch Selections Discovers all Plus switches on network | No Switch Selected | ||
| Passwordpasswordfor all switches | |||
| System Status Names All names | blank | ||
| Switch Information | |||
| DHCP Mode Enabled | |||
| IP Address 192.168.0.239 | |||
| Subnet Mask | 255.255.255.0 | ||
| Gateway Address | 192.168.0.254 | ||
| Maintenance | Change Password | ||
| Device Reboot | |||
| Factory Default | |||
| Firmware Upgrade | |||
| Save Configuration | |||
| Restore Configuration | |||
| Monitoring | Port Statistics | ||
| Mirroring | |||
| Cable Tester | |||
| MultiCast | IGMP Snooping Status | ||
| Tab | Menu | Feature | Default Value |
| VLAN ID Enabled for IGMP Snooping | 1 (not configurable until VLAN is enabled) | ||
| Validate IGMPv3 IP header Disabled | |||
| Block Unknown Multicast Address | Disabled | ||
| IGMP Snooping Static Router Port (GS105E only) | N/A (blank) | ||
| Management Loop | Detection Disabled | ||
| LAG(JGS524E and XS708E only) | LAG Configuration and default value | Disabled | |
| LAG Membership | N/A (blank) | ||
| VLAN Port Based Basic Disabled | |||
| Advanced Disabled | |||
| 802.1Q Basic Disabled | |||
| Advanced Disabled | |||
| QoS Global Configuration | |||
| QoS Mode 802.1P Based | |||
| Rate Limit | |||
| Ingress No limit | |||
| Egress No limit | |||
| Broadcast Filtering Disabled | |||
| Help Online Help Support | - | ||
| User Guide | - | ||
| About the Utility | - | ||
| Registration Link | - | ||
Index
Numerics
802.1p-based priority 34
802.1Q 26
802.1Q VLAN 28
A
about utility 39
Adobe AIR 7
assigning members 27
B
broadcast filtering 35
broadcast storm protection 35
C
cable test 22
D
default settings 41
DHCP 18
F
factory defaults 20, 21
features 10
firewall applications 9
firmware upgrade 20
H
Help 11, 38
|
installation 6
InstallShield Wizard 8
M
maintenance 10, 15, 19
monitoring 11, 15, 21
P
port mirroring 21
port statistics 21
port tagging 30
port-based 26
port-based priority 33
PVID (Port Default VLAN ID) 29
Q
QoS 11, 32
R
rate limiting 35
rebooting device 19
reset 20
resetting factory defaults 20, 21
S
status 10, 15
support 39
switch discovery 9
switch selection 16
T
technical support 2
trademarks 2
U
user guide 39
utility
installing 6
uninstalling 12
V
VLAN membership 29
ProSafe Plus Switch Utility
VLANs 11, 26
VLANs, add groups 29
VLANs, advanced 27
VLANs, port-based 27
W
WinPcap 7

- ProSafe Plus Switch Utility
- Technical Support
- Statement of Conditions
- Revision History
- Contents
- Chapter 1 Getting Started
- Chapter 2 Network and System Configuration
- Chapter 3 Virtual LAN Configuration
- Chapter 4 Quality of Service
- Chapter 5 Help
- Appendix A Default Settings
- Install the ProSafe Plus Switch Utility
- To install the utility:
- Click the Install ProSafe Plus Utility link.
- WinPCap Workaround for Windows 8
- Registration
- Discovering Switches
- Utility Features Overview
- Network
- System
- VLAN
- QoS
- Help
- Switch Settings
- Uninstall the Utility
- To uninstall the utility:
- Network and System Configuration
- 2
- Network Switch Access
- System Features
- Switch Selection
- To select a switch:
- Switch Information
- DHCP Mode Selection
- To enable DHCP operation:
- Set the IP Address Information
- To specify IP interface information:
- Maintenance
- Change Password
- To change the password for a switch:
- Device Reboot
- WARNING:
- To reboot the selected switch:
- Reset Factory Defaults
- To reset the selected switch to factory default settings:
- Firmware Upgrade
- To upgrade firmware on the selected switch:
- Save Configuration
- To save the current configuration on the selected switch:
- Restore Configuration
- Monitoring
- Port Statistics
- Port Mirroring
- Cable Test
- To perform a cable test:
- MultiCast
- IGMP Snooping
- Validate IGMPv3 IP header
- Block Unknown MultiCast Address
- IGMP Snooping Static Router Port
- Management
- To enable or disable loop detection:
- LAG
- To enable or disable a LAG:
- To add ports to be LAG members:
- Virtual LAN Configuration
- 3
- VLAN Overview
- Port-Based Configuration
- Basic Port-Based VLAN Configuration
- To assign members of a VLAN group:
- Advanced Port-Based VLAN Configuration
- 802.1Q-Based Configuration
- Basic 802.1Q VLAN Configuration
- To configure ports using 802.1Q criteria:
- Advanced 802.1Q VLAN Configuration
- VLAN Configuration
- To add VLAN groups:
- To delete a VLAN group:
- VLAN Membership
- To add ports to a VLAN group:
- Port PVID
- To assign a PVID to a port:
- Port Tagging
- To tag data from ports:
- To untag data from ports:
- Quality of Service
- 4
- QoS Overview
- QoS Global Configuration
- Port-Based Priority
- To assign port-based priorities:
- 802.1p-Based Priority
- To assign 802.1p-based priority:
- Rate Limiting
- To configure rate limiting:
- Broadcast Filtering
- To configure broadcast filtering:
- 5
- Online Help
- User Guide
- Support Information
- About the Utility
- To register your product:
- Index
- Numerics
- A
- B
- C
- D
- F
- H
- |
- M
- P
- Q
- R
- S
- T
- U
- V
- W
Brand : NETGEAR
Model : JGS524
Category : Network switch