
10034120 - Fridge Klarstein - Free user manual and instructions
Find the device manual for free 10034120 Klarstein in PDF.


| Product type | Beverage Refrigerator |
| Brand | Klarstein |
| Model | 10034120 |
| Power supply | 220-240 V ~ 50/60 Hz |
| Thermostat | Adjustable from 1 to 5 (recommended position: 3-4) |
| Interior light | With switch |
| Shelves | Removable for cleaning |
| Adjustable feet | Allow leveling |
| Reversible door | Reversible door opening direction (tools required) |
| Defrosting | Manual (do not use mechanical devices) |
| External cleaning | Soft cloth with mild detergent |
| Internal cleaning | Soft cloth with mild detergent |
| Door seals | Clean regularly to ensure sealing |
| Safety | Disconnect before any intervention; wait 5 minutes before restarting |
| Installation instructions | Let stand upright for 4 hours; side clearance >5 cm, rear >10 cm |
| Minimum ambient temperature | 5°C |
| Standards | Compliant with EC directives (EMC, LVD, RoHS, ErP) |
| Number of compatible models | 10034120, 10034121 |
Frequently Asked Questions - 10034120 Klarstein
User questions about 10034120 Klarstein
0 question about this device. Answer the ones you know or ask your own.
Ask a new question about this device
Download the instructions for your Fridge in PDF format for free! Find your manual 10034120 - Klarstein and take your electronic device back in hand. On this page are published all the documents necessary for the use of your device. 10034120 by Klarstein.
USER MANUAL 10034120 Klarstein
bar
| Category | Value | |---|---| | Category 1 | 100 | | Category 2 | 100 | | Category 3 | 100 | | Category 4 | 100 | | Category 5 | 100 | | Category 6 | 100 | | Category 7 | 100 | | Category 8 | 100 | | Category 9 | 100 | | Category 10 | 100 | | Category 11 | 100 | | Category 12 | 100 | | Category 13 | 100 | | Category 14 | 100 | | Category 15 | 100 | | Category 16 | 100 | | Category 17 | 100 | | Category 18 | 100 | | Category 19 | 100 | | Category 20 | 100 | | Category 21 | 100 | | Category 22 | 100 | | Category 23 | 100 | | Category 24 | 100 | | Category 25 | 100 | | Category 26 | 100 | | Category 27 | 100 | | Category 28 | 100 | | Category 29 | 100 | | Category 30 | 100 | | Category 31 | 100 | | Category 32 | 100 | | Category 33 | 100 | | Category 34 | 100 | | Category 35 | 100 | | Category 36 | 100 | | Category 37 | 100 | | Category 38 | 100 | | Category 39 | 100 | | Category 40 | 100 | | Category 41 | 100 | | Category 42 | 100 | | Category 43 | 100 | | Category 44 | 100 | | Category 45 | 100 | | Category 46 | 100 | | Category 47 | 100 | | Category 48 | 100 | | Category 49 | 100 | | Category 50 | 100 | | Category 51 | 100 | | Category 52 | 100 | | Category 53 | 100 | | Category 54 | 100 | | Category 55 | 100 | | Category 56 | 100 | | Category 57 | 100 | | Category 58 | 100 | | Category 59 | 100 | | Category 60 | 100 | | Category 61 | 100 | | Category 62 | 100 | | Category 63 | 100 | | Category 64 | 100 | | Category 65 | 100 | | Category 66 | 100 | | Category 67 | 100 | | Category 68 | 100 | | Category 69 | 100 | | Category 70 | 100 | | Category 71 | 100 | | Category 72 | 100 | | Category 73 | 100 | | Category 74 | 100 | | Category 75 | 100 | | Category 76 | 100 | | Category 77 | 100 | | Category 78 | 100 | | Category 79 | 100 | | Category 80 | 100 | | Category 81 | 100 | | Category 82 | 100 | | Category 83 | 100 | | Category 84 | 100 | | Category 85 | 100 | | Category 86 | 100 | | Category 87 | 100 | | Category 88 | 100 | | Category 89 | 100 | | Category 90 | 100 | | Category 91 | 100 | | Category 92 | 100 | | Category 93 | 100 | | Category 94 | 100 | | Category 95 | 100 | | Category 96 | 100 | | Category 97 | 100 | | Category 98 | 100 | | Category 99 | 100 | | Total (Total) = [sum of two separate bars] * [sum of the bars] * [values from the 'bar' in the 'box' table] * [values from the 'box' table] * [values from the 'box' table] * [values from the 'box' table] * [values from the 'box' table] * [values from the 'box' table]. The sum of the bars is calculated by subtracting the sum of the bars from the 'box' table. Note: The total bar length is based on the sum of the bars. The sum of the bars is calculated as the sum of the bars. The sum of the bars is derived from adding the sum of the bars to the total bar length. The sum of the bars is derived from adding the sum of the bars to the total bar length. The sum of the bars is derived from adding the sum of the bars to the total bar length. The sum of the bars is derived from adding the sum of the bars to the total bar length. The sum of the bars is derived from adding the sum of the bars to the total bar length. The sum of the bars is derived from adding the sum of the bars to the total bar lengths.INHALTSVERZEICHNIS
natural_image
Technical line drawing of two open industrial storage units with internal compartments and ventilation grilles (no text or symbols)natural_image
Symbol of a trash bin crossed with a diagonal line, no text or numbers presentCongratulations on purchasing this equipment. Please read this manual carefully and take care of the following hints to avoid damages. Any failure caused by ignoring the mentioned items and cautions mentioned in the instruction manual are not covered by our warranty and any liability. Scan the QR code to get access to the latest user manual and other information about the product.

CONTENT
Safety Instructions 10
Installation Notes 11
Start and Operation 12
Cleaning and Care 12
Reversing the Door 13
Troubleshooting 14
Hints on Disposal 14
TECHNICAL DATA
| Item number 10034120, 10034121 | |
| Power supply 220-240 V ~ 50/60 Hz |
DECLARATION OF CONFORMITY

Producer:
Chal-Tec GmbH, Wallstraße 16, 10179 Berlin, Germany.
This product is conform to the following European Directives:
2014/30/EU (EMC)
2014/35/EU (LVD)
2011/65/EU (RoHS)
643/2009/EC (ErP)
1060/2010/EU (ErP)
SAFETY INSTRUCTIONS
- Check that the voltage of the power supply in your home is the same as the voltage shown on the rating label of this product.
- This appliance can be used by children aged from 8 years and above and persons with reduced physical, sensory or mental capabilities or lack of experience and knowledge if they have been given supervision or instruction concerning use of the appliance in a safe way and understand the hazards involved. Children shall not play with the appliance. Cleaning and user maintenance shall not be made by children without supervision.
- Keep ventilation opening, in the appliance enclosure or in the built-in structure, clear of obstruction.
- Do not use mechanical devices or other means to accelerate the defrosting process, other than those recommended by the manufacturer.
- Do not use electrical appliances inside the food storage compartments of the appliance, unless they are of the type recommended by the manufacturer.
- Do not damage the refrigerant circuit.
- If the supply cord is damaged, it must be replaced by the manufacturer or its service agent or a similarly qualified person in order to avoid a hazard.
- It is recommended to check regularly the supply cord for any sign of possible deterioration, and the appliance should not be used if the cable is damaged.
- To avoid injury or death from electrical shock, do not operate the appliance with wet hands, while standing on a wet surface.
- It is not recommended to use this refrigerator with an extension cord or power board. Please ensure that the appliance is plugged directly into the electrical outlet.
- When positioning the appliance, ensure that there is at least a 5 cm clearance at the sides and a 10 cm clearance at the back as this is the main outlet for heat. This will allow for adequate ventilation.
- Do not place hot food or drink into the refrigerator before it cools down to room temperature.
- Close the door immediately after putting in any items so the inside temperature will not rise dramatically.
- Keep appliance away from any heat source or direct sunlight.
- To fix stably, the appliance must be placed on a flat and solid surface. It should not be laid on any soft material.
- Do not place any other appliance on top of the refrigerator, and do not wet it.
- Do not store something like ether, methanol, gasoline, which is easy to evaporate burn or explode.
- Do not use outdoors or in wet conditions.
- Never pull the cord to disconnect it from the outlet. Grasp the plug and pull it from the outlet.
- Keep the cord away from heated surfaces.
- This appliance has been incorporated with a grounded plug. Please ensure the wall outlet in your house is well earthed.
- Connect your refrigerator to an independent electrical socket and use a safe ground wire.
- Defrost the freezer at least once a month because too much frost may affect refrigeration.
- Turn on electricity only 5 minutes later after electricity goes off. Otherwise, the compressor may be damaged.
INSTALLATION NOTES
It is important that upon receipt you stand your appliance upright for at least 4 hours before switching on to allow the system to sett le.
- The appliance should not be tilted more than 45 degrees when you move it. Do not use force on any part such as the condenser, the door or handle. They could distort and affect the operation of the cooler. Ensure ALL packaging is removed before installation.
• Make sure there is enough ventilation space around product. - The appliance should not be installed near external heat sources eg direct sun shine or external moisture sources.
- Ensure the supply voltage of socket is same as rating label. 5. The plug must be properly inserted to the wall socket.
- The mains supply socket must be earthed - preferably with a switch. If it is not earthed, do NOT install this appliance there. Do not use an extension cord.
- The product is equipped with adjustable feet. Once the product is in place, adjust these to ensure the fridge is level and doesn't rock.
Note: Do not site the product where the ambient temperature is likely to drop below 5 degrees centigrade - eg: garage or shed.
START AND OPERATION
- It is important that upon receipt you stand your appliance upright for at least 4 hours before switching on to allow the system to settle
-
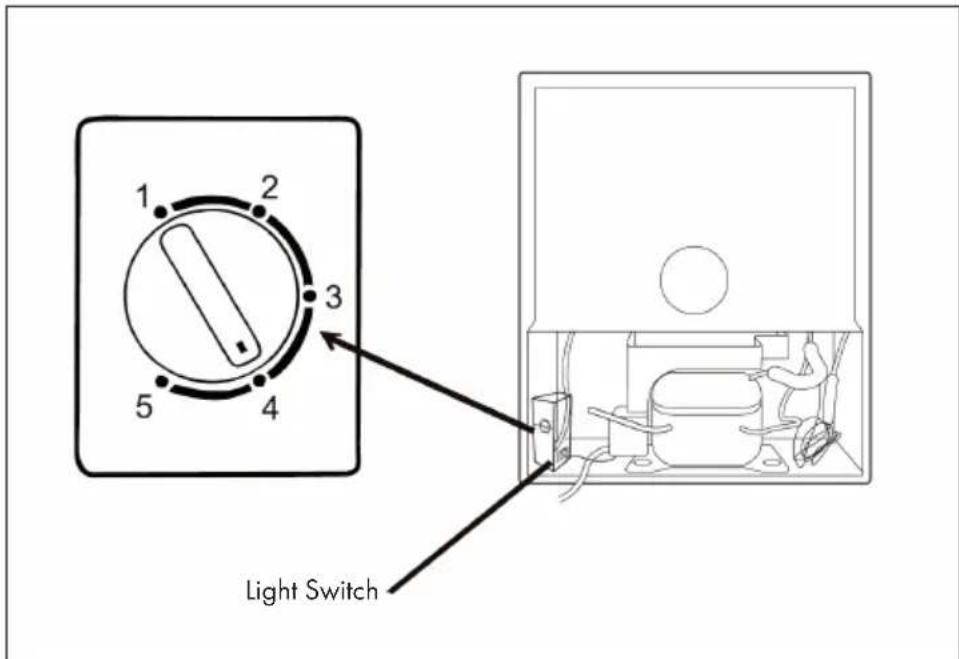
When using the cooler for the first time, set the thermostat to setting 3 or 4. When the refrigeration system starts, you will hear the quiet hum of the compres sor. You may also hear the circulation of liquids and gases. This is normal on first start up, Generally it will take 2-3 hours for the appliance to reach temperature. Once temperature has been reached then put the beverages inside.
-
See below for location of thermostat and light switch on this model.
CLEANING AND CARE
Outside
The outside of your refrigerator can be cleaned using a soft cloth moistened with a mild detergent solution. Wipe dry with kitchen towel. Do not use chemical or abrasive cleaners on any part of your refrigerator as these could permanently damage or discolour the surfaces.
Internal Cleaning
Wipe up any internal spills immediately with a soft cloth moistened with a mild detergent solution. Dry thoroughly.
Shelves and Guards
Any shelves can be removed and cleaned separately.
Door Seals
Ensure that the door seals are kept free from debris at all times. If they don't seal properly this can waste energy and cause refrigeration unit to over run
REVERSING THE DOOR
The door of the cooler can be reversed quite easily. See the illustration below. It is best if you have a friend help you due to the weight, and to assist with alignment. . Always unplug the cooler before reversing the door.
1 Support the door from the bottom
2 Remove the 6 screws that affix the hinges and spacers to the cabinet frame
3 Place the door on a flat, padded surface to prevent scratching
4 Remove the 6 screws that affix the hinges to the door
5 Remove the blanking plugs from the opposite side and use those to plug the holes exposed by the removal of the hinge from the cabinet frame
6 Screw the hinges to the opposite side of the door
7 Pick up the door and carefully align it with the cabinet holes
8 Screw the remaining 6 screws in to both hinges and the 2 spacers into the cabinet to secure the door.
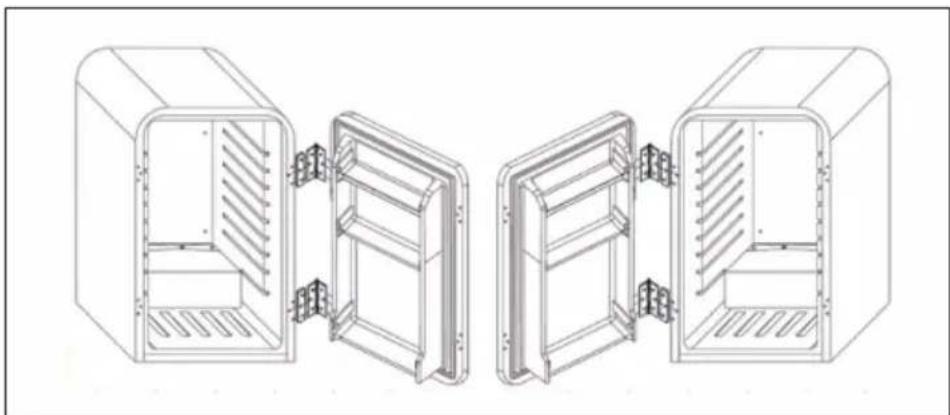
natural_image
Technical line drawing of two open industrial storage units with internal compartments and ventilation grilles (no text or symbols)TROUBLESHOOTING
| Problem Possible cause and suggested solution | |
| Condensation on outside of door. | Humidity in the room is high. This is also to be expected if the room is very warm. |
| Condensation on the inside of the cabinet. | This is also caused by high humidity. You can minimise this by only keeping the door open only as long as you need to. |
| Too cold / not cold enough inside the cabinet. | Adjust thermostat up or down accord ingly. Make sure nothing is stopping the door from sealing properly. |
| No power to cooler. Check power cord, power supply or on/off switch. | |
HINTS ON DISPOSAL
natural_image
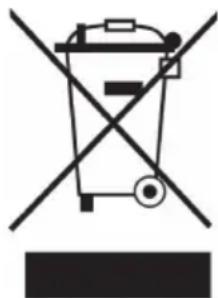
Symbol of a trash bin crossed with a diagonal line, no text or numbers presentAccording to the European waste regulation 2012/19/EU this symbol on the product or on its packaging indicates that this product may not be treated as household waste. Instead it should be taken to the appropriate collection point for the recycling of electrical and electronic equipment. By ensuring this product is disposed of correctly, you will help prevent potential negative consequences for the environment and human health, which could otherwise be caused by inappropriate waste handling of this product. For more detailed information about recycling of this product, please contact your local council or your household waste disposal service.
Chère cliente, cher client,
SOMMAIRE
Fiche technique 15
DÉCLARATION DE CONFORMITÉ

Fabricant :
Chal-Tec GmbH, Wallstraße 16, 10179 Berlin, Allemagne.
natural_image
Technical line drawing of four different internal storage or oven units with hatched patterns, no text or symbols present.IDENTIFICATION ET RÉSOLUTION DES PROBLÈMES
natural_image
Symbol of a trash bin crossed with a diagonal line, representing no waste or discharge (no text or labels)INDICE
Dati tecnici 21
natural_image
Technical line drawing of two open industrial storage units with internal compartments and ventilation grilles (no text or symbols)natural_image
Symbol of a trash bin crossed with a diagonal line, no text or numbers presentÍNDICE
natural_image
Technical line drawing of two open industrial storage units with internal compartments and ventilation grilles (no text or symbols)natural_image
Symbol of a trash bin crossed with a diagonal line, no text or numbers presentbar
| Category | Value | |---|---| | Category 1 | 100 | | Category 2 | 100 | | Category 3 | 100 | | Category 4 | 100 | | Category 5 | 100 | | Category 6 | 100 | | Category 7 | 100 | | Category 8 | 100 | | Category 9 | 100 | | Category 10 | 100 | | Category 11 | 100 | | Category 12 | 100 | | Category 13 | 100 | | Category 14 | 100 | | Category 15 | 100 | | Category 16 | 100 | | Category 17 | 100 | | Category 18 | 100 | | Category 19 | 100 | | Category 20 | 100 | | Category 21 | 100 | | Category 22 | 100 | | Category 23 | 100 | | Category 24 | 100 | | Category 25 | 100 | | Category 26 | 100 | | Category 27 | 100 | | Category 28 | 100 | | Category 29 | 100 | | Category 30 | 100 | | Category 31 | 100 | | Category 32 | 100 | | Category 33 | 100 | | Category 34 | 100 | | Category 35 | 100 | | Category 36 | 100 | | Category 37 | 100 | | Category 38 | 100 | | Category 39 | 100 | | Category 40 | 100 | | Category 41 | 100 | | Category 42 | 100 | | Category 43 | 100 | | Category 44 | 100 | | Category 45 | 100 | | Category 46 | 100 | | Category 47 | 100 | | Category 48 | 100 | | Category 49 | 100 | | Category 50 | 100 | | Category 51 | 100 | | Category 52 | 100 | | Category 53 | 100 | | Category 54 | 100 | | Category 55 | 100 | | Category 56 | 100 | | Category 57 | 100 | | Category 58 | 100 | | Category 59 | 100 | | Category 60 | 100 | | Category 61 | 100 | | Category 62 | 100 | | Category 63 | 100 | | Category 64 | 100 | | Category 65 | 100 | | Category 66 | 100 | | Category 67 | 100 | | Category 68 | 100 | | Category 69 | 100 | | Category 70 | 100 | | Category 71 | 100 | | Category 72 | 100 | | Category 73 | 100 | | Category 74 | 100 | | Category 75 | 100 | | Category 76 | 100 | | Category 77 | 100 | | Category 78 | 100 | | Category 79 | 100 | | Category 80 | 100 | | Category 81 | 100 | | Category 82 | 100 | | Category 83 | 100 | | Category 84 | 100 | | Category 85 | 100 | | Category 86 | 100 | | Category 87 | 100 | | Category 88 | 100 | | Category 89 | 100 | | Category 90 | 100 | | Category 91 | 100 | | Category 92 | 100 | | Category 93 | 100 | | Category 94 | 100 | | Category 95 | 100 | | Category 96 | 100 | | Category 97 | 100 | | Category 98 | 100 | | Category 99 | 100 | | Total (Total) = [sum of two separate bars] * [sum of the bars] * [values from the 'bar' in the 'box' table] * [values from the 'box' table] * [values from the 'box' table] * [values from the 'box' table] * [values from the 'box' table] * [values from the 'box' table]. The sum of the bars is calculated by subtracting the sum of the bars from the 'box' table. Note: The total bar length is based on the sum of the bars. The sum of the bars is calculated as the sum of the bars. The sum of the bars is derived from adding the sum of the bars to the total bar length. The sum of the bars is derived from adding the sum of the bars to the total bar length. The sum of the bars is derived from adding the sum of the bars to the total bar length. The sum of the bars is derived from adding the sum of the bars to the total bar length. The sum of the bars is derived from adding the sum of the bars to the total bar length. The sum of the bars is derived from adding the sum of the bars to the total bar lengths. The sum of the bars is derived from adding the sum of the bars to the total bar lengths. The sum of the bars is derived from adding the sum of the bars to the total bar lengths. The sum of the bars is derived from adding the sum of the bars to the total bar lengths. The sum of the bars is derived from adding the sum of the bars to the total bar lengths. The sum of the bars is derived from adding the sum of the bars to the total bar length. The sum of the bars is derived from adding the sum of the bars to the total bar length. The sum of the bars is derived from adding the sum of the bars to the total bar length. The sum of the bars is derived from adding the sum of the bars to the total bar length. The sum of the bars is derived from adding the sum of the bars to the total bar value. The sum of the bars is derived from adding the sum of the bars to the total bar value. The sum of the bars is derived from adding the sum of the bars to the total bar value. The sum of the bars is derived from adding the sum of the bars to the total bar value. The sum of the bars is derived from adding the sum of the bars to the total bar value. The sum of the bars is derived from adding the sum of the bars to the total bar values. The sum of the bars is derived from adding the sum of the bars to the total bar values. The sum of the bars is derived from adding the sum of the bars to the total bar values. The sum of the bars is derived from adding the sum of the bars to the total bar values. The sum of the bars is derived from adding the sum of the bars to the total bar values. The sum of the bars is derived from adding the sum of the bars to the total bar value. The sum of the bars is derived from adding the sum of the bars to the total bar value. The sum of the bars is derived from adding the sum of the bars to the total bar value.KLARSTEIN NIEI SRA T EIN NIEI SRA T K LARS KLARSTEIN NIEI SRA T EIN NIEI SRA T K LARS KLARSTEIN NIEI SRA T EIN NIEI SRA T K LARS KLARSTEIN NIEI SRA T
- INHALTSVERZEICHNIS
- CONTENT
- TECHNICAL DATA
- DECLARATION OF CONFORMITY
- SAFETY INSTRUCTIONS
- INSTALLATION NOTES
- START AND OPERATION
- CLEANING AND CARE
- Outside
- Internal Cleaning
- Shelves and Guards
- Door Seals
- REVERSING THE DOOR
- TROUBLESHOOTING
- HINTS ON DISPOSAL
- Chère cliente, cher client,
- SOMMAIRE
- DÉCLARATION DE CONFORMITÉ
- IDENTIFICATION ET RÉSOLUTION DES PROBLÈMES
- INDICE
- ÍNDICE
Brand : Klarstein
Model : 10034120
Category : Fridge