
FAT 18 B2 - Lawn mower FLORABEST - Free user manual and instructions
Find the device manual for free FAT 18 B2 FLORABEST in PDF.


| Product Type | Cordless Grass Trimmer |
| Brand | Florabest |
| Model | FAT 18 B2 |
| Motor Voltage | 18 V |
| No-Load Speed | 8000 min⁻¹ (rpm) |
| Cutting Diameter | 25 cm |
| Weight (without battery) | 2.1 kg |
| Battery Type | Lithium-Ion (Li-Ion) |
| Battery Capacity | 1.5 Ah |
| Charging Time | Approx. 5 hours |
| Runtime | Up to 50 minutes |
| Sound Pressure Level (LpA) | 71.3 dB(A), K=3 dB(A) |
| Guaranteed Sound Power Level (LwA) | 94 dB(A) |
| Vibration (upper handle) | 1.098 m/s², K=1.5 m/s² |
| Vibration (additional handle) | 1.539 m/s², K=1.5 m/s² |
| Protection Class (Appliance) | III |
| Charger Model | JLH082100350B |
| Charger Input | 100-240 V~50/60 Hz |
| Charger Output | 21 V ⎓ 350 mA |
| Charger Protection Class | II |
| Telescopic Shaft | Yes, adjustable length |
| Motor Head Pivot | Yes, 6 preset angles |
| Auxiliary Handle | Adjustable position |
| Spacer Bow (Flower Guard) | Yes, retractable |
| Included Cutting Inserts | 20 pieces |
| Included Accessories | Cutting disc, protective cover, auxiliary handle, battery charger, battery, manual |
Frequently Asked Questions - FAT 18 B2 FLORABEST
User questions about FAT 18 B2 FLORABEST
0 question about this device. Answer the ones you know or ask your own.
Ask a new question about this device
Download the instructions for your Lawn mower in PDF format for free! Find your manual FAT 18 B2 - FLORABEST and take your electronic device back in hand. On this page are published all the documents necessary for the use of your device. FAT 18 B2 by FLORABEST.
USER MANUAL FAT 18 B2 FLORABEST
CORDLESS GRASS TRIMMER FAT 18 B2
GB IE CY
CORDLESS GRASS TRIMMER
Translation of original operation manual
GR CY
Before reading, unfold the page containing the illustrations and familiarise yourself with all functions of the device.
GR CY
GB / IE / CY Translation of original operation manual Page 4
Intended purpose ....4
General description ....5
Extent of the delivery ....5
Overview 5
Functional description ....5
Technical data ....5
Safety instructions ......6
Symbols and icons 6
Symbols on the trimmer 6
Symbols on the recharger .....7
Symbols on the battery .....7
Symbols in the manual .....7
General safety instructions for power tools 7
Charging the battery 12
Removing / inserting the battery .... 12
Recharging the battery 12
Used batteries 13
Assembling instructions ...... 13
Operation 13
Turning on and off 14
Checking the battery charge level ... 14
Trimmer settings 14
Manner of operation .....15
Cutting grass.... 15
Vertical cut / lawn edge trimming ... 15
Cleaning and maintenance .....15
Cleaning 16
Trouble shooting ....16
General maintenance 17
Replacing the cutting insert ..... 17
Storage 17
Disposal and protection of the environment 17
Replacement parts ......18
Guarantee 18
Repair Service ....19
Service-Center 19
Importer 19
Translation of the original EC declaration of conformity .....58 Exploded Drawing .....61
Introduction
Congratulations on the purchase of your new device. With it, you have chosen a high quality product.
During production, this equipment has been checked for quality and subjected to a final inspection. The functionality of your equipment is therefore guaranteed. It cannot be ruled out that residual quantities of water or lubricants will remain on or in the equipment/hose lines in isolated cases. This is not a fault or defect and it represents no cause for concern.

The operating instructions constitute part of this product. They contain important information on safety, use and disposal. Before using the product, familiarise yourself with all of the operating and safety instructions. Use the product only as described and for the applications specified. Keep this manual safely and in the event that the product is passed on, hand over all documents to the third party.
Intended purpose
The appliance is solely intended for cutting grass and weeds in the garden and for edge trimming. Any other use that is not specifically approved in these Instructions can result in damage to the trimmer and give rise to serious danger for the user. Do not use the appliance to trim hedges or bushes. The appliance must only be used by adults. Young people aged 16 and
over may only use the trimmer under adult supervision.
The user or operator is responsible for accidents causing injury to other people or damage to property.
The manufacturer cannot be held liable for damage when the trimmer is not used in conformity with its intended purpose or due to incorrect operation.
General description
Extent of the delivery
Carefully unpack the trimmer and check that it is complete:
- Battery-operated lawn trimmer
- Cutting disc with one screw (left-hand thread)
- Protective cover with three screws
- Auxiliary handle
- 20 Cutting inserts
- Battery charger
- Battery
- Instruction Manual

The illustrations are on the front fold-out page.
Overview

1 Top handle
2 On/Off switch
3 Switch lock
4 Box for cutting inserts (not visible)
5 Auxiliary handle
6 Handle rod
7 Lock of handle rod adjustment
8 Threaded bush for length adjustment
9 Telescopic shaft
10 Motor head
11 Spacer bow (flower guard)
12 Cutting disk
13 Cutting insert
14 Protective cover
15 Bar for tilt angle adjustment
16 Battery
17 Battery release button
18 Battery charge state indicator
19 Battery charger
20 Guide track

21 Handle holder

Handle screw

23 Pin

24 Twist lock

Functional description
The trimming assembly of the manually controlled, portable, battery-operated lawn trimmer consists of a system of plastic knife/cutting insert.
The appliance also features a pivoting motor head, adjustable aluminium telescopic shaft, and a spacer bow. A hood covering the cutting device protects the user.
The following describes the functions of the operating parts. This equipment is not suitable for commercial use.
Commercial use will invalidate the guarantee.
Technical data
Appliance
Motor voltage 18 V
Idling speed ....8000 min -1 (rpm)
Protection Class .... III
Runtime ....max. 50 min*
Cutting circle 25 cm
Weight (without battery charger) ... 2.1 kg
Sound pressure level
(LpA) 71.3 dB (A), KpA = 3 dB (A)
GBIECY
Sound power level ( LwA ) guaranteed ....94 dB (A) measured ...89 dB (A); KwA=1.94 dB (A) Vibration ( an ) upper handle .1.098 m/s², K=1.5 m/s² additional handle ..... 1.539 m/s², K=1.5 m/s²
Battery (Li-Ion)
Nominal voltage .... 18 V= Capacity .... 1.5 Ah Charging time .... approx. 5 h
Recharger ....JLH082100350B
Nominal consumption ..... 12 W Uptake voltage / Input ..... 100-240 V\~50/60 Hz Voltage output / Output 21 V---350 mA Protection class ..... ☐ II Protection category ..... IP20
* The actual runtime under load of a fully charged battery depends on how you work and on the load put on the trimmer during operation.
Noise and vibration values have been determined according to the standards and regulations mentioned in the declaration of conformity. The vibration and noise measuring processes in accordance with EN 786, appendices D and E, were completed successfully.
Noise and vibration values have been determined according to the standards and regulations mentioned in the declaration of conformity.
Technical and optical changes may be undertaken in the course of further development without notice. All dimensions, references and information in this instruction manual are therefore not guaranteed. Legal claims made on the basis of the instruction manual can therefore not be considered as valid.
The stated vibration emission value was measured in accordance with a standard testing procedure and may be used to compare one power tool to another.
The stated vibration emission value may also be used for a preliminary exposure assessment.

Warning: The vibration emission value may differ during actual use of the power tool from the stated value depending on the manner in which the power tool is used.
Safety precautions aimed at protecting the user should be based on estimated exposure under actual usage conditions (all parts of the operating cycle are to be considered, including, for example, times during which the power tool is turned off and times when the tool is turned on but is running idle).
Safety instructions
Ensure that the safety instructions are observed when operating the trimmer.
Symbols and icons
Symbols on the trimmer

WARNING!

Carefully read these Operating Instructions.

Wear goggles and ear defenders.

After turning off the appli- ance, the cutting disk will keep revolving for a couple of seconds. Keep away from your hand and feet.

Do not expose the trimmer to moisture. Do not work when it is raining and do not cut wet grass.

Keep by-standers well away. They could be injured by flung out objects.

Remove the battery prior to servicing the appliance.

Noise level rating LWA in dB

Electrical appliances must not be disposed of with the domestic waste.

Cutting circle
Symbols on the battery


Do not dispose of batteries in household waste, fire or water.
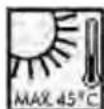
Do not subject the battery to strong sunlight over long periods and do not leave it on a heater (max. 45°C).

Take batteries to an old battery collection point where they will be recycled in an environmentally friendly manner.
Symbols on the recharger

WARNING!

Before using for the first time, carefully read through the user manual

The recharger is for indoor use only.

Protective temperature limiter

Protection class II

Electrical appliances must not be disposed of with the domestic waste.
Symbols in the manual

Warning symbols with information on damage and injury prevention.

Instruction symbols (the instruction is explained at the place of the exclamation mark) with information on preventing damage.

Help symbols with information on improving tool handling.
General safety instructions for power tools

WARNING! Read all safety directions and instructions.
Omissions in the compliance with safety directions and instructions can cause electrical shock, fire and/or severe injuries.
GBIECY
Retain all safety directions and instructions for future use.
The term "Power Tools" used in the safety instructions refers to mains-operated power tools (with power cord) and to battery-operated power tools (without power cord).
1) WORK AREA SAFETY
a) Keep work area clean and well lit. Cluttered or dark areas invite accidents.
b) Do not operate power tools in explosive atmospheres, such as in the presence of flammable liquids, gases or dust. Power tools create sparks which may ignite the dust or fumes.
c) Keep children and bystanders away while operating a power tool. Distractions can cause you to lose control.
2) ELECTRICAL SAFETY
a) Power tool plugs must match the outlet. Never modify the plug in any way. Do not use any adapter plugs with earthed (grounded) power tools. Unmodified plugs and matching outlets will reduce risk of electric shock.
b) Avoid body contact with earthed or grounded surfaces, such as pipes, radiators, ranges and refrigerators. There is an increased risk of electric shock if your body is earthed or grounded.
c) Do not expose power tools to rain or wet conditions. Water entering a power tool will increase the risk of electric shock.
d) Do not abuse the cord. Never use the cord for carrying, pulling or
unplugging the power tool. Keep cord away from heat, oil, sharp edges or moving parts. Damaged or entangled cords increase the risk of electric shock.
e) When operating a power tool outdoors, use an extension cord suitable for outdoor use. Use of a cord suitable for outdoor use reduces the risk of electric shock.
f) If operating a power tool in a damp location is unavoidable, use a residual current device (RCD) protected supply. Use of an RCD reduces the risk of electric shock.
3) PERSONAL SAFETY
a) Stay alert, watch what you are doing and use common sense when operating a power tool. Do not use a power tool while you are tired or under the influence of drugs, alcohol or medication. A moment of inattention white operating power tools may result in serious personal injury.
b) Use personal protective equipment. Always wear eye protection. Protective equipment such as dust mask, non-slip safety shoes, hard hat, or hearing protection used for appropriate conditions will reduce personal injuries.
c) Prevent unintentional starting. Ensure the switch is in the off-position before connecting to power source and/or battery pack, picking up or carrying the tool. Carrying power tools with your finger on the switch or energising power tools that have the switch on invites accidents.
d) Remove any adjusting key or wrench before turning the power tool on. A wrench or a key left attached
to a rotating part of the power tool may result in personal injury.
e) Do not overreach. Keep proper footing and balance at all times.
This enables better control of the power tool in unexpected situations.
f) Dress properly. Do not wear loose clothing or jewellery. Keep your hair, clothing and gloves away from moving parts. Loose clothes, jewellery or long hair can be caught in moving parts.
g) If devices are provided for the connection of dust extraction and collection facilities, ensure these are connected and properly used.
Use of dust collection can reduce dust-related hazards.
h) Never let children or persons who are not familiar with the instructions mentioned use the machine.
i) Stop using the machine when persons, above all children, and house pets are in the vicinity.
i) Use the machine only in daylight or with good artificial lighting.
k) Always keep your hands and feet away from the cutting equipment, above all when you switch the motor on.
I) Never install metallic cutting elements.
m) Before commissioning and after any impacts, check for signs of wear and damages, and have any necessary repairs performed.
n) Never use the machine with damaged or missing protective equipment.
4) POWER TOOL USE AND CARE
a) Do not force the power tool. Use the correct power tool for your application. The correct power tool will do the job better and safer at the rate for which it was designed.
b) Do not use the power tool if the switch does not turn it on and off. Any power tool that cannot be controlled with the switch is dangerous and must be repaired.
c) Disconnect the plug from the power source and/or the battery pack from the power tool before making any adjust -ments, changing accessories, or storing power tools. Such preventive safety measures reduce the risk of starting the power tool accidentally.
d) Store idle power tools out of the reach of children and do not allow persons unfamiliar with the power tool or these instructions to operate the power tool. Power tools are dangerous in the hands of untrained users.
e) Maintain power tools. Check for misalignment or binding of moving parts, breakage of parts and any other condition that may affect the power tool's operation. If damaged, have the power tool repaired before use. Many accidents are caused by poorly maintained power tools.
f) Keep cutting tools sharp and clean. Properly maintained cutting tools with sharp cutting edges are less likely to bind and are easier to control.
g) Use the power tool, accessories and tool bits etc. in accordance with these instructions, taking into account the working conditions and the work to be performed.
Use of the power tool for operations different from those intended could result in a hazardous situation.
h) Ensure that the vents are free of soiling.
5) CAREFUL HANDLING AND USE OF BATTERY DEVICES
a) Charge the batteries only in chargers that are recommended by the manufacturer. Risk of fire if a charger that is suitable for a specific type of battery is used with other batteries.
b) In the power tools, use only the batteries designed for the purpose. The use of other batteries may result in injuries and risk of fire.
c) Keep the unused battery away from paper clips, coins, keys, nails, screws and other small metal objects, which could cause bridging of the contacts. A short circuit between the battery contacts may cause burns or fire.
d) If used incorrectly, liquid may leak from the battery. Avoid contact with this. In the event of accidental contact, rinse off with water. If the liquid gets into eyes, seek medical assistance. Leaking battery fluid may cause skin irritations or burns.
6) SERVICE
Have your power tool serviced by a qualified repair person using only identical replacement parts.
This will ensure that the safety of the power tool is maintained.
7) SPECIAL SAFETY DIRECTIONS FOR BATTERY-OPERATED TOOLS
a) Ensure that the device is switched off before inserting the battery.
Inserting a battery into a power tool that is switched on may result in accidents.
b) Recharge the batteries indoors only because the battery charger is designed for indoor use only.
c) To reduce the electric shock hazard, unplug the battery charger from the mains before cleaning the charger.
d) Do not subject the battery to strong sunlight over long periods and do not leave it on a heater. Heat damages the battery and there is a risk of explosion.
e) Allow a hot battery to cool before charging.
f) Do not open up the battery and avoid mechanical damage to the battery. Risk of short circuit and fumes may be emitted that irritate the respiratory tract. Ensure fresh air and seek medical assistance in the event of discomfort.
g) Do not use non-rechargeable batteries!
8) CORRECT HANDLING OF THE BATTERY CHARGER
- This appliance is not intended for operation by persons (including children) with reduced physical, sensory or mental capabilities, or lacking experience and/or knowledge, unless they are under the supervision of or have been instructed on how to use the appliance by a person responsible for their safety.
- Keep the equipment away from children and pets. Children should be supervised in order to ensure that they do not play with the equipment.
• To charge the battery, use only the charger supplied.
Risk of fire and explosion. This ensures that the safety of the device is maintained.
- Before each use, check the charger, cable and plug and have them
repaired by qualified professionals and only with original parts.
Do not use a defective charger and do not open it up yourself. This ensures that the safety of the device is maintained.
- Connect the charger only to a socket with an earth. Ensure that the mains voltage matches the specifications on the charger rating plate. Risk of electric shock.
- Disconnect the charger from the mains before closing or opening connection to the battery / power tool / device.
- Keep the charger clean and away from wet and rain. Do not use the charger outdoors. Dirt and the entry of water increase the risk of electric shock.
- Operate the charger only with the appropriate original batteries. Charging other batteries may result in injuries and risk of fire.
- Avoid mechanical damage to the charger. This can result in internal short circuits.
- Do not operate the charger on a combustible surface (e.g. paper, textiles). Risk of fire due to heating during charging.
- If the power cable for this equipment is damaged, it must be replaced by the manufacturer, a customer service agent of the same or a similarly qualified person in order to prevent hazards.
- The battery of the appliance is not fully charged at the time of delivery. It therefore needs to be fully recharged before you use it for the first time. For the first recharge cycle we recommend that you charge the battery for about 1 hour. Slot the battery into the base and plug the battery charger into a mains outlet.
- When the battery is fully charged, unplug the charger from the mains and from the appliance. Charging time is approx. 1 hour.
- Do not charge the battery continuously since this may damage the battery cells. Note: Repeatedly charging small capacities may damage the battery cells. Recharge the battery only if the appliance is becoming slow.
- Do not use the charger to charge non-rechargeable batteries.
9) RESIDUAL RISKS
Even if properly operating and handling this electric tool, some residual risks will remain. Due to its construction and build, this electric tool may present the following hazards:
al Cuts
b) Ear damage if working without ear protection.
c) Damage to your health caused by swinging your hands and arms when operating the appliance for longer periods of time or if the unit is not held or maintained properly.

Warning! During operation, this electric tool generates an electromagnetic field which, under certain circumstances, may impair the functionality of active or passive medical implants. To reduce the risk of serious or lethal injuries, we recommend that persons with medical implants consult their doctor and the manufacturer of their medical implant before operating the machine.
Charging the battery

Do not expose the battery to extreme conditions such as heat or impact. Risk of injury from escaping electrolytic solution! After eye/skin contact, rinse the affected areas with water or a neutraliser and consult a doctor.

Charge the battery in a dry room only.
Prior to attaching the charger, check that the battery's outer surface is clean and dry.
There is a risk of injury due to electric shock.

Only use the original charger from the package to charge the battery. Mind not to charge the appliance for more than 5 hours at a time. If you do, the battery and the appliance may be damaged and longer charging times would be a waste of energy. Excessive charging will void the warranty.
- Charge the battery before the first time of use. Do not briefly charge the battery several time in a row.
- Recharge the battery when you notice that the appliance is becoming slower.
- If a fully recharged battery lasts for considerably shorter operating times, the battery is used up and needs to be replaced. Only use an OEM spare battery available from our Customer Service.
• Always take heed of the applicable safety instructions as well as the environmental protection regulations and information.
- The warranty excludes all defects caused by improper handling.
Removing / inserting the battery

-
To remove the battery (16) from the appliance, press the release button (17) on the battery and pull out the battery.
-
To insert the battery (16), place it on the guide track (20) and push it back into the appliance. It will audibly snap in.

Do not insert the battery until the appliance is fully assembled. Risk of injury!
Recharging the battery

Recharge the battery when the last charge state indicator LED (A18) changes from green to orange/red.
When starting to charge and while charging, the battery charge indicator (A19) lights up red.
When charging is over, the light changes to green.

-
Remove the battery (16) from the appliance, as necessary.
-
Inser the battery (16) in the charging compartment of the battery charger (19). It will audibly snap in.
-
Plug the battery charger (19) into a mains outlet.
-
When the battery is fully re-charged unplug the battery charger (19) from the mains.
-
Press the release button ( A 17) on the battery (16) and pull the battery out of the battery charger (19).
Used batteries
- If a fully recharged battery lasts for considerably shorter operating times, the battery is used up and needs to be replaced. Only use an OEM battery pack replacement available from our Customer Service.
- Always take heed of the applicable safety instructions as well as the environmental protection regulations and information (see "Cleaning and Maintenance").
Assembling instructions

Do not insert the battery until the appliance is fully assembled. Risk of injury!

To put together the equipment:
- Turn the black twist lock (24) on the motor head (10) until the notches match up to those in the green casing. Lock open symbol
- When plugging in the telescopic tube (9) be aware of the different plastic pin thicknesses on the tube. Only one position is possible.
- Plug the end of the telescopic tube (9) all the way into opening on the motor head (10). If the position is correct, the cross-head screw on the pipe is no longer visible.
- To lock, turn the twist lock (24) approx. 45° clockwise. Lock closed symbol 🔒▲.
D
To put on the protective cover:
- Place the protective cover (14) on the motor head (10) and screw it down with the 3 Phillips screws.
E
To put on the auxiliary handle:
- Pull the ends of the auxiliary handle (5) to extend the handle and slide it over the handle holder (22).
- Screw down the screw (23) in the auxiliary handle (5).
4.
Mounting the trimming unit:
- Slip the cutting disc (12) onto the axle. There is only one mounting position. Screw the cutting disc (12) to the axle. Mind the left-hand thread. Please ensure that the screws are properly tightened.
Place the cutting insert (13) on the pin (23) on the cutting disk (12) and pull out the insert until it snaps in.

Spare cutting inserts are kept in the box (4) on the auxiliary handle (5).
B.
To insert the battery:
To insert the battery (16), place it on the guide track (20) and push it into the appliance. It will audibly snap in.
Operation

Caution: risk of injury! Do not operate the appliance without the protective cover. To operate the appliance, wear suitable clothing, eye and ear
protection.
Prior to every use, check that the appliance is operative. Do not block the On/Off switch or the switch lock. They must reliably turn off the motor when you release the switch. Do not operate the appliance if one of the switches is damaged.

Please observe local regulations concerning noise protection.
Turning on and off

Maintain a firm stand and hold the appliance well with both hands and at some distance away from your body. Before turning on the appliance, check that it will not touch any objects.

-
Check that the battery (16) is in (see "Assembly instructions - Inserting the battery").
-
To turn on, use your thumb to actuate the switch lock (3), then press the On/Off switch (2). Release the switch lock.
-
To turn off, release the On/Off switch (2). There is no continuous operation mode.

After turning off the appli- ance, the trimming assembly will keep revolving for some time. Allow the trimming as- sembly to come to a stand- still. Neither touch nor slow down the moving cutting in- sert. Risk of injury!
Checking the battery charge level
The battery's (A18) charge level is indicated by the charge state indicator (A16).
Press the PRESS button on the battery. The LEDs indicate the battery's charge level.

Recharge the battery when the last charge state indicator LED (A18) changes from green to orange/red.

Trimmer settings
To adjust the auxiliary handle:
The auxiliary handle can be set to various positions. Adjust the handle such that the cutting disk slightly tilts forward in your working position.
① Loosen the screw (23) in the handle and move the auxiliary handle (5) to your favourite position. Tighten the screw in the handle.
To adjust the height:
The telescopic shaft allows you to adjust the appliance to your personal size.
② Loosen the threaded bush (8). Adjust the telescopic shaft (9) to the correct length and tighten the threaded bush.
To adjust the cutting angle:
Changing the cutting angle lets you trim grass at places that a difficult to reach, e.g. under benches or wall offsets.
③ Tread on the pedal (15) on the motor housing and tilt the telescopic shaft (9). There are 6 preset tilt angles (see "Work instructions").
To adjust the handle rod:
The handle rod can be turned by 90° and 180° (see "Work instructions").
④ Push down the lock (7) and turn the handle rod ▼0°90°180° ▼ (6) until it snaps into your favourite position.
To adjust the spacer bow (flower guard):
The spacer bow keeps the trimming as-sembly away from plants and trunks not to be cut.
⑤ Push the spacer bow (11) forward. When the spacer bow is not in use you can move it back to its parking position.
Manner of operation

WARNING. Danger of in- jury!
- Do not cut moist or wet grass.
- Prior to starting the appliance, check that the cutting disk does not contact stones, gravel or other foreign bodies.
- Switch on the trimmer before you approach the grass that is to be cut.
- Do not overload the trimmer during operation.
- Avoid contact with obstacles (stones, walls, fences, etc.) as this will rapidly wear out the lines.
Cutting grass

Cut the grass by swaying the trimmer sideways to the right and left. Cut slowly while the trimmer is tilted forwards by approx. 30°. Cut tall grass by a
series of levels from top to bottom.
Vertical cut / lawn edge trimming

Be particularly careful and attentive when operating the cutter vertically. To avoid injuries, keep enough distance to the trimming assembly.

Setup for vertical trimming:
Move the appliance to the right and left in a slow swinging motion to trim slopes and steep inclines.
- Handle rod: 180° (see
G ④) - Cutting angle: 0° (see
G ③ - Spacer bow in parking position

Setup for edge trimming:
To trim lawn edges, slowly move the appliance along the lawn edges.
- Handle rod: 90° (see
G ④)
• Cutting angle: 90° (see
G ③ - Spacer bow in parking position
Cleaning and maintenance

Contact our Service Centre about repairs and servicing not described in this manual. Only use OEM parts. Risk of injury!

Turn off the appliance and, before doing any servicing, remove the battery.
The following cleaning and servicing should be done regularly. This will ensure a long and reliable service life.
Cleaning

Do not spray the appliance with water and do not immerse it in water. Electric shock hazard!
- Keep clean the ventilation slots, motor housing and handles of the appliance. Use a damp cloth or a brush.
Do not use cleaning agents or solvents. You may otherwise irreparably damage the appliance.
- After every trimming session, remove grass and soil from the protective cover and the trimming assembly.
- To thoroughly clean the trimming assembly, remove the cutting insert (F 13) (see "Replacing the cutting insert") and use a sharp knife to clean the pin (F 24).
Trouble shooting
| Problem Possible | cause Corrective action | |
| Appliance won't start | Battery (A16) discharged | Recharge battery (A16) (see „Charging") |
| Battery (A16) not in Insert battery (16) (see „Operation") | ||
| On/Off switch (A2) defective | Send in to Service Centre for repair | |
| Motor defective | ||
| Intermittent operation | Internal loose contact | Send in to Service Centre for repair |
| On/Off switch (A2) defective | ||
| Much vibration Loud noise | Cutting insert (A13) broken | Replace cutting insert (A13) (see „Cleaning and servicing") |
| Trimming assembly dirty | Clean trimming assembly (see „Cleaning and servicing") | |
| Motor defective Send in to Service Centre for repair | ||
| Bad trim | Cutting insert (A13) broken | Replace cutting insert (A13) (see „Cleaning and servicing") |
| Trimming assembly dirty | Clean trimming assembly (see „Cleaning and servicing") | |
| Battery (A16) not fully charged | Recharge battery (A16) (see „Charging") | |
General maintenance
- Prior to every use, check the appliance for obvious defects such as loose, worn or damaged parts.
Check that the screws in the cutting disk are tight.
- Check covers and safety devices for damages and correct installation. Replace as necessary.
Replacing the cutting insert

-
Slide the cutting insert (13) inward and push it out of the pin (24) on the cutting disk (12).
-
Place the new cutting insert (13) on the pin (24) and pull out the insert until it snaps in.
Storage
- Store the trimmer in a dry place well out of reach of children.
- Do not stand the trimmer on its protective cover. Suspend it by its upper handle in such a manner that the protective cover does not come into contact with other objects. This is because the protective cover could become deformed, thereby changing its dimensions and its safety properties.
- In order to keep the battery well charged, avoid exposing the appliance to extreme heat or cold in storage.
- Remove the battery before storing the unit for longer periods of time.
Disposal and protection of the environment
Remove the battery from the device and take the device, battery, accessories and packaging for environmentally friendly recycling.

Machines do not belong with domestic waste.
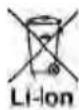
Do not dispose of batteries in household waste, fire (risk of explosion) or water. Damaged batteries may damage the environment and your health if toxic fumes or liquids leak out.
- Return the unit to a recycling centre. The plastics and metals in the unit can be sorted and appropriately recycled. Ask our Service Centre for details.
- Dispose of batteries in discharged condition. We recommend covering the pole with adhesive tape to prevent a short circuit. Do not open up the battery.
- Dispose of batteries in accordance with the local regulations. Take batteries to an old battery collection point where they will be recycled in an environmentally friendly manner. For information about this, ask your local waste management company or our service centre.
- Defective units returned to us will be disposed of for free.
- Throw the cut grass on the compost. Do not throw it in the normal household waste.
Replacement parts
The following spares are available from Service-Center. Please indicate the machine type and the number of the spare part with your order.
Cutting inserts (pack of 20) .....91099379 Battery .....91099396 Battery charger .....91100554
If further spare parts should be necessary, please find the part number on the exploded drawing.
Guarantee
Dear Customer, This equipment is provided with a 3-year guarantee from the date of purchase. In case of defects, you have statutory rights against the seller of the product. These statutory rights are not restricted by our guarantee presented below.
Terms of Guarantee
The term of the guarantee begins on the date of purchase. Please retain the original receipt. This document is required as proof of purchase. If a material or manufacturing defect occurs within three years of the date of purchase of this product, we will repair or replace – at our choice – the product for you free of charge. This guarantee requires the defective equipment and proof of purchase to be presented within the three-year period with a brief written description of what constitutes the defect and when it occurred.
If the defect is covered by our guarantee, you will receive either the repaired product or a new product. No new guarantee period begins on repair or replacement of the product.
Guarantee Period and Statutory Claims for Defects
The guarantee period is not extended by the guarantee service. This also applies for replaced or repaired parts. Any damages and defects already present at the time of purchase must be reported immediately after unpacking. Repairs arising after expiry of the guarantee period are chargeable.
Guarantee Cover
The equipment has been carefully produced in accordance with strict quality guidelines and conscientiously checked prior to delivery.
The guarantee applies for all material and manufacturing defects. This guarantee does not extend to cover product parts that are subject to normal wear and may therefore be considered as wearing parts (e.g. filters or attachments) or to cover damage to breakable parts (e.g. switches, batteries, or parts made of glass). This guarantee shall be invalid if the product has been damaged, used incorrectly or not maintained. Precise adherence to all of the instructions specified in the operating manual is required for proper use of the product. Intended uses and actions against which the operating manual advises or warns must be categorically avoided. The product is designed only for private and not commercial use. The guarantee
will be invalidated in case of misuse or improper handling, use of force, or interventions not undertaken by our authorised service branch.
Processing in Case of Guarantee
To ensure quick handling of you issue, please follow the following directions:
- Please have the receipt and item number (IAN 95940) ready as proof of purchase for all enquiries.
- Please find the item number on the rating plate.
- Should functional errors or other defects occur, please initially contact the service department specified below by telephone or by e-mail. You will then receive further information on the processing of your complaint.
- After consultation with our customer service, a product recorded as defective can be sent postage paid to the service address communicated to you, with the proof of purchase (receipt) and specification of what constitutes the defect and when it occurred. In order to avoid acceptance problems and additional costs, please be sure to use only the address communicated to you. Ensure that the consignment is not sent carriage forward or by bulky goods, express or other special freight. Please send the equipment inc. all accessories supplied at the time of purchase and ensure adequate, safe transport packaging.
Repair Service
For a charge, repairs not covered by the guarantee can be carried out by our service branch, which will be happy to issue a cost estimate for you. We can handle only equipment that has been sent with adequate packaging and postage.
Attention: Please send your equipment to our service branch in clean condition and with an indication of the defect.
Equipment sent carriage forward or by bulky goods, express or other special freight will not be accepted.
We will dispose of your defective devices free of charge when you send them to us.
Service-Center

Service Great Britain
Tel.: 0871 5000 720
(£ 0.10/Min.)
E-Mail: grizzly@lidl.co.uk
IAN 95940

Service Ireland
Tel.: 1890 930 034
(0,08 EUR/Min., (peak))
(0,06 EUR/Min., (off peak))
E-Mail: grizzly@lidl.ie
IAN 95940

Service Cyprus
Tel.: 8009 4409
E-Mail: grizzly@lidl.com.cy
IAN 95940
Importer
Please note that the following address is not a service address. Please initially contact the service centre specified above.

GRIZZLY GARTENGERÄTE GMBH & CO. KG
Am Gewerbepark 2



- CORDLESS GRASS TRIMMER FAT 18 B2
- CORDLESS GRASS TRIMMER
- GR CY
- INTRODUCTION
- INTENDED PURPOSE
- GENERAL DESCRIPTION
- EXTENT OF THE DELIVERY
- OVERVIEW
- FUNCTIONAL DESCRIPTION
- TECHNICAL DATA
- APPLIANCE
- GBIECY
- BATTERY (LI-ION)
- RECHARGER ....JLH082100350B
- SAFETY INSTRUCTIONS
- SYMBOLS AND ICONS
- SYMBOLS ON THE TRIMMER
- SYMBOLS ON THE BATTERY
- SYMBOLS ON THE RECHARGER
- SYMBOLS IN THE MANUAL
- GENERAL SAFETY INSTRUCTIONS FOR POWER TOOLS
- RETAIN ALL SAFETY DIRECTIONS AND INSTRUCTIONS FOR FUTURE USE
- WORK AREA SAFETY
- ELECTRICAL SAFETY
- PERSONAL SAFETY
- RESIDUAL RISKS
- CHARGING THE BATTERY
- REMOVING / INSERTING THE BATTERY
- RECHARGING THE BATTERY
- USED BATTERIES
- ASSEMBLING INSTRUCTIONS
- D
- E
- 4
- B
- OPERATION
- TURNING ON AND OFF
- CHECKING THE BATTERY CHARGE LEVEL
- TRIMMER SETTINGS
- TO ADJUST THE AUXILIARY HANDLE
- TO ADJUST THE HEIGHT
- TO ADJUST THE CUTTING ANGLE
- TO ADJUST THE HANDLE ROD
- TO ADJUST THE SPACER BOW (FLOWER GUARD)
- MANNER OF OPERATION
- WARNING. DANGER OF IN- JURY
- CUTTING GRASS
- VERTICAL CUT / LAWN EDGE TRIMMING
- SETUP FOR VERTICAL TRIMMING
- SETUP FOR EDGE TRIMMING
- CLEANING AND MAINTENANCE
- CLEANING
- GENERAL MAINTENANCE
- REPLACING THE CUTTING INSERT
- STORAGE
- DISPOSAL AND PROTECTION OF THE ENVIRONMENT
- REPLACEMENT PARTS
- GUARANTEE
- TERMS OF GUARANTEE
- GUARANTEE PERIOD AND STATUTORY CLAIMS FOR DEFECTS
- GUARANTEE COVER
- PROCESSING IN CASE OF GUARANTEE
- REPAIR SERVICE
- SERVICE-CENTER
- SERVICE GREAT BRITAIN
- SERVICE IRELAND
- SERVICE CYPRUS
- IMPORTER
Brand : FLORABEST
Model : FAT 18 B2
Category : Lawn mower