BR-310AC - Wi-Fi repeater Silex - Free user manual and instructions
Find the device manual for free BR-310AC Silex in PDF.


User questions about BR-310AC Silex
0 question about this device. Answer the ones you know or ask your own.
Ask a new question about this device
Download the instructions for your Wi-Fi repeater in PDF format for free! Find your manual BR-310AC - Silex and take your electronic device back in hand. On this page are published all the documents necessary for the use of your device. BR-310AC by Silex.
USER MANUAL BR-310AC Silex
1-2. Safety Instructions ....2
1-3. User Registration and Customer Services ....5
User Registration 5
Product Information 5
Customer Support Center 5
2. About BR-310AC....7
2-1. Features....8
2-2. Parts and Functions....10
2-3. Hardware Specification 12
2-4. Software Specification....14
2-5. Use of Radio Waves....15
Notes on Usage 15
2-6. Notes on Security 17
2-7. OpenSSL License .... 18
3. Before You Begin 21
3-1. Operating Mode 21
Single Client Mode ....22
Multi-Client Mode 23
3-2. Configuration Method....24
Easy Configuration Using Configuration Mode ....25
Wireless Configuration Using Smart Wireless Setup (Push Switch) ....
26
Wireless Configuration Using Smart Wireless Setup (PIN Code) .....27
3-3. Necessary Wireless Setting Information....28
4. How to Configure BR-310AC.... 29
4-1. Easy Configuration Using Configuration Mode....30
Starting BR-310AC in Configuration Mode ....30
Configuration 32
Connecting Non-wireless Devices ....36
4-2. Configuration Using Smart Wireless Setup (Push Switch) 38
Configuration 39
Connecting Non-wireless Devices 43
4-3. Configuration Using Smart Wireless Setup(Pin Code) 45
Starting BR-310AC in Configuration Mode 46
Checking a PIN Code ....48
Configuration 50
Connecting Non-wireless Devices ....52
5. List of Functions .... 55
5-1. How to Access Web Configuration Interface....55
Starting BR-310AC in Configuration Mode 56
Configuration via Web Configuration Interface ....58
5-2. IEEE802.1X Authentication .... 59
Network Configuration ....59
IEEE802.1X Authentication 61
Certificate Standard 62
MAC Address Filtering 63
Before Using the IEEE802.1X Authentication 63
IEEE802.1X Authentication Settings ....64
5-3. Saving Log....67
Types of Log 67
Retrieving/Deleting System Log 71
Retrieving Event Log 79
5-4. Maintenance 84
Restarting....84
Factory Default Configuration 86
Firmware Update ....88
A. Appendix......89
A-1. List of All Settings 89
A-2. Troubleshooting....99


natural_image
Blank white image with no visible content, text, or symbols.
natural_image
Blank white image with no visible content, text, or symbols.
natural_image
Blank white image with no visible content, text, or symbols.
natural_image
Blank white image with no visible content, text, or symbols.
natural_image
Blank white image with no visible content, text, or symbols.1. Introduction
Thank you for purchasing the Wireless Bridge BR-310AC (hereinafter the "BR-310AC").
1-1. Introduction
This manual provides information on how to configure and use the BR-310AC. Please read the Safety Instructions carefully before you begin.
Disclaimers
- The unauthorized transfer or copying of the content of this manual, in whole or in part, without prior written consent is expressly prohibited by law.
- The content of this manual is subject to change without notice.
- This manual was prepared to accurately match the content of each OS, but the actual information shown on the computer monitor may differ from the content of this manual due to future OS version upgrades, modifications, and other changes.
- Although every effort was made to prepare this manual with the utmost accuracy, Silex Technology will not be held liable for any damages as a result of errors, setting examples, or other content.
Trademarks
- Microsoft and Windows are registered trademarks of Microsoft Corporation in the United States and/or other countries.
- Wi-Fi, Wi-Fi Protected Setup (WPS), Wi-Fi Protected Access (WPA), WPA2 are trademarks or registered trademarks of Wi-Fi Alliance.
- Other company names and product names contained in this manual are trademarks or registered trademarks of their respective companies.
1-2. Safety Instructions
This page provides the safety instructions for safe use of BR-310AC.
To ensure safe and proper use, please read the following information carefully before using BR-310AC. The safety instructions include important information on safe handling of BR-310AC and on general safety issues.
< Meaning of the warnings >
 | Warning | "Warning" indicates the existence of a hazard that could result in death or serious injury if the safety instruction is not observed. |
 | Caution | "Caution" indicates the existence of a hazard that could result in serious injury or material damage if the safety instruction is not observed. |
< Meaning of the symbols >
 | This symbol indicates the warning and caution.(Example: "Danger of the electric shock") |
 | This symbol indicates the prohibited actions.(Example: "Disassembly is prohibited") |
 | This symbol indicates the actions users are required to observe.(Example: "Remove the AC plug from an outlet") |

Warning
 | * Do not allow physical impact. When damaged, turn off the connected devices, unplug the AC plug of BR-310AC from a power outlet and contact your point of purchase. Failure to take this action could cause fire or an electrical shock. |
 | * In the following cases, turn off the connected devices and unplug the AC plug of BR-310AC from a power outlet and contact your point of purchase. Failure to take this action could cause fire or an electrical shock. |
| * When BR-310AC emits a strange smell, smoke or sound or becomes too hot to touch. | |
| * When foreign objects (metal, liquid, etc.) gets into BR-310AC. | |
 | * Keep the cords and cables away from children. It may cause an electrical shock or serious injury. |
 | * If a ground wire is supplied with your device to use with, connect it to the ground terminal in order to prevent an electrical shock. Do not connect the ground wire to gas pipe, water pipe, lighting rod or telephone ground wire. It may cause malfunction. |
 | * Do not disassemble or modify BR-310AC. It may cause fire, electrical shock or malfunction. |
| * Do not disassemble or modify the AC adaptor that came with BR-310AC. It may cause fire, electrical shock or malfunction. |

Caution
 | * Do not pull on the cord to disconnect the plug from the power supply. The code may be broken, which could result in fire or an electrical shock. |
 | * When removing BR-310AC, disconnect the AC plugs of both BR-310AC and the other devices you are using with.* Use the AC adaptor supplied with BR-310AC. Other AC adaptors may cause malfunction.* Verify all codes or cables are plugged correctly before using BR-310AC.* When BR-310AC will not be used for a long time, unplug the power cables of BR-310AC and the other devices you are using with. |
 | * Do not use or store BR-310AC under the following conditions. It may cause malfunction.- Locations subject to vibration or shock- Shaky, uneven or tilted surfaces- Locations exposed to direct sunlight- Humid or dusty places- Wet places (kitchen, bathroom, etc.)- Near a heater or stove- Locations subject to extreme changes in temperature- Near strong electromagnetic sources (magnet, radio, wireless device, etc.) |
1-3. User Registration and Customer Services
User Registration
To enable us to provide better services (support and repair), please perform the user registration process from our website below:
| URL |
| USA http://www.silexamerica.com/support/product-registration/ |
| Europe http://www.silexeurope.com/en/home/support/registration/ |
| Japan http://www.silex.jp/register/ |

- For user registration, a serial number is required.
Product Information
The services below are available from the Silex Technology website. For details, please visit the Silex Technology website.
| URL | |
| USA http://www.silexamerica.com/ | |
| Europe http://www.silexeurope.com/ | |
| Japan http://www.silex.jp/ |
- Latest firmware download - Latest software download
- Latest manual download - Support information (FAQ)
Customer Support Center
Customer Support is available by e-mail or telephone for any problems that you may encounter. If you cannot find the relevant problem in this manual or on our website, or if the corrective procedure does not resolve the problem, please contact Silex Technology Customer Support.
| Contact Information | ||
| USA +1-801 | -748-1199 support@silexamerica.com | |
| Europe +49 | -(0)2151-65009-0 support@silexeurope.com | |
| Japan +81 | -(0)774-98-3981 support@silex.jp | |

- Visit the Silex Technology website (http://www.silexamerica.com/) for the latest FAQ and product information.
2. About BR-310AC
BR-310AC is the wireless bridge which allows to use a non-wireless device (10/100/1000BASE-T network device) as a wireless device. With 2.4G/5GHz band support, various non-wireless devices can easily be connected over a wireless network.
The enterprise security feature will ensure safe and secure use of wireless communication at an office, factory, etc. where a higher security is required.
2-1. Features
BR-310AC has the following features:
Giving unlimited locations for your non-wireless devices
As you do not have to care wiring conditions in order to establish your environment, choices of location greatly expand in any kinds of scenes such as office, factory, school, commercial facility, etc. where the layout change is frequently required or effective layout of equipment needs to be carefully considered for a work line. Also, cost reductions is largely expected as you will no longer have to pay for wiring construction.
IEEE 802.11a/b/g/n
BR-310AC supports communications at both 2.4GHz/5GHz bands. Using 5GHz band will help to avoid radio interference with 2.4GHz band which is most commonly used in the market.
Advanced security
The following security features are supported:
- WEP (64bit/128bit)
- WPA-PSK(AUTO/AES),WPA2-PSK (AES)
- IEEE 802.1X EAP-TLS, PEAP, EAP-TTLS, EAP-FAST, LEAP
Two types of operating mode
[Single Client Mode]
- Bridges a single non-wireless device connected to a LAN port of the BR-310AC over wireless network.
- For the MAC address to use for wireless LAN connection, the MAC address of the device connected to a LAN port of the BR-310AC will be used (MAC address transparent feature).
- Stops bridging when someone changed the device being connected to a wired LAN port of the BR-310AC to the other one (security feature).
[Multi-Client Mode]
- Up to 16 non-wireless devices can be bridged over wireless network if a HUB is connected to a LAN port of the BR-310AC.
- For the MAC address to use for wireless LAN connection, the MAC address of the BR-310AC will be used.
On-board storage chip with 2GB memory
The operating log data can be stored in the on-board storage chip for a long period of time. This will help you to quickly resolve the troubles that may occur during the use of BR-310AC.
Easy access to the Web configuration interface
Without changing the setting of the PC you use for setup, the Web configuration interface of BR-310AC can easily be accessed.
AMC Manager (non-free program) / AMC Finder (free program)
BR-310AC supports the total management software, "AMC Manager" and "AMC Finder".
The AMC Manager provides the useful features as follows:
- Remote device control and monitoring
- Bulk configuration and firmware updates

Note
- To use the functions above, your Access Point or wireless router needs to support the same functions.
- For details on the "AMC Manager" and "AMC Finder", please visit our homepage.
- To use the "AMC Manager" and "AMC Finder", an IP address needs to be configured to the BR-310AC.
2-2. Parts and Functions
The parts name and functions are as follows:
Front
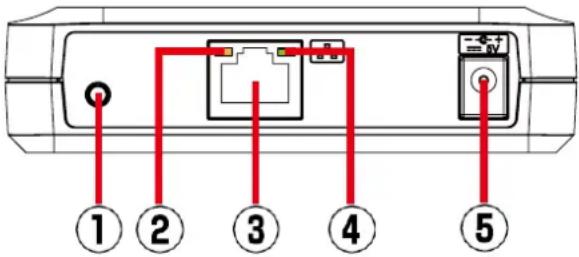
text_image
① ② ③ ④ ⑤| (1) | Push Switch | Start in Configuration Mode | Press and hold this switch for 5 sec while BR-310AC is active. | |
| Wireless configuration using Smart Wireless Setup | Press and hold this switch for 10 sec while BR-310AC is active. | |||
| Factory default configuration | Press and hold this switch while turning on BR-310AC and release it when the WLAN LED turns from Green to Red. | |||
| (2) | Status LED(Green / Orange) | Blink (Orange) Waits for connection when the Link LED is turned off. | ||
| (3) | LAN port Connect a network cable. | |||
| (4) | Link LED (Green) ON Has connected to a wired LAN. | |||
| (5) | AC connector Connect an AC adaptor. | |||
Top Bottom
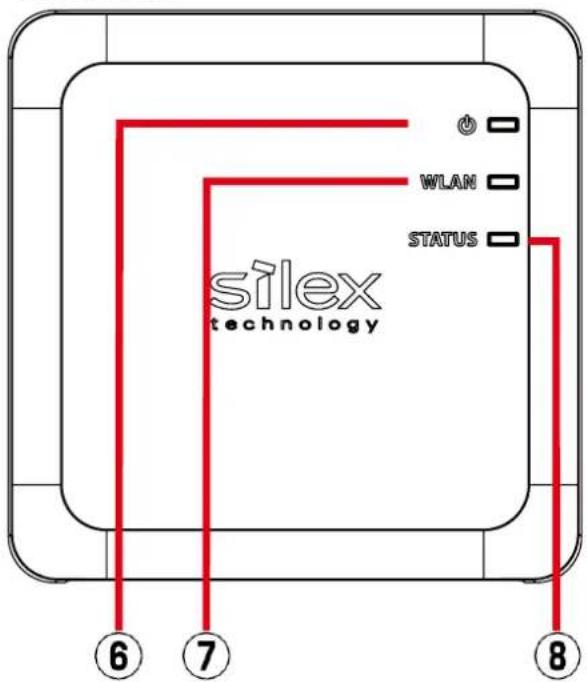
text_image
silex technology WLAN STATUS ⑥ ⑦ ⑧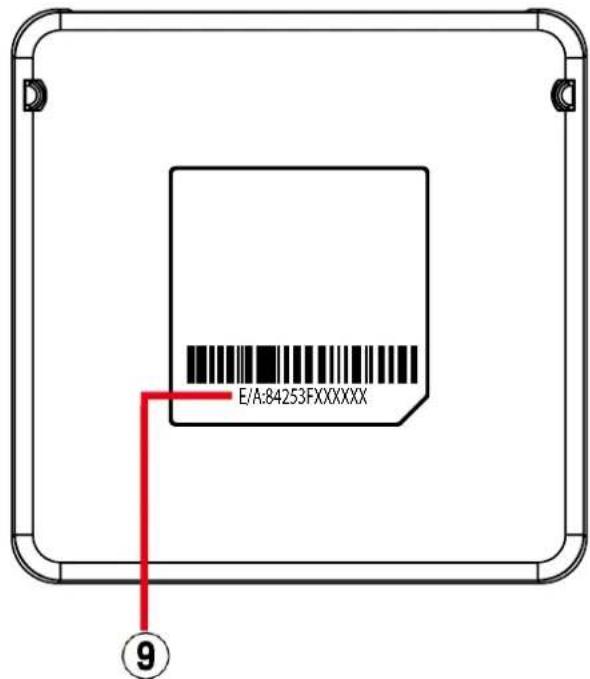
text_image
E/A:84253FXXXXXX ⑨| (6) POWER LED(Green/Red) | ON (Green) Powered on | |
| ON (Red) Powered on and ready | ||
| (7) WLAN LED(Green/Red) | ON (Green) Operating in Infrastructure mode. | |
| Blink (Green) Processing wireless configuration using Smart Wireless Setup. | ||
| * Blinks Green together with the STATUS LED when operating in Configuration Mode.* Turns from Green to Red during the factory default configuration. | ||
| (8) STATUS LED(Green/Red) | ON (Green) Connection is established. | |
| Blink (Green) Handles data communication. | ||
| * Blinks Green together with the WLAN LED when operating in Configuration Mode. | ||
| (9) MAC Address MAC Address of the LAN port on BR-310AC | ||
2-3. Hardware Specification
| Operating environment Temperature: 0 degrees to +40 degrees | |
| Storage environment Temperature: -10 degrees to +50 degrees | |
| EMI VCCI Class B | Humidity: 20% to 90%RH (Non-condensing) |
| FCC Class BICES Class BEN55022, EN55024 | |
| Wired network interface 10BASE-T/100BASE-TX/1000BASE-T (Auto-sensing):1 portAuto MDI/MDIX | |
| Wireless network interface IEEE 802.11a/b/g/n(The channels you can use will differ depending on the regulations of each country.) | |
| Push Switch 1 | |
| LED Top POWER (Green / Red) | WLAN (Green / Red)STATUS (Green / Red) |
| LAN Port Status (Green / Orange)Link (Green) | |
| Compatible devices Network devices with LAN port (RJ-45) | |
| Max number of connectable devices | When operating in Single Client Mode: 1 deviceWhen operating in Multi-Client Mode: 16 devices |
FCC / IC Notice
FC
FCCID: N6C-SXPCEAN2
IC:4908A-SXPCEAN2
Channel Selection
For product available in the USA/Canada market, only channel 1\~11 can be operated. Selection of other channels is not possible.
Fcc Rules Part 15
FCC CAUTION
Changes or modifications not expressly approved by the party responsible for compliance could void the user's authority to operate the equipment.
FCC Rules, Part 15 §15.19(a)(3) / IC RSS Gen §8.4
Below sentences must be indicated on the final product which contains this module inside.
This device complies with Part 15 of FCC Rules and Industry Canada licence-exempt RSS standard(s). Operation is subject to the following two conditions: (1) this device may not cause interference, and (2) this device must accept any interference, including interference that may cause undesired operation of this device.
This equipment complies with FCC/IC radiation exposure limits set forth for an uncontrolled environment and meets the FCC radio frequency (RF) Exposure Guidelines and RSS-102 of the IC radio frequency (RF) Exposure rules. This equipment should be installed and operated keeping the radiator at least 20cm or more away from person's body.
Compliance with FCC requirement 15.407(c)
Data transmission is always initiated by software, which is the passed down through the MAC, through the digital and analog baseband, and finally to the RF chip. Several special packets are initiated by the MAC. These are the only ways the digital baseband portion will
turn on the RF transmitter, which it then turns off at the end of the packet. Therefore, the transmitter will be on only while one of the aforementioned packets is being transmitted.
In other words, this device automatically discontinue transmission in case of either absence of information to transmit or operational failure.
FCC Rules Part 15 Subpart E §15.407(g)
Frequency Tolerance: +/-20 ppm
FCC Rules Part 15 Subpart C §15.247(g) / Subpart E
This device and its antenna(s) must not be co-located or operation in conjunction with any other antenna or transmitter.
RSS-Gen §8.3
This radio transmitter 4908A-SXPCEAN2 has been approved by Industry Canada to operate with the antenna types listed below with the maximum permissible gain and required antenna impedance for each antenna type indicated. Antenna types not included in this list, having a gain greater than the maximum gain indicated for that type, are strictly prohibited for use with this device.
- Antenna type External printed PCB antenna
- Model H2B1PC1A1C
- Antenna Gain 2.4GHz : +1.8dBi (Peak) 5GHz : +3.9 dBi (Peak)
RSS-210
5150-5250 MHz and 5250-5350 MHz bands are restricted to indoor operations only. High-power radars are allocated as primary users (i.e. priority users) of the bands 5250-5350 MHz and 5650-5850 MHz and that these radars could cause interference and/or damage to LE-LAN devices.
The FCC / The Industry Canadaregulations provide that changes or modifications not expressly approved by the party responsible for compliance could void the user'sauthority to operate the equipment.
CE Notice
CE!
2-4. Software Specification
Configuration Mode
| TCP/IP Network | k layer ARP, IP | |
| Transport layer TCP, UDP | ||
| Application layer HTTP, D | NS(simple reply function only), DHCP (simple server function only), NetBIOS over TCP/IP (Name Service only), JCP, FLDP, FLDP/BR* JCP, FLDP, FLDP/BR are the silex proprietary protocols. |
Normal Mode (Single Client Mode)
| TCP/IP Application | ion layer FLDP, FLDP/BR (only on a LAN port), SX_SMP* FLDP, FLDP/BR, SX_SMP are the silex proprietary protocols. |
- This bridges other protocols.
Normal Mode (Multi-Client Mode)
| TCP/IP Application layer FLDP, FLDP/BR (only on a LAN port), SX_SMP* FLDP, FLDP/BR, SX_SMP are the silex proprietary protocols. |
- This bridges TCP/IP (IPv4, IPv6) only.
2-5. Use of Radio Waves
Notes on Usage
Do not use BR-310AC near the following devices or places.
- Microwave, scientific instruments, pacemaker or other medical equipment, etc.
- Licensed radio station in a factory
- Small power radio station (A non-licensed radio station)
These devices may use the same band. If you use BR-310AC near these devices, the radio waves emitted from BR-310AC may interfere with them.
Do not use BR-310AC near a cellular phone, TV or Radio.
A cellular phone, TV and radio use a different radio band than our products. Generally, if they are used near BR-310AC, it will not cause any problems. However, when they approximate BR-310AC, sound or image noise may occur.
If there is reinforced concrete/metal between wireless devices, they may not connect.
BR-310AC can connect through wood or glass, but may have troubles connecting through reinforced concrete/metal.
BR-310AC complies with the certification of conformance to technical standards. Please pay attention to the following points:
- Please do not disassemble or remodel the product. Such action is prohibited by law.
- Please do not remove the certificate label. Using the product without a label is prohibited.
Wireless devices using 2.4GHz band
The same frequency band of BR-310AC is used for a microwave, industry, science, medical equipment and licensed in room or low power (non-licensed) radio stations.
- Before you use BR-310AC, check that it does not interfere with other devices.
- If interference occurs, stop using BR-310AC or change the wireless band. Please consider to create a wall between these devices to avoid interference. Contact us for possible solution.
* The meaning of the symbols in the bottom of the unit:
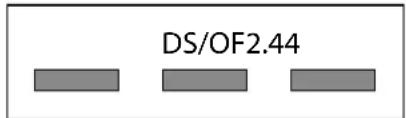
text_image
DS/OF2.442.4 : Wireless devices using 2.4GHz frequency band
DS/OF : DS-SS or OFDM is used as modulation.
4: The range of interference is equal to or lower than 40m.

Notes on using 5GHz band
- Use of 5.2GHz band (W52) and 5.3GHz band (W53) outdoors is prohibited by the radio regulations. Use only W56 channels then.
- BR-310AC does not support Ad hoc mode at 5GHz band.
Please use it in Infrastructure mode then.
2-6. Notes on Security
Because a wireless LAN uses electromagnetic signals instead of a network cable to establish communication with network devices, it has the advantage of allowing devices to connect to the network easily. However, a disadvantage of this is that within a certain range, the electromagnetic signals can pass through barriers such as walls, and if security countermeasures are not implemented in some way, problems such as the following may occur.
- Communication is intercepted by a third party
- Unauthorized access to the network
- Leakage of personal information (ID and Card information)
- Spoofing and the falsification of intercepted data
- System crashes and data corruption
Nowadays, wireless LAN cards or access points are equipped with security measures that address such security problems, so that you can enable security-related settings for wireless LAN products in order to reduce the likelihood of problems occurring.
We recommend that you make yourself fully acquainted with the possible implications of what might happen if you use a wireless product without enabling security features, and that you configure security-related settings and use wireless products at your own responsibility.
2-7. OpenSSL License
This product includes software developed by the OpenSSL Project for use in the OpenSSL Toolkit.
( http://www.openssl.org/ )
OpenSSL License
/* =
* Copyright (c) 1998-2008 The OpenSSL Project. All rights reserved.
*
* Redistribution and use in source and binary forms, with or without
* modification, are permitted provided that the following conditions
* are met:
*
* 1. Redistributions of source code must retain the above copyright
* notice, this list of conditions and the following disclaimer.
*
* 2. Redistributions in binary form must reproduce the above copyright
* notice, this list of conditions and the following disclaimer in
* the documentation and/or other materials provided with the
* distribution.
*
* 3. All advertising materials mentioning features or use of this
* software must display the following acknowledgment:
* "This product includes software developed by the OpenSSL Project
* for use in the OpenSSL Toolkit. (http://www.openssl.org/)
*
* 4. The names "OpenSSL Toolkit" and "OpenSSL Project" must not be used to
* endorse or promote products derived from this software without
* prior written permission. For written permission, please contact
* openssl-core@openssl.org.
*
* 5. Products derived from this software may not be called "OpenSSL"
* nor may "OpenSSL" appear in their names without prior written
* permission of the OpenSSL Project.
*
* 6. Redistributions of any form whatsoever must retain the following
* acknowledgment:
* "This product includes software developed by the OpenSSL Project
* for use in the OpenSSL Toolkit (http://www.openssl.org/)
* THIS SOFTWARE IS PROVIDED BY THE OpenSSL PROJECT "AS IS" AND ANY
* EXPRESSED OR IMPLIED WARRANTIES, INCLUDING, BUT NOT LIMITED TO, THE
* IMPLIED WARRANTIES OF MERCHANTABILITY AND FITNESS FOR A PARTICULAR
* PURPOSE ARE DISCLAIMED. IN NO EVENT SHALL THE OpenSSL PROJECT OR
* ITS CONTRIBUTORS BE LIABLE FOR ANY DIRECT, INDIRECT, INCIDENTAL,
* SPECIAL, EXEMPLARY, OR CONSEQUENTIAL DAMAGES (INCLUDING, BUT
* NOT LIMITED TO, PROCUREMENT OF SUBSTITUTE GOODS OR SERVICES;
* LOSS OF USE, DATA, OR PROFITS; OR BUSINESS INTERRUPTION)
* HOWEVER CAUSED AND ON ANY THEORY OF LIABILITY, WHETHER IN CONTRACT,
* STRICT LIABILITY, OR TORT (INCLUDING NEGLIGENCE OR OTHERWISE)
* ARISING IN ANY WAY OUT OF THE USE OF THIS SOFTWARE, EVEN IF ADVISED
* OF THE POSSIBILITY OF SUCH DAMAGE.
* This product includes cryptographic software written by Eric Young
* (eay@cryptsoft.com). This product includes software written by Tim
* Hudson (tjh@cryptsoft.com).
*/
Original SSLeay License
/* Copyright (C) 1995-1998 Eric Young (eay@cryptsoft.com)
* All rights reserved.
* This package is an SSL implementation written
* by Eric Young (eay@cryptsoft.com).
* The implementation was written so as to conform with Netscapes SSL.
* This library is free for commercial and non-commercial use as long as
* the following conditions are aheared to. The following conditions
* apply to all code found in this distribution, be it the RC4, RSA,
* Ihash, DES, etc., code; not just the SSL code. The SSL documentation
* included with this distribution is covered by the same copyright terms
* except that the holder is Tim Hudson (tjh@cryptsoft.com).
* Copyright remains Eric Young's, and as such any Copyright notices in
* the code are not to be removed.
* If this package is used in a product, Eric Young should be given attribution
* as the author of the parts of the library used.
* This can be in the form of a textual message at program startup or
* in documentation (online or textual) provided with the package.
* Redistribution and use in source and binary forms, with or without
* modification, are permitted provided that the following conditions
* are met:
* 1. Redistributions of source code must retain the copyright
* notice, this list of conditions and the following disclaimer.
* 2. Redistributions in binary form must reproduce the above copyright
* notice, this list of conditions and the following disclaimer in the
* documentation and/or other materials provided with the distribution.
* 3. All advertising materials mentioning features or use of this software
* must display the following acknowledgement:
* "This product includes cryptographic software written by
* Eric Young (eay@cryptsoft.com)"
* The word 'cryptographic' can be left out if the rouines from the library
* being used are not cryptographic related :-).
* 4. If you include any Windows specific code (or a derivative thereof) from
* the apps directory (application code) you must include an acknowledgement:
* "This product includes software written by Tim Hudson (tjh@cryptsoft.com)"
* THIS SOFTWARE IS PROVIDED BY ERIC YOUNG "AS IS" AND
* ANY EXPRESS OR IMPLIED WARRANTIES, INCLUDING, BUT NOT LIMITED TO, THE
* IMPLIED WARRANTIES OF MERCHANTABILITY AND FITNESS FOR A PARTICULAR PURPOSE
* ARE DISCLAIMED. IN NO EVENT SHALL THE AUTHOR OR CONTRIBUTORS BE LIABLE
* FOR ANY DIRECT, INDIRECT, INCIDENTAL, SPECIAL, EXEMPLARY, OR CONSEQUENTIAL
* DAMAGES (INCLUDING, BUT NOT LIMITED TO, PROCUREMENT OF SUBSTITUTE GOODS
* OR SERVICES; LOSS OF USE, DATA, OR PROFITS; OR BUSINESS INTERRUPTION)
* HOWEVER CAUSED AND ON ANY THEORY OF LIABILITY, WHETHER IN CONTRACT, STRICT
* LIABILITY, OR TORT (INCLUDING NEGLIGENCE OR OTHERWISE) ARISING IN ANY WAY
* OUT OF THE USE OF THIS SOFTWARE, EVEN IF ADVISED OF THE POSSIBILITY OF
* SUCH DAMAGE.
* The license and distribution terms for any publicly available version or
* derivative of this code cannot be changed. i.e. this code cannot simply be
* copied and put under another distribution license
* [including the GNU Public License.]
*/
3. Before You Begin
This chapter explains each operating mode and available configuration methods for BR-310AC as well as the wireless setting information you need to check out before the configuration.
3-1. Operating Mode
BR-310AC has 2 operating modes below.
Please use the one appropriate for your environment.
- Single Client Mode
- Multi-Client Mode

Note
- The operating mode can be configured on the Web configuration interface which can be accessed when the BR-310AC operates in Configuration Mode.
- By defaults, the operating mode is set to Single-Client Mode.
Single Client Mode
Use this mode when you connect a single non-wireless device to the BR-310AC. As the MAC address and IP address of the connected device are used for wireless LAN connection, you can use the device as if it is directly connected to a wireless LAN.
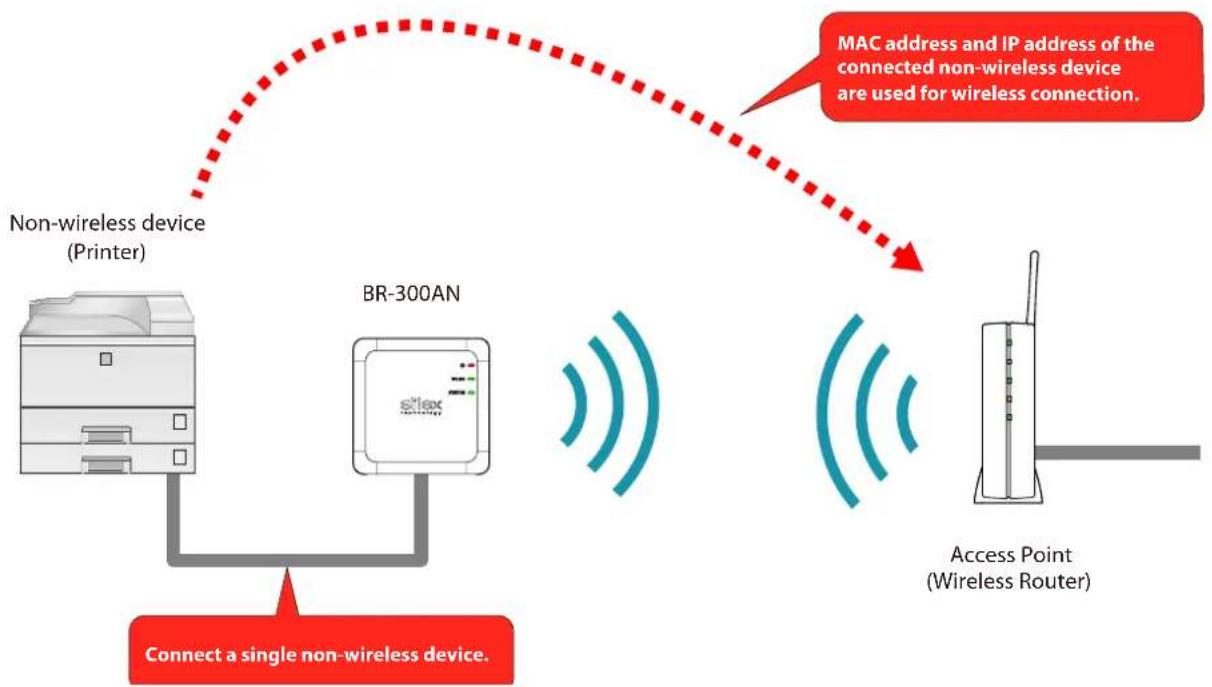
flowchart
graph TD
    A["Non-wireless device (Printer)"] --> B["BR-300AN"]
    B --> C["Access Point (Wireless Router)"]
    C --> D["MAC address and IP address of the connected non-wireless device are used for wireless connection."]
    E["Connect a single non-wireless device."] --> A

- Only one device can be connected to a LAN port.
- The following actions are treated as an error. If one of these occurs, the bridge function will abort.
- Connecting multiple devices to a LAN port using a HUB
-
Changing the device connected to a LAN port to the other device while BR-310AC is running.
-
If the connection is lost on a LAN port while communication is in progress, wireless bridging will be disabled until it is reconnected.
- The devices with multiple MAC addresses cannot be used (e.g. PC with a load balancing feature, etc).
- Due to restrictions of the protocols, "View full map" of "Network and Sharing Center" is not fully supported on Windows Vista / 7.
Multi-Client Mode
Use this mode when you connect multiple non-wireless devices to BR-310AC.
By using a HUB on the LAN port, up to 16 devices can be connected.
For wireless connection, the MAC address of BR-310AC and IP addresses of the connected devices will be used.
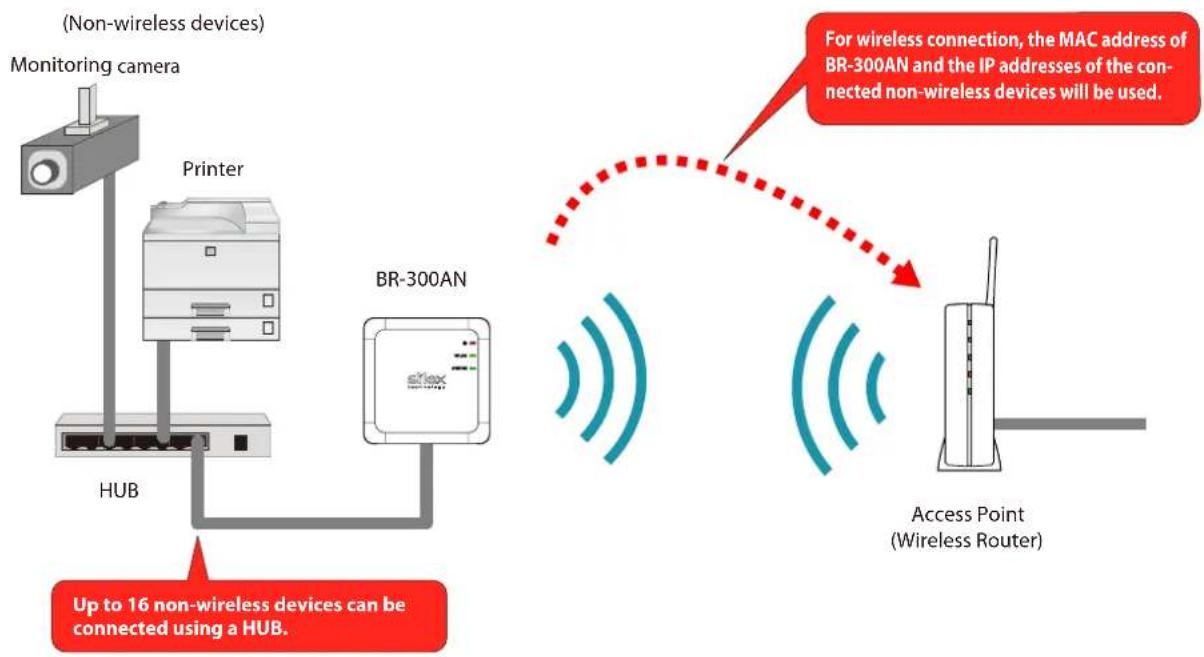
flowchart
graph TD
    A["Monitor camera"] --> B["Printer"]
    B --> C["HUB"]
    C --> D["BR-300AN"]
    D --> E["Access Point (Wireless Router)"]
    style A fill:#f9f,stroke:#333
    style B fill:#ccf,stroke:#333
    style C fill:#cfc,stroke:#333
    style D fill:#fcc,stroke:#333
    style E fill:#cff,stroke:#333

- The devices with multiple MAC addresses cannot be used (e.g. PC with a load balancing feature, etc).
- BR-310AC bridges TCP/IP(IPv4 and IPv6) only. Other protocols are not supported.
- BR-310AC does not support bridging the following IPv6 packets.
- Inverse Neighbor Advertisement
- Fragment Header
- Authentication Header
- Encapsulating Security Payload
3-2. Configuration Method
There are 3 configuration methods as follows.
Please select the one appropriate for your environment.
- Easy configuration using Configuration Mode
- Wireless configuration using Smart Wireless Setup (Push Switch)
- Wireless configuration using Smart Wireless Setup (PIN code)
Easy Configuration Using Configuration Mode
In this configuration method, you connect the BR-310AC to a PC using a network cable to configure the settings from the PC.
By connecting the BR-310AC to the PC and starting it in Configuration Mode, the Web configuration interface can be accessed. Select the Access Point the BR-310AC should wirelessly connect to and enter the Network Key on the configuration interface.
Depending on your environment, you may need to check the wireless LAN information beforehand.
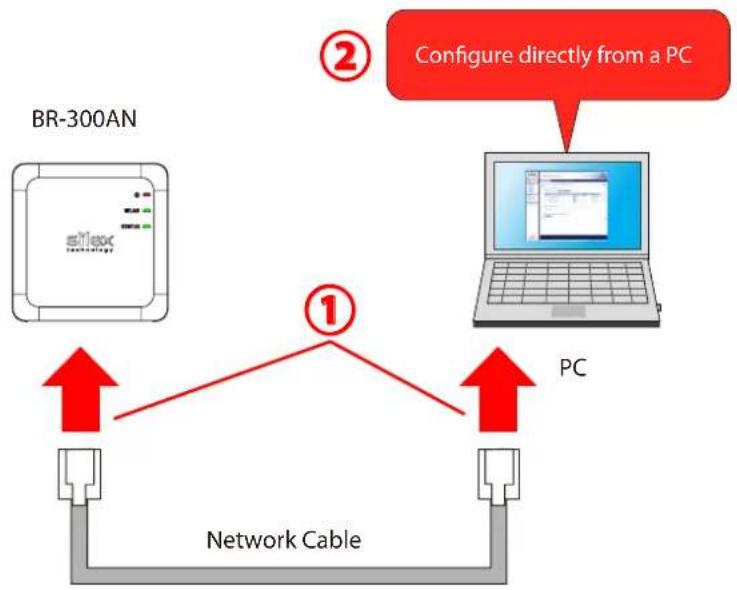
flowchart
graph TD
    A["BR-300AN"] -->|①| B["PC"]
    C["Laptop"] -->|②| D["Configure directly from a PC"]
    B -->|Network Cable| A

Note
In this configuration method, only "SSID" and "Network Key" are needed to connect to a wireless LAN, however, further configuration is required in the following cases.
- Access Point is operating in a stealth mode.
- Access Point is using the Shared authentication
- Access Point is using the Open authentication and the WEP key index other than "1".
- Too many wireless networks are active (up to 32 wireless networks can be shown by BR-310AC).
Wireless Configuration Using Smart Wireless Setup (Push Switch)
In this configuration method, you can automatically configure the wireless settings by pressing the wireless connection button on your Access Point (wireless router) and the push switch on BR-310AC. You will not have to get wireless setting information beforehand, as configuration is automatically handled by the BR-310AC and your Access Point.
For this configuration method, an Access Point supporting WPS(Wi-Fi Protected Setup) is required. To see if your Access Point supports WPS, refer to the operation manual that came with your Access Point or contact the manufacturer.
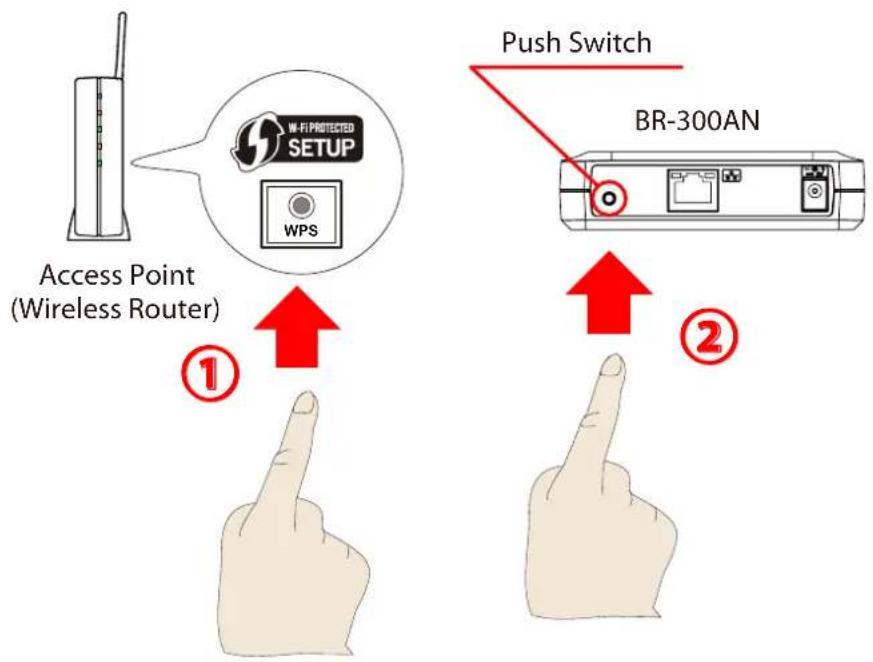
text_image
Access Point (Wireless Router) ① Push Switch BR-300AN ②Wireless Configuration Using Smart Wireless Setup (PIN Code)
In this configuration method, you can automatically configure the wireless settings by entering the PIN code of BR-310AC on your Access Point (wireless router).
The PIN code can be identified from the Web configuration interface of BR-310AC. To access the Web configuration interface, connect the BR-310AC directly to a PC using a network cable and start it in Configuration Mode.
You will not have to get wireless setting information beforehand, as configuration is automatically handled by the BR-310AC and your Access Point. For this configuration method, an Access Point supporting WPS(Wi-Fi Protected Setup) is required. To see if your Access Point supports WPS, refer to the operation manual that came with your Access Point or contact the manufacturer.
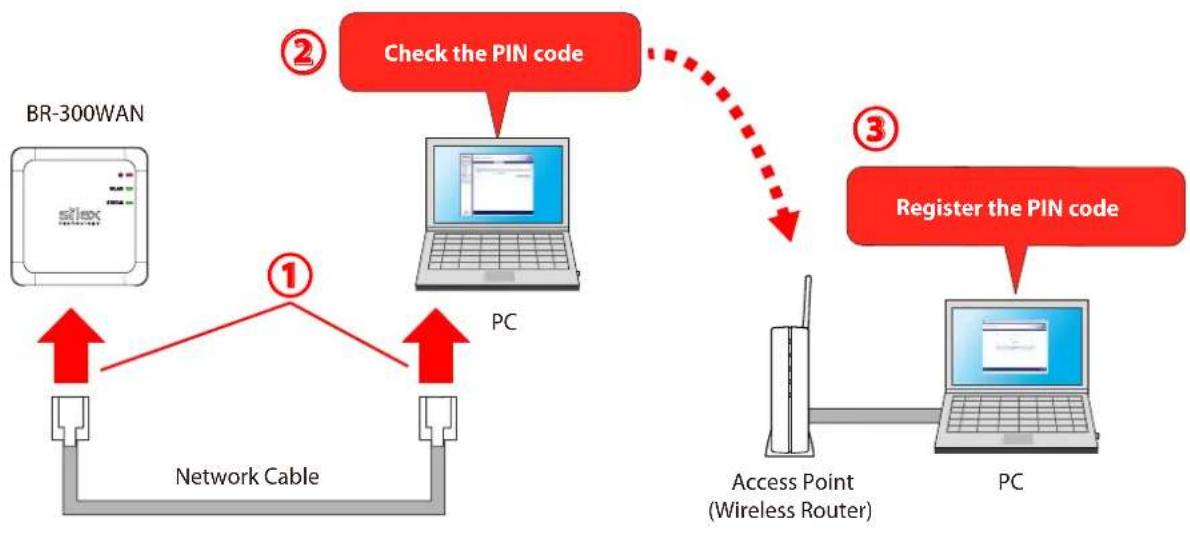
flowchart
graph TD
    A["BR-300WAN"] -->|① Network Cable| B["PC"]
    B -->|② Check the PIN code| C["Laptop"]
    C -->|③ Register the PIN code| D["Laptop"]
    D --> E["Access Point (Wireless Router)"]
    E --> F["PC"]

Note
- Two PCs are required for this configuration; one for the BR-310AC and the other one for your Access Point.
3-3. Necessary Wireless Setting Information
When you configure BR-310AC using the Configuration Mode, the wireless settings need to be configured appropriately for your environment. As the same wireless settings must be configured for both BR-310AC and your Access Point, you need to get the necessary setting information of your Access Point beforehand.

Note
- If you plan to configure the BR-310AC using Smart Wireless Setup, you will not have to get the wireless setting information.

TIP
- The wireless setting information explained in this page is specific to your network and cannot be provided by Silex technical support. For how to confirm each setting, please refer to the operation manual that came with your router or contact the manufacturer.
- Depending on your Access Point, WPS may need to be enabled manually. For details, refer to the operation manual that came with your Access Point.
- If a security feature such as MAC Address filtering is enabled on your Access Point, change the setting so that BR-310AC can communicate with your Access Point. For details, refer to the operation manual that came with your Access Point.
- For the IEEE802.1X authentication, refer to 5-2. IEEE802.1X Authentication.
| SSID The SSID is | an ID that distinguishes a wireless LAN network from others.For wireless devices to communicate with each other on a wireless network, they must share the same SSID. (The SSID is also referred to as "ESSID".) Depending on your Access Point, it may have several SSIDs. If there are different SSIDs for a game console and computer, use the one for the computer. | |
| Encryption Mode | No Encryption Uses | es no encryption for wireless communication.(In this case, you do not have to get any of your settings beforehand.) |
| WEP If WEP encryption is used, wireless communication will be encrypted using the settings for "WEP Key 1-4" and "Key Index".Set the same "WEP Key Size(64bit/128bit)", "WEP Key" and "Key Index" as the wireless device you wish to connect. | ||
| WPA / WPA2 Uses | PSK for network authentication.The encryption key will be generated by communicating with the Access Point using a Pre-Shared key. WEP key setting is not used for this mode. Set the same "Pre-Shared key" and "Encryption Mode"(AES/AUTO) as the wireless device you wish to connect. The Pre-Shared key is also referred to as "Network Key" or "Password". | |
4. How to Configure BR-310AC
This chapter explains how to configure BR-310AC.
Following configuration methods are available:
1) Configuration using Configuration Mode
2) Configuration using Smart Wireless Setup (Push Switch)
3) Configuration using Smart Wireless Setup (PIN code)

- For details on each configuration method, refer to 3-2. Configuration Method.
Note
4-1. Easy Configuration Using Configuration Mode
How to configure BR-310AC using the Configuration Mode is explained.
Starting BR-310AC in Configuration Mode
- Connect BR-310AC and the PC (to use for setup) using a network cable.
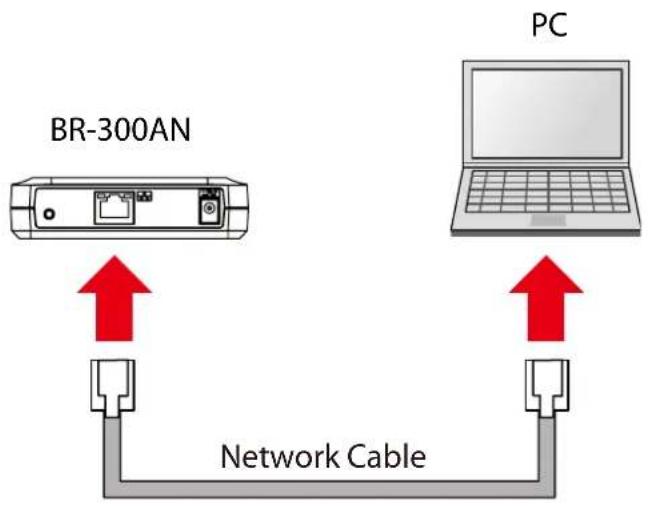
flowchart
graph TD
    A["BR-300AN"] -->|Red Arrow Down| B["Network Cable"]
    C["PC"] -->|Red Arrow Up| B
- Connect the AC adaptor to BR-310AC, and the AC adaptor's plug to an electrical outlet.
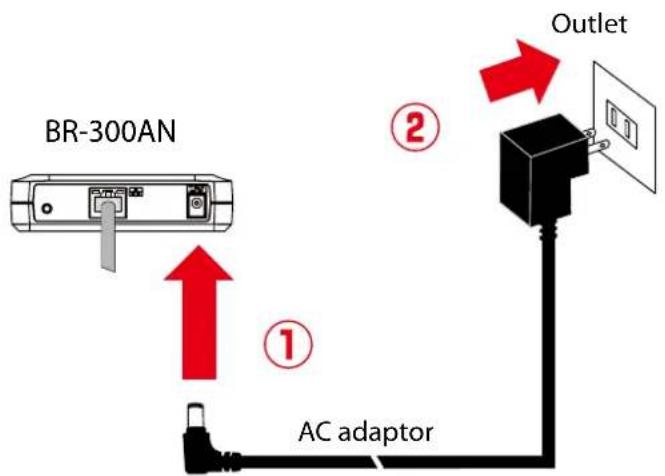
text_image
BR-300AN ① AC adaptor ② Outlet- When the POWER LED on top of BR-310AC turns Red, press and hold the push switch on the front. Release the push switch when the WLAN LED and STATUS LED start blinking Green together (it may take 20sec until blinking). BR-310AC will start operating in the Configuration Mode and you will be ready to configure BR-310AC from the PC.
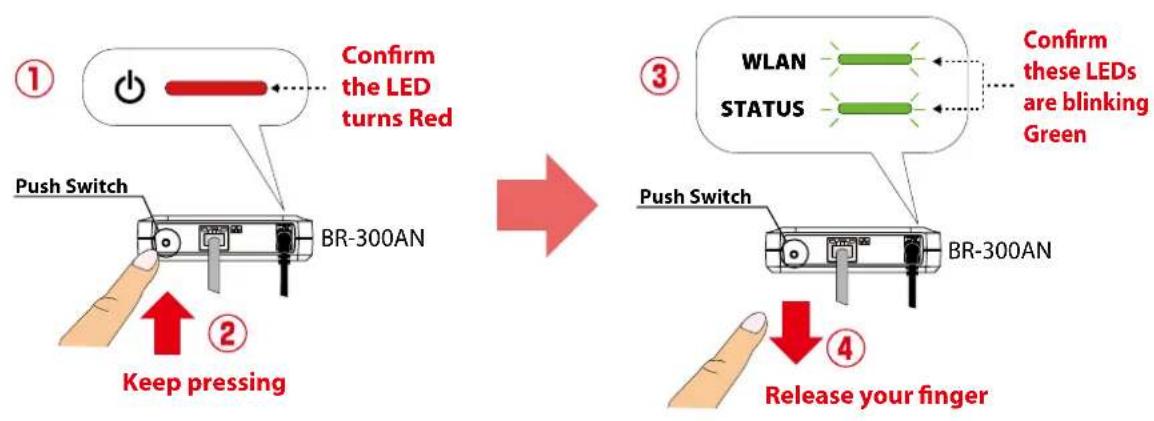
text_image
Confirm the LED turns Red Push Switch BR-300AN Keep pressing Confirm these LEDs are blinking Green WLAN STATUS Push Switch BR-300AN Release your fingerConfiguration
- Start a Web browser (Internet Explorer, Safari, etc) on the PC you are using for the setup. The Web page of BR-310AC is displayed.
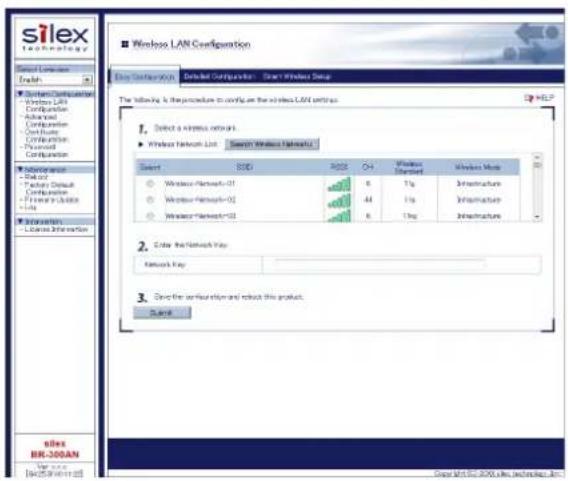
text_image
silex technology Select Consensus Debit System Configuration Windows LAN Configuration Advanced Configuration Certificate Configuration Reserved Configuration Maintenance - Load of - Policy Default Configuration - Power to Command - Help Environment - Access Information silex BR-300AN New user Sirea Wireless LAN Configuration Sirea Wireless LAN Select SILEX SILEX OH Wireless Connected Wireless Mode ● Windows Network-01 6 1kg Infrastructure ● Windows Network-02 44 1kg Infrastructure ● Windows Network-03 6 1kg Infrastructure 2. Enter the Network Map Network Map 3. Save the configuration and reduce this product. Save.
Note
- If the Web page is not displayed, enter "http://silex" in the address bar of the Web browser and press the Enter key.

text_image
http://silox Blank Page- If a password is set to BR-310AC, the password entry screen is displayed. Enter the password and click Login.
- By defaults, the password entry screen is not displayed. Go on to 2 then.

text_image
Welcome to Wireless Bridge BR-200AR Enter the payment and click [click] Password: Look Close License English S i lex [S4:28.2016 11:28] Copyright © 2016 e-mail: wireless.br.
TIP
- To start the configuration, the PC and BR-310AC need to communicate each other properly.
- Confirm that an IP Address is correctly configured to the PC.
- If a wireless LAN is enabled on your PC, please disable it.
- If a static IP address is set to the PC, the Web configuration interface cannot be displayed in the following cases:
- An IP address of the different segment is entered to the address bar, when the default gateway address is not configured to the PC.
- A URL ("www.silexamerica.com", etc.) is entered to the address bar when the name resolution is disabled (DNS server address is not registered or NetBIOS is disabled).
2. In the Web configuration interface, select the Access Point from the Wireless Network List and enter the WEP key or Shared Key for the Network Key.
Click Submit when finished.
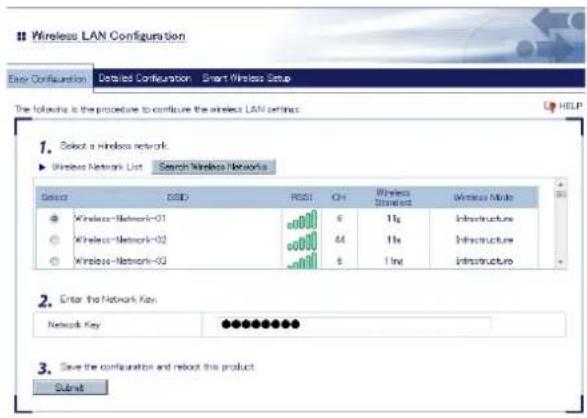
text_image
Wireless LAN Configuration Easy Configuration Detailed Configuration Smart Wireless Setup The following is the procedure to configure the wireless LAN settings. 1. Select a wireless network. ► Wireless Network List Search Wireless Networks Service ESD RST CH Wireless Standard Wireless Mode ● Wireless-Network-01 6 11s Infrastructure ○ Wireless-Network-02 44 11s Infrastructure ○ Wireless-Network-03 6 11s Infrastructure 2. Enter the Network Key Network Key ●●●●●●●● 3. Save the configuration and reboot this product Submit
Note
- To connect multiple network devices using an Ethernet HUB, click Advanced Configuration and select Multi-Client Mode for Client Mode.
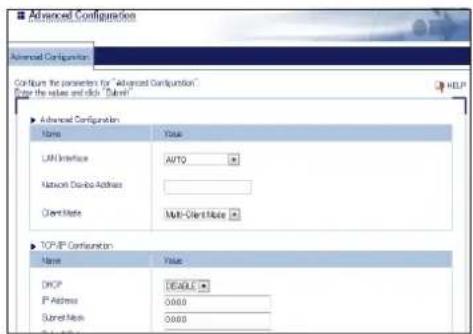
text_image
Advanced Configuration Configure the parameters for "Advanced Configuration" Enter the values and click "Delphi" ▶ Advanced Configuration Name Value LAN Interface AUTO Network Devices Address Client Mode Multi-Client Mode ▶ TCP/IP Configuration Name Value DHCP DEFAULT IP Address O000 Delphi OK000- If the Access Point is operating in a stealth mode, it is not displayed at Wireless Network List. In such a case, click Detailed Configuration on the top, enter the detailed setting information of the Access Point and click Submit. For details on each setting, please refer to the HELP on Web configuration interface.
- To use the IEEE802.1X authentication, click the Detailed Configuration on the top, enter the detailed setting information of the Access Point and click Submit. For details on each setting, please refer to the HELP on Web configuration interface.
- Up to 32 Access Points can be displayed at Wireless Network List.
- If the Access Point you wish to connect is not displayed in the list, you may have reached the maximum number of wireless devices that BR-310AC can detect and show in the list. In that case, use the SSID filter to display the necessary Access Point only.
To use the SSID filter, click the Detailed Configuration on the top, enter the SSID of the Access Point you wish to connect, select ON at SSID Filter and click Submit. The SSID filter will become active after the PC is restarted.
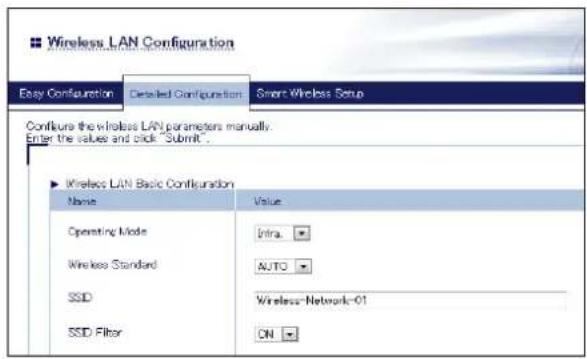
text_image
Wireless LAN Configuration Easy Configuration Detailed Configuration Smart Wireless Setup Configure the wireless LAN parameters manually. Enter the values and back "Submit . ► Wireless LAN Basic Configuration Name Value Operating Mode Intra. Wireless Standard AUTO SSD Wireless-Network-01 SSD Filter ON- When the completion message is displayed on the Web configuration interface, finish the Web browser. The configuration has been completed.
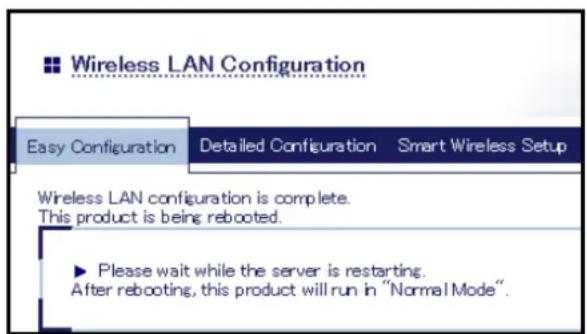
text_image
Wireless LAN Configuration Easy Configuration Detailed Configuration Smart Wireless Setup Wireless LAN configuration is complete. This product is being rebooted. ► Please wait while the server is restarting. After rebooting, this product will run in "Normal Mode".When you wish to bridge the PC used for this configuration wirelessly, restart the PC. To bridge another device wirelessly, turn off both BR-310AC and PC, remove the BR-310AC from the PC and connect the BR-310AC to the device you wish to use wirelessly using a network cable. For details, refer to Connecting Non-wireless Devices in the next page.
Connecting Non-wireless Devices
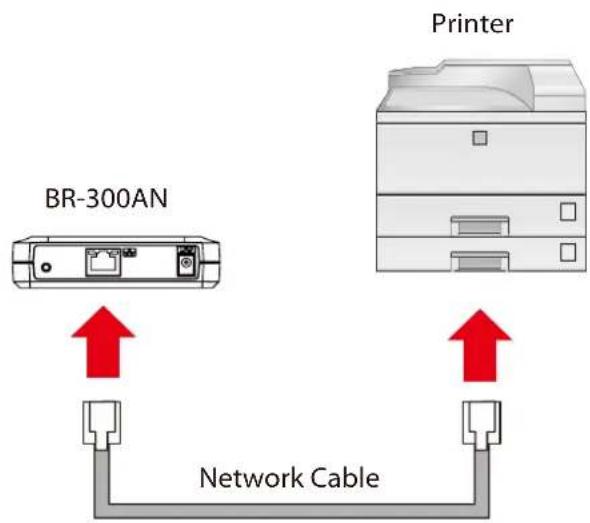
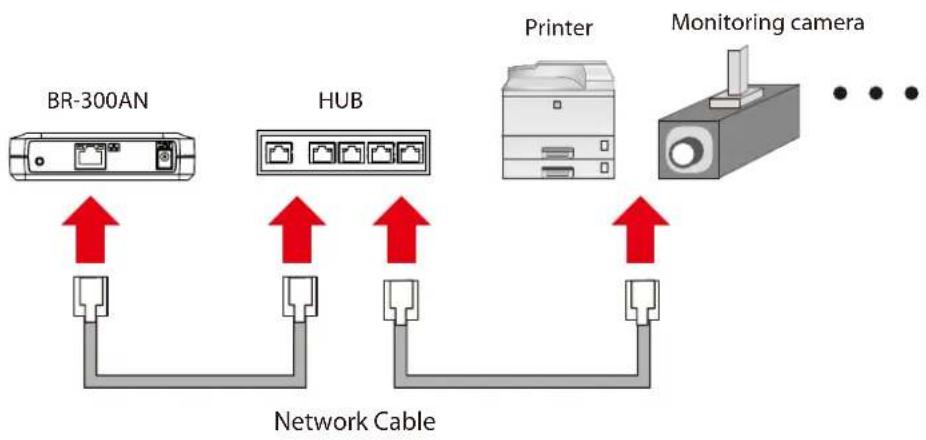
- Turn off the non-wireless device that you wish to use wirelessly and connect the BR-310AC to it using a network cable. The connection method will vary depending on each operating mode.
How to Connect in Single Client Mode
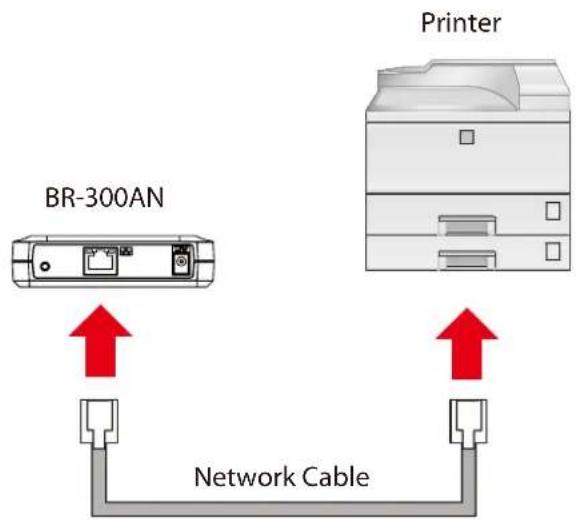
flowchart
graph TD
    A["BR-300AN"] -->|Red Arrow Down| B["Network Cable"]
    C["Printer"] -->|Red Arrow Up| B
    B --> D["Output"]
How to Connect in Multi-Client Mode
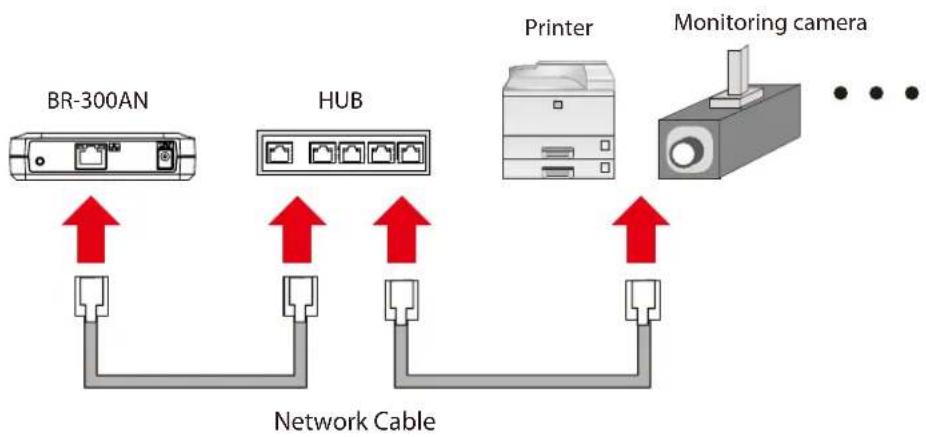
flowchart
graph LR
    A["BR-300AN"] -->|Red Up arrows| B["Network Cable"]
    C["HUB"] -->|Red Up arrows| B
    D["Printer"] -->|Red Up arrows| B
    E["Monitoring camera"] -->|Red Up arrows| B

Note
- For details on each operating mode, refer to 3.1 Operating Mode.
- Connect the AC adaptor to the BR-310AC and the AC plug to the outlet.
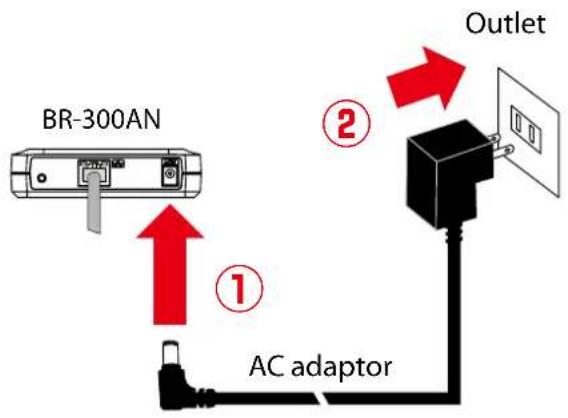
text_image
BR-300AN ① ② Outlet AC adaptor- Turn on the non-wireless device connected to the BR-310AC.
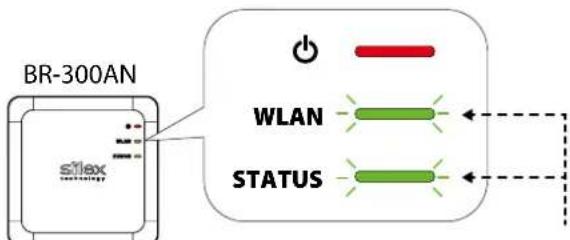
During the MAC address resolution, the WLAN LED and STATUS LED will flash Green alternately. When the LED status has changed from it, the BR-310AC will be ready to use. You can use the non-wireless device over a wireless network.
text_image
BR-300AN sflex WLAN STATUSThe LEDs flash Green alternately during the MAC address resolution

Note
- Depending on the non-wireless device you have connected, further network settings may need to be configured to that device. In such a case, please configure it according to the operating manual that came with your device.
- When you turn on the BR-310AC and your non-wireless device, be sure to turn on the BR-310AC first. Do not press the push switch then.
4-2. Configuration Using Smart Wireless Setup (Push Switch)
The wireless settings can be configured easily using the push switch if your Access Point supports WPS(Wi-Fi Protected Setup). How to configure the wireless settings using the push switch is explained below.

- Please check that the Access Point supporting WPS is installed on your network.
- This configuration method is not available if the Access Point is operating in a stealth mode.
- To ensure proper communication during this configuration, please temporarily move the BR-310AC closer to the Access Point.
- The WPS feature may need to be enabled on your Access Point manually. For details, see the operating manual that came with your Access Point.
- If a security feature such as MAC address filtering is enabled on your Access Point, disable it temporarily.
- If the SSID filter is enabled on the BR-310AC, this configuration method cannot be used. To disable the SSID filter, turn on the BR-310AC in Configuration Mode and change the setting, or otherwise, initialize the BR-310AC.
- To connect multiple devices using a HUB, use Multi-Client Mode. See 5-1. How to Access Web Configuration Interface to change the operating mode.
Configuration
When the operating mode is Single Client Mode, you need to connect a non-wireless device to the BR-310AC in order to start the configuration.
When the operating mode is Multi-Client Mode, you do not have to connect a non-wireless device. In such a case, start from 2 in this section.

Note
- By defaults, the operating mode is set to Single Client Mode.
-
To see which operating mode your BR-310AC is running on, start the BR-310AC in the Configuration Mode and access the Web page.
-
Turn off the non-wireless device that you wish to use wirelessly and connect the BR-310AC to it using a network cable.
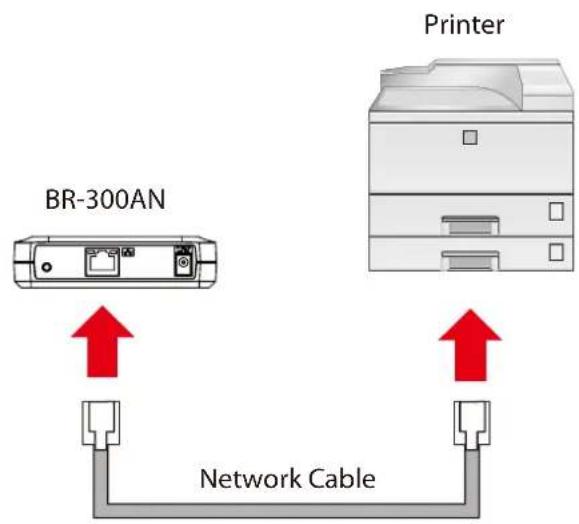
flowchart
graph TD
    A["BR-300AN"] -->|Red Arrow Down| B["Network Cable"]
    C["Printer"] -->|Red Arrow Up| B
    B --> D["Output"]
- Connect the AC adaptor to the BR-310AC and the AC plug to the outlet.
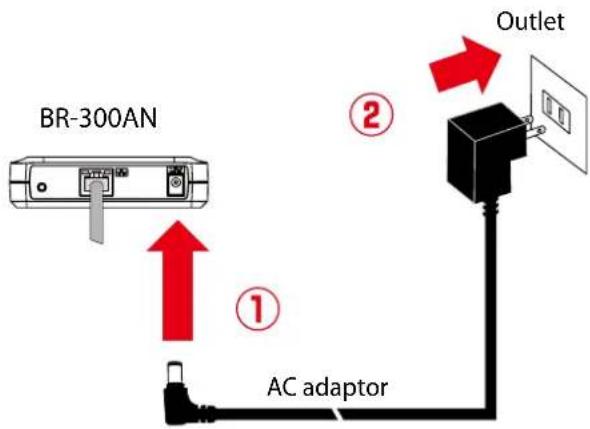
text_image
BR-300AN ① ② AC adaptor Outlet- Turn on the non-wireless device connected to the BR-310AC.
During the MAC address resolution, the WLAN LED and STATUS LED will flash Green alternately. When the LED status has changed from it, the BR-310AC will be ready to configure using Smart Wireless Setup.
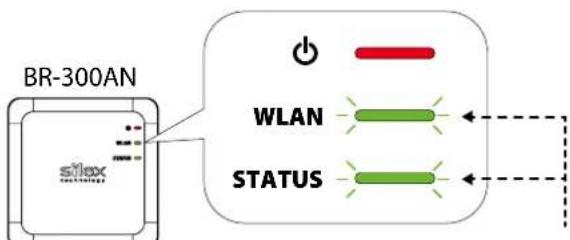
text_image
BR-300AN WLAN STATUSThe LEDs flash Green alternately during the MAC address resolution

Note
- Depending on the non-wireless device you have connected, further network settings may need to be configured to that device. In such a case, please configure it according to the operating manual that came with your device.
- When you turn on the BR-310AC and your non-wireless device, be sure to turn on the BR-310AC first. Do not press the push switch then.
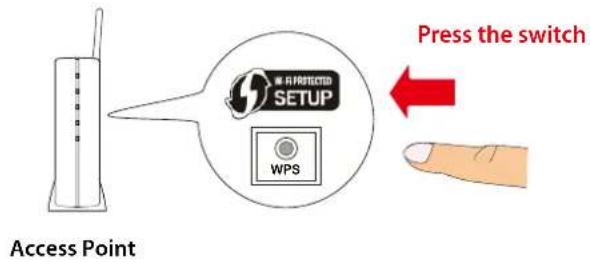
4. Press the WPS button on your Access Point.
Confirm that your Access Point is ready for a wireless connection to be made.
text_image
Press the switch Access Point
- The name, position and shape of the WPS button will differ depending on your Access Point. For details, refer to the operation manual that came with your Access Point.
- Please use only one Access Point. If two or more Access Points are waiting for wireless connections, BR-310AC will not be able to connect properly.
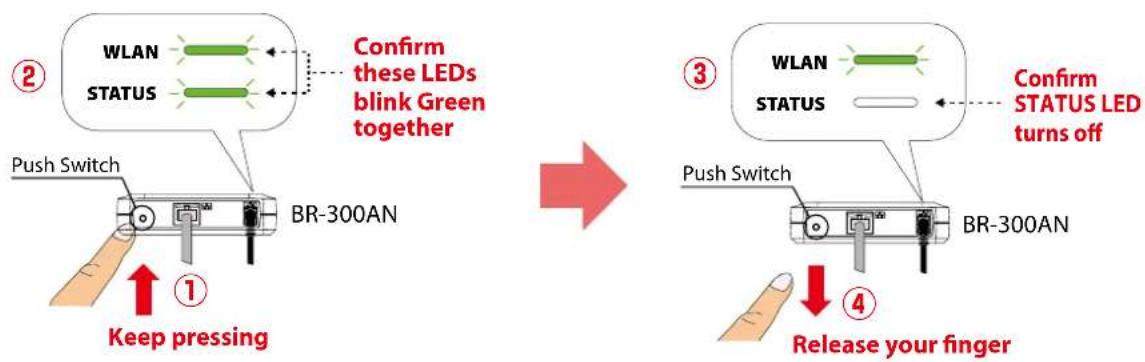
5. Press and hold the push switch on the BR-310AC. The WLAN LED and STATUS LED will start to blink Green together.
When the WLAN LED keeps blinking Green while STATUS LED turns off, release the push switch (it may take 15 sec until the STATUS LED turns off after the WLAN and STATUS LEDs blink together).
text_image
WLAN STATUS Confirm these LEDs blink Green together Push Switch BR-300AN ① Keep pressing ② ③ WLAN STATUS Confirm STATUS LED turns off Push Switch BR-300AN ④ Release your finger6. The BR-310AC and the Access Point will start to communicate each other.
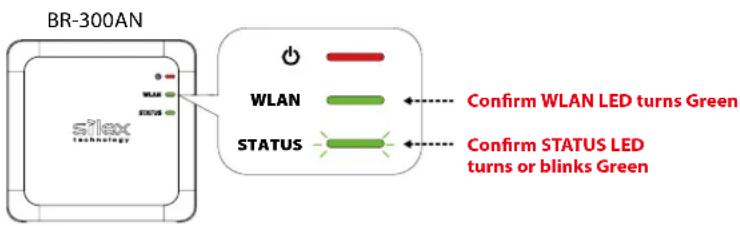
When the configuration finished successfully, the WLAN LED turns Green and the STATUS LED turns or blinks Green.
text_image
BR-300AN WLAN STATUS Confirm WLAN LED turns Green Confirm STATUS LED turns or blinks Green
Note
- It may take up to 2 min to finish the wireless configuration depending on your environment.
- If the wireless configuration is finished in failure, the WLAN LED will flash rapidly for 10 sec.
In such a case, read the instructions carefully and start from 4 again.
If you plan to use BR-310AC in Single Client Mode, you can keep using the connected non-wireless device to use it wirelessly.
To replace it with the other non-wireless device, turn off the BR-310AC and replace the connected non-wireless device to it. See Connecting Non-wireless Devices in the next page for how to connect the BR-310AC and non-wireless device using a network cable.
To change the operating mode, start the BR-310AC in configuration mode. For details, refer to 5-1. How to Access Web Configuration Interface.
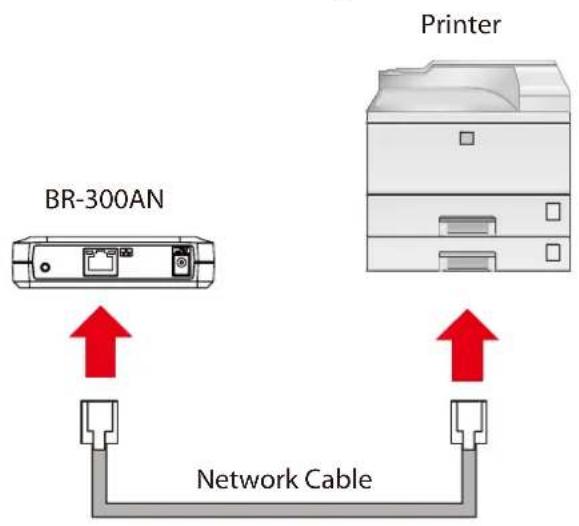
Connecting Non-wireless Devices
- Turn off the non-wireless device that you wish to use wirelessly and connect the BR-310AC to it using a network cable. The connection method will vary for each operating mode.
How to Connect in Single Client Mode
flowchart
graph TD
    A["BR-300AN"] -->|Red Arrow Down| B["Network Cable"]
    C["Printer"] -->|Red Arrow Up| B
    B --> D["Output"]
How to Connect in Multi-Client Mode
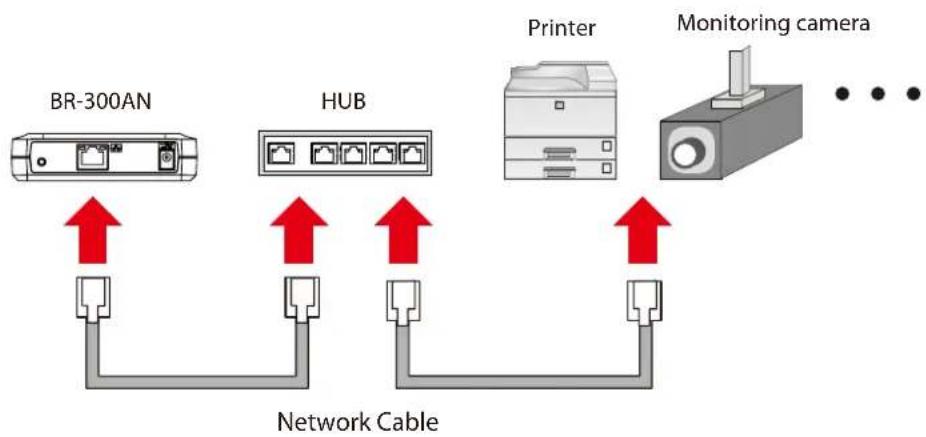
flowchart
graph LR
    A["BR-300AN"] -->|Red Up arrows| B["Network Cable"]
    C["HUB"] -->|Red Up arrows| B
    D["Printer"] -->|Red Up arrows| B
    E["Monitoring camera"] -->|Red Up arrows| B

- For details on each operating mode, refer to 3.1 Operating Mode.
Note
- Connect the AC adaptor to the BR-310AC and the AC plug to the outlet.
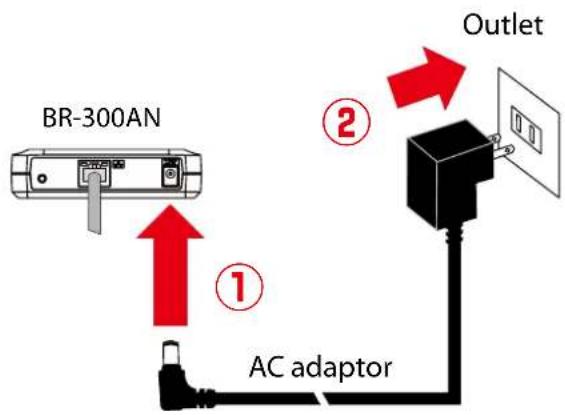
text_image
BR-300AN ① ② Outlet AC adaptor- Turn on the non-wireless device connected to the BR-310AC.
During the MAC address resolution, the WLAN LED and STATUS LED will flash Green alternately. When the LED status has changed from it, the BR-310AC will be ready to use. You can use the non-wireless device over a wireless network.
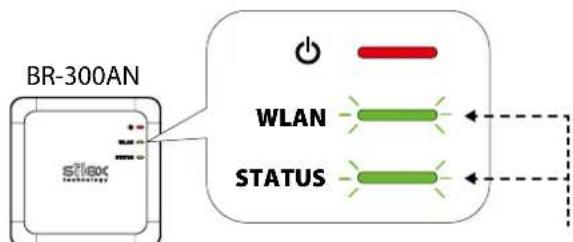
text_image
BR-300AN s21ex WLAN STATUSThe LEDs flash Green alternately during the MAC address resolution

Note
- Depending on the non-wireless device you have connected, further network settings may need to be configured to that device. In such a case, please configure it according to the operating manual that came with your device.
- When you turn on the BR-310AC and your non-wireless device, be sure to turn on the BR-310AC first. Do not press the push switch then.
4-3. Configuration Using Smart Wireless Setup(Pin Code)
The wireless settings can be configured easily using the PIN code when your Access Point supports WPS(Wi-Fi Protected Setup). How to configure the wireless settings using the PIN code is explained below.

- Please check that the Access Point supporting WPS is installed on your network.
- This configuration method is not available if the Access Point is operating in a stealth mode.
- To ensure proper communication during this configuration, please temporarily move the BR-310AC closer to the Access Point.
- The WPS feature may need to be enabled on your Access Point manually. For details, see the operating manual that came with your Access Point.
- If a security feature such as MAC address filtering is enabled on your Access Point, disable it temporarily.
- If the SSID filter is enabled on the BR-310AC, this configuration method cannot be used. To disable the SSID filter, turn on the BR-310AC in Configuration Mode and change the setting, or otherwise, initialize the BR-310AC.
- To connect multiple devices using a HUB, use Multi-Client Mode. See 5-1. How to Access Web Configuration Interface to change the operating mode.
Starting BR-310AC in Configuration Mode
- Connect BR-310AC and the PC (to use for setup) using a network cable.
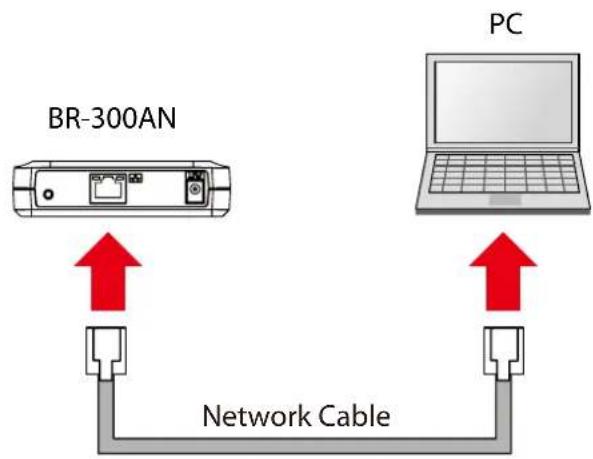
flowchart
graph TD
    A["BR-300AN"] -->|Red Up arrow| B["Network Cable"]
    C["PC"] -->|Red Up arrow| B
- Connect the AC adaptor to BR-310AC, and the AC adaptor's plug to an electrical outlet.
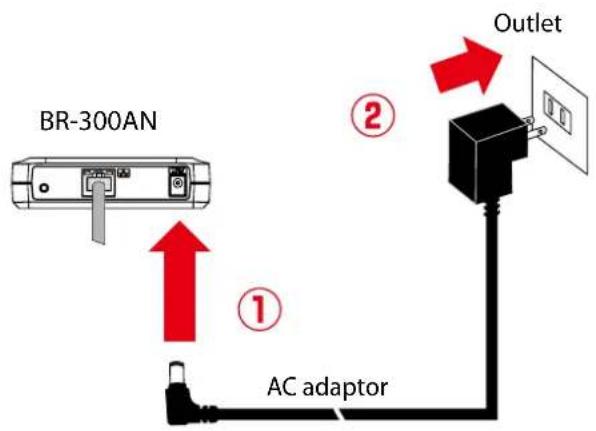
text_image
BR-300AN ① ② AC adaptor Outlet- When the POWER LED on top of BR-310AC turns Red, press and hold the push switch on the front. Release the push switch when the WLAN LED and STATUS LED start blinking Green together (it may take 20sec until blinking). BR-310AC will start operating in the Configuration Mode and you will be ready to configure BR-310AC from the PC.
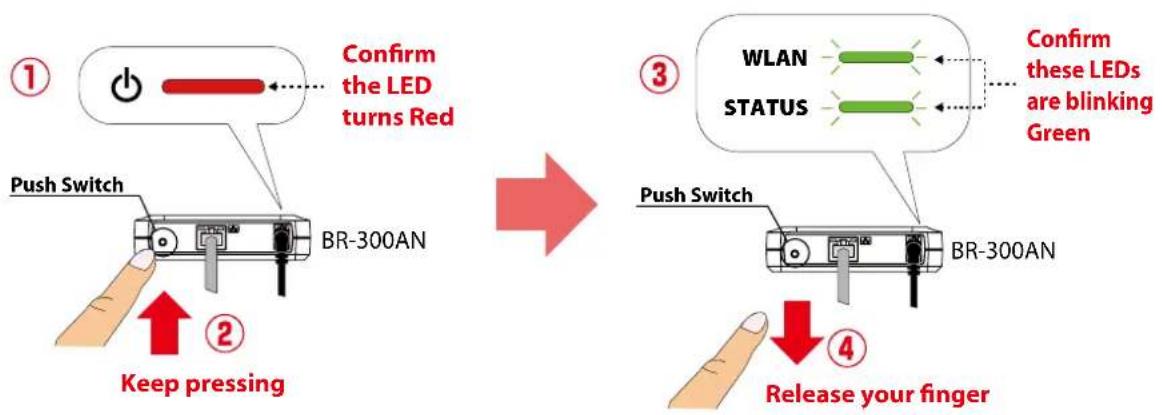
text_image
Confirm the LED turns Red Push Switch BR-300AN Keep pressing Confirm these LEDs are blinking Green WLAN STATUS Push Switch BR-300AN Release your fingerChecking a PIN Code
- Start a Web browser (Internet Explorer, Safari, etc) on the PC you are using for the setup. The Web page of BR-310AC is displayed.
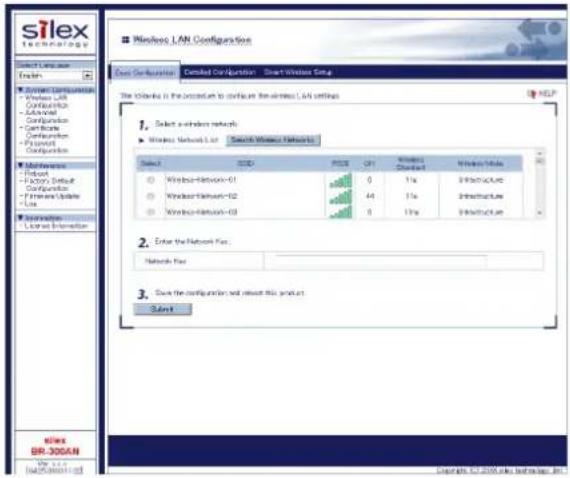
text_image
silex Technology Select Network English System Configuration Windows LAN Configuration Advanced Configuration Certificate Configuration IP Protocol Configuration Maintenance Windows Default Configuration Windows TCP Use Services License Information silex BR 300AN View it up Windows LAN Configuration Cost Configuration C:\Users\Configuration\Smart\Windows Group The Options in the Console to confirm the wireless LAN settings. HELP 1. Select a network network. Windows Network List Switch Wireless Networks Select SICU PCC QTY Windows Standard Windows Node Windows-Network-01 0 1% Infrastructure Windows-Network-02 44 1% Infrastructure Windows-Network-03 0 1% Infrastructure 2. Enter the Network Fox. Network Fox: 3. Save the configuration and adjust this product. Select
Note
- If the Web page is not displayed, enter "http://silex" in the address bar of the Web browser and press the Enter key.

text_image
http://silex Blank Page- If a password is set to BR-310AC, a password entry screen is displayed. Enter the password and click Login.
- The password entry screen is not displayed at the initial setup. Go on to 2 then.
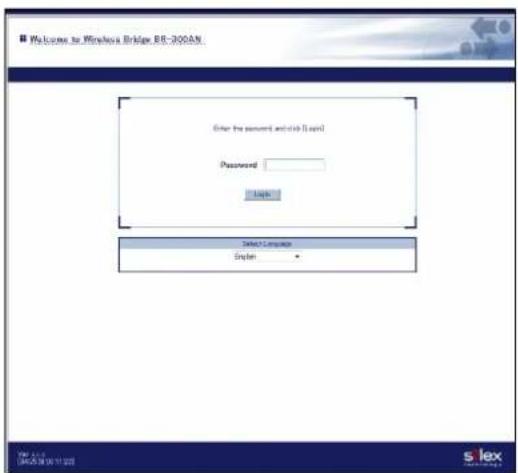
text_image
Welcome to Wireless Bridge BR-300AN Enter the account and click User Password Login Select Company Design s lex
- To start the configuration, the PC and BR-310AC need to communicate each other properly.
- Confirm that an IP Address is correctly configured to the PC.
- If a wireless LAN is enabled on your PC, please disable it.
- If a static IP address is set to the PC, the Web configuration interface cannot be displayed in the following cases:
- An IP address of the different segment is entered to the address bar, when the default gateway address is not configured to the PC.
- A URL ("www.silexamerica.com", etc.) is entered to the address bar when the name resolution is disabled (DNS server address is not registered or NetBIOS is disabled).
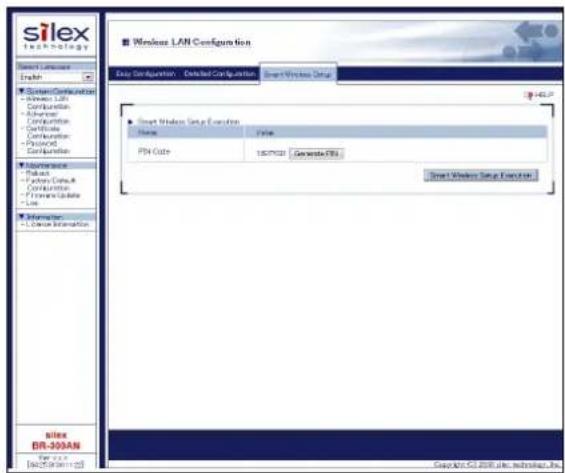
- In the Web configuration interface, click Wireless LAN Configuration - Smart Wireless Setup and check the PIN code. Keep this screen displayed as it will be used again at Configuration in the next page. Do not click the Smart Wireless Setup Execution button yet.
text_image
silex technology Smart Wireless LAN Configuration Display Configuration - Default Configuration - Smart Wireless Group +45.7 Smart Wireless Setup Connection Name Date PIN Code 1027032 Generate FRS Smart Wireless Setup Connection Silex DR-503AN For this Copyright © 2008 site: technology.silex © 2008
- Do not click the Smart Wireless Setup Execution button yet.
It will need to be clicked at Configuration in the next page.

- To change the PIN code, click the Generate PIN button. A new PIN code will be generated automatically.
Note
Configuration
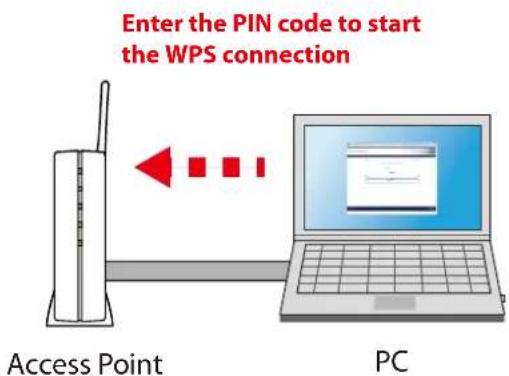
- Access the Web configuration interface of the Access Point using a Web browser (Internet Explorer, Safari, etc) on your PC. Enter the PIN code and start the WPS connection from the Access Point.
text_image
Enter the PIN code to start the WPS connection Access Point PC
- The method to enter the PIN code on Access Point will differ depending on each Access Point. For details, refer to the operating manual that came with your Access Point.
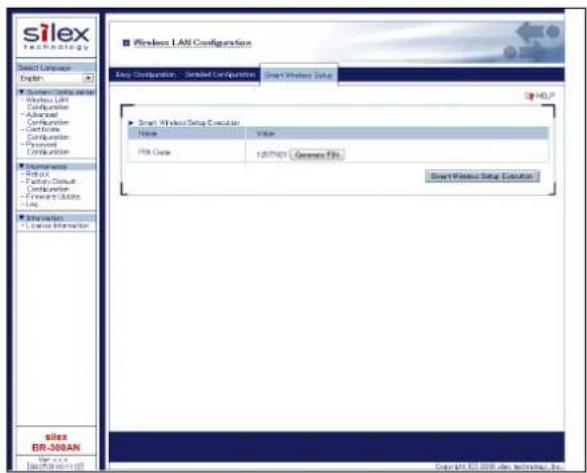
- Go back to the Smart Wireless Setup page of the BR-310AC and click the Smart Wireless Setup Execution button.
text_image
silex Technology Select Complete Design System Configuration Windows LAN Configuration Advanced Configuration Configuration Proposed Configuration Silex DR-308AN View-up silex DR-308AN Smart Wireless Setup Execution Name: File: FIS Date: 12/7/01 General FIS: Smart Wireless Setup Solution Copyright © 2006 do Software, Inc.
- If Smart Wireless Setup is started on the BR-310AC earlier than the Access Point, the configuration may fail.
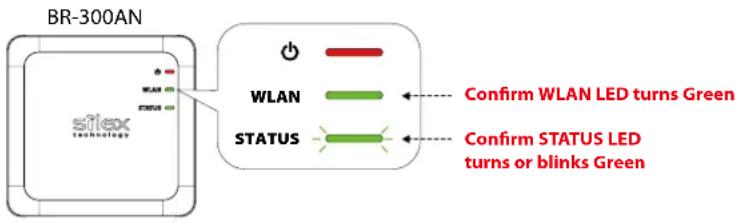
3. The BR-310AC and the Access Point will start to communicate each other.
The wireless configuration is successfully completed when the WLAN LED turns Green and the STATUS LED turns or blinks Green.
text_image
BR-300AN WLAN WLAN LED turns Green STATUS Confirm STATUS LED turns or blinks Green
- It may take up to 2 min to finish the wireless configuration depending on your environment.
- If the wireless configuration failed, the WLAN LED will flash rapidly for 10 sec. In such a case, read the TIP at the beginning of 4-3. Configuration Using Smart Wireless Setup(Pin Code) and try again.
- To change the PIN code, see Checking a PIN Code.
If you plan to use the PC wirelessly (the one you have been using for this configuration), restart the PC. To use the other non-wireless device wirelessly, turn off the BR-310AC and the PC, and connect the BR-310AC to the non-wireless device using a network cable.
For details, refer to Connecting Non-wireless Devices in the next page.
Connecting Non-wireless Devices
- Turn off the non-wireless device that you wish to use wirelessly and connect the BR-310AC to it using a network cable. The connection method will vary for each operating mode.
How to Connect in Single Client Mode
flowchart
graph TD
    A["BR-300AN"] -->|Red Arrow Down| B["Network Cable"]
    C["Printer"] -->|Red Arrow Up| B
    B --> D["Output"]
How to Connect in Multi-Client Mode
flowchart
graph TD
    A["BR-300AN"] -->|Red Up arrows| B["Network Cable"]
    C["HUB"] -->|Red Up arrows| B
    D["Printer"] -->|Red Up arrows| B
    E["Monitoring camera"] -->|Red Up arrows| B

- For details on each operating mode, refer to 3.1 Operating Mode.
Note
- Connect the AC adaptor to the BR-310AC and the AC plug to the outlet.
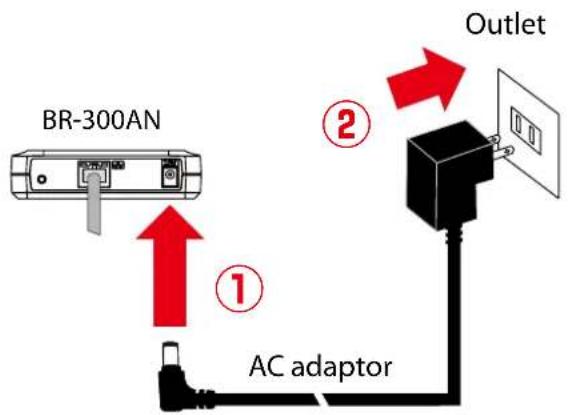
text_image
BR-300AN ① ② Outlet AC adaptor- Turn on the non-wireless device connected to the BR-310AC.
During the MAC address resolution, the WLAN LED and STATUS LED will flash Green alternately. When the LED status has changed from it, the BR-310AC will be ready to use. You can use the non-wireless device over a wireless network.
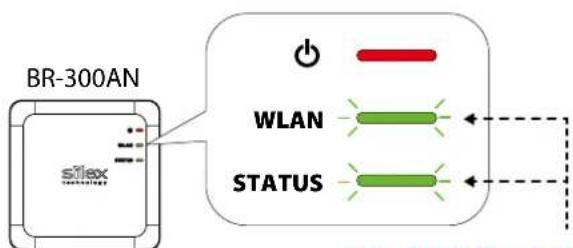
text_image
BR-300AN WLAN STATUSThe LEDs flash Green alternately during the MAC address resolution

Note
- Depending on the non-wireless device you have connected, further network settings may need to be configured to that device. In such a case, please configure it according to the operating manual that came with your device.
- When you turn on the BR-310AC and your non-wireless device, be sure to turn on the BR-310AC first. Do not press the push switch then.
5. List of Functions
This chapter explains the BR-310AC functions.
5-1. How to Access Web Configuration Interface
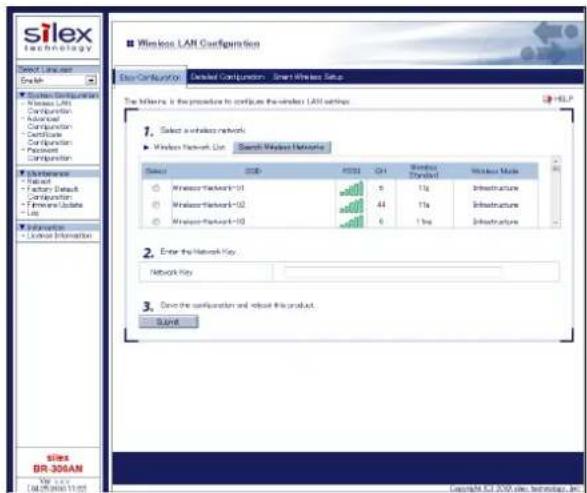
The Configuration Mode is used when you access the Web configuration interface of BR-310AC. In the Web configuration interface, each setting can be configured.
How to start the BR-310AC in Configuration Mode as well as access the Web configuration interface are explained.
text_image
Silex Technology Edit Configuration Detailed Configuration - Smart Wireless Setup The Internet is the procedure to confirm the window LAN settings. 1. Select a wireless network ► Windows Network Use Search Wireless Networks Server: 2000 FOSI QH Network Standard Windows Mode ○ Wireless-Network-1-01 5 1Hz Infrastructure ○ Wireless-Network-1-02 44 1Hz Infrastructure ○ Wireless-Network-1-10 6 1Hz Infrastructure 2. Enter the Network Key Network Key 3. Create the configuration and adjust this product. Start silex DR-306AN We have: Copyright © 2006 site technology, Inc.Starting BR-310AC in Configuration Mode
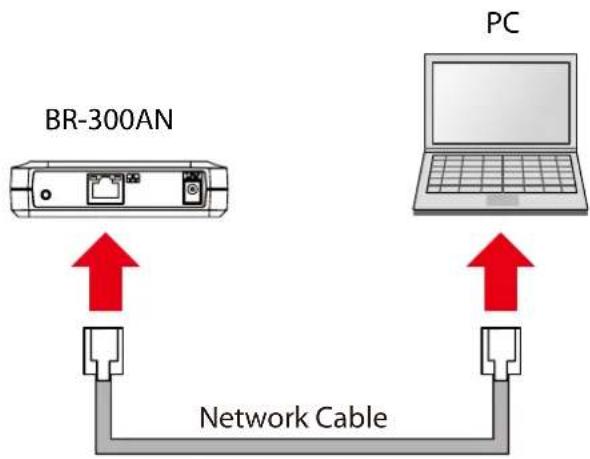
- Connect BR-310AC and the PC (to use for setup) using a network cable.
flowchart
graph TD
    A["BR-300AN"] -->|Red Arrow Down| B["Network Cable"]
    C["PC"] -->|Red Arrow Up| B

- To start the configuration, the PC and BR-310AC need to communicate each other properly.
- Confirm that an IP Address is correctly configured to the PC.
-
If a wireless LAN is enabled on your PC, please disable it.
-
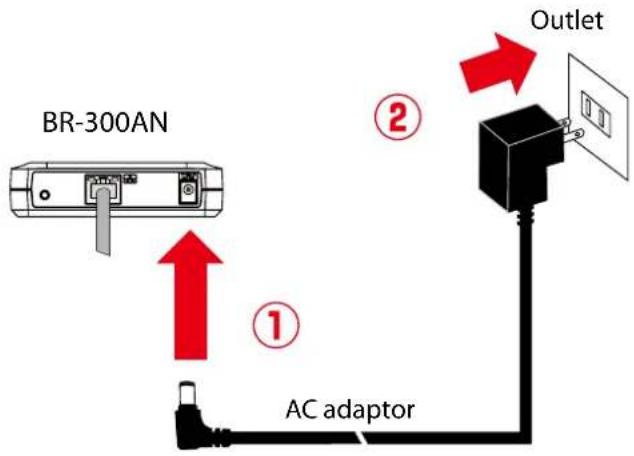
Connect the AC adaptor to BR-310AC, and the AC adaptor's plug to an electrical outlet.
text_image
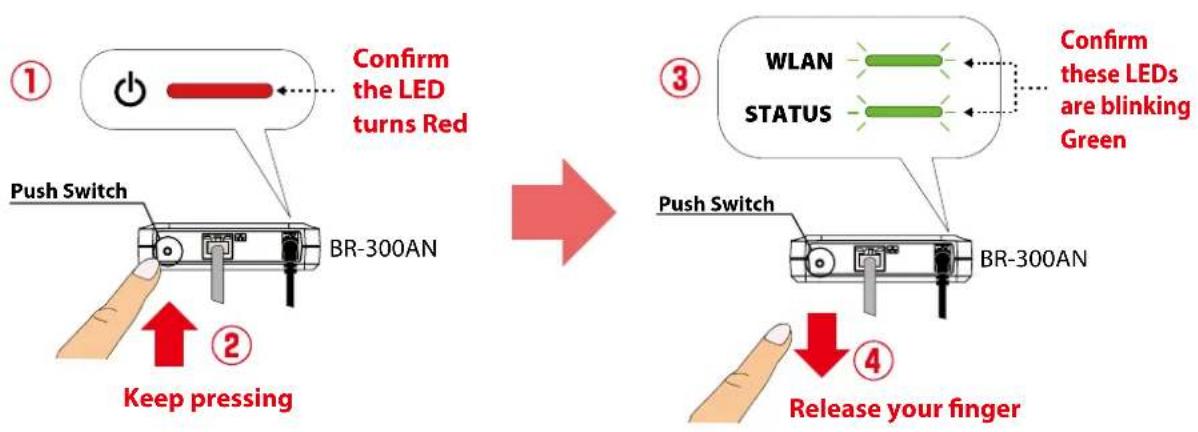
BR-300AN ① AC adaptor ② Outlet- When the POWER LED on top of BR-310AC turns Red, press and hold the push switch on the front. Release the push switch when the WLAN LED and STATUS LED start blinking Green together (it may take 20sec until blinking). BR-310AC will start operating in the Configuration Mode and you will be ready to configure BR-310AC from the PC.
flowchart
graph TD
    A["①"] --> B["Push Switch"]
    B --> C["BR-300AN"]
    C --> D["Confirm the LED turns Red"]
    D --> E["② Keep pressing"]
    E --> F["③ WLAN"]
    F --> G["④ Release your finger"]
    G --> H["Push Switch"]
    H --> I["BR-300AN"]
    I --> J["Confirm these LEDs are blinking Green"]
Configuration via Web Configuration Interface
Start a Web browser (Internet Explorer, Safari, etc) on the PC you are using for the setup. The Web configuration interface of BR-310AC is displayed. In the Web configuration interface, the operating mode, wireless setting, etc. can be changed.

text_image
silex Technology Select Language English System Configuration - Windows LAN - Configuration - Advanced - Configuration - Certificate - Configuration - Payment - Configuration 1. Select a wireless network. ► Wireless Network List Search Wireless Networks Select ADD PDD CI Remote Standard Remote Mode ○ Wireless-Network-C0 9 1% 3nstructure ○ Wireless-Network-C2 44 1% 3nstructure ○ Wireless-Network-C0 8 1% 3nstructure 2. Enable the network key. Network Key 3. Does the configuration and adjust this product. Select siles DR-30CAN Year 1st Copyright © 2006 sales technology, Inc.
Note
- If the Web page is not displayed, enter "http://silex" in the address bar of the Web browser and press the Enter key.

text_image
http://silex Blank Page- If a password is set to BR-310AC, the password entry screen is displayed. Enter the password and click Login. By defaults, the password entry screen is not displayed.
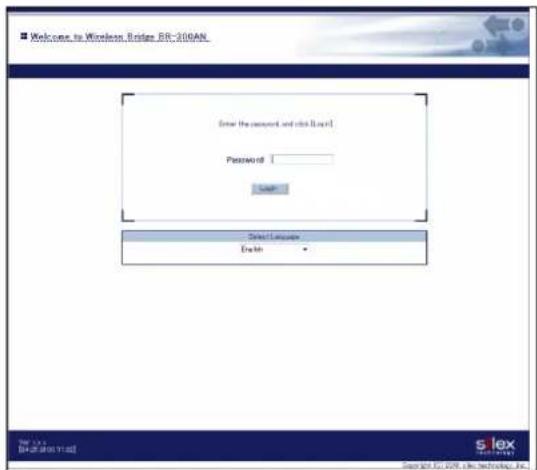
text_image
Welcome to Wireless Bridge SR-200AN Enter the password and click User Password: Save Select Language English S iex Copyright © 2001 the technology, Inc.- BR-310AC needs to be restarted for changes to take effect.
5-2. IEEE802.1X Authentication
BR-310AC supports the IEEE802.1X authentication.
To use the IEEE802.1X authentication, a RADIUS server is needed.
Network Configuration
Connect the BR-310AC to a network as below when you use the IEEE802.1X authentication. The RADIUS server identifies the reliability of BR-310AC as an authentication host, while BR-310AC identifies the reliability of RADIUS server as an authentication client to identify the reliability of the network to connect to.
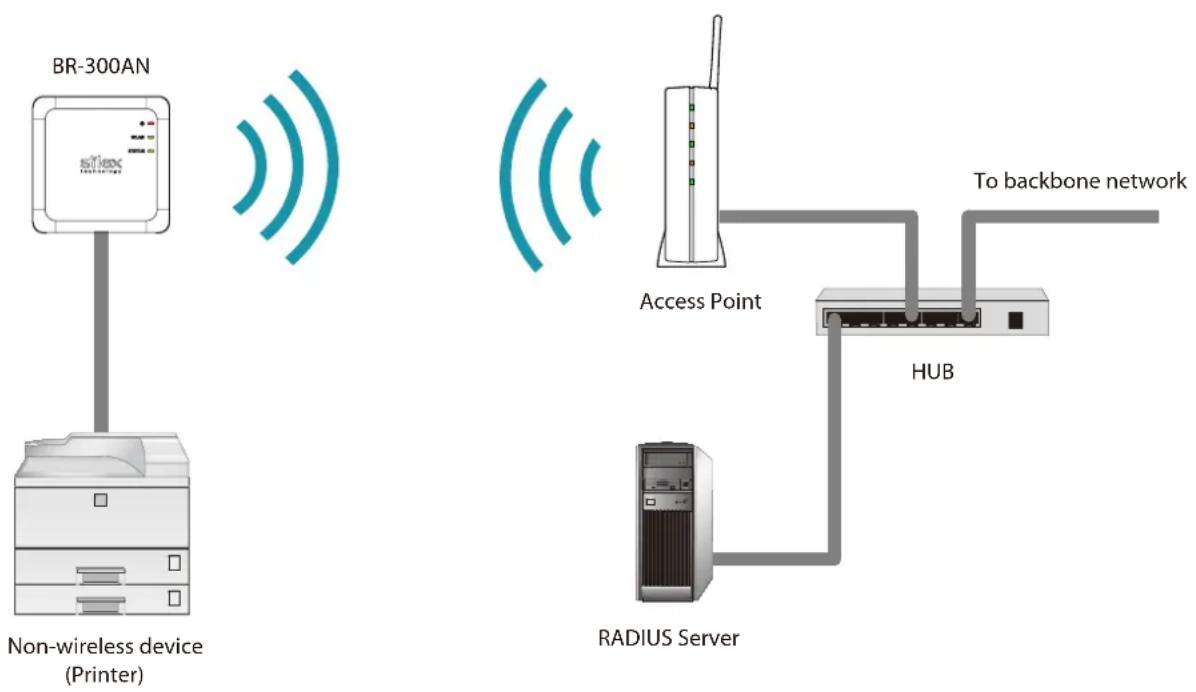
When using the authentication method that requires a certificate, get the necessary certificate issued by the certificate authority and import it to the BR-310AC.
To use this function, register the MAC address of non-wireless device with BR-310AC. The reliability of non-wireless devices connected to BR-310AC is identified using the MAC address filtering.

- IEEE802.1X authentication is supported only for wireless network.
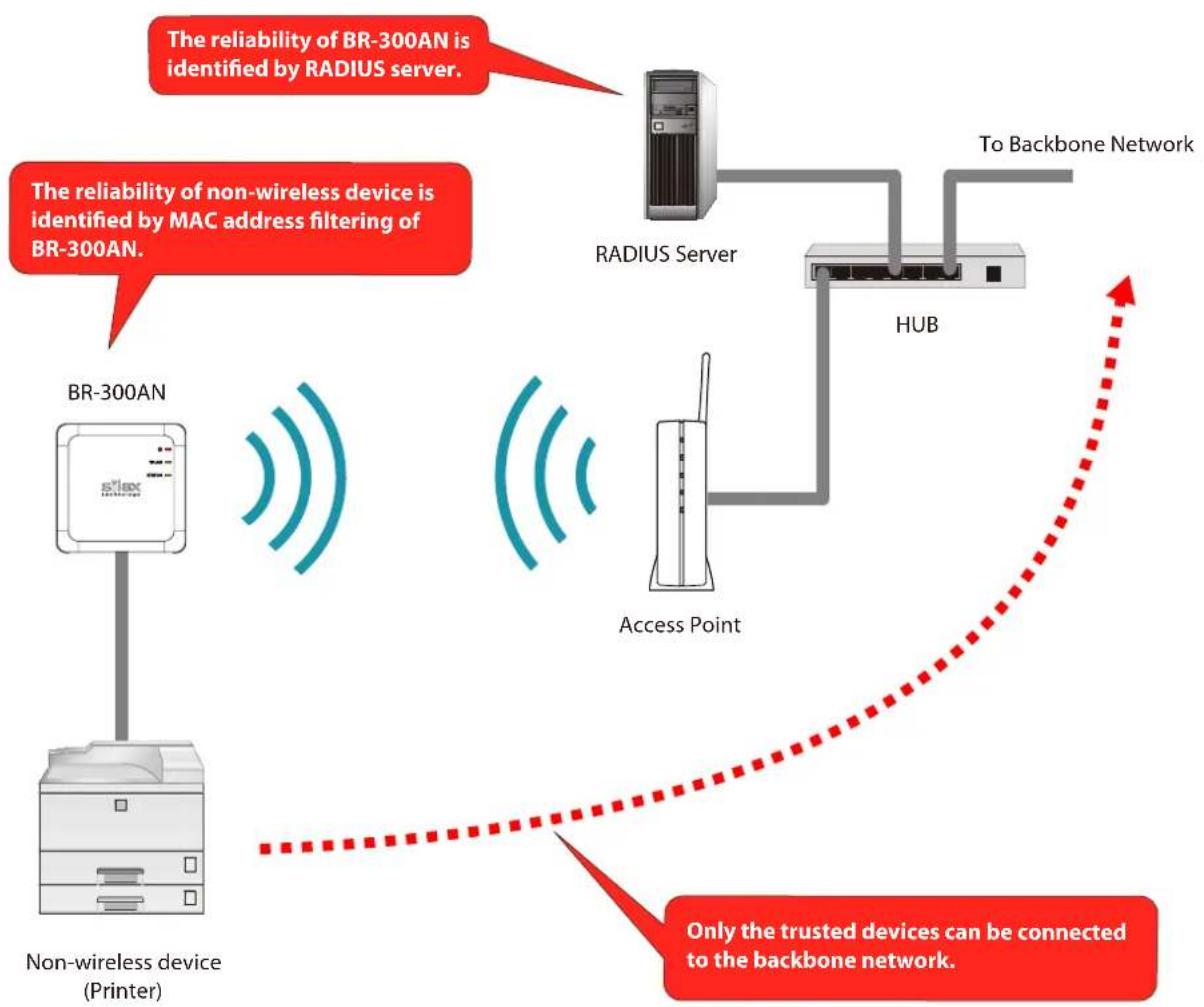
flowchart
graph TD
    A["BR-300AN"] -->|The reliability of non-wireless device is identified by MAC address filtering of BR-300AN.| B["RADIUS Server"]
    B --> C["HUB"]
    C --> D["To Backbone Network"]
    E["Non-wireless device (Printer)"] --> F["Access Point"]
    F --> G["Only the trusted devices can be connected to the backbone network"]
IEEE802.1X Authentication
BR-310AC supports the following IEEE802.1X authentication methods.
In the Web configuration interface of BR-310AC, select ON at IEEE802.1X Authentication and select the authentication mode at IEEE802.1X Authentication Type.
| IEEE802.1X Authentication mode |
| EAP-TLS |
| EAP-TTLS |
| PEAP |
| EAP-FAST |
| LEAP |
Settings on each authentication mode
The compatible settings on each authentication mode are as follows.
For details, refer to Appendix A-1. List of All Settings.
| Name | IEEE802.1X Authentication Mode | ||||
| EAP-TLS EAP | -TTLS PEAP EAP | FAST LEAP | |||
| IEEE802.1X User Name Necessary | Necessary Necessary | Necessary | Necessary | ||
| Password - Necessary Necessary | Necessary | Necessary | |||
| Inner Authentication Method | - Necessary | Necessary -- | |||
| Server Certificate Verification | - | Optional | Optional | - | - |
| CA Certificate | Necessary | Optional | Optional | - | - |
| PAC Auto-distribution | - | - | - | Optional | - |
| PAC File | - | - | - | Optional | - |
| Client Certificate | Necessary - | - | -- | ||
| Password | Necessary - | - | -- | ||
| Name | Details |
| IEEE802.1X User Name | This is an ID and password for the RADIUS server to identify the client. |
| Password | |
| Inner Authentication Method | Specify the authentication protocol to use.For PEAP, MSCHAPv2 is used. |
| Server Certificate Verification | Enable/Disable the reliability check of the RADIUS server.When ON is selected, CA certificate is required to verify the server certificate. |
| CA Certificate | This is a CA certificate to authenticate the RADIUD server. |
| PAC Auto-distribution | Enable/Disable the automatic PAC distribution.When OFF is selected, the PAC file generated by the RADIUS server is required. |
| PAC File | This is the file used for manual provisioning. This file is generated by the RADIUS server. |
| Client Certificate | Use this to check the client reliability. To read out the secret key from the client certificate, a password is required. |
| Password |
Certificate Standard
When using the authentication mode which uses a certificate, get the necessary certificate issued from the certificate authority and import it to the BR-310AC.
The BR-310AC supports the following certificates:
Certificate Standard
The certificate supports the standards as follows:
| Certificate Item Compatible standards | ||
| Client certificate X509 certi | ificate version v3 | |
| Public key algorithm RSA | ||
| Public key size 512bit, 1024bit, 2048 | bit | |
| Signature algorithm SHA1withRSA | MD5withRSA | |
| X509v3 extended key usage Client authentication(1.3.6.1.5.5.7.3.2) | ||
| CA certificate Public key alg | gorithm RSA | |
| Public key size 512bit, 1024bit, 2048 | bit | |
| Signature algorithm SHA1withRSA | MD5withRSA | |
Certificate Saving Format
The following saving formats are supported:
| Certificate Compatible standards | |
| Client certificate PKCS#12, pfx | * This is the format which includes a secret key of the certificate. |
| CA certificate for server authentication | DER (Binary encoded X509)PEM (A text form. DER is BASE64 encoded.) |
MAC Address Filtering
When the IEEE802.1X authentication is used, access to the BR-310AC from non-wireless devices needs to be restricted so that access from unauthorized devices can be blocked. Check the MAC address of the non-wireless device you want to allow an access from and register it with the BR-310AC at Network Device Address of IEEE802.1X Network Device Configuration in the Web configuration interface.
Before Using the IEEE802.1X Authentication
In order to use the IEEE802.1X authentication on BR-310AC, the information below will be required.
(1) User name and password to access the RADIUS server
To access the RADIUS server, the user name and password are required. Also, when using the authentication method that requires a certificate, the certificate file will be needed.
(2) MAC address of the non-wireless device
BR-310AC allows bridging only for those with the registered MAC address. The MAC address information is required to allow them to be bridged using BR-310AC.
IEEE802.1X Authentication Settings
How to configure the IEEE802.1X authentication setting is explained.
To use the authentication method that requires a certificate, import the certificate file.
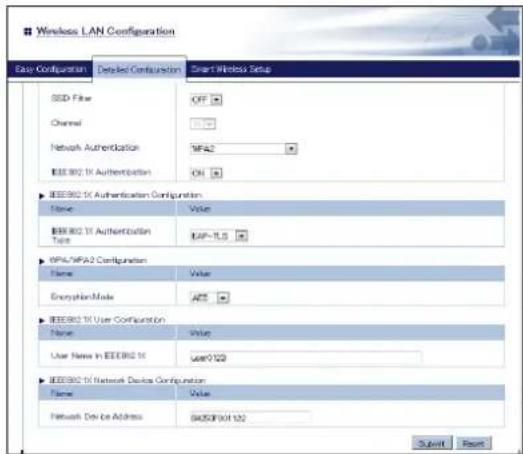
1. In the Web configuration interface of the BR-310AC, click Wireless LAN Configuration - Detailed Configuration.
In the Detailed Configuration page, enter the settings for the IEEE802.1X authentication and the MAC address of the non-wireless device you want to use wirelessly, and click Submit.
text_image
■ Wireless LAN Configuration Ease Configuration Detailed Configuration Smart Wireless Setup GSD Filter OFF Channel Network Authentication WFA2 IEEE 802.1X Authentication CH ▶ IEEE 802.1X Authentication Configuration Name Value IEEE 802.1X Authentication Type EAP-1L3 ▶ EPA/MPA2 Configuration Name Value Encryption Mode APT ▶ IEEE 802.1X User Configuration Name Value User Name In IEEE 802.1X power 122 ▶ IEEE 802.1X Network Device Configuration Name Value Network Device Address GASDF 901 122 Submit Next* Settings will vary depending on the IEEE802.1X authentication mode you select.

- When the IEEE802.1X authentication is used, access to the BR-310AC from non-wireless devices needs to be restricted so that access from unauthorized devices can be blocked.
- The BR-310AC bridges only the devices whose MAC address is registered to Network Device Address. Check the MAC address of the non-wireless device to bridge and register it to Network Device Address.

text_image
IEEE802.1X Network Device Configuration Name Value Network Device Address 84253F001122- Please configure this even when you connect only one non-wireless device in a Single Client Mode.
- In Multi-Client Mode, register the MAC addresses of all non-wireless devices connected to the BR-310AC (up to 16 addresses).

Note
- When the MAC address is registered to Network Device Address of Advanced Configuration page, such setting will automatically take effect on this setting.
-
The following MAC addresses cannot be used for this setting:
-
Broadcast address
- Multicast address
- The address composed of 12 zeros
- Duplicated address (when operating in Multi-Client Mode)
2. The message below is displayed after the setting is updated.
When a certificate will be used for the selected authentication mode, click OK.
When not, click Cancel and go on to 5.
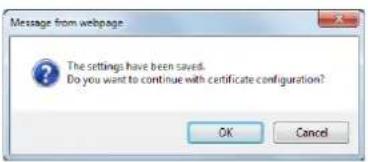
text_image
Message from webpage The settings have been saved. Do you want to continue with certificate configuration? OK Cancel
Note
- If Cancel is clicked, the BR-310AC will be restarted.
3. In the certificate configuration page, click Browse to specify the certificate file to use. After the certificate file is specified, click Submit.
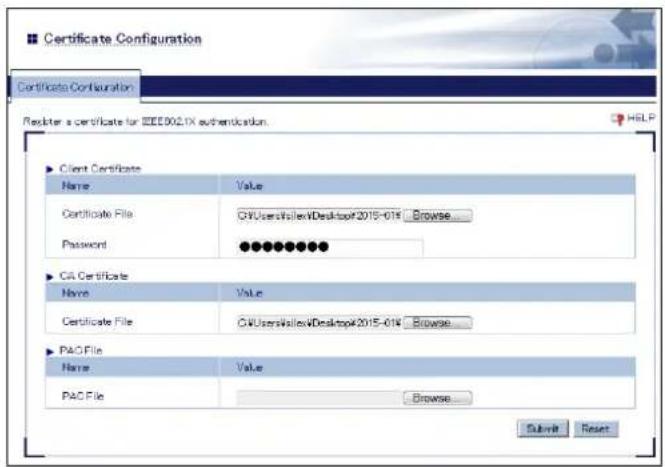
text_image
Certificate Configuration Certificate Configuration Register a certificate for IEEE902.1X authentication. HSLP Client Certificate Name Value Certificate File C:\Users\VerticalDesktop\2015-014 Browse... Password ●●●●●●●● CA Certificate Name Value Certificate File C:\Users\VerticalDesktop\2015-014 Browse... PAO File Name Value PAO File Browse... Submit Reset* The certificate will differ depending on the IEEE802.1X authentication mode you select.
| Certificate to use | IEEE802.1X Authentication Method | ||||
| EAP-TLS EAP | TTLS PEAP EAP-FAST LEAP | ||||
| Client Certificate Necessary | --- | ||||
| CA Certificate Necessary | -(*1) - (*1) -- | ||||
| PAC File | - | -- - (*2) | - | ||
| Note | (*1) Necessary when the server certificate verification is ON. (*2) Necessary when the PAC file auto-distribution is OFF. |
- After the certificate is registered, the message below is displayed. Click Cancel.
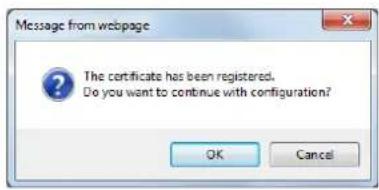
text_image
Message from webpage The certificate has been registered. Do you want to continue with configuration? OK Cancel
Note
- To continue the configuration, click OK. If OK is clicked, the BR-310AC will not be restarted.
- The BR-310AC will be restarted and the IEEE802.1X authentication will take effect.
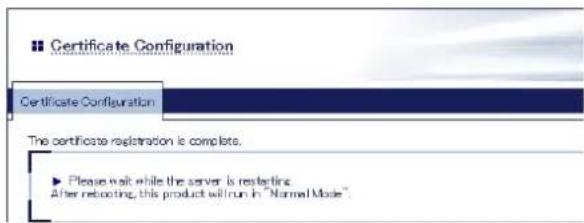
text_image
Certificate Configuration Certificate Configuration The certificate registration is complete. ▶ Please wait while the server is restarting After rebooting, this product will run in "Normal Mode"Turn off the BR-310AC and connect it to the non-wireless device using a network cable. Refer to Connecting Non-wireless Devices for details.
5-3. Saving Log
BR-310AC can save the operating log.
Once the log is saved, it can be retrieved or deleted from the Web configuration interface.
Types of Log
There are two types of log that can be saved by BR-310AC.
Details of each log are as follows.
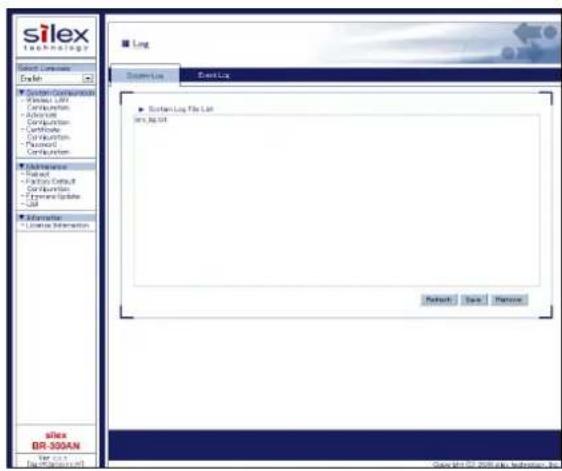
System Log
Power-on status, operating status, etc. of BR-310AC are saved as a log file.
In case of a network trouble, you can check the operating status by referring the retrieved system logs. The system log can be retrieved or deleted from the System Log page of Web configuration interface.
text_image
silex technology Log Silex Log File List log10.001 Silex DR-300AN Log 10.001 Log 10.002 Log 10.003 Log 10.004 Log 10.005 Log 10.006 Log 10.007 Log 10.008 Log 10.009 Log 10.010 Log 10.011 Log 10.012 Log 10.013 Log 10.014 Log 10.015 Log 10.016 Log 10.017 Log 10.018 Log 10.019 Log 10.020 Log 10.021 Log 10.022 Log 10.023 Log 10.024 Log 10.025 Log 10.026 Log 10.027 Log 10.028 Log 10.029 Log 10.030 Log 10.031 Log 10.032 Log 10.033 Log 10.034 Log 10.035 Log 10.036 Log 10.037 Log 10.038 Log 10.039 Log 10.040 Log 10.041 Log 10.042 Log 10.043 Log 10.044 Log 10.045 Log 10.046 Log 10.047 Log 10.048 Log 10.049 Log 10.050 Log 10.051 Log 10.052 Log 10.053 Log 10.054 Log 10.055 Log 10.056 Log 10.057 Log 10.058 Log 10.059 Log 10.060 Log 10.061 Log 10.062 Log 10.063 Log 10.064 Log 10.065 Log 10.066 Log 10.067 Log 10.068 Log 10.069 Log 10.070 Log 10.071 Log 10.072 Log 10.073 Log 10.074 Log 10.075 Log 10.076 Log 10.077 Log 10.078 Log 10.079 Log 10.080 Log 10.081 Log 10.082 Log 10.083 Log 10.084 Log 10.085 Log 10.086 Log 10.087 Log 10.088 Log 10.089 Log 10.090 Log 10.091 Log 10.092 Log 10.093 Log 10.094 Log 10.095 Log 10.096 Log 10.097 Log 10.098 Log 10.099 Log 10.10
Note
- The system log file will remain even after BR-310AC is reset to factory defaults.
- When a size of log file (file name: sys_log.txt) exceeds 10MB, a new file is created. For the existing file, a number will be added to the end of the file name then.
- As the end number of the file name increases one by one when a new log file is created, files with a greater number will be older logs.
- Up to 99 log files can be saved, starting from sys_log.txt.0 to sys_log.txt.98.
- If a new file is created when 99 log files have already been there, the oldest file sys_log.txt.98 will be deleted.
• Up to 1GB log can be saved.
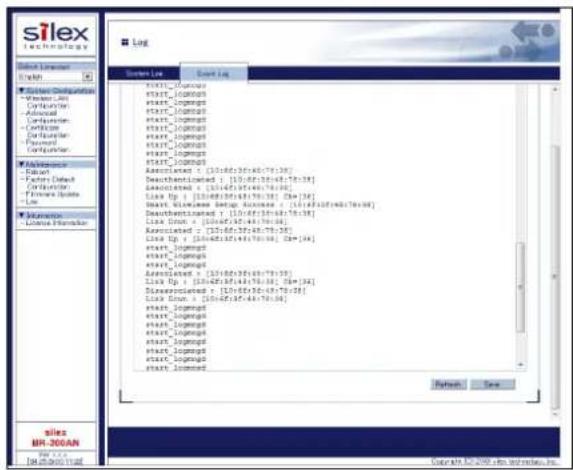
Event Log
When one of the following events occurs, the log message is saved.
- BR-310AC is connected to / disconnected from Access Point
- BR-310AC receives a specific packet from Access Point
- Smart Wireless Setup succeeded or failed
In case of a network trouble, you can check the wireless connection status by referring the retrieved event logs. The event log can be saved or viewed from the Event Log page of the Web configuration interface.
text_image
silex Technology Start Log Start Log Start Loglog start_loglog start_loglog start_loglog start_loglog start_loglog start_loglog start_loglog Aerostructured + (10:46:35:46:78:38) Deaheststructured + (10:46:35:46:78:38) Aerostructured + (10:46:35:46:78:38) List Log + (10:46:35:46:78:38) [M=36] last Wireless Setup Business - (10:46:35:46:78:38) Deaheststructured + (10:46:35:46:78:38) List Log + (10:46:35:46:78:38) Aerostructured + (10:46:35:46:78:38) List Log + (10:46:35:46:78:38) [M=36] last loglog start_loglog start_loglog Aerostructured + (10:46:35:46:78:38) List Log + (10:46:35:46:78:38) [M=36] Slavestructured + (10:46:35:46:78:38) List Log + (10:46:35:46:78:38) start_loglog start_loglog start_loglog start_loglog start_loglog start_loglog Start Log Return Save sales BR-200AN Log 2.0The event log file is saved as the format below:
| Log Events | |
| start_logmngd Event log saving is started. | |
| Link up : [AP MAC Addr] : Ch=[channel] | Wireless connection is made to the Access Point of [AP MAC Addr] at a wireless channel of [channel]. |
| Link Down : [AP MAC Addr] Wireless connection is disconnected from the Access Point of [AP MAC Addr]. | |
| Deauthenticated : [AP MAC Addr] Deauthenticated packet is received from the Access Point of [AP MAC Addr]. | |
| Associated : [AP MAC Addr] Authentication finished successfully with the Access Point of [AP MAC Addr]. | |
| Disassociated : [AP MAC Addr] Disassociated packet is received from the Access Point of [AP MAC Addr]. | |
| Smart Wireless Setup Success : [AP MAC Addr] | Smart Wireless Setup finished successfully with the Access Point of [AP MAC Addr]. |
| Smart Wireless Setup Timeout Smart Wireless Setup timeout | |
| Smart Wireless Setup Overlapped Smart Wireless Setup overlap | |
| Smart Wireless Setup Failed Smart Wireless Setup failed for a reason other than listed above. | |

Note
• Only one file is saved for event log.
- Up to 10MB log information can be saved as event log file. When it exceeds 10MB, the information will automatically be deleted from the older one.

TIP
• It is impossible to delete the event log file manually.
Retrieving/Deleting System Log
How to retrieve system log:
The system log saved on BR-310AC can be accessed from the Web configuration interface.
- Connect BR-310AC and the PC using a network cable.
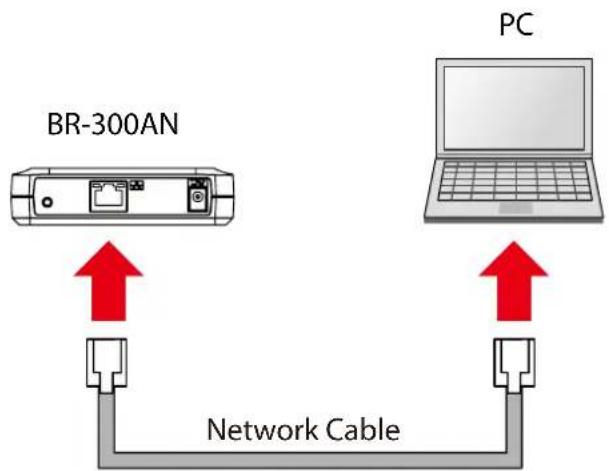
flowchart
graph TD
    A["BR-300AN"] -->|Red Arrow Downward| B["Network Cable"]
    C["PC"] -->|Red Arrow Upward| B
- Connect the AC adaptor to BR-310AC, and the AC adaptor's plug to an electrical outlet.
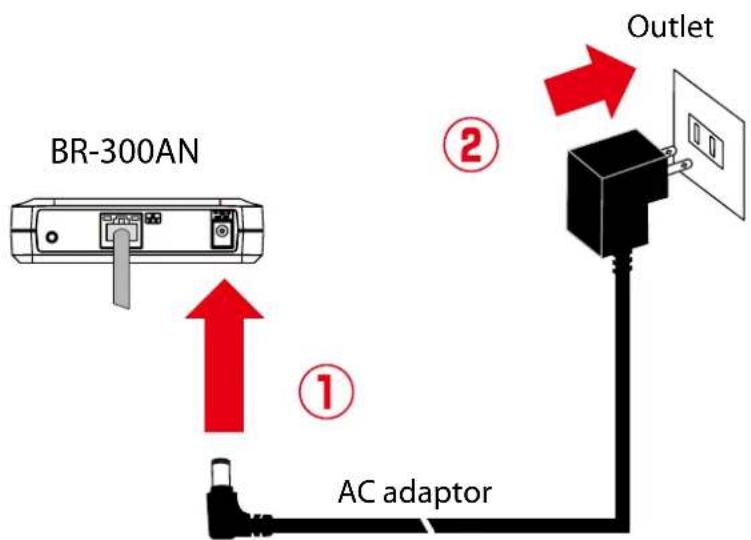
text_image
BR-300AN ① AC adaptor ② Outlet- When the POWER LED on top of BR-310AC turns Red, press and hold the push switch on the front. Release the push switch when the WLAN LED and STATUS LED start blinking Green together (it may take 20sec until blinking). BR-310AC will start operating in the Configuration Mode and you will be ready to configure BR-310AC from the PC.
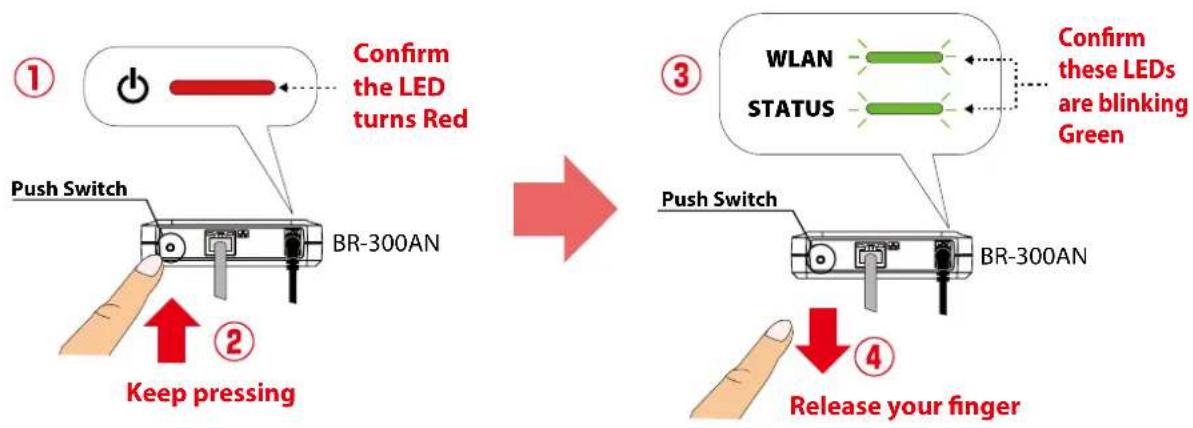
text_image
Confirm the LED turns Red Push Switch BR-300AN Keep pressing Confirm these LEDs are blinking Green WLAN STATUS Push Switch BR-300AN Release your finger- Start a Web browser (Internet Explorer, Safari, etc) on the PC you are using for the setup. The Web page of BR-310AC is displayed.
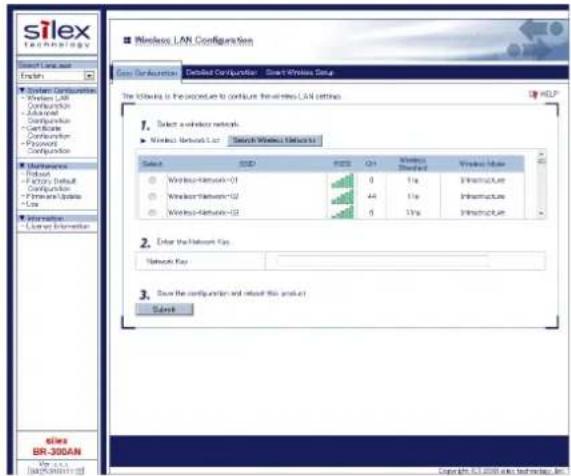
text_image
silex technology Silex LAN Configuration Goss For Accession Detailed Configuration Smart Wireless Data The network is the procedure to configure the wireless LAN settings. 1. Select a wireless network. ► Wireless Network List Search Wireless Network List Select SED FSS Q1 Wireless Checked Wireless Mode ○ Wireless-Network-01 4 1/s Infrastructure ○ Wireless-Network-02 44 1/s Infrastructure ○ Wireless-Network-03 6 1/s Infrastructure 2. Enter the Network Key Network Key 3. Save the configuration and release this product Select silex ER-300LAN Copyright ©2008 https://www.silex.com/ Help
Note
- If the Web page is not displayed, enter "http://silex" in the address bar of the Web browser and press the Enter key.

text_image
http://silex Blank Page- If a password is set to BR-310AC, the password entry screen is displayed. Enter the password and click Login.
- By defaults, the password entry screen is not displayed. Go on to 5 then.
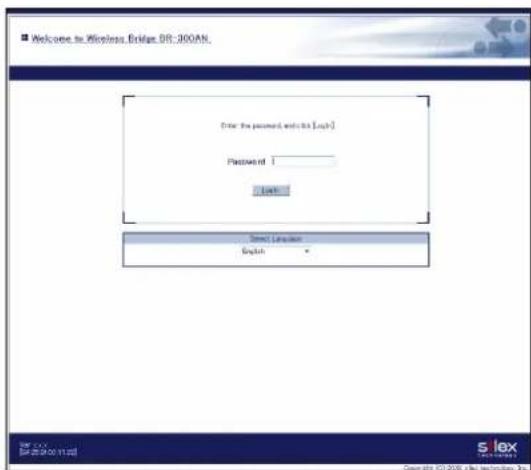
text_image
Welcome to Wireless Bridge DR: 300AN. Enter the password and this link Password: 1 Send Connection English
TIP
- To start the configuration, the PC and BR-310AC need to communicate each other properly.
- Confirm that an IP Address is correctly configured to the PC.
- If a wireless LAN is enabled on your PC, please disable it.
- If a static IP address is set to the PC, the Web configuration interface cannot be displayed in the following cases:
- An IP address of the different segment is entered to the address bar, when the default gateway address is not configured to the PC.
- A URL ("www.silexamerica.com", etc.) is entered to the address bar when the name resolution is disabled (DNS server address is not registered or NetBIOS is disabled).
- Select Log to show a list of the system logs and click Save to save them.
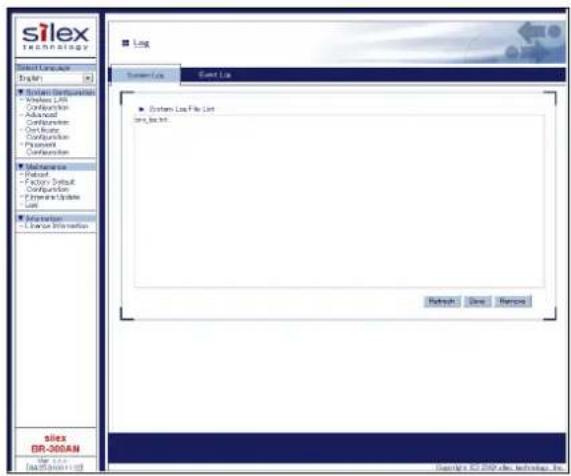
text_image
silex TECHNOLOGY Log System Log File List log10.txt Log Log Log10.txt Log10.txt Log10.txt Log10.txt Log10.txt Log10.txt Log10.txt Log10.txt Log10.txt Log10.txt Log10.txt Log10.txt Log10.txt Log10.txt Log10.txt Log10.txt Log10.txt Log10.txt Log10.txt Log10.txt Log10.exe Log10.exe Log10.exe Log10.exe Log10.exe Log10.exe Log10.exe Log10.exe Log10.exe Log10.exe Log10.exe Log10.exe Log10.exe Log10.exe Log10.exe Log10.exe Log10.exe Log10.exe Log10.exe Log10.exe Log10.02.2024 (the technology, Inc. Copyright © 2024.silex technological, Inc.
• The log files cannot be saved individually.
- When the message appears to confirm where to save the compressed file of system logs (sys_log_archive.tgz), click Save.

text_image
silex BR-300AN Var x: [04:25:00] Do you want to open or save sys_log_archive.tgz (437 KB) from silex? Open Save Cancel technology, Inc.
- If ▼s clicked, Save as option can be selected.
The system log has been saved.
How to delete system log:
The system log saved on BR-310AC can be deleted from the Web configuration interface.
- Connect BR-310AC and the PC using a network cable.
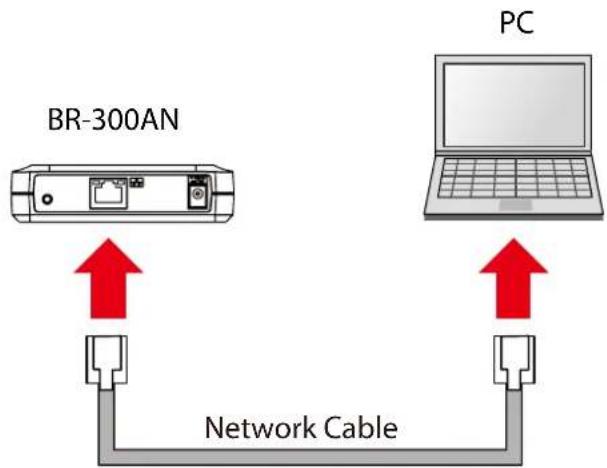
flowchart
graph TD
    A["BR-300AN"] -->|Red Arrow Down| B["Network Cable"]
    C["PC"] -->|Red Arrow Up| B
- Connect the AC adaptor to BR-310AC, and the AC adaptor's plug to an electrical outlet.
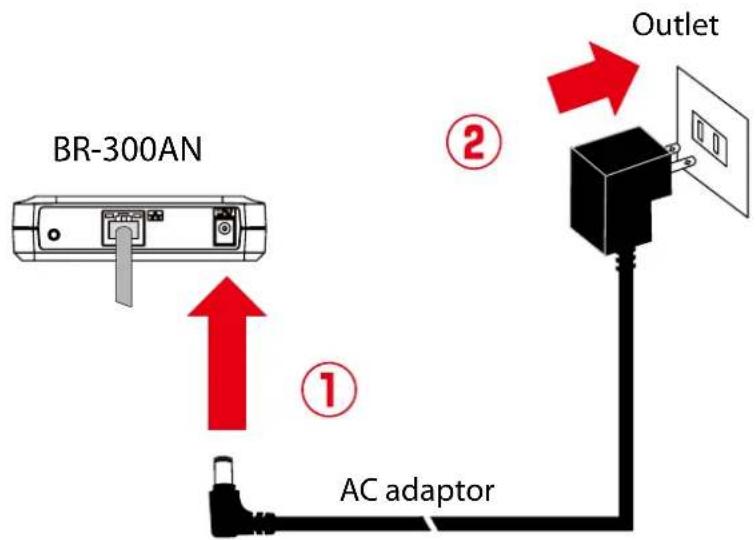
text_image
BR-300AN ① AC adaptor ② Outlet- When the POWER LED on top of BR-310AC turns Red, press and hold the push switch on the front. Release the push switch when the WLAN LED and STATUS LED start blinking Green together (it may take 20sec until blinking). BR-310AC will start operating in the Configuration Mode and you will be ready to configure BR-310AC from the PC.
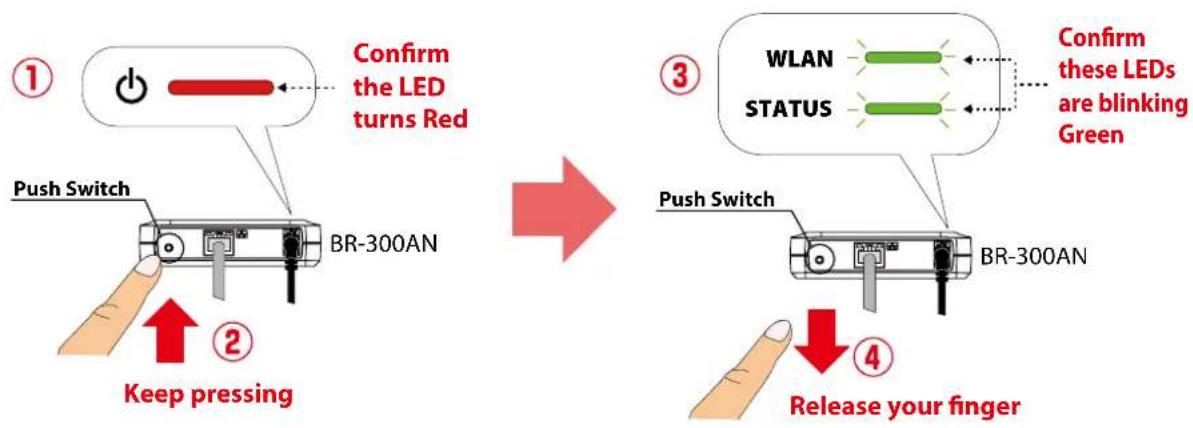
flowchart
graph TD
    A["①"] --> B["Confirm the LED turns Red"]
    B --> C["Push Switch"]
    C --> D["BR-300AN"]
    D --> E["② Keep pressing"]
    E --> F["③ Confirm these LEDs are blinking Green"]
    F --> G["④ Release your finger"]
    G --> H["Push Switch"]
    H --> I["BR-300AN"]
    I --> J["③"]
- Start a Web browser (Internet Explorer, Safari, etc) on the PC you are using for the setup. The Web page of BR-310AC is displayed.
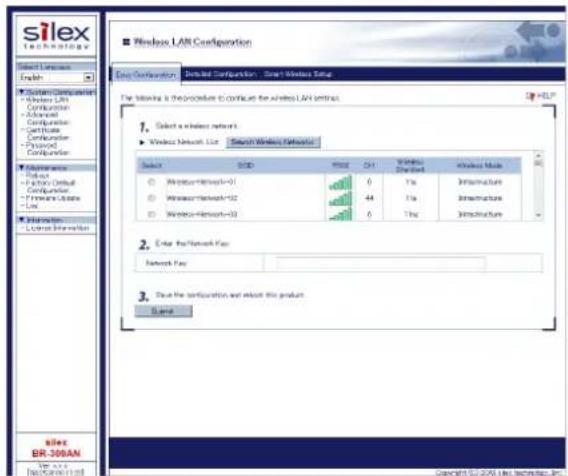
text_image
silex Technology Select Version English Dialysis Computer - Windows LAN - Configurator - Advanced - Configurator - Certificate - Provider - Password - Configuration Maintenance - Reset - Update/Default - Configuration - Privacy Linker - Low Internet Local Information Windows LAN Configuration Select Configuration Detailed Configuration Smart Wireless Data The website is the procedure to continue the wireless LAN setup. 1. Select a wireless network. ▶ Wireless Network List Search Wireless Network Select SISD PRICE CH Wireless Checked Windows Mode ○ Wireless-Network=0 0 1Hz Infrastructure ○ Wireless-Network=12 44 1Hz Infrastructure ○ Wireless-Network=32 6 1Hz Infrastructure 2. Enter the Network Path Network Path 3. Exit the configuration and export this product Name Silex BR-300LAN Copyright © 2000 file technologies.htm
Note
- If the Web page is not displayed, enter "http://silex" in the address bar of the Web browser and press the Enter key.

text_image
http://silex Blank Page- If a password is set to BR-310AC, a password entry screen is displayed. Enter the password and click Login.
- The password entry screen is not displayed at the initial setup. Go on to 5 then.
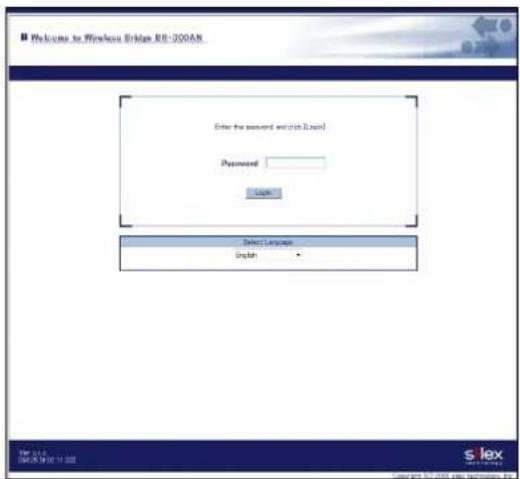
text_image
Welcome to Wireless Bridge RR-200AR Enter the password and click Login Password Login Select Language Browse
- To start the configuration, the PC and BR-310AC need to communicate each other properly.
- Confirm that an IP Address is correctly configured to the PC.
- If a wireless LAN is enabled on your PC, please disable it.
- If a static IP address is set to the PC, the Web configuration interface cannot be displayed in the following cases:
- An IP address of the different segment is entered to the address bar, when the default gateway address is not configured to the PC.
- A URL ("www.silexamerica.com", etc.) is entered to the address bar when the name resolution is disabled (DNS server address is not registered or NetBIOS is disabled).
- Select Log to show a list of the system logs and click Remove to delete them.
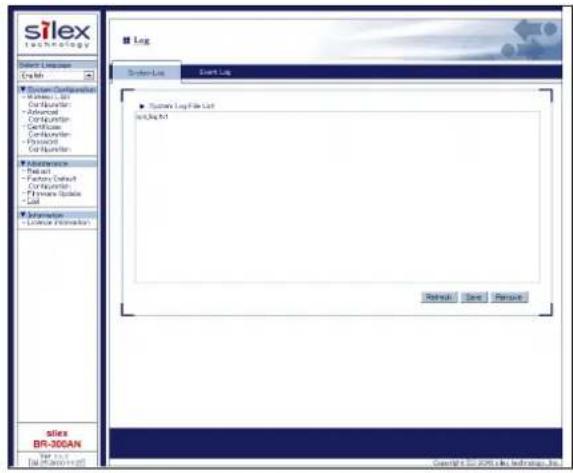
text_image
silex Technology Log System Log File List log10.txt LogLog Silex BR-30GAN Log 10.0 Silex BR-30GAN Log 10.0 Silex BR-30GAN Log 10.0 Silex BR-30GAN Log 10.0 Silex BR-30GAN Log 10.0 Silex BR-30GAN Log 10.0 Silex BR-30GAN Log 10.0 SileX BR-30GAN Log 10.0 SileX BR-30GAN Log 10.0 SileX BR-30GAN Log 10.0 SileX BR-30GAN Log 10.0 SileX BR-30GAN Log 10.0 SileX BR-30GAN Log 10.0 SileX BR-3OAN Log 10.0 SileX BR-3OAN Log 10.0 SileX BR-3OAN Log 10.0 SileX BR-3OAN Log 10.0 SileX BR-3OAN Log 10.0 SileX BR-3OAN Log 10.0 SileX BR-3OAN Log 20.0 Log 20.0 Log 20.0 Log 20.0 Log 20.0 Log 20.0 Log 20.0 Log 20.0 Log 20.0 Log 20.0 Log 20.0 Log 20.0 Log 20.0 Log 20.0 Log 20.0 LOG 20.0 LOG 20.0 LOG 20.0 LOG 20.0 LOG 20.0 LOG 20.0 LOG 20.0 LOG 20.0 LOG 20.0 LOG 20.0 LOG 20.0 LOG 20.0 LOG 20.0 LOG 20.0 LOG 18.7456789878747487898888888888888888888888888888888888888888888888888888888888888888888888888888888888
• The system log files cannot be deleted individually.
- Click OK to a confirmation message.
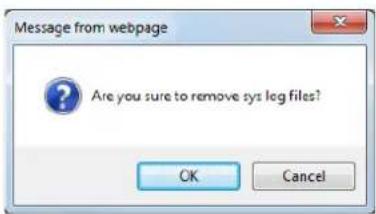
text_image
Message from webpage Are you sure to remove sys log files? OK Cancel
• If Cancel is clicked, the system log will not be deleted.
The system log has been deleted.
Retrieving Event Log
How to retrieve the event log is explained.
The event log saved on BR-310AC can be accessed from the Web configuration interface.
- Connect BR-310AC and the PC using a network cable.
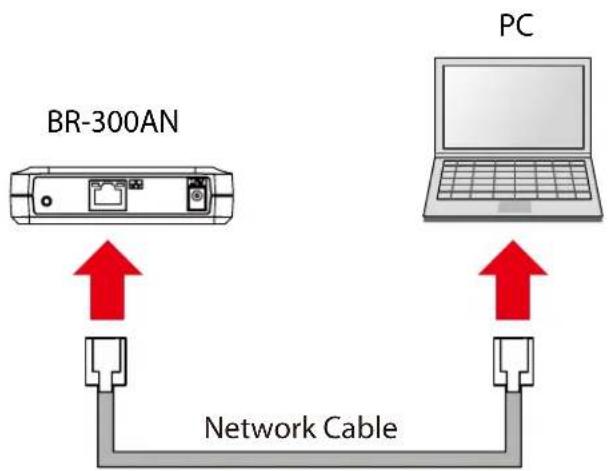
flowchart
graph TD
    A["BR-300AN"] -->|Red Arrow Down| B["Network Cable"]
    C["PC"] -->|Red Arrow Up| B
- Connect the AC adaptor to BR-310AC, and the AC adaptor's plug to an electrical outlet.
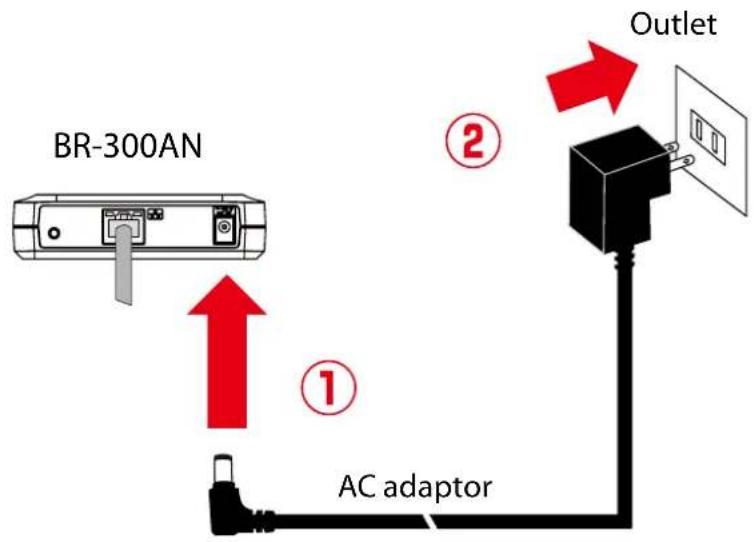
text_image
BR-300AN ① AC adaptor ② Outlet- When the POWER LED on top of BR-310AC turns Red, press and hold the push switch on the front. Release the push switch when the WLAN LED and STATUS LED start blinking Green together (it may take 20sec until blinking). BR-310AC will start operating in the Configuration Mode and you will be ready to configure BR-310AC from the PC.
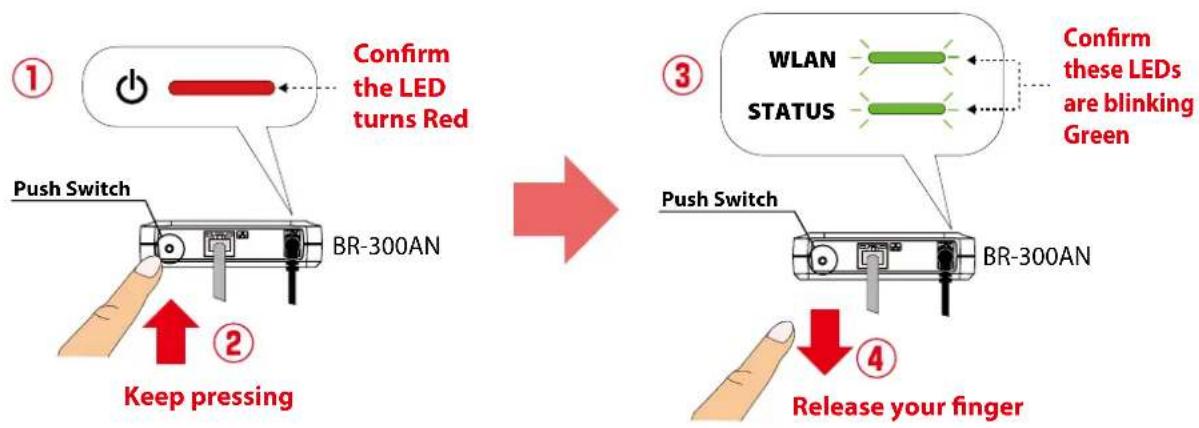
text_image
Confirm the LED turns Red Push Switch BR-300AN Keep pressing Confirm these LEDs are blinking Green WLAN STATUS Push Switch BR-300AN Release your finger- Start a Web browser (Internet Explorer, Safari, etc) on the PC you are using for the setup. The Web page of BR-310AC is displayed.
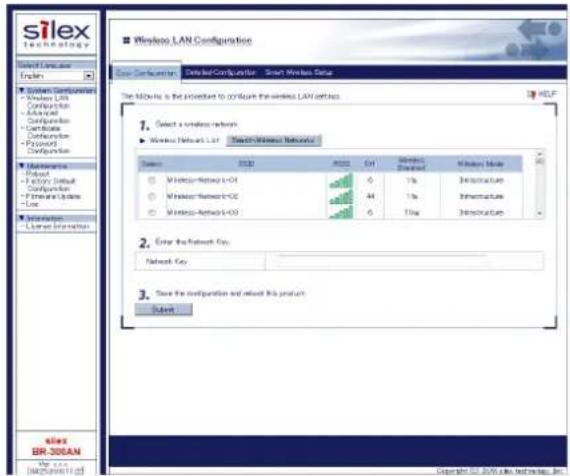
text_image
silex Technology Select Site and English System Configuration - Windows Ltd Configuration - Advanced Configuration - Certificate - Password - Password Maintenance - Provider - 100% Default - Configuration - 100% User - Low Information Lower Information Silex BR-300LAN New sites Silex Silex LAN Configuration Windows LAN Configuration Smart Wireless Data The SILEX is the procedure to configure the wireless LAN options. 1. Select a wireless network: - Wireless Network Ltd - Search Wireless Network System: IEEE 2. Use the Network Key: Network Key: 3. Save the configuration and adjust this product: Subnet HULF Windows Standard Wavelength Mode Windows-Netbox L-01 44 44 6 10% Administration Administration Administration Internet
Note
- If the Web page is not displayed, enter "http://silex" in the address bar of the Web browser and press the Enter key.

text_image
http://silox - → X Blank Page- If a password is set to BR-310AC, the password entry screen is displayed. Enter the password and click Login.
- By defaults, the password entry screen is not displayed. Go on to 5 then.
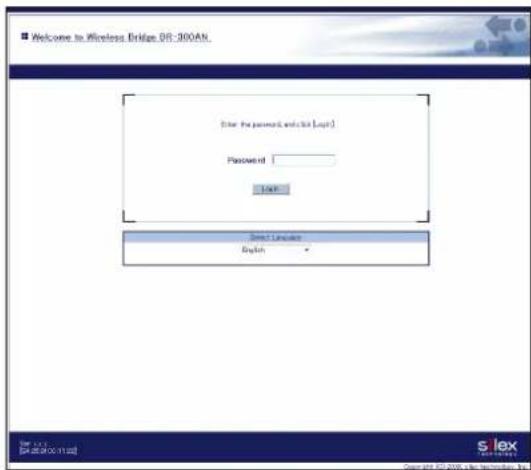
text_image
Welcome to Wireless Bridge 08:300AN Enter the password and/or (Login) Password: Login Select Location English S lex [SIGNATURE] © 2019-06-11/25 Copyright © 2019-06-11/25
TIP
- To start the configuration, the PC and BR-310AC need to communicate each other properly.
- Confirm that an IP Address is correctly configured to the PC.
- If a wireless LAN is enabled on your PC, please disable it.
- If a static IP address is set to the PC, the Web configuration interface cannot be displayed in the following cases:
- An IP address of the different segment is entered to the address bar, when the default gateway address is not configured to the PC.
- A URL ("www.silexamerica.com", etc.) is entered to the address bar when the name resolution is disabled (DNS server address is not registered or NetBIOS is disabled).
5. Click Log - Event Log to display the event log.
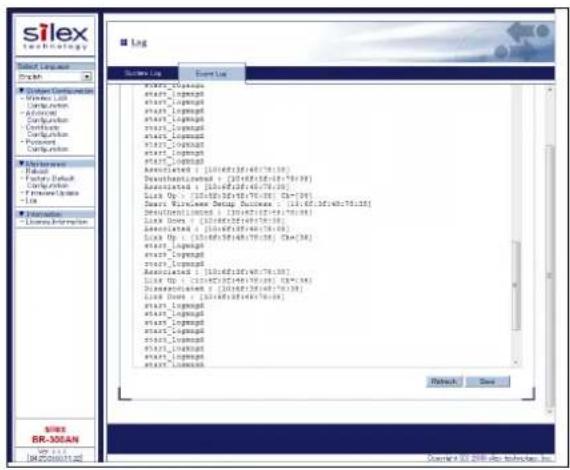
text_image
silex technology Select Language Log User1 Log User2 Log User3 Log User4 Log User5 Log User6 Log User7 Log User8 Log User9 Log User10 Log User11 Log User12 Log User13 Log User14 Log User15 Log User16 Log User17 Log User18 Log User19 Log User20 Log User21 Log User22 Log User23 Log User24 Log User25 Log User26 Log User27 Log User28 Log User29 Log User30 Log User31 Log User32 Log User33 Log User34 Log User35 Log User36 Log User37 Log User38 Log User39 Log User40 Log User41 Log User42 Log User43 Log User44 Log User45 Log User46 Log User47 Log User48 Log User49 Log User50 Log User51 Log User52 Log User53 Log User54 Log User55 Log User56 Log User57 Log User58 Log User59 Log User60 Log User61 Log User62 Log User63 Log User64 Log User65 Log User66 Log User67 Log User68 Log User69 Log User70 Log User71 Log User72 Log User73 Log User74 Log User75 Log User76 Log User77 Log User78 Log User79 Log User80 Log User81 Log User82 Log User83 Log User84 Log User85 Log User86 Log User87 Log User88 Log User89 Log User90 Log User91 Log User92 Log User93 Log User94 Log User95 Log User96 Log User97 Log User98 Log User99 Log User100 Log6. Click Save to save the event log.

TIP
• The event log can only be saved to one file.
7. When the message appears to confirm where to save the event log file, click Save.

text_image
silex BR-300AN Ver x: 84 25.310 Do you want to open or save eventlog.txt from silex? Open Save Cancel Technology, Inc.
- If ▼s clicked, Save as option can be selected.
Note
The event log has been saved.
5-4. Maintenance
Restarting
How to restart BR-310AC by unplugging the AC adaptor:
- Unplug the AC adaptor of BR-310AC from the outlet.
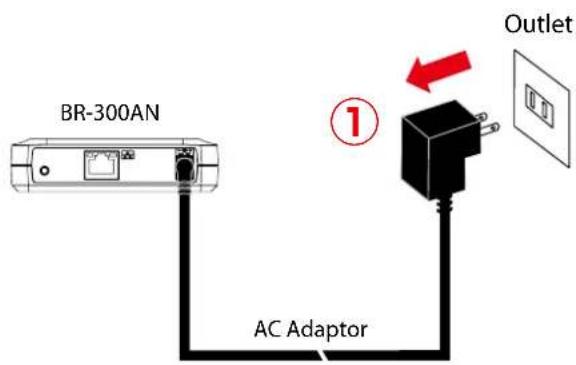
text_image
BR-300AN AC Adaptor ① Outlet- Plug the AC adaptor back into the outlet.
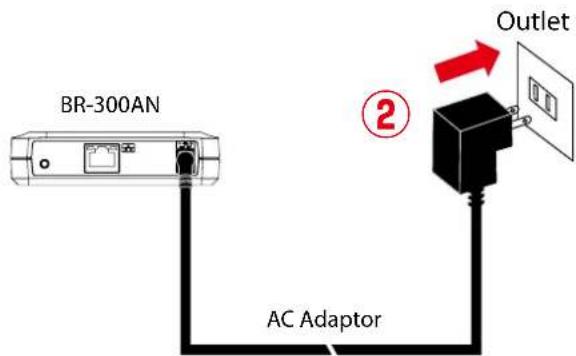
text_image
BR-300AN AC Adaptor ② Outlet- When the POWER LED turns Red, the restart is completed. After the restart, the BR-310AC will start in a normal mode.
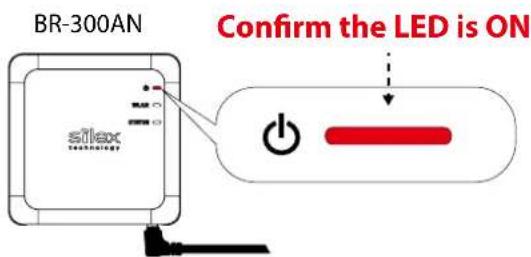
text_image
BR-300AN Confirm the LED is ON silkex technologyHow to restart BR-310AC using the Web configuration interface:
- Start the BR-310AC in Configuration Mode and login to the Web configuration interface using your Web browser.
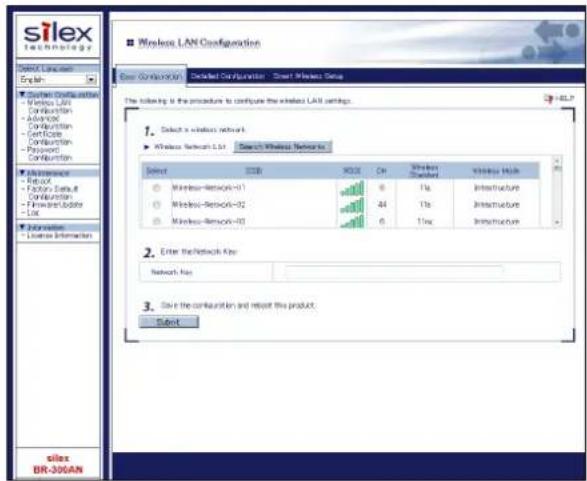
text_image
silex Technology Select Linux English System Configuration - Windows LAN - Configuration - Advanced - Configuration - Certificate - Configuration - Password - Configuration 1. Select a wireless network 2. Wireless Network LAN Search Wireless Network Select USB NO. CH Wireless Network Wireless Node ○ Wireless-Network-01 6 7a Infrastructure ○ Wireless-Network-02 44 7b Infrastructure ○ Wireless-Network-03 6 7c Infrastructure 2. Enter the Network Key Network Key 3. Save the configuration and report the product. Select silex BR-300AN- From the left menu on the Web configuration interface, click Maintenance - Restart. In the page displayed, click Yes.
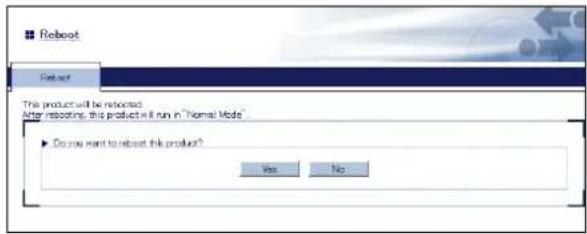
text_image
Reboot Reboot This product will be rebooted. After rebooting: this product will run in "Normal Mode". Do you want to reboot the product? Yes No- When the POWER LED turns Red after all LEDs turn off, the restart is completed. After the restart, the BR-310AC will start in a normal mode.
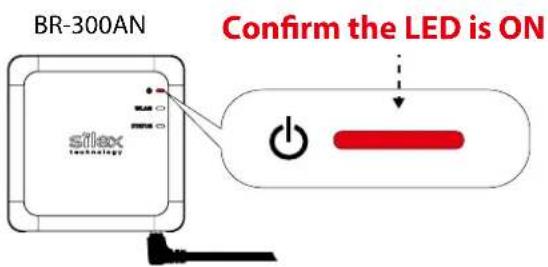
text_image
BR-300AN Confirm the LED is ON silex technologyFactory Default Configuration
How to reset BR-310AC to factory defaults using the Push Switch:
1. Unplug the AC adaptor of BR-310AC from the outlet.
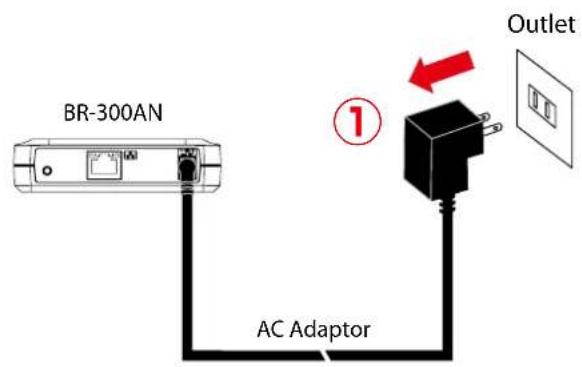
text_image
BR-300AN AC Adaptor ① Outlet2. Press and hold the push switch on the front while inserting the AC adaptor back into the electrical outlet.
When the WLAN LED turns from Green to Red, the factory default configuration is completed. BR-310AC will run in a normal mode then.
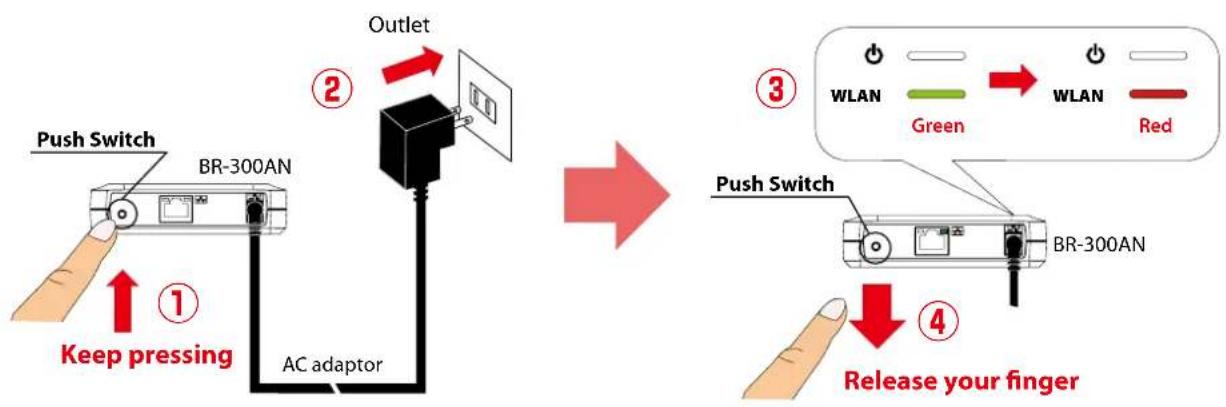
flowchart
graph TD
    A["Push Switch"] --> B["BR-300AN"]
    B --> C["AC adaptor"]
    C --> D["Outlet"]
    D --> E["②"]
    E --> F["① Keep pressing"]
    F --> G["③ WLAN Green WLAN Red"]
    G --> H["Push Switch"]
    H --> I["BR-300AN"]
    I --> J["Release your finger"]
How to reset BR-310AC to factory defaults using the Web configuration interface:
- Start the BR-310AC in Configuration Mode and login to the Web configuration interface using your Web browser.
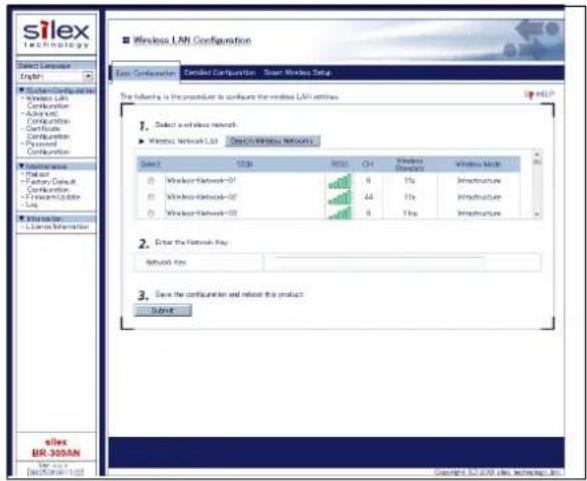
text_image
silex Technology Select Language English Silex Technologies • Windows LAN Configuration • Advanced Configuration • Security Configuration • Password Configuration • Security • Security • Security • Security • Security • Security • Security • Security • Security • Security • Security • Security • Security • Security • Security • Security • Security • Security • Security • Security • Security • Security • Security • Security • Security • Security • Security • Security • Security • Security • Security • Security • Security • Security- From the left menu on the Web page, click Maintenance - Initialize System Configuration. In the page displayed, click Yes.
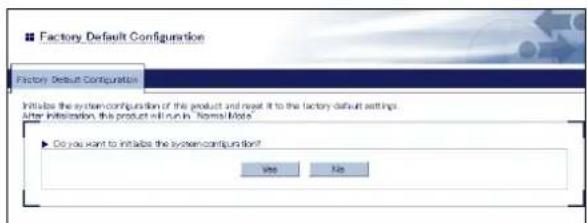
text_image
Factory Default Configuration Factory Default Configuration Initiabs the system configuration of the product and reset it to the factory default settings. After introduction, this product will run in "Forma Files" Do you want to initiate the system configuration? View Help- After the factory default configuration is completed, the BR-310AC will automatically restart. When the POWER LED turns Red after all LEDs turn off, the restart is completed. After the restart, the BR-310AC will start in a normal mode.
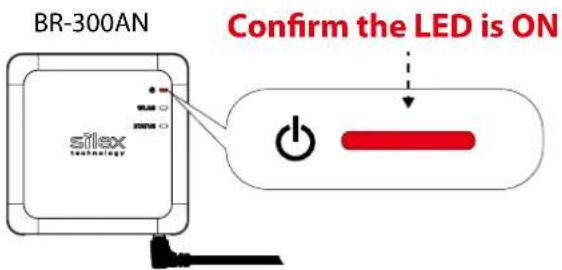
text_image
BR-300AN Confirm the LED is ON silex technologyFirmware Update
The latest firmware file can be downloaded from our website.
See the instructions below to download the firmware file. For how to upload the firmware file to BR-310AC, refer to the firmware update procedure sheet file contained in the firmware file you download.

Note
- The current firmware version can be identified at the bottom left of the Web configuration interface.
How to download the firmware file:
- Access our website below.
| URL |
| USA http://www.silexamerica.com/ |
| Europe http://www.silexeurope.com/ |
- Go to the support section and download the firmware file.
A. Appendix
A-1. List of All Settings
The BR-310AC has the following configuration items:
| Wireless Configuration - Easy Configuration | |
| Select a wireless network. | |
| Details | Select the SSID of the Access Point (or other wireless devices) to connect from Wireless Network List. |
| Range | Access Point of the wireless network to connect |
| Default Value | (None) |
| Enter the Network Key. | |
| Details | Enter the WEP Key or Pre-Shared Key of the wireless network for Network Key. |
| Range | WEP Key or Pre-Shared key |
| Default Value | (None) |
| Wireless LAN Configuration - Wireless LAN Basic Configuration | |
| Operating Mode | |
| Details | This is a connection mode to connect to wireless LAN. |
| Range | Infra. |
| Default Value | Infra. |
| Note | Infra. (Infrastructure mode) only |
| Wireless Standard | |
| Details | Select the wireless standard. |
| Range | AUTO / 2.4GHz / 5GHz |
| Default Value | AUTO |
| Note | Access Points of the selected wireless standard will be connected. |
| SSID | |
| Details | Set the SSID to connect to the wireless network (up to 32 characters). |
| Range | Up to 32 characters |
| Default Value | SXxxxxxx (xxxxxx is the last 6 digits on MAC address of the BR-310AC.) |
| Note | The SSID is an ID that distinguishes a wireless LAN network from others.For wireless devices to communicate with each other on a wireless network,they must share the same SSID. |
| SSID Filter | |
| Details | Enable/Disable the SSID filter. |
| Range | ON / OFF |
| Default Value | OFF |
| Note | If there are too many SSIDs on the wireless network and you fails to connectto the target Access Point, select ON. When ON is selected, only the registeredSSIDs will be shown on Wireless Network List. The Smart Wireless Smartfeature will become unavailable then. |
| Network Authentication | |
| Details | Select the network authentication mode. |
| Range | Open / Shared / WPA2 / WPA/WPA2 Mixed Mode |
| Default Value | Open |
| IEEE802.1X Authentication | |
| Details | Enable/Disable the IEEE802.1X authentication (ON/OFF). |
| Range | OFF / ON |
| Default Value | OFF |
| Note | This function can be used only when WPA2 or WPA/WPA2 Mixed Mode isselected as network authentication mode. |
| Wireless LAN Configuration - WEP Configuration | |
| WEP | |
| Details | Enable/Disable the WEP encryption.If WEP encryption is used, wireless communication will be encrypted using the settings for "WEP Key 1-4" and "Key Index". |
| Range | ON/OFF |
| Default Value | OFF |
| Note | If encryption is not enabled, data is not encrypted and is sent as is. To ensure higher security, enabling encryption is recommended. |
| Key Index | |
| Details | Select the number of the WEP key to use for encryption (1-4).This setting must be the same as that of your wireless device. |
| Range | 1 - 4 |
| Default Value | 1 |
| WEP Key1-4 | |
| Details | Set the WEP key for WEP encryption.Up to 4 WEP keys can be set. This setting must be the same as that of your wireless devices. A WEP key must be entered using hexadecimal or alphanumeric characters. |
| Range | 5 or 13 characters10 or 26 digit hexadecimal value |
| Default Value | (None) |
| Note | In most cases, alphanumeric characters are used.Enter 5 characters if the key size is 64bit or 13 characters if the key size is 128bit.For Hexadecimal, a value consists of numbers (0-9) and English letters (A-F).Enter a 10-digit value if the key size is 64bit or a 26-digit value if the key size is 128bit. |
| Wireless LAN Configuration - WPA/WPA2 Configuration | |
| Encryption Mode | |
| Details | Select the encryption mode to use for WPA2 or WPA/WPA2 Mixed Mode authentication. |
| Range | AES/AUTO |
| Default Value | AES |
| Note | When the network authentication mode is WPA2, AUTO cannot be used. |
| Pre-Shared Key | |
| Details | Set the Pre-Shared Key to use for encryption.The Pre-Shared Key is a keyword used to create the encryption key. It is also referred to as 'network key' or 'password'. |
| Range | 8-63 alphanumeric characters64 hexadecimal value |
| Default Value | silex technology, Inc. |
| Note | In most case, alphanumeric characters are used (8-63 characters).For Hexadecimal, a value consists of numbers (0-9) and English letters (A-F).* This setting must be the same as that of your wireless devices. |
| Wireless LAN Configuration - IEEE802.1X Authentication Configuration | |
| IEEE802.1X Authentication Type | |
| Details | Select the EAP authentication mode (Extensible Authentication Protocol) for IEEE802.1X authentication. |
| Range | EAP-TLS / EAP-TTLS / PEAP / EAP-FAST / LEAP |
| Default Value | EAP-TLS |
| Note | EAP-TLSProvides two-way authentication between the client and RADIUS server using a certificate.EAP-TTLS, PEAPThis is the authentication method using EAP-TLS, providing the client authentication using a user name / password.EAP-FASTIn this authentication, the authentication process is tunneled by the PAC (Protected Access Credential) which is issued from the RADIUS server.LEAPOne kind of EAP protocols used for PPP authentication. The authentication performs using a user name / password between the RADIUS server and client. |
| Wireless LAN Configuration - Inner Authentication Method Configuration | |
| Inner Authentication | |
| Details | Select the authentication protocol to use for EAP-TTLS.In case of PEAP, only MSCHAPv2 can be used. |
| Range | PAP / CHAP / MSCHAP / MSCHAPv2 |
| Default Value | PAP |
| Wireless LAN Configuration - Server Certificate Verification Configuration | |
| Server Certificate Verification | |
| Details | Set whether to verify that the server certificate is issued from a trusted root certification authority when EAP-TTLS or PEAP authentication mode is used (ON/OFF). |
| Range | OFF / ON |
| Default Value | OFF |
| Note | When ON is selected, the CA certificate needs to be registered. |
| Wireless LAN Configuration - IEEE802.1X User Configuration | |
| User Name in IEEE802.1X | |
| Details | Set the user name for IEEE802.1X authentication.The user name is used by the RADIUS server to identify a client. |
| Range | Up to 64 characters |
| Default Value | (None) |
| Password | |
| Details | Set the password for IEEE802.1X authentication.The password is used by the RADIUS server to identify a client. |
| Range | Up to 32 characters |
| Default Value | (None) |
| Wireless LAN Configuration - EAP-FAST Configuration | |
| PAC Auto-distribution | |
| Details | Enable/Disable the automatic distribution of the PAC (Protected Access Credential) in EAP-FAST authentication. |
| Range | OFF / ON |
| Default Value | OFF |
| Note | When OFF is selected, the PAC file generated by the server will need to be registered. |
| Wireless LAN Configuration - IEEE802.1X Network Device Configuration | |
| Device Filter | |
| Details | Enable/Disable filtering for the devices registered to the network device address. |
| Range OFF / ON | |
| Default Value ON | |
| Note | If the device filter is disabled, communication will be bridged even for devices not registered to the network device address. The device authentication (one security feature of IEEEX authentication) will not be assured then. |
| Network Device Address | |
| Details | Register the MAC address of devices to be connected to LAN port of the BR-310AC when the IEEE802.1X authentication is used. |
| Range | MAC address (in Multi-Client Mode, up to 16 addresses can be registered) |
| Default Value | (None) |
| Note | One MAC Address can be registered for Single Client Mode while 16 MAC Addresses can be registered for Multi-Client Mode. |
| Wireless LAN Configuration - Smart Wireless Setup | |
| PIN Code | |
| Details | The PIN code of BR-310AC is displayed. |
| Range | The value is automatically generated by clicking the button. |
| Default Value | Automatically generated |
| Smart Wireless Setup Execution | |
| Details | Execute the wireless configuration by Smart Wireless Setup. |
| Range | (Smart Wireless Setup Execution button) |
| Default Value | - |
| Advanced Configuration | |
| LAN Interface | |
| Details | Configure the physical network type. Usually, "AUTO" is used. |
| Range | AUTO / 10BASE-T-Half / 10BASE-T-Full / 100BASE-TX-Half / 100BASE-TX-Full / 1000BASE-T-Full |
| Default Value | AUTO |
| Note | If a LINK LED on the connected device does not light on when BR-310AC is powered on, change the network type to that of the connected device. |
| Network Device Address | |
| Details | Set the MAC Address of the network device to be connected to a LAN port of the BR-310AC. |
| Range | MAC Address |
| Default Value | (None) |
| Note | In most cases, it is recommended to leave this field blank, as the BR-310AC automatically detects the MAC Address from the network packets sent from the connected device. |
| Client Mode | |
| Details | Set the operating mode. |
| Range | Single Client Mode / Multi-Client Mode |
| Default Value | Single Client Mode |
| Note | Select Single Client Mode to bridge only one device connected to a LAN port of the BR-310AC. In Single Client Mode, not only TCP/IP but various communication protocols can be used.Select Multi-Client Mode to bridge several devices using a HUB on the LAN port of BR-310AC. In Multi-Client Mode, only TCP/IP(IPv4, IPv6) protocol can be used. |
| TCP/IP Configuration | |
| DHCP | |
| Details | Enable/Disable the DHCP protocol.To assign an IP address using DHCP, the DHCP server must be running in your subnetwork. |
| Range | ENABLE/DISABLE |
| Default Value | DISABLE |
| IP Address | |
| Details | Set the IP address.If the DHCP is enabled on your network, the IP Address obtained from it will be applied. |
| Range | 0.0.0.0 - 255.255.255.255 |
| Default Value | 0.0.0.0 |
| Subnet Mask | |
| Details | Set the subnet mask.If the DHCP is enabled on your network, the Subnet Mask obtained from it will be applied. |
| Range | 0.0.0.0 - 255.255.255.255 |
| Default Value | 0.0.0.0 |
| Note | When set to "0.0.0.0", a subnet mask appropriate for the IP address is automatically assigned. |
| Default Gateway | |
| Details | Set the gateway address.If "0.0.0.0" is set, this setting is disabled. When the DHCP is enabled on your network, the Default Gateway obtained from it will be applied. |
| Range | 0.0.0.0 - 255.255.255.255 |
| Default Value | 0.0.0.0 |
| Push Switch Configuration | |
| Time before turning into Configuration Mode | |
| Details | Specify the period of time until the BR-310AC turns into the Configuration Mode. If the Push Switch is pressed for the period of time specified here, the BR-310AC will turn into the Configuration Mode. |
| Range | 5-60 (sec) |
| Default Value | 5 |
| Note | * Please keep 5 sec or more interval than the value you specify at Time before starting Smart Wireless Setup. |
| Time before starting Smart Wireless Setup | |
| Details | Specify the period of time until Smart Wireless Setup is started. If the Push Switch is pressed for the period of time specified here, Smart Wireless Setup will start. |
| Range | 5-60 (sec) |
| Default Value | 10 |
| Note | * Please keep 5 sec or more interval than the value you specify at Time before turning into Configuration Mode. |
| Certificate Configuration - Client Certificate | |
| Certificate File | |
| Details | Register the certificate used to authenticate the BR-310AC by IEEE802.1X authentication. |
| Range | A certificate file to authenticate the BR-310AC by IEEE802.1X authentication. |
| Default Value | The certificate file must support the followings:- File formatPKCS#12 format (*.p12, *.pfx)- Certificate versionV3- Public key algorithmRSA- Public key size512bit, 1024bit, 2048bit- Signature algorithmSHA1withRSA, MD5withRSA- Extended key usage"Client authentication(1.3.6.1.5.5.7.3.2)" is included. |
| Password | |
| Details | This is the password to read a secret key from the client certificate. |
| Range | 1 - 32 characters |
| Default Value | (None) |
Certificate Configuration - CA Certificate
| Certificate File | |
| Details | This is the CA certificate file to authenticate the certificate sent from the RADIUS server when the IEEE802.1X authentication is used. |
| Range | CA certificate file to authenticate the certificate sent from the RADIUS server when the IEEE802.1X authentication is used. |
| Default Value | The certificate file must support the followings:- File formatDER format(*.der), PEM format(*.pem)- Public key algorithmRSA- Public key size512bit, 1024bit, 2048bit- Signature algorithmSHA1withRSA, MD5withRSA |
Certificate Configuration - PAC File
| PAC File | |
| Details | When the PAC (Protected Access Credential) is manually distributed in EAP-FAST authentication method, register the PAC file generated from the server. |
| Range | A PAC file generated from the server |
Password Configuration
| Password | |
| Details | Configure the password to manage the BR-310AC.This password is used for authentication to login to the Web configuration interface of BR-310AC. |
| Range | Up to 15 characters |
| Default Value | (None) |
A-2. Troubleshooting
This section provides the solutions for possible troubles you may experience when you are configuring or using the BR-310AC.
My Access Point is not displayed in the Wireless Network List of the Web configuration interface.
| The Access Point may not be active. | |
| Solution | Please check that the Access Point is operating correctly. |
| The Access Point may be operating in a stealth mode. | |
| Solution | Configure the detailed settings of the wireless network at Detailed Configuration of the Web configuration interface to connect to the Access Point. Remember that Access Points operating in a stealth mode will not be displayed in the list. |
| Too many wireless devices may be operating, exceeding the maximum number of devices the BR-310AC can show on (up to 32 devices). | |
| Solution | Up to 32 wireless devices can be displayed at Wireless Network List.To show your Access Point in the list, use SSID Filter so that only the specified networks are displayed there.Even when the Access Point is not displayed in the list, it can be connected by configuring the wireless settings at Detailed Configuration of the Web configuration interface. |
I failed to connect to a wireless network using Smart Wireless Setup.
| The WPS feature may be disabled on the Access Point. | |
| Solution | Check that the Access Point supports the WPS feature.Depending on the Access Point, you may need to manually enable the WPS feature. For details, see the operating manual that came with your Access Point. |
| The SSID Filter may be enabled on the BR-310AC. | |
| Solution | Disable the SSID Filter at Detailed Configuration of the Web configuration interface. If the SSID Filter is enabled, configuration using Smart Wireless Setup does not work. |
A LAN port error has occurred (POWER LED: Blinks rapidly, WLAN LED: OFF, STATUS LED: ON).
| The bridge feature may be aborted as the non-wireless device is unplugged and changed to the other device on the LAN port. | |
| Solution | Restart the BR-310AC.In Single Client Mode, if the non-wireless device is unplugged and changed to the other device, BR-310AC will abort bridging of that device, taking such occurrence as an error.Also, when the MAC address filtering is used to restrict the devices to bridge, you will need to change the setting registered to Network Device Address.This error does not occur in Multi-Client Mode. The restart is not required then. |
| Several devices may have been connected to the BR-310AC using a HUB, though it is operating in Single Client Mode. | |
| Solution | In Single Client Mode, connect only one device to the LAN port of BR-310AC. To use several devices, use Multi-Client Mode. |
I cannot access the non-wireless device connected to a LAN port of the BR-310AC.
| The BR-310AC or non-wireless device may not be operating correctly. | |
| Solution | Please check the LED status on BR-310AC. Please also check that the non-wireless device is properly powered on. |
| The connection may be restricted by the MAC address filtering on BR-310AC. | |
| Solution | See the setting at Network Device Address to check that access of the connected device is not restricted by the MAC address filtering. |
The connection to the non-wireless device is lost.
| The connection may be timed out. | |
| Solution | If the connected non-wireless device is idle and no communication occurs from it for 5 mins, BR-310AC automatically cuts a link with it. To recover the communication, try to do anything that can cause communication packets on the non-wireless device. For the connection not to be timed out again, it is recommended to disable the sleep mode on the non-wireless device.(Example) If the connected non-wireless device is a printer and the printer has turned into a sleep mode, printing will become unavailable as BR-310AC will disconnect a link with the printer.To get printing ready again, wake up the printer from a sleep mode using the control panel on it to make a communication from the printer to BR-310AC. |
The imported IEEE802.1X certificate cannot be deleted.
| It is impossible to delete the imported certificate only. | |
| Solution | To delete the imported certificate, initialize the BR-310AC.NOTE:The imported certificate is validated only when it is used.Even if you keep the certificate, it has no impact on the authentication process since the imported certificate is used only with the compatible authentication method. |