
HBOD 82488 - Refrigerator HOOVER - Free user manual and instructions
Find the device manual for free HBOD 82488 HOOVER in PDF.
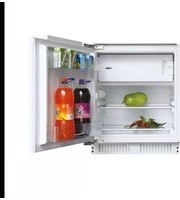


| Product type | Refrigerator-freezer |
| Brand | Hoover |
| Model | HBOD 82488 |
| Dimensions (W x H x D) | 600 x 820-870 x 696 mm |
| Climate class | SN, N, ST, T (10 °C to 43 °C) |
| Supply voltage | 220-240 V ~ 50 Hz |
| Light bulb | 12 V, 1 W (LED) |
| Refrigerant | R600a (flammable) |
| Number of doors | 1 |
| Freezer compartment | Yes, with stars |
| Adjustable temperature | 5 positions (1 to 5) + quick freeze function |
| Quick freeze function | Yes |
| Refrigerator defrost | Automatic |
| Freezer defrost | Manual |
| Door reversal | Possible |
| Adjustable feet | Yes |
| Included accessories | Shelves, egg tray, bottle holder, vegetable drawer |
| Spare parts availability | 7 years (thermostats, sensors, boards, lights, handles, hinges, trays, bins); 10 years (door gaskets) |
| Warranty | 2 years (EU) |
| Compliance | CE, WEEE |
Frequently Asked Questions - HBOD 82488 HOOVER
User questions about HBOD 82488 HOOVER
0 question about this device. Answer the ones you know or ask your own.
Ask a new question about this device
Download the instructions for your Refrigerator in PDF format for free! Find your manual HBOD 82488 - HOOVER and take your electronic device back in hand. On this page are published all the documents necessary for the use of your device. HBOD 82488 by HOOVER.
USER MANUAL HBOD 82488 HOOVER
INSTRUCTION MANUAL
LANGUAGES
Italian 4
English 13
French....22
Spanish....31
German 40
Portuguese....49
Dutch 59
Greek 69
Polish....80
Czech....89
Italian
(Figure 2)
OPERATION
Thermostat
INSTRUCTIONS


DISPOSAL OF OLD ELECTRICAL APPLIANCES

Thank you for purchasing this product.
Before using your refrigerator, please carefully read this instruction manual in order to maximize its performance. Store all documentation for subsequent use or for other owners. This product is intended solely for household use or similar applications such as:
- the kitchen area for personnel in shops, offices and other working environments - on farms, by clientele of hotels, motels and other environments of a residential type - at bed and breakfasts (B & B) - for catering services and similar applications not for retail sale.
This appliance must be used only for purposes of storage of food, any other use is considered dangerous and the manufacturer will not be responsible for any omissions. Also, it is recommended that you take note of the warranty conditions.
SAFETY INFORMATION
Please read the operating and installation instructions carefully!
They contain important information on how to install, use and maintain the appliance.
The manufacturer is not liable if you fail to comply with the instructions and warnings.
Retain all documents for subsequent use or for the next owner.
- Do not connect the appliance to the electricity supply until all packing and transit protectors have been removed. Keep children away from packaging and its parts. Danger of suffocation from folding cartons and plastic film!
- Leave to stand for at least 4 hours before switching on the product, to allow compressor oil to settle if transported horizontally.
- Make sure there is no transport damage.
- Do not damage the refrigerant circuit.
- Keep the ventilation openings in the appliance enclosure or in the built-in structure free of obstruction.
- Never use water to wash the compressor area; wipe it with
a dry cloth thoroughly after cleaning to prevent rust.
- Always handle the appliance with at least two people because it is heavy.
- Install and level the appliance in an area suitable for its size and use.
- Ensure that the electrical information on the rating plate matches the power supply. If it does not, contact an electrician.
- The appliance operates on a 220-240 VAC/50 Hz power supply. Abnormal voltage fluctuations may cause the appliance to fail to start, damage the temperature control or compressor, or produce abnormal noise during operation. In such cases, an automatic voltage regulator should be installed.
- For UK only: The appliance's power cable is fitted with a 3-core (grounding) plug that fits a standard 3-core (grounded) socket. Never cut off or remove the third pin (grounding). After installation, the plug should be accessible.
- Ensure that the mains cable is not trapped under the appliance during and after moving it, to avoid damage to the cable. If the supply cord is damaged, it must be replaced by the manufacturer, its service agent, or a similarly qualified person to avoid a hazard.
- Do not install the appliance in humid, oily, or dusty places, nor expose it to direct sunlight or
water.
- Do not install the appliance near heaters or flammable materials.
- For appliances with a freezer compartment: if there is a power failure, do not open the lid. Frozen food should not be affected if the failure lasts less than the hours indicated on the rating label (temperature rise time). If the failure is longer, check the food and eat it immediately, or cook it and then refreeze.
- If you find the lid of the appliance is difficult to open just after closing it, don't worry. This is due to a pressure difference that will equalize and allow the lid to open normally after a few minutes.
- Do not store medicines, bacteria, or chemical agents in the appliance. This appliance is a household appliance; it is not recommended to store materials that require strict temperature control.
- Do not excessively pull or fold the power cord, and do not touch the plug with wet hands.
- Do not store products containing flammable propellants (e.g., spray cans) or explosive substances in the appliance. Risk of explosion!
- Do not place unstable items (heavy objects, containers filled with water) on top of the refrigerator to avoid personal injury from falling objects or electric shock from contact with water.
- Do not use electrical appliances inside the food storage
compartments unless they are of the type recommended by the manufacturer.
- Do not touch internal cooling elements, especially with wet hands, to avoid cracks or injuries.
- At risk are children, people with limited physical, mental, or sensory abilities, and people who lack adequate knowledge of safe appliance operation.
- Ensure that children and vulnerable people understand the hazards. A person responsible for safety must supervise or instruct children and vulnerable people using the appliance. Only children aged 8 years and above may use the appliance.
- Children should not play with the appliance.
- Children aged 3 to 8 years are allowed to load and unload this appliance.
- FOR appliances with a freezer compartment: do not store bottled or canned liquids (especially carbonated drinks) in the freezer compartment. Bottles and cans may burst!
- FOR appliances with a freezer compartment: never put frozen food straight from the freezer compartment into your mouth. Risk of low-temperature burns!
- Keep plastic parts and the door seal free of oil and grease. Otherwise, they will become porous.
- Before performing any operation, unplug the power cord from the power socket.
- Do not use mechanical devices or other means to accelerate the defrosting process, other than those recommended by the manufacturer.
- Do not use pointed or sharp-edged objects such as knives or forks to remove the frost.
- Never use hairdryers, electrical heaters or other such electrical appliances for defrosting.
- It is recommended to keep the plug clean, any excessive dust residues on the plug can be the cause of fire.
- Do not try to repair, disassemble or modify the appliance by yourself. In case of repair, please always contact our customer service.
- Supervise children while the appliance is being cleaned or maintained.
- Do not clean the cold glass shelves with hot water. Sudden temperature change may cause the glass to break.
- WARNING: The tubes of the refrigeration circuit convey a small quantity of an environmentally friendly but flammable refrigerant (R600a) and insulating gas (cyclopentane). It does not damage the ozone layer and does not increase the greenhouse effect. If refrigerant escapes, it may injure your eyes or ignite.
- If the refrigerant circuit should be damaged:
- Switch off the appliance and pull out the mains plug,
- Keep naked flames and/or ignition sources away from the appliance,
- Thoroughly ventilate the room for several minutes,
- Inform customer service.
- WARNING: Do not damage the plug and/or the power cord; this could cause electrical shocks or fires.
- WARNING: Do not use multiple portable socket-outlets or portable power supplies. We do not recommend the use of extension leads and multi-way adapters.
- Do not attempt to sit or stand on the top of the appliance. You could injure yourself or damage it. This appliance is not designed for stacking with any other ones.
- The product is designed and built for domestic household use only.
- Only original parts supplied by the manufacturer may be used. The manufacturer guarantees that only these parts satisfy the safety requirements.
- Opening the door for long periods can cause a significant increase of the temperature in the compartments of the appliance.
- Clean regularly surfaces that can come in contact with food and accessible drainage systems.
- Clean water tanks if they have not been used for 48h; flush the water system connected to a water supply if water has not been drawn for 5 days.
- Store raw meat and fish in suitable containers in the refrigerator, so that it is not in contact with or drip onto other
food.
- Two-star frozen-food compartments (if they are presented in the appliance) are suitable for storing pre-frozen food, storing or making ice-cream and making ice cubes.
- One-, two- and three-star compartments, if present in the appliance, are not suitable for the freezing of fresh food.
- If the appliance is left empty for long periods, switch off, defrost, clean, dry and leave the door open to prevent mould developing within the appliance.
- FOR Wine Coolers: this appliance is intended to be used exclusively for the storage of wine
- FOR a free standing appliance: this refrigerating appliance is not intended to be used as a built-in appliance
- FOR appliances without a 4-star compartment: this refrigerating appliance is not suitable for freezing foodstuffs
REFRIGERATOR DIAGRAM

- Freezing compartment
- Temperature Control
3. Shelves
- Egg tray/door rack
- Bottle rack
This diagram may vary slightly from the actual layout of the refrigerator you have purchased due to technical improvements.
The most energy-saving configuration requires drawers, food boxes, and shelves to be positioned in the product. Please refer to the above pictures.
PREPARATION
Unpacking
Remove all packaging materials.
Check attachments and materials
Please check that your appliance comes with all quoted accessories and that all components are in good condition.
Ensure proper location of the refrigerator
Clean the refrigerator before first use.
Ensure the appliance is located out of direct sunlight and away from other heat producing appliances.
See also ventilation requirements (below).
Install the appliance at a location where the ambient temperature corresponds to the climate class indicated on the rating plate of the appliance.
- extended temperate (SN): 'this refrigerating appliance is intended to be used at ambient temperatures ranging from 10 °C to 32 °C';
- temperate (N): 'this refrigerating appliance is intended to be used at ambient temperatures ranging from 16 °C to 32 °C';
- subtropical (ST): 'this refrigerating appliance is intended to be used at ambient temperatures ranging from 16 °C to 38 °C';
- tropical (T): 'this refrigerating appliance is intended to be used at ambient temperatures ranging from 16 °C to 43 °C';
Idle time
After the refrigerator has been sited and cleaned, let it stand for at least 4 hours before connecting the power source.
Ventilation
* Level the appliance with a spirit level. The appliance has adjustable feet.
* A minimum gap of 38mm must be maintained at the back of the appliance for ventilation.
* Do not cover the air inlet at the front of the appliance and allow for 200 cm² air flow through plinth.
* Check the position of the power socket for usability and check the AC voltage is compatible with the data shown on the rating plate which can be found left inside wall of the appliance next to the salad crisper drawer(s). The power supply must be suitably earthed.

Built-under Installation (Figure 2)
- Check that the kitchen unit door is in the correct operating position.
- Run the mains cable through the unit aperture so that it can be connected to the power supply after installing the appliance. Remove the cover (6) only if space is restricted.
- Place the refrigerator into the kitchen unit. Fix the mountings (1) with screws (2) onto the upper frame when two thirds of the refrigerator has been pushed in. Then push the refrigerator in completely, ensuring that the gib clamp of the mountings sticks on the horizontal frame of the kitchen unit. Adjust the position of the refrigerator making a 6mm space between the inside wall of the kitchen unit and the external sides of the refrigerator. Fix the mountings to the horizontal frame of the kitchen unit with screws.
- Insert the seal in the aperture (approx. 10mm) between the lower front frame and bottom board of the kitchen. Fix lower mountings (3) to the lower front frame with screws (2). Fix the lower mountings to the bottom board of the kitchen unit with screws (2).
- Properly insert seals in the apertures on the left, upper and right sides of the refrigerator.
- Fix the door to the holders (4) (each upper and lower position has one) with screws (2). Press close the doors of the refrigerator and of the kitchen unit, and then completely open the doors, and then place the connecting plate (5) to the corresponding holder and fix it to the door of the kitchen unit (space between the connecting plate and the edge of the kitchen unit "t" equals to the thickness of the external board of the kitchen unit, about 20mm). Adjust the connecting element so that the handle side of the kitchen unit door does not make contact with the unit body when closed. (Approximately 1mm gap for large appliances), mount the second door connecting element where appropriate.
- Plug the open hole in the appliance door.

(Figure 2)
OPERATION
Starting the refrigerator
There are total 5 temperature settings for the refrigerator. After connecting to the power supply, the refrigerator will be set on setting 3, which is the default setting.
Button "press": Located on the left side, functions as switching on/off the refrigerator by pressing for 3 seconds.
Button "Adjust": located on the right side, functions as adjusting the temperature settings for the refrigerator.
Adjusting the temperature:
The temperature inside the refrigerator is adjusted by pressing the left "adjust" button. By pressing the button, the settings 1 to 5 represent different temperatures from the highest to the lowest.
| Position | Conditions |
| 1-2 | Summer or ambient temperature between 25-35 °C |
| 3-4 | Spring, autumn or ambient temperature between 15-25 °C |
| 5 | Winter, or ambient temperature between 5-15 °C |
| Super freezing function | Quick freeze |
Caution: Some time will be required for the refrigerator to reach the set level when temperature adjustments are made. The length of this period is determined by difference in the existing and set temperatures, the ambient temperature, the frequency with which the door is opened and closed and the amount of food in storage.
Super freezing function
To activate the Super Freezing function:
- set the thermostat in position 5,
- press door switch and temperature adjustment button together, wait until the Led of position 5 blinks continuously,
• the SF function has been activated
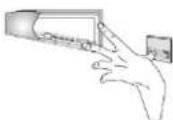
Note: During the SF period, the Led of position 5 will keep blinking.
Loading the refrigerator with food
When the refrigerator is switched on, do not load food until 1 \~ 2 hours have passed. Usually, food for cold storage or deep freezing can be loaded when the temperature inside the compartment reaches the set point.

Thermostat
INSTRUCTIONS
Cold storage is for short-term food
Storage or for daily consumption.
Although the temperature in most parts of the cold storage compartment can be regulated between 0 and 10 degrees Centigrade, extended periods of food storage is not recommended. Cold storage should only be used for short-term storage.
Cold storage compartment
- Eggs and butter
- Beverages and bottled drinks
- Food to be frozen
- General food, meat, vegetables, etc.

Cautions for cold storage
* Hot food must be cooled to room temperature before storing in the refrigerator. * Dry any water droplets on the food before placing it in the refrigerator.
* It is recommended that food be sealed in suitable storage bags before being placed in the refrigerator; this will prevent moisture in the food from evaporating and prevent vegetables and fruit from withering or altering in flavor.
* Do not store excess quantities or weights of food; food should be stored with spaces in between for better storage results. Never overload shelves, as they may collapse under excessive loads. * Food to be stored should be sorted according to consumer requirements. Food consumed daily should be placed in the most convenient area, this will minimize opening periods for the door. Do not place food too close to the internal walls.
Food holder cleaning
* Food holders can be taken out for cleaning.

Lamp & Replacement:
Lamp: 12V 1W
* For replacement, unplug to disconnect the power. * Replace the LED lamp board.

Instructions for food storage
* It's suggested to set the temperature at 4°C in the fridge compartment, and, if possible, at -18°C in the freezer compartment. * For most food categories, the longest storage time in the fridge compartment is achieved with colder temperatures. Since some particular products (such as fresh fruits and vegetables) may be damaged by colder temperatures, it is suggested to keep them in the crisper drawers, if present. If not present, maintain an average thermostat setting. * For frozen food, refer to the storage time written on the food packaging. This storage time is achieved when the setting respects the reference temperatures of the compartment (one-star -6°C, two stars -12°C, three stars -18°C). * Storage period will be extended if vegetables are placed with their roots towards the cold source. * Leaves of carrots or turnips should be removed before storage. * Put a wad of tissue on the bottle holder before placing bottles on it so that later cleaning is easier. * Frozen food can be placed in the cold compartment before serving, as this will conserve energy. * Onions, garlic, ginger, water chestnuts, and other root vegetables should not be stored in the refrigerator, as these foods are suitable for long-term storage at normal temperatures. * Ripe squash, melon, papaw, bananas, and pineapples should not be stored in the refrigerator. Freezing will accelerate the ripening process.
Long-term storage of food
As the freezer storage temperature is very low, fresh food can be stored in the freezer compartment for a long time. Food requiring long-term storage can be stored in the frozen food compartment. Attention should be paid to the storage information printed on the food packaging.
Frozen food storage
* The recommended weight of fresh food is less than 2 kg. * Hot food should not be stored in the refrigerator until it has cooled down to room temperature. * The outside of any food packaging should be dried before storage in the freezer, and any packaging materials should be odor-free, airtight, non-poisonous, and non-toxic. * Only remove the required amount of food from the refrigerator. Defrosted food cannot be re-stored in the freezer unless it is first cooked. * Food cut into small portions will freeze faster and be easier to defrost and cook. The recommended weight for each portion is less than 1.5 kg. * Do not put in bottled beer or drinks. * Do not touch frozen food with wet hands.
Making water ice
* Pour water into the water ice mould up to three-quarters of the mould volume, and then place the mould in the freezing compartment. * Do not use a knife or other metal tools to take the ice out of the mould. * The ice can be easily removed by hand after the mould has been placed in warm water for a short time.
DEFROSTING, CLEANING, AND COMMISSIONING
Defrosting the cold storage compartment
The cold storage compartment is designed for automatic defrosting. Frost formed on the back wall will melt and flow via the drainpipe to the evaporating container over the compressor on the back of the refrigerator, where the heat generated by the compressor will evaporate the water.

Caution: Always keep the drain over the vegetable and fruit tray clear to ensure the normal flow of defrosted water. Use the rod provided to clear any blockages.
Defrosting the freezer
After a period of operation, a layer of frost will form on the surface of the freezer. Additional electricity will be consumed if this layer becomes too thick. The defrosting process must be carried out when a thick layer of frost has been formed.
To defrost the freezer, first disconnect the power by unplugging the refrigerator, and then remove any food from the refrigerator and place it in a cool place. Use a plastic defrosting tool.
After ice and frost are melted, wipe up the inside of the freezer compartment.
Caution: Never use a metal tool or electrical heater for defrosting.
After the defrosting is completed, plug in the refrigerator and it starts operation again.
Power failure
Even in summer, food can be stored in the refrigerator for a few hours after a power failure.
* Don't put additional food into the refrigerator during a power failure.
* Avoid opening the door during power failures
* If prior notice of a power failure is given, make some ice and put it in a container in the top of the cold storage compartment.
Caution: temperature in the refrigerator will rise during a power failure or in the event of technical problems, and the storage period will be reduced.
Cleaning
The refrigerator should be cleaned regularly to prevent the formation of bad odors.
* Disconnect the power before cleaning the refrigerator. * Do not use a hard brush, steel brush, detergent, gasoline or other solvents, hot water, acid or alkali for cleaning. * Wipe water drops on the surface of the refrigerator with a soft cloth.
(1) Do not use excessive amounts of water for cleaning the refrigerator. (2) Use a dry cloth to clean the switch, the lamp and the temperature controller.
* Always keep the rubber door seal clean. * Clean the back and sides of the refrigerator regularly.
Cessation of Operation
If the power failure lasts for an extended period, unplug the refrigerator and clean the refrigerator as previously described. Keep the door of the refrigerator open when the power is turned off to prevent any food remaining in the compartment from producing bad odors.
During Vacations
* Remove any food from the refrigerator if the vacation is short. Turn the temperature selection knob to the proper position, and make sure that the door of the refrigerator is properly closed. * If the vacation is long, take out the food from the refrigerator and disconnect the power. When the frost inside melts, clean and dry the compartment.
Discarding
* Remove the door of the refrigerator when you get rid of it, in case children may get trapped in.
Moving the refrigerator
* Unplug the refrigerator. * Remove any food. * Tightly close the door with tape.
QUESTIONS AND ANSWERS
Events below are the problems:
* The temperature of the refrigerator and the compressor will rise and the compressor will run for comparatively longer periods when the refrigerator is first started. * Wipe water drops on the external surface of the refrigerator with a soft cloth. * When the refrigerator is opened frequently or stays open too long in humid seasons, the cavity will be dampened. * A slight sound will be heard when the liquid refrigerant circulates or when the compressor switches on and off. * A slight sound will be heard when defrosted water drops into the evaporating dish. * The compressor will operate for comparatively longer periods if excessive quantities of food are stored or the ambient temperature is high. * The evaporator will produce odors if the compartment is not cleaned.
Caution: The refrigerator should never be restarted until a period of at least five minutes has elapsed.
Please determine the cause of the problem before making any repairs.
| Phenomena | Causes |
| Refrigerator will not start | * Bad connection to power source (plug, socket and fuse)* The temperature knob is at the 0 position* Low voltage |
| The lamp does not blink | *Bulb failure* Power supply not connected* The temperature knob is at the 0 position |
| Excessive noise | *Uneven placement*Contact between the refrigerator and a wall or other article |
| Compressor operates for a long period or temperature does not reach set point | * First time of operation* Excessive food stored* Frequent opening of the refrigerator door due to hot weather* The temperature controller is not set properly* Refrigerator is in direct sunlight, or close to a heat source* Poor ventilation, or dirt on the condenser |
| Food dry | * Food not properly covered or sealed |
| Thick frost on frozen food | * Door is not properly closed* Frequent opening of the refrigerator door* Frost inside food bags is normal |
| Strange odor | * Failure to seal food properly* Rotting food inside refrigerator* Refrigerator should be cleaned. See “Cleaning” |
To contact technical assistance, visit our website: https://corporate.haier-europe.com/en/
Under the "website" section, choose the brand of your product and your country. You will be redirected to the specific website where you can find the telephone number and form to contact technical assistance.
AVAILABILITY OF SPARE PARTS
Thermostats, temperature sensors, printed circuit boards, and light sources are available for a minimum period of seven years after placing the last unit of the model on the market.
Door handles, door hinges, trays, and baskets are available for a minimum period of seven years, and door gaskets for a minimum period of 10 years, after placing the last unit of the model on the market.
DOOR REVERSAL
- Unplug the appliance before reversing the door opening direction.
- Remove food from the appliance.
- Remove caps on the front of the refrigerator body (Fig. 1, Fig. 2).
- Remove the two screws that attach the upper hinge to the appliance.
door (Fig. 3). Take special care and hold the appliance door vertically.
- Holding the door, swing the upper door hinge away from the door using the other hand (Fig. 4).
Be especially careful during this step, as the hinge may close and cause injury.
- Remove the two screws that attach the lower hinge to the appliance door (Fig. 5). Take special care and hold the appliance door with the other hand.
- Holding the door, swing the lower door hinge away from the door using the other hand, then detach the door from the appliance body (Fig. 6).
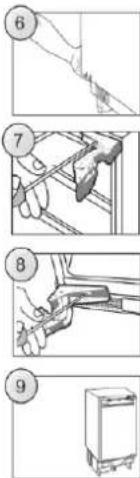
- Remove the two screws that attach the upper hinge to the body and the two screws holding the lower hinge to the appliance body (Fig. 7).
- Screw the upper and lower hinge on the opposite side of the appliance body using suitable screws (Fig. 8). The upper hinge should be mounted on the other side of the appliance as the lower hinge. The lower hinge should be mounted on the other side of the appliance as the upper hinge.
With the hinges open, hold the door parallel to the appliance body and screw the hinges to the door using suitable screws while taking proper care.
- Make sure that the door is properly aligned with the appliance body (Fig. 9).
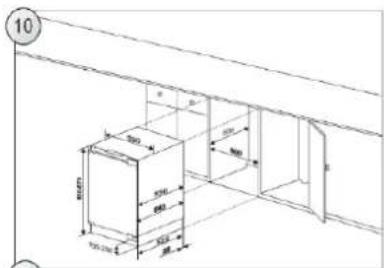
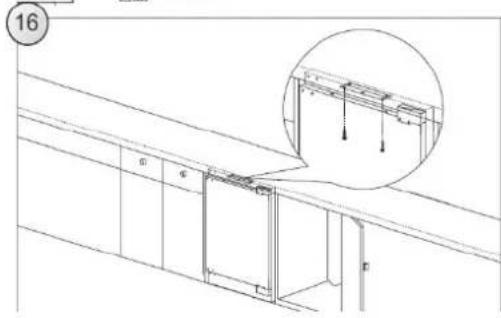
Installation of the appliance should be performed by a qualified installer. The appliance should be placed in the furniture case (Fig. 10). Once the appliance is placed correctly, adjust the height of the appliance by turning the 4 adjustable feet as appropriate. If necessary, adjacent Amica appliances should be braced with a bracket fixed by screws and fitted in the furniture (Fig. 11). There is a special strip at the top of the appliance. Attach it to the underside of the cabinet with the appropriate screws supplied with the assembly kit (Fig. 16).
Decorative strip
must not block the vents located in the bottom casing unit; the strip must be cut to size (Fig. 17). The depth of the bottom casing unit can be adjusted by moving it forwards or backwards. Once properly adjusted, tighten the mounting screws (located in the openings on both sides of the casing unit) with a cross-head screwdriver.
This will permanently attach the casing unit (Fig. 18).
FITTING FURNITURE BOARD TO APPLIANCE DOOR
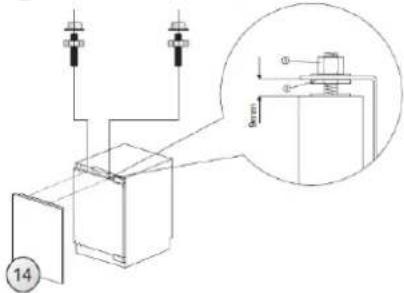
Place the mounting bracket on the furniture board and position it accordingly (Fig. 12). The distance between the furniture board and the underside of the worktop should be 5 mm (Fig. 13). Attach the mounting bracket using suitable screws supplied in the installation kit. Pull out the mounting bracket cover and screw in the two special screws (2) in the appliance doors (Fig. 14). Attach the furniture board with the fixed mounting bracket to the appliance door. Secure the furniture board with suitable nuts (item 3, Figure 14). Make sure the furniture board assembly is positioned correctly relative to the appliance (Fig. 15). Using the supplied screws, attach the furniture board assembly to the bottom of the appliance door (Fig. 15). Replace the mounting bracket cover in its original location.



SCRAPPING OLD APPLIANCES

This appliance is marked according to the European directive 2012/19/EU on Waste Electrical and Electronic Equipment (WEEE).
WEEE contains both polluting substances (which can cause negative consequences for the environment) and basic components (which can be reused). It is important to have WEEE subjected to specific treatments, in order to remove and dispose properly all pollutants, and recover and recycle all materials.
Individuals can play an important role in ensuring that WEEE does not become an environmental issue; it is essential to follow some basic rules:
WEEE should not be treated as household waste.
WEEE should be handed over to the relevant collection points managed by the municipality or by registered companies. In many countries, for large WEEE, home collection could be present.
In many countries, when you buy a new appliance, the old one may be returned to the retailer who has to collect it free of charge on a one-to-one basis, as long as the equipment is of equivalent type and has the same functions as the supplied equipment.
Conformity
By placing the mark 66 on this product, we are confirming compliance with all relevant European safety, health and environmental requirements that are applicable in legislation for this product.
Guarantee
Minimum guarantee is: 2 years for EU Countries, 3 years for Turkey, 1 year for UK, 1 year for Russia, 3 years for Sweden, 2 years for Serbia, 5 years for Norway, 1 year for Morocco, 6 months for Algeria, Tunisia no legal warranty required.
For further information about the product, please consult https://eprel.ec.europa.eu/ or scan the QR on the energy label supplied with the appliance
French
Thermostat
INSTRUCTIONS


DISPOSAL OF USED APPLIANCES

Thermostat
INSTRUCTIONS
The refrigerated compartment should be used to store
Thermostat
INSTRUCTIONS

- Freezer compartment 2. Temperature controller 3. Shelves 4. Door shelf/egg holder 5. Bottle shelf
Thermostat
INSTRUCTIONS
QUESTIONS AND ANSWERS


- Freezer compartment 2. Temperature regulator 3. Shelves 4. Egg compartment/door shelf 5. Bottle rack
(Figure 2)
OPERATION
Starting the refrigerator
Thermostat
INSTRUCTIONS
Lamp and replacement:
Lamp: 12 V, 1 W
INSTALLATION OF THE APPLIANCE


DISPOSING OF OLD APPLIANCES

Thermostat
INSTRUCTIONS




Thermostat
Refrigerator compartment

SCRAPPING OLD APPLIANCES

Thermostat
INSTRUCTIONS
Cooled space


DISPOSAL OF OLD APPLIANCE

- LANGUAGES
- ITALIAN
- OPERATION
- INSTRUCTIONS
- DISPOSAL OF OLD ELECTRICAL APPLIANCES
- SAFETY INFORMATION
- REFRIGERATOR DIAGRAM
- PREPARATION
- UNPACKING
- CHECK ATTACHMENTS AND MATERIALS
- ENSURE PROPER LOCATION OF THE REFRIGERATOR
- IDLE TIME
- VENTILATION
- BUILT-UNDER INSTALLATION (FIGURE 2)
- STARTING THE REFRIGERATOR
- SUPER FREEZING FUNCTION
- LOADING THE REFRIGERATOR WITH FOOD
- COLD STORAGE IS FOR SHORT-TERM FOOD
- STORAGE OR FOR DAILY CONSUMPTION
- COLD STORAGE COMPARTMENT
- CAUTIONS FOR COLD STORAGE
- FOOD HOLDER CLEANING
- LAMP & REPLACEMENT
- INSTRUCTIONS FOR FOOD STORAGE
- LONG-TERM STORAGE OF FOOD
- FROZEN FOOD STORAGE
- MAKING WATER ICE
- DEFROSTING, CLEANING, AND COMMISSIONING
- DEFROSTING THE COLD STORAGE COMPARTMENT
- DEFROSTING THE FREEZER
- POWER FAILURE
- CLEANING
- CESSATION OF OPERATION
- DURING VACATIONS
- DISCARDING
- MOVING THE REFRIGERATOR
- QUESTIONS AND ANSWERS
- EVENTS BELOW ARE THE PROBLEMS
- AVAILABILITY OF SPARE PARTS
- DOOR REVERSAL
- FITTING FURNITURE BOARD TO APPLIANCE DOOR
- SCRAPPING OLD APPLIANCES
- CONFORMITY
- GUARANTEE
- FRENCH
- DISPOSAL OF USED APPLIANCES
- THE REFRIGERATED COMPARTMENT SHOULD BE USED TO STORE
- LAMP AND REPLACEMENT
- INSTALLATION OF THE APPLIANCE
- DISPOSING OF OLD APPLIANCES
- REFRIGERATOR COMPARTMENT
- COOLED SPACE
- DISPOSAL OF OLD APPLIANCE
Brand : HOOVER
Model : HBOD 82488
Category : Refrigerator