
H160EUK - Washing machine HOOVER - Free user manual and instructions
Find the device manual for free H160EUK HOOVER in PDF.


User questions about H160EUK HOOVER
0 question about this device. Answer the ones you know or ask your own.
Ask a new question about this device
Download the instructions for your Washing machine in PDF format for free! Find your manual H160EUK - HOOVER and take your electronic device back in hand. On this page are published all the documents necessary for the use of your device. H160EUK by HOOVER.
USER MANUAL H160EUK HOOVER
Washing machine Instructions for use
H130E
H140E
H160E
Contents Page
Introduction 3
General delivery notes 4
Safety notes 4
Quick start 5
Installation & testing 6
Useful advice for the user 11
Description of controls 12
Detergent drawer 14
Detergents, washing aids and amounts to use 15
Programme selector 17
The main wash 18
Consumption data 22
Programme Table 23
Cleaning and routine maintenance 25
Trouble shooting 27
Power failure 29
Technical data 30
Customer service 31
Introduction
Please read and follow these instructions carefully and operate the machine accordingly. This booklet provides important guidelines for safe use, installation, maintenance and some useful advice for best results when using your machine. Keep all documentation in a safe place for future reference or for any future owners.
Note: this machine is solely for domestic use, i.e. to wash, rinse and spin dry household textiles and garments.
Notes on disposal
All packaging materials used are environmentally-friendly and recyclable. Please help dispose of the packaging via environmentally-friendly means.
Your retailer or local council will be able to give you details of current means of disposal.
Appliances that have reached the end of their useful life are not worthless rubbish! Valuable materials can be salvaged from an old appliance via scrap reprocessing.
Note: to ensure safety when disposing of an old washing machine disconnect the mains plug from the socket, cut the mains power cable and destroy this together with the plug. To prevent children shutting themselves in the machine break the door hinges or the door lock.
General delivery notes
Please check that the following items are delivered with the appliance:
– Instruction manual
- Guarantee card
- Blanking plug
- Inlet hoses & bracket
- Base panel & x2 push clips
Check that no damage has occurred to the machine during transit. If it has, call for service by GIAS (tel: 08705 400 600). Please see Customer Service.
Safety notes
Note: before carrying out any cleaning or maintenance of the washing machine.
A) Disconnect the plug from the mains supply.
B) Turn off the water supply.
C) Hoover equips all its appliances with earthing. Ensure that the mains power supply is earthed, if not, seek assistance from a qualified electrician.
D) Do not touch the appliance when hands or feet are wet or damp. Do not use the appliance with bare feet.
E) The use of adapters, multiple connectors and/or extensions is not recommended.
F) Caution: water temperature can reach 90^ C during the whites wash cycle and as a result the door glass may get very hot.
G) Check there is no water visible in the drum before opening the door.
H) Do not allow children or unauthorised persons to use the appliance without supervision.
I) Do not pull the power cable or the appliance itself to remove the plug from the socket.
J) The appliance must not be exposed to weather conditions (rain, direct sun, etc...)
K) When moving the appliance never lift it by the controls, the detergent drawer, the hoses or the power cable.
To avoid damaging the door when moving the appliance never rest the door against objects e.g a trolley.
L) IMPORTANT!
If the appliance is installed on a carpeted floor ensure that the ventilation through the base of the appliance is not obstructed.
M) When lifting the machine always use two people to help avoid injuries.
N) If the appliance is not running properly or breaks down, switch it off, disconnect the plug from the socket, turn off the water supply and do not tamper with the appliance. Consult GIAS Service (tel: 08705 400 600) for possible repair. Failure to comply with the above can compromise the safety of the appliance.
O) If the appliance's power cable is damaged it must be replaced by a special cord which is only available from GIAS Service.
P) After the machine has been installed, ensure that the mains plug and water supply valves are easily accessible.
Q) Glass fibre curtains should never be put into this machine.
R) Lint or fluff must not be allowed to collect on the floor around the outside of this machine.
S) Always ensure that the door locked indicator neon has switched itself off before opening the door. By doing so the machine is allowed to cool down before the laundry is handled.
T) Always ensure to fit the base panel to the machine.
Quick start
Washing
- Open the door by pressing the DOOR button
- Select the laundry and put it in the machine
- Close the door
- Put the detergent in the dispenser compartments.
– Select programme by turning the programme knob. - Select any function buttons required and then press the START/PAUSE button. The button functions are selected when the button neon is lit.
After washing
- Wait about two minutes for the door locking device to disengage. The door locked neon will go out
- Switch off the washing machine by turning the programme knob to the "OFF" position
- Open the door and remove the laundry
Installation & testing
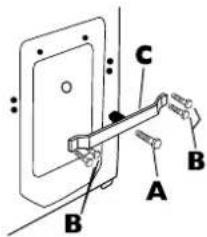
Remove the machine from the packaging - close to where it will finally be positioned - and proceed as follows:
On the back of the machine
1) Remove the central screw A and side screws B and pull out the transit bracket C along with the red locator.
2) Tilt the machine forward and remove the polystyrene spacers.
3 Cover the central hole using the cap enclosed in the instructions bag.
4) Adjust the two feet at the front to level the machine.
5) Tilt the machine forward and locate the base panel by (1) removing the paper backing from the adhesive tape, (2) locate the base panel in the front of the machine, (3) offer the base panel up to the base of the washing machine and locate the two push clips.
text_image
Technical diagram showing labeled components A, B, and C on a mechanical assembly with a rod and lever mechanism.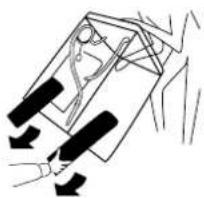
natural_image
Simple line drawing of a car with arrows indicating motion or movement (no text or symbols)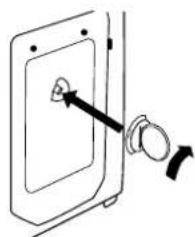
natural_image
Simple line drawing of a door with a knob and a scroll, no text or symbols present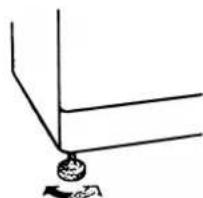
natural_image
Simple line drawing of a mechanical setup with a pendulum and lever (no text or symbols)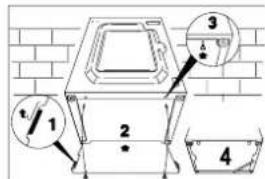
text_image
Technical diagram showing a brick wall with labeled components and measurement indicatorsNote: we recommend you keep the transit bracket and screws to protect the machine for future transit. The Manufacturers will not be responsible for any damage to the machine caused by not following the instructions relating to releasing the transit protection. The user is responsible for all installation costs.
Connecting the fill hoses
This machine has inlet hoses with 19mm (3/4") threaded ferrules fitted to the ends to attach between the threaded connector on the appliance and the water supply.
Only use the new hoses supplied to connect the machine and ensure that the sealing washers are in place inside the hose connectors. Do not re-use old hoses which are attached to existing installations. Do not over-tighten the connections. Hand tight is sufficient. Do not trap or kink the hoses.
-
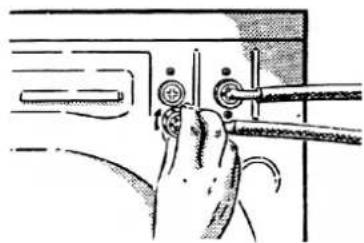
Connect the elbow end of hoses to the back of the machine: red connector (for hot water) to the red threaded inlet, the white connector (for the cold water) to the white threaded inlet.
-
Connect the straight end of the hoses to the stop taps.
natural_image
Pure mechanical diagram showing a hand operating a tool with no text or symbols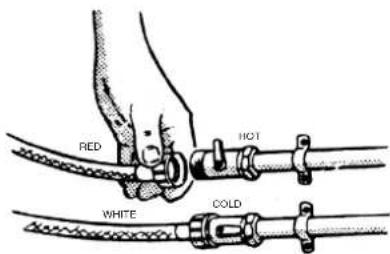
text_image
RED HOT WHITE COLDIf the inlet hose's connection point is changed, check that the 3/4" threaded ferrule on the inlet hose is firmly attached to the electrovalve connector.
Water supply requirements
Connect the machine to the drainage system used by household sinks.
THIS MACHINE MUST BE CONNECTED IN ACCORDANCE WITH THE WATER SUPPLY REGULATIONS. WATER BYELAWS PROHIBIT CONNECTION TO A SURFACE WATER DRAIN.
No other appliance should be plumbed into the standpipe.
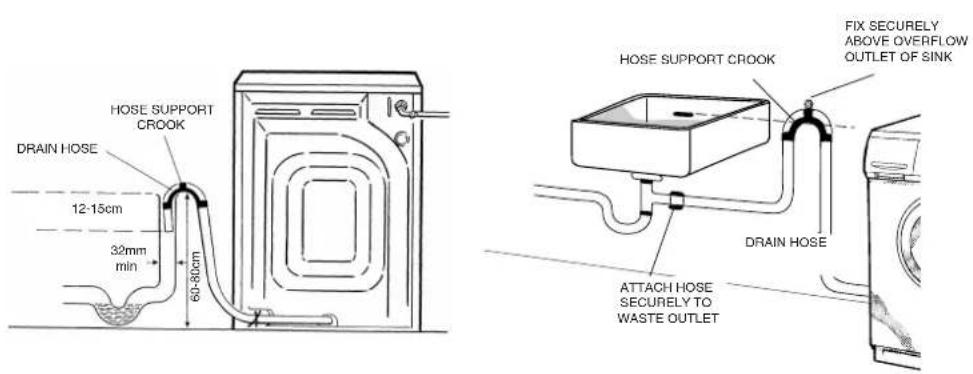
There are two possible arrangements which can be seen below :-
text_image
HOSE SUPPORT CROOK DRAIN HOSE 12-15cm 32mm min 60-80cm HOSE SUPPORT CROOK FIX SECURELY ABOVE OVERFLOW OUTLET OF SINK DRAIN HOSE ATTACH HOSE SECURELY TO WASTE OUTLETFor the washing machine to function properly the outlet end of the drain hose must be at a minimum of 60 cm and a maximum of 80 cm from the ground.
Testing the installation
Refer to the programme guide for details of how to select programmes.
- Turn on the water supply and check for leaks from fill hoses.
- Switch on the electricity supply.
- Select a spin programme and then press the START/PAUSE button to start the machine.
Allow the programme to continue for one minute and then cancel the programme (please refer to “Description of Controls” section for cancelling the programme). This will remove any water remaining in the machine from factory testing. - To check for cold water filling to the machine:
Select a rinse programme and press the START/PAUSE button to start the machine.
Allow the tumble action to continue until the water has pumped out.
Check that the drain outlet is not leaking or overflowing. - Switch off the machine at the end of the cycle by turning the programme knob to the "OFF" position.
- To check for hot water filling to the machine:
Select programme 1 and press the START/PAUSE button to start the machine.
Allow the wash action to continue for one minute, then cancel the programme.
Alternatively, both inlets can be connected to the cold water supply by using a suitable adaptor. - Select a spin programme and press the START/PAUSE button to switch the machine on. If the machine takes longer than one minute to empty check the drain hoses for kinks.
Installation testing is now complete.
To ensure the drum is thoroughly clean after testing and storage, select programme 1 and run the machine for a complete cycle using only wash detergent and water.
If the machine is not to be used immediately, switch off the mains power supply and remove the plug from the power socket. We also recommend that the water stop taps are turned off.
Note: it is advisable to isolate the washing machine from the water and electricity supplies after each wash.
Electricity supply and safety advice
Washing machines are supplied to operate at a voltage of 240V, 50 Hz single-phase. Check that the conductor is powerful enough to supply at least 3.0 kW, then connect the plug to a 13A earthed socket.
Electricity can be extremely dangerous. This washing machine must be earthed. The socket outlet and the plug on the appliance must be of the same type.
It is not advisable to use multiple adapters and/or extension leads.
The wires in the mains lead are coloured in accordance with the following codes: Blue – NEUTRAL
Brown – LIVE
Green and Yellow – EARTH
If the mains cord on this appliance is damaged, it must be replaced by a special cord which is only obtainable from the Hoover spares service, GIAS (01204 556111).
Useful washing advice
Tips on using your appliance in the most environmentally-friendly and economical way
Loading your washing machine
To make further reductions of energy, water and detergent consumption, we recommend that you put a full load into your machine. Energy savings of up to 50% can be achieved by washing one full load compared to two half loads.
When is prewashing really needed?
Only with particularly dirty loads! Energy savings of 5 to 15% are made by not selecting the prewash option for less dirty laundry.
Which wash temperature should you choose?
Using stain removers before machine washing reduces the need to wash at temperatures over 60^ C. Energy savings of up to 50% can be made by using a 40^ C wash temperature.
Heavily soiled laundry
To ensure the best performance when washing a particularly dirty load, we recommend that you reduce the amount of items to be put into the machine. If the drum is not crammed full, the items will circulate more freely and will wash cleaner.
ARIEL - Chosen and recommended by Hoover
When we produce a new washing machine we subject it to every test possible. And one of the most important tests is the one that enables our experts to identify the most suitable detergent for solving laundry problems. Ariel was able to meet our needs: to make the washing machine function efficiently, not compromise the machine's lifespan and produce the best wash results. Consistently excellent results, which was the main aim of the test we carried out, determined our choice and our recommendation. The prime function of a detergent that answers all washing requirements is to work with the water to remove dirt from fabrics, holding it in suspension until it is removed when the water is pumped out, and to control the amount of foam forming in the washing machine, without damaging the fibres of the items being washed. Ariel fully satisfies all these requirements, as it contains high quality elements, the result of the most advanced research, ensuring excellent results under all conditions.
Description of Controls
All the controls on your product's control panel are listed as follows. The button function is selected when the button neon is lit. Carefully read the relevant descriptions detailed below:
START/PAUSE START
After selecting the programme press the START/PAUSE button once to start the machine.
The door locked neon will illuminate and there will be a short time delay to the start of the programme while the machine sets the wash parameters for the selected programme. The “START” neon in the “TIME COUNTDOWN” indicator will illuminate. If the duration of the programme you have selected is shorter than 60 minutes, then the time remaining indicator will illuminate accordingly.
PAUSE
The programme may be paused at any time during the wash cycle by holding down the Start/Pause button for about two seconds. When the machine is in the paused mode, the time remaining for the programme in the “TIME COUNTDOWN” indicator and function buttons will flash. To restart the programme press the Start/Pause button once again.
CANCEL
To cancel the programme the Start/Pause button must be pressed down for five seconds. To signify that the programme has been cancelled the "STOP" light in the "TIME COUNTDOWN" indicator will light.
Door button
A special safety device prevents the door from being opened immediately after the end of the cycle. 'Door locked' indicator light is illuminated when the door is fully closed. Wait for 2 minutes after the wash cycle has finished and the door locked neon has gone off before opening the door. As a safety measure check that there is no water evident in the drum.
Super Wash button
This option can only be utilised for cotton programmes. Hoover has designed this special wash boost system for “Large Wash Loads” - by selecting the option, the volume of water within the selected wash cycle and the length of time of the programme are increased to improve the wash performance for the bigger load.
Extra Rinse button
This option adds more water at the rinsing stage. This can help prevent skin
irritation from detergent residue for people with particularly sensitive skin. Selecting the Extra Rinse button is also recommended when washing heavily soiled fabrics which need a lot of detergent, or when the wash load contains towelling fabrics that have a greater tendency to retain detergent.
Time Saver Button
This option can be utilised on cottons and synthetics. By selecting the Time Saver option, the wash time may be reduced by up to 50 minutes, depending on the selected programme, temperature and load, without giving up a good wash quality.
Energy Saver button
This option can be utilised on all programmes. By selecting the Energy Saver option the wash temperature is limited to the water inlet temperature. It is particularly suggested in the case of lightly soiled fabrics, and allows you to save 80% of energy compared with the normative at 60%.
Spin Speed Selector
By adjusting the control knob it is possible to reduce the maximum speed of your selected programme to suit your needs and help reduce creasing of fabrics. Turn the spin speed selector knob until the indicator aligns with the required spin.
PROGRAMME Selector
Note: do not press the START/PAUSE button before selecting the programme. If this does happen, cancel the programme (that you have accidentally selected) by pressing the Start/Pause button for five seconds (see "Programme cancelled" description).
The tables in the washing section describe the various programmes and illustrate the number or symbol to select for them.
Note: this model is fitted with an electronic “sensor” device that checks the load is balanced correctly. If the load is slightly unbalanced the machine will re-balance it automatically to then carry out the normal spin. If, after several attempts, balance is not restored a reduced spin speed will be used. If loads are seriously unbalanced the spin stage will be cancelled. This helps limit vibration, reduce noise and improve the washing machine’s reliability and life.
Time Countdown System
In order to better manage your time, this washing machine features an indicator light system that keeps you constantly informed on the remaining cycle time.
Indicator light Start: Remaining time above 60 minutes
Indicator light 60: Remaining time less than 60 minutes
Indicator light 30: Remaining time less than 30 minutes
Indicator light 15: Remaining time less than 15 minutes
Indicator light Stop: End of the programme.
Detergent drawer
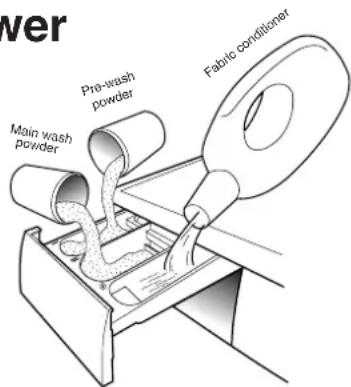
The detergent draw is split into 3 compartments:
– the first, labelled "I", is for detergent utilised during Prewash.
– the second, labelled "II", is for detergent utilised during the main wash.
text_image
over Main wash powder Pre-wash powder Fabric conditionerNote: some forms of detergents are difficult to dispense from the drawer e.g. concentrated powders. For these, we suggest you use the recommended dispenser which is placed inside the drum.
This ensures that the liquid detergent is dispersed in the drum only when needed.
- the third, labelled “ is for special additives, fabric softeners, fragrances, starch, brighteners etc.
The machine is programmed to automatically take up additives during the final rinse stage for all wash cycles.
Note: only put special additives, fabric softeners, fragrances, starch, brighteners, etc, in the third compartment.
Detergents, washing aids and amounts to use
Choice of detergent
General purpose detergents
- Powder detergents, for a thorough wash, with bleaching agents, are particularly suitable for use in hot wash programmes (60°C and over), for heavily soiled and stained laundry.
- Liquid detergents, are particularly suitable for grease stains, such as greasy skin marks, cosmetics and oil.
These detergents are not suitable for washing stained laundry, as they do not contain bleach.
– Biological detergents, not all the products available give a really thorough wash.
Special detergents
- Detergents for coloureds and delicates, without added bleach, also often without any optical brightening agents, to preserve the colour.
- Detergents for a thorough wash, without added bleach or enzymes, particularly suitable for handling woollen fibres.
- Detergents for curtains with optical brightening agents, resistant to light, to prevent yellowing from sunlight.
- Special detergents for programmed use of chemical substances, depending on fabric type, degree of soiling and water hardness.
Here basic detergents, softeners, bleaches/stain removers can be added separately.
Additional laundry aids
- Water softener, means less detergent can be used where water hardness is classed as hard to very hard.
- Prewash substances, for the programmed treatment of stains prior to the main wash.
Using them means the subsequent wash can be at a low temperature or with bleach-free detergents. - Fabric softener, prevents static build-up in synthetic fabrics and softens fabrics.
If you own a tumble dryer, clothes are softened even without the use of a fabric softener.
Do not put solvents in the washing machine!
Keep detergents and other laundry products out of children's reach.
Before pouring in the detergent check that there are no foreign bodies in the detergent drawer.
Dosage details are usually shown on the detergent packaging. Follow those instructions!
Dosages
Only use detergents which are suitable for use in a washing machine.
You will obtain the best results from your wash with the minimum use of chemical products and the best care for your laundry if you take into consideration the degree of soiling as well as the type of detergent to choose.
The amount of detergent to use depends on:
- water hardness, depending on the hardness of the water and the type of detergent used, it is possible to reduce the amount of detergent. The softer the water supply, the less detergent is required.
- the degree of soiling, it is possible to reduce the amount of detergent used depending on the degree of soiling. Use less detergent for less soiled items.
- amount of laundry, it is possible to reduce the amount of detergent when washing only a small amount of laundry. For smaller loads use less detergent.
The amounts shown on pack for detergents for washing delicates often already refer to a reduced wash size.
Follow the dosage instructions!
Dosage for powder detergent
For normal and low concentration detergents: for normally soiled laundry choose a programme without prewash.
Put the detergent in compartment II of the drawer.
For heavily soiled laundry, choose a programme with prewash.
Put 1/4 of the detergent in compartment I, 3/4 in compartment II of the drawer.
When using water softeners, first put in the detergent, then add the softener to compartment II.
For highly concentrated detergents not in single dose format, follow exactly what is shown on pack with regards to type and amount of dosage.
To avoid the difficulty of checking if the detergent has been taken up, use the dosage aids provided in the detergent packaging.
Liquid detergent dosage
Liquid detergents may be used in accordance with the instructions on the relevant packaging, for all programmes without prewash, by using the recommended dispenser which is placed in the drum.
Programme selector
The washing machine has different programme groups according to type of wash, temperature, spin speeds and duration for handling the various types of fabric and their level of soiling (see wash programme guide).
1. COTTONS
The programmes are designed for maximum washing and rinsing. With spin cycles in between, they guarantee the laundry is rinsed perfectly. The final spin cycle ensures laundry is spun dry as much as possible up to the maximum speed.
2. SYNTHETICS and mixed fabrics
Washing and rinsing performance is optimised through drum rotation speeds and water levels. The delicate action spin minimises creasing.
3. DELICATES
This is a new concept in washing, with a cycle that comprises of alternate periods of activity and pauses, particularly suitable for washing very delicate fabrics, such as Pure New Wool.
Wash and rinsing are carried out using a high water level to provide the best results.
4. SPECIAL PROGRAMMES
i) AA SPECIAL PROGRAMME at 40°C
This special programme has been studied to allow you to obtain the best washing performance, even at full load, as the 60^ C Cotton programme (the normative cycle), but with the double advantage of :
- washing cotton and mixed in the same cycle
- energy saving due to 40^ C temperature, instead of 60^ C.
ii) DAILY WASH 40°C - FAST PROGRAMMES
By maintaining exceptional washing performance, these programmes allow you to know in advance the necessary time for your everyday laundry. In fact, this washing machine is equipped with two daily rapid programmes at 40^ C, that were just studied for:
- lightly soiled fabrics;
- medium or little load.
DAILY WASH 40°C - FAST 29'
A complete washing cycle (wash, rinse and spin), able to wash in approximately 29 minutes:
- a maximum load of 2 KGs;
- lightly soiled fabrics (cotton and mixed fabrics).
We recommend, with this programme, a 20% detergent loading dose (compared to the normal one), in order to avoid detergent waste.
DAILY WASH 40°C - FAST 44'
A complete washing cycle (wash, rinse and spin), able to wash in approximately 44 minutes:
- a maximum load of 3.5 KGs;
- lightly soiled fabrics (cotton and mixed fabrics).
We recommend, with this programme, a 30% detergent loading dose (compared to the normal one), in order to avoid detergent waste.
iii) HAND WASH
This washing machine also has a gentle Hand Wash programme cycle. This programme allows a complete washing cycle for garments specified as 'Hand Wash only' on the fabric label.
The programme has a maximum temperature of 30^ and concludes with 2 rinses, one for fabric conditioner, and a slow spin.
iv) SPORTSWEAR
The washing machine has a unique Sportswear programme.
It is specially designed to wash mixed sportswear fabrics that cannot be washed on hotter programmes and is designed to remove the soiled and staining created by participation in sports activities.
This programme starts with a cold prewash that breaks down and loosens any excess dirt and then washes at a cool 30^ C, rinses twice (one is for fabric conditioner) and spins slowly for the best care of your heavily soiled, delicate garments.
Hoover has given sports items their own wash care programme.
Main wash
Auto half load
The washing machine is fitted with a self adjusting water level system. This system enables the machine to use the optimum amount of water needed to wash and rinse the laundry in relation to the particular load. This results in a reduction of the water and electricity used without in any way compromising the washing and rinsing performance.
In fact, the amount of water and electricity used will always be appropriate for the clothes load.
The washing machine automatically ensures excellent washing results at minimum cost whilst respecting the environment.
Sorting the laundry
- It is recommended you wash only items which are washable with water and detergent and not dry-clean items.
- If you need to wash rugs, bedspreads or other heavy items, it is best not to spin them.
- Sort the laundry according to fabric type, degree of soiling and wash temperature: follow the labelling on the garments.
Examples:
Laundry for hot wash 95
Coloured, easy-care materials

Delicates and wool 40
- Items labelled with the following symbols are not suitable for machine washing:
Wash by hand

Dry clean Ⓟ
For very delicate items, such as net curtains, underwear, tights etc., you are advised to use a laundry net or wash bag.
- Woollen items must be labelled with the "Pure New Wool" symbol if they are to be washed in the machine, and must also be labelled "non-matting" or "machine washable". Please check the laundry item for the label.
– Colour often leaks from new coloured items.
This can then colour other lighter items being washed.
We therefore recommend that coloured items should be washed for the first time separately.
For future washes, non colourfast items can only be washed with white laundry up to 40^ C.
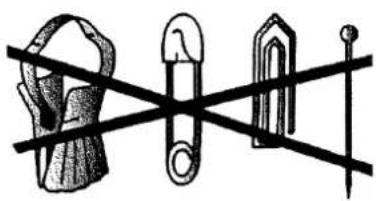
Do not wash

Note: when sorting laundry
- check there are no metal objects in the laundry (such as paper clips, safety pins, pins, coins etc...); In the event of a machine failure during the warranty period and foreign objects are found to be the cause of the failure a labour charge may be made for the call out of an engineer.
- button up pillowcases, fasten zips, hook & eye fasteners, belts and long dressing gown cords;
- remove curtain hooks;
– pay close attention to the labels on items; - if you notice stubborn stains whilst sorting the laundry, remove them using a special detergent or a special stain remover.
natural_image
Pure mechanical diagram showing two hanging weights connected by a string, no text or symbols present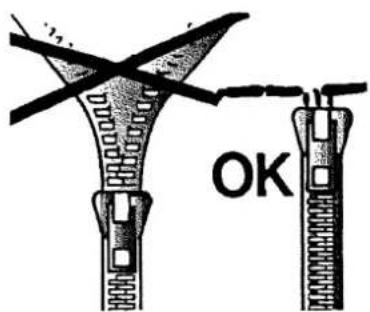
text_image
OK- We do not recommend washing a full load of just towelling items as they absorb a lot of water and may become too heavy for the drum.
The correct way to wash
Preparing the laundry
A) Select and sort the laundry according to the wash care labels found on each garment. Always check the care labels.
Loading the laundry
B) Open the door.
C) Put the laundry in the washing machine. Close the door again, ensuring that no items of laundry are obstructing the lock or door seal.
Putting detergent in machine
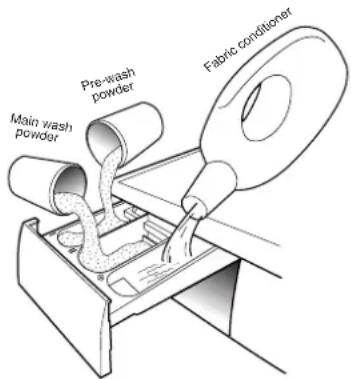
D) Open the drawer, choose the detergent and put in the correct amount, according to the manufacturer's instructions and the detergent advice section within this manual. Add any other laundry aids (see page 15). Close the drawer again. Liquid detergents that are to be placed directly into the drum should use the recommended dispensing device.
text_image
Pre-wash powder Main wash powder Fabric conditionerSelecting the wash programme
Refer to the programme guide or the programme descriptions on the front of the machine to select the most suitable programme.
The programme is selected by turning the programme selector clockwise and aligning the programme number with the indicator.
Check that the tap is turned on and that the discharge hose is positioned correctly.
Press the START/PAUSE button. The door locked indicator illuminates and the programme will begin.
When the programme has finished
Wait for the door lock to be released (about 2 minutes after the programme has finished). Switch off the machine by turning the programme dial to the "OFF" position, and open the door by pressing the door button. Remove the laundry. Disconnect the plug from the mains power supply and turn off the water supply after every use.
Water and electricity consumption and approximate length of programmes selected
| Programme Water Electricity Duration consumption in litres kWh | |||
| Whites normal 90°C, full load 42 | 1.8 120 | ||
| Coloureds fast 60°C, full load 39 | 0.95 120 | ||
| Coloureds non-fast 40°full load 39 0.55 120 | |||
| Mixed fabrics 40°C; 2.0 kg load | 45 0.45 85 | ||
| Wool 30°C; 1.0 kg load | 55 0.35 50 | ||
| Delicates 30°C; 1.5 kg | 55 0.35 50 | ||
The above results are based upon cold fill water (15°C) and maximum load capacities.
* Programme length is variable depending on the type of fabric in the loads, the weight of the load, the wash temperature and pressure of the water as it enters the machine.
Programme guide
| PROGRAMME FABRIC | TYPE PROGRAMME FOR LOAD WATER DETERGENT | TEMP °C | ||||||
| I | II | |||||||
| COTTONS | Whites Colourfast fabrics Intensive - Cotton, linen, hemp soiled | heavily 5 90° | * | * | ||||
| +P Whites & Prewash cotton, colourfast Normal mixed fibres | soiling 5 60° | * | * | * | ||||
| Coloureds Fast Cotton, mixed fabrics Colour Fast | Normal-Light soiling | 5 | 60° | * | * | |||
| Coloureds Non Fast Cotton, mixed fabrics Coloureds Non Fast | Lightly soiled - delicate 5 coloureds | 40° | * | * | ||||
| Coloureds Non Fast Cotton, mixed fabrics Coloureds Non Fast | Lightly soiled - delicate 5 coloureds | 15° | cold | * | * | |||
| SYNTHETICS & ACRYLICS | Mixed Fabrics & Prewash Mixed & synthetic fabrics, colourfast mixed fabrics | Heavily soiled | 2.5 | 60° | * | * | * | |
| Mixed Fabrics Mixed & synthetic fabrics, colourfast mixed fabrics | Heavily soiled | 2.5 | 60° | * | * | |||
| Coloureds Mixed fabrics, cotton, synthetics | Normal soiling | 2.5 | 50° | * | * | |||
| Acrylics Synthetics (Nylon), coloured mixed fabrics | Heavily soiled | 2.5 | 40° | * | * | |||
| Acrylics Synthetics (Nylon), coloured mixed fabrics | Lightly soiled | 2.5 | 15° cold | * | * | |||
| DELICATES | Delicates Delicates, synthetics and mixed fabrics | Light soiling of delicate fabrics | 1 | 40° | * | * | ||
| Woollens Machine washable wool , very delicate fabrics, synthetic knits | Lightly soiled | 1 30° | * | * | ||||
| Woollens fabrics, synthetic knits | Lightly soiled | 1 15° | cold | * | * | |||
| SPECIALS | Rinse Mixed fabrics | Thorough rinsing | 5 | - | * | |||
| Spin Mixed fabrics | High speed spin 5 _ | |||||||
| Drain Mixed delicate fabrics | Drains water from the drum with no spin action | 5 | - | |||||
Programme guide
| PROGRAMME FABRIC | TYPE PROGRAMME FOR LOAD WATER DETERGENT | TEMP °C | |||||||
| I | II | ||||||||
| SPECIALS | Special AA 40°C Mixed fabrics at 40°C | Cottons, Energy saving 5 40°ed fabrics | Lightly soiled | 3.5 | 40° | * | * | ||
| Daily fast 44" | Cottons,Mixed fabrics | * | * | ||||||
| Daily fast 29" | Cottons,Mixed fabrics | Lightly soiled 2 40° | * | * | |||||
| Hand wash | "Hand wash only" garments | Hand washing of delicate garments | 2.5 | 30° | * | * | |||
| Sportswear | Mixed fabrics | Thorough wash for small loads | 2.5 | 30° | * | * | |||
Points to consider:
When washing heavily soiled laundry it is recommended the load is reduced by about 1 - 1.5kg . By doing so the laundry is allowed to circulate more freely.
Energy label data based on programme 3 tested in accordance with EN60456.
Cleaning and routine maintenance
Do not use alcohol-based scourers and/or thinners on the outside of your washing machine, just a wipe with a damp cloth will suffice. The washing machine needs very little maintenance:
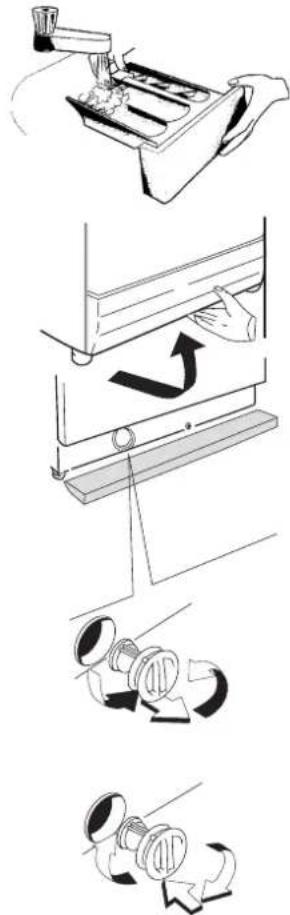
- Cleaning the drawer compartments.
- Cleaning the filter.
Cleaning the drawer
Clean the compartments occasionally to remove detergents and additives.
A) To do this you just need to pull the drawer out firmly from the machine, but without forcing it.
B) Clean the compartments and the syphon cap under running water.
C) Replace the drawer.
Cleaning the filter
The washing machine is fitted with a special filter to prevent items such as coins, buttons, etc. blocking the discharge hose. These may be retrieved by:
- Removing the kickplate by gently pulling it from the bottom in an outwards and upwards direction.
- Use the kickplate to collect the water still in the filter.
- Turn the filter anticlockwise, remove it and clean it.
After cleaning, return to it's original position and lock by turning clockwise. Replace the kickplate.
We recommend that the filter be cleaned frequently, at least once a month.
natural_image
Illustration of a mechanical assembly with four steps: pressing a component, rotating a slide, inserting a valve, and finally adjusting a ring (no text or symbols present)Transporting or storing the appliance for long periods when appliance is not in use
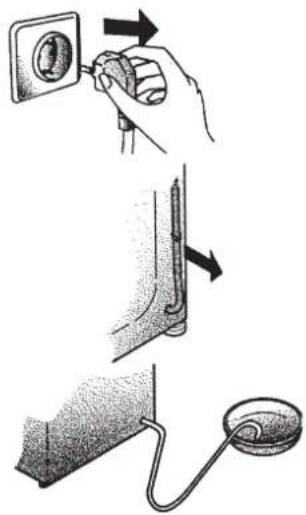
If the appliance is being transported or is out of use for long periods in unheated places, all remaining water must be completely removed from all hoses.
Ensure mains power plug is disconnected, then unclip the discharge hose and lower it into a basin on the floor until all the water has emptied out.
When transporting the appliance refit the transit bracket, central screw and side screws.
natural_image
Illustration of a medical procedure showing hand positioning, cable insertion, and endoscopic view (no text or symbols)Trouble shooting
What might be the cause of...
Defects you can remedy yourself
Before calling GIAS Service for technical advice please run through the following checklist. A charge will be made if the machine is found to be working or has been installed incorrectly or used incorrectly. If the problem persists after completing the recommended checks, please call the GIAS Service (tel: 08705 400 600), they may be able to assist you over the telephone.
| PROBLEM | CAUSE | REMEDY |
| 1. Does not work on any programme | Plug not in socket.Not switched on.Power failure.Fuse blown.Door open.RCD tripped (trip switch). | Plug it in.Switch on.Check and refer to ‘Power Failure’ section.Check.Close door.Reset RCD. |
| 2. Does not fill with water | See cause 1.Water supply turned off.Programme selector not correctly positioned. | Check.Turn on water supply.Position programme selector correctly. |
| 3. Water does not drain away | Kink in discharge hose.Foreign bodies in filter.The machine has been plumbed in incorrectly. | Straighten discharge hose.Examine filter.Check installation. |
| 4. Water on floor around the washing machine | Leaking gasket between tap and water inlet hose.Strand of clothing or dirt between door rubber gasket and door glass.Incorrect plumbing. | Replace gasket and tighten connection.Re-load the machine and keep rubber door gasket/door glass clean.Check plumbing. |
| 5. Does not spin | Water has not yet drained away.‘Spin Cancel’ option selected (certain models only.Unbalanced load. | Wait a few minutes for machine to empty.Check.Rearrange load evenly. |
| 6. Machine vibrates a lot during spin | Washing machine not completely level.Load not distributed evenly.Transit brackets not removed. | Adjust the special adjustable feet.Rearrange the laundry evenly.Remove transit brackets. |
| 7. Door will not open | Two minutes have not elapsed since the programme finished. | Wait two minutes. |
| 8. The control knob turns a full circle quickly during a programme | The control knob was not in the expected position when automatically checked by the machine. | Note: This action is normal if the knob has been moved accidentally during a cycle. |
It is unlikely that water will be visible in the drum! This is due to the latest technology that achieves the same standard of washing and rinsing but with far less water consumption.
Note:
The use of environmentally-friendly, phosphate-free detergents (check detergent information on pack) can have the following effects:
- waste water from rinsing may be cloudier because of the presence of a white powder (zeolites) held in suspension, without the rinse performance being adversely affected;
– presence of white powder on laundry after washing, which is not absorbed by the fabric and does not alter the colour of the fabric.
– The presence of foam in the final rinsing water is not necessarily an indication of poor rinsing. - Carrying out more rinse cycles does not serve any purpose in such cases.
Power failure
If there is a power failure the wash cycle will be interrupted, the wash programme and functions will be suspended.
When the power is restored, the wash programme and functions will re-start from the same point and complete the programme.
The load can be removed from the machine during a power failure as follows:
The water can be drained from the machine by:
-
Switch off the machine both via the programme knob and on the mains power supply. Remove the plug from the mains power supply socket.
-
Carefully move the machine so the rear of the machine is accessible. Please follow the safety precautions which we recommend under the 'safety notes' section of this manual.
-
Unclip the drain hose from the rear panel of the machine and lower the hose into a bowl on the floor.
Important: the water may be very hot!
When the bowl is full raise the end of the drain pipe to a height higher than the top of the appliance to stop the flow of water. Empty and replace the bowl and continue draining the machine until empty.
- Once the machine is fully drained of water, clip the hose to the rear of the machine. Press the door button and remove the load.
The door can be opened approximately 2 minutes after the power failure by simply pressing the door open button. Do not force open the door.
Important: the water and the load may be very hot!
| Technical data | |
| ● Max. load of dry laundry 5kg● Water pressure (0.5-8 bar)● Spin speed max. 1300 rpmMeasurements● Width 50cm● Depth 54cm● Height 85cm | 0.05-0.8 MPa(H130E)max. 1400 rpm(H140E)max. 1600 rpm(H160E) |
NB: For specifications regarding electrical data, see the data plate on the front of the washing machine (door area). You will also need to refer to the information on the data plate should you need to contact the GIAS Service for any advice.
Customer Service
The appliance is covered by a certificate of guarantee which allows you free use of the Hoover Technical Support Service (termed GIAS tel: 08705 400 600), except for the price of the call, for a period of one year from the date of purchase. Remember to send off the guarantee certificate for validation within 10 days of the date of purchase.
You should retain the receipt issued by the retailer when you purchased the machine to show to the call out engineer, should you need to consult one.
If your washing machine shows signs of a defect or is not working properly, before you contact GIAS Service we recommend you carry out the checks detailed within the Trouble shooting section.
If the problem with the machine persists after completing all the recommended checks, please dial the GIAS Service number on the rear cover of this manual.
For the cost of a telephone call, you will be connected directly to GIAS. It is important you tell the GIAS advisor your product's model number and serial number, which you will find on the rating label (16 characters, beginning with the number 3), found on the front of the washing machine (door area). By doing this, your enquiry will be responded to more efficiently.
Your Guarantee
Hoover guarantees all parts of this product for 5 years from the date of purchase. During that time Hoover will replace or repair all defective parts free of charge, except for parts subject to fair wear and tear such as belts. The call out fee and labour costs are chargeable after the first 12 months. To qualify for benefits under the guarantee, you must be able to provide proof of date of purchase and the appliance must have been installed and used in accordance with the instructions described in this manual. Consequential losses and accidental damage to the machine is not covered by the guarantee. Hoover cannot be responsible for the results of using this machine for any purposes other than those described in this manual. This guarantee does not effect your statutory or common law rights.
For service and repairs please call our national number:
Hoover Technical Support Service
- Tel: 08705 400 600 [ Eire 018301 666 ]
Always use genuine Hoover spares, available direct from GIAS Service:
Hoover Spares Service Tel: 01204 556111
Hoovercare
To maintain your Hoover product in peak condition you may wish to take out a Hoovercare policy, which for an annual payment provides a comprehensive maintenance and repair scheme. For more information please call 08705 400 600.
The Hoovercare scheme is not available in Eire.
The manufacturer declines all responsibility in the event of any printing mistakes in this booklet. The manufacturer also reserves the right to make appropriate modifications to its products without changing the essential characteristics.