
VHD 814-80 - Washing machine HOOVER - Free user manual and instructions
Find the device manual for free VHD 814-80 HOOVER in PDF.


User questions about VHD 814-80 HOOVER
0 question about this device. Answer the ones you know or ask your own.
Ask a new question about this device
Download the instructions for your Washing machine in PDF format for free! Find your manual VHD 814-80 - HOOVER and take your electronic device back in hand. On this page are published all the documents necessary for the use of your device. VHD 814-80 by HOOVER.
USER MANUAL VHD 814-80 HOOVER
Instructions for use
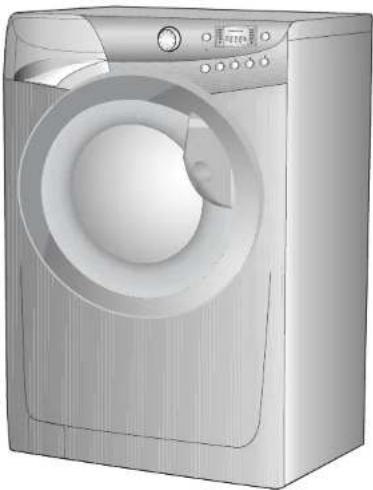
VisionHD
natural_image
3D rendering of a silver washing machine with a circular vent and handle (no text or symbols visible)Introduction
Please read these instructions for use carefully and all other information enclosed with the washing machine.
Keep all documentation in a safe place for future reference or for any future owners.
Note: this machine is solely for domestic use.
Notes on disposal
All packaging material used is environmentally-friendly and recyclable. Please help dispose of the packaging via environmentally-friendly means.
Your supplier or local council will be able to give you details of current means of disposal.
Valuable materials can be salvaged from an old appliance via scrap reprocessing.
Note: pull out the mains plug from any old appliance. Cut the power cable and dispose of it, together with the plug.
When disposing of an old washing machine, please ensure that the door lock is rendered inoperable to prevent children shutting themselves in the appliance.
Contents Page
Introduction 2
General delivery notes 4
Safety notes 4
Quick start 5
Description of controls 6
Programme Table 12
Programme selector 14
Detergent drawer 17
Detergents, washing aids and amounts to use 18
Useful advice for the user 20
The main wash 21
Cleaning and routine maintenance 23
Investigating malfunctions 25
Technical data 27
Setting up + installation 28
BEFORE SWITCHING ON THE APPLIANCE MAKE SURE IT IS CORRECTLY INSTALLED AND THAT THE TRANSIT BRACKETS ARE REMOVED AS SHOWN IN PAGE 28.
General delivery notes
Please check that the following items are delivered with the appliance:
- Instruction manual
- Certificate of guarantee
- Inlet hose
Check that no damage has occurred during transit, and if so, call your nearest Authorised Technical Support Service agent.
Safety notes.
Note: for cleaning or maintenance of the washing machine.
A) Pull out the plug
B) Turn off the tap
C) Hoover equips all its appliances with earthing. Ensure that the mains supply is earthed, and if it is not, seek assistance from a qualified person.
D) Do not touch the appliance when hands or feet are wet or damp. Do not use the appliance with bare feet.
E) The use of adapters, multiple connectors and/or extensions is not recommended.
Note: water temperature can reach 90^ during the wash cycle.
F) Check there is no water left in the drum before opening the door.
G) Do not allow children or unauthorised persons to use the appliance without supervision.
H) Do not pull the power cable or the appliance itself to remove the plug from the socket.
I) The appliance must not be exposed to weather conditions (rain, direct sun, etc...)
L) When moving the appliance never lift it by the controls or by the detergent drawer.
When in transit never rest the door against the trolley or transport the appliance without the polystyrene base.
M) N.B!
If the appliance is installed on a carpeted floor ensure that the ventilation holes on the base of the appliance are not obstructed.
N) If the appliance is not running properly or breaks down, switch it off, turn off the tap and do not tamper with the appliance.
Consult only the Authorised Technical Support Service for possible repair and ask them to use original spare parts.
Failure to comply with the above can compromise the safety of the appliance.
O) If the appliance's power cable should ever need replacing, consult the Authorised Technical Support Service
Quick start
Washing
- Open the door by using the handle "A" (Fig. 1, page 6)
- Select laundry and put it in the machine
- Close the door
- Put detergent in the compartments as indicated in the programme guide in this instruction manual
- Select programme
- Wait for the "STOP" indicator light to flash
Press additional function buttons (if required)
- Press the "Start/Pause" button (page 7)
- After few seconds the appliance starts working.
After washing
- The indicator light "STOP" will go on.
- Wait for the door lock to be released (about 2 minutes after the programme has finished). The “Door Security” indicator light will go out.
- Switch off the washing machine by turning the selector to "OFF" position.
- Open the door and remove the laundry.
Ensure that the machine is correctly installed in line with the instructions found on page 28.
Description of controls
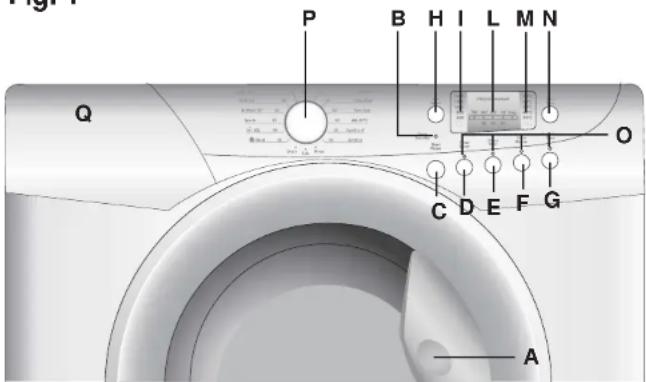
Fig. 1
text_image
P B H I L M N Q O C D E F G ADoor handle A
"Door Security" indicator light B
"Start/Pause" button C
"Timer Saver" button D
"Delay Start" button E
"Stain Blaster" button F
"Sensitive Care" button G
"Spin Speed" button H
Spin speed indicator light I
"Time To End" and "Delay Start" indicator light L
Wash temperature indicator light M
Wash temperature button N
Buttons indicator light O
Programme selector with "OFF" position P
Detergent drawer
Q
Door handle
Press the finger-bar inside the door handle to open the door.
A
DOOR SECURITY indicator light
B
The "Door Security" indicator light is illuminated when the door is fully closed and the machine is ON. When "Start/Pause" is pressed on the machine with the door closed the indicator will flash momentarily and then illuminate.
If the door is not closed the indicator will continue to flash.
A special safety device prevents the door from being opened immediately after the end of the cycle. Wait for 2 minutes after the wash cycle has finished and the "Door Security" light has gone out before opening the door. At the end of the cycle turn the programme selector to "OFF".
START/PAUSE button
C
When a programme is selecting, wait for the "STOP" indicator light to flash before pressing the "Start/Pause" button.
Press to start the selected cycle (according to the selected cycle one indicator lights will go on).
NOTE: When the "Start/Pause" button has been pressed, the appliance can take few seconds before it starts working.
Changing the settings after the programmes has started (PAUSE)
The programme may be paused at any time during the wash cycle by holding down the "Start/Pause" button for about two seconds. When the machine is in the paused mode, the indicator light "Time To End" and option buttons will flash.
To restart the programme, press the "Start/Pause" button once again.
If you wish to add or remove items during washing, wait 2 minutes until the safety device unlocks the door.
When you have carried out the manoeuvre, close the door, press "Start/Pause" button and the appliance will continue working where it left off.
CANCELLING THE PROGRAMME
To cancel the programme the programme selector should be rotated to the "OFF" position.
The option buttons should be selected before pressing the "Start/Pause" button.
TIME SAVER button

Press the button to select or deselect this function.
Pressing this button reduces the time of the wash programme by a maximum of 50 minutes depending on the programme and the temperature selected. The "Timer saver" button can be used for washing loads of 1 to 8 kg. This option may only be utilised on COTTONS and SYNTHETICS programmes.
DELAY START button

Appliance start time can be set with this button, delaying the start by 3, 6 or 9 hours.
Proceed as follows to set a delayed start:
Select a programme ("STOP" indicator light blinks)
Press "Delay Start" button (each time the button is pressed the start will be delayed by 3, 6 or 9 hours respectively and the corresponding light will blink).
Press "Start/Pause" to commence the Delay Start operation (the indicator light associated with the selected Delay Start time stops blinking and remains ON).
At the end of the required time delay the programme will start.
To cancel the Delay Start function:
press the "Delay Start" button until the indicator lights will be off (The "STOP" light blinks) and the programme can be started manually using the "Start/Pause" button or switch off the appliance by turning the programme selector to "OFF" position.
Warning: If there is any break in the power supply while the machine is operating, a special memory stores the selected programme and, when the power is restored, it continues where it left off.
STAIN BLASTER Button

By pressing this button, which can only be activated in the Cotton cycles, the sensors in the new system come into operation. They affect both the selected temperature, keeping it at a constant level throughout the wash cycle, and the mechanical function of the drum.
The drum is made to turn at two different speeds at crucial moments. When the detergent enters the garments, the drum rotates in such a way that the detergent is distributed in a uniform manner; during the wash and rinse procedures, however, the speed increases in order to maximise the cleaning action. Thanks to this special system, the efficiency of the wash procedure is improved WITHOUT ANY INCREASE IN THE LENGTH OF THE PROGRAM.
SENSITIVE CARE button

By pressing this button you can activate a special new wash cycle in the Cotton and Mixed Fabrics programs, thanks to the new Sensor System. This option treats with care the fibres of garments and the delicate skin of those who wear them.
The load is washed in a much larger quantity of water and this, together with the new combined action of the drum rotation cycles, where water is filled and emptied, will give you garments which have been cleaned and rinsed to perfection. The amount of water in the wash is increased so that the detergent dissolves perfectly, ensuring an efficient cleaning action. The amount of water is also increased during the rinse procedure so as to remove all traces of detergent from the fibres. This function has been specifically designed for people with delicate and sensitive skin, for whom even a very small amount of detergent can cause irritation or allergy.
You are advised to also use this function for children's clothing and for delicate fabrics in general. or when washing garments made of towelling, where the fibres tend to absorb a greater quantity of detergent. To ensure the best performance for your wash, this function is always activated on the Delicates and Woollens programs.
SPIN SPEED button

The spin cycle is very important to remove as much water as possible from the laundry without damaging the fabrics. You can adjust the spin speed of the machine to suit your needs.
By pressing this button, it is possible to reduce the maximum speed, and if you wish, the spin cycle can be cancelled.
To reactivate the spin cycle press the button until you reach the spin speed you would like to set. To prevent damage to the fabrics, it is not possible to increase the speed over that which is automatically suitable during the selection of the program.
It is possible to modify the spin speed without to pausing the machine.
Note:
The machine is fitted with a special electronic device, which prevents the spin cycle should the load be unbalanced. This reduces the noise and vibration in the machine and so prolongs the life of your machine.
Spin speed indicator light

When you set a program, the maximum possible spin speed will be automatically shown by the relevant indicator light.
Choosing a smaller spin speed by the appropriate button, the relevant indicator light will go on.
TIME TO END indicator light

In order to manage your time better, this washing machine features an indicator light system that keeps you constantly informed on the remaining cycle time.
Indicator light 90:
Remaining time above 60 minutes.
Indicator light 60:
Remaining time less than 60 minutes.
Indicator light 30:
Remaining time less than 30 minutes.
Indicator light 15:
Remaining time less than 15 minutes.
Indicator light STOP:
End of the programme.
"Wash Temperature" button

The Wash Temperature button allows a reduction in the wash temperature in each programme.
Each time the button is pressed the temperature decreases until a minimum of 15^ C (cold wash ✉).
Wash temperature indicator light

When you set a program, the maximum possible Temperature will be automatically shown by the relevant indicator light.
Choosing a lower temperature by the appropriate button, the relevant indicator light will go on.
Buttons indicator light

The indicator light around the option buttons will light when specific options are selected. If you select an option button that is not compatible with the programme you require the button light will not illuminate.
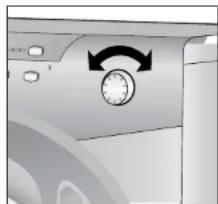
PROGRAMME selector with "OFF" position

Rotates in both directions.
The machine is turned on by selecting a programme via the programme selector. This status will be indicated by the "STOP" indicator light flashing, this light will continue to flash until the machine has started or the machine is returned to the "OFF" position.
natural_image
Close-up of a washing machine front panel showing a rotary dial and control buttons (no text or symbols visible)Press the "Start/Pause" button to start the selected cycle.
Once a programme is selected the programme selector remains stationary on the selected programme till cycle ends.
Switch off the washing machine by turning the selector to "OFF".
Note:
The programme selector must be returned to the "OFF" position at the end of each cycle or when starting a subsequent wash cycle prior to the next programme being selected and started.
TABLE OF PROGRAMMES
| PROGRAM FOR | PROGRAMMES SELECTOR ON: | WEIGHT MAX Kg | TEMP. °C | CHARGE DETERGENT | |||
| 2 | ✿ | 1 | |||||
| Resistant fabrics Cotton,linen | Cottons + P - 90 | 8 | Up to: 90° | • | • | • | |
| Cotton,mixed resistant | Colourfast - 60 | 8 | Up to: 60° | • | • | ||
| Cotton | Non-fast - 40 | 8 | Up to: 40° | • | • | ||
| Resistant fabrics | AA 40°C - 40 | 8 | Up to: 40° | • | • | ||
| Mixed fabrics and synthetics Mixed,resistant | Synth's + P - 50 | 4 | Up to: 50° | • | • | • | |
| Very delicate fabrics | Acrylics - 40 | 3 | Up to: 40° | • | • | ||
| RINSE | Rinse | - | - | • | |||
| SPIN | Spin | - | - | ||||
| DRAIN ONLY | Drain | - | - | ||||
| Specials | WOOLMARK | Wool - 40 | 1 | Up to: 40° | • | • | |
| SILK-HAND WASH | Silk - 30 | 1 | Up to: 30° | • | • | ||
| MIXED FABRICS | Sports - 30 | 2,5 | Up to: 30° | • | • | • | |
| RESISTANT FABRICS | A Wash 59' | 3 | Up to: 60° | • | • | ||
| RESISTANT or MIXED FABRICS | Daily 44' | 3,5 | Up to: 40° | • | • | ||
| RESISTANT or MIXED FABRICS | Daily 29' | 2 | Up to: 40° | • | • | ||
text_image
Diagram of a mechanical device with labeled parts 1 and 2, showing components like a tool and a flower symbol.Please read these notes
When washing heavily soiled laundry it is recommended the load is reduced to 4 kg maximum.
* Programme also recommended for low temperature wash (below the indicated Max. temperature). Programmes according to CENELEC EN 60456.
■ The variable temperature button allows a reduction in the wash temperature in each programme.
The spin speed may also be reduced, to match any guidelines suggested on the fabric label, or for very delicate fabrics cancel the spin completely this option is available with a spin speed button.
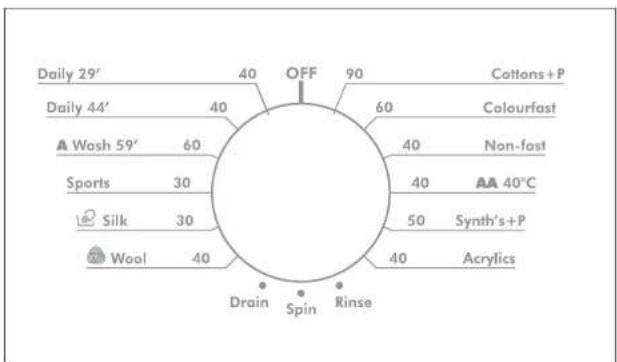
radar
| Category | Value | |---|---| | Daily 29' | 40 | | Daily 44' | 40 | | Wash 59' | 60 | | Sports | 30 | | Silk | 30 | | Wool | 40 | | Off | 90 | | Cottons+P | 60 | | Colourfast | 40 | | Non-fast | 40 | | AA 40°C | 50 | | Synth's+P | 40 | | Acrylics | 40 | | Drain | Spin | | Rinse | Spin |Programme selector
For the various types of fabrics and various degrees of dirt the washing machine has different programme bands according to: wash cycle, temperature and length of cycle (see table of washing cycle programmes).
| FABILIA PROVISIONI | ||||
| PROGRAMA NO | COLDING PROCESSED MACHADO PROGRAMMA 83 | PROMATO DOG NO | MINI NO | C |
| 1 | ||||
| PARATHODIC CIVI. NO. 2023 (M) | Cultivated mainly | 50 | 1 | [4] |
| POLO, V. No. 100 (M) | Germania | 80 | 1 | [4] |
| CUCUMUL TUT | Delaware | 40 | 1 | [4] |
| BANANA PARATHIC | L. No. 40 | 5 | 1 | [4] |
| BANANA BANANA PARATHIC | Carmelol | 50 | 2 | [4] |
| BANANA DEFECT | N. No. 40 | 2 | 1 | [4] |
RESISTANTS FABRICS
The programmes have been designed for a maximum wash and the rinses, with spin intervals, ensure perfect rinsing. The final spin gives more efficient removal of water.
Cottons+P Colourfast Non-fast
AA SPECIAL PROGRAMME AT 40°C
This special programme has been studied to allow you to obtain the best washing performance, even at full load, as the 60^ C Cotton programme (the normative cycle), but with the advantage of an energy saving due to 40^ C temperature, instead of 60^ C. The length of this programme lasts almost the 3 hours.
AA 40°C
MIXED AND SYNTHETIC FABRICS
The main wash and the rinse gives best results thanks to the rotation rhythms of the drum and to the water levels. A gentle spin will mean that the fabrics become less creased.
Synth's+P
SPECIAL DELICATE FIBRES
This is a new wash cycle which alternates washing and soaking and is particularly recommended for very delicate fabrics. The wash cycle and rinses are carried out with high water levels to ensure best results.
Acrylics
SPECIAL "RINSE" PROGRAMME
This programme carries out three rinses with a intermediate spin (which can be reduced or excluded by using the correct button). It can be used for rinsing any type of fabric, eg. use after hand-washing.
Rinse
SPECIAL "SPIN" PROGRAMME
Programme "SPIN" carries out a maximum spin (which can be reduced by using the correct button).
DRAIN ONLY
This programme drains out the water.
WOOLMARK PROGRAMME
A programme dedicated to washing fabrics labelled with the woolmark. The cycle comprises of alternate periods of activity and pauses. The programme has a maximum temperature of 40^ and concludes with 3 rinses and a short spin.
SPECIAL SILK PROGRAMME
This washing machine also has a gentle Silk and Hand Wash programme cycle. This programme allows a complete washing cycle for garments specified as 'Hand Wash only' and laundry items made from Silk on the fabric label.
The programme has a maximum temperature of 30^ and concludes with 3 rinses and no final spin.
SPORTS
Hoover has given sports items their own wash care programme. The washing machine has a unique Sportswear programme. It is specially designed to wash mixed sportswear fabrics that cannot be washed on hotter programmes and is designed to remove the soil and staining created by participation in sports activities. This programme starts with a cold prewash that breaks down and loosens any excess dirt and then washes at a cool 30°C, rinses and spins slowly for the best care of your heavily soiled, delicate garments.
The length of this programme lasts almost the 2 hours.
"A" WASH 59'
This specially designed programme maintains the high quality wash performance identified with the "A"
rating whilst greatly reducing the wash time. The programme is designed for a maximum load of 3 kg with a temperature of 60^ C and concludes with 2 rinses and a high speed spin sequence.
Spin
Drain

Wool

Silk
Sports
A Wash 59'
DAILY WASH 40°C – FAST PROGRAMMES
By maintaining exceptional washing performance, these programmes allow you to know in advance the necessary time for your everyday laundry. In fact, this washing machine is equipped with 2 daily rapid programmes at 40^ C, that were just studied for lightly soiled fabrics and medium or little load.
Daily 44'
DAILY WASH 40°C – FAST 44'
A complete washing cycle (wash, rinse and spin), able to wash in approximately 44 minutes:
- a maximum load of 3,5 kg;
- lightly soiled fabrics (cotton and mixed fabrics)
We recommend, with this programme, a 30% detergent loading dose (compared to the normal one), in order to avoid detergent waste.
Daily 29'
DAILY WASH 40°C – FAST 29'
A complete washing cycle (wash, rinse and spin), able to wash in approximately 29 minutes:
- a maximum load of 2 kg;
- lightly soiled fabrics (cotton and mixed fabrics)
We recommend, with this programme, a 20% detergent loading dose (compared to the normal one), in order to avoid detergent waste.
POWER JET
The HOOVER VISION HD is fitted with an additional pump system called "POWER JET" that sprays water directly into the wash load. This system optimises the dissolving of the detergent and directs it into the garments to be washed. The effect is a perfect wash result, demonstrated by the awarding of the "AA wash classification. During the rinsing cycle the POWER JET constant flow of clean water is used to totally remove all detergent residue from the garments.
Auto half load
The washing machine is fitted with a self adjusting water level system.
This system enables the machine to use the amount of water needed to wash and rinse the laundry in relation to the particular load.
This results in a reduction of the water and electricity used, without in any way compromising the washing and rinsing performance.
In fact the amount of water and electricity used will always be appropriate for the clothes load. The washing machine automatically ensures excellent washing results at minimum cost whilst respecting the environment.
Detergent drawer
Q
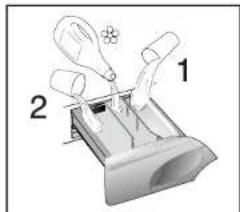
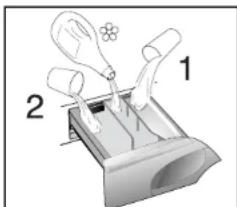
The detergent drawer is split into 3 compartments:
- the compartment labelled "1" is for prewash detergent;
- the compartment labelled "is for special additives, fabric softeners, fragrances, starch, brighteners etc;
- the compartment labelled "2" is for main wash detergent.
text_image
Diagram showing a mechanical or electrical component with labeled parts 1 and 2, likely illustrating a process or assembly.NOTE:
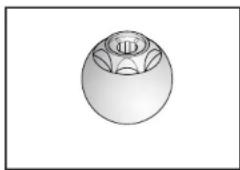
Some Detergents are Difficult to utilise. Ensure to use an in drum dispenser if recommended by the detergent Manufacturer.
natural_image
Simple line drawing of a spherical object with internal leaf-like structure (no text or symbols)Note: only put liquid products in the compartment labelled “ ✉”. The machine is programmed to automatically take up additives during the final rinse stage for all wash cycles.
Detergents, washing aids and amounts to use
Choice of detergent
General purpose detergents
- Powder detergents, for a thorough wash, with bleaching agent, particularly suitable for use in hot wash programmes (60°C and over), for heavily soiled and stained laundry.
- Liquid detergents, particularly suitable for grease stains, such as greasy skin marks, cosmetics and oil. These detergents are not suitable for washing stained laundry, as they do not contain bleach.
- Biological detergents, not all the products available give a really thorough wash.
Additional laundry aids
- Water softener, means less detergent can be used where water hardness is classed as hard to very hard.
- Prewash substances, for the programmed treatment of stains prior to the main wash. Using them means the subsequent wash can be at a low temperature or with bleach-free detergents.
- Fabric softener, prevents static build-up in synthetic fabrics and softens fabrics. If you own a tumble dryer, clothes are softened even without the use of a fabric softener.
Do not put solvents in the washing machine!
Keep detergents and other laundry products out of children's reach.
Before pouring in the detergent check that there are no foreign bodies in the detergent drawer.
Dosage details are usually shown on the detergent packaging. Follow those instructions.
Dosages
Only use detergents which are suitable for use in a washing machine.
You will obtain the best results from your wash with the minimum use of chemical products and the best care for your laundry if you take into consideration the degree of soiling as well as the type of detergent to choose.
The amount of detergent to use depends on:
- water hardness: depending on the hardness of the water and the type of detergent used, it is possible to reduce the amount of detergent.
- the degree of soiling: it is possible to reduce the amount of detergent used depending on the degree of soiling.
- amount of laundry: it is possible to reduce the amount of detergent when washing only a small amount of laundry.
Dosage for powder detergent
For normal and low concentration detergents: for normally soiled laundry choose a programme without prewash.
Put the detergent in compartment "2" of the drawer.
For heavily soiled laundry, choose a programme with prewash.
Put 1/4 of the detergent in compartment "1", 3/4 in compartment "2" of the drawer.
When using water softeners, first put in the detergent, then add the softener to compartment "2". For highly concentrated detergents not in single dose format, follow what is shown on pack exactly as regards type and amount of dosage.
To avoid the difficulty of checking if the detergent has been taken up, use the dosage aids provided in the detergent packaging.
Liquid detergent dosage
Liquid detergents may be used in accordance with the instructions on the relevant packaging, for all programmes without prewash, by using the special container which is placed in the drum or, for those models that have it, in the special insert for liquid detergents.
Useful advice for users
Tips on using your domestic appliance in the most environmentally-friendly and economical way
Do a full load in your washing machine
To prevent any possible waste of energy, water or detergent we recommend that you put a full load in your washing machine, not exceed the recommended maximum load size. Up to 50% energy saving can be made with one full load compared to two half load washes
When is prewashing really needed?
Only with particularly dirty loads!
Energy savings of 5 to 15% are made by not selecting the prewash option for normal soiled laundry.
Which wash temperature should you choose?
Using stain removers before machine washing reduces the need to wash at temperatures over 60^ C.
Energy savings of up to 50% can be made by using a 60°C wash temperature rather than 90°C
Main wash
Sorting the laundry
- It is recommended you wash only items which are machine washable with water and detergent and not dry-clean items.
- If you need to wash rugs, bedspreads or other heavy items, it is best not to spin them.
- Sort the laundry according to fabric type, degree of soiling and wash temperature: Always follow the wash care advice on the garment label for the most suitable care and treatment of the laundry
Laundry for hot wash 95°
Coloured, easy-care materials


Delicates and wool


Wash by hand

Items labelled with the following symbol are not suitable for machine washing:
Dry clean
For very delicate items, such as net curtains, underwear, tights etc., you are advised to use a laundry net or wash bag.
- Woollen items must be labelled with the "Pure New Wool" symbol to be washed in the machine and must also be labelled "non-matting" or "machine washable".
- Colour often leaks from new coloured items.
This can then colour other lighter items being washed.
We therefore recommend that coloured items should be washed for the first time separately.
For future washes, colourfast items can only be washed with whites up to 40^ C.
Note: when sorting laundry
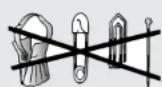
- check there are no metal objects in the laundry (such as paper clips, safety pins, pins, coins etc...);
- button up pillowcases, fasten zips, hook & eye fasteners, belts and long dressing gown cords;
- remove curtain hooks;
- pay close attention to the labels on items
- if you notice stubborn stains whilst sorting the laundry, remove them using a special detergent or a special stain remover.
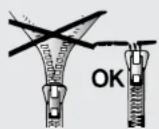
- We recommend that you do not do a full load of towelling items only as these become too heavy since they absorb a lot of water.
The correct way to wash
Preparing the laundry
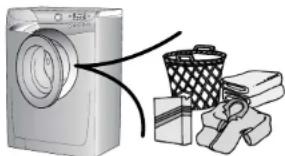
A) Select the laundry.
Loading the laundry
B) Open the porthole.
C) Put the laundry in the washing machine. Close the porthole again, ensuring that no items of laundry are obstructing the lock.
Putting detergent in machine
D) Open the drawer, choose the detergent and put in the correct amount, according to the manufacturer's instructions and the advice on page 18. Add any other laundry aids (see page 18). Close the drawer again.
natural_image
Illustration of a washing machine connected to a trash bin and recycling box (no text or symbols)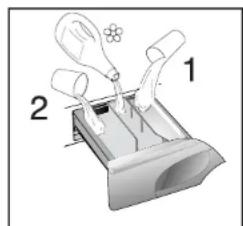
text_image
Diagram showing a mechanical or electrical component with labeled parts 1 and 2, likely illustrating a process or assembly.Selecting the wash programme
Refer to the programme guide or the programme descriptions on the machine to select the most suitable programme.
Turning the selector knob, the required programme is activated.
Wait for the "STOP" indicator light to flash.
Press additional function buttons (if required).
Check that the tap is turned on and that the discharge hose is positioned correctly.
Press the "Start/Pause" button.
When the "Start/Pause" button is pressed the machine sets the working sequence in motion.
The programme carries out with the programme selector stationary on the selected programme till cycle ends.
Warning: If there is any break in the power supply while the machine is operating, a special memory stores the selected programme and, when the power is restored, it continues where it left off.
When the programme is finished
At the end of the programme the indicator light "STOP" will go on.
Wait for the door lock to be released (about 2 minutes after the programme has finished). The "Door Security" indicator light will go out.
Switch off the machine by turning the programme selector on the "OFF" position. Open the door and remove the laundry. Turn off the tap.
Cleaning and routine maintenance
Do not use alcohol-based scourers and / or thinners on the outside of your washing machine, just a wipe with a damp cloth will suffice. The washing machine needs very little maintenance:
- Cleaning the drawer compartments.
- Cleaning the filter.
- Cleaning the door glass.
Cleaning the drawer compartments
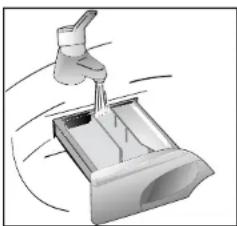
Even if it is not strictly necessary, it is good to clean the compartments for bleaching detergents and additives occasionally.
A) To do this you just need to pull them out firmly, but without forcing them.
B) Clean everything in the compartment under running water.
C) Put everything back in its proper place.
Cleaning the filter
The washing machine is fitted with a special filter for handling large deposits which could block the discharge hose (coins, buttons etc.) and which can, therefore, be easily retrieved.
We recommend that the filter be cleaned at least once a month.
The cleaning operation is as follows:
1) Open the flap
2) Only available on certain models:
Pull out the corrugated hose, remove the stopper and drain the water into a container.
3) Before removing the filter, place an absorbent towel below the filter cap to collect the small amount of water likely to be inside the pump
4) Turn the filter anti-clockwise until it stops in the vertical position.
Remove and clean.
5) After cleaning, replace the filter and lock by tightening the filter screw. Then follow all procedures described above in reverse order.
natural_image
Illustration of a hand using a tool to lift or lift a mechanical component (no text or symbols visible)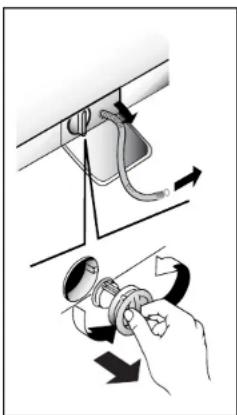
natural_image
Diagram showing hand operating a valve with directional arrows indicating motion (no text or symbols)Attention: if the filter needs cleaning while there is washing still in the drum, follow the instructions on the following page to empty the water. This will prevent excessive loss of water via the filter.
Cleaning the door glass
Regularly clean the door glass with a damp cloth. A build up of soiling and
residues from the water may result in water leaking from the door.
Do not use abrasive cleaners as they can scratch the surface.
Transporting the appliance or long periods when appliance is not in use
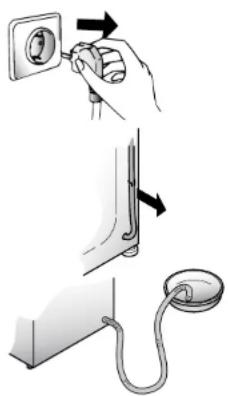
If the appliance is being transported or is out of use for long periods in unheated places, all remaining water must be completely removed from the hoses.
Ensure mains power is off, then unclip the hose and point it downwards into a basin until all the water has emptied out.
When finished, repeat the operation in the reverse order.
natural_image
Illustration of a hand inserting a socket into a wall socket, with a magnified inset showing the cable (no text or symbols present)Investigating malfunctions
What might be the cause of... Defects you can remedy yourself
| MALFUNCTION | CAUSE REMEDY | |
| 1. Does not work on any programme | Plug not in socket.Not switched on.Power failure.Fuse blown.Door open. | Plug it in.Switch on.Check.Check.Close door. |
| 2. Does not fill with water | See cause 1.Tap turned off.Programme selector not correctly positioned.Fill hoses are kinked | Check.Turn on tap.Position programme selector correctly.Straighten fill hoses |
| 3. Water does not drain away | Kink in discharge hose.Foreign bodies in filterHouse drain is blocked | Straighten discharge hose.Examine filter (see pages 23-24)Clean drain |
| 4. Water on floor around the washing machine | Leaking gasket between tap and water inlet hose.House drain is blockedSoap drawer blocked with soap residues | Replace gasket and tighten hose and tap well.Clean drainClean soap drawer |
| 5. Does not spin | Water has not yet drained away."No spin" selected (certain models only). | Wait a few minutes for machine to empty.Reset button or turn "no spin" knob. |
| 6. Machine vibrates a lot during spin | Washing machine not completely level.Transit brackets not removed yet.Load not distributed evenly. | Adjust the special adjustable feet.Remove transit brackets.Rearrange the laundry evenly. |
| 7. Door will not open | Two minutes have not elapsed since the programme finished. | Wait two minutes. |
The machine makes a different noise when spinning! This is because it has a brush motor for better performance.
Only a small level of water can be seen in the drum! This is because new machines do not use much water, yet achieve the same standard of washing and rinsing.
Note:
The use of environmentally-friendly, phosphate-free detergents can have the following effects:
- waste water from rinsing may be cloudier because of the presence of zeolites held in suspension, without the rinse performance being adversely affected;
- presence of white powder (zeolites) on laundry after washing, which is not absorbed by the fabric and does not alter the colour of the fabric.
- The presence of foam in the final rinsing water is not necessarily an indication of poor rinsing.
- Anionic surfactants used in washing detergent formulae often prove to be difficult to remove from the laundry itself and, even in small quantities, can still cause considerable foam production.
- Carrying out more rinse cycles does not serve any purpose in such cases.
CUSTOMER SERVICE AND GUARANTEE
Your new appliance is fully guaranteed by the manufacturer for 12 months against electrical/mechanical breakdown excluding:
A. Any faults which occur due to bad installation or misuse of the machine.
B. Any faults which occur due to repair of, or interference with, the machine by any person not authorised by the manufacturer to carry out service.
C. Any faults which arise from parts fitted to the machine which are not the manufacturers original parts.
D. Any faults arising from non-domestic use or unusual or abnormal use of the machine.
E. Any faults arising from operation at an incorrect voltage.
F.Any faults arising from incorrect operation of the machine.
The guarantee applies to Gt. Britain and Northern Ireland only, and is an addition to your statutory rights.
After Sales Service
If, having investigated the possible malfunctions on the chart on the previous page, you believe the appliance is not working correctly, please call our After Sales Service dept. on telephone number:
Gias Service -
Tel: 08705 400 600
Support Service
(Eire 018301 666)
text_image
MODE IN ITALY ENRIQUE EN ITALIE Mod. N. 3100878XXX XXXX G. TypeFig. 2
| Technical data | ||
| Max. load of dry laundryWater pressure | 8 kg0,05 ÷ 0,8 MPa | |
| MeasurementsWidthDepthHeight | 60 cm60 cm85 cm |
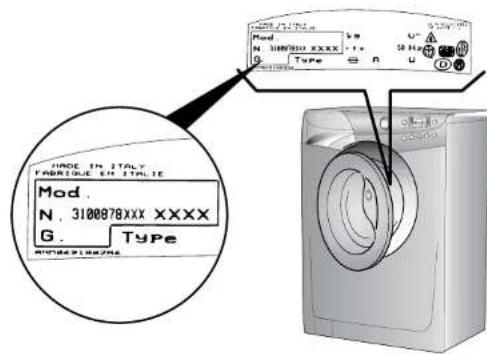
NB: For specifications regarding electrical data, see the data panel on the front of the washing machine (porthole area) - as shown in diagram above.

EC Appliance complies with European Directive 89/336/EEC, 73/23/EEC and subsequent amendments.
SETTING UP + INSTALLATION
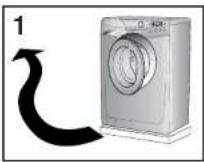
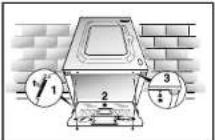
Remove the polystyrene base and place the machine near its permanent position (diagram 1).
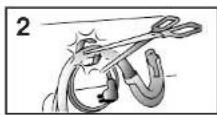
Carefully cut through the hose retaining clip at the rear of the appliance (diagram 2).
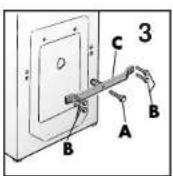
Unscrew the central bolt (A); unscrew the 4 lateral screws (B) and remove the cross piece (C) (diagram 3).
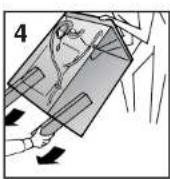
Lean the machine forward and remove the plastic bags containing the two polystyrene blocks at the sides, pulling downwards (diagram 4).
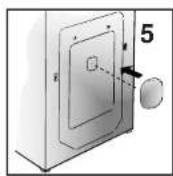
Press the plug (to be found in the envelope with the instructions) into the hole (diagram 5).
WARNING:
DO NOT LEAVE THE PACKAGING WITHIN REACH OF CHILDREN AS IT IS A POTENTIAL SOURCE OF DANGER.
Apply the insulation sheet of corrugated material to the base as shown.
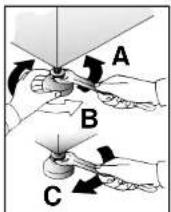
Use the 4 feet to level the machine with the floor:
a) Turn the nut clockwise to release the screw adjuster on the foot.
b) Rotate the foot to raise or lower it until it stands firmly on the ground.
c) Lock the foot in position by turning the nut anti-clockwise until it comes up against the bottom of the machine.
Note: we recommend you keep the transit bracket, braces and screws to immobilise the machine for future transit.
The Manufacturers will not be responsible for any possible damage to the machine caused by not following the rules relating to releasing the mechanism. The user is responsible for all costs of installation.
Water connection
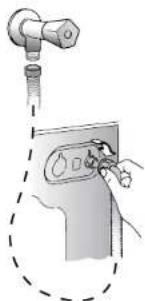
The appliance must be connected to the water mains using new hose-sets.
The old hose-sets should not be re-used.
The machine has an inlet hose with 3/4" B.S.P threaded end connection to attach between the threaded connector on the appliance and the cold water supply.
This machine only uses cold water, therefore only one hose is needed to connect to the cold water supply. Do not connect to the hot supply. Cold fill is an energy efficient system. Only the water required for the washing is heated. There is no loss of heat in the pipeline from a hot water tank or boiler to the machine.
natural_image
Illustration of a hand inserting a component into a device (no text or symbols visible)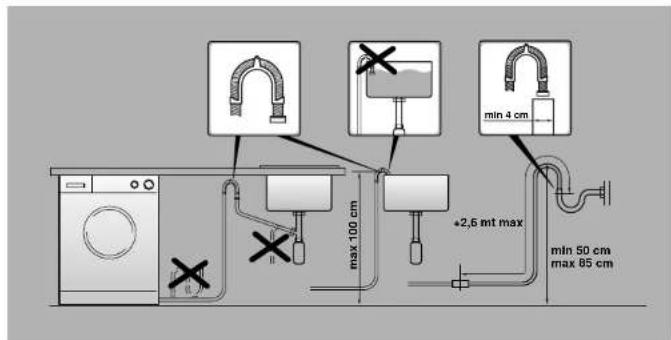
text_image
max 100 cm +2,6 mt max min 4 cm min 50 cm max 85 cmNote: it is advisable to turn off the tap after each wash to isolate the washing machine from the water supply.
For the washing machine to function properly the terminal end of the discharge hose (mouth) must be at a minimum of 50 cm and a maximum of 85 cm from the ground.
ELECTRICAL CONNECTIONS
After installation, the appliance must be positioned so that the plug is accessible.
If the plug we supply does not fit
CUT IT OFF AND DESTROY IT!
You can't use it on other appliances, and the exposed wires could be dangerous if plugged in.
To fit a replacement plug, proceed as follows:
Connect to the terminal in the plug
green and yellow wire marked with the letter E,
OR marked
with the symbol,
OR coloured green,
OR coloured green and yellow.
blue wire marked N
OR coloured black.
brown wire marked L
OR coloured red.
WARNING
This appliance must be earthed
Fuses and plugs
This appliance should be used only on a socket with a minimum rating of 13 Amp.
Our ready-fitted plug is already equipped with a 13 amp fuse which is BS 1362 ASTA approved. Any replacement should be exactly the same.
If the fuse cover is lost, do not use the plug until it is replaced. A correct replacement fuse cover (obtainable from your local retailer) must be the same colour as shown or named on the insert on the base of the plug.
The manufacturer declines all responsibility in the event of any printing mistakes in this booklet. The manufacturer also reserves the right to make appropriate modifications to its products without changing the essential characteristics.
HOOVER®
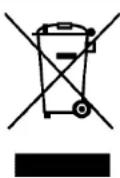
This appliance is marked according to the European directive 2002/96/EC on Waste Electrical and Electronic Equipment (WEEE).
By ensuring this product is disposed of correctly, you will help prevent potential negative consequences for the environment and human health, which could otherwise be caused by inappropriate waste handling of this product.
The symbol on the product indicates that this product may not be treated as household waste. Instead it shall be handed over to the applicable collection point for the recycling of electrical and electronic equipment. Disposal must be carried out in accordance with local environmental regulations for waste disposal.
For more detailed information about treatment, recovery and recycling of this product, please contact your local city office, your household waste disposal service or the shop where you purchased the product.

EN
06.10 - 41021296.A - www.argracastampa.it - Printed in Italy - Imprieme en Italie