
San Francisco 1119 - Grill tepro - Free user manual and instructions
Find the device manual for free San Francisco 1119 tepro in PDF.


| Product Type | Charcoal Barbecue Grill |
| Brand | tepro |
| Model | San Francisco 1119 |
| Dimensions (L x W x H) | Approx. 110 x 55 x 90 cm |
| Weight | Approx. 18 kg |
| Cooking Area | Approx. 2500 cm² (50 x 50 cm) |
| Fuel Type | Charcoal |
| Main Functions | Grilling, Smoking, Roasting |
| Material | Powder-coated steel, chrome-plated grill grate |
| Number of Grates | 1 main grate, 1 warming rack |
| Adjustable Air Vents | Yes, for temperature control |
| Ash Pan | Removable for easy cleaning |
| Wheels | 2 lockable wheels for mobility |
| Side Shelves | 2 foldable side shelves |
| Thermometer | Integrated lid thermometer |
| Safety Features | Heat-resistant handles, stable base, warning labels |
| Cleaning | Hand wash grate with mild soap, empty ash pan regularly |
| Spare Parts Availability | Replacement grates, ash pans, and thermometers available from tepro |
| Warranty | 2 years (typical) |
| Documentation | User manual available in PDF at notice-facile.com |
Frequently Asked Questions - San Francisco 1119 tepro
User questions about San Francisco 1119 tepro
0 question about this device. Answer the ones you know or ask your own.
Ask a new question about this device
Download the instructions for your Grill in PDF format for free! Find your manual San Francisco 1119 - tepro and take your electronic device back in hand. On this page are published all the documents necessary for the use of your device. San Francisco 1119 by tepro.
USER MANUAL San Francisco 1119 tepro
natural_image
Exterior view of a black and silver K-10 grill on a stand, no text or symbols visibleGB Instruction Manual "SAN FRANCISCO" KETTLE GRILL Charcoal BBQ
Version 2015/
Art. Nr. 1119
text_image
Exploded view diagram of a portable grill with numbered parts for identificationInhalt
text_image
Technical diagram of a mechanical assembly with labeled components A, B, and C, showing internal components and motion indicators.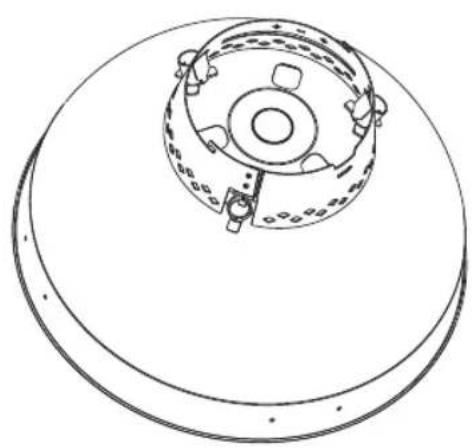
natural_image
Technical line drawing of a mechanical component with circular base and central hub (no text or symbols)natural_image
Technical diagram of a mechanical device with wheels and a dome base, showing directional arrows (no text or symbols)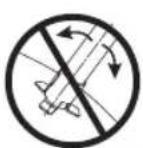
text_image
Technical diagram of a mechanical device with labeled components A and B, showing rotational and linear motion paths.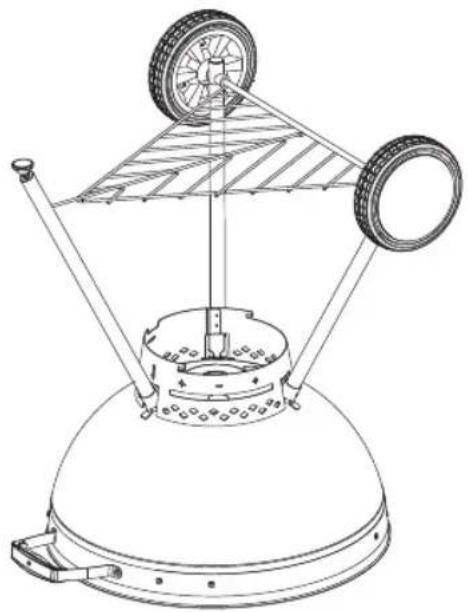
natural_image
Technical line drawing of a mechanical device with wheels and a dome base (no text or symbols)
natural_image
Line drawing of a portable stove with wheels and a bucket, showing mechanical components and directional arrows (no text or symbols)
natural_image
Technical line drawing of a portable grill with wheels and a central handle (no text or symbols)natural_image
Line drawing of a portable grill with wheels and a lid, no text or symbols presentnatural_image
Line drawing of a portable grill with a circular top and wheels, no text or symbols present10
D
natural_image
Technical line drawing of a portable grill with wheels and a circular heating element (no text or symbols)natural_image
Line drawing of a portable stove with three legs and a central dish (no text or symbols)D
natural_image
Line drawing of a portable grill with wheels and heat exchanger (no text or symbols)natural_image
Line drawing of a portable grill with wheels and a lid, showing heat transfer direction (no text or symbols)natural_image
Circular object with horizontal parallel lines, resembling a mesh or filter (no text or symbols)natural_image
Black oval-shaped baking pan with two side handles (no text or symbols visible)natural_image
Circular object with beige top and two black side handles, resembling a food item or plate (no text or symbols visible)natural_image
3D rendering of a dark gray wok with two side handles (no text or symbols)natural_image
White fabric bag with a small white mark on top (no visible text or symbols)natural_image
Pure curved line diagram without any text, numbers, or symbolsScope of delivery.... 20
Intended use 21
For your safety.... 21 - 23
Signal symbols....21
General safety instructions 21
Safety instructions 21 - 23
Assembly.... 23 - 28
Preparation 23
Required tools....23
Assembling the BBQ....24 - 28
Setting up the BBQ.... 28
Before grilling 28
Operation.... 28 - 29
Maintenance and Cleaning 30
Disposal.... 30
Declaration of conformity.... 31
Technical details.... 31
Service 31
Distributor 31
Matching accessories (not included in the delivery scope).... 32 - 33
Further matching accessories (not included in the delivery scope).... 34
Before using the device
After unpacking and before every use, check whether the item shows any signs of damage. Should this be the case, do not use the item, but notify your retailer.
The operating manual is based on the norms and regulations that are applicable in the European Union. In non-EU countries, observe country-specific directives and laws!

Before start-up, first read through the safety information and the operating manual carefully. Only by doing so will you be able to use all of the functions safely and reliably.
Keep the operating manual and pass it on to any third party that might own the BBQ after you.
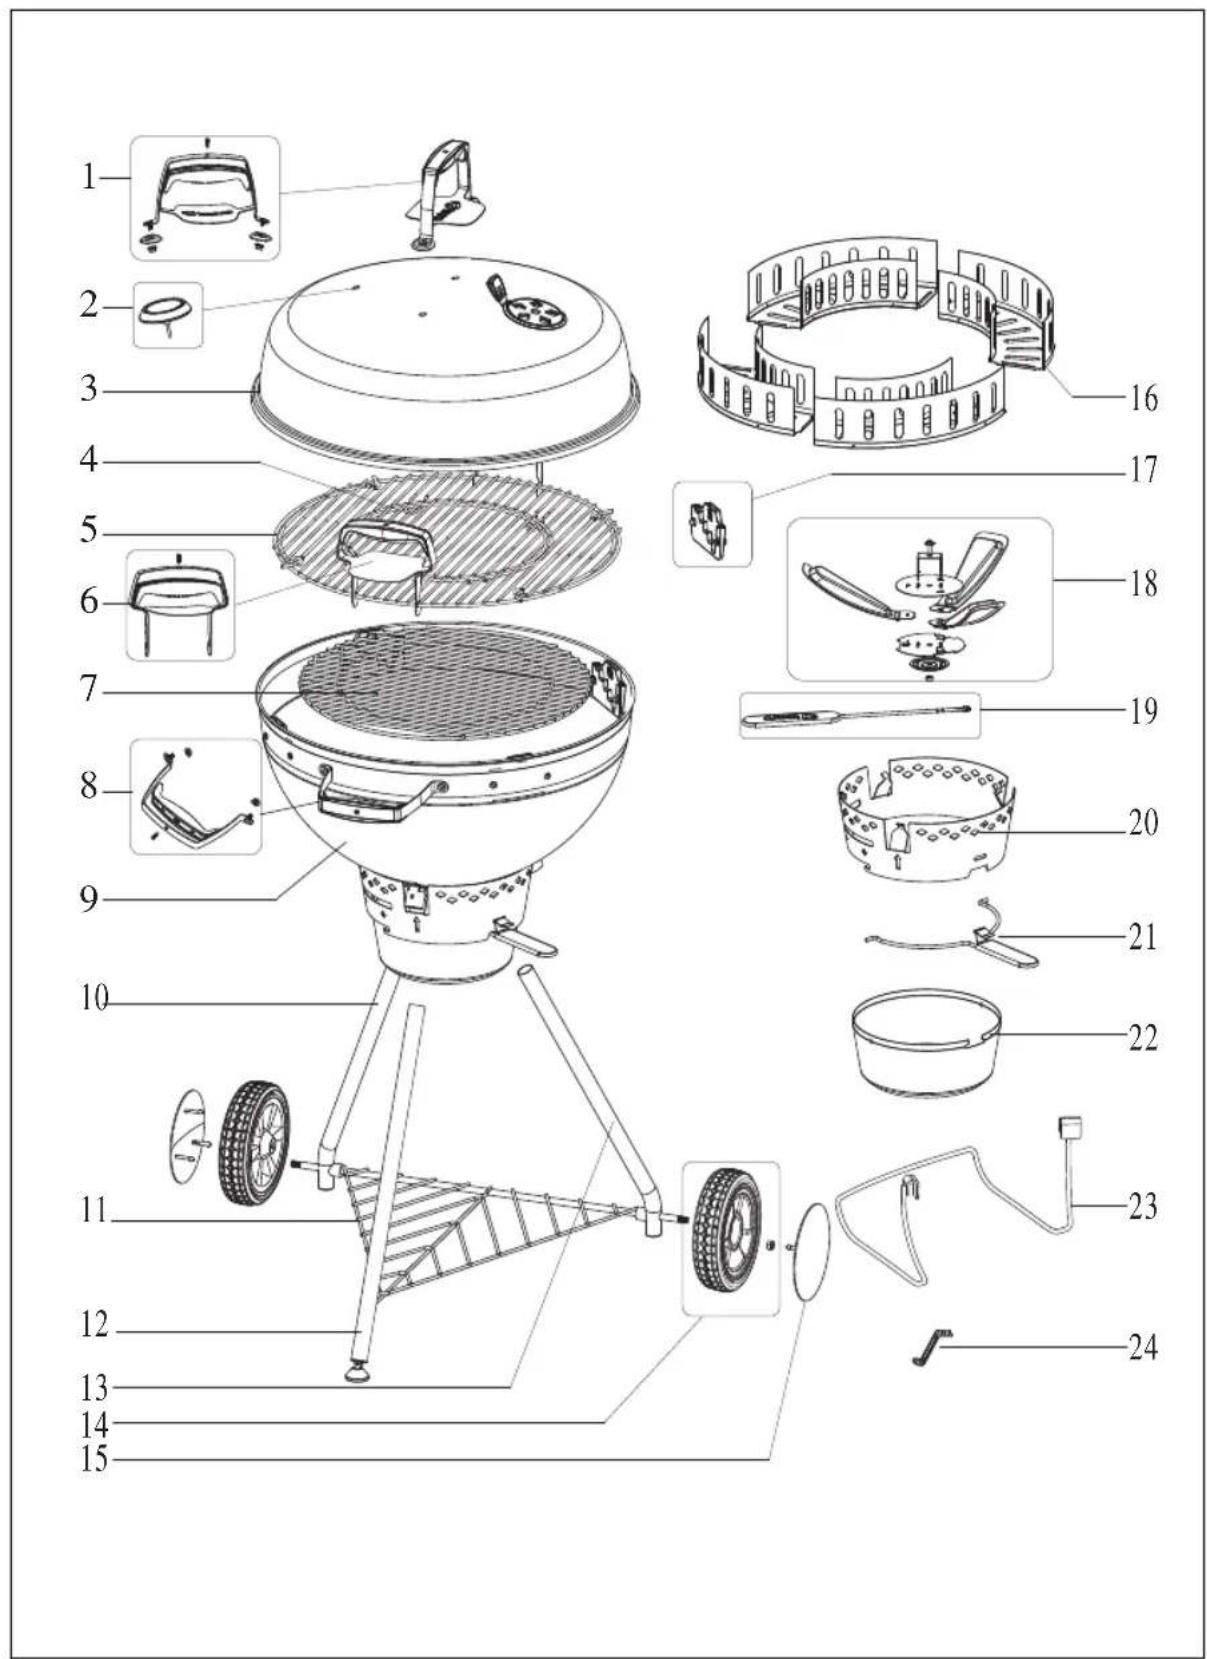
Scope of delivery
| No. | Description Quantity | |
| 1 Lid | handle 1 | |
| 2 Thermometer | 1 | |
| 3 Lid | 1 | |
| 4 BBQ | grate insert (removable) | 1 |
| 5 BBQ | grate 1 | |
| 6 BBQ | grate handle 2 | |
| 7 Charcoal | grate 1 | |
| 8 Fire | bowl handle 1 | |
| 9 Fire | bowl 1 | |
| 10 Left wheel leg | ||
| 11 Base rack | ||
| 12 Front leg | 1 | |
| 13 Right wheel leg | ||
| 14 Wheel | 2 | |
| 15 Wheel hub cap | 2 | |
| 16 Charcoal dividers | 4 | |
| 17 Functional part | 4 | |
| No. | Description Quantity | |
| 18 V | Ventilation and cleaning system | 1 |
| 19 V | Ventilation lever | 1 |
| 20 H | Holder for ash collecting cup | 1 |
| 21 H | Handle for ash collecting cup | 1 |
| 22 A | sh collecting cup | 1 |
| 23 Lid | holder | 1 |
| 24 A | assembly tool | 1 |
Please check that the delivery is complete and undamaged. Should a part be missing or defective, please contact your dealer.
Claims relating to damages or missing parts made after assembly has taken place or commenced will not be recognised.
Intended use
Use this BBQ to heat, cook and grill food.
This BBQ is intended exclusively for private, outdoor use and not for indoor or commercial use.
Only use the item as described in this operating manual. All other uses are considered improper and can lead to material damage or even to personal injuries.
The manufacturer accepts no liability for damages caused by improper use.
For your safety
Signal symbols
Danger High risk!

Failure to observe the warning can lead to potentially fatal injuries.
Attention Moderate risk!

Disregarding this warning can lead to property damage.
Caution Low risk!

Facts that should be respected when handling the device.
GENERAL SAFETY
INSTRUCTIONS
- to be observed in each use
- Do not use indoors!
- WARNING! Do not use spirit or petrol for lighting or relighting!
- Use only firelighters complying to EN 1860-3!
- WARNING! This barbecue will become very hot, do not move it during operation!
- WARNING! Keep children and pets away!
Safety instructions
Danger Fire hazard!

Live coals and BBQ components get very hot during operation and can start fires.
- It is essential that you have a fire extinguisher and first-aid kit ready and be prepared for an accident or fire.
- Place the BBQ on an even, horizontal, secure, heat-resistant and clean surface.
- Set up the BBQ with at least 1 m clearance from highly flammable materials such as awnings, wooden patios or furniture.
- Do not move the BBQ during use.
– Ignite the charcoal only in a sheltered location.
- Fill the BBQ with a max. 2 kg of charcoal.
GB
– Some foods produce flammable fats and juices. Clean the BBQ regularly, preferably after each use.
- Only tip out the ash once the charcoal has completely burned out and cooled down.
– Never leave the BBQ unattended during use.
Danger Risk of burning and accidents!

This device is not intended for use by persons (incl. children) with limited physical, sensory, or mental capacities or lacking experience and/or lacking knowledge.
- Such persons must be informed about the dangers of the device and supervised by a person responsible for their safety.
– Any modifications to the product represent a large safety risk and are forbidden. Do not undertake any unauthorised interventions yourself. In case of damages, repairs or other problems with the BBQ, contact our service point or a professional in your area. - Keep children and pets away from the device.
The BBQ, the charcoal and BBQ meat become very hot during use. Any contact can result in serious burns.
- Keep sufficient distance from the hot parts, since any contact can lead to severe burns.
– Always wear oven or BBQ gloves when grilling.
- Use only long-handled utensils with heat-resistant grips.
- Do not wear any clothing with wide sleeves.
- Use only dry lighters or special fluid lighters compliant with EN 1860-3 as firelighters.
- Let the BBQ cool down completely before cleaning and/or storage.
Danger Risk of deflagration!

Flammable liquids that are poured on the embers cause flash flames or deflagrations.
– Never use flammable liquids such as petrol or spirits.
– Nor put pieces of charcoal soaked in flammable liquid onto the embers.
Danger Risk of poisoning!

When burning charcoal, barbecue briquettes, etc., carbon monoxide is formed. This gas is odourless and can be fatal in closed spaces!
– Use the grill outdoors only!
Danger Health risk!

Do not use any decolourants or thinners to remove stains. These are harmful to health and must not come into contact with food.
Danger Risks to children!

While playing, children can become caught in the packaging film and choke.
- Do not let children play with the packaging films.
- Make sure that children do not put any small assembly parts into their mouths. They could swallow the parts and choke on them.
Danger Risk of injury!

Both the BBQ and individual parts have some sharp edges.
- Be careful with individual parts to prevent accidents and/or injury during assembly and use. Wear protective gloves if necessary.
- Do not set up the BBQ near entryways or high-traffic zones.
– Always exercise extreme caution while grilling. If distracted, you can lose control of the device.
– Always be attentive to and aware of what you are doing. Do not use this product if you are unfocussed or tired, or if you are under the influence of drugs, alcohol, or medications. Just one moment of carelessness during use of the product can lead to serious injuries.
Attention Risk of damage!

During use, the screws can loosen slowly and impair the BBQ's stability.
- Check the stability of the screws prior to each use. If necessary, tighten all of the screws again to ensure the BBQ is standing securely.
Attention Risk of damage!

Do not use any strong or grinding solvents or abrasive pads, since these can attack the surfaces and leave behind scrape marks.
Assembly
Preparation
Danger Risk of injury!

Failure to follow these instructions can lead to problems and risks while using the BBQ.
– Follow all of the assembly instructions listed here.
- First read through the assembly instructions completely.
- Take sufficient time for the assembly and establish an even work surface of one to two square metres.
- Small parts such as handles will probably be preassembled.
- Look out for sharp corners and wear protective gloves for assembly.
Required tools
The assembly tool (24) is included in the product contents.
GB
Assembling the BBQ
1. Unpack BBQ
Unpack the BBQ and dispose of all packaging materials. Keep the packaging materials out of the reach of children and dispose of them according to regulations after BBQ assembly. Pay attention to the illustration of the BBQ during assembly.
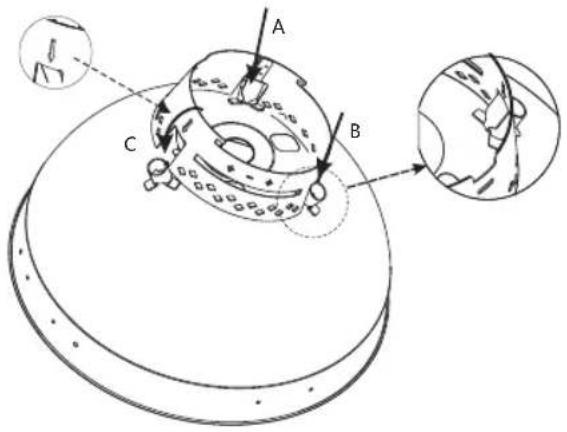
2. Attach the holder for the ash collecting cup (20) under the fire bowl (9). The arrow of the holder (20) must be pointing forwards. Make sure that the clips of the holder for the ash collecting cup (20) fully latch onto the three leg sockets.
text_image
Technical diagram of a mechanical assembly with labeled components A, B, and C, showing internal components and motion indicators.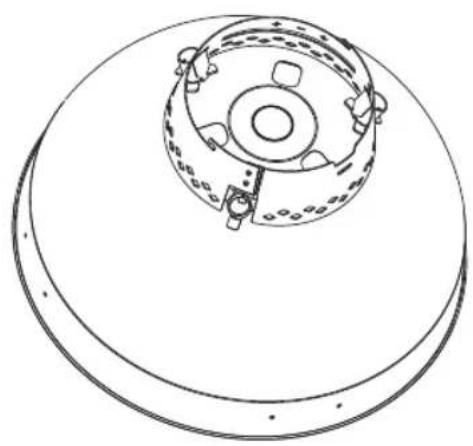
natural_image
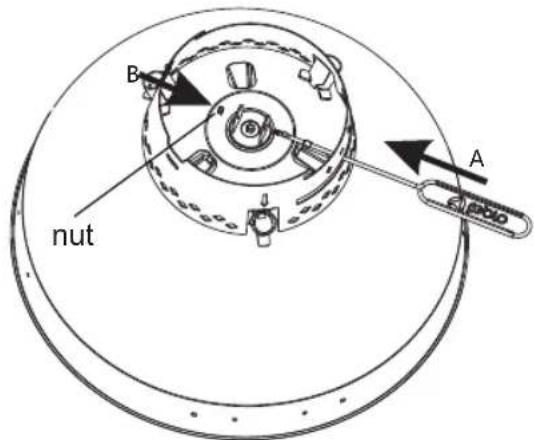
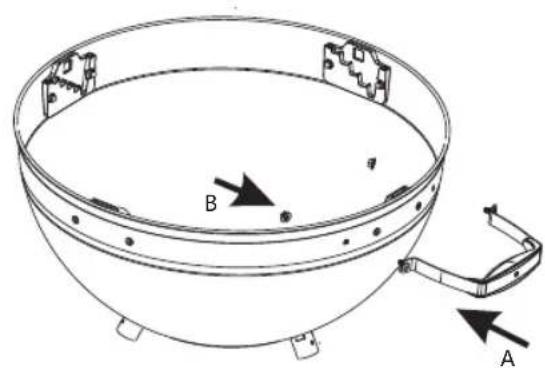
Technical line drawing of a mechanical component with circular base and central hub (no text or symbols)- Thread the ventilation lever (19) under the fire bowl (9) and secure with the nut.
text_image
B A nut- Attach the fire bowl handle (8) to the fire bowl (9).
text_image
B A- Attach the wheel legs (10,13), wheels (14) and wheel hub caps (15) to the base rack (11). Note the R and L markings on the legs and place the wheels with the wedge toward the inside.
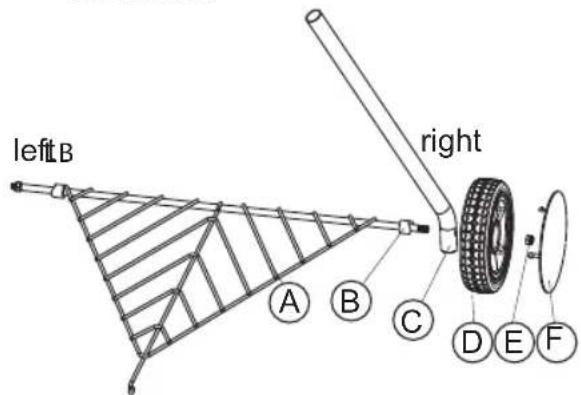
text_image
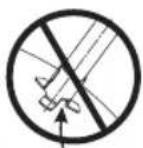
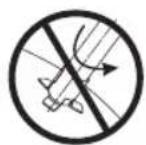
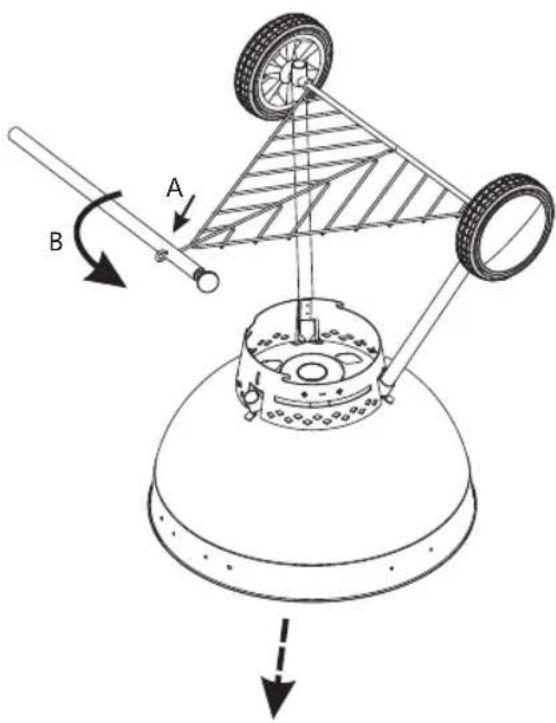
left B right A B C D E F- Attach the wheel legs (10,13) and the base rack (11) to the fire bowl (9). Warning! Just plug in the wheel legs, do not turn them.
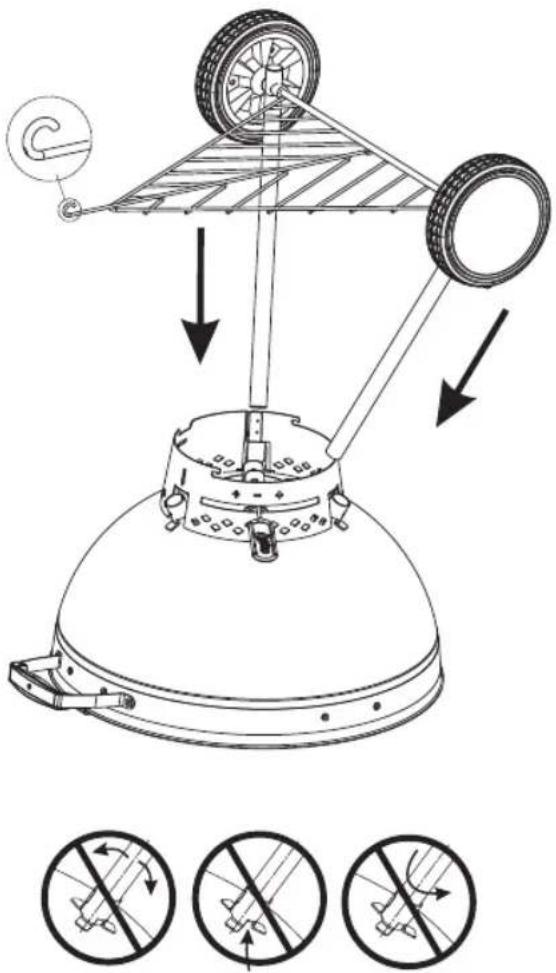
text_image
Technical diagram illustrating mechanical assembly with labeled components and directional arrows, accompanied by three circular diagrams below showing rotational motion.- Hook the front leg (12) to the base rack and then plug it under the fire bowl. Warning! Just plug in the front leg, do not turn it.
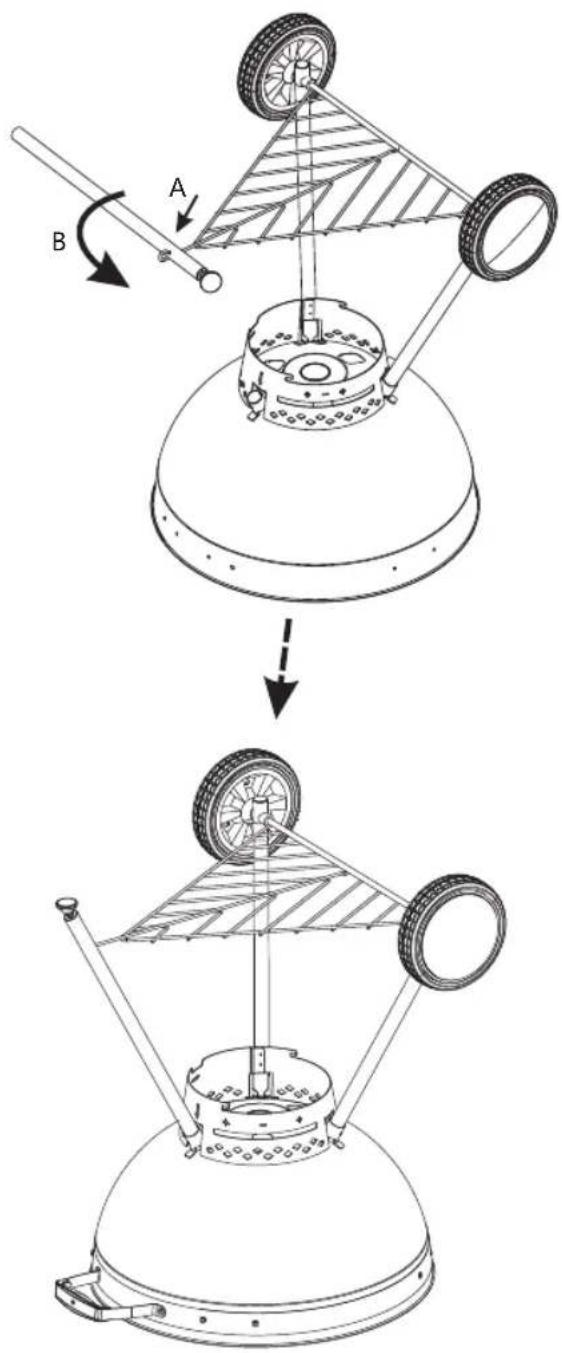
text_image
Technical diagram illustrating a mechanical assembly with labeled components A and B, showing a top-down view of a dome-like structure.
- Attach the handle for the ash collecting cup (21) to the ash collecting cup (22). To attach it to the holder (20), hook it in sideways first and then let the front tab latch on.
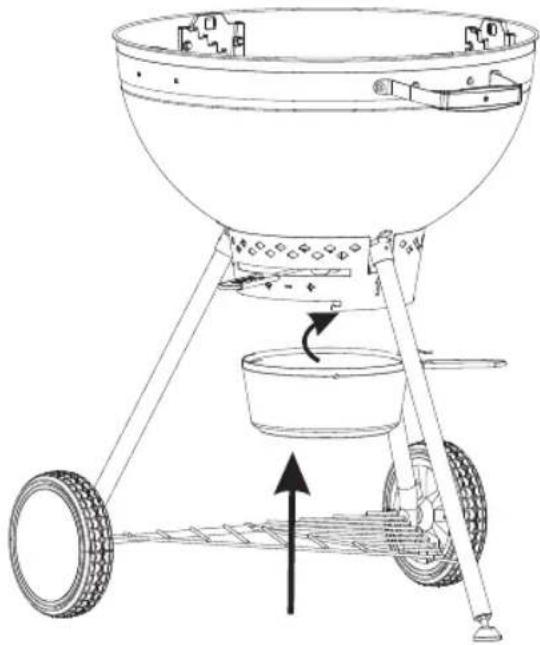
natural_image
Line drawing of a portable stove with wheels and a central container, showing mechanical components and directional arrows (no text or symbols)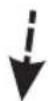
natural_image
Technical line drawing of a portable sunflower sprayer with wheels and a central container (no text or symbols)- Put in the charcoal grate (7).
natural_image
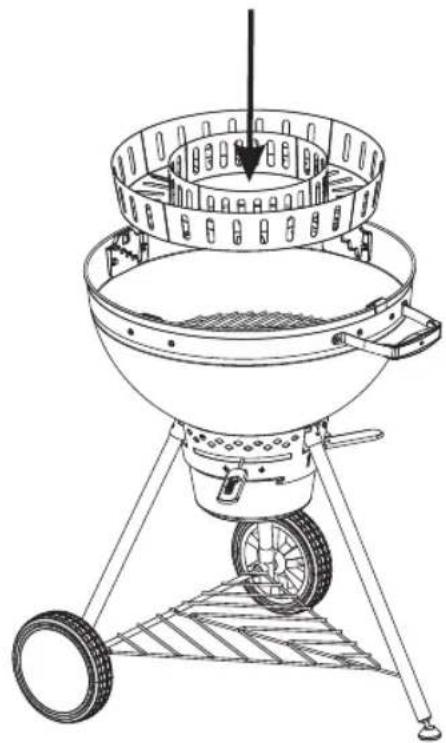
Line drawing of a portable grill with wheels and a lid, no text or symbols present- Put in the charcoal dividers (16).
natural_image
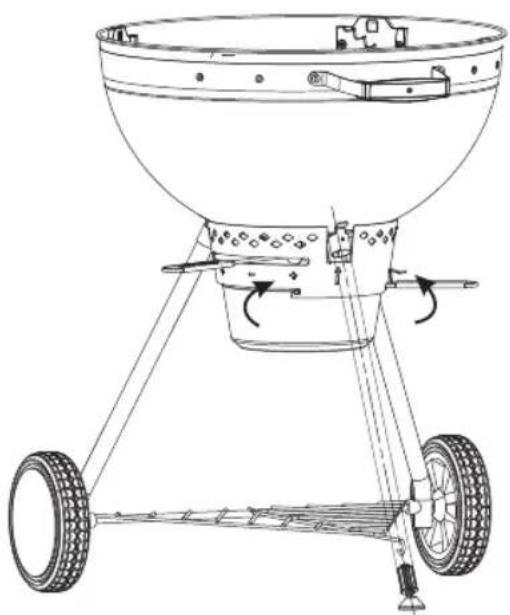
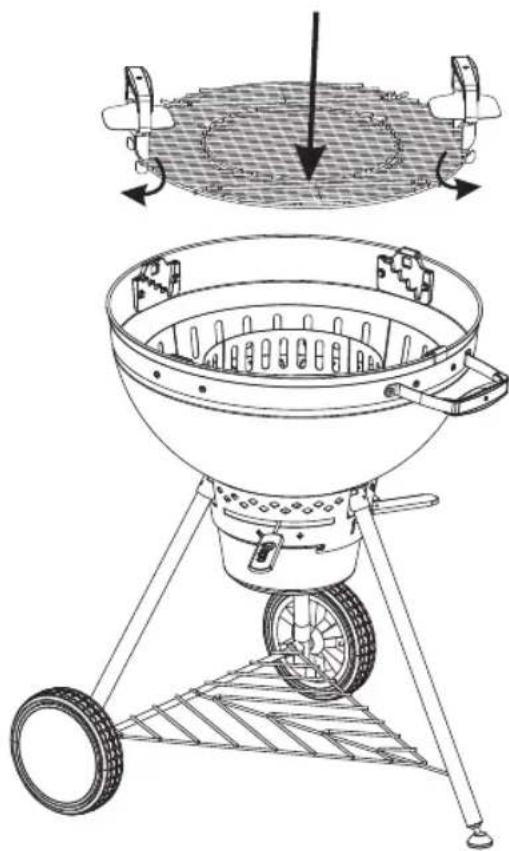
Line drawing of a portable grill with a circular top and wheels, no text or symbols present- Place the BBQ grate (5) with the BBQ grate handles (6) on the functional part (17).
natural_image
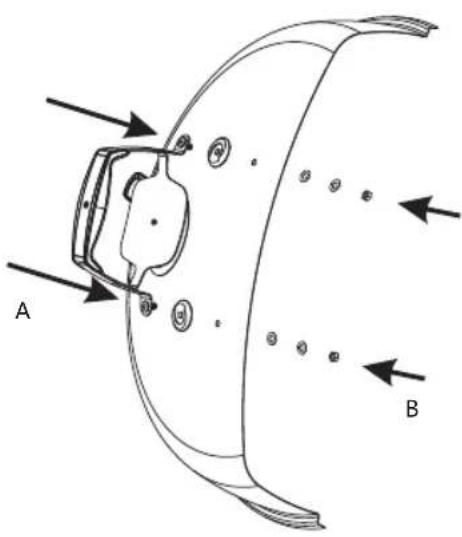
Technical line drawing of a portable grill with a circular lid and wheels, showing structural change (no text or symbols)- Attach the lid handle (1).
text_image
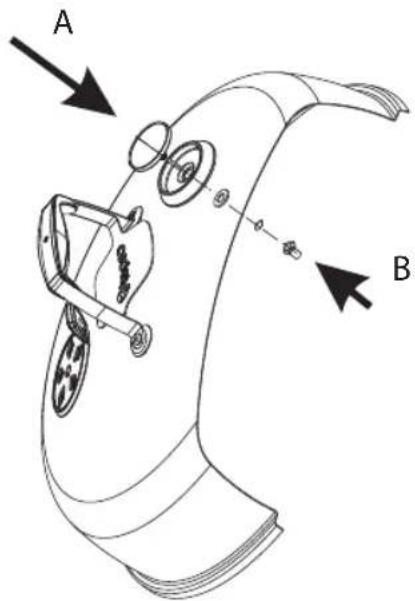
A B- Attach the thermometer (2) to the lid (3). Attach the parts to the inside of the cover in the following order: washer, snap ring, thumbscrew.
text_image
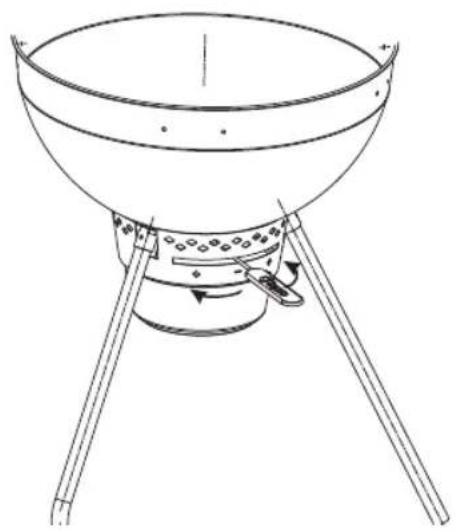
A B- Test the ventilation system.
natural_image
Line drawing of a portable stove with three legs and a central dish, no text or symbols presentGB
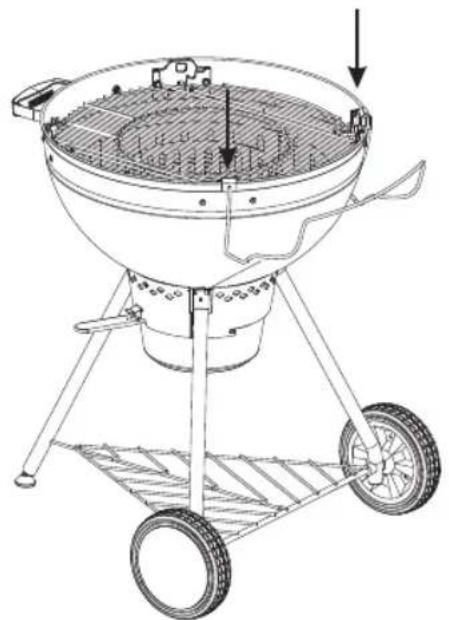
- Hook the lid holder (23) into the grooves of the functional part (17) at the fire bowl.
natural_image
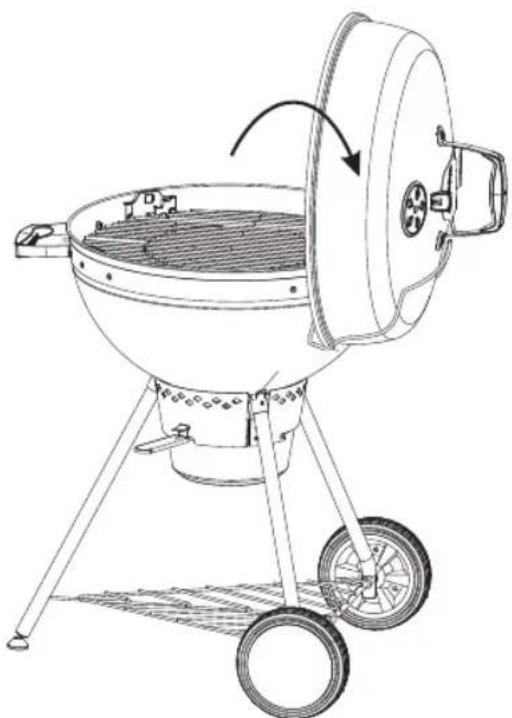
Technical line drawing of a portable grill with wheels and heat exchanger (no text or symbols)- Hook in the lid (3).
natural_image
Line drawing of a portable grill with wheels and a lid, showing heat transfer or cooling mechanism (no text or symbols)Important: All screws must be tightly fastened.
Setting up the BBQ
Attention Risk of damage!

During use, the screws can loosen slowly and impair the BBQ's stability.
- Check the stability of the screws prior to each use. If necessary, tighten all of the screws again to ensure the BBQ is standing securely.
- Before use, place the BBQ on an even, sturdy surface outdoors.
Before grilling
- Prior to first use, wash the BBQ grate insert and the BBQ grate (4,5) in warm soapy water.
- Pre-firing
Prior to the first grilling, the BBQ must be pre-fired for a minimum of 30 minutes at a temperature of 100 °C - 200 °C.
This is necessary in order to make the inside ready for barbecuing.
Operation
Danger Risk of burning!

The BBQ, the charcoal and BBQ meat become very hot during use. Any contact can result in serious burns.
- Keep sufficient distance from the hot parts, since any contact can lead to severe burns. Always wear oven or BBQ gloves when grilling.
- Use only long-handled utensils with heat-resistant grips.
- Do not wear any clothing with wide sleeves.
-
Use only dry lighters or special fluid lighters compliant with EN 1860-3 as firelighters.
-
Remove the lid, and the BBQ grate with the BBQ grate insert.
- Place 1-2 solid firelighters in the middle of the charcoal grate (7). Pay attention to the manufacturer's instructions on the packaging. Light the firelighters with a match.
- Layer a maximum of 2 kg of charcoal around the firelighters.
- Prior to first use, the BBQ must be pre-fired for a minimum of 30 minutes. See section Before grilling.
- As soon as the charcoal is glowing, spread them as needed on the charcoal dividers (16). To do this, use a suitable fireproof tool with a long, fireproof handle.
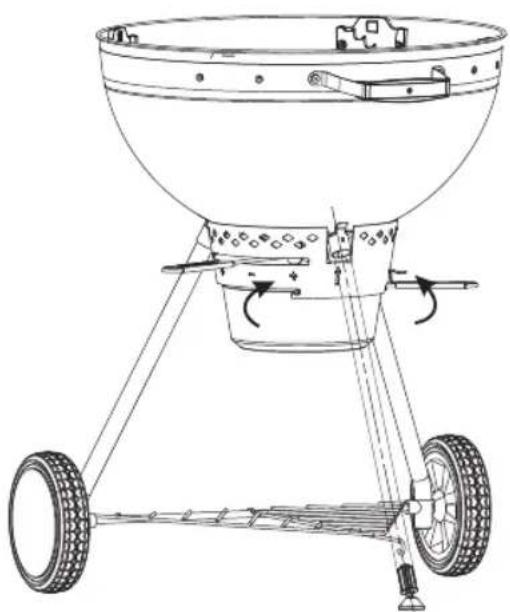
- The ventilation lever (19) is used to regulate the air supply and this can thereupon be controlled. To do this, look for the "+" and "-" signs on the holder for the ash collecting cup (20). The more the ventilation lever is set to "-", the less air is supplied.
- Only place the BBQ meat on the grate when the charcoal is covered with a bright layer of ash.
-
Place the BBQ grate on the bracket in the fire bowl.
-
In the direct grilling method, the BBQ meat is placed directly over the evenly distributed coals on the BBQ grate and cooked at high temperatures of approx. 280 °C to 320 °C. This method is suitable for sausages and meats that are grilled for no longer than 25 minutes.
-
Set the lid on the BBQ to prevent the formation of flames. Regulate the air supply with the ventilation disc on the lid and on the ash collecting cup. From time to time, check the BBQ meat and turn it around. Prevent the BBQ meat from becoming too dark.
-
In the indirect grilling method, the charcoal is separated with the help of the charcoal dividers (16) and placed laterally on the charcoal grate. The BBQ meat is placed in the centre of the BBQ grate insert. If necessary, place an aluminium tray between the charcoal dividers to collect fat or gravy. All 4 charcoal dividers plugged together make up a ring. This method is suitable, for example, for whole chicken and roasts, but also for bread and pizza. Always close the lid for indirect grilling and regulate the air supply with the ventilation disc. It is not necessary to turn the BBQ meat. The temperature should be between 180 °C and 220 °C.
-
With matching inserts, the BBQ grate can be used for different purposes. You can find further information in the chapter 'Matching Accessories' starting page 32.
Maintenance and Cleaning
Your grill is made of high-quality materials. To clean and maintain the surfaces, please heed the following instructions:
Danger Risk of burning!

Let the grill cool down completely before cleaning.
- Only tip out the ash when the fuel has completely burned out.
Danger Health risk!

Do not use any decolourants or thinners to remove stains. These are harmful to health and must not come into contact with food.
Attention Risk of damage!

Do not use any strong or grinding solvents or abrasive pads, since these can attack the surfaces and leave behind scrape marks.
- Let the fuel burn out completely after grilling. This eases the cleaning effort by burning away excess fat and BBQ residues.
-
Remove the cold ashes. It is very important you remove the ash before moisture comes into contact with the cold ash. Ash contains salt and affects the inside of the ash collection tray when damp. Therefore the ash collection tray can be damaged by rust over the years.
-
Clean the BBQ regularly, at best after every use.
- Remove the BBQ grate insert and the BBQ grate (4,5) and clean the parts thoroughly with soapy water. Rinse the parts with clear water. Dry the BBQ grate insert and the BBQ grate thoroughly.
- Use a wet sponge to remove loose residue from the grill.
- Use a soft, clean cloth for drying. Do not scratch the surfaces when wiping them dry.
- Clean the internal and external surfaces generally with warm, soapy water.
- Tighten all screws before every use to guarantee the stability of your BBQ at all times.
- IMPORTANT: The BBQ should always be stored somewhere where it is protected from moisture.
Disposal

The packaging is made from environmentally friendly materials, which you can dispose of at your local recycling points.
Do not under any circumstance dispose of the BBQ in normal household waste! Dispose of it at an approved disposal business or at your community disposal facility. Respect the currently valid regulations. If in doubt, get in touch with your disposal facility.
Declaration of conformity
This product is in compliance with the applicable European and national Directives (DIN EN 1860-1).
Technical details
Product: Item No. 1119
"San Francisco"
Kettle Grill
Weight: approx. 19.3 kg
Overall dimension,
BBQ assembled: approx. 80 x 65 x 110 cm (W x D x H)
Grill surface: approx. ∅ 53 cm
Max. amount of fuel: 2 kg max.
Service
Please contact our service point for assistance with technical questions. This product was carefully manufactured and packaged. Should you nevertheless have a complaint, our employees are more than happy to assist.
Subject to technical modifications and typographical errors.
Distributor
tepro Garten GmbH
Matching accessories (not included in the delivery scope)
Available over-the-counter and online.
Step 1: Remove the centre of the grid

text_image
and the door to a new grilling dimension opens for youStep 2: Attach the desired rack inlay

text_image
Sear your food in the twinkle of an eye and produce the typical steak pattern
text_image
Ideal for everything that should be fried, whether it's eggs, vegetables or potatoes
text_image
Bread, pizza and tarte flambée - turn your grill into an oven
text_image
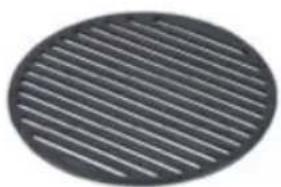
Ideally suited for vegetable dishes and Asian mealsCast Iron BBQ Grate Insert
tepro Item Number 8571
natural_image
Circular object with horizontal parallel lines, resembling a mesh or filter (no text or symbols)- For inserting into the grate in the grate system, approx. ∅ 57 cm
- Cast iron BBQ grate, approx. ∅ 30.5 cm
GB
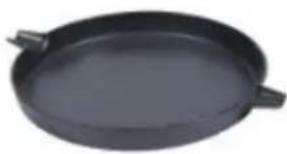
Cast Iron Pan Insert
tepro Item Number 8573
natural_image
Black oval-shaped cooking pan with side handles (no text or symbols visible)- For inserting into the grate in the grate system, approx. ∅ 57 cm
- Cast iron pan, approx. ∅ 31.7 x 3.5 cm
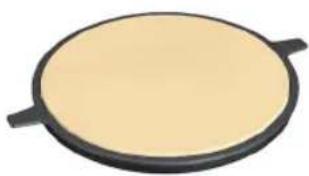
Pizza Stone Insert
tepro Item Number 8572
natural_image
Circular object with beige top and two side handles, resembling a food or baking pan (no text or symbols visible)- For inserting into the grate in the grate system, approx. ∅ 57 cm
– Pizza stone made of cordierite, approx. ∅ 28.5 cm
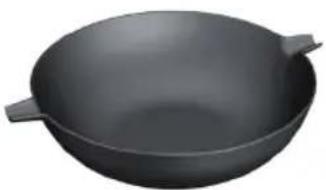
Cast Iron Wok Insert
tepro Item Number 8580
natural_image
3D rendering of a dark wok with two side handles (no text or symbols)- For inserting into the grate in the grate system, approx. ∅ 57 cm
- Cast iron wok approx. ∅ 35.3 × 10 cm
GB
Further matching accessories (not included in the delivery scope)
Available over-the-counter and online.
Universal Dust Cover for Kettle Grill (Large)
tepro Item Number 8601

natural_image
White fabric bag with a pointed tip and visible stitching (no text or symbols)- Made from high-quality, durable, polyester fabric 300 x 250D
– with water-repellent PVB coating - resistant to UV rays
- ventilation holes
– with Velcro fastener - Material:
Exterior: PVB (polyvinyl butyral)
Interior: 100% polyester
- Hood dimensions approx. 73 x 90 cm (∅xH)
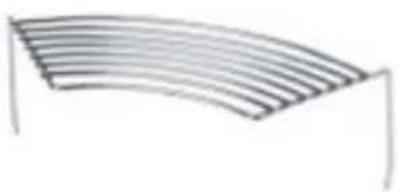
Warming rack ∅ 57 cm, set of 2
tepro Item Number 8581
natural_image
Pure curved line diagram without any text, numbers, or symbols- For hooking into the Sacramento (Item 1117) and San Francisco (Item 1119) ∅ 57 cm
- 2 chrome-plated warming racks, surface approx. 34.6 × 14.7 cm each