
LC4745 - Dishwasher VOX - Free user manual and instructions
Find the device manual for free LC4745 VOX in PDF.


| Product Type | Dishwasher |
| Brand | VOX |
| Model | LC4745 |
| Capacity | 10 place settings |
| Height | 850 mm (820 mm without worktop) |
| Width | 450 mm |
| Depth | 598 mm |
| Net Weight | 33.8 kg |
| Power Supply | 220-240 V, 50 Hz, 1900 W |
| Heating Power | 1800 W |
| Pump Power | 100 W |
| Drain Pump Power | 30 W |
| Current | 10 A |
| Water Pressure Range | 0.03 - 1 MPa |
| Energy Efficiency Class | A++ |
| Annual Energy Consumption | 211 kWh (based on 280 cycles) |
| Annual Water Consumption | 3080 L (based on 280 cycles) |
| Drying Efficiency Class | A |
| Noise Level | 52 dB(A) |
| Number of Programmes | 7 (including Eco, Rapid, Delicate, Daily, Super 50 min, Intense, Pre-wash) |
| Standard Programme | Eco (198 min, 0.73 kWh, 11.0 L) |
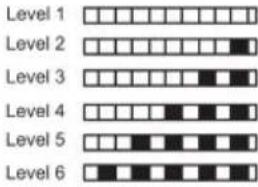
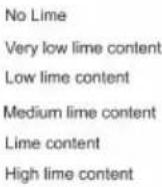
| Water Softener | Adjustable salt consumption (levels 1-6) |
| Rinse Aid Dispenser | Adjustable dosage (levels 1-5) |
| Filter System | Micro, coarse, and metal/plastic filters |
| Safety Features | Child lock, door safety, aquastop (on some models) |
Frequently Asked Questions - LC4745 VOX
User questions about LC4745 VOX
0 question about this device. Answer the ones you know or ask your own.
Ask a new question about this device
Download the instructions for your Dishwasher in PDF format for free! Find your manual LC4745 - VOX and take your electronic device back in hand. On this page are published all the documents necessary for the use of your device. LC4745 by VOX.
USER MANUAL LC4745 VOX
natural_image
Abstract black-and-white geometric pattern with diagonal stripes inside a circle (no text or symbols)VOX
ELECTRONICS
LC - 4745IX
OPERATING INSTRUCTIONS DISHWASHER
UPUTSTVO ZA UPOTREBU MAŠINA ZA SUDOVE
УПАТСТВА ЗА РАКУВАНЬЕ МАШИНА ЗА МИЕНЬЕ САДОВИ
GBR Dishwasher / User Manual
natural_image
Simple line drawing of a rectangular container with a horizontal bar at the top (no text or symbols)LC4745IX
CONTENTS
- Technical specifications .... 4
• C onformity with the standards and Test data 4
Safety information and Recommendations.... 5
- R recycling 5
- S safety information 5
- R recommendations 8
- I tems not suitable for dishwashing .... 9
Installing the machine 9
- P positioning the machine 9
- W water connections 10
- W water inlet hose 11
- W water outlet hose 12
- E electrical connection.... 13
- F itting the machine undercounter 14
- P prior to using the machine 16
Preparing the machine for use 16
• T he importance of water decalcification 16
- F illing with salt 16
- T esting strip.... 17
- A djusting salt consumption.... 17
• D etergent usage .... 19
- F illing the detergent compartment.... 19
• C combined detergent .... 19
- F illing with rinse aid and making the setting.... 20
Loading your dishwasher 21
- Dish rack 21
• A Alternative basket loads 23
Programme descriptions 25
- P programme items 25
Programme Selection and Operating the Machine 26
- Operating the Machine ... 28
- Programme Monitoring .... 28
- Changing the Programme .... 28
- Cancelling the Programme 29
- Switching the Machine Off 29
Maintenance and Cleaning 30
- F filters 30
- S prayarms 31
• H ose filter 31
Failure codes and what to do in case of failure 32
Practical and useful information.... 34
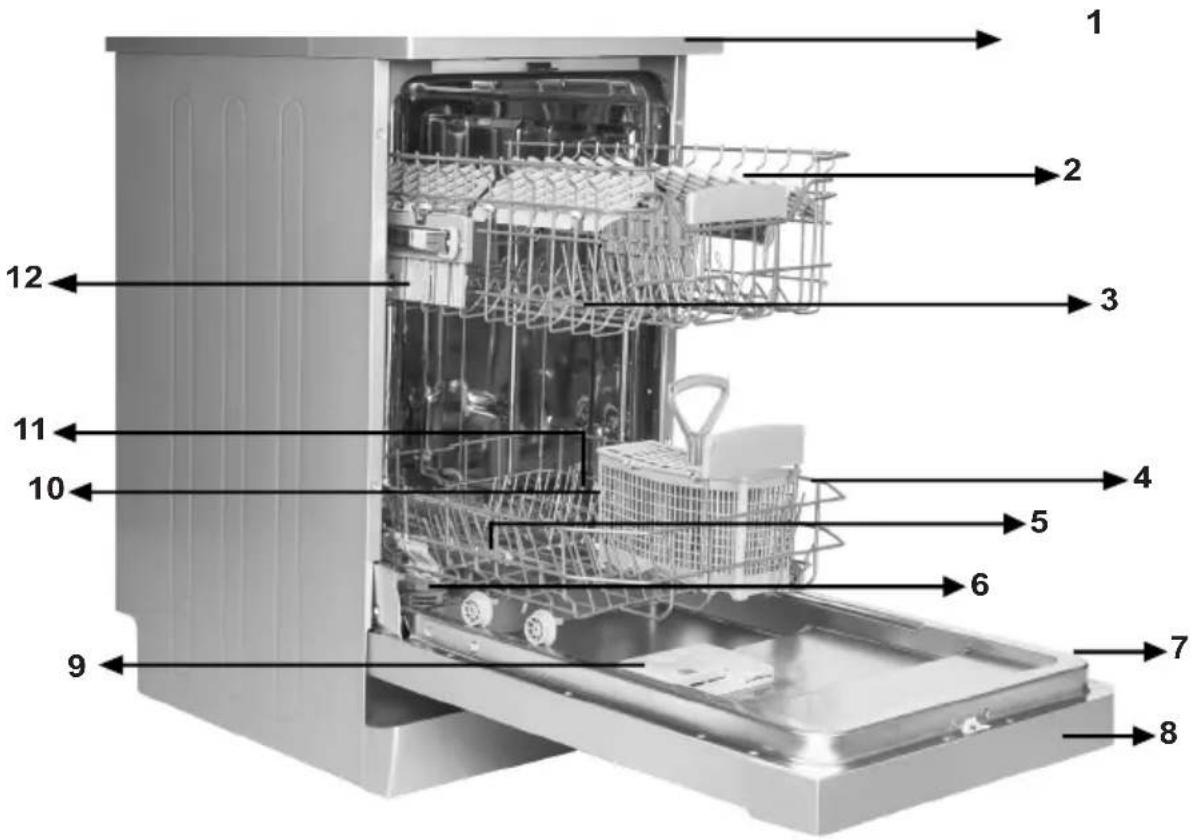
- Worktop
- Upper basket with racks
- Upper spray arm
- Lower basket
- Lower spray arm
-
Filters
-
Rating plate
- Control Panel
- Detergent and rinse-aid dispenser
- Cutlery basket
- Salt dispenser
- Upper basket track latch
natural_image
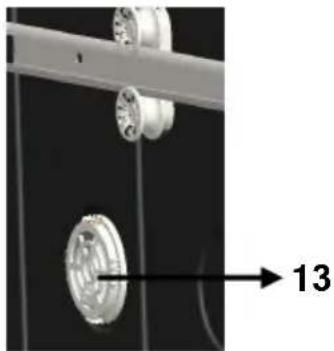
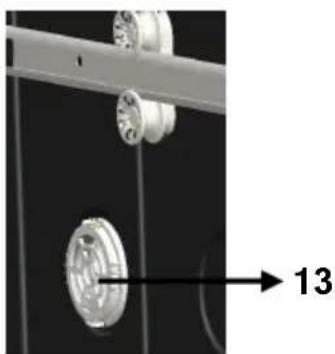
Close-up of mechanical components with a numbered arrow pointing to a circular component (no text or symbols visible)Active Drying Unit: This system provides better drying performance for your dishes.
Technical specifications
| Capacity 10 place settings | |
| Height 850 mm | |
| Height (without worktop) | 820 mm |
| Width 450 mm | |
| Depth 598 mm | |
| Net Weight | 33,800kg |
| Electricity input 220-240 | V , 50 Hz |
| Total Power 1900 W | |
| Heating Power 1800 W | |
| Pump Power 100 W | |
| Drain Pump Power 30 W | |
| Water supply pressure 0 | .03 MPa (0,3 bar)-1 MPa (10 bar) |
| Current 10 A |
Conformity with the standards and Test data / EU Declaration of Conformity
This product meets the requirements of all applicable EU directives with the corresponding harmonised standards, which provide for CE marking.
Important Note for User: For softcopy of this user manual, please contact following address:
"dishwasher@standardtest.info". In your e-mail, please provide the model name and serial number (20 digits) which you can find on the appliance door.
SAFETY INFORMATION AND RECOMMENDATIONS
Recycling
- Certain components and the packaging of your machine have been produced from recyclable materials.
- Plastic parts are marked with international abbreviations: (>PE<, >PS<, >POM<, >PP<,)
- Cardboard parts have been produced from recycled paper and they should be disposed of into waste paper collection containers for recycling.
- Such materials are not suitable for being disposed of into garbage bins. They should be delivered to recycling centres instead.
- Contact relevant centres in order to obtain information on methods and points of disposal.
Safety Information
When you take delivery of your machine
- Check for any damage to your machine or to its packaging. Never start a machine damaged in any way, make sure to contact an authorised service.
- Unwrap the packaging materials as indicated and dispose of them in accordance with the rules.
The points to pay attention during machine installation
- Choose a suitable, safe and level place to install your machine.
- Carry out the installation and connection of your machine by following the instructions.
- This machine should be installed and repaired by an authorised service only.
- Only original spare parts should be used with the machine.
-
Before installing, be sure that the machine is unplugged.
-
Check whether the indoor electrical fuse system is connected according to the regulations.
- All electrical connections must match the values indicated on the rating plate.
- Pay special attention and be sure that the machine does not stand on the electricity supply cable.
- Never use an extension cord or a multiple socket for making a connection. The plug should be comfortably accessible after the machine has been installed.
• After installing the machine to a suitable place, run it unloaded for the first time.
In daily use
- This machine is for household use; do not use it for any other purpose. Commercial usage of the dishwasher will void the guarantee.
- Do not get up, sit or place a load on the open door of the dishwasher, it may fall over.
- Never put into the detergent and rinse aid dispensers of your machine anything other than those detergents and rinse aids which are produced specifically for dishwashers. Our company will not be responsible for any damage that might occur in your machine otherwise.
- The water in the machine's washing section is no drinking water do not drink it.
- Due to danger of explosion, do not put into the machine’s washing section any chemical dissolving agents such as solvents.
- Check whether plastic items are heat-resistant before washing them in the machine.
- This appliance can be used by children aged from 8 years and above and persons with reduced physical, sensory or
mental capabilities or lack of experience and knowledge if they have been given supervision or instruction concerning use of the appliance in a safe way and understand the hazards involved. Children shall not play with the appliance.Cleaning and user maintenance shall not be made by children without supervision.
- Do not put into your machine those items which are not suitable for dishwashing. Also, do not fill any basket above its capacity. Our company will not be responsible for any scratch or rust to form on the inner frame of your machine due to basket movements otherwise.
- Especially because hot water may flow out, the machine door should not be opened under any circumstances while the machine is in operation. In any case, a safety devices ensures that the machine stops if the door is opened.
- Do not leave your dishwasher's door open. Failure to do so may lead to accidents.
- Place knives and other sharp-ended objects in the cutlery basket in blade-down position.
- If the supply cord is damaged, it must be replaced by the manufacturer, its service agent or similarly qualified persons in order to avoid a hazard.
- This appliance is not intended for use by persons (including - children) with reduced physical, sensory or mental capabilities, or lack of experience and knowledge, unless they have been given supervision or instruction concerning use of the appliance by a person responsible for their safety.
- If EnergySave option is selected as "Yes", The door will be opened at the end of the program. Do not force to close the door to avoid harm auto door mechanism during 1 minute. The door must be open during 30 minutes to get effective drying.(in models with auto door opening system)
Warning: Do not stand in front of the door after the signal sounds belonging auto-open.
For your children's safety
- After removing the machine’s packaging, make sure that the packaging material is out of reach of children.
- Do not allow children to play with or start the machine.
- Keep your children away from detergents and rinse aids.
- Keep children away from the machine while it is open because there may still be residues of cleaning substances inside the machine.
- Be sure that your old machine does not pose any threat to your children. Children are known to have gotten themselves locked in old machines. To forestall such a situation, break your machine's door lock and tear off the electrical cables.
In case of malfunctioning
- Any malfunction in the machine should be repaired definitely by qualified persons. Any repair work performed by anyone other than the authorised service personnel will cause your machine to be left outside the scope of warranty.
- Prior to any repair work on the machine, be sure that the machine is cut off from the mains.Switch off the fuse or unplug the machine.Do not pull by the cable when unplugging. Make sure to turn off the water tap.
Recommendations
- For energy and water saving, remove coarse residues on your dishes before placing the dishes into the machine. Start your machine after having fully loaded it.
- Use the pre-wash programme only whenever necessary.
- Place such hollow items as bowls, glasses and pots into the machine in such a way that they will face down.
- You are recommended not to load into your machine any dishes different or more than indicated.
Items not suitable for dishwashing:
- Cigarette ashes, candle leftovers, polish, paint, chemical substances, iron-alloy materials;
- Forks, spoons and knives with wooden or bone, or ivory or nacre-coated handles; glued items, items soiled with abrasive, acidic or base chemicals.
- Plastic items that are not heat-resistant, copper or tin-coated containers.
- Aluminium and silver objects (they may discolour, become dull).
- Certain delicate glass types, porcelains with ornamental printed patterns as they fade even after the first wash; certain crystal items as they lose their transparency over time, adhered cutlery that is not heat-resistant, lead crystal glasses, cutting boards, items manufactured with synthetic fibre;
- Absorbent items as sponges or kitchen rags are not suitable for dishwashing.
Warning: Take care to buy dishwasher-proof sets in your future purchases.
INSTALLING THE MACHINE Positioning the machine
When determining the place to put your machine on, take care to choose a place where you can easily load and unload your dishes.
Do not put your machine in any location where there is the probability for the room temperature to fall below 0^ C.
Before positioning, take the machine out of its packaging by following the warnings located on the package.
Position the machine close to a water tap or drain. You need to site your machine, taking into consideration that its connections will not be altered once they are made.
Do not grip the machine by its door or panel in order to move it.
Take care to leave a certain clearance from all sides of the machine so that you can comfortably move it back and forth during cleaning.
Make sure that the water inlet and outlet hoses do not get squeezed while positioning the machine. Also, make sure that the machine does not stand on the electrical cable.
Adjust the machine's adjustable feet so that it can stand level and balanced. Proper positioning of the machine ensures problem-free opening and closing of its door.
If the door of you machine does not close properly, check if the machine is stable on the floor it stands; if not, adjust the adjustable feet and ensure its stable position.
Water connection
Be sure that the indoor plumbing is suitable for installing a dishwasher. Also, we recommend that you fit a filter at the entrance of your place or apartment so as to avoid any damage to your machine because of any contamination (sand, clay, rust etc.) that might be occasionally carried in through the mains water supply or the indoor plumbing, and to forestall such complaints as yellowing and formation of deposits after washing.
natural_image
Illustration of a hand holding a faucet with a valve, showing a curved arrow indicating motion (no text or symbols)Water inlet hose
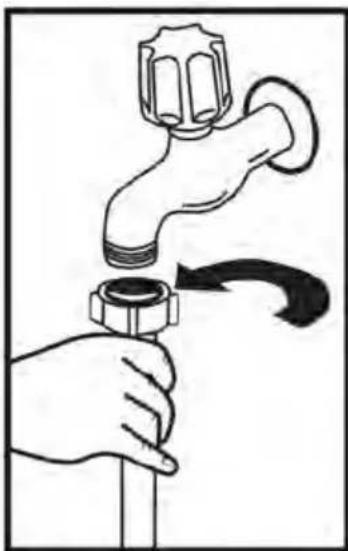
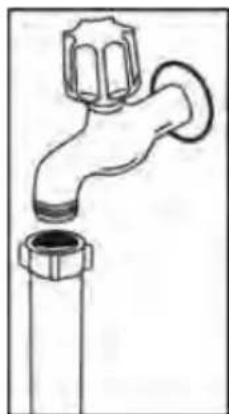
Do not use the water inlet hose of your old machine, if any. Use the new water inlet hose supplied with your machine instead. If you are going to connect a new or long - unused water inlet hose to your machine , run water through it for a while before making the connection. Connect the water inlet hose directly to the water inlet tap. The pressure supplied by the tap should be at a minimum of 0.03 Mpa and and at a maximum of 1 Mpa. If the water pressure is above 1 Mpa, a pressure-relief valve should be fitted inbetween.
After the connections are made, the tap should be turned on fully and checked for water tightness. For the safety of your machine, make sure to always turn off the water inlet tap after each wash programme is finished.
natural_image
Line drawing of a faucet with a flanged handle and a side pipe (no text or symbols)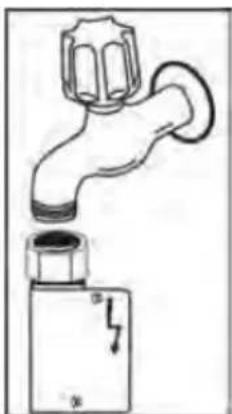
natural_image
Simple line drawing of a faucet with a valve and a base component (no text or symbols)NOTE: Aquastop water spout is used in some models. In case of using Aquastop, a dangerous tension exists. Do not cut Aquastop water spout. Do not let it get folded or twisted.
Water outlet hose
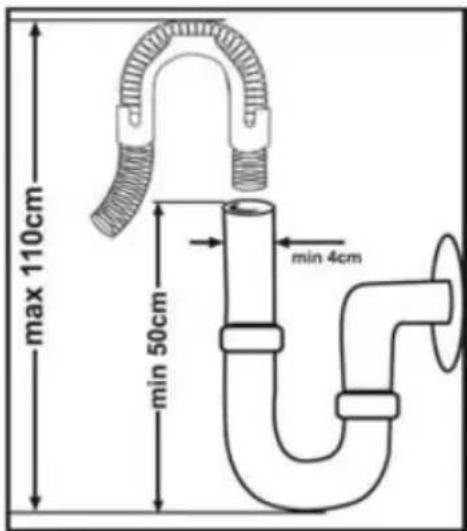
The water drain hose can be connected either directly to the water drain hole or to the sink outlet spigot. Using a special bent pipe (if available), the water can be drained directly into the sink via hooking the bent pipe over the edge of the sink. This connection should be at a minimum of 50 cm and at a maximum of 110 cm from the floor plane.
Warning: When a drain hose longer than 4 m is used, the dishes might remain dirty. In that case, our company will not accept responsibility.
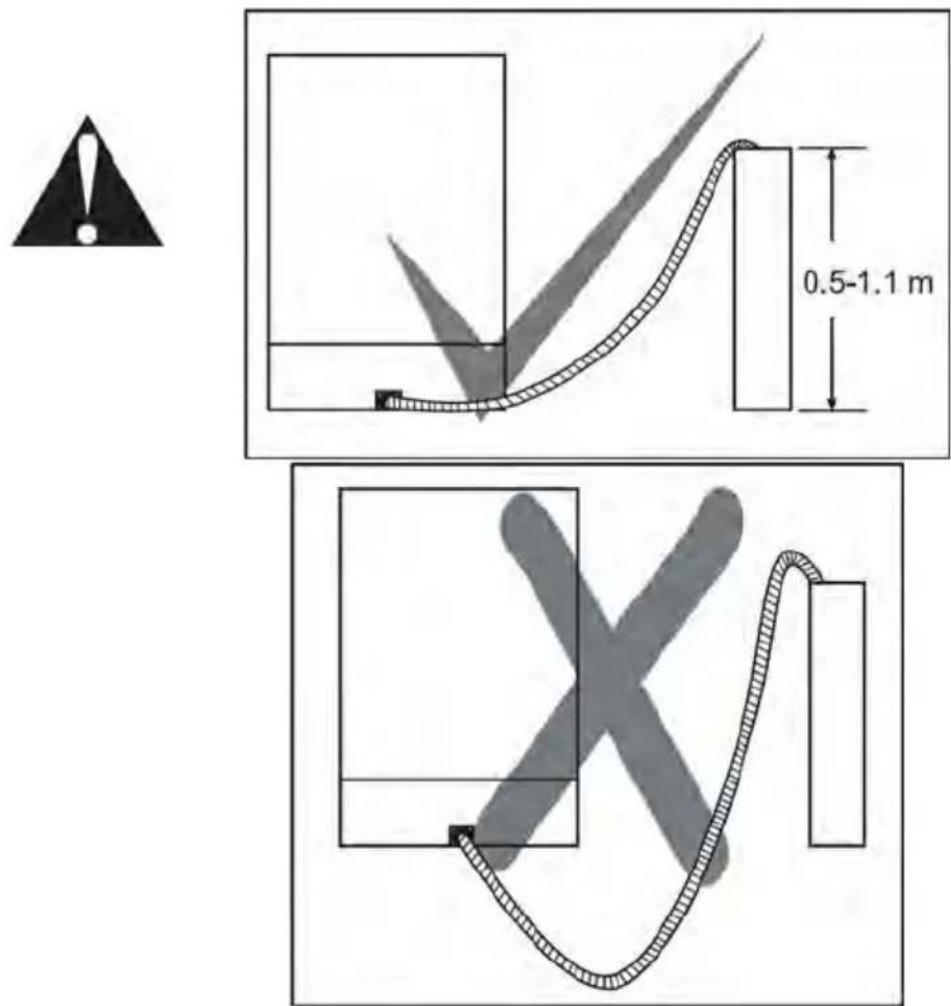
Electrical connection
The earthed plug of your machine should be connected to an earthed outlet supplied by suitable voltage and current. If there is no earthing installation, have a competent electrician carry out an earthing installation. In case of usage without earthing installed, our company will not be responsible for any loss of usage that might occur.
The indoor fuse current value should be 10-16 A.
Your machine is set according to 220-240 V. If the mains voltage in your location is 110 V, connect a transformer of 110/220 V and 3000 W in between. The machine should not be plugged in during positioning.
Always use the coated plug supplied with your machine.
Running in low voltage will cause a decline in washing quality.
The machine's electrical cable should be replaced by an authorised service or an authorised electrician only. Failure to do so may lead to accidents.
For safety purposes, always make sure to disconnect the plug when a wash programme is finished.
In order not to cause an electric shock, do not unplug when your hands are wet.
When disconnecting your machine from the mains supply, always pull from the plug. Never pull the cord itself.
Fitting the machine undercounter
If you wish to fit your machine undercounter, check whether you have sufficient space under your countertop and whether the wiring-plumbing is suitable to do so.1 If you decide that the space under the countertop is suitable for fitting your machine, remove the worktop as shown in the illustration. 2
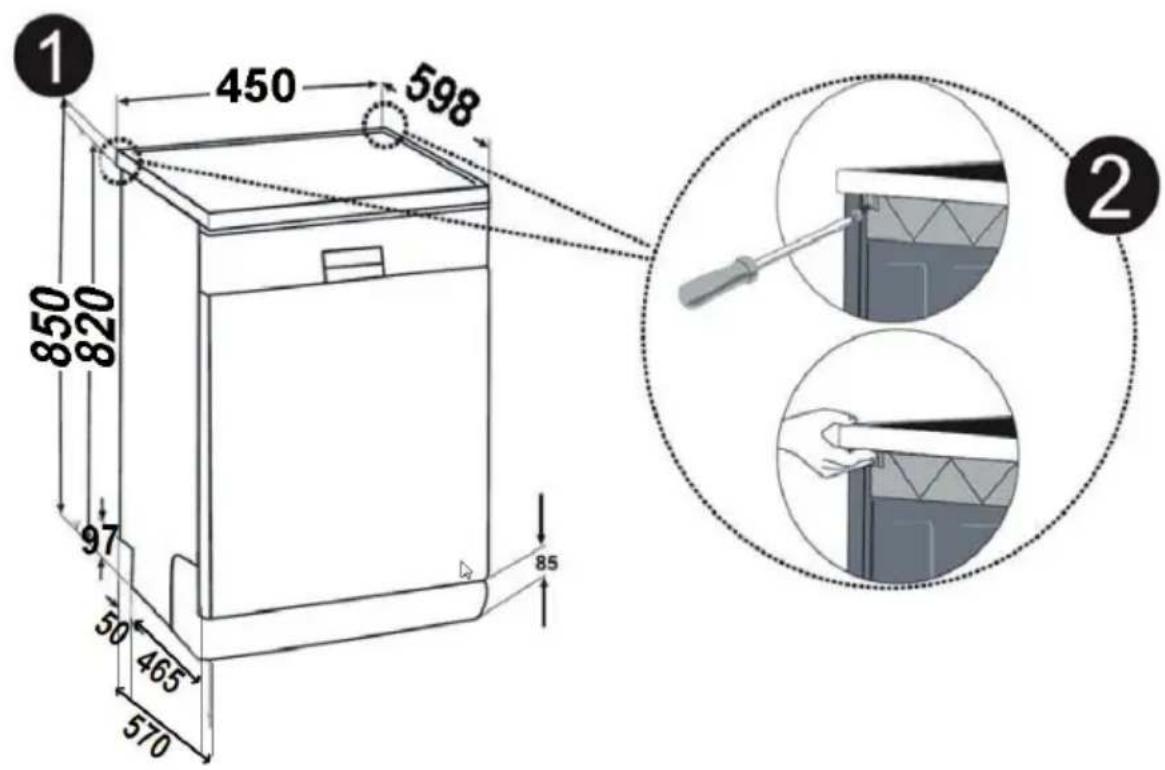
Warning: The stand part which we will settle our machine under it by removing its worktop has to be stable in such a way not to allow balance disorder.
To remove the worktop, remove the screws that hold the worktop which are located at the rear of the machine; then push the front panel 1 cm from the front side towards the rear and lift it.
Adjust the machine feet according to the slope of the floor.3 Fit your machine by pushing it undercounter without letting the hoses get crushed or bent.4
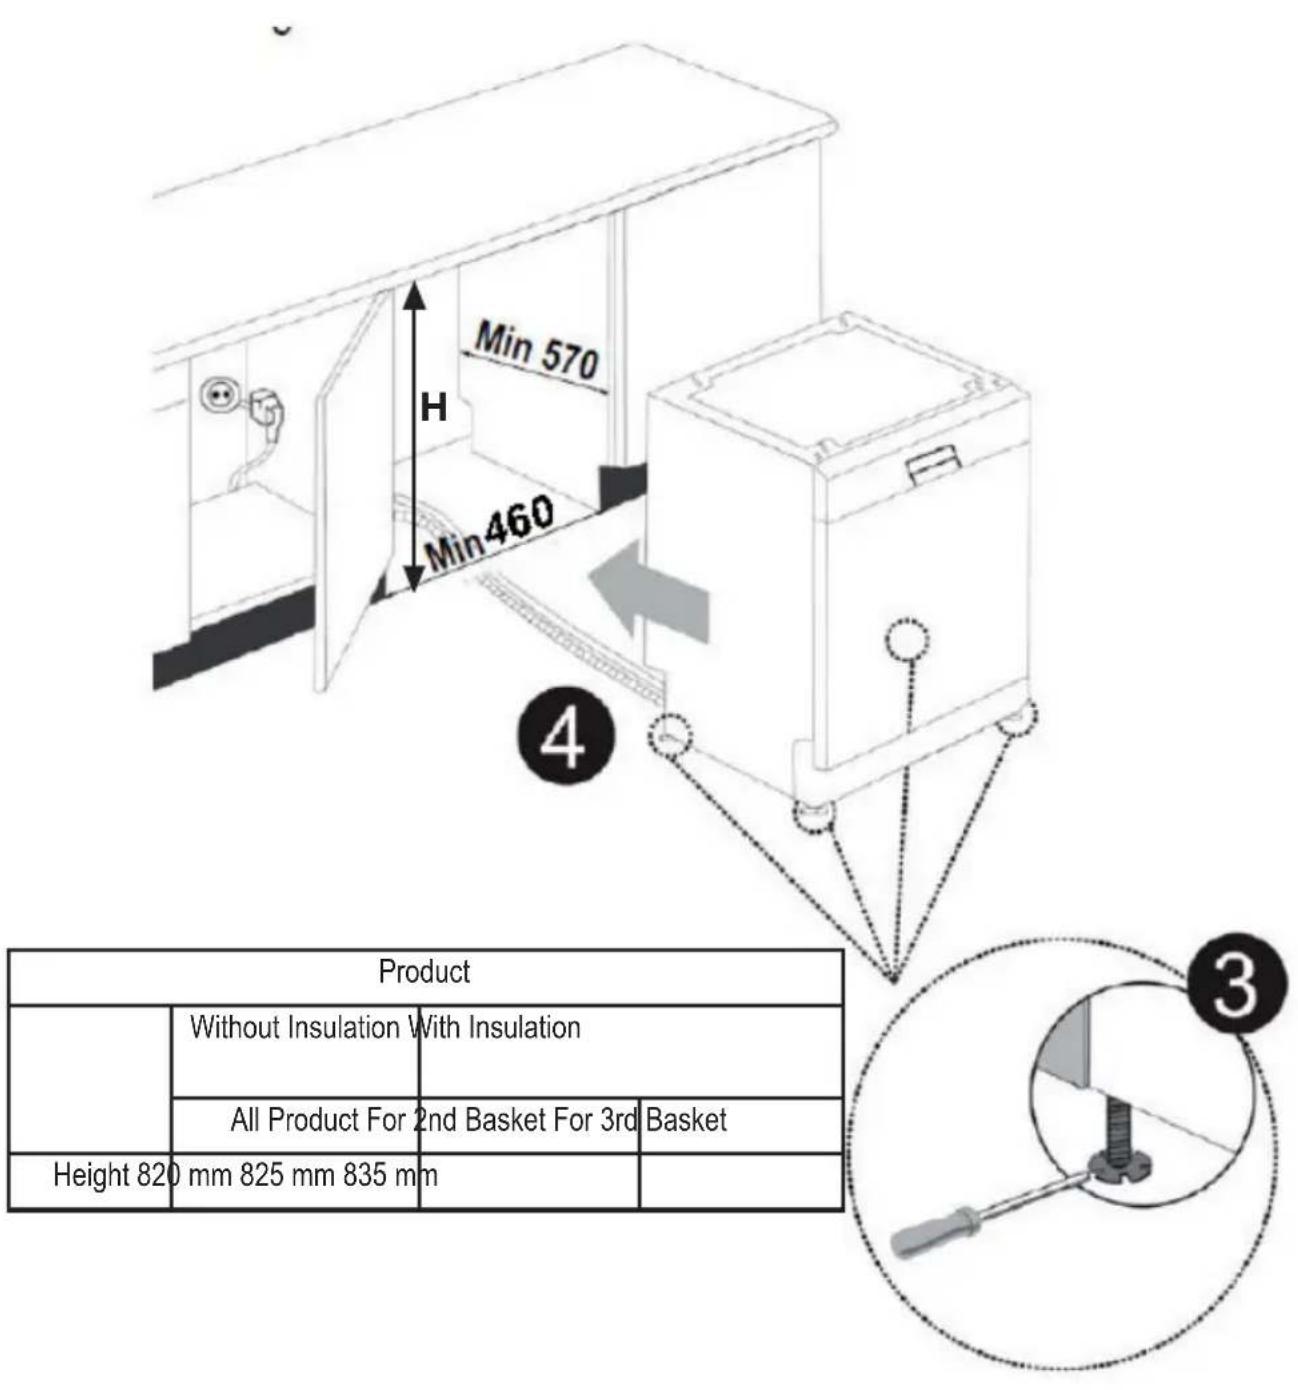
Warning: After removal of worktop, the machine should be placed in such a closed place of which dimensions are shown at fig.
Prior to using the machine for the first time
- Check whether the electricity and supply water specifications match the values indicated by the installation instructions for the machine.
- Remove all packaging materials inside the machine.
- Set the water softener.
- Add 1 kg salt into the salt compartment and fill with water up to a level at which it will almost overflow.
- Fill the rinse aid compartment.
PREPARING THE MACHINE FOR USE
The importance of water decalcification
For a good washing function, the dishwasher needs soft, i.e. less calcareous water. Otherwise, white lime residues will remain on the dishes and the interior equipment. This will negatively affect your machine's washing, drying and shining performance. When water flows through the softener system, the ions forming the hardness are removed from the water and the water reaches the softness required to obtain the best washing result. Depending on the level of hardness of the inflowing water, these ions that harden the water accumulate rapidly inside the softener system. Therefore, the softener system has to be refreshed so that it operates with the same performance also during the next wash. For this purpose, dishwasher salt is used.
Filling with salt
Use softener salt specifically produced for use in dishwashers. To
natural_image
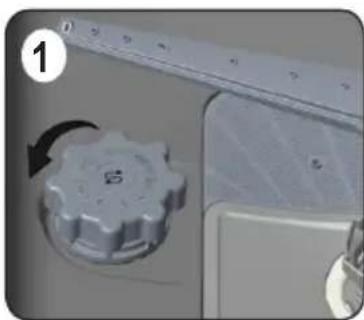
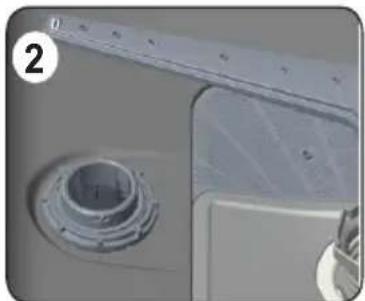
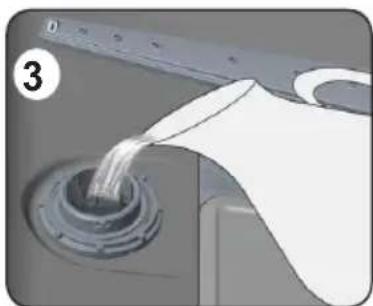
Close-up of a mechanical knob with a ruler and dial, no visible text or symbolsput softener salt, first remove the lower basket and then open the salt compartment cap by turning it counter clockwise. 12 At first fill the compartment with 1kg salt and water3at overflowing level If
available, using the funnel provided will make filling easier; refit the cap and close it. When salt absent indicator is lighten on (app. between 20th-30th cycles depend on the water hardness) add salt into your machine until it fills up (approx. 1 kg) Fill the salt compartment with water at first use only. We recommend that you use small-grained or powder softener salt. Do not put table salt into your machine. Otherwise, the function of the softener compartment may decrease over time. When you start your dishwasher, the salt
natural_image
Close-up of a mechanical component with a circular bolt and flange (no visible text or symbols)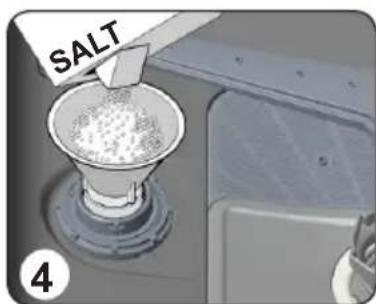
natural_image
Close-up of a mechanical component with a pipe inserted into a circular opening, no visible text or symbolscompartment gets filled with water. Therefore, put the softener salt prior to starting your machine. This way, overflowing salt gets immediately cleaned up through the wash operation. If you are not going to wash any dishes immediately after putting salt, then run a short washing program with an empty machine in order to avoid any damage (to prevent corrosion) to your machine due to the salt overflow while filling in the salt container.
Testing strip
The washing effectiveness of your machine depends on the softness of the tap water. For this reason, your machine is equipped with a system that reduces the hardness in mains water supply. The washing effectiveness will increase when the system is correctly set. To find out the water hardness level of water in your area, contact your local water board or determine water hardness level by using the test strip(if available).
| Open the testing strip. | Run water through your tap for 1 min. | Keep the testing strip in water for 1 sec. | Shake the testing strip after taking it out of water. | Wait for 1 min. | Make your machine's water hardness setting according to the result obtained through the testing strip. |
 | 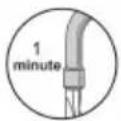 | 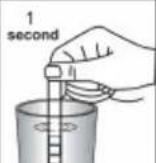 | 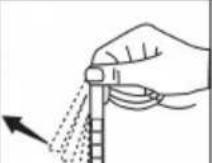 | 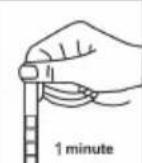 |  |  |
Adjusting salt consumption
Table of Water Hardness Level Settings
| Water hardness degree | German hardness dH | French hardness dH | British hardness dH | Water hardness indicator |
| 1 0-5 0-9 | 0-6 Wash light is on. | |||
| 2 6-11 10-2 | 0 7-14 End light is on. | |||
| 3 12-17 21- | 30 15-21 | Start/Pause key is on. | ||
| 4 18-22 31- | 40 22-28 | Wash light is on. | End light is on. | |
| 5 | 23-34 | 41-60 | 29-42 | Wash light is on.Start/Pause key is on. |
| 6. | 35-50 | 61-90 | 43-63 | End light is on.Start/Pause key is on. |
If the hardness of the water you use is above 90 dF (French hardness) or if you are using well water; you are recommended to use filter and water refinement devices.
NOTE: Hardness level is adjusted to level 3 as a factory setting.
In accordance with the level determined on the test strip, perform the water hardness adjustment of your appliance as specified below.
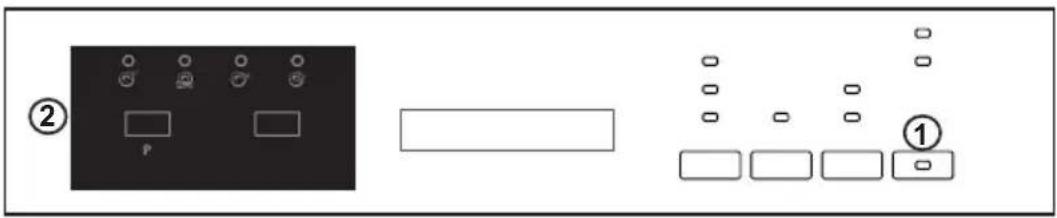
- When the machine is off, press the program button (2).
- Press the On/Off button (1) to switch on the machine and press and hold the program button (2) for at least 3 seconds.
• If the "hardness setting" is recognized, "SL" will be displayed for 2 seconds.
• Release the program button (2). The last setting level will be displayed. - Press the program button (2) to set the desired level. The level of harness will increase every time you press the program button. The hardness level will return to 1 after 6.
- You can press the On/Off button (1) to de-energize the machine to save the recently selected hardness level.
WARNING: In case of moving, adjusting the water hardness level according to the water hardness of the area you are moving is important for the washing performance.
Detergent usage
Use a detergent specifically designed for use in domestic dishwashers.
You can find powder, gel, and tablet detergents in the market that have been designed for household dishwashers.
Detergent should be put into the compartment prior to starting the machine. Keep your detergents in cool, dry places out of reach of your children.
Do not fill detergent into the detergent compartment more than required; otherwise it may cause scratches on your glasses as well as lead to a poorly dissolved detergent.
Should you need more information concerning the detergent you will use, contact detergent manufacturers directly.
natural_image
Illustration of a hand pressing down on a device component with a black arrow indicating the action (no text or symbols present)Filling the detergent compartment
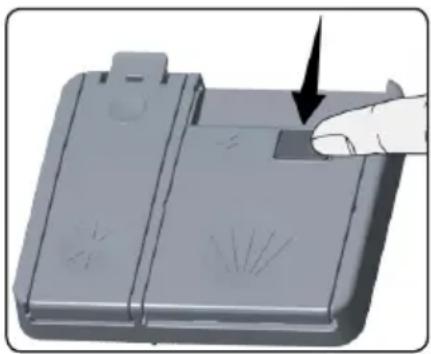
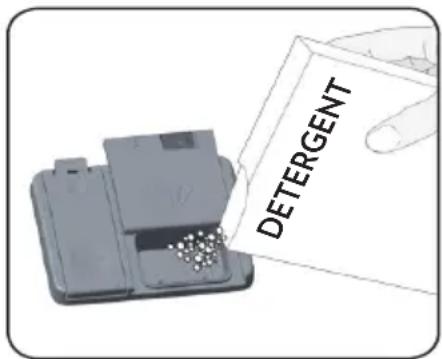
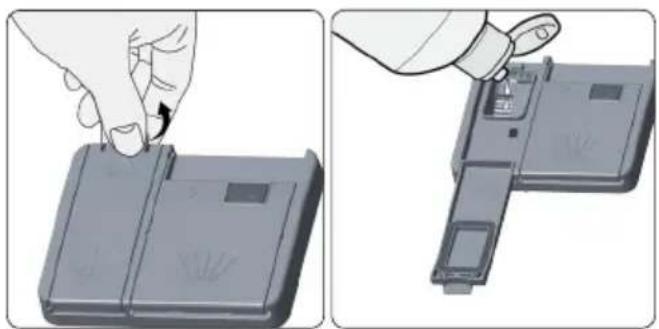
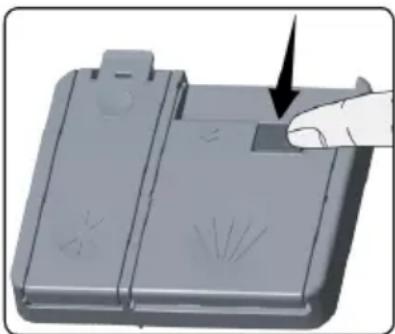
Push the latch to open the detergent container as shown in the image. Detergent pod has level lines inside. It is possible to measure the right detergent amount using these lines. Detergent pod can take totally 40 cm^3 detergent.
Open the dishwasher detergent and pour into the larger compartment 25 cm ^3 if your dishes are heavily soiled or 15
cm ^3 if they are less soiled.2 If your dishes have been kept dirty for a very
long time, if there are dried food wastes on them, and if you have overly loaded the dishwasher, pou 5cm ^3 detergent into the pre-wash compartment and start your machine.
You may have to add more detergent into your machine, depending on the degree of soil and on the water hardness level in your area.
Combined detergents
Detergent manufacturers also manufacture combined detergents that are called 2 in 1 - 3 in 1 - 5 in 1...
The 2 in1 detergents contain detergent+ salt or rinse aid. While using the 2 in 1 detergents, it should be observed which functions the tablet consists of.
The other tablet detergents also have detergent+rinse aid +salt+various extra functions.
Generally, combined detergents produce sufficient results under certain usage conditions only. Such detergents contain rinse aid and/or salt in preset amounts.
Points to consider when using this type of products:
- Always make sure to check the specifications of the product you will use or whether or not it is a combined product.
- Check if the detergent used is appropriate for the hardness of mains water that machine is appertaining to.
-
Observe the instructions on packagings when using such products.
-
If such detergents are in the form of tablets, never put them into the interior section or the cutlery basket of the dishwasher. Always put the tablets into the detergent compartment in the detergent dispenser.
- They produce good results for certain types of usage only. If you are using this type of detergents, you need to contact the manufacturers and find out about the suitable conditions of use.
- When the conditions of use of such products and the machine settings are appropriate, they ensure savings in salt and/or rinse aid consumption.
- Contact the detergent manufacturers if you are not obtaining good wash results (if your dishes stay calcareous and wet) after having used 2 in 1 or 3 in 1 detergents. The scope of warranty for your machine does not cover any complaints caused by the use of these types of detergents.
Recommended usage: If you want to obtain better results while using combined detergents, add salt and rinse aid into your machine and adjust the water hardness setting and the rinse aid setting to the lowest position.

Solubility of the tablet detergents produced by different companies can vary depending on the temperature and time. Therefore, it is not recommended to use such detergents in short programs. It is more suitable to use powder detergents in such programs.
Warning: Should any problem, which you have not encountered before, arise with the use of this type of detergents, contact the detergent manufacturers directly.
When you give up using combined detergents
- Fill the salt and rinse aid compartments.
- Adjust the water hardness setting to the highest position and run an empty-wash.
- Adjust the water hardness level.
- Make the suitable rinse aid setting.
1.1. Filling the rinse-aid and setting
To fill the rinse aid compartment, open the rinse-aid compartment cap. Fill the compartment with rinse aid to the MAX level and then close the cap. Be careful not to overfill the rinse aid compartment and wipe up any spills.
In order to change the rinse aid level, follow the below steps before turning on the machine:
- Push the programme button and hold it down.
- Turn on the machine.
- Hold down the programme button until "rA" disappears from the display. Rinse aid setting follows water hardness setting.
• The machine will display the last setting. - Set the level by pushing the programme button.
- Switch off the machine to save the setting.
• The factory setting is "4".
If the dishes are not drying properly or are spotted, increase the level. If blue stains form on your dishes, decrease level.
natural_image
Illustration showing a hand inserting a component into a device, with no visible text or symbols.| Level Brightener Dose Indicator | |
| 1 Rinse-aid not dispensed r1 is shown on the display. | |
| 2 1 dose is dispensed r2 is shown on the display. | |
| 3 2 doses are dispensed r3 is shown on the display. | |
| 4 3 doses are dispensed r4 is shown on the display. | |
| 5 4 doses are dispensed r5 is shown on the display. | |
LOADING YOUR DISHWASHER
If you properly place your dishes into the machine, you will be using it in the best way in terms of energy consumption, washing and drying performance.
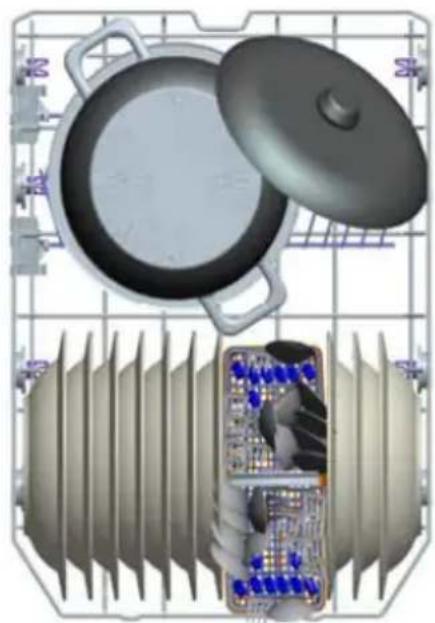
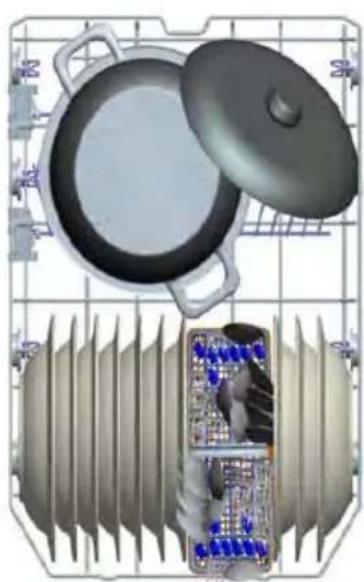
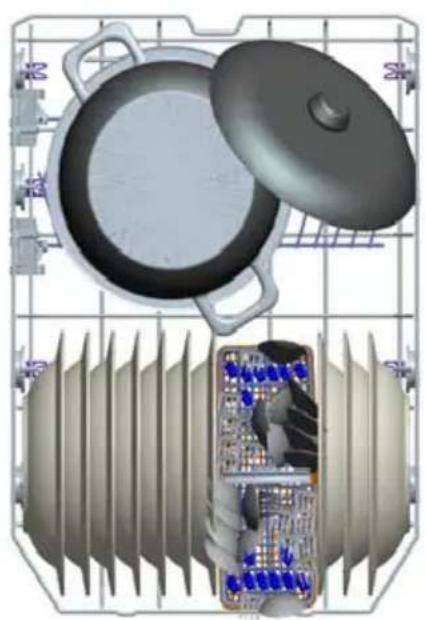
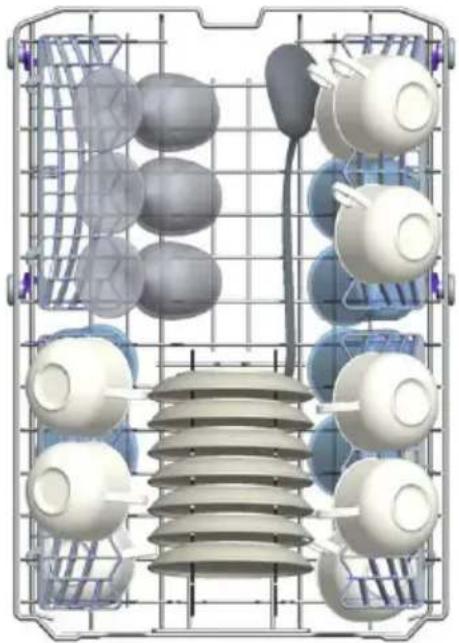
There are two separate baskets for you to load your dishes into your machine. You can load into the lower basket such round and deep items as pots with long handles, pot lids, plates, salad plates, cutlery sets.
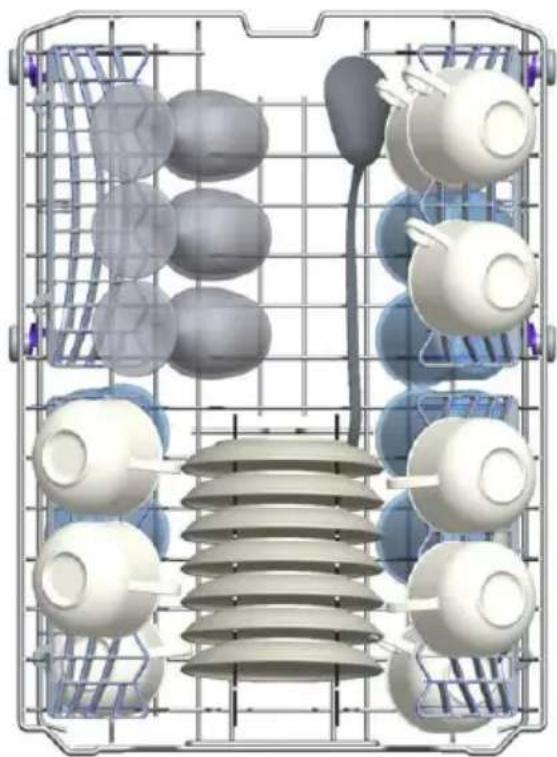
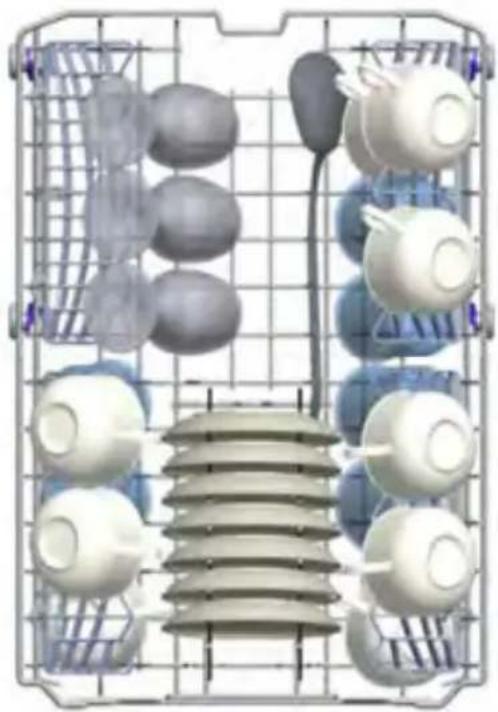
The upper basket has been designed for tea plates, dessert plates, salad bowls, cups and glasses. When placing long-stem glasses and goblets, lean them against the basket edge, rack or glass supporter wire and not against other items. Do not lean long glasses against one another or they cannot remain steady and may receive damage.
It is more appropriate to locate the thin narrow parts into the middle sections of baskets. You can place spoons among the other cutlery sets in order to prevent them from sticking to one another. You are recommended to use the cutlery grid in order to obtain the best result. To avoid any possible injuries, always place such long-handle and sharp-pointed dishes as serving fork, bread knife etc. with their sharp points facing down or horizontally on the baskets.
Warning: Place your dishes into your machine in a way that they will not prevent the upper and lower spray arms from spinning.
Dish rack
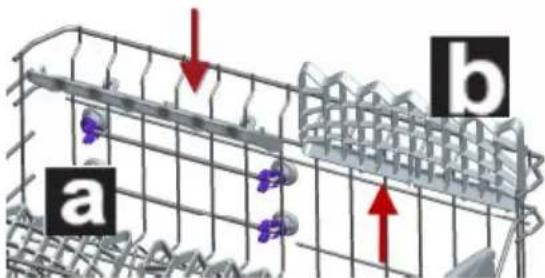
There are dish racks on the upper basket of your machine. a b You can use these dish racks in open or closed position. When they are in open position a you can place your cups on them; and when in closed position b you can place long glasses on the basket. Also, you can use these racks by placing long forks, knives and spoons on them laterally.
Top basket height adjustment
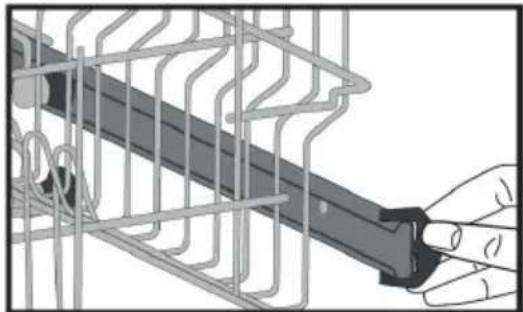
Top basket of your machine is in upper position. When it is in this position, you can place big items such as pans, etc. on lower basket. When you take top basket to lower position, you can place and wash big sized plates on the top basket.
Use wheels in order to change the basket height. Open the basket retaining parts at the end of top basket rails by turning them to the sides, and take the basket out. Change the position of the wheels; reinstall the basket to the rail, and close basket retainer parts. In this way, you take the top basket to lower position.
natural_image
Illustration of a hand holding a black tool inside a wire cage (no text or symbols visible)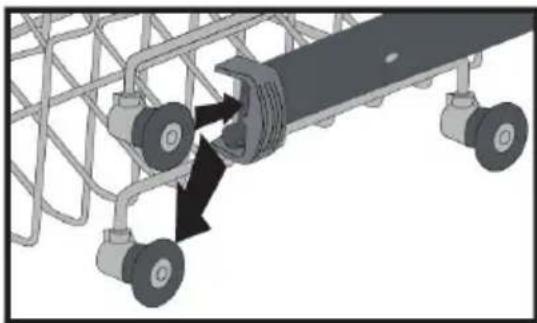
natural_image
Mechanical assembly diagram showing a vehicle chassis with two wheels and a central shaft, no text or symbols present.Alternat've basket loads
Lower Basket
natural_image
Illustration of a cooking pan and fan with a close-up of a hand holding a tray with blue beads, placed on a grid background (no text or symbols)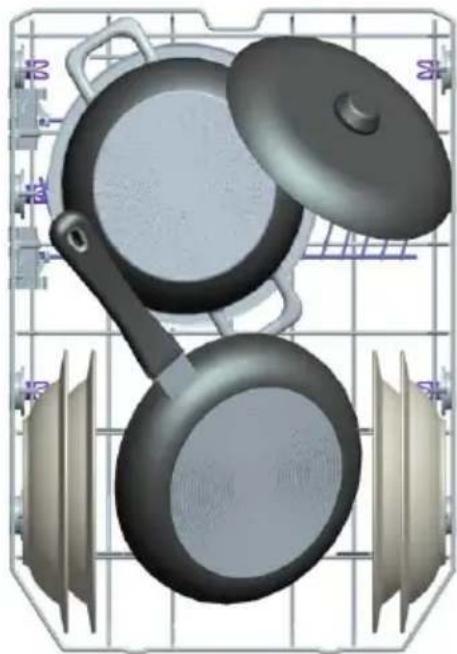
natural_image
3D rendering of a cooking pan and lid on a grid background, no text or symbols visibleTop basket
natural_image
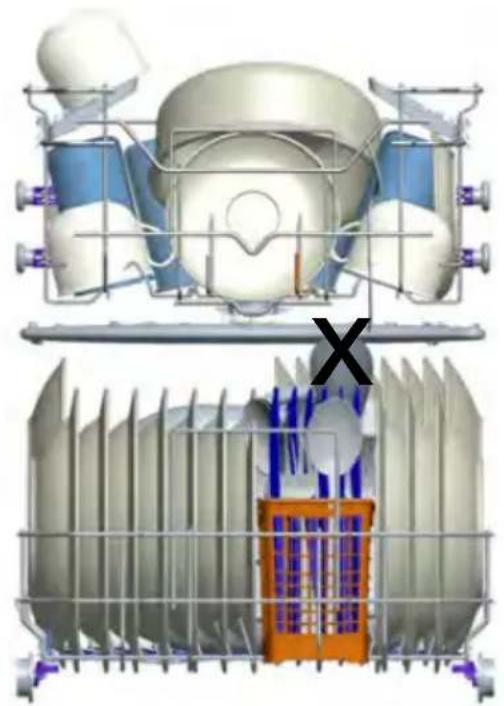
3D diagram of a grid-based mechanical or electrical component assembly with multiple components and no visible text or symbolsFaulty loads
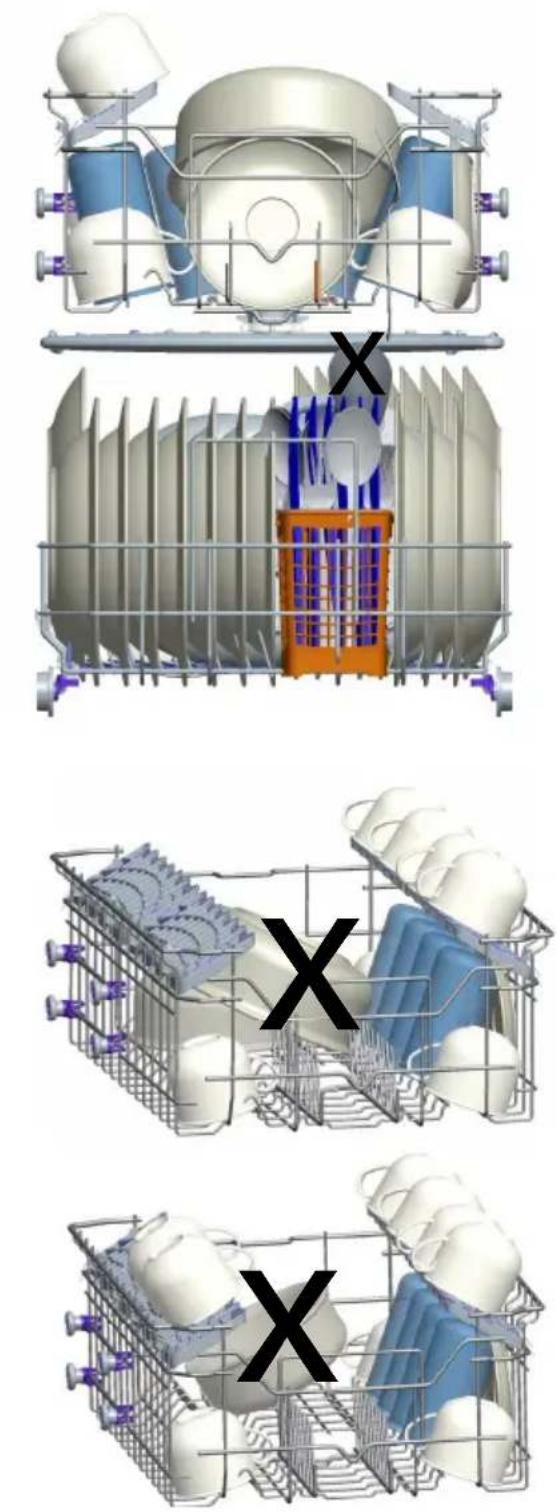
Important Note for Test Laboratories
For detailed information on performance tests, please contact following address: "dishwasher@standardtest.info". In your email, please provide the model name and serial number (20 digits) which you can find on the appliance door.
Program Definition
| Program No 123 | |||
| Program No Pre-wash R | rapid Wash 30 min. Delicate W | wash | |
| Temperatures - 40°C 40°C | |||
| Food residue type Pre-wash program that helps you soften and remove the residues on soiled dishes that have been waiting for several days | Coffee, milk, tea, cold meat, vegetables (not left for a long time) | Coffee, milk, tea, cold meat, vegetables (not left for a long time) | |
| Soil level - Low Medium | |||
| Amount of detergent B: 25 cm3 / 15 cm3 A: 5 cm3 | - B A+B | ||
| Pre-wash 40°C Wash Pre-wash | |||
| End Cold Rinse 40°C Wash | |||
| Warm Rinsing | Cold Rinse | ||
| End | Warm Rinsing | ||
| Drying | |||
| End | |||
| Program duration (min) | 15 | 30 74 | |
| Power consumption (kW/h) | 0.02 | 0.90 | 0.95 |
| Water Consumption (liter) | 4.5 | 12.4 | 15.7 |
Warning: Short programs do not contain a drying step. Values given above have been obtained under laboratory conditions in line with relevant standards. These values may vary depending on product's use and environment (mains voltage, water pressure, inlet water temperature and ambient temperature).
Program Definition
| Program No Reference 4 | 567 | |||
| Program No Eco (Economical) mode | Daily 60°C Super 50 min. Intense Wash | |||
| Temperatures 50°C 60°C | ||||
| Food residue type Coffee | milk, tea, cold meat, vegetables (not left for a long time) | Coffee, milk, tea, cold meat, vegetables (not left for a long time) | Soups, sauces, pastries, eggs, pilaf, potatoes, oven dishes, and fries | Soups, sauces, pastries, eggs, pilaf, potatoes, oven dishes, and fries |
| Soil level Medium Medium | Medium High | |||
| Amount of detergent B: 25 cm3 / 15 cm3 A: 5 cm3 | A+B A+B | A+B | A+B | |
| Pre-wash | Pre-wash | 65°C Wash | 45°C Wash | |
| 50°C Wash | 60°C Wash | Intermediate Rinsing | 65°C Wash | |
| Warm Rinsing | Rinsing | Warm Rinsing | Cold Rinse | |
| Drying | Warm Rinsing | End | Warm Rinsing | |
| End | Drying | Drying | ||
| End | End | |||
| Program duration (min) | 198 | 104 | 50 | 117 |
| Power Consumption (kW/h) | 0.73 | 1.12 | 1.35 | 1.61 |
| Water Consumption (liter) | 11.0 | 14.5 | 12.7 | 17.2 |
Program Selection and Operating the Machine
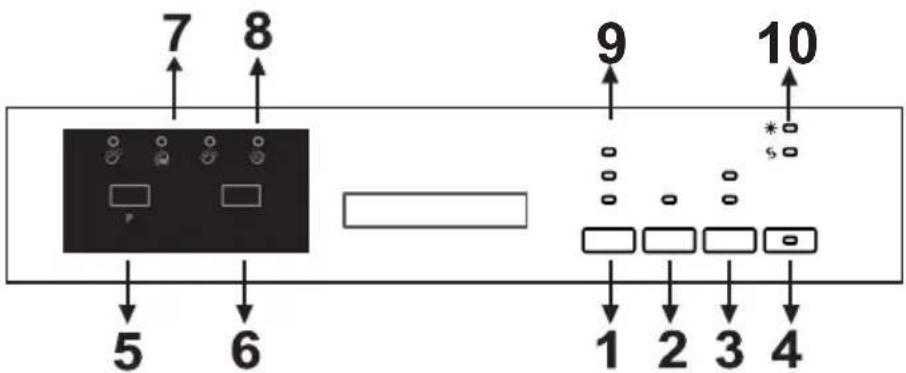
You can press the On/Off button (4) to switch on the product. On/off lights will be on so long as the machine is on. Press the program button (5) to set the suitable program.
Press the Start/Pause button (6) to start the program. Once the selected program has started, the Washing light will be on and the program duration will be displayed. If you open the door of the machine while the program is continuing, program number and program duration will be displayed alternately (7).
You can follow the program flow with the Washing, Rinsing, Drying and End lights (8) on the control panel. Once the drying light has become on, the machine will remain silent for 40 to 50 minutes.
NOTE: If you press the option button (3) once, half load option will be activated. This option will shorten the durations of the selected programs to reduce power and water consumption. If you are using combined detergents that contain salt, rinse aid and extra features, press the option button for the second time and activate the tablet function (1). You can use the Extra button to add the following functions to the compatible washing program.
When the hygiene function is active, you can make the washing process more hygienic by changing the washing temperature and durations of the current program.
If you select the extra rinsing function, the extra rinsing light will become on and thus, washing-rinsing steps will be added to the selected program, making your dishes cleaner and shinier.
If you select the extra drying function, the extra drying light will become on and thus, drying duration of the selected program will extend, making your dishes drier. Additionally, Hygiene and Drying functions cannot be selected at the same time since they are incompatible with each other.
If you have used any extra function in the washing program that you last used, that function will be active in the next washing program. If you want to cancel that function for the newly selected program, press and hold the button of the relevant function since the corresponding lights go off, or press the On/Off button (4) to switch off the machine. If you want to use an extra function for the newly selected program, select the desired functions.
If you want to change the delay time, press the Start/Pause button first, and then press the Delay (2) button to select the new delay time. Press Start/Pause button to activate the new delay time. To cancel the delay, press the Delay button until the delay time is 0h.
NOTE: If you switch off the machine after selecting the delay time and starting the program, the delay time will be cancelled.
NOTE: You can press the delay button (2) before the program starts to delay the program start time for 1 to 19 hours.
NOTE: Salt refill indicator (10) will become on if salt is missing/insufficient. In this case, please fill the salt compartment.
NOTE: Rinse aid refill indicator (10) will become on if rinse aid is missing/insufficient. In this case, please fill the rinse aid compartment.
Using the Child Lock
Press "Extra" and "Option" keys simultaneously for 3 seconds to activate Child Lock. At that time, on the remaining time indicator, "CL" is displayed for 2 seconds. To deactivate the function, again, press "Extra" and "Option" keys at the same time for 3 seconds. "CL" will flash twice.
MAINTENANCE AND CLEANING
Cleaning the machine in regular intervals prolongs the machine's service life.
Oil and lime may accumulate in the machine's washing section. In case of such accumulation; -Fill the detergent compartment without loading any dishes into the machine, select a programme that runs at high temperature, and start the machine. In case of insufficiency, use special cleansing material available in the market. (Cleansing material produced special to machines by detergent producers.)
Cleaning the seals in the machine door,
-To clean any accumulated residues in the door seals, wipe the seals regularly by using a dampened cloth.
Cleaning machine,
Clean the filters and spray arms at least once a month.
Unplug your machine and turn off its tap before starting the cleaning.
Do not use hard materials when cleaning your machine. Wipe with a fine cleaning material and a dampened cloth.
Filters
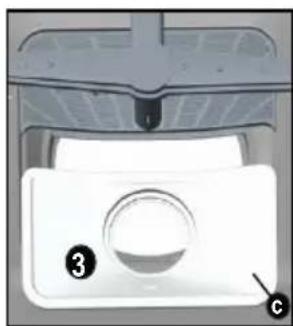
Check if any food wastes have remained on the coarse and fine filters.
If any food wastes are left, remove the filters and clean them thoroughly under the water tap.
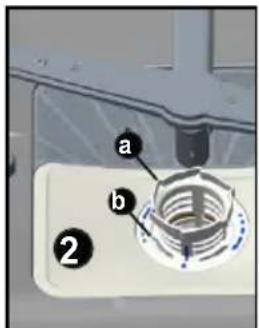
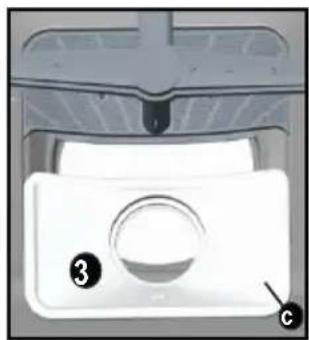
a. Micro Filter
b. Coarse Filter
c. Metal/Plastic Filter
natural_image
Close-up of a mechanical component with a hexagonal nut and circular base (no visible text or symbols)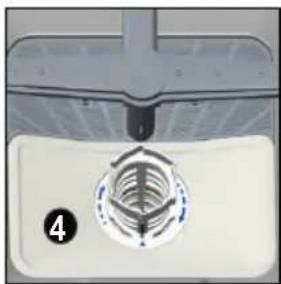
natural_image
Close-up of a mechanical component with a circular feature and a numbered label (4), no readable text or symbols present.machine.
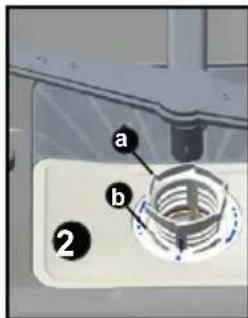
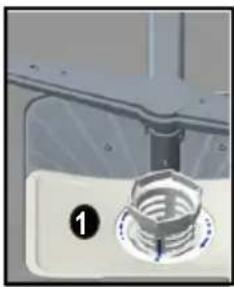
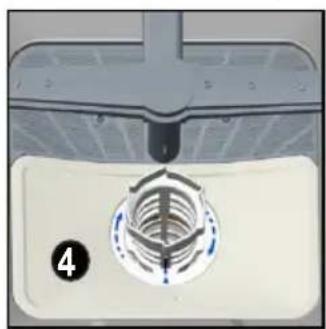
To remove and clean the filter combination, turn it counter clockwise and take it out by lifting upwards.1
Pull and remove the metal/plastic filter. 3 Then pull the coarse filter out of the micro filter.2 Rinse it with lots of water under the tap. Refit the metal/plastic filter. Insert the
coarse filter into the micro filter in a way that the marks will correspond to one another. Attach micro filter into the metal/plastic filter and turn to the direction of arrow and it is locked when the arrow on micro filter can be seen from across. 4
- Never use your dishwasher without any filter.
- Incorrect fitting of the filter will reduce the washing effectiveness.
- Clean filters are very important in terms of the proper running of the
natural_image
Close-up of a white appliance control panel with labeled buttons (no text or symbols beyond numbers)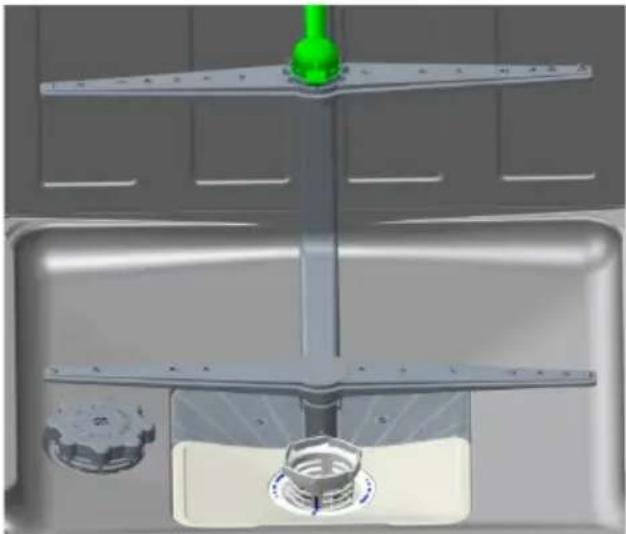
natural_image
3D rendering of a stainless steel kitchen sink with a green piping bag and a circular vent (no text or symbols visible)Spray arms
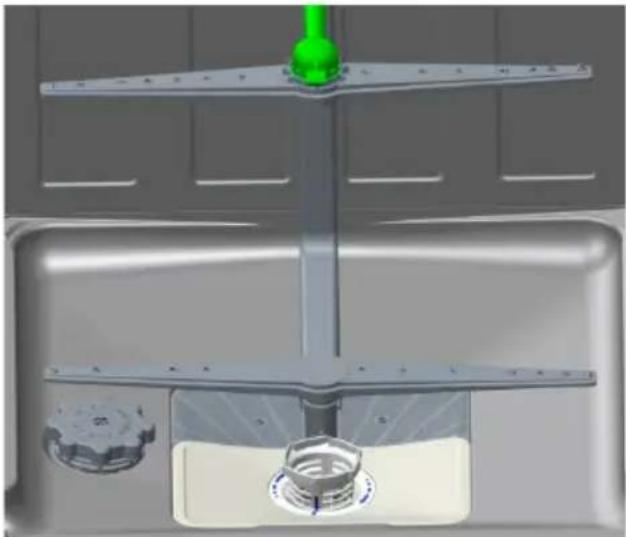
Check whether or not the holes for the upper and lower spray arms are clogged. If there is any clogging, remove the spray arms and clean them under water.
You can remove the lower spray arm by pulling it upwards, while the upper spray arm nut can be removed by turning the nut to the left.
Be sure that the nut is perfectly tightened when refitting the upper spray arm.
Hose filter
Water is prevented by the inlet hose filter so as to avoid any damage to your machine because of any contamination (sand, clay, rust etc.) that might be occasionally carried in through the mains water supply or the indoor plumbing, and to forestall such complaints as yellowing and formation of deposits after washing. Check the filter and the hose from time to time and clean them if necessary. To clean the filter, first turn off your tap and then remove the hose. After removing the filter from the hose, clean it under the tap. Insert the cleaned filter back into its place inside the hose. Refit the hose.
FAILURE CODES AND WHAT TO DO IN CASE OF FAILURE
| ERROR CODE ERROR | DESCRIPTION CONTROL | |
| F5 | Inadequate water supply | Make sure the water input tap is totally open and that there is no water cut.Close the water input tap, separate the water input hose from the tap and clean the filter at the connection end of the hose.Restart your machine, contact the service if the error resumes. |
| F3 | Error of continuous water input | Close the tap.Contact the service. |
| F2 | The waste water in the machine cannot be discharged. | Water discharge hose is clogged.The filters of your machine might be clogged.Power off-on your machine and activate the programme cancellation command.If the error continues, contact the service. |
| F8 | Heater error | Contact the service. |
| F1 | Alarm is active against water overflow | Power off your machine and close the tap.Contact the service. |
| FE | Faulty electronic card | Contact the service. |
| F7 | Overheating error (temperature in the machine is too high) | Contact the service. |
| F9 | Divisor position error | Contact the service. |
| F6 | Faulty heater sensor | Contact the service. |
If one of programme monitor lights is on and Start/Pause light flashing,
Your machine's door is open, shut the door.
If the programme won't start
- Check if the plug is connected.
- Check your indoor fuses.
- Be sure that the water inlet tap is turned on.
- Be sure that you have closed the machine door.
- Be sure that you switched off the machine by pressing the Power ON/OFF button.
- Be sure that the water inlet filter and the machine filters are not clogged.
If the Programme Monitor Indicators won't go out after a wash operation
The Power ON/OFF button is not released yet.
If detergent residues are left in the detergent compartment
Detergent has been added when the detergent compartment was wet.
If water is left inside the machine at the end of the programme
- The water drain hose is clogged or twisted.
- The filters are clogged.
- The programme is not finished yet.
If the machine stops during a wash operation
- Power failure.
- Water inlet failure.
- Programme can be on standby mode.
If shaking and hitting noises are heard during a wash operation
- Dishes placed incorrectly.
- Spray arm hitting the dishes.
If there are partial food wastes left on the dishes
- Dishes placed incorrectly into the machine, sprayed water did not reach related places.
- Basket overly loaded.
- Dishes leaning against one another.
• Very small amount of detergent added. - An unsuitable, rather weak wash programme selected.
- Spray arm clogged with food wastes.
- Filters clogged.
- Filters incorrectly fitted.
• Water drain pump clogged.
If there are whitish stains on the dishes
• A very small amount of detergent is being used.
- Rinse aid dosage setting at a very low level.
- No special salt is being used despite the high degree of water hardness.
• Water softener system setting is at a very low level.
- Salt compartment cap not closed well.
If the dishes won't dry up
- A programme without a dry operation selected.
- Rinse aid dosage set too low
- Dishes unloaded too fast.
If there are rust stains on the dishes
- Stainless-steel quality of the dishes washed is insufficient.
• High rate of salt in the wash water. - Salt compartment cap not closed well.
- Too much salt spilt into the sides and into the machine while filling it with salt.
- Unhealthy mains grounding.
Call an authorised service if the problem still persists after the controls or in case of any malfunction not described above.
PRACTICAL AND USEFUL INFORMATION
- Whenever you will not be operating your machine
- Unplug the machine and then turn the water off.
- Leave the door slightly ajar in order to prevent the formation of unpleasant smells.
- Keep the machine interior clean.
- Eliminating water droplets
- Wash the dishes with the intensive programme.
- If you properly place your dishes into the machine, you will be using it in the best way in terms of energy consumption, washing and drying performance.
- Clean all rough waste before you place dirty dishes to the machine.
- Operate the machine after it is completely full.
- Use pre-washing programme only when necessary.
- Observe programme information and average consumption values table when selecting a programme.
- Since the machine will reach high temperatures, it should not be mounted near refrigerator.
- If the appliance is located in a place where the risk of freezing exists, you must completely drain the water that has remained in the machine. Turn off the water tap, disconnect the water inlet hose from the tap and allow the interior water to drain.
THE PRODUCT FICHE
| Supplier's trade mark | VOX |
| Supplier's model | LC4745IX |
| Capacity of dishwasher | 10 |
| The energy efficiency class | A++ |
| Annual energy consumption in kWh per year (AEc) (280 Cycle)* | 211 |
| Energy consumption (Et) (kWh per cycle) | 0,73 |
| Off-mode power consumption (W) (Po) 0,50 | |
| Left-on mode power consumption (W) (Pl) 1,00 | |
| Annual water consumption in litres per year (AWc) (280 Cycle) ** | 3080 |
| Drying efficiency class *** | A |
| Standard programme name **** | Eco |
| Programme time for standard cycle (min) | 198 |
| Noise dB(A) | 52 |
* Energy consumption 211 kwh per year, based on 280 standard cleaning cycles using cold water fill and the consumption of low power modes. Actual energy consumption will depend on how the appliance is used.
** Water consumption 3080 liters per year based on 280 standard cleaning cycles. Actual water consumption will depend on how appliance is used.
***Drying efficiency class A on a scale from G(least efficient) to A (most efficient).
**** The “Eco is the standard cleaning cycle to which the information in the label and the fiche relates. This programme is suitable to clean normally soiled tableware and it is the most efficient programme in terms of combined energy and water consumption.

SRB Korisničko uputstvo
natural_image
Simple line drawing of a rectangular container with a horizontal bar at the top (no text or symbols)LC4745IX
SADRŽAJ:
- Tehničke karakteristike .... 4
- Usaglašenost sa standardima i rezultati testiranja 5
SIGURNOSNE MERE I PREPORUKE 6
• Recikliranje 6
- Sigurnosne informacije 6
- Preporuke 10
- Predmeti nepodesni za pranje u sudomašini 10
INSTALIRANJE MAŠINE 11
- Pozicioniranje mašine 11
• Povezivanje sa dovodom vode 12
• Dovod vode 12
• Odvod vode 13
• Povezivanje sa električnom mrežom 15 - Podešavanje mašine 16
- Prva upotreba mašine 18
PRIPREMA MAŠINE ZA UPOTREBU 18
• Važnost dekalcifikacije vode 18
- Punjenje solju 18
• Test traka 19
• Potrebna količina soli 19
- Upotreba deterdženta 21
• Punjenje pregrade za deterdžent 21
• Kombinovanje deterdženta 21
• Punjenje sredstvom za sjaj 22
PUNJENJE VAŠE MAŠINE.... 23
- Polica za posud je 23
• Alternativno punjenje korpica 24
OPIS PROGRAMA.... 26
- Programske funkcije 26
Izbor programa i rukovanje mašinom 27
• Rukovanje mašinom.... 29
- Nadzor programa 29
- Promena programa 29
- Otkazivanje programa 30
• Isključivanje mašine 30
ČIŠĆENJE I ODRŽAVANJE 31
- Filteri.... 31
- Prskalice 32
- Filter creva 32
OPISI KVAROVA I ŠTA RADITI U SLUČAJU KVARA 33
Praktične i korisne informacije 35
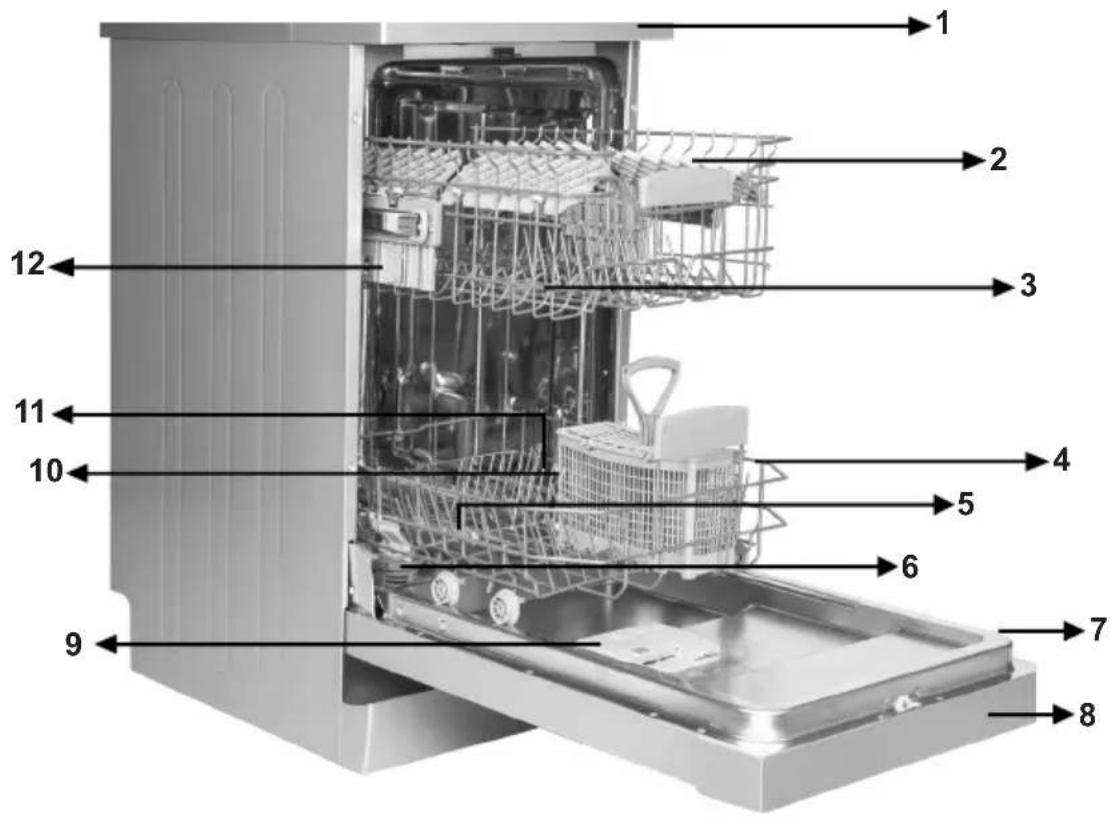
- Radna ploča 7. Unutrašnja ploča vrata
2.Gornja korpa sa policom 8.Kontrolna konzola
3.Gornja prskalica 9.Dispenzer deterdženta I sjaja
4.Donja korpa 10.Korpa za pribor za ručavanje
5.Donja prskalica 11.Dispenzer soli
6.Filteri 12.Klizač gornje korpe
natural_image
Close-up of mechanical components with a numbered arrow pointing to a circular component (no text or symbols visible)Uređaj za aktivno sušenje: Ovaj sistem omogućava bolje performanse sušenja vašeg posuđa.
Tehničke karakteristike
| Kapacitet 10 setova posuđa | |
| Visina 850 mm | |
| Visina (bez gornjeg pokrova) | 820 mm |
| Širina 450 mm | |
| Dubina 598 mm | |
| Neto težina | 33,800 kg |
| Napon 220-240 V, 50 Hz | |
| Maksimalna snaga 1900 W | |
| Snaga grejanja 1800 W | |
| Snaga dovoda 100 W | |
| Snaga odvoda 30 W | |
| Pritisak vode 0,03 MPa | (0,3 bara)-1 MPa (10 bara) |
| Struja 10 A | |
natural_image
Illustration of a hand holding a faucet with a valve, showing a curved arrow indicating rotation (no text or symbols)Crevo za dovod vode
Preporučujemo upotrebu creva za dovod vode koje ste dobili sa mašinom; nemojte da koristite crevo za dovod vode od stare mašine. Ukoliko spajate mašinu na dovod vode koji niste koristili duži period vremena, pre spajanja pustite vodu Crevo za dovod vode spojite direktno na priključak. Preporučeni pritisak na priključku je od minimalnih 0,03 Mpa do maksimalnih 1 Mpa. Ukoliko je pritisak vode veći od 1 Mpa potrebno je da između creva i priključka postavite sigurnosni ventil koji se otvara na povišeni pritisak.
natural_image
Diagram showing two different pipe fittings: one with a handle and the other with a valve, both without any text or symbols.NAPOMENA: Neki modeli imaju
natural_image
Abstract diagram with a curved line and shaded X shape, no text or symbols presentnatural_image
Diagram showing a tool inserted into a circular component with a numbered label (3), no readable text or symbols present.Upozorenje: Nakon što ste uklonili gornji poklopac mašina obavezno mora biti smeštena u zatvorenom prostoru, dimenzija kao što je prikazano na slici. 3
Pre prve upotrebe mašine
- Proverite je li specifikacije snabdevanja vode i struje odgovaraju vrednostima navedenim u uputstvu o instalaciju mašine.
- Uklonite sve materijale za pakovanje iz unutrašnjosti mašine.
- Podesite omekšivača vode
• Dodati 1kg soli u odeljku soli i popunite vodom do nivoa na kome će skoro preliti. - Popunite odeljak pomoćnog sredstva ispiranja
PRIPREMA MAŠINE ZA PRVU UPOTREBU
Važnost dekalcifikacije vode
natural_image
Close-up of a mechanical knob with a circular dial indicator and a numbered label (1) in the corner, no readable text or symbols beyond the number.natural_image
Close-up of a mechanical component with a pouring liquid into a circular opening (no visible text or symbols)natural_image
Close-up of a mechanical component with a circular flange and bolted plate (no visible text or symbols)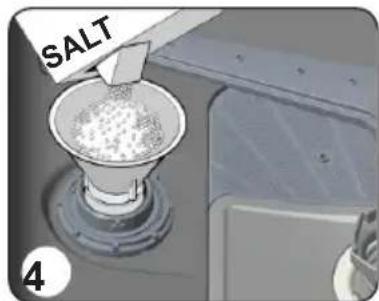
Na ovaj način, prelita so je odmah uklonjena kroz operaciju pranja. Ukoliko ne nameravate odmah nakon punjenja soli prati posuđe, pustite kratki program pranja na praznu mašinu kako bi izbegli oštećenja mašine (prevencija korozije) od prelite soli.
Traka za testiranje
• Kada je mašina isključena, pritisnite programsko dugme (2).
- Pritisnite dugme Uključeno/lsključeno (1) da uključite mašinu i pritisnite i držite programsko dugme (2) najmanje 3 sekunde.
- Ako se prepozna „podešavanje tvrdoće“, „SL“ će se prikazati na 2 sekunde.
- Otpustite programsko dugme (2). Poslednji nivo podešavanja će se prikazati.
- Pritisnite programsko dugme (2) da podesite željeni nivo. Nivo tvrdoće će se povećati svaki put kada pritisnete programsko dugme. Nivo tvrdoće će se vratiti na 1 nakon 6.
- Možete da pritisnete dugme Üključeno/Isključeno (1) za deenergizaciju mašine radi čuvanja trenutno izabranog nivoa tvrdoće.
UPOZORENJE: U slučaju selidbe, važno je konfigurisati podešavanje tvrdoće vode u skladu sa tvrdoćom vode područja u koje ste se preselili zarad efikasnosti pranja.
Sredstva za pranje ( prašak tečnost ili tableta)
Koristite sredstva za pranje koja su specijalno proizvedena za pranje u mašini posuđa i koja su preporučena od strane proizvođača mašine posuđa.
Deterdženti mogu da budu u tekućem stanju, kao prašak i kao tablete.
Deterdžent stavite u poseban odeljak mašine pre stavljanja mašine u rad. Držite ga na na suvom i hladnom mestu, van dohvata dece.
Ne stavljajte veće količine od preporučenog, jer u protivnom na posuđu mogu da se pojave mrlje koje su uzrokovane slabim rastvaranjem deterdženta.
Punjenje odeljka za deterdžent
natural_image
3D illustration of a device with a hand pointing to a button, showing no text or symbols.Kombinovani deterdženti
Proizvođači deterdženata za mašine osim običnih proizvode i kombinacije deterdženata nazvanih "2 u 1", "3 u 1" ili "5 u 1" itd.
“2 u 1” deterdženti sadrže deterdžent u kombinaciji sa soli ili sredstvom za ispiranje. Pre korišćenja ovih deterdženta proverite specifikacije i sadržaj na pakovanju.
Ostale tablete sadrže deterdžent sa dodatkom sredstva za ispiranje, soli i dodatnih posebnih sredstava koja poboljšavaju pranje vašeg posuđa.
Generalno, kombinovani deterdženti daju zadovoljavajuće rezultate pranja prilikom posebnih uslova upotrebe.
natural_image
Illustration of a hand inserting a component into a grid-like structure (no text or symbols)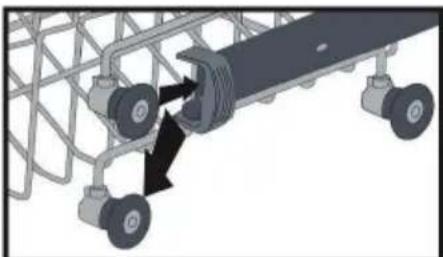
natural_image
Mechanical assembly diagram showing a conveyor belt system with pulleys and a wheel (no text or symbols)Neki od primera punjenja korpi posudjem Donja korpa
natural_image
3D technical illustration of a cooking pan and cooling fan assembly (no text or symbols)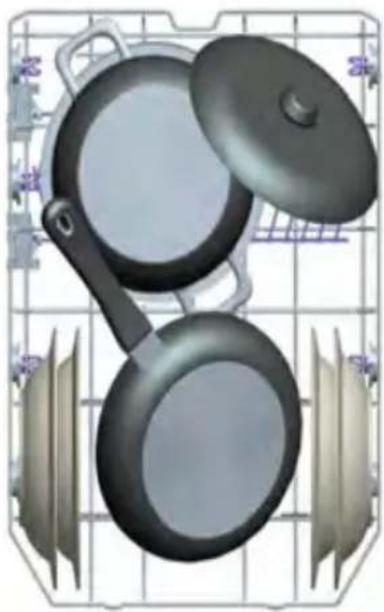
natural_image
Illustration of two cooking pots with a lid, placed on a grid background (no text or symbols)Gornja korpa
natural_image
3D rendering of a grid-based mechanical component with multiple circular components and a central threaded base (no text or symbols visible)Nepravilno punjenje
natural_image
3D technical illustration of a mechanical assembly with internal components and a highlighted section (no text or symbols)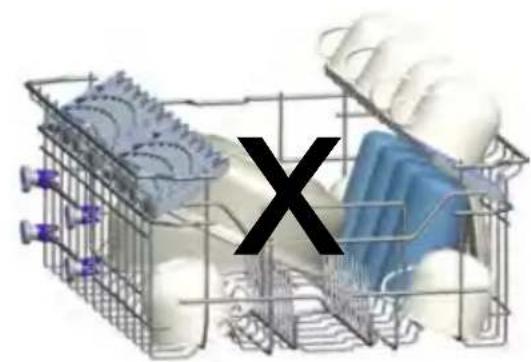
natural_image
3D wireframe basket with plastic components and a large 'X' symbol overlay (no text or symbols on main objects)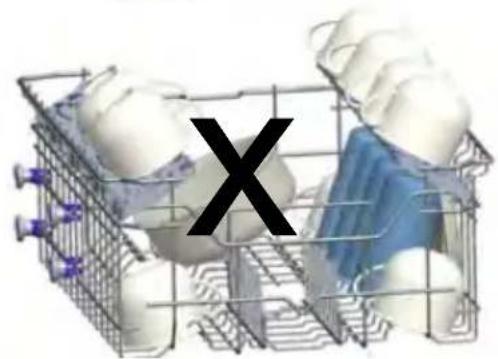
natural_image
3D wireframe model of a multi-cell grid with white and blue components, overlaid with a black 'X' symbol (no text or labels)Važna napomena za testiranje labaratorije.
natural_image
Pure electrical circuit lines without any symbols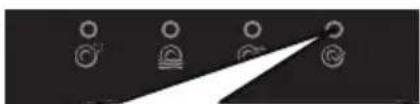
natural_image
Abstract black-and-white graphic with four circular icons and a diagonal white stripe (no text or symbols)Kada se svetlo za kraj uključilo, pritisnite dugme Uključeno/Isključeno za isključivanje mašine.
Isključite uređaj.
Isključite slavinu.
natural_image
Close-up of a mechanical component with a circular dial and numbered label (1), no readable text or symbols present.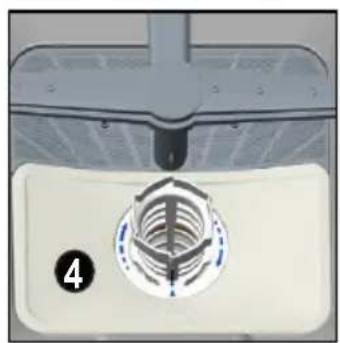
natural_image
Close-up of a mechanical component with a circular dial and numbered label (4), no readable text or symbols present.Odstranite metalno/plastični filter (slika 3). Nakon toga odstranite grubi filter iz mikro filtera kao što je prikazano na slici 2. Operite ih pod jakim mlazom vode. Vratite grubi filter u mikro filter. Umetnite grubi filter u mikro filter na način da oznake odgovaraju jedne drugima. Pričvrstite mikro filter na metalno/plastični filter i okrenite u smeru strelice kao što je prikazano na slici 4. Filter je u pravilnom položaju i zaključan kada je preko njega vidljiva strelica mikro filtera.
natural_image
Close-up of a white appliance control panel with labeled buttons (no readable text or symbols)- Nikada ne koristite mašinu bez bilo kojeg od filtera.
- Nepravilno postavljeni filteri smanjuju efikasnost pranja mašine.
- Čišćenje filtera je vrlo važno za pravilan i efikasan rad mašine.
natural_image
3D rendering of a stainless steel kitchen sink with a green piping bag and a circular vent (no text or symbols visible)natural_image
Simple line drawing of a rectangular box with a horizontal bar at the top (no text or symbols)LC4745IX
СОДРЖИНА
natural_image
Mechanical assembly diagram showing a shaft and flange with a circular component, no visible text or symbolsnatural_image
Illustration of a hand holding a faucet with a valve, showing a curved arrow indicating rotation (no text or symbols)Црево за довод
natural_image
Diagram showing two different pipe fittings: one with a handle and one with a valve, both without any text or symbols.natural_image
Diagram showing a curved path with a shaded X-shaped region and a rectangular box, no text or symbols present.natural_image
Diagram showing a screwdriver inserted into a circular component with a magnified view (no text or symbols)natural_image
Close-up of a mechanical knob with a circular dial indicator and a ruler, no visible text or symbolsnatural_image
Close-up of a mechanical component with a circular feature and a ruler-like scale (no visible text or symbols)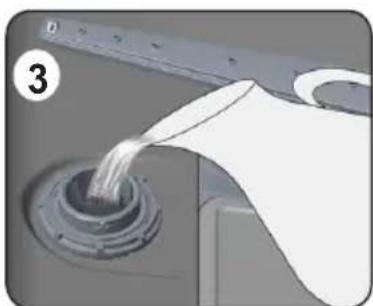
natural_image
Close-up of a mechanical component with a transparent cylindrical shaft inserted into a circular opening, showing fluid flow (no text or symbols visible)natural_image
Illustration of a hand pressing down on a device component with a black arrow indicating the process (no text or symbols present)natural_image
Illustration of a hand inserting a small object into a rectangular device (no text or symbols visible)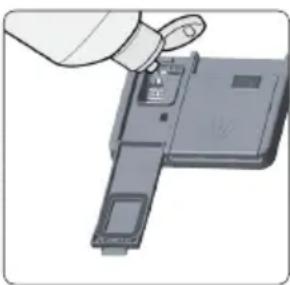
natural_image
Illustration of a hand inserting a small component into a device (no text or symbols visible)natural_image
Mechanical assembly diagram showing a hand operating a rail vehicle with pulleys and wheels (no text or symbols)Долна корпа
natural_image
Technical illustration of a cooking pan and fan assembly (no text or symbols)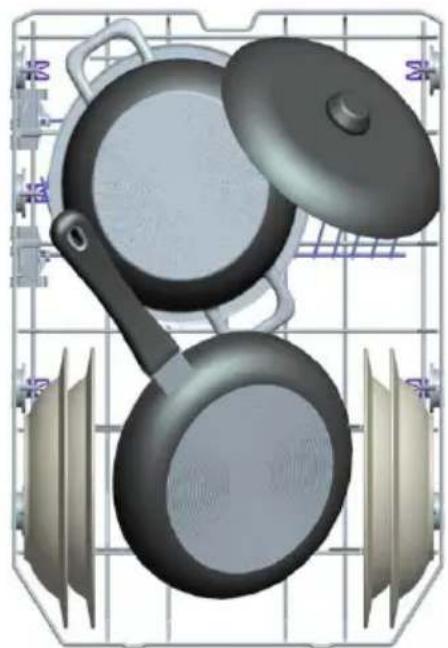
natural_image
3D rendering of two cooking pots on a grid surface, no text or symbols visibleГорна корпа
natural_image
3D diagram of a grid-based mechanical or electrical component with multiple spherical components and a central insulator (no text or symbols)natural_image
Technical diagram of a mechanical assembly with internal components and a highlighted section (no text or symbols)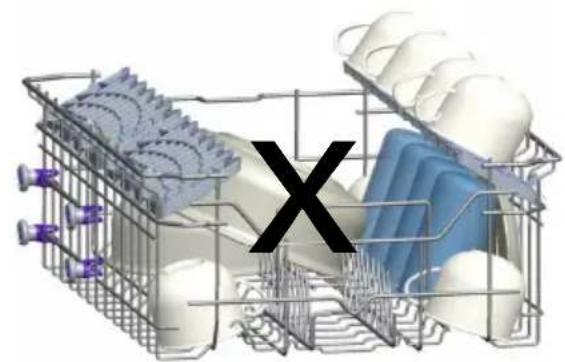
natural_image
3D rendering of a multi-compartment kitchen unit with cutlery and a large 'X' symbol overlay (no text or labels)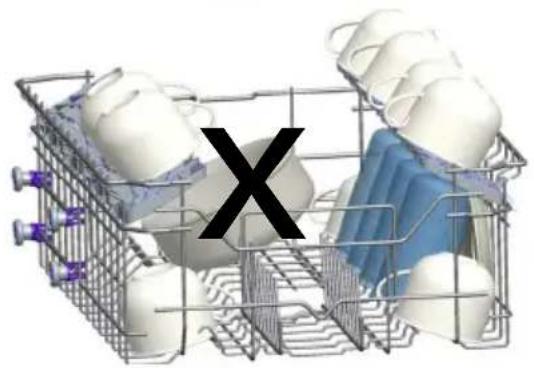
natural_image
3D wireframe model of a food delivery rack with white and blue containers, marked with a black 'X' symbol (no text or labels)Важна забелешка за тест лабаратории.
natural_image
Close-up of a mechanical component with a circular dial and numbered label (1), no readable text or symbols present.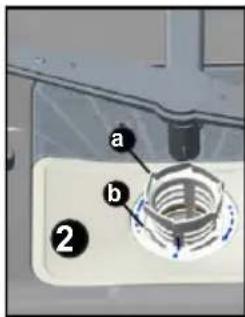
natural_image
Close-up of a mechanical component with a circular dial and a numbered label (4), no readable text or symbols present.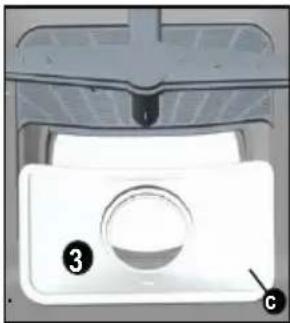
natural_image
Close-up of a white appliance interior with labeled parts (3 and C), no visible text or symbols beyond labelsnatural_image
3D rendering of a mechanical component with a green handle and central hub, no visible text or symbols- VOX
- ELECTRONICS
- LC - 4745IX
- CONTENTS
- Safety information and Recommendations.... 5
- Installing the machine 9
- Preparing the machine for use 16
- Loading your dishwasher 21
- Programme descriptions 25
- Programme Selection and Operating the Machine 26
- Maintenance and Cleaning 30
- Failure codes and what to do in case of failure 32
- Practical and useful information.... 34
- Conformity with the standards and Test data / EU Declaration of Conformity
- SAFETY INFORMATION AND RECOMMENDATIONS
- Recycling
- Safety Information
- When you take delivery of your machine
- The points to pay attention during machine installation
- In daily use
- For your children's safety
- In case of malfunctioning
- Recommendations
- Items not suitable for dishwashing:
- INSTALLING THE MACHINE Positioning the machine
- Water connection
- Water inlet hose
- Water outlet hose
- Electrical connection
- Fitting the machine undercounter
- Prior to using the machine for the first time
- PREPARING THE MACHINE FOR USE
- The importance of water decalcification
- Filling with salt
- Testing strip
- Adjusting salt consumption
- Detergent usage
- Filling the detergent compartment
- Combined detergents
- Points to consider when using this type of products:
- When you give up using combined detergents
- Filling the rinse-aid and setting
- In order to change the rinse aid level, follow the below steps before turning on the machine:
- LOADING YOUR DISHWASHER
- Dish rack
- Top basket height adjustment
- Alternat've basket loads
- Lower Basket
- Top basket
- Faulty loads
- Important Note for Test Laboratories
- Program Selection and Operating the Machine
- Using the Child Lock
- MAINTENANCE AND CLEANING
- Cleaning the seals in the machine door,
- Cleaning machine,
- Filters
- Spray arms
- Hose filter
- If the programme won't start
- If the Programme Monitor Indicators won't go out after a wash operation
- If detergent residues are left in the detergent compartment
- If water is left inside the machine at the end of the programme
- If the machine stops during a wash operation
- If shaking and hitting noises are heard during a wash operation
- If there are partial food wastes left on the dishes
- If there are whitish stains on the dishes
- If the dishes won't dry up
- If there are rust stains on the dishes
- PRACTICAL AND USEFUL INFORMATION
- SADRŽAJ:
- SIGURNOSNE MERE I PREPORUKE 6
- INSTALIRANJE MAŠINE 11
- PRIPREMA MAŠINE ZA UPOTREBU 18
- PUNJENJE VAŠE MAŠINE.... 23
- OPIS PROGRAMA.... 26
- Izbor programa i rukovanje mašinom 27
- ČIŠĆENJE I ODRŽAVANJE 31
- OPISI KVAROVA I ŠTA RADITI U SLUČAJU KVARA 33
- Praktične i korisne informacije 35
- Crevo za dovod vode
- NAPOMENA: Neki modeli imaju
- Pre prve upotrebe mašine
- PRIPREMA MAŠINE ZA PRVU UPOTREBU
- Važnost dekalcifikacije vode
- Traka za testiranje
- Sredstva za pranje ( prašak tečnost ili tableta)
- Punjenje odeljka za deterdžent
- Kombinovani deterdženti
- Nepravilno punjenje
- Važna napomena za testiranje labaratorije.
- СОДРЖИНА
- Црево за довод
Brand : VOX
Model : LC4745
Category : Dishwasher