Performa 3 F208 - Pregnant Revel - Free user manual and instructions
Find the device manual for free Performa 3 F208 Revel in PDF.


User questions about Performa 3 F208 Revel
0 question about this device. Answer the ones you know or ask your own.
Ask a new question about this device
Download the instructions for your Pregnant in PDF format for free! Find your manual Performa 3 F208 - Revel and take your electronic device back in hand. On this page are published all the documents necessary for the use of your device. Performa 3 F208 by Revel.
USER MANUAL Performa 3 F208 Revel
F208/F206 Floorstanding Loudspeaker Owner's Manual
natural_image
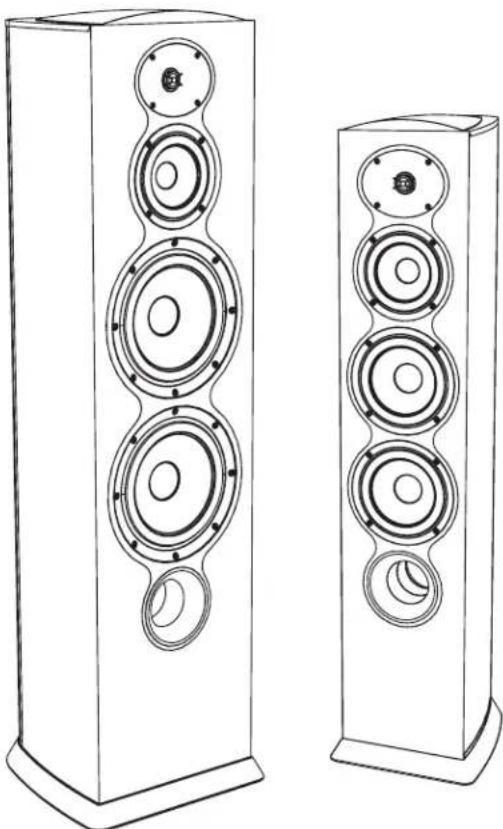
Line drawing of two multi-tiered speaker speakers with circular speaker holes (no text or symbols)
natural_image
Abstract black silhouette of a stylized human figure (no text or symbols)REVEL®
by HARMAN
TABLE OF CONTENTS
Unpacking the F208/F206 3
About Revel Performa3 Floorstanding Loudspeakers.... 3
F208/F206 Overview
Tweeter Level Switch, Low-Frequency Compensation Switch, Binding Posts, Shorting Straps 4
Installation Considerations
Loudspeaker Placement, Listening Room Acoustics, Acoustic Treatment Materials, Adjustable Spikes....5
Making Connections
Observe Proper Polarity, Speaker Cable, F206 Connections, F208 Connections....7
Optimizing Performance
Port Plugs, F208 Adjustments 10
Caring for Your Loudspeakers
Grilles, Cabinet Finish....10
Specifications
F208, F206 12
UNPACKING THE F208/F206
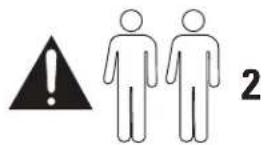
1.
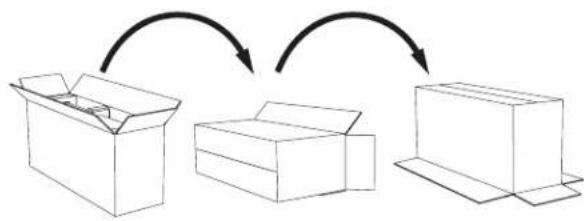
flowchart
graph TD
    A["Step 1: Box Packing"] --> B["Step 2: Box Packing"]
    B --> C["Step 3: Box Packing"]
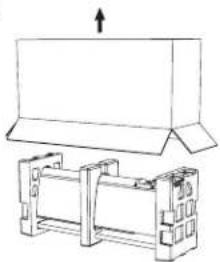
natural_image
Technical line drawing of a mechanical assembly with a bracket and housing (no text or symbols)3.
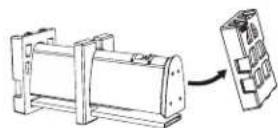
4.5.6.7.
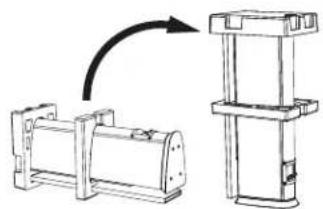
natural_image
Diagram showing a mechanical assembly with two components and an arrow indicating rotation (no text or symbols)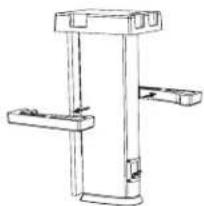
natural_image
Technical line drawing of a mechanical bracket or support structure (no text or symbols)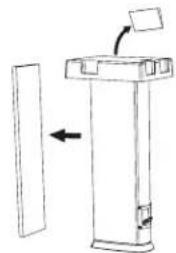
natural_image
Simple line drawing of a vertical panel with an arrow indicating direction, no text or symbols present.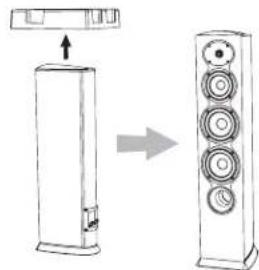
natural_image
Diagram showing a vertical stacker device transforming into a multi-tiered speaker tower (no text or symbols present)ABOUT REVEL PERFORMA3 FLOORSTANDING LOUDSPEAKERS
Thank you for purchasing Revel Performa3 fl oorstanding loudspeakers. These true full-range loudspeakers feature small footprints and sleek designs, allowing them to blend-in easily with your existing décor. They deliver an impressive combination of wide frequency range, uncompressed dynamic range and low distortion across the entire audible spectrum.
Revel F208 and F206 low-frequency and midrange transducers feature distortion reduction mechanisms that stabilize the fl ux fi eld during operation, assuring low distortion even at high listening volumes. These precision transducers utilize ribbed aluminum cones for ideal piston-like behavior that eliminates a major source of resonances that are clearly audible in most other loudspeakers. Their cast aluminum frames eliminate another source of resonances that is common in many lesser-quality loudspeakers. These loudspeakers employ a sophisticated fluid-model designed low-frequency port with identical fl ares on both ends. This greatly minimizes dynamic compression and port-generated noise, assuring low-distortion low-frequency performance. The front-fi ring port location expands the speakers' installation options.
The F208 and F206 tweeter has been created around a newly-designed motor and dome assembly that sets a new standard of transparency for speakers anywhere near the Performa3's class. The tweeter's integrated acoustic lens waveguide is based on a breakthrough mathematical approach that accurately matches the tweeter's dispersion to that of the midrange transducer in the crossover region. This gives the loudspeaker very smooth sound far off-axis – an important contributor to overall sound quality, providing consistent sound over an exceptionally wide listening area. In fact, this new waveguide actually increases the tweeter's dispersion at higher frequencies.
The F208 and F206 are housed in enclosures that are similar to our flagship Ultima2 Series. These fully-curved enclosures are inherently
stiffer than conventional box shapes and are formed with contiguous wood layers that prevent splitting. They feature strategically-oriented bracing that eliminates the possibility of enclosure-induced coloration. These beautiful, modern enclosures are finished in high-gloss piano black or genuine American walnut in a process (developed and overseen by Italian luxury cabinet makers) that exceeds automotive fi nish quality. The loudspeaker grilles are designed to minimize sonic diffraction or veiling and provide a clean, subtle appearance. The magnetic grille attachment method completely eliminates ugly hardware on the loudspeaker baffl e, so if you decide to use the loudspeakers without grilles they will look like they were designed to be used without grilles.
Revel Performa3 crossover networks feature carefully-selected components that contribute to great performance and benchmark-setting value. These high-order crossover networks dramatically reduce distortion and dynamic compression for clear sound that maintains the same quality over a very wide dynamic range. These precision networks optimize the speakers' timbral accuracy, enhancing musical enjoyment for listeners who are anywhere in the room, not only those seated on-axis to the loudspeakers. The F208 network provides a calibrated high-frequency level control that allows precise fine-tuning of the sound while maintaining a very tight acoustic match between loudspeakers. Revel-designed binding posts are heavily gold plated and include an articulated section that allows for more secure connections when using spade lugs. The F208 includes two sets of binding posts that enable the loudspeakers to be bi-wired or bi-amped.
During development, every Revel loudspeaker model is compared to competitive models in our unique position-independent double-blind listening lab. This process utilizes the latest psychoacoustic research to assure that these listening tests are valid, enabling us to verify that all Revel loudspeakers are superior to their competitors before they are allowed to go into production.
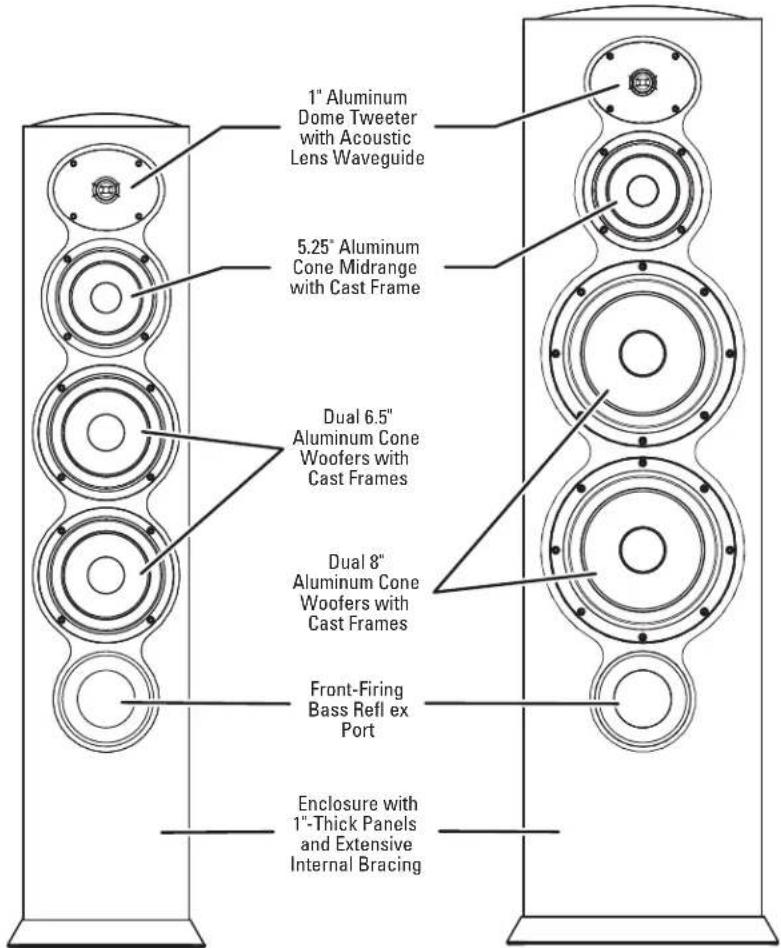
text_image
1" Aluminum Dome Tweeter with Acoustic Lens Waveguide 5.25" Aluminum Cone Midrange with Cast Frame Dual 6.5" Aluminum Cone Woofers with Cast Frames Dual 8" Aluminum Cone Woofers with Cast Frames Front-Firing Bass Refl ex Port Enclosure with 1"-Thick Panels and Extensive Internal BracingF206 F208
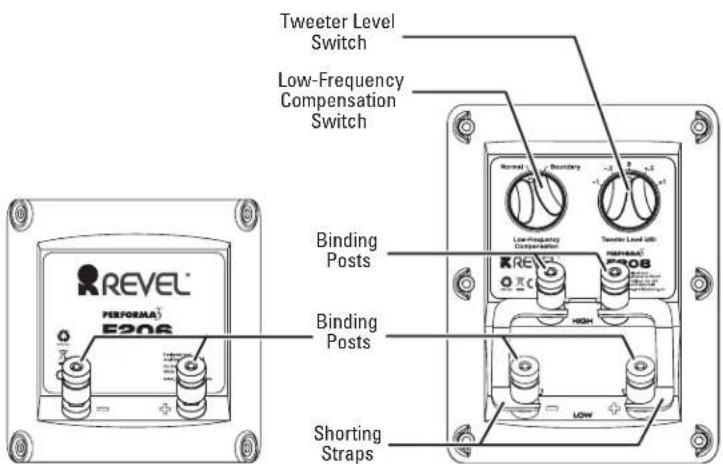
text_image
Tweeter Level Switch Low-Frequency Compensation Switch Binding Posts Binding Posts Shorting StrapsF206 F208
TWEETER LEVEL SWITCH (F208)
This switch alters the tweeter's output by -1dB, -0.5dB, 0dB, +0.5dB, or +1dB.
CAUTION: Do not operate the switch while audio is playing through the speaker.
LOW-FREQUENCY COMPENSATION SWITCH (F208)
This switch compensates for less-than-ideal loudspeaker placement near a wall, in an entertainment center, or in a room that “boosts” low frequencies.
- Select "Normal" if the loudspeaker is located at least three feet (0.91m) from walls and other large objects.
- Select "Boundary" if the loudspeaker is built into an entertainment center or shelving unit or if the loudspeaker is located less than about two feet (0.61m) from walls or other large objects.
- You can fi ne-tune the low-frequency performance even further by experimenting with the Low-Frequency Compensation adjustment along with the supplied port plugs.
CAUTION: Do not operate the switch while audio is playing through the speaker.
BINDING POSTS
These gold-plated terminals provide connections from the power amplifier(s).
The F208 has one pair of high-frequency and one pair of low-frequency binding posts that come from the factory connected by a pair of shorting straps (see below). The two sets of binding posts can be configured for single-wired, bi-wired, or bi-amped connections. Refer to the Making Connections section on page 7 for additional information.
SHORTING STRAPS (F208)
Two gold-plated shorting straps that configure the loudspeaker for single-wired connections are installed at the factory. The shorting straps must be removed when the binding posts are re-configured for bi-wired or bi-amped connections. Refer to the Making Connections section on page 7 for additional information.
INSTALLATION CONSIDERATIONS
Loudspeaker fi delity depends on the following three factors: loudspeaker accuracy, loudspeaker placement and listening room acoustics.
Advanced Revel design features allow the F208 and F206 to achieve exceptional acoustical precision. As a result, experimenting with loudspeaker placement and listening room acoustics will have the most significant impact on the loudspeakers' performance.
LOUDSPEAKER PLACEMENT
The following are important loudspeaker placement considerations for the F208 and F206:
- Remove all obstructions between the loudspeaker and the primary listening position. For instance, a coffee table between the loudspeaker and the primary listening position will create reflections that will degrade stereo imaging and timbre. Placing the loudspeakers near large objects may also cause unwanted reflections.
- For the best stereo imaging, place the loudspeakers so that they are both the same distance from the primary listening position and so they are both the same distance from the side walls, as shown in the illustration at the top of the next column.
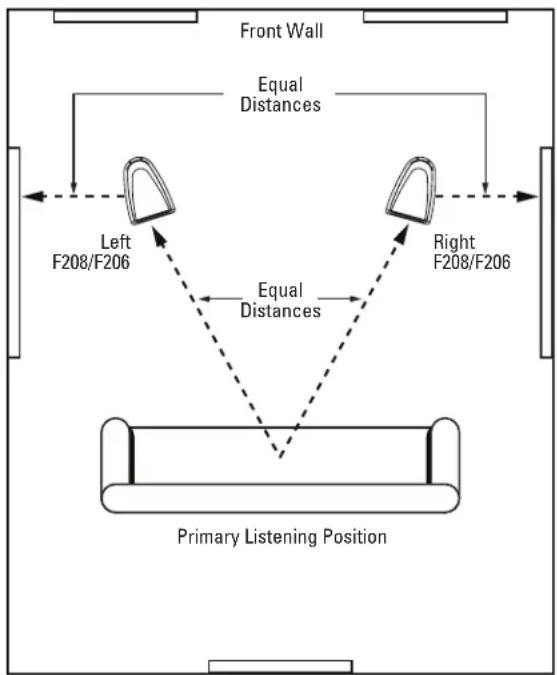
flowchart
graph TD
    A["Front Wall"] --> B["Left F208/F206"]
    A --> C["Right F208/F206"]
    B --> D["Equal Distances"]
    C --> D
    D --> E["Primary Listening Position"]
    style A fill:#f9f,stroke:#333
    style B fill:#ccf,stroke:#333
    style C fill:#ccf,stroke:#333
    style D fill:#cfc,stroke:#333
    style E fill:#fcc,stroke:#333
- For optimal stereo imaging and timbre, aim the loudspeakers directly toward the primary listening position as shown in the illustration above. If you wish to widen the stereo soundstage you can reduce this toe-in angle, even to the point at which the loudspeakers are pointing straight forward.
- Moving the loudspeakers farther from the front and side listening room walls will improve stereo imaging and the sense of spaciousness in the listening space.
- Moving the loudspeakers closer to the corners or walls of the listening room will increase bass level.
LISTENING ROOM ACOUSTICS
Listening rooms have a profound impact on sound, particularly at lower frequencies. In fact, the effect of the listening room can dominate sounds below about 400Hz. Ideally, listening rooms would include optimized dimensional ratios to minimize the effects of room resonances. But in reality, most listening rooms are not designed to enhance loudspeaker performance.
The interaction between loudspeakers and listening rooms is complex, with two important determinants that affect the loudspeaker and the listener:
- Surfaces and other boundaries often cause large peaks and dips in low-frequency response. These peaks and dips can often range 12dB or more.
- Standing waves (also known as room modes or resonances) interact with both the loudspeaker and the listener, resulting in large errors in frequency response.
Unfortunately, there is no simple solution that addresses both of these factors. Even computer software programs that examine one or both factors may not calculate proper primary listening position or loudspeaker placement values.
In most cases, proper selection of the primary listening position combined with proper placement of the loudspeaker can result in superior performance at lower frequencies. The difference between superior and inferior results is often just a small adjustment of the primary listening position or loudspeaker placement. Contact your authorized Revel dealer for assistance.
ACOUSTIC TREATMENT MATERIALS
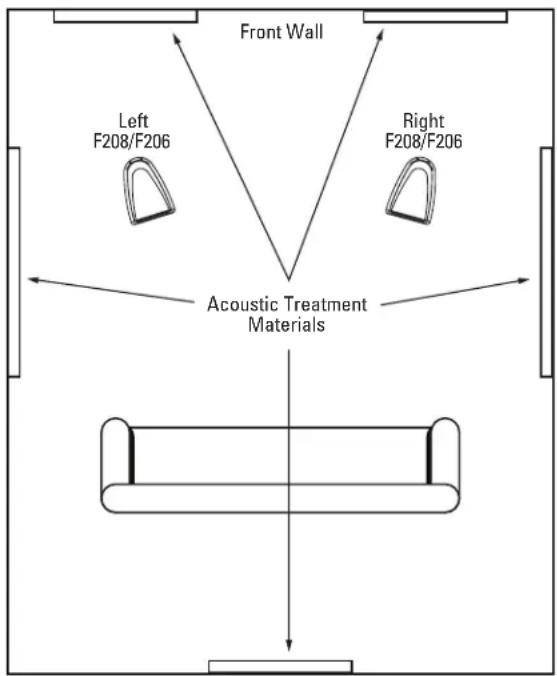
The F208 and F206 feature high-order filters that optimize the loudspeakers' on-axis and off-axis response, minimizing sonic degradations that occur in overly "live" rooms (those with surfaces that are acoustically refl ective). Placing minimal acoustic treatment materials at the room's primary refl ection points will reduce these distortions even further. Ideally, acoustic absorbers should be placed at the fi rst refl ection points on the front and side walls and either acoustic absorbers or diffusers should be placed at the fi rst refl ection points on the rear wall.
flowchart
graph TD
    A["Front Wall"] --> B["Left F208/F206"]
    A --> C["Right F208/F206"]
    B --> D["Acoustic Treatment Materials"]
    C --> D
    D --> E["Top Box"]
Because the listener's eyes and ears are on the same plane, the "mirror method" is an accurate determinant of critical reflection points. This method can be used to determine reflection points for side walls, rear walls, front walls, and even the ceiling. Applying acoustic treatment materials to the side walls is most important, followed by the ceiling, front wall and rear wall.
To determine reflection points using the mirror method:
- Once the loudspeakers have been placed, sit in the primary listening position and ask another person to slide a mirror along the listening room walls.
- Note the locations at which you can see either loudspeaker in the mirror from the primary listening position. Be sure to look for both loudspeakers in the reflection on each room boundary. These are reflection points that require acoustic treatment materials.
If acoustic treatment materials are not available, hanging a rug over the refl ection points will help reduce sonic degradation in overly "live" rooms. Carpeting the fl oor area between the loudspeakers and the primary listening position and placing irregular surfaces such as bookcases at the fi rst refl ection points will also help minimize strong refl ections.
ADJUSTABLE SPIKES
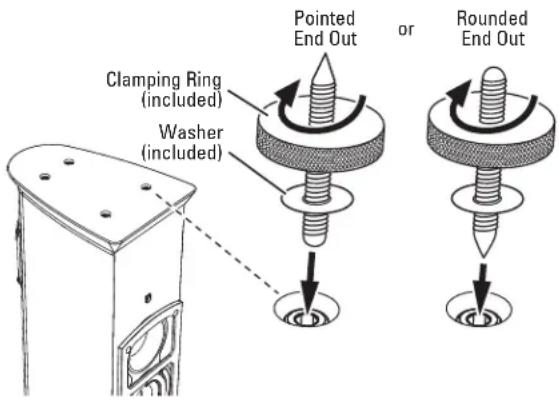
Four adjustable spikes are included for each F208 and F206 loudspeaker. You can install these spikes in the bottoms of the loudspeaker cabinets to provide optimal stability, accommodating installations on tile, hardwood, and carpeted floors.
NOTE: When moving the F208 and F206 with the spikes installed, avoid dragging the loudspeaker across the floor.
To install and adjust the spikes:
- Place the loudspeaker on its side on a soft towel or carpeted floor.
- Screw the spikes into the fi ttings on the bottom of the loudspeaker. The spikes can be installed with either the pointed end or round end protruding from the cabinet.
text_image
Clamping Ring (included) Washer (included) Pointed End Out or Rounded End Out- If the loudspeakers are to be placed on a carpeted floor, install the spikes with the pointed ends protruding from the cabinet.
- If the loudspeakers are to be placed on a wood, linoleum or tile floor, install the spikes with the round ends protruding from the cabinet. After determining the fi nal locations for the speakers you can place coins under the spikes to protect the floor surface from damage.
NOTE: If you wish you can install the spikes with the pointed ends protruding from the cabinet for placement on wood, linoleum or tile floors. In this case you must place coins or similar items under the spikes to avoid damaging the floor surface.
- Rotate the locking ring clockwise to firmly secure the spike to the cabinet. Make sure to thread the locking rings of all four spikes to achieve a level balance when the loudspeaker is placed rightside-up on the floor.
CAUTION: Floor-standing loudspeakers such as the F208 and F206 have a high center of gravity, which may cause them to fall if tipped or improperly positioned. To avoid this, anchor the loudspeaker to the floor and/or wall using the same procedures and hardware used to anchor bookcases, wall units, and other furniture. HARMAN International Industries, Inc. assumes no responsibility for proper selection and installation of hardware or for any personal injuries or product damages resulting from improper installation or a fallen loudspeaker.
MAKING CONNECTIONS
CAUTION: Never make or break connections unless all system components are powered off.
OBSERVE PROPER POLARITY
Connect the amplifi er's positive (+) terminal to the positive (+) terminal on the corresponding speaker; connect the amplifi er's negative (−) terminal to the negative (−) terminal on the corresponding speaker. Do not reverse polarities (that is, do not connect + to −, or − to +) when making connections. Doing so will cause poor stereo imaging and diminished bass response.
SPEAKER CABLE
Use high-quality loudspeaker cable with a maximum total loop resistance of 0.07 ohms or less for each wire run. Refer to the table below to determine the appropriate wire gauge for your installation.
MINIMUM WIRE GAUGE
| Maximum Wire Length (Feet) | Maximum Wire Length (Meters) | Minimum Wire Gauge (AWG) |
| <87 <27 6 | ||
| <69 <21 7 | ||
| <58 <18 8 | ||
| <43 <13 9 | ||
| <34 <10 10 | ||
| <27 <8 11 | ||
| <22 <7 12 | ||
| <17 <5 13 | ||
| <14 <4 14 | ||
| <11 <3.5 15 | ||
| <9 <3 16 | ||
| <7 <2 17 | ||
| <5 <1.5 18 |
NOTE: High loop resistances that exceed 0.07 ohms (for each wire run) will cause the loudspeaker's fi liter network to be mis-terminated, resulting in considerable degradation of sound quality.
F206 CONNECTIONS
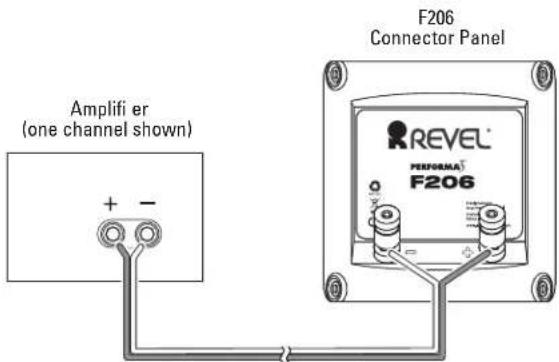
The F206 features gold-plated binding posts that allow single-wire connection.
text_image
Amplifier (one channel shown) + - F206 Connector Panel REVEL® PERIOMA® F206Connect both loudspeakers using the same method, using speaker cables of the same length for each speaker.
F208 CONNECTIONS
Before making connections to the F208, note the following:
- The standard connection method uses a single loudspeaker cable. The F208 is equipped with two pairs of input terminals to allow for bi-wiring or bi-amping. While Revel does not endorse one particular connection method over another, these additional connection options are available if desired. The design of this loudspeaker is such that optimal performance can be attained using the standard connection method.
- Vertical bi-amped connections (see below) must be made with identical power amplifiers. Horizontal bi-amped connections (see below) can be made with identical or non-identical power amplifiers with identical gain factors.
- When making bi-amped connections, both power amplifiers must receive identical input signals from the associated preamplifier. If the associated preamplifier offers two connectors per output channel, each power amplifier can be connected to a separate connector for the same output channel of the preamplifier. If the associated preamplifier does not offer two connectors per output channel "Y" adaptors are required.
- No matter which connection method you choose, the speaker cables used for the left and right loudspeakers should always be the same length.
- If desired, contact your authorized Revel dealer for information about the suitability of power amplifi er components before connecting the F208 to your power amplifi er(s).
- Review the owner's manuals for all associated audio components to determine their correct connection procedures.
NOTE: Do not use an electronic crossover network when bi-amping Revel F208 loudspeakers. Doing so will cause a considerable degradation of sound quality.
F208 Single-Wired Connection
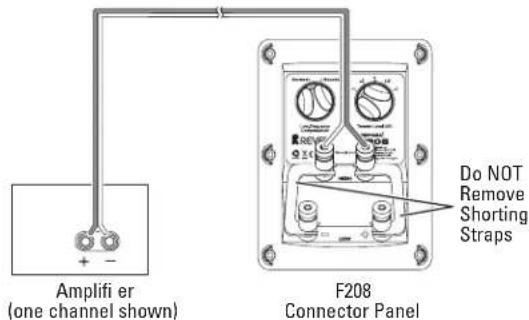
NOTE: Do not remove the shorting straps between the speaker terminals.
Single-wired connections are the most common. These are made between one pair of F208 input terminals and one power amplifier output channel as shown below.
text_image
Amplifier (one channel shown) F208 Connector Panel Do NOT Remove Shorting StrapsTo make single-wired connections:
- Connect one speaker cable to the desired set of F208 input terminals. (The high-frequency - "HIGH" - input terminals are recommended.) Then connect the other end of that speaker cable to the desired power amplifier output channel.
- Repeat step 1 to connect the second F208 to the power amplifier's remaining output channel.
F208 Bi-Wired Connections
CAUTION: Remove the shorting straps before making bi-wired connections. Failure to do so may cause damage to some power amplifiers.
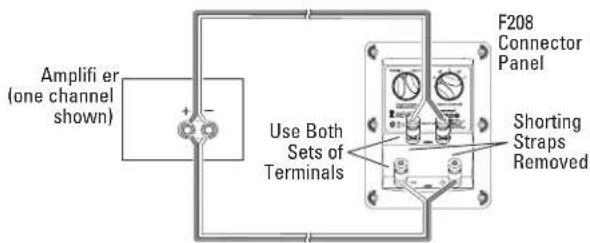
Bi-wired connections use two sets of speaker cables to connect both sets of F208 input terminals to a single power amplifier output channel as shown below.
text_image
Amplifier (one channel shown) + - Use Both Sets of Terminals F208 Connector Panel Shorting Straps Removed- Remove the shorting straps.
- Connect one speaker cable to the high-frequency set of F208 input terminals. Then connect the other end of that speaker cable to the desired power amplifier output channel.
- Connect another speaker cable to the low-frequency set of F208 input terminals. Then connect the other end of that speaker cable to the same power amplifier output channel that you connected in step 2.
- Repeat steps 1, 2 and 3 to connect the second F208 to the power amplifier's remaining output channel.
F208 Vertical Bi-Amped Connections
CAUTION: Remove the shorting straps before making bi-amped connections. Failure to do so may cause damage to some power amplifiers.
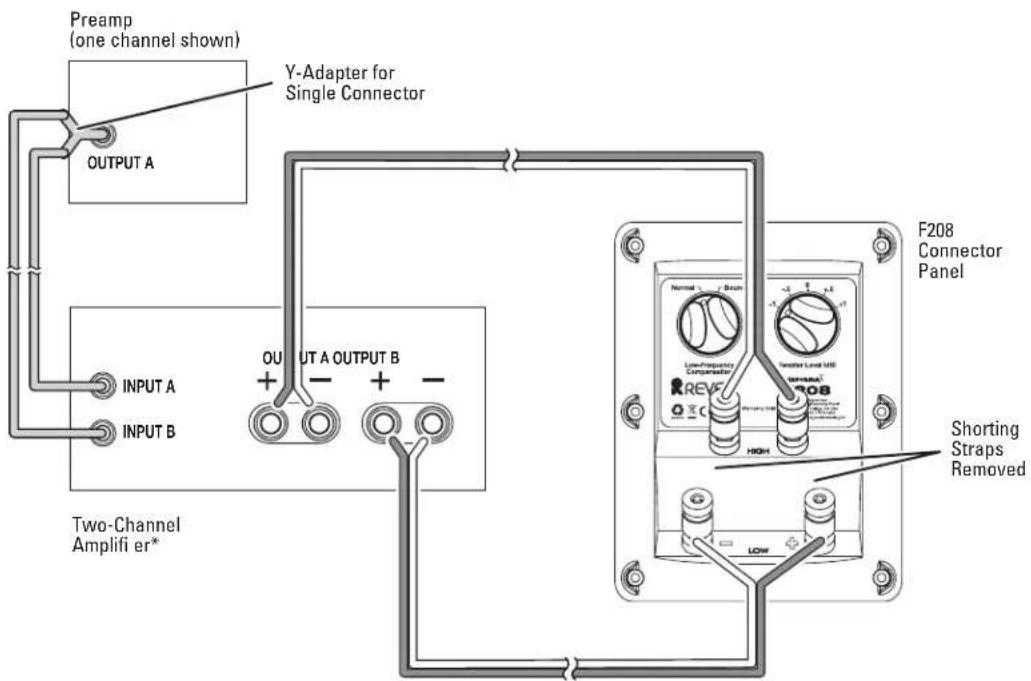
Vertical bi-amped connections are made between both pairs of F208 input terminals and two separate output channels of a single power amplifier. Each F208 loudspeaker is connected to an individual power amplifier, which can sometimes increase sonic performance. The power amplifiers for the two loudspeakers must be identical.
NOTE:
- Vertical bi-amped connections must be made using two identical power amplifiers, one for each loudspeaker.
- When making vertical bi-amped connections, both power amplifi er channels must receive identical input signals from the associated preamplifi er. If the associated preamplifi er does not have two output connectors for each channel, "Y" adaptors are required.
text_image
Preamp (one channel shown) Y-Adapter for Single Connector OUTPUT A INPUT A INPUT B OUTPUT A OUTPUT B Two-Channel Amplifi er* F208 Connector Panel Normal - 1.5kΩ Line-Frequency Compressor Vibrator Level HSE REVS HIGH LOW Shorting Straps Removed* Amplifi er for other loudspeaker must be identical
- Remove the shorting straps.
- Connect one speaker cable to the high-frequency set of F208 input terminals. Then connect the other end of that speaker cable to the desired power amplifier output channel.
-
Connect another speaker cable to the low-frequency set of F208 input terminals. Then connect the other end of that speaker cable to another output channel of the same power amplifier you connected to the high-frequency input terminals.
-
Connect both amplifi er channel inputs to the output of a single preamplifi er channel. If the preamp only has one connector for the channel, use a "Y"-adaptor.
- Repeat steps 1, 2 and 3 to connect the second F208 to another, identical power amplifier. Repeat step 4 to connect the second amplifier to the preamplifier's other channel.
F208 Horizontal Bi-Amped Connections
CAUTION: Remove the shorting straps before making bi-amped connections. Failure to do so may cause damage to some power amplifiers.
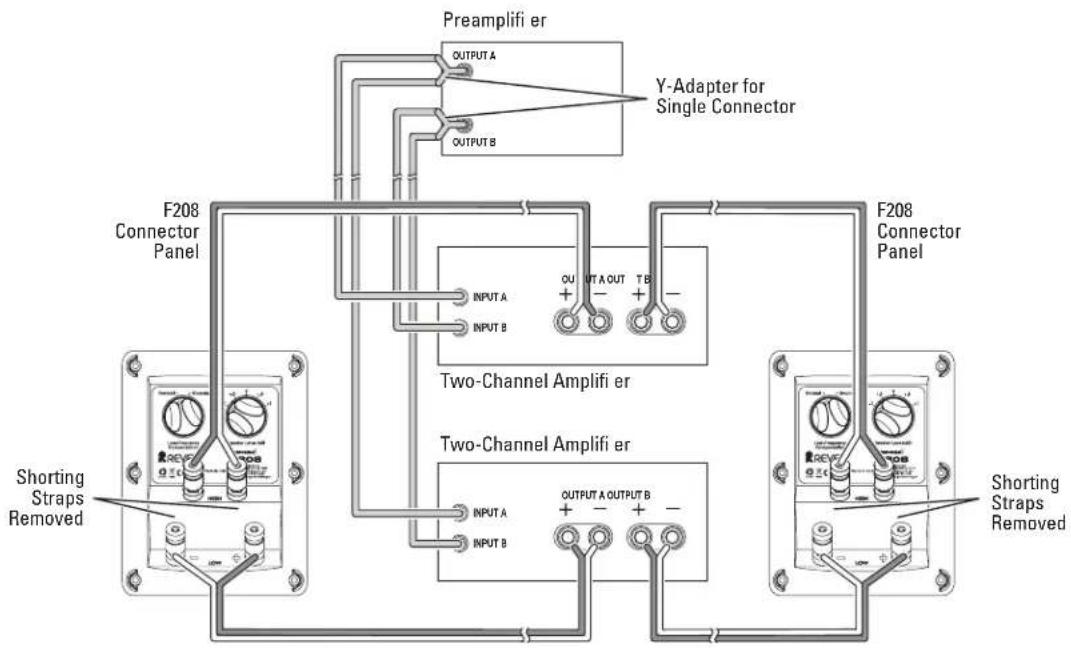
Horizontal bi-amped connections are made between both pairs of F208 input terminals and two separate output channels of two separate power amplifiers. The F208's set of high-frequency input terminals is connected to one power amplifier, while the F208's set of low-frequency input terminals is connected to the other power amplifier.
The two power amplifiers can be identical or non-identical, but they must have identical gain factors. If their gain factors are not identical, at least one of the amplifiers must have a means of adjusting its input level. Contact your authorized Revel dealer for assistance.
NOTE: When making horizontal bi-amped connections, both power amplifiers must receive identical input signals from the associated preamplifier. If the associated preamplifier does not have two output connectors for each channel, "Y" adaptors are required.
flowchart
graph TD
    A["F208 Connector Panel"] -->|Preamplifier er| B["Y-Adapter for Single Connector"]
    A -->|Shorting Straps Removed| C["Two-Channel Amplifier er"]
    A -->|Shorting Straps Removed| D["Two-Channel Amplifier er"]
    B --> E["F208 Connector Panel"]
    D --> F["Shorting Straps Removed"]
    style A fill:#f9f,stroke:#333
    style B fill:#ccf,stroke:#333
    style C fill:#cfc,stroke:#333
    style D fill:#fcc,stroke:#333
- Remove the shorting straps.
- Connect one speaker cable to the high-frequency set of F2D8 input terminals. Then connect the other end of that speaker cable to the desired power amplifier output channel.
- Connect another speaker cable to the low-frequency set of F208 input terminals. Then connect the other end of that speaker cable to the desired output channel on another power amplifier.
-
Repeat step 2 to connect the high frequency set of input terminals on the second F208 to the other channel of the power amplifier that was connected in step 2.
-
Repeat step 3 to connect the low-frequency set of input terminals on the second F208 to the other channel of the power amplifier that was connected in step 3.
- Connect the left and right channel inputs of the high-frequency amplifi er to the preamplifi er's left and right outputs. Repeat for the left and right inputs of the low-frequency amplifi er. If the preamplifi er only has one connector for each channel, use "Y"-adaptors.
OPTIMIZING PERFORMANCE
PORT PLUGS
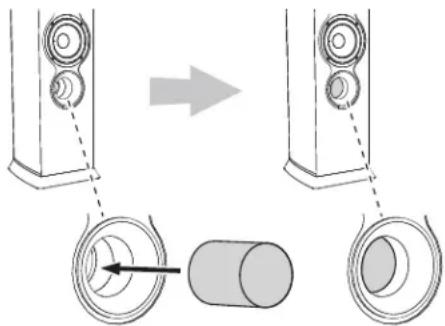
Revel Performa3 fl oorstanding loudspeakers include a pair of foam port plugs that can be used to adjust the loudspeaker's low-frequency performance in certain installation situations.
If your loudspeakers are built into an entertainment center or shelving unit, or if the loudspeaker is located less than about two feet (0.61m) from walls or other large objects, inserting the port plugs into the loudspeaker's port openings can reduce the overly-aggressive bass output that can be created by the speaker's proximity to large surfaces that reflect bass energy.
- In the F208 you can experiment with the port plugs in conjunction with the loudspeaker's Low-Frequency Compensation adjustment to fi ne-tune the low-frequency performance even further.
Insert the port plug into the loudspeaker's port tube opening far enough so that the end of the plug is flush with the inside end of the port tube's flared section.
text_image
Diagram illustrating the transformation of a speaker into a microphone, showing the left side with sound waves and the right side with lens components.CAUTION: Be careful not to insert the port plug so far into the port tube that it falls inside of the speaker.
F208 ADJUSTMENTS
As discussed in the F208/F206 Overview section on page 5, the F208 has Low-Frequency Compensation and Tweeter Level adjustments that allow you to tailor its performance for your individual listening situation and personal preferences.
Once you have installed and connected your loudspeakers follow these steps the first time you turn you new F208 loudspeakers on:
- Set the Tweeter Level switch to 0. (Different installation situations may require other settings.)
-
Set the Low Frequency Compensation switch to the appropriate position.
-
Select the Normal setting if the loudspeaker is located at least 3 feet (0.91m) from walls.
-
Select the Boundary setting if the loudspeaker is built into an entertainment center or shelving unit or if the loudspeaker is located less than about 2 feet (0.61m) from walls and other objects.
-
Begin playback of a familiar music or film source.
- Listen from the primary listening position, increasing volume to a comfortable level.
-
Experiment with the loudspeakers' placement to achieve the best overall tonal balance, stereo image precision, and sense of spaciousness in the listening room. Refer to the Installation Considerations section on page 5 for additional information about loudspeaker placement.
-
Adjust the Tweeter Level switch on each loudspeaker to change the high-frequency level and fine-tune the overall tonal balance.
CAUTION: Do not operate the switch while audio is playing through the speaker.
NOTE: For best results, set the Tweeter Level switches on both loudspeakers to the same position.
- Experiment with the Low-Frequency Compensation switch and the port plugs to achieve the best low-frequency performance for your particular listening room and installation.
CAUTION: Do not operate the switch while audio is playing through the speaker.
LOUDSPEAKER VOLUME LEVELS
The high-order filters employed in Revel Performa3 series loudspeakers include steep cut-offs to reduce potential transducer damage from "out-of-band" frequencies. Combined with carefully selected transducers and filter network components, this approach helps the Performa3 fil outstanding loudspeakers maintain their performance under extreme operating conditions.
However, all loudspeakers have limits when it comes to continuous playback. To avoid exceeding these limits, avoid playback at volume levels that distort or strain the sound.
CAUTION: To avoid damage, reduce the volume level immediately if the loudspeaker sound is not clean and clear.
CARING FOR YOUR LOUDSPEAKERS
GRILLES
Revel Performa3 floorstanding speakers feature grilles with a magnetic attachment method that eliminates unsightly attachment hardware from the speaker baffle, so if you decide to use your speakers with the grilles removed they will retain their elegant appearance.
When installing the grilles on the speakers, orient them so that the "TOP" markings (embossed in the rears of the grille frames) are towards the tops of the speaker cabinets.
CABINET FINISH
The cabinet's wood veneer fi nish does not require routine maintenance. Cabinet surfaces that have been marked with dust, fi ngerprints, or other dirt can be cleaned using a soft cloth – preferably micro-fi ber, and high quality auto wax. Take care not to come in contact with the transducers.
- Use caution to avoid contacting the rubberized trim on the top of the loudspeaker with auto wax. If necessary, the rubberized trim can be cleaned with denatured alcohol on a microfiber cloth.
To clean the grille, gently vacuum it using a soft-bristled brush vacuum attachment with the vacuum cleaner set to the lowest possible suction.
CAUTION: To prevent cabinet damage, do not use a cloth made with steel wool or metal polish to clean the cabinet. To prevent possible transducer damage, do not apply furniture polish directly to the cabinet.
SPECIFICATIONS
F208
| Type: 3-way dual 8" fl oorstanding loudspeaker | |
| Low-frequency transducer: Two 8" (200mm) aluminum cones, with cast frames | |
| Midrange transducer: 5-1/4" (130mm) aluminum cone, with cast frame | |
| High-frequency transducer: 1" (25mm) aluminum dome, with acoustic lens waveguide | |
| Recommended amplifi er power range: 50 – 350 watts | |
| Low-frequency extension: 23Hz (-10dB); 27Hz (-6dB); 31Hz (-3dB) | |
| Nominal impedance: 8 ohms | |
| Sensitivity (2.83V/1m): 88.5dB | |
| Crossover frequencies: 270Hz; 2.2kHz | |
| Enclosure type: Bass-refl ex via front-mounted port | |
| Controls: Low-frequency contour; high-frequency level | |
| Inputs: Dual gold-plated binding posts with shorting straps | |
| Available fi nishes: Piano black, high-gloss walnut | |
| Dimensions (H x W x D): | 46-1/2" x 11-13/16" x 14-3/4" (1182mm x 300mm x 375mm) |
| Weight: | 79.8 lb (36.3kg) |
F206
| Type: 3-way dual 6-1/2" fl oorstanding loudspeaker | |
| Low-frequency transducer: Two 6-1/2" (165mm) aluminum cones, with cast frames | |
| Midrange transducer: 5-1/4" (130mm) aluminum cone, with cast frame | |
| High-frequency transducer: 1" (25mm) aluminum dome, with acoustic lens waveguide | |
| Recommended amplifi er power range: 50 – 200 watts | |
| Low-frequency extension: 30Hz (-10dB); 34Hz (-6dB); 42Hz (-3dB) | |
| Nominal impedance: 8 ohms | |
| Sensitivity (2.83V/1m): 88dB | |
| Crossover frequencies: 275Hz; 2.15kHz | |
| Enclosure type: Bass-refl ex via front-mounted port | |
| Inputs: Gold-plated binding posts | |
| Available fi nishes: Piano black, high-gloss walnut | |
| Dimensions (H x W x D): | 41-3/8" x 9-3/4" x 13-11/16" (1051mm x 249mm x 347mm) |
| Weight: | 58.1 lb (26.4kg) |
LIMITED WARRANTY
A valid serial number is required for warranty coverage. This Revel warranty protects the original retail purchaser for a period of five (5) years (parts and labor) from any failure as a result of original manufacturing defects so long as:
- The Revel products were purchased within the 50 United States, its territories or Canada.
- The dealer from whom the Revel products were purchased was authorized to sell such products at the time of the original purchase.
- The original, dated Bill of Sale is presented whenever service is required during the warranty period.
The balance of this warranty is transferable only if the used product is purchased from an authorized Revel dealer. This warranty is only valid for service within the United States, its territories and Canada; please contact an authorized Revel dealer for warranty and service information.
Any Revel product not performing satisfactorily may be returned to the factory for evaluation. Return authorization must first be obtained by either calling or writing Customer Service prior to shipping the product. The customer is responsible for shipping charges to the
factory. Customer Service will pay return shipping charges within the United States only in the event that the product is found to be defective as mentioned above. There are other stipulations that may apply to shipping charges.
There is no other express warranty on this product. Neither this warranty nor any other warranty, express or implied, including implied warranties of merchantability and fitness, shall extend beyond the warranty period. No responsibility is assumed for any incidental or consequential damages, so that the above exclusion or limitation may not apply.
This warranty provides specific legal rights. Other states may provide additional rights. This warranty is applicable in the United States, its territories and Canada. Outside of the United States, its territories and Canada, please contact an authorized Revel dealer for warranty and service information.
The information this document contains is subject to change without notice. In the event that there are differences between this warranty and the provisions of any advertisements, documentation, product brochures or packaging cartons, the terms of this warranty will prevail.
HARMAN
HARMAN International Industries, Incorporated
8500 Balboa Boulevard, Northridge, CA 91329 USA
© 2012 HARMAN International Industries, Incorporated. All rights reserved.
Revel and the Revel logo are trademarks of HARMAN International Industries, Incorporated, registered in the United States and/or other countries.
Features, specifications and appearance are subject to change without notice.
For questions, assistance or additional information concerning any of our products, call us at: (516) 594-0300 or (888) 691-4171. For technical support, submit your detailed inquiry to:csupport@harman.com.
Part No. REVP4411 Rev: A

REVEL by HARMAN
www.revelspeakers.com
LIMITED WARRANTY
United States, US Territories – Effective January 1, 2017
This limited warranty (this "Limited Warranty") protects only the original end-user ("you" or "your"), and is not transferable. Any attempt to transfer this Limited Warranty shall immediately make this Limited Warranty void.
Harman International Industries, Incorporated ("Harman") warrants to you that your Revel product (the "Product") will be free from defects in workmanship and materials for the corresponding period set forth in the table below (the "Warranty Period").
| A-stock(purchased from authorized resellers) | B-stock(denoted with "-Z" at the end of the part number) | ||
| Product Category | Warranty Period | Product Category | Warranty Period |
| Passive Loudspeakers | 5 years | Passive Loudspeakers | 1 year |
| Powered Loudspeakers | 5 years | Powered Loudspeakers | 1 year |
| In-wall Loudspeakers | Lifetime | In-wall Loudspeakers | 1 year |
| In-ceiling Loudspeakers Lifetime In-ceiling Loudspeakers 1 year | |||
This Limited Warranty does not cover defects which are a result of: (1) damage caused by accident, disaster, misuse, abuse or other unreasonable use or neglect (including the lack of reasonable and necessary maintenance); (2) damage occurring during shipment (claims must be presented to the carrier); (3) damage caused by improper installation or adjustment; (4) damage to, or deterioration of, any accessory or decorative surface; (5) damage resulting from failure to follow instructions contained in your owner's manual; or (6) damage resulting from the performance of repairs by someone other than an authorized Revel service center.
Furthermore, this Limited Warranty covers only actual defects within the Product itself, and does not cover the cost of installation or removal from a fixed installation, setup or adjustments, claims based on misrepresentation by the seller, performance variations resulting from installation-related circumstances such as program source quality or AC power or Product modifications, any Product on which the serial number has been effaced, modified or removed, or any Product sold on an "as-is" or final sale basis. This Limited Warranty is valid only for Products purchased from an authorized Revel dealer.
THIS LIMITED WARRANTY IS EXCLUSIVE AND IN LIEU OF ALL OTHER WARRANTIES, EXPRESS OR IMPLIED. EXCEPT TO THE EXTENT EXPRESSLY PROHIBITED BY APPLICABLE LAW, HARMAN EXPRESSLY DISCLAIMS ALL SUCH OTHER WARRANTIES, INCLUDING BUT NOT LIMITED TO IMPLIED WARRANTIES OF MERCHANTABILITY, FITNESS FOR A PARTICULAR PURPOSE AND NON-INFRINGEMENT, WITH RESPECT TO THE PRODUCT. TO THE MAXIMUM EXTENT PERMITTED BY LAW, HARMAN SHALL NOT BE RESPONSIBLE FOR ANY INCIDENTAL OR CONSEQUENTIAL DAMAGES EXCEPT TO THE EXTENT EXPRESSLY PROVIDED (OR PROHIBITED) BY APPLICABLE LAW, EVEN IF HARMAN HAS BEEN ADVISED OF THE POSSIBILITY OF SUCH DAMAGES.
Notwithstanding the above, if you qualify as a "consumer" under the Magnuson-Moss Warranty Act, or applicable state laws, then you may be entitled to any implied warranties allowed by law for the Warranty Period. Further, some states do not allow limitations on how long an implied warranty lasts or allow the exclusion or limitation of consequential damages, so such limitations may not apply to you. This Limited Warranty gives you specific legal rights, and you may also have other rights which vary from state to state.
This Limited Warranty is applicable in the United States and its territories. Outside of the United States and its territories, please contact an authorized Revel dealer for warranty and service information.
When the Product needs service contact an authorized Revel dealer, or contact Revel customer support to request information about where the Product should be taken or sent. To validate your right to this Limited Warranty, you must provide the original dated sales receipt or other proof of ownership and date of purchase. Do not return your Product for service without prior authorization from an authorized service center. Warranty repair of the Product must be carried out by an authorized service center. Unauthorized warranty repair will void this Limited Warranty and is performed at your sole risk.
During the Warranty Period, Harman will at its sole option and expense, repair or replace any product found to be defective. In the event that the Product is no longer available and cannot be repaired effectively, Harman, at its sole option, may replace it with a reasonable equivalent, or refund the original purchase price paid. Harman will cover reasonable return shipping charges within the United States and its territories, only if the Product is found to be defective under this Limited Warranty.
You will be charged for the cost of examining any Product that is not in need of repair (including resulting shipping costs), or for necessary repairs not covered by this Limited Warranty.
We sincerely thank you for your expression of confidence in Revel. We wish you many years of listening pleasure.

REVEL®
HARMAN Luxury Audio Group
8500 Balboa Blvd, Northridge, CA 91329 USA
(Toll-Free) 1-888-691-4171

Harman International Industries, Incorporated
400 Atlantic Street, 15 ^th Floor, Stamford, CT 06901 USA
© 2017 Harman International Industries, Incorporated. All rights reserved.
P/N 950-0513-001, Artwork # 080-3681 Rev B