Diamond 11.cs - Pregnant Wharfedale - Free user manual and instructions
Find the device manual for free Diamond 11.cs Wharfedale in PDF.


User questions about Diamond 11.cs Wharfedale
0 question about this device. Answer the ones you know or ask your own.
Ask a new question about this device
Download the instructions for your Pregnant in PDF format for free! Find your manual Diamond 11.cs - Wharfedale and take your electronic device back in hand. On this page are published all the documents necessary for the use of your device. Diamond 11.cs by Wharfedale.
USER MANUAL Diamond 11.cs Wharfedale
CAUTIONS! ATTENTIONS! WARNUNGS! AVVERTENZE!
WAARSCHUWINGS! PRECAUCIONES! ATENÇÃO! 注意!
1 UNPACKING DEBALLAGE AUSPACKEN DISIMBALLAGGIO
UITPAKKEN DESEMBALAGEM DESEMBALAJE 开封您的扬声器
2 VASCHETTA COLLEGAMENTI KLEMMENBORD PANELES DE TERMINALES 5
PAINEL DOS TERMINAIS 接头端子面板
3 STANDARD LAUTSPRECHERANSCHLUSSE COLLEGAMENTO CONVENZIONALE
TRADITIONELE AANSLUITINGEN CONEXION NORMAL
LIGAÇÕES DE COLUNAS CONVENCIONAIS 扬声器的常规连接
natural_image
Warning symbol: black triangle with exclamation mark (no text or numbers)
text_image
ABefore installing this product read all these instructions. (A+B)
Before making any connections, switch the tier off.
When you switch on your system or change sources, set the volume control at minimum and turn the level up gradually.
DO NOT use your amplifier at full volume.
Ensure that all loudspeakers in the system are correctly wired and are in phase.
DO NOT subject your loudspeakers to excessive cold, heat, humidity or sunlight.
DO NOT place heavy objects on top of loudspeaker cabinets.
DO NOT connect your loudspeaker to the mains supply.
DO NOT attempt to dismantle the loudspeaker. There are no user serviceable parts inside it and you will void the warranty.
WARNUNGS!
GER
GBR After taking out the top-most packing piece the loudspeakers can be lifted from the carton and the polythene bags removed. Check each loudspeaker after unpacking and in the event of any transit damage, immediately contact your Wharfedale dealer. We suggest you retain the packaging.
GBR Your loudspeakers use two or four terminals.
natural_image
Pure electrical circuit lines without any symbols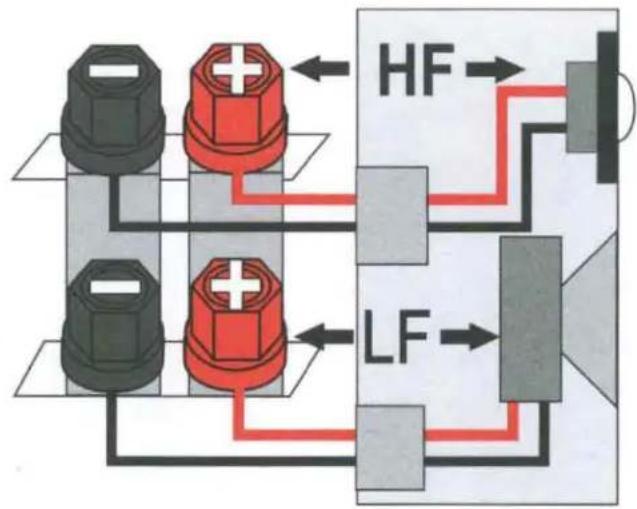
flowchart
graph TD
    A["Component 1"] --> B["HL"]
    C["Component 2"] --> B
    D["Component 3"] --> B
    B --> E["Output"]
    F["Input"] --> B
    G["Input"] --> B
    H["Input"] --> B
    I["Input"] --> B
    J["Input"] --> B
    K["Input"] --> B
    L["Input"] --> B
    M["Input"] --> B
    N["Input"] --> B
    O["Input"] --> B
    P["Input"] --> B
    Q["Input"] --> B
    R["Input"] --> B
    S["Input"] --> B
    T["Input"] --> B
    U["Input"] --> B
    V["Input"] --> B
    W["Input"] --> B
    X["Input"] --> B
    Y["Input"] --> B
    Z["Input"] --> B
    AA["Input"] --> B
    AB["Input"] --> B
    AC["Input"] --> B
    AD["Input"] --> B
    AE["Input"] --> B
    AF["Input"] --> B
    AG["Input"] --> B
    AH["Input"] --> B
    AI["Input"] --> B
    AJ["Input"] --> B
    AK["Input"] --> B
    AL["Input"] --> B
    AM["Input"] --> B
    AN["Input"] --> B
    AO["Input"] --> B
    AP["Input"] --> B
    AQ["Input"] --> B
    AR["Input"] --> B
    AS["Input"] --> B
    AT["Input"] --> B

CAUTION!
ATTENTION!
WARNUNG!
WAARSCHUWING!
AVVERTENZE!
PRECAUCION!
ATENÇÃO!
注意!
GBR Before making any connections, switch the amplifier off.
GBR Loudspeaker cable is polarity coded along one edge. Split the cable to a depth of about 25mm and strip 8mm of insulation from each wire. If the cable is stranded, twist the strands together.
text_image
Diagram illustrating two mechanical or electrical setups with labeled components and directional arrows, showing component movement.GBR Unscrew each terminal. Thread the bare end of the cable through the cross-hole ensuring there are no loose strands. Tighten securely.
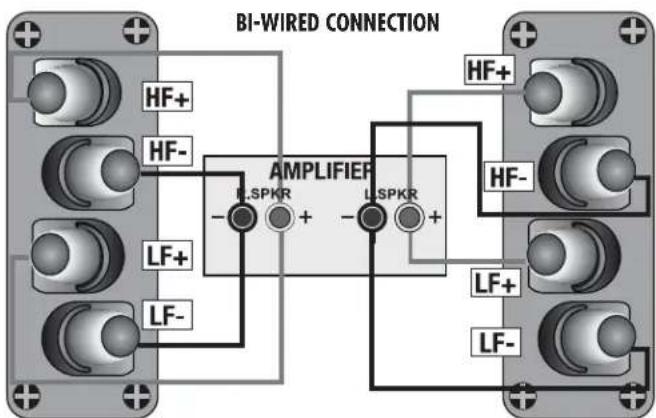
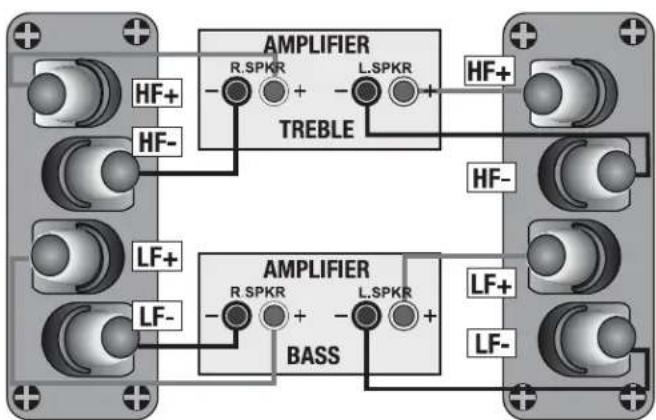
GBR Remove the metal links connecting the pairs of terminals. In the case of bi-wiring connect each of the red terminals on the speaker via separate cables to the red output terminal on the amplifier. Repeat the process for the black terminals. Take care that the left channel outputs are fed to the left hand speakers and similarly for the right hand side. Bi-amping is similar but requires the use of two stereo amplifiers.
natural_image
Pure electrical circuit lines without any symbols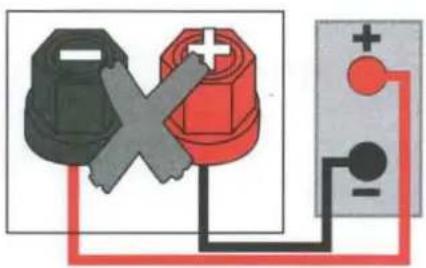
text_image
Diagram showing two electrical components connected by a power line with a cross symbol indicating disconnection or fault.6
ROOM POSITIONING
DISPOSITION DES ENCEINTES
GBR Your loudspeakers offer great flexibility of positioning. Depending upon the model they can be positioned upon shelves, on stands or directly on the floor. All the models can be positioned as close as 0.7m - 1m from a side facing wall. There must be a distance of at least 0.2m - 1m between the backs of the cabinets and the walls. If the loudspeakers are positioned close to the wall they should ideally be angled inwards slightly and be 3 metres apart.
text_image
2 - 4 metres >700mm 15 40° >200 mm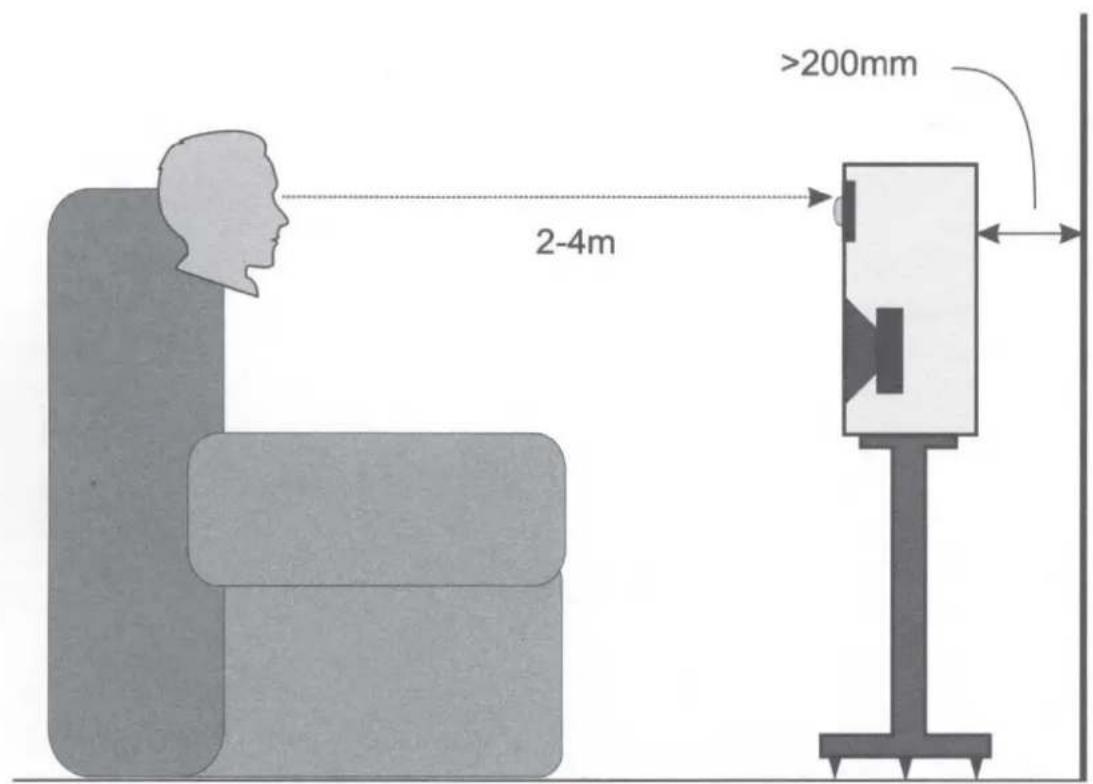
text_image
2-4m >200mm7 HOME CINEMA (1)
flowchart
graph TD
    A["Component C"] -->|+| B["Component L"]
    A -->|-| C["Component R"]
    B --> D["Component R"]
    C --> E["Component L"]
    D --> F["Output"]
    E --> G["Output"]
    style A fill:#f9f,stroke:#333
    style B fill:#ccf,stroke:#333
    style C fill:#cfc,stroke:#333
    style D fill:#fcc,stroke:#333
    style E fill:#cff,stroke:#333
    style F fill:#ffc,stroke:#333
    style G fill:#fcc,stroke:#333
flowchart
graph TD
    subgraph Component_C
        A1["Black Pump"] -->|+| B1["Red Pump"]
        A2["Black Pump"] -->|-| B2["Red Pump"]
        A3["Black Pump"] -->|+| B3["Red Pump"]
        A4["Black Pump"] -->|-| B4["Red Pump"]
        A5["Black Pump"] -->|+| B5["Red Pump"]
        A6["Black Pump"] -->|-| B6["Red Pump"]
        A7["Black Pump"] -->|+| B7["Red Pump"]
        A8["Black Pump"] -->|-| B8["Red Pump"]
        A9["Black Pump"] -->|+| B9["Red Pump"]
        A10["Black Pump"] -->|-| B10["Red Pump"]
        A11["Black Pump"] -->|+| B11["Red Pump"]
        A12["Black Pump"] -->|-| B12["Red Pump"]
        A13["Black Pump"] -->|+| B13["Red Pump"]
        A14["Black Pump"] -->|-| B14["Red Pump"]
        A15["Black Pump"] -->|+| B15["Red Pump"]
        A16["Black Pump"] -->|-| B16["Red Pump"]
        A17["Black Pump"] -->|+| B17["Red Pump"]
        A18["Black Pump"] -->|-| B18["Red Pump"]
        A19["Black Pump"] -->|+| B19["Red Pump"]
        A20["Black Pump"] -->|-| B20["Red Pump"]
        A21["Black Pump"] -->|+| B21["Red Pump"]
        A22["Black Pump"] -->|-| B22["Red Pump"]
        A23["Black Pump"] -->|+| B23["Red Pump"]
        A24["Black Pump"] -->|-| B24["Red Pump"]
        A25["Black Pump"] -->|+| B25["Red Pump"]
        A26["Black Pump"] -->|-| B26["Red Pump"]
        A27["Black Pump"] -->|+| B27["Red Pump"]
        A28["Black Pump"] -->|-| B28["Red Pump"]
        A29["Black Pump"] -->|+| B29["Red Pump"]
        A30["Black Pump"] -->|-| B30["Red Pump"]
        A31["Black Pump"] -->|+| B31["Red Pump"]
        A32["Black Pump"] -->|-| B32["Red Pump"]
        A33["Black Pump"] -->|+| B33["Red Pump"]
        A34["Black Pump"] -->|-| B34["Red Pump"]
        A35["Black Pump"] -->|+| B35["Red Pump"]
        A36["Black Pump"] -->|-| B36["Red Pump"]
        A37["Black Pump"] -->|+| B37["Red Pump"]
        A38["Black Pump"] -->|-| B38["Red Pump"]
        A39["Black Pump"] -->|+| B39["Red Pump"]
        A40["Black Pump"] -->|-| B40["Red Pump"]
        A41["Black Pump"] -->|+| B41["Red Pump"]
        A42["Black Pump"] -->|-| B42["Red Pump"]
        A43["Black Pump"] -->|+| B43["Red Pump"]
        A44["Black Pump"] -->|-| B44["Red Pump"]
        A45["Black Pump"] -->|+| B45["Red Pump"]
        A46["Black Pump"] -->|-| B46["Red Pump"]
        A47["Black Pump"] -->|+| B47["Red Pump"]
        A48["Black Pump"] -->|-| B48["Red Pump"]
        A49["Black Pump"] -->|+| B49["Red Pump"]
        A50["Black Pump"] -->|-| B50["Red Pump"]
        A51["Black Pump"] -->|+| B51["Red Pump"]
        A52["Black Pump"] -->|-| B52["Red Pump"]
        A53["Black Pump"] -->|+| B53["Red Pump"]
        A54["Black Pump"] -->|-| B54["Red Pump"]
        A55["Black Pump"] -->|+| B55["Red Pump"]
        A56["Black Pump"] -->|-| B56["Red Pump"]
        A57["Black Pump"] -->|+| B57["Red Pump"]
        A58["Black Pump"] -->|-| B58["Red Pump"]
        A59["Black Pump"] -->|+| B59["Red Pump"]
        A60["Black Pump"] -->|-| B60["Red Pump"]
        A61["Black Pump"] -->|+| B61["Red Pump"]
        A62["Black Pump"] -->|-| B62["Red Pump"]
        A63["Black Pump"] -->|+| B63["Red Pump"]
        A64["Black Pump"] -->|-| B64["Red Pump"]
        A65["Black Pump"] -->|+| B65["Red Pump"]
        A66["Black Pump"] -->|-| B66["Red Pump"]
        A67["Black Pump"] -->|+| B67["Red Pump"]
        A68["Black Pump"] -->|-| B68["Red Pump"]
        A69["Black Pump"] -->|+| B69["Red Pump"]
        A70["Black Pump"] -->|-| B70["Red Pump"]
        A71["Black Pump"] -->|+| B71["Red Pump"]
        A72["Black Pump"] -->|-| B72["Red Pump"]
        A73["Black Pump"] -->|+| B73["Red Pump"]
        A74["Black Pump"] -->|-| B74["Red Pump"]
        A75["Black Pump"] -->|+| B75["Red Pump"]
        A76["Black Pump"] -->|-| B76["Red Pump"]
        A77["Black Pump"] -->|+| B77["Red Pump"]
        A78["Black Pump"] -->|-| B78["Red Pump"]
        A79["Black Pump"] -->|+| B79["Red Pump"]
        A80["Black Pump"] -->|-| B80["Red Pump"]
8 HOME CINEMA (2)
text_image
>450mm >450mm DVD etc.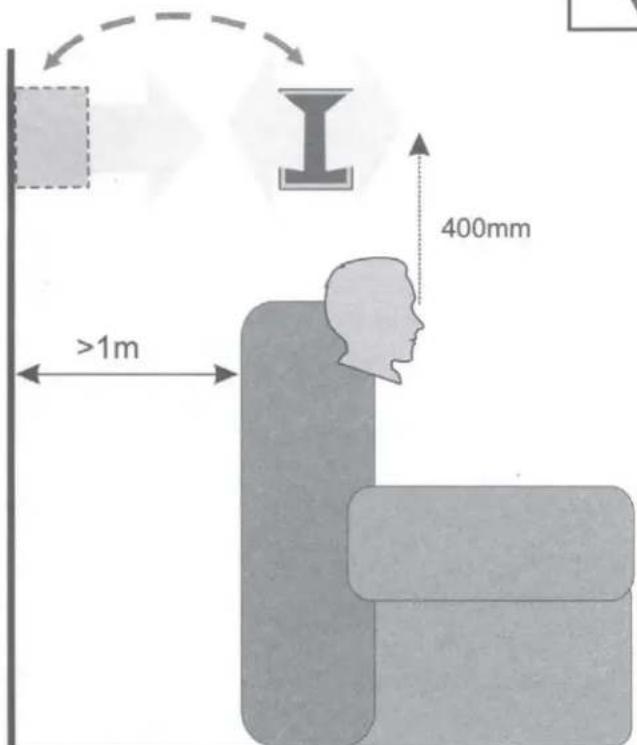
text_image
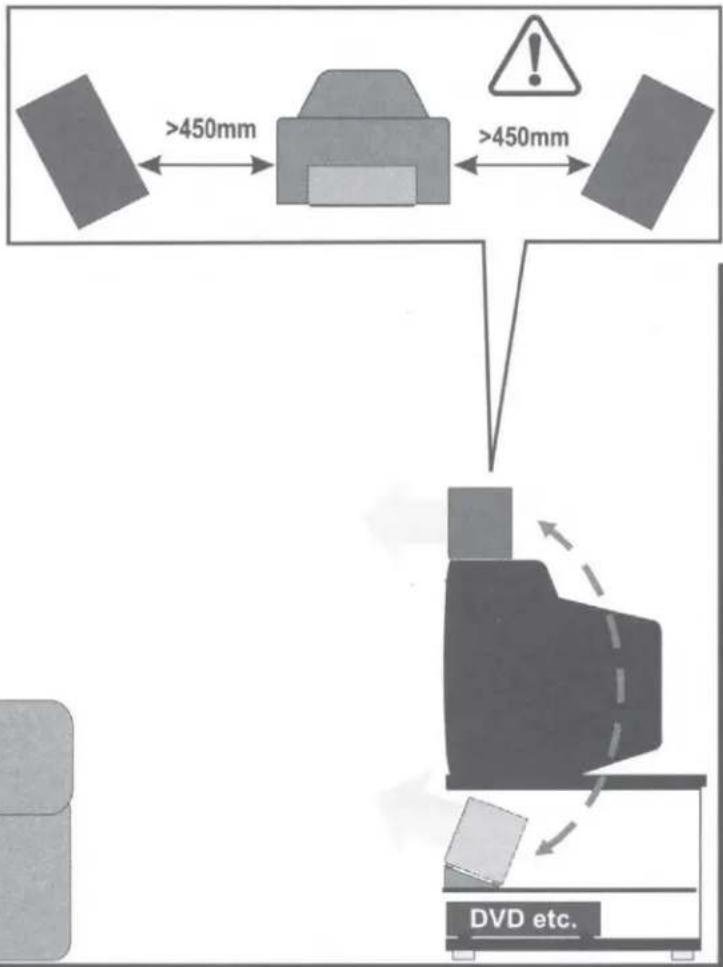
400mm >1mGBR The centre channel loudspeaker is usually placed on top of the TV monitor or on a shelf or in a cabinet below the screen.
text_image
5.1 SUB WOOFER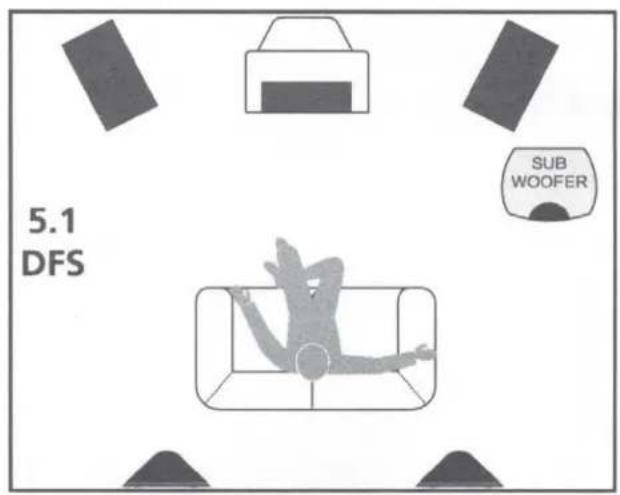
text_image
5.1 DFS SUB WOOFER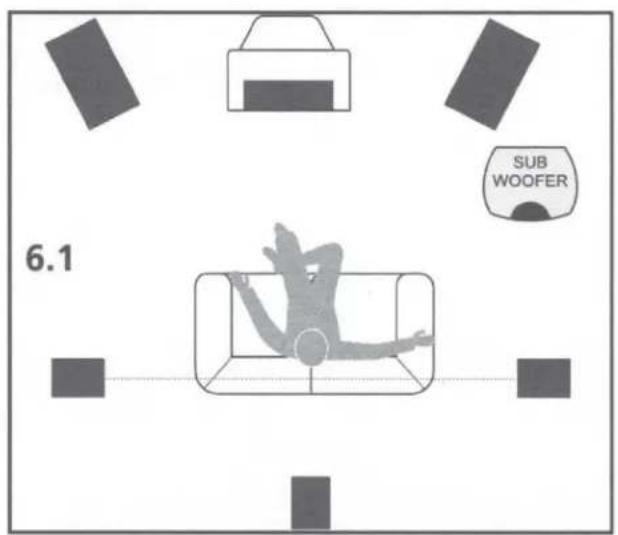
text_image
6.1 SUB WOOFER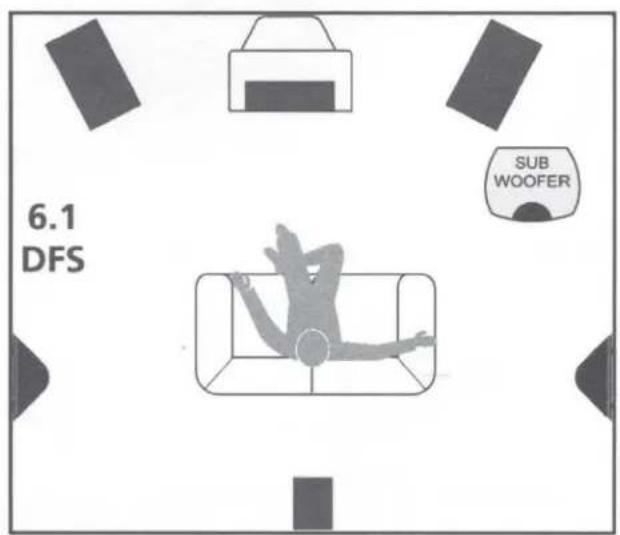
text_image
6.1 DFS SUB WOOFER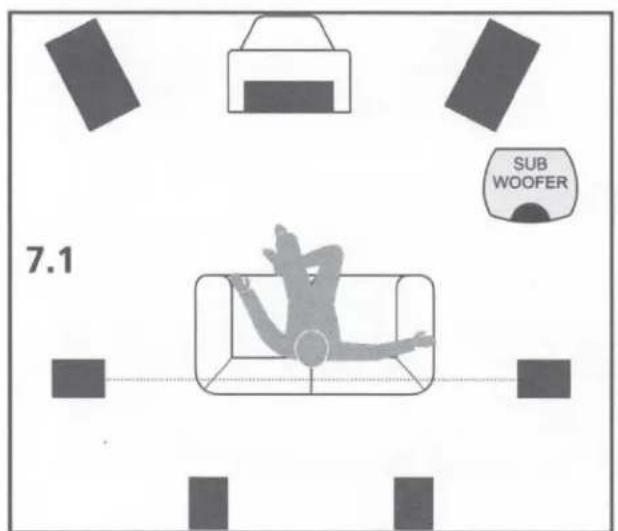
text_image
7.1 SUB WOOFER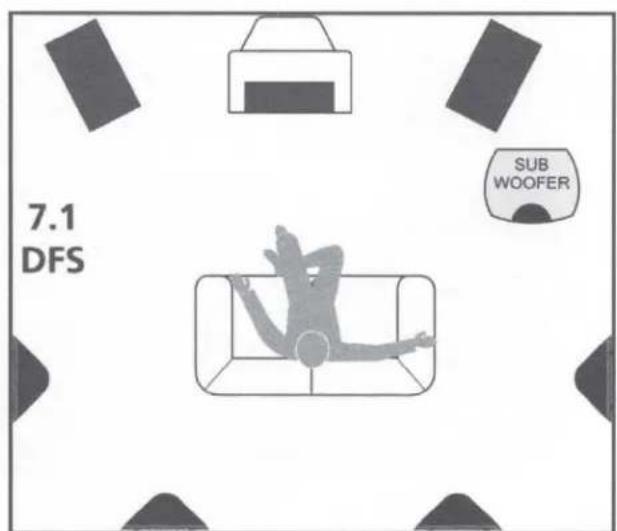
text_image
7.1 DFS SUB WOOFER10
SOUND LEVEL
NIVEAU SONORE SCHALLPEGEL LIVELLO ACUSTICO
GELUIDSNIVEAU NIVEL DE SONIDO NÍVEL SONORO
声音电平
GBR It is important that the centre, front and rear speakers are set to the same sound level as perceived from the listening position. Follow your AV processor handbook instructions carefully, especially the section concerned with setting up relative loudspeaker levels.
GBR The cabinets can be occasionally wiped with a damp (not wet) cloth. Spray polishes can be used but they must not be sprayed onto the grilles or drive units. Spray the polish onto a cleaning cloth not the loudspeaker.
In the unlikely even that your unit develops a fault you should return it to your Wharfedale dealer using the original packing to ensure safe shipping. The terms of your warranty may vary in different countries but in all cases the guarantee excludes:
All damage caused through accident, misuse, wear and tear, neglect, incorrect installation, adjustment or repair by unauthorised personnel. Liability for damage or loss occurring in transit to or from the purchaser.
Wharfedale will not be liable for any consequential damage, loss or injury, arising from or in conjunction with this equipment.
GBR The warranty on this product if it is sold outside the United Kingdom shall comply with applicable law and shall be the sole responsibility of the distributor that supplied this product.
Service Addresses, UK & USA
IAG Service Centre
IAG House, 13/14 Glebe Road,
Huntingdon, Cambridgeshire,
PE29 7DL, UK
Tel: +44 (0) 1480 452561
Fax: + 44 (0) 1480 413403
IAG America, Inc.
15 Walpole Park South
Walpole
MA 02081
USA
Tel: +1 508 850 3950
Fax +1 508 850 3905
Wharfedale International Ltd., IAG House, 13/14 Glebe Road, Huntingdon, Cambridgeshire, PE29 7DL, UK
Tel: + 44 (0) 1480 452561 www.wharfedale.co.uk
Wharfedale is a member of the International Audio Group.
DIAMOND 11 SERIES
DIAMOND11.0
DIAMOND11.1
DIAMOND11.2
DIAMOND11.3
DIAMOND11.4
DIAMOND11.5
DIAMOND11.CC
DIAMOND11.CS
DIAMOND11.CM
DIAMOND11.SR
DIAMOND11.DFS
natural_image
Technical line drawing of a multi-tiered speaker system with multiple speakers and circular components (no text or labels)Important Safety Information
Before installing this product read all these instructions!

This symbol indicates that there are important operating and maintenance instructions in the literature accompanying this unit.
Read these instructions. Keep these instructions. Heed all warnings. Follow all instructions.
Before making any connections, switch all the units in your system off at the mains.
Set the volume control at minimum when you switch on your system or change sources, and turn the level up gradually.
DO NOT use your amplifier at full volume.
Ensure that all loudspeakers in the system are correctly wired.
DO NOT subject your loudspeakers to excessive cold, heat, humidity or sunlight.
Loudspeakers should not be placed directly facing other hi-fi units, or share the same shelf or cabinet.
DO NOT place heavy objects on top of loudspeakers.
Some manufacturers forbid the placing of objects on top of their TV sets. Check your TV handbook before installing the speaker directly on your TV set. Consult your TV dealer if you are in any doubt.
DO NOT connect speaker terminals to the mains supply.
DO NOT dismantle the loudspeaker. There are no user serviceable parts inside it and you will void the warranty by doing so.
Refer all servicing to qualified service personnel. Servicing is required when the apparatus has been damaged in any way, the apparatus has been exposed to rain or moisture, does not operate normally, or has been dropped.
Caution: Changes or modifications not expressly approved by the manufacturer could void the user's authority to operate this device.
Unpacking Your Loudspeaker
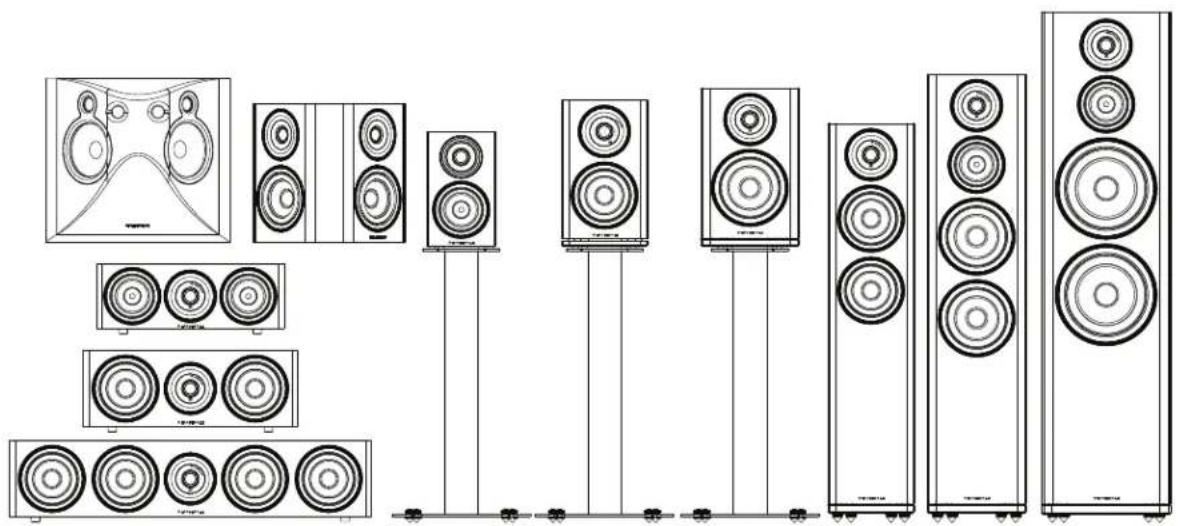
Diamond 11 loudspeakers come in different shapes and sizes. If you are unpacking a floor stander, please remember that these units are heavy. We suggest that you have someone to assist you.
Lift the loudspeaker carefully out of the packing. DO NOT try and lift the loudspeaker using the protective bag.
Unpack the accessories carefully.
If there is any sign of damage or if the contents are incomplete, report this to your dealer as soon as possible.
Retain the packing for future safe transport of the product. If you dispose of the packing, do so with respect to any recycling provisions in your area.
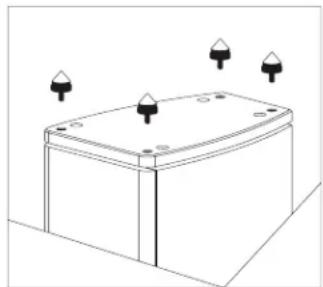
Attaching the Spikes to Floorstanding Models - 11.3, 11.4, 11.5
• Make sure you have plenty of unobstructed working space.
- Place a soft cloth on the floor to protect the loudspeaker.
• Invert the loudspeaker onto the cloth.
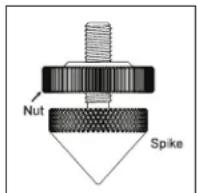
• Thread a locknut onto each spike and loosely rub it up the thread.
- Thread the spikes into the spike inserts. Tighten them finger tight.
- Invert the loudspeaker. Be careful not to damage the floor with the spikes.
natural_image
Simple line drawing of a rectangular box with three small protrusions on top, no text or symbols present.Levelling the Loudspeakers
When the speaker is upright: You will probably find that the speaker will wobble with one spike not contacting the floor. Adjust this spike until all four spikes are in contact to the floor.
With the aid of a spirit level move each spike in and out until the loudspeaker is level and sitting squarely on all four spikes without rocking.
Now tighten each locknut securely against the collar in the plinth to secure the spike.
Screw in rubber feet are provided for use on wood or stone floors etc. and should be attached in the same manner as the spikes.
Preparing the Diamond 11 Loudspeakers
Stands and Brackets
The bookshelf loudspeakers are intended primarily for stand mounting, though they can be mounted on wall brackets or even on sturdy shelves. The quality of loudspeaker stands greatly influences the performance of your loudspeakers, please do not use flimsy products.
Centre Channel Loudspeakers
Each centre channel loudspeaker is supplied with one set of mounting feet. By using combination of large and small feet the loudspeaker may be angled to point directly at the listening position. This will be found useful when the centre speaker is positioned under the TV screen.
Cables and Connectors
Choosing Loudspeaker Cable
Specialist audio cable usually offers better performance than general purpose 'bell' or 'zip' wire.
Choose a cable of suitable diameter – cable that is too thin will limit the dynamics of the sound and may impair the bass response. Audio cable is polarised, with two cores of different colours, or often a raised rib or coloured tracer in the case of twin cable. Before you purchase your cable, give careful thought to the positioning of your loudspeakers.
This is especially the case if you are bi-wiring your loudspeakers.
Cable lengths to loudspeaker pairs should be the same for left and right channels in order to equalise the signal transmission. Allow some slack in your speaker cables so you can alter their position to best advantage.
text_image
40mm 10mmPreparing Loudspeaker Cable
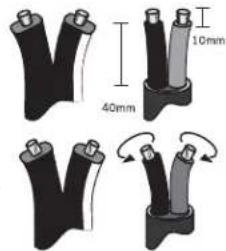
Split the twin cores to a depth of about 40mm. Carefully strip the insulation from each end, leaving about 10mm of bare wire. If the cable is stranded, lightly twist to gather any loose strands.
Connecting Screw Terminals
All loudspeakers use screw terminals.
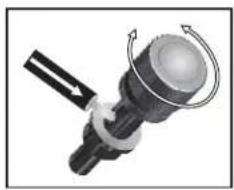
Unscrew the terminal. Insert the bare end of the cable into the hole in the base of the terminal. Tighten securely.
When connecting terminals make sure you leave no strands of bare wire that can short across to adjacent terminals.
As an alternative to bare wire you can use specialist spade connectors. Your Wharfedale dealer will be pleased to advise you on this issue.
natural_image
Mechanical component diagram showing a rotating shaft and housing with directional arrows (no text or symbols)Crossover Networks
Bi-Wireable Networks
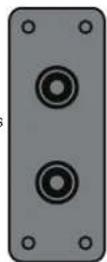
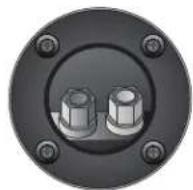
Most speakers in the Diamond 11 floorspeaker use a special bi-wireable crossover panel with four terminal binding posts. Please follow the drawing carefully to see the correct orientation of the loudspeaker terminals. The upper terminals connect to the treble unit, the lower pair to the bass unit. As supplied, the treble terminal pairs connected to the bass terminal pair via removable metal straps. These should be left in place for standard installations.

text_image
HV F + BAS S + HV F + BAS S -Why Bi-Wire?
Using separate cables for treble and bass units in a bi-wiring configuration reduces intermodulation effects and improves headroom and clarity. To bi-wire, you will need to install two lengths of twin core cable between the amplifier and each loudspeaker.
D11 bookshelf & centre D11.0 & D11.1 & D11.SR
Standard Networks
The D11.0, D11.1, D11.2 compact monitor, the D11.CC and D11.CS, D11.CM compact centre channel speaker D11.SR, D11.DFS compact surround channel speaker. None of the above loudspeakers are bi-wireable as smaller loudspeakers derive no particular advantages from bi-wiring.
Positioning the Front Loudspeakers
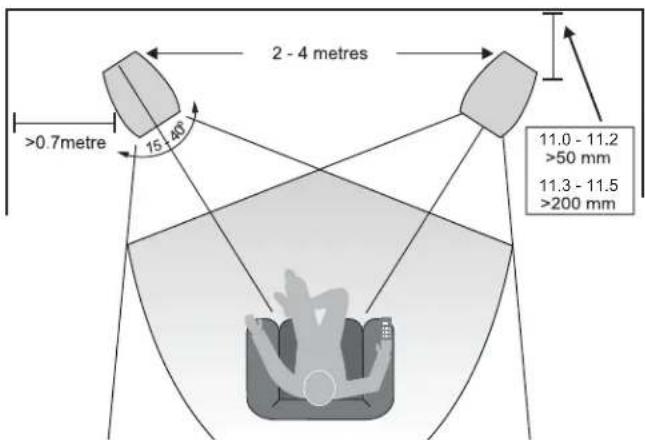
The 11.3, 11.4 and 11.5 models are designed to be floor standing. We suggest that they are positioned at least 200mm from the rear walls and 700mm from the side walls, facing slightly inwards. The 11.0 and 11.1 11.2 models should be stand or wall mounted though they may be placed on a rigid shelf. The bass extension will improve if the small speakers are operated closer to the rear wall.
If the loudspeakers are placed too close to the walls the bass will increase but may be boomy and indistinct. If the loudspeakers are placed away from the walls, the inward angle may be increased by up to 40%, although this may restrict the width of the optimum listening position.
A useful rule of thumb is that the listener should be as for from the loudspeakers as they are from each other. The speakers should ideally be positioned so that the treble units are roughly at ear level to s seated listener. As personal taste plays a large role, experiment with different configurations and play a wide range of programmes before finalising the position of your speakers.
text_image
2 - 4 metres >0.7metre 15 - 40° 11.0 - 11.2 >50 mm 11.3 - 11.5 >200 mmPositioning the Centre Loudspeaker
natural_image
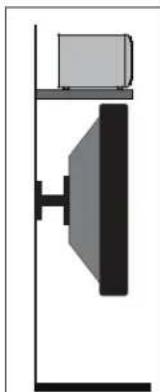
Simple line drawing of a vertical structure with a rectangular block on top and a black triangular base, no text or symbols present.The centre channel loudspeaker should be positioned centrally between the loudspeakers, close to the television and mounted above or below the screen.
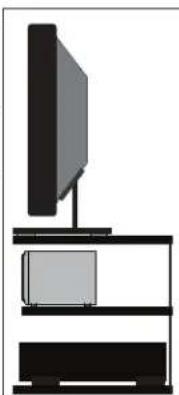
The loudspeaker should be located on a stable flat surface to avoid any cabinet movement at high sound levels. If you mount the unit above the television, move it forward so that the front grille sits slightly in front of the screen and the top of the cabinet.
A custom stand is available for the model which allows the loudspeaker to be positioned under a wall mounted monitor and has an adjustable vertical tilt for optimal dispersion.
natural_image
Simple line drawing of a monitor mounted on a stand with a smaller box, no text or symbols present.Positioning Surround Loudspeakers
Diamond11.SR Surround Loudspeakers
The speakers should ideally be sited 600 mm-1.5 metres above the listening position and 2.5-3.5 metres apart, central to the listener and behind the listening position, preferably on a rear wall. If the listening position is some distance from a rear wall, the speakers may be mounted on opposite side walls but always behind the listening position.
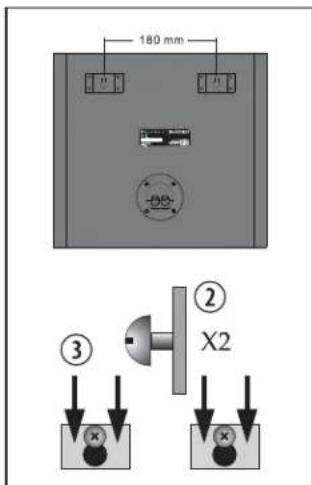
Ensure that the wall is sound and can support the product. Drill two 5mm holes in the wall 180mm apart.
Fix a suitable No 8 round head screw firmly into each hole using appropriate wall plugs. Leave a stub of 5mm protruding from the wall.
Connect the loudspeakers. Align the holes in the mounting brackets over the screw and carefully lower the unit onto the screws. The speaker should now be securely attached with the spacers resting against the wall. Now connect the speakers to the amplifier.
text_image
180 mm ② X2 ③Connecting the Front Loudspeakers
Standard Connection
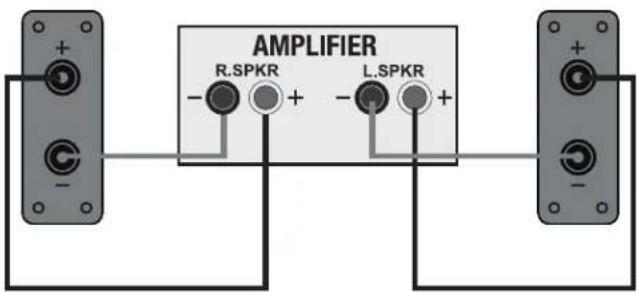
Choose a suitable length of twin core speaker cable for each channel, and prepare the ends. Unscrew each terminal a few turns. Connect the red, positive (+) terminal of the Left loudspeaker to the corresponding red, positive (+) amplifier terminal. Connect the black, negative (-) terminals similarly. Tighten the terminals securely. Repeat this procedure for the Right channel.
text_image
AMPLIFIER R.SPKR L.SPKRBi-Wiring
Unscrew each terminal a few turns and remove the metal straps. Connect the cables between the amplifier and the loudspeakers as indicated above and re-tighten all the terminals securely.
text_image
BI-WIRED CONNECTION HF+ HF- LSPKR LSPKR LSPKR HF+ HF- LF+ LF- LSPKR LF+By connecting each loudspeaker drive unit to its own dedicated amplifier the advantages of bi-wiring can be extended.
IF you own two identical stereo power amplifiers, your speakers may be bi-amped. For further details please consult your dealer.
text_image
AMPLIFIER R.SPKR + L.SPKR + TREBLE HF+ HF- HF- AMPLIFIER R.SPKR + L.SPKR + BASS LF+ LF- LF+Connecting Centre Loudspeaker
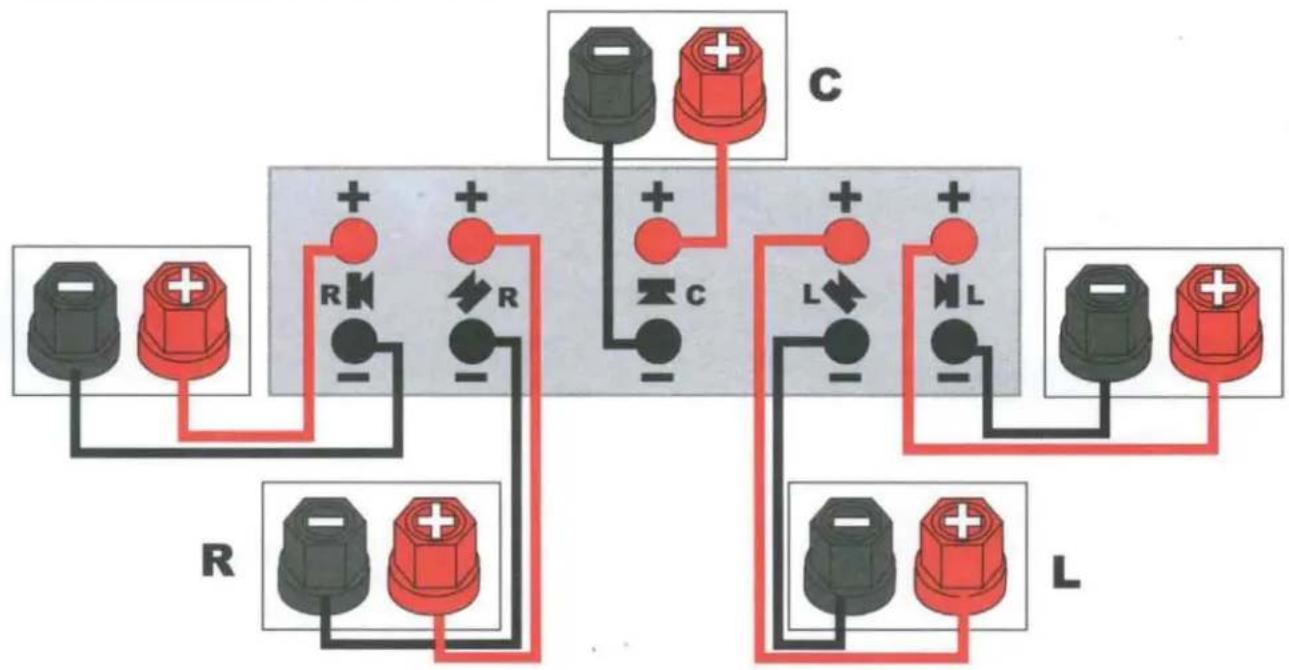
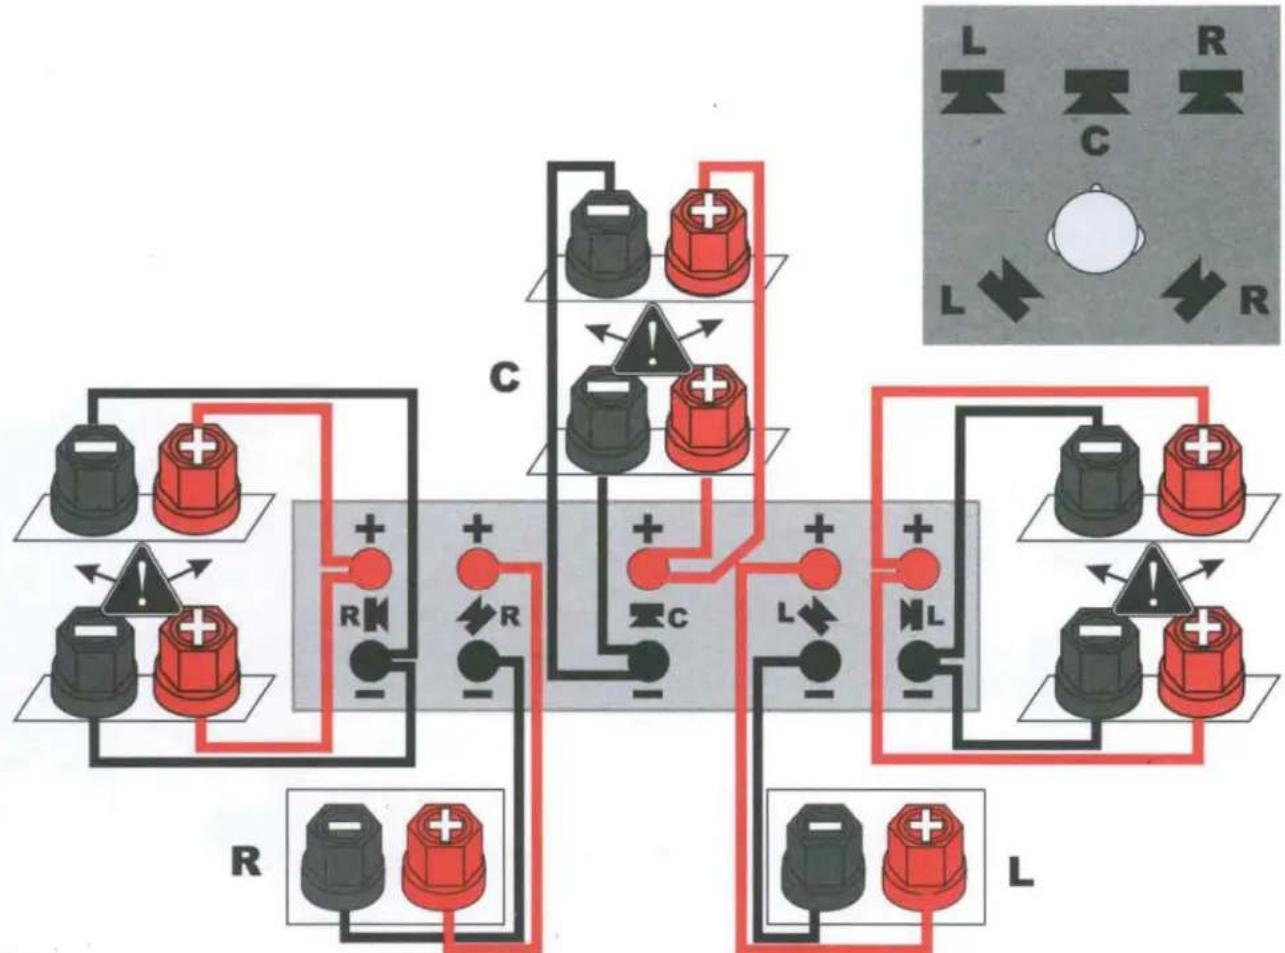
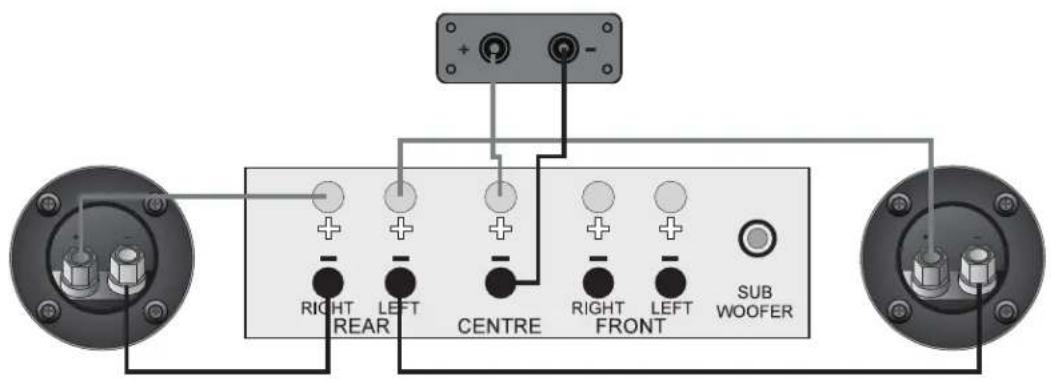
The Centre channel speaker may be connected as shown, or bi-wired.
text_image
RIGHT REAR LEFT CENTRE RIGHT FRONT LEFT SUB WOOFERSetting Up a Home Theatre System
Placement
Front and Effects Channels: The front loudspeakers are placed on either side of the television screen, 2 to 3 metres apart. The speakers should be angled slightly so they car aimed towards the listeners.
We recommend placing the rear effects speakers in a high position, behind the listener's head. If the rear or side walls are a long way from the listening seat, consider stand mounting the loudspeakers. If the centre loudspeaker is very high or low, angle it towards the listener's ear level.
The front faces of the centre and surround loudspeakers should also be in line as far as possible.
Subwoofer: As the ear is unable to detect the direction from which deep bass originates, you have freedom to position the unit. Varying the distance from the wall alters the bass. Placing the subwoofer across a corner boosts the bass but may impair clarity. The performance of a home theatre system can be enhanced by using two subwoofers.
6.1 and 7.1 System Placement
Dolby Labs, DTS and THX offer 6.1 and 7.1 format. Although the precise configuration of these systems will depend on the capabilities of your processor and you should be guided by those instructions, we would make some observation.
For 6.1 and 7.1 formats the listening seat should not be too close to the rear wall.
Optimising the time delay so that information from all speakers arrives the listening seat coherently is critical of the benefits of these systems are to be fully realised.
Dolby Labs Recommended Placement for Multichannel Home Theater Systems
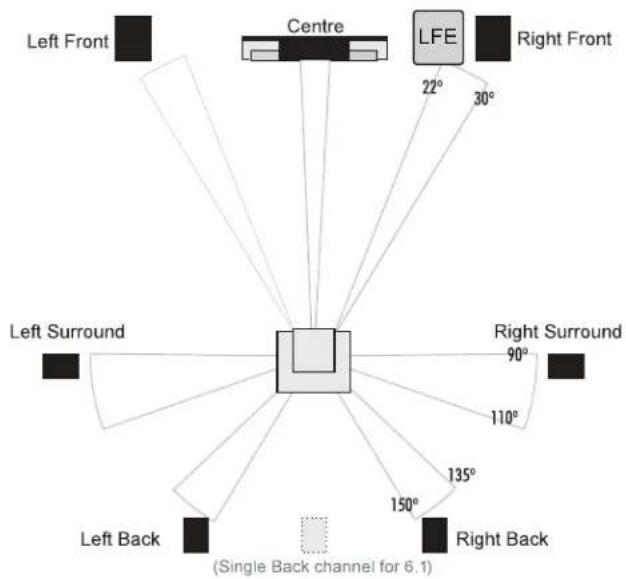
text_image
Left Front Centre LFE Right Front 22° 30° Left Surround Right Surround 90° 110° 135° 150° Right Back Left Back (Single Back channel for 6.1)Setting Loudspeaker Sizes and Levels
If you are not using a subwoofer: Set the Front speakers to 'Large'. Set the 'Subwoofer' option on the processor to 'Off' or 'No'. The Front channels will now receive all the system bass.
If you are using a subwoofer: When set to 'Small' all the system bass will go into the subwoofer. If you choose 'Large' the Front channel bass will be reproduced from the Front speakers. Follow the instructions on this page for suitable size and crossover settings.
Once the loudspeaker settings have been finalised, put the A/V amplifier into its 'Test' mode (see instructions supplied with your processor). Adjust the level of each channel until all channels are reproduced at equal loudness.
On some programme material the surround channel may seem lower than the front. Do not readjust this level. You may, however, need to adjust the subwoofer output level. Avoid setting too high a level or you will swamp the sound with bass. This can be tiring to listen to, and may limit the subwoofer's ability to respond to large bass transients. You should also set a sensible level going into the subwoofer from the A/V processor. The subwoofer volume control should be between 12 o'clock and 3 o'clock.
Delay and LFE Settings
Many A/V processor feature delay settings. The purpose of delay is to enable surround and dialogue information to arrive at the listener's ears at the same time as the front channels, even when the listening seat is in a non-ideal position. On some processors, this can be achieved by setting the distance from the listening position to each speaker, but other system allow only a time delay setting.
Rear Delay: If the listening position is equidistant from the front and rear speakers, set a low delay setting. The closer the listener is to the rear speakers this higher the delay setting used should be.
Centre Delay: If the centre speaker is level with (or slightly behind) the front speakers, set the delay to zero. If the centre speaker is forward of the front speakers, increase the delay.
LFE: In the cinema the low frequency effects channel is an extra bass channel with its own subwoofer. In domestic systems the LFE channel typically feeds into the subwoofer. Where no subwoofer is used, the LFE signal is combined with the front channels and sent to the front speakers. When you set the LFE level at your A/V processor, use care as powerful low frequencies can overload domestic loudspeakers. If you hear popping or thumping noises coming from the front loudspeakers or subwoofer, immediately turn the A/V processor's volume level down and then lower the LFE level. This should cure the problem. If it does not, lower the volume level at the subwoofer (if you are using one) until the problem disappears.
Phase: Please read the relevant sections of your A/V amplifier manual and familiarise yourself with the various issues. If you are unsure, consult your dealer for help. A home theatre system should have a precise front stage, a diffuse rear stage and good localization of dialogue. If the colours on the loudspeaker terminals do not correspond with those on the amplifier, the sound will appear poorly focused or 'out of phase'. For this reason it is essential that the speakers are connected according to the wiring diagrams in this manual.
Connecting loudspeakers correctly (in phase) is essential whether the system is stereo or multichannel. This is especially important if you are bi-wiring – if only one element in a bi-wired system is incorrectly connected (out of phase), the effects can be very noticeable yet hard to pinpoint.
Troubleshooting
Before investigating a problem, always switch off the system at mains.
If your system is not working properly please work through this checklist before returning the unit to your dealer.
| Symptom Possible Cause | |
| No Sound System not switched on; Speaker | cables shorting terminals out; Wrong source selected |
| Sound lacks bass content Subwoofer not switched on | |
| Lack of bass reproduction Subwoofer phase | incorrect; Subwoofer crossover control too low |
| Excessive bass distortion at low volumes Subwoofer set to high; LFE level set too high; Subwoofer incorrectly wired | |
| Excessive or distorted bass at high levels | System level set too high; Bass control set too high; Subwoofer too close to room corners |
| Distorted / rattling sound at high levels | System level set too high; Objects too close to subwoofer |
| Popping or thumping from the subwoofer System level set too high; Subwoofer level set too high; LFE level set too high |
Looking After Your Loudspeaker
- Your loudspeakers use special hardwearing sealed finish. They should not be waxed or treated with spray polishes which will smear and dim the finish. Occasionally polish them with a dry or barely moist cloth to remove dust and finger marks, etc.
- If you play the speakers with the grilles off exercise great care. NEVER operate speakers with the grilles off if there are children or pets in the house.
• Occasionally, remove the loudspeaker grilles and brush them gently with a soft brush before replacing them carefully.
• NEVER use a vacuum cleaner to clean loudspeaker grilles. - NEVER stand objects on your loudspeakers. In particular do not stand flowers etc. on them – they are not jardinières!
- Avoid getting any liquid behind the grille. If you spill liquid on your loudspeakers, take them to your dealer for attention before using them again.
• DO NOT open the speakers, there are no user serviceable parts inside. - NEVER touch the drive units either with an object or your hands.
Quality Assurance
Your loudspeakers have been constructed to the highest standards. From top grade furniture construction and finish to carefully designed and selected acoustic components, Wharfedale speakers are built to provide a lifetime of sonic pleasure. We hope you will derive many years of good service from our products.
Servicing
In the unlikely event that your unit develops a fault you should return it to your Wharfedale dealer using the original packing to ensure safe shipping.
The terms of your guarantee may vary in different countries. However, in all cases the guarantee excludes:
Liability for damage or loss occurring in transit to or from the purchaser.
All damage caused through accident, misuse, wear and tear, neglect, incorrect installation, adjustment or repair by unauthorised personnel.
Wharfedale will not be liable for any consequential damage, loss or injury, arising from or in conjunction with this equipment.
Service Centre Address
For technical support, servicing or product queries and information please contact either your local retailer or the office below.
UK
IAG Service Dept.
13/14 Glebe Road
Huntingdon
Cambridgeshire
PE29 7DL
UK
Tel: +44(0)1480 452561
Fax: +44(0)1480 413403
For information on other authorised service centres worldwide contact Wharfedale International, UK.
A world wide distributors list is available on the Wharfedale website: www.wharfedale.co.uk
Specifications
Model
General description
Design philosophy and core technology
Enclosure type
Transducer complement
ABR
Bass driver
Midrange driver
Treble driver
Full-range driver
AV shield
Sensitivity (2.83V @ 1m)
Recommended amplifier power
Peak power handling
Peak SPL
Nominal impedance
Minimum impedance
Frequency response (+/-3dB)
Bass extension (-6dB)
Crossover frequency
Cabinet Volume (in litres)
Dimensions (mm)
Height (on plinth)
Width
Depth (with terminals)
Carton size
Net weight
Gross weight

Diamond 11.0
2-way bookshelf speaker
bass reflex
2-way
4"(100mm) Woven Kevlar Cone
1"(25mm) Textile Dome
No
85dB
15-75W
90dB
8Ω Compatible
3.7Ω
75Hz \~ 20kHz
64Hz
2.3kHz
3.951
255mm
155mm
(165+10)mm
425*255*340mm
3.1kg/pcs
7.2kg/ctn

Diamond 11.1
2-way bookshelf speaker
bass reflex
2-way
5"(130mm) Woven Kevlar Cone
1"(25mm) Textile Dome
No
87dB
25-100W
95dB
8Ω Compatible
3.8Ω
55Hz \~ 20kHz
45Hz
2.4kHz
11.11
310mm
194mm
(285+32)mm
520*385*435mm
6.8kg/pcs
14.8kg/ctn

Diamond 11.2
2-way bookshelf speaker
bass reflex
2-way
6.5"(150mm) Woven Kevlar Cone
1"(25mm) Textile Dome
No
88dB
25-125W
96dB
8Ω Compatible
3.8Ω
48Hz - 20kHz
40Hz
2.3kHz
13.2L
355mm
221mm
(290+32)mm
580*390*460mm
9.0kg/pcs
19.4kg/ctn
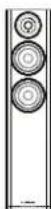
Model
General description
Design philosophy and core technology
Enclosure type
Transducer complement
ABR
Bass driver
Midrange driver
Treble driver
Full-range driver
AV shield
Sensitivity (2.83V @ 1m)
Recommended amplifier power
Peak power handling
Peak SPL
Nominal impedance
Minimum impedance
Frequency response (+/-3dB)
Bass extension (-6dB)
Crossover frequency
Cabinet Volume (in litres)
Dimensions (mm)
Height (on plinth)
Width
Depth (with terminals)
Carton size
Net weight
Gross weight
Diamond 11.3
2.5-way floorstanding speaker
bass reflex
2.5-way
5"(130mm) Woven Kevlar Cone
5"(130mm) Woven Kevlar Cone
1"(25mm) Textile Dome
No
90dB
25-150W
103dB
8Ω Compatible
3.8Ω
441Hz \~ 20kHz
35Hz
2.1kHz
29.21.
(875+25)mm
194mm
(285+38)mm
385*285*1000mm
15.0kg/pcs
16.8/kg/ctn
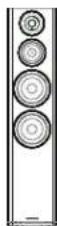
Diamond 11.4
3-way floorstanding speaker
bass reflex
3-way
6.5"(150mm) Woven Kevlar
Conex2
4"(100mm) Woven Kevlar Cone
1"(25mm) Textile Dome
No
91dB
25-175W
105dB
8Ω Compatible
3.8Ω
42Hz - 20kHz
33Hz
630Hz & 2.5kHz
Mid internal 12.0L
Bass internal 30.9L
(985+25)mm
222mm
(320+38)mm
440*335*1115mm
24.0kg/pcs
25.4kg/ctn
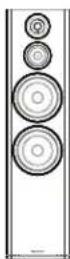
Diamond 11.5
3-way floorstanding speaker
bass reflex
3-way
8"(200mm) Woven Kevlar Conex2
4"(100mm) Woven Kevlar Cone
1"(25mm) Textile Dome
No
90dB
25-200W
112dB
8Ω Compatible
3.5Ω
351Hz \~ 20kHz
28Hz
570Hz & 2.6kHz
Mid internal 10.71
Bass internal 63.0L
(1125+25)mm
290mm
(350+38)mm
490*400*1270mm
33.5kg/pcs
35.4kg/ctn
| Diamond 11.CC | Diamond 11.CS | Diamond 11.CM | |
| Model | 2-way centre speaker | 2-way centre speaker | 2-way centre speaker |
| General description | |||
| Design philosophy and core technology | |||
| Enclosure type | bass reflex | bass reflex | closed-box system |
| Transducer complement | 2-way | 2-way | 2-way |
| ABR | |||
| Bass driver | 4"(100mm) Woven Kevlar Cone X2 | 5"(130mm) Woven Kevlar Cone x 2 | 5"(130mm) Woven Kevlar Cone x 4 |
| Midrange driver | |||
| Treble driver | 1"(25mm) Textile Dome | 1"(25mm) Textile Dome | 1"(25mm) Textile Dome |
| Full-range driver | |||
| AV shield | No | no | no |
| Sensitivity (2.83V @ 1m) | 87dB | 87dB | 94dB |
| Recommended amplifier power | 25-100W | 25-150W | 25-200W |
| Peak power handling | |||
| Peak SPL | 95dB | 98dB | 108dB |
| Nominal impedance | 8Ω Compatible | 8Ω Compatible | 4Ω |
| Minimum impedance | 3.7Ω | 4.8Ω | 3.6Ω |
| Frequency response (+/-3dB) | 85Hz - 20kHz | 65Hz - 20kHz | 95Hz - 20kHz |
| Bass extension (-6dB) | 75Hz | 55Hz | 85Hz |
| Crossover frequency | 2.3kHz | 2.3kHz | 2.3kHz |
| Cabinet Volume (in litres) | 5.0L | 11.0L | 21.2L |
| Dimensions (mm) | |||
| Height (on plinth) | (145+10)mm | (170+10)mm | (170+10)mm |
| Width | 420mm | 480mm | 810mm |
| Depth (with terminals) | (138+32)mm | (200+32)mm | (220+32)mm |
| Carton size | 250*245*525mm | 600*320*285mm | 900*320*270mm |
| Net weight | 5.0kg/pcs | 7.6kg/pcs | 14.2kg/pcs |
| Gross weight | 5.8kg/ctn | 8.6kg/ctn | 16.1kg/ctn |
Model
General description
Design philosophy and core technology
Enclosure type
Transducer complement
ABR
Bass driver
Midrange driver
Treble driver
Full-range driver
AV shield
Sensitivity (2.83V @ 1m)
Recommended amplifier power
Peak power handling
Peak SPL
Nominal impedance
Minimum impedance
Frequency response (+/-3dB)
Bass extension (-6dB)
Crossover frequency
Cabinet Volume (in litres)
Dimensions (mm)
Height (on plinth)
Width
Depth (with terminals)
Carton size
Net weight
Gross weight

Diamond 11.SR
2-way surround speaker
closed-box system
2-way
5"(130mm) Black Woven Kevlar Cone x2
1"(25mm) Soft Dome x2
No
88dB
25-120W
98dB
8Ω Compatible
3.9Ω
100Hz - 24kHz
80Hz
2.8kHz
6.5L
310mm
342mm
(220+5)mm
450*450*440mm
9.7kg/pcs
21kg/ctn

Diamond 11.DFS
2-way surround speaker
bass reflex
2-way
5"(130mm) Black Woven Kevlar Cone x2
1"(25mm) Textile Dome x2
No
90dB
25-150W
106dB
6Ω
3.7Ω
70Hz - 20kHz
65Hz
3kHz
5.2L
365mm
415mm
(175+5)mm
475*415*440mm
4.2kg/pcs
10.5g/ctn
Diamond 11.CM
Specifications
| Model | Diamond 11.0 | Diamond 11.1 | Diamond 11.2 |
| General description | 2-way bookshelf speaker | 2-way bookshelf speaker | 2-way bookshelf speaker |
| Design philosophy and core technology | |||
| Enclosure type | bass reflex | bass reflex | bass reflex |
| Transducer complement | 2-way | 2-way | 2-way |
| ABR | |||
| Bass driver | 4"(100mm) Woven Kevlar Cone | 5"(130mm) Woven Kevlar Cone | 6.5"(150mm) Woven Kevlar Cone |
| Midrange driver | |||
| Treble driver | 1"(25mm) Textile Dome | 1"(25mm) Textile Dome | 1"(25mm) Textile Dome |
| Full-range driver | |||
| AV shield | No | No | No |
| Sensitivity (2.83V @ 1m) | 85dB | 87dB | 88dB |
| Recommended amplifier power | 15-75W | 25-100W | 25-125W |
| Peak power handling | |||
| Peak SPL | 90dB | 95dB | 96dB |
| Nominal impedance | 8Ω Compatible | 8Ω Compatible | 8Ω Compatible |
| Minimum impedance | 3.7Ω | 3.8Ω | 3.8Ω |
| Frequency response (+/-3dB) | 75Hz - 20kHz | 55Hz - 20kHz | 48Hz - 20kHz |
| Bass extension (-6dB) | 64Hz | 45Hz | 40Hz |
| Crossover frequency | 2.3kHz | 2.4kHz | 2.3kHz |
| Cabinet Volume (in litres) | 3.95L | 11.1L | 13.2L |
| Dimensions (mm) | |||
| Height (on plinth) | 255mm | 310mm | 355mm |
| Width | 155mm | 194mm | 221mm |
| Depth (with terminals) | (165+10)mm | (285+32)mm | (290+32)mm |
| Carton size | 425*255*340mm | 520*385*435mm | 580*390*460mm |
| Net weight | 3.1kg/pcs | 6.8kg/pcs | 9.0kg/pcs |
| Gross weight | 7.2kg/ctn | 14.8kg/ctn | 19.4kg/ctn |
| [4vok] |  |  | |
| Model | Diamond 11.3 | Diamond 11.4 | Diamond 11.5 |
| General description | 2.5-way floorstanding speaker | 3-way floorstanding speaker | 3-way floorstanding speaker |
| Design philosophy and core technology | |||
| Enclosure type | bass reflex | bass reflex | bass reflex |
| Transducer complement | 2.5-way | 3-way | 3-way |
| ABR | |||
| Bass driver | 5"(130mm) Woven Kevlar Cone | 6.5"(150mm) Woven Kevlar Conex2 | 8"(200mm) Woven Kevlar Conex2 |
| Midrange driver | 5"(130mm) Woven Kevlar Cone | 4"(100mm) Woven Kevlar Cone | 4"(100mm) Woven Kevlar Cone |
| Treble driver | 1"(25mm) Textile Dome | 1"(25mm) Textile Dome | 1"(25mm) Textile Dome |
| Full-range driver | |||
| AV shield | No | No | No |
| Sensitivity (2.83V @ 1m) | 90dB | 91dB | 90dB |
| Recommended amplifier power | 25-150W | 25-175W | 25-200W |
| Peak power handling | |||
| Peak SPL | 103dB | 105dB | 112dB |
| Nominal impedance | 8Ω Compatible | 8Ω Compatible | 8Ω Compatible |
| Minimum impedance | 3.8Ω | 3.8Ω | 3.5Ω |
| Frequency response (+/-3dB) | 44Hz - 20kHz | 42Hz - 20kHz | 35Hz - 20kHz |
| Bass extension (-6dB) | 35Hz | 33Hz | 28Hz |
| Crossover frequency | 2.1kHz | 630Hz & 2.5kHz | 570Hz & 2.6kHz |
| Cabinet Volume (in litres) | 29.2L | Mid internal 12.0L | Mid internal 10.7L |
| Bass internal 30.9L | Bass internal 63.0L | ||
| Dimensions (mm) | |||
| Height (on plinth) | (875+25)mm | (985+25)mm | (1125+25)mm |
| Width | 194mm | 222mm | 290mm |
| Depth (with terminals) | (285+38)mm | (320+38)mm | (350+38)mm |
| Carton size | 385*285*1000mm | 440*335*1115mm | 490*400*1270mm |
| Net weight | 15.0kg/pcs | 24.0kg/pcs | 33.5kg/pcs |
| Gross weight | 16.8/kg/ctn | 25.4kg/ctn | 35.4kg/ctn |

Model
General description
Design philosophy and core technology
Enclosure type
Transducer complement
ABR
Bass driver
Midrange driver
Treble driver
Full-range driver
AV shield
Sensitivity (2.83V @ 1m)
Recommended amplifier power
Peak power handling
Peak SPL
Nominal impedance
Minimum impedance
Frequency response (+/-3dB)
Bass extension (-6dB)
Crossover frequency
Cabinet Volume (in litres)
Diamond 11.SR
2-way surround speaker
closed-box system
2-way
5"(130mm) Black Woven Kevlar Cone x2
1"(25mm) Soft Dome x2
No
88dB
25-120W
98dB
8Ω Compatible
3.9Ω
100Hz - 24kHz
80Hz
2.8kHz
6.5L
310mm
342mm
(220+5)mm
450*450*440mm
9.7kg/pcs
21kg/ctn

Diamond 11.CC
2-way centre speaker
bass reflex
2-way
4"(100mm) Woven Kevlar Cone X2
1"(25mm) Textile Dome
No
87dB
25-100W
95dB
80 Compatible
3.70
85Hz-20kHz
75Hz
2.3kHz
5.0L
(145+10)mm
420mm
(138+32)mm
250*245*525mm
5.0kg/pcs
5.8kg/ctn

Diamond 11.CS
2-way centre speaker
bass reflex
2-way
5"(130mm) Woven Kevlar Cone x 2
1"(25mm) Textile Dome
no
87dB
25-150W
98dB
80 Compatible
4.8Ω
65Hz - 20kHz
55Hz
2.3kHz
11.0L
(170+10)mm
480mm
(200+32)mm
600*320*285mm
7.6kg/pcs
8.6kg/ctn