Crystal 4.C - Loudspeaker Wharfedale - Free user manual and instructions
Find the device manual for free Crystal 4.C Wharfedale in PDF.


| Product Type | Center Channel Speaker |
| Brand | Wharfedale |
| Model | Crystal 4.C |
| Speaker Type | 2-way |
| Driver Complement | 1" (25mm) Soft Dome Tweeter, Two 4" (100mm) Woven Glass Fiber Woofers |
| Frequency Response | 60Hz - 20kHz |
| Sensitivity | 87dB (2.83V @ 1m) |
| Impedance | 6 Ohms (Compatible with 4-8 Ohm amps) |
| Recommended Amplifier Power | 20 - 120 Watts |
| Dimensions (W x H x D) | 500 x 170 x 200 mm (19.7" x 6.7" x 7.9") |
| Weight | 7 kg (15.4 lbs) |
| Finish Options | Black Ash, Walnut |
| Grille | Removable, Magnetic Attachment |
| Magnetic Shielding | Yes (for proximity to CRT TVs) |
| Placement | Center Channel (on TV stand or shelf) |
| Connection Type | Binding Posts (single-wire) |
| Recommended Crossover | 80 Hz (with subwoofer) |
| Cleaning Instructions | Dust with soft, dry cloth. Avoid liquids and abrasive cleaners. |
| Safety Notes | Place on a stable, level surface. Ensure adequate ventilation. Do not expose to moisture. |
| Spare Parts & Repairability | Contact Wharfedale authorized service centers for any repairs or parts. |
Frequently Asked Questions - Crystal 4.C Wharfedale
User questions about Crystal 4.C Wharfedale
0 question about this device. Answer the ones you know or ask your own.
Ask a new question about this device
Download the instructions for your Loudspeaker in PDF format for free! Find your manual Crystal 4.C - Wharfedale and take your electronic device back in hand. On this page are published all the documents necessary for the use of your device. Crystal 4.C by Wharfedale.
USER MANUAL Crystal 4.C Wharfedale
natural_image
Line drawing of five different speaker models in a row, showing front, side, and top views with no text or symbols.IMPORTANT SAFETY INFORMATION

BEFORE INSTALLING THIS PRODUCT READ ALL THESE INSTRUCTIONS!
This symbol indicates that there are important operating and maintenance instructions in the literature accompanying this unit.
Read these instructions. Keep these instructions. Heed all warnings. Follow all instructions.
Before making any connections, switch all the units in your system off at the mains.
Set the volume control at minimum when you switch on your system or change sources and turn the level up gradually.
DO NOT use your amplifier at full volume.
Ensure that all loudspeakers in the system are correctly wired.
DO NOT subject your loudspeakers to excessive cold, heat, humidity or sunlight.
Loudspeakers should not be placed directly facing other hi-fi units, or share the same shelf or cabinet.
DO NOT place heavy objects on top of loudspeakers.
Some manufacturers forbid the placing of objects on top of their TV sets. Check your TV handbook before installing the speaker directly on your TV set. Consult your TV dealer if you are in any doubt.
DO NOT connect speaker terminals to the mains supply.
DO NOT dismantle the loudspeaker. There are no user serviceable parts inside it and you will void the warranty.
Refer all servicing to qualified service personnel. Servicing is required when the apparatus has been damaged in anyway, the apparatus has been exposed to rain or moisture, does not operate normally, or has been dropped.
Caution: Changes or modifications not expressly approved by the manufacturer could void the user's authority to operate this device.
Unpacking
After taking out the top packing piece, lift the loudspeakers from the carton. Do NOT lift a loudspeaker out using the protective bad. After unpacking remove all the protective bags from the loudspeakers and store or dispose of them safely.
The Crystal-4.3 and Crystal-4.4 are heavy. If you are unsure of your ability to unpack and manoeuvre them safely, get someone to help you.
Check all items after unpacking. If any item is missing or damaged, immediately contact your Wharfedale dealer. Retain the packaging. If you dispose of the packing, follow all recycling regulations in your area.
Preparing The Crystal-4.3 and Crystal-4.4 Loudspeakers
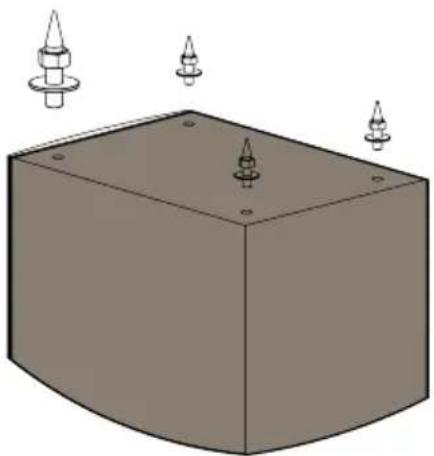
Attaching The Spikes
Place a soft cloth on the floor to protect the speaker. Invert the loudspeaker and place it on the cloth.
Thread a locking nut two-thirds of the way up the spike. Thread each spike assembly into a spike mount. Tighten finger tight so that spike is secure but not locked in place.
natural_image
3D illustration of a gray rectangular block with three small protrusions above it, no text or symbols present.Levelling The Loudspeaker
Invert the loudspeaker and place int carefully on the floor. If the floor is not perfectly level you will find that one spike is off the ground. Starting with this spike, unscrew it so that it touches the floor. Move the other spikes in and out so until the speaker is level front and back and sideways. Now tighten the nuts to lock the spikes firmly in position.
Spike Seats: A set of spike seats is provided for sensitive floors. Place a seat under each spike before you level the speakers.
Caution: Spikes Are Sharp
Make sure that there are no wires or hidden obstacles that could be damaged by the spikes in the immediate operational area of the speakers. NEVER drag a loudspeaker on its spikes. Always lift it. If the item is heavy get assistance.
Positioning Stereo Loudspeakers
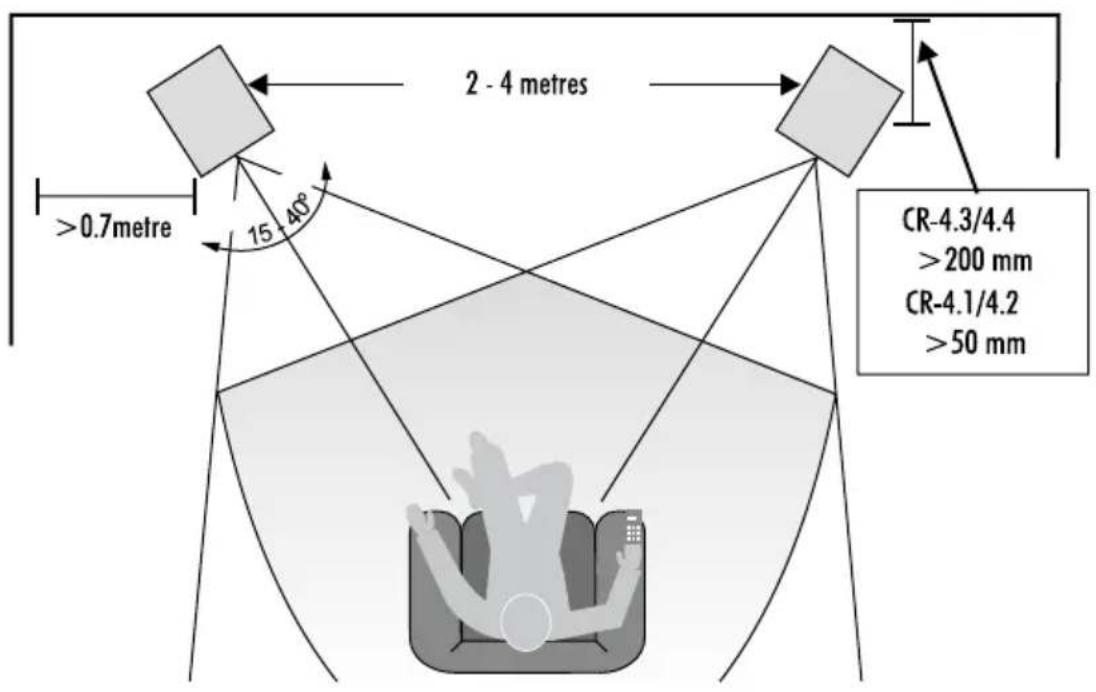
The Crystal-4.3 and Crystal-4.4 are floor standing. We suggest they are positioned at least 200mm from the rear walls and 700mm from the side walls, facing slightly inwards. The Crystal-4.1 and Crystal-4.2 maybe stand or wall mounted or placed on a rigid shelf.
The bass extension will improve if smaller speakers are operated closer to the rear walls. If the loudspeakers are placed too close to the walls the bass will increase but maybe boomy and indistinct. If the loudspeakers are placed away from the
walls, the inward angle maybe increased by up to 40%, but this may restrict the width of the optimum listening position.
A rule of thumb is that the listener should be as far from the loudspeakers as they are from each other. The speakers should be ideally positioned so that the treble units are roughly at ear level to a seated listener. As personal taste plays a large role, experiment with different configurations and play a wide range of programmes before finalising the position of your speakers.
Positioning Home Cinema Loudspeakers
5.1 Positioning
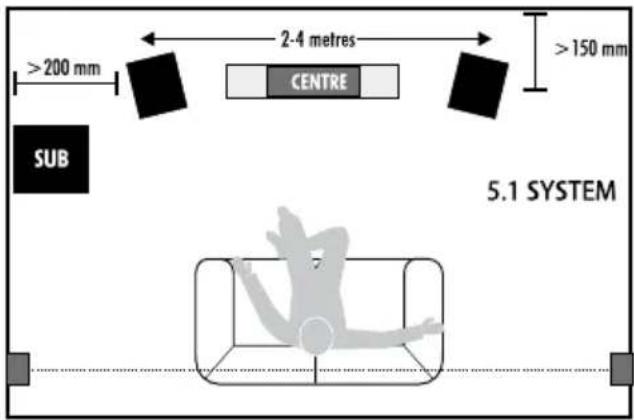
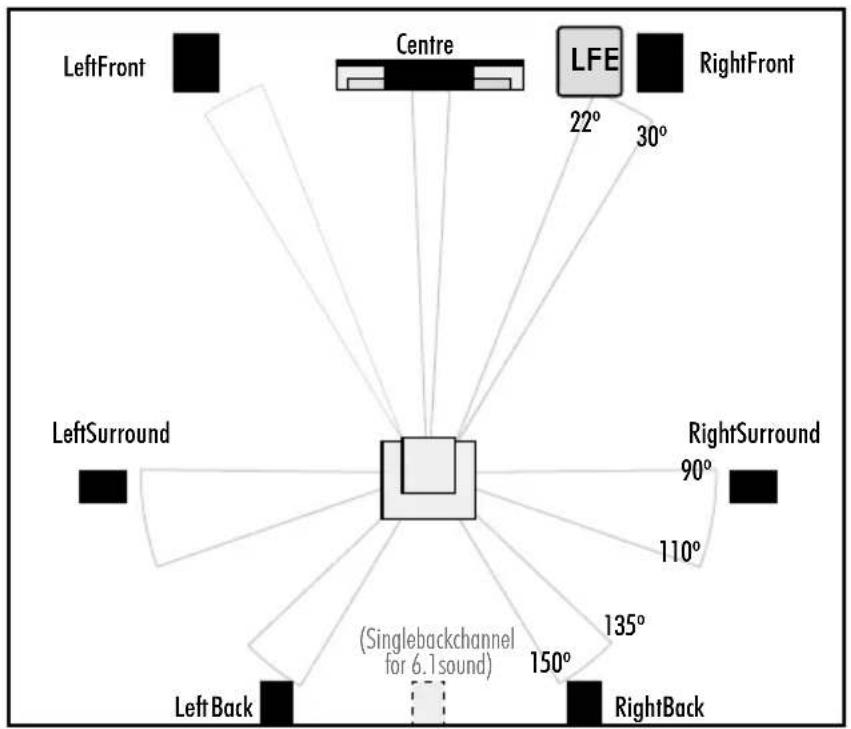
Place the front speakers as shown. Front loudspeakers should be placed away from the walls for best results. Angling the speakers inward slightly will improve stereo images but too extreme an angle will impair the movie sound.
All the speakers with the exception of the Crystal-4. C must be placed at least 450mm from a CRT TV. Flat panels are unaffected.
The Crystal-4.C centre speaker can be placed above or below the TV screen.
Subwoofer room positioning is not critical but we recommend that it is placed in front of the listening seat. Never operate the subwoofer within 450mm of a conventional TV screen.
The surround speakers should be placed above and behind the listening seat. They may be mounted on the side walls or on the rear walls but always behind a listener. Do not operate them within 450mm of a conventional CRT TV.
If the distance between the side walls is too great, you could use a second pair of stand mounted or floor standing loudspeakers, as the surround loudspeakers placed as shown in the drawing opposite.
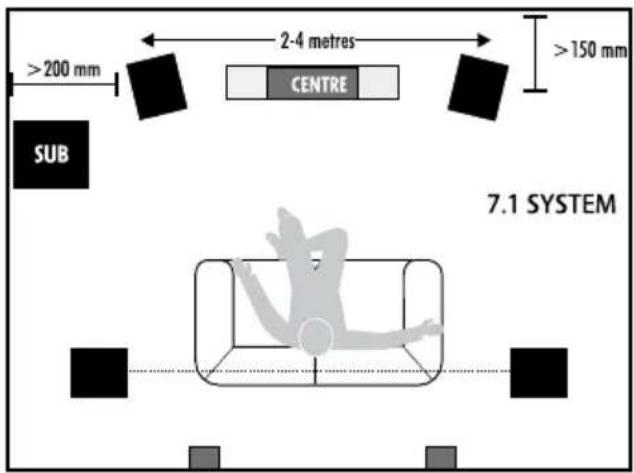
7.1 Positioning
If you are using a 7.1 system, the back loudspeakers must be at least 1 metre behind the listening seat.
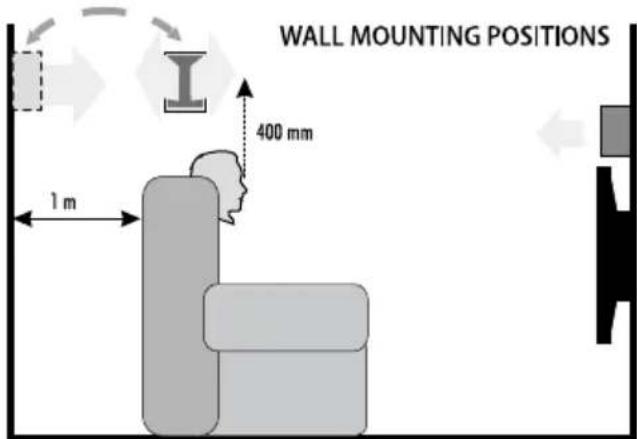
Wall Monting Positions
If you arewall mounting the centre and effects loudspeakers we recommend that they be mounted as shown.
The Crystal-4.1 has integral speaker mounts. To wall mount the Crystal-4.C we recommend that you consult your dealer to advise you on a suitable wall bracket.
Wall mounting the centre loudspeaker below the screen is not recommended unless the screen is mounted significantly above eye level. Consult your TV user guide for preferred placement options.
Doby Labs Recommended 7.1 Placement
Wall Mounting The Crystal-4.1 Loudspeakers
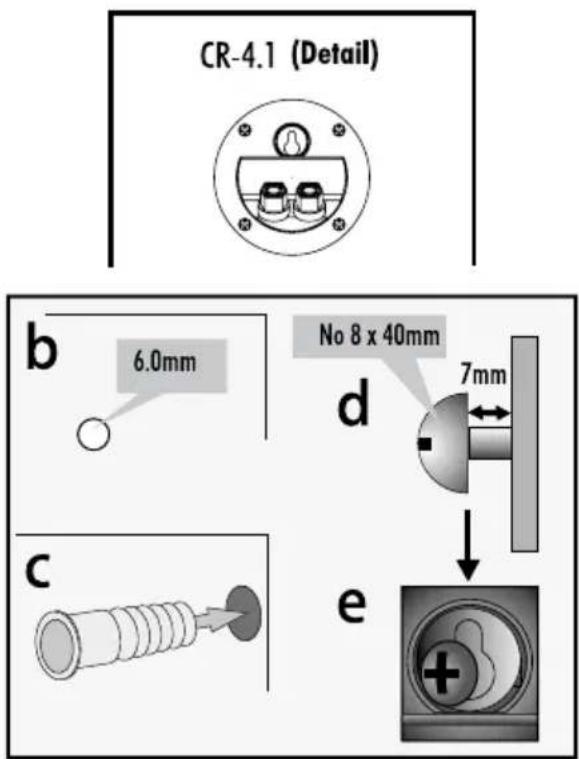
The crossover terminal panel of the Crystal-4.1 loudspeaker is provided with an integral keyhole slot for wall mounting. Wall mounting should be carried out by licensed sound contractors or technicians with appropriate qualifications and experience. All installations and wiring should comply with the standards laid down by the competent authority in the country and place of installation. Before you attempt wall or ceiling mounting, ensure the surface is stable and strong enough to support the weight of the speaker and mounting hardware.
You will need 1 No.8 screw and matching wall plug to attach each loudspeaker to the wall. These are the responsibility of the installer who should supply suitable fixings for this purpose.
Drill one 6mm hole in the wall at a suitable height off the floor. Fix a suitable No 8 round head screw firmly into each hole using appropriate wall plugs. Leave a stub of 7mm protruding from the wall. Align the keyhole slot in the crossover panel over the screw head and carefully lower the unit onto the screw.
Remove the loudspeakers from the wall ready for connection. After connection they can be re-installed on the wall.
Connecting Your Loudspeakers
Terminal Panels
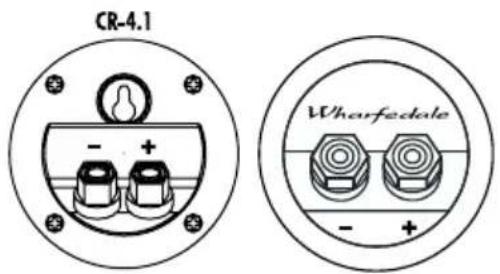
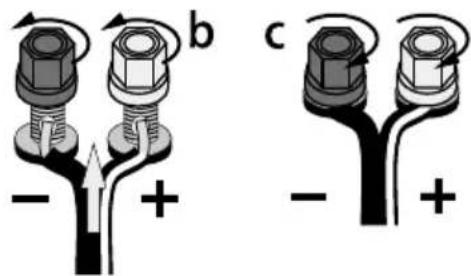
All the loudspeakers are connected to the amplifier via a twin terminal connecting panel. The positive terminal is located at the right of the panel and is coded red, the negative terminal is coded black.
Cable Preparation:
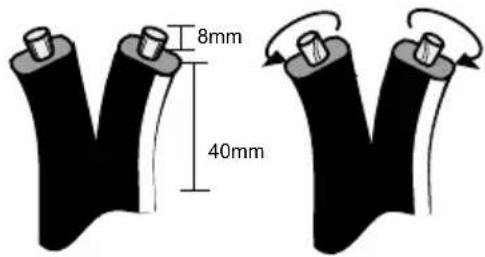
Prepare a suitable length of loudspeaker cable for each unit. Split the twin cores to a depth of about 40mm. Carefully strip the insulation from each end, leaving about 8mm of bare wire. If the cable is stranded, lightly twist together any loose strands.
Threading Cable
Unscrew a terminal. Thread the bared end of each cable through the hole in the bottom of the terminal post. Ensure that there are no loose strands which may touch adjacent terminals. Retighten the terminal securely.
Amplifier – Speaker Connections:
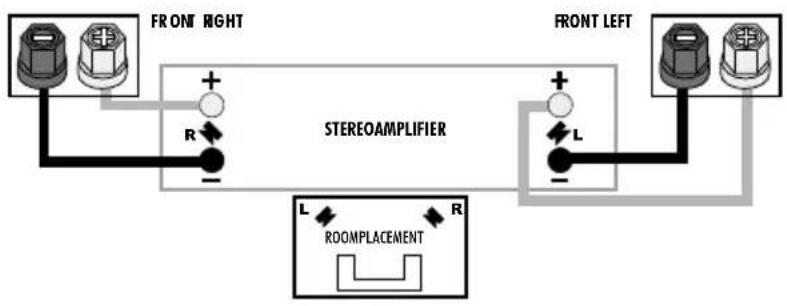
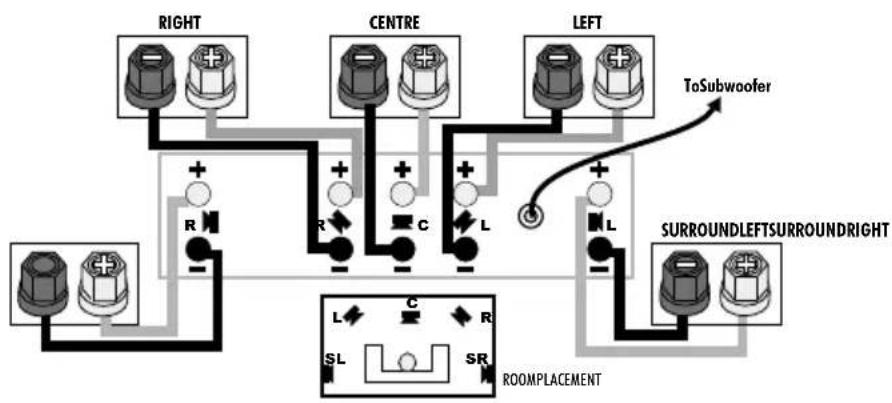
Audio cable is polarised, with two cores of different colours, or often a coloured tracer or identification rib. We suggest that you connect the coloured / striped wire to the red, positive terminals of your AV amplifier. This will ensure that all the loudspeakers are connected the correct way round and avoid set-up problems.
Connect each loudspeaker to the correct channel of your amplifier or AV processor taking care to connect the red (+) positive terminal of the speaker to the red, positive (+) terminal of the speaker output terminal of the amplifier and similarly with the black, negative (-) terminal. Use the connection diagrams on the next page to help you.
Connecting Your Loudspeakers
Stereo Connection
5 Channel Connection
flowchart
graph TD
    A["RIGHT"] --> B["R"]
    B --> C["+"]
    C --> D["CENTRE"]
    D --> E["R"]
    E --> F["C"]
    F --> G["L"]
    G --> H["LEFT"]
    H --> I["L"]
    I --> J["ToSubwoofer"]
    K["SURROUNDLETSURROUNDRIGHT"] --> L["ROOMPLACEMENT"]
    M["SL"] --> N["C"]
    N --> O["R"]
    O --> P["SR"]
    P --> Q["Room placement"]
7 Channel Connection
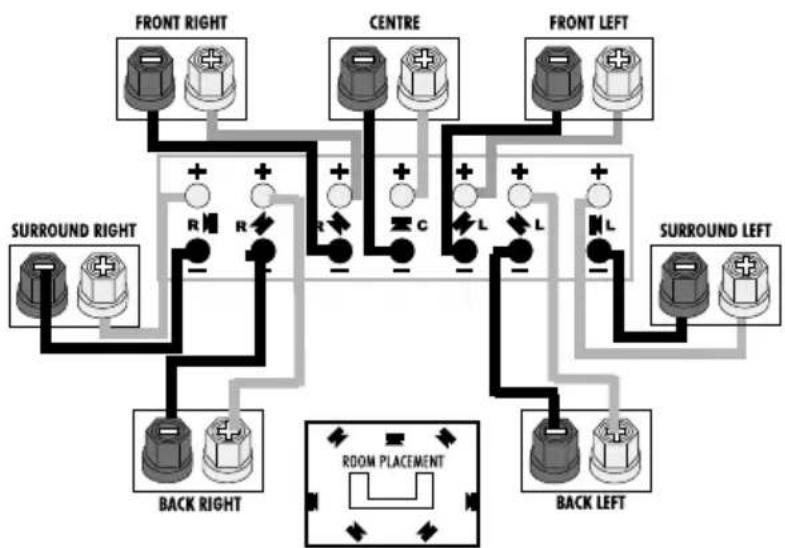
flowchart
graph TD
    A["FRONT RIGHT"] --> B["R"]
    C["SURROUND RIGHT"] --> D["-"]
    E["CENTRE"] --> F["R"]
    G["FRONT LEFT"] --> H["L"]
    I["SURROUND LEFT"] --> J["-"]
    K["BACK RIGHT"] --> L["+"]
    M["BACK LEFT"] --> N["+"]
    O["ROOM PLACEMENT"] --> P["Bottom Left"]
    Q["Ground"] --> R["Ground"]
Setting Up A Stereo System
Ensure that the listening seat is central to the loudspeakers.
Play some music with which you are familiar. Adjust the speakers for the optimum performance. You will find that a few degrees more or less 'toe in' can effect the sound dramatically.
The sound should be well balanced with a firm bass. If the sound lacks definition or the bass is indistinct, the
Setting Up An AV System

Please read the relevant sections of your AV amplifier manual and familiarise yourself with the various issues. If you are unsure, consult your dealer for help.
Most digital AV processors require you to specify the size of speakers in all operational channels. These are usually 'Large' or 'Small'. Set all the bookshelf speakers to 'Small'. This will direct all the bass in the system to the subwoofer for clean, deep and louder bass. The floorstanding loudspeakers should be set to 'Large'. It is normal for a centre and effects speakers to be set to 'Small'. Set the 'Subwoofer' option n the processor to 'On'. If there is no subwoofer in the system set all the speakers to 'Large' and set the subwoofer to 'Off'.
When the loudspeaker settings are finalised, put the AV amplifier into its 'Test' mode (see your processor instruction) and adjust the levels until all channels are equally loud.
Troubleshooting
IF YOUR LOUDSPEAKERS ARE NOT WORKING SATISFACTORILY, PLEASE WORK THROUGH THE TABLE BELOW BEFORE CONTACTING YOUR DEALER FOR ASSISTANCE. BEFORE INVESTIGATING A PROBLEM, SWITCH OFF THE SYSTEM AT THE MAINS
| Symptom Possible Cause | Possible Cause |
| No Sound System not switched on: Speaker ca | System shorting terminal out, wrong source selected terminals out. wrong source selected |
| Sound lacks bass contentBass reproduction is indistinct | Front loudspeakers out of phase. Check all system connections and redtify.Subwoofer not switched on! Subwoofer phase incorrect; Subwoofer crossover control doctew |
| Excessive bass distortion at low volumes | Subwoofer level set too high; LFE level set too high; Subwoofer incorrectly wired |
| Excessive or distorted bass at high levels System level | System set too high; Bags cannot be too high |
| Distortion / rattling at high levels System level | To high objects high closer to top of speaker of speakers |
| Indistinct Sound; Poor localisation of effects.Poor localisation of dialogue. | One or more loudspeakers is out of phase. Check all system connections and redtify.(Read the manual for correct connection procedure) |
Further Information
Care and Maintenance
If you play the speakers with the grilles off exercise great care. NEVER touch drive units which are easily damaged. The loudspeaker cabineys can be cleaned with a damp cloth or with a spray furniture polish and a soft cloth. Apply the spray sparingly to the cloth and then polish the cabinet. Never apply spray directly to the cabinet.
Guarantee & Service
In the unlikely event that your unit develops a fault you should return it to the Wharfedale dealer using the original packing to ensure safe shipping.
The terms of your guarantee may vary in different countries but in all cases the guarantee excludes.
All damage caused through accident, misuse, wear and tear, neglect, incorrect installation, adjustment or repair by unauthorised personnel is not covered by your warranty.
Wharfedale will not be liable for any consequential damage, loss or injury, arising from or inconjunction with this equipment.
Authorised Service Centres
UK
IAG UK LTD.
IAG House 13/14 Glebe Road, Huntingdon, Cambridgeshire, PE29 7DL, England
Tel: +44 (0)1480 447700
ASIA
IAG Group LTD.
Sanecore Industrial Park, Jiuwei, Xixiang, Shenzhen China
Tel: +86 755 27483535
Additionally, Wharfedale retailers and global distributors will be able to assist you on finding authorised service centres worldwide. To find your Wharfedale distributor visit www.wharfedale.co.uk
Wharfedale has a policy of continuous product development and reserves the right to change specification without notice.
The name 'Wharfedale' is a registered trademark of Wharfedale International Ltd. Wharfedale is a member of the International Audio Group
Specifications
| Modle | Crystal-4.1 | Crystal-4.2 | Crystal-4.3 | Crystal-4.4 |
| General description | Bookshelf Speaker | Bookshelf Speaker | Floorstanding Speaker | Floorstanding Speaker |
| Enclosure type | Bass Reflex | Bass Reflex | Bass Reflex | Bass Reflex |
| Transducer complement | 2-way | 2-way | 3-way | 3-way |
| Bass driver | 100mm Woven Kevlar Cone | 125mm Woven Kevlar Cone | 165mm Polypropylene Cone | 165mmPolypropylene Cone x2 |
| Midrange driver | 125mm Woven Kevlar Cone | 125mm Woven Kevlar Cone | ||
| Treble driver | 25mm Soft Dome | 25mm Soft Dome | 25mm Soft Dome | 25mm Soft Dome |
| AV shield | No | No | No | No |
| Sensitivity (2.83V @ 1m) | 86dB | 88dB | 88dB | 90dB |
| Recommended amplifier power | 20-60W | 20-100W | 25-120W | 25-150W |
| Peak SPL | 95dB | 96dB | 96dB | 102dB |
| Nominal impedance | 8Ω Compatible | 8Ω Compatible | 8Ω Compatible | 8Ω Compatible |
| Minimum impedance | 4.3Ω | 4.4Ω | 3.7Ω | 3.5Ω |
| Frequency response (+/-3dB) | 75Hz - 20kHz | 60Hz - 20kHz | 50Hz - 20kHz | 40Hz - 20kHz |
| Bass extension (-6dB) | 70Hz | 55Hz | 45Hz | 35Hz |
| Crossover frequency | 3.4kHz | 2.5kHz | 500Hz & 2kHz | 460Hz & 27kHz |
| Cabinet Volume (in litres) | 2.3L | 6gL | 7.5L&21L | 7.5L&23L |
| Dimensions (mm) | ||||
| Height (on plinth) | 194mm | 265mm | (900+22)mm | (950+22)mm |
| Width | 141mm | 180mm | 205mm | 205mm |
| Depth (with grille&terminal) | (147+10)mm | (212+10)mm | (245+10)mm | (245+10)mm |
| Carton size | 382 x 225 x 280mm | 475 x 300 x 385mm | 1020 x 360 x 315mm | 1070 x 360 x 315mm |
| Net weight | 2kg each | 4.2kg each | 14.5kg each | 15kg each |
| Gross weight | 4.8kg/ctn | 9.6kg/ctn | 16.2kg/ctn | 17kg/ctn |
| Finish | Black / Walnut / White | Black / Walnut / White | Black / Walnut / White | Black / Walnut / White |
| Modle | Crystal-4.C |
| General description | Centre Speaker |
| Enclosure type | Bass Reflex |
| Transducer complement | 2-way |
| Bass driver | 125mm Woven Kevlar Cone x2 |
| Midrange driver | |
| Treble driver | 25mm Soft Dome |
| AV shield | Yes |
| Sensitivity (2.83V @ 1m) | 89dB |
| Recommended amplifier power | 25-100W |
| Peak SPL | 95dB |
| Nominal impedance | 8Ω Compatible |
| Minimum impedance | 4.2Ω |
| Frequency response (+/-3dB) | 70Hz - 20kHz |
| Bass extension (-6dB) | 65Hz |
| Crossover frequency | 2.4kHz |
| Cabinet Volume (in litres) | 8.2L |
| Dimensions (mm) | |
| Height (on plinth) | 172mm |
| Width | 415mm |
| Depth (with grille&terminal) | (192+10)mm |
| Carton size | 495 x 280 x 260mm |
| Net weight | 6.8kg each |
| Gross weight | 8kg/ctn |
| Finish | Black / Walnut / White |
- IMPORTANT SAFETY INFORMATION
- BEFORE INSTALLING THIS PRODUCT READ ALL THESE INSTRUCTIONS!
- Unpacking
- Preparing The Crystal-4.3 and Crystal-4.4 Loudspeakers
- Attaching The Spikes
- Levelling The Loudspeaker
- Caution: Spikes Are Sharp
- Positioning Stereo Loudspeakers
- Positioning Home Cinema Loudspeakers
- Positioning
- Positioning
- Wall Monting Positions
- Doby Labs Recommended 7.1 Placement
- Wall Mounting The Crystal-4.1 Loudspeakers
- Connecting Your Loudspeakers
- Terminal Panels
- Cable Preparation:
- Threading Cable
- Amplifier – Speaker Connections:
- Setting Up A Stereo System
- Setting Up An AV System
- Troubleshooting
- Further Information
- Care and Maintenance
- Guarantee & Service
- Authorised Service Centres
- ASIA
Brand : Wharfedale
Model : Crystal 4.C
Category : Loudspeaker