FT080TMIP65HDMI - Monitor Faytech - Free user manual and instructions
Find the device manual for free FT080TMIP65HDMI Faytech in PDF.


User questions about FT080TMIP65HDMI Faytech
0 question about this device. Answer the ones you know or ask your own.
Ask a new question about this device
Download the instructions for your Monitor in PDF format for free! Find your manual FT080TMIP65HDMI - Faytech and take your electronic device back in hand. On this page are published all the documents necessary for the use of your device. FT080TMIP65HDMI by Faytech.
USER MANUAL FT080TMIP65HDMI Faytech
faytech IP65 Series Touchscreen Monitors
7 Inch IP65 Touch Monitor....28
8 Inch IP65 Touch Monitor....29
10 Inch IP65 Touch Monitor....30
10.4 Inch IP65 Touch Monitor....31
12.1 Inch IP65 Touch Monitor....32
15 Inch IP65 Touch Monitor....33
Warranty: 35
General warning:....37
Trouble-shooting: 37
Ongoing changes: 37
Components: 38
To connect the signal source:....40
Connect to power: 40
Using the touch function:....41
Display Operation:....41
The remote control:....41
OSD-Menu-Operation in VGA mode:....41
Installation of the Touch-Driver under Windows: 46
Setting up the faytech software:....49
Troubleshooting: 56
Physical Setup: 56
Startup: 56
Specification: 58
7 Inch IP65 Touch Monitor....59
8 Inch IP65 Touch Monitor....60
10 Inch IP65 Touch Monitor....61
10.4 Inch IP65 Touch Monitor....62
12.1 Inch IP65 Touch Monitor....63
15 Inch IP65 Touch Monitor....64
Kontakt / Contact: 65
DEUTSCH
GARANTIE
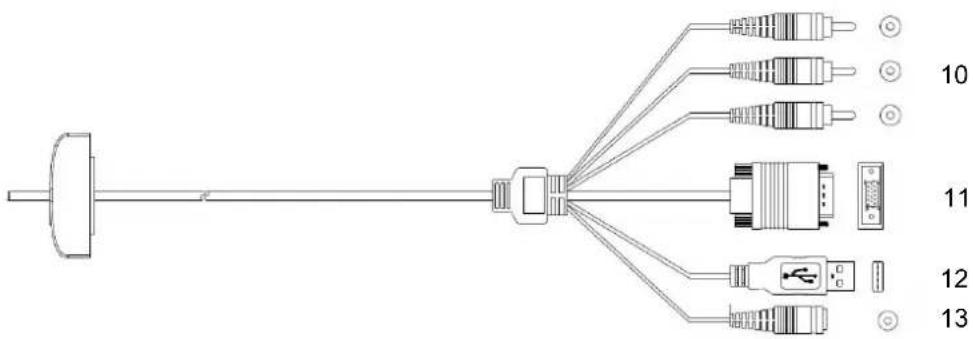
All-In-One VGA Kabel
text_image
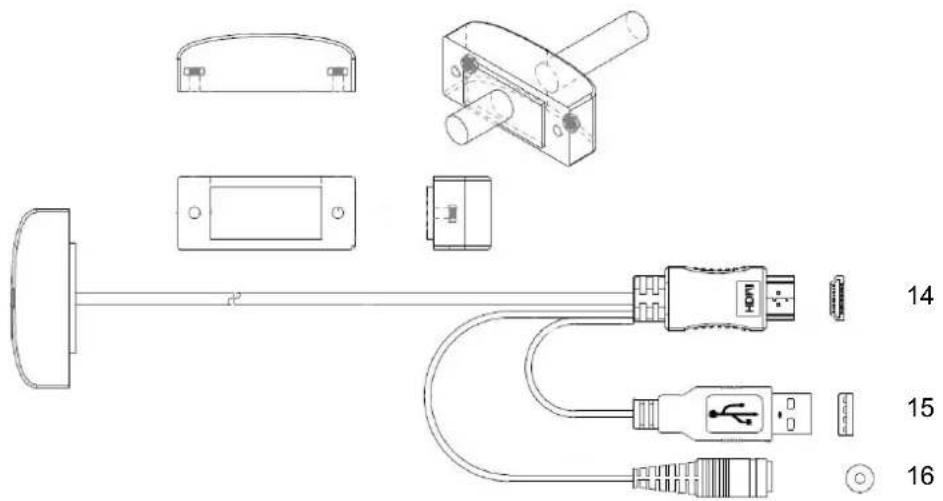
10 11 12 13All-In-One HDMI Kabel
text_image
Technical diagram showing exploded view of a cable connector with labeled components and connectors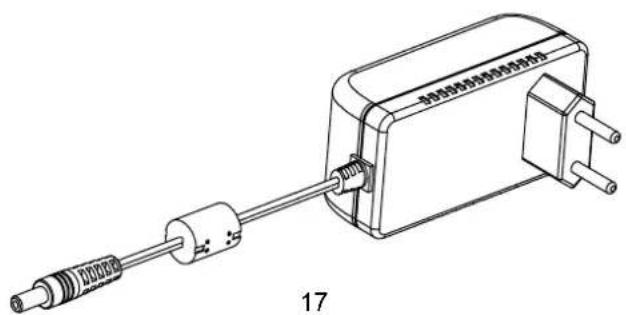
natural_image
Technical line drawing of a mechanical device with a coiled spring and terminal ports (no text or symbols)Extra PS/2 interface driver for TouchKit controller. Please check the check box for PS/2 touch controller.

Install PS/2 interface driver
Every system boot up

Next system boot up

None
text_image
TouchKit - InstallShield Wizard If you are trying to install the USB touch device, please make sure that your touch monitor or touch controller's USB cable is plugged into the computer now. Please close the "Found New Hardware Wizard" dialog when it pop-up. OKtext_image
If you want to use Multi-Monitor, please check the box. ✓ Support Multi-Monitor Systemtext_image
faytech Lancetan Davestannatural_image
Two abstract 3D shapes: one with a small icon, the other with a red and blue segmented shape (no text or symbols)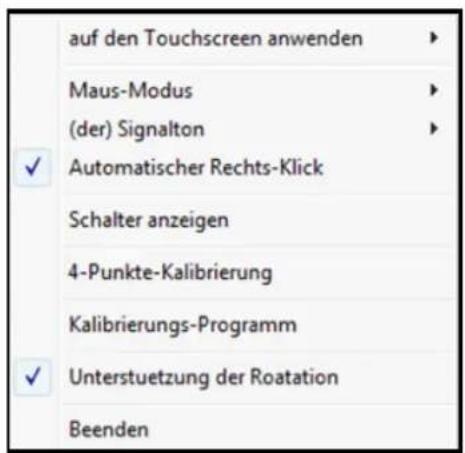
faytech touch displays are produced following the most modern production and test processes. Carefully selected components and accurate production ensure reliable operation and long life. faytech warrants to the original purchaser that each faytech touch display delivered shall be free from defects in material or workmanship at time of shipment, and that each such module delivered will meet the published specifications for a period of 24 months as measured from the date of original shipment. faytech's obligation under the Warranty contained herein is limited to the repair or replacement of any faytech touch monitor that does not meet the specifications, provided that said product is returned to faytech, transportation charges pre-paid, and provided that upon faytech's examination, the product, when tested within the specified ratings and in accordance with good engineering practice, does not meet the specifications as defined. THIS WARRANTY IS IN LIEU OF ALL OTHER WARRANTIES, EXPRESSED OR IMPLIED, INCLUDING WITHOUT LIMITATION THE WARRANTY OF MERCHANTABILITY AND THE WARRANTY OF FITNESS FOR A PARTICULAR PURPOSE.
All claims under warranty must be made promptly after occurrence of circumstances giving rise thereto and must be received within the applicable warranty period by faytech or its authorized representative. Such claims should include the Product type and serial numbers and a full description of the circumstances giving rise to the claim. Before any Products are returned for repair and/or adjustment, written authorization from faytech or its authorized representative for the return and instructions as to how and where these Products should be shipped must be obtained. Any product returned to faytech for examination shall be sent prepaid via the means of transportation indicated as acceptable by faytech. faytech reserves the right to reject any warranty claim not promptly reported and any warranty claim on any item that has been altered or has been shipped by non-acceptable means of transportation. When any Product is returned for examination and inspection, or for any other reason, Customer will be responsible for all damage resulting from improper packing or handling and for loss in transit, notwithstanding any defect or nonconformity in the Product. In all cases faytech has sole responsibility for determining the cause and nature of failure, and faytech's determination with regard thereto shall be final. If it is found that faytech's Product has been returned without cause and is still serviceable, Customer will be notified and the Product returned at Customer's expense. In addition, a charge for testing and examination may, in faytech's sole discretion, be made on Products so returned.
SELLER'S LIABILITY FOR DAMAGES SHALL NOT EXCEED THE PAYMENT, IF ANY, RECEIVED BY SELLER FOR THE UNIT OF PRODUCT OR SERVICE FURNISHED OR TO BE FURNISHED AS THE CASE MAY BE WHICH IS THE SUBJECT OF CLAIM OR DISPUTE.
IN NO EVENT SHALL SELLER BE LIABLE FOR INCIDENTAL, CONSEQUENTIAL OR SPECIAL DAMAGES. LIABILITY TO THIRD PARTIES, FOR BODILY INJURY INCLUDING DEATH, RESULTING FROM SELLER'S PERFORMANCE SHALL BE DETERMINED IN ACCORDANCE WITH APPLICABLE LAW AND THE TOTAL LIABILITY LIMITATION STATED ABOVE SHALL NOT BE CONSTRUED AS A LIMITATION ON SELLER FOR DAMAGES FOR ANY SUCH BODILY INJURY, INCLUDING DEATH.
WARRANTY FOR ITEMS REPLACED UNDER WARRANTY Whenever a failed module is replaced under Warranty, the greater of the balance of the original Warranty Period or 90 days will constitute the remaining warranty period. The replaced unit does not carry a new Warranty.
LIFE SUPPORT POLICY "WARNING: DO NOT USE IN LIFE SUPPORT" SELLER'S PRODUCTS ARE NOT AUTHORIZED FOR USE AS CRITICAL COMPONENTS IN LIFE SUPPORT DEVICES OR SYSTEMS WITHOUT THE EXPRESS PRIOR WRITTEN APPROVAL OF THE PRESIDENT OF FAYTECH. As used herein, "Life Support Devices or Systems" are devices which support or sustain life and whose failure to perform when properly used in accordance with instructions for use provided in the labeling can be reasonably expected to result in a significant injury to the user. A "Critical Component" is any component in a life support device or system whose failure to perform can be reasonably expected to cause the failure of the life support device or system or to affect its safety or effectiveness.
If your device does have a defect within the warranty period, please contact faytech directly. The warranty period is 24 months from the date of purchase under the following conditions:
- All warranties are void if the unit has been opened or disassembled without faytech's prior approval.
- Damage caused by improper handling or operation, by incorrect installation or storage, through improper connections, as well as due to force majeure or other external influences are not covered by the warranty.
- For warranty claim, we reserve the right to replace the defective components or to exchange the device.
● Exchanged components or devices become the property of faytech. - Claims for damages are excluded in so far as they are not based on intent or gross negligence of the manufacturer.
● After expiration of the warranty period, warranty claims can no longer be pursued. - Any warranty claim must be accompanied by proof of purchase (receipt or invoice).
GENERAL WARNING:
Avoid all contact with dirt, oil, dust or water. Never open the unit. Do not drop the unit. If you notice a burning smell or hear the device making unusual sounds, please disconnect it immediately from the power source. To clean the unit, please turn off the device first, then clean it very gently with a dry, soft cloth. For your own safety, please do not use the device during driving.
TROUBLE-SHOOTING:
Please follow all instructions carefully. At the end of this guide there is an overview of possible connection or other types of operation errors.
ONGOING CHANGES:
faytech produces its displays in China with German know-how and quality management. Your feedback is the most valuable information for the improvement of our products. Continuous production and product improvement is our primary goal. For this reason, there may be improvements in our products which are not yet included in this user's guide. Differences between your product and this user's guide are generally related to specification changes and product improvements. If you have any questions or suggestions, please contact our support team or visit our website at www.faytech.com
COMPONENTS:
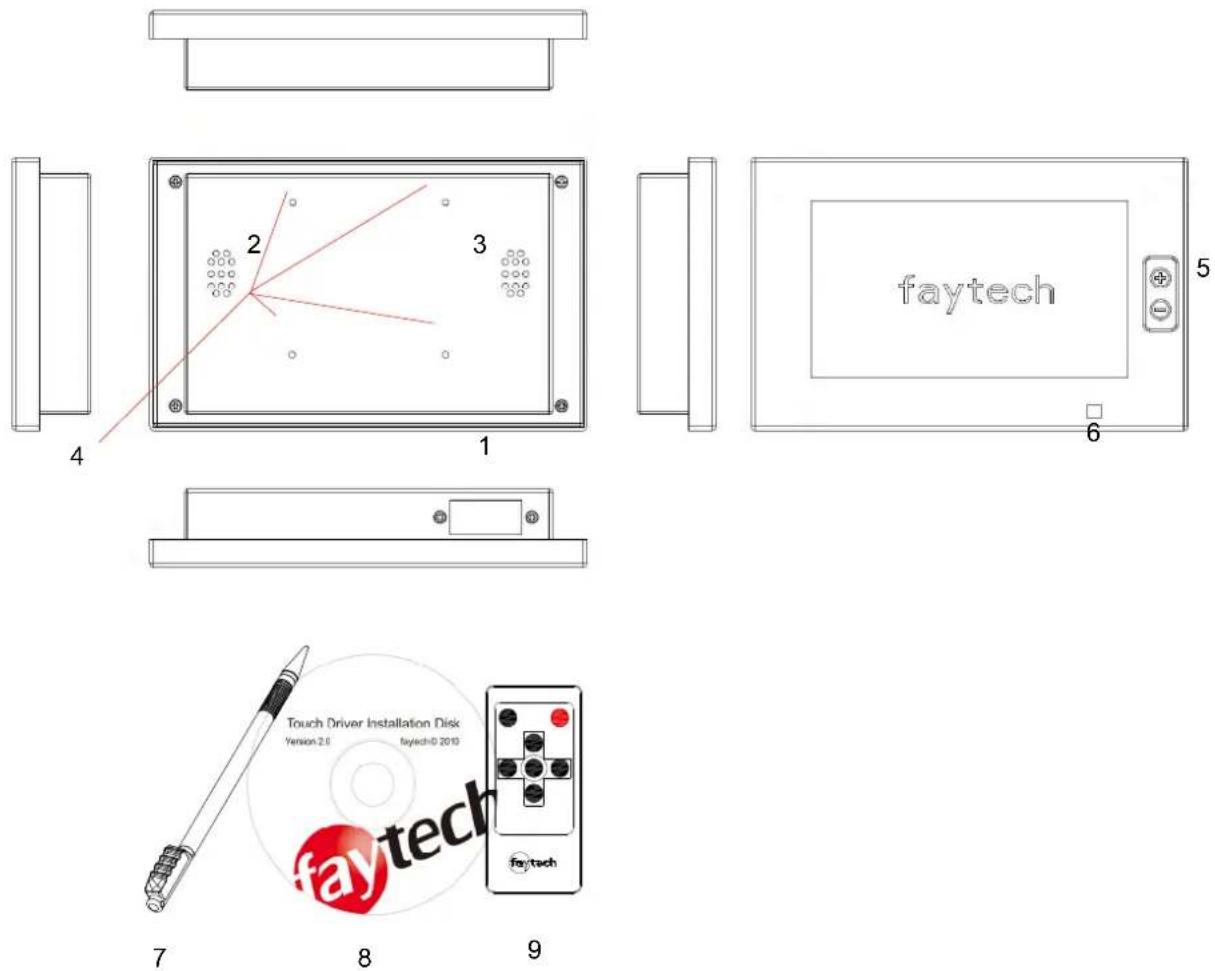
- Cable-Port 2-3. Loudspeaker 4. VESA-75 fixation holes 5. BRIGHTNESS: Switch prestored brightness settings 6. Status LED 7. Touch-pen 8. driver-CD detailed manual included 9. Remote control
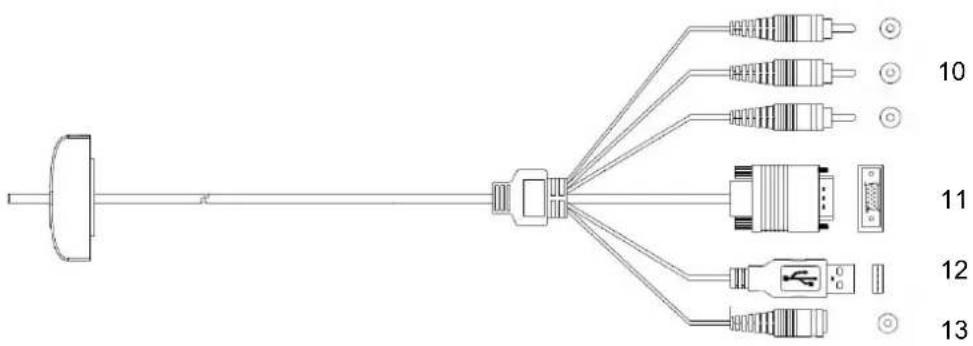
All-In-One VGA Cable
text_image
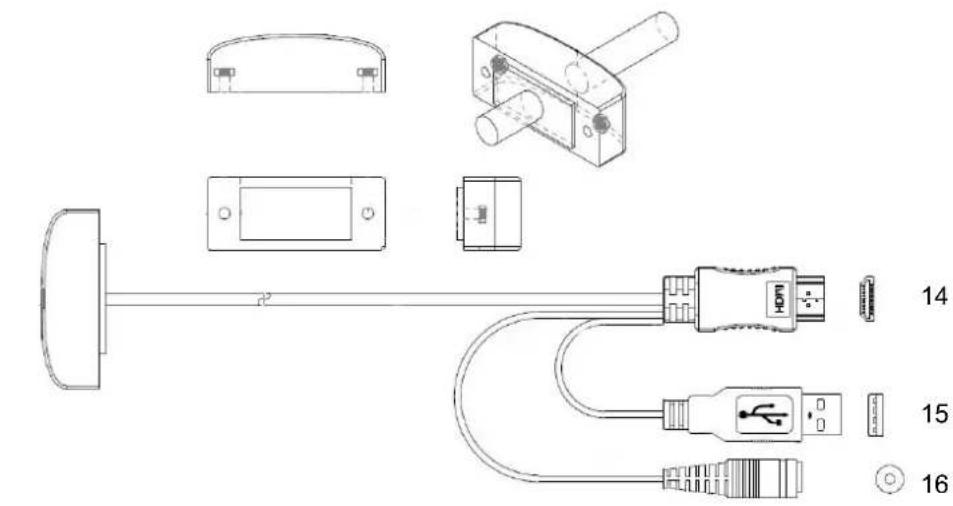
Diagram showing cable connector connections with labeled components and pin numbers 10 to 13All-In-One HDMI Cable
text_image
Technical diagram of a USB connector with labeled pins and cable connections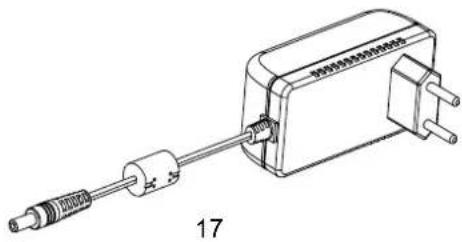
natural_image
Technical line drawing of a mechanical device with a coiled spring and housing (no text or symbols)- 3 x RCA Connectors, 14. HDMI Connector
1 x Video, 2 x Audio - USB Connector
- VGA Connector 16. DC-IN, 5.5/2.5mm
- USB Connector outer/inner diameter
- DC-IN, 5.5/2.5mm 17. Power supply
outer/inner diameter
Display Connection
Each cable is labeled for easy connection. To operate your faytech display properly, there must be at least one signal source and a power source connected. To use the touch function please connect the USB cable to your PC.
TO CONNECT THE SIGNAL SOURCE,
you have the following options:
- On a PC: Connect the VGA cable from the faytech monitor to the VGA output of your PC graphics card. Please select SOURCE VGA, so you have an image on the display. (VGA version.)
- On a PC: If you have a HDMI/DVI output on your PC please use the HDMI-port of the faytech touch-monitor, with DVI you need a DVI to HDMI connector (HDMI version.)
- To DVD-Player/camera/Video source: Connect one video input to a corresponding video source. Please be sure to switch off the video source before you connect the cables. Switch SOURCE to the respective channel input (AV or SV) (VGA version.)
In addition, the display has one stereo audio input for video input. Audio comes through the speakers only if there is an image signal.
CONNECT TO POWER
You can connect the faytech display with the included 120V/220V plug or the 12V power adapter. Insert one of these power sources into the 12-36V DC-IN.
Another alternative is to connect another 12-36V source to the DC-IN. Please pay attention not to mix the polarity (+ is inside)! Please make secure that the power source has enough current, at 12V 1.5A for 10" IP65 Touchscreen Monitors, 12V 3A for 10.4"-15" IP65 Touchscreen Monitors.
Connect the USB cable to the USB port on your PC (after you have been asked within the software installation process).
The touch-screen series also supports the use of touch through the serial port. These functions are suitable and are available for project customers. Please order the faytech special cable.
DISPLAY OPERATION
THE REMOTE CONTROL
As the +/- buttons on the touchscreen are used to adjust brightness, the remote control provides the whole menu functionalities like to turn the touchscreen on and off, change the source signals (AV, VGA), Brightness adjusting, auto calibration and settings like explained in the following menu. Before using the remote for the first time, please remove the thin plastic on the back side so that the battery makes contact and the remote control has power.
SETTINGS IN VGA MODE
The Menu operation of the faytech display is simple and logical. Pressing MENU buttons on the remote control brings up the main settings including color setting, pictures setting, menu setting and sound settings; with +/- you can navigate through the options. The selected item will be marked in red. Press MENU again to save the changes .To exit, select EXIT and press MENU.
Color settings:
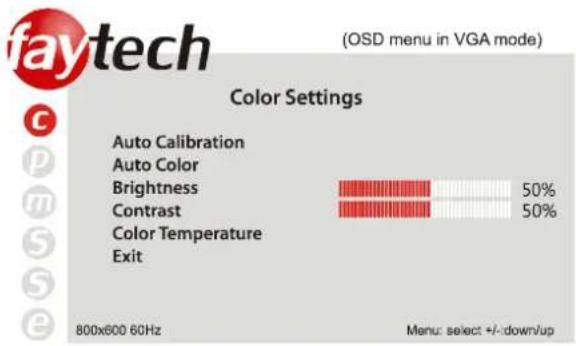
bar
Color Settings | Category | Value (%) | |---|---| | Auto Calibration | | | Auto Color | | | Brightness | 50 | | Contrast | 50 | | Color Temperature Exit | | 800x600 60Hz Menu: select +/-down/up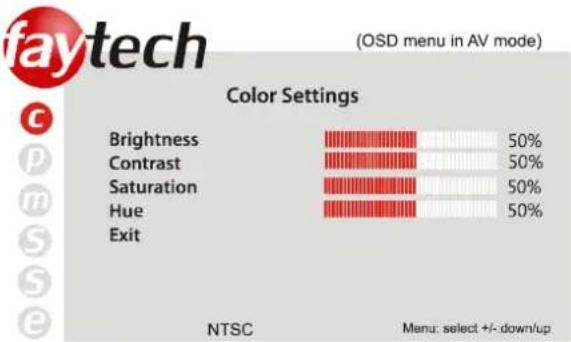
bar
Color Settings | Category | Value (%) | |---|---| | Brightness | 50 | | Contrast | 50 | | Saturation | 50 | | Hue | 50 | | Exit | 50 | NTSC Menu: select +/-down/upThe Menu for the AV signal has almost the same tabs and functions as when in VGA mode.
The “Picture Settings” tab is not available. The “Auto Calibration”, “Auto Color” and “Color Temperature” functions under “Color Settings” are replaced with “Saturation” and “Hue”.
● Auto calibration:
The display is automatically adjusted to the current resolution of your graphics card. If you are not satisfied with the auto setting, you can optimize it manually.
- Auto color:
This function will optimize the color of the faytech displays. You can always change the color of the display manually.
- Brightness:
This allows you to increase or decrease the brightness of the faytech display.
- Contrast:
This allows you to increase or decrease the contrast of your display.
- Color temperature:
You can choose predefined color settings (cool, warm, medium, SRGB) or make your own color setting (User).
- Saturation:
(Only inAV mode) Press + to increase the color purity (more colorful). Press - to decrease the color purity (less colorful)
- Hue:
(Only in AV mode) Press + to move to warmer colors. Press - to move to cooler colors.
- Exit:
Return to the main menu or submenu.
Picture settings: (not available in AV mode)
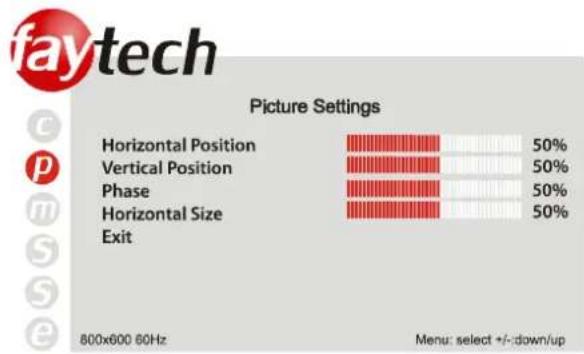
bar
faytech Picture Settings | Picture Settings | Percentage (%) | | :--- | :--- | | Horizontal Position | 50 | | Vertical Position | 50 | | Phase | 50 | | Horizontal Size | 50 | | Exit | 50 | 800x600 60Hz Menu: select +/-down/up● Horizontal position:
Move the position of the image on the display to the left (-) or the right (+).
- Vertical position:
Move the position of the image on the display down (+) or up (-).
- Phase:
Change visual distortion when viewing the screen from different angles. Use +/- to find the best display effect.
- Horizontal size:
To reduce (-) or enlarge (+) the horizontal size of the image on the faytech display.
- Exit:
Return to the main menu or submenu.
Menu settings
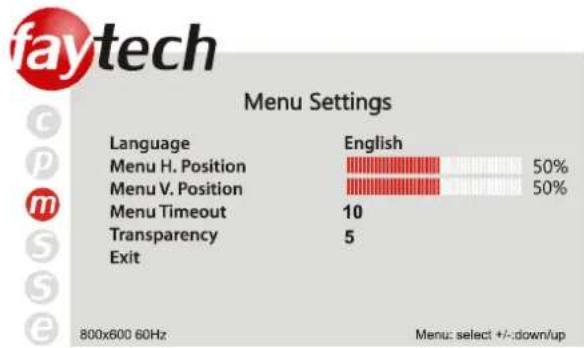
bar
faytech Menu Settings | Language | English (%) | | :--- | :--- | | Menu H. Position | 50 | | Menu V. Position | 50 | | Menu Timeout | 10 | | Transparency | 5 | | Exit | 800x800 60Hz Menu: select +/-down/up- Language:
To change the language of the menu.
- Menu H. Position:
To move the position of the menu to the left (-) or the right (+).
- Menu V. Position:
To move the position of the menu up (-) or down (+).
- Menu Timeout:
Determines how many seconds the OSD menu is displayed before it is automatically switched off, if there are no more operations. You can also select "off" to remove the OSD menu from the screen.
- Transparency:
You can choose various levels of transparency for the OSD-Menu.
- Exit:
Return to the main menu or submenu.
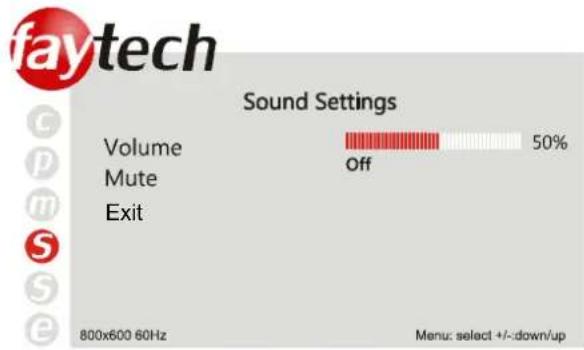
Sound settings
text_image
faytech Sound Settings Volume Mute Exit 50% Off 800x600 60Hz Menu: select +/-down/up• Volume:
To adjust the volume of the built-in speakers. Use - to reduce the volume and use + to increase it.
- Mute:
Turn the speakers on /off.
- Exit:
Return to the main menu or submenu.
Settings
- Reset:
This option will return the display back to the factory settings. All changes you have made are deleted.
- Exit:
Return to the main menu or submenu.
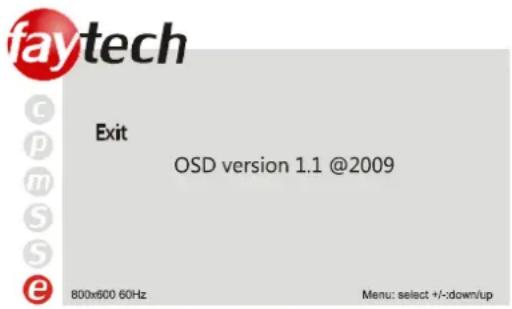
Exit
text_image
faytech Exit OSD version 1.1 @2009 800x600 60Hz Menu: select +/-down/upTo quit the OSD-Menu.
- Put the CD into your CD-ROM.
- Use the Explorer on the CD and select the appropriate subdirectory (Touch Driver, then the right operation system) to open the installation file setup.exe directly. Now you will see the following window:
Select the Windows driver 2000/XP/Vista/Windows7 in the upper right. If a security warning pops up, click "Run", "Continue" or "Execute". Under Vista you must confirm the UserAccount Control with "Continue". Some further warnings may be given depending on installed security programs. Always click the button to continue the operation.
To complete the installation with all default options, click "Next" on each of the following dialog boxes. You can cancel at any time. To switch back to a previous step, click the "<back" button. Please note! The installation process is in English. Later on you can choose the language for the OSD.
3."Welcome to the InstallShield Wizard for TouchKit":Press "Next" if you to continue the installation.It's advisable to close all other programs before beginning this installation.
4."Setup Type":
Extra PS/2 interface driver for TouchKit controller. Please check the check box for PS/2 touch controller.

Install PS/2 interface driver
Check the box (see the picture on the next page upper left) only if you want to install the PS/2-Driver. Usually for a USB-touch display, you should NOT select this option. The PS/2-Driver works smoothly with a PS / 2 mouse but if you do not have a PS / 2 mouse you should leave this box unchecked to avoid compatibility problems.
5."Setup Type"
Do 4 point calibration

Every system boot up

Next system boot up

None
We recommend "None" (see the picture upper right) for the calibration setting. A calibration will be performed every time your PC starts up if you choose "Every system boot up". If you choose "Next system boot up" a calibration will be performed on the next system reboot. You can carry out a calibration at any time after the TouchKit program is installed. (See "Setting up the faytech Touch software".) After making your selection on this screen, click "Next".
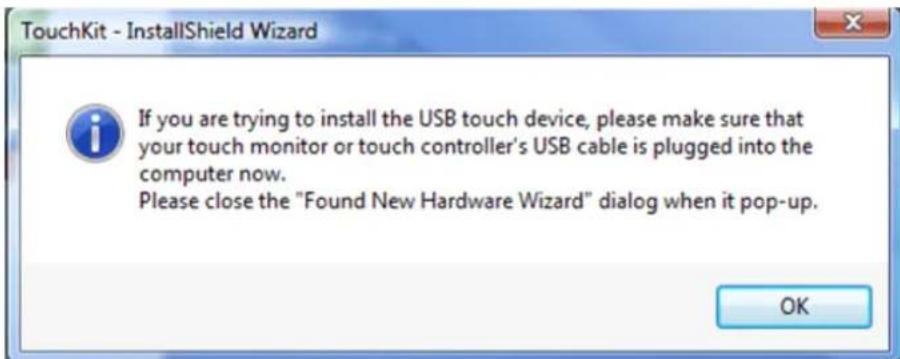
6."TouchKit - InstallShield Wizard":
text_image
TouchKit - InstallShield Wizard If you are trying to install the USB touch device, please make sure that your touch monitor or touch controller's USB cable is plugged into the computer now. Please close the "Found New Hardware Wizard" dialog when it pop-up. OKConnect the USB cable now and press "OK". If the "New Hardware Found" dialog of Windows opens, please cancel it.
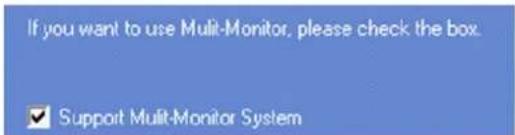
- "Setup Type":
text_image
If you want to use Multi-Monitor, please check the box. ✓ Support Multi-Monitor SystemIf you plan to use multiple monitors, please choose this box. (See "Setting up the faytech Touch software".)
8."Choose Destination Location": Accept the default destination or choose your own then press "Next".
- "Select Program Folder": Give the program a name or use the default setting and press "Next".
10."Setup Status":
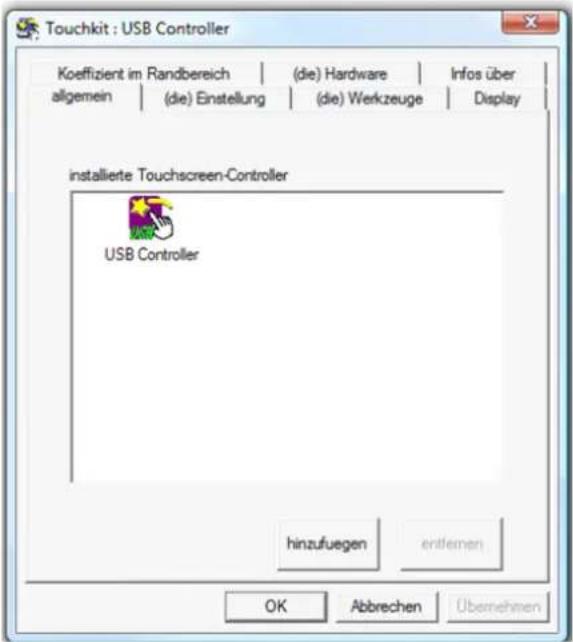
The installation will be started automatically with the selected settings.
- The installation is successfully completed when the following window appears:
If the USB controller icon is not showing, please disconnect the USB cable from your PC and connect it again. For more help, Please go to the "Troubleshooting" section.
SETTING UP THE FAYTECH TOUCH SOFTWARE
Start the administration program by going to "Start - Programs - TouchKit - Configure Utility". (If you accepted all the defaults the program may be at "Start - Programs - Accessories - Touchkit - Configure Utility".) Or you can find this program in the system tray section of your task bar.
1. General tab
Gives information on whether one or more touch controllers are found and installed.
After the initial installation, if no touch controller shows up on this tab, please pull out the USB connector on your PC and connect the device again.
2. Setting tab
When you touch the touch panel there is a beep if you select the first checkbox. You can change the frequency and duration of the beep. The changes will be saved after you click on "OK".
Under linearization, you can choose the number of linearization points under the Tools - linearization setting. On a 25-point linearization the deviation of a touched point will be less than on a 9-point linearization. In general, the faytech displays have been set correctly and should not be linearized.
Double Click Time. You can set how fast you need to click on the same object to make a double click. If you choose Shorter <<, then you need to tap faster. If you choose >> Longer, then you can tap the screen more slowly..
The same applies to Double Click Area. If you choose Smaller <<, your taps must be in a relatively small area in order for a double click to be recognized. >> Larger enables you to make a successful double- click within a larger area.
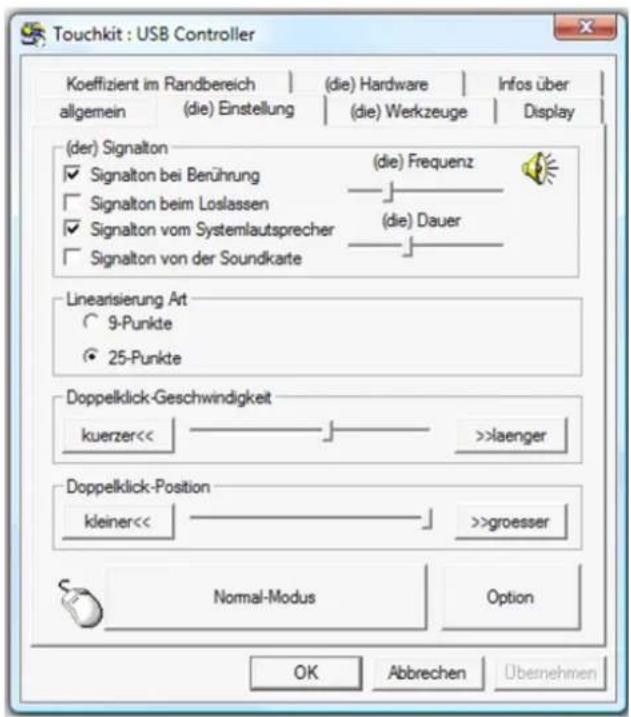
To the right of the mouse icon are options to set different mouse-like modes. Normal mode offers the most intuitive touch-operation.
Normal-Mode: Allows the user to select an object or drag an object with the touch pen or a finger. This is the best mode to use for most applications.
Click on touch: The "click" is recognized when the screen is touched. To initiate a new mouse-click, the display must be released and re-pressed.
Click on release: Contrary to the click function in touch, it is generated a click when the display is released.
Click on touch without moving cursor: The first touch point generates a click. The cursor follows the finger / pen movement. For a better understanding of this setting, try it with the Draw Test application under the Tools tab.
Click on release without moving cursor: The cursor does not move to the touch position except at the lift-off point. For a better understanding of this setting, try it with the Draw Test application under the Tools tab.
On the far right of the mouse icon, there is an Option button. The following options are available for the faytech display in this submenu:
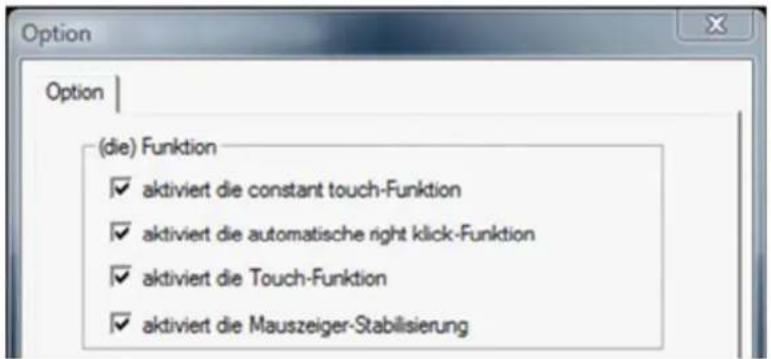
Enable Constant Touch: is the function to check to enable the driver to determine if the most recent touched position is the same as the previously touched point. If the difference is smaller than the defined area, the driver does not generate any mouse movement which helps reduce system load.
Enable Auto Right Click: If the touch screen is touched for a specified time, the driver will generate a mouse right button click if this function is enabled.
Enable Touch: Be careful! If you don't check this box, the touch function will not work!
Enable Cursor Stabilization: A software filter exists inside the driver to filter some noise to stabilize and smooth the touch points. When activated, the user will experience a more stable cursor.
You can adjust the parameter for the Constant Touch Area function. This is a criterion to judge if the most recent touched point is the same as the previously touched point. If the difference between the two points is within this area, it will be recognized as the same touch point and the driver does not generate a new mouse event for this touch point.
You can adjust the Auto Right Click Time function. If the touch screen is touched and held for this period of time, the driver generates a right mouse click.
3. Tools tab:

You can adjust the faytech touch panel calibration with the functions called 4 Points Calibration, Clear and Calibrate, Linearization and Draw Test. Start by performing the 4 points calibration. By using the application drawing test, you can test the touch panel to determine if further setting changes are desirable.
When you press the 4 Points Calibration button, the surface of the monitor shows the following image:
Press blinking X symbol until stop blinking Touch and hold each of the blinking X symbols in the calibration window until it stops blinking to make sure that the utility can gather enough data for computation. In addition, a progress bar is shown at the bottom of the window to indicate time elapsed. If the touch screen is not touched before the progress bar gets to the far right, the calibration task will be terminated automatically.
natural_image
Simple diagram with a red crosshair symbol and a blue horizontal line, no text or labels present.The Clear and Calibrate button will clear all calibration and linearization settings. It will then automatically take you through a 4 Points Calibration.
The Linearization (25 or 9 points calibration) function is used to compensate the touch screen linearity. It will require you to press and hold on 9 or 25 targets on the screen so it can compensate for the curvature (if any) of the display. After linearization is completed, the linearity of the touch screen will be shown in the Linearity curve window.
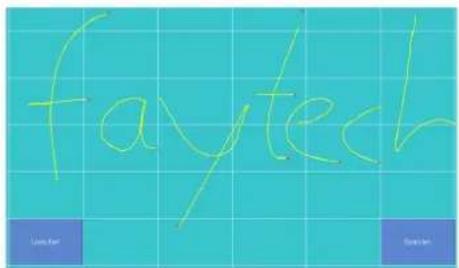
The Draw Test function is used for accuracy and performance checking. Press this button and a new pop up window will be popped up on the monitor (see below). Touch or drag your touch pen or finger on this grid to gauge the effectiveness of the settings and calibrations that you have made. If you are using your finger, you may have to press firmly to draw continuous lines. Press the Clear button to clear the window. Press the Quit button to terminate this draw test.
text_image
faytech Lima San Baton San4. Display-Multi-Monitor Setting tab:
If you selected "Support Multi-Monitor System" when you installed the Touch driver, you will see a Display tab when you run the Touchkit Configure utility. If you did not select this option, you will not see a Display tab.
You can have up to four faytech touch-screens connected simultaneously. You can also use a (non-touch) display and a touch screen. In the example below, the touch-screen is display "1", while the second display "2" is a normal monitor. Both have the same resolution, but the touch screen is the primary monitor.
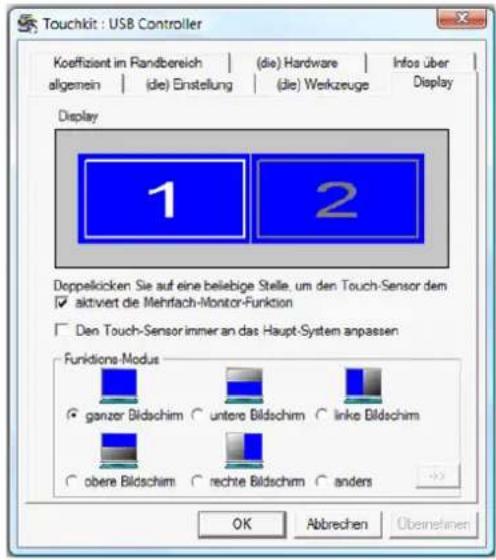
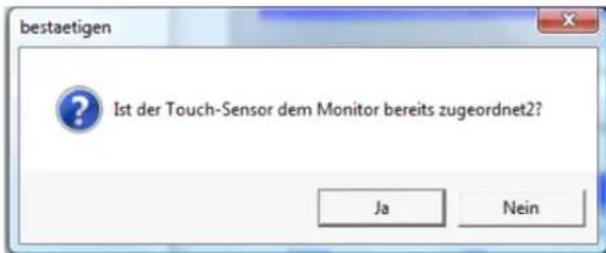
Enable multiple-monitors: When this function is disabled, the touch screen will be mapped to the primary monitor automatically. When this function is enabled, you can double click on the monitor area in the monitor geometry window to assign the monitor area where the touch screen will be mapped. Double-tap on the desired monitor and answer the question in the pop-up window with Yes.
After confirmation, your touches on the selected touch monitor will be simulated as mouse clicks.
If the function "The touch sensor is automatically connected to the main system" is activated, the program automatically puts the touch function on the primary monitor, if only one monitor is connected.
The Operation mode settings allow you to set the size of the touch area on your faytech touch-screen. E.g. if you select the "right screen", after a new calibration only the right side of the monitor will work as a touch area. If you select "other" and then click on the -> button, you can set more modes or set an individually touch-defined area.
- Edge Compensation tab: fine adjustment of the touch area
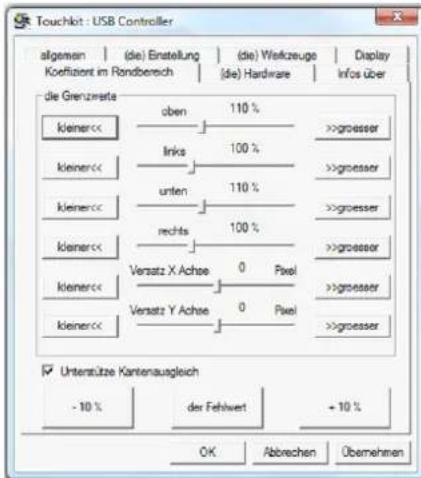
On this tab you can finely adjust the touch area. This is very useful when you have problems touching at the edges of the touch screen. In the following image you can see that the limits for all edges of the screen were corrected (to 110%). E.g. if you have problems in the upper right area, just increase the upper and right limit (>> Bigger). Confirm the change and try the new settings with the Draw Test. You can also use the X-axis and Y-axis displacement options to compensate if your touch always seems to be off the same amount in the X and/or Y directions.
The "Support Edge Compensation" option optimizes the touch detection in the corners of your faytech touch panels. This option should always be enabled.
6. Hardware and About tabs:
The last two tabs are for information only - there are no options to select on these tabs.
The Hardware tab gives information about the design of the faytech touch display and the firmware used.
The About tab gives information about the touch driver version as well as information about the developer of the software.


7. Touchkit program in the taskbar
With the Touch Kit icon in the taskbar, you can use a right mouse click to make quick changes in many of the Touch Kit settings. The individual functions have already been described in this chapter.
On the context menu, if you select the option Display Button, you will see a mouse animation displayed in the lower right half of the screen. The red mark indicates which mouse button will be simulated the next time you touch the screen. By clicking on the left or right pointer of the animation you change the behavior of the touch panel accordingly.
TROUBLESHOOTING
If you are having trouble getting your touch monitor to work correctly, please look through this list of common problems:
PHYSICAL SETUP:
- Cable connections. Care should be taken when connecting the cables. Make sure the cables are connected to the right connectors at each end and make sure the cables are attached firmly to their respective connectors. Lack of an image or poor quality images are often caused by the wrong connection. Turn off the display and check each pin of the cable separately. If you think you have a defective cable, we are happy to exchange it for you - you do not have to send the display back.
- Avoid short circuits! Please be careful before connecting power to the display that there are no cables that have not yet been connected at both ends. If the monitor does not power up, try another outlet or another power source.
- Provide the display with a 12-36V DC power supply only. Higher or lower voltage can permanently damage the display and is not covered under warranty. Also take care that you do not mix polarity.
STARTUP:
Please note: After you switch the display on, you may have to change the input mode (HDMI/AV/SV/VGA) in order to receive a signal. If there is no signal source connected, the display will show "no signal" and go off automatically after a short period of time.
Display remains black
- Connection error:
Please check again to make sure that all cables are properly connected.
● Resolution / activation errors:
Using the right resolution and activating the display is a common problem that is often not the fault of the display itself. The monitor supports the resolutions given in the technical data. Sometimes during simultaneous operation of two displays on a PC or the connection of an additional display to a notebook complications can arise. Usually these problems need to be resolved in the hardware and software of the PC. It is always best to use the display initially as a single display with a resolution of 800x600 at 60Hz. Try to start with this resolution then experiment with other resolutions and other combinations of displays to see which work best for you.
Please note that extended desktops often are black in the beginning. In this situation your display may be black at first if you configure it as an extended desktop.
Tip: It is often best to use the display at the following resolutions: 7" 800x480 or 800x600, 8" 800x600, 10" 1024x768, all at 60Hz. If the display is used as a second display with a PC, which is already connected to a display with a much higher resolution, configure resolution profiles. With an ATI graphic card, you can set up profiles in the advanced catalyst control center under profiles. Activate a hotkey, so that you can change the profiles of each display (one is the touch display, the other is the higher resolution display). Also you can configure the profiles using a software tool such as powerstrip.
● Power supply error:
If the display has no signal input, there might be an error with the power supply. First please check the connection with another power supply before you return the display. We're happy to exchange the defective power supply if necessary.
Stripes / errors in the image
- Pixel error:
Each faytech display has been thoroughly tested and sold with no pixel defects. If there is a pixel error at your display, please contact us for Support.
● Text is hard to read, picture looks fuzzy:
The display image is in the original resolution (see specifications) clear. At higher resolutions the display interpolates. This leads to inaccuracies and picture distortions.
- Stripes / errors in the image:
When connecting the display using power from a PC's power supply, the power supply can cause a light flickering. This is because of the interference created by the PC's power supply. In order to improve the picture, please try an alternative power supply.
- image is upside down:
Press (when there is a signal) the + button. This switches through four different modes (the original, top / bottom mirrored, left / right mirrored)
7 INCH IP65 TOUCH MONITOR
| Display case (cm): 21.40 x 13.40 x 3 | 85 |
| Screen diagonal (Inch/cm): 7/17.78 | |
| Display active screen size (cm): 15.40 x 8.59 | |
| Mounting (cm): VESA-75 on the back | |
| Gross weight (inclusive cartonage, kg): | 2.10 |
| Net weight (kg): 1.10 | |
| Aspect ratio: 16:9 | |
| Physical resolution: 800 x 480 | |
| Maximum showable resolution: 1920 x 1200 | |
| Colours displayed: 16.7M | |
| Brightness (cd/m2): 400+ | |
| Contrast: 500:1 | |
| Typical reaction time Tr/ Tf (ms): 10;15 | |
| Visual Angle horizontal; vertical (°): | 140;120 |
| Working power (V): 8~36 | |
| Power consumption (W): | 5 |
| Stand-By-Consumption (W): | <1 |
| Operating temperature (°C): | -25~+75 |
| Touch Panel: | 4-wire resistive |
| Touch Connectors: | 1 x USB port |
| Touch Panel-driver: | Windows, Linux, Mac |
| Touch life (contacts): | 1 million touch in 1 location without failure |
| Response time Touch Panel (ms): | <10 |
| Surface hardness: | 3H |
| Input force (g) / vandalism secure: | 20~150 |
| Connectors, Video-In: | 1 x VGA, 1 x Video |
| Connectors, audio: | 1 x Audio-In |
| Connectors: USB-Port / DC-IN | -/8-36V DC-IN |
| Additional features | Auto brightness function, remote controller, touch pen, driver-CD, short installation manual |
| 8 INCH IP65 TOUCH MONITOR | |
| Display case (cm): 23.2 x 17.20 x 3.95 | |
| Screen diagonal (Inch/cm): 8/20.32 | |
| Display active screen size (cm): 16.20 x 12.15 | |
| Mounting (cm): VESA-75 on the back | |
| Gross weight (inclusive cartonage, kg): | 2.30 |
| Net weight (kg): 1.50 | |
| Aspect ratio: 4:3 | |
| Physical resolution: 800 x 600 | |
| Maximum showable resolution: 1920 x 1200 | |
| Colours displayed: 16.7M | |
| Brightness (cd/m2): 400+ | |
| Contrast: 500:1 | |
| Typical reaction time Tr/ Tf (ms): 10;15 | |
| Visual Angle horizontal; vertical (° ): | 140;120 |
| Working power (V): 8~36 | |
| Power consumption (W): | 9 |
| Stand-By-Consumption (W): | <1 |
| Operating temperature (° C): | -25~+75 |
| Touch Panel: | 4-wire resistive |
| Touch Connectors: | 1 x USB port |
| Touch Panel-driver: | Windows, Linux, Mac |
| Touch life (contacts): | 1 million touch in 1 location without failure |
| Response time Touch Panel (ms): | <10 |
| Surface hardness: | 3H |
| Input force (g) / vandalism secure: | 20~150 |
| Connectors, Video-In: | 1 x VGA, 1 x Video |
| Connectors, audio: | 1 x Audio-In |
| Connectors: USB-Port / DC-IN | -/8-36V DC-IN |
| Additional features | Auto brightness function, remote controller, touch pen, driver-CD, short installation manual |
10 INCH IP65 TOUCH MONITOR
| Display case (cm): 26.22 x 20.94 x 4 | 25 |
| Screen diagonal (Inch/cm): 10/25.40 | |
| Display active screen size (cm): 20.28 x 15.20 | |
| Mounting (cm): VESA-75-Bohrung | |
| Gross weight (inclusive cartonage, kg): | 2.50 |
| Net weight (kg): 1.80 | |
| Aspect ratio: 4:3 | |
| Physical resolution: 1024 x 768 | |
| Maximum showable resolution: 1920 x 1200 | |
| Colours displayed: 262K | |
| Brightness (cd/m2): 250 | |
| Contrast: 600:1 | |
| Typical reaction time Tr/ Tf (ms): 2;6 | |
| Visual Angle horizontal; vertical (°): | 150;130 |
| Working power (V): 12 | |
| Power consumption (W): | 10 |
| Stand-By-Consumption (W): | <1 |
| Operating temperature (° C): | -25~+75 |
| Touch Panel: | 4-wire resistive |
| Touch Connectors: | 1 x USB port |
| Touch Panel-driver: | Windows, Linux, Mac |
| Touch life (contacts): | 1 million touch in 1 location without failure |
| Response time Touch Panel (ms): | <10 |
| Surface hardness: | 3H |
| Input force (g) / vandalism secure: | 20~150 |
| Connectors, Video-In: | 1 x VGA, 1 x Video |
| Connectors, audio: | 1 x Audio-In |
| Connectors: USB-Port / DC-IN | -/8-36V DC-IN |
| Additional features | Auto brightness function, remote controller, touch pen, driver-CD, short installation manual |
| 10.4 INCH IP65 TOUCH MONITOR | |
| Display case (cm): 27.62 x 20.94 x 4 | 25 |
| Screen diagonal (Inch/cm): 10.4/26.4 | 2 |
| Display active screen size (cm): 21.12 x 15.84 | |
| Mounting (cm): VESA-75 on the back | |
| Gross weight (inclusive cartonage, kg): | 2.60 |
| Net weight (kg): 1.80 | |
| Aspect ratio: 4:3 | |
| Physical resolution: 1024 x 768 | |
| Maximum showable resolution: 1920 x 1200 | |
| Colours displayed: 262K | |
| Brightness (cd/m2): 600+ | |
| Contrast: 500:1 | |
| Typical reaction time Tr/ Tf (ms): 12.5;12.5 | |
| Visual Angle horizontal; vertical (° ): | 140;120 |
| Working power (V): 8~36 | |
| Power consumption (W): | 12 |
| Stand-By-Consumption (W): | <1 |
| Operating temperature (° C): | -25~+75 |
| Touch Panel: | 5-wire resistive |
| Touch Connectors: | 1 x USB port |
| Touch Panel-driver: | Windows, Linux, Mac |
| Touch life (contacts): | 35 million touch in 1 location without failure |
| Response time Touch Panel (ms): | <10 |
| Surface hardness: | 3H |
| Input force (g) / vandalism secure: | 20~150 |
| Connectors, Video-In: | 1 x VGA, 1 x Video |
| Connectors, audio: | 1 x Audio-In |
| Connectors: USB-Port / DC-IN | -/8-36V DC-IN |
| Additional features | Auto brightness function, remote controller, touch pen, driver-CD, short installation manual |
12.1 INCH IP65 TOUCH MONITOR
| Display case (cm): 29.30 x 21.00 x 3.15 | |
| Screen diagonal (Inch/cm): 12.1/30.73 | |
| Display active screen size (cm): 24.58 x 18.43 | |
| Mounting (cm): VESA-75 on the back | |
| Gross weight (inclusive cartonage, kg): | 3.10 |
| Net weight (kg): 2.60 | |
| Aspect ratio: 4:3 | |
| Physical resolution: 1024x768 | |
| Maximum showable resolution: 1920 x 1200 | |
| Colours displayed: 16.7M | |
| Brightness (cd/m2): 1000+ | |
| Contrast: 700:1 | |
| Typical reaction time Tr/ Tf (ms): 25;10 | |
| Visual Angle horizontal; vertical (°): | 160;160 |
| Working power (V): 8~36 | |
| Power consumption (W): | 16 |
| Stand-By-Consumption (W): | <1 |
| Operating temperature (°C): | -25~+75 |
| Touch Panel: | 5-wire resistive |
| Touch Connectors: | 1 x USB port |
| Touch Panel-driver: | Windows, Linux, Mac |
| Touch life (contacts): | 35 million touch in 1 location without failure |
| Response time Touch Panel (ms): | <10 |
| Surface hardness: | 3H |
| Input force (g) / vandalism secure: | 20~150 |
| Connectors, Video-In: | 1 x VGA, 1 x Video |
| Connectors, audio: | 1 x Audio-In |
| Connectors: USB-Port / DC-IN | -/8-36V DC-IN |
| Additional features | Auto brightness function, remote controller, touch pen, driver-CD, short installation manual |
15 INCH IP65 TOUCH MONITOR, HIGH BRIGHTNESS
| Display case (cm): 36.80 x 28.70 x 4:55 | |
| Screen diagonal (Inch/cm): 15/38.1 | |
| Display active screen size (cm): 30.4 x 22.8 | |
| Mounting (cm): VESA-100 on the back / VESA-400 on the back | |
| Gross weight (inclusive cartonage, kg): | 5 |
| Net weight (kg): 3.4 | |
| Aspect ratio: 4:3 | |
| Physical resolution: 1024x768 | |
| Maximum showable resolution: 1920 x 1200 | |
| Colours displayed: 16.7M | |
| Brightness (cd/m2): 1000+ | |
| Contrast: 500:1 | |
| Typical reaction time Tr/ Tf (ms): 2;6 | |
| Visual Angle horizontal; vertical (°): | 160;160 |
| Working power (V): | 12 |
| Power consumption (W): | 18 |
| Stand-By-Consumption (W): | <1 |
| Operating temperature (°C): | 0~+60 |
| Touch Panel: | 5-wire resistive |
| Touch Connectors: | 1 x USB port |
| Touch Panel-driver: | Windows, Linux, Mac |
| Touch life (contacts): | 35 million touch in 1 location without failure |
| Response time Touch Panel (ms): | <10 |
| Surface hardness: | 3H |
| Input force (g) / vandalism secure: | 20~150 |
| Connectors, Video-In: | 1xVGA, 1x Video |
| Connectors, audio: | 1 x Audio-In |
| Connectors: USB-Port / DC-IN | -/8-36V DC-IN |
| Additional features | Auto brightness function, remote controller, touch pen, driver-CD, short installation manual |
KONTAKT / CONTACT
Support-E-Mail: support@faytech.de
Contact, RMA service (in English):
Support Number: +1 720 251 4158
Global Support: +86 755 89580612
Support E-Mail: support@faytech.com
Homepage: www.faytech.com Webpage of RMA: http://rma.faytech.com
RMA service:
If you think your faytech product has a defect please always contact us directly. Our trained after sales service specialists can help you resolve your problems. Please check the manual and our frequently asked questions before contacting us – you will usually find an answer to your question. If there is a defect you can request an RMA number (Return Merchandise Authorization) at support@faytech.com or via fax at +86-755- 89580613 (Chinese fax-number). Please attach in the contact e-mail/fax your invoice and what problems you are experiencing. In reply, you will receive an e-mail/fax with your RMA number and additional information. For accessories like cables, adapters or power supplies which are not working, we can usually send you a replacement before receiving the damaged goods. For a defective product, we try to check and solve the problem within 3 days after receipt. Make sure that shipping has been paid before sending goods back to us. We do not accept postage due packages at our service centers. Anything received with postage due will be returned to you without any testing or resolution. Within the first 30 days after you buy a new faytech product, we will refund your shipping costs for returned products. For the rest of the warranty period, we will pay the shipping costs for any repaired or replaced items that we ship back to you.
For support outside of China, we work with local representatives / local service partners together who may work on our behalf in our name. On request, more information can be obtained at the above contact information.