Excel 900 T - Treadmills True - Free user manual and instructions
Find the device manual for free Excel 900 T True in PDF.


User questions about Excel 900 T True
0 question about this device. Answer the ones you know or ask your own.
Ask a new question about this device
Download the instructions for your Treadmills in PDF format for free! Find your manual Excel 900 T - True and take your electronic device back in hand. On this page are published all the documents necessary for the use of your device. Excel 900 T by True.
USER MANUAL Excel 900 T True
TE900 TREADMILL OWNER'S MANUAL
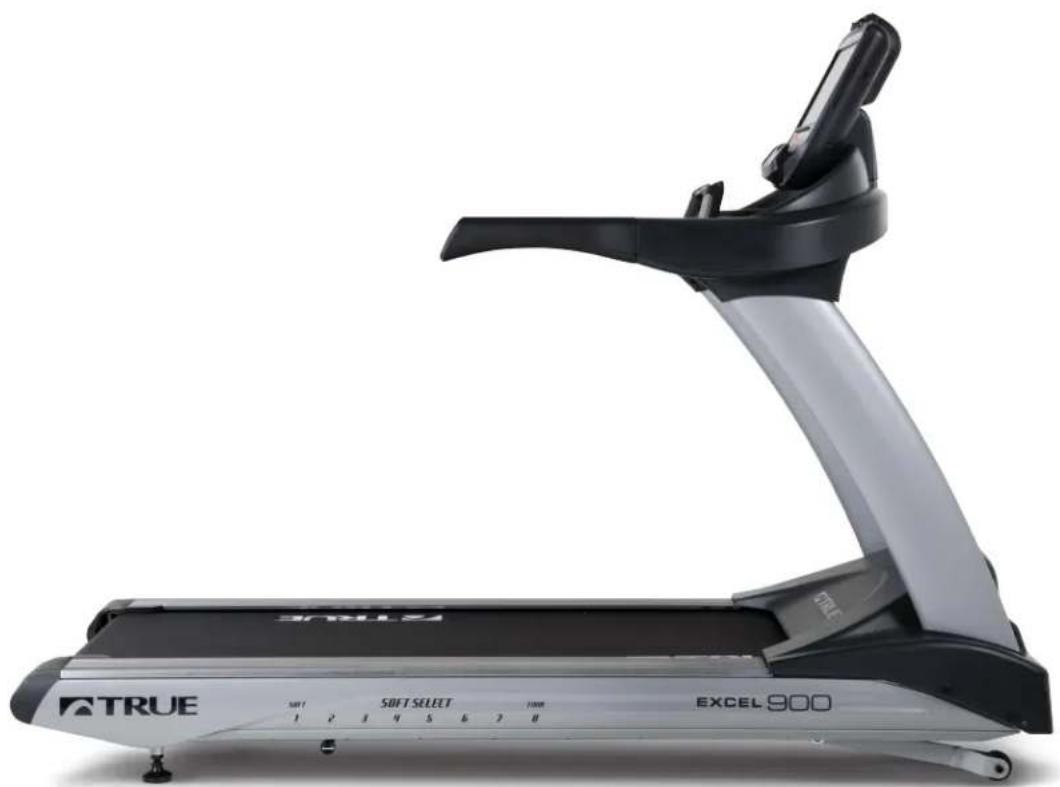
natural_image
Exterior view of a treadmill with visible brand name 'TRUE' and model number EXCEL 900, no text or symbols on the device itself.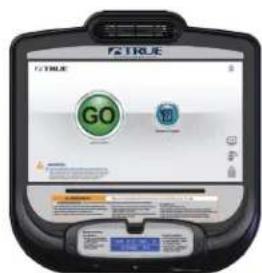
text_image
GO STOPTranscend Console
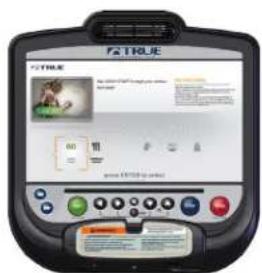
text_image
T4TRUE T4TRUE 10 11 since 2018 is addedEscalate ^15 Console
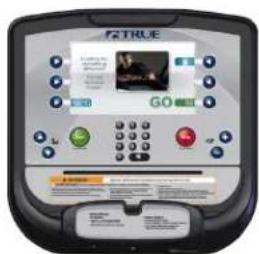
text_image
F2 TRUE GOEscalate ^9 Console
TE900 TREADMILL OWNERS MANUAL
IMPORTANT:
All Products shown are prototype. Actual product delivered may vary.
Product specifications, features & software are subject to change without notice.
For the most up to date owner's manual please visit www.truefitness.com.
For documents in additional languages please visit www.truefitness.com/document-library/29/international-manuals
IMPORTANTE:
Frank Trulaske, founder and CEO of TRUE, has had the same simple philosophy of delivering superior products, service and support for over 30 years. Today, TRUE is the global leader in premium cardio equipment for the commercial and residential markets. Our goal is to be the leader in technology, innovation, performance, safety and style. TRUE has received many awards for its commercial and retail product over the years and remains the benchmark for the industry. Fitness facilities and consumers invest in TRUE products for their durable commercial platforms used in all its cardio products, both commercial and residential alike.
The proud manufacturing tradition of quality and the culture of innovation at TRUE have given rise to a full line of truly extraordinary treadmills, indoor cycles and elliptical cross-trainers. As a result, people all over the world are benefiting from the TRUE experience. Innovation across the full product line has made TRUE successful and is a trademark of the TRUE heritage. TRUE's patented Heart Rate Control® technology is just one of the remarkable ways we deliver simple and superior performance every user can enjoy, and most importantly, use to achieve personal health and fitness goals.
TRUE strives to perfect biomechanically correct and orthopedically comfortable, functional products. Whether it be the mesh seat in the recumbent bike, the Soft Step ^® in the elliptical cross-trainers or the Soft System ^® in our treadmills, we deliver the best.
At the heart of our success is the relentless and systematic life testing of both our products and their components. We have dedicated employees who understand our philosophy is to deliver the best products in the world.
Our goal is not to sell the most cardio products in the world, but to deliver the world's best premium equipment for our customers' health and fitness solutions.
To own a TRUE machine is to be part of an exclusive fitness community that delivers results – your results.
Thank you for becoming a part of the TRUE experience.
TRANSCEND ALL OTHERS!
TE900 TREADMILL OWNERS MANUAL
TABLE OF CONTENTS:
Chapter 1: Safety Instructions
Safety Instructions 1
Space Requirements 4
Safety Key Instructions.... 5
Grounding Instructions 7
Power Requirements 8
Warning Decals 9
Compliances 9
Chapter 2: Assembly Instructions
Pre-Assembly Checklist 11
Assembly Steps....13
Wiring Diagram 27
Transcend Console Install 28
Escalate ^15 Console Install 36
Escalate ^9 Console Install 43
Chapter 3: Product Overview
Treadmill Overview 48
Chapter 4: Programming & Operation
Heart Rate Monitoring 50
Heart Rate Control 51
Program Descriptions 52
Outside Interactive *Videos 56
Chapter 4A: Transcend Operation
Transcend Overview 58
Touchscreen Introduction 60
Touchscreen Navigation 60
Web Browser 66
Bluetooth Audio 67
TV Controls 69
Outside Interactive ^® 70
Advanced Console Functions....71
Chapter 4B: Escalate ^15 Operation
Escalate ^15 Overview 89
Console Navigation 91
TV Controls 95
Bluetooth Audio 97
Advanced Console Functions 99
Chapter 4B: Escalate ^9 Operation
Escalate ^9 Overview 115
Console Navigation 117
Advanced Console Functions 123
Chapter 5: Care & Maintenance
Care & Maintenance 131
Cleaning the Equipment 131
Running Belt Alignment 132
Tensioning the Running Belt....133
Treadmill Lubrication 133
Leveling the Treadmill 134
Other Scheduled Preventive Maintenance....134
Long Term Storage 134
Chapter 6: Customer Service
Contacting Service 135
Contacting Sales 135
Reporting Freight Claims or Parts Damage....135
Chapter 7: Additional Information
Troubleshooting Guide 137
Product Specifications 143
Warranty Information 145
CHAPTER 1: SAFETY INSTRUCTIONS
IMPORTANT SAFETY INSTRUCTIONS
SAVE THESE SAFETY INSTRUCTIONS
This treadmill is intended for in-home use only; do not use this treadmill in a commercial or institutional setting. Doing so may void the expressed warranty.

WARNING: All EXERCISERS MUST READ ALL INSTRUCTIONS BEFORE USING THE TREADMILL.

WARNING: Heart rate monitoring systems may be inaccurate for some individuals. Over-exercising may result in serious injury or death. If you feel faint, stop exercising immediately.

WARNING: Equipment should be immediately taken out of use if it fails to work properly or when a warning is presented electronically.
TRUE STRONGLY recommends seeing a physician for a complete medical exam before undertaking an exercise program, particularly if the user has a family history of high blood pressure or heart disease, is over the age of 45, smokes, has high cholesterol, is obese or has not exercised regularly in the past year. Additionally, TRUE recommends consulting a fitness professional on the correct use of this product. If at any time while exercising the user experiences faintness, dizziness, pain or shortness of breath, he or she must stop immediately.

WARNING: To reduce the risk of electrical shock, always unplug this TRUE product before cleaning or attempting any maintenance activity. Do not handle the plug with wet hands.

WARNING: To reduce the risk of burns, fire, electric shock or injury, it is imperative to connect each product to a properly grounded 110V electrical outlet. A risk of electrical shock may result from improper connection of the equipment's grounding conductor. Check with a qualified electrician if you are unsure about proper grounding techniques. Do not modify the plug provided with this product. If it will not fit an electrical outlet, have a proper outlet installed by a qualified electrician. Your TRUE Fitness product must be properly grounded to reduce risk of shock if the treadmill malfunctions. Your treadmill is equipped with an electrical cord, which includes an equipment grounding conductor and a grounding plug. The plug must be inserted into an outlet that has been properly installed and grounded in accordance with all local codes and ordinances. A temporary adapter cannot be used to connect this plug to a two-pole receptacle in North America. If a properly grounded 15 amp outlet is not available, a qualified electrician must install one.

WARNING: Do not move the equipment by lifting the console. Do not use the console as a handlebar during a workout.

WARNING: This product contains chemicals known to the state of California to cause cancer and birth defects or other reproductive harm.

WARNING: Keep equipment stable on flat ground.

WARNING: Replace warning labels that may be worn, damaged or missing

WARNING: Replace any non-working or damaged components; remove the unit from service until repair is performed.
CHAPTER 1: SAFETY INSTRUCTIONS

WARNING: To reduce the risk of burns, fire and electric shock or injury to persons, follow these instructions:
- This appliance should never be left unattended when plugged in.
- Do not use any type of extension cord with this product.
- Unplug it from the outlet when not in use and before any servicing.
- Do not operate the equipment while being covered with a blanket, plastic, or anything that insulates or stops airflow.

WARNING: Risk of personal injury-crushing hazard when treadmill is in operation - Keep feet, hands, and fingers away from moving parts.

CAUTION:
- Health related injuries may result from incorrect or excessive use of exercise equipment.
- Do not use typing or web surfing features at excessive speeds. Always stabilize yourself by holding a stationary handle when using typing or web surfing features. (Varies by console option)
- Do not use the contact heart rate grips as a handlebar during a workout.
- Any changes or modifications to this equipment could void the product warranty.
- To disconnect, turn power OFF at the ON/OFF switch if applicable, then remove plug from electrical outlet.
- Never operate a TRUE product if it has a damaged power cord or electrical plug, or if it has been dropped, damaged, or even partially immersed in water. Contact TRUE Customer Service for a replacement.
- Use a TRUE AC power cord or AC/DC adapter only.
*Note the plug configuration for the power adapter may vary by country. - Position this product so the power cord plug is accessible to the user.
- Keep the power cord away from heated surfaces. Do not pull the equipment by the power cord or use the cord as a handle. Do not run the power cord along the side or under the treadmill.
- If the electrical supply cord is damaged it must be replaced by the manufacturer, an authorized service agent, or a similarly qualified person to avoid a hazard.
- Do not use this product in areas where aerosol spray products are being used or where oxygen is being administered. Such substances create the danger of combustion and explosion.
• Always follow the console instructions for proper operation. - Close supervision is necessary when used near children under the age of 15, or disabled persons.
- Do not use this product outdoors, near water, while wet, or in areas of high humidity including extreme temperature changes
- Never operate a TRUE product with the air openings blocked. Keep air openings free of lint, hair or any obstructing material.
- Never insert objects into any openings in this product. If an object should drop inside, turn off the power, unplug the power cord from the outlet and carefully retrieve it. If the item cannot be reached, contact TRUE Customer Service.
- Never place liquids of any type directly on the unit except in the accessory tray or bottle holders. Containers with lids are recommended.
- Wear shoes with rubber or high traction soles. Do not use shoes with heels, leather soles, cleats or spikes. Make sure no stones are embedded in the soles. Do not use this product in bare feet. Keep all loose clothing, shoelaces and towels away from moving parts.
- Do not reach into or underneath the unit, or tip it on its side during operation.
CHAPTER 1: SAFETY INSTRUCTIONS
CAUTION (CONTINUED):
- Use correct ergonomic positioning while running on treadmill.
- Do not allow animals on or near the equipment while in operation.
- Use the side handrails whenever additional stability is required. In case of emergency, such as tripping, the side handrails should be grabbed and the user should place his/her feet on the side platforms. The front handlebars should be used to grasp the heart rate sensors or to rest the hand on while operating the activity zone keys, but not for stability, emergency, or continuous use.
• Do not exceed maximum user weight of 400 lbs (181 kg).
• Do not use if you have a cold or fever. - When using this exercise machine, basic precautions should always be followed.
- Use this equipment only for its intended use as described in this manual.
- Do not use attachments not recommended by the manufacturer.
- Allow only trained personnel to service this equipment.
- Avoid the possibility of bystanders being struck or caught between moving parts by making sure that they are out of reach of the equipment while it is in motion.
- This appliance can be used by children aged from 8 years and above and persons with reduced physical, sensory or mental capabilities or lack of experience and knowledge if they have been given supervision or instruction concerning use of the appliance in a safe way and understand the hazards involved.
• Children shall not play with the appliance. - Cleaning and user maintenance shall not be made by children without supervision.
- Allow only one person at a time on the equipment while it's operating.
- It is the sole responsibility of the owner/operator to ensure regular and scheduled maintenance is performed.
• To avoid injury stand on the side rails before starting the treadmill. - Avoid exiting treadmill while leaving the tread belt in motion.
• Never walk or jog backwards on the treadmill.
CAUTION:
• To avoid serious injury, do not touch the incline rack while the treadmill is in use.
• To avoid serious injury, do not touch the belt while the treadmill is in use.
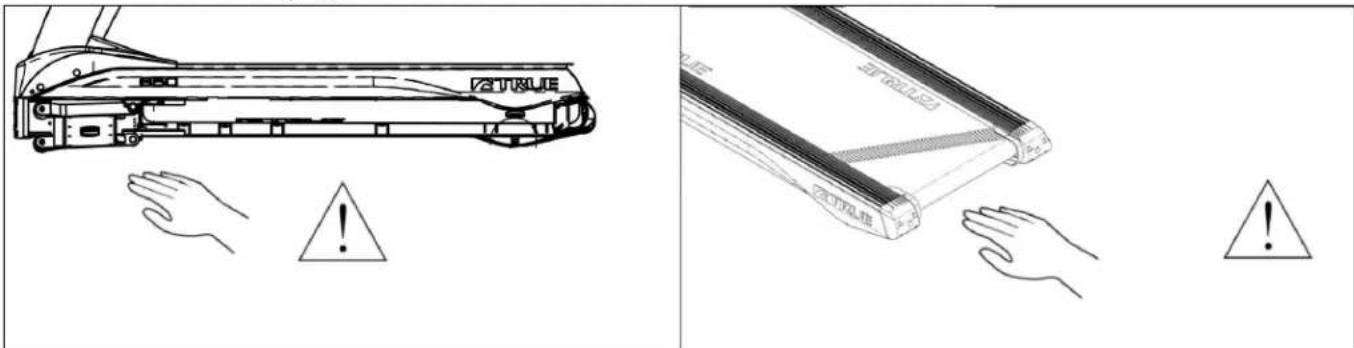
text_image
Technical diagram showing a device with warning symbols and warning signs, including hand gestures and warning labels.CHAPTER 1: SAFETY INSTRUCTIONS
SPACE REQUIREMENTS:
TRUE's recommendation is to leave a minimum of 20" (0.5m) on each side of the treadmill and a 79" (2 m) safety zone at the rear of the treadmill.
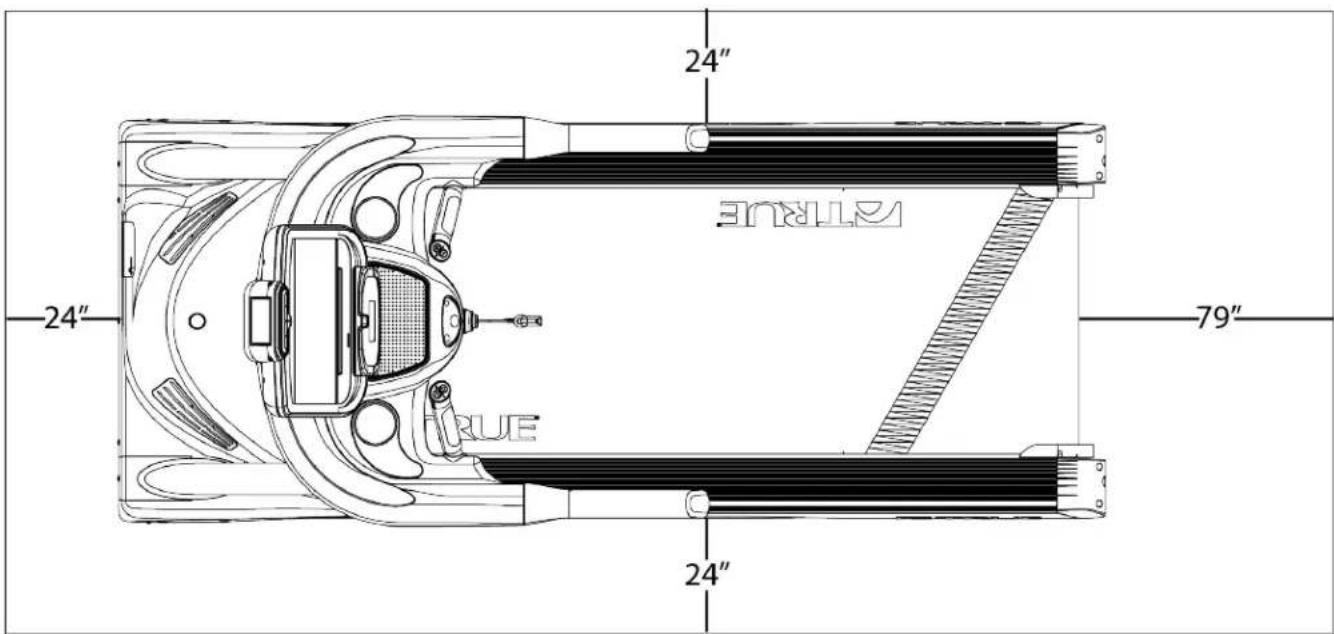
text_image
24" 24" 79" 24" TRUE TRUECHAPTER 1: SAFETY INSTRUCTIONS
Safety Key (E-Stop) Overview:
Attach the safety clip to your clothing before each workout and when equipment is in use to ensure an immediate halt of all treadmill belt activity if the user is unable to continue.
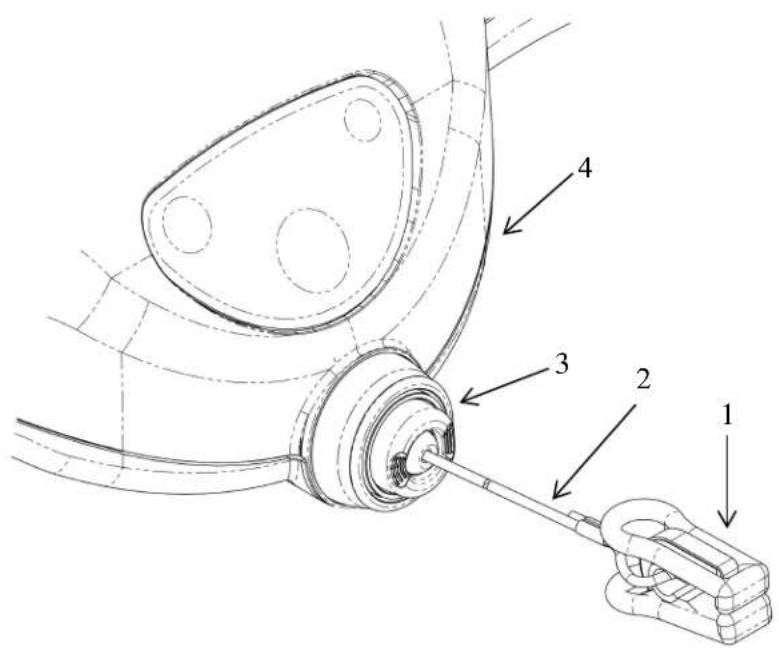
text_image
Technical diagram of a mechanical assembly with numbered components labeled 1 to 4| Safety Key Feature Number | |
| Safety Key Clip 1 | |
| Safety Key Pull Cord 2 | |
| Safety Stop Engagement Indicator/Safety Stop Reset Button | 3 |
| Console Rack 4 | |
CHAPTER 1: SAFETY INSTRUCTIONS
Safety Key (E-Stop) Usage:
Safety Key (E-Stop) Disengaged:
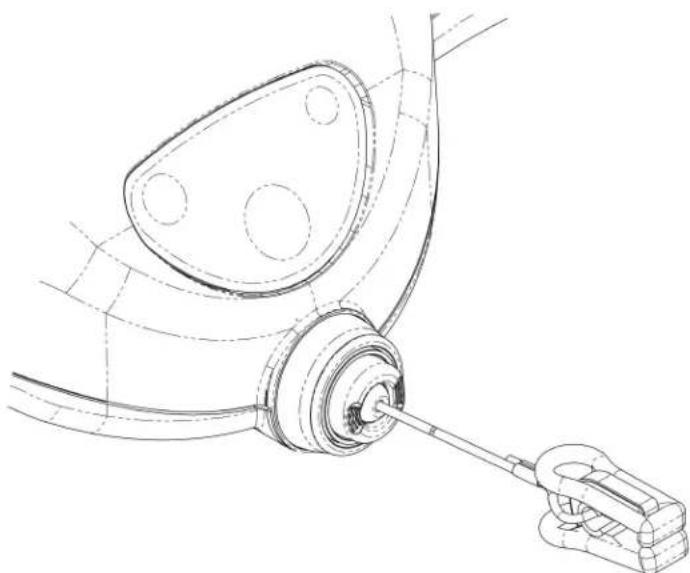
natural_image
Technical line drawing of a mechanical assembly with no visible text or symbolsSafety Key (E-Stop) Engaged:
text_image
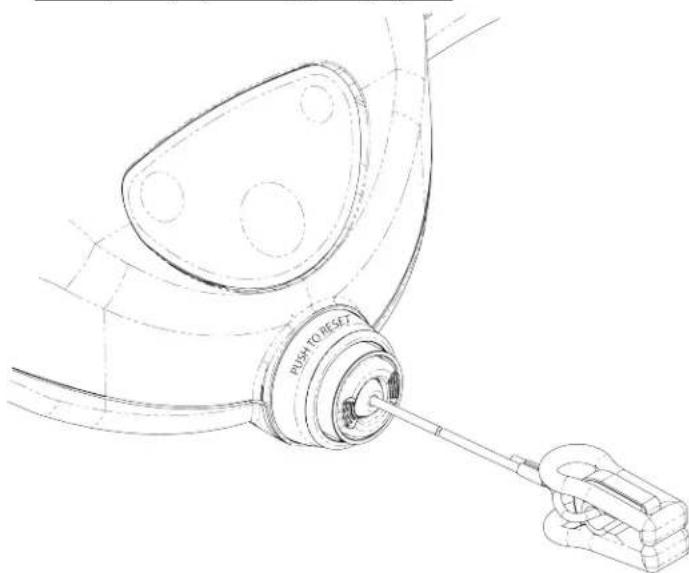
PUSH TO RESETShown to the left is the disengaged position of the safety key (e-stop).
When the equipment is in use or the user is standing on the belt not in use, the safety key clip must be attached to the user's clothing. This allows the safety stop to be engaged if the safety clip attached to the user pulls the safety key pull cord taught, thus immediately halting all treadmill belt activity.
Note: The safety key pull cord length allows free range of motion for the user within the normal workout parameters identified within this owner's manual.
Shown to the left is the engaged position of the safety key (e-stop). Note the safety stop outer sleeve that covers the safety stop to denote the engaged position.
When the safety stop is engaged, all treadmill belt activity will cease and the following error message will appear on the console advising the safety stop is engaged "INSERT SAFETY KEY."
To remove the console error message and place the safety stop back in the disengaged position, push the safety stop reset button in once.
Note: You will be taken to the workout conclusion screen once the safety stop is switched back to the disengaged position.
CHAPTER 1: SAFETY INSTRUCTIONS
GROUNDING INSTRUCTIONS:
This product must be grounded, if it should malfunction or breakdown, grounding provides a path of least resistance for electric current to reduce the risk of electric shock. This product is equipped with a cord having an equipment-grounding conductor and a grounding plug. The plug must be plugged into an appropriate outlet that is properly installed and grounded in accordance with all local codes and ordinances.

DANGER:
- Improper connection of the equipment-grounding conductor can result in a risk of electric shock.
- Check with a qualified electrician or serviceman if you are in doubt as to whether the product is properly grounded. Do not modify the plug provided with the product. If it will not fit the outlet, have a proper outlet installed by a qualified electrician.
- Do not remove the motor cover or you may risk injury due to electric shock.
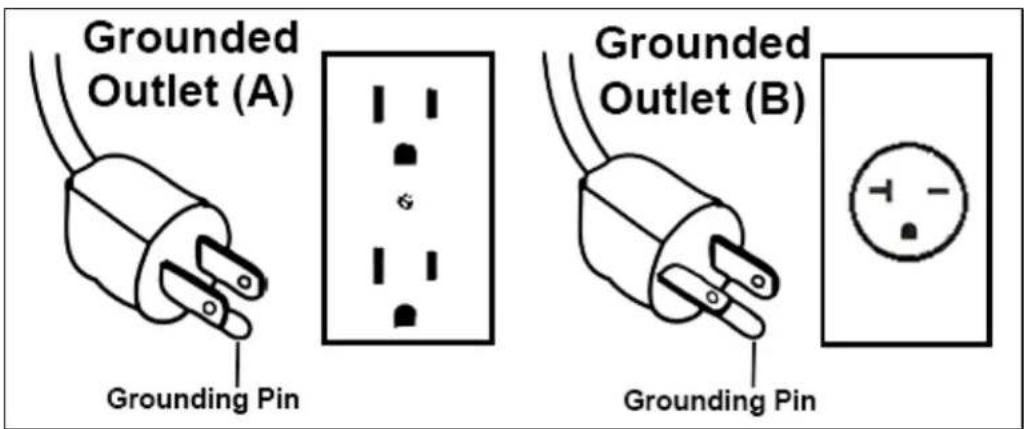
- The 120-V model is for use on a nominal 120-V circuit and has a grounding plug that looks like the plug illustrated in figure A. Make sure the product is connected to an outlet having the same configuration as the plug. No adaptor should be used with this product.
- The 230-V model is for use on a circuit having a nominal rating more than 120-V and is factory-equipped with a specific electric cord and has a grounding plug that looks like the plug illustrated in figure B. Make sure that the product is connected to an outlet having the same configuration as the plug in Figure B. No adapter should be used with this product. If the product must be reconnected for use on a different type of electric circuit, the reconnection should be made by qualified service personnel.
text_image
Grounded Outlet (A) Grounding Pin Grounded Outlet (B) Grounding PinInformation Sheet 2010
NOTE: Read and understand all instructions on this sheet and in the Owner's manual before plugging any TRUE power cord into an electrical outlet. This information sheet will help you identify the voltage and cords you need where you live and will outline requirements for:
• Grounded, dedicated lines
- Voltage
- Power cords
- Power adapters
- Extension cords
!DANGER: Improper connection of the equipment-grounding conductor can result in risk of electric shock. Check with a qualified electrician or service provider if you are in doubt as to whether the equipment is properly grounded or installed on a dedicated line. Seek a qualified electrician to perform any modifications to the cord or plug. TRUE is not responsible for injuries or damages as a result of cord or plug modification.
!CAUTION: Place cords away from heat (such as baseboards). Use care to arrange any cord so it doesn't become an obstacle.
Extension Cords
Do not use an extension cord to supply power to any TRUE product.
Grounded, Dedicated Line
TRUE equipment must be grounded. If it should malfunction or break down, grounding provides a path of least resistance for electric current to reduce the risk of electric shock. TRUE cords (except for cycle adapters) have an equipment-grounding conductor and a grounding plug. The plug must be plugged into an appropriate outlet that is properly installed and grounded in accordance with all local codes and ordinances where you live. Do not use a ground plug adapter to adapt the power cord to a non-grounded outlet. Do not use a GFCI outlet or GFCI circuit breaker. A dedicated line will assure that adequate power is available for safe operation over the life of your TRUE Product.
Voltage
Voltage required for your unit is located on the serial number decal (usually on the front of the unit). Depending on where you live voltage requirements differ.
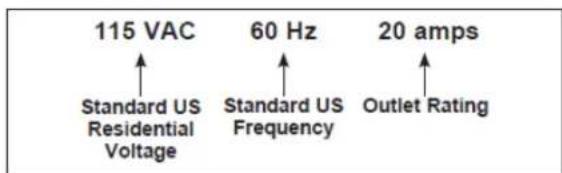
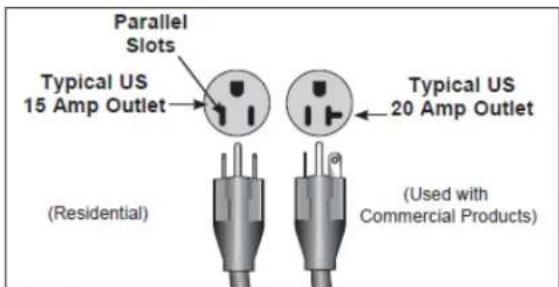
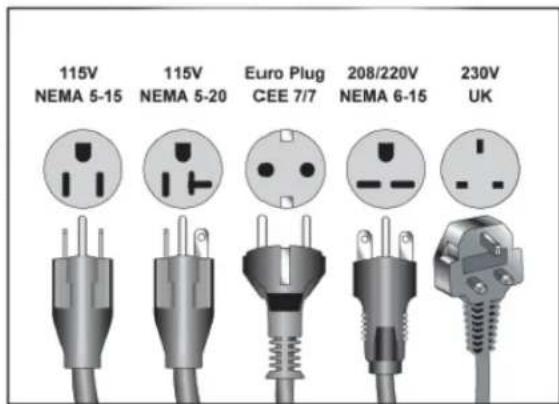
For example, in the United States some TRUE treadmills require a circuit rated 115 VAC, 60 Hz and 20 amps. See Figure 1. However, a home typically has 15 amp outlets. In this case, contact an electrician to install a 20 amp dedicated line prior to use. See Figure 2.
text_image
115 VAC Standard US Residential Voltage 60 Hz Standard US Frequency 20 amps Outlet RatingFigure 1
text_image
Parallel Slots Typical US 15 Amp Outlet Typical US 20 Amp Outlet (Residential) (Used with Commercial Products)Figure 2
text_image
115V NEMA 5-15 115V NEMA 5-20 Euro Plug CEE 7/7 208/220V NEMA 6-15 230V UKFigure 3
CHAPTER 1: SAFETY INSTRUCTIONS
WARNING DECALS:

WARNING: Replace warning labels that may be worn, damaged or missing
To replace any worn or missing warning decals contact TRUE FITNESS by visiting www.truefitness.com or contact customer service at 800-883-8783.
WARNING!
Read and understand all instructions and warnings prior to use.
- Death or serious injury can result if caution is not used while exercising.
- Stop exercise if you feel faint, dizzy, or experience pain.
-
Keep body, clothing, and fitness accessories clear of all moving parts.
WARNING heart rate monitoring system may be inaccurate. Over exercising may result in serious injury or death. If you feel faint stop exercising immediately. -
Obtain medical exam before beginning any exercise program.
- inspect equipment before use. Do not use if machine
appears damaged or inoperable. - Care should be used when mounting or dismounting machine.
- Keep children away at all times.
FOR TREADMILL USE:
- Straddle treadbelt before starting.
- Read, understand, and test the emergency stop procedures before use.
- ALWAYS ATTACH THE EMERGENCY STOP SAFETY CLIP TO CLOTHING PRIOR TO USE
- Prior to use, inspect safety clip cord to ensure it is free of tangles or inots, and that red magnetic key will easily disengage from machine.
ATRUE
TRUE FITNESS TECHNOLOGY, INC. ST LOUIS, MISSOURI 63366

Intertek
3135202
CONFORMS TO ANSI/UL STD.1647 CERTIFIED TO CAN/CSA STD. C22.2 NO.68
Model No.
TE900
Serial No./Date Code
13-TE900001A
Rating: 120V, 50/60Hz, 15A
MADE IN TAIWAN
COMPLIANCES:
This equipment complies with all applicable codes and regulations. For a complete list of compliances, please visit www.truefitness.com
CHAPTER 2: ASSEMBLY INSTRUCTIONS
IMPORTANT SAFETY INSTRUCTIONS
- Read and understand all instructions and warnings prior to use.
- Obtain a medical exam before beginning any exercise program. If at any time during exercise you feel faint, dizzy, or experience pain, stop and consult your physician.
- Obtain proper instruction prior to use.
• This treadmill is intended for in-home use only. - Inspect the treadmill for incorrect, worn, or loose components and do not use until corrected, replaced, or tightened prior to use.
- Do not wear loose or dangling clothing while using the treadmill.
- Care should be used when mounting or dismounting the treadmill.
- Read, understand, and test the emergency stop procedures before use.
- Disconnect all power before servicing the treadmill.
- Do not exceed maximum user weight of 400 lbs.
- Keep the top side of the moving surface clean and dry.
- Keep children and animals away.
- Use caution when moving and assembling treadmill.
- All exercise equipment is potentially hazardous. If attention is not paid to the conditions of equipment usage, death, or serious injury could occur.
- Save these instructions.
Basic Guidelines for Setting Up Your Treadmill:
After removing the treadmill from the packaging, place your treadmill on a clean, level surface. Make sure the electrical cord easily reaches a grounded three-pronged outlet and has enough slack to allow the deck to incline without tightening the cord. Do not allow the treadmill assembly to rest on the cord.
Important Electrical Requirements - 120V:
Your TRUE treadmill requires a dedicated 120 volt, alternating current (AC), 20 amp grounded outlet circuit. This means nothing else can be plugged into the same circuit. Most power circuits are rated for this 120V AC 20 amp requirement, but you must ensure the treadmill does not share the circuit with anything else.
Danger: Do not use an extension cord or ungrounded outlet:
The ground helps prevent electrical damage to your treadmill and enhances your safety by helping to prevent shock. Check with a qualified electrician or serviceman if you are in doubt as to whether the treadmill is properly grounded. Do not modify the plug provided with the treadmill if it will not fit the outlet. Have a proper outlet installed by a qualified electrician.
CHAPTER 2: ASSEMBLY INSTRUCTIONS
PRE-ASSEMBLY CHECK LIST:
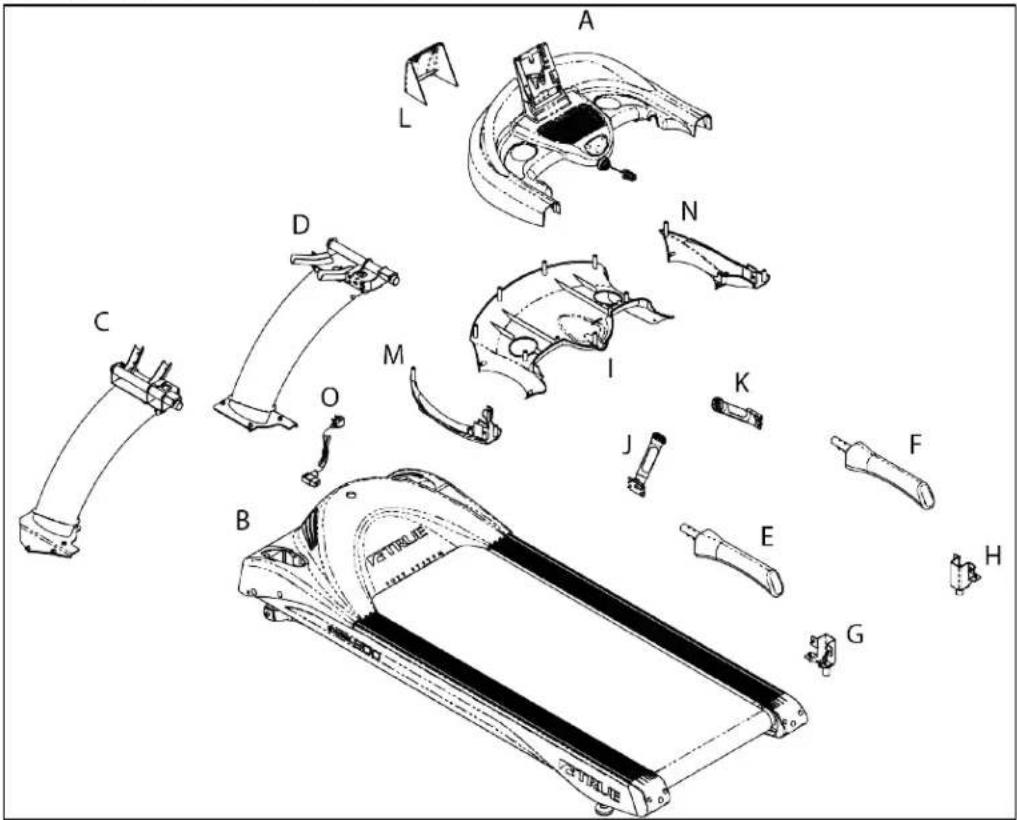
text_image
Technical diagram of a treadmill assembly with labeled parts A through L, showing exploded and assembled views.| Item Description Qty | — | |
| A Console Rack 1 | ||
| B Frame 1 | ||
| C Pedestal - Left 1 | ||
| D Pedestal - Right 1 | ||
| E Handrail - Left 1 | ||
| F | Handrail - Right | 1 |
| G | Optional Decline Bracket - Left | 1 |
| H | Optional Decline Bracket - Right | 1 |
| I | Lower Console Rack Cover | 1 |
| J | Hand Grip Assembly - Left | 1 |
| K | Hand Grip Assembly - Right | 1 |
| L | Rear Console Cover | 1 |
| M | Lower Shoulder Cover-Left | 1 |
| N | Lower Shoulder Cover-Right | 1 |
| O | Power Cord | 1 |
CHAPTER 2: ASSEMBLY INSTRUCTIONS
PRE-ASSEMBLY CHECK LIST (CONTINUED):
TE900
text_image
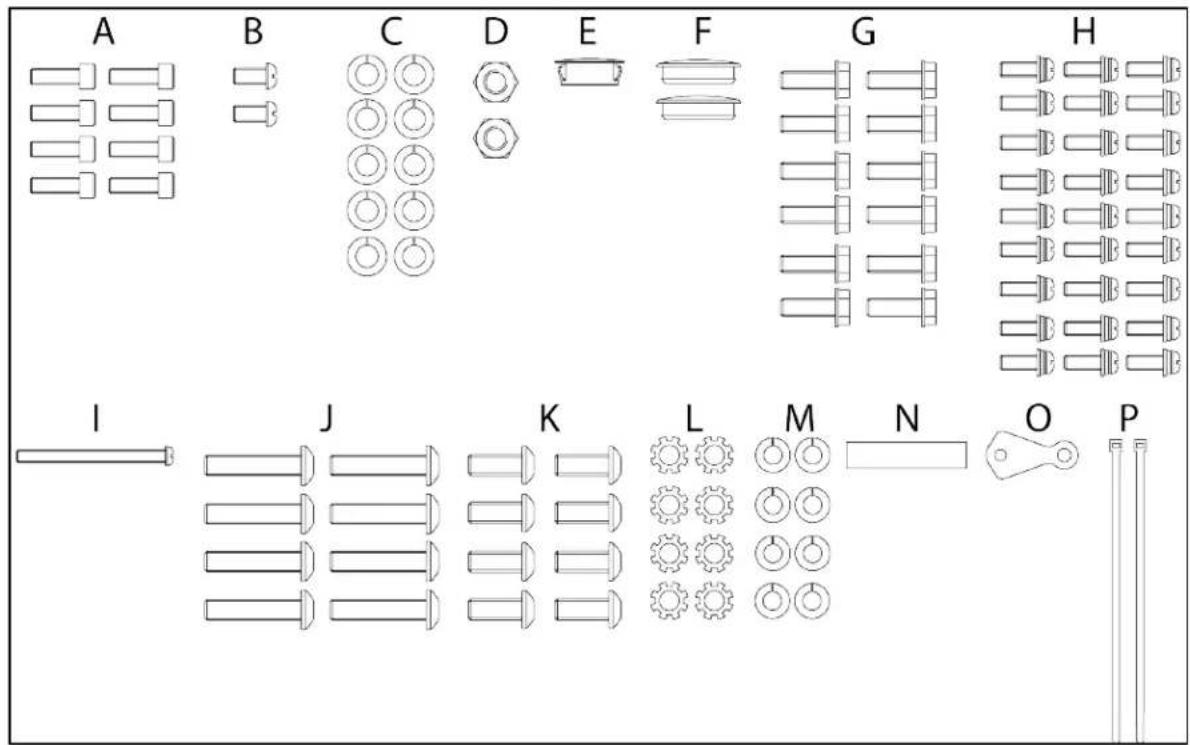
A B C D E F G H I J K L M N O P| Item | Description | Qty |
| a | Bolt M8 x P1 25 x 25 | 10 i |
| b | Screw M5 x P0.8 x 10 | 2 |
| c | Lock Washer M8 | 10 k |
| d | Lock Nut M8 x P1.25 | 2 |
| e | Cap-Motor Cover Screw | 1 |
| f | Cap-Motor Cover Screw | 2 |
| g | Bolt 1/4"-20 x 3/4" | 12 |
| h | Screw M4 x P0.7x12 | 27 |
| Item | Description | Qty |
| Bolt M5 x P0.8 x 60 | 1 | |
| j 8 | Bolt 5/16"-24 x 1-1/2" | |
| Bolt 1/4"-20 x 5/8" | ||
| l 8 | External Tooth Star Washer M8 | |
| m | Lock Washer 1/4" | 8 |
| n | Spacer | 1 |
| o | Retainer-Power Cord | 1 |
| p | Wire Tie | 2 |
Tools Required (not included):
• Open End Wrenches: 15/16", 7/8", and 1/2"
• Hex Keys: 5/32", 3/16", 4mm, and 8mm
- Screwdrivers: #2 Phillips with 4" long tip, #2 Phillips with 8" long tip, 5/16" slotted approximately 6" long
- 7/16" 6-point socket, short extension and ratchet
• Long-nose pliers, small (optional)
• Wire cutters, small (optional)
CHAPTER 2: ASSEMBLY INSTRUCTIONS
TREADMILL ASSEMBLY STEPS:

CAUTION:
• Use caution when assembling treadmill. Unpacking and assembling of this treadmill is a two person task
- Remove all treadmill components from packaging.
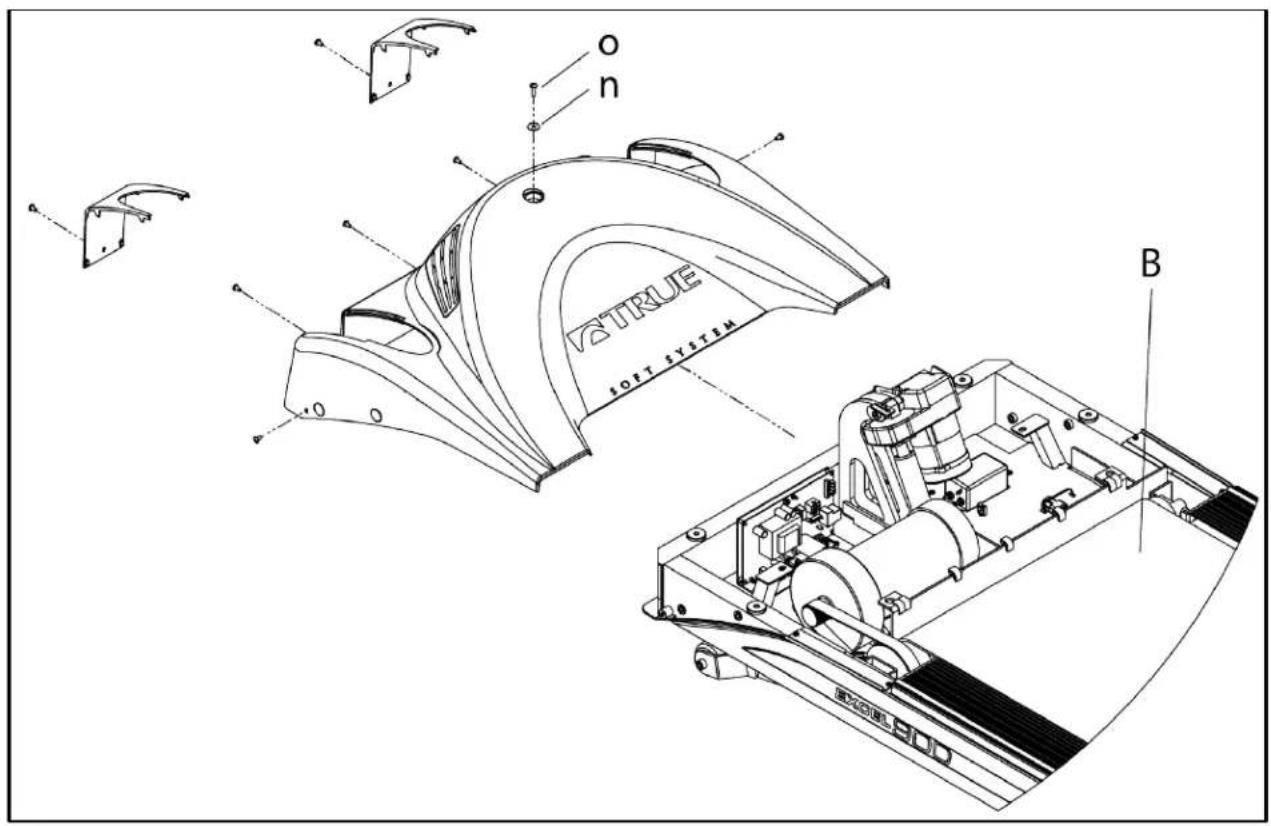
Step 1 Remove Motor Cover:
a) Remove the screw (o) and washer (n) from the motor cover and set to the side.
b) Remove the motor cover from the treadmill frame (B)
text_image
VATRUE SOFT SYSTEM BCHAPTER 2: ASSEMBLY INSTRUCTIONS
TREADMILL ASSEMBLY STEPS (CONTINUED):
Step 2 Pedestal Installation:
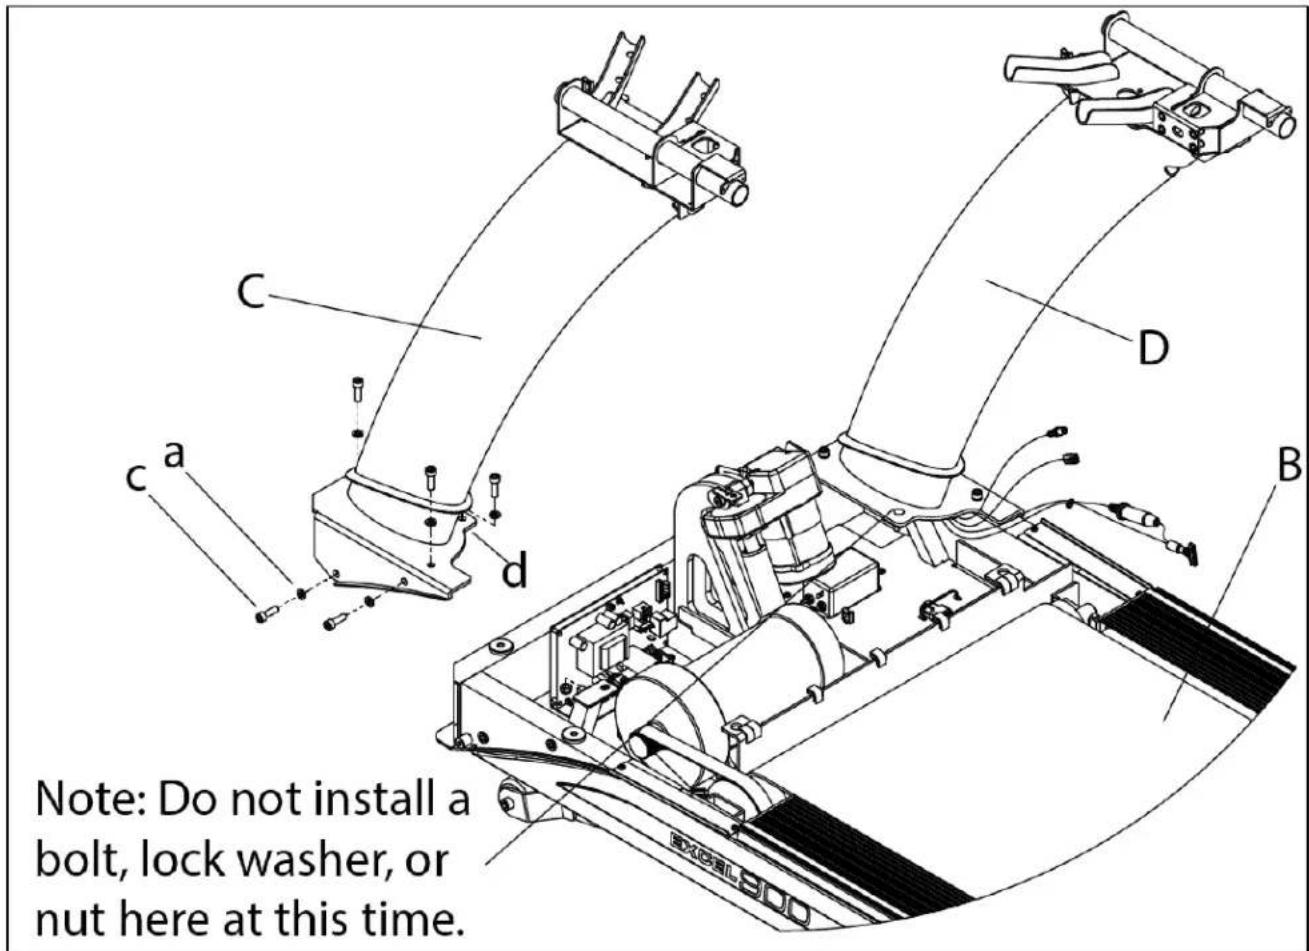
a) Secure the pedestals to the treadmill frame using nine Bolts M8 x 25 (c), nine M8 lock washers (a), and one M8 lock nut (d) where shown.
Note: Do not fully tighten the hardware used in this step yet.
Note: Ensure the pedestal cables are routed between the treadmill frame and pedestal support brace as shown.
text_image
Note: Do not install a bolt, lock washer, or nut here at this time.CHAPTER 2: ASSEMBLY INSTRUCTIONS
TREADMILL ASSEMBLY STEPS (CONTINUED):
Step 3 Frame Cable Connections:
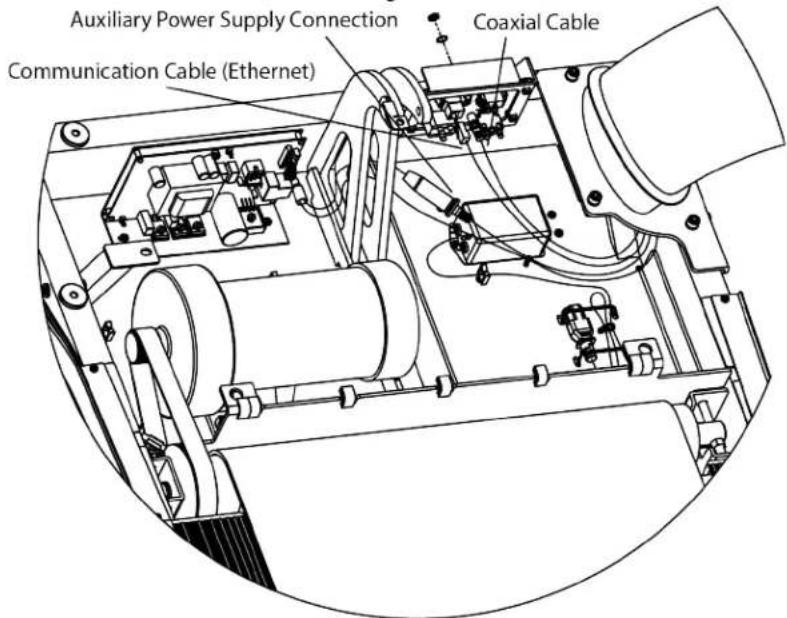
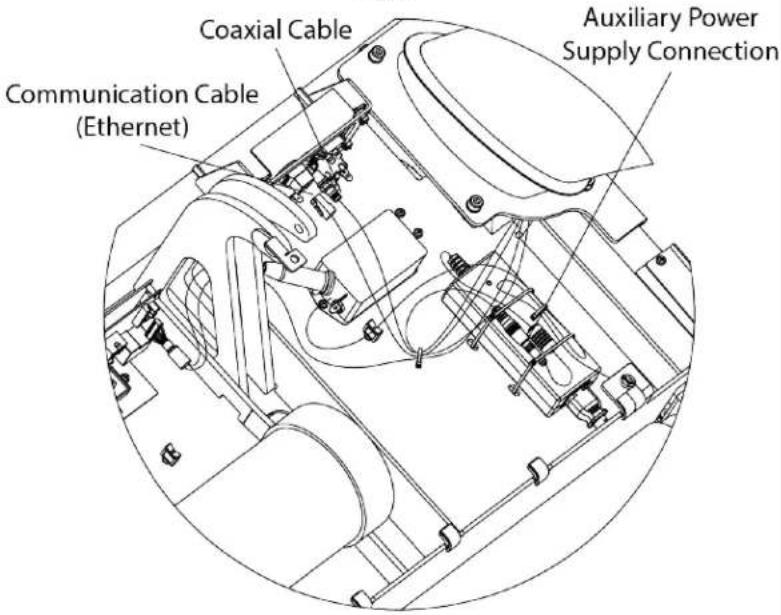
a) Route the cables exiting from the right pedestal to the appropriate connection point as shown. Cables will be marked for easy identification.
b) Remove the nut and washer attached to the coaxial cable as shown.
c) Pass the front of the coaxial cable through the hole in the electrical panel and reinstall the washer and nut on the coaxial cable.
Note: Fig. 3-1 is how the frame cable connections appear coming out of the shipping box. Fig. 3-1 illustrates the frame cable connections for the Emerge (LED) and 9" TFT consoles. Fig. 3-2 illustrates the frame cable connections for the Transcend and 15" TFT consoles. Note the different auxiliary power supply connection points between the two pictures based on the console used.
Note: The assembly instructions for securing the 12V power adapter to the motor pan and the corresponding cable connections can be found on pgs. 33-35 for the Transcend ^16 console and pgs. 40-42 for the Escalate ^15 console.
Fig. 3-1
text_image
Auxiliary Power Supply Connection Coaxial Cable Communication Cable (Ethernet)Fig. 3-2
text_image
Coaxial Cable Auxiliary Power Supply Connection Communication Cable (Ethernet)CHAPTER 2: ASSEMBLY INSTRUCTIONS
TREADMILL ASSEMBLY STEPS (CONTINUED):
Step 4 Hand Grip Assemblies:
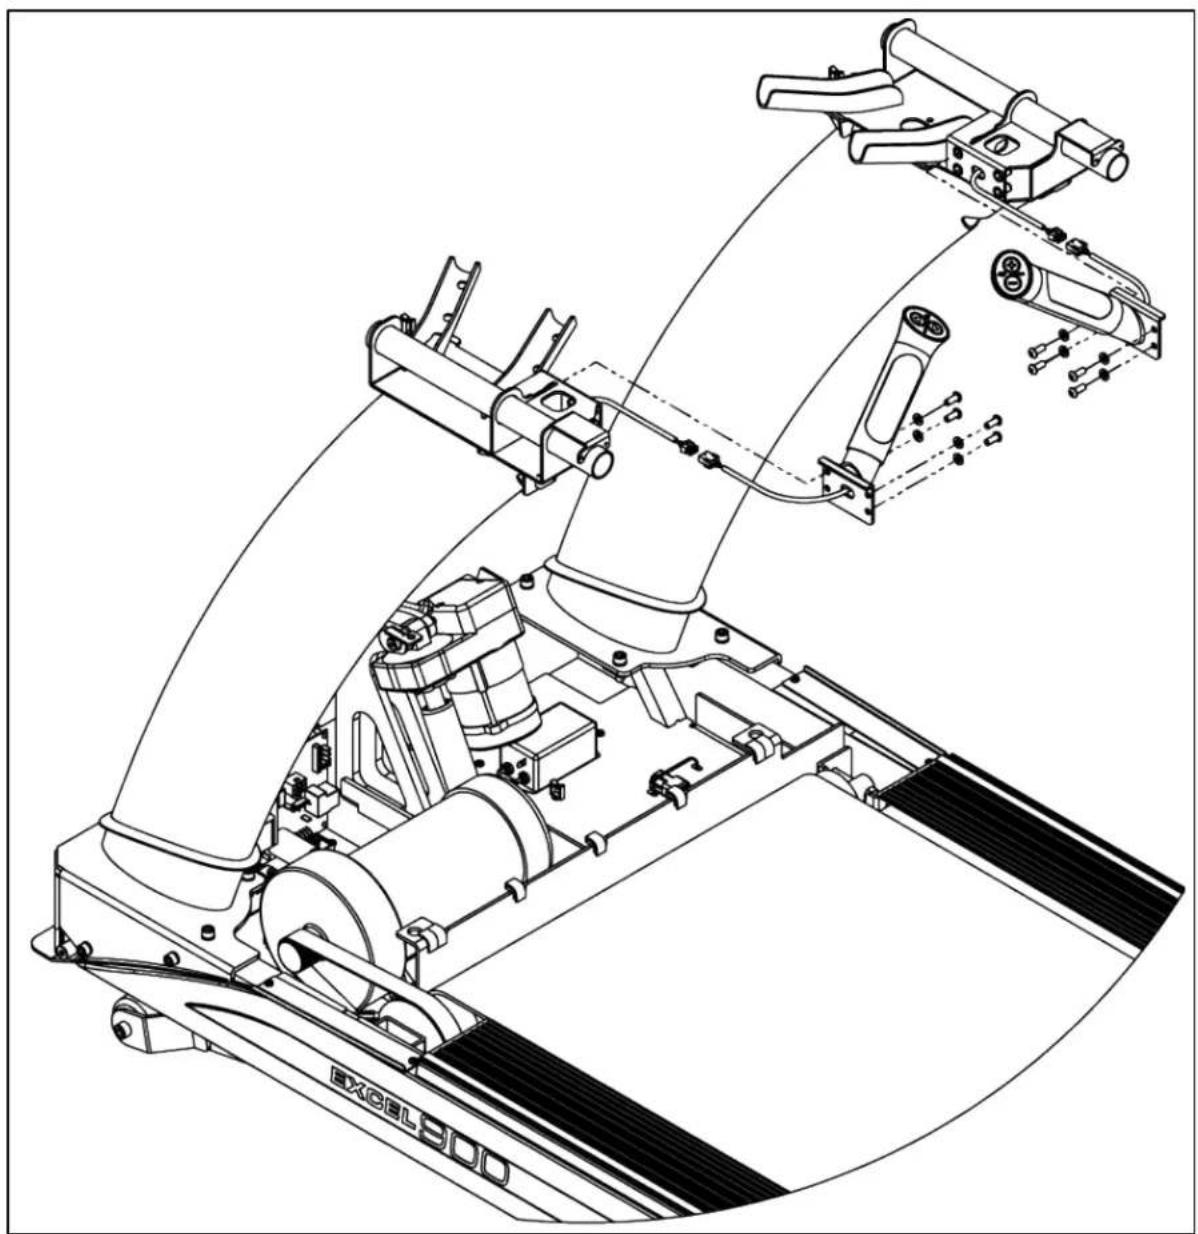
a) Connect the wire coming from the bottom of the Contact Heart Rate (CHR) grip assembly to the corresponding wire located in the pedestal arm as shown.
b) Secure each CHR grip assembly to the pedestal arm with four screws and four lock washers.
Note: Confirm each grip assembly is assembled on the correct pedestal using the left and right orientation stickers on them.
natural_image
Technical line drawing of an industrial robotic device with labeled components (no readable text or symbols)CHAPTER 2: ASSEMBLY INSTRUCTIONS
TREADMILL ASSEMBLY STEPS (CONTINUED):
Step 5 Console Rack and Secure Pedestals:
a) Install the console rack onto the pedestals by resting the console rack tubing on top of the pedestal tubing cradles.
Caution: Do not pinch cabling during this step.
b) Install eight bolts 5/16" x 1-1/2" and eight external tooth lock washers through the pedestal tubing cradle and console rack, but do not tighten.
c) Tighten all hardware from steps 2a - 6c.
d) Install four M4 x 12 screws and tighten.
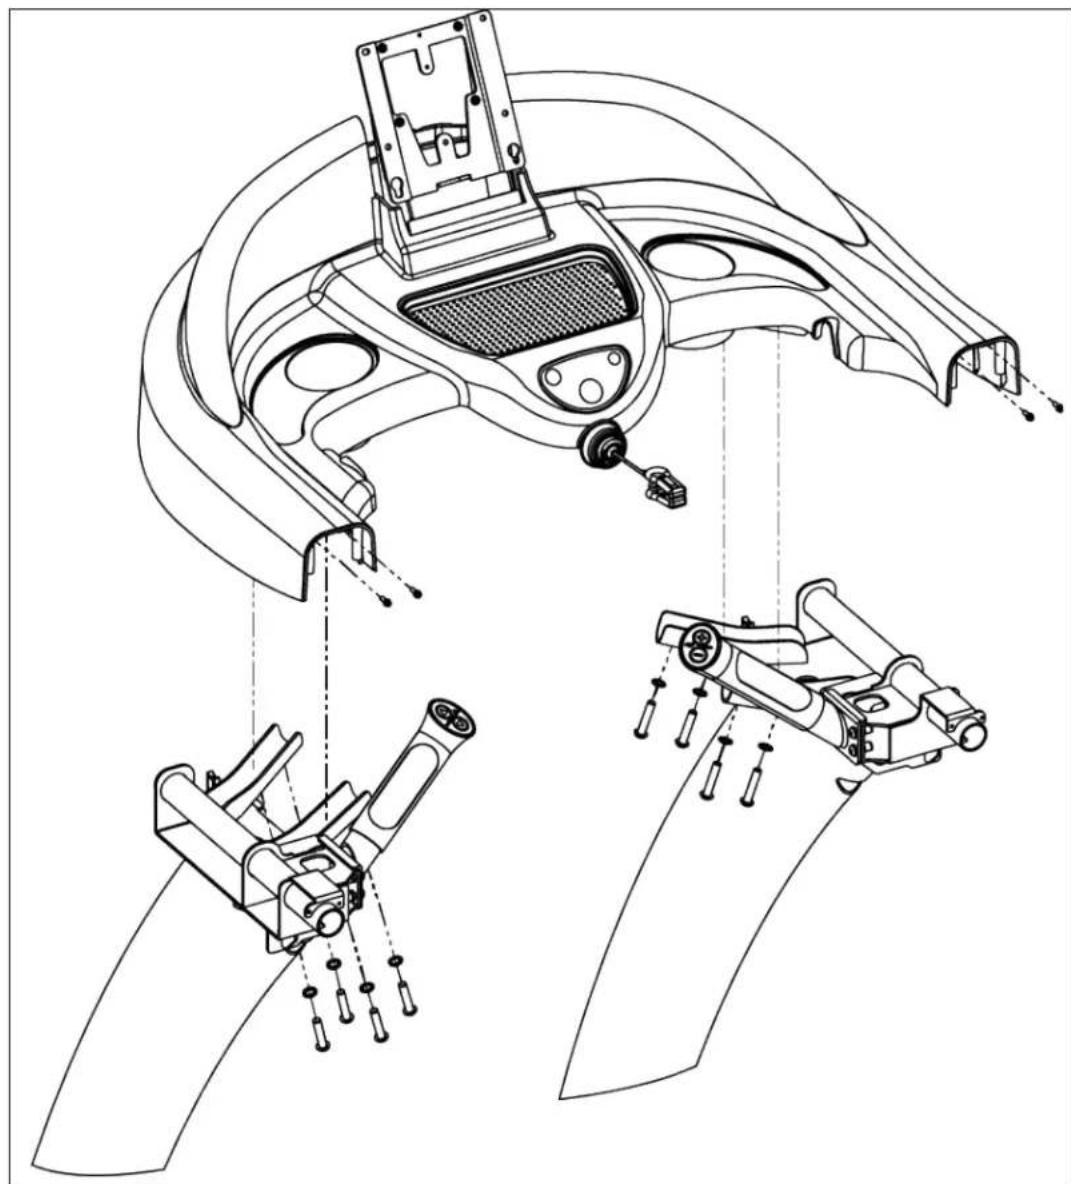
natural_image
Technical line drawing of a car interior with mechanical components and assembly details (no text or symbols)CHAPTER 2: ASSEMBLY INSTRUCTIONS
TREADMILL ASSEMBLY STEPS (CONTINUED):
Step 6 Console Rack Cable Connections and Lower Cover Installation:
a) Connect all wires from the left and right pedestal arms to the wires from the upper console rack cover as shown (all cables will be connected regardless of console option).
*Do not over torque the coax TV cable.
b) Route all cables into the underside of the upper console rack cover as shown to prevent wire pinching when installing the bottom console rack cover.
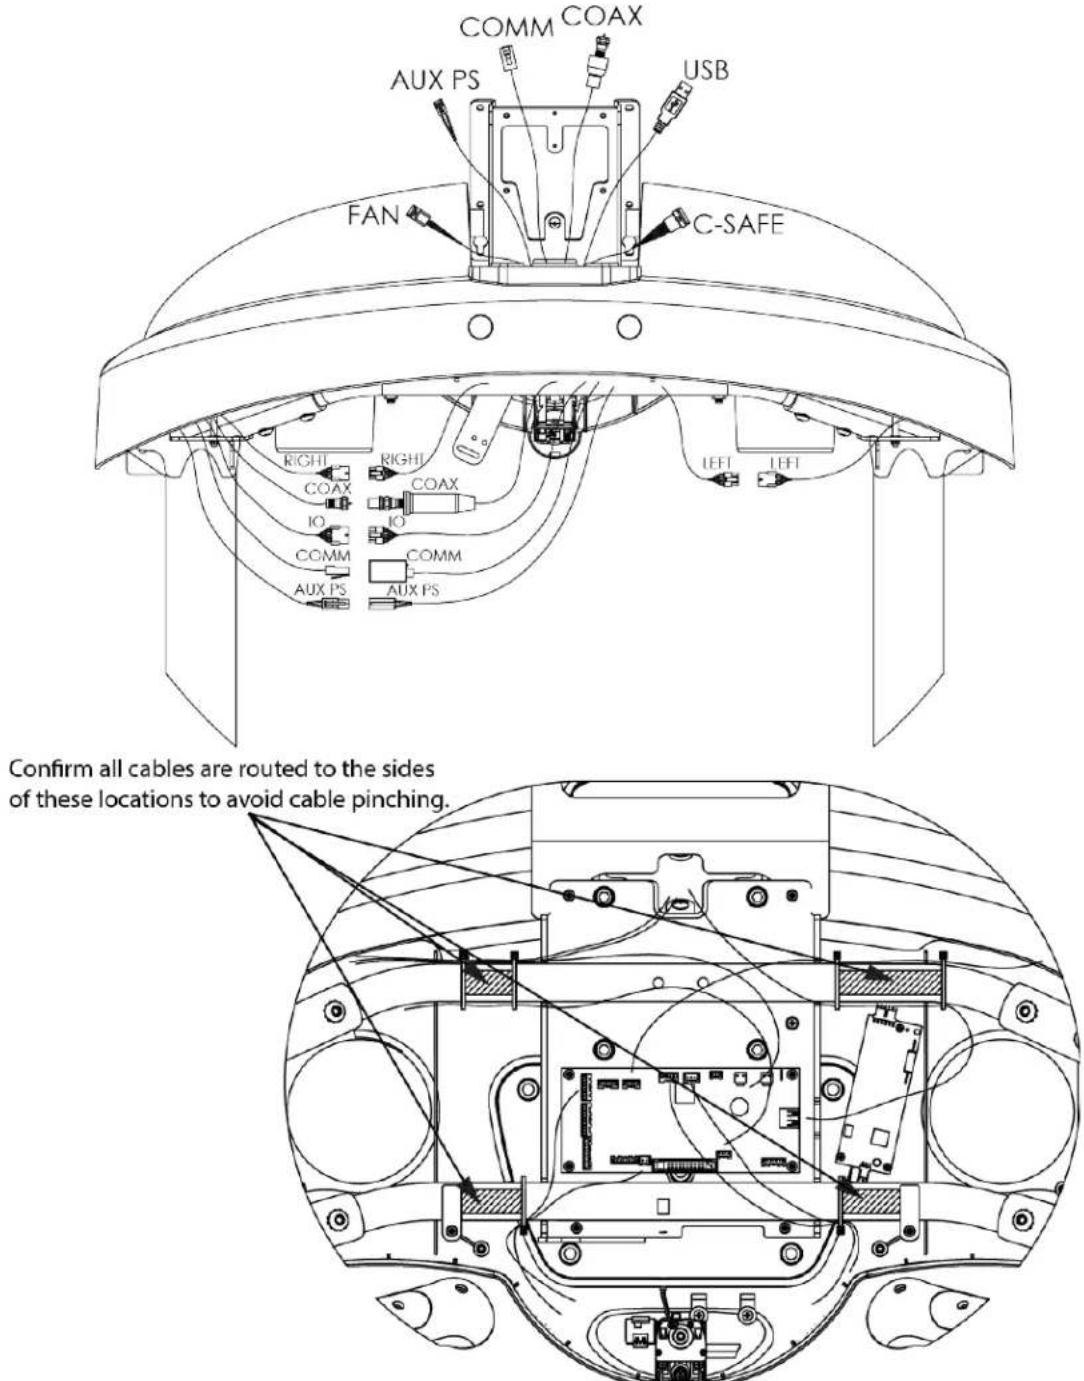
text_image
COMM COAX AUX PS USB FAN C-SAFE RIGHT RIGHT COAX COAX IO IO COMM COMM AUX PS AUX PS LEFT LEFT Confirm all cables are routed to the sides of these locations to avoid cable pinching.Truefitness.com / 800.426.6570 / 636.272.7100
CHAPTER 2: ASSEMBLY INSTRUCTIONS
TREADMILL ASSEMBLY STEPS (CONTINUED):
Step 7 Lower Console Rack Cover:
a) Position the rear edge with the long screw bosses slightly up inside the console rack first. Next, carefully raise up the front edge while making adjustments so the safety clip docking bracket and long screw boss passes up through the safety key mechanism.
Warning: Do not force the installation of the bottom cover.
Hardware Required:
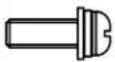
9 bolts M4 x 12
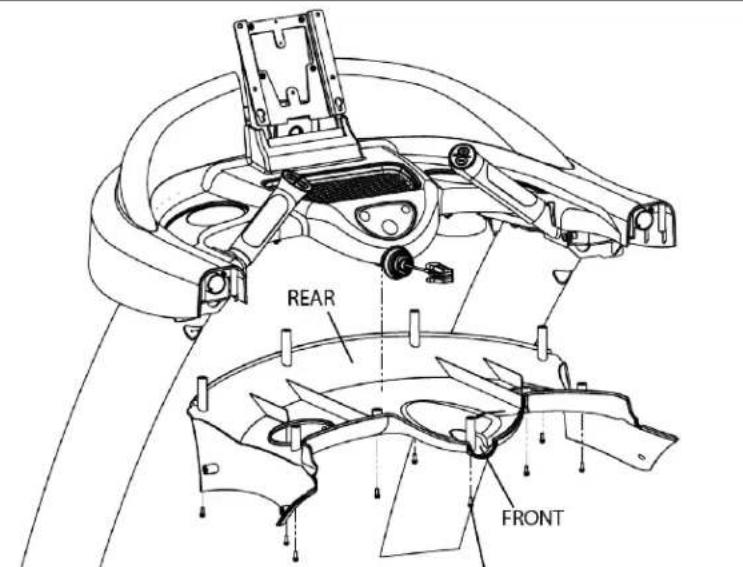
text_image
REAR FRONTLoosely install this screw to secure the lower console rack cover in place. This will enable the remaining 8 screws to be easily installed.
Step 8 Shoulder Trim Assembly:
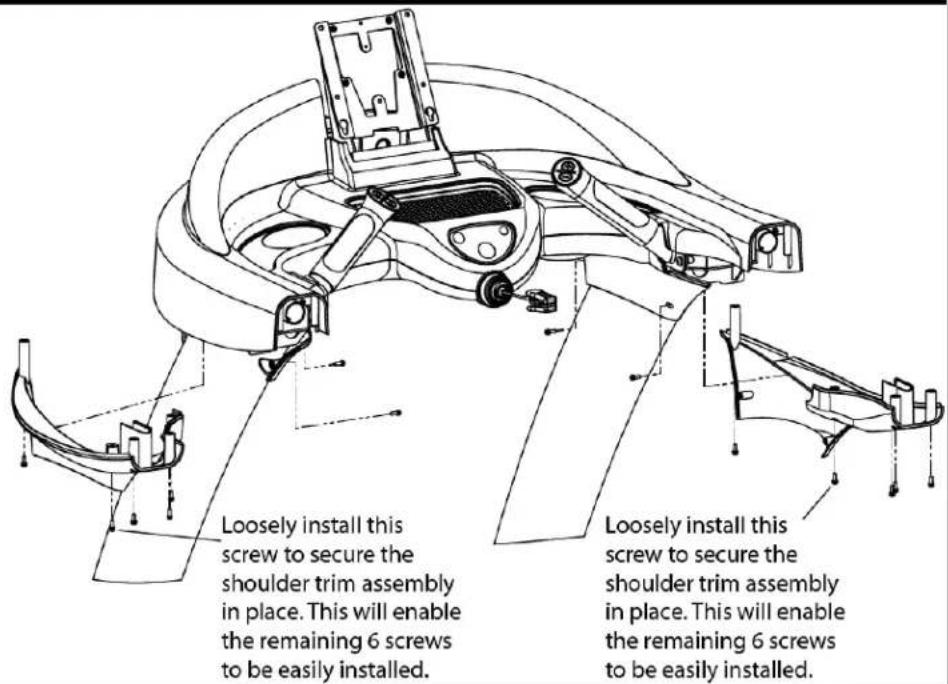
a) Secure the left and right shoulder trim assemblies to the console rack using 14 bolts M4 x 12.
Hardware Required:
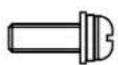
14 bolts M4 x 12
text_image
Loosely install this screw to secure the shoulder trim assembly in place. This will enable the remaining 6 screws to be easily installed. Loosely install this screw to secure the shoulder trim assembly in place. This will enable the remaining 6 screws to be easily installed.CHAPTER 2: ASSEMBLY INSTRUCTIONS
TREADMILL ASSEMBLY STEPS (CONTINUED):
Step 9 Handrails:
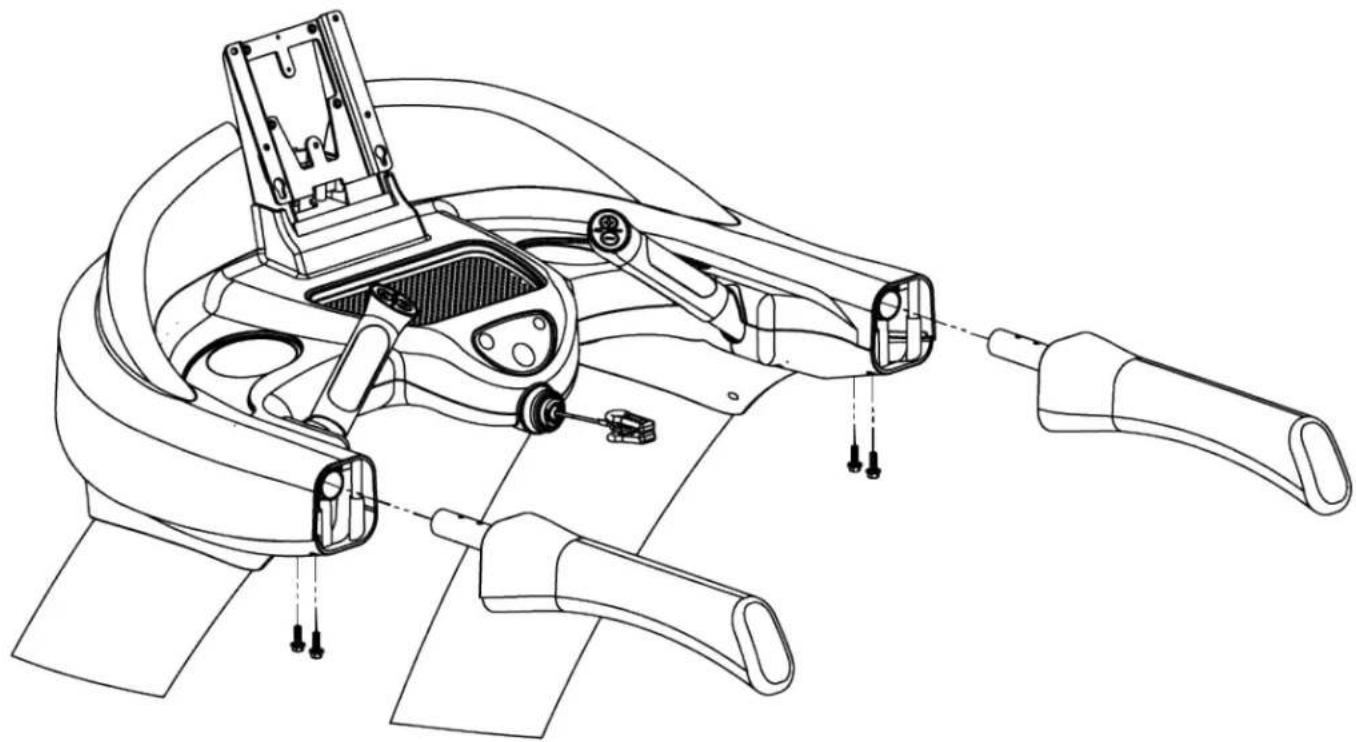
a) Fully insert the handle and then loosely install the four bolts 1/4" - 20 x 3/4", two for each handrail. While slightly rotating the handle to best align the seams and holding inwards, securely tighten the bolts.
Caution: When starting the bolts, be careful not to cross thread them.
natural_image
Technical line drawing of a mechanical device with labeled parts (no text or symbols)CHAPTER 2: ASSEMBLY INSTRUCTIONS
TREADMILL ASSEMBLY STEPS (CONTINUED):
Step 10 Safety Key:
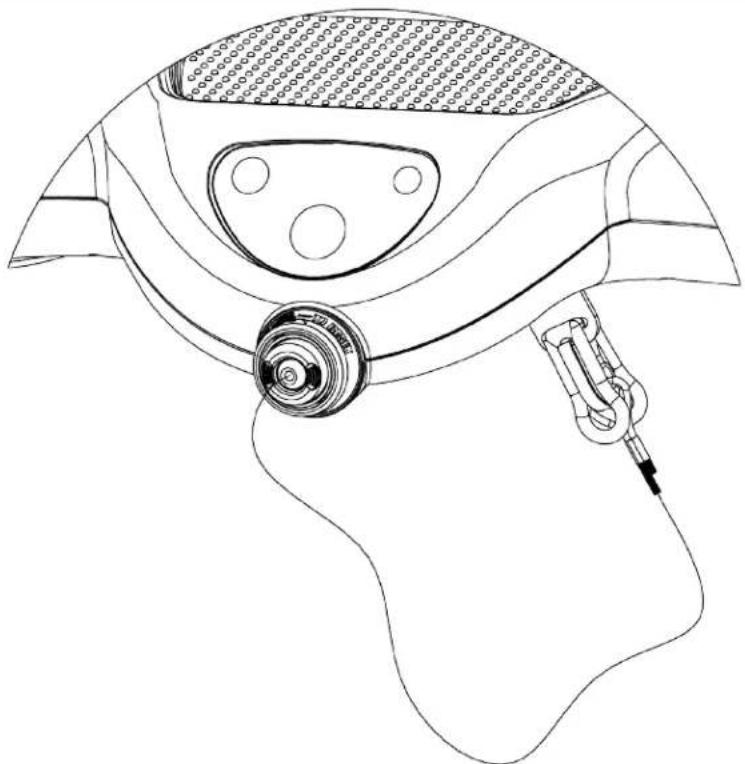
a) Locate the Safety Key attached to the console rack.
b) Attach the Safety Key clip to the anchor plate located on the console rack (when not working out).
c) Attach the safety key clip to clothing at the beginning of any workout.
CAUTION: Read treadmill Owner's Manual before attempting any workout
natural_image
Line drawing of a human head with medical device and earpiece (no text or symbols)CHAPTER 2: ASSEMBLY INSTRUCTIONS
TREADMILL ASSEMBLY STEPS (CONTINUED):
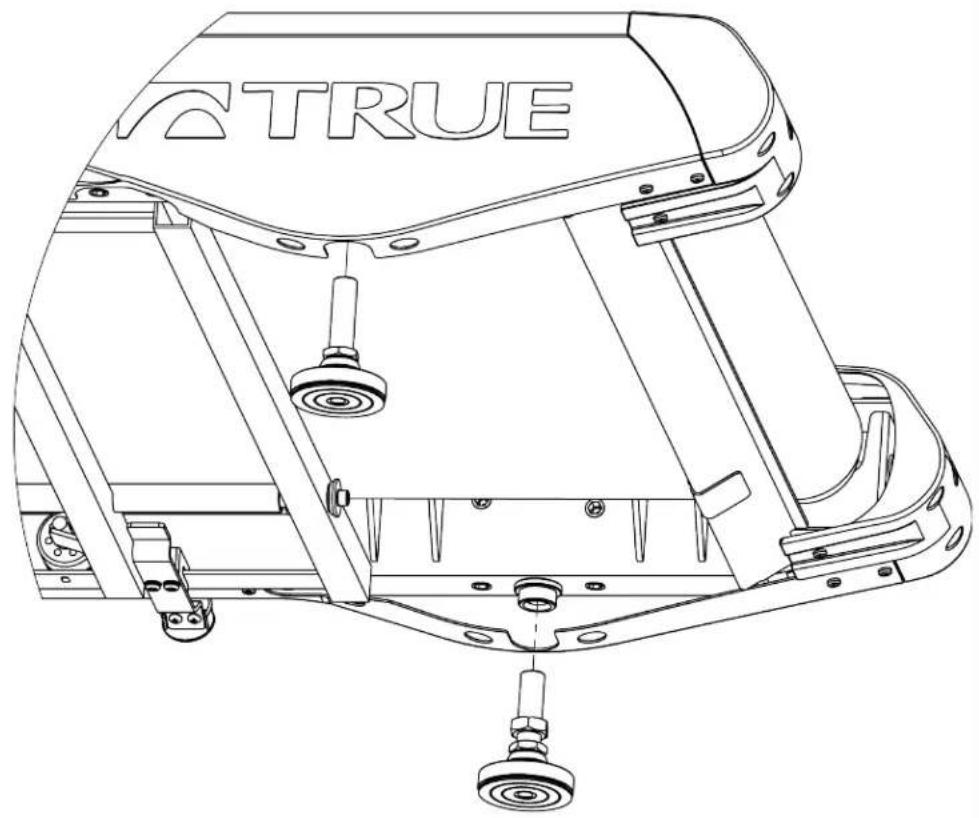
Step 12 Leveling Feet-Decline Kit:
a) Remove the leveling feet from the treadmill frame as shown.
natural_image
Technical line drawing of a mechanical device with labeled parts (no readable text or symbols)CHAPTER 2: ASSEMBLY INSTRUCTIONS
TREADMILL ASSEMBLY STEPS (CONTINUED):
Step 12 Leveling Feet-Decline Kit (Continued):
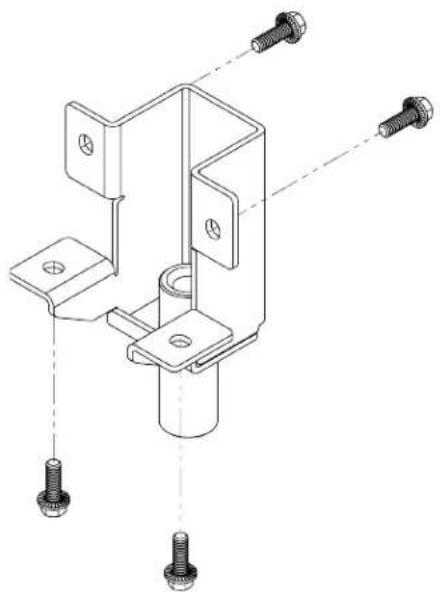
a) Secure the optional decline kit to the treadmill frame in the identified areas using four bolts 1/4"-20 x 3/4" per kit. b) Screw the leveling feet into the optional decline kit holes as shown.
Note: The bracket is left and right side sensitive so confirm you are using the correct bracket.
Hardware Required:
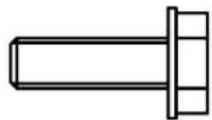
8 bolts 1/4"-20 x 3/4"
natural_image
Technical line drawing of a mechanical bracket assembly with bolted pins and mounting holes (no text or symbols)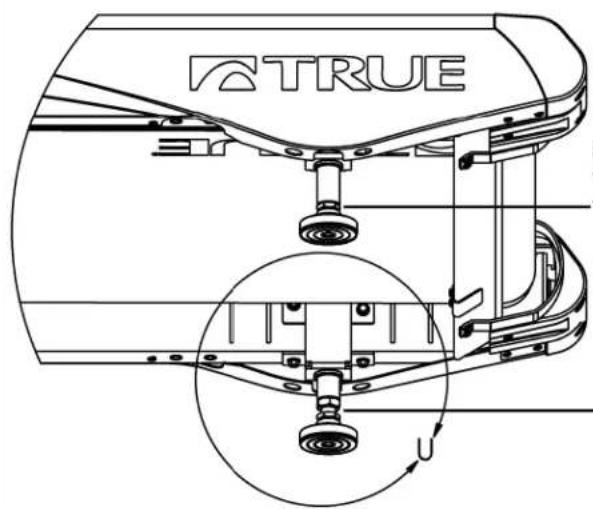
text_image
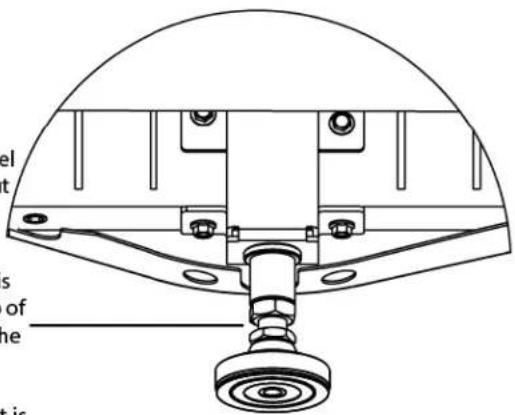
TRUENote: The left hand side swivel foot is fully tightened without the use of a locking nut.
Note: The right swivel foot is initially installed with a gap of 1/4" between the nut and the hex area of the swivel foot.
Note: The right swivel foot is installed with the use of an adjustment locking nut.
text_image
el t s of ne t isDETAIL U SCALE 1:2
CHAPTER 2: ASSEMBLY INSTRUCTIONS
TREADMILL ASSEMBLY STEPS (CONTINUED):
Step 13 Rear Foot Leveling:
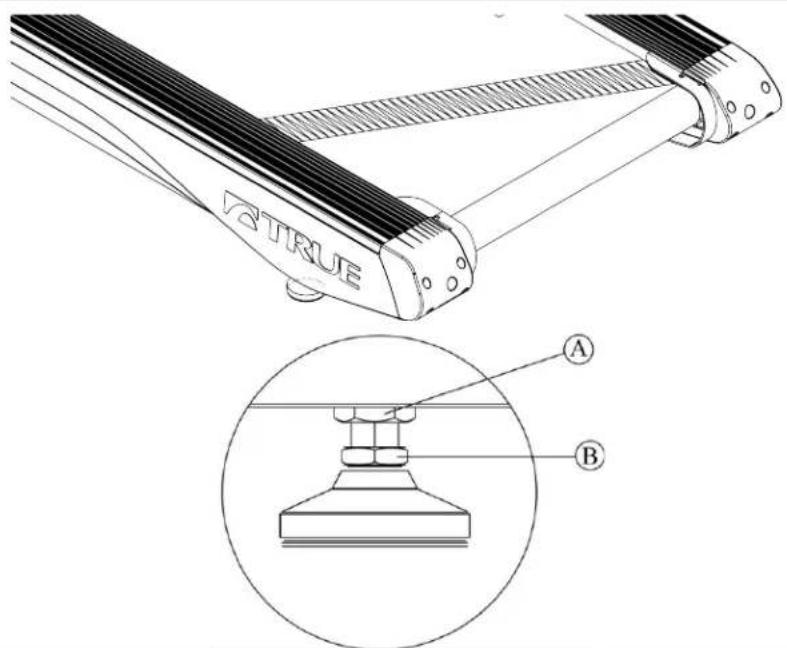
a) Ensure treadmill incline rack wheels and rear feet are resting on the floor and not on cardboard, packaging, etc.
b) Using a 15/16 inch open end wrench, loosen nut A on Right Rear Foot (only side adjustable).
c) Using a level or estimating by sight, turn section B of foot clockwise, or counter-clockwise, using a 7/8 inch open end wrench to level the rear of treadmill.
d) Tighten nut A until it is secured against bottom of treadmill.
Note: The recommended gap between (A) and (B) is 1/4" on a flat floor.
text_image
QTRUE A BCHAPTER 2: ASSEMBLY INSTRUCTIONS
TREADMILL ASSEMBLY STEPS (CONTINUED):
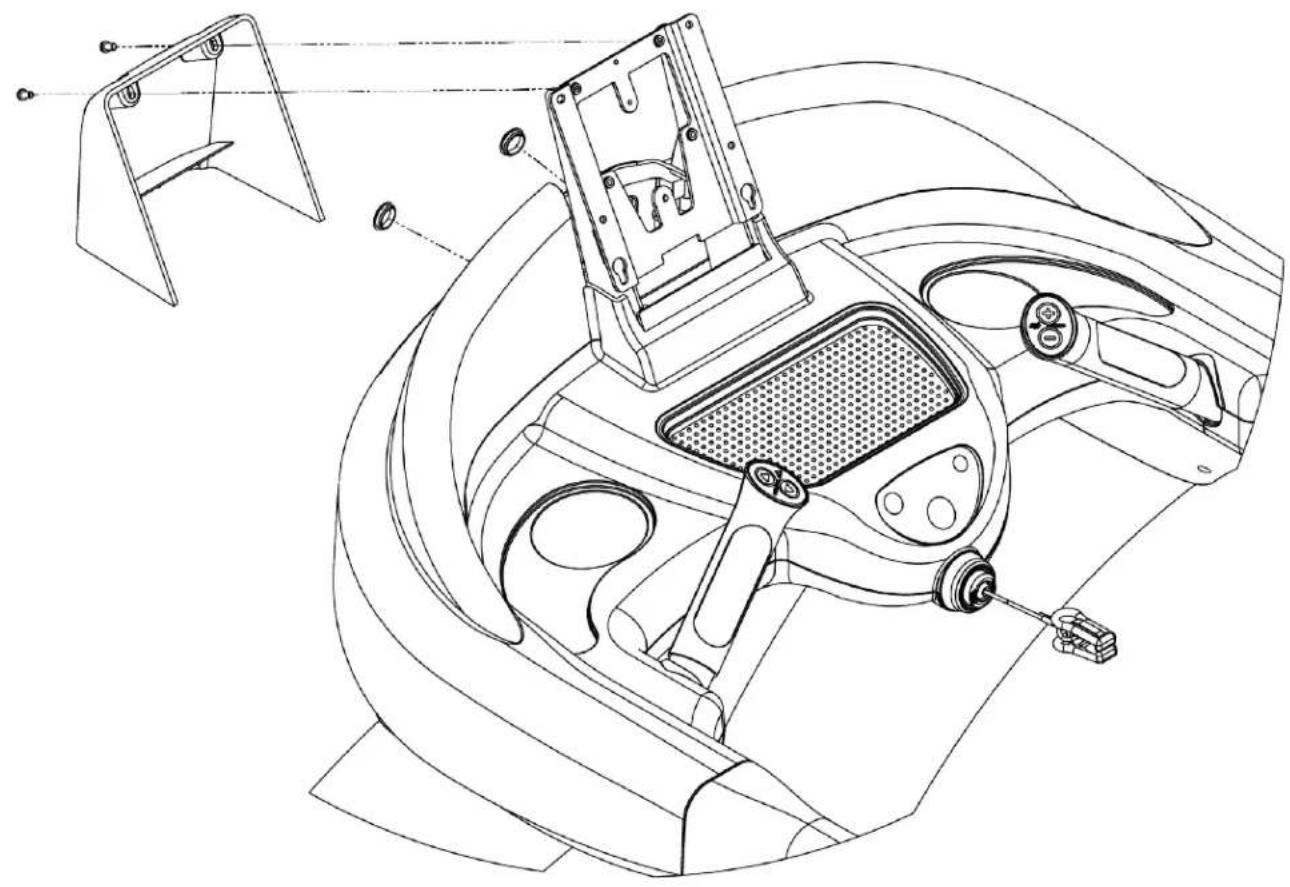
Step 14 Rear Console Cover Assembly:
a) Secure the rear console cover assembly to the console mast assembly using two bolts M5 x 10. CAUTION:
Make sure cabling is NOT pinched during installation.
Note: For specific console assembly instructions, see the corresponding section at the end of Chapter 2: Assembly Instructions.
Hardware Required:
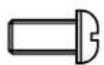
2 bolts M5 x 10.
natural_image
Technical line drawing of a car interior showing steering wheel, dashboard, and steering wheel (no text or labels)CHAPTER 2: ASSEMBLY INSTRUCTIONS
TREADMILL ASSEMBLY STEPS (CONTINUED):
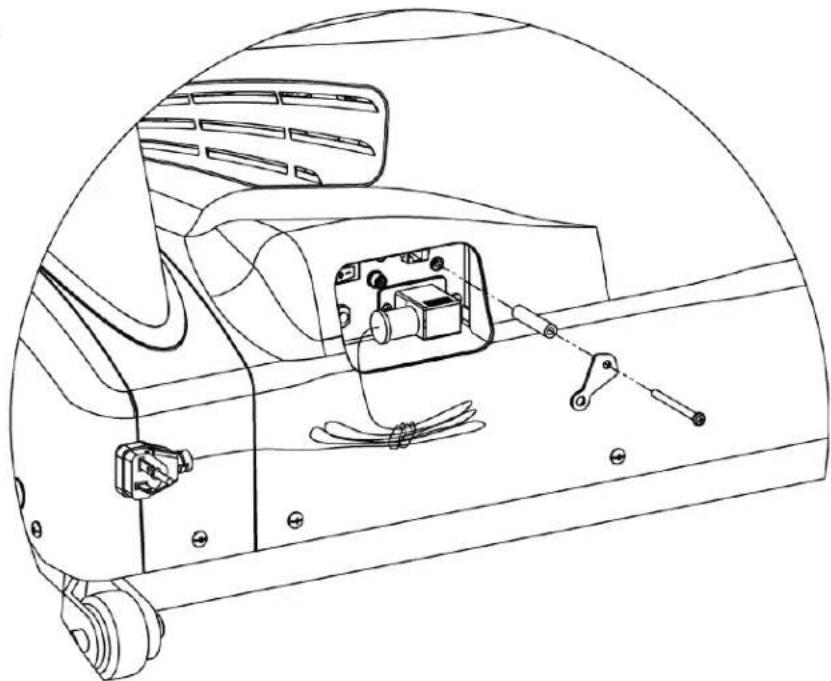
Step 15 Power Cord Retainer:
a) Install the power cord retainer assembly in the order shown, but do no tighten. b) Rotate power cord retainer down and tighten the screw to push the retainer up against the power cord.
Hardware Required:
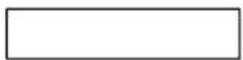
1 spacer
Note: The 110V spacer is 1-3/4" long.
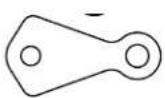
1 retainer-power cord

1 bolt M5 x 60
natural_image
Technical line drawing of a car interior showing engine, wheels, and internal components (no text or symbols)110V configuration
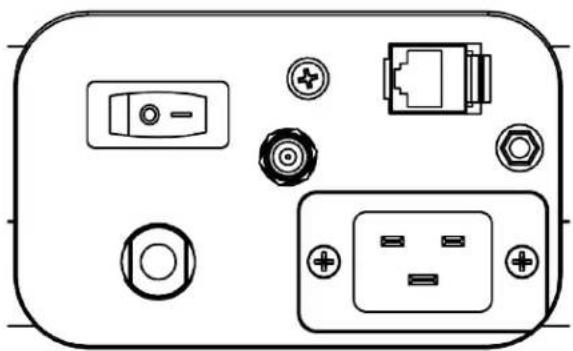
Step 16 Power Cord Installation:
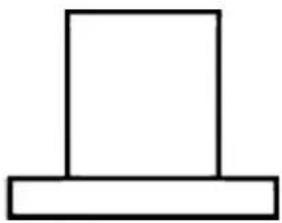
CIRCUIT BREAKER: In the event the current drawn by the treadmill exceeds a specified threshold value, the Circuit Breaker will operate; the button will pop out, and open the circuit. If this should occur, please wait 10 minutes and then reset the Circuit Breaker by pressing the button in on Circuit Breaker. If it does not reset, or the Circuit Breaker operates again, please contact True Fitness Service department at 1-800-883-8783.
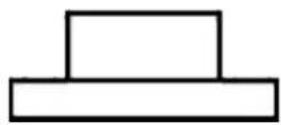
CLOSED
natural_image
Simple geometric shape resembling a T-shape with no text or symbolsOPEN
CIRCUIT BREAKER POSITIONS
natural_image
Diagram of electronic device components including buttons, connectors, and power outlets (no text or labels)CHAPTER 2: ASSEMBLY INSTRUCTIONS
TREADMILL ASSEMBLY STEPS (CONTINUED):
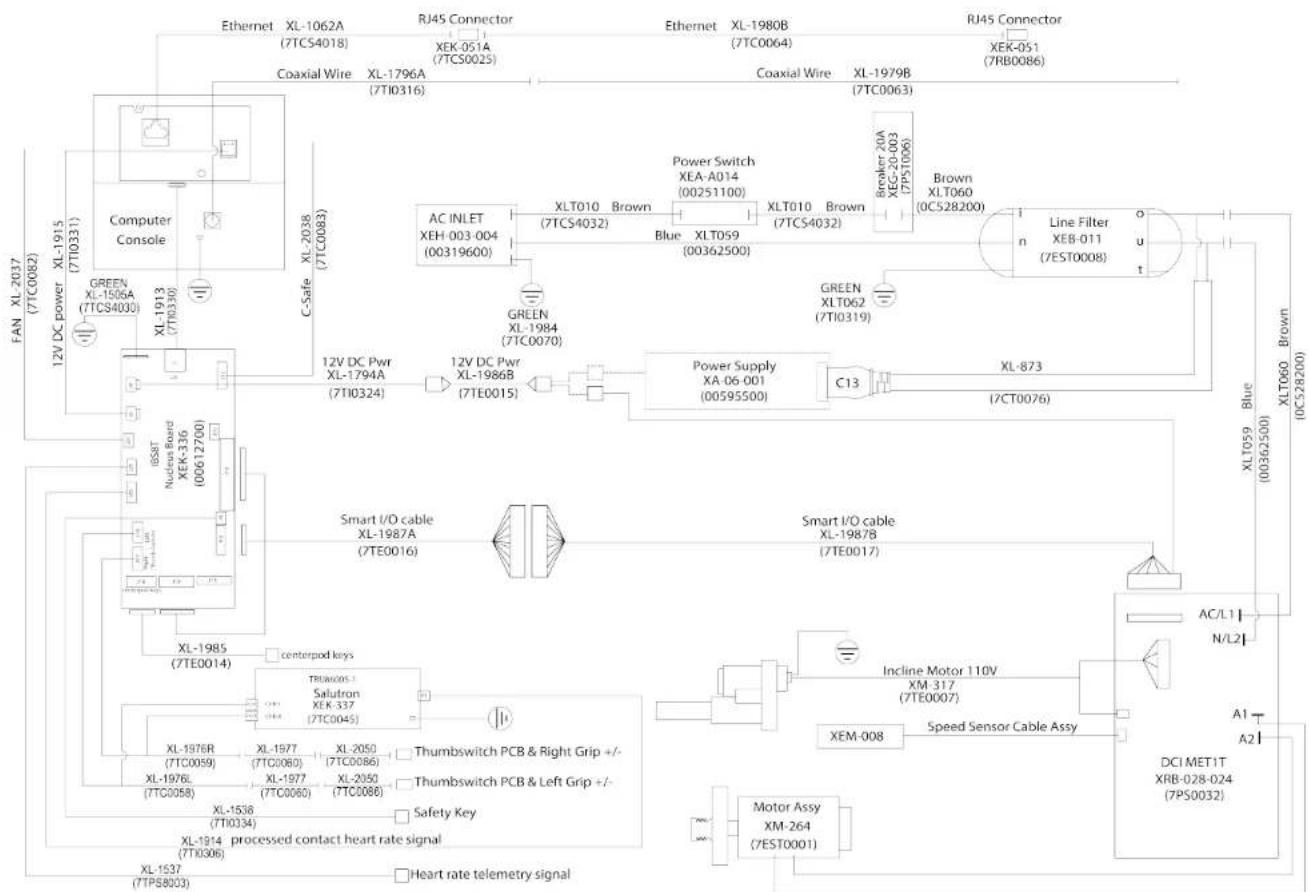
Step 17 Wiring Diagrams:
TE900_110V Treadmill 2017/03/27
flowchart
graph TD
    A["Computer Console"] -->|12V DC power XL-1915 (7T0331)| B["Greenen XL-1506A (7TCS4030)"]
    A -->|12V DC power XL-1913 (7T0330)| C["ICSB T Nucleus Board XEK-336 (00612700)"]
    A -->|C-Safe XL-2038 (7TC0082)| D["AC INLET XEH-003-004 (00319600)"]
    A -->|C-Safe XL-2038 (7TC0082)| E["AC INLET XEH-003-004 (00319600)"]
    A -->|C-Safe XL-2038 (7TC0082)| F["AC INLET XEH-003-004 (00319600)"]
    A -->|C-Safe XL-2038 (7TC0082)| G["AC INLET XEH-003-004 (00319600)"]
    A -->|C-Safe XL-2038 (7TC0082)| H["AC INLET XEH-003-004 (00319600)"]
    A -->|C-Safe XL-2038 (7TC0082)| I["AC INLET XEH-003-004 (00319600)"]
    A -->|C-Safe XL-2038 (7TC0082)| J["AC INLET XEH-003-004 (00319600)"]
    A -->|C-Safe XL-2038 (7TC0082)| K["AC INLET XEH-003-004 (00319600)"]
    A -->|C-Safe XL-2038 (7TC0082)| L["AC INLET XEH-003-004 (00319600)"]
    A -->|C-Safe XL-2038 (7TC0082)| M["AC INLET XEH-003-004 (00319600)"]
    A -->|C-Safe XL-2038 (7TC0082)| N["AC INLET XEH-003-004 (00319600)"]
    A -->|C-Safe XL-2038 (7TC0082)| O["AC INLET XEH-003-004 (00319600)"]
    A -->|C-Safe XL-2038 (7TC0082)| P["AC INLET XEH-003-004 (00319600)"]
    A -->|C-Safe XL-2038 (7TCO66) | Q["ACINLET XEH-1556R"]
    A -->|C-Safe XL-2038 (7TCO66) | R["ACINLET XEH-1556R"]
    A -->|C-Safe XL-2038 (7TCO66) | S["ACINLET XEH-1556R"]
    A -->|C-Safe XL-2038 (7TCO66) | T["ACINLET XEH-1556R"]
    A -->|C-Safe XL-2038 (7TCO66) | U["ACINLET XEH-1556R"]
    A -->|C-Safe XL-2038 (7TCO66) | V["ACINLET XEH-1556R"]
    A -->|C-Safe XL-2038 (7TCO66) | W["ACINLET XEH-1556R"]
    A -->|C-Safe XL-2038 (7TCO66) | X["ACINLET XEH-1556R"]
    A -->|C-Safe XL-2038 (7TCO66) | Y["ACINLET XEH-1556R"]
    A -->|C-Safe XL-2038 (7TCO66) | Z["ACINLET XEH-1556R"]
    A -->|C-Safe XL-2038 (7TCO66) | AA["ACINLET XEH-1556R"]
    A -->|C-Safe XL-2038 (7TCO66) | AB["ACINLET XEH-1556R"]
    A -->|C-Safe XL-2038 (7TCO66) | AC["ACINLET XEH-1556R"]
    A -->|C-Safe XL-2038 (7TCO66) | AD["ACINLET XEH-1556R"]
    A -->|C-Safe XL-2038 (7TCO66) | AE["ACINLET XEH-1556R"]
    A -->|C-Safe XL-2038 (7TCO66) | AF["ACINLET XEH-1556R"]
    A -->|C-Safe XL-2038 (7TCO66) | AG["ACINLET XEH-1556R"]
    A -->|C-Safe XL-2038 (7TCO66) | AH["ACINLET XEH-1556R"]
    A -->|C-Safe XL-2038 (7TCO66) | AI["ACINLET XEH-1556R"]
    A -->|C-Safe XL-2038 (7TCO66) | AJ["ACINLET XEH-1556R"]
    A -->|C-Safe XL-2038 (7TCO66) | AK["ACINLET XEH-1556R"]
    A -->|C-Safe XL-2038 (7TCO66) | AL["ACINLET XEH-1556R"]
    A -->|C-Safe XL-2038 (7TCO66) | AM["ACINLET XEH-1556R"]
    A -->|C-Safe XL-2038 (7TCO66) | AN["ACINLET XEH-1556R"]
    A -->|C-Safe XL-2038 (7TCO66) | AO["ACINLET XEH-1556R"]
    A -->|C-Safe XL-2038 (7TCO66) | AP["ACINLET XEH-1556R"]
    A -->|C-Safe XL-2038 (7TCO66) | AQ["ACINLET XEH-1556R"]
    A -->|C-Safe XL-2038 (7TCO66) | AR["ACINLET XEH-1556R"]
    A -->|C-Safe XL-2038 (7TCO66) | AS["ACINLET XEH-1556R"]
    A -->|C-Safe XL-2038 (7TCO66) | AT["ACINLET XEH-1556R"]
    A -->|C-Safe XL-2038 (7TCO66) | AU["ACINLET XEH-1556R"]
    A -->|C-Safe XL-2038 (7TCO66) | AV["ACINLET XEH-1556R"]
    A -->|C-Safe XL-2038 (7TCO66) | AW["ACINLET XEH-1556R"]
    A -->|C-Safe XL-2038 (7TCO66) | AX["ACINLET XEH-1556R"]
    A -->|C-Safe XL-2038 (7TCO66) | AY["ACINLET XEH-1556R"]
    A -->|C-Safe XL-2038 (7TCO66) | AZ["ACINLET XEH-1556R"]
    A -->|C-Safe XL-2038 (7TCO66) | BA["ACINLET XEH-1556R"]
    A -->|C-Safe XL-2038 (7TCO66) | BB["ACINLET XEH-1556R"]
    A -->|C-Safe XL-2038 (7TCO66) | BC["ACINLET XEH-1556R"]
    A -->|C-Safe XL-2038 (7TCO66) | BD["ACINLET XEH-1556R"]
    A -->|C-Safe XL-2038 (7TCO66) | BE["ACINLET XEH-1556R"]
    A -->|C-Safe XL-2038 (7TCO66) | BF["ACINLET XEH-1556R"]
    A -->|C-Safe XL-2038 (7TCO66) | BG["ACINLET XEH-1556R"]
    A -->|C-Safe XL-2038 (7TCO66) | BH["ACINLET XEH-1556R"]
    A -->|C-Safe XL-2038 (7TCO66) | BI["ACINLET XEH-1556R"]
    A -->|C-Safe XL-2o 4.4.4.4.4.4.4.4.4.4.4.4.4.4.4.4.4.4.4.4.4.4.4.4.4.4.4.4.4.4.4.4.4.4.4.4.4.4.4.4.4.4.4.4.4.4.4.4.4.4.4  #A#A
    A -->|C-Safe XL 1998A 7TE 9 9 9 9 9 9 9 9 9 9 9 9 9 9 9 9 9 9 9 9 9 9 9 9 9 9 9 9 9 9 9 9 9 9 9 9 9 9 9 9 9 9 9 9 9 9 9 9 9 9  .A#B
    A -->|C-Safe XL 1998A 7TE 9 9 9 9 9 9 9 9 9 9 9 9 9 9 9 9 9 9 9 9 9 9 9 9 9 9 9 9 9 9 9 9 9 9 9 9  .A#C
    A -->|C-Safe XL 1998A 7TE 9 9 9 9 9 9 9 9 9 9 9 9 9 9 9 9 9 9 9 9 9 9 9 9 9 9 9 9  .A#D
    A -->|C-Safe XL 1998A 7TE 9 9 9 9 9 9 9 9 9 9 9 9 9 9 9 9 9 9 9
    A -->|C-Safe XL 1998A 7TE 9
      |
    A -->|C-Safe XL -1/1/1/1/1/1/1/1/1/1/1/1/1/1/1/1/1/1/1/1/1/1/1/1/1/1/1/1/1/1/1/1/1/1/1/1/1/1/1/1/1/1/1/1/1/1/1/1/1/1/1 /XEM -XEM -XEM -XEM -XEM -XEM -XEM -XEM -XEM -XEM -XEM -XEM -XEM -XEM -XEM -XEM -XEM -XEM -XEM -XEM -XEM -XEM -XEM -XEM -XEM -XEM -XEM -XEM -XEM -XEM -XEM -XEM -XEM -XEM -ZEN |
    B -->|Coaxial Wire XL-TI-TI-TI-TI-TI-TI-TI-TI-TI-TI-TI-TI-TI-TI-TI-TI-TI-TI-TI-TI-TI-TI-TI-TI-TI-TI-TI-TI-TI-TI-TI-TI-TI-TI-TI-TI-TI-TI-TI-TI-TI-TI-TI-TI-TI-TI-TI-TI-TI-TI-TII
        |
        B --> C
        B --> D
        B --> E
        B --> F
        B --> G
        B --> H
        B --> I
        B --> J
        B --> K
        B --> L
        B --> M
        B --> N
        B --> O
        B --> P
        B --> Q
        B --> R
        B --> S
        B --> T
        B --> U
        B --> V
        B --> W
        B --> X
        B --> Y
        B --> Z
        B --> AA
        B --> AB
        B --> AC
        B --> AD
        B --> AE
        B --> AF
        B --> AG
        B --> AH
        B --> AI
        B --> AJ
        B --> AK
        B --> AL
        B --> AM
        B --> AN
        B --> AO
        B --> AP
        B --> AQ
        B --> AR
        B --> AS
        B --> AT
        B --> AU
        B --> AV
        B --> AW
        B --> AX
        B --> AY
        B --> AZ
        B --> BA
        B --> BB
        B --> BC
        B --> BD
        B --> BE
        B --> BF
        B --> BG
        B --> BH
        B --> BH
        B --> BH
        B --> BH
        B --> BH
        B --> BH
        B --> BH
        B --> BH
        B --> BH
        B --> BH
        B --> BH
        B --> BH
        B --> BH
        B --> BH
        B --> BH
        B --> BH
        B --> BH
        B --> BH
        B --> BH
        B --> BH
        B --> BI
        B --> BJ
        B --> BK
        B --> BL
        B --> BM
        B --> BN
        B --> BO
        B --> BP
        B --> BP
        B --> BP
        B --> BP
        B --> BP
        B --> BP
        B --> BP
        B --> BP
        B --> BP
        B --> BP
        B --> BP
        B --> BP
        B --> BP
        B --> BP
Truefitness.com / 800.426.6570 / 636.272.7100
CHAPTER 2: ASSEMBLY INSTRUCTIONS
TREADMILL ASSEMBLY STEPS (CONTINUED):
Transcend Console Assembly:
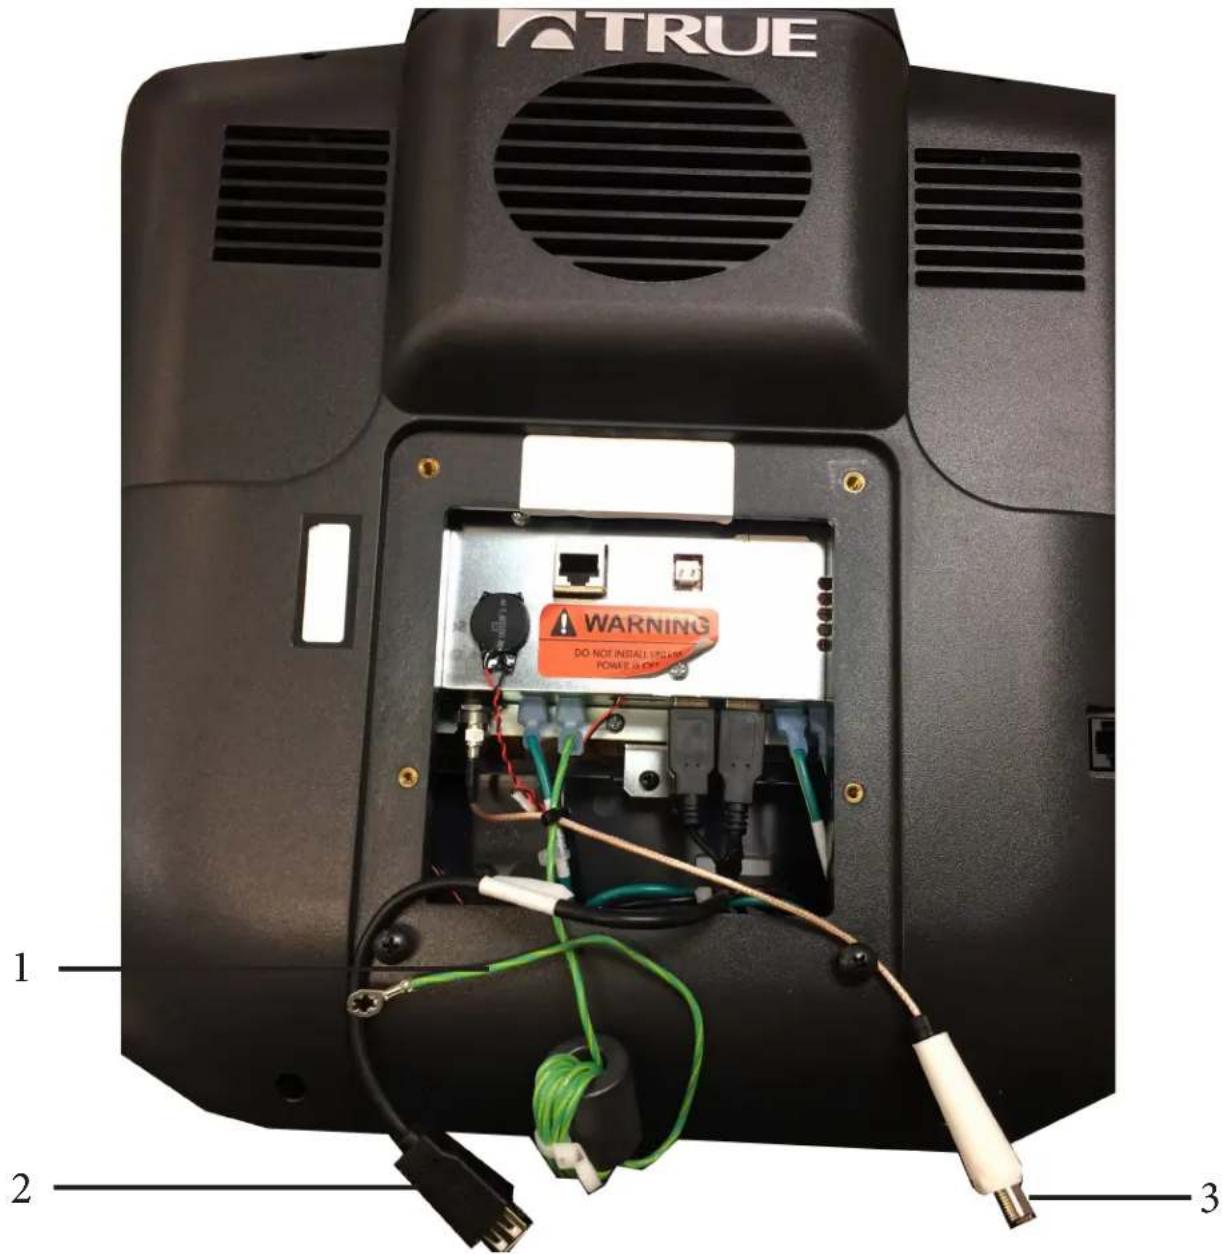
Step 1 (Ground, Data, and Coaxial Cables):
Locate the Ground Wire, Coaxial Cable, and Data Cable (USB) coming from the console.
Partially thread the bottom two console attachment screws into the console.
| Item Description Quantity | ___ |
| 1 Ground Wire 1 | |
| 2 Data Cables (USB) 1 | |
| 3 Coaxial Cable 1 |
text_image
TRUE WARNING DO NOT INSTALL VOLUME POWER INPUTS 1 2 3CHAPTER 2: ASSEMBLY INSTRUCTIONS
TREADMILL ASSEMBLY STEPS (CONTINUED):
Transcend Console Assembly:
Step 2 (Console Mounting):
Route the Ground Wire and Data Cable (USB) through the console mast assembly.
| Item Description Quantity | ___ |
| 4 Ground Wire 1 | |
| 5 Data Cable (USB) 1 |
Set the bottom two console mounting screws, which were partially thread into the console, into the keyholes on the console mast assembly.
Partially thread the top two console mounting screws and then fully tighten all four console mounting screws using a long, Phillips screwdriver.
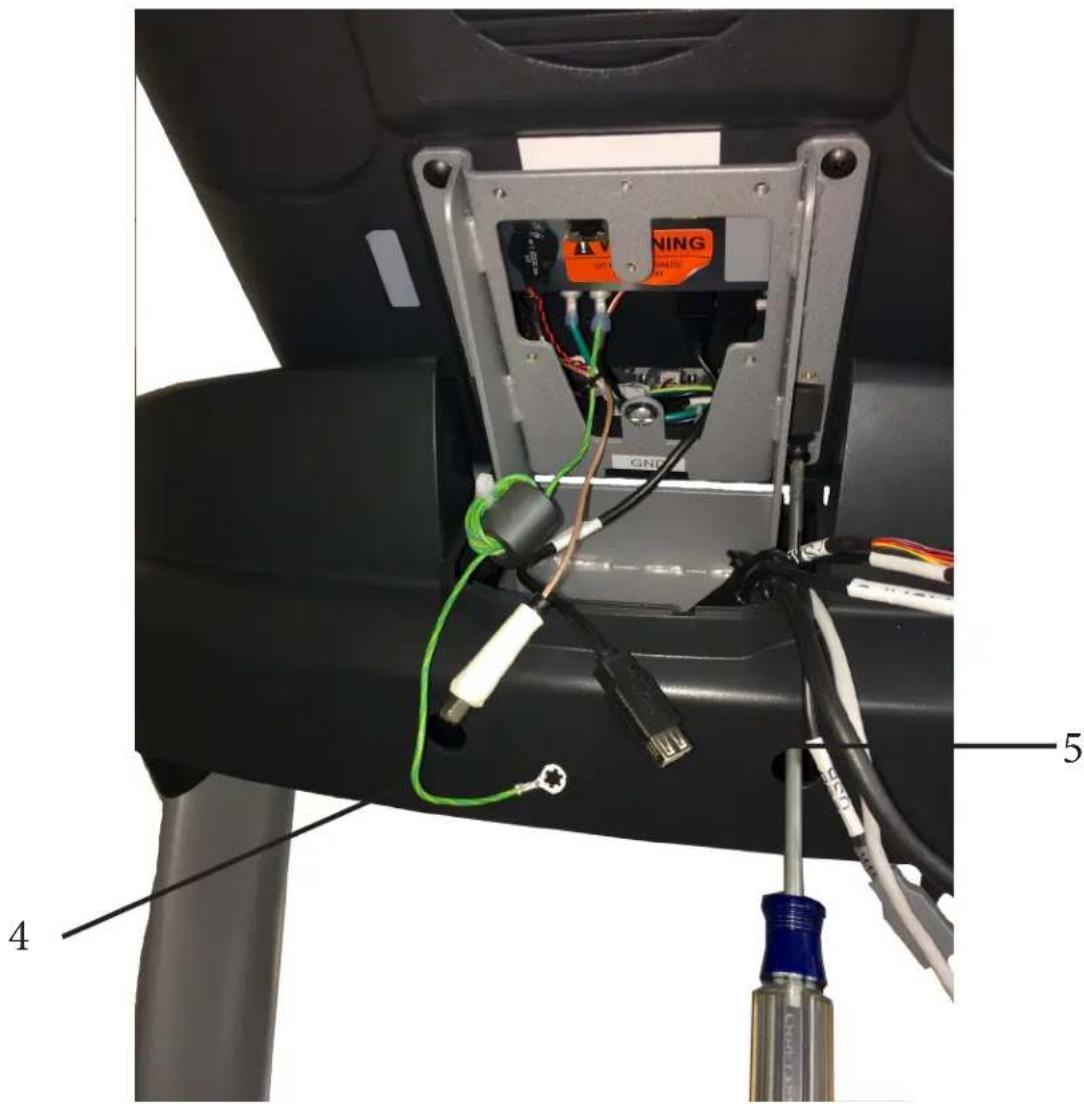
text_image
Labeled diagram of an electronic device showing internal components including a GNG connector, wiring, and screwdriver.CHAPTER 2: ASSEMBLY INSTRUCTIONS
TREADMILL ASSEMBLY STEPS (CONTINUED):
Transcend Console Assembly:
Step 3 (Data and Coaxial Cables):
Connect the Coaxial Cable and Data Cable (USB) to their counterparts as shown below.
| Item Description Quantity | ____ |
| 6 Data Cable (USB) 1 | |
| 7 Coaxial Cable 1 |
Note: Position the rubber boot over the coaxial cable connection point.
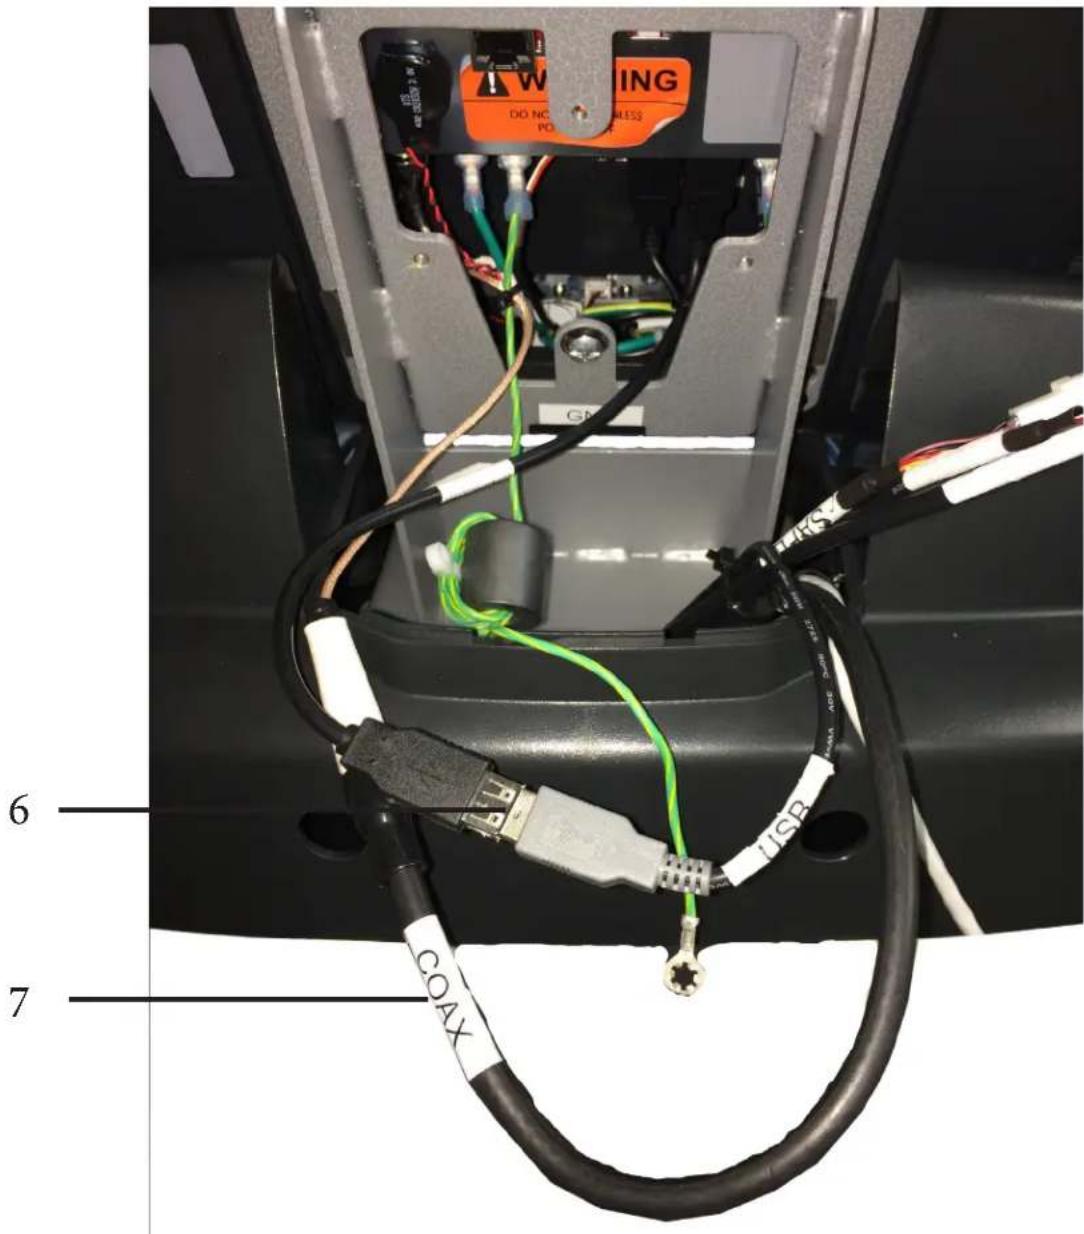
text_image
WARNING DO NC PO 6 7 COAXCHAPTER 2: ASSEMBLY INSTRUCTIONS
TREADMILL ASSEMBLY STEPS (CONTINUED):
Transcend Console Assembly:
Step 4 (Console Wiring):
Connect the Auxiliary Power Supply (AUXPS) and Communication Cable (Ethernet) to the corresponding ports on the console, placing any excess cord length inside the console.
| Item Description Quantity | ____ |
| 8 Auxiliary Power Supply Cable | 1 |
| 9 Communication Cable (Ethernet) | 1 |
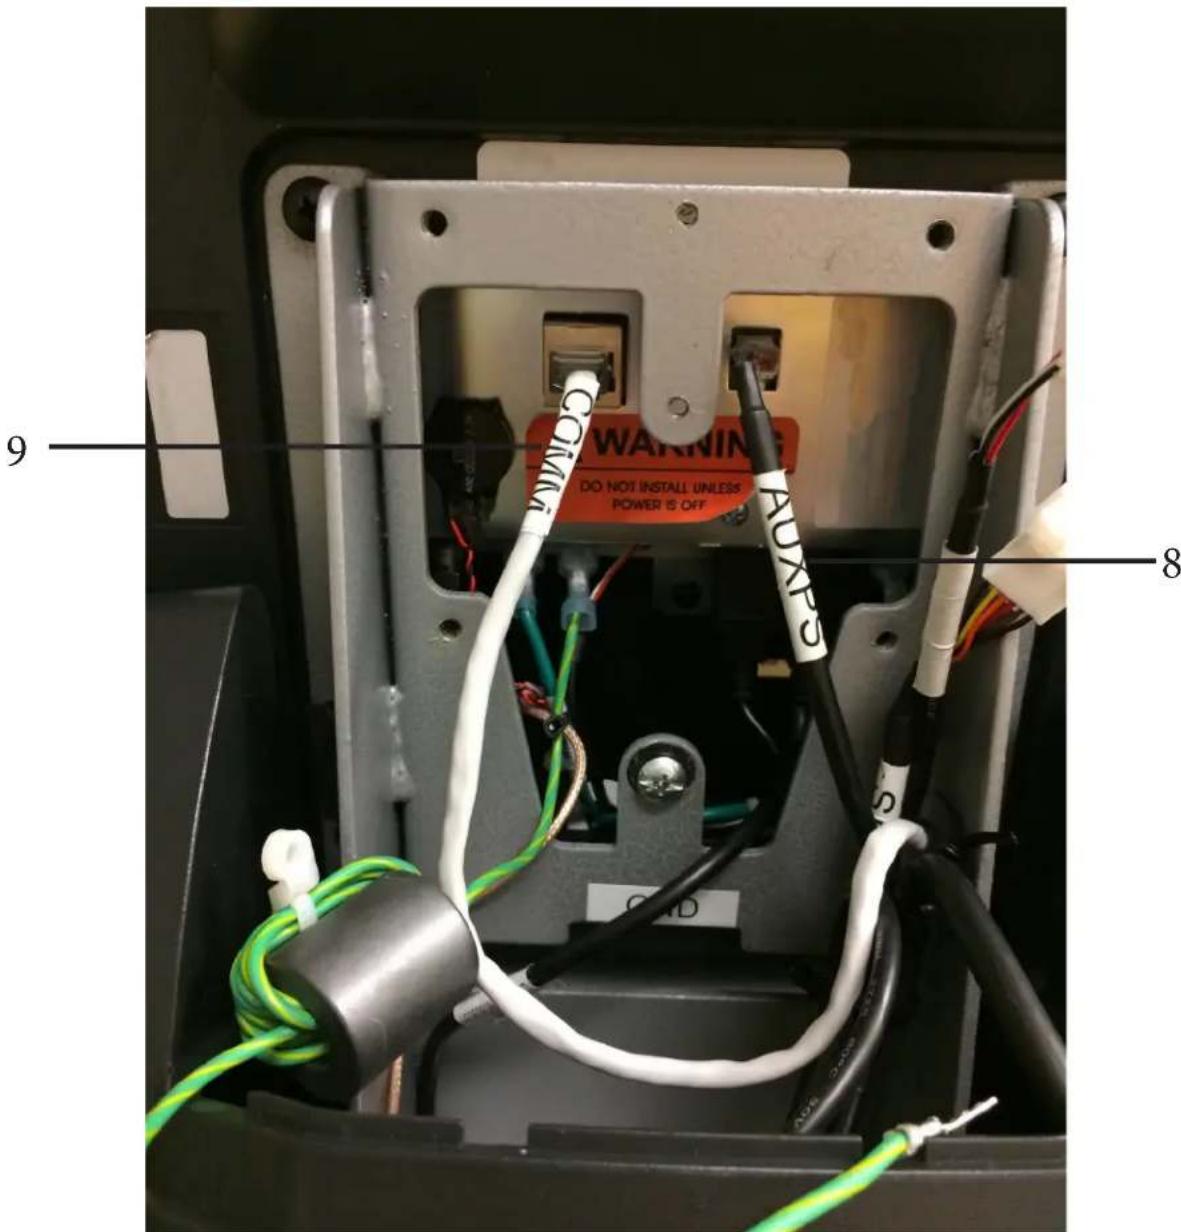
text_image
9 WARNING DO NOT INSTALL UNLESS POWER IS OFF 8 CAN AUXPSCHAPTER 2: ASSEMBLY INSTRUCTIONS
TREADMILL ASSEMBLY STEPS (CONTINUED):
Transcend Console Assembly:
Step 5 (Wire Ties):
Secure the ferrite on the ground wire to the console mast assembly in the location identified using a M4 screw.
Secure the ground wire ring terminal to the corresponding location on the console mast assembly marked “GND” using the screw that is currently there.
| Item Description Quantity | ___ |
| 10 Ground Wire 1 | |
| 11 Ferrite 1 | |
| 12 Wire Tie 1 |
Position the unused Fan and CSAFE cables inside the pedestal.
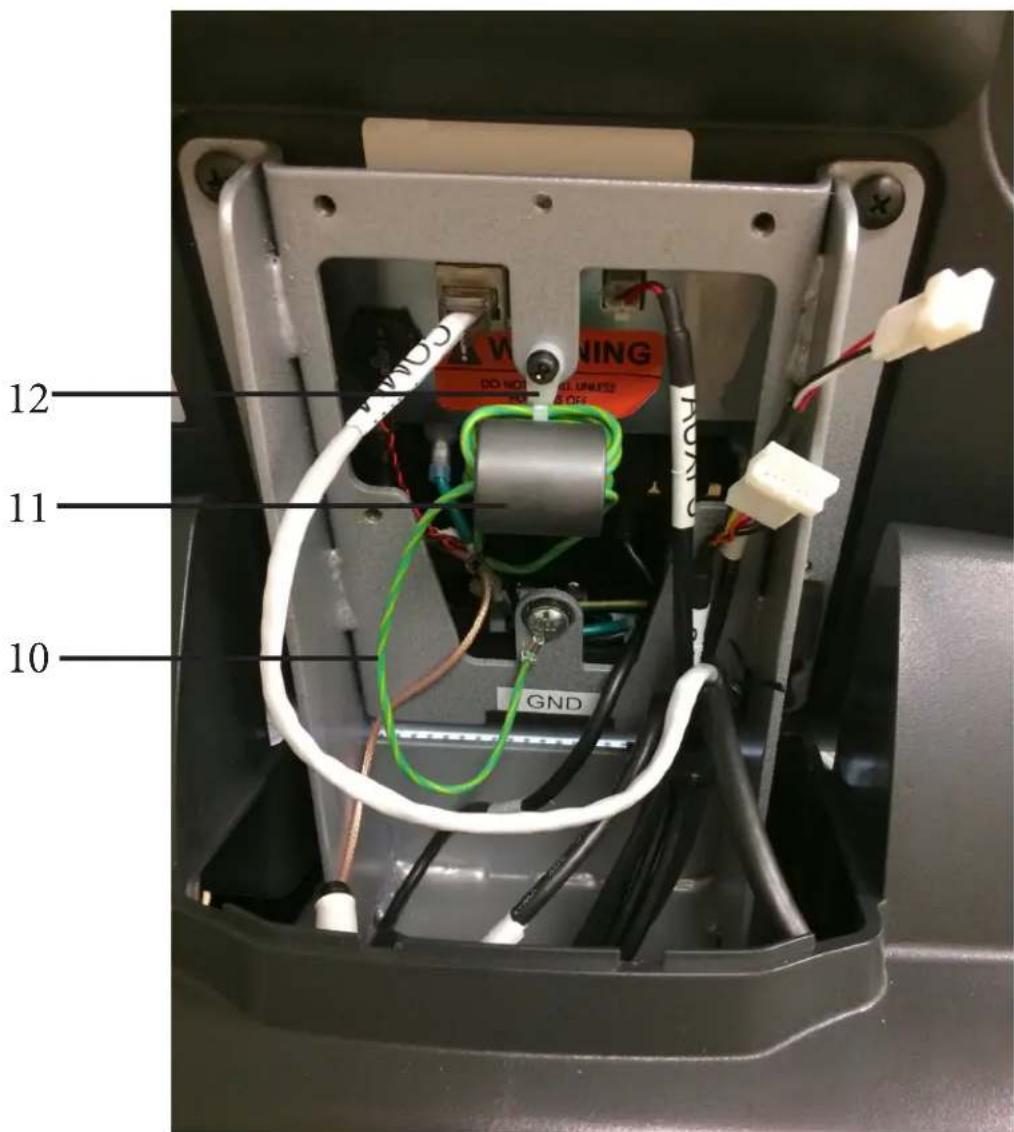
text_image
12 11 10 GND DO NOT DO NOT DO NOT DO NOT DO NOT DO NOT DO NOT DO NOT DO NOT DO NOT DO NOT DO NOT DO NOT DO NOT DO NOT DO NOT DO NOT DO NOT DO NOT DO NOT DO NOT DO NOT DO NOT DO NOT DO NOT DO NOT DO NOT DO NOT DO NOT DO NOT DO NOT DO NOT DO NOT DO NOTCHAPTER 2: ASSEMBLY INSTRUCTIONS
TREADMILL ASSEMBLY STEPS (CONTINUED):
Transcend Console Assembly:
Step 6 (12V Power Adapter: Locate Cable Connection):
Locate the identified cable connection (A) and the adjacent wire tie.
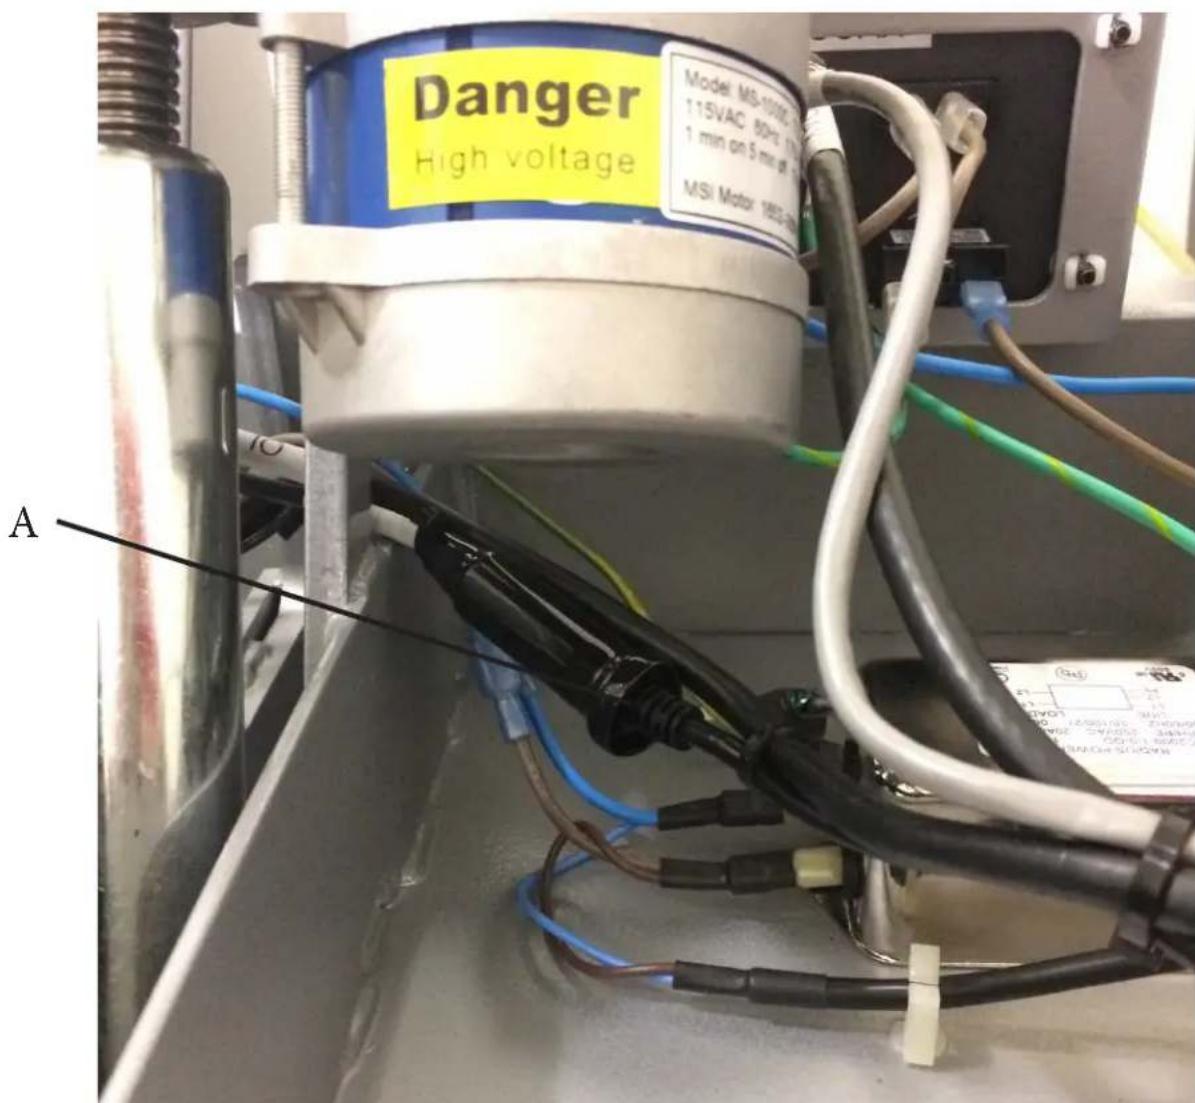
text_image
Danger High voltage Model MS-1000 115VAC 80Hz 12 1 min on 5 min off 10 MSI Motor 180A ACHAPTER 2: ASSEMBLY INSTRUCTIONS
TREADMILL ASSEMBLY STEPS (CONTINUED):
Transcend Console Assembly:
Step 7 (12V Power Adapter: Separate Cable Connection):
Remove the adjacent wire tie and separate the cable connection identified in Step 5. Cable connection (A) is no longer used and cable connection (B) will be connected to the 12V power adapter.
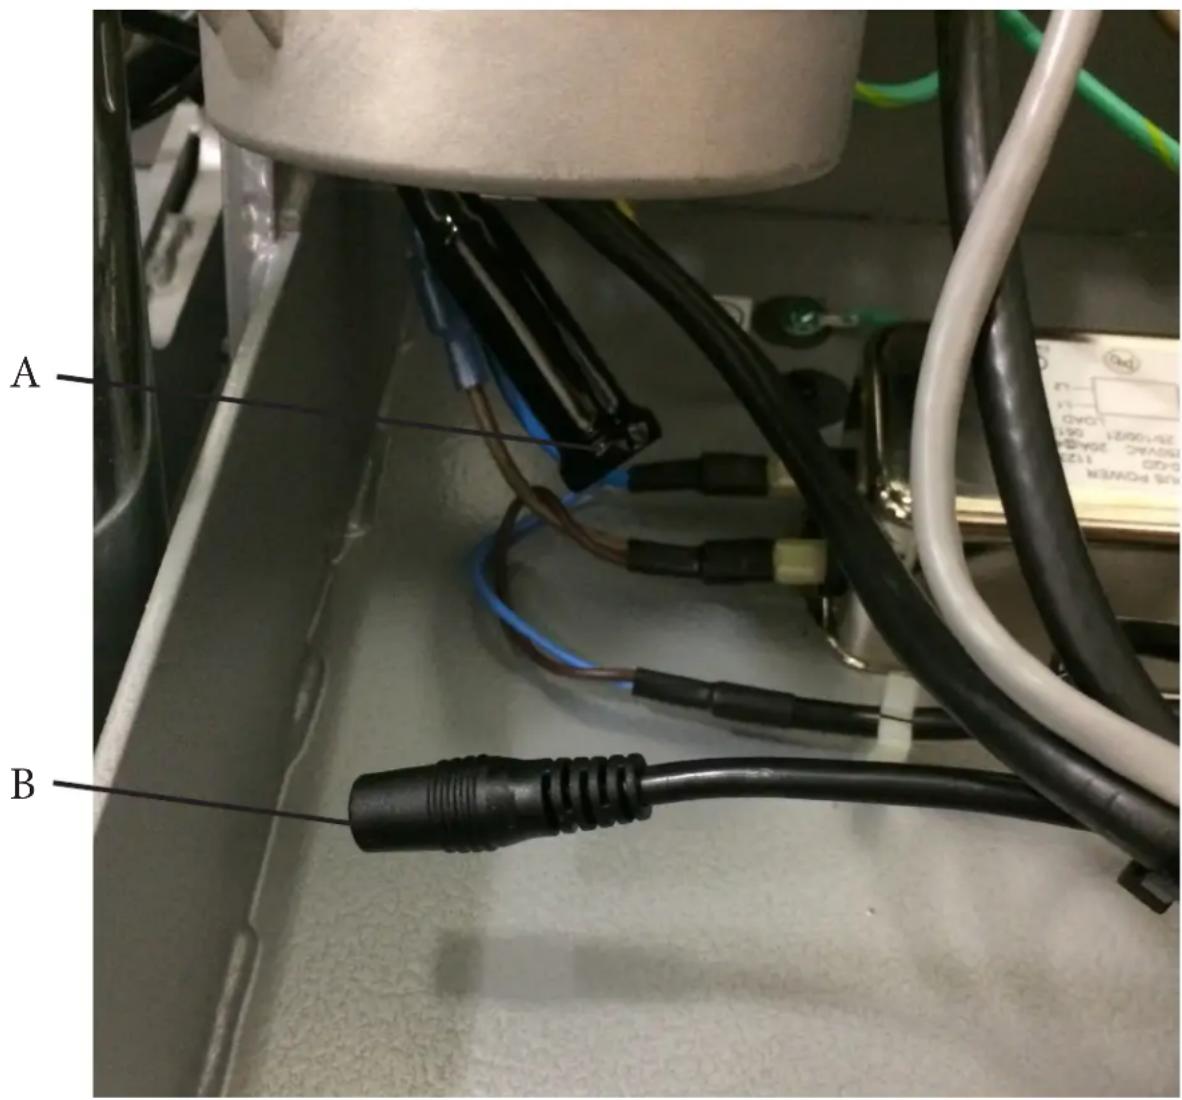
text_image
A BCHAPTER 2: ASSEMBLY INSTRUCTIONS
TREADMILL ASSEMBLY STEPS (CONTINUED):
Transcend Console Assembly:
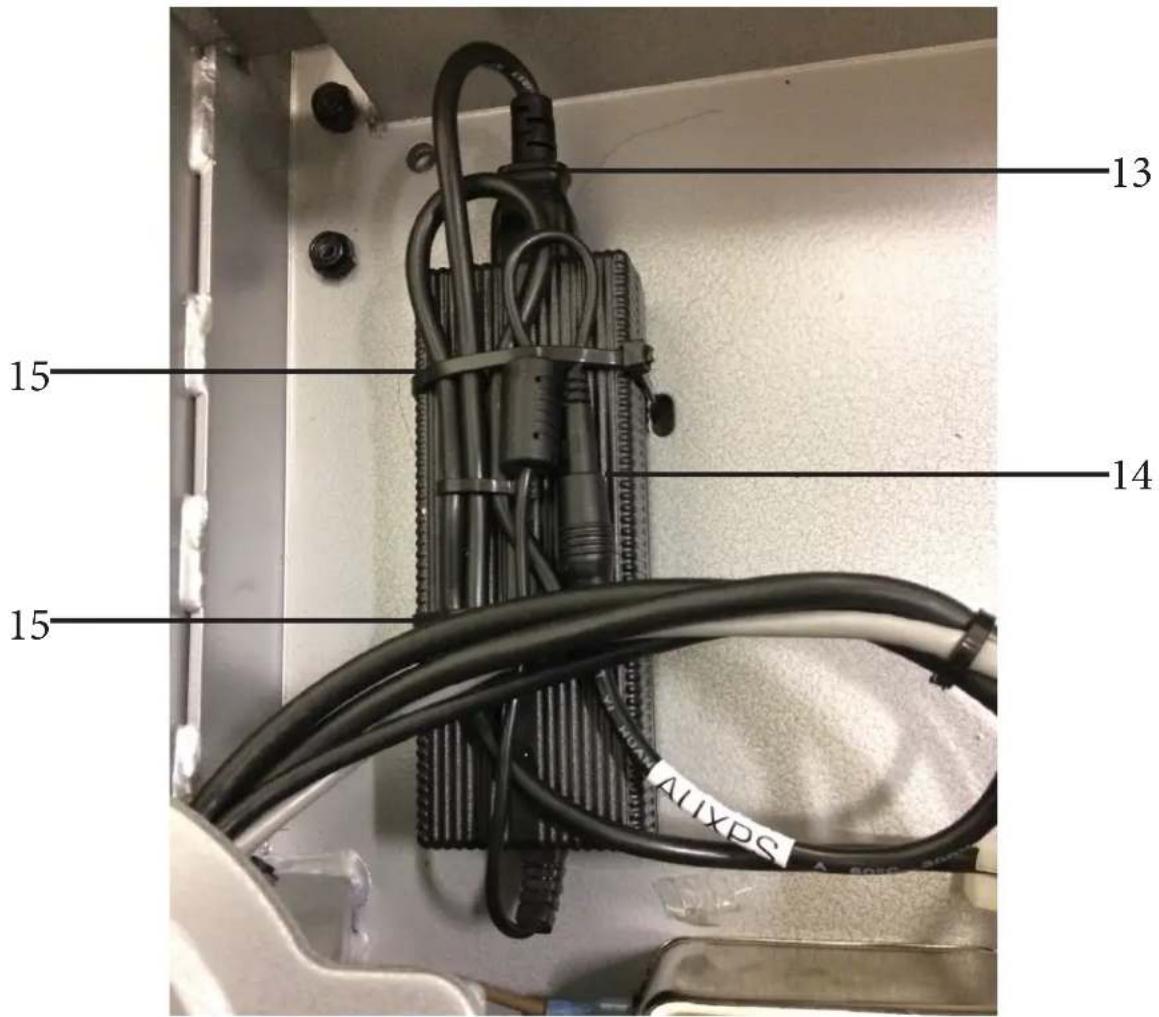
Step 8 (12V Power Adapter: Connect & Mount Adapter):
Place the 12V power adapter in the motor pan as shown and connect the AC power adapter cable and AUXPS cable from the pedestal tube to the identified connection points.
Position all cables as shown below and use two wire ties to secure the cables and 12V power adapter to the motor pan, ensuring the inline cable connector is positioned between both wire ties.
| Item Description Quantity | ___ |
| 13 AC Power Adapter Cable 1 | |
| 14 AUXPS 1 | |
| 15 Wire Tie 2 |
Trim any excess wire tie length using wire cutters.
text_image
13 15 14 15 ALIXPSCHAPTER 2: ASSEMBLY INSTRUCTIONS
TREADMILL ASSEMBLY STEPS (CONTINUED):
Escalate ^15 Console Assembly:
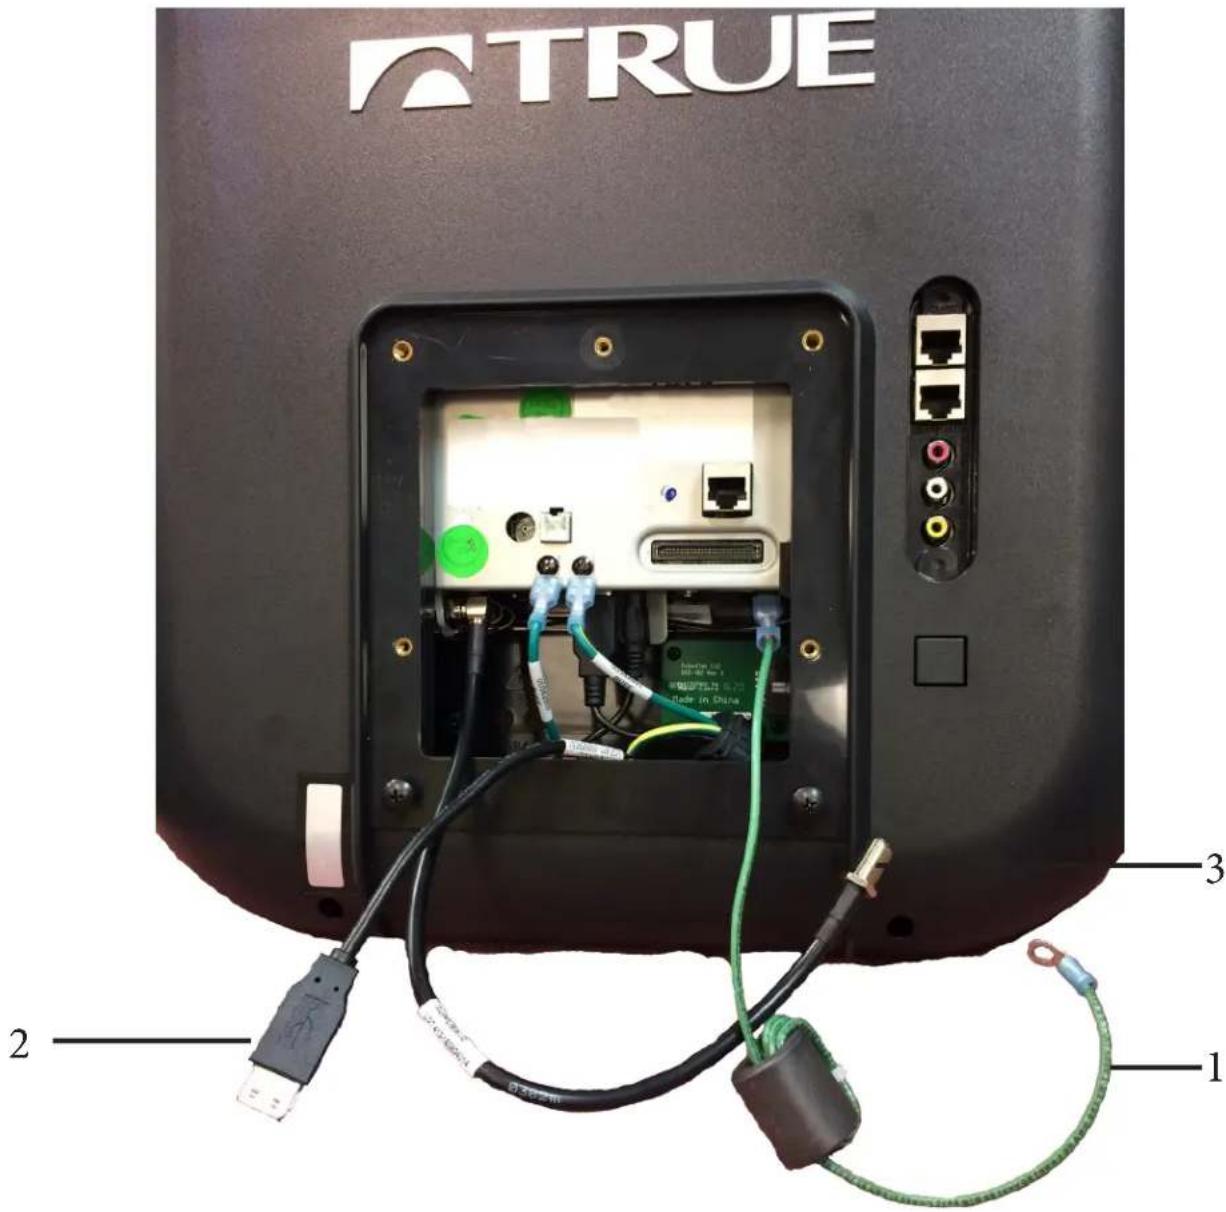
Step 1 (Ground Wire, Coaxial, and Data Cables):
Locate the Ground Wire, Coaxial Cable, and Data Cable (USB) coming from the console.
Partially thread the bottom two console attachment screws into the console.
| Item Description Quantity | ____ |
| 1 Ground Wire 1 | |
| 2 Data Cable (USB) 1 | |
| 3 Coaxial Cable 1 |
text_image
TRUE 2 3 1CHAPTER 2: ASSEMBLY INSTRUCTIONS
TREADMILL ASSEMBLY STEPS (CONTINUED):
Escalate ^15 Console Assembly:
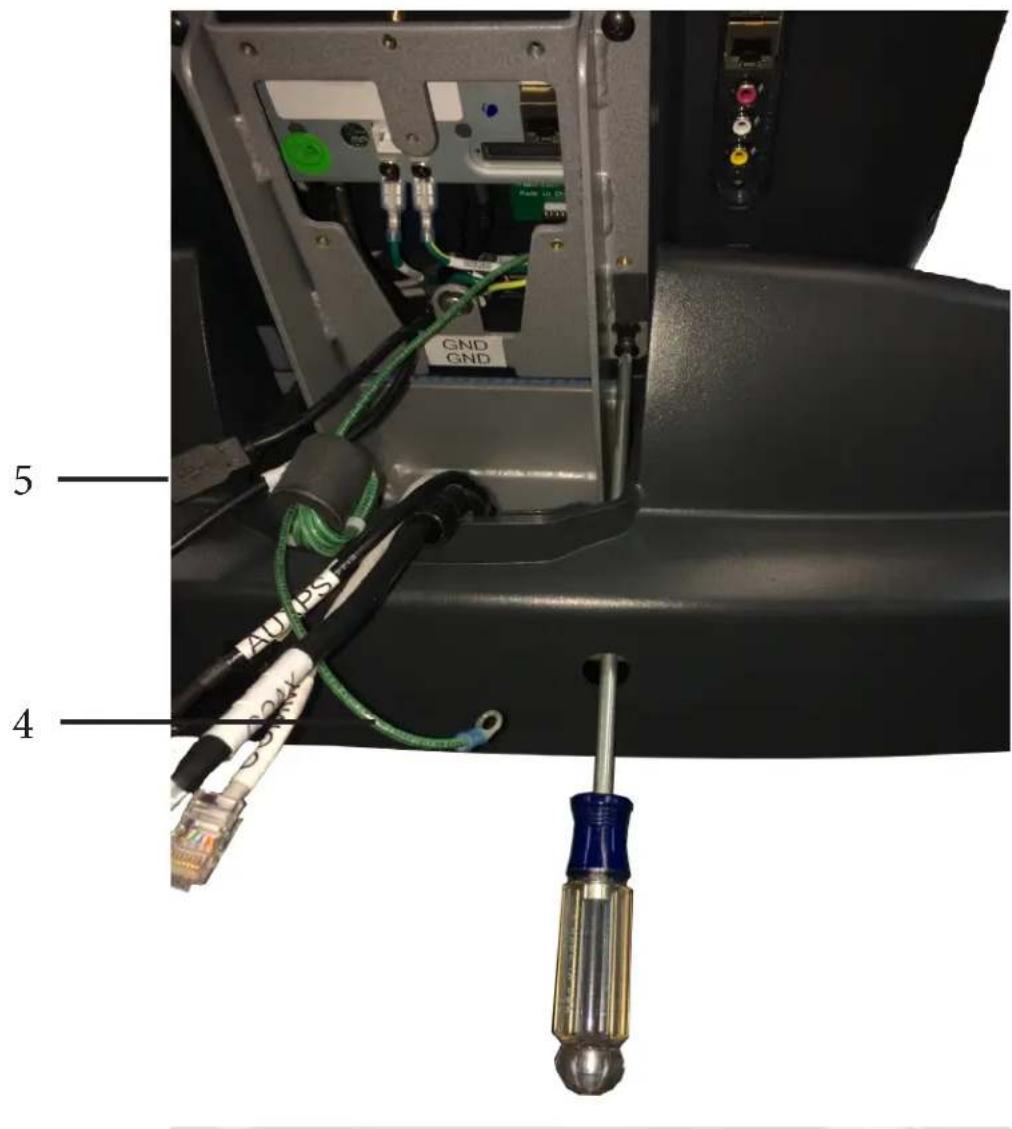
Step 2 (Console Mounting):
Route the Ground Wire and Data Cable (USB) through the console mast assembly.
| Item Description Quantity | ___ |
| 4 Ground Wire 1 | |
| 5 Data Cable (USB) 1 |
Set the bottom two console mounting screws, which were partially thread into the console, into the keyholes on the console mast assembly.
Partially thread the top two console mounting screws and then fully tighten all four console mounting screws using a long, Phillips screwdriver.
text_image
GND GND 5 AD BS 4CHAPTER 2: ASSEMBLY INSTRUCTIONS
TREADMILL ASSEMBLY STEPS (CONTINUED):
Escalate ^15 Console Assembly:
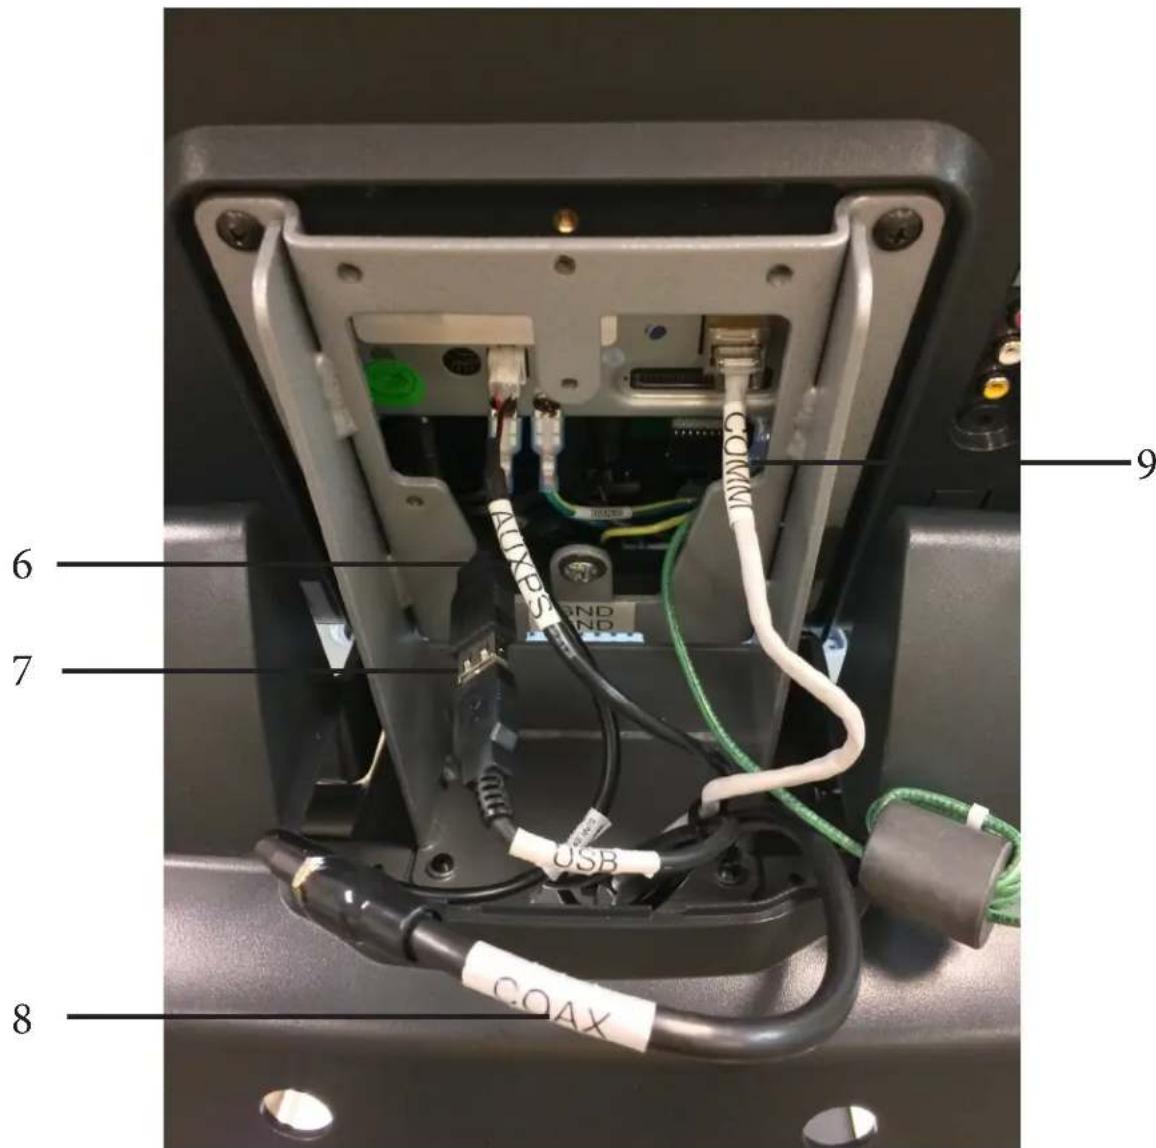
Step 3 (Console Wiring):
Connect the Data Cable (USB), Auxiliary Power Supply (AUXPS), Communication Cable (Ethernet), and Coaxial Cable to the corresponding ports on the console, placing any excess cord length inside the console.
Note: Position the rubber boot over the coaxial cable connection point.
| Item Description Quantity | ____ |
| 6 Auxiliary Power Supply Cable | 1 |
| 7 Data Cable (USB) 1 | |
| 8 Coaxial Cable 1 | |
| 9 Communication Cable (Ethernet) | 1 |
text_image
CO2ND USB COAX 6 7 8 9CHAPTER 2: ASSEMBLY INSTRUCTIONS
TREADMILL ASSEMBLY STEPS (CONTINUED):
Escalate ^15 Console Assembly:
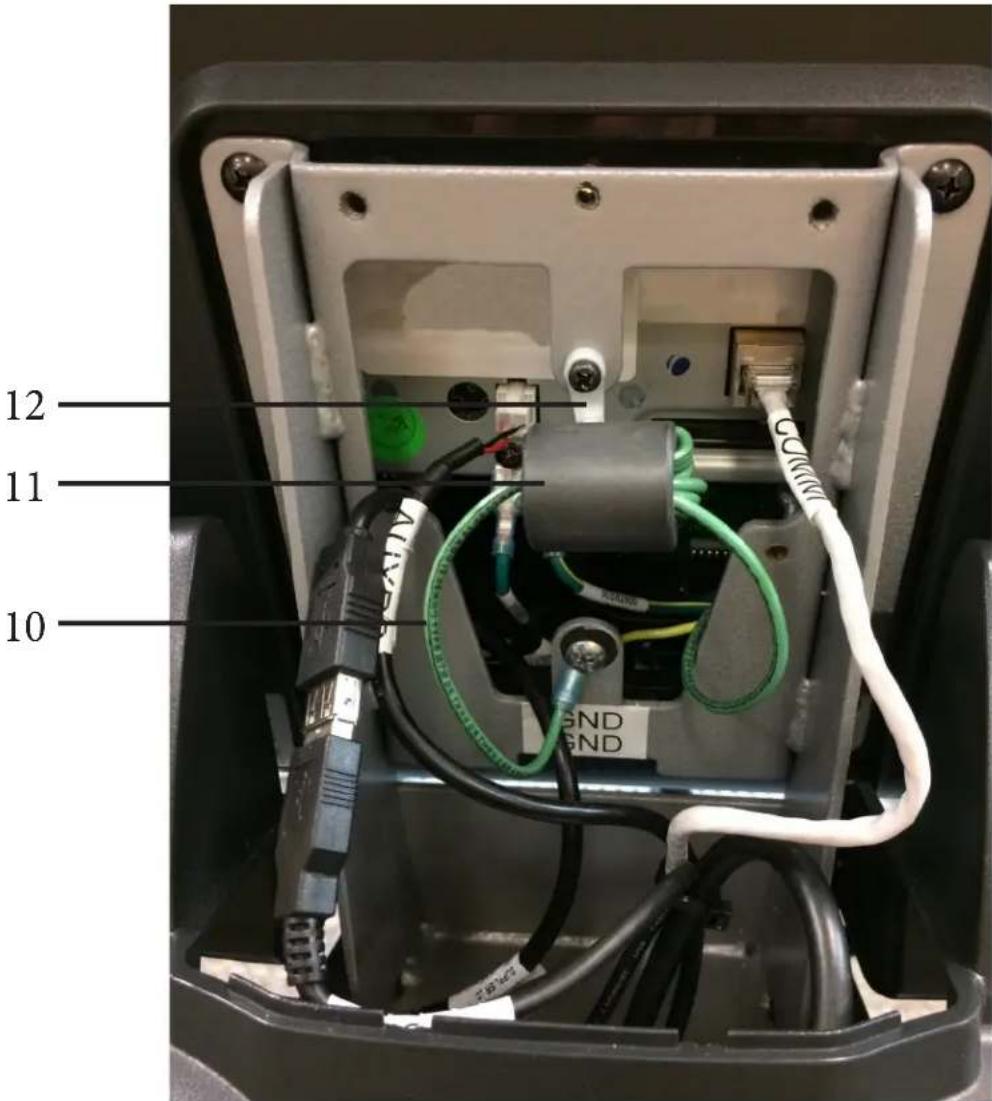
Step 4 (Ground Wire):
Secure the ferrite on the ground wire to the console mast assembly in the location identified using a M4 screw.
Secure the ground wire ring terminal to the corresponding location on the console mast assembly marked “GND” using the screw that is currently there.
| Item Description Quantity | ____ |
| 10 Ground Wire 1 | |
| 11 Ferrite 1 | |
| 12 Wire Tie 1 |
Position the unused Fan and CSAFE cables inside the pedestal.
text_image
12 11 10CHAPTER 2: ASSEMBLY INSTRUCTIONS
TREADMILL ASSEMBLY STEPS (CONTINUED):
Escalate ^15 Console Assembly:
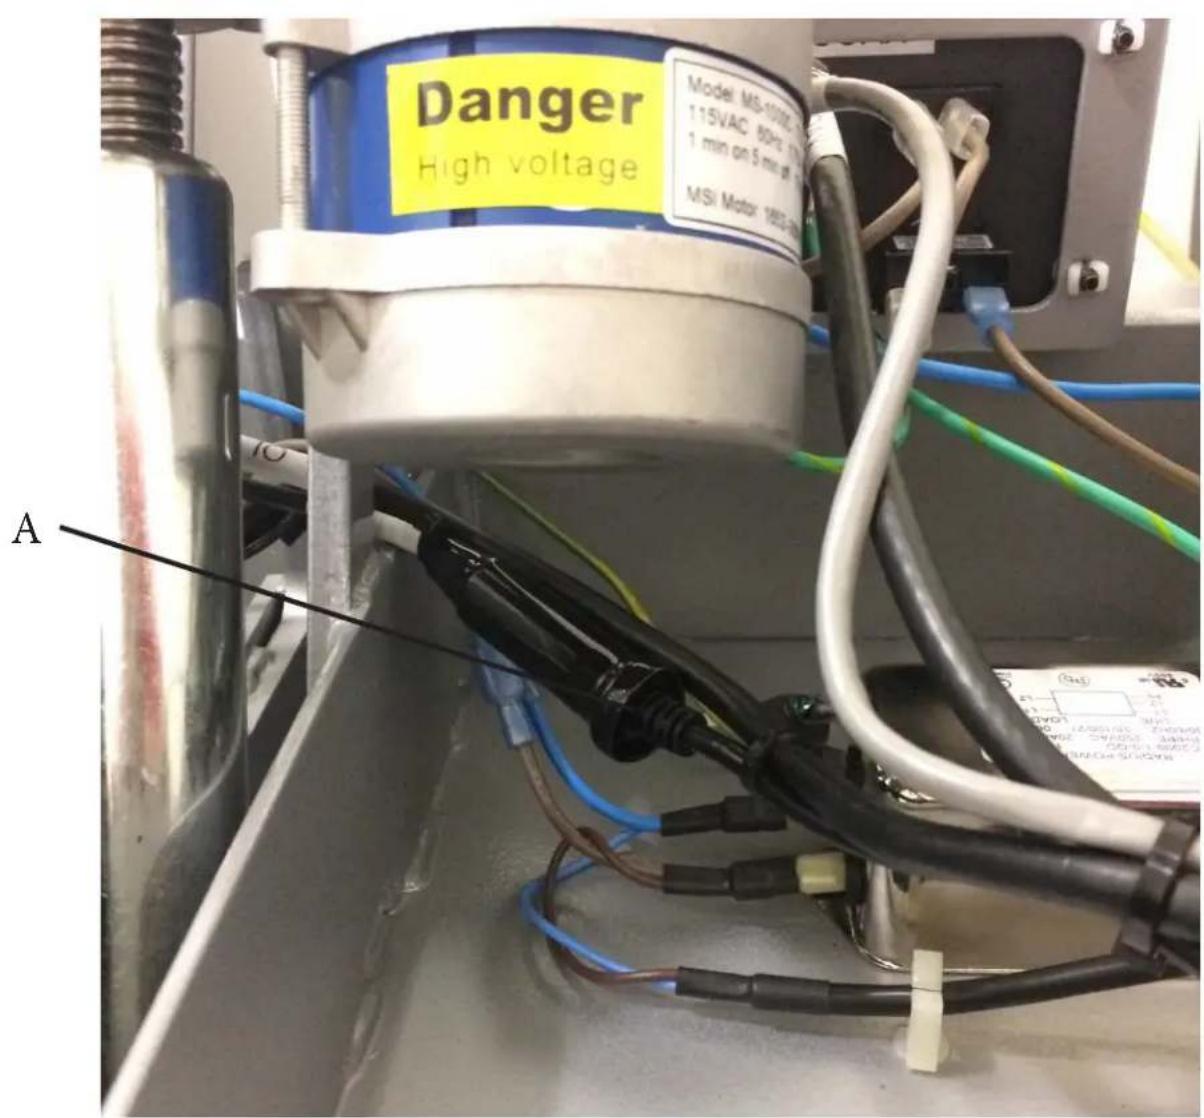
Step 5 (12V Power Adapter: Locate Cable Connection):
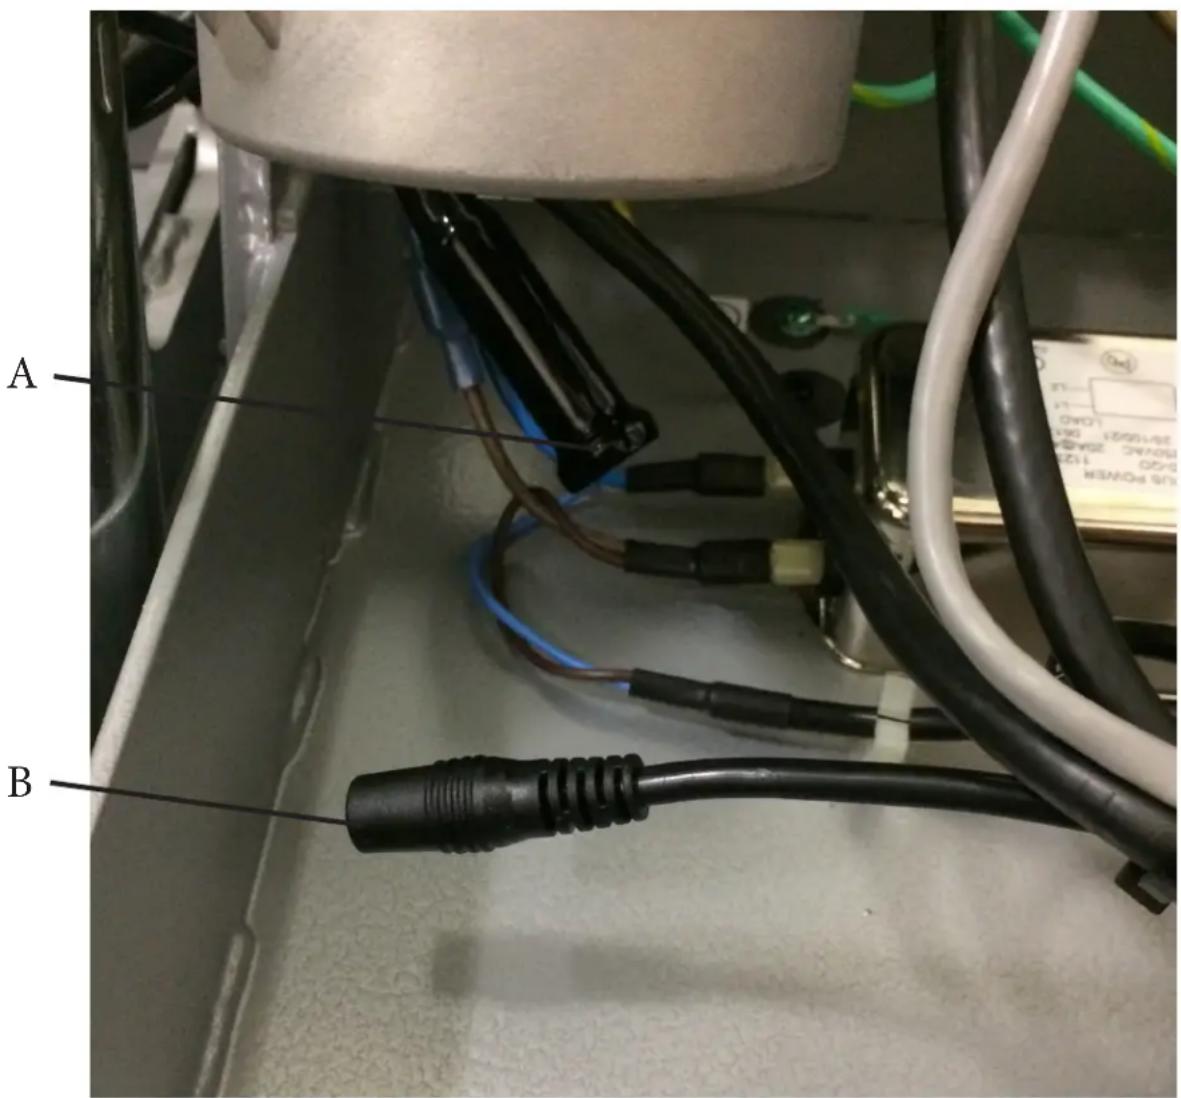
Locate the identified cable connection (A) and the adjacent wire tie.
text_image
Danger High voltage Model MS-1000C 115VAC 60Hz 170 1 min on 5 ms at 3.5 MSI Motor 1800mA ACHAPTER 2: ASSEMBLY INSTRUCTIONS
TREADMILL ASSEMBLY STEPS (CONTINUED):
Escalate ^15 Console Assembly:
Step 6 (12V Power Adapter: Separate Cable Connection):
Remove the adjacent wire tie and separate the cable connection identified in Step 5. Cable connection (A) is no longer used and cable connection (B) will be connected to the 12V power adapter.
text_image
A BCHAPTER 2: ASSEMBLY INSTRUCTIONS
TREADMILL ASSEMBLY STEPS (CONTINUED):
Escalate ^15 Console Assembly:
Step 7 (12V Power Adapter: Connect & Mount Adapter):
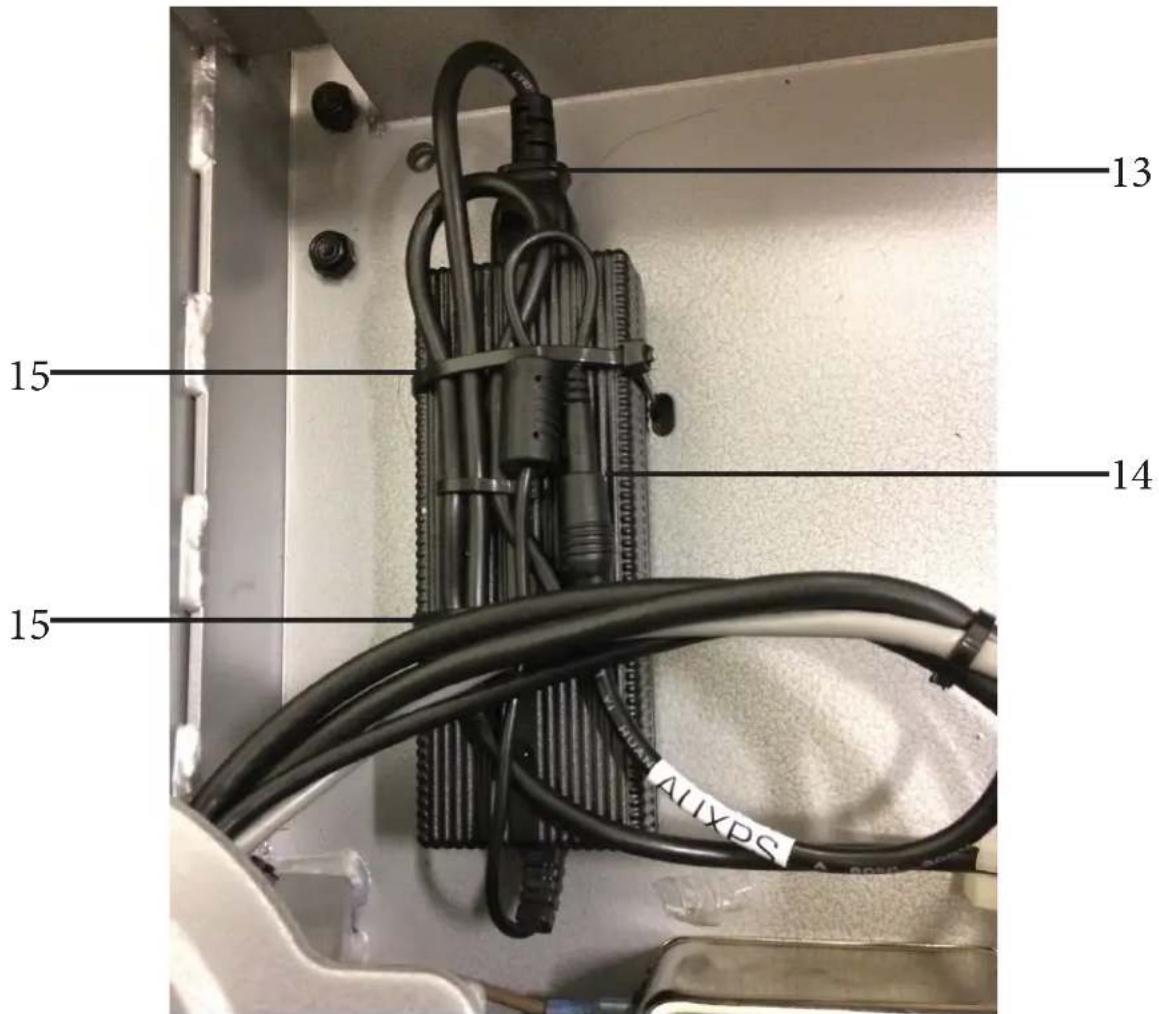
Place the 12V power adapter in the motor pan as shown and connect the AC power adapter cable and AUXPS cable from the pedestal tube to the identified connection points.
| Item Description Quantity | ___ |
| 13 AC Power Adapter Cable 1 | |
| 14 AUXPS 1 | |
| 15 Wire Tie 2 |
Position all cables as shown below and use two wire ties to secure the cables and 12V power adapter to the motor pan, ensuring the inline cable connector is positioned between both wire ties.
Trim any excess wire tie length using wire cutters.
text_image
13 15 14 15 ALIXPSCHAPTER 2: ASSEMBLY INSTRUCTIONS
TREADMILL ASSEMBLY STEPS (CONTINUED):
Escalate ^9 Console Assembly:
Step 1 (Ground Wire and Data Cable):
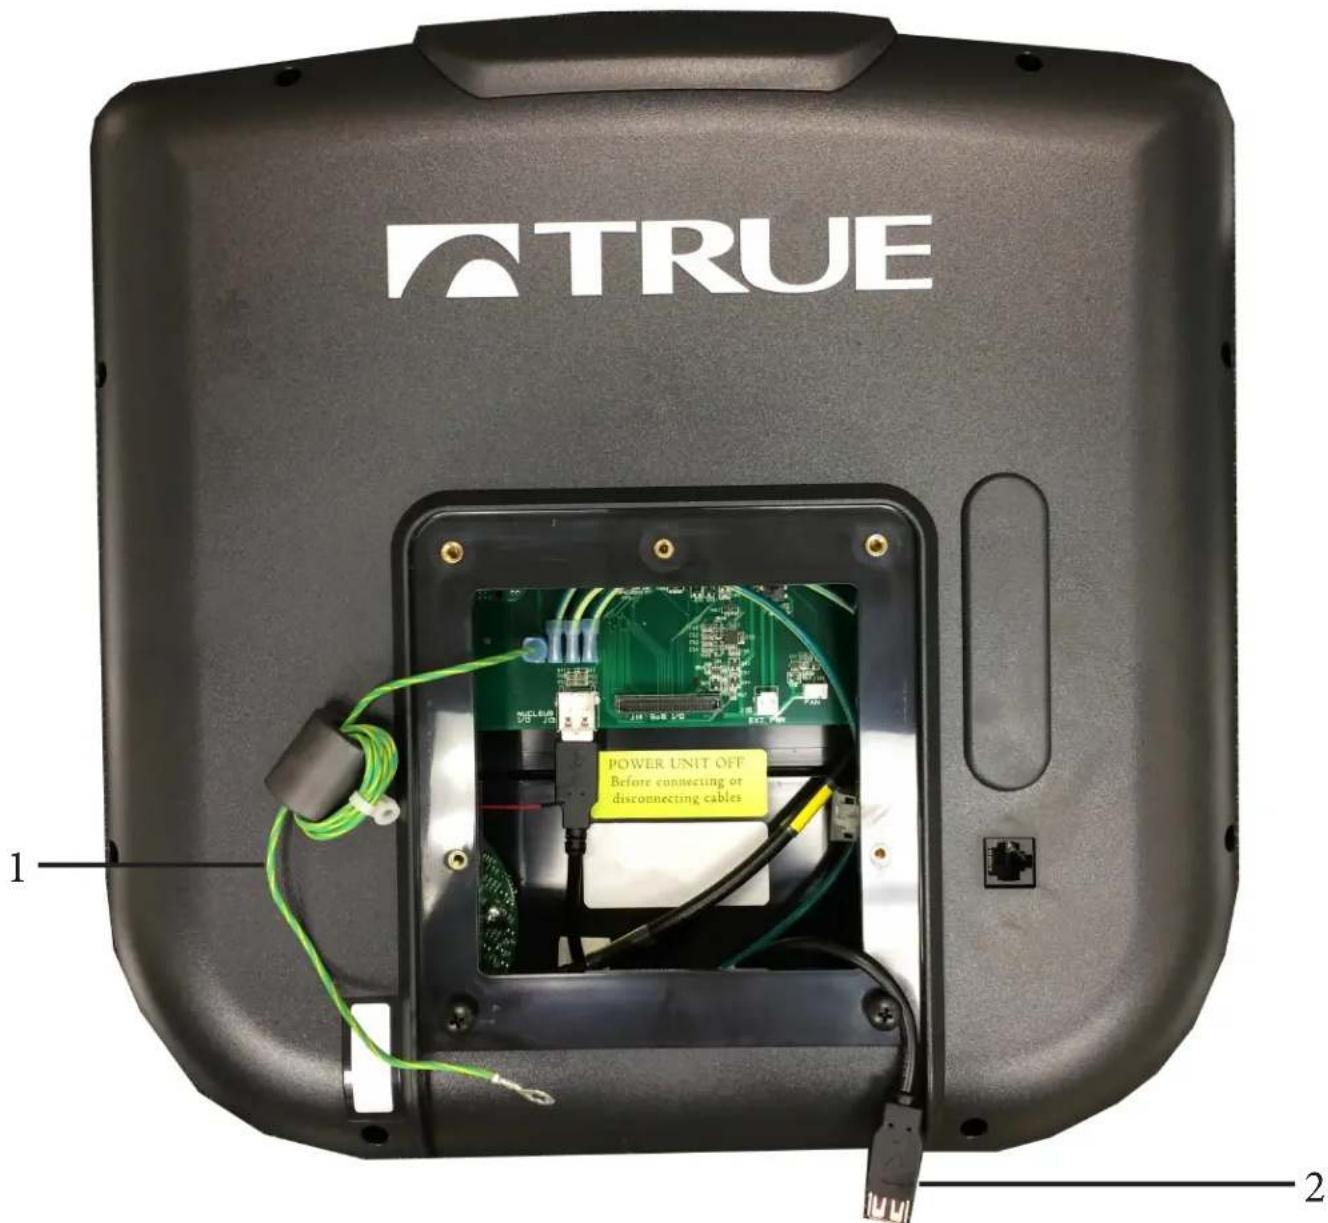
Locate the ground wire and Data Cable (USB) coming from the console.
| Item Description Quantity | _ |
| 1 Ground Wire 1 | |
| 2 Data Cable (USB) 1 |
Partially thread the bottom two console attachment screws into the console.
text_image
TRUE POWER UNIT OFF Before connecting or disconnecting cables 1 2CHAPTER 2: ASSEMBLY INSTRUCTIONS
TREADMILL ASSEMBLY STEPS (CONTINUED):
Escalate ^9 Console Assembly:
Step 2 (Console Mounting):
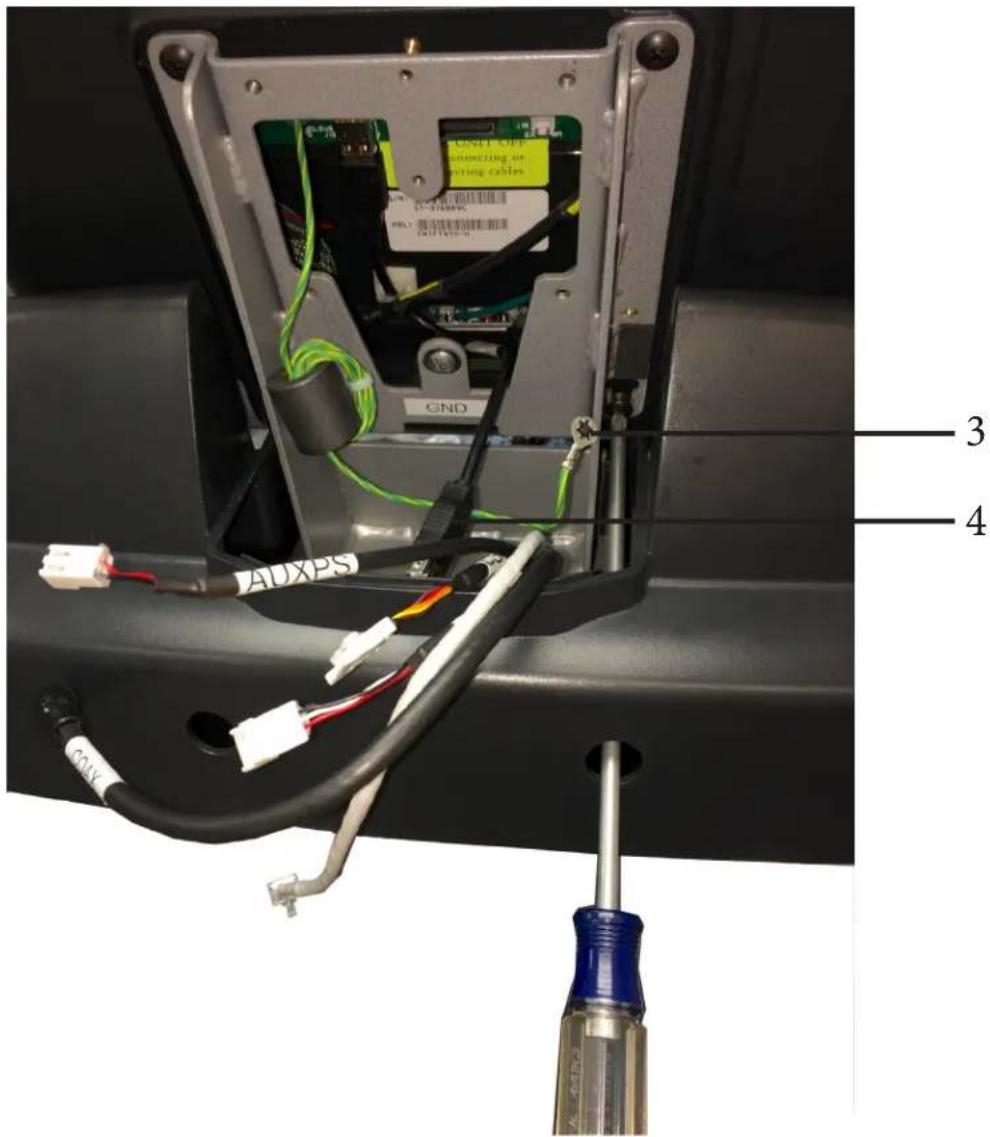
Route the Ground Wire and Data Cable (USB) through the console mast assembly.
| Item Description Quantity | ___ |
| 3 Ground Wire 1 | |
| 4 Data Cable (USB) 1 |
Set the bottom two console mounting screws, which were partially thread into the console, into the keyholes on the console mast assembly.
Partially thread the top two console mounting screws and then fully tighten all four console mounting screws using a long, Phillips screwdriver.
text_image
UNIT OFF selecting air sitting cables GND 3 4 AUXPSCHAPTER 2: ASSEMBLY INSTRUCTIONS
TREADMILL ASSEMBLY STEPS (CONTINUED):
Escalate ^9 Console Assembly:
Step 3 (Console Mounting):
Connect the Data Cable ([USB] located in the console mast assembly) to the Adapter Cable (located in the console) and position the connectors and any excess cable length in the bottom of the console.
| Item Description Quantity | |
| 5 Auxiliary Power Supply Cable | 1 |
| 6 Data Cable (USB) 1 | |
Connect the auxiliary power supply (AUXPS) cable to the corresponding console port.
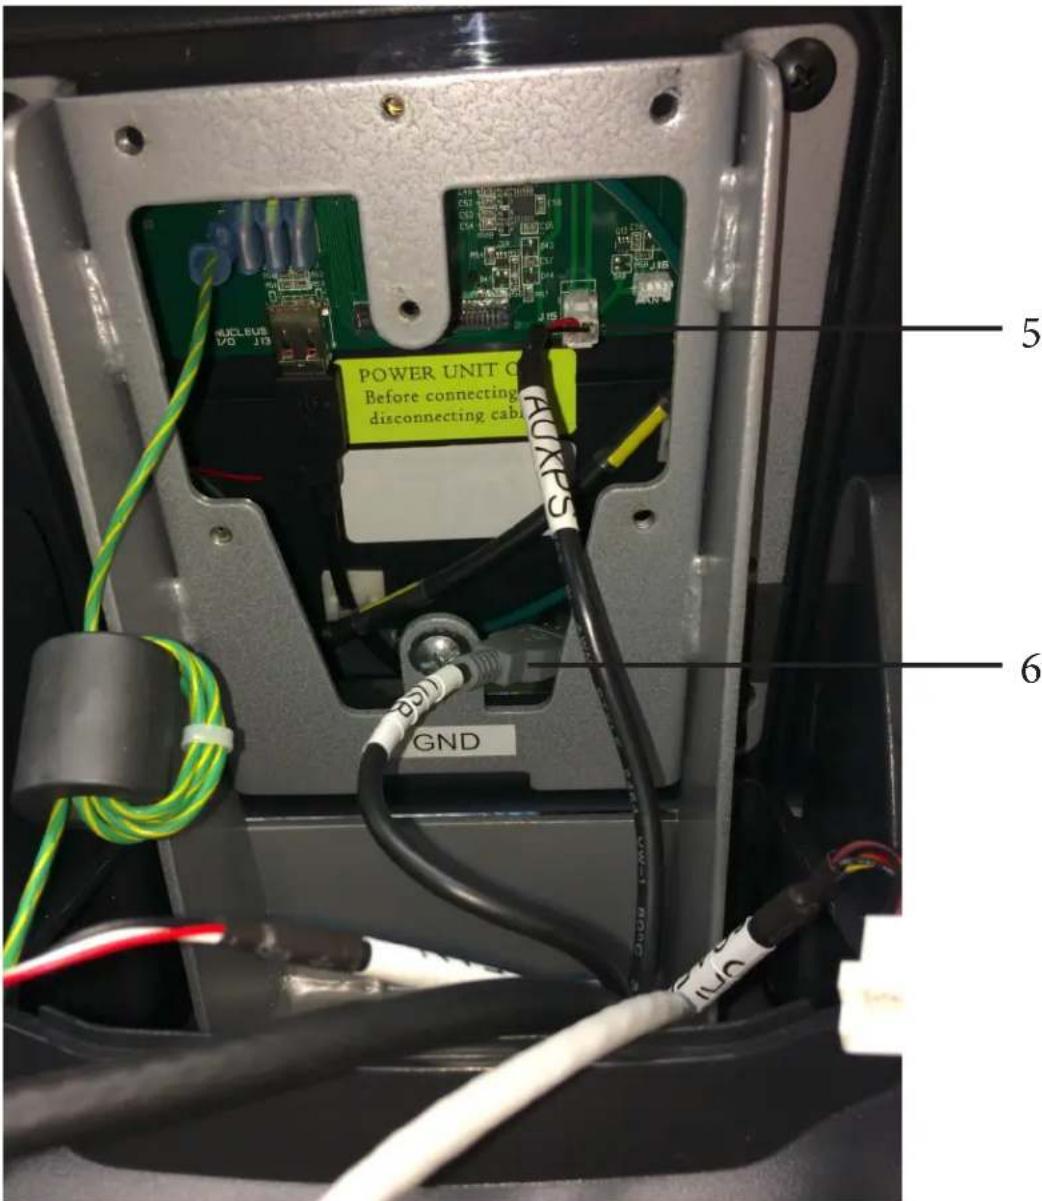
text_image
NUCLEBUS 170 13 POWER UNIT O Before connecting disconnecting cabi GND FOXES 5 6CHAPTER 2: ASSEMBLY INSTRUCTIONS
TREADMILL ASSEMBLY STEPS (CONTINUED):
Escalate ^9 Console Assembly:
Step 4 (Ground Wire):
Secure the ferrite on the ground wire to the console mast assembly in the location identified using a M4 screw.
Secure the ground wire ring terminal to the corresponding location on the console mast assembly marked "GND" using the screw that is currently there.
| Item Description Quantity | ___ |
| 6 Ground Wire 1 | |
| 7 Ferrite 1 | |
| 8 Wire Tie 2 |
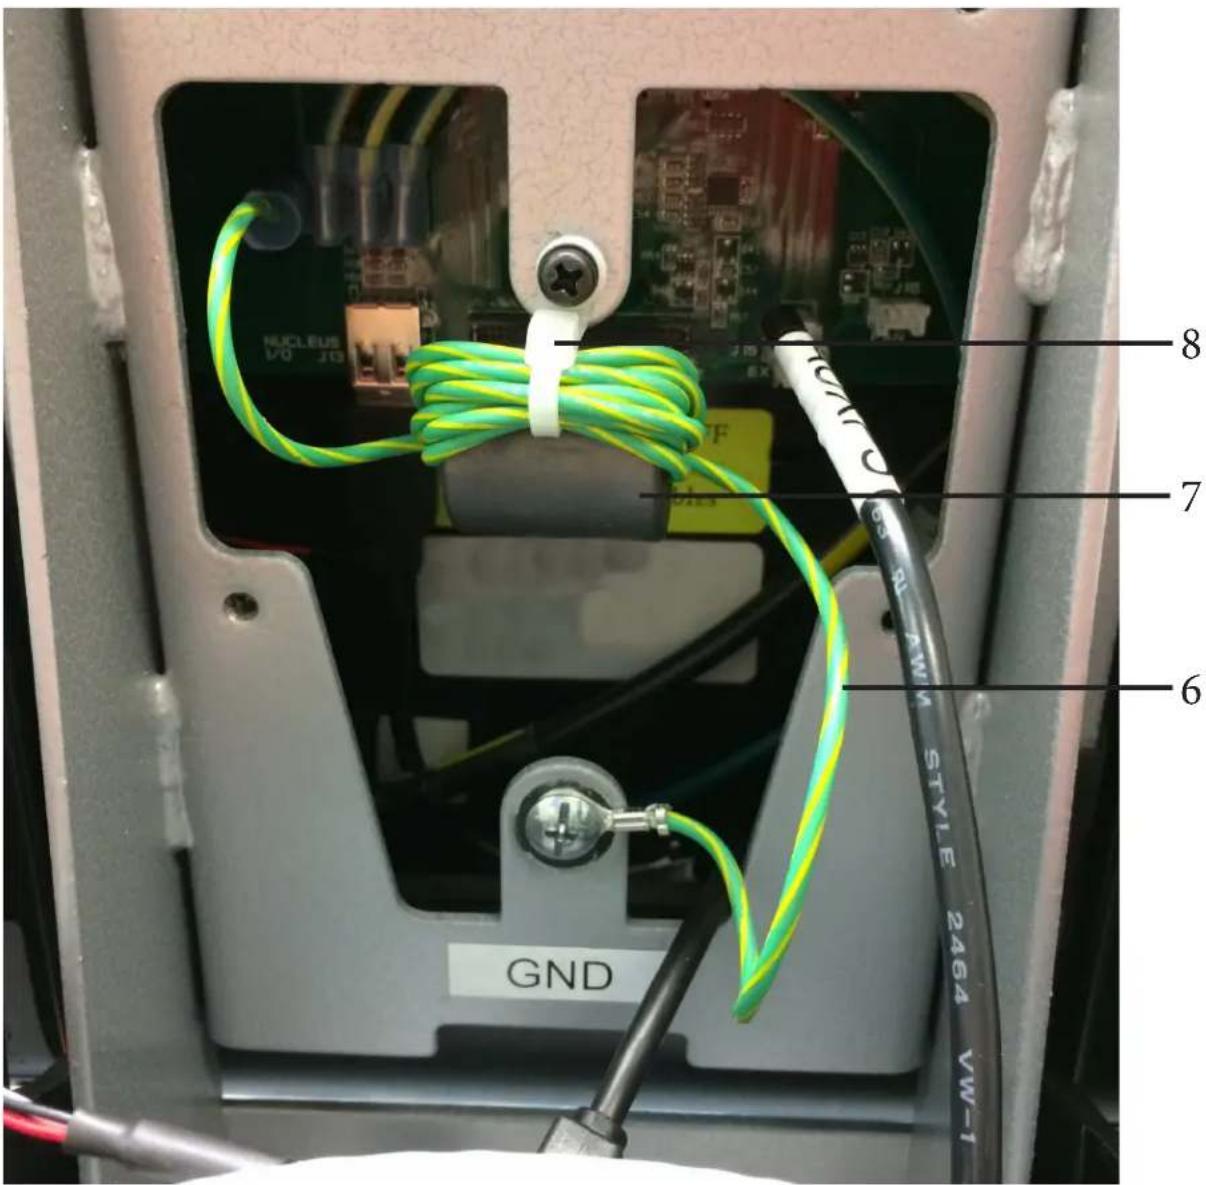
text_image
NUCLEUS GND 8 7 6 NUT 60-21-AW STYLE 2464 VW-1CHAPTER 2: ASSEMBLY INSTRUCTIONS
TREADMILL ASSEMBLY STEPS (CONTINUED):
Escalate ^9 Console Assembly:
Step 5 (Console Wiring):
Position the unused Coaxial, COMM, Fan, and CSAFE cables in the bottom of the console.
Note: Position the rubber boot over the coaxial cable connection point.
| Item Description Quantity | _ |
| 9 Coaxial Cable 1 | |
| 10 Communication Cable (Ethernet) | 1 |
| 11 Fan Cable 1 | |
| 12 CSAFE Cable 1 |
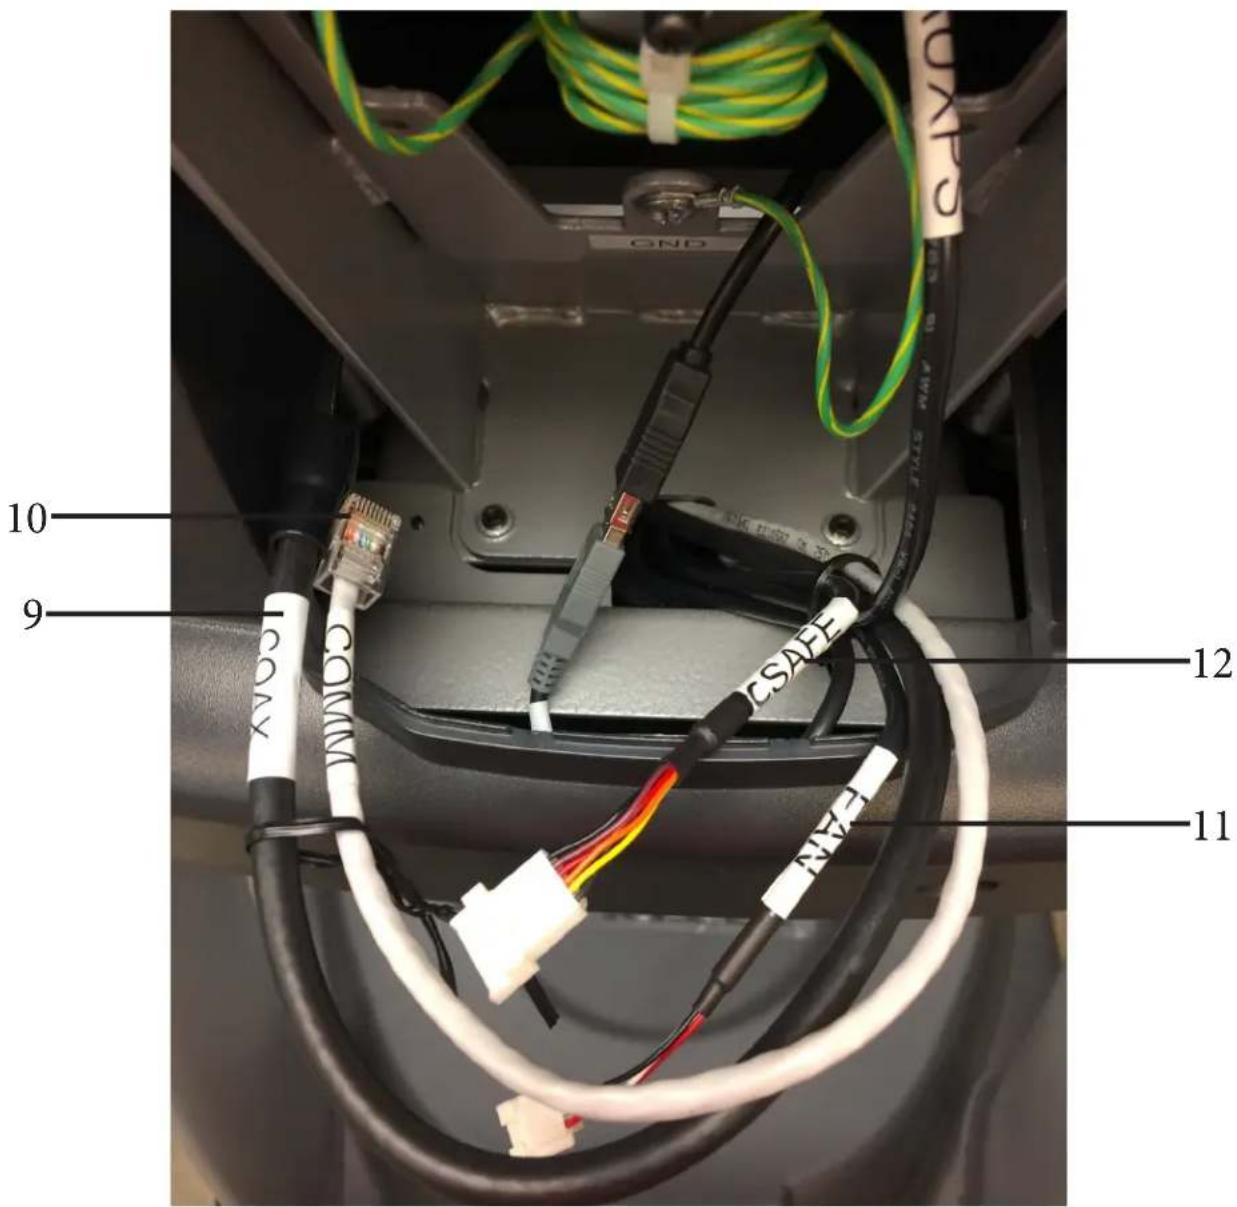
text_image
CNSA 10 9 12 11 CNNH COMN CSAFECHAPTER 3: PRODUCT OVERVIEW
TREADMILL OVERVIEW:
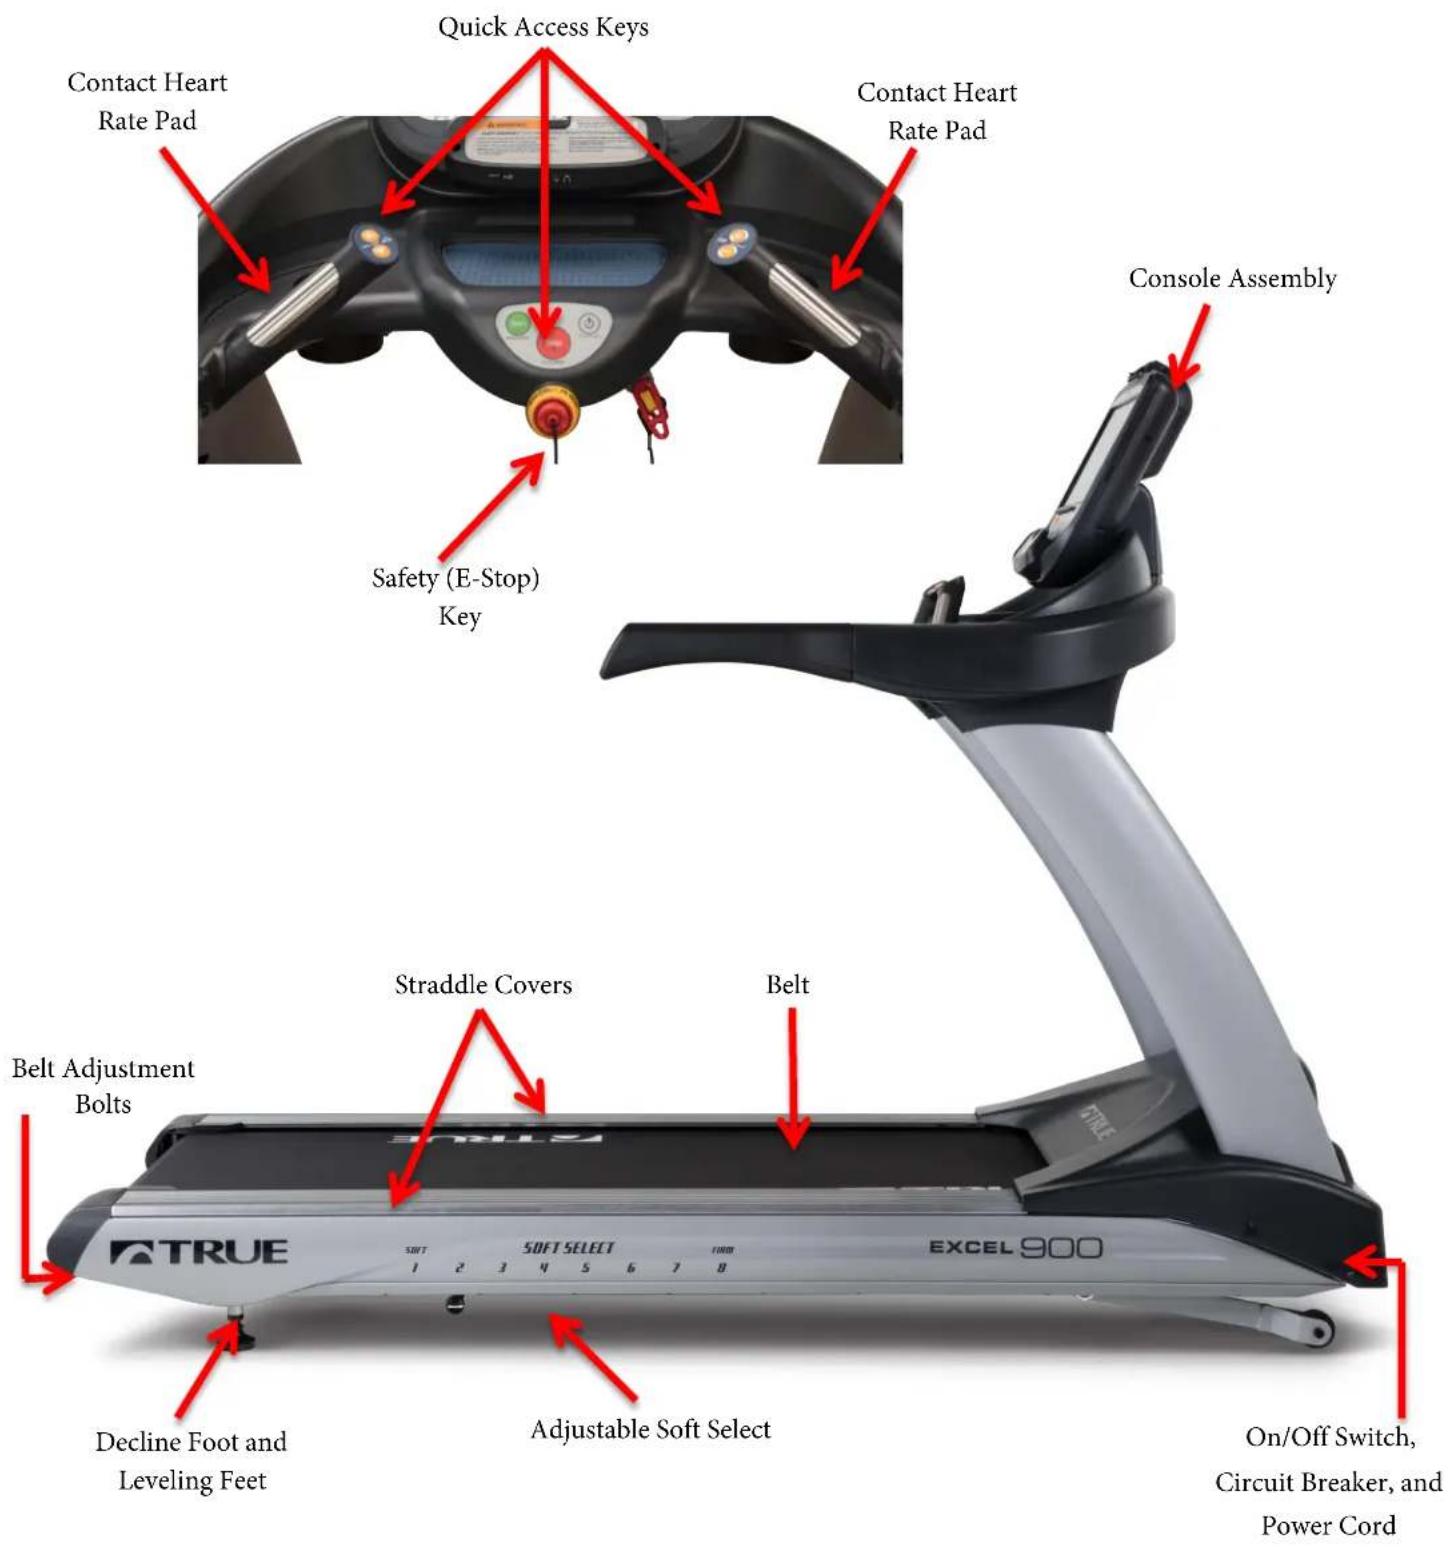
text_image
Contact Heart Rate Pad Quick Access Keys Contact Heart Rate Pad Console Assembly Safety (E-Stop) Key Straddle Covers Belt Belt Adjustment Bolts DELINE FOOT AND LEVELING FEET Adjustable Soft Select SOFT SELECT EXCEL 900 On/Off Switch, Circuit Breaker, and Power CordCHAPTER 3: PRODUCT OVERVIEW
TREADMILL OVERVIEW (CONTINUED):
Console Assembly:
The console allows the user to set up a workout program and control the treadmill during a workout (For console overview and operation instructions refer to chapter 4).
Quick Access Keys:
Allows the user to quickly start, stop and wake the treadmill or make fast, convenient adjustments to the incline level or speed of the treadmill.
Contact Heart Rate Pads:
Allows the user to check their heart rate without wearing a wireless chest strap.
*For increased safety and accuracy this feature should only be used when the belt speed is below 4 mph.
Safety Stop-Reset Button:
A tethered safety device designed to attach to both the user and the treadmill console. Depressing the safety stop-reset button on the console assembly will stop belt motion to prevent injury in an emergency.
*The safety stop-reset button should be attached to the user's clothing. The treadmill will not operate if the safety stop-reset button is in the engaged position.
Belt:
The moving surface of the treadmill on which the user walks or runs.
Straddle Covers:
Stationary covers on either side of the belt, which allows the user to safely straddle the belt during startup or in the event of an emergency.
Belt Adjustment Bolts:
An adjustment system that allows the users to adjust the belt tracking and tension as needed.
On/Off Switch:
Allows users or faculty to turn the power on or off to the treadmill.
Circuit Breaker:
A safety device designed to protect the treadmill from excessive electrical current.
Power Cord:
Delivers power from the wall outlet to the treadmill.
Decline Foot and Leveling Feet:
The decline foot allows the treadmill to decline so the user can enjoy the benefits of a downhill workout,. The leveling feet are an adjustable system used to aid in the leveling the treadmill.
Adjustable Soft Select:
Allows users to “personalize” the walking surface from soft to firm or anywhere in between.
CHAPTER 4: PROGRAMMING & OPERATION
CAUTION:
The safety key must be in place on the treadmill console, and should be attached to the user's clothing. The treadmill will not operate if the safety key is not attached to the console.
HEART RATE MONITORING:
This treadmill can monitor a user's heart rate using either a Polar® compatible chest strap or the metal grips on the hand rails (called contact heart rate or CHR pads). A chest strap transmits the user's heart rate to the treadmill via radio, and the CHR pads connect to a special computer circuit to extract the user's heart rate.
Chest Strap Heart Rate Monitoring:
Although this treadmill functions fine without using the heart rate monitoring feature, this kind of monitoring gives valuable feedback on the user's effort level. Using chest strap or Bluetooth monitoring also allows users to use Heart Rate Control, the most advanced exercise control system available.
When users wear a Polar ^® compatible transmitter strap or a Bluetooth transmitter, the treadmill will display the user's heart rate as a digital beats-per-minute (bpm) readout.
A chest strap should be worn directly against the user's skin, about 1-2 inches below the pectoral muscles/breast line. Women should be careful to place the transmitter below their bra line.
*Bluetooth transmitters should be worn in accordance with the manufacturer's documentation. Initially the transmission signal for heart rate may be erratic or non-existent. Some moisture is necessary between the strap and the user's skin for proper transmission. Sweat from exercise works best, but ordinary tap water may be used prior to the workout if desired.

natural_image
Woman wearing a light blue sports bra and cap, posing against a plain background (no text or symbols visible)A Note on Chest Strap Heart Rate Monitoring:
The chest strap produces a radio signal that the treadmill reads and registers as the user's heart rate. The accuracy of a reading may be affected when outside interference is present.
Contact Heart Rate (CHR):
The CHR system will let the user monitor their heart rate without wearing a chest strap. When using the CHR system users should gently grasp the CHR pads with both hands. Within 30 seconds, the user's heart rate should be displayed as a digital bpm readout (during the first 30 seconds the system is analyzing and locking in the user's heart rate). Users should exercise with smooth body motions and breathe regularly. It is best to avoid talking while using the CHR system, as talking will cause unrepresentative heart rate spikes of 5 to 10 bpm. To ensure an accurate reading, the user's hands should be clean, free of both dirt and hand lotions.
*For increased safety and accuracy the CHR system should only be used at speeds of 4 mph or lower (CHR readings are less accurate due to large muscle movements above this speed).
A Note on CHR Accuracy:
CHR monitoring may be less accurate than chest strap monitoring since the heart rate signals are much stronger at the chest. When using a HRC workout, it is best to use a chest strap because of the stronger and more accurate readings.
CAUTION:
Do not use the contact heart rate grips as a handlebar during a workout.
CHAPTER 4: PROGRAMMING & OPERATION
HEART RATE CONTROL (HRC):
Introduction:
You are now the owner of the most sophisticated Heart Rate Control treadmill available. TRUE HRC is unique and patented. It accommodates users from rehabilitation to world class athletes, and all those in between. TRUE HRC allows users to do a completely hands free heart rate controlled workout using speed, incline or both. By training at a specific target heart rate, users can exercise at a more efficient cardiovascular level.
The TRUE HRC system is unique because users must enter the key parameters of the workout; target heart rate, maximum speed, maximum incline, and time, prior to beginning the HRC workout. As users approach their target heart rate, the treadmill's computer automatically takes over and changes the speed and/or incline automatically to keep users near their target heart rate. This allows for a completely “hands free” workout.
* A Polar® compatible heart rate monitoring chest strap should be worn during HRC workouts. For increased safety and accuracy, contact heart rate monitoring is not recommended for HRC workouts.
Target Heart Rate:
TRUE's heart rate control (HRC) workouts let the treadmill monitor relative exercise intensity by way of the user's heart rate, then automatically adjust the speed and incline to keep the user at their target heart rate and thus their desired exercise intensity. Heart rate is a good measure of the body's exercise stress level. It reflects differences in physical condition, fatigue, the comfort of the workout environment, even diet and emotional state. Users should compare their heart rate with how they feel to ensure safety and comfort.
Consult a physician to determine target heart rate:
Using heart rate to control a workout takes the guesswork out of the workout settings. Consult a physician before using heart rate controlled workouts for advice on selecting a target heart rate range. Also, it is important to use the treadmill for several workouts in the manual mode while monitoring heart rate. Users should compare their heart rate with how they feel to ensure safety and comfort. After users have spent some time learning how their heart responds to different levels of speed and incline, they will have a better understanding of how to select the maximum speed and maximum incline required for reaching their target heart rate.
Warm Up:
At the beginning of an HRC workout, the treadmill is in full Manual Control mode. Users should gradually increase the workout intensity to slowly raise their heart rate to within 10 beats per minute (bpm) of their target heart rate. The treadmill will operate as if in manual mode during the warm up stage. Users control both speed and incline. The user may only increase speed and incline to the present maximum values entered. It is important that the user starts at a low level of perceived exertion and gradually increase the workout intensity over several minutes until they approach their target heart rate. This allows the body to adapt to the workout. Increasing the workout intensity gradually will allow the user to enter the heart rate control stage without overshooting their target, keeping their heart rate within a few bpm of their target. *Warming up too fast may cause the user to overshoot their target. If this occurs it may take several minutes before the computer software can control their heart rate. Users may overshoot and undershoot for several minutes until control is achieved.
CHAPTER 4: PROGRAMMING & OPERATION
HEART RATE CONTROL (CONTINUED):
Heart Rate Control Stage:
The treadmill takes control of speed and incline, keeping the user's heart rate within a few bpm of their target. When using the Interval HRC Workout, the treadmill alternates between work and rest intervals.
Cool-Down:
At the end of the workout time or distance, the treadmill reduces the workout intensity by half and goes back into Manual Control mode, where users directly control their cool-down.
PROGRAM DESCRIPTIONS:
Available programs vary depending on the console option selected. Please refer to the chart to the below for assistance in determining which programs are available on this unit.
| Console Options | 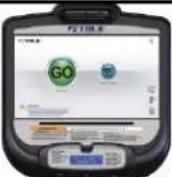 Transcend ^16 Escalate Transcend ^16 Escalate | 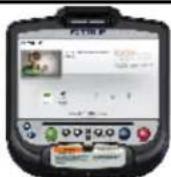 ^13 ^13 | 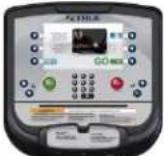 Escalate^9 Escalate^9 |
| ××××× | YES YES | YES | |
| ××× | YES YES | YES | |
| ×× | YES YES | ||
| YES |
Quick Start: \*\*\*\*
A workout in which the user controls all settings. The workout continues until it is ended by the user.
Manual: \*\*\*
Users enter their weight, workout time or distance. The user controls both the SPEED and INCLINE of the treadmill throughout the workout.
Hill Intervals: \*\*\*\*
Hill Intervals makes changes to the INCLINE in 2-minute segments with the SPEED remaining constant. Users can make adjustments to the SPEED during the workout. SPEED changes are permanent; INCLINE changes affect the current 2-minute segment only.
CHAPTER 4: PROGRAMMING & OPERATION
PROGRAM DESCRIPTIONS (CONTINUED):
Rolling Hills: ****
Series of gradually increasing and decreasing INCLINE changes that simulate rolling hills. Users can make adjustments to the SPEED during the workout. SPEED changes are permanent; INCLINE changes affect the current segment only.
Single Hill: ****
INCLINE increases to a maximum at the mid-point of the workout, then decreases to the finish. Users can make adjustments to the SPEED during the workout. SPEED changes are permanent; INCLINE changes affect the current segment only.
Weight Loss Hills: ***
2-minute WALKING interval segments with INCLINE alternating between hills and a nearly flat landscape. Users can make adjustments to the SPEED during the workout. SPEED changes are permanent; INCLINE changes affect the current segment only.
Glute Buster: ***
A changing INCLINE profile simulates hilly terrain to promote intense glute muscle use. Users can make adjustments to the SPEED during the workout. SPEED changes are permanent; INCLINE changes affect the current segment only.
Calorie Goal: ***
This workout allows users to choose the number of calories they wish to burn within a specified workout time. The treadmill will control SPEED and INCLINE within the limits set by the user to attain this goal.
Cardio Challenge: ****
SPEED and INCLINE increase to a maximum at the mid-point of the workout, then decrease to the finish. INCLINE and SPEED changes affect the current segment only.
Walk and Run Intervals: ****
Uses SPEED to create WALKING then RUNNING intervals in 1-minute segments. Users can make adjustments to the INCLINE during the workout. INCLINE changes are permanent; SPEED changes affect the current 1-minute segment only.
Speed Intervals: ****
Walking or running speed intervals that are in 1-minute segments. Users can make adjustments to the INCLINE during the workout. INCLINE changes are permanent; SPEED changes affect the current 1-minute segment only.
Speed Ramp: ****
Speed increases to a maximum at the mid-point of the workout, then decreases to the finish. Users can make adjustments to the INCLINE during the workout. INCLINE changes are permanent; SPEED changes affect the current segment only.
Leg Shaper: ***
SPEED changes in this workout to emphasize the leg muscles with added intensity. Users can make adjustments to the INCLINE during the workout. INCLINE changes are permanent; SPEED changes affect the current segment only.
Truefitness.com / 800.426.6570 / 636.272.7100 53
CHAPTER 4: PROGRAMMING & OPERATION
PROGRAM DESCRIPTIONS (CONTINUED):
Distance Workouts: ***
Choose any one of our 4 common distance workouts - 5k, 10k, 2 mile or 4 mile. The user controls both the SPEED and INCLINE of the treadmill throughout the workout.
Saved Workouts: ***
Access to previously saved manual workouts.
Custom Speed: **
Set up custom SPEED intervals. Up to 30 easy to adjust segments allow users to customize any speed profile.
Custom Incline: **
Build a custom INCLINE profile using up to 30 segments. A user friendly setup screen allows users to create any hill or incline profile.
Custom Ultra: ***
If users are having trouble finding a workout that fits their specific needs, try setting up the Custom Ultra! This completely customizable workout setup allows both SPEED and INCLINE control in up to 30 segments.
HRC Cruise Control: ****
While in any program, Cruise Control will allow the user to set current heart rate as target heart rate by pressing a single button. The Cruise Control program takes control of SPEED and INCLINE to maintain the users target Heart Rate. If Beats per Minute exceeds the target by more than 12 BPM the workout will end and Cool Down will begin.
HRC Target: ****
Users choose their target heart rate. The treadmill begins in MANUAL control – The user should gradually increase the workout intensity until heart rate is within 10 bpm of their target. At this point, the treadmill takes over to control speed and incline to maintain heart rate within a few beats of the user's target.
HRC Weight Loss: ***
Based on age, this is a heart rate controlled workout at 65% of the user's maximum heart rate. This creates efficient fat burning without overtraining. The treadmill begins in MANUAL control –The user should gradually increase the workout intensity until their heart rate is within 10 bpm of their target. At this point, the treadmill takes over to control speed and incline to maintain heart rate within a few beats of the user's target.
HRC Aerobic: ***
Based on age, this is a heart rate controlled workout at 80% of the user's maximum heart rate. This keeps the user in the optimum aerobic training range to improve cardio fitness. The treadmill begins in MANUAL control - gradually increase the workout intensity until the user's heart rate is within 10 bpm of their target. At this point, the treadmill takes over to control speed and incline to maintain heart rate within a few beats of the user's target.
CHAPTER 4: PROGRAMMING & OPERATION
PROGRAM DESCRIPTIONS (CONTINUED):
HRC Intervals: ***
Intervals of WORK and REST determined by target heart rate. The treadmill begins in MANUAL control – Users should gradually increase their workout intensity until their heart rate is within 10 bpm of their target. At this point, the treadmill takes over to control speed and incline to maintain the user's HR within a few beats of their target. The rest segment will reduce to 65% intensity of work segment.
Custom HRC Intervals: \*\*
Set up a custom heart rate interval. Specify WORK and REST targets and let the treadmill make all the adjustments. The treadmill begins in MANUAL control - gradually increase the workout intensity until heart rate is within 10 bpm of the user's target. At this point, the treadmill takes over to control speed and incline to get the user's heart rate within a few beats of their target.
HRC Distance Workouts: \*\*
4 popular fixed distance workouts (5k, 10k, 2 miles and 4miles) that put the treadmill in control of pace by selecting the user's target heart rate. The treadmill begins in MANUAL control - The user should gradually increase the workout intensity until heart rate is within 10 bpm of their target. At this point, the treadmill takes over to control speed and incline to maintain heart rate within a few beats of the user's target.
Fitness Test: \*\*\*
A fitness test uses heart rate to estimate the user's VO2 max. The test increases SPEED and INCLINE gradually every minute and ends at the point where the user's heart rate reaches 85% of the maximum for their age.
Air Force fitness Test: \*\*
1.5-mile running test measured against age and gender calculations. Users can make adjustments to the SPEED during the workout.
Navy Fitness Test: \*\*
1.5-mile running test measured against age and gender calculations. Users can make adjustments to the SPEED during the workout.
Army Fitness Test: \*\*
2-mile running test measured against age and gender calculations. Users can make adjustments to the SPEED during the workout.
Marines Fitness Test: \*\*
3-mile running test measured against age and gender calculations. Users can make adjustments to the SPEED during the workout.
CHAPTER 4: PROGRAMMING & OPERATION
OUTSIDE INTERACTIVE VIDEOS: \*
*Content is provided by Outside Interactive™ and is subject to change without notice.

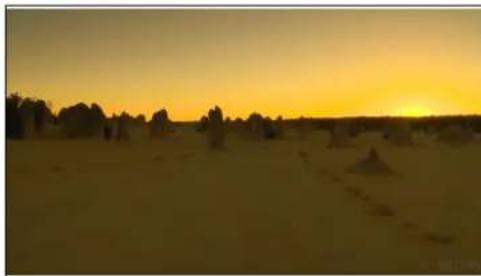
Australian Outback:
G'Day mate! Grab your running shoes as we head Down Under for this glorious sunrise run through the Australian Outback. This brisk, early morning video will wake you up no matter what time of day you run it. This peaceful run through the desert trail will leave you breathless from the scenery - the running out of breath is up to you and your cardio workout!
natural_image
Sunset over a desert landscape with silhouetted structures and trees (no text or symbols visible)Niagara Falls:
Enjoy a crisp cool morning run along Niagara Falls on the Canadian border. Start at the Niagara Power Plant and enjoy the views along the river scouting tourists on the U.S. side as you run under Rainbow Bridge, gateway to the U.S. On your return, you'll enjoy spectacular sweeping views of the falls. Don't worry about overheating as the mist
will be sure to keep you cool!

natural_image
Scenic view of a riverside road with a cannon under a clear blue sky, snow-capped mountains in the background (no visible text or symbols)Hills of Bali:
We hope you will enjoy this run through the beautiful volcanic mountains and rice fields of Bali. The Indonesian island sits just below the equator. Bali is a balmy, yet comfortable 82 degrees year round in both the dry and monsoon seasons. The island is also known for its yoga and meditation retreats. Maybe you can include those before or after your TRUE cardio workout.

natural_image
Scenic mountain road with palm trees, a utility pole, and ocean in the background under a clear blue sky (no text or symbols visible)CHAPTER 4: PROGRAMMING & OPERATION
OUTSIDE INTERACTIVE VIDEOS (CONTINUED):
Washington D.C. Mall:
Washington Mall is one of the most scenic and popular jogging/running routes in the United States. This early morning run begins and ends at the base of the Lincoln Memorial. During your run you will travel counter clockwise towards the Capitol Building before your return journey. There are far too many moving
and incredible memorials, landmarks, and points of interest to describe, but all the images are captured for you to view during your run through American history.

natural_image
Exterior view of the U.S. Capitol Building with a large dome and surrounding greenery, framed by trees in the foreground (no signage visible)Central Park:
The Big Apple is where the action is. This is evident when you run to this video. Runners of all kinds, even a few bikes and a horse-drawn carriage greet you as you run through New York's Central Park. On average, 25 million people visit Central Park every year. Now you can visit from the comfort of your club or gym thanks to TRUE's
Outside Interactive run through the park.

natural_image
Street scene with a paved road, trees, and cyclists under a clear sky (no visible text or symbols)New Balance Falmouth Road Race:
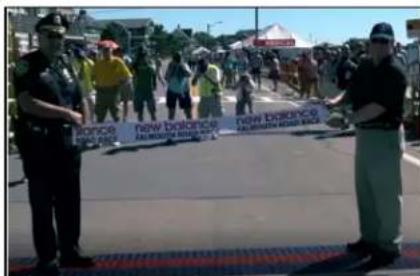
Test your endurance while on a virtual run through beautiful and scenic Cape Cod. Running this route will make you feel like a rock star for a day as bystanders cheer you on, offer you water and even play a complete drum set as you run this scenic road race. Everyone feels like a winner when they break the tape at end of the New Balance Falmouth Road Race.
text_image
BONICE Aldemnian B#### new bocice Aldemnian B####CHAPTER 4A: TRANSCEND OPERATION
TRANSCEND OVERVIEW:
text_image
Touchscreen Display Cooling Fan TRUE GO QUICK START WORKOUT FINDER WARNING: Read and understand all the instructions and warnings prior to use. • Obtain a medical exam before beginning any exercise program. If if any time during exercise you feel hard, noisy or expiratory pain, stop and consult your disposition. • All exercise equipment is potentially hazardous. If attention is not paid to the conditions of the equipment usage, death or serious injury could occur. WARNING! Read and understand all instructions and warnings prior to use. AVERTISSEMENT! Prised continuance de manuel d'instruction et consape de securité event l'utilisation. • Wash or serious injury can result if users not used while exercising. • Alert rule does have how questions and should be used for reference only. • Stop screen if you feel hard, noisy, or experience pain. • Keep body, clothing, and fitness accessories clear of all meaning parts. FOR TREADMILL: USE: • Streadable treadmill before starting. • Read, understand, without the emergency stay procedures before use. • ALWAYS ATTACH THE EVIDENCY STRIP SAFETY CLIP TO CLOTHING PRIOR TO USB • Prior to use, supply safety also could be secure it is free of tangles or bands, but not respite they are easily storage from racks. Instructions: TO BEGIN A WORKOUT: • Press QUICK START button. • Or select WORKOUT FINDER for present workouts. • Use the ▼ or ▲ buttons to adjust then press Lack or account on next session. TIME 13:13 SPEED 8.5 PACE 128:07 WHEN ON A TREADMILL: • Use the — or ▲ buttons to adjust speed at any time during workout. • Press STOP at any time during workout. Reading Rack Auxiliary LCD Display USB Jack Headphone Jack Warning DecalCHAPTER 4A: TRANSCEND OPERATION
CONSOLE OVERVIEW (CONTINUED):
Touchscreen Display:
A capacitive touchscreen used for workout control and feature navigation.
Headphone Jack:
Standard 3.5mm audio jack used to connect headphones to the console during media playback.
USB Jack:
Allows users to export workout data to an external USB drive or update the console software.
Auxiliary LCD Display:
Displays workout data that can be easily viewed regardless of which mode is displayed on the Touchscreen Display. *Available on the 16" model only.
Reading Rack:
This ledge on the console can be used to hold a book, magazine, e-reader, or tablet computer during a workout.
Cooling Fan:
Integrated fan that delivers a cooling flow of air during a workout.
Warning Decal:
Important safety information for users to review prior to using the equipment.
CHAPTER 4A: TRANSCEND OPERATION
TOUCHSCREEN INTRODUCTION:
The Transcend Console utilizes a fully integrated capacitive touch screen display and a multi-screen interface to provide a state of the art and user friendly workout.
Capacitive touchscreen technology relies on the conductive properties of the human body to detect when and where on the display the user is touching. Because of this, capacitive touchscreens are highly responsive and do not require pressure to register a touch.
TOUCHSCREEN NAVIGATION:
TRUE recommends that users familiarize themselves with the different screens to ensure that they are safely taking advantage of all of the features that this equipment has to offer.
Icon Character Map
This console uses several icons to provide users with a simplified and visually appealing workout experience. The character map below is a quick reference of commonly used icons:
 | Incline Speed |  | |
 | Cool Down |  | Toolbox |
 | Fan Icon Keypad |  | |
 | Screen Toggle |  | Home |
 | TV |  | Outside Interactive ^ |
CHAPTER 4A: TRANSCEND OPERATION
TOUCHSCREEN NAVIGATION (CONTINUED):
Home Screen:
The Home Screen is displayed on the console when there is no workout in progress. From this screen the user is able to select from various options to begin a workout or view media.
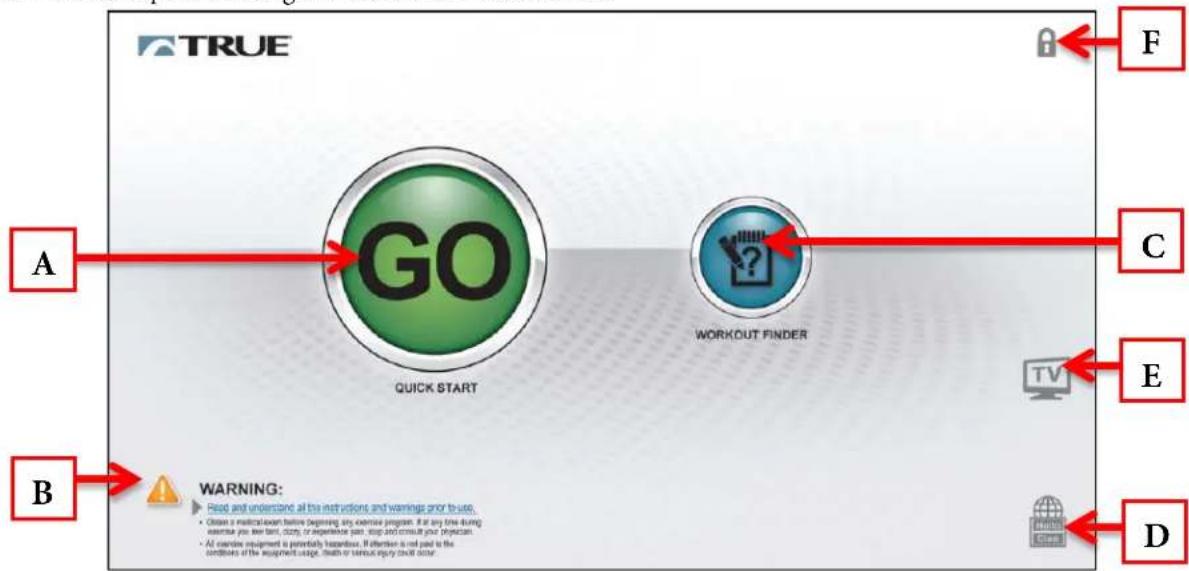
flowchart
graph LR
    A["GO"] --> B["QUICK START"]
    B --> C["WORKOUT FINDER"]
    C --> D["TV"]
    D --> E["E"]
    E --> F["F"]
    style A fill:#90EE90,stroke:#333
    style B fill:#FFB6C1,stroke:#333
    style C fill:#B2C4A2,stroke:#333
    style D fill:#E6E6E6,stroke:#333
    style E fill:#E6E6E6,stroke:#333
    style F fill:#FFD700,stroke:#333
A) Quick Start
Starts a Quick Start workout in which the user controls all settings. The workout continues until it is ended by the user.
B) Safety Instructions
Displays a list of safety instructions for users to review prior to beginning a workout.
C) Workout Finder
Displays preset workouts categorized by goal focus categories.
D) Language Options
Allows users to choose between 12 language options.
E) TV
Displays TV interface without starting a workout.
F) Screen Lock
When the screen lock is held for 3 seconds, the touchscreen display will lock for 20 seconds to allow for cleaning.
CHAPTER 4A: TRANSCEND OPERATION
TOUCHSCREEN NAVIGATION (CONTINUED):
Selecting a Preset Workout:
Preset workouts are accessed by touching the Workout Finder Button on the home screen. Workouts are organized into 5 categories. To view the workouts in a category simply touch a Category Selection button (A) or swipe through categories in the category preview window (B). Workouts can also be viewed in an uncategorized list by touching the Show All Workouts button (C).
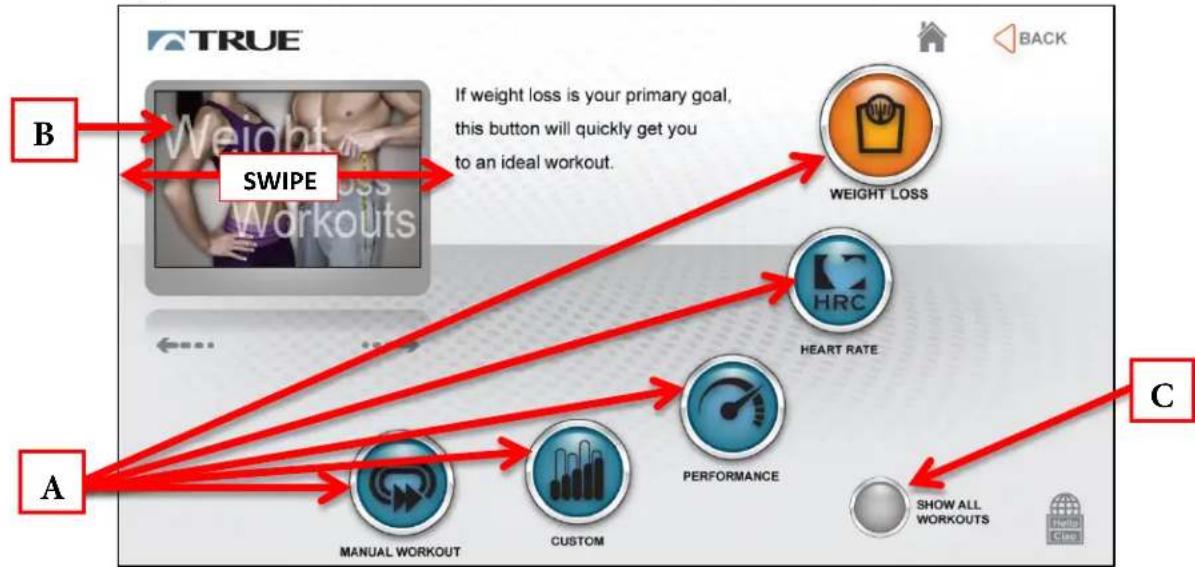
flowchart
graph TD
    A["TRUER"] -->|B| B["Weight Loss Workouts"]
    A -->|A| C["MANUAL WORKOUT"]
    A -->|C| D["CUSTOM"]
    B --> E["WEIGHT LOSS"]
    B --> F["HEART RATE"]
    B --> G["PERFORMANCE"]
    C --> H["SHOW ALL WORKOUTS"]
    D --> I["Back"]
    style A fill:#f9f,stroke:#333
    style B fill:#ccf,stroke:#333
    style C fill:#cfc,stroke:#333
    style D fill:#fcc,stroke:#333
Workout Data Entry Screens:
Workout data entry screens allow the user to input their personal information or workout goals prior to beginning a preset workout. To set a value, touch the heading (A) of the value and adjust the slider (B) to the desired setting or manually enter a value using the keypad (C).
*Workout Data Entry Screens vary by program selection.
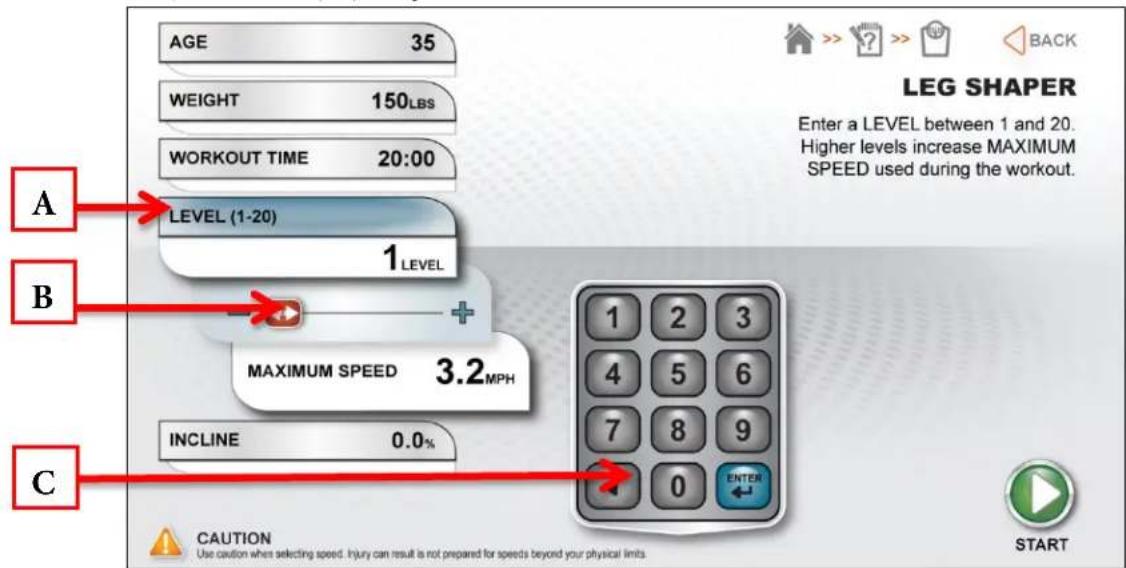
text_image
AGE 35 WEIGHT 150LBS WORKOUT TIME 20:00 LEVEL (1-20) 1 LEVEL MAXIMUM SPEED 3.2 MPH INCLINE 0.0% A B C LEG SHAPER Enter a LEVEL between 1 and 20. Higher levels increase MAXIMUM SPEED used during the workout. 1 2 3 4 5 6 7 8 9 0 ENTER CAUTION Use caution when selecting speed. Injury can result is not prepared for speeds beyond your physical limits. STARTCHAPTER 4A: TRANSCEND OPERATION
TOUCHSCREEN NAVIGATION (CONTINUED):
Workout View Screens:
During any workout a Workout View Screen will be displayed to give the user a comprehensive visual overview of their current workout data.
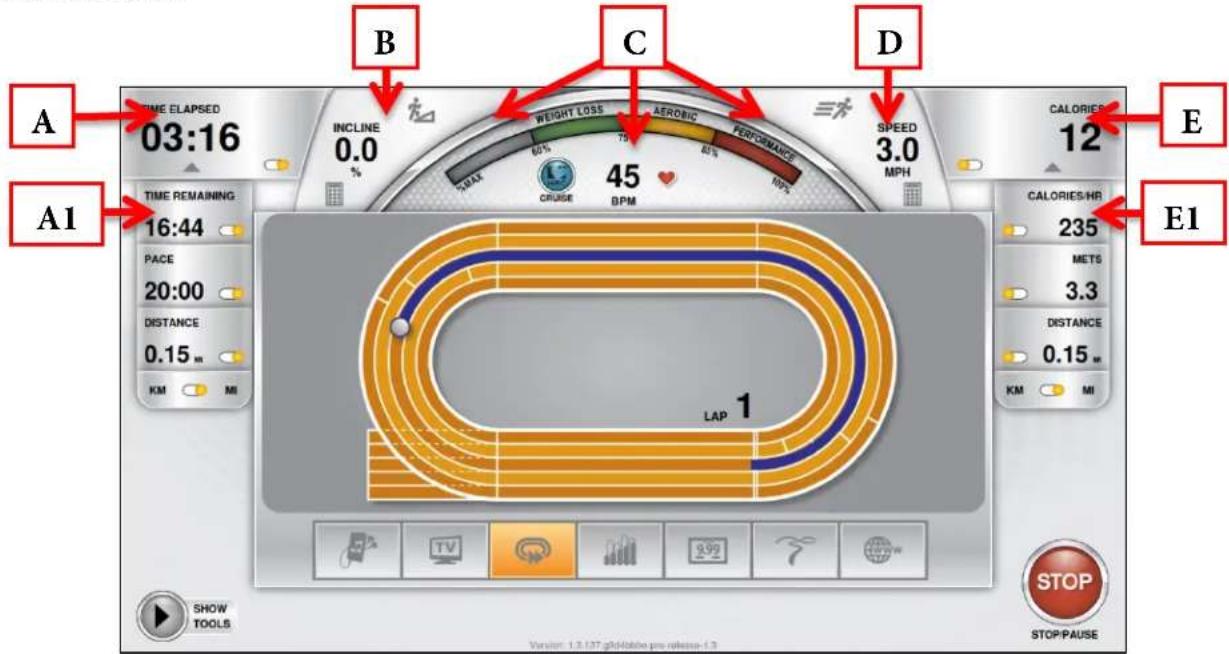
text_image
A TIME ELAPSED 03:16 INCLINE 0.0 % TIME REMAINING 16:44 PACE 20:00 DISTANCE 0.15 m KM MI B C WEIGHT LOSS 60% 75% 80% AEROIC 45 BPM AERobic 80% PERFORMANCE 10% SPEED 3.0 MPH CALORIES 12 E E1 CALORIES/HR 235 METS 3.3 DISTANCE 0.15 m KM MI LAP SHOW TOOLS STOP/PAUSE Version: 1.3.137.g0140b/a.pro.rebeio-1.3A) Custom Data Display #1:
This display will toggle between data points throughout the workout. To select which data points are displayed, press the arrow below the Data Display to open the Selection Toolbox (A1)
B) Incline:
Displays the current incline level.
C) Heart Rate Information:
When the user is wearing a heart rate chest strap or utilizing the contact heart rate system, their heart rate will be displayed in beats per minute (bpm) and in the graphic meter. The graphic meter is based on age and will gauge the user's approximate heart rate within 3 target levels; Weight Loss, Aerobic or Performance.
D) Speed:
Displays the current speed of the treadmill belt.
E) Custom Data Display #2:
This display will toggle between data points throughout the workout. To select which data points are displayed, press the arrow below the Data Display to open the Selection Toolbox (E1)
CHAPTER 4A: TRANSCEND OPERATION
TOUCHSCREEN NAVIGATION (CONTINUED):
Workout View Screen Controls:
The Workout View Screens contain controls that allow users to adjust settings during their workout
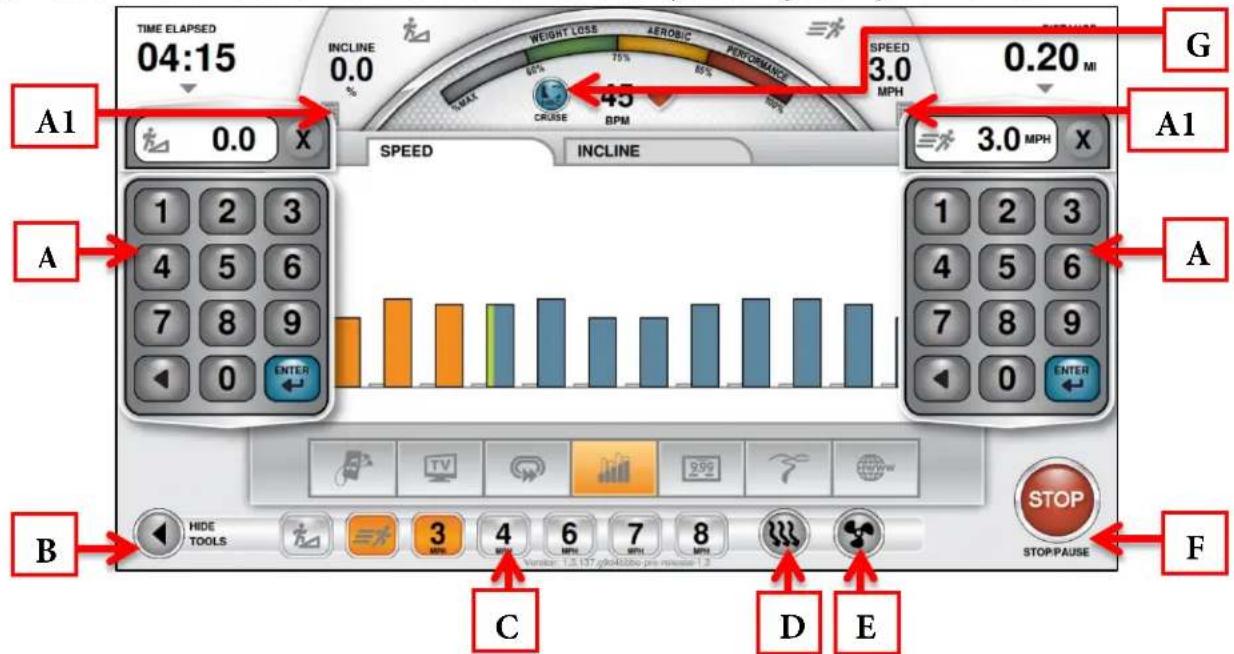
text_image
TIME ELAPSED 04:15 INCLINE 0.0 WEIGHT LOSS AERobic PERFORMING SPEED 3.0 0.20 MI A1 0.0 X SPEED INCLINE 3.0 MPH X A1 1 2 3 4 5 6 7 8 9 0 ENTER B HIDE TOOLS C D E STOP/PAUSE STOP FA) Incline/Speed Adjustment Keypads:
These keypads allow the user to input a manual speed or inline adjustments. Touching the Keypad Icons (A1) will open these keypads
C) Quick Keys:
These keys are displayed by touching the Show/Hide button (B) and allow the user to quickly switch between preset speeds or incline levels.
D) Cool Down:
This button is displayed by touching the Show/Hide Tools button (B) and allows the user to end their current workout with a two minute low intensity cool down period. When Cool Down is activated the unit is in manual mode and the user directly controls all settings.
E) Fan On/Off:
This button is displayed by touching the Show/Hide Tools button (B) and turns the cooling fan on or off.
F) Stop:
Stops or pauses the current workout.
G) HRC Cruise Control:
Engages Heart Rate Control to allow the equipment to maintain the user's current heart rate through automatic speed and incline adjustments (when the user is utilizing heart rate monitoring).
CHAPTER 4A: TRANSCEND OPERATION
TOUCHSCREEN NAVIGATION (CONTINUED):
Switching Between Workout View Screens:
There are several Workout Data Screens available to choose from. To switch between screens the user can touch the selection button (A) for the specific Workout Data Screen they wish to use or simply swipe their finger across the main display window (B) to scroll through the available screens.
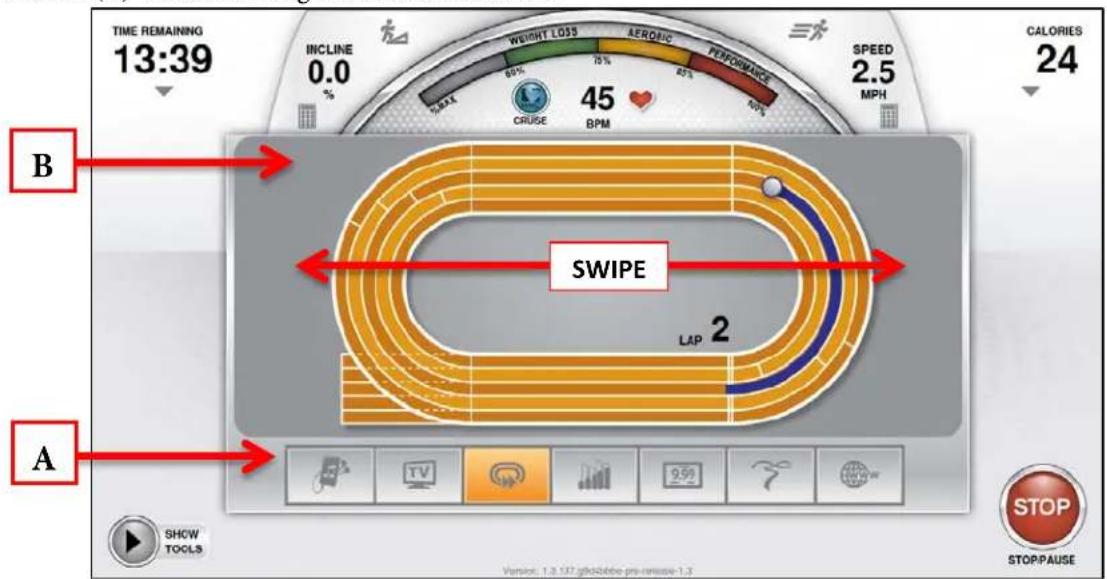
text_image
TIME REMAINING 13:39 INCLINE 0.0 % SWEET LOSS AEROGIC PERFORMANCE 2.5 MPH CALORIES 24 B 45 CRIUSE BPM SWIPE LAP 2 A SHOW TOOLS STOP/PAUSE Version: 1.3.197.globobbe-pro-release-1.3Workout Summary Screen:
At the end of a workout the Summary Screen will display an overview of the workout data. The workout data can be exported to a USB drive by inserting the USB drive into the console's USB port and touching the Save button (A). If the user requires more time to view the summary or to save the workout to a USB device, they can touch the timer (B) to extend the time that the summary remains on the screen.
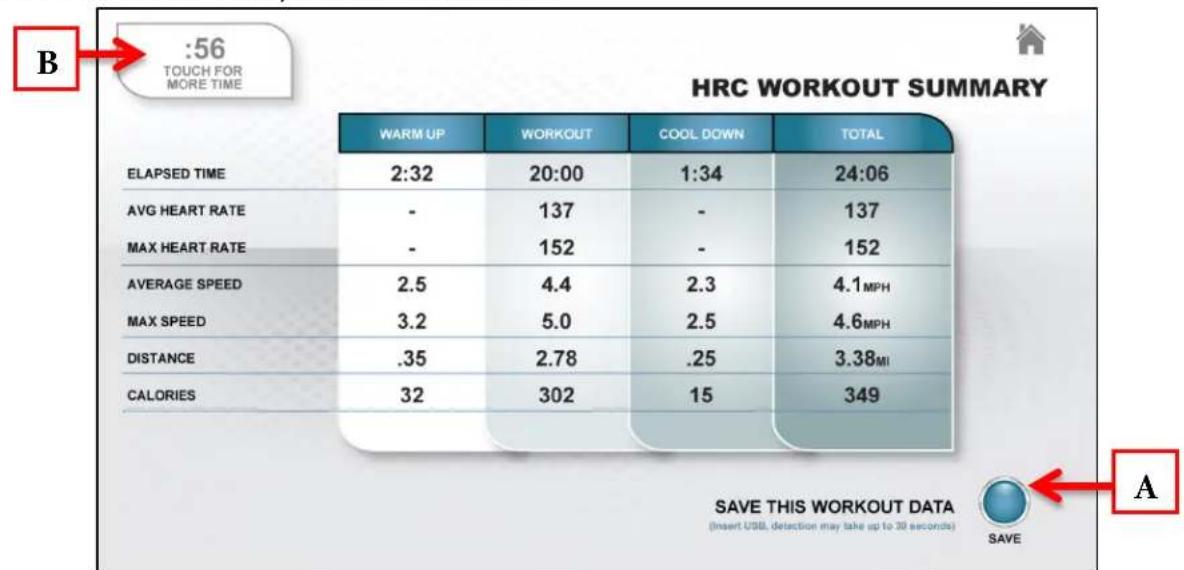
text_image
B :56 TOUCH FOR MORE TIME HRC WORKOUT SUMMARY WARM UP WORKOUT COOL DOWN TOTAL ELAPSED TIME 2:32 20:00 1:34 24:06 AVG HEART RATE - 137 - 137 MAX HEART RATE - 152 - 152 AVERAGE SPEED 2.5 4.4 2.3 4.1 MPH MAX SPEED 3.2 5.0 2.5 4.6 MPH DISTANCE .35 2.78 .25 3.38 MI CALORIES 32 302 15 349 SAVE THIS WORKOUT DATA (Insert USB, detection may take up to 30 seconds) SAVE ACHAPTER 4A: TRANSCEND OPERATION
WEB BROWSER:
When enabled, the integrated web browser allows users to catch up on breaking news, watch sports highlights, check email and connect with their friends on social media. Having this feature built into a Workout Data Screen allows users to easily multi task.
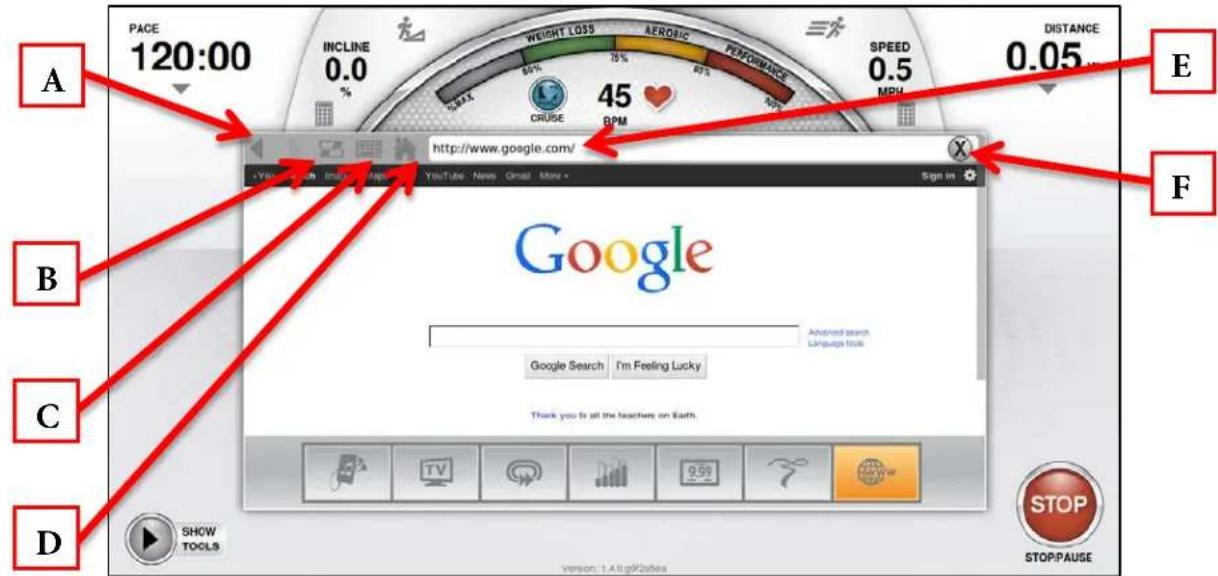
text_image
PACE 120:00 INCLINE 0.0 % WEIGHT LOSS AEROGIC PERFORMANCE SPEED 0.5 MPH DISTANCE 0.05 A E B C D http://www.google.com/ Google Advanced search Language tool Google Search I'm Feeling Lucky Thank you to all the teachers on Earth. SHOW TOOLS Version: 1.4.9.gf02idea STOP/PAUSEA) Navigation Buttons:
Move forward or backward to the previous page displayed
B) Screen Toggle:
Allows the user to switch back and forth between full screen and regular mode.
C) Keyboard:
Displays the onscreen keyboard to allow users to input text.
D) Home:
Displays the browsers home page.
*See advanced console options for instructions on setting the homepage.
E) Address Bar:
Displays the web address of the page that is being displayed and allows users to input the addresses of pages they wish to visit.
F) Clear Address:
Clears the web address of the page currently being displayed to allow users to input the address of the page they wish to visit.
CHAPTER 4A: TRANSCEND OPERATION
BLUETOOTH AUDIO:
This console has integrated Bluetooth support for Bluetooth capable audio devices. To pair a device with the console, touch the Audio Device Selection Button (A). Ensure that the device is discoverable via Bluetooth and press the Bluetooth Button (B) to search for devices.
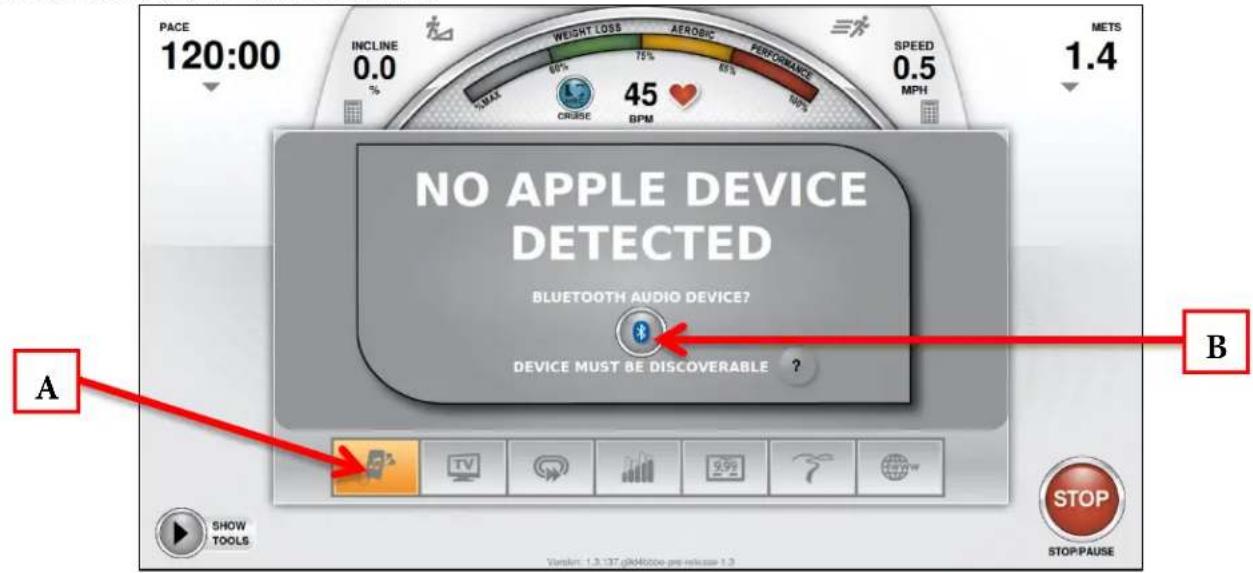
text_image
PACE 120:00 INCLINE 0.0 % WEIGHT LOSS AEROBIC PERFORMANCE SPEED 0.5 METH 1.4 70MAX 60% 75% 65% 45 BPM CRASE SPM NO APPLE DEVICE DETECTED BLUETOOTH AUDIO DEVICE? DEVICE MUST BE DISCOVERABLE ? A B SHOW TOOLS STOP STOP-PAUSE Vorrain: 1.3,13T g/84h200e pre release 1.3The console will complete a scan for available Bluetooth devices. Once the scan is complete, simply touch the name of the desired device (C) to begin the pairing process.
*If the device is not listed, verify that it the Bluetooth is enabled and that the device is discoverable. Then touch the Bluetooth logo (D) to re-scan for the Bluetooth devices.
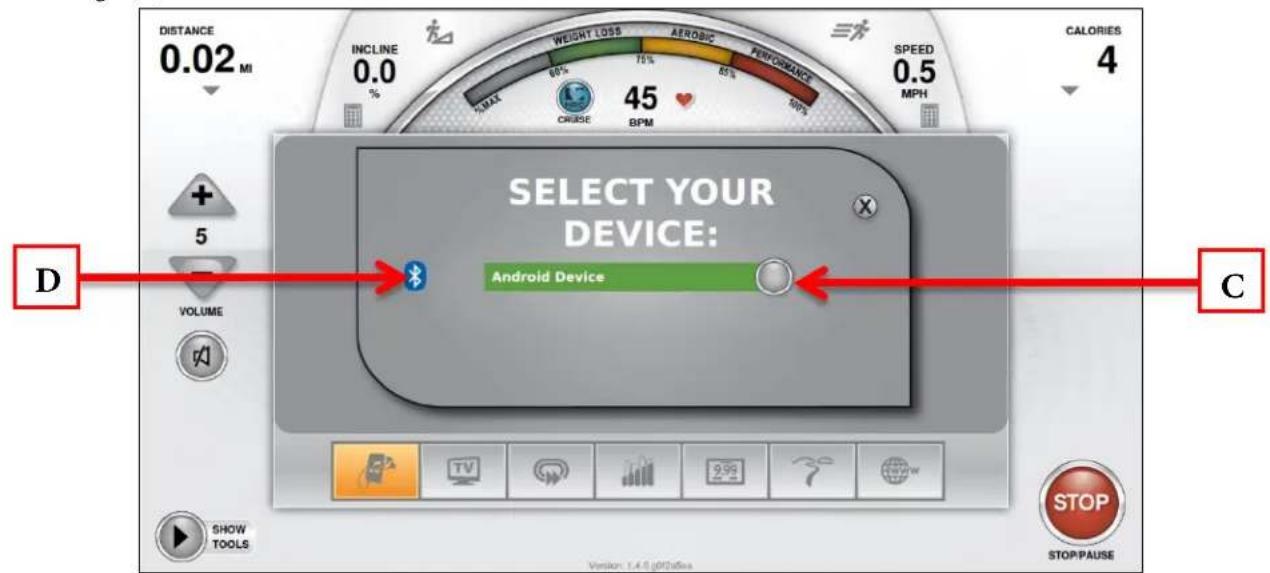
text_image
DISTANCE 0.02 MI INCLINE 0.0 % WEIGHT LOSS AEROBIC PERFORMANCE SPEED 0.5 MPH CALORIES 4 45 CRISE BPM SELECT YOUR DEVICE: Android Device D 5 VOLUME SHOW TOOLS STOP/PAUSE Version: 1.4.4 (JF)afina CCHAPTER 4A: TRANSCEND OPERATION
BLUETOOTH AUDIO (CONTINUED):
When a device is selected from the list, the console will send a pairing request to that device. The paring request must be accepted in order for this feature to operate. For iOS devices, press Pair (E) to accept the request. For Android devices, press Accept (F) to accept the request.
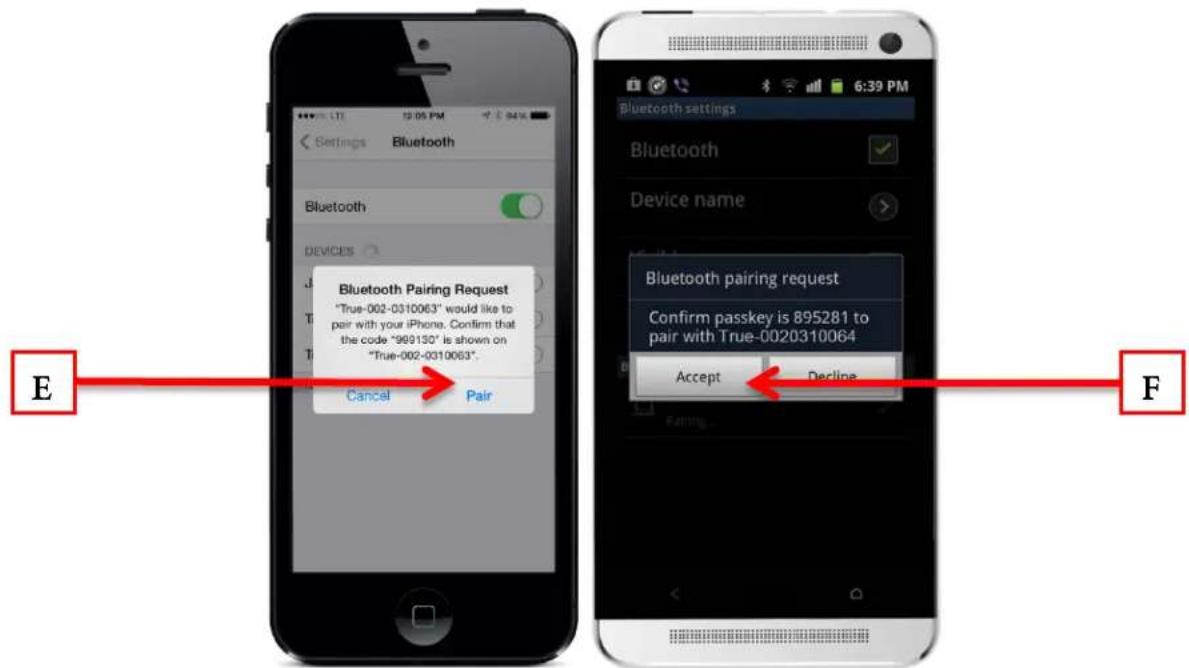
text_image
Bluetooth Pairing Request "True-002-0310063" would like to pair with your iPhone. Confirm that the code "969130" is shown on "True-002-0310063". Cancel Pair Bluetooth settings Bluetooth Device name Bluetooth pairing request Confirm passkey is 895281 to pair with True-0020310064 Accept Decline E FOnce the Bluetooth pairing request has been accepted, the playback screen will be displayed. During playback, users can control volume (G), pause, advance or replay tracks by using the navigation buttons (H), and toggle between available audio sources by touching the Change Audio Button (I). To disconnect the Bluetooth audio device, simply touch the disconnect button (J).
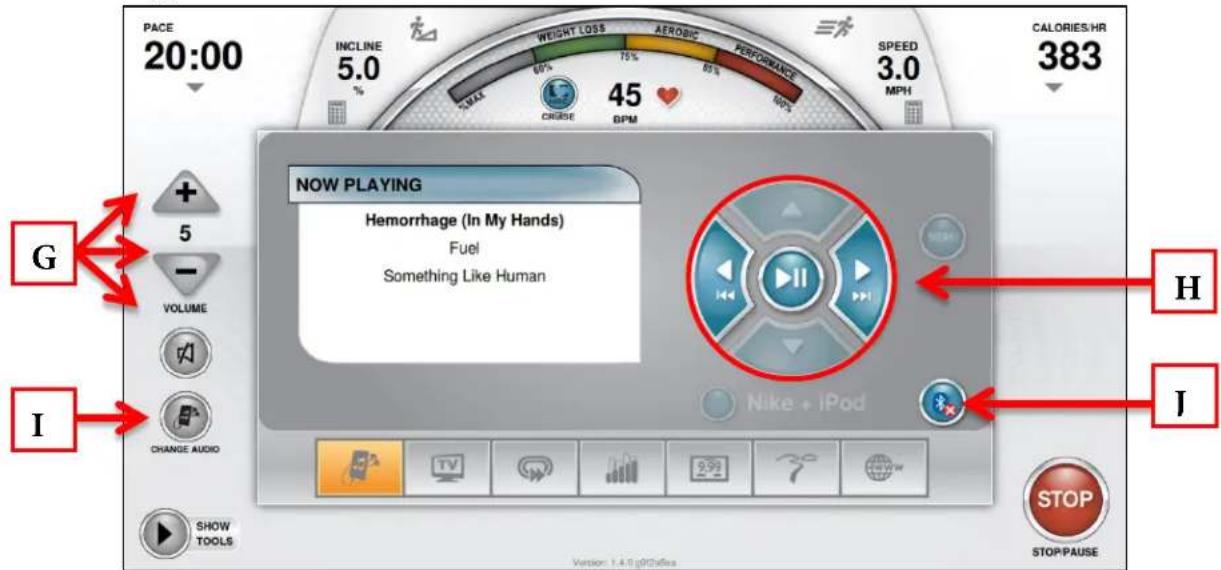
text_image
PACE 20:00 INCLINE 5.0 WEIGHT LOSS AEROBIC PERFORMANCE SPEED 3.0 CALORIES/HR 383 % 60% 75% 85% MPD CRUSE 45 BPM NOW PLAYING Hemorrhage (In My Hands) Fuel Something Like Human G + - VOLUME I CHANGE AUDIO SHOW TOOLS NIKE + iPod STOP/PAUSE H I Version: 1.4.10 gPDDoseCHAPTER 4A: TRANSCEND OPERATION
TV CONTROLS:
This console also features an integrated HDTV Tuner which allows the user to watch live programming in crisp, clear high Definition. The TV controls are built in to a Workout View Screen to allow the user to monitor their workout while enjoying their favorite shows.
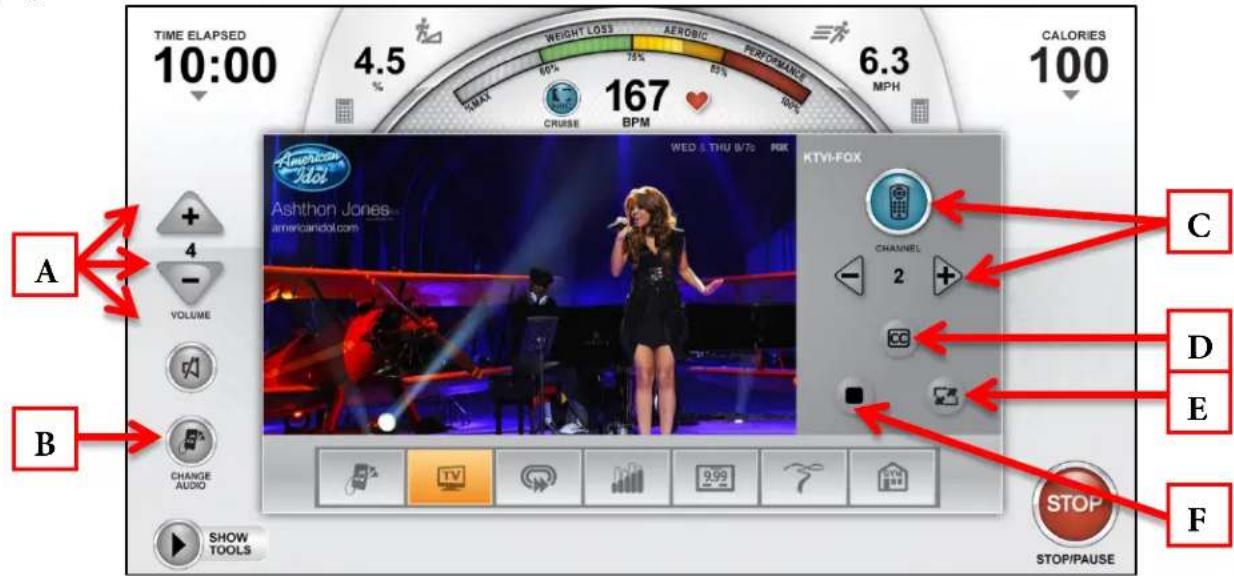
text_image
TIME ELAPSED 10:00 4.5 WEIGHT LOSS AERobic PERFORMANCE 6.3 MPH CALORIES 100 MAX 60% 75% 85% 100% CRUISE BPM 167 WED & THU 8/70 KWK American Idol Ashthon Jones... americandol.com C CHANNEL 2 + - D E CHANGE AUDIO STOP/PAUSE SHOW TOOLS A B FA) Volume Controls:
Increases, Decreases or Mutes the audio volume from the TV program.
B) Change Audio:
Toggles between available audio sources.
C) Channel Controls
Used to display a full list of available channels or to change channels one at a time.
D) Closed Captioning
Toggles the closed captioning on or off.
*This button will only be visible when the program displayed supports closed captioning.
E) Screen Toggle:
Allows the user to switch back and forth between full screen and regular mode.
F) Stop:
Stops the current TV/TV audio feed.
CHAPTER 4A: TRANSCEND OPERATION
OUTSIDE INTERACTIVE®:
Outside Interactive® provides users with a scenic, first-person video to enhance a workout. Audio from the web browser, TV, and Bluetooth sources can be combined with this feature by pressing the Change Audio Button (A) to create a truly unique workout. Additionally, the Workout View Screen controls and displays are still available when using this feature in standard mode. The video can be stopped, without ending the workout, at any time by touching the Stop Button (B). To display the video in full screen mode, simply touch the Screen Toggle Button (C). Audio Volume (C) can also be adjusted.
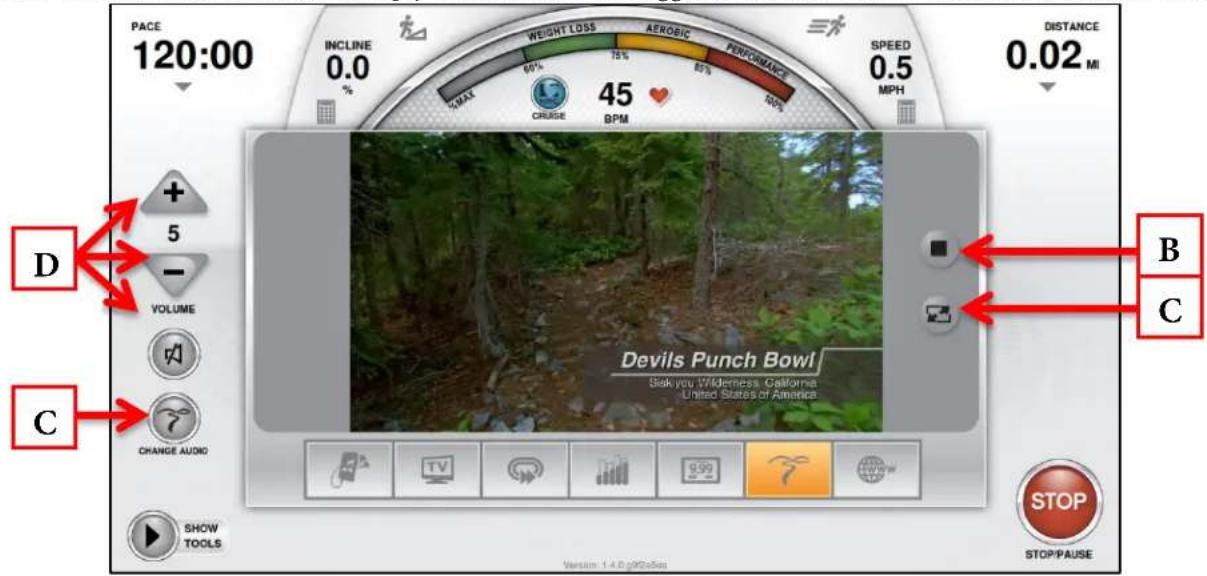
text_image
PACE 120:00 INCLINE 0.0 % SINEMA WEIGHT LOSS AEROBIC PERIODSICS 45 60% SPEED 0.5 MPH DISTANCE 0.02 MI D + 5 - VOLUME C CHANGE AUDIO DEVILs Punch Bowl Sak you Wilderness California United States of America B C SHOW TOOLS STOP/PAUSE Version: 1.4.8 g90c5esCHAPTER 4A: TRANSCEND OPERATION
ADVANCED CONSOLE FUNCTIONS:
Entering Service Mode:
Entering Service Mode can be completed by pressing and holding the TRUE logo (A) in the upper left corner of the home screen. When the word “TRUE” (B) begins to flash, release the logo and press and hold the lower right corner of the screen(C).
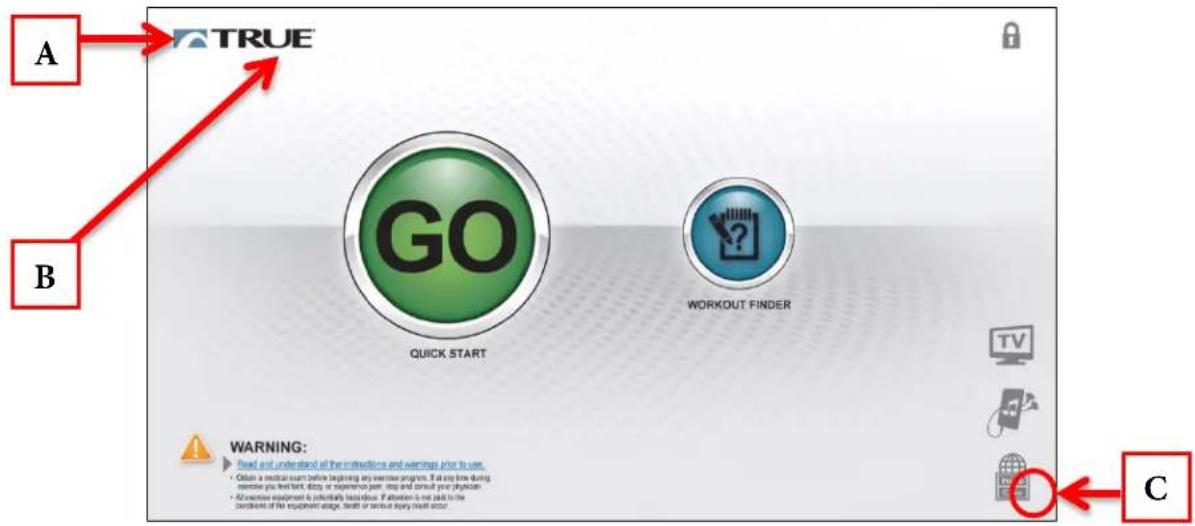
text_image
A B TRUE GO QUICK START WORKOUT FINDER WARNING: Read and understand all the instructions and warnings prior to use. • Obtain a medical team before beginning any exercise program. If at any time during exercise you feel bad, doily or experience pain. Help and consult your physician. • Do exercise equipment is potentially feasible. If attention is not said to the conditions of the equipment upgrade, feed or sense injury could occur. CMain Menu:
After successfully entering service mode the screen below will be displayed. From this menu users can access all of the service mode features by navigating through the various menus.
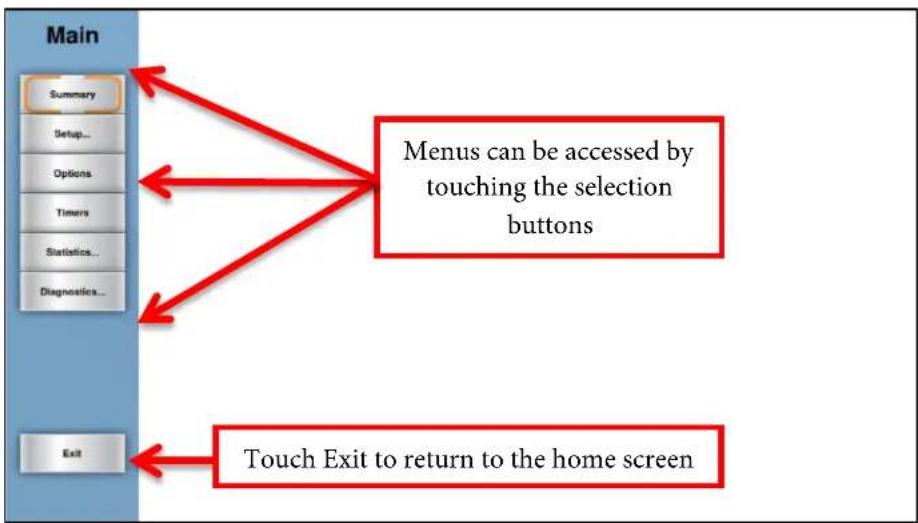
flowchart
graph TD
    A["Main"] --> B["Summary"]
    A --> C["Setup..."]
    A --> D["Options"]
    A --> E["Timers"]
    A --> F["Statistics..."]
    A --> G["Diagnostics..."]
    A --> H["Exit"]
    B --> I["Menus can be accessed by touching the selection buttons"]
    C --> I
    D --> I
    E --> I
    F --> I
    G --> I
    H --> J["Touch Exit to return to the home screen"]
CHAPTER 4A: TRANSCEND OPERATION
ADVANCED CONSOLE FUNCTIONS (CONTINUED):
Summary Screen:
The Summary Screen will be the first screen displayed after entering service mode. This screen will give a general overview of the unit's setup.
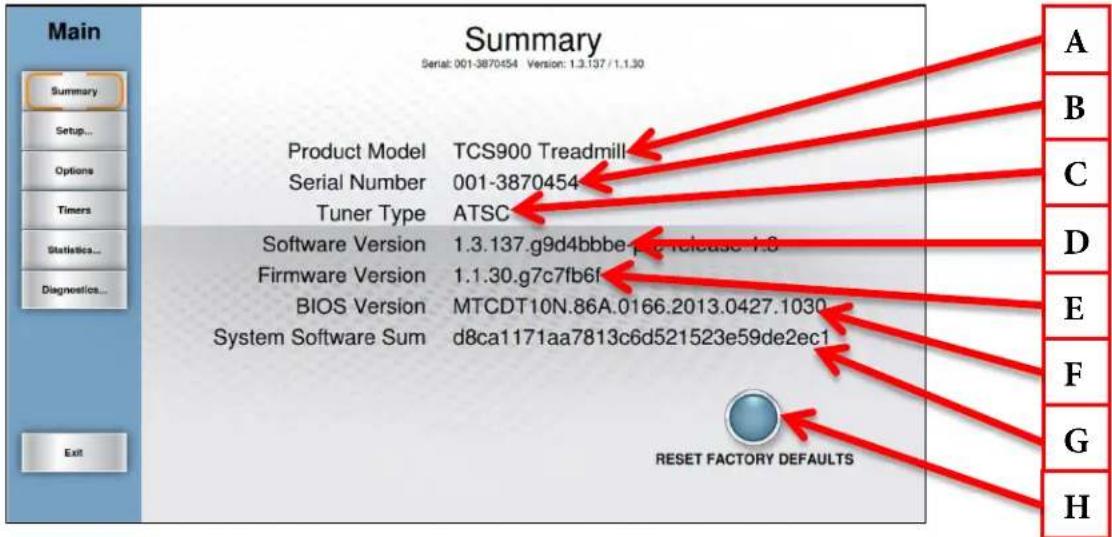
text_image
Summary Serial: 001-3870454 Version: 1.3.137 / 1.1.30 Product Model TCS900 Treadmill Serial Number 001-3870454 Tuner Type ATSC Software Version 1.3.137.g9d4bbbe p2 release 1.8 Firmware Version 1.1.30.g7c7fb6f BIOS Version MTCDT10N.86A.0166.2013.0427.1030 System Software Sum d8ca1171aa7813c6d521523e59de2ec1 RESET FACTORY DEFAULTS A B C D E F G H ExitA) Product Model:
The model number that the console is currently configured to.
B) Serial Number:
The serial number of the console (not the base unit).
C) Tuner Type:
The type of TV tuner installed in the console.
D) Software Version:
The current version of software that is installed on the console.
E) Firmware Version:
The current version of firmware that is installed on the console.
F) BIOS Version:
The current BIOS version that is installed on the console.
G) System Software Sum:
Displays OS data that is used in the production of the console.
G) Reset Factory Defaults:
Resets all console settings to their factory defaults.
CHAPTER 4A: TRANSCEND OPERATION
ADVANCED CONSOLE FUNCTIONS (CONTINUED):
Setup Menu:
The setup menu is accessed by touching the Setup button on the main menu. The Setup Menu is separated into subcategories and allows to users configure the console and to set up various functions of the unit.
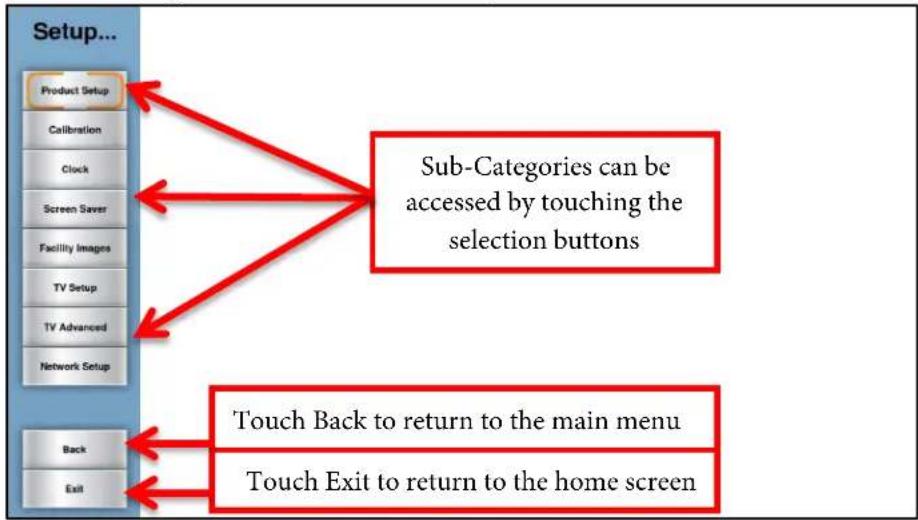
flowchart
graph TD
    A["Setup..."] --> B["Product Setup"]
    A --> C["Calibration"]
    A --> D["Clock"]
    A --> E["Screen Saver"]
    A --> F["Facility Images"]
    A --> G["TV Setup"]
    A --> H["TV Advanced"]
    A --> I["Network Setup"]
    A --> J["Back"]
    A --> K["Exit"]
    B --> L["Sub-Categories can be accessed by touching the selection buttons"]
    C --> L
    D --> L
    E --> L
    F --> L
    G --> L
    H --> L
    I --> L
    J --> M["Touch Back to return to the main menu"]
    K --> N["Touch Exit to return to the home screen"]
Setup Menu - Product Setup:
The Product Setup screen allows users to change the console configuration to match the unit on which it is installed. To change the console configuration:
• From the Main Menu, touch the Setup button.
• From the Setup Menu, Press Product Setup (A).
- Touch the correct model number to select it (B).
- Touch the Save key to save the configuration (C).
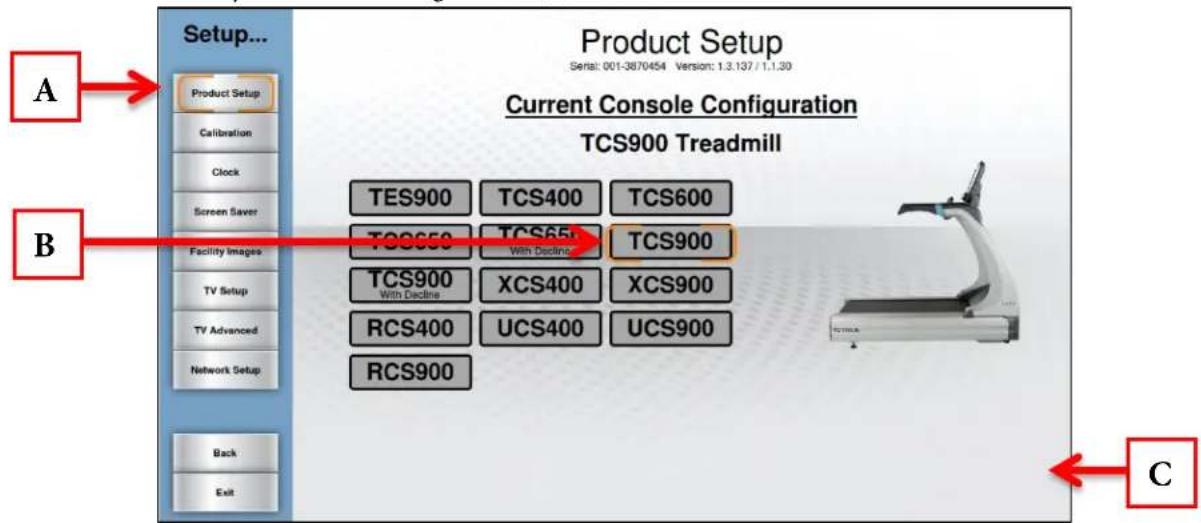
flowchart
graph LR
    A["Setup A"] --> B["Product Setup"]
    B --> C["Calibration"]
    B --> D["Clock"]
    B --> E["Screen Slaver"]
    B --> F["Facility Images"]
    B --> G["TV Setup"]
    B --> H["TV Advanced"]
    B --> I["Network Setup"]
    J["Setup B"] --> K["TES900"]
    J --> L["TCS400"]
    J --> M["TCS600"]
    N["Current Console Configuration TCS900 Treadmill"] --> O["TCS900 With Decline"]
    N --> P["TCS900"]
    N --> Q["XCS400"]
    N --> R["XCS900"]
    N --> S["RCS400"]
    N --> T["UCS400"]
    N --> U["UCS900"]
    V["Setup C"] --> W["Back"]
    V --> X["Exit"]
CHAPTER 4A: TRANSCEND OPERATION
ADVANCED CONSOLE FUNCTIONS (CONTINUED):
Setup Menu - Calibration:
Calibration will conduct a basic test of the drive and incline systems to ensure that they are operating as intended. Calibration may also be used by technicians to troubleshoot system faults.
WARNING:
This process will take full control of the treadmill and can be dangerous if caution is not taken.
• Calibration can take up to two minutes to complete.
- Do not stand on the treadmill during the calibration procedure.
- Verify that the machine is free of all parts and tools.
- Keep children and animals at a safe distance.
Calibration Steps:
• From the Main Menu, press the Setup button.
• From the Setup Menu, press Calibration (A)
- Press the Calibrate key (B)
- When complete, the console will display "Calibration Successful".
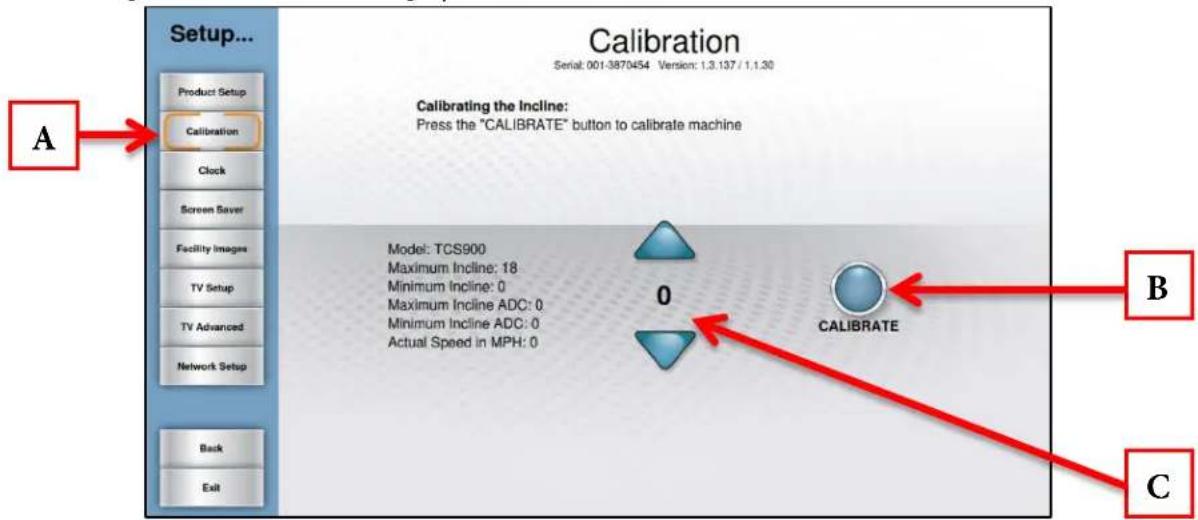
text_image
Setup... Product Setup Calibration Clock Screen Saver Facility Images TV Setup TV Advanced Network Setup Back Exit Calibration Serial: 001-3870454 Version: 1.3.137 / 1.1.30 Calibrating the Incline: Press the "CALIBRATE" button to calibrate machine Model: TCS900 Maximum Incline: 18 Minimum Incline: 0 Maximum Incline ADC: 0 Minimum Incline ADC: 0 Actual Speed in MPH: 0 0 CALIBRATE B CWARNING:
The Potentiometer Value (C) should only be adjusted by a trained service professional. Any adjustment made to the Potentiometer Value may result in unexpected errors or damage to the incline system.
CHAPTER 4A: TRANSCEND OPERATION
ADVANCED CONSOLE FUNCTIONS (CONTINUED):
Setup Menu - Clock:
Correctly setting up the clock will ensure that all workout data that is exported by a user will be correctly labeled. Correct time is also important for troubleshooting purposes when viewing the system's error log.
Setting the Clock:
• From the Main Menu, press the Setup button.
• From the Setup Menu, press the Clock Button (A).
- Touch the arrows (B) to adjust the date and time and use the slider button(C) to select AM or PM.
- Once the correct time and date are entered, touch the Next key (D).
• Use the slider (E) or swipe through the list of time zones until the correct time zone is shown in bold (F).
- Touch the Save key (G).
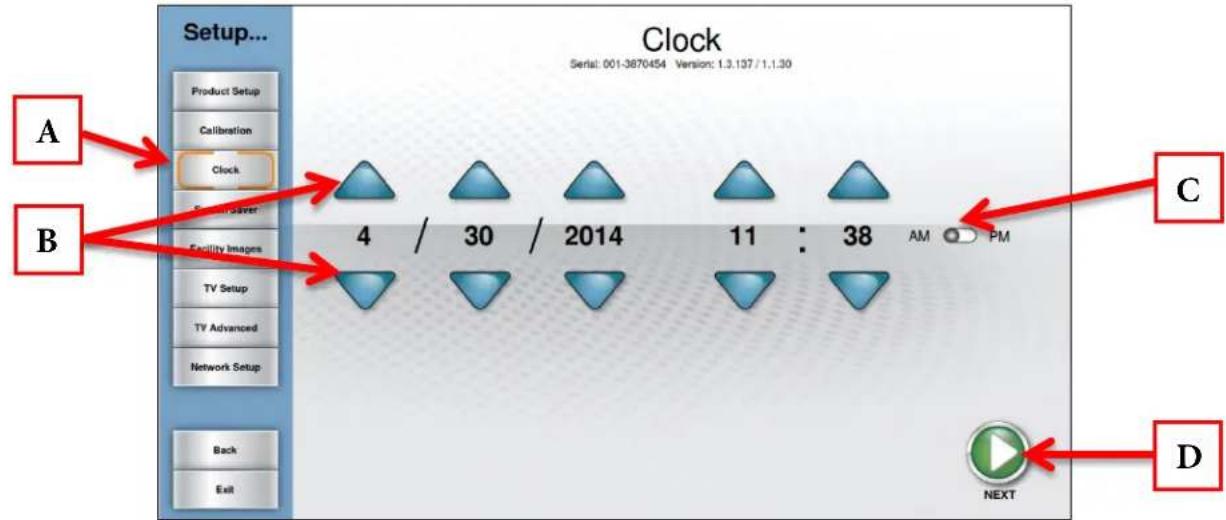
flowchart
graph TD
    A["Setup..."] --> B["Product Setup"]
    B --> C["Calibration"]
    C --> D["Clock"]
    D --> E["Security Saver"]
    E --> F["Facility Images"]
    F --> G["TV Setup"]
    G --> H["TV Advanced"]
    H --> I["Network Setup"]
    I --> J["Back"]
    I --> K["Exit"]
    D --> L["4 / 30 / 2014 : 11 : 38 AM PM"]
    L --> M["C"]
    L --> N["D"]
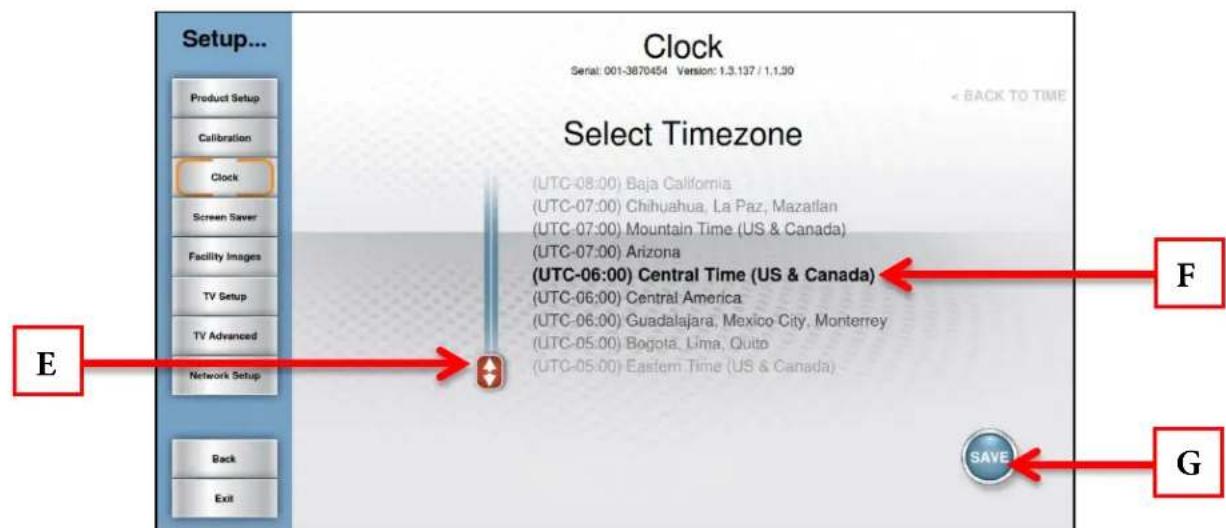
text_image
Setup... Clock Serial: 001-3870454 Version: 1.3.137 / 1.1.30 Select Timezone (UTC-08:00) Baja California (UTC-07:00) Chihuahua, La Paz, Mazatlan (UTC-07:00) Mountain Time (US & Canada) (UTC-07:00) Arizona (UTC-06:00) Central Time (US & Canada) (UTC-06:00) Central America (UTC-06:00) Guadalajara, Mexico City, Monterrey (UTC-05:00) Bogota, Lima, Quito (UTC-05:00) Eastern Time (US & Canada) E Back Exit SAVE F GCHAPTER 4A: TRANSCEND OPERATION
ADVANCED CONSOLE FUNCTIONS (CONTINUED):
Setup Menu - Screen Saver:
Users can load JPG images to be used by the console as a custom screen saver. In order to be uploaded to the console, images will need to be placed on a USB drive in a folder named “screen saver” (case sensitive).
Importing Screen Saver Images:
• Touch the Screen Saver button (A)
- Insert the USB drive that contains the images into the console's USB port.
• Verify the images in the preview window (B)
- Touch the Save button (C) to save the images to the console.
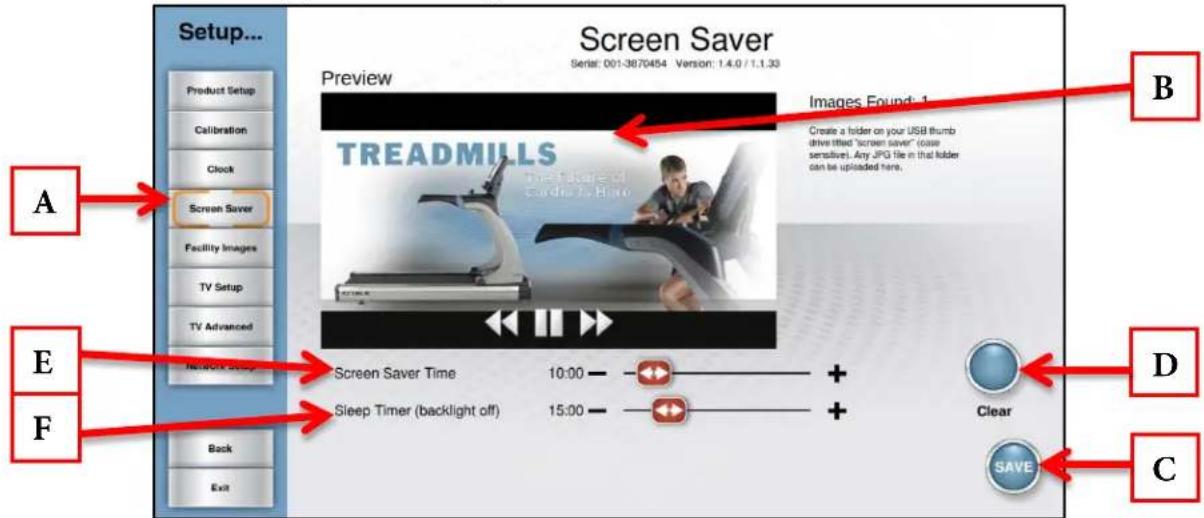
text_image
Setup... Product Setup Calibration Clock Screen Saver Facility Images TV Setup TV Advanced Network Setup Back Exit Screen Saver Preview Images Found 1 Create a folder on your USB thumb drive lifted "screen saver" (case sensitive). Any JPG file in that folder can be uploaded here. B E F Screen Saver Time 10:00 - Sleep Timer (backlight off) 15:00 - + + + Clear SAVE CAdditional Screen Saver Options:
- Custom Screen Saver images can be deleted by touching the clear button (D).
- The amount of time the console must be idle before the screen saver engages can be adjusted by using the Screen Saver Time Slider (E)
- The Sleep timer is a function that will turn off the console's back light after a period of time to save energy. The amount of time the console must be idle before going to sleep can be adjusted by using the Sleep Timer Slider (F).
WARNING:
Moving the Screen Saver Time completely to the left will disable the screen saver. Disabling the screen saver is not recommended and may cause damage to the screen and void the manufacturer warranty.
CHAPTER 4A: TRANSCEND OPERATION
ADVANCED CONSOLE FUNCTIONS (CONTINUED):
Setup Menu - Facility Images:
The Transcend console supports customizable facility images to help promote specials, events or endorse a brand. In order to be uploaded to the console, images will need to be placed on a USB drive in a folder named “facility” (case sensitive).
Importing Facility Images:
- Touch the Facility Images button (A)
- Insert the USB drive that contains the images into the console's USB port.
• Verify the images in the preview window (B) - Touch the Save button (C) to save the images to the console.
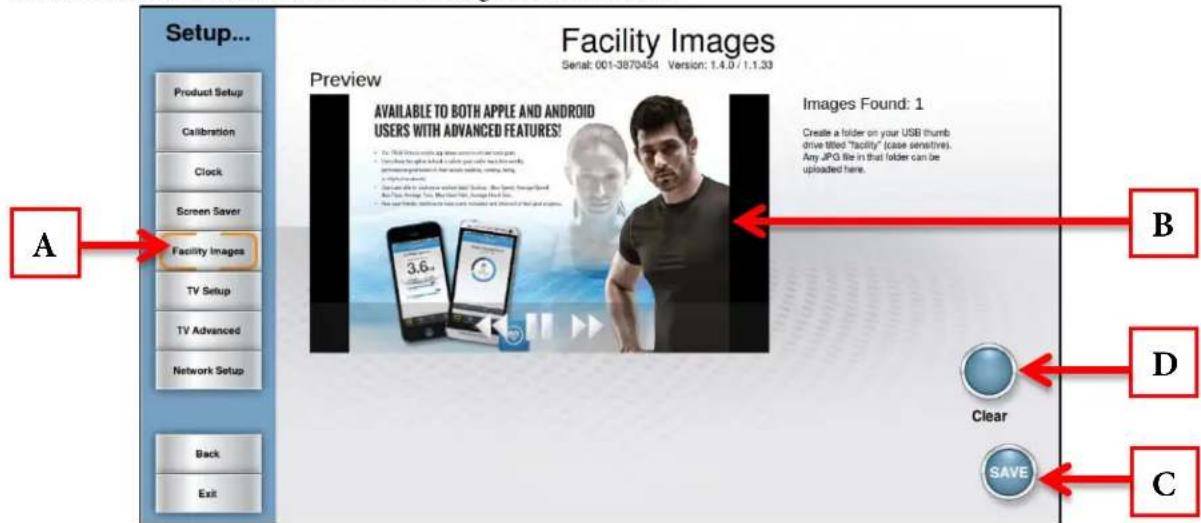
text_image
Setup... Product Setup Calibration Clock Screen Saver Facility Images TV Setup TV Advanced Network Setup Back Exit Facility Images Serial: 001-3870454 Version: 1.4.0 / 1.1.33 Preview AVAILABLE TO BOTH APPLE AND ANDROID USERS WITH ADVANCED FEATURES! • For Quick Access with Apple and Android • Get the right to build a key user with the next work, • Advanced and provide that all users are working, using, testing, • Software development • Create a file in database and Web Server, the Web Image Book • Use the Image Web, the Web Image, or other Web... • Use the Image Web for help you use your device and your app. Images Found: 1 Create a folder on your USB thumb drive titled "facility" (case sensitive). Any JPG file in that folder can be uploaded here. A Images Found: 1 B D C Clear SAVE* Facility images can be deleted by touching the clear button (D).
Once loaded correctly, the facility Images will be displayed in the Facility Workout Data Screen (as shown below).
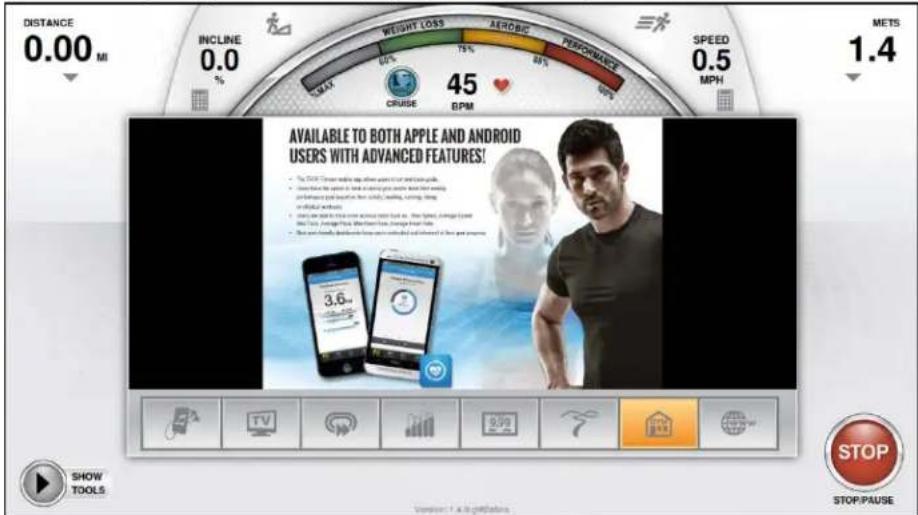
text_image
DISTANCE 0.00 MI INCLINE 0.0 % WEIGHT LOSS AEROBIC PERFORMICE SPEED 0.5 MPH METS 1.4 45 BPM AVAILABLE TO BOTH APPLE AND ANDROID USERS WITH ADVANCED FEATURES! • The iPhone is the best mobile app, when used for next-gen phone. • Use the next-gen phone to enable your own body and your own path. You can use the next-gen phone to access your own body. • Use the next-gen phone to ensure that you can use the next-gen phone. • Use the next-gen phone to ensure that you can use the next-gen phone. • Use the next-gen phone to ensure that you can use the next-gen phone. • Use the next-gen phone to ensure that you can use the next-gen phone. 3.6 STOP/PAUSE SHOW TOOLS Version 1 - All rights reserved.CHAPTER 4A: TRANSCEND OPERATION
ADVANCED CONSOLE FUNCTIONS (CONTINUED):
Setup Menu - TV Setup:
Transcend consoles have an integrated HDTV Tuner which allows the user to watch live programming in crisp, clear high Definition. Before any programming can be viewed, the TV signal needs to be set up. (TV Options will not be displayed on the Home Screen or in the Workout Data Screens until the TV Setup Steps have been completed)
TV Setup Steps:
• From the Setup Menu, touch TV Setup (A).
- Touch the type of signal that is being used to select it (B); Analog, Digital, or Both. (Digital is selected by default) *When analog is selected the user will need to choose the analog standard (NTSC-M for the United States).
- Touch the Source Slider (C) to select between Antenna and Cable.
• Verify that the correct Country is listed (D).
- Touch Enable Aux Input (E) to enable or disable the AUX inputs located on the back of the console.
- Touch Begin Channel Scan (F) to begin scanning for channels.
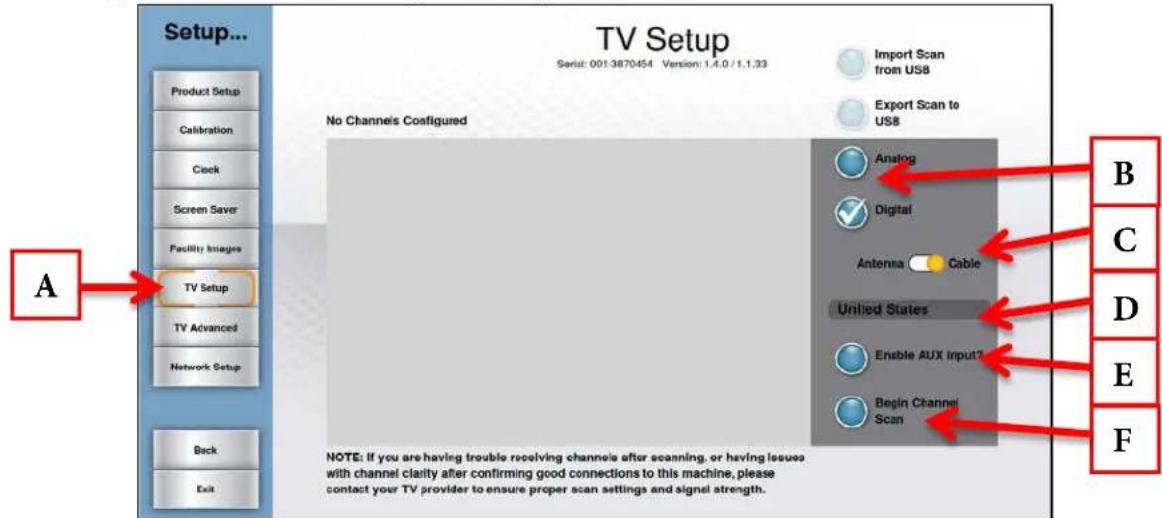
text_image
Setup... Product Setup Calibration Clock Screen Saver Facility Images TV Setup TV Advanced Network Setup Back Exit TV Setup Serial: 001-3870454 Version: 1.4.0 / 1.1.33 Import Scan from USB Export Scan to USB No Channels Configured Analog Digital Antenna Cable United States Enable AUX Input? Begin Channel Scan A B C D E F NOTE: If you are having trouble receiving channels after scanning, or having issues with channel clarity after confirming good connections to this machine, please contact your TV provider to ensure proper scan settings and signal strength.- Once the channel scan is complete, the channel list (G) will be populated with the available channels.
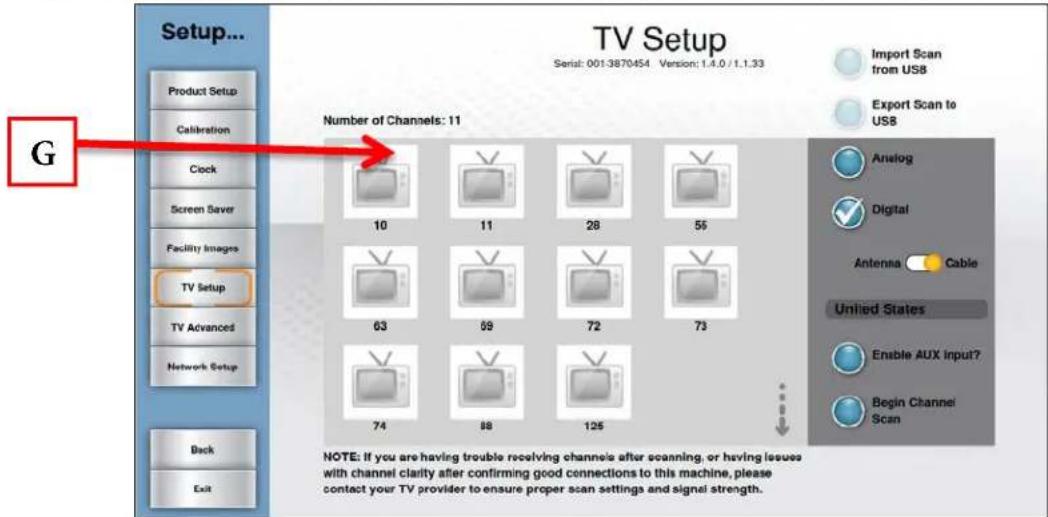
text_image
Setup... Product Setup Calibration Clock Screen Saver Facility Images TV Setup TV Advanced Network Setup Back Exit TV Setup Serial: 0013870454 Version: 1.4.0 / 1.1.33 Number of Channels: 11 10 11 28 55 63 59 72 73 74 88 125 NOTE: If you are having trouble receiving channels after scanning, or having issues with channel clarity after confirming good connections to this machine, please contact your TV provider to ensure proper scan settings and signal strength. Import Scan from USB Export Scan to USB Analog Digital Antenna Cable Unified States Enable AUX Input? Begin Channel ScanCHAPTER 4A: TRANSCEND OPERATION
ADVANCED CONSOLE FUNCTIONS (CONTINUED):
Setup Menu - TV Setup (continued):
Users can save time when setting up multiple units or maintain a back-up of their TV Setup Data by exporting it to a USB drive.
Exporting TV Setup Data to USB:
• Complete the TV Setup process.
- Insert a blank USB drive into the console's USB port.
- When all desired channels are listed in the Channel List (A), touch the Export Scan to USB Button (B)
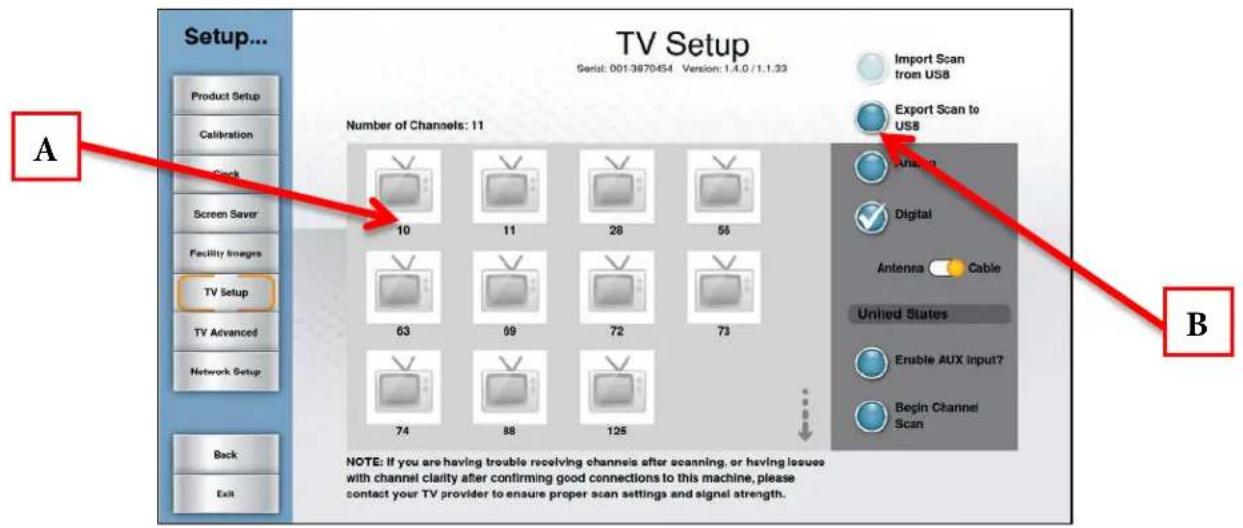
text_image
Setup... Product Setup Calibration Clock Screen Saver Facility Images TV Setup TV Advanced Network Setup Back Exit TV Setup Serial: 001-3870454 Version: 1.4.0 / 1.1.33 Number of Channels: 11 10 11 28 56 63 69 72 73 74 88 125 Import Scan from US8 Export Scan to US8 Unusing Digital Antenna Cable United States Enable AUX Input? Begin Channel Scan A B NOTE: If you are having trouble receiving channels after scanning, or having issues with channel clarity after confirming good connections to this machine, please contact your TV provider to ensure proper scan settings and signal strength.Importing TV Setup Data from USB:
- Navigate to the TV Setup screen.
- Insert the prepared USB stick into the console's USB Port.
- Touch Import Scan from USB (A).
- Once the import process is complete, verify that all channels are listed in the channel list (B).
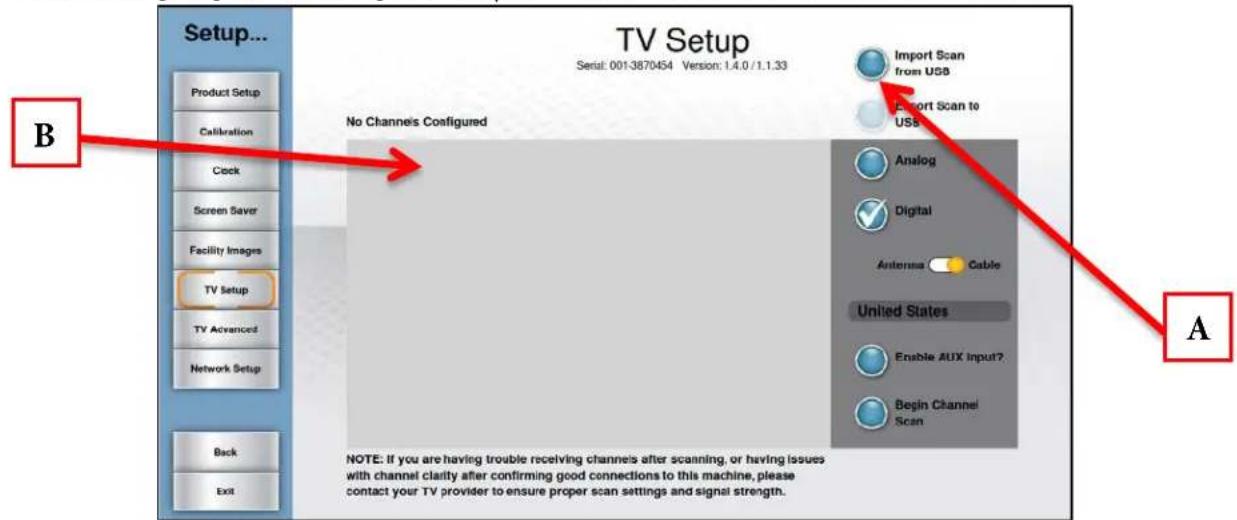
text_image
Setup... Product Setup Calibration Clock Screen Saver Facility Images TV Setup TV Advanced Network Setup Back Exit TV Setup Serial: 001-3870454 Version: 1.4.0 / 1.1.33 No Channels Configured Import Scan from USB Export Scan to USB Analog Digital Antenna Cable United States Enable AUX Input? Begin Channel Scan B A NOTE: If you are having trouble receiving channels after scanning, or having issues with channel clarity after confirming good connections to this machine, please contact your TV provider to ensure proper scan settings and signal strength.CHAPTER 4A: TRANSCEND OPERATION
ADVANCED CONSOLE FUNCTIONS (CONTINUED):
Setup Menu - TV Advanced:
The TV Advanced Menu allows users to fine tune their TV settings by adding channels, removing channels, and adding channel logos.
Add a Channel:
- Navigate to the TV Advanced Screen (A).
- Press the Add Channel Button (B) to access the Add Channel Screen.
- Use the Up/Down Arrows(C) to adjust the values (Standard, Frequency, Network, and Channel Number).
*Channel frequencies must be obtained from your television service provider.
• Once all values are correct, press OK (D) to save the channel.
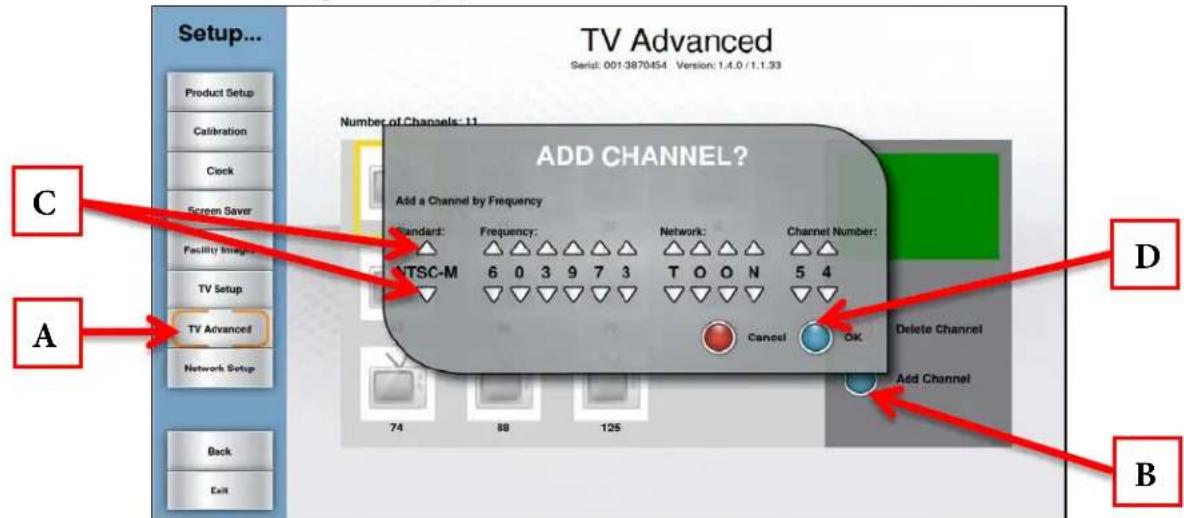
text_image
TV Advanced Serial: 0013870454 Version: 1.4.0 / 1.1.33 Setup... Product Setup Calibration Clock Screen Saver Facility Integr... TV Setup TV Advanced Network Setup Back Exit Number of Channels: 11 ADD CHANNEL? Add a Channel by Frequency Standard: Frequency: Network: Channel Number: NTSC-M 6 0 3 9 7 3 T O O N 5 4 Cancel OK Delete Channel Add Channel C D A BDeleting Channels:
- Touch the channel to be deleted to select it.
- Press the Delete Channel Button (A)
- Press Delete Channel (B) to delete the selected channel or Delete all Channels (C) to delete all channels.
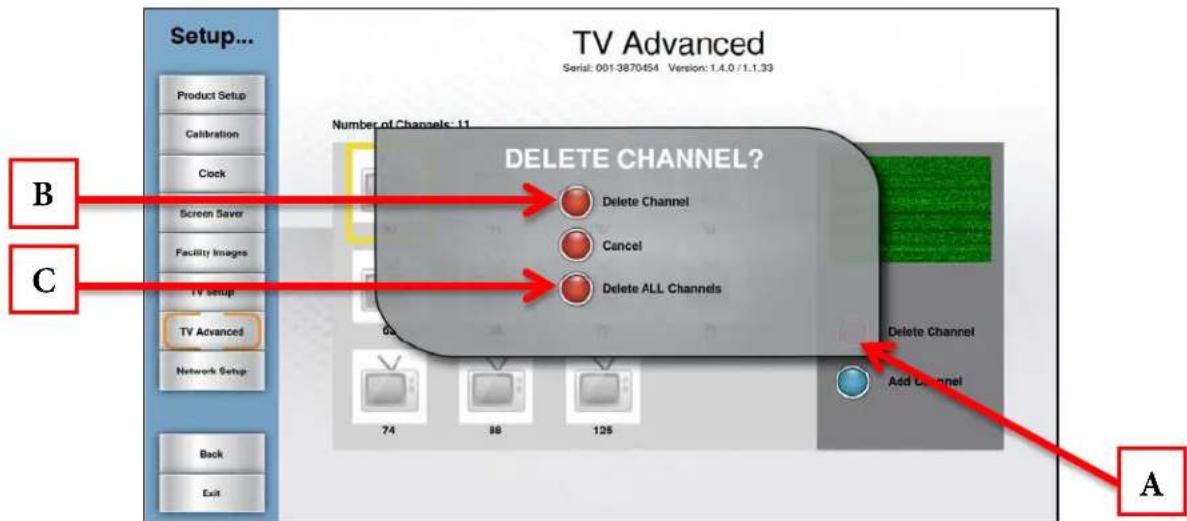
text_image
TV Advanced Serial: 001-3870454 Version: 1.4.0 / 1.1.33 Setup... Product Setup Calibration Clock Screen Saver Facility Images TV Setup TV Advanced Network Setup Back Exit Number of Channels: 11 DELETE CHANNEL? Delete Channel Cancel Delete ALL Channels 74 88 125 Delete Channel Add Channel ACHAPTER 4A: TRANSCEND OPERATION
ADVANCED CONSOLE FUNCTIONS (CONTINUED):
Setup Menu - TV Advanced (continued):
Using Channel logos allows users to quickly identify and select their favorite TV channels with minimal interruption to their workout.
Adding Channel Logos:
- Navigate to the TV Advanced Screen (A).
- Touch the desired channel in the Channel List (B) to select it
- Touch the channel again to enter the logo screen.
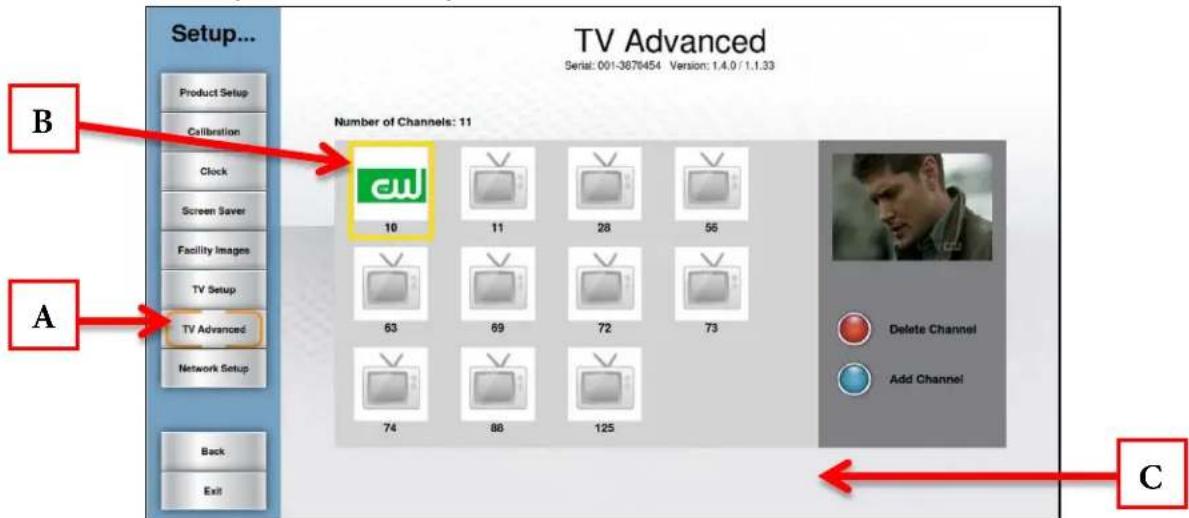
text_image
Setup... Product Setup Calibration Clock Screen Saver Facility Images TV Setup TV Advanced Network Setup Back Exit TV Advanced Serial: 001-3876454 Version: 1.4.0 / 1.1.33 Number of Channels: 11 CW 10 11 28 56 63 69 72 73 74 86 125 Delete Channel Add Channel C- Touch the logo (C) that corresponds to the selected channel.
- Repeat these steps for each channel for which a logo is available.
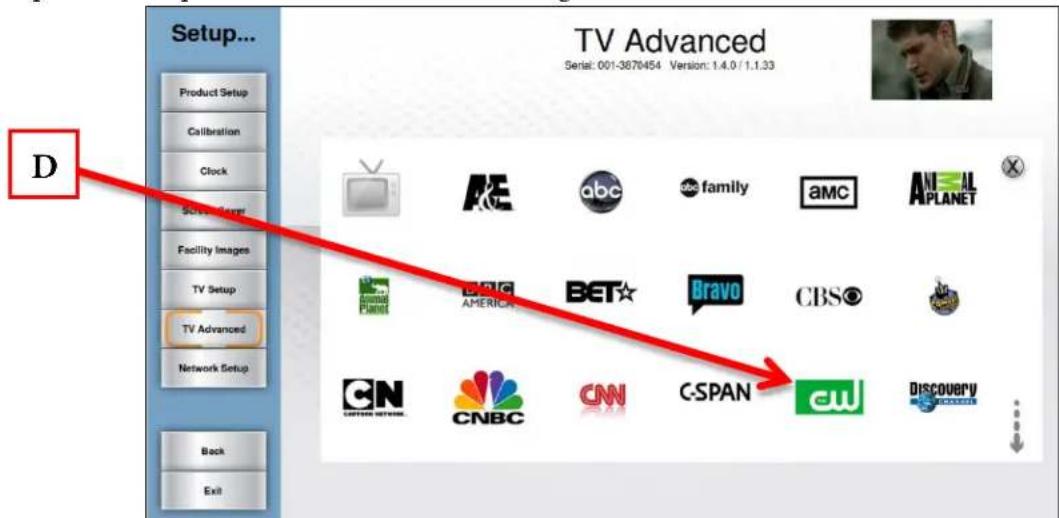
text_image
Setup... Product Setup Calibration Clock Screen-Smart Facility Images TV Setup TV Advanced Network Setup Back Exit TV Advanced Serial: 001-3876454 Version: 1.4.0 / 1.1.33 D RE abc family amc AMEL APLANET AMERICAN BET Bravo CBS CN NBC CN CSPAN CW DiscoveryCHAPTER 4A: TRANSCEND OPERATION
ADVANCED CONSOLE FUNCTIONS (CONTINUED):
Setup Menu - Network Setup:
The Network Setup screen displays the current network information for the console. This screen also allows users to setup wired or wireless internet connection and enable web browsing. To connect to a network, simply touch the Setup Connection button (A) and select the desired network from the list (and enter the password if necessary) and then press connect.
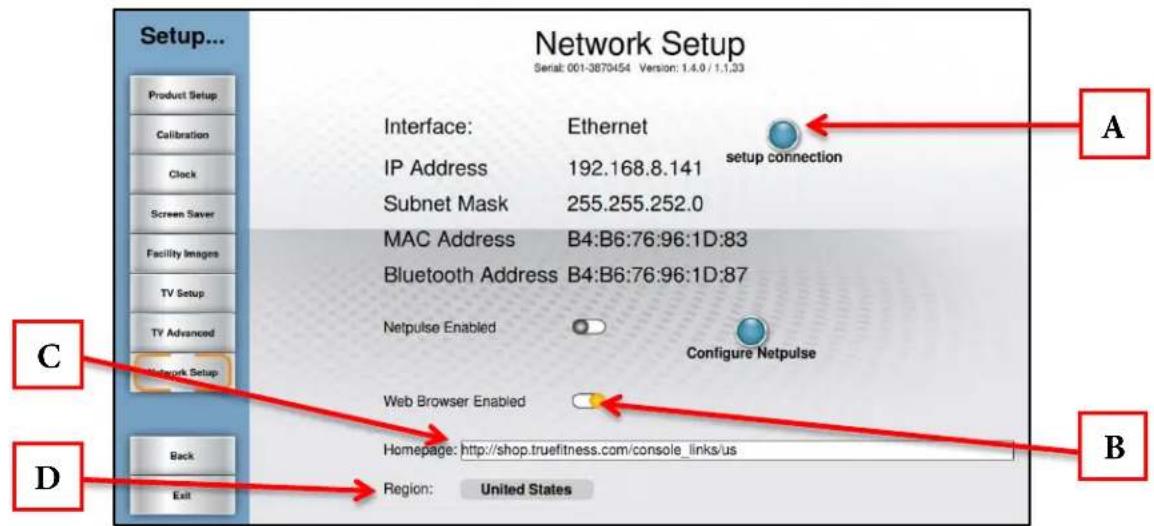
text_image
Setup... Network Setup Serial: 001-3870454 Version: 1.4.0 / 1.1.23 Interface: Ethernet IP Address 192.168.8.141 Subnet Mask 255.255.252.0 MAC Address B4:B6:76:96:1D:83 Bluetooth Address B4:B6:76:96:1D:87 Netpulse Enabled Configure Netpulse Web Browser Enabled Homepage: http://shop.truefitness.com/console_links/us Region: United States Product Setup Calibration Clock Screen Saver Facility Images TV Setup TV Advanced Network Setup C D Region: United StatesEnabling the Web Browser:
- Touch the Web browser Enabled Slider (B) to enable it.
• Accept the Internet Service Agreement. - Select a homepage by touching the Homepage Address Bar (C) and typing the web address of the desired page and pressing Enter to confirm the page.
• Ensure that the correct Region (D) is displayed.
CHAPTER 4A: TRANSCEND OPERATION
ADVANCED CONSOLE FUNCTIONS (CONTINUED):
Options Menu:
The Options menu allows users to customize settings on the console to meet their needs. The settings in this menu save automatically.

text_image
Main Summary Setup... Options Timers Statistics... Diagnostics... Exit Options Serial: 001-3870454 Version: 1.3.137 / 1.1.30 Metric Units Save Workout Enabled Contact Heart Rate Has Priority LCD Brightness 100% - System Sound Volume 80% - Default Language ENGLISH A B C D E FA) Metric Units:
When enabled, the console will display all Metric units rather than American Standard.
B) Save Workout Enabled:
Turn on this feature to allow users to save custom workouts to the console.
C) Contact Heart Rate Has Priority:
When enabled, the console will attempt to read heart rate data from the contact heart rate grips before reading data from a wireless chest strap.
*When this option is turned off, telemetry heart rate will take priority.
D) LCD Brightness:
Use the slider to adjust the brightness of the touchscreen display.
E) System Sound Volume:
Use the slider to adjust the volume of the notifications and beeps that come from the console.
F) Default Language:
Touch the flag to select a different language. Once a new default language has been selected, all menus, options and workout data will appear in that language.
CHAPTER 4A: TRANSCEND OPERATION
ADVANCED CONSOLE FUNCTIONS (CONTINUED):
Timers Menu:
The Timers Menu allows for time limits to be set on various console features and functions.
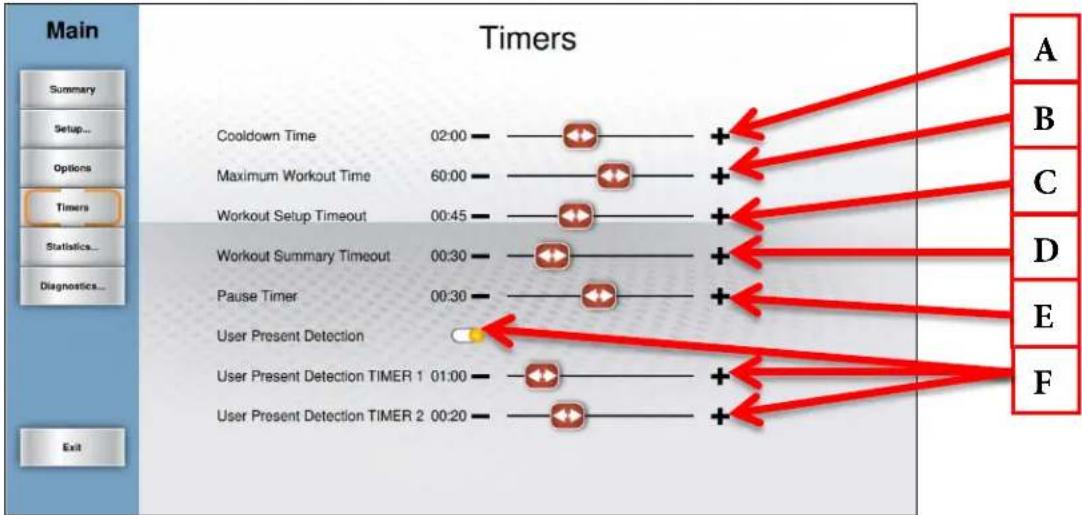
flowchart
graph TD
    A["Main"] --> B["Summary"]
    B --> C["Setup..."]
    C --> D["Options"]
    D --> E["Timers"]
    E --> F["Statistics..."]
    F --> G["Diagnostics..."]
    G --> H["Exit"]

    I["Cooldown Time 02:00"] --> J["+"]
    K["Maximum Workout Time 60:00"] --> L["+"]
    M["Workout Setup Timeout 00:45"] --> N["+"]
    O["Workout Summary Timeout 00:30"] --> P["+"]
    Q["Pause Timer 00:30"] --> R["+"]
    S["User Present Detection"] --> T["+"]
    U["User Present Detection TIMER 1 01:00"] --> V["+"]
    W["User Present Detection TIMER 2 00:20"] --> X["+"]

    Y["A"] --> Z["Red Arrow"]
    AB["B"] --> Z
    AC["C"] --> Z
    AD["D"] --> Z
    AE["E"] --> Z
    AF["F"] --> Z
A) Cooldown Time:
Use the slider to adjust the length of the cooldown segment at the end of a workout.
B) Maximum Workout Time:
This setting will limit the amount of time that all workouts can last (this setting does not apply to quickstart workouts, manual workouts or distance workouts).
C) Workout Setup Timeout:
Choose how long the workout data entry screen will remain on the display without any user interaction. By choosing the "off" setting, the data entry screen will be displayed until closed by a user.
D) Workout Summary Timeout:
Determines the amount of time the Workout Summary Screen will remain on the display. By choosing the “Off” setting, the summary will be displayed until ended by a user.
E) Pause Timer:
This setting will limit the amount of time that a workout can be paused before it automatically ends. By choosing the “Off” option, the unit will remain paused until the user resumes or ends the workout.
F) User Present Detection (AC drive systems only):
When User Present Detection is enabled the treadmill will pause if it does not detect a normal amp draw which would be indicative of the weight of the user on the treadbelt. Timer 1 will set the amount of time before the console displays a User Present Notification and Timer 2 will set the amount of time that the notification is displayed on the console before the treadbelt is stopped.
CHAPTER 4A: TRANSCEND OPERATION
ADVANCED CONSOLE FUNCTIONS (CONTINUED):
Statistics Menu:
The statistics menu provides an overview of how and how long the unit has been used. Touching the summary button (A) will provide a usage summary. Run Hours (B) is the total number of hours the unit has been used. Machine Distance (C) is the total distance in miles that the belt has traveled. Distance (D) is the amount of distance the belt has traveled since the last time the Clear Mileage button (E) was pressed.
*The Distance/Clear Mileage feature is helpful for tracking mileage in a preventive maintenance schedule.
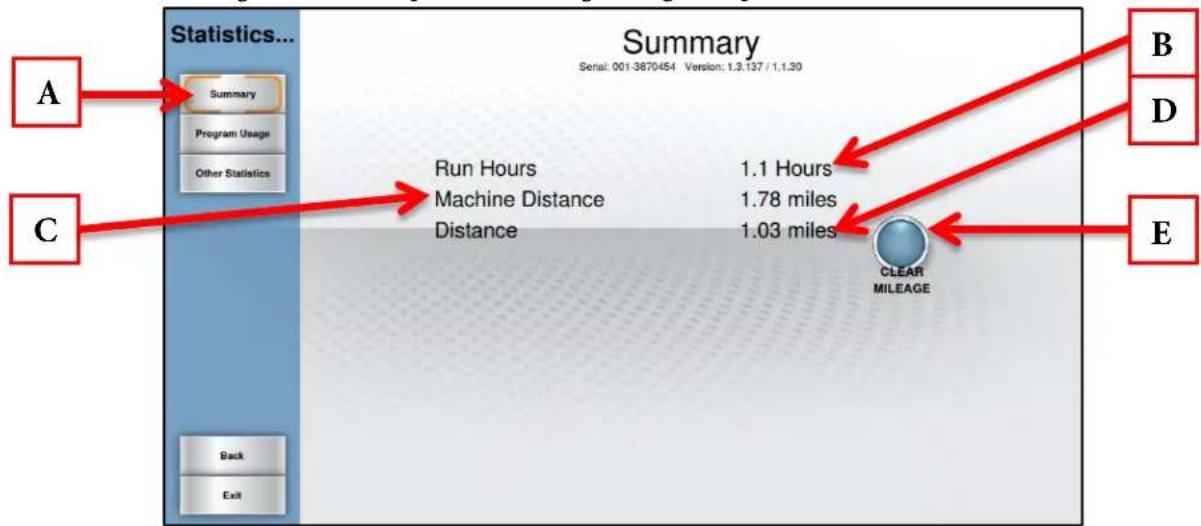
flowchart
graph TD
    A["Statistics..."] --> B["Summary"]
    B --> C["Program Usage"]
    B --> D["Other Statistics"]
    C --> E["Run Hours"]
    C --> F["Machine Distance"]
    C --> G["Distance"]
    E --> H["1.1 Hours"]
    F --> I["1.78 miles"]
    G --> J["1.03 miles"]
    H --> K["CLEAR MILEAGE"]
    I --> K
    J --> K
    K --> L["B"]
    K --> M["D"]
    K --> N["E"]
Touching the Program Usage button (F) will provide a list of programs that have been used on the unit and how many times those programs have been used. These statistics can be reset by touching the Clear button (G), but it is not recommended.
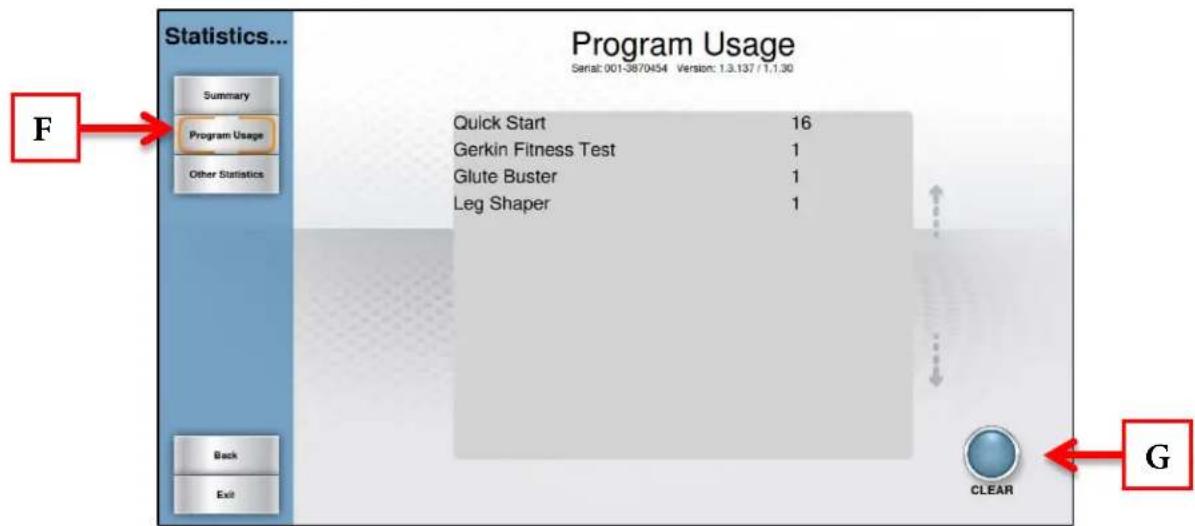
text_image
Statistics... Program Usage Serial: 001-3870454 Version: 1.3.137 / 1.1.30 Summary Program Usage Other Statistics Quick Start 16 Gerkin Fitness Test 1 Glute Buster 1 Leg Shaper 1 Back Exit CLEAR F GCHAPTER 4A: TRANSCEND OPERATION
ADVANCED CONSOLE FUNCTIONS (CONTINUED):
Diagnostics Menu:
The Diagnostics Menu contains tools used to help diagnose errors and performance issues. The first screen Displayed is Tests:
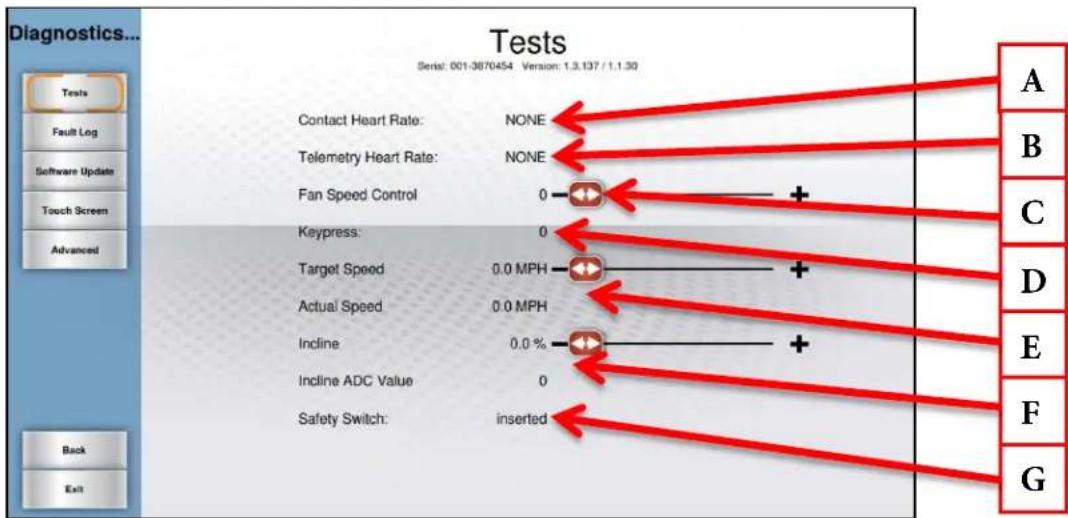
text_image
Diagnostics... Tests Serial: 001-3670454 Version: 1.3.137 / 1.1.30 Contacts Heart Rate: NONE Telemetry Heart Rate: NONE Fan Speed Control 0 - + Keypress: 0 Target Speed 0.0 MPH + + Actual Speed 0.0 MPH Incline 0.0 % - + Incline ADC Value 0 Safety Switch: inserted Back Exit A B C D E F GA) Contact Heart Rate:
Ensures the unit is receiving the data by displaying the user's heart rate when the contact heart rate pads are gripped.
B) Telemetry Heart Rate:
Use a wireless heart rate strap or simulator to test if the unit is receiving wireless heart rate data. If there is a reading displayed without the use of a heart rate strap or simulator, there is outside interference from another source.
*This unit is designed to receive 5 khz non-coded transmissions only.
C) Keypress:
When a quick access key is pressed on the unit, "NONE" will change to indicate which key is being pressed. In the event of a stuck key, the key that is being engaged will display.
Using the slider allows users to test the fan independent of a program.
E) Target Speed/Actual Speed:
Use the Target Speed slider to command the treadbelt to move and verify that the belt is moving at the commanded speed using the actual speed readout.
F) Incline/Incline ADC Value:
Used to troubleshoot incline system faults by commanding the unit to incline with the incline slider and reading the Incline ADC Value.
G) Safety Switch:
Used to verify that the console is able to read the safety key.
Truefitness.com/800.426.6570/636.272.7100
CHAPTER 4A: TRANSCEND OPERATION
ADVANCED CONSOLE FUNCTIONS (CONTINUED):
Diagnostics Menu - Fault Log:
Touching the Fault Log button (A) in the Diagnostics Menu, will display a time stamped list of recent fault codes that can be helpful in the troubleshooting process. The Error Log can be reset by touching the Clear button (B), but it is not recommended.

text_image
Diagnostics... Fault Log Serial: 001-3870454 Version: 1.3.137 / 1.1.30 Tests Fault Log Software Update Touch Screen Advanced Back Exit 0.75mi : Wed Apr 9 11:10:21 2014 CN05 : No Lower Control 0.75mi : Wed Apr 9 14:24:23 2014 CN05 : No Lower Control 0.84mi : Wed Apr 9 14:49:54 2014 CN05 : No Lower Control 0.85mi : Tue Apr 22 11:41:54 2014 CN05 : No Lower Control 0.85mi : Thu Apr 24 16:46:45 2014 CN05 : No Lower Control 0.85mi : Thu Apr 24 16:49:35 2014 CN05 : No Lower Control 0.85mi : Thu Apr 24 16:49:50 2014 CN05 : No Lower Control 0.85mi : Thu Apr 24 17:04:18 2014 CN05 : No Lower Control 0.85mi : Tue Apr 29 15:39:16 2014 CN05 : No Lower Control 0.94mi : Tue Apr 29 16:09:16 2014 CN05 : No Lower Control 1.78mi : Wed Apr 30 11:38:35 2014 CN05 : No Lower Control BDiagnostics Menu - Software Update:
TRUE may periodically release software updates to ensure users enjoy the best workout experience available. To update the console software, download the update program (A) from truefitness.com and load the software to a blank USB drive by following the downloadable instructions.
*DO NOT place the installation program on the USB stick! The program must be run on a Windows based computer!
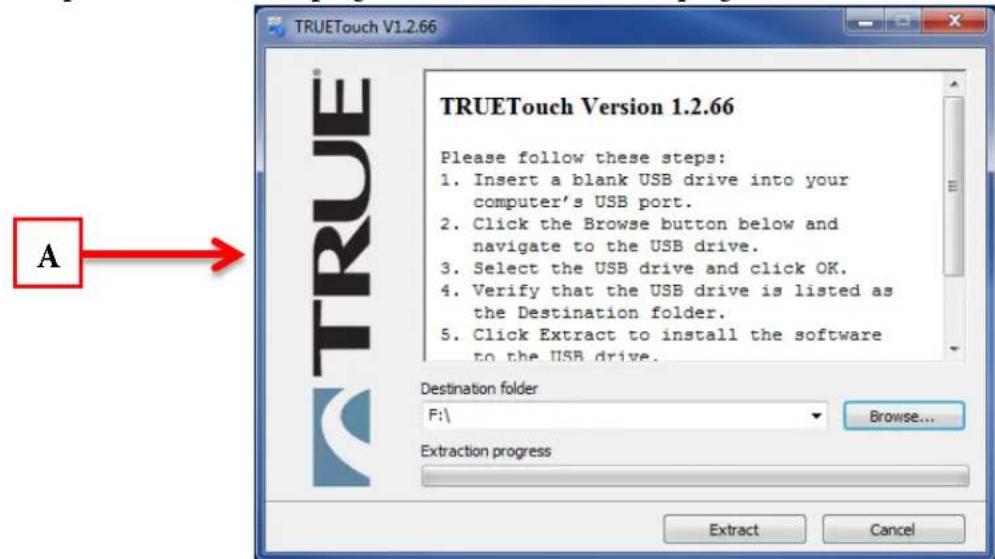
text_image
TRUETouch V1.2.66 A TRUE TRUETouch Version 1.2.66 Please follow these steps: 1. Insert a blank USB drive into your computer's USB port. 2. Click the Browse button below and navigate to the USB drive. 3. Select the USB drive and click OK. 4. Verify that the USB drive is listed as the Destination folder. 5. Click Extract to install the software to the USB drive. Destination folder F:\ Browse... Extraction progress Extract CancelWARNING:
Disconnecting the power source, switching the unit off or pressing buttons on the console will disrupt the information flow and potentially cause fatal errors.
CHAPTER 4A: TRANSCEND OPERATION
ADVANCED CONSOLE FUNCTIONS (CONTINUED):
Diagnostics Menu - Software Update (continued):
- Insert the USB drive containing the software update into the console's USB port.
• From the Main Menu, press the Diagnostics button. Then press Software update button (A). - When the console locates the software update, press the Update Software button (B)
• After the installation of the software update, press the Load Firmware button (C).
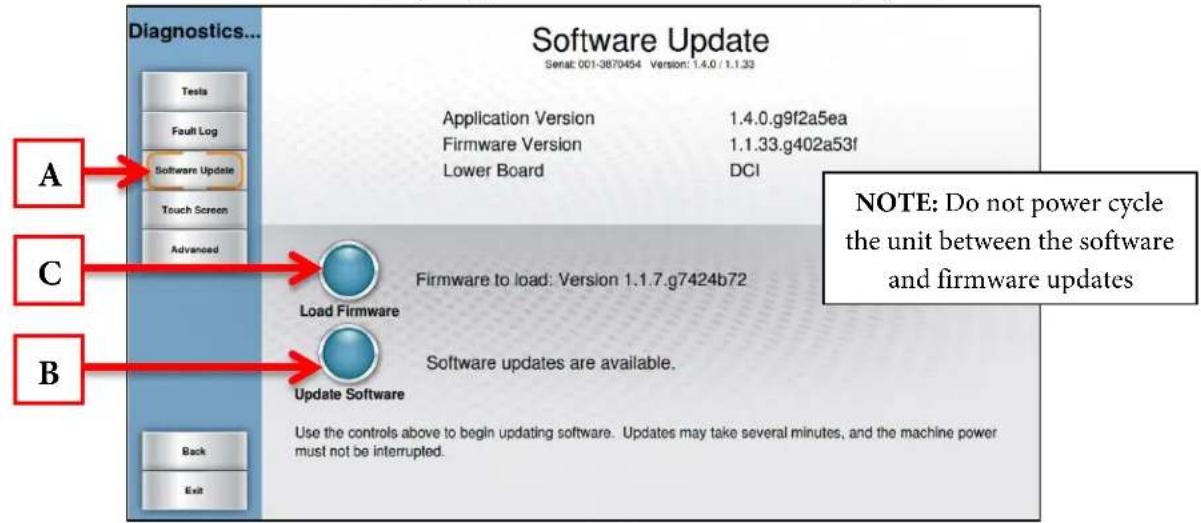
text_image
Diagnostics... Software Update Serial: 001-3870454 Version: 1.4.0 / 1.1.33 Application Version 1.4.0.g9f2a5ea Firmware Version 1.1.33.g402a53f Lower Board DCI A Fault Log Software Update Touch Screen Advanced C Load Firmware B Update Software Software updates are available. Back Exit NOTE: Do not power cycle the unit between the software and firmware updates Use the controls above to begin updating software. Updates may take several minutes, and the machine power must not be interrupted.Diagnostics Menu - Touch Screen:
Touching the Touchscreen key (A) will open the touchscreen calibration tool. On the first screen displayed, users can touch anywhere in the white area (B) and a small red box (C) will appear to verify screen function. Touching the Calibrate button (D) will begin a touchscreen calibration. During this process, targets will appear on the screen and the user must press and hold each target until it turns red to complete the calibration.
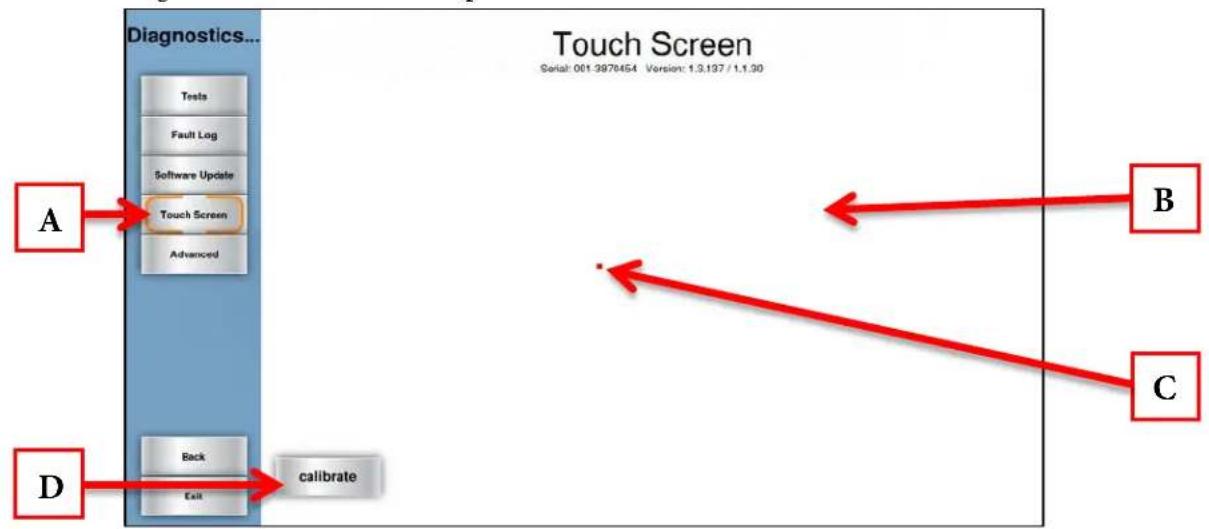
flowchart
graph TD
    A["Testa"] --> B["Fault Log"]
    B --> C["Software Update"]
    C --> D["Touch Screen"]
    D --> E["Advanced"]
    F["D"] --> G["Back"]
    G --> H["calibrate"]
    I["B"] --> J
    K["C"] --> J
    style A fill:#f9f,stroke:#333
    style B fill:#ccf,stroke:#333
    style C fill:#cfc,stroke:#333
    style D fill:#fcc,stroke:#333
    style E fill:#ffc,stroke:#333
    style F fill:#fcc,stroke:#333
    style G fill:#cff,stroke:#333
    style H fill:#ffc,stroke:#333
Diagnostics Menu - Advanced:
The advanced screen contains multiple tools that are used in the production of the console and for demonstration purposes. It is recommended to leave these settings in their default positions.
CHAPTER 4B: ESCALATE ^15 OPERATION
ESCALATE ^15 OVERVIEW:

text_image
Left/Right Selection Buttons TFT Display Cooling Fan Up/Down Selection Buttons TRUERuelfitness.com Use QUICK START to begin your workout right away! INSTRUCTIONS: Read and understand all the instructions and warnings prior to use. • Scrollle trackbolt before starting • Read underwork and hold the emergency stop procedures before use. • ALWAYS ATTACH THE EMERGENCY STOP SAFETY CLIP TO CLOTHING PRIOR TO SEE • Prior to use. Inspect button is card to ensure it is free of margins or locks, and that not may be will easily disengage from machine. • Use the (+) or (+) buttons to adjust SPEED at any time during workout. • Press STOP at any time during workout. GO QUICK START WORKOUT FINDER press ENTER to select Start QUICK START Back Enter Stop hold to RESET WARNING! AVE FISSEMENT! Premez connaissance de manuals & instruction et consigne de sécurité avant l'utilisation. • Do not use medical exam before beginning any exercise program. • Inspect equipment before use. Do not use medical appairs designed or imperient. • Care should be used when mounting or dismounting machine. Keep children away at all times. Stop Enter Navigation Buttons Start TV Button USB Jack Headphone Jack Back Button Reading RackCHAPTER 4B: ESCALATE ^15 OPERATION
ESCALATE ^15 OVERVIEW (CONTINUED):
TFT Display:
Used to monitor or control a workout and feature navigation.
Selection Buttons:
Used to navigate menus and make selections via the LCD Display.
Navigation Buttons:
Used to navigate menus and control features of the console.
Start:
Allows the user to begin a Quick Start workout or preset workout.
TV Button:
Displays the TV interface.
USB Jack:
Allows users to export workout data to an external USB drive or update the console software.
Headphone Jack:
Standard 3.5mm audio jack used to connect headphones to the console during media playback.
Back Button
Used in navigate back within various console features.
Reading Rack:
This ledge on the console can be used to hold a book, magazine, e-reader, or tablet computer during a workout.
Enter:
Used to confirm selections.
Stop:
Stops/Pauses a workout. Press and hold this key for five seconds to reset the unit.
Cooling Fan:
Integrated fan that delivers a cooling flow of air during a workout.
CHAPTER 4B: ESCALATE ^15 OPERATION
CONSOLE NAVIGATION:
Home Screen:
The Home Screen is displayed on the console when there is no workout in progress. From this screen the user is able to select from various options to begin a workout or view media. To select an item, use the Left/Right Selection Buttons (A) to highlight the item and then press the Enter button (B).
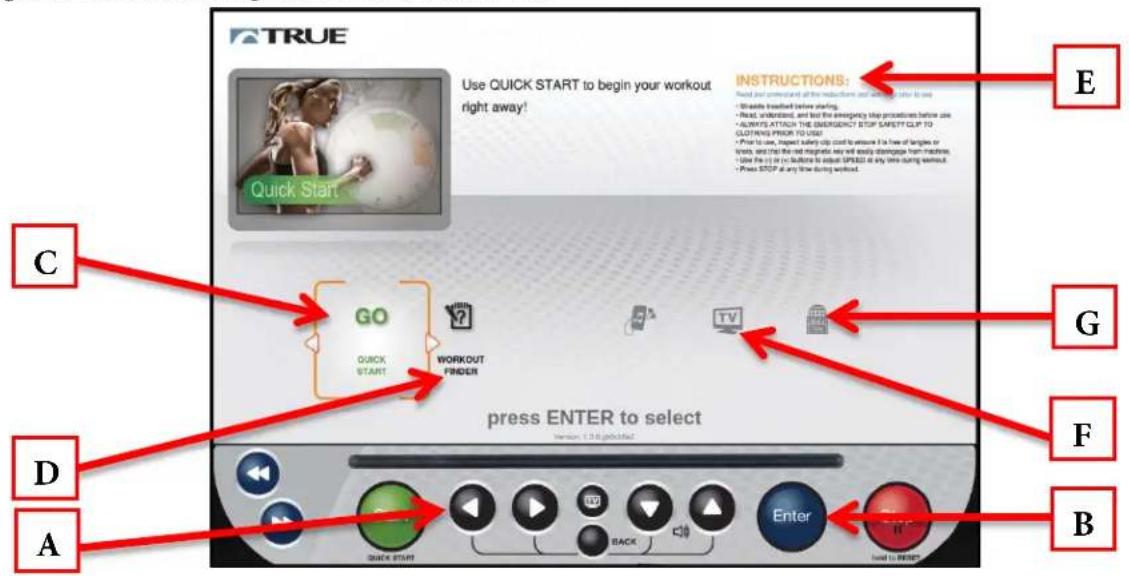
text_image
TRUE Use QUICK START to begin your workout right away! QUICK START GO QUICK START WORKOUT FINDER E INSTRUCTIONS: Read our comments all the instructions and/or what is to use • Beads treated before starting. • Read, understand, and but the emergency stop procedures before use • ALWAYS ATTACH THE EMERGENCY STOP SAFETY CLIP TO CLOTHING PRIOR TO USE • Prior to use, Impact safety clip card to ensure it is free of longies or books, and try the red magmatic eye will easily disengage from machines. • Use File 10 in to before to adjust SPREAD at any time during workout. • Press STOP at any time during workout. press ENTER to select A B D G F NEXTC) Quick Start
Starts a Quick Start workout in which the user controls all settings. The workout continues until it is ended by the user.
D) Workout Finder
Displays preset workouts categorized by goal focus categories.
E) Safety Instructions
Displays a list of safety instructions for users to review prior to beginning a workout.
F) TV
Displays TV interface without starting a workout.
G) Language Options
Allows users to choose between 12 language options.
CHAPTER 4B: ESCALATE ^15 OPERATION
CONSOLE NAVIGATION (CONTINUED):
Selecting a Preset Workout:
Preset workouts are accessed by selecting the Workout Finder option on the home screen. Workouts are organized into 5 categories. To view the workouts in a category, select the category (A) by using the Left/Right Selection Buttons (B) and then press Enter (C). Workouts can also be viewed in an uncategorized list by selecting the Show All Workouts option(C).
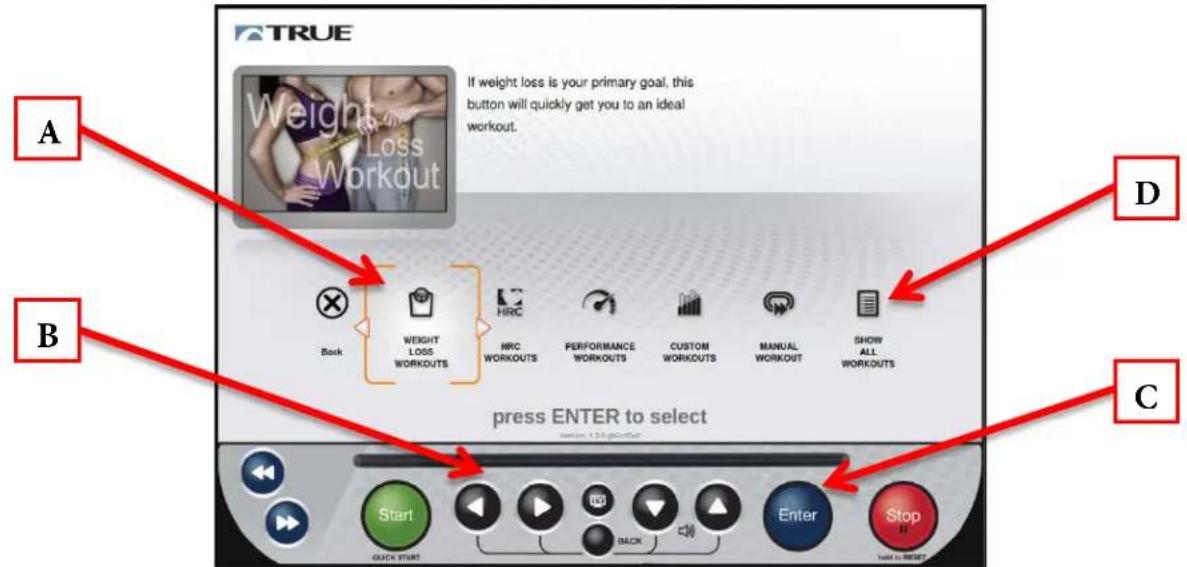
text_image
A B If weight loss is your primary goal, this button will quickly get you to an ideal workout. Back Weight Loss WORKOUTS HRC WORKOUTS PERFORMANCE WORKOUTS CUSTOM WORKOUTS MANUAL WORKOUT SHOW ALL WORKOUTS press ENTER to select C Start QUICK START Back Enter Stop II I want to RESETWorkout Data Entry Screens:
Workout data entry screens allow the user to input their personal information or workout goals prior to beginning a preset workout. To set a value (A), select it using the Left/Right Selection Buttons (B) and then use the Up/Down Selection Buttons (C) to adjust the value to the desired setting. After all values are set, press start to begin the workout. *Workout Data Entry Screens vary by program selection.
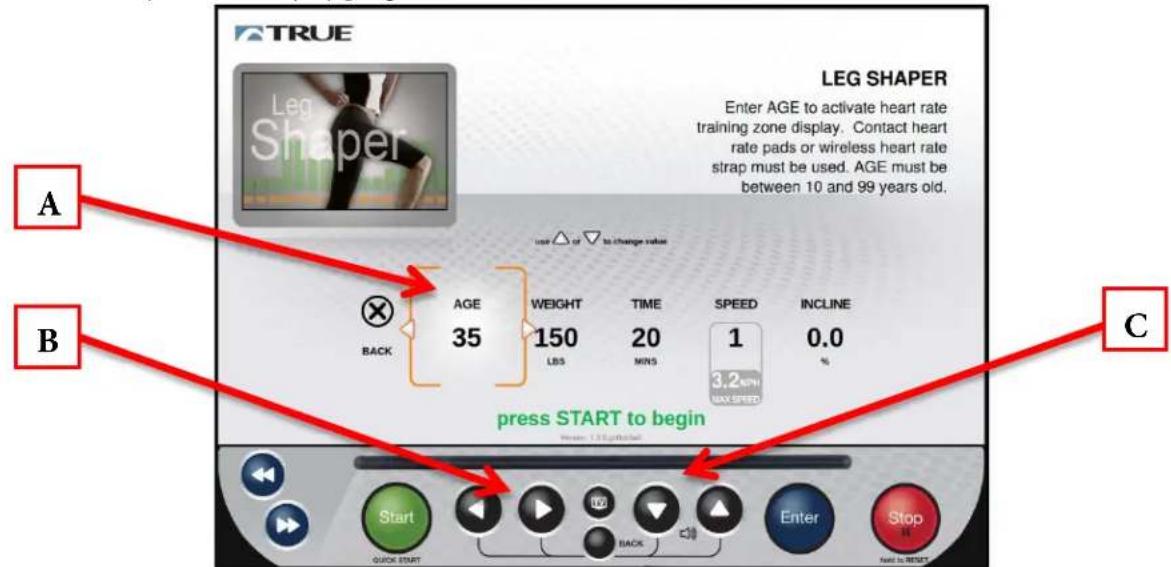
text_image
TRUE LEG SHAPER Enter AGE to activate heart rate training zone display. Contact heart rate pads or wireless heart rate strap must be used. AGE must be between 10 and 99 years old. use △ or ▽ to change value AGE 35 WEIGHT 150 LBS TIME 20 MINS SPEED 1 3.2 NTH MAX SPEED INCLINE 0.0 press START to begin Start QUICK START Back c10 Enter Stop Held to RESETCHAPTER 4B: ESCALATE ^15 OPERATION
CONSOLE NAVIGATION (CONTINUED):
Workout View Screens:
During any workout a Workout View Screen will be displayed to give the user a comprehensive visual overview of their current workout data. Users can switch between the available Workout View Screens by using the Left/Right Selection Buttons (F).
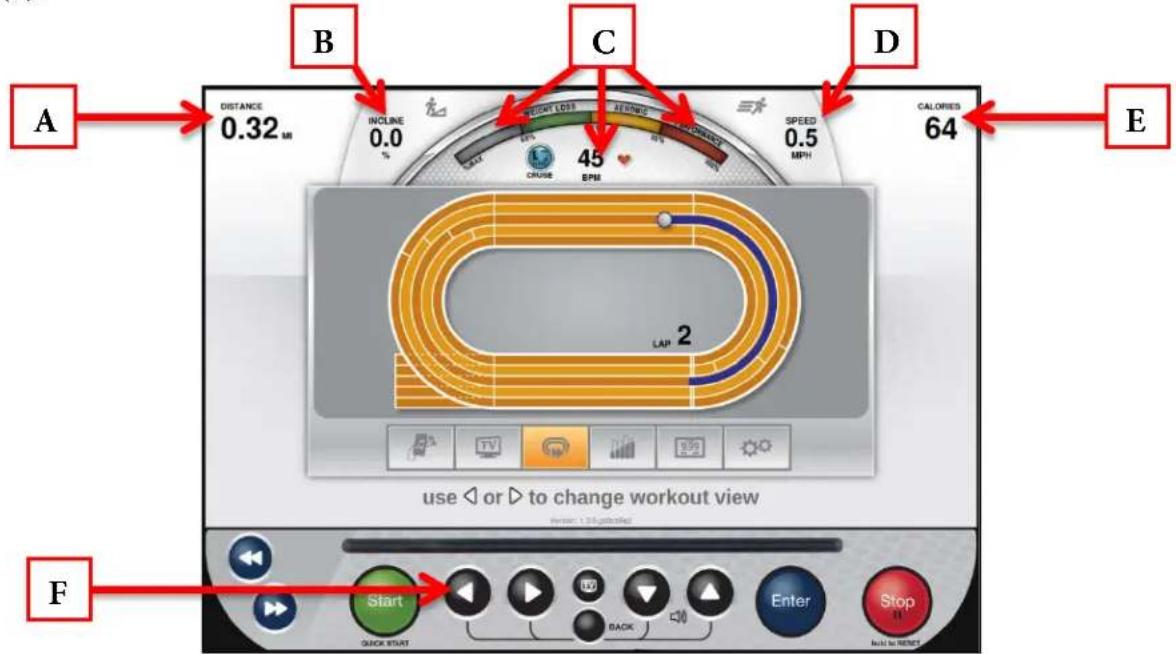
text_image
A DISTANCE 0.32 MI INCLINE 0.0 % SPEED 45 EPM C B CERIKING SPEED 0.5 MPH BAL CRUSE EPM D CALORIES 64 E LAP use ◀ or ▷ to change workout view F Start GACK START Back Enter Stop Hold to RESETA) Data Display #1:
This display will toggle between multiple data points throughout the workout. These data points vary by program, but include Time, Distance, and Pace.
B) Incline:
Displays the current incline level.
C) Heart Rate Information:
When the user is wearing a heart rate chest strap or utilizing the contact heart rate system, their heart rate will be displayed in beats per minute (bpm) and in the graphic meter. The graphic meter is based on age and will gauge the user's approximate heart rate within 3 target levels; Weight Loss, Aerobic or Performance.
D) Speed:
Displays the current speed of the treadmill belt.
E) Data Display #2:
This display will toggle between multiple data points throughout the workout. These data points vary by program, but include Calories, Distance, and METS.
CHAPTER 4B: ESCALATE ^15 OPERATION
CONSOLE NAVIGATION (CONTINUED):
Tools Screen Controls:
The Tools Screen contains controls that allow users to adjust settings during their workout. The Tools screen can be reached by using the Left/Right Selection Buttons (A) during any workout. The Navigation Buttons (B) are used in the Tools Screen to select between the available options. Once the desired tool has been selected, press Enter (C) to confirm the selection.
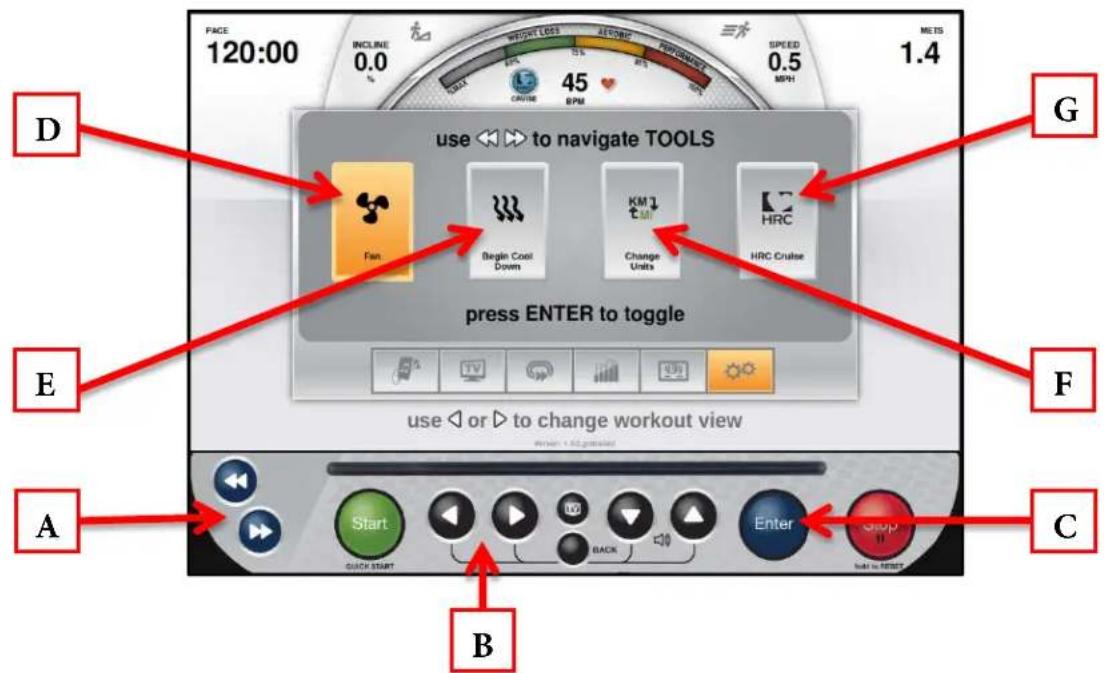
text_image
FACE 120:00 INCLUDE 0.0 45 CROVE EPM SPEED 0.5 MPH 1.4 WEIGHT LOSS AVOCRC PROM/POST G useD) Fan:
This tool toggles the cooling fan on and off.
E) Cool Down:
Allows the user to end their current workout with a two minute low intensity cool down period. When Cool Down is activated the unit is in manual mode and the user directly controls all settings.
F) Change Units:
Allows users to change the data readouts between English Standard and Metric Units.
G) HRC Cruise Control:
Engages Heart Rate Control to allow the equipment to maintain the user's current heart rate through automatic speed and incline adjustments (when the user is utilizing heart rate monitoring).
CHAPTER 4B: ESCALATE ^15 OPERATION
CONSOLE NAVIGATION (CONTINUED):
Workout Summary Screen:
At the end of a workout the Summary Screen will display an overview of the workout data. The workout data can be exported to the TRUE Fitness App via Bluetooth or to a USB drive that is connected to the console's USB port. To export the Workout Data, use the Left/Right Selection Buttons (A) to select Save (B) and then press the Enter Button (C). If the user requires more time to view the summary or to export the workout data, they can select More Time (D) and press the Enter Button (C) to extend the time that the summary remains on the screen.
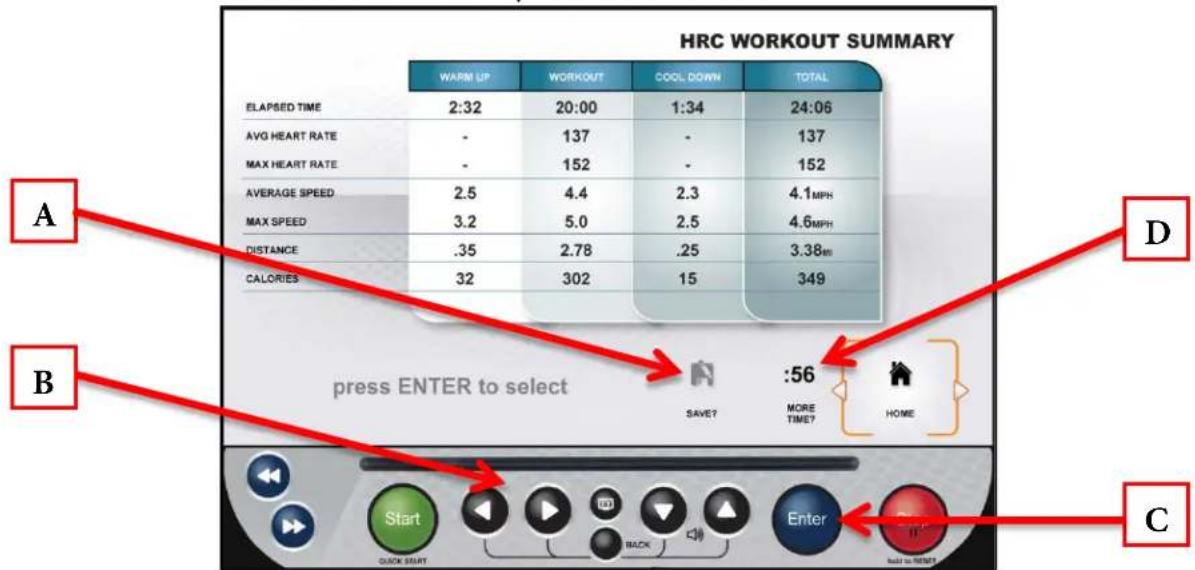
text_image
HRC WORKOUT SUMMARY WARM UP WORKOUT COOL DOWN TOTAL ELAPSED TIME 2:32 20:00 1:34 24:06 AVG HEART RATE - 137 - 137 MAX HEART RATE - 152 - 152 AVERAGE SPEED 2.5 4.4 2.3 4.1MPH MAX SPEED 3.2 5.0 2.5 4.6MPH DISTANCE .35 2.78 .25 3.38MI CALORIES 32 302 15 349 press ENTER to select SAVE? :56 MORE TIME? HOME Start BACK Enter C quick start have to return lead to returnTV CONTROLS:
This console has an integrated HDTV Tuner which allows the user to watch live programming in crisp, clear high Definition. The TV controls are built in to a Workout View Screen to allow the user to monitor their workout while enjoying their favorite shows. While watching TV, users can control volume using the Up/Down Selection Buttons (A) and change channels using the Navigation Buttons (B) or by selecting a channel from the list of available channels by pressing the TV Button (C). To enter full screen mode, simply press the Enter Button (D).
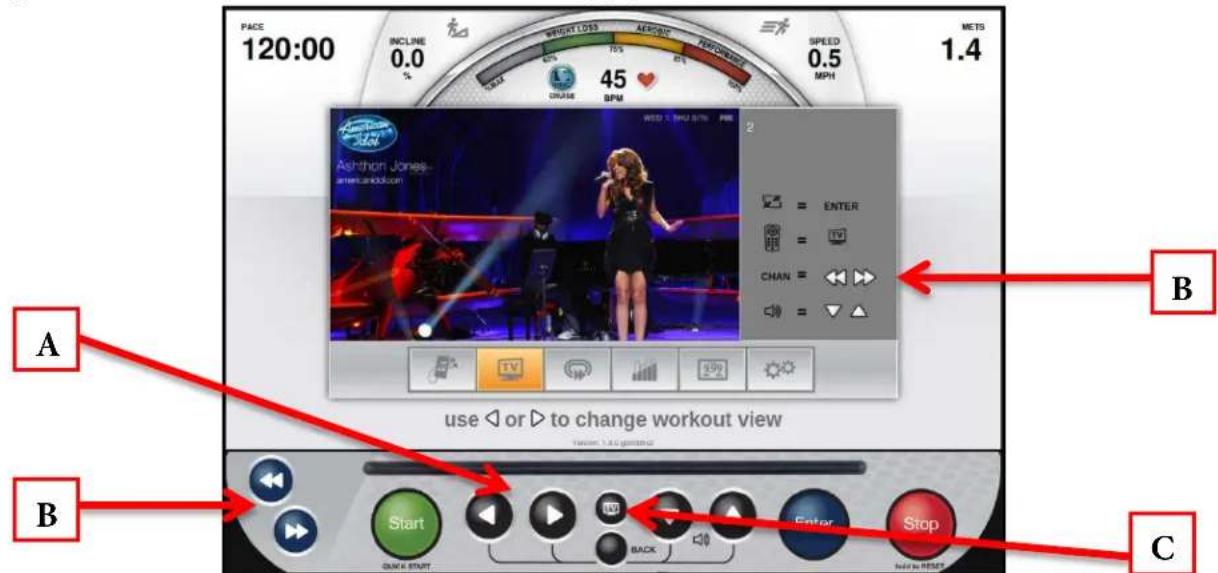
text_image
PACE 120:00 INCLINE 0.0 % SPEED 0.5 MPH METS 1.4 A B use ◀ or ▶ to change workout view Start Quick START AERIOR PERFORMER 45 BPM Churn ENTER CHAN = = = = = = = = = = = = = = = = = = = = = = = = = = = = = = = = = = = = = = = = = = = = = = = = = = = = = = = = = = = = = = = = = = = = = = = = = = = = = = = = = = = = = = = = = = = = = = = = = = = = =B CTruefitness.com/800.426.6570/636.272.7100
CHAPTER 4B: ESCALATE ^15 OPERATION
BLUETOOTH AUDIO:
The Escalate ^15 console has integrated Bluetooth support for Bluetooth enabled audio devices. To pair a device with the console, use the Left/Right Selection Buttons (A) to select the Audio Device Screen. Ensure that the device is discoverable via Bluetooth and press the Enter Button (B) to search for devices.
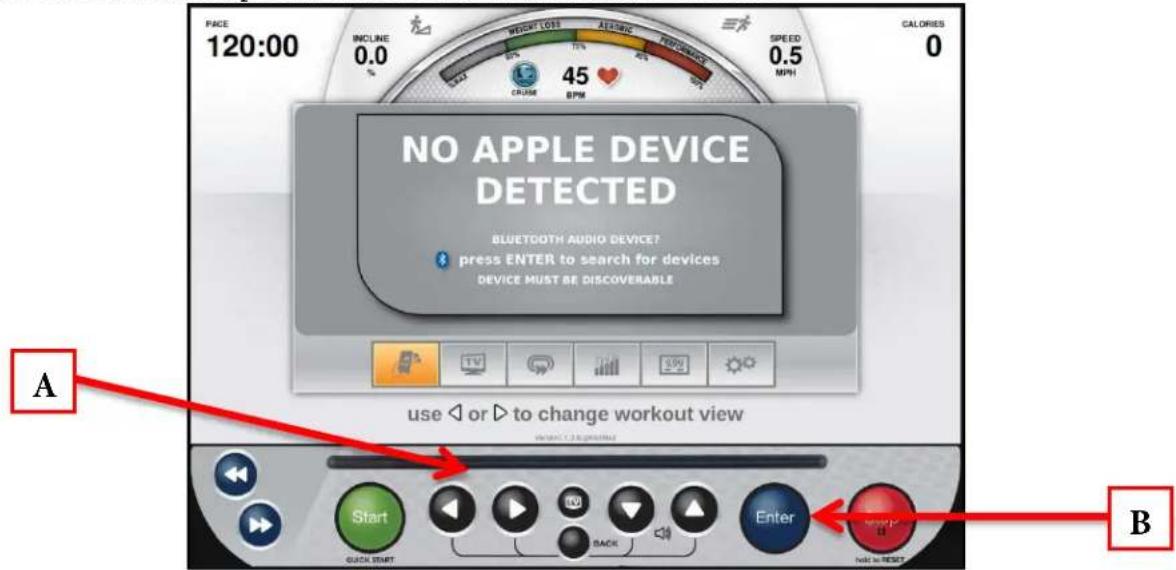
text_image
PACE 120:00 INCLINE 0.0 % 45 SPEED 0.5 MPH CALORIES 0 WEIGHT LOSS AEROSIC PERFORMANCE CRUSM BPM NO APPLE DEVICE DETECTED BLUETDOTH AUDIO DEVICE? press ENTER to search for devices DEVICE MUST BE DISCOVERABLE use < or > to change workout view Start Back Enter BThe console will complete a scan for available Bluetooth devices. Once the scan is complete, use the Up/Down Selection Buttons (C) to select the desired device from the list of available devices and press Enter (D).
*If the device is not listed, verify that it the Bluetooth is enabled and that the device is discoverable. Use the Up/Down Selection Buttons (C) to select Refresh List and Press Enter (D) to re-scan for the Bluetooth device.
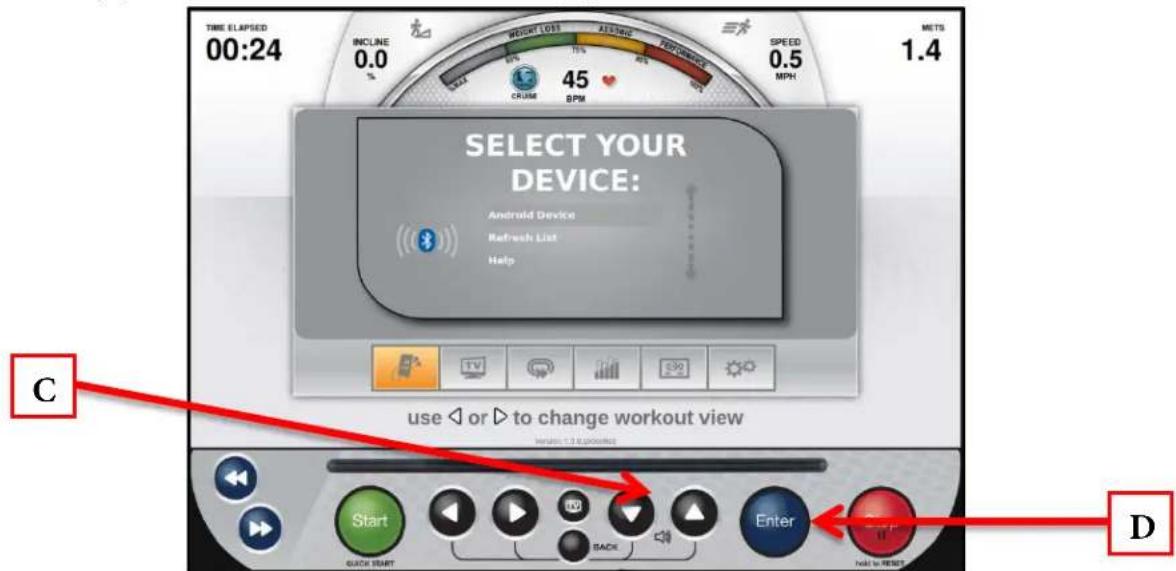
text_image
TIME ELAPSED 00:24 INCLINE 0.0 % WEIGHT LIFT AVERAGE PERFORMANCE SPEED 0.5 MPH 1.4 CRISE 45 BPM SELECT YOUR DEVICE: Android Device Refresh List Help use ▶ or ▷ to change workout view DCHAPTER 4B: ESCALATE ^15 OPERATION
BLUETOOTH AUDIO (CONTINUED):
When a device is selected from the list, the console will send a pairing request to that device. The paring request must be accepted in order for this feature to operate. For iOS devices, press Pair (E) to accept the request. For Android devices, press Accept (F) to accept the request.
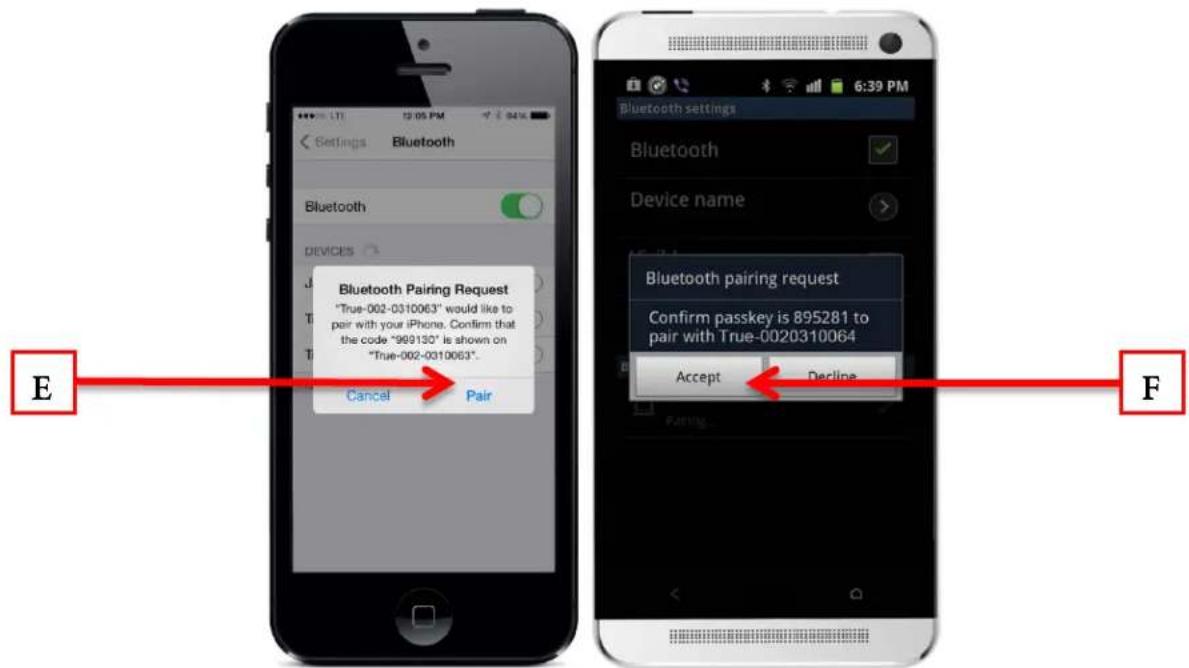
text_image
Bluetooth Pairing Request "True-002-0310063" would like to pair with your iPhone. Confirm that the code "999130" is shown on "True-002-0310063". Cancel Pair Bluetooth settings Bluetooth Device name Bluetooth pairing request Confirm passkey is 895281 to pair with True-0020310064 Accept Decline E FOnce the Bluetooth pairing request has been accepted, the playback screen will be displayed. During playback, users can control volume by using the Up/Down Selection Buttons (G) and advance or replay tracks by using the navigation buttons (H).

text_image
PACE 120:00 INCLINE 0.0 % WEIGHT LOSS AVERAGE PERFORMER SPEED 0.5 MPH NETS 1.4 CRASE CRUSSE 45 BPM NOW PLAYING Dark Side Kelly Clarkson Stronger (Deluxe Version) Android Device Connected use to advance or replay. use < or > to change workout view G Start Quick Start Back Enter Stop HCHAPTER 4B: ESCALATE ^15 OPERATION
ADVANCED CONSOLE FUNCTIONS:
Entering Service Mode:
Entering Service Mode can be completed by pressing and holding the Back navigation Button (A). When the TRUE Logo (B) begins to flash, release the navigation button and press and hold the Enter Button(C).
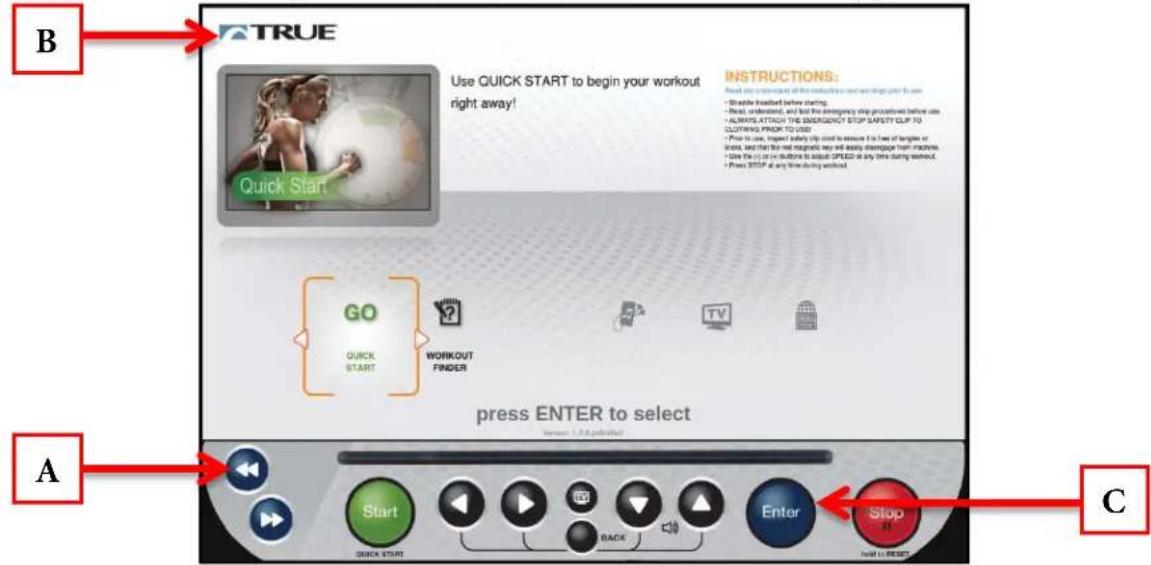
text_image
B TRUE Use QUICK START to begin your workout right away! QUICK START INSTRUCTIONS: Read an entertainment of the exercises and wages prior to use • Read the instruction before starting. • Read, understand, and list the emergency stop procedures before use • ALWAYS ATTACH THE EMERGENCY STOP SAFETY GLIP TO CLOTHING PRIOR TO USE • Plan to use, inspect safety clip card to ensure 1 to face of lengths or stairs, and that the next matches key will easily disengage from machines. • Show the off-in buttons to adjust SPEED at any time during workout. • Press STOP at any time doing workout. GO QUICK START WORKOUT FINDER press ENTER to select A Start QUICK START Back Enter Stop HOLD TO RESET CMain Menu:
After successfully entering service mode the Main Menu will be displayed. From this menu users can access all of the service mode features by navigating through the various menus.
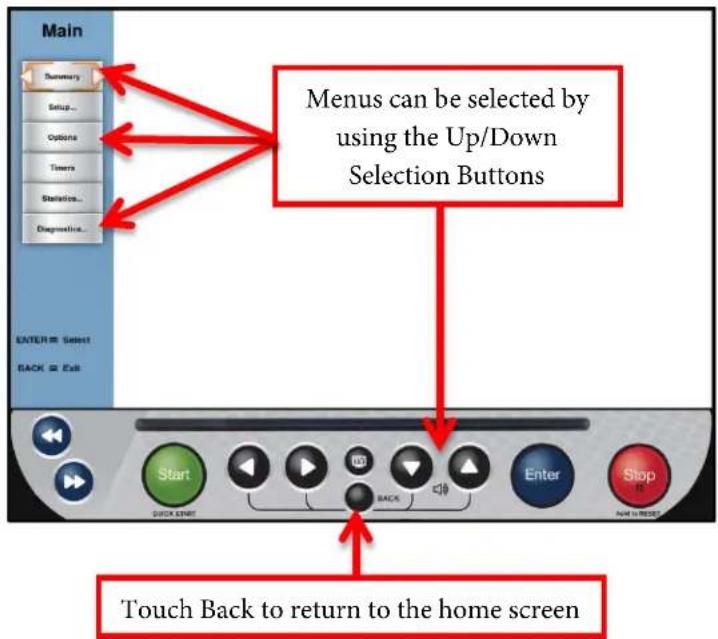
text_image
Main Summary Setup... Options Timers Statistics... Diagnosis... Enter to Select BACK to Exit Menus can be selected by using the Up/Down Selection Buttons Start QUICK START Back Enter Stop AND IN RESET Touch Back to return to the home screenCHAPTER 4B: ESCALATE ^15 OPERATION
ADVANCED CONSOLE FUNCTIONS (CONTINUED):
Summary Screen:
The Summary Screen will be the first screen displayed after entering service mode. This screen will give a general overview of the unit's setup.
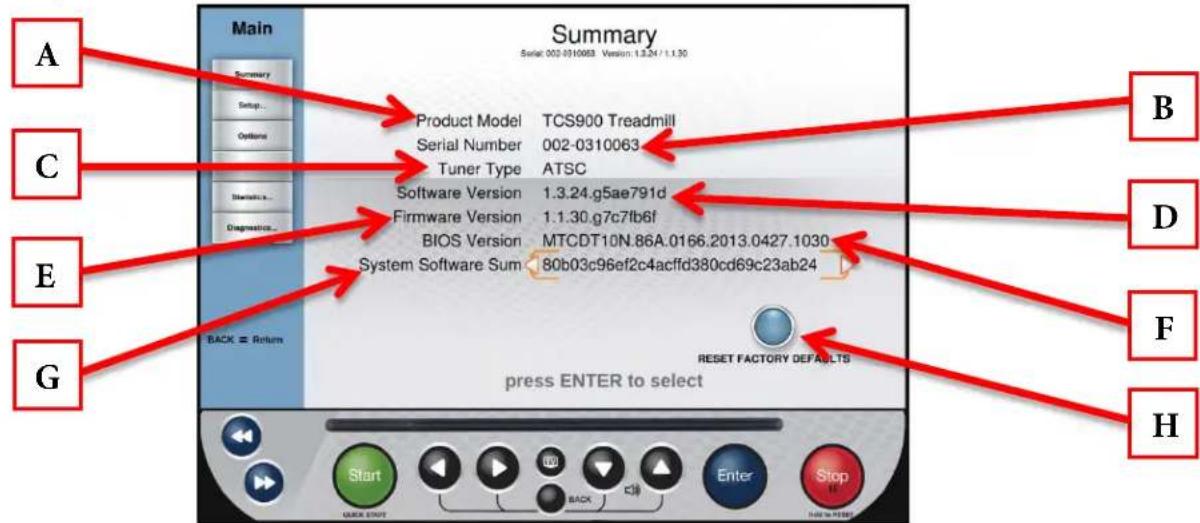
text_image
Summary Serial: 003-010083 Version 1.3.24 / 1.1.30 A B C D E F G Product Model TCS900 Treadmill Serial Number 002-0310063 Tuner Type ATSC Software Version 1.3.24.g5ae791d Firmware Version 1.1.30.g7c7fb6f BIOS Version MTCDT10N.86A.0166.2013.0427.1030 System Software Sum 80b03c96ef2c4acffd380cd69c23ab24 BACK = Return RESET FACTORY DEFAULTS press ENTER to select Start BACK Enter StopA) Product Model:
The model number that the console is currently configured to.
B) Serial Number:
The serial number of the console (not the base unit).
C) Tuner Type:
The type of TV tuner installed in the console.
D) Software Version:
The current version of software that is installed on the console.
E) Firmware Version:
The current version of firmware that is installed on the console.
F) BIOS Version:
The current BIOS version that is installed on the console.
G) System Software Sum:
Displays OS data that is used in the production of the console.
H) Reset Factory Defaults:
Resets all console settings to their factory defaults.
CHAPTER 4B: ESCALATE ^15 OPERATION
ADVANCED CONSOLE FUNCTIONS (CONTINUED):
Setup Menu:
The setup menu is accessed by touching the Setup button on the main menu. The Setup Menu is separated into seven subcategories and allows to users configure the console and to set up various functions of the unit.
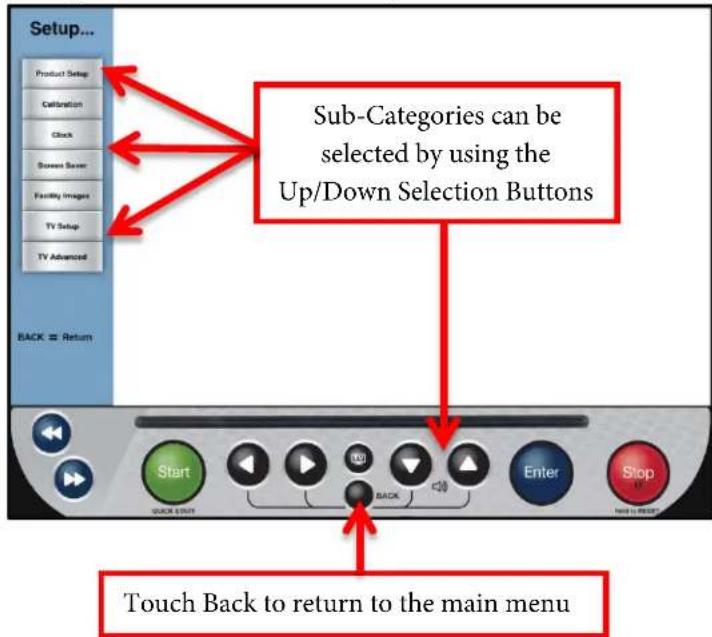
text_image
Setup... Product Setup Calibration Clock Scream Saver Facility Images TV Setup TV Advanced BACK = Return Sub-Categories can be selected by using the Up/Down Selection Buttons Start Quick Exit Back Enter Stop Hind to Back Touch Back to return to the main menuSetup Menu - Product Setup:
The Product Setup screen allows users to change the console configuration to match the unit on which it is installed. To change the console configuration:
• From the Main Menu, select the Setup menu.
• From the Setup Menu, select Product Setup (A).
• Use the Selection Buttons (B) to select the correct model number (C).
- Press the Enter Button (D) to confirm the selection.
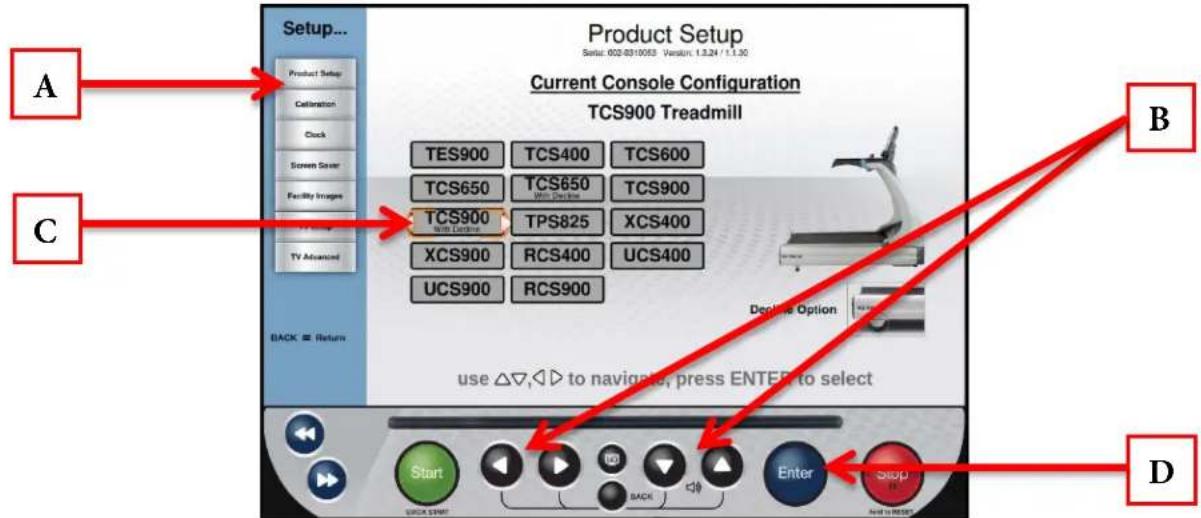
text_image
Setup... Product Setup Serial: 002-0310053, Version: 1.3.24 / 1.1.30 Current Console Configuration TCS900 Treadmill A C BACK Return B Use △▽, ◀ to navigate, press ENTER to select D Start Back Enter StopCHAPTER 4B: ESCALATE ^15 OPERATION
ADVANCED CONSOLE FUNCTIONS (CONTINUED):
Setup Menu - Calibration:
Calibration will conduct a basic test of the drive and incline systems to ensure that they are operating as intended. Calibration may also be used by technicians to troubleshoot system faults.
WARNING:
This process will take full control of the treadmill and can be dangerous if caution is not taken.
• Calibration can take up to two minutes to complete.
- Do not stand on the treadmill during the calibration procedure.
- Verify that the machine is free of all parts and tools.
- Keep children and animals at a safe distance.
Calibration Steps:
• From the Main Menu, press the Setup button.
• From the Setup Menu, select Calibration (A).
- Press the Enter Button (B) to begin calibration.
- When complete, the console will display "C calibration Successful".

text_image
Setup... Product Setup Calibration Check Screen Save Facility Images TV Setup TV Advanced BACK □ Return Calibration Serial: 002-0310019 Version: 1.3.24 / 1.3.30 Calibrating the Incline: • Press ENTER to begin the incline calibration • Use the UP and DOWN arrow keys to adjust incline level Model: TCS900 Maximum Incline: 16 Minimum Incline: -3 Maximum Incline ADC: 905 Minimum Incline ADC: 85 Actual Speed in MPH: 0 Incline ADC = 199 press ENTER to begin calibration C BWARNING:
The Potentiometer Value (C) should only be adjusted by a trained service professional. Any adjustment made to the Potentiometer Value may result in unexpected errors or damage to the incline system.
CHAPTER 4B: ESCALATE ^15 OPERATION
ADVANCED CONSOLE FUNCTIONS (CONTINUED):
Setup Menu - Clock:
Correctly setting up the clock will ensure that all workout data that is exported by a user will be correctly labeled. Correct time is also important for troubleshooting purposes when viewing the system's fault log.
Setting the Clock:
• From the Main Menu, select the Setup menu.
• From the Setup Menu, select Clock (A).
• Use the Left/Right Selection Buttons (B) to select the desired value (C).
- Use the Up/Down Selection Buttons (D) to adjust the value to the desired setting.
- Once the correct time and date are entered, select Next (E) and press Enter (F).
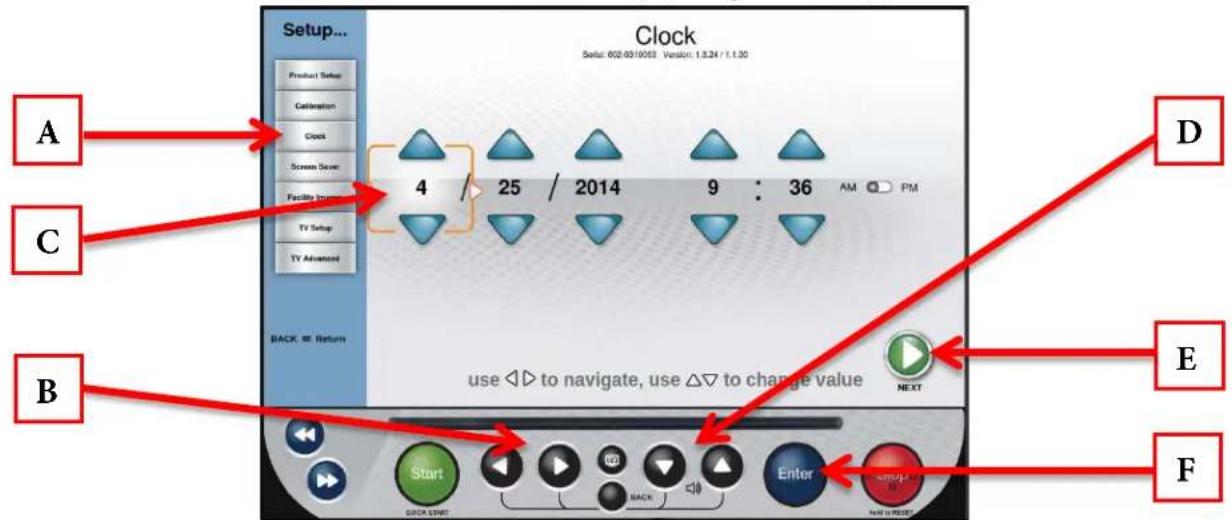
text_image
Setup... Clock Serial: 002-03/00/03 Version: 1.3.24 / 1.1.30 Product Setup Calculation Clock Screen Save Facility Imped TV Setup TV Advanced 4 / 25 / 2014 9 : 36 AM PM BACK Return use ◀▶ to navigate, use △▽ to change value NEXT A C B D E F- Use the Up /Down Selection Buttons (G) to scroll through the list of time zones until the correct time zone is shown in bold (H).
• Use the Right Selection Button (I) to highlight Save (J) and press Enter (K).
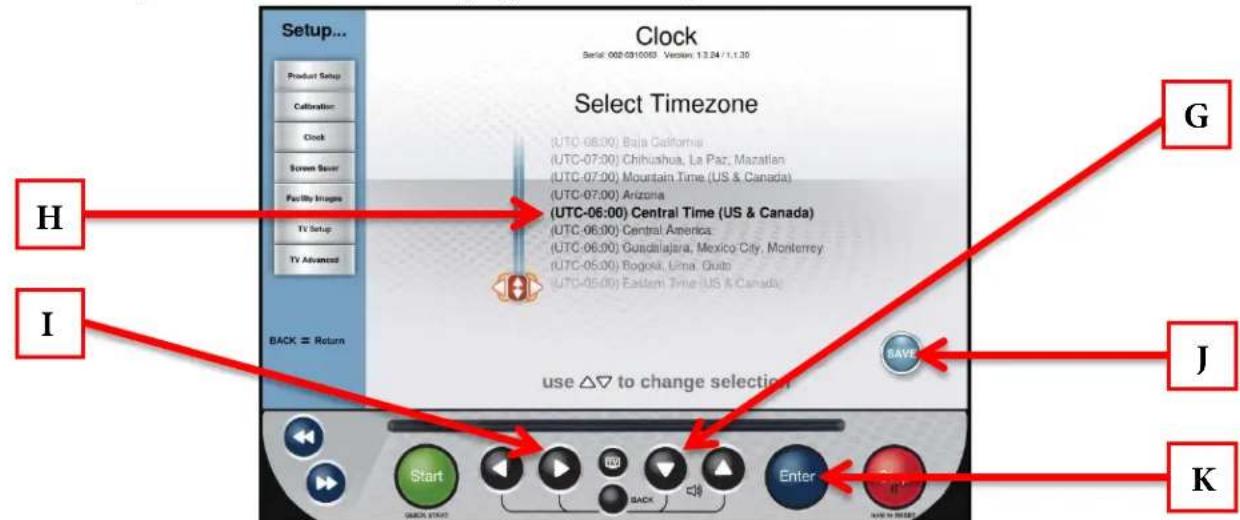
text_image
Setup... Clock Serial: 002-0310000 Version: 1.3.24 / 1.1.30 Product Setup Calibration Clock Screen Save Facility Image TV Setup TV Advanced Select Timezone (UTC-08:00) Baja California (UTC-07:00) Chihushua, La Paz, Mazatlan (UTC-07:00) Mountain Time (US & Canada) (UTC-07:00) Arizona (UTC-06:00) Central Time (US & Canada) (UTC-06:00) Central America (UTC-06:00) Guadalajara, Mexico City, Monterrey (UTC-05:00) Bogotá, Lima Quito (UTC-05:00) Eastern Time (US & Canada) BACK = Return use △▽ to change selection G I J KCHAPTER 4B: ESCALATE ^15 OPERATION
ADVANCED CONSOLE FUNCTIONS (CONTINUED):
Setup Menu - Screen Saver:
Users can load JPG images to be used by the console as a custom screen saver. In order to be uploaded to the console, images will need to be placed on a USB drive in a folder named “screen saver” (case sensitive).
Importing Screen Saver Images:
- Select Screen Saver (A) from the Setup Menu and press Enter (B).
- Insert the USB drive that contains the images into the console's USB port.
- Verify the images in the preview window (C)
- Select Save (D) and press Enter (B) to save the images to the console.
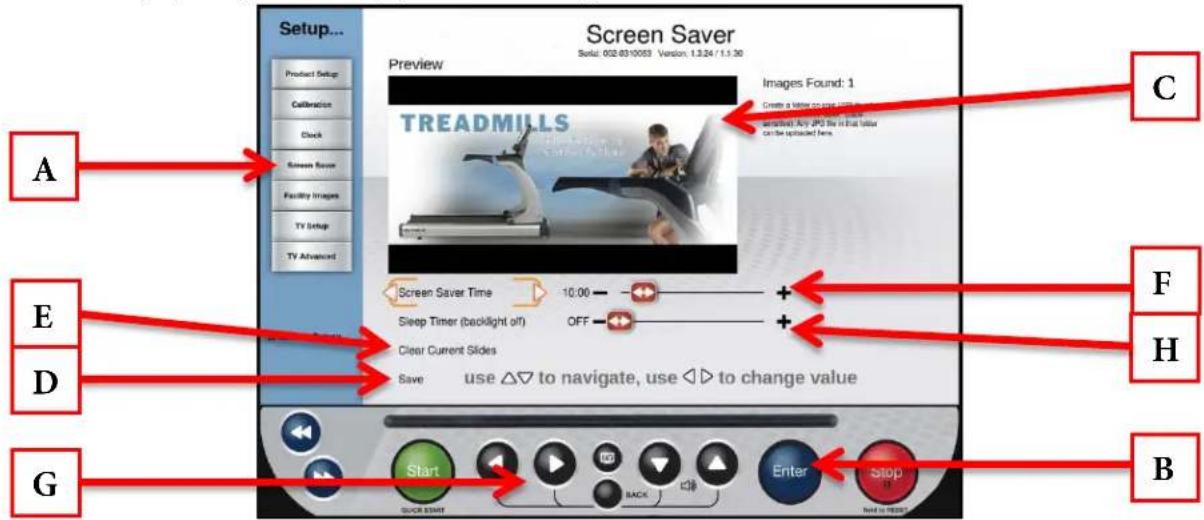
text_image
Setup... Product Setup Calibration Clock Screen Save Facility Images TV Setup TV Advanced A E D G Screen Saver Preview Images Found: 1 Create a letter on the screen in the image. TREADMILLS Clear Current Slides Save use △▽ to navigate, use ◀◀ to change value C F H BAdditional Screen Saver Options:
- Custom Screen Saver images can be deleted by selecting Clear Current Slides (E) and pressing Enter (B).
- The amount of time the console must be idle before the screen saver engages can be adjusted by selecting Screen Saver Time (F) and using the Left/Right Navigation buttons (G) to select the desired time.
- The Sleep timer is a function that will turn off the console's back light after a period of time to save energy. The amount of time the console must be idle before going to sleep can be adjusted by selecting the Sleep Timer (H) and using the Left/Right Selection Buttons to select the desired time.
WARNING:
Setting the Screen Saver Time to zero will disable the screen saver. Disabling the screen saver is not recommended! Doing so may cause damage to the screen and void the manufacturer warranty.
CHAPTER 4B: ESCALATE ^15 OPERATION
ADVANCED CONSOLE FUNCTIONS (CONTINUED):
Setup Menu - Facility Images:
The Escalate ^15 console supports customizable facility images to help promote specials, events or endorse a brand. In order to be uploaded to the console, images will need to be placed on a USB drive in a folder named “facility” (case sensitive).
Importing Facility Images:
- Select Facility Images (A) and press Enter (B).
- Insert the USB drive that contains the images into the console's USB port.
• Verify the images in the preview window (C)
- Select Save (D) using the Up/Down Selection Buttons (E) and press Enter (B) to save the images to the console.
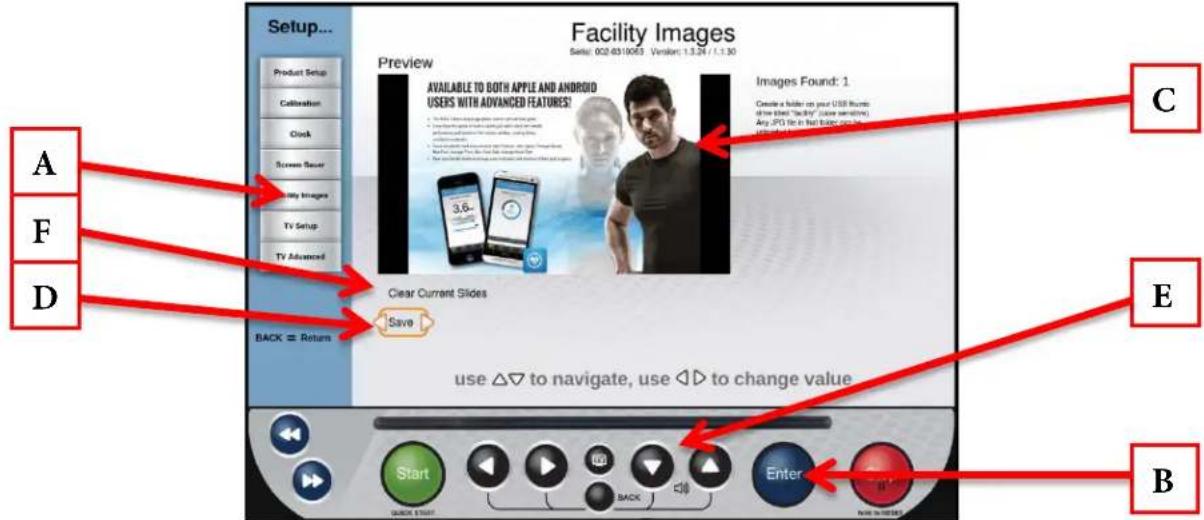
text_image
Setup... Product Setup Calcitation Clock Screen Seaver Italy Images TV Setup TV Advanced Facility Images Setup: 02-03/10/03 Version: 1.3.24 / 1.1.30 Preview AVAILABLE TO BOTH APPLE AND ANDROID USES WITH ADVANCED FEATURES! Images Found: 1 Create a holder on your USB Mounts Show other "Facility" (use sensitive) Any PDF to its User Support C E B Save back = Return use △▽ to navigate, use ◀◀ to change value* Facility images can be deleted by selecting the Clear (F) and pressing Enter (B).
Once loaded correctly, the facility Images will be displayed in the Facility Workout Data Screen (as shown below).
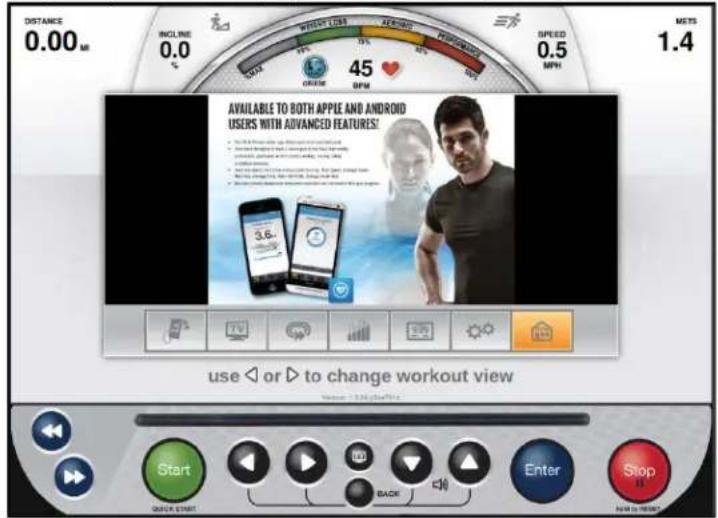
text_image
DISTANCE 0.00 MR INCLUDE: 0.0 45 SPEED 0.5 MPN! 1.4 AVAILABLE TO BOTH APPLE AND AROID USERS WITH ADVANCED FEATURES! • You'll be able to use Apple iOS App Store • Wear the best of it to change your own product • Use the best of it to change your own product • Use the best of it to change your own product 3.6. use ◀ or ▶ to change workout view Start MAKE START Back Enter Stop MAKE STOPCHAPTER 4B: ESCALATE ^15 OPERATION
ADVANCED CONSOLE FUNCTIONS (CONTINUED):
Setup Menu - TV Setup:
Escalate ^15 consoles have an integrated HDTV Tuner which allows the user to watch live programming in crisp, clear high Definition. Before any programming can be viewed, the TV signal needs to be set up. (TV Options will not be displayed on the Home Screen or in the Workout Data Screens until the TV Setup Steps have been completed)
TV Setup Steps:
• From the Setup Menu, select TV Setup (A) and press Enter (D).
- Use the Up/Down Selection Buttons (B) to highlight the type of signal is being used (C). Then press Enter (D) to select the appropriate signal type; Analog, Digital, or Both. (Digital is selected by default)
*When analog is selected the user will need to choose the analog standard (NTSC-M for the United States).
- Highlight the Source Slider (E) and Press Enter (D) to toggle between Antenna and Cable.
• Verify that the correct Country is listed (F).
- Highlight Enable Aux Input (G) and press Enter (D) to Enable or disable the AUX inputs located on the back of the console.
- Highlight Begin Channel Scan (H) and press Enter (D) to begin scanning for channels.
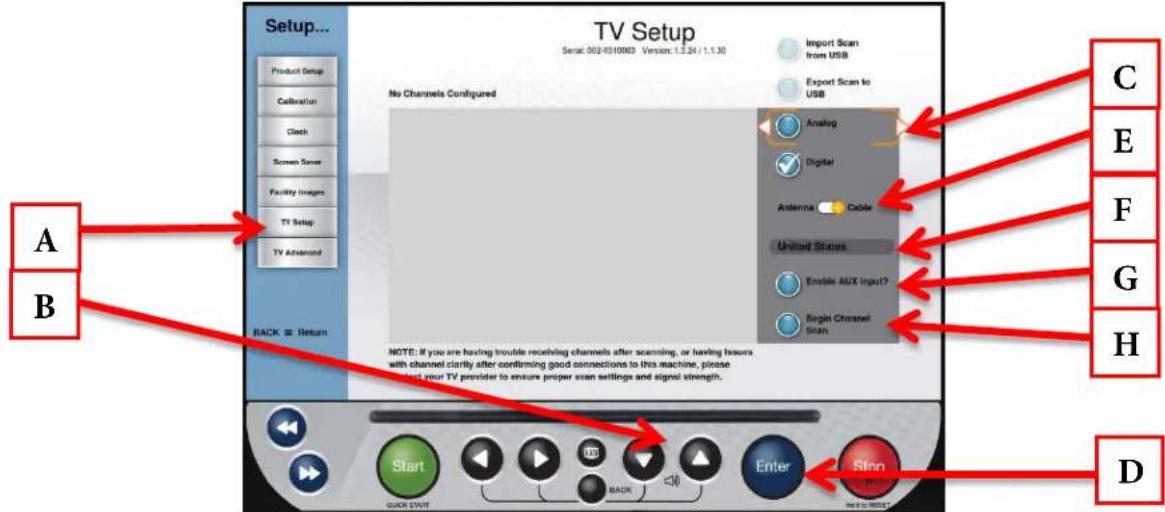
text_image
Setup... Product Setup Calibration Clock Screen Save Facility Images TV Setup TV Advanced TV Setup Serial: 002-0310003 Version: 1.5.24 / 1.1.30 No Channels Configured Import Scan from USB Export Scan to USB Analog Digital Antenna Cable United States Enable AUX Input? Begin Channel Scan A B BACK Return NOTE: If you are having trouble receiving channels after scanning, or having issues with channel clarity after confirming good connections to this machine, please start your TV provider to ensure proper scan settings and signal strength. Start BACK Enter Stop QUICK START END TO NOTE C E F G H D- Once the channel scan is complete, the channel list (I) will be populated with the available channels.
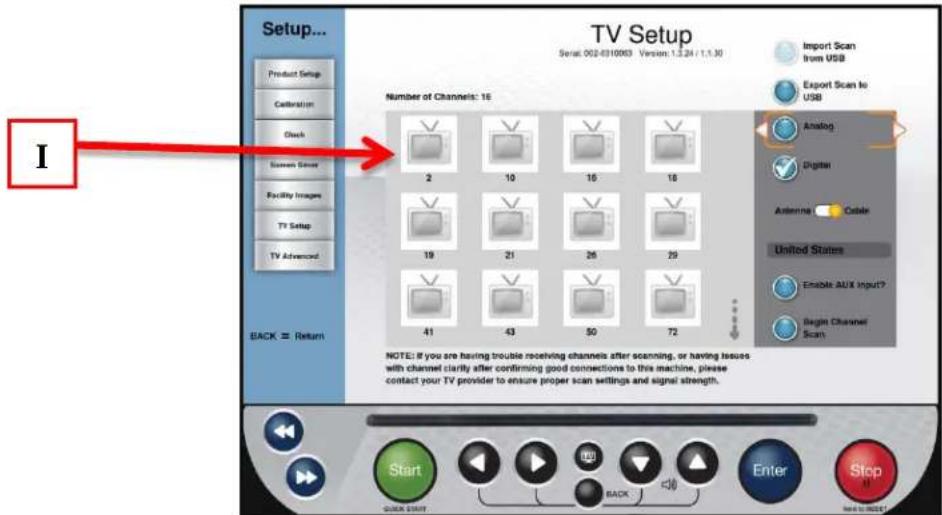
text_image
Setup... Product Setup Celebration Check Screen Slices Facility Images TV Setup TV Advanced BACK = Return TV Setup Serial: 002-8310063 Version: 1.3.24 / 1.1.30 Number of Channels: 16 2 10 16 18 19 21 26 29 41 43 50 72 Import Scan from USB Export Scan to USB Analog Digital Antenna Cable United States Enable AUX Input? Begin Channel Scan NOTE: If you are having trouble receiving channels after scanning, or having issues with channel clarity after confirming good connections to this machine, please contact your TV provider to ensure proper scan settings and signal strength. Start BACK Enter Stop QUICK START BACK Enter NET to NONETruefitness.com / 800.426.6570 / 636.272.7100
CHAPTER 4B: ESCALATE ^15 OPERATION
ADVANCED CONSOLE FUNCTIONS (CONTINUED):
Setup Menu - TV Setup (continued):
Users can save time when setting up multiple units or maintain a back-up of their TV Setup Data by exporting it to a USB drive.
Exporting TV Setup Data to USB:
• Complete the TV Setup process.
- Insert a blank USB drive into the console's USB port.
- When all desired channels are listed in the Channel List (A), use the Up/Down Selection Buttons (B) to highlight Export Scan to USB(C) and press Enter (D).
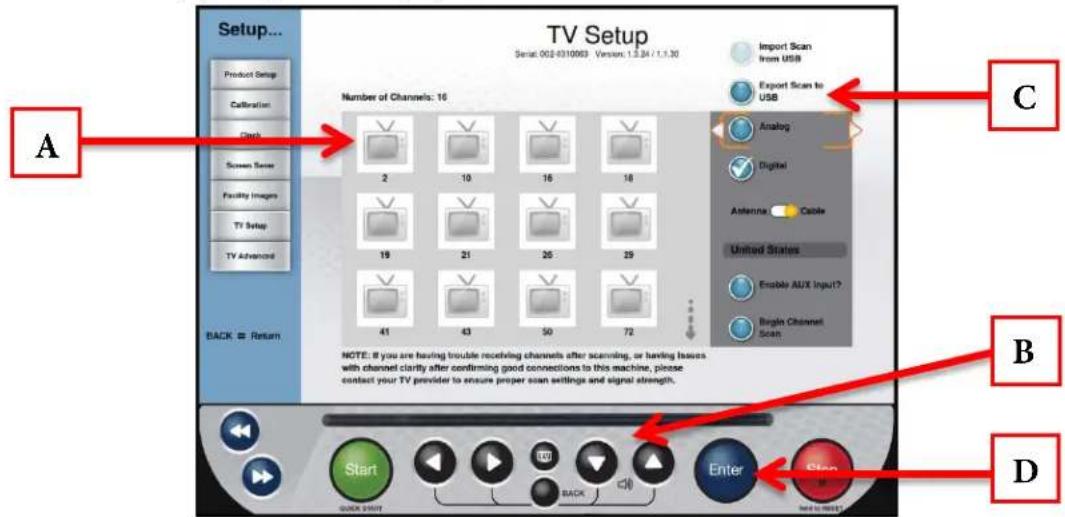
text_image
Setup... Product Setup Calibration Clash Screen Save Facility Images TV Setup TV Advanced Number of Channels: 16 2 10 16 18 19 21 26 29 41 43 50 72 BACK □ Return TV Setup Serial: 002-0310003 Version: 1.2.24 / 1.1.30 Import Scan from USB Export Scan to USB Analog Digital Antenna Cable United States Enable AUX Input? Begin Channel Scan NOTE: If you are having trouble receiving channels after scanning, or having issues with channel clarity after confirming good connections to this machine, please contact your TV provider to ensure proper scan settings and signal strength. A C B DImporting TV Setup Data from USB:
- Navigate to the TV Setup screen.
- Insert the prepared USB stick into the console's USB Port.
- Highlight Import Scan from USB (A) using the UP/Down Selection Buttons (B) and press Enter (C).
- Once the import process is complete, verify that all channels are listed in the channel list (D).
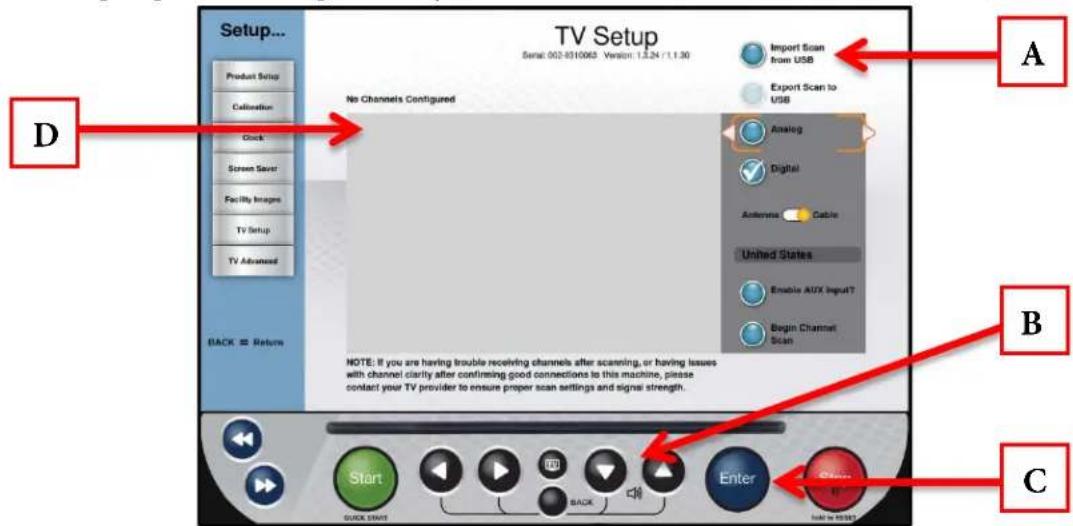
text_image
Setup... Product Setup Calibration Clock Screen Saver Facility Images TV Setup TV Advanced TV Setup Serial: 002-8510063 Version: 1.3.24 / 1.1.30 No Channels Configured Import Scan from USB Export Scan to USB Analog Digital Antenna Cable United States Enable AUX Input? Begin Channel Scan BACK Return NOTE: If you are having trouble receiving channels after scanning, or having issues with channel clarity after confirming good connections to this machine, please contact your TV provider to ensure proper scan settings and signal strength. Start Back Enter A B CTruefitness.com / 800.426.6570 / 636.272.7100
CHAPTER 4B: ESCALATE ^15 OPERATION
ADVANCED CONSOLE FUNCTIONS (CONTINUED):
Setup Menu - TV Advanced:
The TV Advanced Menu allows users to fine tune their TV settings by adding channels, removing channels, and adding channel logos.
Add a Channel:
- Navigate to the TV Advanced Screen (A).
- Press the Forward Navigation Button (B) to access the Add Channel Screen.
- Use the Left Right Navigation Buttons(C) to select between the available values (Standard, Frequency, Network, and Channel Number). *Channel frequencies must be obtained from your television service provider.
• Use the Up/Down Selection buttons (D) to adjust each value.
• Once all values are correct, press Enter (E) to save the channel
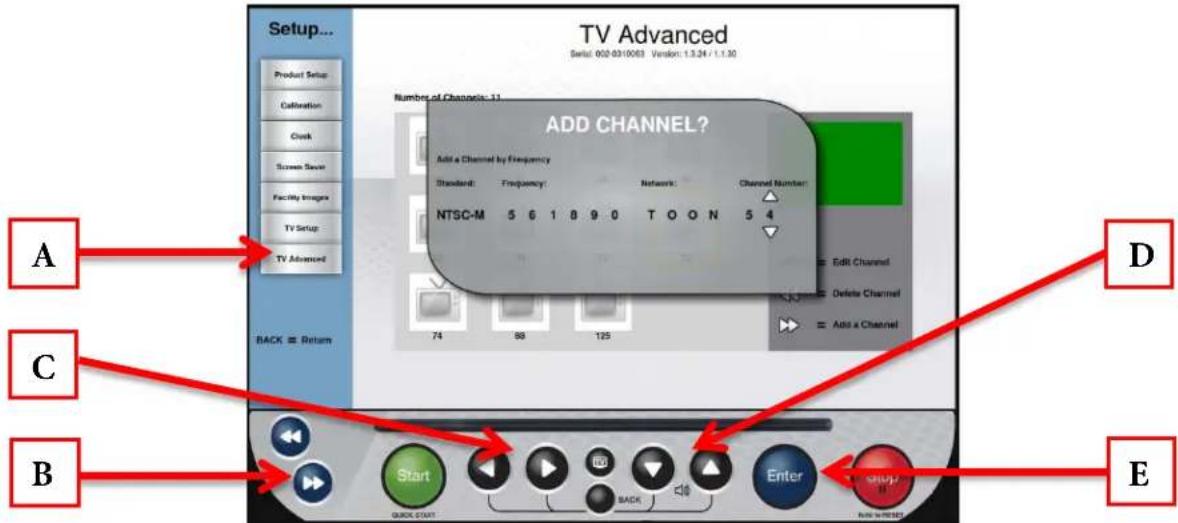
text_image
Setup... Product Setup Calibration Clock Screen Saver Facility Images TV Setup TV Advanced ADD CHANNEL? Add a Channel by Frequency Standard: 5 6 1 8 9 0 TO O N 5 4 NTSC-M Edit Channel Delete Channel Add a Channel A C B Start Back Enter Stop E BACK = ReturnDeleting Channels:
• Highlight the channel to be deleted.
- Press the Back Navigation Button (A)
- Press Enter (B) to delete the selected channel or the forward navigation button (C) to delete all channels
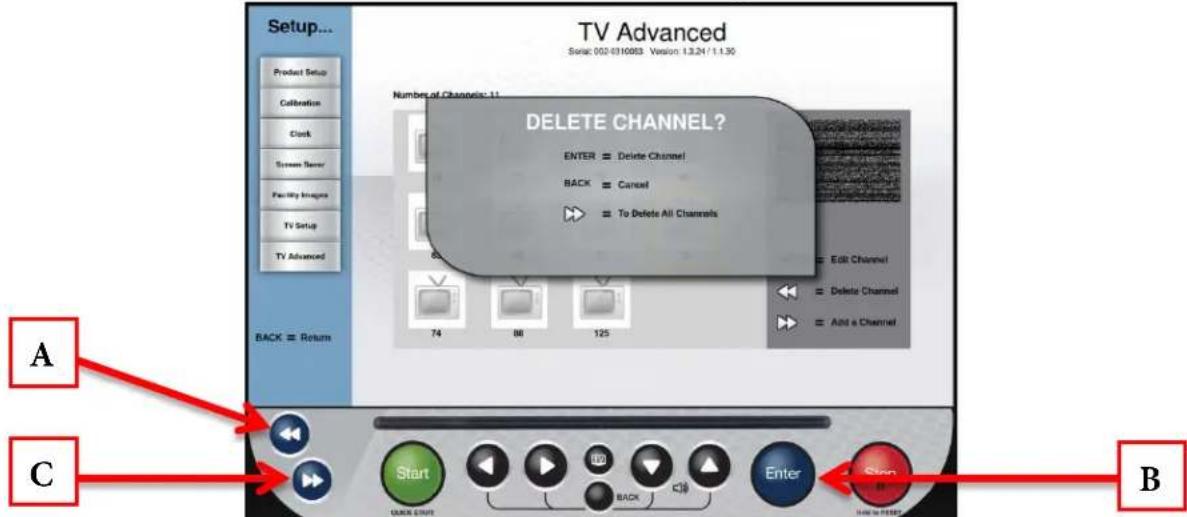
text_image
Setup... Product Setup Calibration Clock Screen Server Facility Images TV Setup TV Advanced BACK = Return TV Advanced Serial: 002-0310983 Version 1.3.24 / 1.1.30 Number of Channels: 11 DELETE CHANNEL? ENTER = Delete Channel BACK = Cancel To Delete All Channels Edit Channel Delete Channel Add a Channel 74 88 125 A C Start Back Enter BTruefitness.com / 800.426.6570 / 636.272.7100
CHAPTER 4B: ESCALATE ^15 OPERATION
ADVANCED CONSOLE FUNCTIONS (CONTINUED):
Setup Menu - TV Advanced (continued):
Using Channel logos allows users to quickly identify and select their favorite TV channels with minimal interruption to their workout.
Adding Channel Logos:
- Navigate to the TV Advanced Screen (A).
- Select the desired channel in the Channel List (B) and press the Enter Button (C).
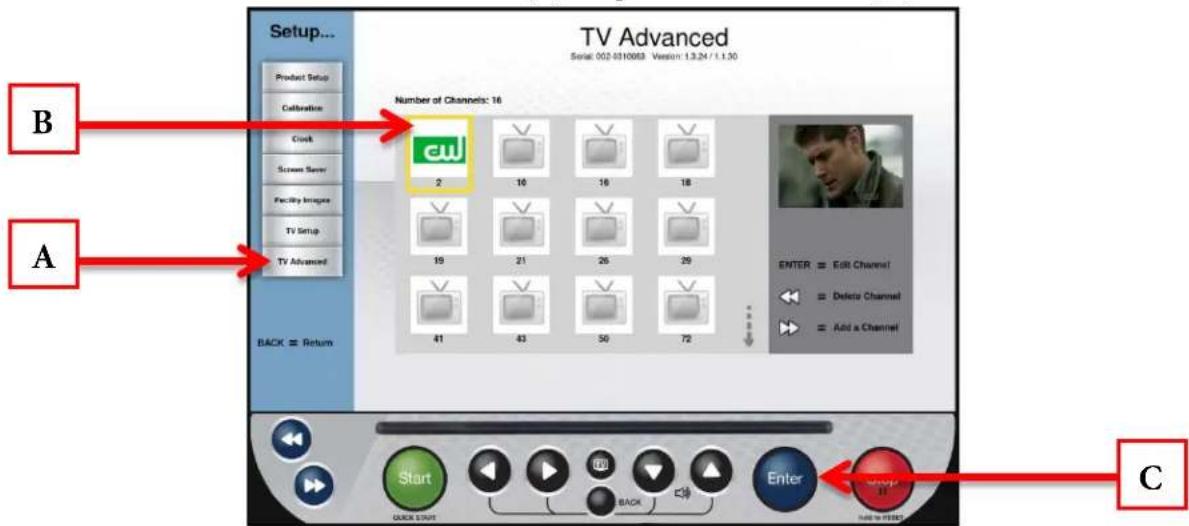
text_image
Setup... Product Setup Celebration Clock Screen Server Facility Image TV Setup TV Advanced Number of Channels: 16 CW 2 10 16 18 19 21 26 29 41 43 50 72 ENTER = Edit Channel Delete Channel Add a Channel Start Back Enter C B A BACK = Return- Select the logo (D) that corresponds to the selected channel and press Enter (C) to save.
- Repeat these steps for each channel for which a logo is available.
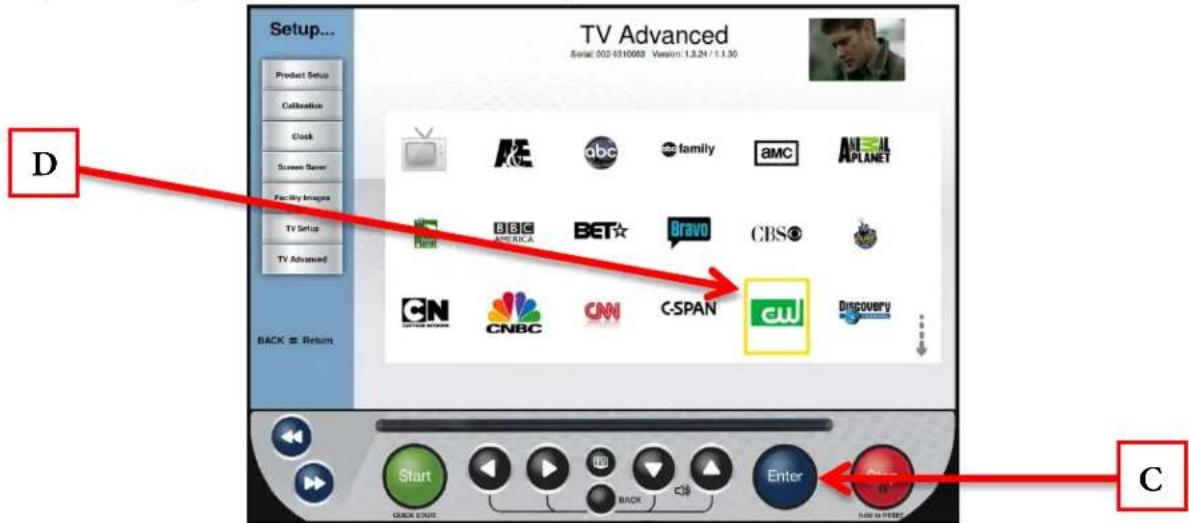
text_image
Setup... Product Setup Calibration Clock Screen Server Facility Images TV Setup TV Advanced TV Advanced Serial: 002-0310093 Version 1.3.24 / 1.1.30 D BACK = Return C Start Back Enter CCHAPTER 4B: ESCALATE ^15 OPERATION
ADVANCED CONSOLE FUNCTIONS (CONTINUED):
Options Menu:
The Options menu allows users to customize settings on the console to meet their needs. Use the Up/Down Selection Buttons (A) to select the desired option and the Left/Right Selection Buttons (B) to adjust the value.
*The settings in this menu save automatically.
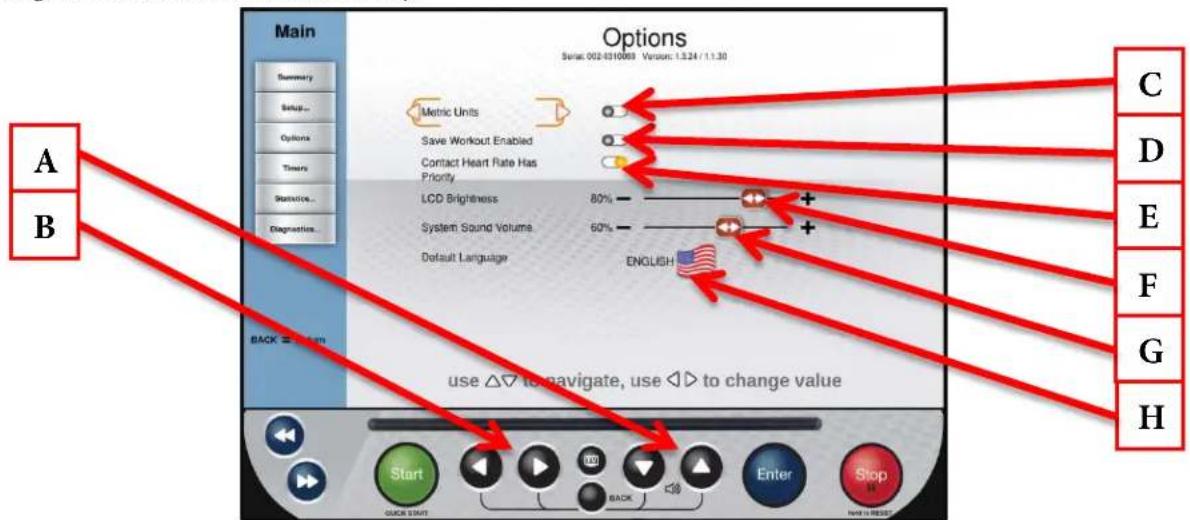
text_image
Main Options Serial: 002-0310069 Versus: 1.3.24 / 11.30 Summary Setup... Options Timer Statistics... Diagnostics... Metric Units Save Workout Enabled Contact Heart Rate Has Priority LCD Brightness 80% System Sound Volume 60% Default Language ENGLISH C D E F G H BACK = 1.0 m use △▽ to navigate, use ◀◀ to change value Start Back Enter Stop CHANGE START STOP STARTC) Metric Units:
When enabled, the console will display all Metric units rather than American Standard.
D) Save Workout Enabled:
Turn on this feature to allow users to save custom workouts to the console.
E) Contact Heart Rate Has Priority:
When enabled, the console will attempt to read heart rate data from the contact heart rate grips before reading data from a wireless chest strap.
*When this option is turned off, telemetry heart rate will take priority.
F) LCD Brightness:
Adjusts the brightness of the TFT display.
G) System Sound Volume:
Adjusts the volume of the notifications and beeps that come from the console.
H) Default Language:
Select a different language. Once a new default language has been selected, all menus, options and workout data will appear in that language.
CHAPTER 4B: ESCALATE ^15 OPERATION
ADVANCED CONSOLE FUNCTIONS (CONTINUED):
Timers Menu:
The Timers Menu allows for time limits to be set on various console features and functions. Use the Up/Down Selection Buttons (A) to select the desired option and the Left/Right Selection Buttons (B) to adjust the value.
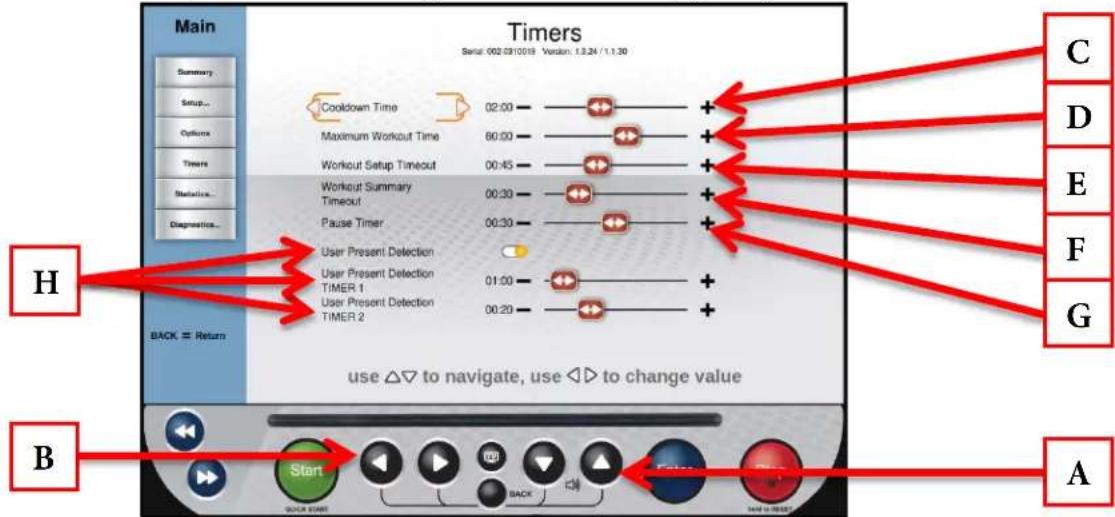
text_image
Main Timer Serial: 002-0310019 Version: 1.3.24 / 1.1.30 Summary Setup... Options Timers Statistics... Diagnosis... Cookdown Time 02:00 Maximum Workout Time 80:00 Workout Setup Timeout 00:45 Workout Summary Timeout 00:30 Pause Timer 00:30 User Present Detection 01:00 User Present Detection TIMER 1 User Present Detection TIMER 2 BACK = Return use △▽ to navigate, use ◀◀ to change value C D E F G B Start Back AC) Cooldown Time:
Adjusts the length of the cooldown segment at the end of a workout.
D) Maximum Workout Time:
This setting will limit the amount of time that all workouts can last (this setting does not apply to quickstart workouts, manual workouts or distance workouts).
E) Workout Setup Timeout:
Choose how long the workout data entry screen will remain on the display without any user interaction. By choosing the "off" setting, the data entry screen will be displayed until closed by a user.
F) Workout Summary Timeout:
Determines the amount of time the Workout Summary Screen will remain on the display. By choosing the “Off” setting, the summary will be displayed until ended by a user.
G) Pause Timer:
This setting will limit the amount of time that a workout can be paused before it automatically ends. By choosing the “Off” option, the unit will remain paused until the user resumes or ends the workout.
H) User Present Detection (AC drive systems only):
When User Present Detection is enabled the treadmill will pause if it does not detect a normal amp draw which would be indicative of the weight of the user on the treadbelt. Timer 1 will set the amount of time before the console displays a User Present Notification and Timer 2 will set the amount of time that the notification is displayed on the console before the treadbelt is stopped.
CHAPTER 4B: ESCALATE ^15 OPERATION
ADVANCED CONSOLE FUNCTIONS (CONTINUED):
Statistics Menu:
The statistics menu provides an overview of how and how long the unit has been used.
Statistics Menu – Summary:
Selecting the Summary screen (A) will provide a usage summary. Run Hours (B) is the total number of hours the unit has been used. Machine Distance (C) is the total distance in miles that the belt has traveled. Distance (D) is the amount of distance the belt has traveled since the last time the Clear Mileage (E) feature was used.
*The Distance/Clear Mileage feature is helpful for tracking mileage in a preventive maintenance schedule.
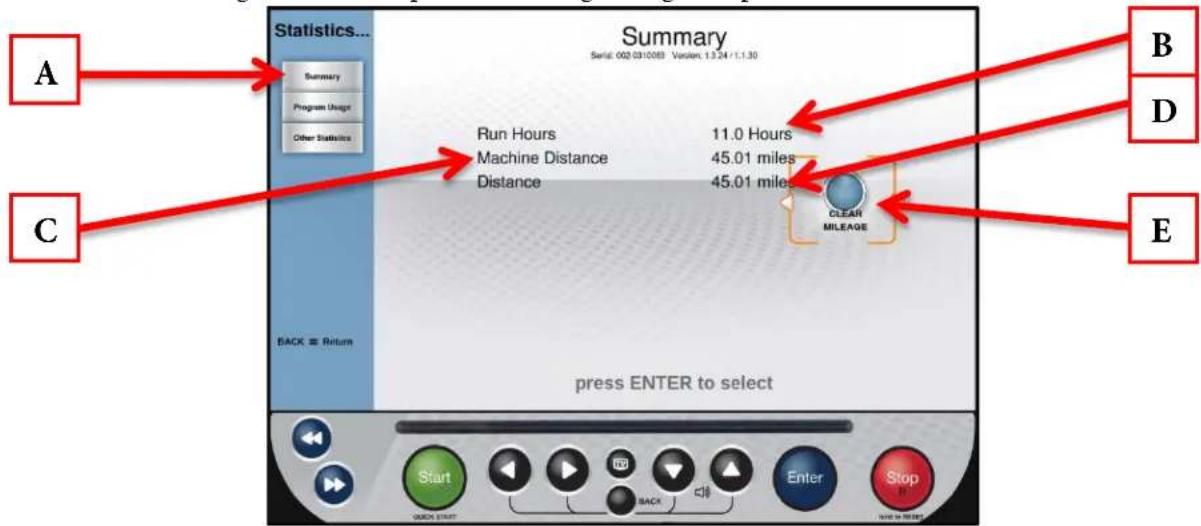
text_image
Statistics... Summary Serial: 002.031008 - Version: 1.3.24 / 1.3.30 A B C Run Hours 11.0 Hours Machine Distance 45.01 miles Distance 45.01 miles CLEAR MILEAGE BACK = Return press ENTER to select Start Back Enter StopStatistics Menu – Program Usage:
Selecting the Program Usage screen (A) will provide a list of programs that have been used on the unit and how many times those programs have been used. These statistics can be reset by highlighting the Clear button (B) and Pressing Enter (C), but it is not recommended.
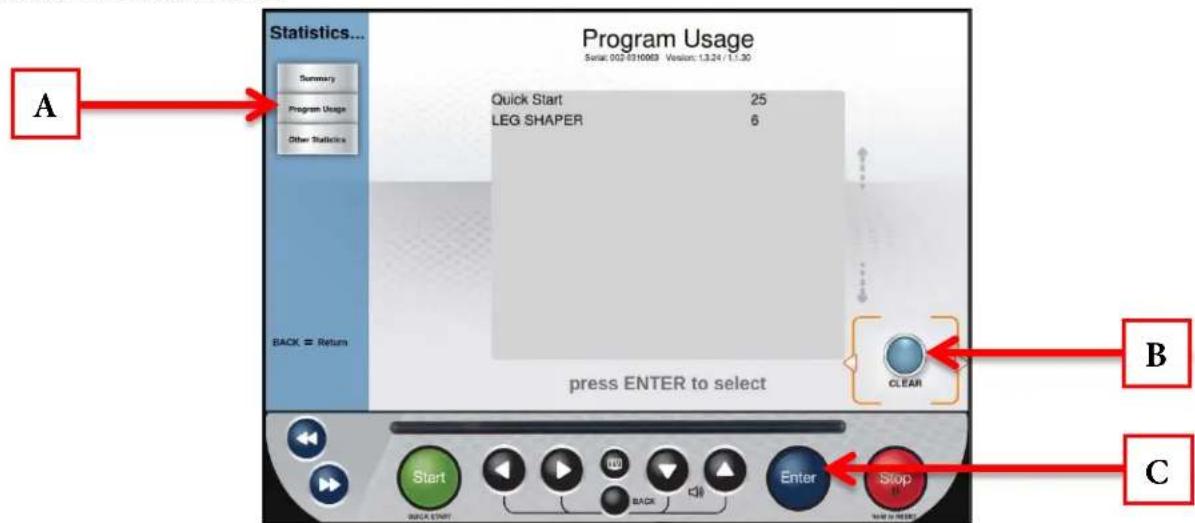
text_image
Statistics... Program Usage Serial: 002-0310089 Version: 1.3.24 / 1.1.30 Summary Program Usage Other Statistics Quick Start 25 LEG SHAPER 6 BACK = Return press ENTER to select CLEAR Start BACK START Enter Stop B CCHAPTER 4B: ESCALATE ^15 OPERATION
ADVANCED CONSOLE FUNCTIONS (CONTINUED):
Diagnostics Menu:
The Diagnostics Menu contains tools used to help diagnose errors and performance issues.
Diagnostics Menu-Tests:
The Tests Screen is used by technicians to aid in troubleshooting and contains commonly used troubleshooting tests.
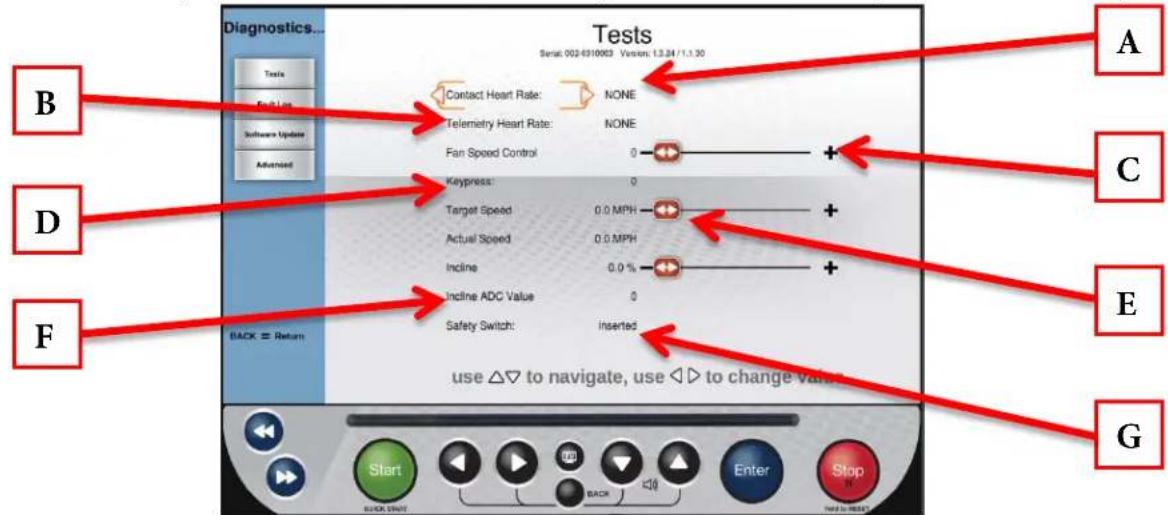
text_image
Diagnostics... Tests Serial: 002-6310003 Version: 1.3.24 / 1.1.30 B Contact Heart Rate: NONE Telemetry Heart Rate: NONE Fan Speed Control 0 + Keypress: 0 Target Speed 0.0 MPH + Actual Speed 0.0 MPH + Incline 0.0 % Incline ADC Value 0 + Safety Switch: inserted A C D E F BACK ≧ Return use △▽ to navigate, use ◀◀ to change value. GA) Contact Heart Rate:
Ensures the unit is receiving the data by displaying the user's heart rate when the contact heart rate pads are gripped.
B) Telemetry Heart Rate:
Use a wireless heart rate strap or simulator to test if the unit is receiving wireless heart rate data. If there is a reading displayed without the use of a heart rate strap or simulator, there is outside interference from another source.
*This unit is designed to receive 5 khz non-coded transmissions only.
C) Fan Speed Control:
Allows users to test the fan independent of a program.
D) Keypress:
When a quick access key is pressed on the unit, "NONE" will change to indicate which key is being pressed. In the event of a stuck key, the key that is being engaged will display.
E) Target Speed/Actual Speed:
Commands the treadbelt to move and verifies that the belt is moving at the commanded speed using the actual speed readout.
F) Incline/Incline ADC Value:
Used to troubleshoot incline system faults by commanding the unit to incline and reading the Incline ADC Value.
G) Safety Switch:
Used to verify that the console is able to read the safety key.
CHAPTER 4B: ESCALATE ^15 OPERATION
ADVANCED CONSOLE FUNCTIONS (CONTINUED):
Diagnostics Menu - Fault Log:
The Fault Log (A) will display a time stamped list of recent fault codes that can be helpful in the troubleshooting process. The Fault Log can be exported to a USB drive by highlighting Export (B) and pressing Enter (C). The log can also be reset by highlighting Clear (D) and pressing Enter (C), but it is not recommended.
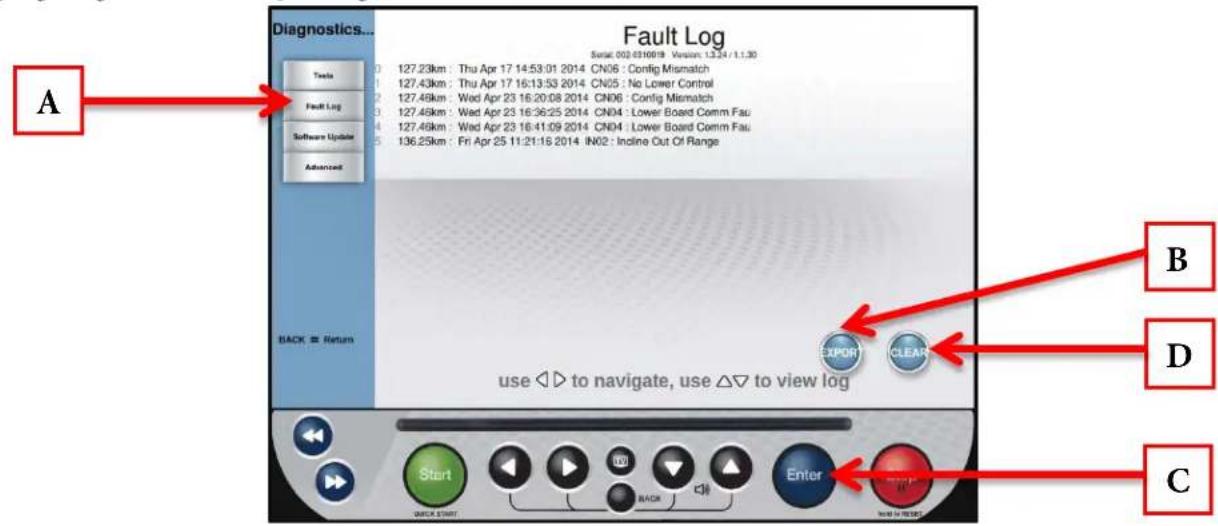
text_image
Diagnostics... Fault Log Serial: 002-0310019 Version: 13.24 / 1.1.30 Tools Fault Log Software Update Advanced BACK = Return 127.23km : Thu Apr 17 14:53:01 2014 CN06 : Config Mismatch 127.43km : Thu Apr 17 16:13:53 2014 CN05 : No Lower Control 127.49km : Wed Apr 23 16:20:08 2014 CN06 : Config Mismatch 127.49km : Wed Apr 23 16:36:25 2014 CN04 : Lower Board Comm Fau 127.49km : Wed Apr 23 16:41:09 2014 CN04 : Lower Board Comm Fau 136.25km : Fri Apr 25 11:21:16 2014 IN02 : Incline Out Of Range use ◀ to navigate, use △▽ to view log B C DDiagnostics Menu - Software Update:
TRUE may periodically release software updates to ensure users enjoy the best workout experience available. To update the console software, download the update program (A) from truefitness.com and load the software to a blank USB drive by following the downloadable instructions.
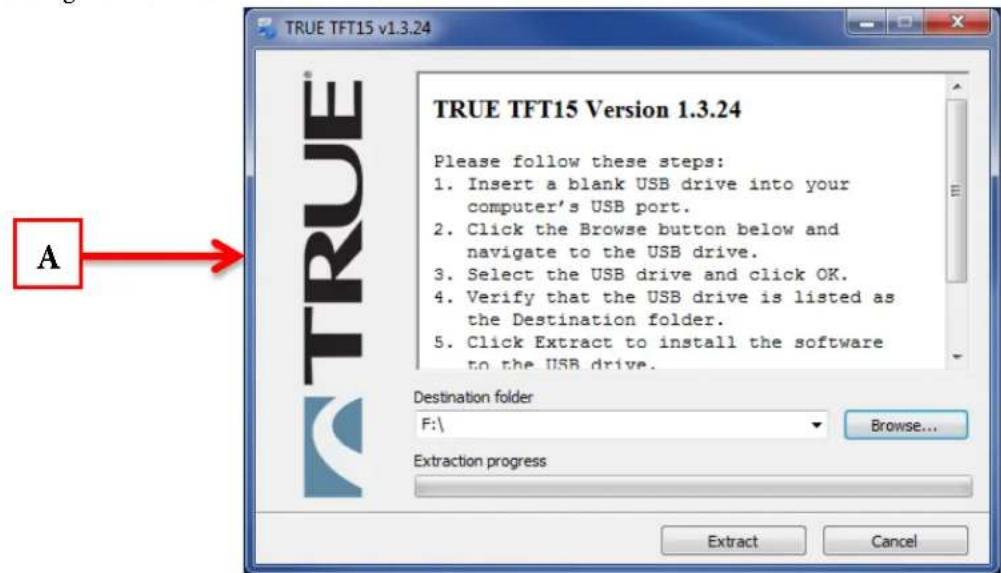
text_image
TRUE TFT15 v1.3.24 A TRUE TFT15 Version 1.3.24 Please follow these steps: 1. Insert a blank USB drive into your computer's USB port. 2. Click the Browse button below and navigate to the USB drive. 3. Select the USB drive and click OK. 4. Verify that the USB drive is listed as the Destination folder. 5. Click Extract to install the software to the USB drive. Destination folder F:\ Browse... Extraction progress Extract CancelWARNING:
Disconnecting the power source, switching the unit off or pressing buttons on the console will disrupt the information flow and potentially cause fatal errors.
CHAPTER 4B: ESCALATE ^15 OPERATION
ADVANCED CONSOLE FUNCTIONS (CONTINUED):
Diagnostics Menu - Software Update (continued):
- Insert the USB drive containing the software update into the console's USB port.
- From the Diagnostics Menu, use the Up/Down Selection Buttons to highlight Software Update and press the Enter Button (A).
- When the console locates the software update, highlight Update Software (B) and press Enter.
NOTE: Do not power cycle the unit between the software and firmware updates
• After the installation of the software update, highlight Load Firmware (C) and press Enter.
- Following the installation of the software and firmware, power cycle the unit to finalize the software update.
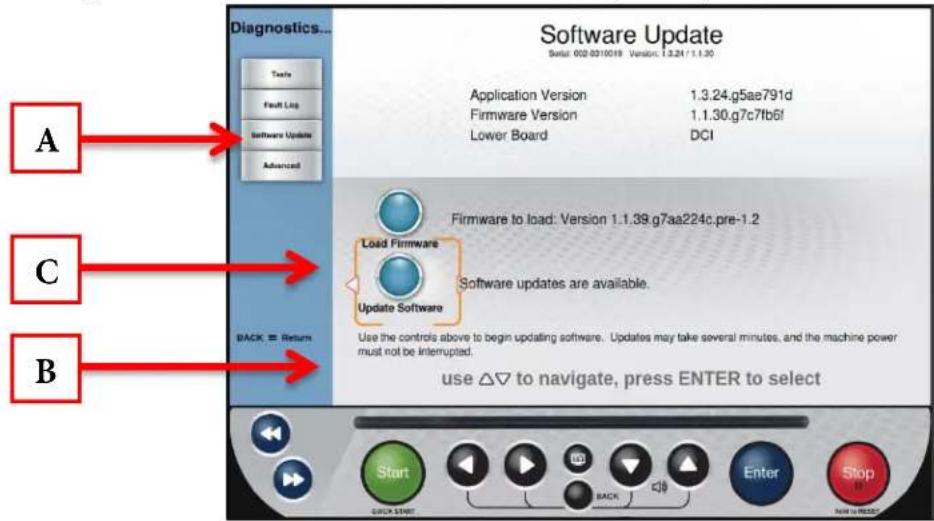
text_image
A B Diagnostics... Testis Fault Log Software Update Advanced Software Update Serial: 002-0310019 Version: 1.3.21 / 1.1.30 Application Version 1.3.24.g5ae791d Firmware Version 1.1.30.g7c7fb6! Lower Board DCI Firmware to load: Version 1.1.39.g7aa224c.pre-1.2 Load Firmware Update Software Software updates are available. BACK = Return Use the controls above to begin updating software. Updates may take several minutes, and the machine power must not be interrupted. use △▽ to navigate, press ENTER to selectDiagnostics Menu - Advanced:
The advanced screen contains multiple tools that are used in the production of the console and for demonstration purposes. It is recommended to leave these settings in their default positions.
CHAPTER 4C: ESCALATE ^9 OPERATION
ESCALATE ^9 OVERVIEW:
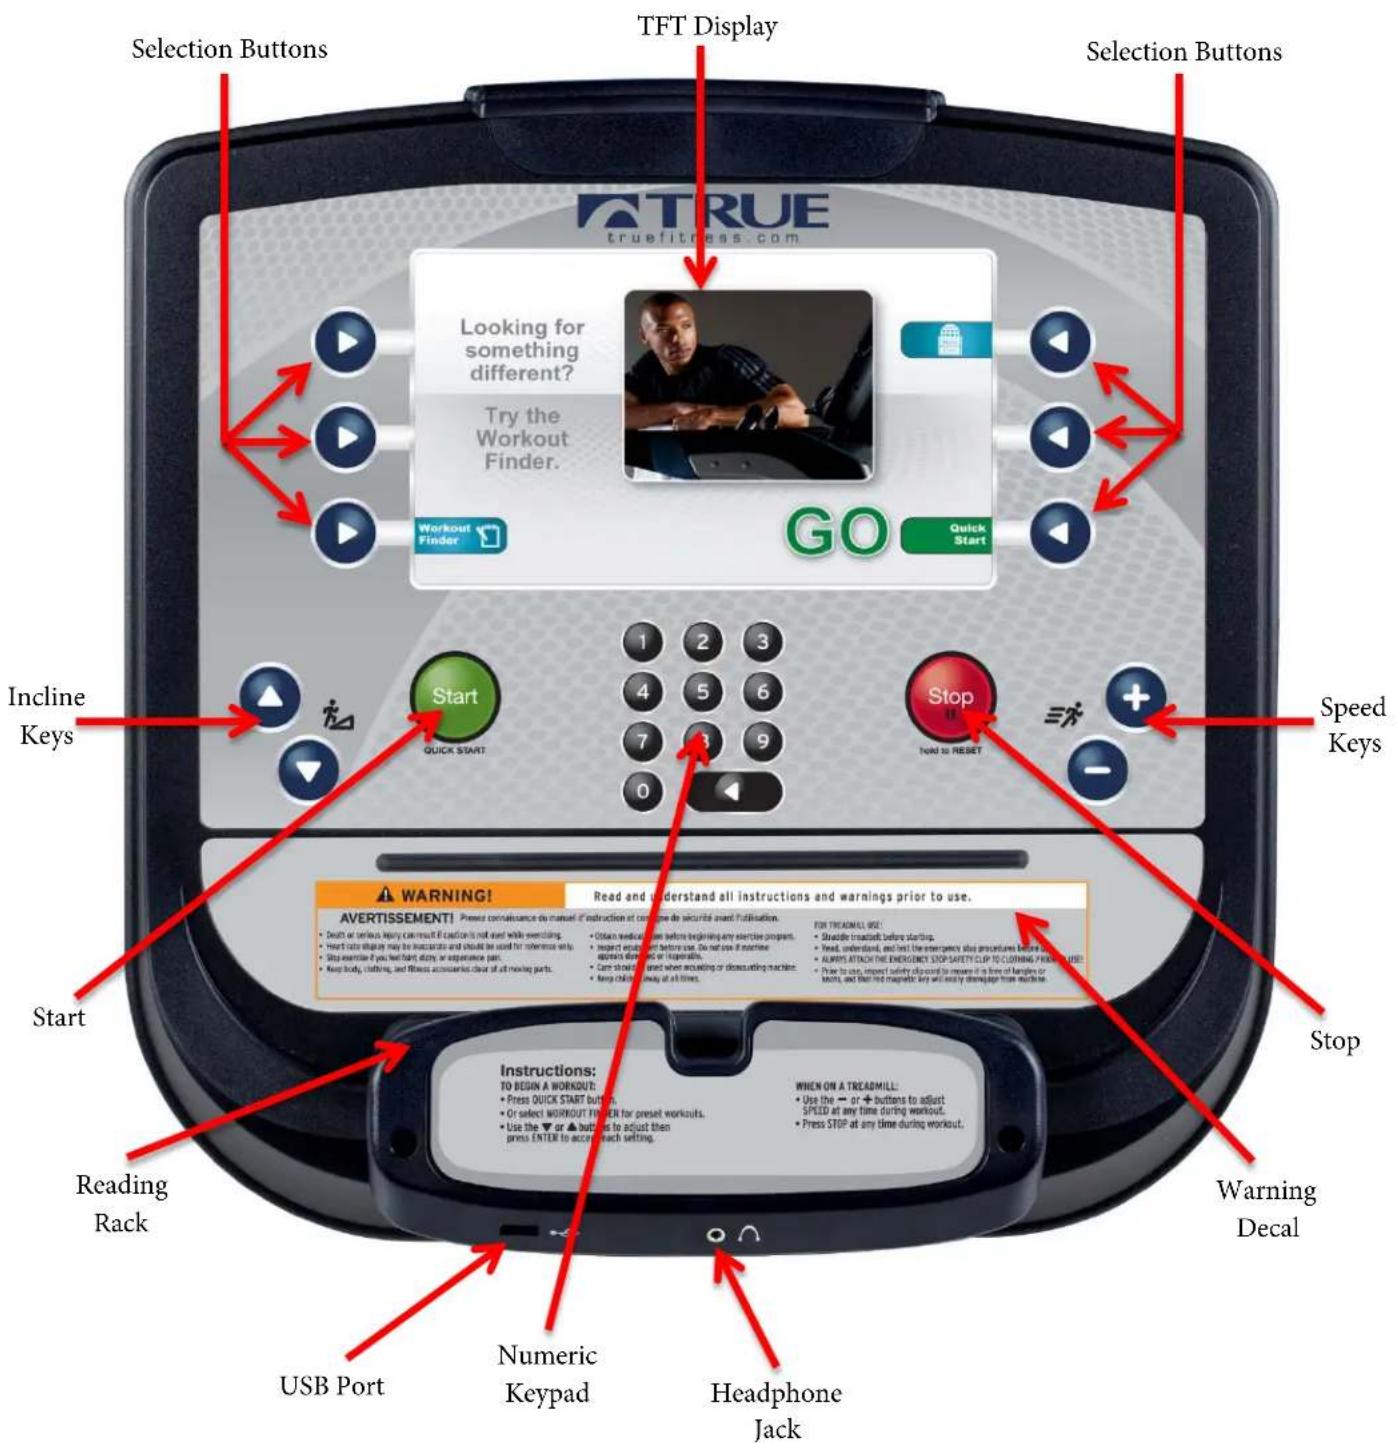
text_image
Selection Buttons TFT Display Selection Buttons Looking for something different? Try the Workout Finder. Start Quick START Stop Hold to RESET Speed Keys Incline Keys Warning! A VERTISSEMENT! Read and understand all instructions and warnings prior to use. • Death or serious injury can result if accident is not and while events. • Hold body images may be used for exercise and should be used for reference only. • Stay exercised for exercise or exercise of exercise parts. • Keep body, clothing, and fitness accounts clear off moving parts. Start Reading Rack Instructions: TO BEGIN A WORKOUT. • Press QUICK START button. • Or select WORKOUT ENTER for press workouts. • Use the ▼ or ▲ buttons to adjust then press ENTER to account setting. USB Port Numeric Keypad Headphone Jack WHEN ON A TREADMILL. • Use the → or + buttons to adjust SPEED at any time during workout. • Press STOP at any time during workout.CHAPTER 4C: ESCALATE ^9 OPERATION
ESCALATE ^9 OVERVIEW (CONTINUED):
TFT Display:
Used to monitor or control a work out and feature navigation.
Selection Keys:
Used to navigate menus and make selections via the TFT Display.
Incline Keys:
Manually increases or decreases the incline of the treadmill.
Start:
Allows the user to begin a Quick Start workout or preset workout.
Reading Rack:
A ledge on the console can be used to hold a book, magazine, e-reader, or tablet computer during a workout.
USB Port:
Allows users to export workout data to an external USB drive or update the console software.
Numeric Keypad:
A small panel of keys on the console that allow the user to quickly enter numeric data.
Headphone Jack:
Standard 3.5mm audio jack used to connect headphones to the console during media playback.
Warning Decal:
Important safety information for users to review prior to using the equipment.
Stop:
Stops/Pauses a workout. Press and hold this key for five seconds to reset the unit.
Speed Keys:
Manually increases or decreases the speed of the belt.
CHAPTER 4C: ESCALATE ^9 OPERATION
CONSOLE NAVIGATION:
Home Screen:
The Home Screen is displayed on the console when there is no workout in progress. From this screen the user is able to select from various options to begin a workout.
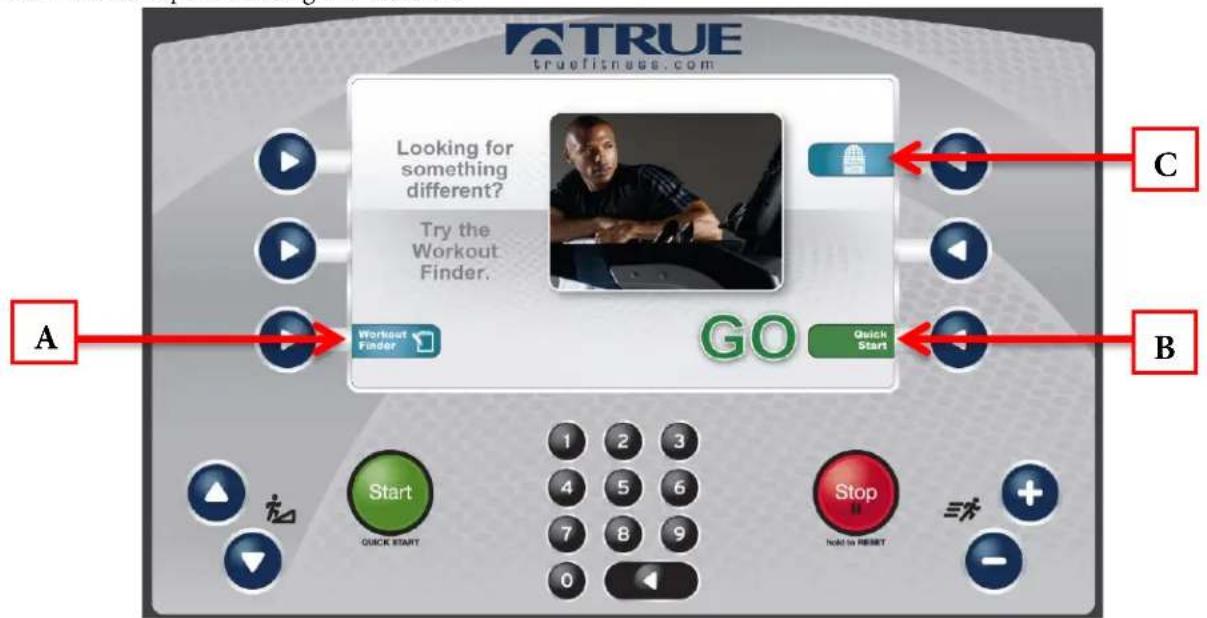
text_image
TRUE truefitnase.com Looking for something different? Try the Workout Finder. Go Quick Start A B C 1 2 3 4 5 6 7 8 9 0 Stop Hold to RESET +A) Workout Finder
Displays preset workout selections by category
B) Quick Start
Starts a Quick Start workout in which the user controls all settings until the workout is ended by the user.
C) Language Options
Allows users to choose between 12 language options.
CHAPTER 4C: ESCALATE ^9 OPERATION
CONSOLE NAVIGATION (CONTINUED):
Selecting a Preset Workout:
Preset workouts are accessed by selecting Workout Finder from the home screen. To view the workouts in a category, select the category (A) by using the Scroll Selection Buttons (B) and then press the Next Selection Button (C).
*Press and hold the Next Selection Button to return to the previous screen.
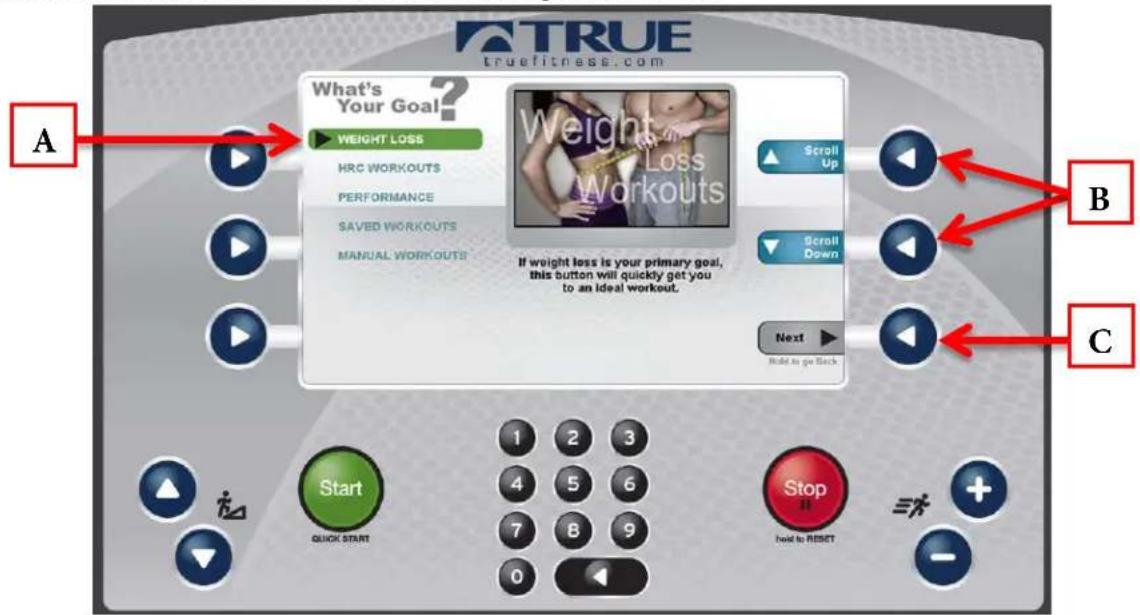
text_image
A What's Your Goal? WEIGHT LOSS HRC WORKOUTS PERFORMANCE SAVED WORKOUTS MANUAL WORKOUTS Weight Loss If weight loss is your primary goal, this button will quickly get you to an Ideal workout. Scroll Up Scroll Down Next Reset to go Back B C Start QUICK START 1 2 3 4 5 6 7 8 9 Stop hold to RESETWorkout Data Entry Screens:
These screens allow users to input their personal information or workout goals prior to beginning a workout. To set a value, press the Selection Button for the value you wish to change (A) and use the + and - keys (B) to adjust the value to the desired setting. Users may also manually enter a value using the Numeric Keypad (C).
*Workout Data Entry Screens vary by program selection.
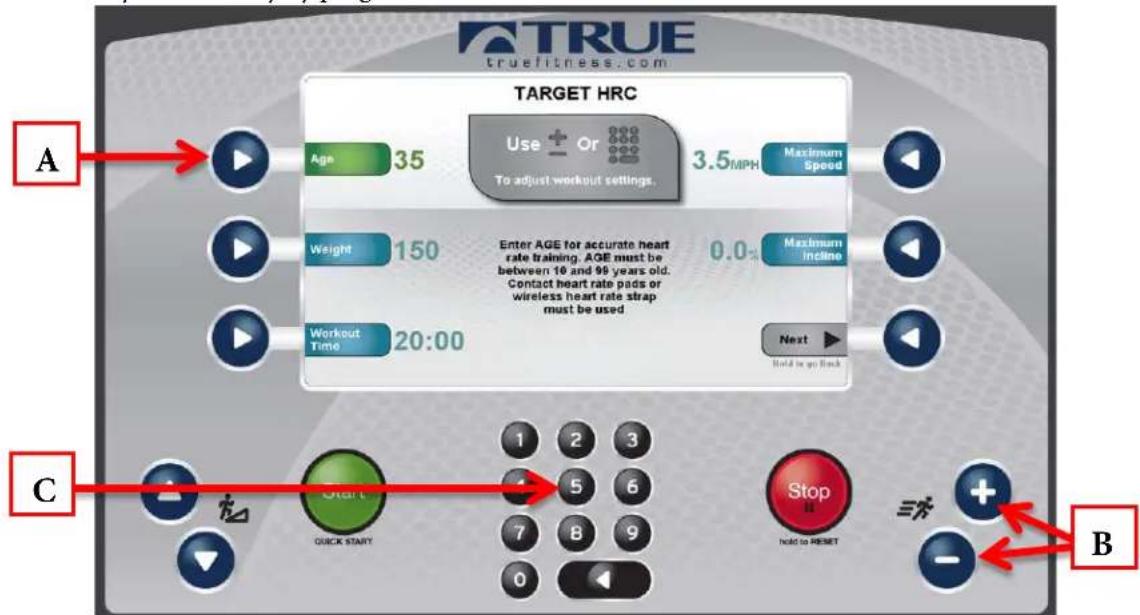
text_image
TRUE truefitness.com TARGET HRC A Age 35 Weight 150 Workout Time 20:00 C Start QUICK START 1 2 3 4 5 6 7 8 9 0 Stop hold to RESET B Use Or To adjust workout settings. Maximum Speed 0.0% Maximum incline Next Hold to go backTruefitness.com / 800.426.6570 / 636.272.7100 118
CHAPTER 4C: ESCALATE ^9 OPERATION
CONSOLE NAVIGATION (CONTINUED):
Workout Data Screens:
During any workout a Workout Data Screen will be displayed to give the user a comprehensive visual overview of their current workout data.
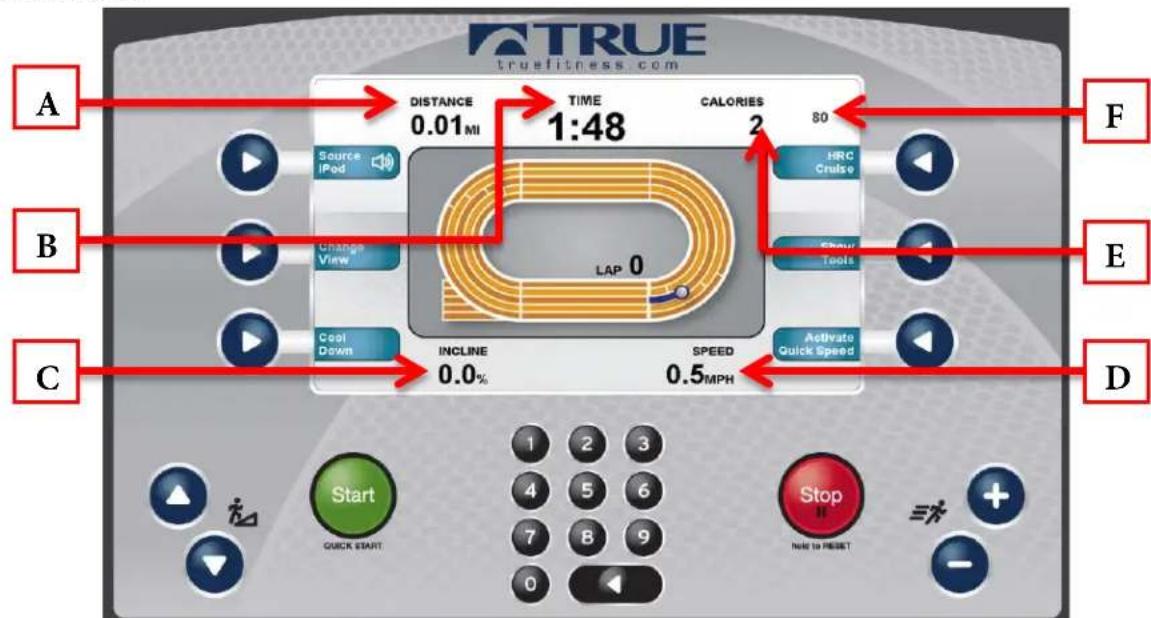
flowchart
graph TD
    A["Start"] --> B["Quick Start"]
    B --> C["0.0%"]
    C --> D["Speed 0.5MPH"]
    D --> E["Activate Quick Speed"]
    E --> F["HRC Cruise"]
    F --> G["Show Tools"]
    G --> H["Change View"]
    H --> I["Source iPod"]
    I --> J["Distance 0.01MI"]
    J --> K["TIME 1:48"]
    K --> L["CALORIES 2"]
    L --> M["F"]
    N["Stop"] --> O["Note to RESET"]
A) Custom Data Display #1:
By Default, this display will show the distance for the current workout. Users can also choose custom data points to be seen in this display.
*See Workout Data Screen Controls; F) Show Tools section.
B) Time:
Displays the time elapsed for the current workout.
C) Incline:
Shows the current incline of the treadmill.
D) Speed:
Shows the current speed of the treadmill belt.
E) Custom Data Display #2:
By Default, this display will show the calorie count for the current workout. Users can also choose custom data points to be seen in this display.
*See Workout Data Screen Controls; F) Show Tools section.
F) Heart Rate:
Shows the user's heart rate in a digital beats per minute (bpm) readout.
CHAPTER 4C: ESCALATE ^9 OPERATION
CONSOLE NAVIGATION (CONTINUED):
Workout Data Screen Controls:
The Workout Data Screens contain various controls that allow users to adjust workout settings and to customize their overall workout experience. These controls are accessed by pressing the Selection Button for the control they wish to use.
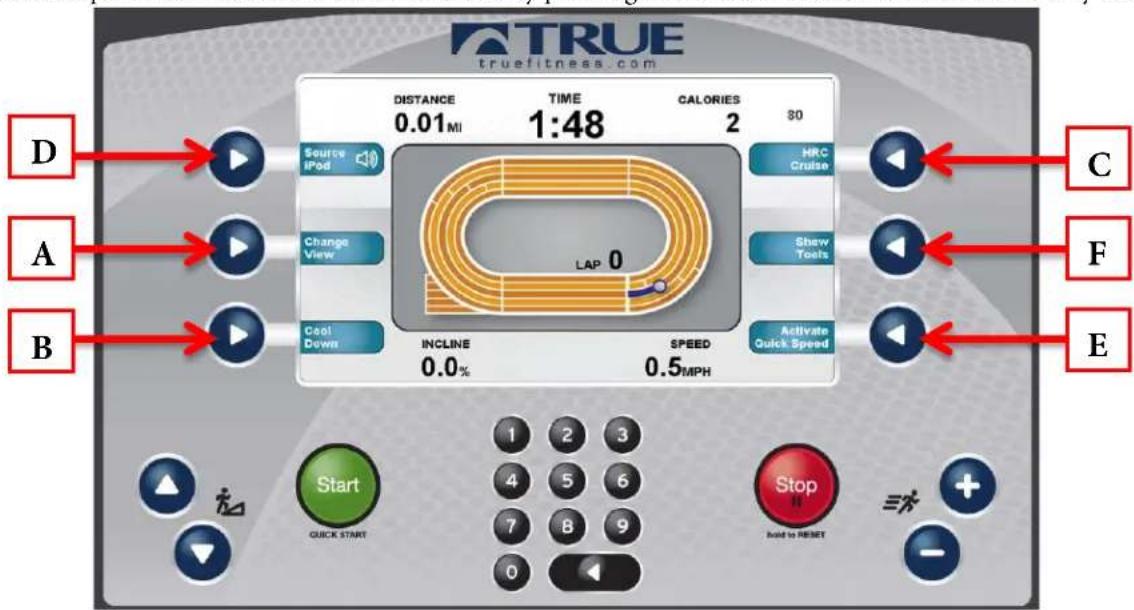
text_image
TRUE truefitness.com DISTANCE TIME CALORIES 0.01 MI 1:48 2 30 Source IPod HRC Cruise A Change View Show Tools B Cool Down LAP 0 INCLINE SPEED 0.0% 0.5 MPH Activate Quick Speed C F E Start QUICK START Stop Reset to RESETA) Change View:
Switches between the available Workout Data Screens
B) Cool Down:
Pressing this button allows the user to end their current workout with a two minute low intensity cool down period. When Cool Down is activated the unit is in manual mode and the user directly controls all settings.
C) HRC Cruise:
Engages Heart Rate Control to allow the equipment to maintain the user's current heart rate through automatic speed and incline adjustments (when the user is utilizing heart rate monitoring).
CHAPTER 4C: ESCALATE ^9 OPERATION
CONSOLE NAVIGATION (CONTINUED):
D) Source:
Toggles between available audio sources which include; TV (if the console is equipped with a Broadcast Vision receiver) and FM radio. When an audio source is selected the user is given control over volume (A), and channel adjustments (B).

text_image
TRUE truefitness.com DISTANCE 2.0MI TIME 12:52 CALORIES 125 ♥ 125 B Channel Next Channel Prev WORKLOAD LEVEL 1 PACE 60RPM Volume + Volume - A Start Quick Start Stop Hold to RESET -E) Activate Quick Speed:
When the Activate Quick Speed Selection Button is pressed, various preset speeds will appear. Pressing one of the Speed Selection Buttons (A) will allow the user to quickly and conveniently switch to that preset speed. To return to the Workout Data Screen press the Exit Quick Speed Selection Button (B)
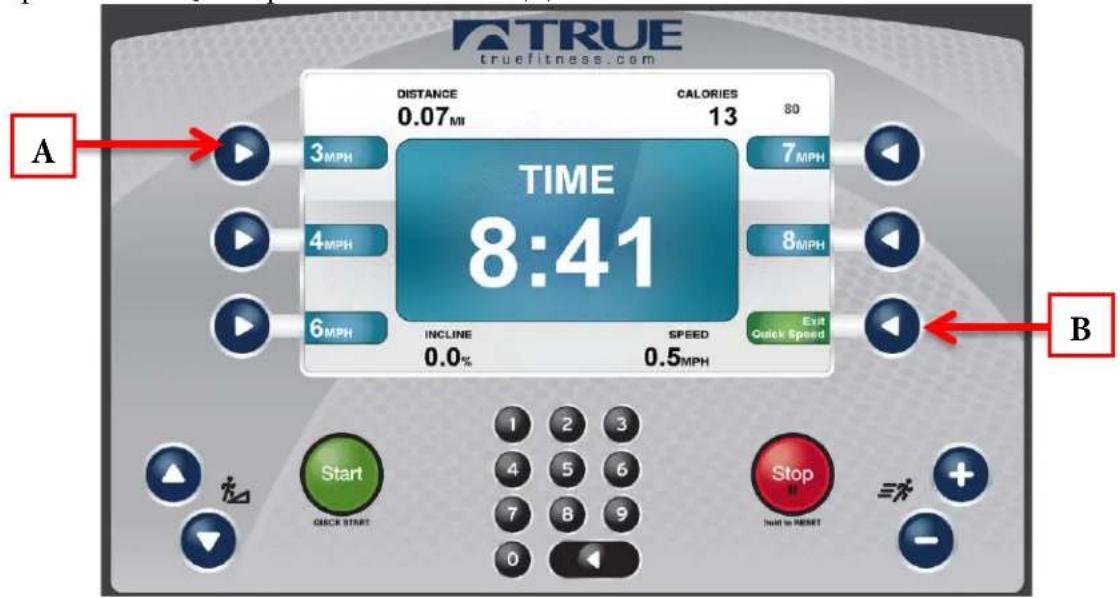
text_image
TRUE truefitness.com DISTANCE 0.07 MI CALORIES 13 80 TIME 8:41 INCLINE 0.0% SPEED 0.5MPH 7 MPH 8 MPH Exit Quick Speed A B Start QUICK START Stop Inlet to RESET 三木 +CHAPTER 4C: ESCALATE ^9 OPERATION
CONSOLE NAVIGATION (CONTINUED):
F) Show Tools:
Pressing the Show Tools Selection Button (A) will display various options. Pressing the Change Data Selection Button (C) will toggle the data points in Custom Data Display 1(1) between distance and pace. The data in custom data display 2 (2) will toggle between calories and METs. Pressing the Scroll Data Selection button (B) will allow the Custom Data Displays to automatically toggle between data. Pressing the Unit Selection Button (D) will change the units displayed between English and Metric.
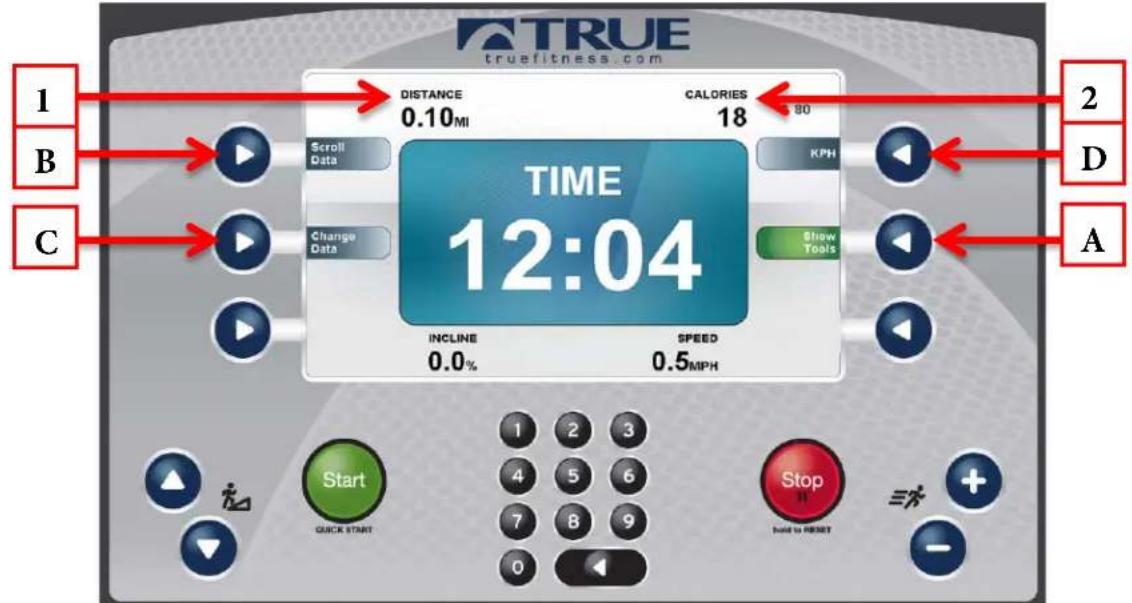
text_image
TRUE truefitness.com 1 B C DISTANCE 0.10MI CALORIES 18 SO TIME 12:04 INCLINE 0.0% SPEED 0.5MPH KPH Show Tools A 2 D Start QUICK START Stop END to RESETWorkout Summary Screen:
At the end of a workout the Summary Screen will display an overview of the workout data. The workout data can be exported to another device by inserting a USB drive into the console's USB port and pressing the Save Selection Button (A) or to return to the home screen press the Home Selection Button (B)
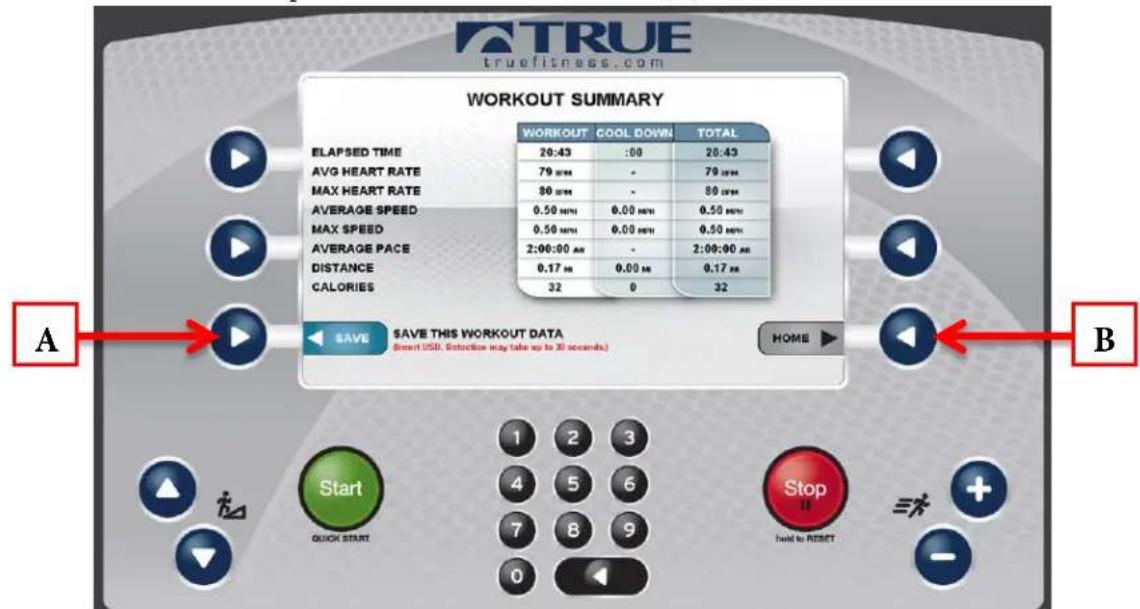
text_image
TRUE truefitness.com WORKOUT SUMMARY ELAPSED TIME AVG HEART RATE MAX HEART RATE AVERAGE SPEED MAX SPEED AVERAGE PACE DISTANCE CALORIES 20:43 79 mPM 30 mPM 0.50 mPM 0.50 mPM 2:00:00 AM 0.17 mM COOL DOWN :00 -0.00 mPM 0.00 mPM 0.50 mPM 0.50 mPM -0.00 mM 0.00 mM 32 0 TOTAL 20:43 79 mPM 80 mPM 0.50 mPM 0.50 mPM 2:00:00 AM 2:00:00 AM 0.17 mM 32 0 32 SAVE THIS WORKOUT DATA (Discount USD. Selection may take up to 30 seconds) HOME ▶ Start QUICK START Stop hold to RESET A BTruefitness.com / 800.426.6570 / 636.272.7100 122
CHAPTER 4C: ESCALATE ^9 OPERATION
ADVANCED CONSOLE FUNCTIONS:
Entering Service Mode:
Entering Service Mode can be completed by pressing and holding the upper left selection button (A) for 3-5 seconds or until the “Workout Finder” icon (B) blinks. When the “Workout Finder” icon blinks, release and hold the “Workout Finder” selection button (C) until the service screen displays.
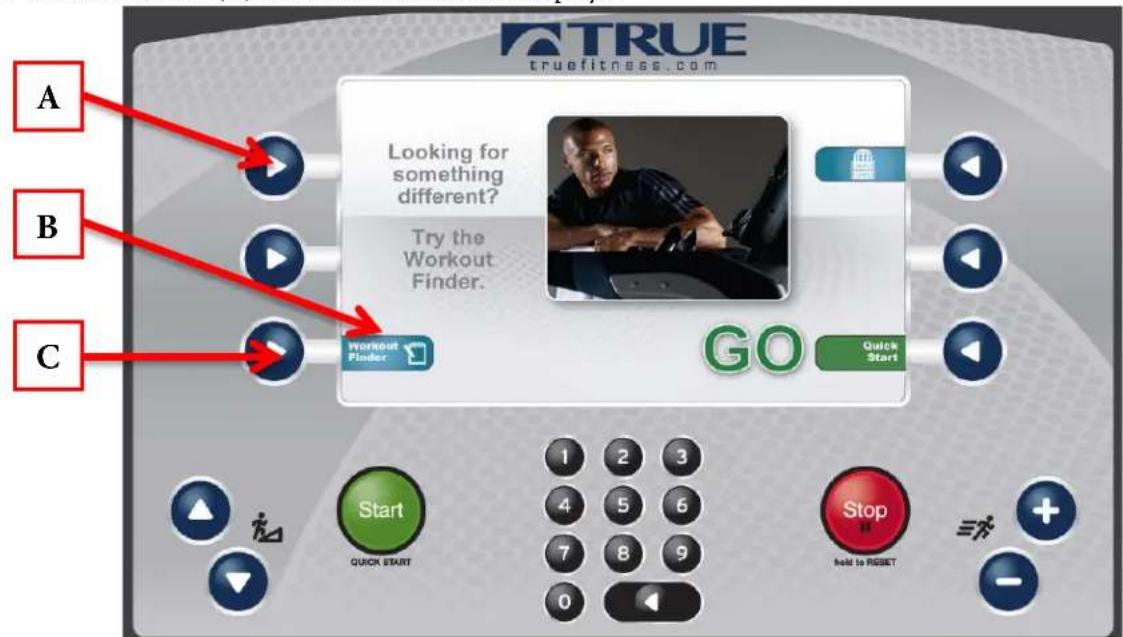
text_image
A B C Looking for something different? Try the Workout Finder. Go Quick Start Start QUICK START Stop hold to RESET TRUE truefitness.comService Menu:
The first screen displayed after entering service mode is the Service Menu. From this menu technicians can access all of the service mode features by selecting different categories. To select a category use the scroll selection buttons (A) to highlight a category (B). Once a category has been selected, press the enter selection button (C) to Confirm the selection.
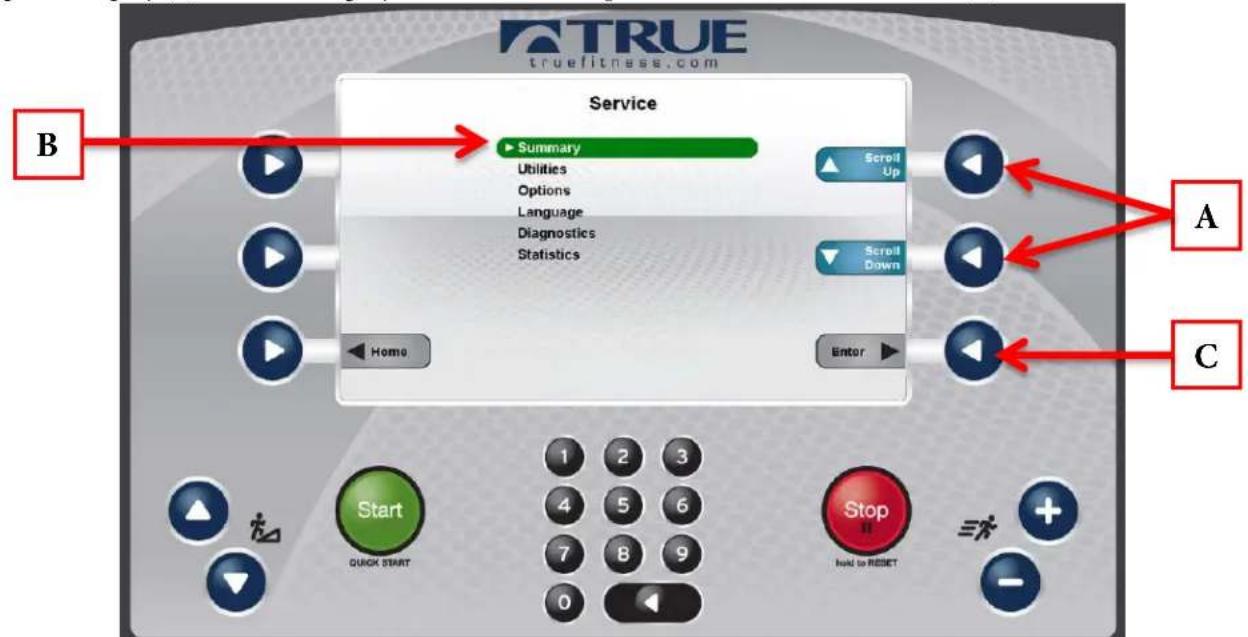
text_image
TRUE truefitness.com Service Summary Utilities Options Language Diagnostics Statistics Scroll Up Scroll Down Home Enter A C Start QUICK START 1 2 3 4 5 6 7 8 9 0 Stop Hold to RESETTruefitness.com / 800.426.6570 / 636.272.7100 123
CHAPTER 4C: ESCALATE ^9 OPERATION
ADVANCED CONSOLE FUNCTIONS (CONTINUED):
Summary Screen:
The Summary Screen provides an overview of the unit's current settings (values cannot be changed in this screen).
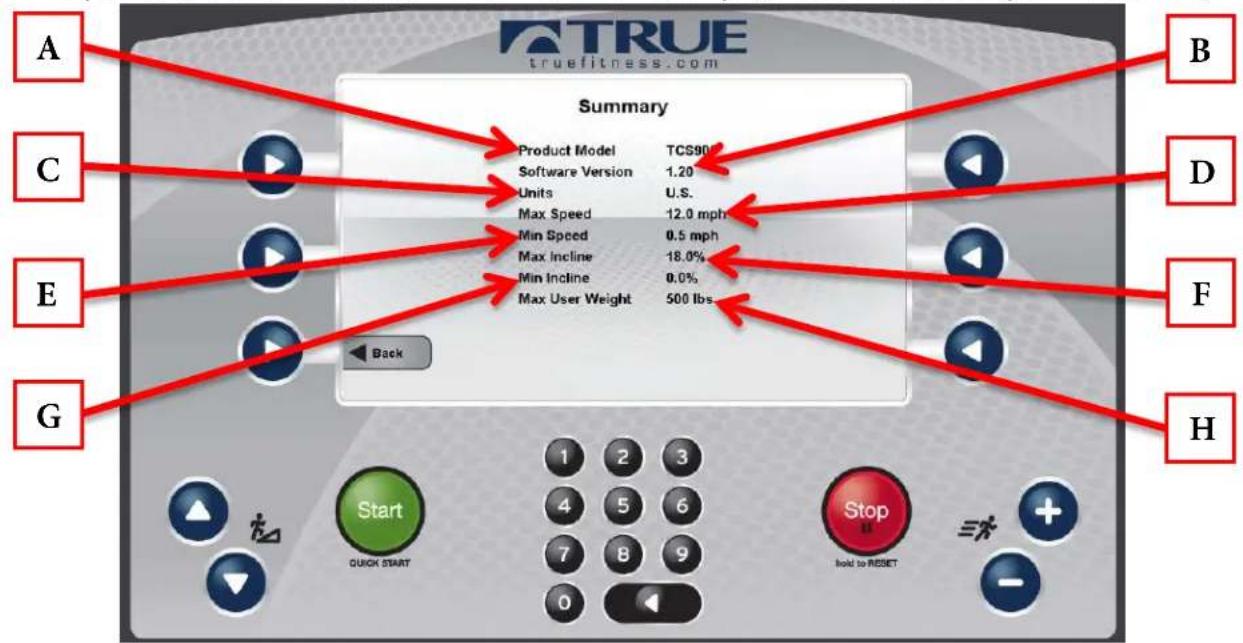
text_image
A B C D E F G Summary Product Model TCS90 Software Version 1.20 Units U.S. Max Speed 12.0 mph Min Speed 0.5 mph Max Incline 18.0% Min Incline 0.0% Max User Weight 500 lbs Back Start Quick Start Stop Ihold to RESETA) Product Model:
The model number that the console is currently configured to.
B) Software Version:
The current version of software that is installed on the console.
C) Units:
Displays the units the console is currently using as default (U.S. or Metric).
D) Max Speed:
The maximum speed the unit is able to reach.
E) Min Speed:
The minimum Speed the unit is able to maintain.
F) Max Incline:
The maximum percentage that the unit can be inclined.
G) Min Incline:
The minimum percentage that the unit can be inclined.
H) Max User Weight:
The amount of user weight that the unit can support.
CHAPTER 4C: ESCALATE ^9 OPERATION
ADVANCED CONSOLE FUNCTIONS (CONTINUED):
Utilities Menu:
The utilities menu contains multiple screens that allow the technician to change various console settings. Settings are broken down in to three categories. To adjust settings, highlight a category (A) by using the scroll selection buttons (B) and pressing the enter selection button (C) to confirm the selection.
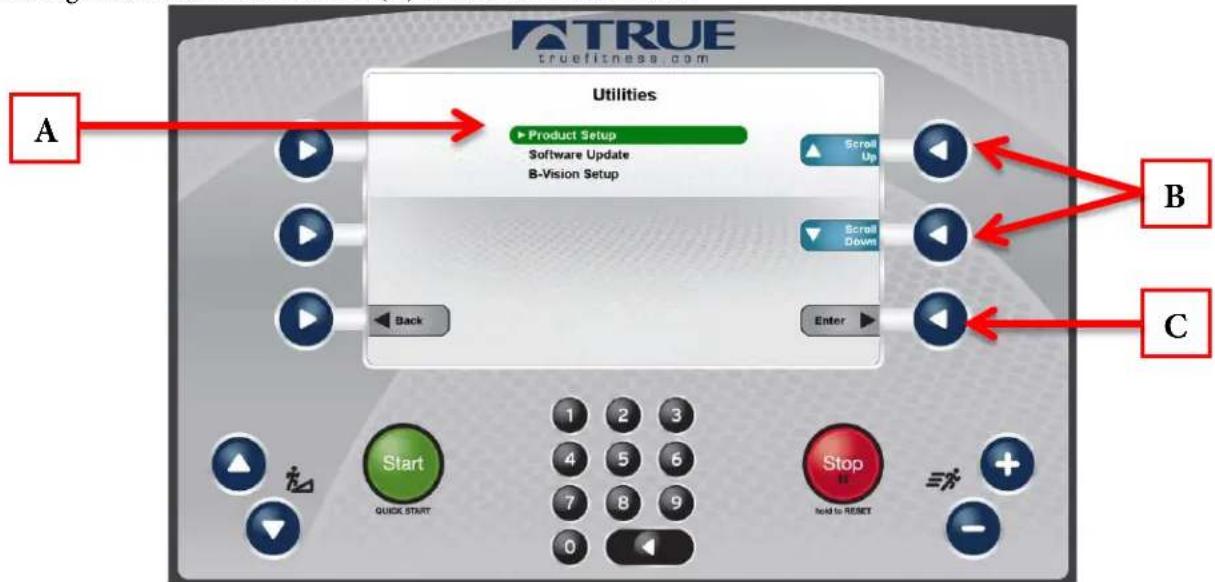
text_image
A Product Setup Software Update B-Vision Setup Scroll Up Scroll Down Enter Back Start QUICK START Stop Hold to RESET B CUtilities Menu - Product Setup:
The product setup screen allows the technician to adjust model configuration, incline range, and speed range. TRUE's recommendation is to only use the Setup Wizard to adjust these attributes. After pressing the Setup Wizard Selection Button (A), simply follow the on screen instructions to complete the setup procedure
WARNING:
Misconfiguration of the console may cause damage to the unit and void the manufacturer warranty. If necessary, please contact TRUE Fitness Technical Support at 800-883-8783 for assistance.
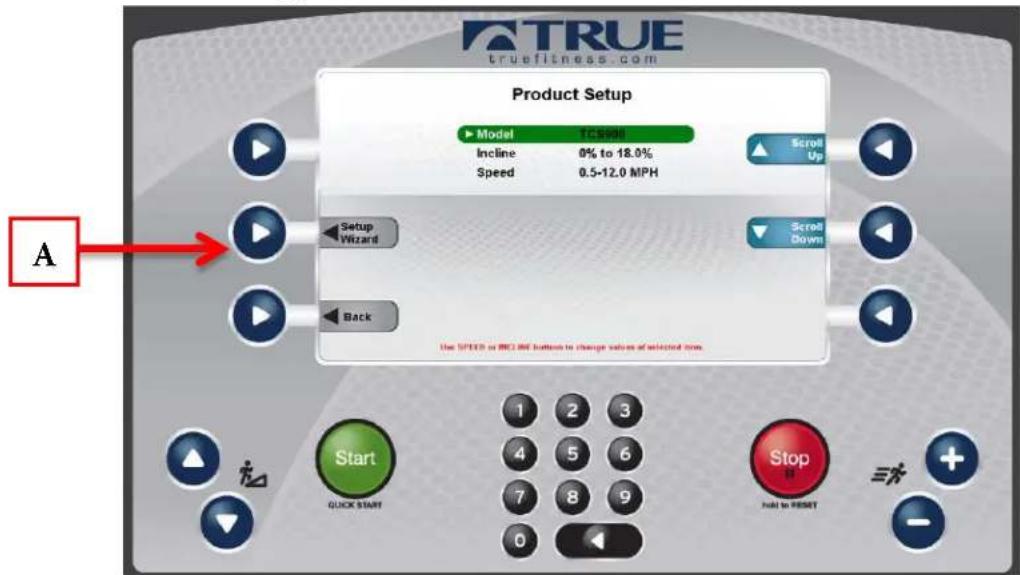
text_image
TRUE truefitness.com Product Setup ► Model TCS900 Incline 0% to 18.0% Speed 0.5-12.0 MPH ▲ Scroll Up ▼ Scroll Down Setup Wizard Back A Use SPEED or BCLIME buttons to change values of selected icons Start QUICK START 1 2 3 4 5 6 7 8 9 0 Stop Help to RESET ≡ + -Truefitness.com / 800.426.6570 / 636.272.7100 125
CHAPTER 4C: ESCALATE ^9 OPERATION
ADVANCED CONSOLE FUNCTIONS (CONTINUED):
Utilities Menu - Software Update:
TRUE may periodically release software updates to ensure users enjoy the best workout experience available. To update the console software, download the update program (A) from truefitness.com and load the software to a blank USB drive by following the downloadable instructions.
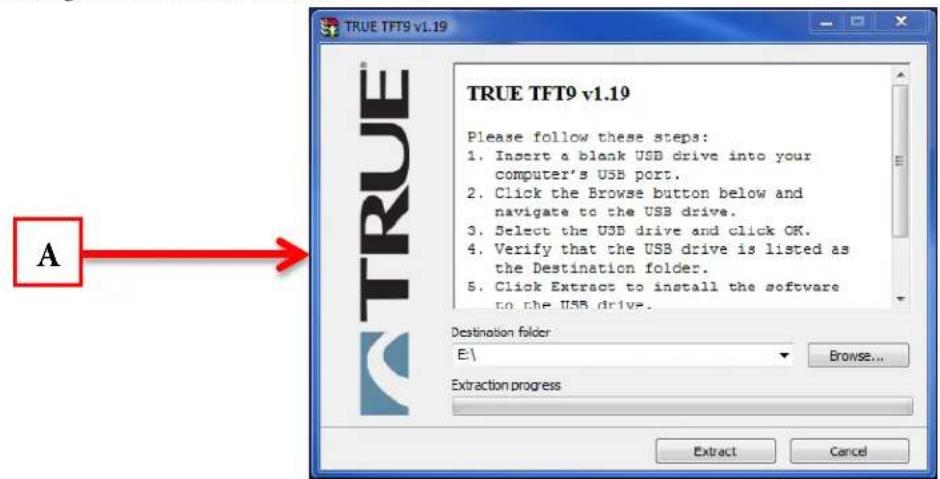
text_image
TRUE TFT9 v1.19 A TRUE TFT9 v1.19 Please follow these steps: 1. Insert a blank USB drive into your computer's USB port. 2. Click the Browse button below and navigate to the USB drive. 3. Select the USB drive and click OK. 4. Verify that the USB drive is listed as the Destination folder. 5. Click Extract to install the software to the USB drive. Destination folder E:\ Browse... Extraction progress Extract CancelNavigate to the software update screen and insert the prepared USB drive into the console's USB port. When the console recognizes the software it will show a message that reads "Drive found and ready. Press Update to begin. Warning: Improper use can render this machine inoperable". To complete the update, press the update selection button (A).
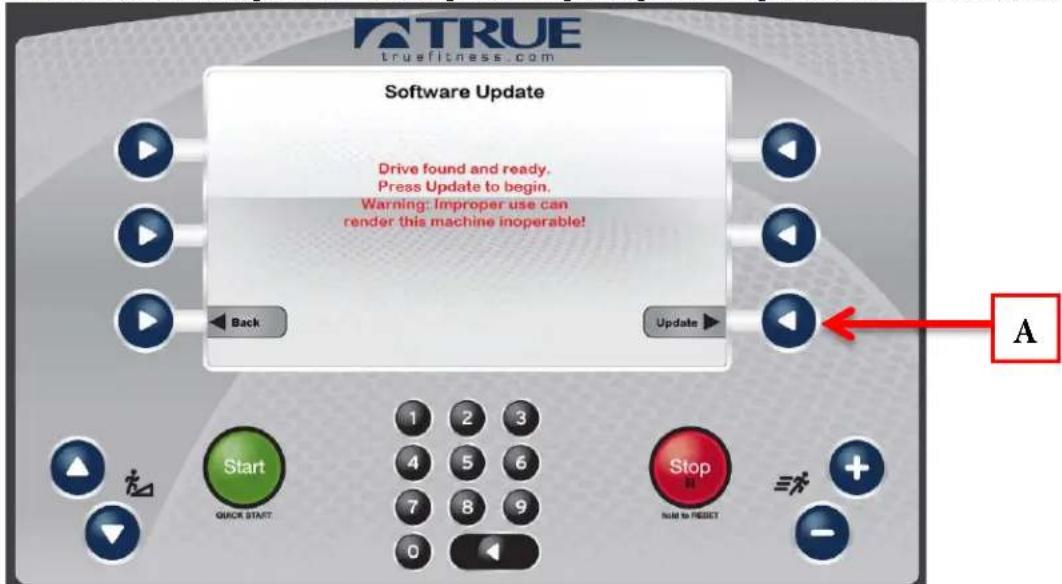
text_image
TRUE truefitness.com Software Update Drive found and ready. Press Update to begin. Warning: Improper use can render this machine inoperable! Back Update A Start QUICK START 1 2 3 4 5 6 7 8 9 Stop MAKE IN RESET 三+ + -WARNING:
Disconnecting the power source, switching the unit off or pressing buttons on the console will disrupt the information flow and potentially cause fatal errors.
Utilities Menu - B-Vision Setup:
This feature is not available on the TE900 Treadmill
Truefitness.com/800.426.6570/636.272.7100 126
CHAPTER 4C: ESCALATE ^9 OPERATION
ADVANCED CONSOLE FUNCTIONS (CONTINUED):
Options Menu:
The options menu contains 12 Settings with various options available for each. For a complete list of settings and options, please refer to the table on the next page. To navigate the options menu, use the scroll selection buttons (A) to highlight the option to be changed (B) and use the speed keys (C) or incline keys (D) to adjust the options. Once the changes are complete, press the back selection button (E) and the changes will be automatically saved.
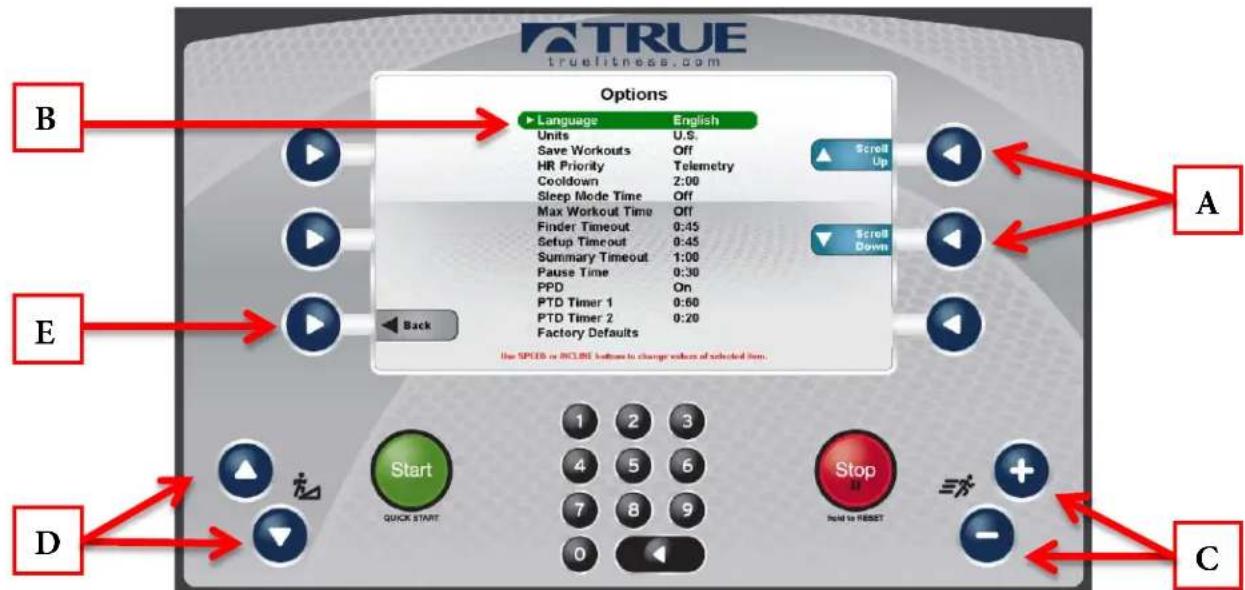
text_image
A TRUE truefitness.com Options Language English Units U.S. Save Workouts Off HR Priority Telemetry Cooldown 2:00 Sleep Mode Time Off Max Workout Time Off Finder Timeout 0:45 Setup Timeout 0:45 Summary Timeout 1:00 Pause Time 0:30 PPD On PTD Timer 1 0:60 PTD Timer 2 0:20 Factory Defaults Back the SPEED or RCLBE values to change values of selected item. B E D C A A B CLanguage:
Select a default Language for the unit. All settings and workout data will be displayed in that language.
Units:
Choose how the workout data is displayed by default.
Save Workout:
Turns the saved workout feature on or off.
Heart Rate Priority:
Determines the order in which the unit reads heart rate data.
Cooldown:
Adjusts the length of the cooldown time at the end of a workout.
Sleep Mode Time:
The amount of time the unit can be idle before entering sleep mode. By choosing the “Off” setting, the unit will remain powered.
CHAPTER 4C: ESCALATE ^9 OPERATION
ADVANCED CONSOLE FUNCTIONS (CONTINUED):
Options Menu (continued):
Max Workout Time:
This setting will limit the amount of time that all workouts can last. By choosing the “Off” setting, the time will be unlimited (this setting does not apply to manual workouts or distance workouts).
Finder Timeout:
Choose how long the Workout Finder remains on the screen without any user interaction. By choosing off, the Workout finder will stay open until closed by a user.
Setup Timeout:
Choose how long the workout data entry screen will remain on the display without any user interaction. By choosing the "off" setting, the data entry screen will be displayed until closed by a user
Summary Timeout:
Determines the amount of time the Workout Summary Screen will remain on the display. By choosing the “Off” setting, the summary will be displayed until ended by a user.
Pause Time:
This setting will limit the amount of time that a workout can be paused before it automatically ends. By choosing the “Off” option, the unit will remain paused until the user resumes or ends the workout.
Factory Defaults:
Resets all settings in the options menu to factory defaults.
Diagnostics Menu:
The diagnostics menu contains tools used to help diagnose errors and performance issues. The tools are broken down into three categories. To use a tool, highlight a category (A) by using the scroll selection buttons (B) and pressing the enter selection button (C) to confirm the selection.
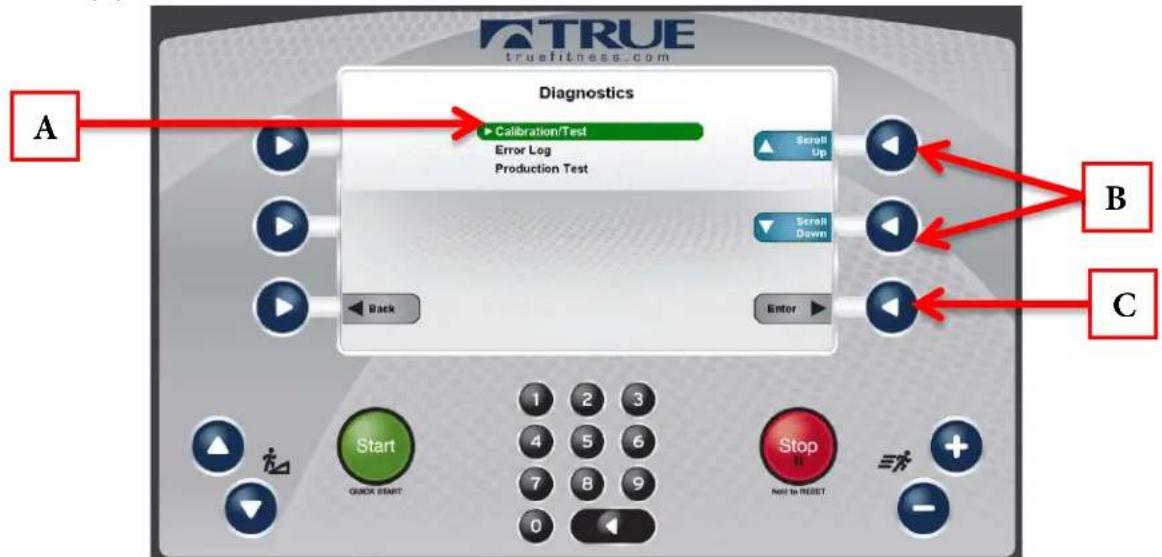
text_image
A Diagnostics Calibration/Test Error Log Production Test Scroll Up Scroll Down Enter Back Start QUICK START 1 2 3 4 5 6 7 8 9 0 Stop NOT IN RESET B C TRUE truefitness.comTruefitness.com / 800.426.6570 / 636.272.7100 128
CHAPTER 4C: ESCALATE ^9 OPERATION
ADVANCED CONSOLE FUNCTIONS (CONTINUED):
Diagnostics Menu - Calibration/Test:
This menu contains tools for testing and verifying treadmill operation.
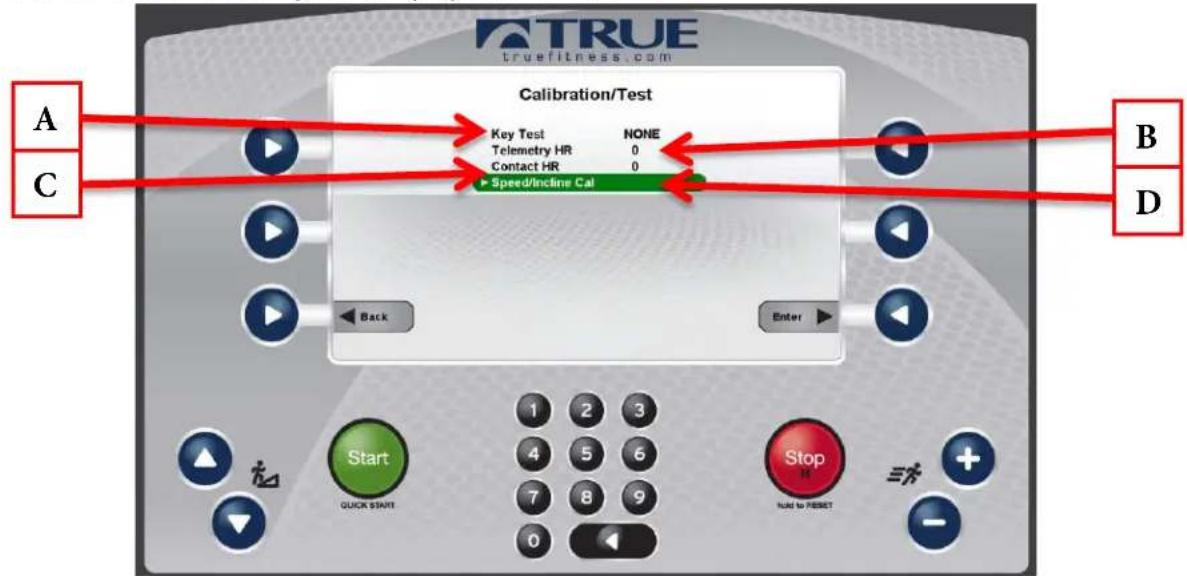
text_image
TRUE truefitness.com Calibration/Test Key Test NONE Telemetry HR 0 Contact HR 0 ▶ Speed/Incline Cal Back Enter Start QUICK START 1 2 3 4 5 6 7 8 9 0 Stop RUN TO RESET B DA) Key Test:
When a key is pressed on the console "NONE" will change to indicate which key is being pressed. In the event of a stuck key, the key that is being engaged will display (the selection buttons are excluded from this test).
B) Telemetry HR:
Use a wireless heart rate strap or simulator to test if the unit is receiving wireless heart rate data. If there is a reading displayed without the use of a heart rate strap or simulator, there is outside interference from another source.
C)Contact HR:
Ensures the unit is receiving the data by displaying the user's heart rate when the contact heart rate pads are gripped.
D) Speed/Incline Cal:
Speed/Incline Cal (calibration) is selected by default in this menu. To run a calibration press the enter selection button (E) and then follow the on screen instructions.
WARNING:
This process will take full control of the treadmill and can be dangerous if caution is not taken.
• Calibration can take up to two minutes to complete.
- Do not stand on the treadmill during the calibration procedure.
- Verify that the machine is free of all parts and tools.
- Keep children and animals at a safe distance.
Production Test:
The production test screen is used during the production process and is not used for service or troubleshooting.
Truefitness.com / 800.426.6570 / 636.272.7100 129
CHAPTER 4C: ESCALATE ^9 OPERATION
ADVANCED CONSOLE FUNCTIONS (CONTINUED):
Diagnostics Menu - Error Log:
Error codes are an important part of troubleshooting any issues with the treadmill. Any time an error occurs it is entered into the error log for review by a service professional. This console is capable of storing the ten most recent errors. The error log can be cleared by pressing the enter selection button (A), but it is not recommended.
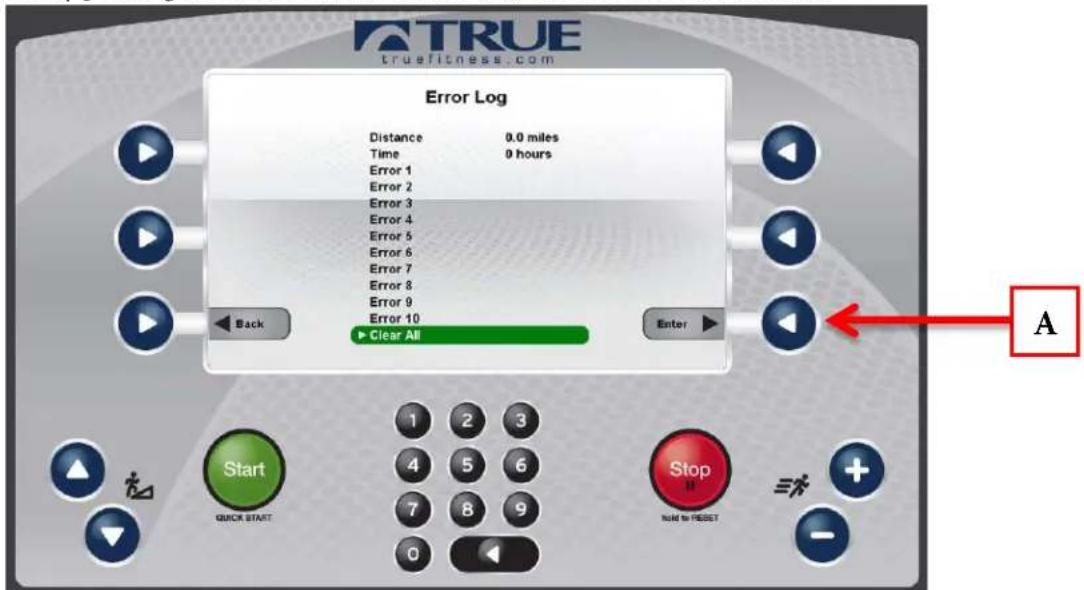
text_image
TRUE truefitness.com Error Log Distance 0.0 miles Time 0 hours Error 1 Error 2 Error 3 Error 4 Error 5 Error 6 Error 7 Error 8 Error 9 Error 10 Clear All Enter Back Start QUICK START Stop No to RESET AStatistics:
The statistics menu displays an overview of the treadmill's running data. The overview includes distance, time, average speed, maximum speed, manual program count, and preset program count. These statistics can be exported to a connected USB drive by using the scroll selection buttons (A) to highlight the USB Export option (B) and pressing the enter selection button (C). The data can be cleared by selecting Clr Dist/Time/Spd (D) or Clr Man/Prog/Apple (E), but it is not recommended.
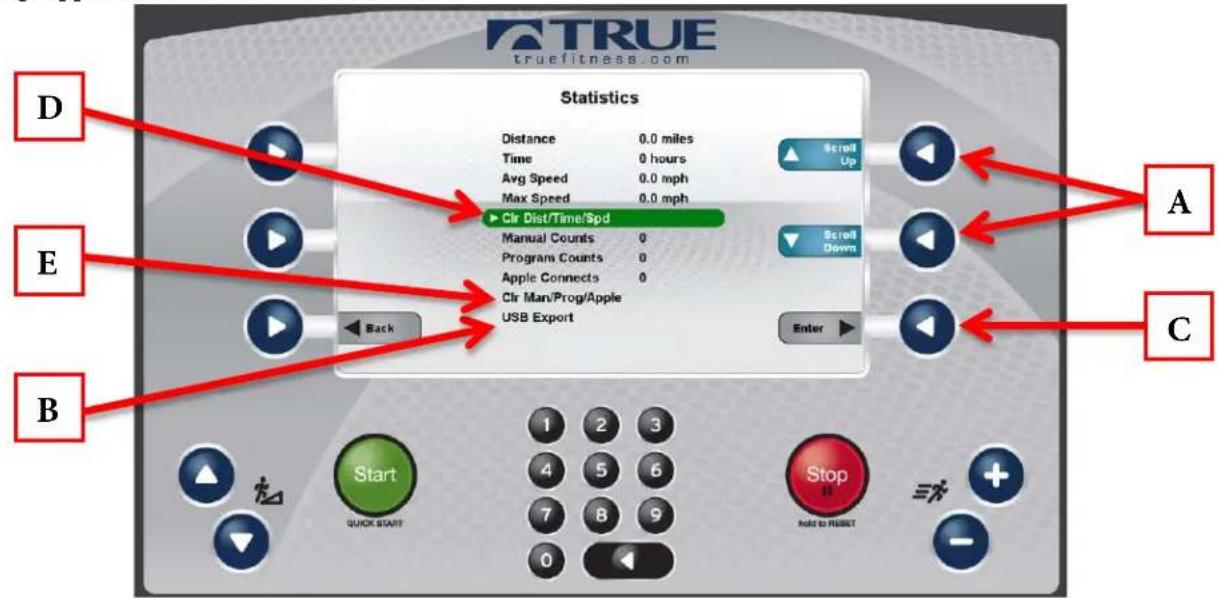
text_image
TRUE truefitness.com Statistics Distance 0.0 miles Time 0 hours Avg Speed 0.0 mph Max Speed 0.0 mph Clr Dist/Time/Spd Manual Counts 0 Program Counts 0 Apple Connects 0 Clr Man/Prog/Apple USB Export Enter A C D E B Start QUICK START 1 2 3 4 5 6 7 8 9 Stop Add to RESET -CHAPTER 5: CARE & MAINTENANCE
CARE & MAINTENANCE:
It is important to perform the minor maintenance tasks described in this section. Failure to maintain the treadmill as described here could void the TRUE Fitness Warranty. To reduce the risk of electrical shock, always unplug the unit from its power source before cleaning or performing any maintenance tasks.
Inspection:
TRUE Fitness is not responsible for performing or scheduling regular maintenance or inspections. Users should inspect the treadmill daily. Check for worn, frayed or missing safety lanyards. Replace missing or worn safety lanyards immediately. Do not exercise on the treadmill without attaching the safety clip to your clothing. Look and listen for slipping belts, loose fasteners, unusual noises, worn or frayed power cords, and any other indications that the equipment may be in need of service. If any of these are noticed, obtain service. Do not attempt to use the treadmill until proper service has been performed or damaged parts have been replaced.
Important:
If you determine that the treadmill needs service, make sure that the treadmill cannot be used inadvertently. Turn the unit off, and then unplug the power cord from its power source. Remove the magnetic safety key and safety clip and store it in a safe place. Make sure other users know that the treadmill needs service.
*To order parts or to contact a TRUE Authorized Service representative, please visit www.truefitness.com.
CLEANING THE EQUIPMENT:
After Each Use:
- Use GymWipes™ Antibacterial wipes or spray a solution of 30 parts water to 1 part mild detergent to dampen a soft cloth and wipe all exposed surfaces.
- Use a LCD/screen cleaner or spray a solution of 1 part 91% isopropyl alcohol and 1 part water to dampen a soft cloth and wipe the surface of the console. This helps remove fingerprints, dust, and dirt.
Weekly:
- Vacuum any dust or dirt that might have accumulated under or around the treadmill, any motor cover vents and under the straddle covers. Clogged air vents can prevent adequate cooling to the drive motor, incline motor, and motor control board causing a shortened life.
- Check for proper running belt alignment and tension. If running belt adjustment is required see sections RUNNING BELT ALIGNMENT: and TENSIONING THE RUNNING BELT: below.
CAUTION:
Do not use any acidic cleaners. Doing so will weaken the paint or powder coatings and may void the TRUE Fitness Warranty. Never pour water or spray liquids on any part of the treadmill. Allow the treadmill to dry completely before using. Frequently vacuum the floor underneath the unit to prevent the accumulation of dust and dirt, which can affect the smooth operation of the unit. Use a soft nylon scrub brush to clean the running belt. Do not clean directly underneath the treadbelt. Most of the working mechanisms are protected inside the motor cover and base of the treadmill. However, for efficient operation, the treadmill relies on low friction. To keep the friction low, the unit's running belt, staging platforms, and internal mechanisms must be as clean as possible.
CHAPTER 5: CARE & MAINTENANCE
RUNNING BELT ALIGNMENT:
Proper belt alignment allows the belt to remain centered and ensures smooth operation. Realigning the belt takes a few simple adjustments. If you are unsure about this procedure, call the TRUE Service Department.

CAUTION:
Special care must be taken when aligning the running belt. Turn off the treadmill while adjusting or working near the rear roller. Remove any loose clothing and tie back your hair. Be very careful to keep your fingers and any other object clear of the belt and rollers, especially in front of the roller and behind the deck. The treadmill will not stop immediately if an object becomes caught in the belt or rollers.

CAUTION:
If you hear any chafing or the running belt appears to be getting damaged, stop the running belt immediately by pressing the STOP key. Contact the TRUE Service Department. Walk around to the rear of the unit and observe the belt for a few minutes. The belt should be centered on the running deck. If the belt drifts off center, you must make adjustments.
Important:
Failure to align the belt may cause the belt to tear or fray, which may not be covered under the TRUE Fitness Warranty. To stop the running belt, press the STOP key. Turn the treadmill off.

CAUTION:
For your safety, use the power switch to turn off the treadmill before making any adjustments. Do not adjust the running belt when someone is standing on the unit.

CAUTION:
Do not turn the adjusting bolt more than 14 turn at a time. Over tightening the bolt can damage the treadmill. If you are unsure how to adjust the running belt, call the TRUE Service Department.
If the running belt is too far to the right side:
- Locate the belt adjustment bolts in the rear end caps of the treadmill. (To determine left and right, stand at the rear of the treadmill and face the display).
- Using the appropriate size Allen wrench or socket turn the RIGHT adjustment bolt clockwise 14 turn.
- Turn the treadmill on and start the belt at 3mph keeping off the unit.
- Allow 2 minutes for the belt to adjust itself.
- Repeat the above steps if additional adjustment is necessary.
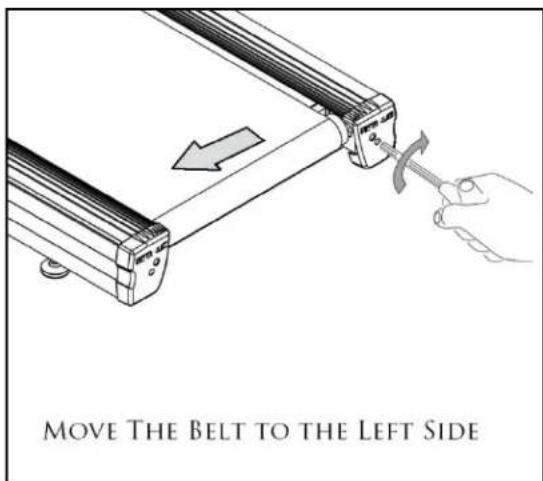
text_image
MOVE THE BELT TO THE LEFT SIDECHAPTER 5: CARE & MAINTENANCE
RUNNING BELT ALIGNMENT (CONTINUED):
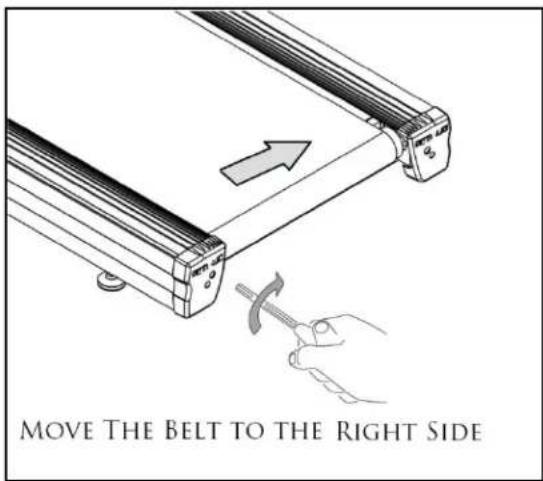
text_image
MOVE THE BELT TO THE RIGHT SIDEIf the running belt is too far to the left side:
- Locate the belt adjustment bolts in the rear end caps of the treadmill. (To determine left and right, stand at the rear of the treadmill and face the display).
- Using the appropriate size Allen wrench or socket turn the LEFT adjustment bolt clockwise 14 turn.
- Turn the treadmill on and start the belt at 3mph keeping off the unit.
- Allow 2 minutes for the belt to adjust itself.
- Repeat the above steps if additional adjustment is necessary.
TENSIONING THE RUNNING BELT:
If there is a slipping or jerking sensation when running on the treadmill, the running belt may require tightening. In most cases the belt has stretched from use. Tensioning the belt takes a few simple adjustments. If you are unsure about this procedure, call the TRUE Service Department.
- Lo cate the belt adjustment bolts in the rear end caps of the treadmill.
- Using the appropriate size Allen wrench or socket turn BOTH adjustment bolts clockwise 14 turn.
- Turn the treadmill on and start the belt and check if the slipping continues. Repeat the above steps if additional adjustment is necessary.
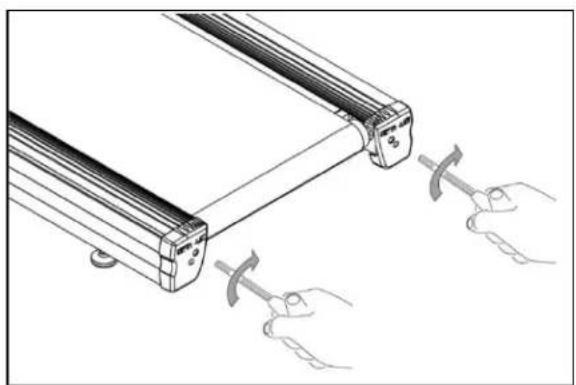
natural_image
Technical line drawing of a mechanical component with two clamps and a handle, no text or symbols presentTREADMILL LUBRICATION:
For in-home use over 20 hours per week, TRUE recommends lubricating every three months. For average in-home use of the treadmill, TRUE recommends lubrication under the tread belt once per year.
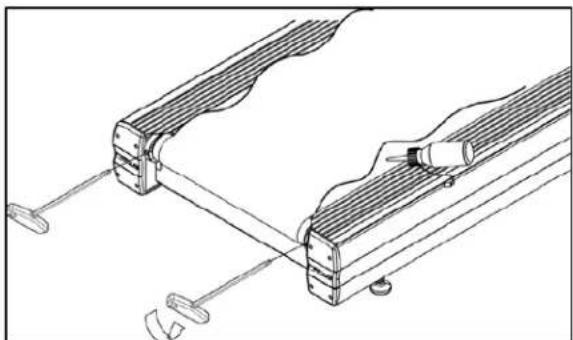
natural_image
Technical line drawing of a mechanical clamp or bracket assembly (no text or symbols)- Loosen the belt adjustment bolts in the rear end caps.
- Lift the belt and apply the lubricant to the center of the deck.
• Center and re-tension the belt using the directions above. - Walk on the treadmill at 2MPH for about 60 seconds to spread the lubricant evenly through the belt and deck.
*Please contact your dealer or visit www.truefitness.com to obtain the proper lubricants.
CHAPTER 5: CARE & MAINTENANCE
LEVELING THE TREADMILL:
The treadmill has adjustable rear leveling feet. Make sure that the running surface is level. If the treadmill is placed on an uneven surface, adjusting the rear feet can help, but may not completely compensate for extremely uneven surfaces.

natural_image
Simple line drawing of a mechanical component inside a circle (no text or symbols)OTHER SCHEDULED PREVENTIVE MAINTENANCE:
TRUE recommends that quarterly scheduled maintenance be performed by a qualified service technician. Please contact your dealer or visit www.truefitness.com to contact a local TRUE authorized service technician.
Scheduled Preventive Maintenance:
• Record time, distance and hours from the console.
- Check error log in console.
- Check running belt and drive belt tension and tracking.
- Remove the motor cover and vacuum any debris out of the drive motor, speed sensor cage, motor control board and heat sink motor compartment.
- Move treadmill and vacuum underneath.
- Lubricate elevation pivot points including rear stabilizing feet and the lift motor screw.
• Lubricate walking belt and deck.
- Inspect all fasteners.
• Inspect all electrical connections.
- Inspect all components for abnormal or premature wear.

CAUTION:
Use only TRUE Fitness certified service providers.
LONG TERM STORAGE:
When the treadmill is not in use for any length of time, turn it off. Make sure that the power cord is unplugged from the power source and is positioned so that it will not become damaged or interfere with people or other equipment.
Storing the Chest Strap:
Store the chest strap in a place where it remains free of dust and dirt such as, in a closet or drawer. Be sure to protect the chest strap from extremes in temperature. Do not store it in a place that may be exposed to temperatures below 32^ F ( 0^ C). To clean the chest strap, use a sponge or soft cloth dampened in mild soap and water. Dry the surface thoroughly with a clean towel.
CHAPTER 6: CUSTOMER SERVICE
CONTACTING SERVICE:
TRUE Fitness recommends that you gather the serial number, model number, and a brief description of the reason for the request. After information has been gathered you may choose to contact your selling dealer or local service company to set an appointment. (If you are not familiar with who is in your area, you may visit our website at www.truefitness.com and use our dealer locator to obtain the contact information for the closest dealer).
You may also contact TRUE Fitness' customer support team by calling 800.883.8783 or e-mailing us at service@truefitness.com Monday – Friday during normal business hours.
TRUE FITNESS SERVICE DEPARTMENT
865 HOFF ROAD
ST. LOUIS, MO 63366
1.800.883.8783
HOURS OF OPERATION: 8:30 A.M. - 5:00 P.M. CST
E-MAIL: service@truefitness.com
CONTACTING SALES:
Interested in TRUE Products? Please contact us with any sales or product inquires so that we may direct you to the appropriate sales representative to answer your questions.
E-MAIL: sales@truefitness.com
CHAPTER 6: CUSTOMER SERVICE
REPORTING FREIGHT OR PARTS DAMAGE:
Unfortunately, sometimes materials can be damaged during shipment. If materials are damaged during shipment, please follow the guidelines below to determine the appropriate process for you to follow in case of damages.
Severe Damage:
Obvious damage to external packaging / internal product. Please refuse the shipment and it will be returned to TRUE Fitness by the carrier. Contact the TRUE Fitness customer support team by calling 800.883.8783 or sales support team by calling 800.426.6570 Monday-Friday during normal business hours to notify us that the shipment has been refused. Once we have received the damaged shipment, a replacement shipment will be sent to you. Only refuse the damaged piece if the shipment is multiple boxes.
Slight Damage:
The box may have minimal damages and you are not sure if the actual product is damaged or not. You must sign the bill of lading as damaged when accepting the shipment. Once you have opened the box and you have determined something is indeed damaged please gather the serial number, model number, description and photos of damages. Please make sure the photos include the damaged product as well as the damaged box the product arrived in. Contact the TRUE Fitness customer support team by calling 800.883.8783 or sales support team by calling 800.426.6570 Monday-Friday during normal business hours.
Concealed Damage:
You may receive a shipment that looks intact and discover once the box has been opened that there are hidden damages. Please notify the carrier immediately. We will not be able to file a claim if the carrier is not notified in a timely manner. Once you have called the carrier you will need to gather the serial number, model number, description and photos of damages. Contact the TRUE Fitness customer support team by calling 800.883.8783 or sales support team by calling 800.426.6570 Monday-Friday during normal business hours.
CHAPTER 7: ADDITIONAL INFORMATION
TROUBLESHOOTING GUIDE:
This troubleshooting guide is intended to assist in diagnostics only and is not all inclusive. Technical specifications, error codes and programming are subject to change without notice. TRUE accepts no liability for any damage or loss suffered by persons whom rely wholly or in part on any description or statement contained within this manual. Please visit www.truefitness.com to obtain the most recent version of all manuals and contact the TRUE Service Department at 800-883-8783 for assistance with troubleshooting and diagnostics.
| Malfunction | Possible Cause | Corrective Action |
| No Power | Unit turned off | Verify the On/Off switch is at the ON position |
| Damaged power cord | Replace power cord | |
| Power cord not fully seated in socket | Inspect power connection at the unit and outlet | |
| No power at outlet | Using a voltmeter verify power at outlet | |
| Tripped circuit breaker | The location of the circuit breaker is next to the On/Off switch. Verify the circuit breaker is not open. If the breaker is open reset. | |
| Unit resets or pauses randomly | Damaged power cord | Replace power cord |
| Power cord not fully seated in socket | Inspect power connection at the unit and outlet | |
| Safety e-stop key not fully engaged | Re-engage the safety/e-stop key to the console | |
| Insufficient power | Verify output voltage from 20A outlet with a voltmeter | |
| Error code is displayed on console | Contact TRUE Fitness Customer Service Department | |
| Pinched or loose main communication cable | Contact TRUE Fitness Customer Service Department | |
| No User Present displayed on screen | User weight must be over 90lbs. Verify No User Present settings in console. | |
| Walking belt is off center | Uneven floor | Adjust treadmill with rear leveling feet. See Chapter 5: Running Belt Alignment |
| Adjust belt tracking | See Chapter 5: Centering the Running Belt | |
| Walking belt hesitates or slips when stepping | Adjust belt tension | See Chapter 5: Tensioning the Running Belt |
| Lubricate running belt | See Chapter 5: Treadmill Lubrication | |
| Rubbing sound from treadmill when in operation | Walking belt is rubbing a straddle cover | Adjust belt tracking. See Chapter 5: Centering the Running Belt |
| Foreign object may be stuck under walking belt | Inspect under the unit. Remove and object that may be under the unit. | |
| Foreign object may be stuck in motor compartment | Contact TRUE Fitness Customer Service Department | |
| Roller bearings may be damaged | Contact TRUE Fitness Customer Service Department | |
| Drive motor may be damaged | Contact TRUE Fitness Customer Service Department | |
| Drive belt may be misaligned | Contact TRUE Fitness Customer Service Department |
CHAPTER 7: ADDITIONAL INFORMATION
TROUBLESHOOTING GUIDE (CONTINUED):
| Malfunction | Possible Cause | Corrective Action |
| Heart rate is displaying erratically or not displaying | Transmitter belt contacts are not making good contact with the skin | Re-adjust the transmitter belt so that it is in full contact with the skin |
| Contacts on the transmitter belt are not moist | Moisten the contacts on the transmitter belt | |
| Transmitter belt is not within 3 feet (1 meter) of the heart rate receiver | Adjust your position on the belt so that you are within 3 feet (1 meter) of the console | |
| The battery inside the transmitter belt is depleted | replace the transmitter belt with a compatible transmitter belt | |
| Another user wearing a compatible transmitter strap is within 3 foot (1 meter) of the unit | Move the units so that there is more space in-between units | |
| Heart rate is displaying erratically or not displaying (continued) | Environmental interference from high voltage power lines | Move the unit to another position within the room or move the cause of the interference until heart rate reading are stable. If the probable source of interference is plugged into the same outlet move the suspect source to another outlet. |
| Environmental interference from computers | ||
| Environmental interference from motor driven appliances | ||
| Environmental interference from cell or cordless phone | ||
| Environmental interference from Wi-Fi router |
| Fault Code | Category | Description | Cause | Corrective Action |
| Fault CN00: Corrupted Console Configuration | Console | Corrupted brainboard configuration - fails integrity check | Corrupt software | Power cycle |
| Re-configure console | ||||
| Firmware and software versions are not compatible | Re-install software/firmware | |||
| Contact dealer or TRUE service | ||||
| Fault CN01: Internal Fault | Console | Math error - software | Console Configure incorrectly | Power cycle |
| Re-configure console | ||||
| Corrupt Software | Re-install software/firmware | |||
| Contact dealer or TRUE service | ||||
| Fault CN02: Invalid Console Configuration | Console | The product configuration data has failed validation checks (incline ranges make no sense, etc.) | Console Configure incorrectly | Power cycle |
| Re-configure console | ||||
| Incline Motor out of range | Contact dealer or TRUE service | |||
| Loose Cable |
CHAPTER 7: ADDITIONAL INFORMATION
TROUBLESHOOTING GUIDE (CONTINUED):
| Fault CN03: Stuck Key Console | Membrane Key stuck down/closed | Membrane key is damaged | Contact dealer or TRUE service | |
| Fault CN04: Lower Board Comm Fault (Treadmill Only) | Console | Brainboard fails to receive timely communication responses from lower board - Fault after 3 retries | Loose Cable | Power cycle |
| Check cable connections | ||||
| Smart Card | Contact dealer or TRUE service | |||
| Motor control board | ||||
| Console | ||||
| Fault CN05: No Lower Control | Console | No lower board connected to console - detection wires not connected. | Loose Cable | Power cycle |
| Check cable connections | ||||
| Console Configure incorrectly | Re-configure console | |||
| Fault CN06: Config Mismatch | Console | Console is configured for a product different than that to which it is connected. | Console Configure incorrectly | Power cycle |
| Re-configure console | ||||
| Loose Cable | Check cable Connections | |||
| Fault CN07: Calibration Timeout | Console | Incline Calibration was not able to complete within allowed time. | Low AC Line Voltage | Retry calibration |
| Verify AC Voltage at Outlet | ||||
| Fault CN08: Calibration Failed - Lower Limit Not Reached | Console | During incline calibration, the incline stalled before reaching what should be the lower limit. | Console displays Fault Calibration not saved. Incline disabled. | Power cycle |
| Check cable connections | ||||
| Run incline calibration | ||||
| Incline Potentiometer value out of range | Contact dealer or TRUE service | |||
| Fault CN09: Insert Safety Key | Console | Emergency Circuit opened | Safety Key not engaged | Re-insert safety key |
| Loose Cable | Check cable Connections | |||
| Switch Damaged | Contact dealer or TRUE service | |||
| Fault CN10: E-Stop Fault | Console | A test of the emergency circuit has failed | Console Catch | Power cycle |
| Safety Key not engaged | Re-insert safety key | |||
| Loose Cable | Check cable connections | |||
| Switch Damaged | Contact dealer or TRUE service | |||
CHAPTER 7: ADDITIONAL INFORMATION
TROUBLESHOOTING GUIDE (CONTINUED):
| Fault CN24: BB Comm Fault | Console | SBC cannot communicate with Brainboard | Console | Power cycle |
| Contact dealer or TRUE service | ||||
| Fault CN25: Firmware Mismatch | Console | Firmware on brainboard not compatible with SBC software | Corrupt software | Power cycle |
| Re-configure console | ||||
| Firmware and software versions are not compatible | Re-install software/firmware | |||
| Contact dealer or TRUE service | ||||
| Fault SP01: Belt Under Speed | Speed | Tread motor rpm is below target rpm | High Belt Deck Friction | Lubricate treadbelt |
| Contact dealer or TRUE service | ||||
| High belt tension | Check drive belt and walking belt tension | |||
| Low Line Voltage | Contact dealer or TRUE service | |||
| Dirty or misaligned speed sensor | ||||
| Fault SP02: Belt Over Speed | Speed | Tread motor rpm is higher than target rpm | High Belt Deck Friction | Lubricate treadbelt |
| Contact dealer or TRUE service | ||||
| Line Voltage | Check AC line voltage | |||
| Dirty or misaligned speed sensor | Contact dealer or TRUE service | |||
| Fault SP03: Belt Over Accel | Speed | Tread belt speed increasing too quickly | User is holding belt back | Do not try to stop belt |
| High Belt Deck Friction | Lubricate treadbelt | |||
| Contact dealer or TRUE service | ||||
| Dirty or misaligned speed sensor | ||||
| Fault SP04: No Speed Signal | Speed | Speed sensor is not providing speed data | Dirty or misaligned speed sensor | Contact dealer or TRUE service |
| High Belt Deck Friction | Lubricate treadbelt | |||
| Contact dealer or TRUE service | ||||
| Low Line Voltage | Check AC line voltage | |||
| Fault IN01: Incline Stall | Incline | Incline not moving when commanded | Console displays Fault Calibration not saved. Incline disabled. | Power cycle |
| Check cable connections | ||||
| Run incline calibration | ||||
| Incline Potentiometer value out of range | Contact dealer or TRUE service |
CHAPTER 7: ADDITIONAL INFORMATION
TROUBLESHOOTING GUIDE (CONTINUED):
| Fault IN02: Incline Out of Range | Incline | Incline value is out of the calibrated range - does not occur during calibration | Console displays Fault Calibration not saved. Incline disabled. | Power cycle |
| Check cable connections | ||||
| Run incline calibration | ||||
| Incline Potentiometer value out of range | Contact dealer or TRUE service | |||
| Fault IN03: Incline Run Fault | Incline | Incline moving when not commanded | Console displays Fault Calibration not saved. Incline disabled. | Power cycle |
| Check cable connections | ||||
| Run incline calibration | ||||
| Incline Potentiometer value out of range | Contact dealer or TRUE service | |||
| Fault IN04: Incline Max/Min | Incline | Incline value is out of expected operating range - may indicate that it is disconnected. | Console displays Fault Calibration not saved. Incline disabled. | Power cycle |
| Check cable Connections | ||||
| Run incline calibration | ||||
| Incline Potentiometer value out of range | Contact dealer or TRUE service | |||
| Fault D100: Motor Controller Fault | DCMCB | Motor Control Board Fault | Motor Control Board | Power cycle |
| Contact dealer or TRUE service | ||||
| Fault D101: Lower Board Communication Fault | DCMCB | Endex did not receive communication from BB in 18 seconds | Loose Cable Connection | Power cycle |
| Check cable connections | ||||
| Motor Control Board | Contact dealer or TRUE service | |||
| upper display/console | ||||
| Fault D103: Motor Controller Fault | DCMCB | Low Incoming AC Voltage Low AC Line Voltage | Power cycle | |
| Check AC line voltage | ||||
| Fault D104: Motor Controller Fault | DCMCB | Motor Control Board Fault | Motor Control Board | Power cycle |
| Contact dealer or TRUE service | ||||
| Fault D106: Motor Controller Fault | DCMCB | High Incoming AC Voltage | High AC line voltage | Check AC line voltage |
| Motor Control Board | Power cycle | |||
| Contact dealer or TRUE service | ||||
| High Belt Deck Friction | Lubricate treadbelt | |||
| Fault D107: Motor Over Current | DCMCB | High Incoming AC Voltage | High AC line voltage | Check AC line voltage |
CHAPTER 7: ADDITIONAL INFORMATION
TROUBLESHOOTING GUIDE (CONTINUED):
| Fault D108: Motor Over Current | DCMCB | High Incoming AC Voltage | High AC line voltage | Check AC line voltage |
| Motor Control Board | Power cycle | |||
| Contact dealer or TRUE service | ||||
| High Belt Deck Friction | Lubricate treadbelt | |||
| Fault D109: Motor Controller Zero Current | DCMCB | Low Incoming AC Voltage | Low AC Line Voltage | Power cycle |
| Contact dealer or TRUE service | ||||
| Fault D110: Motor Controller Overcurrent | DCMCB | High Incoming AC Voltage | High AC line voltage | Check AC line voltage |
| Motor Control Board | Power cycle | |||
| Contact dealer or TRUE service | ||||
| High Belt Deck Friction | Lubricate treadbelt | |||
| Fault D111: Motor Controller Voltage Overload | DCMCB | Low Incoming AC Voltage | Low AC Line Voltage | Power cycle |
| Check AC line voltage | ||||
| Contact dealer or TRUE service | ||||
| Fault D112: Motor Controller Undervoltage | DCMCB | Low Incoming AC Voltage | Low AC Line Voltage | Power cycle |
| Check AC line voltage | ||||
| Contact dealer or TRUE service | ||||
| Fault D113: Motor Controller Control Fault | DCMCB | Incline Stall - incline not moving when commanded | Console displays Fault Calibration not saved. Incline disabled. | Power cycle |
| Check cable Connections | ||||
| Run incline calibration | ||||
| Incline Potentiometer value out of range | Contact dealer or TRUE service | |||
| Acme Nut Jammed | ||||
| Motor bearings | ||||
| Fault D114: Lower Board Incline Range Fault | DCMCB | Incline out of range | Console displays Fault Calibration not saved. Incline disabled. | Power cycle |
| Check cable connections | ||||
| Run incline calibration | ||||
| Incline Potentiometer value out of range | Contact dealer or TRUE service |
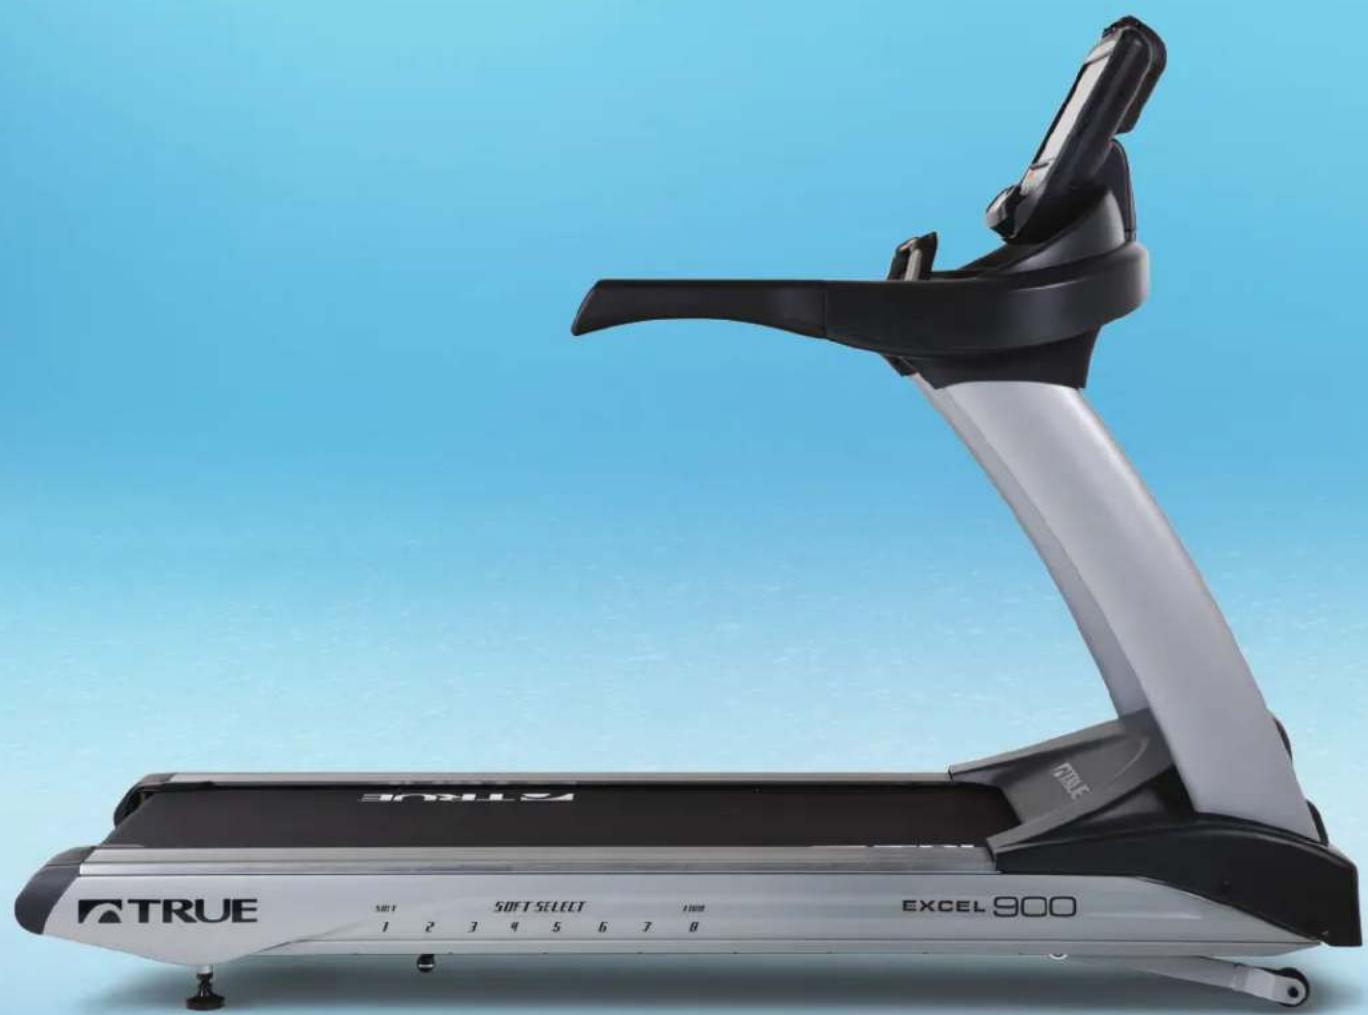
natural_image
Exterior view of a treadmill with EXCEL 900 branding and a black TBU359 logo, set against a clear blue sky (no text or symbols on the device itself)PREMIUM FITNESS EQUIPMENT SINCE 1981
EXCEL 900
The TRUE Excel 900 treadmill is a premium treadmill offering commercial-grade quality, performance and innovation. This award-winning treadmill is equipped with TRUE's patented HRC Heart Rate Control® to maximize your workout. In addition, the patented low-impact Soft System® running surface featuring Soft Select® controls the level of softness or firmness of the Excel 900's deck. Multiple console options provide customizable features and technology to meet your family's fitness needs.

natural_image
Black-and-white photo of a muscular man in motion, possibly running or performing a exercise (no visible text or symbols)EXCEL 900 TREADMILL
SKU: TE900
| TECHNICAL SPECIFICATIONS | Power Source 110V/20A, 220V Option Available |
| Cord Length 12" / 3.7 M | |
| Drive Motor 4HP DC Motor | |
| Power Factor Correction (PFC) Standard | |
| Incline Motor 1,200 lbs. of Thrust | |
| Speed Sensor Optical | |
| Deck Reversible 1" / 0.8 cm Medium-Density Fiberboard | |
| Reversible Deck Standard | |
| Belt Siegling Multi-Ply with PVC Coating | |
| Rollers 3" / 8 cm w/ Shielded Bearings | |
| Impact System True Soft Select * (adjustable) | |
| Frame Construction Robotically Welded Heavy-Gauge Steel | |
| Lubrication Silax | |
| Speed Range 0.5 to 12.0 MPH / 0.8 to 19.3 KPH | |
| Incline/Decline Range -3% to 15% Decline Kit Standard | |
| Quick Access Control Speed and Incline on Hand Grips with Start and Stop on Quick Access Point | |
| Handrail Design Extended Handrails with Molded Rubber, Moisture Resistant Grips | |
| Contact Heart Rate Monitoring Yes | |
| Wireless Heart Rate Monitoring Polar * | |
| AVAILABLE CONSOLES Transcend | %, Escalate®, Escalate® |
| SAFETY Saftey Clip Standard/Non-Removable | |
| REGULATORY APPROVALS ETL UL1647, CSA, FCC | |
| EXTRAS | Accessories Water Bottle Holder, Accessory Tray, Over Molded Reading Rack/Tablet Holder, Optional Medical Rails |
| PHYSICAL SPECIFICATIONS | Footprint 82" L x 34" W x 60.37" H / 208 cm x 86.36 cm x 153.35 cm |
| Running Surface 60" L x 22" W / 152.4 cm x 55.88 cm | |
| Machine Weight 428 lbs /194 kg | |
| Shipping Weight 470 lbs / 213 kg | |
| Maximum User Weight 400 lbs / 181.44 kg | |
| Step-Up Height 9" / 22.86 cm | |
| Portability 2 Front Transport Wheels | |
| WARRANTY | Warranty Type Commercial (all dues paying facilities, regardless of usage) |
| Frame Lifetime | |
| Motor Lifetime | |
| Parts 10 Years (Transcend * Consoles are 3 Years) (Escalat® Consoles are 3 years) | |
| Labor 2 Years | |
Warranties outside the U.S. and Canada may vary - Please contact your dealer for details. Specifications subject to change without notice.
CHAPTER 7: ADDITIONAL INFORMATION
TRUE
RESIDENTIAL LIMITED WARRANTY TE900 TREADMILLS
Save Time and Register Online!
Activate Multiple Warranties at www.truefitness.com/support
All TRUE® Fitness products are distributed by TRUE and are warranted to the original registered product purchaser and the parts of the TRUE product (the "Product") listed below, under normal use and service, shall be free of manufacturing defects in workmanship and materials only for the period of time beginning from the original date of purchase set forth below:
| Frame* Lifetime | |
| Drive Motor Lifetime | |
| Parts | |
| Transcend Touchscreen | 3 Years |
| Escalate ^15 Console | 3 Years |
| Electrical | 10 Years |
| Wear Items | 10 Years |
| Cosmetics | 6 Months |
| Labor | |
| Parts | 2 Years |
| Motor | 2 Years |
| Cosmetics | 6 Months |
| Connectivity | |
| Headphone Jack & USB Port | 90 Days Parts, No Labor |
Frame
The frame is warranted for defects in material and workmanship for as long as the original purchaser owns the Product. The frame is warranted for labor and freight (for parts shipped from TRUE) for two years from date of purchase. * This limited warranty on the structural frame does not include paint or coatings.
Drive Motor
The treadmill drive motor is warranted for defects in material and workmanship for the life of the product with a two year labor warranty. This limited warranty does not cover damage or equipment failure resulting from or caused by improper assembly/installation, failure to follow instructions and warnings in owner's manual, accident, misuse, abuse, unauthorized modification, or failure to provide reasonable and necessary maintenance.
Parts
The treadmill electrical parts and wear items are warranted for defects in material and workmanship for ten years with two years labor warranty. This limited warranty does not cover damage or equipment failure resulting from or caused by improper assembly/installation, failure to follow instructions and warnings in owner's manual, accident, misuse, abuse, unauthorized modification, or failure to provide reasonable and necessary maintenance. This limited warranty will apply to but may not be limited to the treadmill elevation motor, upper control board, deck, running belt and drive belt. *TRUE Fitness shall not warrant the performance of the heart rate system on its products, as the heart rate system performance varies, based on user's physiol-
ogy, age, method of use and other factors. *This limited warranty shall not apply to Software version upgrades.
Cosmetics
The treadmill cosmetic parts are warranted for defects in material and workmanship for six months with labor warranty to match the parts warranty period. This limited warranty does not cover damage or equipment failure resulting from or caused by improper assembly/installation, failure to follow instructions and warnings in owner's manual, accident, misuse, abuse, unauthorized modification, or failure to provide reasonable and necessary maintenance. This limited warranty will apply to but may not be limited to paint/coatings, covers/caps, badges, overlays, safety key and straddle covers.
Connectivity: Headphone jack and USB Port are warranted for defects in material and workmanship for 90 days with no labor warranty.
Labor
Labor is covered for a period of two years from the date of purchase unless otherwise expressed within this limited warranty as long as a TRUE authorized service provider performs the service. Service that requires over 50 miles of travel may be subject to additional charges. Reasonable and necessary maintenance includes proper lubrication of the running deck and tread belt area as specified in the owner's manual. Failure to maintain proper lubrication of the Product will void this Limited Warranty.
Claims Procedure:
TRUE Limited Warranty service may be obtained by contacting the authorized TRUE dealer from whom the Product was purchased. If the dealer from whom the Product was purchased is no longer an authorized TRUE dealer, then TRUE Limited Warranty service may be obtained by contacting TRUE directly at:
TRUE Fitness, Service Department
865 Hoff Road, St. Louis, MO 63366
1-800-883-8783, (Hours of operation 8:30am - 5:00 pm CST)
NOTE: Warranty valid for USA and Canada only.
NOTE: Failure to register this product will result in no servicing or authorization of parts to be shipped.
NOTE: Buying after-market products from a 3rd party will result in voided warranty. NOTE: This product is intended for Residential use. If this product will not be used in this particular setting, please contact TRUE as is warranty is void.
CHAPTER 7: ADDITIONAL INFORMATION

TRUE
RESIDENTIAL LIMITED WARRANTY
TE900 TREADMILLS
Save Time and Register Online!
Activate Multiple Warranties at www.truefitness.com/support
The above Limited Warranty is subject to and will be in accordance with the conditions set forth below:
-
THIS LIMITED WARRANTY GIVES YOU SPECIFIC LEGAL RIGHTS AND YOU MANY ALSO HAVE OTHER RIGHTS, WHICH VARY FROM STATE TO STATE.
-
This Limited Warranty can be processed only if the Warranty Registration Form is completed on-line; or if the attached form is filled in, signed by the original purchaser and mailed to TRUE within 30 days of purchaser's receipt of this Product. The serial number must be intact on the Product for this Limited Warranty to be valid.
-
This Limited Warranty applies to the product only while the Product remains in the possession of the original purchaser and is not transferable.
-
This Limited Warranty becomes VALID ONLY if the Product is initially assembled/installed by a TRUE authorized dealer/ technician (if anyone other than a TRUE authorized dealer/ technician initially assembles and installs the Product, this Limited Warranty will be void unless the written authorization of TRUE is first obtained).
-
This Limited Warranty does not cover damage or equipment failure resulting from or caused by improper assembly/installation, failure to follow instructions and warnings in owner's manual, accident, misuse, abuse, unauthorized modification, or failure to provide reasonable and necessary maintenance (as referenced in the owner's manual.)
-
This Limited Warranty applies only to the cost of repair or replacement of parts and does not include labor (beyond the above warranty period), transportation, service, return and freight charges associated therewith except as expressly specified herein.
-
This Limited Warranty shall not apply to: Service calls to correct installation of the equipment or instruction to owners on how to use the equipment; or any labor costs incurred beyond the applicable labor warranty period.
-
This Limited Warranty, which is given expressly and in lieu of all other express warranties, constitutes the only warranty made by TRUE.
-
ANY IMPLIED WARRANTY, INCLUDING WITHOUT LIMITATION THE WARRANTIES OF MERCHANTABILITY AND FITNESS FOR A PARTICULAR PURPOSE, IS LIMITED IN DURATION AND REMEDY TO THE TIME PERIOD COVERED BY THE LIMITED WARRANTY. SOME STATES DO NOT ALLOW LIMITATIONS ON HOW LONG AN IMPLIED WARRANTY LASTS, SO THE ABOVE LIMITATION MAY NOT APPLY TO YOU.
-
THE REMEDIES DESCRIBED ABOVE ARE YOUR SOLE AND EXCLUSIVE REMEDIES AND TRUE'S ENTIRE LIABILITY FOR ANY BREACH OF THIS LIMITED WARRANTY. TRUE'S LIABILITY SHALL UNDER NO CIRCUMSTANCES EXCEED
THE ACTUAL AMOUNT PAID BY YOU FOR THE PRODUCT, NOR SHALL TRUE UNDER ANY CIRCUMSTANCES BE LIABLE FOR ANY CONSEQUENTIAL, INCIDENTAL, SPECIAL OR PUNITIVE DAMAGES OR LOSSES, WHETHER DIRECT OR INDIRECT. SOME STATES DO NOT ALLOW THE EXCLUSION OR LIMITATION OF INCIDENTAL OR CONSEQUENTIAL DAMAGES, SO THE ABOVE LIMITATION OR EXCLUSION MAY NOT APPLY TO YOU.
NOTE TO AUTHORIZED WARRANTY LABOR PROVIDERS:
Warranty labor reimbursement or warranty parts rights may not be transferred to, reassigned to, a third party without the express written consent of TRUE. Even jobbing out warranty labor requires TRUE's written approval.
TE900 TREADMILL SERIAL NUMBERS:
The TE900 treadmill comes with two serial numbers; one on the base and one on the display console (see diagram below). The serial number on the base is on the lower portion of the treadmill directly adjacent to the power inlet. The console serial number is located on the bottom right side of each console. Please write down your serial numbers below and keep for your records.
CONSOLE SERIAL NUMBER:
BASE SERIAL NUMBER:
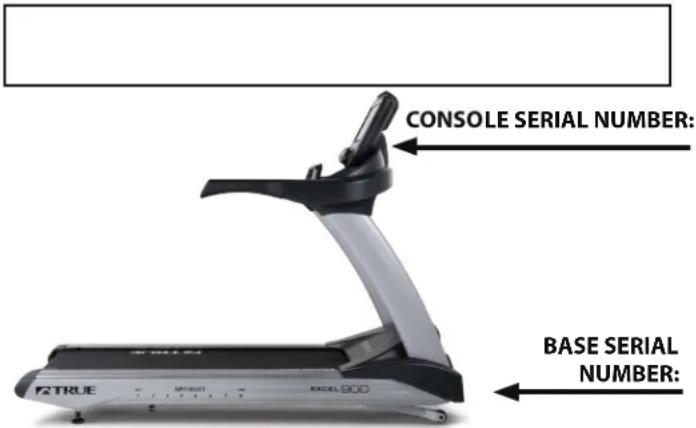
text_image
CONSOLE SERIAL NUMBER: BASE SERIAL NUMBER:SAMPLE SERIAL NUMBER STICKER:
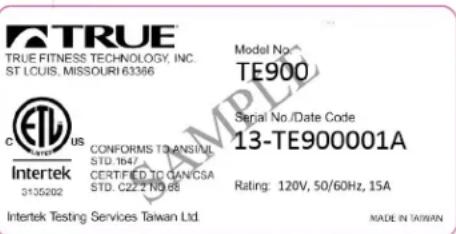
text_image
TRUE TRUE FITNESS TECHNOLOGY, INC. ST LCUIS, MISSOURI 63366 Model No: TE900 C:\TEL\US CONFORMS TO ANSINIL STD. 1847 CERTIFIED TO CANCSA STD. C22.2 NO.68 Serial No./Date Code 13-TE900001A Rating: 120V, 50/60Hz, 15A Intertek Testing Services Taiwan Ltd. MADE IN TAIWANKeep this page for your records
CHAPTER 7: ADDITIONAL INFORMATION

TRUE
RESIDENTIAL LIMITED WARRANTY
TE900 TREADMILLS
Thank you for purchasing a TRUE product. To validate the TRUE product warranty the fast and easy way, please go on-line now to www.truefitness.com and register your product. The information you provide will never be distributed to any other individuals or agencies for any purpose. If you prefer to mail your warranty card, have the owner of the product complete the information below and return it to TRUE Fitness within 30 days from the date of equipment installation.
To mail your warranty information, please fill in the information below and mail to: Service Dept., TRUE Fitness, 865 Hoff Road, St. Louis, MO 63366 (or save postage and register online at www.truefitness.com)

Residential Warranty Registration
Model Type: ____ Treadmill ____ Elliptical ____ Bike ____
Other
Date of Purchase
Purchased From (dealer name)
First Name
Last Name
Address
City____ State____ ZIP____
Email Address
Phone
- Where did you first learn about TRUE?
a. Dealer b. Website
c. Referral d. Gym/Club
e. Current Customer f. Other
- The primary user(s) is:
____ a. Male ____ b. Female
c. Both
- Do you currently belong to a health club?
____ a. Yes ____ b. No
- Your age group:
a. Under 25 b. 25-35
c. 36-45 d. 46-55
____ e. 56-65 ____ f. 65+
- What was the primary reason you bought a TRUE product? (Check only one)
a. Design/Appearance b. Dealer
____ c. Price ____ d. Ease of Operation
____ e. Quality of Construction ____ f. Size
____ g. Reputation ____ h. Warranty
____ i. Friend/Family Recommendation
- Do you plan to purchase more fitness equipment
in the next 6-12 months?
Yes ____ No
- If you answered "yes" to question 6, what type do you plan to purchase?
a. Treadmill b. Elliptical
c. Stationary Bike d. Free Weights
____ e. Gym ____ c. Other
- What is your annual household income? (Optional)
a. Under \$50,000
b. \50,000 - \75,000
c. \75,000 - \100,000
d. \100,000 - \150,000
e. \$150,000+
- You are a valued customer of TRUE and your suggestions allow us to continually improve your experience. Is there anything else you would like us to know? Please explain:
PLEASE PROVIDE BOTH SERIAL NUMBERS BELOW. REQUIRED FOR WARRANTY REGISTRATION:
CONSOLE SERIAL NUMBER:
BASE SERIAL NUMBER:
