
XDP-MU110 - Car hands-free kit SONY - Free user manual and instructions
Find the device manual for free XDP-MU110 SONY in PDF.

| Product Type | Car Hands-Free Kit / Digital Link Sound System |
| Brand | Sony |
| Model | XDP-MU110 |
| Category | Car Hands-Free Kit |
| Dimensions (DSP Master Unit) | Approx. 210.6 × 40 × 156.6 mm (8 3/8 × 1 5/8 × 6 1/4 in) (w/h/d) |
| Weight (DSP Master Unit) | Approx. 0.92 kg (2 lb 1 oz) |
| Dimensions (Cradle) | Approx. 65 × 138.8 × 105.3 mm (2 5/8 × 5 1/2 × 4 1/4 in) (w/h/d); arm fully extended: 147.1 mm (5 7/8 in) (h) |
| Weight (Cradle) | Approx. 0.14 kg (5 oz) |
| Power Requirements | 12 V DC car battery (negative ground) |
| Power Output (RMS) | 17 Watts RMS per channel at 4 Ohms, < 1% THD+N (CEA2006 Standard) |
| Maximum Power Output | 45 W × 4 (at 4 Ω) |
| Speaker Impedance | 4 Ω - 8 Ω |
| Inputs | iPod/iPhone dock connector, Hi-level input (4-channel) |
| Outputs | Speaker outputs (Front L/R, Rear L/R), Subwoofer output (mono), Power amplifier control terminal |
| Sound Controls | Bass/Treble ±7 dB, Fader/Balance ±7 steps, Subwoofer volume ±6 steps (with no sound option) |
| Compatible Devices | iPod touch (4th & 3rd gen), iPhone 4, iPhone 3GS |
| Remote Commander | RM-X251 card remote commander with SOURCE/OFF, volume, track skip, and sound adjustment buttons |
| Remote Battery | CR2025 lithium battery (replaceable) |
| Safety Certifications | FCC Part 15 (Class B), California Perchlorate warning |
| Included Accessories | Cradle, mounting sheet, strap, cord clamp, cradle cable, cleaning sponge for suction cup, card remote commander RM-X251, installation/connection parts set |
| Installation Method | Suction cup on dashboard with locking lever; optional strap for safety |
| Sound Optimization | 12 vehicle-specific settings via DIP switches (VEHICLE SIZE, SUBWOOFER, SW LOCATION) |
| Digital Sound Technology | Creates natural front sound field; digital connection reduces noise/distortion |
| Cleaning | Suction cup: clean with supplied sponge; cradle: avoid alcohol, thinner, benzene |
Frequently Asked Questions - XDP-MU110 SONY
User questions about XDP-MU110 SONY
0 question about this device. Answer the ones you know or ask your own.
Ask a new question about this device
Download the instructions for your Car hands-free kit in PDF format for free! Find your manual XDP-MU110 - SONY and take your electronic device back in hand. On this page are published all the documents necessary for the use of your device. XDP-MU110 by SONY.
USER MANUAL XDP-MU110 SONY
Digital Link Sound System
Operating Instructions US
The model and serial numbers are located on the bottom of the DSP master unit.
Record the serial number in the space provided below.
Refer to these numbers whenever you call upon your Sony dealer regarding this product.
Model No. XDP-MU110 Serial No. ____
Made for

iPod

iPhone
Warning
This equipment has been tested and found to comply with the limits for a Class B digital device, pursuant to Part 15 of the FCC Rules.
These limits are designed to provide reasonable protection against harmful interference in a residential installation. This equipment generates, uses, and can radiate radio frequency energy and, if not installed and used in accordance with the instructions, may cause harmful interference to radio communications. However, there is no guarantee that interference will not occur in a particular installation. If this equipment does cause harmful interference to radio or television reception, which can be determined by turning the equipment off and on, the user is encouraged to try to correct the interference by one or more of the following measures:
– Reorient or relocate the receiving antenna.
– Increase the separation between the equipment and receiver.
- Connect the equipment into an outlet on a circuit different from that to which the receiver is connected.
- Consult the dealer or an experienced radio/TV technician for help.
You are cautioned that any changes or modifications not expressly approved in this manual could void your authority to operate this equipment.
For the State of California, USA only
Perchlorate Material – special handling may apply, See www.dtsc.ca.gov/hazardouswaste/perchlorate Perchlorate Material: Lithium battery contains perchlorate
iPhone, iPod, iPod classic, iPod nano, and iPod touch are trademarks of Apple Inc., registered in the U.S. and other countries.
Note on the lithium battery
Do not expose the battery to excessive heat such as direct sunlight, fire or the like.
Warning if your car's ignition has no ACC position
To prevent battery drain, turn off the system after use by pressing and holding the SOURCE/OFF button on the remote commander/cradle more than two seconds. The LED indicators on the DSP master unit and cradle turn off when the system is off.
Table of contents
Introduction 4
Getting Started ....4
Resetting the unit 4
The System Components....5
DSP master unit .... 5
Cradle....6
RM-X251 Card remote commander 7
Sound Settings....8
Optimized sound setting based on your vehicle 8
Setting the sound balance based on your listening preference 9
Setting up the Cradle....10
Precautions ...... 10
Parts List 10
Before Installation ....11
Installation....11
Arranging the cradle cable ....14
Attaching an iPod/iPhone....15
Playback....17
Precautions ...... 17
Setting up the system....17
Enjoying an iPod/iPhone 17
Playing from a car audio unit....17
Additional Information....18
Precautions 18
Maintenance....19
Specifications....19
Troubleshooting....20
Introduction
Thank you for purchasing the Digital Link Sound System (XDP-MU110).
This system allows you to digitally integrate an iPod/iPhone into your existing car audio unit. You can enjoy exciting sound from your car audio unit and iPod/iPhone via this system, which features sound settings optimized for your vehicle type by using Sony's original digital sound technology.
The DSP master unit makes a natural “front sound field” possible, so that you can feel bass as though it comes from directly in front of the driver’s seat even though the subwoofer is located at the rear of your car, e.g., in a cargo area.
There is also a digital connection for an iPod/iPhone so that you can enjoy high quality sound in your car without noise/distortion.
Enjoy the new sound experience with this Digital Link Sound System.
Getting Started
Resetting the unit
Before operating the system for the first time, or after replacing the car battery or changing connections, you should reset the system (page 5).
Press the RESET button of the DSP master unit.
The System Components
This section contains explanations on the location of controls and their basic operations.
DSP master unit
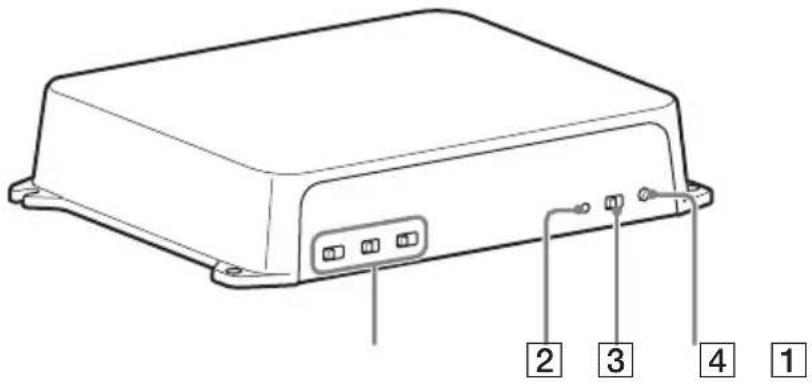
1 Sound setting switches page 8
Set each switch according to your car type/interior.
2 SOURCE indicator
You can check the status of the DSP master unit.
| Indicator Status | |
| Turns blue. A car audio unit is selected as the source. | |
| Turns red. An iPod/iPhone is selected as the source. | |
| Flashes blue. Diagnostic error. See “Troubleshooting” (page 20). | |
| Flashes red. Overload error when an iPod/iPhone is selected as the source. See “Troubleshooting” (page 20). | |
| Flashes blue and red alternately. | Temperature detection is working. See “Troubleshooting” (page 20). |
3 INPUT SELECT switch
Select either 2-channel or 4-channel sound from the car audio unit. Select "2ch" if you connect only the front car speakers to the DSP master unit, with High Level Input connection.
4 RESET
Press to reset the DSP master unit settings.
Note
- Avoid touching the top of the DSP master unit during use, as it becomes hot over time.
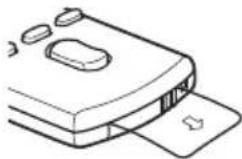
Cradle
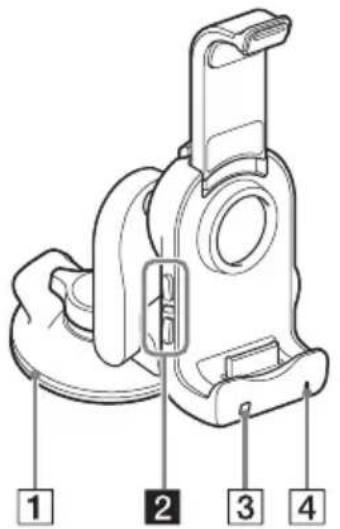
1 Suction cup
2 SEEK ◀◀/▶▶I buttons*1*2
Press to skip tracks.
3 Remote sensor
4 Indicator
You can check the status of the DSP master unit.
Indicator Status
| Turns blue. A car audio unit is selected as the source. | |
| Turns red. An iPod/iPhone is selected as the source. | |
| Flashes blue. Diagnostic error. See “Troubleshooting” (page 20). | |
| Flashes red. Overload error when an iPod/iPhone is selected as the source. See “Troubleshooting” (page 20). | |
| Flashes blue and red alternately. | Temperature detection is working. See “Troubleshooting” (page 20). |
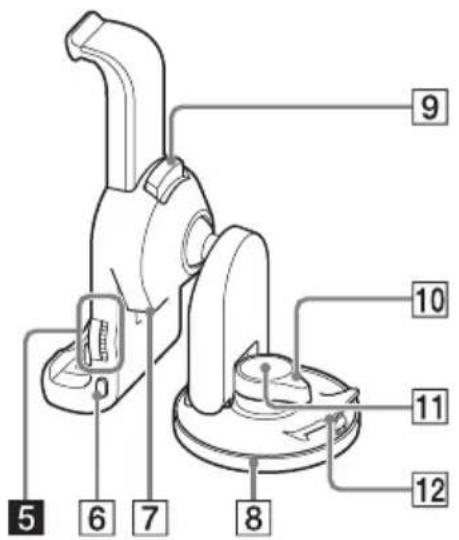
5 VOLUME (VOL) +/−2*
6 SOURCE/OFF button
Press to turn on the power/change the source between a car audio unit and an iPod/iPhone.
Press and hold more than two seconds to turn off the system. The indicator (4) turns off.
7 Port for the cradle cable
Used for connecting the cradle cable.
8 Cover for the suction cup
9 PUSH RELEASE button
Push to stretch the arm.
10 LOCK/RELEASE lever
Turn to lock/release the suction cup.
11 PUSH button
Press hard to secure the cradle on the dashboard.
12 Tab
Pull up to remove the cradle from the dashboard.
*1 ▶▶▶ has a tactile dot.
*2 These buttons work only when an iPod/iPhone is selected as the source and the music player on an iPod/iPhone is activated.
RM-X251 Card remote commander
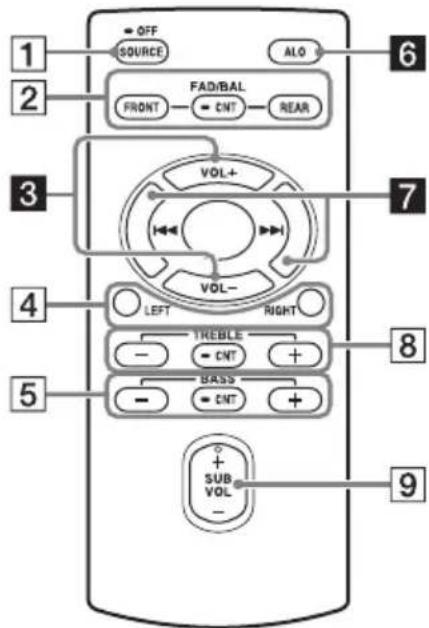
Remove the insulation film before use.
1 SOURCE/OFF button
Press to turn off the power/change the source between a car audio unit and an iPod/iPhone.
Press and hold more than two seconds to turn off the system. The indicators on the DSP master unit and the cradle turn off.
2 FAD/BAL (FRONT/CNT/REAR)
buttons page 9
Press to adjust the balance between the speakers.
3 VOL +/- buttons\*
4 LEFT/RIGHT buttons page 9
Press to adjust the speaker balance. Press and hold the CNT button ( 2 ) to return to the default setting.
5 BASS (-/CNT/+) buttons page 9
Press to adjust the bass level.
6 ALO (Automatic Level Optimizer) button*1 page 10
Adjust the playback volume level of an iPod/iPhone to the optimum level: "ON," "OFF."
7 ◀◀/▶▶I buttons*1
Press to skip tracks.
8 TREBLE (-/CNT/+) buttons page 9
Press these buttons to adjust the treble level.
9 SUB VOL +/- button*page 9
Press to adjust the subwoofer volume if you connect a subwoofer to the system and the SUBWOOFER switch on the DSP master unit is set to "Y."
*1 These buttons work only when an iPod/iPhone is selected as the source and the music player on an iPod/iPhone is activated.
*2 SUB VOL + has a tactile dot.
Note
- If the system is turned off and the indicators on the cradle/DSP master unit are off, remote commander operation is not possible. To activate the system again, press the SOURCE/OFF button on the cradle, and make sure that the indicators on the cradle/DSP master unit are lit.
Sound Settings
Optimized sound setting based on your vehicle
This system provides well balanced sound, which appears to come from in front of the driver's seat, optimized for the vehicle type by setting the DSP master unit. 12 different settings are available.
Warning
- Avoid touching the top of the DSP master unit when setting the switches, as it becomes hot during use.
Notes
- Set the sound of the car audio unit (BASS/TREB/Loudness, etc.) to the flat position.
- Set the switches on the front panel of the DSP master unit with your fingers. Do not use any tools when setting these switches.
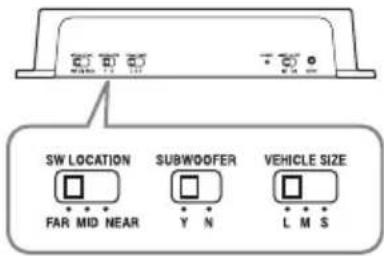
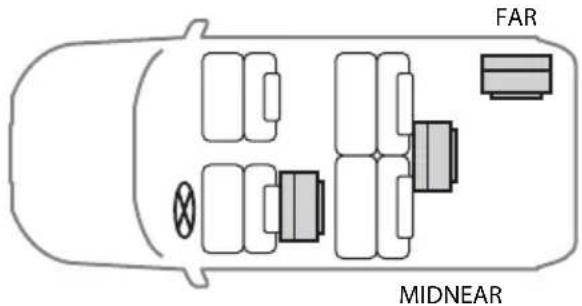
SW LOCATION switch
Select from one of three positions (FAR/MID/NEAR) based on the distance between the driver's seat and where the subwoofer is. This function only works when a subwoofer is connected to the system and the SUBWOOFER switch on the DSP master unit is set to "Y."
SUBWOOFER switch
Select "Y" (yes) or "N" (no) depending on whether the subwoofer is connected to the system. Select "Y" when the subwoofer is connected.
VEHICLE SIZE switch
Select from one of three sizes (L/M/S) based on the air volume of your car.
See the following examples.
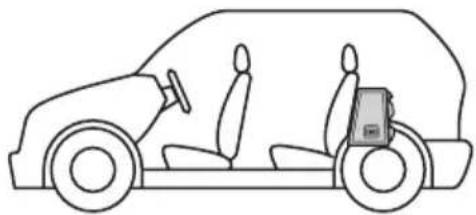
Compact hatchback
natural_image
Side profile line drawing of a car with driver seats and passenger seat (no text or symbols)VEHICLE SIZE: S
SUBWOOFER: Y
SW LOCATION: MID
Middle sized sedan

natural_image
Line drawing of a car showing front and side views (no text or symbols)VEHICLE SIZE: M
SUBWOOFER: N
SW LOCATION: -
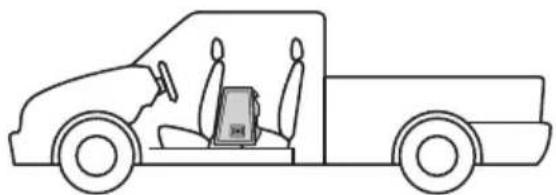
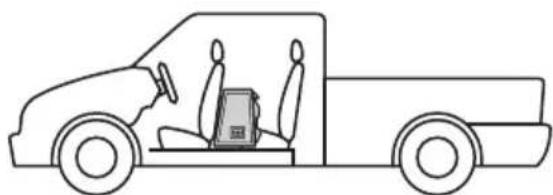
Pickup Truck
natural_image
Side-view line drawing of a pickup truck with driver seat and passenger vehicle (no text or symbols)VEHICLE SIZE: S
SUBWOOFER: Y
SW LOCATION: NEAR
Full sized SUV
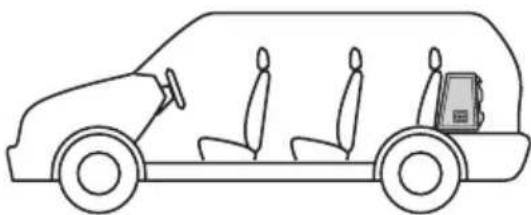
natural_image
Side-view line drawing of a car with three seated seats and two people inside, no text or symbols present.VEHICLE SIZE: L
SUBWOOFER: Y
SW LOCATION: FAR
Tip for setting the SW LOCATION switch
If you are not sure about these sound settings, set the VEHICLE SIZE switch first, and then set the SW LOCATION switch to where bass sound appears to come from in front of the driver's seat.
Setting the sound balance based on your listening preference
You can adjust the sound balance easily by using the supplied remote commander (page 7).
The system allows you to make separate settings for each source (car audio unit, iPod and iPhone)*. The setting you make for a source is applied each time that source is selected.
*The ALO button works only for an iPod/ iPhone selected as the source.
Tip
- Turn off the EQ of your iPod/iPhone before adjusting the following sound settings.
Adjusting the speaker balance
Press the FRONT/REAR/LEFT/RIGHT buttons to adjust the balance between the speakers.
An adjustment range of 7 steps is available for each speaker setting. Press and hold the CNT button to return to the default setting. The default setting is CNT (center).
Adjusting the treble level
Press the TREBLE (-/CNT/+) button.
Available settings are -7 to +7, in 1-step increments. Press and hold the CNT button to return to the default setting. The default setting is 0.
Adjusting the bass level
Press the BASS (-/CNT/+) button.
Available settings are -7 to +7, in 1-step increments. Press and hold the CNT button to return to the default setting. The default setting is 0.
Adjusting the subwoofer level
Press the SUB VOL +/- button.
Available settings are from -7 (no sound) to +6, in 1-step increments. The default setting is 0.
This function only works when a subwoofer is connected to the system and the SUBWOOFER switch on the DSP master unit is set to "Y."
Adjusting the input volume from the iPod/iPhone
Press the ALO button.
Adjust the playback volume level of an iPod/iPhone to the optimum level.
Press the ALO button repeatedly to switch between ON and OFF. The default setting is ON. This function is available only when an iPod/iPhone is selected as the source.
• ON: A high-pitched beep
• OFF: A low-pitched beep
Setting up the Cradle
Precautions
• Install the cradle on a dashboard properly so that the unit will not interfere with normal driving.
- Follow the instructions on this manual about dealing with the suction cup to secure the cradle on a dashboard. If you fail to do so, the adhesive strength of the suction cup may decrease, and the cradle may fall down.
- If the cradle becomes detached, a traffic accident may result. To prevent this, use the supplied strap.
- Keep the cradle out of the reach of children. Should a small part of the cradle be swallowed, immediately consult a doctor.
- Remove the cradle from the dashboard and keep it out of direct sunlight after use. Leaving it on a dashboard or in a car where it will be exposed to high temperature may cause malfunction, and it may also damage the dashboard.
- An iPod/iPhone may not be charged if you put it on the cradle when the temperature in the car is extremely high/low.
- Be careful not to splash water on the cradle. It may cause a malfunction.
• To disconnect the cradle cord, pull it out by its connector, not the cord.
Parts List
Cradle
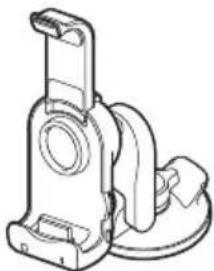
natural_image
Technical line drawing of a mechanical clamp or bracket component (no text or symbols)Mounting sheet

Strap
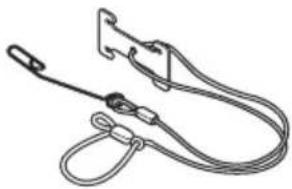
natural_image
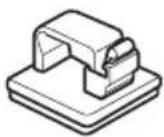
Line drawing of a cable with attached clip and strap (no text or symbols)Cord clamp

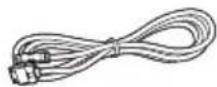
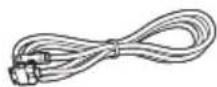
Cradle cable
Cleaning sponge for suction cup
Before Installation
- Mount the cradle on the dashboard where it is smooth and horizontal.

- Make sure that the surface of the dashboard where you intend to install the cradle is clean. Dirty surfaces will make the adhesive strength of the suction cup weak, and may cause unstable installation of the cradle.
- The suction cup may leave a mark on the dashboard, depending on the surface material. Your consideration is requested.
To attach the mounting sheet
Attach the mounting sheet to the dashboard before installing the cradle.
Notes
- Choose the mounting location carefully. Practice installation before you actually mount the sheet, if necessary.
- Removing the mounting sheet from the dashboard decreases the adhesive strength of the mounting sheet. It should not be reused after removal.
1 Peel the paper from the mounting sheet, and then stick the mounting sheet to the dashboard.
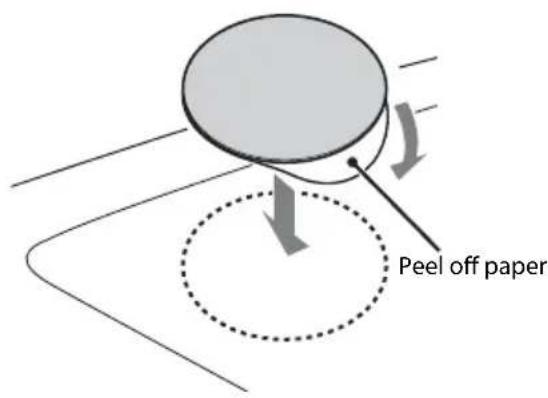
Allow 24 hours after sticking the mounting sheet on the dashboard before installing the cradle on it.
Installation
1 Mount the clip of the strap on the defroster of your car.

natural_image
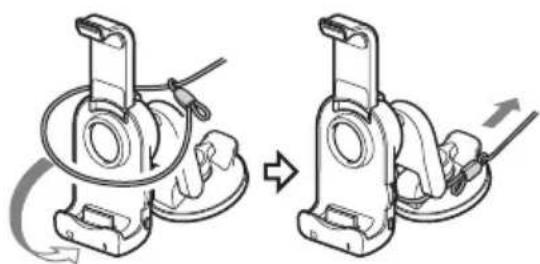
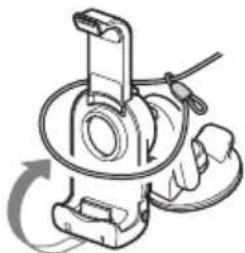
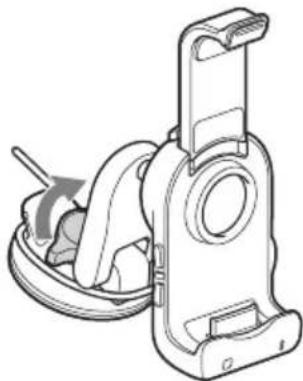
Diagram showing a cable being inserted into a plastic sheet, with arrows indicating direction (no text or symbols)2 Place the hoop of the strap over the cradle and attach the strap as shown in the illustrations below.
natural_image
Mechanical assembly diagram showing two stages of a mechanical component with rotation arrows (no text or symbols)Notes
• After you attach the strap to the cradle, pull the strap gently to make sure that the strap is securely attached to the cradle.
- Do not forcefully pull the cradle after attaching the strap. Doing so may damage your car.
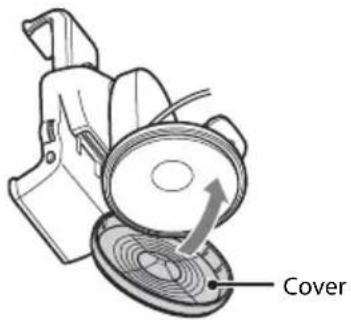
3 Remove the cover from the suction cup gently.
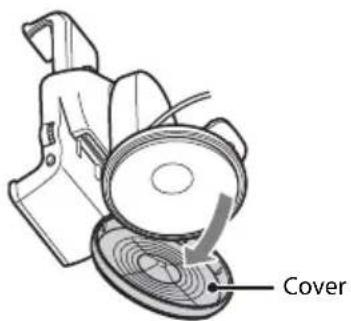
Note
- It may be difficult to remove the cover from the suction cup as the adhesive strength of the suction cup is strong.
4 Press down the suction cup gradually, expelling the air under the suction cup (①), and press the PUSH button firmly enough to secure the cradle on the dashboard (②).
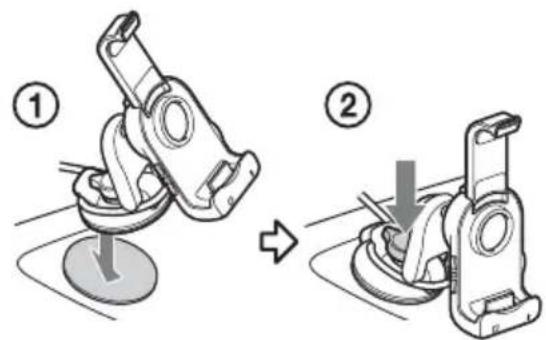
Notes
- If the suction cup contains air, the adhesive strength of the suction cup will be weakened.
• Make sure that the suction cup is dry before mounting the cradle.
Tip
- The suction cup may contain tiny holes. This can occasionally occur in the production process, and should not cause a malfunction.
5 Turn the LOCK/RELEASE lever counterclockwise 90 degrees to secure the cradle on the dashboard.
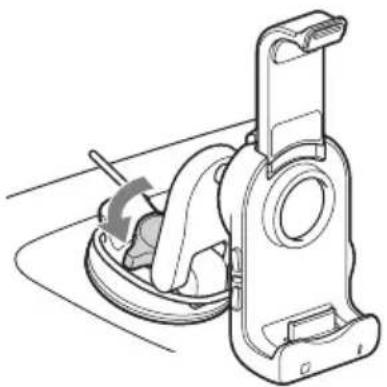
natural_image
Mechanical assembly diagram showing a rotating component with a handle and base mount (no text or symbols)Note
- Before turning the LOCK/RELEASE lever, make sure that you have pressed the PUSH button hard and expelled the air from under the suction cup.
6 Connect the cradle cable.
Rotate the arm of the cradle to the horizontal position, and connect the cradle cable.
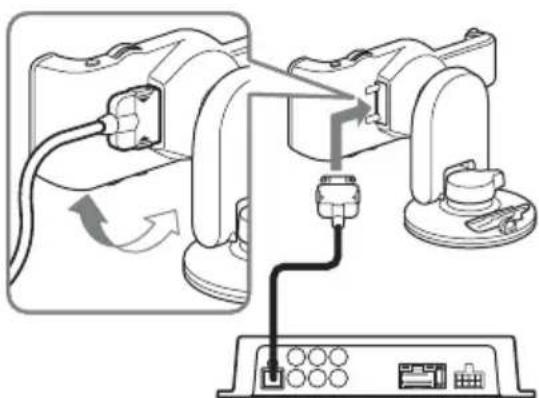
natural_image
Diagram of a device with connected ports and cables, showing internal components and connections (no text or symbols)Notes
- Make sure that the ▶ marks on the connector are visible, as shown in the illustration, when connecting the cradle cable.
- Do not use any cable other than the supplied cradle cable.
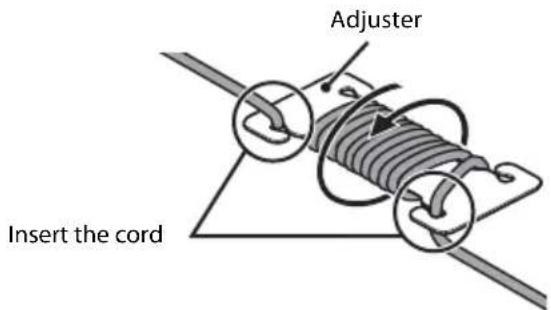
7 Adjust the strap.
Adjust the strap by using the adjuster.
To remove the cradle
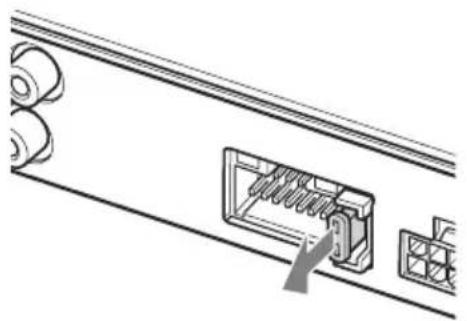
1 Press the ridges to remove the cradle cable from the cradle.
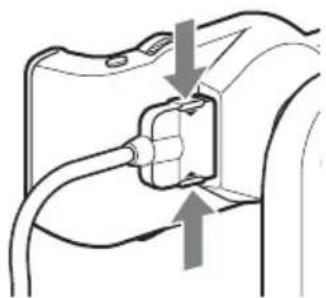
natural_image
Diagram of a mechanical or electrical component with arrows indicating direction (no text or symbols)2 Loosen the strap from the adjuster.
3 Take the hoop of the strap off from the cradle.
natural_image
Mechanical assembly diagram showing a rotating component with no visible text or symbols4 Turn the LOCK/RELEASE lever clockwise by 90 degrees.
natural_image
Mechanical assembly diagram showing a rotating component with a handle and base (no text or symbols)5 Pull the tab of the cradle for a few seconds in the direction of the arrow marked in the illustration below (①), and then slowly (over 3 to 5 seconds) remove the suction cup (②).
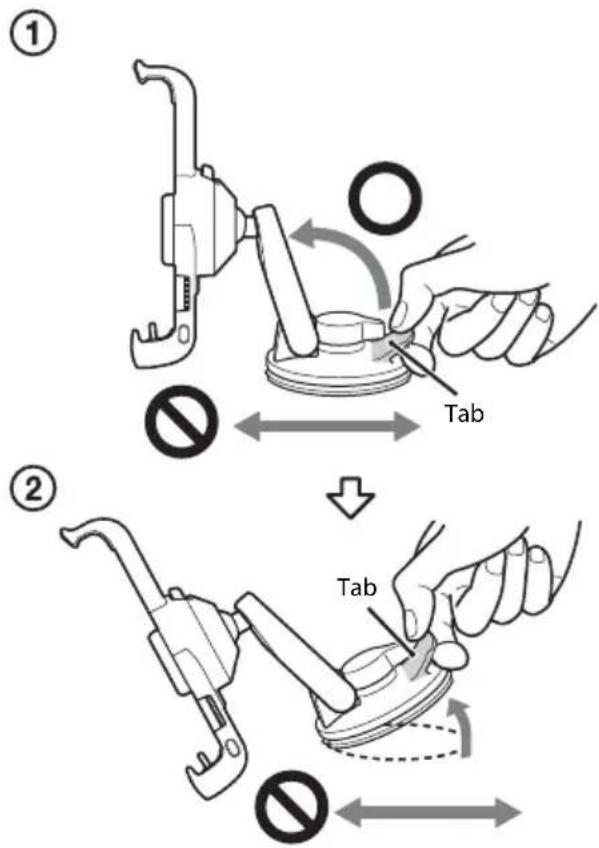
Notes
- Pull the cradle by its tab when you remove the suction cup from the dashboard.
- Doing any of the following may damage the suction cup.
- press/pull the cradle by its tab in a horizontal direction.
- insert a hard object (key, blade, finger, etc.) between the suction cup and the dashboard to remove the suction cup from the dashboard.
- The suction cup may be damaged if it is forcefully removed, or the cradle is forced in a horizontal direction while still attached to the dashboard, or put the pressure on the cradle in the horizontal direction before completely taking off the suction cup from the dashboard.
- If the temperature of the surface of the dashboard is low, for example, in winter or when used in a cold region, removal of the suction cup may be difficult.
6 Replace the cover on the suction cup.
Note
- Put the cover on the suction cup when you take the cradle off the dashboard. If the suction cup becomes dirty or scratched, its adhesive strength will be reduced.
Arranging the cradle cable
Use the cord clamp to secure the cradle cable.
Note
- Clean the surface where you intend to install the cord clamp.
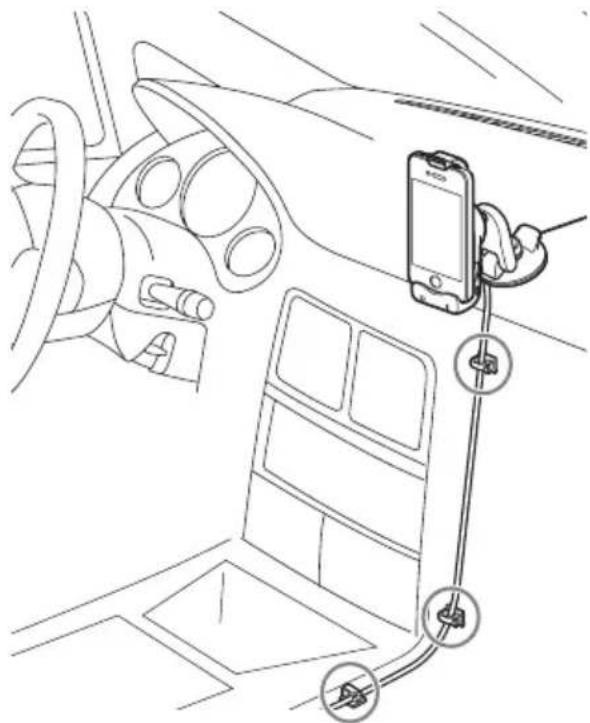
natural_image
Interior view of a car dashboard with a smartphone attached to the windshield and cable connectors (no text or symbols visible)To secure the cradle cable
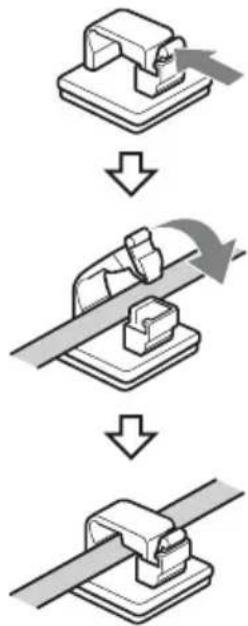
flowchart
graph TD
    A["Initial Clamp"] --> B["Assembly Step"]
    B --> C["Final Assembly"]
To release the cradle cable
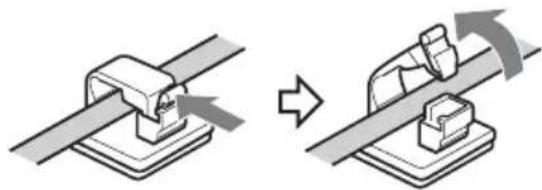
natural_image
Diagram showing two mechanical assembly steps: one with a clamp and arrow indicating rotation, the other with a block and curved arrows indicating rotation (no text or symbols)Note
- You should not reuse the cord clamp once it has been removed as the adhesive strength will be reduced.
Attaching an iPod/iPhone
Compatible iPod/iPhone models
See “About iPod/iPhone” (page 18) or visit the support page:
- Start the car's engine before connecting the iPod/iPhone. Depending on the device, malfunction or damage may occur if it is connected before starting the engine.
- Remove the case or cover from the iPod/iPhone before setting it in the cradle to ensure a stable installation.
- Sony cannot accept responsibility in the event that data recorded to an iPod/iPhone is lost or damaged when using an iPod/iPhone connected to the cradle.
- For details on environmental conditions for operating the iPod/iPhone, check the website of Apple Inc.
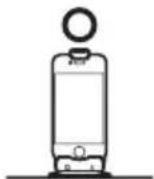
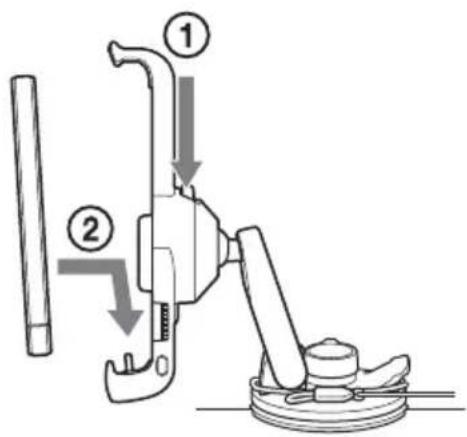
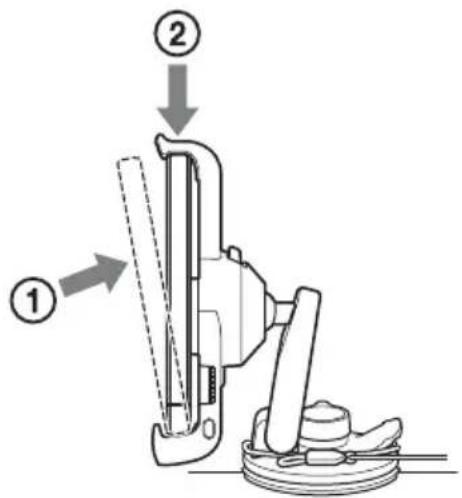
1 Push the PUSH RELEASE button to stretch the arm of the cradle (①), and then set the iPod/iPhone in the cradle (②).
Notes
- When setting the iPod/iPhone, hold the iPod/iPhone at the same angle as that of the connector on the cradle.
- When setting the iPod/iPhone, hold the cradle securely.
2 Press the arm down gently and set your iPod/iPhone in the cradle.
Press the iPod/iPhone backward until it touches to the cushion in the center of the cradle (①), and hold the iPod/iPhone securely while pressing the arm down (②).
Notes
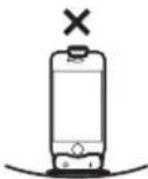
- Make sure that there is no gap between the iPod/iPhone and the arm when setting the iPod/iPhone in the cradle.
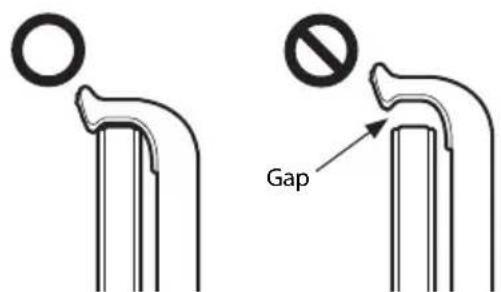
• Make sure that the arm holds the iPod/iPhone securely. When the temperature is low, it may be difficult to lock the iPod/iPhone in place.
Tips
- The system plays back music from the iPod/iPhone when the iPod/iPhone is in the play mode as you set it on the cradle.
- An iPod/iPhone is charged when set in the cradle, and the system is turned on.
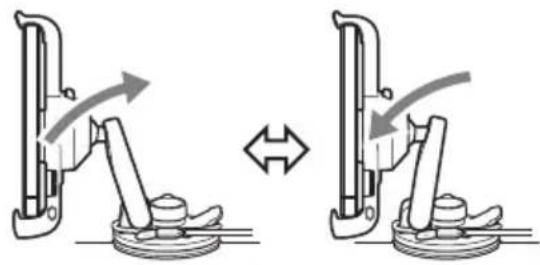
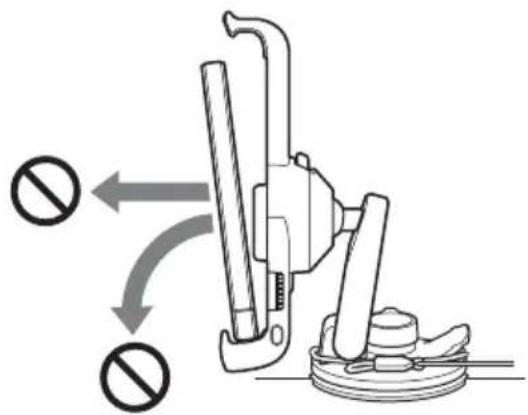
To adjust the angle of the cradle
You can adjust the angle of the cradle as shown in the illustration below. Do not use force to adjust the angle, as a malfunction may result.
natural_image
Diagram showing two mechanical lever mechanisms with directional arrows indicating motion (no text or symbols)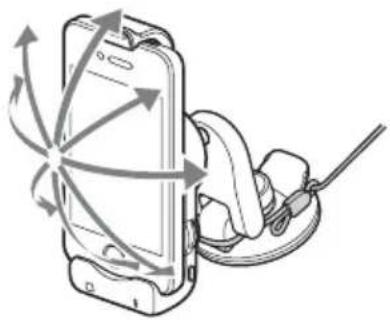
natural_image
Diagram of a smartphone mounted on a stand with a cable, showing magnetic field lines around it (no text or symbols present)To remove the iPod/iPhone from the cradle
1 Press the PUSH RELEASE button to stretch the arm of the cradle (①).
2 Remove the iPod/iPhone, following the same angle as the connector on the cradle (②).

Notes
- If you remove the iPod/iPhone from the cradle when it is in the play mode, the iPod/iPhone stays selected as the source.
- When removing the iPod/iPhone, do not twist or bend the iPod/iPhone as it may result in connector damage.
natural_image
Mechanical assembly diagram showing a clamp mechanism with two circular symbols indicating no movement or absence (no text or labels present)- When removing the iPod/iPhone, hold the cradle securely.
Tip
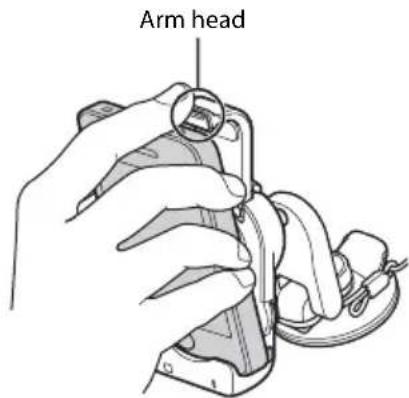
- If you cannot remove the iPod/iPhone after pressing the PUSH RELEASE button, hold the upper part of the iPod/iPhone and push the front of the arm head of the cradle, then remove the iPod/iPhone.
Playback
Precautions
- For safety reasons, keep your car audio unit and iPod/iPhone volume moderate so that you can still hear sounds outside your car.
- Do not watch an iPod/iPhone while driving. It is dangerous and may cause a traffic accident. If you need to operate the iPod/ iPhone or the cradle, or take a phone call, be sure to stop your car in a safe place before operating the iPod/iPhone or the cradle or taking a phone call.
- An iPod/iPhone's Screen Rotation function may work on rare occasions, which changes the display to the landscape/portrait mode unexpectedly.
Setting up the system
Follow the steps below when using the system for the first time.
1 When the system is turned on, press the RESET button on the DSP master unit (page 5).
2 Make sure that the LED indicators on the DSP master unit and the cradle are lit.
3 Set the sound setting switches according to your vehicle (page 8).
Enjoying an iPod/iPhone
You can enjoy the music of an iPod/iPhone via the system.
Note
- If the battery of the iPod/iPhone is extremely low, charge it for a while before operation.
1 Press the SOURCE/OFF button on the cradle or the remote commander repeatedly until the LED indicator on the cradle turns red (page 6).
Tip
- If you set an iPod/iPhone on the cradle when the system is on, the iPod/iPhone is selected as the source. If the iPod/iPhone is in play mode when you set it on the cradle, the music/video on the iPod/iPhone will automatically play back.
2 Play back music on the iPod/iPhone.
3 Adjust the volume with the remote commander or the cradle.
4 Adjust the sound characteristics by pressing the buttons on the remote commander.
For details on sound settings, see page 9.
Playing from a car audio unit
You can play music, etc., from your car audio unit via this system.
1 Press the SOURCE/OFF button on the cradle or the remote commander repeatedly until the LED indicator on the cradle turns blue (page 6).
2 Turn on your car audio unit and select the source you want to play.
3 Adjust the volume by the car audio unit itself.
Notes
- Do not turn off the system when the car audio unit is turned on. If you fail to do so, the system could malfunction.
- Adjust the volume by the car audio unit itself. You cannot adjust the volume by the system's remote commander/cradle when the car audio unit is selected as the source.
Additional Information
Precautions
- If your car is parked in direct sunlight and there is a considerable rise in temperature inside the car, allow the system to cool down before use.
- Do not use the system on a weak battery as its optimum performance depends on a good power supply.
- For safety reasons, keep your car audio unit and iPod/iPhone volume moderate so that you can still hear sounds outside your car.
- If you have any questions or problems concerning the system that are not covered in this manual, please consult your nearest Sony dealer.
Fuse replacement for the DSP master unit
If a fuse blows, check the power connection and replace the fuse. If the fuse blows again after replacement, there may be an internal malfunction. In such a case, consult your nearest Sony dealer.
Warning
When replacing the fuse, be sure to use one matching the amperage stated above the fuse holder. Never use a fuse with an amperage rating exceeding the one supplied with the system as this could damage the system.
Note
- Use an appropriate tool to replace a fuse.
DSP master unit
natural_image
Diagram of a mechanical or electrical component with internal wiring and a highlighted section (no text or symbols)About iPod/iPhone
- You can connect to the following iPod/ iPhone models.
Update your iPod/iPhone devices to the latest software before use.
Made for
- iPod touch (4th generation)
- iPod touch (3rd generation)
- iPhone 4
- iPhone 3 GS
- “Made for iPod,” and “Made for iPhone” mean that an electronic accessory has been designed to connect specifically to iPod or iPhone, respectively, and has been certified by the developer to meet Apple performance standards. Apple is not responsible for the operation of this device or its compliance with safety and regulatory standards. Please note that the use of this accessory with iPod or iPhone may affect wireless performance.
Maintenance
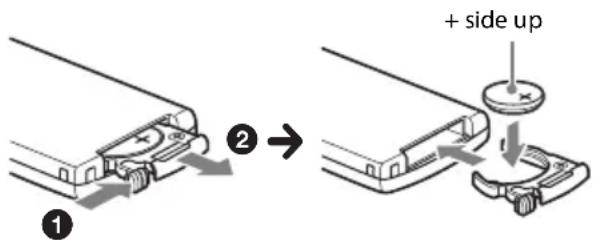
Replacing the lithium battery of the remote commander
When the battery becomes weak, the range of the remote commander becomes shorter. Replace the battery with a new CR2025 lithium battery. Use of any other battery may present a risk of fire or explosion.
RM-X251
Notes on the lithium battery
- Keep the lithium battery out of the reach of children. Should the battery be swallowed, immediately consult a doctor.
- Wipe the battery with a dry cloth to assure a good contact.
- Be sure to observe the correct polarity when installing the battery.
- Do not hold the battery with metallic tweezers, otherwise a short-circuit may occur.
WARNING
Battery may explode if mistreated. Do not recharge, disassemble, or dispose of in fire.
Cleaning the cradle
- Clean the suction cup with the supplied cleaning sponge, in order to maintain adhesive strength.
- Do not use alcohol, thinner or benzene to clean the cradle, as the cradle may be damaged.
- Do not use liquid detergent to clean the cradle.
- Do not use a specialized cleaning cloth. Doing so may cause discoloration.
- Do not spray the cradle with a volatile substance, such as an insecticide or a hair spray. Doing so may cause deterioration of the cradle.
- Do not place the cradle with a rubber, vinyl product or repellent close together. Doing so might be deteriorated the cradle.
Specifications
DSP Master Unit
AUDIO POWER SPECIFICATIONS

CEA2006 Standard
Power Output: 17 Watts RMS 4 at
4 Ohms < 1% THD+N
SN Ratio: 80 dBA
(reference: 1 Watt into 4 Ohms)
Power-AMP
Output: Speaker outputs 4 CH
(Front L/R, Rear L/R)
Speaker impedance: 4 Ω - 8 Ω
Maximum power output: 45 W × 4 (at 4 Ω)
General
Outputs:
Audio output terminals: (Front/Rear)
Subwoofer output terminal (mono)
Power amplifier control terminal
Inputs:
iPod signal input terminal (dock connector)
Hi-level input terminal
Sound controls:
Bass/Treble ±7 dB
Fader/Balance ±7 steps
SUB-W Volume* +/- 6Step, No sound
Power requirements: 12 V DC car battery (negative ground (earth))
Dimensions: (Mounting dimensions)
Approx. 210.6 mm × 40 mm × 156.6 mm
(8^3 / 8in× 1^5 / 8in× 6^1 / 4in)(w / h / d)
Mass: Approx. 0.92 kg (2 lb 1 oz)
Supplied accessories:
Card remote commander: RM-X251
Parts for installation and connections (1set)
* This function only works when a subwoofer is connected to the system and the SUBWOOFER switch on the DSP master unit is set to "Y."
Cradle
Dimensions:
Approx. 65 mm × 138.8* mm × 105.3 mm
(2^5 / 8in× 5^1 / 2in× 4^1 / 4in)(w / h / d)
Mass: Approx. 0.14 kg (5 oz)
* Arm fully extended: 147.1 mm (5 ^7/8 in) (h)
Your dealer may not handle some of the above listed accessories. Please ask the dealer for detailed information.
Design and specifications are subject to change without notice.
Troubleshooting
The following checklist will help you remedy problems you may encounter with your unit. Before going through the checklist below, check the connection and operating procedures.
For details on removing the unit, refer to the installation/connections manual supplied with this system.
Should any problem persist, stop using the system and consult your nearest Sony dealer.
DSP Master Unit
The SOURCE indicator on the DSP master unit flashes blue.
→ If the SOURCE indicator stops flashing when you press any button on the remote commander/cradle, one or more connections are incorrect.
- Refer to the Installation/Connections manual supplied with this system.
→ If the SOURCE indicator continues to flash blue when pressing any button on the remote commander/cradle, there may be an internal malfunction.
- Check the connection. If the SOURCE indicator continues to flash, consult your nearest Sony dealer.
The SOURCE indicator on the DSP master unit flashes red.
→ The power supply from the cradle to the iPod/iPhone is overloaded.
- Remove the iPod/iPhone from the cradle, and change the source by pressing the SOURCE/OFF button on the cradle. After checking the iPod/iPhone is working correctly, set it on the cradle again.
The SOURCE indicator on the DSP master unit flashes blue and red alternately.
→ Temperature detection is activated.
- Be sure to place the system in a well ventilated location.
- Reduce the volume.
Cradle
The adhesive strength of the suction cup is reduced.
→ The surface of the suction cup dirty.
- Clean the suction cup with the supplied cleaning sponge.
→ Do not use the liquid detergent to clean the cradle.
→ Make sure that the surface of the suction cup is not moistened before mounting the cradle.
The I◄◄/►►I buttons on the cradle do not work.
→ The car audio unit is selected as the source. These buttons are available only when an iPod/iPhone is selected as the source and the music player on the iPod/iPhone is activated.
The indicator on the cradle flashes blue.
→ If the indicator stops flashing when you press any button on the remote commander/cradle, one or more connections are incorrect.
– Refer to the Installation/Connections manual supplied with this system.
→ If the indicator continues to flash blue when pressing any button on the remote commander/cradle, there may be an internal malfunction.
- Check the connection. If the indicator continues to flash, consult your nearest Sony dealer.
The indicator on the cradle flashes red.
→ The power supply from the cradle to the iPod/iPhone is overloaded.
- Remove the iPod/iPhone from the cradle, and change the source by pressing the SOURCE/OFF button on the cradle. After checking the iPod/iPhone is working correctly, set it on the cradle again.
The indicator on the cradle flashes blue and red alternately.
→ Temperature detection is activated.
- Be sure to place the system in a well ventilated location.
- Reduce the volume.
The cradle is dirty.
→ See page 19 for details on cleaning the cradle.
The arm does not hold the iPod/iPhone properly.
→ The rubber used in the upper part of the arm becomes hard at low temperature.
- Allow the ambient temperature to increase, then set the iPod/iPhone.
Remote commander
The ◀◀/▶▶I buttons on the remote commander do not work.
→ The car audio unit is selected as the source. These buttons are available only when an iPod/iPhone is selected as the source and the music player on the iPod/iPhone is activated.
The remote commander does not work.
→ Make sure the remote commander is pointed at the remote sensor on the cradle.
→ Replace the lithium battery.
→ Make sure that the cradle cable is connected to the cradle securely.
→ Remove the iPod/iPhone from the cradle and then press the RESET button on the DSP master unit.
Other issues
Sound is heard only from the front speakers.
→ Set the INPUT SELECT switch on the DSP master unit to "2ch."
There is no sound when the car audio unit is selected as the source.
→ Press the SOURCE/OFF button on the cradle or the remote commander repeatedly until the LED indicator on the cradle turns blue.
→ Make sure that the car audio unit is turned on.
There is no sound when an iPod/iPhone is selected as the source.
→ Press the SOURCE/OFF button on the cradle or the remote commander repeatedly until the LED indicator on the cradle turns red.
→ If there is still no sound, even though the LED indicator on the cradle is red:
- Make sure that the iPod/iPhone is set on the cradle securely.
- Remove any case or cover from the iPod/iPhone.
- Operate playback on the iPod/iPhone directly.
Sound reduces suddenly.
→ Temperature detection could be activated.
- Be sure to place the system in a well ventilated location.
- Reduce the volume.
Suddenly there is no sound.
→ Temperature detection could be activated.
- Be sure to place the system in a well ventilated location.
- Reduce the volume.
Volume range is limited.
→ Temperature detection could be activated.
- Be sure to place the system in a well ventilated location.
- Reduce the volume.
The iPod/iPhone Screen Rotation function works unexpectedly when the car is being driven.
→ The Screen Rotation can be caused by vibration, according to the road condition.
- Turn this function off.
No sound is heard from the subwoofer.
→ Ensure that the subwoofer is connected properly to the system, and the SUBWOOFER switch is set to "Y" on the DSP master unit.
natural_image
Line drawing of a device with a paper clip inserted, showing no text or symbols1 Botón SOURCE/OFF
Interruptor SW LOCATION
Interruptor SUBWOOFER
Interruptor VEHICLE SIZE
natural_image
Side profile line drawing of a car with driver seats and a vehicle (no text or symbols)VEHICLE SIZE: S
SUBWOOFER: Y
SW LOCATION: MID
natural_image
Line drawing of a car interior showing driver and passenger (no text or symbols)VEHICLE SIZE: M
SUBWOOFER: N
SW LOCATION: -
Camioneta pick up
natural_image
Line drawing of a pickup truck with driver's seat and cab, no text or symbols presentVEHICLE SIZE: S
SUBWOOFER: Y
SW LOCATION: NEAR
natural_image
Side-view line drawing of a car with three passenger seats and a vehicle, no text or symbols presentVEHICLE SIZE: L
SUBWOOFER: Y
SW LOCATION: FAR
natural_image
Technical line drawing of a mechanical clamp or bracket component (no text or symbols)Lámina de montaje
Correa

natural_image
Line drawing of a cable with attached clip and strap (no text or symbols)Abrazadera de cables
Cable del soporte
natural_image
Three identical diagrams showing a battery with a circular top, marked with an 'O', and marked with an 'X' (no text or symbols on the devices themselves)natural_image
Diagram showing a paperclip being inserted into a plastic sheet, with arrows indicating the process (no text or symbols present)natural_image
Mechanical assembly diagram showing two stages of a device with rotating components and directional arrows (no text or symbols)Notas
Notas
natural_image
Mechanical assembly diagram showing a rotating component with a curved arrow indicating rotation (no text or symbols present)Nota
natural_image
Diagram of a mechanical device with wiring and a connected plug, showing no text or symbolsNotas
natural_image
Diagram of a mechanical or electrical component with two arrows indicating direction (no text or symbols present)2 Libere la correa del tensor.
natural_image
Mechanical assembly diagram showing a rotating component with a handle and base (no text or symbols)natural_image
Mechanical assembly diagram showing a rotating component with a curved arrow indicating rotation (no text or symbols present)natural_image
Interior view of a car dashboard and infotainment system showing steering wheel, battery pack, and smartphone (no text or symbols)flowchart
graph TD
    A["Initial clamp device"] --> B["Downward movement"]
    B --> C["Assembly of clamp device"]
    C --> D["Downward movement"]
natural_image
Diagram showing two mechanical assembly states: one with a clamp and arrow indicating rotation, the other with a bracket and curved arrows indicating rotation (no text or symbols)Nota
Notas
Notas
natural_image
Diagram showing two mechanical assembly states with arrows indicating motion direction (no text or symbols)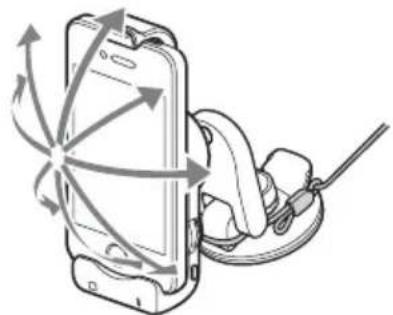
natural_image
Diagram of a hand holding a smartphone with a cable inserted, showing directional arrows indicating motion (no text or symbols present)Notas
natural_image
Mechanical device diagram showing a lever mechanism with two opposing force arrows (no text or symbols)natural_image
Line drawing of a hand holding a small mechanical component with a circular hole, no text or symbols presentnatural_image
Technical line drawing of a mechanical component with internal channels and a highlighted section (no text or symbols)If you have any questions or for the latest support information on this product, please visit the web site below:
Site d'assistance
If you have any questions/problems regarding this product, try the following:
1 Read Troubleshooting in these Operating Instructions.
2 Please contact (U.S.A. only);
Call 1-800-222-7669
URL http://www.SONY.com
- Digital Link Sound System
- Warning
- For the State of California, USA only
- Note on the lithium battery
- Warning if your car's ignition has no ACC position
- Table of contents
- Introduction 4
- Getting Started ....4
- The System Components....5
- Sound Settings....8
- Setting up the Cradle....10
- Playback....17
- Additional Information....18
- Introduction
- Getting Started
- Resetting the unit
- The System Components
- DSP master unit
- Note
- Cradle
- RM-X251 Card remote commander
- SOURCE/OFF button
- FAD/BAL (FRONT/CNT/REAR)
- VOL +/- buttons\*
- Sound Settings
- Optimized sound setting based on your vehicle
- Notes
- SW LOCATION switch
- SUBWOOFER switch
- VEHICLE SIZE switch
- Compact hatchback
- Middle sized sedan
- Pickup Truck
- Full sized SUV
- Tip for setting the SW LOCATION switch
- Setting the sound balance based on your listening preference
- Tip
- Adjusting the speaker balance
- Press the FRONT/REAR/LEFT/RIGHT buttons to adjust the balance between the speakers.
- Adjusting the treble level
- Press the TREBLE (-/CNT/+) button.
- Adjusting the bass level
- Press the BASS (-/CNT/+) button.
- Adjusting the subwoofer level
- Press the SUB VOL +/- button.
- Adjusting the input volume from the iPod/iPhone
- Press the ALO button.
- Setting up the Cradle
- Precautions
- Parts List
- Mounting sheet
- Strap
- Cord clamp
- Cradle cable
- Cleaning sponge for suction cup
- Before Installation
- To attach the mounting sheet
- Peel the paper from the mounting sheet, and then stick the mounting sheet to the dashboard.
- Installation
- Adjust the strap.
- To remove the cradle
- Arranging the cradle cable
- Attaching an iPod/iPhone
- Compatible iPod/iPhone models
- Tips
- To adjust the angle of the cradle
- To remove the iPod/iPhone from the cradle
- Playback
- Setting up the system
- Enjoying an iPod/iPhone
- Playing from a car audio unit
- Additional Information
- Fuse replacement for the DSP master unit
- About iPod/iPhone
- Maintenance
- Replacing the lithium battery of the remote commander
- Notes on the lithium battery
- Cleaning the cradle
- Specifications
- AUDIO POWER SPECIFICATIONS
- Power-AMP
- General
- Outputs:
- Inputs:
- Sound controls:
- Supplied accessories:
- Dimensions:
- Troubleshooting
- The SOURCE indicator on the DSP master unit flashes blue.
- The SOURCE indicator on the DSP master unit flashes red.
- The SOURCE indicator on the DSP master unit flashes blue and red alternately.
- The adhesive strength of the suction cup is reduced.
- The I◄◄/►►I buttons on the cradle do not work.
- The indicator on the cradle flashes blue.
- The indicator on the cradle flashes red.
- The indicator on the cradle flashes blue and red alternately.
- The cradle is dirty.
- The arm does not hold the iPod/iPhone properly.
- Remote commander
- The ◀◀/▶▶I buttons on the remote commander do not work.
- The remote commander does not work.
- Other issues
- Sound is heard only from the front speakers.
- There is no sound when the car audio unit is selected as the source.
- There is no sound when an iPod/iPhone is selected as the source.
- Sound reduces suddenly.
- Suddenly there is no sound.
- Volume range is limited.
- The iPod/iPhone Screen Rotation function works unexpectedly when the car is being driven.
- No sound is heard from the subwoofer.
- Botón SOURCE/OFF
- Interruptor SW LOCATION
- Interruptor SUBWOOFER
- Interruptor VEHICLE SIZE
- Camioneta pick up
- Notas
- Nota
- Site d'assistance
- If you have any questions/problems regarding this product, try the following:
Brand : SONY
Model : XDP-MU110
Category : Car hands-free kit