WP 600 - Dishwasher Modena - Free user manual and instructions
Find the device manual for free WP 600 Modena in PDF.


| Product Type | Freestanding Dishwasher |
| Brand | Modena |
| Model | WP 600 |
| Place Settings | 12 |
| Product Dimensions (W x D x H) | 60 x 60 x 85 cm |
| Weight | 44 kg |
| Color | Stainless (S) |
| Cabinet Material | Metal outer, Stainless inner |
| Power Supply | 220-240 V, 50 Hz |
| Maximum Electrical Power | 1850 W |
| Water Pressure (min-max) | 0.04 - 1.0 MPa |
| Maximum Washing Temperature | 60°C |
| Number of Programs | 6 (Intensive, Normal, Eco, Crystal, Rapid, Pre-Rinse) |
| Normal Wash Time | 153 minutes |
| Water Consumption (Normal) | 14 liters |
| Energy Consumption (Normal) | 1.05 kWh |
| Delay Start Options | 3, 6, or 9 hours |
| Adjustable Legs | Yes (max 20 mm height adjustment) |
| Adjustable Upper Basket Height | Yes |
| Water Softener | Yes, with salt container |
| Rinse Aid Dispenser | Yes, capacity ~140 ml, 6 dosage levels |
| Detergent Dispenser | Yes, with pre-wash compartment |
| Filter System | Coarse, flat (main) and micro filter |
| Child Lock | Yes (press Intensive + Eco for 1 second) |
| Water Overflow Protection | Yes |
| Safety Features | Door open detection, overflow sensor, leakage protection |
| Warranty | Refer to warranty card |
Frequently Asked Questions - WP 600 Modena
User questions about WP 600 Modena
0 question about this device. Answer the ones you know or ask your own.
Ask a new question about this device
Download the instructions for your Dishwasher in PDF format for free! Find your manual WP 600 - Modena and take your electronic device back in hand. On this page are published all the documents necessary for the use of your device. WP 600 by Modena.
USER MANUAL WP 600 Modena
DISHWASHER MANUAL AND WARRANTY CARD
04/17
PETUNJUK DAN PANDUAN PEMAKAIAN MESIN PENCUCI PIRING (DISHWASHER) MODENA
natural_image
Illustration of a hand holding a pipe fitting and a mechanical clamp (no text or symbols)natural_image
Simple circular diagram with a central arrow and two labeled points (no text or symbols)natural_image
Close-up of a mechanical component with a lever and cylindrical part inside a tray (no visible text or symbols)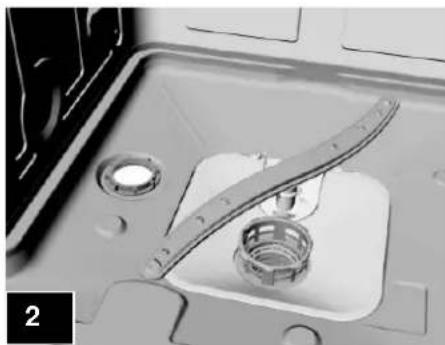
natural_image
Close-up of a mechanical component with a curved tool and circular features (no visible text or symbols)natural_image
Simple line drawing of a lampshade with a small object on top (no text or symbols)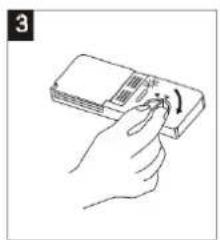
natural_image
Hand holding a card with a scroll, no visible text or symbolsnatural_image
Line drawing of a hand holding a device with a tool, showing a circular component and directional arrows (no text or symbols)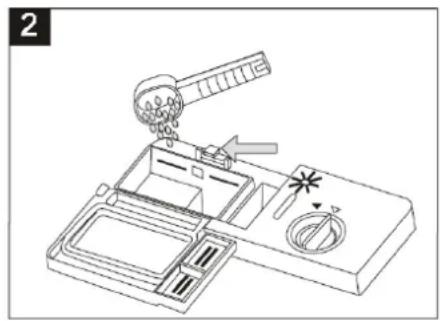
natural_image
Line drawing of a mechanical device with a lever and base plate (no text or symbols)CATATAN:
natural_image
Mechanical assembly diagram showing two labeled components (1 and 2) with springs and wheels, no text or symbols present.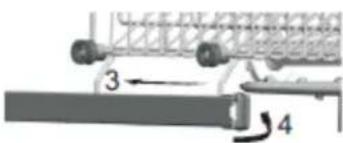
| Keranjang Bawah | |
| Tipe | Item |
| F | Piring Sup |
| G | Mangkuk |
| H | Piring Nasi |
| I | Piring Kue |
| J | Piring Oval |
natural_image
Technical line drawing of a mechanical assembly with numbered components (no text or symbols)natural_image
Technical diagram of a mechanical component with numbered parts (1, 5, 7) and no visible text or symbols
natural_image
Illustration of a modern building with large windows and surrounding trees, no visible text or symbols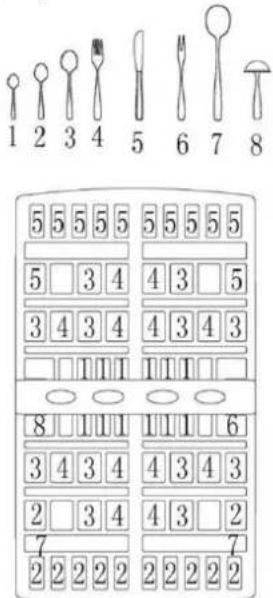
| Keranjang/Rak Peralatan Makan | |
| Tipe | Item |
| 1 | Sendok Teh |
| 2 | Sendok Kue/Puding |
| 3 | Sendok Sup |
| 4 | Garpu |
| 5 | Pisau Makan |
| 6 | Garpu Saji |
| 7 | Sendok Saji |
natural_image
Close-up of a mechanical component with a central spring and lever mechanism (no visible text or symbols)natural_image
Close-up of a mechanical component with a curved handle and circular opening, no visible text or symbolsnatural_image
Mechanical device diagram showing a rotating lever mechanism with directional arrows (no text or symbols)Pemeliharaan
INSTRUCTION AND GUIDE TO USING MODENA DISWASHER
Thank you for your trust and decision to buy MODENA product and make it a part of your modern family's needs and lifestyle. The stylish and advanced design in each product is an elegant combination for your daily household activities.
This book contains various matters regarding dishwasher, from its method of usage, maintenance, various professional features of the product down to its trouble-shooting. As a manufacturer of user friendly home appliances, we thrive to simplify the description in this manual to facilitate the users.
In order for this dishwasher to perform normally for an extended period of time, we highly recommend not only the buyer to hold onto this manual, but also those who wish to operate the product optimally to maintain its service period and quality. This manual is recommended for use by anyone who operates the dishwasher.
We also provide a customer care service for MODENA users as well as other support information on our official website www.modena.co.id. Please contact us if you have other questions regarding the dishwasher.
Enjoy your daily activities, we hope that our products may provide the best services to your family.
MODENA
CONTENTS PAGE.
• Introduction 23
• Part 1 : Name of Part 25
• Part 2 : Installation 25
• Part 3 : How to Use 28
• Part 4 : Maintenance 38
• Part 5 : Precaution Action 40
• Part 6 : Problem & Solution 42
• Part 7 : Specification 44
Part 1: Name of Part
WP 600
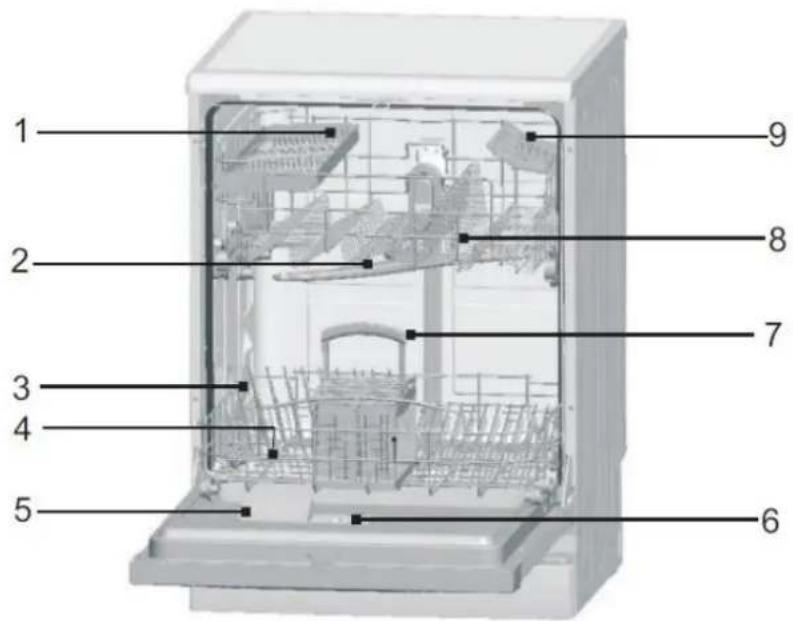
\* Front side
- Upper basket
- Arm Spray
- Bottom basket
- Salt container /water softener.
- Filter.
- Detergent dispenser.
- Dispenser rinse aid.
- Cutlery basket.
- Glass Buffer.
* Features and completeness depends on the type of products
Part 2: Installation

Please read the manual carefully: This manual contains the information that provided for your safety. You MUST read them carefully before installing or using this appliance.

When transferring the unit, always makes sure the upright position, when absolutely had to please try to move the side to the rear.
Placement and tightening (leveling)
- Check your units whether have any damage due to transport. Never connect a damaged machine. If the unit is damaged, contact the service center of Modena.
- Check whether the unit is installed properly so the sides or the rear panel attached to adjacent cabinets or even with the wall. This tool can also be mounted on the bottom of a single kitchen table.
- Put the unit on a solid and flat floor. If the floor is uneven, adjustable the height of front feet of the unit until the unit is stable (the unit slope should not exceed 2 degrees). If the unit has been set correctly, the unit will be more stable and reduce the possibility of moving due to vibration.
Connecting the water and electricity sources

Connecting to the water source and the power source must be performed by a qualified technician.

Make sure the unit is installed above the water hose or power cord.

The unit must be connected to a water source using a new pipe. Do not use old pipe.
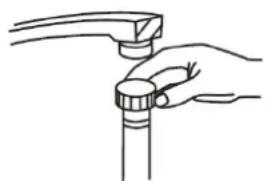
Connecting the water inlet hose
natural_image
Line drawing of hands holding a pipe fitting (no text or symbols)Connect the cold water hose with a threaded connector to (3/4 inch) and make sure it is properly installed and tight. If the drains are new or unused for long periods of time, then turn on the water first until the channel is clean, it aims to avoid blockage and damage to the unit caused by dirty water.
Connect the water outlet hose (drain hose)
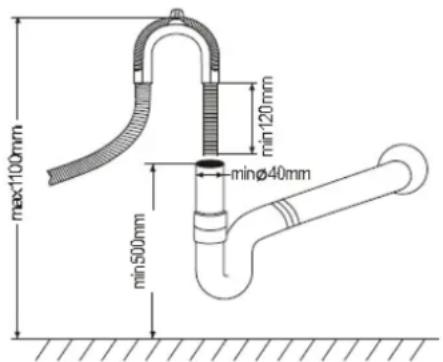
Attach the drain hose of the unit to pipe / home sewer, make sure it is not bent or pinch.
If the hose length is not long enough, then use additional hose with the same materials and quality. It must be remembered that the length of the hose should not more than 4 meter connection either with or without a connection. If the drain hose is more than 4 meters it could lead to the plates and other tableware washed less clean. Make sure the drain hose is properly installed and secured in the plumbing/ sewer.
Connecting to the power source
Before installing the power cord to the power source, make sure that:
- The power outlet is at ground / earth with the appropriate current.
- The power outlet can hold a maximum load of unit.
- The power outlet is appropriate with the mains unit, if it does not fit contact a qualified technician to replace it. Do not use a cable connector or socket along with the other unit.
- Once the unit is installed, the power cords and plugs should be easy accessible.
- Make sure the cable is not bent or pinched.
- If the power cord is damage it must be replaced with a cable that has the same qualifications, contact a technician for installation, this is to avoid the danger that can be caused.
- The Company is not responsible for any accidents caused because of not following these instructions.
Suggestion for the first time use
Before you operate the unit for the first time, fill in the salt container with the special salt for the dishwasher as much as 2 Kg (see how to fill the salt and rinse aid). It is normal if there is a little flood water and salt indicator lights remain lit for a few cycles after filling the salt.
Put / install the unit
Install the unit at desired place. Put the backside of the unit against the wall behinds it and the sides on the wall or closet nearby. This dishwasher is equipped with water hose inlet and outlet that can be positioned to the right or the left to facilitate mounting in the right position.
Adjust the height of Units
At the time of installation, to set the height of the unit can be done by turning the foot inward or outward of the unit (the slope of the unit should not be more than 2 degrees).
Note: Legs can be set with a maximum height of 20 mm.
Remove the excess water from the hose
If the sink height is 1000 mm from the floor, the excess water in hose can not be discharged directly into the sink. The waste water should be stored in tubs or other containers that are placed in the lower position of the sink height.
Drainage
Connect the drain hose. Drain hose must be installed correctly and tight to prevent the leakage. Make sure that the inlet and outlet of water hose is not squashed or bent.
Extension / connection Hose
If needed to extend the hose, be sure to use the hose with the same quality and material. Hose length should not more than 4 meters, if not the quality of the wash will be reduced.
Sewer
The minimum height of the drain is 50 cm to a maximum of 100 cm from the unit base. Tighten the drain hose using hose clips.
Starting to operate the dishwasher
Before starting to operate the unit, check the following things:
- The unit has been steadily installed
- The water channel has been opened
- There is no leakage at the connection
- The cable has been installed tightly
- The electric power is on
- The hose water already in position in and out is not pinched or bent.
- The entire packing material has been removed from the unit
Part 3: How to Use
Control Panel
flowchart
graph LR
    A["Power"] --> B["Delay"]
    B --> C["Start/Stop"]
    C --> D["6"]
    D --> E["Internal"]
    D --> F["External"]
    E --> G["Control Bus"]
    F --> H["External Bus"]
    G --> I["7"]
    H --> I
    style A fill:#f9f,stroke:#333
    style B fill:#ccf,stroke:#333
    style C fill:#cfc,stroke:#333
    style D fill:#fcc,stroke:#333
    style E fill:#ffc,stroke:#333
    style F fill:#fcc,stroke:#333
    style G fill:#cff,stroke:#333
    style H fill:#cff,stroke:#333
    style I fill:#ffc,stroke:#333
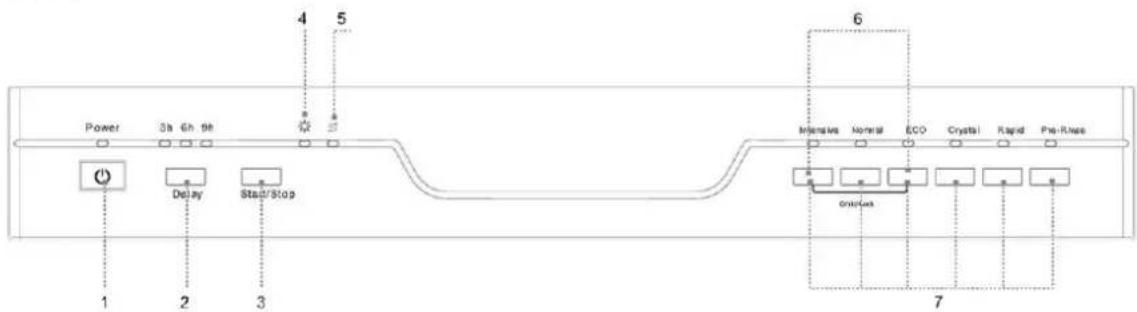
- Power Button: To turn on or turn off the engine.
2.. Delay time: Press the delay time once the waiting time will be active for 3 hours, press twice to activate the waiting time of 6 hours, press three times the waiting time becomes to 9 hours. Press once again to cancel the delay time selection function.
-
The Start / Stop button: Press this button to activate or stop the dishwasher, the lights will turn on when the engine is started to active.
-
Rinse Aid Indicator Light: If the light is on indicating the rinse aid box should be refilled.
-
The Salt Indicator Light: Turns on when the softener / salt needs to be recharged.
-
Child Lock: To lock the function of dishwasher that has been selected, press and hold the INTENSIVE & ECO button simultaneously for about a second. INTENSIVE & ECO lamp will light up. To stop the child lock function repeat the above steps until the INTENSIVE & ECO light turn off.
-
Program button: To select a program press the program as needed.
- Adjust water softener
- Fill in the salt container with 500 ml of water and then enter the special salt for dishwasher.
- Fill in the dispenser rinse aid.
- Fill in detergent dispenser
A. Water softener.
Water softener must be set manually, use key regulator of water hardness. Water softener is designed to remove minerals and salts from the water source, which can lead to harmful and damaging effects on the operation of the appliance. The higher content of minerals and salts, the harder the water. Set softener according to the waterhardness in your area. You can ask the hardness of water to the region of your local water company.
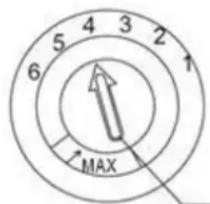
Set the salt consumption.
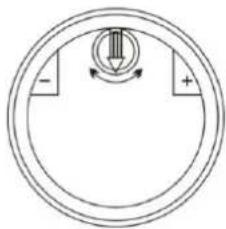
The dishwasher is designed to use an amount of salt that can be set based on the hardness of the water used. It aims to optimize the use of the salt to regulate the use of salt can follow these steps:
natural_image
Simple circular diagram with a central arrow and two labeled terminals (no text or symbols)-
Remove the lid from the salt container.
-
In the salt container there is a circle with an arrow (see the next figure), if necessary turn the arrows anticlockwise with the sign "-" as a reference, to setup towards the "+" sign, based on the water hardness level to be used.
Recommended setting is based on the following scheme:
| Water hardness. | Position | Consumption (Grams / cycle) | Autonomy (cycles/2kgs) | |||
| ^ dH | ^ fH | ^ Clark | Mmol/l | |||
| 0 ~10 | 0 ~17 | 0 ~12.5 | 0 ~1.7 | / | 0 | / |
| 10 ~25 | 17 ~44 | 12.5 ~31.3 | 1.7 ~4.4 | - | 20 | 60 |
| 25 ~ 50 | 44 ~ 89 | 31.3 ~ 62.5 | 4.4 ~ 8.9 | Mid | 40 | 40 |
| >50 | >89 | >62.5 | >8.9 | + | 60 | 25 |
Contact your local water company for information on the hardness of the water in your house.
B. Fill in the Salt to the softener / Salt Container
Always use the salt that intended for dishwashers.
NOTE: If your dishwasher models do not have this feature, the following steps can be ignored.
WATER SOFTENER
The water hardness is different in each place. If the hard water used in dishwasher, it will cause sediment on dishes and other tableware. The unit is equipped with a special softener that uses the salt that specifically designed to eliminate the lime and minerals in the water.
Salt container is located below the bottom of the basket, follow the instructions below for the charging process:
Attention!!!
Only use the salt intended for dishwashers! Other types of salt that are not intended for the use of the dishwasher, especially table salt, will damage the water softener. The Company does not provide warranty coverage, if any damage caused by it.
Fill the salt container with special dishwasher salt before washing program is complete operate from one of the existing program, this will prevent the grains of salt or salty water that may have split, left at the bottom of the machine for a long time and can cause rust.
After the first round of washing the control panel light is off.
natural_image
Close-up of a mechanical component with a lever and housing (no visible text or symbols)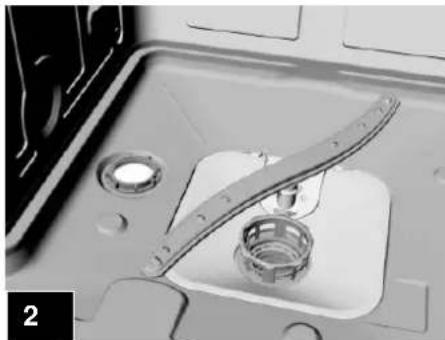
natural_image
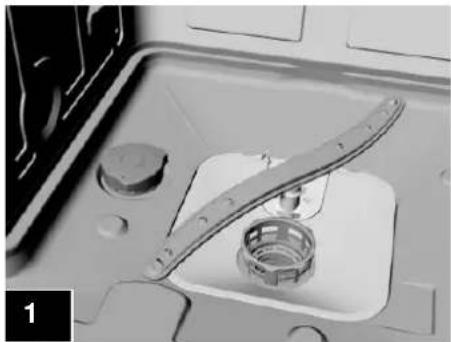
Close-up of a mechanical component with a curved handle and circular features (no visible text or symbols)F. Remove the bottom basket and remove the salt container by turning it counter-clockwise.(1).
G. If you fill the salt container for the first time, fill in 2/3 volume with water (about 500ml).
H. Put a funnel (in the packing) to the salt container and fill in approximately 2kg of salt. If there was a little water coming out of salt container, this is normal.
I. Replace the cover carefully.
J. Usually, the salt warning light will be off 2-6 days after the salt container filled.
Note:
-
The salt container should be filled when the salt container warning light is on. Although the salt container is fully filled, the indicator light may not be off before the salt is completely dissolved. If there is no salt container indicator light on the panel control (for selected models), you can estimate when to fill in the salt / softener based on the number of rounds that the process has been started (see the previous scheme of salt consumption).
-
If there is a spill of salt, the soak program could be run to clean it.
C. Filling the Rinse Aid Place
Rinse aid function
Rinse aid automatically added during the last rinse, ensuring thorough rinsing and dry with no stains and dirt layers.
Attention!
Only use branded rinse aid for dishwashers. Never fill the dispenser with other substances (eg dishwasher cleaning agent, liquid detergent). This would damage the appliance.
Dispenser charging time
If there are no warning lights on the control panel, you can estimate the amount of rinse aid by the color in the glass level indicator "D" that located on the cap / hole. Rinse aid when the box is full, the hole will be dark / closed. As reduction in rinse aid, the dark point on the holes size is also smaller. Make sure the rinse aid is never less than 14 full.
As the rinse aid reduce, the size of dark spots on rinse aid pit indicators also changed as illustrated below:

Full.

3/4 Full

12 Full.

14 Full – must be filled to reduce the spot.

Empty.
D (Rinse aid indicator)
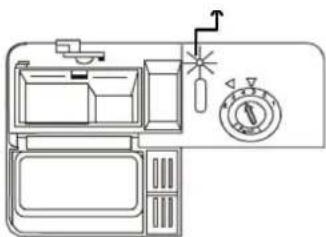
natural_image
Line drawing of a kitchen appliance with a stopwatch and air vent (no text or symbols)PLACE OF RINSE AID
natural_image
Simple line drawing of a lamp with a lampshade and a small object above it (no text or symbols)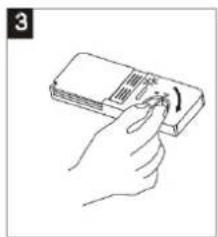
natural_image
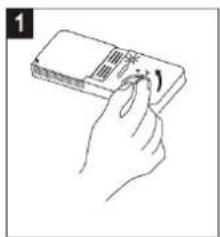
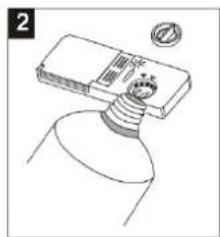
Line drawing of a hand holding a stack of books with a scroll, no text or symbols present- To open the rinse aid, turn the stopper / cap in the direction of the arrow "open" (left).
- Pour the rinse aid into the container, be careful not to excess.
- Replace the stopper / cap by aligning the arrow "open" and turn toward the arrow "closed" (right).
This dishwasher is designed to use rinse aid with the type of fluid. Rinse aid container is located inside (attached to door) next to the detergent.
To fill the rinse aid, open the lid and pour the rinses into it until the rinse aid indicator color completely dark. Rinse aid container capacity is about 140 ml.
Be careful when filling the rinse aid not to exceed the maximum limit, as it can cause excess foam.
Wipe the rinse aid spilled with a damp cloth. Do not forget to put the lid back before closing the door of rinse aid dishwasher.
Attention!!!
Clean rinse aid spilled during the filling using vacuum cloth to prevent excessive foam on the next wash.
Adjusting the Rinse Aid Container
Dispenser container has six dosing levels (position 1 minimum dosage, position 6 maximum dosage), always starting the dose setting to "2", if the stain is still there and no drying problems, increase the dose levels by moving the setting to the level of "3", if the result of the washing is not maximized then raise to the next level, until there is no more stain / spot on cutlery. Recommended dose is set at a level "4". (Dose set by the factory at position 4).
Level Control
NOTE: Raise the dose if still happen droplets or spots on the cutlery after washing. Reduce if there is a white coating that sticks to cutlery or visible bluish transparent layer on the tools made of glass, or the blade.
D. DETERGENT FUNCTION
Detergent serves to remove the stains, the stains that harden and running it through the dishwasher.
Only use the detergent specifically designed for dishwasher's use.
Various types of detergent
Concentrated Detergent
Based on its chemical composition, dishwasher detergents divided into 2 basic types:
- Conventional, alkaline detergents with caustic components
- Low alkaline concentrated detergents with natural enzymes
The use of "normal" washing program with concentrated detergent reduces the pollution and is good for your dishes; this washing program is specifically matched to the destruction of dirt on the nature of the enzyme in the detergent concentrates. Because of these reasons a "normal" washing program by using concentrated detergent can get the same results with results that can only be obtained by using the "intensive" program.
Detergent tablets with a different brand dissolve in different speeds. That is why some detergent tablets can not dissolve and wash thoroughly when operating a short run program. Therefore, use long programs when using detergent tablets, to ensure removal of traces of detergent thoroughly. Do not put detergent tablets inside the tub or cutlery basket because it will give poor washing results. Detergent tablet should be placed in the detergent dispenser.
Detergent container
Detergent must be filled before the start of each wash cycle according to the instructions shown in the washing table. This dishwasher uses less detergent and rinse aid when compared to a conventional dishwasher. In general, just one tablespoon of detergent is needed for a normal wash load of capacity. For heavier dirtiness level it takes more detergent. Always add the detergent before starting the wash, if not the result will be clean and not wet.
The amount of detergent used
NOTE:
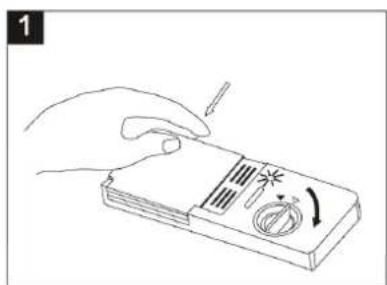
If the lid is not already open: press the release button. Lid opens
Always put the detergent before starting each washing cycle. Only use branded detergent for dishwashers.
natural_image
Line drawing of a hand holding a pen and a device with a screwdriver, no text or symbols present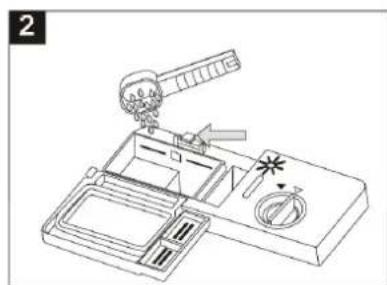
natural_image
Technical line drawing of a mechanical device with no visible text or symbolsNOTE:
- If the lid is not already open: press the release button. Lid opens.
- Always put the detergent before starting each washing cycle. Only use branded detergent for dishwashers.

WARNING! Dishwasher detergent is corrosive! Keep away from children.
Only use detergents specifically for dishwasher. Make sure the detergent in a dry and fresh condition. Do not put detergent into the dishwasher before it is ready for washing.
Fill in the detergent
Fill in the detergent container with the detergent.
1). The signs exist indicate the dosage levels, like the picture on the main detergent wash, "MIN" shows roughly 20g of detergent.
2). A place to put the detergent for pre-wash process, approximately 5g of detergent.
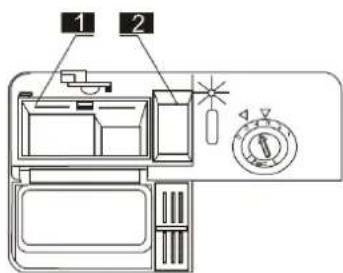
Check the dosage and method of storage on the detergent pack.
Press the cover until it locks.
If the cutlery is very dirty, add the detergent dose in the pre-wash detergent box. This will give the effect of detergent during pre-wash phase.
NOTE:
Information regarding the amount of single process detergent you would have encountered at the end of the page. Please note the difference could occur depending on the level of dirtiness and water hardness.
Note the manufacturer's recommendations on the detergent pack.
Detergent
There are 3 detergent type
- Detergent with phosphate and with klorin
- Detergent with phosphate and without chlorine
- Detergents without phosphate and without chlorine
Normally, a new non-phosphate detergent powder, so the water softener function of the phosphate is not given, in cases like this always fill in the salt in its container even if the level of hardness of water is only 6 dH, and if at the time of using detergents without phosphates on high water hardness cause white patches on the cutlery and glasses, then input more detergent for better results.
Detergents without chlorine only bleach slightly, strong and colored spots are not completely lost, in this case select the program with a higher temperature.
E. FILL IN THE DISHWASHER BASKET
To get the best performance out of the dishwasher, follow the instructions below to fill in the basket. Feature and display of basket and cutlery place may be different depending on the model.
The things to note before or after Fill in the Dishwasher Machine Basket
- Dispose the food waste, soften the crust remnants of food in the pan. When laying plates and cutlery in the dishwasher, follow the following:
A. Dishes and cutlery must not impede spray arm.
B. Place the perforated objects, such as glasses, cups, pans, etc. with the opening facing down so that water does not accumulate in container.
C. Plates and tools that have to be placed angle and should not be placed overlap with each other so that the surface exposed to water spray.
D. Put the small objects in the cutlery basket. - Objects that are too small should not be washed using a dishwasher as it will easily fall from basket.
- Plastic objects and pans with non-stick coating droplets have a tendency to hold the water droplets, these items will not dry as well as porcelain objects or steel.
- Do not pull out the basket when the engine will start and or operate, operate the machine with the door open is a dangerous act.
- Avoid pulling out the basket up and down simultaneously when filled.
Taking out the cutlery
To avoid the water droplets hit the bottom of the basket, we recommend to emptying the bottom basket first.
Fill in the Upper Basket
Upper basket is designed to accommodate the equipment such as glasses, coffee and tea cups, saucers, salad bowls, small bowls and shallow pans (as long as not too dirty). Adjust the position of cutlery and cookware so that all surfaces exposed to water spray and not moving because of the water spray.
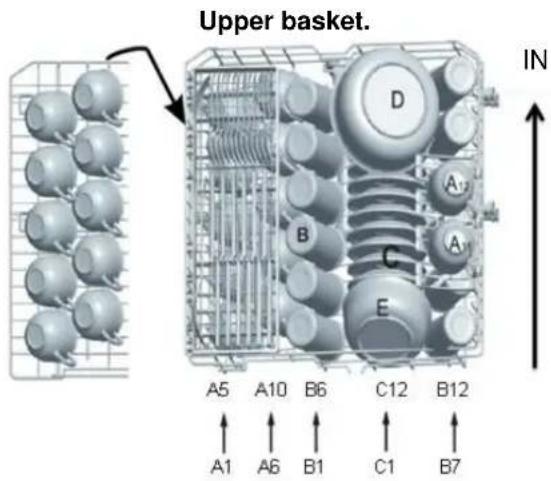
| Upper basket. | |
| Type | Item |
| A | coffee and tea cups |
| B | Glasses |
| C | saucers |
| D | bowls |
| E | bowls |
| F | bowls |
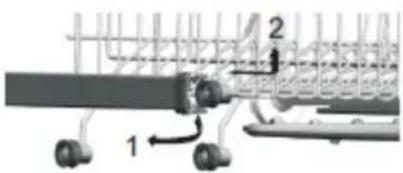
Set the Upper basket
If required, the height of the upper basket could be set to get more space for large equipment either at the basket and lower basket. The height of the basket is set by placing a different height on rail wheels that are available. And sharp objects such as knives or long meat knife should be placed horizontally in the basket blades that can be moved, such as the position on the back of the basket, so it will not hinder the rotation of the spray arms. Basket blade can be bent back or removed when not in use. Bottom basket. Soup plate. Rice plate. Cake plate. Oval plate.
natural_image
Mechanical assembly diagram showing two components labeled 1 and 2, with no visible text or symbols beyond labels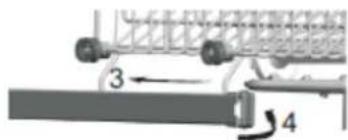
Fill in the bottom basket
Bottom basket is designed for saucepan, cover, plates, salad bowls, cutlery, and others. Plate and lid should be placed on the side of the basket to make sure not obstruct the upper arm spray. The hollow pot is placed at an angle so water can flow. The two rows behind the basket below the buffer can easily be degraded so that you can put the pots and bowls.
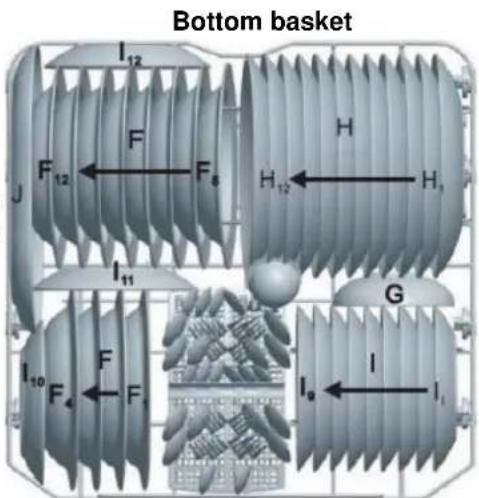
| bottom basket | |
| Type | Item |
| G | Soup plate |
| H | Rice plate |
| I | Cake plate |
| J | Oval plate. |
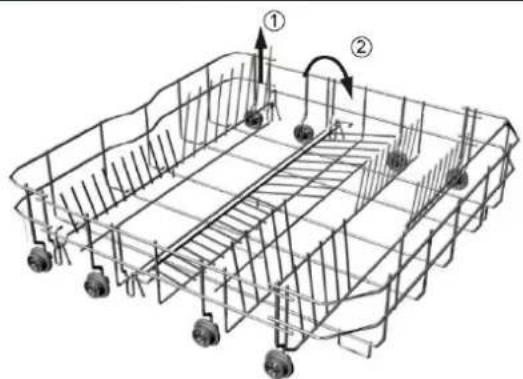
Bottom shelf Fold In Basket
Folding rack found in the bottom basket, consists of two parts that are made to facilitate the placement of bulky items, such as a saucepan, wok etc.. Follow the instructions below to fold up and restore the position of the rack:
- Draw up a bit and let it face down (see picture).
- To return to the center position, simply pull back.
natural_image
Technical line drawing of a multi-level industrial container with railings and wheels, no text or symbols presentBasket / Cutlery Rack
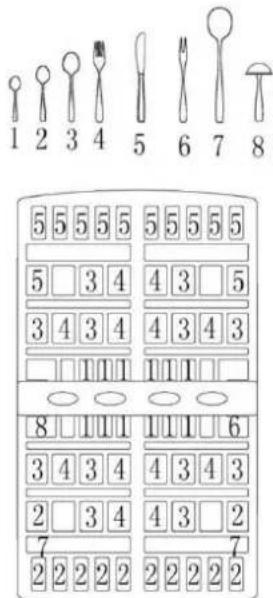
Fork and spoon should be placed in the cutlery basket can be moved with stem facing down and the blade with handle facing up. If a place has a cutlery basket section sides, the spoon should be placed in the hole available one by one. Especially for the equipment with the length with a horizontal position placed at the front of the basket.
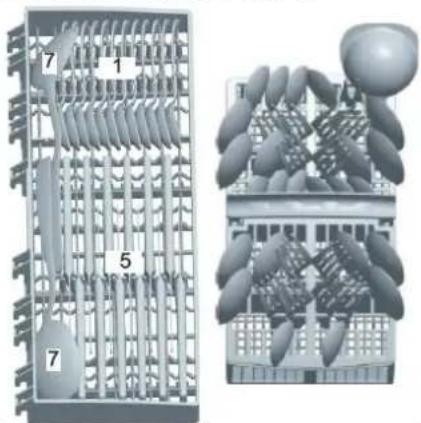
| Basket / Cutlery Rack | |
| Type | Items |
| 1 | Tea spoon. |
| 2 | Cake / pudding spoon. |
| 3 | Soup spoon |
| 4 | Fork. |
| 5 | Table knife. |
| 6 | Serving fork. |
| 7 | Serving spoon |
| 8 | Soup spoon |
Door
Not suitable for washing the utensils / plates of the following with the dishwash
- Cutlery made of wood handle, horn, pottery, or pearls.
- Plastic objects that can not resist the heat.
- The cutlery with parts that do not resist the heat.
- Plates / cutlery parts stored.
- The objects of pewter and copper.
- Glass Crystal.
- The objects of steel that can rusty.
- Wood plate. Large of objects that made of synthetic fiber.
WARNING !!!
Do not let the equipment washed out to the bottom part.
Little fit.
- Several types of objects made of glass can be frosted after being washed many times.
- Aluminum parts and silver has a tendency blackened during the washing.
- Layered patterns may fade if washed frequently.
NOTE:
- Do not put the dirty cutlery caused by cigarette ash, candle wax, varnish or paint. If you buy tableware make sure the cutlery can be washed using dishwasher.
NOTE: The following matters are necessary to get good results and reasons of energy consumption. - Do not exceed the specified capacity. This unit is designed for 12 standard sized cutlery.
- Do not use this unit to wash the cutlery that can not be washed by using a dishwasher.
Put the cutlery and plates
Before putting plates in the dishwasher, you should:
- Throw away the leftovers.
- Soften the crust remnants of food in the pan.
When putting the plates and cutlery, consider:
- Dishes and cutlery must not impede the spray arm.
- Place the perforated objects, such as glasses, cups, pans, etc. with the opening facing down so that water does not collect in the container.
- Dishes and tools should not be placed inside and cover one another.
- In order to avoid damage, the glass should not be touched.
- Put small objects in the cutlery basket.
- Put large-sized objects that are difficult to wash at the bottom of the basket.
- Upper basket is designed for objects that are lighter and easier to clean as glass, tea cups and coffee mugs.
Attention!
Long edge blade that placed in an upright position can be dangerous!
And sharp objects such as knives or long meat knife should lie flat on the upper of the basket. Be careful when inserting or removing sharp objects such as knives.
Damage to glasses and other tableware
Possible causes:
- Type of glass or manufacturing process. The chemical composition of the water contained in detergent.
- Temperature and duration of the selected program.
Recommendation:
- Use the glassware or cutlery that has been flagged by the manufacturer that the product safely washed with a dishwasher.
- Use a mild detergent for tableware. If needed refer to the information that provided by the manufacturer.
- Select the program with a low temperature.
- To prevent damage, remove glasses or eating utensils as soon as possible after the wash program has been completed.
At the end of the washing program
When the wash cycle has stopped, buzzer / alarm will sound 6 times, then stopped. Turn off the unit by pressing the On / Off button, turn off the water supply and open the door of the machine. Wait for a few minutes before removing tableware, so that the tableware will be cold and the dryer would be better. Hot plates can easily broken. Therefore allow it to cool before take them out. Empty the lower basket first and then the upper basket, this will prevent water droplets from the basket override the plates under the basket.
When the washing program has finished, it is recommended to remove the dishwasher plug and turn off the water faucet.
F. Run a wash program
Table of washing cycle
| Program | Specification | Cycle | Detergent Pre / Main | Time (min) | Energy (kWh) | Water (L) |
| Intensive | Washing program for heavily dirty tableware such as the pan, tableware with lids, cutlery and tableware with dried food stains. | Pre-wash Rinse Main wash (60°C) Hot Rinse Drying | 5/25g | 168 | 1.30 | 14 |
| *Normal | Daily washing cycle for equipment with a normal amount of impurities such as pans, glasses etc. | Pre-wash Rinse Main wash (50°C) Hot Rinse Drying | 5/25g | 153 | 1.05 | 14 |
| Eco | For equipment with light dirty such as plates, cups, bowls and pan that are not too dirty. | Pre-wash Main wash (45°C) Hot Rinse Drying | 5/25g | 123 | 0.85 | 11 |
| Crystal | Economical and quick wash program for appliances that are susceptible to high temperatures. | Pre-wash Main wash (40°C) Hot Rinse Drying | 5/25g | 126 | 0.80 | 11 |
| Rapid | quick washing for the cutlery with the level of light dirty and no need to dry it. | Main wash (40°C) Hot Rinse | 5/25g | 37 | 0.50 | 7 |
| Pre-Rinse | For the cutlery to be washed / cleaned later. | Pre-wash | 8 | 0.01 | 4 |
*This program at the time of testing, information for comparative testing accordance with the program as below:
- Capacity: 12 setting.
- The position of the basket on the low position.
- Rinse aid setting at level 5.
Starting a wash cycle
Pull out the bottom and upper basket, then place a plate and cutlery on the basket and insert the basket into the machine.
- It is advisable to fill in the bottom of the basket first and then the upper basket (see section "FILL IN DISHWASHER BASKET"), fill the detergent in place (see section "salt, rinse aid and detergent").
- Insert the power cord into the wall socket. Required power supply is 220V-240V AC 50 HZ, the specification of the outlet is 12 A 250 V AC 50HZ. Make sure the water supply has been opened with the maximum pressure. Close the door, press the ON / OFF button, press the "program" to select the "wash cycle". (see "Table of washing cycles"). Make sure the door has completely closed.
Note: The sound "click" will be heard indicating the door has completely closed. When the wash cycle has ended, you can turn off the unit by pressing the ON / OFF.
Changing the program
Reason: the washing cycle that may be changed is the wash cycle that has been running for a while. If the detergent has been given and the wash water has been cleared, if the cases like this then the detergent must be refilled (see the "fill in detergent").
Open the door and press the washing program that is currently running for more than 3 seconds to cancel the washing program, then you may change the desired program (see section "start the wash cycle"). Then close the door.
Note: If you open the washing machine when the program is running, the engine will be in a position "pause" and an alarm will sound, the display shows E1. When the door is closed again, the machine will return to work after 10 seconds.
6 light program shows the state of the machine:
a. All program lights off □ stand by condition.
b. One of the program lights lit □ wash cycle conditions were running.
c. One of the program lights flashing □ pause conditions
Note: If all the lights began to dim, it indicates that engine damage, before contacting service center, turn off the energy source and shut off the water supply first.
Adding plates or cutlery that left behind
You can add plates or cutlery in the dishwasher before the detergent open.
- Open the door a little to stop the washing process.
- After the arms spray stop, the door may be fully opened.
- Put the dishes and cutlery that are left behind.
- Close the door, the machine will return to work after 10 second.

WARNING!
It could be dangerous if you open the door during the washing process of the unit is running, because hot water may spray to you.
Turn off the dishwasher
Digital display will show "- -", at this time this program has been stopped.
- Turn off the dishwasher by pressing ON/OFF.
- Close the water tap.
Be careful when opening the door. Hot steam may come out when the door is opened!
- Plates in hot condition are very vulnerable to rupture. Allow the plates and cutlery for 15 minutes after completion of the washing process prior to take them out from the machine.
- Before the plates and cutlery were taken out from the dishwasher, open the door of the machine and let it open a little and wait a few minutes for the plates to cool and dry, and take them out.
Emptying the dishwasher
It is normal if the inside of the engines wet.
Empty the lower basket first and then the upper basket. This will prevent water droplets from the upper basket into the lower basket.
Part 4: Maintenance
Filtering System
Filters are used to prevent the leftovers and the objects that can enter into the pump. Sometimes the leftovers can clog the filter.
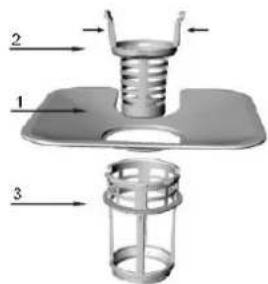
Filter consists of a coarse filter, a flat filter (main filter) and micro filter (fine filter)
4. Flat Fiter
The leftover and crumbs that accommodated on special filter at the bottom of arm spray.
5. Coarse filter
Big leftovers such as bones and other, which might clog the drain will be accommodated on a coarse filter.
To release the coarse filter press gently tap / lock located at the top of the filter and lift it up.
6. Micro filter
Micro filter accommodate the dirt and leftover residue and prevents it back to the plate and cutlery during the washing process.
- To avoid the clogging always check the filter of the machine after each use.
- By releasing the coarse filter, you may remove the filter system entirely. Dispose of any dirt and clean the filter with water.
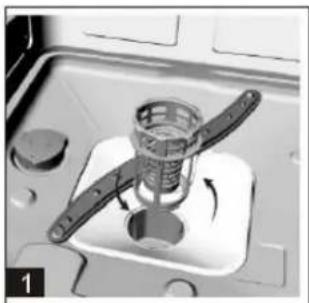
natural_image
Close-up of a mechanical component with a rotating shaft and housing (no visible text or symbols)Step 1: Turn the coarse filter counter clockwise and lift it
Step 2: Remove the flat filter.
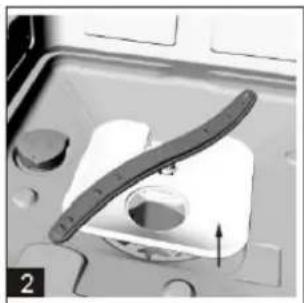
natural_image
Close-up of a mechanical component with a curved blade and circular opening, no visible text or symbolsNote: To remove the filter system above starting from step 1, while to replace the filter system start the steps above from step 2 then step 1.
Filter
For the best results, the filter should be clean. The filter is useful for removing food particles from the wash water, which is circulated back during the washing process. For those reasons dispose the food waste that deposited on the filter after each use and clean the machine filter under running water. To release the filter pull the glass filter up. Overall the filter should be cleaned at least once a week. Use a clean brush to clean the coarse filter and micro filter. Then reinstall the entire filter as shown above on the machine, put the filter in place and press down. Do not use the dishwasher without filters. The error in installation the filter can result in less maximum of washing results obtained, and can result in damage to the cutlery washed.

WARNING!
Never use the dishwasher without filters. When cleaning the filter, do not tap the filter when cleaning it because the filter can be deformed and lose its performance.
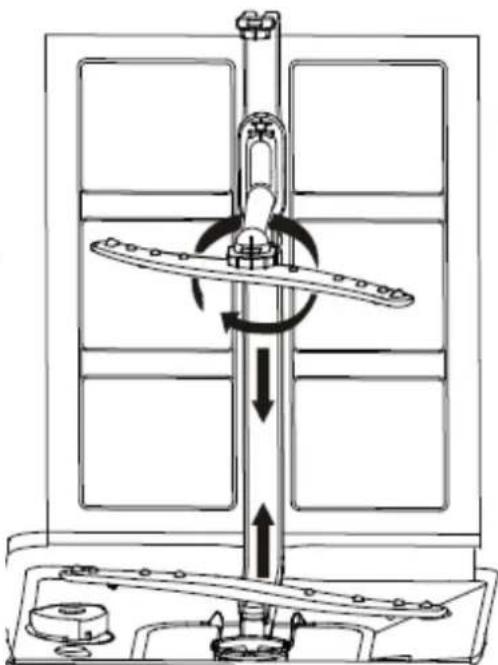
Cleaning the spray arms
It is important to periodically clean the spray arms from the chemical constituents of hard water that will clog the spray arm. To release the spray arm, turn the nut clockwise to release the washers on the top of the spray arm and remove the spray arm. Wash the spray arm with soap and warm water, use a soft brush to clean the spray. Replace the after rinsing.
Caring the Dishwashing Machine
To clean the control panel, use a soft damp cloth and wipe it until dry.
To clean the exterior, use an equipment polish with good quality. Do not use sharp objects, abrasive brushes or harsh cleaners on parts of this unit.
Cleaning the Door
To clean the sides of the door, use a soft cloth dampened with warm water. To prevent the entry of water into the lock and electrical components, do not use spray cleaners. Also, do not use abrasive cleaners or scouring brush on the outer surface as it will cause scratches or scars.
natural_image
Technical line drawing of a mechanical device with rotating components and directional arrows (no text or symbols)Maintenance
- Every time finished the washing.
Every time finished using the machine, close the water supply and leave the door slightly open so the moisture and odor free from the machine.
- Disconnect the power cord.
To avoid the risk, before cleaning or performing the maintenance, always unplug the power cord from the outlet.
- Do not use abrasive cleaners or solvents.
To clean the exterior and rubber parts of the machine, do not use solvents or abrasive cleaners. To clean just use a cloth and warm water mixed with a mild soap. To remove stains or spots inside the machine, use a soft cloth dampened with water and white vinegar, or use special cleaning agent for dishwasher.
- Seal
One of factors that contributed to the smell is the leftover that inserted / trapped in part of the seal / rubber on the door, clean the seal / rubber on the door regularly.
- Move the dishwasher
When moving the engine makes sure the upright position, if have to tilt it towards backward.
- When on vacation
When on vacation, it is advisable to run the washing machine with an empty condition and then unplug the power cord from the outlet, close the water supply and leave the door open slightly. This is to avoid the seal closed too long and smells arise in machine.

CAUTION!
Plumbing and electrical equipment should be performed by a professional person
| WARNING! | |
| Dangers of Electrical Shock!Disconnect the power before installing the machine. The error in the installation can result in electrical shock or death. | |
Part 5 : Precaution Action
SAFETY INFORMATION

WARNING!
Hydrogen gas explosion. On certain conditions: hydrogen gas can arise in hot water system that is not used for two weeks or more. HYDROGEN GAS is a gas that can explode. If the hot water system is not used for two weeks or more, before using the dishwasher, open all channels of closed hot water tap and let the water flow for several minutes. This will release the hydrogen gas collected.

WARNING! PROPERLY USE
- Do not sit or stand on the door or dishwasher basket.
- Do not touch or touch in rush part or the cutlery that is still hot.
- Do not operate the machine unless all the equipment has been installed correctly. Open the door very carefully if the machine is operating, because of the risk of the water spray out.
- Do not put any heavy thing or sit on the door of the machine when the door opens. Because the door may be broken / collapsed forward.
-
At the time of filling for washing:
-
Position the sharp objects so as not to damage the seal / rubber (seals the door.)
- Place the knife with the handle position above to avoid the dangerous risk.
-
Warning: Knives and utensils with sharp edges should be placed in a position the sharp part facing down or lay down positioned.
-
When use dishwasher machines, avoid contact with hot plastic utensils.
- Check whether the container element in a discharged condition after the wash cycle has finished.
- Do not washing the cutlery made of plastic materials unless there is a sign show that the equipment can be washed using a dishwasher or the like. For the plastic cutlery that does not have a check mark manufacturer's recommendations.
- Only use rinse aid detergent and specifically for automatic dishwashers. Never use soap detergent clothes.
- keep children away from detergent and rinse aid, keep children away from the dishwasher with the door open, there is still the possibility the detergent left inside..
- The children must be monitored so as not to play the buttons on the machine.
- This machine is designed to use by adults, supervised the children and people who have a mental disability for security.
- Dishwasher detergent is a strong alkali, hence can be dangerous if touch the skin or eyes.
- Do not let the door left open because it can not cause harm due to tripping.
- If the power cord is damaged, the cable must be replaced by a service agent with the same qualifications to avoid danger
- Dispose the packaging properly
- Use the dishwashers according to it function.
- During installation, do not let the power supply cord too high or bend.
- Do not spoil the control.
- The machine must be connected to the water resource using new hose, do not use old hoses.
- Make sure the carpet does not obstruct to open the lower base.
- Only used indoors.
ERROR CODE
When there is a malfunction that is not appropriate, then the screen monitor of the unit will display error code as a warning.
| Code | Description | Possible Causes |
| LED1, LED2 blinking | Door open | Door open when the machine operate |
| LED1, LED4 blinking | The water channel enter | Incoming water line is not working |
| LED1, LED5 blinking | Sewer water | Drainage is not functioning |
| LED1, LED6 blinking | Temperature sensor | Temperature sensor is not functioning |
| LED2, LED3 blinking | Overflowing / leaking | Overflow occurs |
| LED2, LED4 blinking | Water leaks | Water leak |
| LED2, LED5 blinking | Telecommunications | Abnormal communication transmission |
| LED2, LED6 blinking | Heating element | Heating is not normal |
| LED3, LED4 blinking | Dry-fire | Heating element burned |
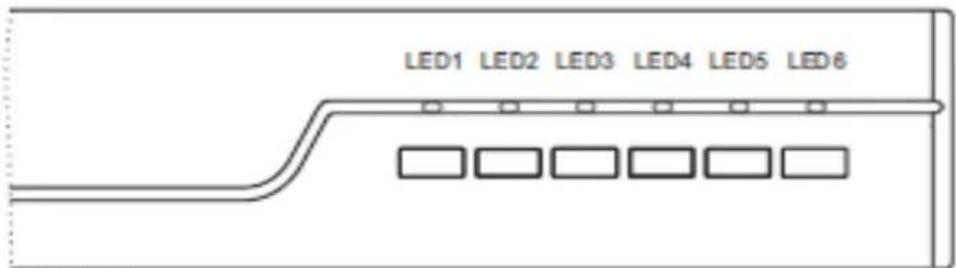

WARNING!
If overflow occurs, turn off the water supply source before contacting the service center. If there is water at the bottom of filling unit due to excess or slightly overflowed, the water must be removed / dried before restarting the machine.
Part 6 : Problem & Solution
| Problem | Possible Cause | Solution |
| The machine is not working | Blown fuse, or the circuit breaker active | Replace fuse or reset the breaker settings. Disconnect all devices that use the same circuit breaker to this machine or the circuit breaker that active. |
| The power is not turn on. | Make sure that the machine has been turned on, doors have been closed and the power cord properly connected to the outlet | |
| The water pressure is too low | Check the water sources that have been opened and the hose is connected correctly. | |
| Drain pump does not stop | Overflowing water / flood. | The system is designed to be able to detect the occurrence of flood water. When overflow occurs the system will stop the circulation pumps and activate the dewatering / disposal pump. |
| Sound occur | Some of the voices sound normal | Sound comes from the detergent lid that open |
| The equipment is not installed tight on the basket, or there is a small object in the basket | Make sure everything is installed properly and tight on the basket. | |
| Hum of the motor | The machine is not used on a regular basis, if you rarely use the dishwasher, always fill and draining it every week, this is to help keep the seal remains wet. | |
| Foam in the tube | Not proper detergents | To avoid the foam just use dishwasher detergent. If the foam still happens open the machine door and let the foam evaporated, put cold water about 1 gallon (3.7 liters), close and lock the engine door, then start the washing cycle "pre-rinse" to drain the water, repeat if necessary |
| Stain inside the tube | Rinse agent spilled | Immediately clean whenever the rinse agent spills. |
| Detergents that used contain dyes | Make sure that the detergent used does not contain dyes. | |
| Plates and spoons that is not clean. Not suitable washing program. | Not suitable washing program. | Select the stronger washing program |
| Improper charging the basket | Make sure that the detergent and spray arms are not blocked by large equipment | |
| Spotting on glass and spoon | 1. The water hardness is too high2. The inlet temperature low3. Filling the dishwasher too much4. Improper fill in5. Detergent expired6. Rinse the empty rinse agent7. Detergent dose selection is not proper. | To eliminate the spot from glass equipment.1. Remove the metal equipment from the machine.2. Do not enter the detergent3. Choose longer washing cycle.4. Turn on the dishwasher and allow about 18 to 22 minutes, then proceed to the main washing process.5. Open the door to pour 2 cups of white vinegar in the bottom of the machine.6. Close the door and let the machine finish the wash cycle. If the white vinegar does not work: Repeat the above section, replaced white vinegar with 1/4 cup (60 ml) of citric acid crystals / lime. |
| The tableware glass is not clear | The water mixed too soft and the put the detergent too much. | If water hardness is low / soft then reduce the use of detergents and select a shorter washing cycle. |
| Transparent layer yellow or brown colored inside the surface | Coffee or tea stains. | Use 1/2 cup of bleaching and 3 cups warm water to clean the stains by handAttention:Before cleaning this part, wait for 20 minutes after the washing cycle is complete so that the heating element cool, to avoid burns. |
| Iron content in the water can cause a transparent layer. | Use special water filter. | |
| Transparent layer on the surface white | Heavy mineral content in the water. | To clean the inside of the machine, use a damp sponge with dishwasher detergent and abrasive wear gloves. Never use other cleaning other than special dishwasher detergent to avoid the occurs of foam |
| The detergent cover can not be locked | The button is not in "Off" position | Turn the knob to position "Off" and slide the door lock to the left. |
| Detergent did not get out | Detergent blocked by the plate | Reset the placement of the plate on the basket. |
| Steam | This is a normal event | The vapor may arise due to the fan through the door latch during drying and empty / draining the water. |
| Black or gray spots on the plate. | The aluminum tableware is rubbing the plate. | Use a gentle cleanser to remove the sign. |
| Stagnant water from the bottom of the tube | This is a normal occurrence | A little clean water around the outlet tube is normal to lubricate the seals. |
| An overflow on the machine | Put too many cutlery in the dishwasher or the rinse aid spilled | Be careful not to fill the rinse aid excess. The spill of rinse aid can cause foam and easy excess to overflow. Wipe the spills with a damp cloth. |
| Leveling of the machine has not been set. | Make sure the machine has adjustable the height and in a stable position and flat. |
Part 7 : Specification
| DISHWASHER | WP 600 |
| Types | Freestanding |
| Washing capacity | 12 place settings. |
| Color | Stainless (S) |
| Material from outside cabinet | Metal |
| Material from the cabinet | Stainless |
| Water overflow protection | Ya |
| Number of programs | 6 |
| Water pressure (Mpa) | 0.04-1 |
| Maximum washing temperature (Celsius) | 60^ |
| Normal washing time (minutes) | 153 |
| Light wash program | Ya |
| Delay start (hours) | 3/6/9 |
| The height of the legs is adjustable | Ya |
| The height of the baskets is adjustable | Ya |
| Water consumption (liter) | 14 |
| Maximum electrical power (Watt) | 1850 |
| Voltage (Volt) | 220-240 V 50 Hz |
| Product dimensions (L x W x H) cm | 60 x 60 x 85 |
| Weight (Kg) | 44 |
S = Stainless W = White B = Brown V = Silver G = Gray L = Black R = Mirror Specifications of this appliance may change without notice to improve the quality of the product. Figures in this manual are schematic and may not match your product exactly. Values stated on the machine labels or in the documentation accompanying it are obtained in laboratory in accordance with the relevant standards. Depending on operational and environmental conditions of the appliance, values may vary.
MODENA
- DISHWASHER MANUAL AND WARRANTY CARD
- PETUNJUK DAN PANDUAN PEMAKAIAN MESIN PENCUCI PIRING (DISHWASHER) MODENA
- CATATAN:
- Pemeliharaan
- INSTRUCTION AND GUIDE TO USING MODENA DISWASHER
- MODENA
- CONTENTS PAGE.
- Part 1: Name of Part
- WP 600
- \* Front side
- Part 2: Installation
- Placement and tightening (leveling)
- Connecting the water and electricity sources
- Connecting the water inlet hose
- Connect the water outlet hose (drain hose)
- Connecting to the power source
- Suggestion for the first time use
- Put / install the unit
- Adjust the height of Units
- Remove the excess water from the hose
- Drainage
- Extension / connection Hose
- Sewer
- Starting to operate the dishwasher
- Part 3: How to Use
- Control Panel
- Water softener.
- Fill in the Salt to the softener / Salt Container
- WATER SOFTENER
- Attention!!!
- Note:
- Filling the Rinse Aid Place
- Rinse aid function
- Attention!
- Dispenser charging time
- PLACE OF RINSE AID
- Adjusting the Rinse Aid Container
- DETERGENT FUNCTION
- Various types of detergent
- Detergent container
- The amount of detergent used
- Fill in the detergent
- Detergent
- There are 3 detergent type
- FILL IN THE DISHWASHER BASKET
- The things to note before or after Fill in the Dishwasher Machine Basket
- Taking out the cutlery
- Fill in the Upper Basket
- Set the Upper basket
- Fill in the bottom basket
- Bottom shelf Fold In Basket
- Basket / Cutlery Rack
- Not suitable for washing the utensils / plates of the following with the dishwash
- WARNING !!!
- Little fit.
- Put the cutlery and plates
- When putting the plates and cutlery, consider:
- Damage to glasses and other tableware
- Possible causes:
- Recommendation:
- At the end of the washing program
- Run a wash program
- Starting a wash cycle
- Changing the program
- Adding plates or cutlery that left behind
- WARNING!
- Turn off the dishwasher
- Emptying the dishwasher
- Part 4: Maintenance
- Filtering System
- Flat Fiter
- Coarse filter
- Micro filter
- Filter
- Cleaning the spray arms
- Caring the Dishwashing Machine
- Cleaning the Door
- Maintenance
- CAUTION!
- Part 5 : Precaution Action
- SAFETY INFORMATION
- WARNING! PROPERLY USE
- ERROR CODE
Brand : Modena
Model : WP 600
Category : Dishwasher