
Dashcam 96-86002 - Action Camera BRESSER - Free user manual and instructions
Find the device manual for free Dashcam 96-86002 BRESSER in PDF.


| Product Type | Full HD Dashcam / Action Camera |
| Brand | Bresser |
| Model | Dashcam 96-86002 |
| Part Numbers | 9686000, 9686001, 9686002 |
| Video Resolution | 1080FHD, 720P, VGA |
| Photo Resolution | 12M, 10M, 8M, 5M, 3M, 2MHD, 1M, VGA |
| Display | Built-in screen with status icons |
| Storage | microSD card (not included) |
| Power Supply | Built-in rechargeable battery or via USB cable / in-car charger (included) |
| Connections | USB mini, HDMI, microUSB |
| Mounting | Suction cup mount with ball-and-socket joint |
| Special Features | Loop recording, motion detection, G-sensor, WDR, night vision, lane departure warning (LDWS), forward collision warning (FCWS) |
| Modes | Video, Photo, Playback |
| Menu Languages | Multiple (selectable) |
| Dimensions | Approx. 60 x 50 x 30 mm (estimated) |
| Weight | Approx. 80 g (estimated with battery) |
| Operating Temperature | Indoor use only; avoid high temperatures |
| Safety | Do not use while driving, keep away from children, avoid electric shock |
| Cleaning | Dry cloth only; no cleaning solutions |
| Warranty | 2 years standard, extended with registration |
| Manufacturer | Bresser GmbH, Gutenbergstr. 2, 46414 Rhede, Germany |
Frequently Asked Questions - Dashcam 96-86002 BRESSER
User questions about Dashcam 96-86002 BRESSER
0 question about this device. Answer the ones you know or ask your own.
Ask a new question about this device
Download the instructions for your Action Camera in PDF format for free! Find your manual Dashcam 96-86002 - BRESSER and take your electronic device back in hand. On this page are published all the documents necessary for the use of your device. Dashcam 96-86002 by BRESSER.
USER MANUAL Dashcam 96-86002 BRESSER
natural_image
Black digital camera with a funnel mounted on top and connected to a cable with USB ports (no visible text or symbols)Digitalkamera · Digital camera ·
Full HD Dashcam
DE
Bedienungsanleitung
EN
Instruction manual

Visit our website via the following QR Code or web link to find further information on this product or the available translations of these instructions.

natural_image
Blue circular icon with a white human figure reading a document (no text or symbols)HINWEIS

GEFAHR
Erstickungsgefahr!

GEFAHR
Unfallgefahr!
! VORSICHT
Verätzungsgefahr!
HINWEIS
natural_image
Blue circular warning sign with a white exclamation mark (no text or symbols beyond the icon)HINWEIS
natural_image
Blue circular warning sign with a white exclamation mark (no text or symbols beyond the icon)HINWEIS
natural_image
Blue circular warning sign with a white exclamation mark (no text or symbols beyond the icon)HINWEIS
VORSICHT
Verätzungsgefahr!
1 Company details.... 26
2 Validation 26
3 About this manual 27
4 Intended use 27
5 General safety instructions 28
6 Parts overview and scope of delivery 31
7 Displays.... 32
8 Installing the mount 33
9 Inserting and formatting the memory card 34
10 Connecting the power supply 35
11 Settings menus.... 36
12 Recording.... 41
13 Resetting the device 42
14 Cleaning and maintenance.... 42
15 Disposal 43
16 EC Declaration of Conformity 44
17 Warranty.... 44
1 Company details
Bresser GmbH
Gutenbergstr. 2
46414 Rhede
Germany
If you wish to submit a warranty claim or service request, please refer to the “Warranty” and “Service” information in this document. Please be aware that any requests or submissions sent directly to the manufacturer cannot be processed.
Errors excepted. Subject to technical modifications.
© 2017 Bresser GmbH
All rights reserved.
Reproduction of this document, including extracts, in any form (photocopied, printed etc.) or the use and distribution of this document by electronic means (image file, website etc.) is not permitted without the prior written consent of the manufacturer.
The terms and brand names of the respective companies used in this document are protected by brand, patent or product law in Germany, the European Union and/or other countries.
2 Validation
This document is valid for the products with the following part numbers:
9686000 9686001 9686002
Version of manual: v062017a
Name of manual: Manual_9686002_Full-HD-Dashcam_de-en_BRESSER_v062017a
Information is always provided for service requests.
3 About this manual

natural_image
Blue circular icon with a white silhouette of a person reading a document (no text or symbols)NOTICE
This instruction manual should be considered part of the device.
Before using the equipment, read the safety instructions and operating instructions carefully.
Keep this instruction manual in a safe place to refer to at a later date. If the equipment is sold or passed on, the instruction manual must also be passed on to each subsequent owner of the product.
4 Intended use
- This device is not intended to be used by persons (including children) with limited physical, sensory or mental capabilities or those who lack the relevant experience and/or knowledge, unless they are supervised by a person responsible for their safety or have received instructions from this person as to how the device is used.
- This device is for private use only.
- The device was developed as an electronic accessory and may only be used to connect and operate the devices for private use described in this manual.
- The device is for indoor use only.
5 General safety instructions


DANGER
Risk of electric shock
This device has electronic parts operated via a power source (power supply and/or batteries). Improper use of this product can cause an electric shock. An electric shock can cause serious or potentially fatal injuries. The following safety information must be observed at all times.
- Never bend, crush or pull power cables, connection cables, extensions or connectors. Protect cables from sharp edges and heat sources.
- Before starting up the device, check the device, the cables and the connections for signs of damage.
- Never use a damaged device or a device with damaged live parts. Damaged parts must be immediately replaced by an authorised service company.
- Position your device so that it can be disconnected from the power supply at any time. The power socket should be installed near the device and should be easily accessible as the mains cable plug is used to disconnect the device from the power supply.
- To disconnect the device from the power supply, always pull on the plug. Never pull on the cable.


DANGER
Risk of suffocation
Improper use of this product can result in suffocation. This is particularly dangerous for children. The following safety information must be observed at all times.
- Keep packaging materials (plastic bags, rubber bands etc.) away from children. They can cause suffocation.


DANGER
Risk of accidents
Never operate this device while driving. This could cause an accident.


DANGER
Risk of explosion
Improper use of this product can cause an explosion. The following safety information must be observed at all times to prevent an explosion.
- Do not expose the device to high temperatures and protect it against water and high levels of moisture. This will prevent the integrated battery from leaking or exploding.
- Do not expose the device to high temperatures. Use only the power supply provided. Never short-circuit the device or throw it into a fire. Excessive heat and improper handling of this product can result in short-circuits, fires or even explosions.


CAUTION
Risk of chemical burns
Leaking battery acid can cause chemical burns. Do not allow battery acid to come into contact with your skin, eyes and mucous membranes. If you come into contact with the battery acid, rinse the affected areas immediately with plenty of clean water and seek medical advice.

NOTICE
Risk of damage to property
Improper handling can result in damage to the device and/or to the accessories. Always observe the following safety information when using the device.
- Never disassemble the device. In the event of a fault, please contact your specialist retailer. The specialist retailer will contact the service centre and send the device for repair if necessary.

natural_image
Blue circular warning sign with a white exclamation mark (no text or symbols beyond the icon)NOTICE
Risk of surge damage
The manufacturer accepts no liability for any surge damage resulting from the use of an unsuitable power supply.

natural_image
Blue circular warning sign with a white exclamation mark (no text or symbols beyond the icon)NOTICE
Risk of data loss
Never terminate an established data connection between the device and the computer before all of the data has been transferred. The manufacturer accepts no liability for data loss resulting from the disconnection of the device.

natural_image
Blue circular warning sign with a white exclamation mark (no text or symbols beyond the icon)NOTICE
Observe statutory requirements.
Before using this device, check the statutory requirements. Particularly with regard to protection of personal data, certain provisions, or even prohibitions, apply when saving im-
age and video information. Specific regulations may also apply when using the device in road traffic depending on the legislation of each particular country.
6 Parts overview and scope of delivery
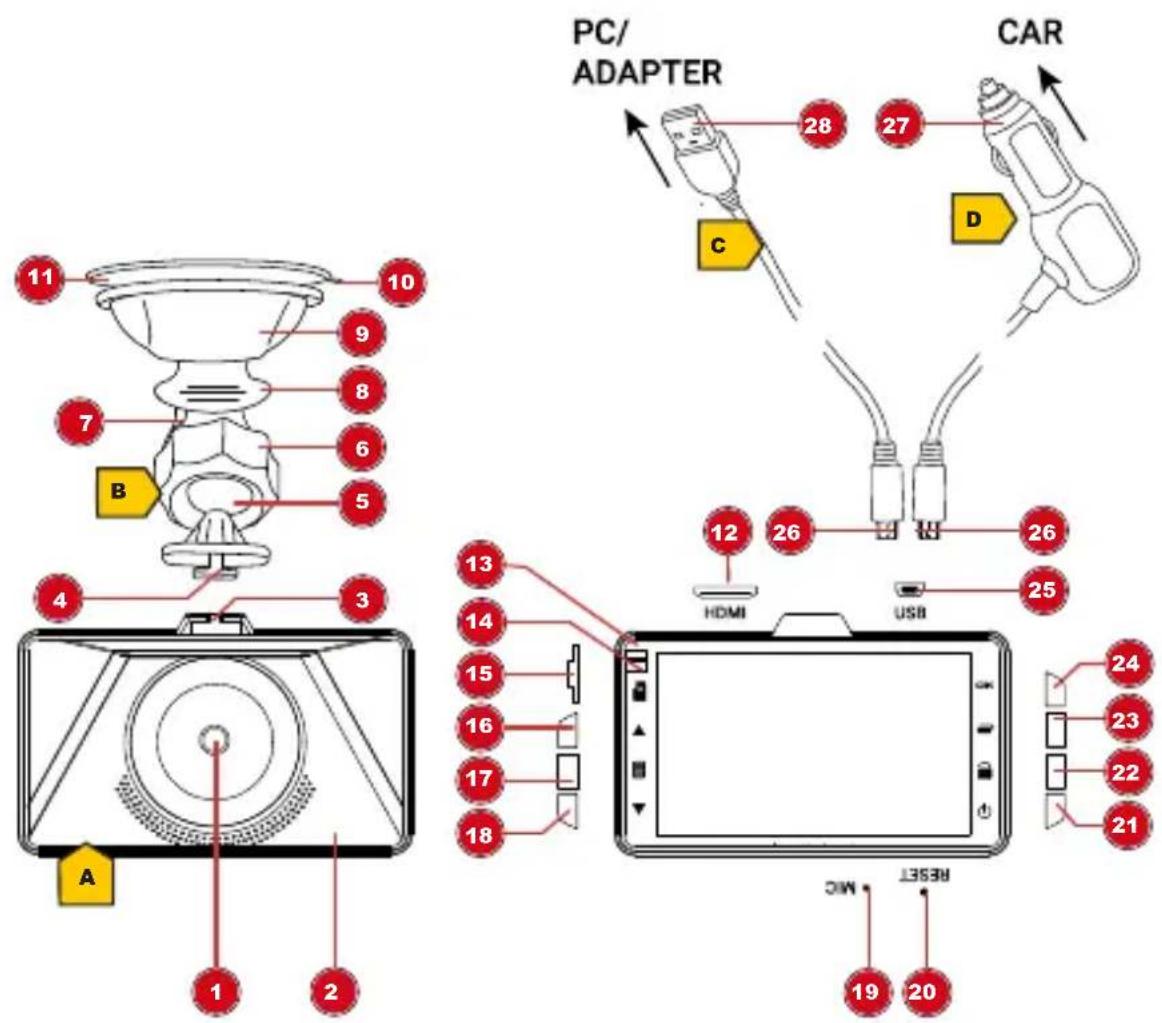
Illustration 1: All parts of the in-car camera
1 Camera lens 2 Housing
3 Mounting shoe 4 Mounting pins
5 Ball-and-socket joint 6 Locking ring
7 Mounting bracket 8 Fixing lever
9 Mount head 10 Guide
11 Suction pad 12 HDMI connector socket
13 Camera function light 14 Power function light
15 microSD card slot 16 UP button
17 MENU button 18 DOWN button
19 Integrated microphone 20 RESET button
21 ON/OFF button 22 LOCK button
23 MODE button 24 OK button
25 USB connector socket 26 microUSB connector
27 Vehicle connector plug 28 USB-A connector
Scope of delivery
In-car camera (A), mount (B), USB cable (C), in-car charger (D), instruction manual
7 Displays
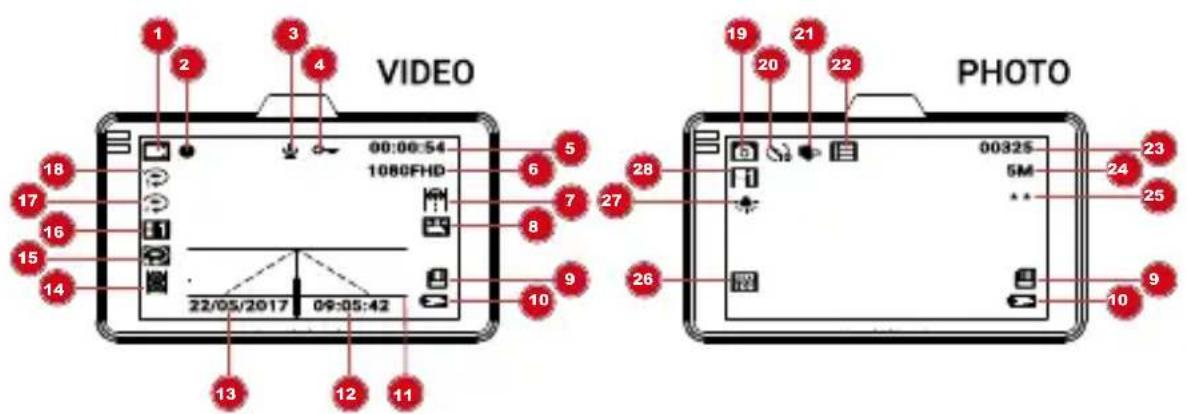
Illustration 2: Camera displays
Video mode
1 Video symbol 2 Record Video activated (recording symbol)
3 Record Audio activated or deactivated (crossed out) 4 Write-protected recording
| 5 Recording time remaining until storage capacity is reached | 6 Video resolution |
| 7 Lane Departure Warning System activated | 8 Park Assist activated |
| 9 microSD card* inserted 10 Battery charge capacity | |
| 11 Lane Departure Warning System display | 12 Time |
| 13 Date 14 Collision warning | |
| 15 Gravity Sensing settings | 16 Exposure settings |
| 17 Motion detection mode | 18 Loop recording and display time |
| Photo mode | |
| 19 Photo symbol 20 Timer | |
| 21 Image stabilisation 22 Serial recording activated | |
| 23 Shots remaining 24 Image resolution | |
| 25 Image quality 26 Sensor sensitivity | |
| 27 White balance 28 Exposure | |
*not included in the delivery
8 Installing the mount
- Insert the mounting pins on the mount into the camera mounting shoe so that the mount is firmly attached to the camera.
- Ensure the suction pad on the mount and the intended mounting surface are free from any dust, dirt or grease.
NOTICE! Position the camera so that the camera and the cable do not restrict the field of vision when driving.
- Press the fixing lever down towards the camera.
- Lightly moisten the suction pad and press against the chosen surface.
- Push the lever back up.
- Loosen the locking ring by turning anti-clockwise and rotate the camera into the desired position.
- Turn the locking ring clockwise by hand to tighten.
- Connect the power supply.
NOTICE! Although the camera is equipped with an integrated battery, we recommend using a permanent power supply. An in-car charger is included in the delivery for use while driving.
9 Inserting and formatting the memory card
- Insert a suitable microSD card* in the microSD card slot. Insert the shorter edge first. The contacts on the card must be facing towards the display.
- Once the power supply is connected, the device switches on automatically and starts video recording. Press the OK button to stop recording.
- Press the MENU button twice to access the "Basic settings" menu.
- Press the UP or DOWN button to select the "Formatting" menu item and press the OK button.
-
Press the UP or DOWN button to select "SD card" and press the OK button.
-
In the “Format memory / delete all data” information window, use the UP or DOWN button to select OK and press the OK button. The storage medium is formatted.
NOTICE! When the memory card is formatted, all of the stored data is permanently deleted.
- Press the MENU button to exit the menu.
- Press and hold the ON/OFF button for approximately two seconds to switch off the device.
- Disconnect the device from the power supply.
*not included in the delivery
10 Connecting the power supply
Power supply via USB cable
- Insert the mini USB connector on the USB cable into the USB connector socket on the camera.
- Insert the USB-A connector on the cable into the empty USB port on the computer. The computer provides the power supply once it has been switched on. The green light appears on the camera.
NOTICE! Using a suitable USB network adapter*, the USB cable can also be used to connect the camera to mains power or to a power bank.* Simply insert the USB-A connector into the corresponding connector socket of the USB network adapter or power bank.
Power supply via in-car charger
-
Insert the mini USB connector on the in-car charger into the USB connector socket on the camera.
-
Insert the vehicle connector plug into the on-board voltage connector (cigarette lighter). A direct power supply is established. The green function light appears.
*not included in the delivery.
11 Settings menus
- In record mode or playback mode, press the MENU button to access the settings menu for each mode. The corresponding menu items are displayed depending on the selected mode.
- Navigate through the menu items using the UP or DOWN button.
- Press the OK button to call up the options for the particular menu item.
- Choose the required setting using the UP or DOWN button (see the table below).
- Press the OK button to confirm the chosen setting.
- Press the MENU button again to access the settings menu for the basic camera settings.
- Repeat steps 1 to 5 to adjust the basic settings or press the MENU button again to return to record mode or playback mode.
NOTICE! To exit a menu item without making any changes, exit the entire menu by pressing the MENU button then call up the menu again.
Menu item Setting option(s)
Resolution Set video resolution (1080FHD, 720P or VGA).
Menu item Setting option(s)
| Loop Recording Activate automatic recording (1, 3 or 5 minutes) or deactivate automatic recording (OFF). If the function is activated and the storage medium is full, recordings that are not write-protected will be overwritten. If the function is deactivated and the storage medium is full, the camera will stop recording. |
| WDR Activate Wide Dynamic Range function (ON) or deactivate function (OFF). |
| Exposure Set exposure value (-2, -1, 0, 1, 2). |
| Motion Detection Activate Motion Detection (ON) or deactivate function (OFF). When Motion Detection is activated, a video is automatically captured when motion is detected depending on the loop value setting. |
| Record Audio Activate Record Audio (ON) or deactivate function (OFF). |
| Gravity Sensing Select sensor sensitivity (high, medium or low) or deactivate function (OFF). |
| Date Stamp Overlay date stamp (ON) or hide date stamp (OFF). |
| LDWS Activate Lane Departure Warning System (ON) or deactivate function (OFF). |
Menu item Setting option(s)
FCWS Activate Forward Collision Warning System (ON) or deactivate function (OFF).
Table 1: Video recording settings menu
| Menu item Setting option(s) | |
| Capture Mode Set the type of image recording (instant image (single) or image with a time delay of 2 seconds, 5 seconds or 10 seconds (timer) after the shutter release). | |
| Resolution Set the image resolution (12M, 10M, 8M, 5M, 3M, 2MHD, 1M or VGA). | |
| Sequence Activate the Continuous-Advance function (ON) or deactivate func-tion (OFF). If the function is activ-ated, three images will be cap-tured each time you release the shutter. | |
| Quality Set the image quality (basic, nor-mal or fine). | |
| Sharpness Set the sharpness of the image (strong, normal or soft). | |
| White Balance Set White Balance (fluorescent, tungsten, cloudy, daylight or auto). | |
| Colour Set the colour (black, black and white or sepia). | |
| ISO Set the light sensitivity of the im-age sensor (400, 200, 100 or auto). |
Menu item Setting option(s)
| Exposure Set exposure value (-2, -1, 0, 1, 2). |
| Anti-Shaking Activate Anti-Shaking (ON) or de-activate function (OFF). |
| WDR Activate Wide Dynamic Range function (ON) or deactivate func-tion (OFF). |
| Quick Review Activate quick display after record-ing (2 seconds or 5 seconds) ordeactivate function (OFF). |
| Date Stamp Overlay date stamp (ON) or hide date stamp (OFF). |
Table 2: Photo settings menu
Menu item Setting option(s)
| Delete Delete the current video or imageor delete all. |
| Protect Lock the current video or image orlock all. Unlock the current videoor image or unlock all. |
| Slide Show Set the interval between the sequence of images (2 seconds, 5seconds or 8 seconds). |
Table 3: Replay settings menu
Menu item Setting option(s)
| Date/Time Set the current date and time or set the date display. Change the values using the UP or DOWN button. Press the OK button to jump to the next value. |
| Licence Plate Activate Overlay of Specific Li-cence Plate (ON) or deactivate function (OFF). Use the OK button to change the setting for the length of the licence plate. Change the value using the UP or DOWN button. Press the OK button to access the first character position. Change the value using the UP or DOWN button (0 – 9, A – Z). Press the OK button to access the next character position. Press the MENU button to save the setting and exit the menu. |
| Auto Power Off Activate Auto Power Off (after 1 minute, 3 minutes or 5 minutes) or deactivate function (OFF). |
| Beep Sound Activate Beep Sound (ON) or de-activate function (OFF). |
| Language Select the language of the menu. |
| Frequency Set the frame rate (50 Hz or 60 Hz). |
| Screen Saver Set the screen saver (activate after 30 seconds, 1 minute or 2 minutes) or deactivate function (OFF). |
| Night Vision Activate Night Vision mode (ON or auto) or deactivate function (OFF). |
Menu item Setting option(s)
Format Select storage medium to be
formatted.
WARNING: When the memory
card is formatted, all of the stored
data is permanently deleted.
Default Setting Reset the device to the default set-
ting (OK) or cancel.
WARNING: When the device is re-
set to the default setting, all of the
existing settings are lost.
Version Display the version of the device.
Table 4: Basic settings menu
12 Recording
After formatting the storage medium and switching on the camera, the camera starts recording video automatically. If you do not want the camera to start recording automatically, perform the following steps:
In video mode
- Press the OK button to start recording. The recording symbol flashes.
- Press the OK button to stop recording. The recording symbol disappears.
- Press the UP or DOWN button to zoom in or out.
NOTICE! It is only possible to zoom when recording has stopped.
-
Press the MODE button several times to switch to a different mode (photo mode or playback mode).
-
Press the LOCK button to protect the current recording immediately.
In photo mode
- Press the OK button to take a photo (shutter release). The shutter release sound is emitted.
- Press the MODE button (several times) to switch to a different mode (video mode or playback mode).
In replay mode
- Press the UP or DOWN button to select from the individual recordings.
- Press the OK button to play the video.
- Press the UP or DOWN button to adjust the volume.
- Press the MODE button (several times) to switch to a different mode (video mode or photo mode).
13 Resetting the device
The device can be restarted if a fault occurs. Gently and carefully press the RESET button using a narrow object (e.g. paper clip).
14 Cleaning and maintenance
- Switch off the device to perform maintenance tasks or when the device is not in use.
- Only clean the device externally using a dry cloth. Do not use cleaning solution to prevent damage to the electronic parts.
- Do not expose the device to impacts, vibrations, dust, constant high temperatures or excessive humidity. This can result in malfunctions, short-circuits or damage to the batteries and components.
15 Disposal

Sort packaging into different materials for disposal. Contact the local waste disposal service provider or environmental agency for information about appropriate waste management.
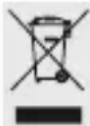
Do not dispose of electrical devices with the household waste.
In accordance with European Directive 2002/96/EC regarding waste electrical and electronic equipment and its incorporation into national law, used electrical devices must be collected separately and recycled in an environmentally friendly manner.

Do not dispose of batteries and rechargeable batteries with the household waste. You are legally required to return used batteries and rechargeable batteries. After they are used, the batteries can be returned free of charge to our point of sale or to a nearby location (for example, retailers or municipal collecting points).
Batteries and rechargeable batteries are marked with a symbol of a crossed-out dustbin and the chemical symbol of the pollutant. “Cd” stands for Cadmium, “Hg” stands for mercury and “Pb” stands for lead.


CAUTION
Risk of chemical burns
Leaking battery acid can cause chemical burns. Do not allow battery acid to come into contact with your skin, eyes and mucous membranes. If you come into contact with the battery acid, rinse the affected areas immediately with plenty of clean water and seek medical advice.
- Discharge the battery completely before disposal.
- Remove the screws completely from the housing and open the housing.
- Separate the connections from the battery and remove the battery.
- Cover exposed contacts and package the battery securely for transport.
16 EC Declaration of Conformity

A declaration of conformity has been prepared by Bresser GmbH in accordance with the applicable guidelines and standards. This can be examined at any time upon request.
17 Warranty
The regular warranty period is two years and starts on the day of purchase. To take advantage of the extended, voluntary warranty period specified on the presentation box, you must register on our website.
Please see http://archive.bresser.de/download/warranty_terms/warranty_terms.pdf for all of the warranty conditions as well as information about extended warranties and services.

BRESSER
BRESSER GmbH
Gutenbergstr. 2 · 46414 Rhode Germany
- HINWEIS
- GEFAHR
- Erstickungsgefahr!
- Unfallgefahr!
- ! VORSICHT
- Verätzungsgefahr!
- VORSICHT
- Company details
- Validation
- About this manual
- NOTICE
- This instruction manual should be considered part of the device.
- Intended use
- General safety instructions
- DANGER
- Risk of electric shock
- Risk of suffocation
- Risk of accidents
- Risk of explosion
- CAUTION
- Risk of chemical burns
- Risk of damage to property
- Risk of surge damage
- Risk of data loss
- Observe statutory requirements.
- Parts overview and scope of delivery
- Illustration 1: All parts of the in-car camera
- Scope of delivery
- Displays
- Illustration 2: Camera displays
- Video mode
- Installing the mount
- Inserting and formatting the memory card
- NOTICE! When the memory card is formatted, all of the stored data is permanently deleted.
- Connecting the power supply
- Power supply via USB cable
- Power supply via in-car charger
- Settings menus
- Menu item Setting option(s)
- Recording
- In video mode
- NOTICE! It is only possible to zoom when recording has stopped.
- In photo mode
- In replay mode
- Resetting the device
- Cleaning and maintenance
- Disposal
- EC Declaration of Conformity
- Warranty
- BRESSER
Brand : BRESSER
Model : Dashcam 96-86002
Category : Action Camera